freedom - tradeinn
TRANSCRIPT

1

2
FREEDOM
Technical diving computer
from DIVESOFT
User Manual
Contents Welcome to the world of FREEDOM ....................................................................................................... 6
Warnings ................................................................................................................................................. 6
Dimensions .............................................................................................................................................. 9
Charging ................................................................................................................................................. 10
Activation .............................................................................................................................................. 10
Control ................................................................................................................................................... 10
Buttons .............................................................................................................................................. 10
Universal codes ............................................................................................................................. 11
Working with menus ..................................................................................................................... 11
Main screen codes ......................................................................................................................... 11
OC mode ........................................................................................................................................ 11
Free mode and Gauge ................................................................................................................... 11
Log book – Other Dives ................................................................................................................. 11
Tilting ............................................................................................................................................. 12
Clicking ........................................................................................................................................... 13
Surface mode ........................................................................................................................................ 14
Menu navigation ............................................................................................................................... 15
Main menu content ........................................................................................................................... 16
Settings .................................................................................................................................................. 17
Before first use .................................................................................................................................. 17
Horizontal calibration .................................................................................................................... 17
Set time ......................................................................................................................................... 17
Preferences ........................................................................................................................................ 17
Display ........................................................................................................................................... 18
Timeouts ........................................................................................................................................ 19

3
Units .............................................................................................................................................. 19
Checklist ........................................................................................................................................ 19
Plan order ...................................................................................................................................... 19
Key press delay .............................................................................................................................. 20
Editor navigation ........................................................................................................................... 20
Gas shortcuts ................................................................................................................................. 20
Salinity ........................................................................................................................................... 20
Default mode ................................................................................................................................. 20
Factory defaults ............................................................................................................................. 20
Before the dive .................................................................................................................................. 21
Salinity ........................................................................................................................................... 21
Decompression .............................................................................................................................. 21
Mixtures......................................................................................................................................... 24
Alarms ............................................................................................................................................ 25
CCR setup .......................................................................................................................................... 27
Faulty sensors ................................................................................................................................ 28
Oxygen-sensor calibration ................................................................................................................. 28
Calibration settings ........................................................................................................................ 28
System check ..................................................................................................................................... 29
Open circuit – dive mode ...................................................................................................................... 29
Mode activation ................................................................................................................................ 29
Screens .............................................................................................................................................. 29
The Detailed screen ....................................................................................................................... 29
The Synoptic screen....................................................................................................................... 30
Screens legend............................................................................................................................... 31
Open circuit MENU ............................................................................................................................ 32
Symbols legend.................................................................................................................................. 32
No-decompression dives ................................................................................................................... 33
Screensaver ................................................................................................................................... 34
Safety stop ..................................................................................................................................... 34
End dive ......................................................................................................................................... 35
Decompression dives......................................................................................................................... 35
Decompression stops .................................................................................................................... 36
Show plan ...................................................................................................................................... 36

4
Diving with the ceiling method ..................................................................................................... 37
Deep stops ..................................................................................................................................... 37
Multi-gas decompression dives ......................................................................................................... 37
Gas switching ................................................................................................................................. 38
Gas correction ............................................................................................................................... 39
Measrued CCR mode ............................................................................................................................. 39
Activating CCR mode ......................................................................................................................... 39
Menu ................................................................................................................................................. 40
Bailout mode (OC) ......................................................................................................................... 40
Fixed SP mode (CCR) ...................................................................................................................... 40
End dive ......................................................................................................................................... 40
Show plan ...................................................................................................................................... 40
Faulty sensors ................................................................................................................................ 40
Fixed CCR mode ..................................................................................................................................... 41
Activating Fixed CCR mode ................................................................................................................ 41
Menu ................................................................................................................................................. 42
Bailout mode (OC) ......................................................................................................................... 42
Setpoint ......................................................................................................................................... 42
End dive ......................................................................................................................................... 42
Show plan ...................................................................................................................................... 42
Free mode ............................................................................................................................................. 43
Activating Free mode ........................................................................................................................ 43
Diving part ......................................................................................................................................... 43
Surface part ....................................................................................................................................... 44
Free mode setup ............................................................................................................................... 45
Gauge mode .......................................................................................................................................... 46
Activating Gauge mode ..................................................................................................................... 46
Stopwatch ...................................................................................................................................... 46
End dive and deactivation ............................................................................................................. 46
Plan ........................................................................................................................................................ 47
Log book ................................................................................................................................................ 48
Data transfer ......................................................................................................................................... 49
Firmware update and upgrade .............................................................................................................. 50
Games .................................................................................................................................................... 50

5
Sokoban ............................................................................................................................................. 50
Game control ................................................................................................................................. 50
Snake ................................................................................................................................................. 51
Game control ................................................................................................................................. 51
Air transport .......................................................................................................................................... 51
Maintenance ......................................................................................................................................... 51
Storage .................................................................................................................................................. 51
Disposal of the device ........................................................................................................................... 51

6
Welcome to the world of FREEDOM Congratulations on your purchase of a Divesoft Freedom – computer for technical diving. The
FREEDOM is made with high precision in every detail from high-quality materials for long life in the
harsh conditions of military, deep and cave diving. The solid aluminum shell protects high-tech
electronics with the most sophisticated decompression software. Reading the full-color OLED display
is a pleasure in any depth and in all conditions. Use trimix, SCR or CCR and dare to dive deeper,
longer and farther.
You have made the best choice for your diving.
Dive in and enjoy your newly acquired FREEDOM!
Warnings The FREEDOM computer is a diver’s assistant for depth detection, time counting, temperature
detection, and decompression counting. It can be used with conventional and military scuba
apparatus, all kinds of SCR (only when the ppO2 cell is connected), all kinds of technical and military
CCR rebreathers and for free diving. The DIVESOFT FREEDOM computer cannot be used for
saturation diving.
The FREEDOM can calculate decompression with all mixes with oxygen, nitrogen and helium in any
combination. No other gases can be used.
Use of the computer does not replace the knowledge gained in an ordinary diving course. Never
use a diving computer without proper diving training!
There is always the risk of DCS. The actual course of decompression may vary according to individual
predispositions and environmental conditions. Decompression risk cannot be excluded even if the
recommended procedure is applied. DIVESOFT used generally known procedures to calculate
decomression. However, DIVESOFT cannot be held responsible for the consequences of
decompression accidents due to unforeseeable circumstances.
Always check all your settings before the dive. All settings of the FREEDOM computer have an effect
on decompression process and other parts of diver’s safety. Soberly evaluate each element of the
settings and its importance in a particular dive – especially GF and mixture settings!
The FREEDOM computer can be set incorrectly (among other things, for example, if the breathing
mixture is set to a value other than what is actually used), so even if compliance is displayed in the
onscreen instructions a decompression accident can occur. Therefore it is necessary to set the
parameters with the knowledge of things and cannot be assumed that the FREEDOM computer can
replace an appropriate course or training.
Observe no fly limits! Do not fly before the termination of no fly limits! Plan your dives with regards
on yours departure. Pressure in a plane’s cabin is reduced to 76.1 kPa (0.761 bar) and to 58 kPa (0.58
bar) in an emergency situation. The no-fly time is the period when a diver’s tissues are still saturated
with inertial gases and a decrease of pressure to the level of cabin pressure could cause DCS.

7
Set the correct altitude! The FREEDOM computer does not contain an atmospheric pressure sensor
which that would detect altitude. Altitude is an essential parameter for computing the
decompression procedure. Wrong setting may result in DCS!
A dive computer is a personal device. Sharing one computer between several divers affects the
decompression procedure.
Do not reset decompression data if it is used by one diver repeatedly. Resetting the decompression
data serves for use by diving schools and diving rental services. Reset of the decompression data can
be used only if the original diver will no longer use this computer.
Use conservative gradient factor setting. The DIVESOFT FREEDOM computer uses Baker’s gradient
factors for setting decompression conservatism. Be sensible and use a conservative setting adjusted
to your physical and ambient conditions. Decompression is influenced especially by: physical fitness,
health, body constitution, mental condition, exertion, stress, hydration, CO2 level, temperature,
individual predisposition, gender and age.
A higher ascent rate is very hazardous and may cause DCS. Do not exceed the maximum ascent rate.
If you do not follow decompression information, your real ascent time could be longer than the
device displays. This could be due to spending more time at depth, a slower ascent than the set
ascent rate and decompression stops at depths lower than those recommended. These factors will
also increase the amount of air required to reach the surface.
Do not exceed decompression stops and never ascend above the ceiling. The ceiling is a serious
limit. Going beyond this limit enormously increases the risk of DCS.
Always analyze the breathing gases that you will take with you! Use Divesoft He/O2 Analyzer for
save recognition.
Ensure the water resistance of the device!
Do not exceed maximum altitude! Atmospheric pressure decreases with as altitude increases. It is
the same principle as pressure reduction as a diver ascends. Maximum altitude information shows
the diver the maximum altitude which would be reached without DCS risks at the given moment.
Check your oxygen clock often! If your CNS oxygen exposition exceeds the 75% value, start your
ascent immediately. When cave diving, stricter rules are applied.
Never exceed the maximum operational depth (MOD) for your gases! Exceeding MOD could cause
death.
When diving with hypoxic gas mixtures, never breathe this mixture when the partial pressure is
lower than 0.18 bar!
Always use realistic SAC rates and conservative turn pressures during dive planning.
Always take heed of visual and vibrating alarms of the device!
You need to take into account the danger of nitrogen narcosis. The FREEDOM does not issue any
warnings in connection with this danger.

8
In all no-decompression dives, perform at least a three-minute safety stop at a depth of 5 m.
Never dive alone! Never go under water without your dive partner, especially when free diving, as
this type of diving involves a high risk of blacking out.
Like any technical equipment the FREEDOM may malfunction. The user must be able to detect a
malfunction and deal with backup equipment and emergency procedures. To do this, the user must
have the necessary skills and knowledge. Otherwise, the FREEDOM should not be used.

9
Dimensions Weight 256g (0,564 lb)
Length: 87mm (3.4 in) / 81mm (3.2 in)
Width: 69mm (2.7 in) / 53mm (2.1 in)
Height: 33mm (1.33 in)

10
Charging The capacity of the FREEDOM’s Li-Ion battery is about 20 hours, depening on ambient temperature
and extent of use. Charging of the FREEEDOM is quite simple. Unscrew the connector lid (between
the buttons) with a coin. Attach the charging connector and connect it to your personal computer via
USB or to a wall socket using the standard electrical plug. When battery is charged, the “C” symbol
appears. If the battery is fully the “F” symbol appears.
Charging time is four hours.
Activation Press BOTH KEYS for five seconds. The FREEDOM boots and you can check the hardware and
software version during this time. If you want to read the splash screen with the serial number and
license, keep one of the buttons pressed. After booting, the FREEDOM switches to surface mode.
After descending to a 1.5 meters, the FREEDOM is activated automatically. In the mode in which it is
activated depends on the default mode setting.
Control
Buttons
The Freedom is controlled with two buttons; depending on the configuration, tilting and
clicking are used for editing data. Irrespective of the orientation (right or left hand), the top
button is labeled K1 and K2 is at the base.
Each button can be pressed briefly (at least 250ms) or for a longer time (press and hold at
least 2.5s).
List of handling and labeling as used in the following description
Action Designation
Short press K1 KEY 1
Short press K2 KEY 2
Short press both BOTH KEYS
Long press K1 KEY 1 LONG
Long press K2 KEY 2 LONG
Long press both BOTH KEYS LONG

11
Universal codes
BOTH KEYS LONG return to the basic screen under the schematic, leaving all menus
DEBUG SEQUENCE creation of an internal state of FREEDOM dump for later analysis of defects
Working with menus
KEY 1 select marked items
KEY 2 cyclically move the cursor down one item
BOTH KEYS return one level back or access the menu
Main screen codes
KEY 1 switch to next screen (cyclic)
KEY 2 screen on/off (energy saving)
BOTH KEYS access the standard menu
OC mode
KEY 1 switch to next screen (cyclic)
KEY 2 screen on/off (energy saving)
BOTH KEYS entry to OC menu
KEY 1 LONG gas switch up (cyclic)
KEY 2 LONG gas switch down (cyclic)
Free mode and Gauge
KEY 1 switch to next screen (cyclic)
KEY 2 stopwatch start, stop
BOTH KEYS access the menu
KEY 2 LONG stopwatch reset
Log book – Other Dives
KEY 1 Select dive
KEY 2 Scroll down
KEY 1 LONG Page Up (to later dives)
KEY 2 LONG Page Down (to earlier dives)
See the symbols on the sides of the menu. The symbol in the upper part shows the current KEY 1
function. The symbol at the bottom shows the current KEY 2 function. The symbol in the middle
shows the current BOTH KEYS function.
Confirm
Back
Down

12
Tilting
Tilting is used if you want to change some values in the settings. Tilt the unit up to increase the value
or check the box, down to decrease the value or uncheck the box, right to move the cursor to the
right, left to move the cursor to the left.

13
Clicking
Clicking is an alternative to tilting for setting values. Tap the top of the unit with your fingers to
increase the value or check the box, the bottom of the unit to decrease the value or uncheck the box,
the right side of the unit to move the cursor to the right, and the left side of the unit to move the
cursor to move the cursor to the left.

14
Surface mode Surface mode displays the main information about your current inert gas saturation and implications
for next dive. Current time and date, surface time since the last dive (regardless of wether such dive
was OC, SCR or free diving), no fly time, and maximum altitude. In addition, priority mode
information is displayed. Surface mode uses a shadow frame.
Surface time is displayed in hours and minutes in the course of the first day. After 24 hours it is
displayed as days, hours and minutes.
No fly - Pressure in planes cabin is reduced to 76.1 kPa (0.761 bar) and to 58 kPa (0.58 bar) in an
emergency situation. The-no fly time is time when a diver’s tissues are still saturated with inertial
gases and a reduction of the pressure level to that of the plane’s cabin pressure could cause DCS.
DIVESOFT strictly recommends against flying before termination of the no-fly limit. Keep a sufficient
period of time between your last dive and flying!
Max. altitude – atmospheric pressure decreases as altitude increases. It is the same principle as
pressure reduction as a diver ascends. Maximum altitude information shows the diver the maximum
altitude that can be reached without DCS risks at this moment.
Priority mode information – shows which mode is set as the priority mode. The color of the
information corresponds to the color of the set priority mode frame.

15
Menu navigation
After activating (BOTH KEYS LONG), Surface mode appears. Press BOTH KEYS to switch to the Main
For basic menu control Key symbols are placed in the left column on the display. See the illustration
below.
KEY 1 – Confirmation/Enter
BOTH KEYS – Back
KEY 2 – Down
If the menu item has another submenu, the arrow symbol is present.
Sophisticated menus were developed for orientation in the functions and settings. Each mode has its
own color of menu frame for better differentiation and easy orientation: Surface menu shadow,
Open circuit blue, Gauge mode red and Free mode yellow.

16
Main menu content
Dive (OC) – selection of the desired dive mode
Switch off – deactivation of the whole system. Switch off your FREEDOM when you are not using it in
order to save its batteries.
Log book - opens the computer’s memory. Instruction on how to use it are provided here
Setup – the setup menu contains configuration and settings items. Instructions how to set up your
FREEDOM before its first use and before each dive are provided here
The setup menu consists of:
Decompression
Mixtures
Alarms
Free Setup
Preferences
Calibrate level
Set time
Factory defaults
Plan – built-in decompression planner. It enables proper dive planning before each dive with regards
to your current saturation wherever you are. Instructions on how to use it are provided here.
System check – general information about the version, license, settings, battery and sensor status.
More
Games – FREEDOM contains simple video games for relieving boredom during decompression stops.
More information is available here
USB connection – serves for connection to an external unit (PC, tablet). The FREEDOM is displayed as
an external device after selecting this item.
17
Settings It is possible to apply a broad range different settings to the FREEDOM. The unit can be adjusted to
meet the specific requirements of many different kinds of diving and experience levels of divers.
Before first use
Before the first use, it is necessary to decide how you want to use your new FREEDOM and set your
personalization.
Horizontal calibration
Before the subsequent setup, it is crucial to have the correct level calibration. Level calibration serves
for the proper and accurate functioning of the accelerometer. The built-in accelerometer enables
recognition of the computer’s position, thus making it possible to control the FREEDOM and change
parameters by tilting or clicking.
Go to: Main menu > Setup > Horizontal calibration
Now place the FREEDOM a PERFECTLY STABLE HORIZONTAL POSITION (on a table for, example) and
press any key. Wait for the result and then continue with the other settings.
Set time
Main menu > Setup > Set time
Set time is very important because several FREEDOM functions depend on having the correct time. If
you do not have the correct time set, the FREEDOM cannot work properly.
Set the time by tilting.
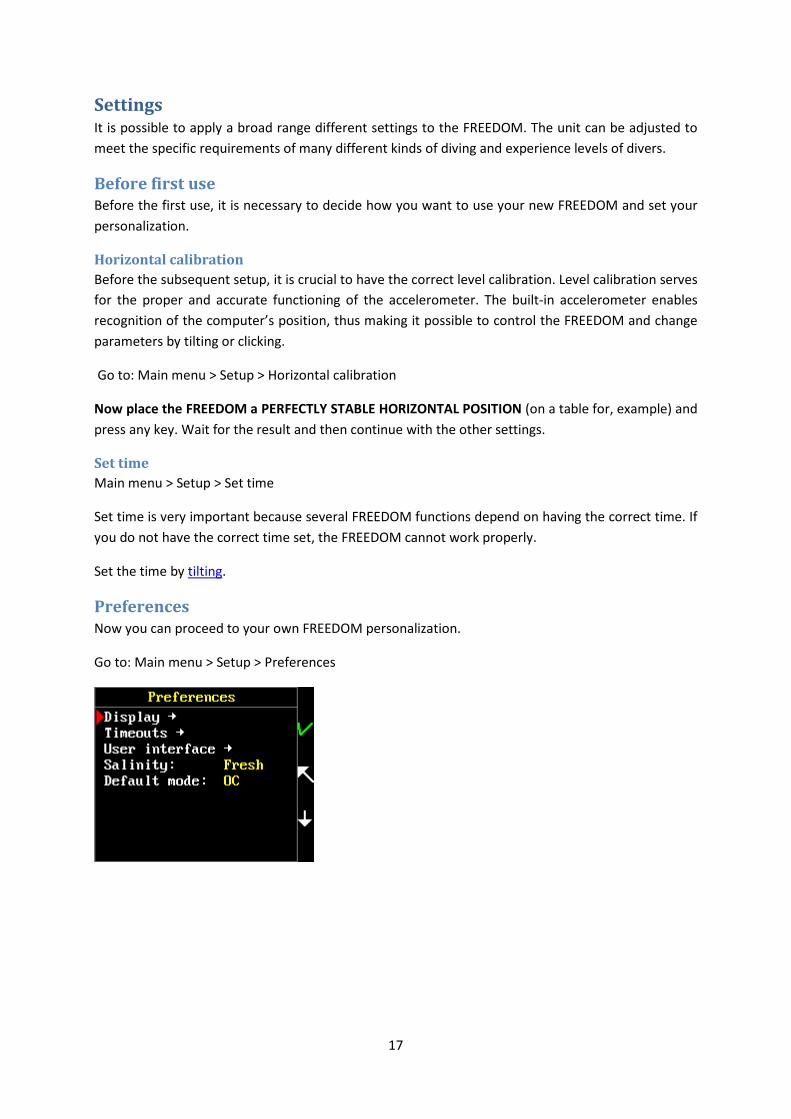
Preferences
Now you can proceed to your own FREEDOM personalization.
Go to: Main menu > Setup > Preferences

18
Display
Orientation
Main menu > Setup > Preferences > Display > Orientation
Orientation allows changing the orientation of the computer from left-hand orientation to right-hand
orientation so that you can use your FREEDOM on either hand without changing the direction of the
buttons. If you set AUTO orientation, the display is automatically set after start.
Keep in mind: if you change the orientation, the functions of the buttons also change so that KEY 1 is
always at the top.
Press KEY 1 for change orientation.
Screensaver
Main menu > Setup > Preferences > Display > Screensaver
Select the screensaver delay in seconds from 0 (off) to 120 seconds. Use tilting or clicking (depending
on the setting) to enter the value. Instructions on how to use the screensaver are available here.
Show by light
In the screensaver mode, it is possible to reactivate the display either by pressing a key, shaking the
device or by shining a diving light on the display. This option can be set up in the menu (Main menu >
Setup > Preferences > Display preferences > Show by light).

19
Screens
Main menu > Setup > Preferences > Display > OC screens
Specify which screens should by displayed in Closed-circuit or SCR mode. You can disable some of the
screens for displaying with KEY 1 and re-enable them with KEY 1.
Timeouts
Main menu > Setup > Preferences > Timeouts
In this submenu you can set the duration of FREEDOM activiation.
Surface idle – set a time period for switch-off after inactivity in surface mode and menus. Range 1 –
120 min.
Prepared idle – set a period for switch-off after inactivity in dive mode before the dive. Range 1 –
120 min.
Dive termination – set an automatic dive termination after surfacing in the range of 0 (never) – 30
min.
Units
Main menu > Setup > Preferences > User interface > Units
The FREEDOM computer can work with both metric and imperial units. Select your preferred unit.
Checklist
Main menu > Setup > Preferences > User interface > Checklist
Enable or disable checklist before dive modes (OC, CCR) activation.
Plan order
Main menu > Setup > Preferences > User interface > Plan order

20
Plan order determines whether depth issues in the plan are arranged from the top down or reverse.
“normal” bottom time and the first stop are below
“reverse” bottom time and the first stop are above
Key press delay
Main menu > Setup > Preferences > User interface > Key press delay
You can choose how long you must press the button for a given action. The default setting is 250ms
for short press. A press that is too short could be activated unintentionally and a press that is too
long is not very practical when you must wait for navigation in the menu.
Long press is 2.5 seconds and cannot be changed.
Editor navigation
Main menu > Setup > Preferences > User interface > Editor navigation
This menu determines if you will control the entering of values by tilting or tapping.
Gas shortcuts
The second way is with a key shortcut. When you press KEY 1 LONG, the computer switches to the
next gas in your list. You can scroll in the list this way cyclically. This is the quick and easy way to
change your gas. In light of the fact that there is a certain risk of unintentional switching of gases
during a dive, this option is adjustable in the (Main menu > Setup > Preferences > User interface >
Gas shortcuts) in firmware version 1.5. Key shortcuts are activated by default.
Salinity
Main menu > Setup > Preferences > Salinity
Although you will change this item more often, it is a good idea to set the predicted more frequent
salinity mode: Salt water / Fresh water
NOTE: The salinity setting doesn't affect decompression procedure. It affects just depth measuring
and indirectly the depth of decompression stop (rounded to 3m / 10ft) due to the different water
density.
Default mode
Main menu > Setup > Preferences > Default mode
You can choose the mode that you prefer. This means that if you dive below the activating depth (1.5
m), the chosen default mode will be activated. So select the mode in which you dive most often and
in which you are most likely to dive. Of course, you can always change it.
Factory defaults
Main menu > Setup > Factory defaults
If you are not sure about custom settings, set all settings to default.

21
Before the dive
It is a good idea optimize your FREEDOM for your specific dive goals and needs. You can choose your
decompression strategy in many ways, prepare gases for your dive and set alarms, among many
more parameters.
Salinity
Main menu > Setup > Preferences > Salinity
Choose the salinity mode. Salt water / Fresh water
Decompression
Main menu > Setup > Decompression
Altitude
Main menu > Setup > Decompression > Altitude
The FREEDOM computer does not have its own altimeter so the altitude must be set manually.
Correct setting of altitude is crucial for safe decompression and safe no-fly limits! Check your
altitude setting before each dive and compare it with your current position or altitude of your
target destination!
Use tilting or clicking (depending on the setting) for enter the value.
Gradient factor
Main menu > Setup > Decompression > Altitude
The gradient factor (GF) serves for conservative correction of Bühlmann’s decompression model. GF
determines how far you want to be from M-Value saturation. If GF = 1.0, you are reaching M-Value. If
GF = 0.0, all inert gases are de-saturated and tissue inert pressure is equal to ambient pressure on

22
the surface. If the GF = 0.3, tissue compartments are saturated at 30% of M-value. Two GFs can be
set: gradient factor low and gradient factor high. Gradient factor low determines the extent of
oversaturation at depth. This value is relevant to the first decompression stop depth. GF high is the
value of determined oversaturation at the end of ascent.
Use tilting or clicking (depending on the setting) to enter the values from 0.10 to 1.00 The default
setting is GF low 0.30; GF high 0.80.
NOTE: in case of cave diving where is yo-yo profile inevitable due to the cave profile is possible to set
GF’s near to 1.00 to avoid several
Safety stop
Main menu > Setup > Decompression > Safety stop
Enabled or disabled Safety stop (range 6 – 3 m/ 10 – 20 ft).
Deco stop
Main menu > Setup > Decompression > Deco stops
In this part of the menu you can choose the kind of decompression process and the depth of the last
stop.
Stops/Ceiling
Main menu > Setup > Decompression > Deco stops > Stops/Ceil.
You can choose between standard deco stops graduated after three meters and the ceiling. The
ceiling is an exact value (according to the M-value and GF) of minimal depth to which a diver can
ascend without risk of tissue oversaturation (decompression sickness). The diver must not exceed
the ceiling in any case! Using a ceiling is a way to maximally shorten the decompression procedure
due to setting the accurate depth for desaturation without rounding. The ceiling style of the
decompression procedure is suited for advanced, experienced and disciplined divers. It is especially
advantageous for ascents along some solid reference point (rope, anchor chain, slightly sloping
bottom). Standard decompression stops are much more practical when ascending without a
reference point or for less experienced divers. Deco stops are the default setting.
Change the setting with KEY 1

23
Last stop
Main menu > Setup > Decompression > Deco stops > Last stop
The last stop determines how deep your last decompression stop will be. It is possible to choose
between 3 meters (10 feet) and 6 meters (20 feet) depending on your preferences, conventions and
ambient conditions. A deeper last stop extends the decompression time but it is safer in big waves
and much more useful when using oxygen with regard to the oxygen window.
Change the setting with KEY 1
Rounding
Main menu > Setup > Decompression > Deco stops > Rounding
The FREEDOM rounds the ascent and decompression time in 1s, 30s and 60s relations.
Deep stop
Main menu > Setup > Decompression > Deep stop
In order to prevent the formation of microbubbles in a diver’s tissues, it is a good idea to make deep
stops. There are several options for how to do this. The first possibility is to set your GF low to a very
low value – for example 10. This setting determines the first decompression stop much deeper than
one would expect.
The second possibility consists in additional stops added to your common Bühlmann decompression.
These stops are called Deep stops. The FREEDOM uses Pyle’s deep stop procedure.
It is possible to choose either one of these two options or to combine them.
Deep stops set as OFF by default. For activation of deep stops, press KEY 1 to switch to ON.
If you want to use the descent rate warning, make sure that the global alarms and descent rate alarm
are set to ON.

24
Ascent rate
Main menu > Setup > Decompression > Ascent rate
Some divers could take advantage of the possibility of a more aggressive ascent rate at greater
depths. Other divers would like to be safer by using a very slow ascent speed in the upper part of the
dive or between deco stops. It is your choice which strategy you will use. The only limitation is that at
depths to 30m the speed cannot be higher than 9 m per minute.
Select the ascent rate for the first zone (between rate 1 and 2) and then select the range of this zone
in meters or feet. Continue with the same principle for another rates and zones.
Descent rate
Main menu > Setup > Decompression > Descent rate
When you diving deep with trimix, a slow descent is very important in order to avoid HPNS. Select
the desired zone and set the descent rate by tilting or clicking (depending on the setting) to enter the
values from 1 to 40 meters per minute.
Select the descent rate activation depth.
If you want to use the ascent rate warning, make sure that the global alarms and ascent rate alarm
are set to ON.
Mixtures
Main menu > Setup > Mixtures
In this menu, set the gas mixtures that you will use. You can use nine different mixtures with any
fraction of oxygen, nitrogen and helium.

25
Available mixtures are without brackets; enabled mixtures are with brackets in the list of mixtures.
To reselect or adjust the mixture, select the desired mixture and press KEY 1. Then it is necessary to
select the checkbox if you want to use this mixture or deselect it if you do not want to use it by tilting
or clicking. Then set the fraction of individual gases with tilting or clicking.
Alarms
Main menu > Setup > Alarms
The FREEDOM contains numerous vibration alarms. The diver can set many kinds of alarms which he
considers to be important or can centrally deactivate all alarms.
WARNING: Because the FREEDOM is primarily suited for technical diving, all alarms are turned off
by default.
Global alarms
Set all alarms to ON or OFF.
Alarm sources
Choose which alarms you want to use.

26
Ceiling – alarm triggered by exceeding decompression ceeling
Deco stop miss – alarm triggered by missing a decompression stop
CNS – alarm triggered by achievement 75% and 100% CNS clock
pO2 – alarm triggered by exceeding the safe limit of oxygen partial pressure (1.6 bars)
RATES
Descent rate – alarm triggered by exceeding the descent rate
Ascent rate – alarm triggered by exceeding the descent rate
Low battery alarm - In firmware version 1.5, a low-battery alarm can be set (Main menu > Setup >
Alarms > Alarm sources > Low battery). The values can be set in the range of 0 to 40% (this pertains
to the percentage of the fully charged battery), whereas 0 means a triggered alarm. If you set the
value lower than 10%, the alarm alerting you to the battery’s critical status will be triggered
automatically when reaching the 10% charge level of the battery.
NOTIFICATIONS

27
No deco end – alarm triggered at the moment of termination of the no-decompression time
Deco stop end - alarm triggered at the moment of termination of the decompression stop
Gas switch reminder – alarm triigered at the optimal gas switch depth
Gas switch done - alarm triggered at the moment when the gas switch is done
Depth – you can use three different depth alarms (alarms are activated by each exceeding of the
depth by descent).
Time – you can use three different time alarms
CCR setup
This part of the manual pertains only to Freedoms with a CCR license.
For setting the parameters of the CCR mode, go to the Setup/CCR setup menu. Setup is identical for
diving in the directly measured partial pressure mode (Measured CCR) and in the constant ppO2
mode (Fixed CCR). In the “Number of sensors” item, set the number of sensors connected to the
Freedom computer. According to the setting, the corresponding number of fields for displaying the
measured ppO2 are displayed in the diving mode. The setting of the number of sensors is irrelevant
for the Fixed CCR mode.
With the “Diluent” item, set the composition of the utilized diluent for your planned dive. WARNING!
If you set a different diluent than the one you are actually using, the Freedom computer will actually
calculate the wrong decompression and CNS toxicity calculation. This situation can cause serious
injury or death.

28
In the “SP low” item, set the value of your low setpoint in ppO2 bars. Notice: the Freedom is not a
control computer for your automatic solenoid valve for oxygen dosing. The Freedom serves only for
calculating decompression on the basis of:
a) measured ppO2 in the breathing circuit (Measured CCR mode)
b) set ppO2 in the Freedom computer (Fixed CCR mode)
For the most precise decompression calculation possible in the Fixed CCR mode, switch the Freedom
to the corresponding setpoint when changing the setpoint on the control unit of your rebreather. We
recommend setting a slightly lower setpoint than the actual setpoint on your rebreather. By doing so,
you ensure a safety reserve that partially eliminates the error consisting in variation of the partial
pressure in the circuit. Variation of the partial pressure of oxygen in the breathing circuit is caused by
numerous factors and it cannot be effectively prevented.
SP low sets the low setpoint. Select the item with KEY 1 and change the value by tilting or tapping.
The values are shown in bars. The default value is 0.7 bar.
SP High sets the high setpoint. Select the item with KEY 1 and change the value by tilting or tapping.
The values are shown in bars. The default value is 1.3 bar.
Before diving, do not forget to set the bailout gases. Setting the bailout gases is identical to setting
“Mixtures” for open circuit.
Faulty sensors
In the “Faulty sensors” item, it is possible to remove faulty sensors that significantly deviate from the
values of other sensors or are completely nonfunctional. By doing so, you will remove the given
sensor from the calculation of the ppO2 average, which is used for calculating decompression and
other computed values.
Place the cursor on the defective sensor and use KEY 1 to change the value from “Normal” to
“Disabled”.
Oxygen-sensor calibration
If you use the Freedom in the measured ppO2 mode, it is necessary to calibrate the oxygen sensor
prior to every dive. The calibration menu is found in the Main menu/Dive/Calibration.
Calibration settings
Prior to the actual calibration, it is necessary to set the corresponding calibration values. Go to the
Change item and select it with KEY 1.
In the “Oxygen purity” item, set the value that corresponds to the fraction of oxygen in the gas that
you are preparing to calibrate.
The “Warning days” item comprises time data according to which the Freedom will notify you of the
age of the calibration. To change the value, move the cursor to the item, select it by pressing KEY 1
and set the value by tilting or tapping. The default value is seven days; the setting range is 0-30 days.
The “Valid days” item is a time value after the expiry of which the calibration is considered to be
invalid and new calibration is required. To change the value, move the cursor to the item, select it by

29
pressing KEY1 and set the value by tilting or tapping. The default value is 180 days; the setting range
is 0-540 days.
For the actual calibration, connect the oxygen sensors to the Freedom’s connector. Calibrate the
sensors using ambient air; check to make sure that the ambient air has not been contaminated with
another gas (e.g. exhaled air, exhaust gases, oxygen from your rebreather, etc.). If you calibrate for a
different, specific gas, use appropriate means to ensure that the calibration gas flows around the
oxygen sensors and is not contaminated with other ambient gases. Afterwards, select “Start
calibration” and confirm the displayed fraction of oxygen by pressing KEY 1 or, if necessary, cancel it
by pressing KEY 2. After starting calibration, wait until all sensors display the value “Stable”. Then
STORE THE CALIBRATION BY PRESSING KEY1. If you cancel the calibration by pressing BOTH KEYS, the
new calibration will not be stored.
System check
System check shows the current information about the software and firmware versions, license,
current settings, battery status and pressure-sensor status.
DivingwithFreedom
Open circuit – dive mode The dive mode is the heart of the FREEDOM system. The dive mode serves for online calculation of
decompression using conventional open-circuit scuba equipment. It is possible to use a wide range of
breathing mixtures, from Air and NITROX to HELIOX and TRIMIX. You can use up to nine variable
mixes as travel, bottom and decompression mixes.
The dive mode is identified by the blue frame.
Mode activation
Go to main menu > Dive > Open circuit
The current setting status is displayed first. Check all settings and confirm with KEY 2 or go back with
KEY 1.
If you have the dive mode set as your priority mode, it starts automatically after you enter the water
and dive to a depth below 1.5m. DIVESOFT recommends checking the battery status and manual
activation before entering the water.
Screens
SCR mode includes four screens. The diver can scroll cyclically between screens with KEY 1.
The Detailed screen is the most detailed screen and it displays: Depth, Dive time, Deco
stop/Ceiling, Stop time, Ascent time, Deep Stop, Max depth, Temperature, ppO2, decompression-
status graphic symbol, battery-status graphic symbol.
30
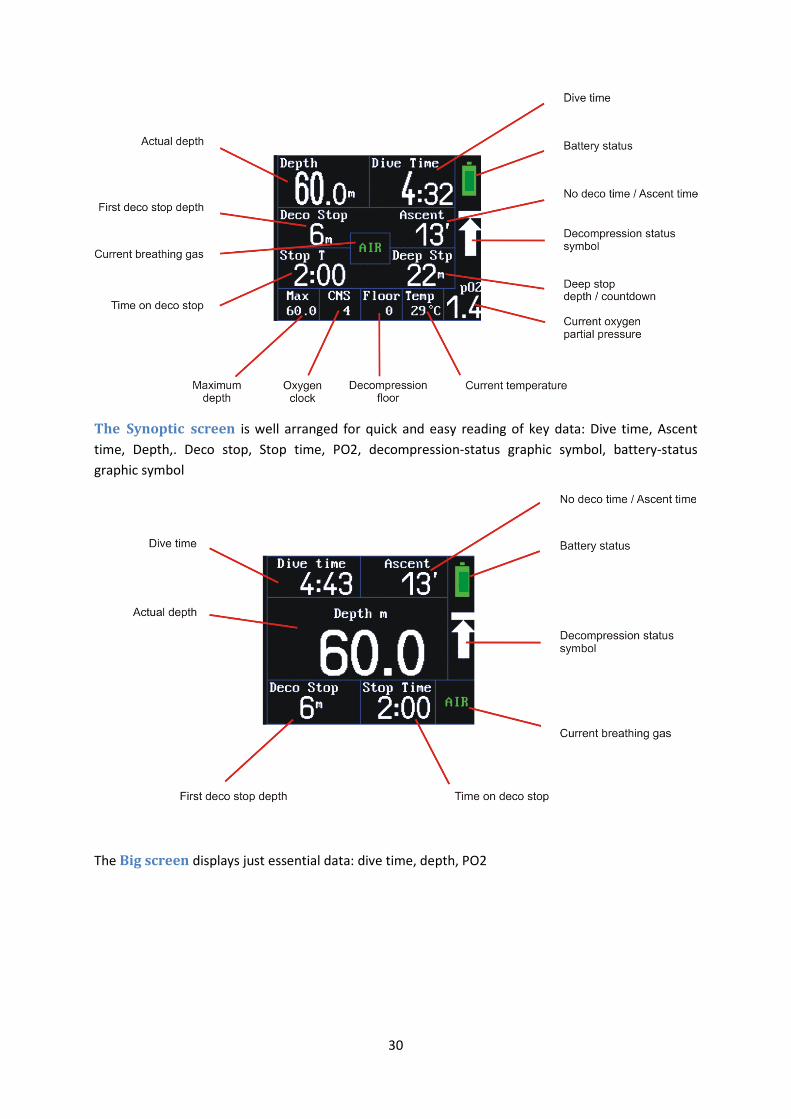
The Synoptic screen is well arranged for quick and easy reading of key data: Dive time, Ascent
time, Depth,. Deco stop, Stop time, PO2, decompression-status graphic symbol, battery-status
graphic symbol
The Big screen displays just essential data: dive time, depth, PO2

31
The Graph screen displays the current dive profile graph, which displays the situation at the
moment of switching to the graph screen and it is refreshed every five seconds. Under the graph are
displayed essential online data: dive time, depth, PO2.
Screens legend
Depth – shows current depth in meters or feet (depending on the settings) with an accuracy of tenth
Dive time – measure of dive time from plunge to ascent termination in seconds.
Deco stop – depth of the next or current decompression stop (in meters or feet depending on the
setting)
Ceiling – The ceiling is the safe oversaturation limit. This is the minimal depth at which divers can
ascend in relation to their tissue saturation and selected gradient factor.
When the ceiling type of decompression is selected, the ceiling information is displayed in the
decompression-stop box. Instructions on how to perform ceiling decompression are available here.
Stop time – time until the decompression stop in seconds. When the diver is in a decompression
stop, this data shows the total time until the next decompression stop. At the moment when the
diver reaches the deco-stop depth, this time begins to count down to zero and then the time until
the next stop.
NOTE: When is the Ceiling type of decompression selected, stop time is not displayed.
No deco – information on how long the diver can stay at the current depth without decompression
stops. Time is displayed in minutes.

32
Ascent time – length of time needed to reach the surface. It includes ascent speed, deep stops (if
selected) and decompression stops. Ascent time is displayed instead of of No deco at the moment
when decompression stops become necessary.
Deep Stop – additional stops in the deeper part of the dive. Deep stops can prevent could the
formation of microbubbles. Deep stop is available in screen 1 only.
Max depth – maximum achieved depth
CNS – proportion of maximum oxygen exposure in relation to oxygen toxicity, expressed as a
percentage
Floor – depth level where the duration of decompression is not increasing
Temperature – current temperature in Celsius or Fahrenheit (depending on the settings)
pO2 – partial pressure of oxygen depending on the oxygen fraction and ambient pressure
Decompression-status graphic symbol – graphically shows different decompression situations. For
an overview of decompression status, see below.
Battery-status graphic symbol – graphic symbol of battery status: green when fully charged, yellow
when at 50%-30% capacity, orange at 30%-10% capacity, red when the battery charge is lower than
10% of capacity.
Open circuit MENU
Throughout an entire dive the Open circuit menu remains available. For Switching to menu, press
BOTH KEYS.
Mix – Select your current mix or switch to another decompression mix
End dive – terminates the dive manually. A condition for use of this function is that the depth must
be less than 0.5 m.
Mixture setup – set or correct proportions and enable or disable used gases.
Games – switch to games during deep or safety stops
Switch off – switch off the whole computer. A condition for use of this function is that the depth
must be less than 0.5 m
Symbols legend
Symbols are displayed during the dive in Open circuit or SCR/CCR mode. These symbols appear in the
right-side column on the display. They represent the current situation and recommend procedures to
divers.
No Deco. Free ascent
Ascent speed exceeded. Slow down!
Decompression ceiling exceeded. Go down to ceiling depth.

33
Ceiling depth reached
Deco stop reached
Under ceiling depth. Decompression required
Decompression stop exceeded. Go down to decompression stop
Deep stop reached
Safety stop. Stay between 6 and 3 meters for 3minutes.
No-decompression dives
Before the dive, activate your FREEDOM, go to Main menu and select Open circuit or make sure that
you have set Open circuit as your Default mode for correct automatic activation. Make sure that the
altitude setting corresponds to your current position. Check your breathing gas and compare it
with the setup. Check the battery status to be sure that it is sufficient for the planned dive.
At the start of the dive, depth, time, no-decompression time in minutes for the current depth,
information in the bottom boxes and graphic information in the right-side column are displayed. The
decompression-status graphic symbol shows arrow up. This is the symbol for free ascent to the
surface without decompression stops.

34
During the dive it is possible to switch between screens with KEY 1.
The Open circuit menu remains available during the whole dive.
During the ascent, maintain the ascent rate. In the case of exceeding the ascent rate, two red arrows
are displayed in the right-side column and the alarm vibrates if it is set.
Screensaver
The screensaver is very useful for preserving battery capacity. We recommend using it for every dive.
If the screensaver is set, your display will shut off periodically. You have three easy options for
returning to normal function if you need to read the display:
• Push any button.
• Tap on the cover glass.
• Shine light on the display with your lamp.
Instructions on how to set the screensaver interval are available here.
Safety stop
Every dive deeper than 10 meters requires a safety stop. The safety stop takes place from six to three
meters. After exceeding six meters the decompression-status graphic symbol changes to a yellow
dashed line and the safety stop time starts a three-minute countdown in the lower left box in the
detailed screen, in bottom middle box in the synoptic screen and in the bottom box in the big screen.

35
The safety stop is interrupted if the diver falls below a depth of six meters. After returning above this
depth, the safety-stop countdown starts again from the beginning. When the diver completes a
safety stop and then falls below 10 meters again, then it is necessary to make a safety stop from the
beginning.
During a safety stop it is possible to play games (in fixed position preventing unwanted ascent or
deep descent). After termination of the safety stop, the free ascent arrow is displayed again and the
diver can end the dive.
End dive
When you terminate a dive, you can end the dive on the computer manually or wait for automatic
termination. For manually ending a dive, go to the Open circuit menu and select end dive. This is
possible only on the surface. Automatic end dive occurs after ascending above a depth of 0.5 m. If
you resume diving with 10 minutes after the last ascend, it will be logged as a one dive. If you
actually finish diving at that moment, the dive time will be logged until the moment of exceeding 0.5
m.
Decompression dives
WARNING: Decompression dives must be preceded by proper planning. Make sure that you have a
sufficient gas supply for your dive. Plan the dive, dive the plan! Do not exceed your personal
qualification limits!
The start of a decompression dive is the same as that of a No-decompression dives. At the moment
of termination of the no-decompression limit, the upper right box changes from NO DECO to
ASCENT. Ascent shows the ascent time from the current depth in minutes including deep and
decompression stops.
In the upper left box, the depth of the first decompression stop is displayed. The time until the stop is
shown below in minutes and seconds.

36
Decompression stops
When the diver ascends to the decompression-stop depth, the decompression-status graphic symbol
changes to a white dashed line and the time in the lower left box starts to count down.
The ascent rate between decompression stops is set to 3 m/min (10ft/min). The ascent time is
counted in the length of the decompression stop. If the diver ascends at a higher rate, the stop will
be extended by the time required to ascend at the prescribed speed.
Tolerance at the decompression stop is +/- 0.5 m.
If the diver passes a decompression stop and the ceiling simultaneously, then a red arrow is
displayed. That is a serious and dangerous situation. The diver has to return below the ceiling
immediately! Exceeding the ceiling involves a huge risk!
When the diver falls deeper than 0.5 m below the current decompression stop, the time countdown
is interrupted and the FREEDOM continues with the decompression calculation.
After termination of the last stop, the deco information disappears and a white arrow for free ascent
is displayed in the right-side column.
In the case of missing a decompression stop, a new decompression procedure is calculated from the
current position. However, missing a decompression stop can lead to critical oversaturation and the
occurrence of decompression sickness.
Show plan
The current course of decompression can be displayed during the dive. If you are just under the
surface or you launch a demo dive, go to the menu (BOTH KEYS) and select the “Show plan” item.
The Freedom will display the list of decompression stops and the length thereof. Use of all set
37
mixtures with gas switch at the optimum depth is anticipated in the calculation of the ascent time. If
you want to display the ascent time only with the current mixture, set this option in the menu
Setup/Decompression/Ascent gas = Current.
Diving with the ceiling method
The ceiling is the maximal limit of safe oversaturation. If the diver follows THE decompression ceiling,
he/she achieves the shortest possible decompression with the set parameters. However, the ceiling
method requires a high level diving ability and experience.
The ceiling depth is displayed in the upper left box. The ascent time is shown in the upper right box.
The diver can follow the ceiling depth, but he/she must always stay below this limit. Exceeding the
ceiling represents a huge risk of DCS!
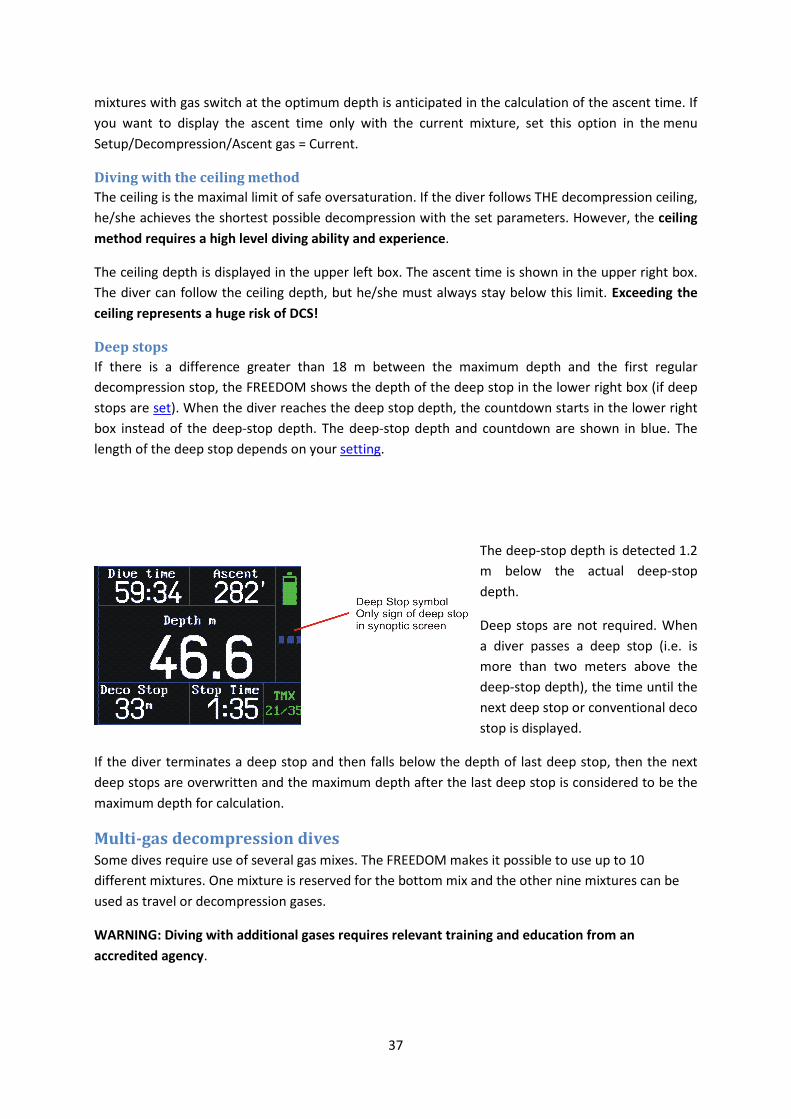
Deep stops
If there is a difference greater than 18 m between the maximum depth and the first regular
decompression stop, the FREEDOM shows the depth of the deep stop in the lower right box (if deep
stops are set). When the diver reaches the deep stop depth, the countdown starts in the lower right
box instead of the deep-stop depth. The deep-stop depth and countdown are shown in blue. The
length of the deep stop depends on your setting.
The deep-stop depth is detected 1.2
m below the actual deep-stop
depth.
Deep stops are not required. When
a diver passes a deep stop (i.e. is
more than two meters above the
deep-stop depth), the time until the
next deep stop or conventional deco
stop is displayed.
If the diver terminates a deep stop and then falls below the depth of last deep stop, then the next
deep stops are overwritten and the maximum depth after the last deep stop is considered to be the
maximum depth for calculation.
Multi-gas decompression dives
Some dives require use of several gas mixes. The FREEDOM makes it possible to use up to 10
different mixtures. One mixture is reserved for the bottom mix and the other nine mixtures can be
used as travel or decompression gases.
WARNING: Diving with additional gases requires relevant training and education from an
accredited agency.

38
WARNING: Always analyze all of your gases before diving! The best way to analyze your mixtures is
by using a DIVESOFT He/O2 Analyzer.
First it is necessary to set your mixtures before the dive. Make sure that you have enabled all desired
gases and that all of your selected mixtures have the correct proportion set.
TIP: We recommend disabling all gases which you are not going to use. Choosing a mixture during a
dive is much easier if you select from fewer issues.
Gas switching
WARNING: Before you switch to another gas, make sure that the MOD of the desired gas is greater
than your current depth! Make absolutely sure that you that you are using the regulator from the
desired bottle!
When you start breathing from a new bottle, switch to the currently used gas in your computer.
There are two ways to switch gases in the FREEDOM. The first possibility is to access the Open circuit
menu with BOTH KEYS. In this menu, select MIX, scroll with KEY 2 and confirm your selection with
KEY 1.
The second way is with a key shortcut. When you press KEY 1 LONG, the computer switches to the
next gas in your list. You can scroll in the list this way cyclically. This is the quick and easy way how to
change your gas.
In light of the fact that there is a certain risk of unintentional switching of gases during a dive, this
option is adjustable in the (Main menu > Setup > Preferences > User interface > Gas shortcuts) in
firmware version 1.5. Key shortcuts are activated by default.
TIP: Set your gases in the list in the order that you will use them. This saves time when switching
gases.
WARNING: The FREEDOM calls attention to gas switching with a pop-up message (and optionally
with a vibrating alarm) if any of your additional mixes drops below 1.6bar ppO2. However, it does
not avert selection of an improper or wrong mix, as several possibilities are generally possible in
technical diving. Selecting a mixture, including timing of air-breaks, is exclusively the diver’s
responsibility!

39
WARNING: Never switch to another gas before you start breathing it!
Gas correction
If you have all mixes prepared and you have already switched the FREEDOM to Open circuit mode
and for some reason you decide to exchange one of utilized bottles for another gas or change it with
your partner during the dive, it is necessary to correct the existing proportions. Go to the Open
circuit menu and select MIXTURE SETUP. There you can change the proportions of your gases.
Measrued CCR mode Use of the measured CCR mode is intended for diving with a closed-circuit apparatus, when the
partial pressure of oxygen in the breathing gas is measured directly by sensors connected with a
cable to the Freedom computer. In such a case, this does not depend on the principle of the utilized
rebreather (all types of SCR, eCCR and mCCR can be used).
Activating CCR mode
To start a dive, select the item “Main menu/Dive/Measured CCR”. Measured CCR can be set as the
default mode in preferences; in such a case, your computer will be started in this mode even in the
case of automatic start of the Dive mode due to an increase in ambient pressure. In addition, this
simplifies the selection of the dive mode prior to diving, as the default mode is always offered first in
the “Dive” menu.
After pressing KEY1, a recapitulation of the important settings will be displayed: listing of bailout
gases, water salinity (which has an impact on the precise measurement of depth), gradient factors,
decompression procedure (stops/ceiling), depth of the last stop, activation/deactivation of safety
stops, length of deep stops, current altitude above sea level (measured by a pressure sensor; this
value is influenced by weather), status of alarms, CCR mode, number of sensors, diluent composition,
SP low and SP high.
The dive mode is started after the important settings have been checked. Depth, dive time, window
for decompression stops, actual time, ascent time, currently used mixture, no deco limit/time at
stop, window for deep stop, 1-3 fields with the ppO2 value (depending on the setting of the number
of sensors), battery status and decompression status are displayed on the detailed screen.
The No deco limit window is shared with the time at the decompression stop. At the moment of
expiry of the no-decompression time, the time spent at the first decompression stop is displayed.
Deep stop is indicated by the depth of the deep stop. At the moment of reaching the deep stop level,
the depth value changes to time data corresponding to the moment of termination of the deep stop.
The values of partial pressures are displayed in white. If a values are below the hypoxic limit, the
values are displayed in blue. If the values exceed the hyperoxic limit, the values are displayed in red.
Dive time, ascent time, depth (highlighted), maximum depth, CNS %, temperature, average ppO2
(average of the values of the valid oxygen sensors), battery status and decompression status are
displayed on the Synopsis screen (switch to this screen using KEY1).

40
Press KEY1 again to go to the Big screen, on which are displayed only the dive time, depth and no-
decompression time or, as the case may be, decompression information after expiry of the no-
decompression time.
On the Dive graph screen, you will see the current dive profile with information on depth, maximum
depth and time. Press KEY1 to return to the Detailed screen.
Menu
(BOTH KEYS)
Unlike the OC mode, several items that are important for closed-circuit diving are added to the
menu.
Bailout mode (OC)
If it is necessary to change to open circuit, this command switches the computer to the open-circuit
mode. After switching to this mode, decompression is calculated in the standard manner according
to the composition of the chosen mixture. Therefore, it is necessary to immediately select the
mixture that is actually being breathed after switching to bailout mode. This is accomplished by using
either the keypad shortcuts KEY1 LONG up and KEY2 LONG down or by accessing the menu and
selecting “Mix”. All controls are then identical to the OC mode. To return to the CCR mode, select
“Original mode (CCR)” in the menu.
Fixed SP mode (CCR)
In this mode, the pressure sensors are disconnected and the Freedom computer calculates
decompression on the basis of the fixed setpoints. Control of this mode is identical to the Fixed CCR
mode. To return to the CCR mode, select “Original mode (CCR)” in the menu.
End dive
This item (which functions only on the surface) terminates the dive and the dive is stored in the
Logbook. If a dive is not terminated manually, it will end automatically following a ten minute
interval from the last ascent above the depth of 0.5m. The dive is then stored in the logbook without
the last ten minutes on the surface.
Show plan
The current course of decompression can be displayed during the dive. If you are just under the
surface or you launch a demo dive, go to the menu (BOTH KEYS) and select the “Show plan” item.
The Freedom will display the list of decompression stops and the length thereof. Use of all set
mixtures with gas switch at the optimum depth is anticipated in the calculation of the ascent time.
Faulty sensors
In the “Faulty sensors” item, it is possible to remove faulty sensors that significantly deviate from the
values of other sensors or are completely nonfunctional. By doing so, you will remove the given
sensor from the calculation of the ppO2 average, which is used for calculating decompression and
other computed values.
Place the cursor on the defective sensor and use KEY 1 to change the value from “Normal” to
“Disabled”.

41
Fixed CCR mode The Fixed CCR mode is intended for apparatuses with a fully closed circuit (eCCR, mCCR) that do not
have their own decompression computer but do have their own ppO2 monitor. In this mode,
decompression is calculated on the basis of strictly set partial pressure, which corresponds to the
selected setpoint on the rebreather. Maintaining the set ppO2 and timely switching of the setpoints
according to the current actual ppO2 status on the rebreather are of key importance for the correct
calculation of the decompression procedure. A preset setpoint can be switched during a dive with
the keypad shortcuts KEY1 LONG and KEY 2 LONG.
Warning: failure to maintain the partial pressure of oxygen in the values of the actual partial
pressure in the rebreather can cause serious injury or death.
Activating Fixed CCR mode
To start a dive, choose the item “Main menu/Dive/Fixed CCR”. Fixed CCR can be set as the default in
preferences, in which case your computer will be started in this mode also in the case of automatic
start of Dive mode due to an increase of ambient pressure. In addition, this simplifies the selection of
the dive mode prior to diving, as the default mode is always offered first in the “Dive” menu.
After pressing KEY1, a recapitulation of the important settings will be displayed: list of bailout gases,
water salinity (which has an impact on the precise measurement of depth), gradient factors,
decompression procedure (stops/ceiling), depth of the last stop, activation/deactivation of safety
stops, length of deep stops, current altitude above sea level (measured by a pressure sensor; this
value is influenced by weather), status of alarms, CCR mode, number of sensors, diluent composition,
SP low and SP high.
The dive mode is started after the important settings have been checked. Depth, dive time, window
for decompression stops, actual time, ascent time, currently used mixture, no deco limit/time at
stop, window for deep stop, maximum depth, CNS %, temperature, battery status, decompression
status and the selected setpoint are displayed on the detailed screen.
The No deco limit window is shared with the time at the decompression stop. At the moment of
expiry of the no-decompression time, the time spent at the first decompression stop is displayed.
Deep stop is indicated by the depth of the deep stop. At the moment of reaching the deep stop level,
the depth value changes to time data corresponding to the moment of termination of the deep stop.
The values of partial pressures are displayed in white. If a values are below the hypoxic limit, the
values are displayed in blue. If the values exceed the hyperoxic limit, the values are displayed in red.
Dive time, ascent time, depth (highlighted), maximum depth, CNS %, temperature, selected setpoint,
battery status and decompression status are displayed on the Synopsis screen (switch to this screen
using KEY1).

42
Press KEY1 again to go to the Big screen, on which are displayed only the dive time, depth and no-
decompression time or, as the case may be, decompression information after expiry of the no-
decompression time.
On the Dive graph screen, you will see the current dive profile with information on depth, maximum
depth and time. Press KEY1 to return to the Detailed screen.
Menu (BOTH KEYS)
Unlike the OC mode, several items that are important for closed-circuit diving are added to the
menu.
Bailout mode (OC)
If it is necessary to change to open circuit, this command switches the computer to the open-circuit
mode. After switching to this mode, decompression is calculated in the standard manner according
to the composition of the chosen mixture. Therefore, it is necessary to immediately select the
mixture that is actually being breathed after switching to bailout mode. This is accomplished by using
either the keypad shortcuts KEY1 LONG up and KEY2 LONG down or by accessing the menu and
selecting “Mix”. All controls are then identical to the OC mode. To return to the CCR mode, select
“Original mode (CCR)” in the menu.
Setpoint
The setpoint item serves for switching or changing the setpoint. The “Set high” and “Set low” items”
serve for switching the selected setpoint to high or low.
To change the setpoint to a completely different value, use the +0.10 and -0.10 items, by means of
which you will change the setpoint value by one-tenth up or down. You will see the changed value
one line below highlighted in yellow. For storing this setting, move the cursor to the “Accept” item
and confirm by pressing KEY1.
It is also possible to switch setpoints with key shortcuts in the same manner as when switching gases
during an open-circuit dive. By pressing KEY1 LONG, you will switch to setpoint high; by pressing KEY2
LONG, you will switch to setpoint low. In light of the fact that there is a certain risk of unintentional
switching of gases during a dive, this option is adjustable in the (Main menu > Setup > Preferences >
User interface > Gas shortcuts) in firmware version 1.5. Key shortcuts are activated by default.
End dive
This item (which functions only on the surface) terminates the dive and the dive is stored in the
Logbook. If a dive is not terminated manually, it will end automatically following a ten minute
interval from the last ascent above the depth of 0.5m. The dive is then stored in the logbook without
the last ten minutes on the surface.
Show plan
The current course of decompression can be displayed during the dive. If you are just under the
surface or you launch a demo dive, go to the menu (BOTH KEYS) and select the “Show plan” item.
The Freedom will display the list of decompression stops and the length thereof. Use of all set
mixtures with gas switch at the optimum depth is anticipated in the calculation of the ascent time.
43
Free mode Free mode serves for the special needs of free divers. Free mode is indicated by a yellow frame and is
divided into two sub-modes: diving and surface. Free diving is characterized by a lot of comparatively
short dives with comparatively short surface times. Therefore, the sum of dives in one training
session or competition is included in one specific log with detailed statistics.
Warning: Free diving immediately after scuba diving is not safe and could cause decompression
sickness, especially DCS Type II. Microbubbles caught in pulmonary shunts could be squeezed and
transported to arterial blood, where they could cause injury or death. Scuba diving after free diving
is possible.
Activating Free mode
Go to Surface mode main menu> Free mode
Go to the Surface mode main menu> Free mode
If you have Free mode set as your priority mode, it starts automatically after you enter the water and
dive below 1.5 m. The starting depth is set at 1.5 m by default, but it can be changed in the Free
mode settings (Surface mode main menu> Setup> Free setup> Free mode start depth or Free mode>
Setup> Free mode start depth) in the range from 1 m to 2 m.
Start dive – the dive time starts at the moment when the diver’s wrist with a fitted FREEDOM
computer exceeds the Free mode start depth.
End dive – the dive time is interrupted at the moment when the diver’s arm reaches a depth that is
shallower than the Free mode end depth.
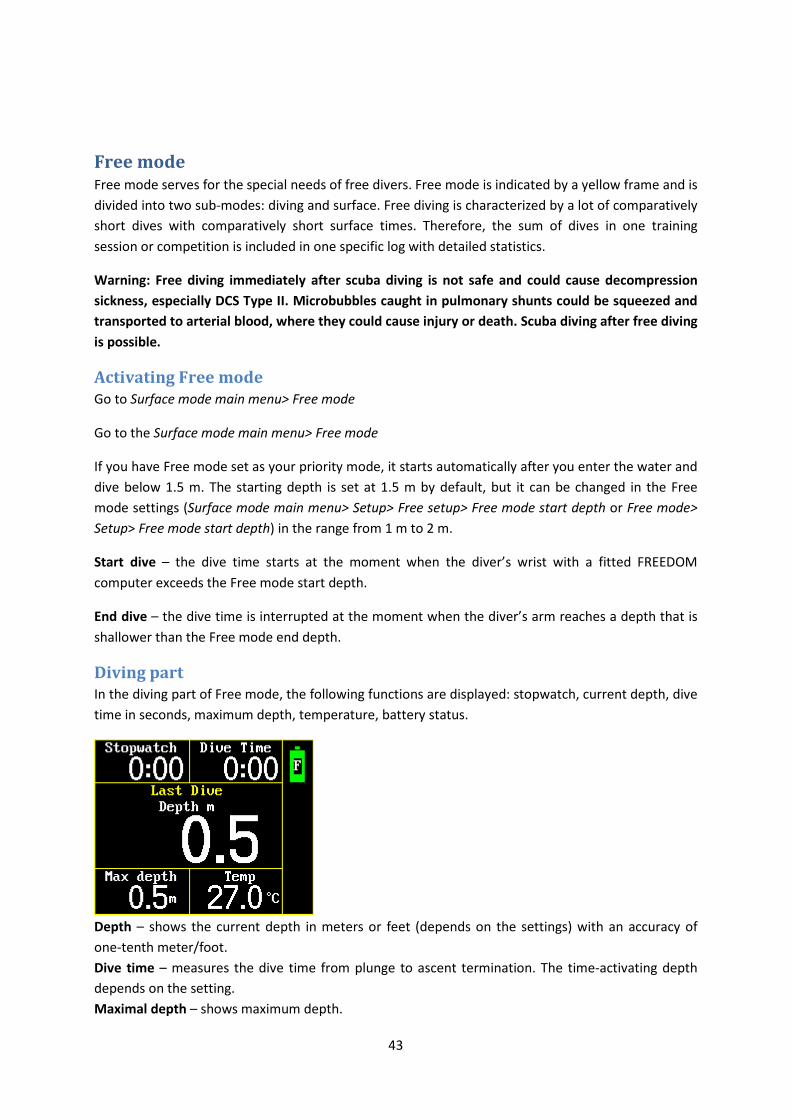
Diving part
In the diving part of Free mode, the following functions are displayed: stopwatch, current depth, dive
time in seconds, maximum depth, temperature, battery status.
Depth – shows the current depth in meters or feet (depends on the settings) with an accuracy of
one-tenth meter/foot.
Dive time – measures the dive time from plunge to ascent termination. The time-activating depth
depends on the setting.
Maximal depth – shows maximum depth.

44
Temperature – current temperature in Celsius or Fahrenheit.
Battery status – graphic symbol of battery status: green when fully charged, yellow when at 50%-
30% capacity, orange at 30%-10% capacity, red when the battery charge is lower than 10% of
capacity.
Surface part
In the Surface part of Free mode, the following are displayed: time, duration in seconds, surface
interval in seconds, dive count, cumulative dive time, maximum depth.
Time – current time
Duration – duration from first plunge to manually ending the dive. Includes all free dives and surface
interval in one diving event (training, competition).
Surface interval – time between two dives. It is possible to set the surface interval alarm in Free
setup: Surface mode main menu> Setup> Free setup>.
Dive count
Cumulative dive time – sum of dive times. Total time spent under water.
Maximum depth – maximum depth of all dives in the current diving event.
In the surface part of Free mode, it is possible to switch to last dive information with KEY 1. It is
possible to see stopwatch, maximum depth, dive time and minimal temperature of the last dive.
¨
Stopwatch – The stopwatch is activated with KEY 2, stopped with KEY 2 again, and reset with KEY 2
LONG. If you finished a dive and do not stop the stopwatch and switch the computer to the Surface
part, the stopwatch will continue to run. It is possible to check the last dive information. If the
stopwatch is not stopped during the time at the surface, it will continue to measure the time in the
next dive.

45
Free mode setup
Go to Surface mode main menu>Setup>Free Setup
It is possible to set depths where the timer is activated and stopped automatically. You can choose
activation (At depth) and deactivation (At depth) separately.

46
Gauge mode Gauge mode serves as a high-precision depth gauge for those who do not want to use
decompression data. Gauge mode is indicated by a red frame. The following functions are displayed:
Stopwatch, current depth, dive time in seconds, maximum depth, temperature, battery status.
After each dive, the diver has residual nitrogen in his/her tissues. For this reason, diving without
proper knowledge about your previous saturation is not safe. If you want to use Gauge mode after
a scuba dive, make sure that you can use dive tables or decompression planning software for your
next exposure. Divesoft is not responsible for any decompression problems caused by poor
planning and using Gauge mode.
Activating Gauge mode
Go to Surface mode main menu> Gauge mode
If you have Gauge mode set as your priority mode, it starts automatically after you enter the water
and dive below 1.5 m.
Stopwatch
The stopwatch is activated with KEY 2, stopped with KEY 2 again, and reset with KEY 2 LONG.
End dive and deactivation
The dive is terminated at the moment of exceeding a depth of 1.2 m.
The dive mode is automatically deactivated after 10 minutes following the last dive. For manual
deactivation, press BOTH KEYS and select End dive.

47
Plan
Decompression planner
The DIVESOFT Freedom computer contains a comprehensive decompression planner for planning
advanced and technical dives. For the purpose of simple control, which is limited to two buttons and
tilting, direct setting of the dive plan is limited to the surface interval, depth, time and bottom mix.
All other settings, such as the unit system, setting of gradient factors, depth of the last stop, ascent
speed and the number and composition of mixes, are taken from the current global setting of the
Freedom computer.
Go to the Main menu and select the “Plan” item.
In the “Plan mode” item, set whether the dive will be conducted with an open circuit (OC) or closed
circuit (CCR).
In the “Surface interval” item, use tilting or tapping to set the time interval between the current time
and the time of starting the planned dive. The Freedom takes into account the diver’s tissue
saturation with inert gases from previous dives.
In the “Target depth” item, set your planned maximum depth. Units are set according to your global
setting: metric = meters, imperial = feet.
In the “Bottom time” item, set the total time of stay at the bottom until the moment of beginning
the ascent. The descent time at the assumed speed of 30m/min. is also figured into the bottom time.
The “Bottom mix” item determines which of your preset mixtures will be used for the stay at the
bottom. Other gases will be used as travel and decompression mixtures. Only preset gases are
displayed in the list of gases in the main menu > setup > mixtures. Gases are used in the planner so
that all of the gases are used during ascent at the moment when the ppO2 of the given mixture
reaches 1.6 bars. The depth for gas switch is rounded to 3m
or, as the case may be, 10ft. Every mixture is differently color-
coded in the plan. Air is depicted as white, oxygen blue, nitrox
mixtures green and trimix mixtures brown. The shade of green
and brown differs in relation to the oxygen content of the
given mixture.
The “Start calculation” command starts the calculation of your
plan. Upon pressing KEY 1, a recapitulation of the set values,

48
the no-decompression time for the set depth, ascent time and total dive time are displayed. If you
are not satisfied with the settings, you can go back by pressing BOTH KEYS and reset the input values.
By pressing KEY 2, you will display the detailed decompression plan. Individual lines determined by
the depth are color-coded according to the utilized mixture (see the previous paragraph). The
following data are always displayed in a line: depth, time at that depth, Runtime (total time at the
given moment), utilized gas. The last pink line under the
previous pink line is the summary. The sum under the time at
depth expresses the total ascent time and the sum under the
runtime expresses the total time of the entire dive. Whether
depths are arranged from the top down or vice versa depends
on the settings (setup > preferences > plan) where “normal”
(bottom time and the first stop are below) or “reverse”
(bottom time and the first stop are above) can be set. Please
set the display of the plan in the manner that is more natural
for you to read. Only eight lines can be displayed on the Freedom computer’s screen. In the event
that a planned dive requires more decompression stops, these are displayed on the following page.
You can browse through the pages in the plan using the KEY 1 up and KEY 2 down keys.
The “Start simulation” command launches a demo dive according to the parameters than you have
set. During the demo dive, the Freedom can be controlled in the same manner as during an actual
dive. However, for these purposes the “Demo dive” item, which offers the possibility of immediately
terminating the demo dive (End demo dive) or starting ascent at the current point in the demo dive
(Start ascent), has been added to the menu (BOTH KEYS). The demo dive is recorded in the Logbook,
though such dive does not in any way influence the decompression model and calculation of
decompression during the subsequent actual dive.
You also have the possibility to store the entered values as your default values. This means that if you
thus store such values, the stored values will be displayed first upon the next opening of the planner.
Log book
Main menu > Log book
The FREEDOM has an internal memory for logging your dives. The internal memory can save 80 to
240 hours of diving profiles. The quantity of saved dives depends on their duration and the amount
of saved information. The FREEDOM detects the changes in your diving profile every second! If there
are not any or events in your profile, the FREEDOM saves only the initial information and the state
before the change. The FREEDOM thus saves internal memory capacity for more logs.
First, the list of your logged dives is opened. Each dive is described with the date, dive time and
maximum depth. If there are several dives during a given day, dives are marked with letters from “a”
to “p”.

49
Select the desired dive and open it with KEY 1. Each dive includes a graph of the diving profile, date
and time in the format yyyy.mm.dd hours:minutes, maximum depth, duration, average depth and
mode.
Date – date of dive in the format yyyy.mm.dd
Time – time of plunge in hours : minutes
Depth – maximum depth in meters / feet
Duration – dive time in hours : minutes : seconds
Avg depth – average depth of the dive is useful information for your personal SAC and RMV
calculation.
Mode – shows the mode in which the dive was performed (OC, SCR, Free, Gauge)
When the log memory is full, the oldest dives are overwritten.
Data transfer Connect the FREEDOM to your PC or tablet with a USB cable. Select USB in the menu. The FREEDOM
will be connected to your device as an external disk drive. Download files from the DIVELOG folder to
your hard drive and then upload data to WETNOTES.COM. Here you can store and edit your dives,
study graphs, details and much more. If you wish, you can share dives with your buddy or a group.
Visit WETNOTES.COM now and explore all the possibilities that it offers!

50
Firmware update and upgrade The firmware upgrade and update process will be described in a specialized manual with first update
release.
WARNING: License is fixed to serial number and non-transferable to other computers.
Games
The DIVESOFT FREEDOM contains games for relieving boredom during decompression stops .
When playing games, depth is the only displayed data.
WARNING: Playing a game could reduce your attention to vital functions and important life-
threatening situations. Do not lose your buoyancy control! Play games only during decompression
or safety stops in a safe place (on a rope or near the bottom. Do not play games in open water
without the possibility of a catch hold! Do not play games if it is not possible to rule out some
dangerous situation!
During the dive it is possible to activate games by pressing BOTH KEYS to switch to the menu in dive
mode and selecting GAMES.
Sokoban
Your character is a diving mask with snorkel. Your goal is to move the scuba cylinders through the
labyrinth at the marked point (red spots) with a minimum number of steps. If you make a mistake,
you can go back, but only three times per level.
Start game
The game begins.
Practice level
Select your desired level from 0 to 50.
Game control
Clicking game control
51
KEY 1 give up the game (repeat level, lost life)
KEY 2 one step back, maximally three times
Snake
Control your snake by tilting and eat the yellow cups. Each swallow of a yellow cup causes your snake
to grow. The goal is to have the largest snake. But be careful! Don’t bite your own tail, don’t hit the
wall, don’t hit the fence and do not eat poison (skull).
Game control
Tilting direction control
KEY 1 give up the game
KEY 2 give up the game
Air transport When transporting the Freedom computer by plane, the changes in pressure can cause activation of
the device to occur. This can be due to an overly sensitive pressure sensor, which gauges pressure for
the purpose of determining depth. In order to prevent unwanted activation, switch the Freedom to
Flight mode (Main menu > Switch off > Flight mode)
WARNING! The Freedom must be activated manually before the next dive.
Maintenance
Rinse the Freedom in fresh water after each dive.
Storage Store the unit in dry condition. For long-term storage, keep it at room temperature with charged
batteries. Do not expose the unit to excessive sunlight. Do not leave it in a wet dive-gear box after a
diving trip, especially with salt water.
Disposal of the device Please dispose of the device in an appropriate way, treating it as electronic waste. Do
not dispose of it as common rubbish.