fortini f4 osd - furious fpvfuriousfpv.com/document/manual_furious_/user_manual_fortini_f4_o… ·...
TRANSCRIPT
Please contact us if you need further assistance: Tech support: [email protected] Sales support: [email protected] Website: http://furiousfpv.com/
FORTINI F4 OSD Flight Controller
USER MANUAL VERSION 1.1

1
Contents Contents .................................................................................................................................................. 1
Change Log .............................................................................................................................................. 2
v1.1 .......................................................................................................................................................... 2
Introduction ............................................................................................................................................ 3
Features .................................................................................................................................................. 3
Connections ............................................................................................................................................ 5
Connect with Receiver: ....................................................................................................................... 5
Using SPD15 Receiver: ............................................................................................................ 5
Using LR1000D Receiver: ........................................................................................................ 6
Using XSR FrSky Receiver: ....................................................................................................... 7
Using Spektrum Satellite Receiver: ......................................................................................... 7
Using TBS Crossfire Receiver: .................................................................................................. 8
Connect with Video Transmitter: ........................................................................................................ 9
Using Stealth Race VTx: ........................................................................................................... 9
Using Tramp HV VTx:............................................................................................................. 11
Using TBS Unify Pro VTx: ....................................................................................................... 13
Using FX FX799T: ................................................................................................................... 15
External Device: ................................................................................................................................ 17
Connect Runcam Split2 using Stealth Race VTx .................................................................... 17
Connect Runcam Split2 using Tramp HV VTx ........................................................................ 18
Connect Runcam Split2 using TBS Unify Pro VTx .................................................................. 19
Connect with GPS .................................................................................................................. 20
Connect with Lightning PDB:............................................................................................................. 21
Connect with ESC 4 in 1: ................................................................................................................... 22
Using Aikon SEFM 30A: ......................................................................................................... 22
Using Cicada 35x4 35A: ......................................................................................................... 23
Using T-Motor F 35A 4IN1-4S: .............................................................................................. 24
Using Hobbywing XRotor Micro 40A 4in1:............................................................................ 25
Basic configuration ................................................................................................................................ 26
Tips ........................................................................................................................................................ 29
Guideline configuration OSD with BetaFlight ................................................................................... 29
How to open camera setting by Transmitter .................................................................................... 30

2
How to open Betaflight OSD by Transmitter .................................................................................... 31
VTx configuration by Transmitter ..................................................................................................... 32
PIDs tunning on Betaflight OSD ........................................................................................................ 33
Change Log
v1.1 Add External device:
- Connect Runcam Split2 using Stealth Race VTx
- Connect Runcam Split2 using Tramp HV VTx
- Connect Runcam Split2 using TBS Unify Pro VTx
- Connect with GPS

3
Introduction Building upon the powerful Fortini F4, Furious FPV introduces the all new Fortini F4 OSD, introducing
new capability & functionality to simplify setup & redefine your next FPV experience. Hold on - it's
about to get really good.
Utilizing the cutting edge & feature packed Fortini F4 platform, we have introduced BetaFlight OSD,
with the full ability to alter every setting you need direct via your transmitter. No need for your PC -
just a few simple stick movements, and you're there - simple and straightforward, just the way it
should be.
From PID's, camera settings, VTx power and beyond, the Fortini F4 OSD builds upon the previous F4
with powerful and easy to use operating capability without the need of a PC. Need more? We added
a built in LC filter for even greater video image, allowing you to push the ragged edge with your next
FPV ride.
Designed to be nothing but the very best, the Fortini OSD utilizes high performance, low noise 32kHz
Invensense 20602 gyros, (5) UARTS, built in Input / Output Inrush Voltage Protection, and the
capability to allow S.PORT direct connection with the receiver without any aspect of receiver
modification. This massive feature dense packaging offers everything you could ever want from the
most sophisticated flight controller available today.
Feature rich and ultra-powerful, the Fortini is the full up package, breaking new ground in true FC
brilliance. Toss compromise out the window and open your FPV world to the most functional and
feature packed FC you have ever seen before.
Features
Built-in OSD
Built-in Camera OSD Control for FPV camera
Selectable 3.3V or 5V voltage for RX
Silicone damper for better anti-vibration
Fortini F4 OSD modifies camera settings by
transmitter
5x Serial UARTs for USB, SBUS, SPORT, TBS Receiver
or GPS, Telemetry VTX
Separate power supply for gyro with LDO low noise
and high accuracy
Built-in driver inverter for S-bus and Smart-Port connection directly to FC
Inrush voltage protection input and output by transient voltage suppressor
Invensense 20602 gyro for high speed 32khz, lowest noise floor and highest sensitivity
Weight: 5.5gr

4
Pinout
Dimensions
S

5
Connections *WARNING: Fortini F4 OSD can support up to 6S Lipo battery but make sure other devices also
support it.
Connect with Receiver:
Using SPD15 Receiver:
You can buy SPD15 Receiver right here: https://goo.gl/FTnrpR

6
Using LR1000D Receiver:
You can buy LR1000D Receiver right here: https://goo.gl/4Cr0Hl
* NOTE: If you use LR1000D Receiver please go to CLI and type the following commands:
set sbus_inversion = OFF
save

7
Using XSR FrSky Receiver:
*NOTE: If telemetry of XSR is not working with FORTINI F4 OSD, please update
firmware for XSR receiver
Download firmware here: https://goo.gl/t1LMT5
Using Spektrum Satellite Receiver:
8
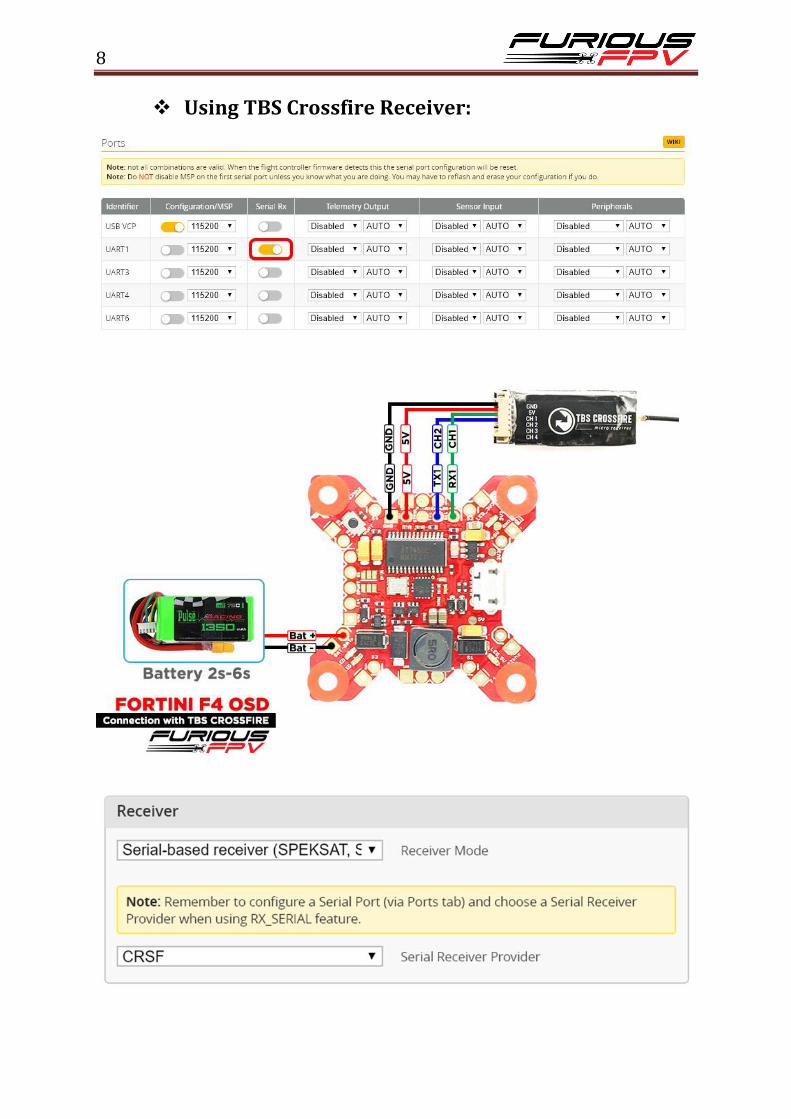
Using TBS Crossfire Receiver:

9
Connect with Video Transmitter:
Using Stealth Race VTx:
Using 5V from VTx to power Camera
*NOTE: Fortini F4 OSD can support up to 6S Lipo battery but make sure other devices also
support it.

10
Using Battery from VTx to power Camera
*NOTE: Fortini F4 OSD can support up to 6S Lipo battery but make sure other devices also
support it.

11
Using Tramp HV VTx:
Using 5V from VTx to power Camera
*NOTE: Fortini F4 OSD can support up to 6S Lipo battery but make sure other devices also
support it.

12
Using Battery from VTx to power Camera
*NOTE: Fortini F4 OSD can support up to 6S Lipo battery but make sure other devices also
support it.

13
Using TBS Unify Pro VTx:
Using 5V from VTx to power Camera
*NOTE: Fortini F4 OSD can support up to 6S Lipo battery but make sure other devices also
support it.

14
Using Battery from VTx to power Camera
*NOTE: Fortini F4 OSD can support up to 6S Lipo battery but make sure other devices also
support it.

15
Using FX FX799T:
Using 5V from VTx to power Camera
*NOTE: Fortini F4 OSD can support up to 6S Lipo battery but make sure other devices also
support it.

16
Using Battery from VTx to power Camera
*NOTE: Fortini F4 OSD can support up to 6S Lipo battery but make sure other devices also
support it.

17
External Device:
Connect Runcam Split2 using Stealth Race VTx

18
Connect Runcam Split2 using Tramp HV VTx

19
Connect Runcam Split2 using TBS Unify Pro VTx

20
Connect with GPS

21
Connect with Lightning PDB:
*NOTE: Fortini F4 OSD can support up to 6S Lipo battery but make sure other devices also
support it.

22
Connect with ESC 4 in 1:
Using Aikon SEFM 30A:
*NOTE: Fortini F4 OSD can support up to 6S Lipo battery but make sure other devices also
support it.

23
Using Cicada 35x4 35A:
*NOTE: Fortini F4 OSD can support up to 6S Lipo battery but make sure other devices also
support it.

24
Using T-Motor F 35A 4IN1-4S:
*NOTE: Fortini F4 OSD can support up to 6S Lipo battery but make sure other devices also
support it.

25
Using Hobbywing XRotor Micro 40A 4in1:
*NOTE: Fortini F4 OSD can support up to 6S Lipo battery but make sure other devices also
support it.

26
Basic configuration Please follow carefully these next steps, and always remove your propellers when you’re configuring
your quad
STEP 1: Connect Fortini F4 OSD with computer via USB cable and then open BetaFlight
STEP 2: Configure Ports.
(1) Configure Receiver:
With TBS Crossfire Receiver: Turn on Serial Rx of UART 1 to use Receiver Mode
With RX Serial:
- Turn on Serial Rx of UART 3 to use Receiver Mode
- Select SmartPort of UART 6 to use S.Port TX 6
(2) In Peripherals of UART 4:
Select IRC Tramp for Tramp HV VTx and Stealth Race VTx

27
Select TBS Smartaudio for TBS Unify Pro VTx
* NOTE: Please make sure that all the connections are correct.
STEP 3: Go to Configuration tab and choose ESC/Motor protocol in ESC/Motor Features
STEP 4: Select Serial- based receiver in Receiver Mode

28
If you are using SBus, iBus or a Spektrum Satellite, you will need to pick your Serial Receiver Provider.
Follow below table:
RX Type Serial Receiver Provider
DSM2 1024bit/22ms SPEKTRUM1024
DSM2 2048bit/11ms SPEKTRUM2048
DSMX 1024bit/22ms SPEKTRUM1024
DSMX 2048bit/11ms SPEKTRUM2048
FrSky RX SBUS
Futaba RX SBUS
FlySky RX IBUS
Turnigy RX IBUS
Click “Save and Reboot”.
Finally, go to the Receiver tab. Pull down the drop down that says “Channel Map” and select the
suitable option with your RX.
Once again, click “Save”.

29
Tips
Guideline configuration OSD with BetaFlight
STEP 1: Connect Fortini F4 OSD with PC via USB cable.
STEP 2: Open Betaflight configurator on Google Chrome.
STEP 3: Click Connect on Betaflight interface then go to OSD tab to configure.
STEP 4: After configuring OSD please click Save to save your configuration.
30
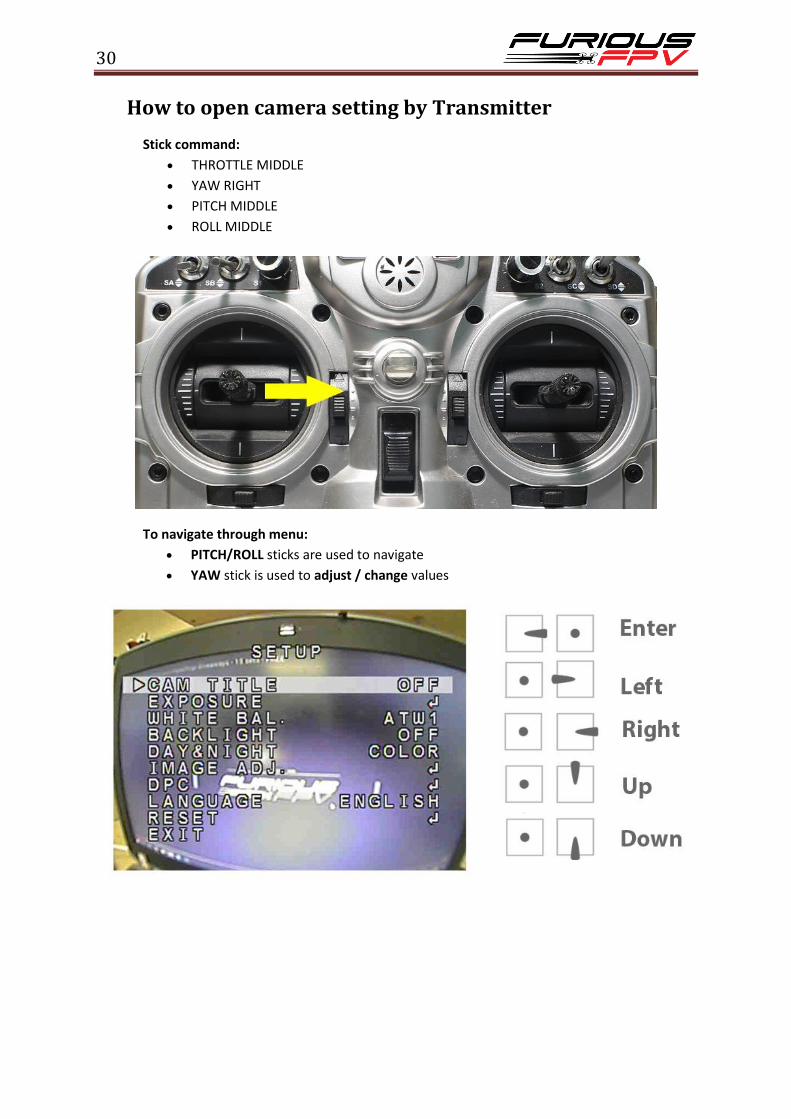
How to open camera setting by Transmitter
Stick command:
THROTTLE MIDDLE
YAW RIGHT
PITCH MIDDLE
ROLL MIDDLE
To navigate through menu:
PITCH/ROLL sticks are used to navigate
YAW stick is used to adjust / change values

31
How to open Betaflight OSD by Transmitter
Stick command:
THROTTLE MIDDLE + YAW LEFT + PITCH FULL + ROLL MIDDLE
To navigate through menu:
PITCH/ROLL sticks are used to navigate
YAW stick is used to adjust / change values

32
VTx configuration by Transmitter
From Betaflight OSD menu use stick go to: Main menu > Features
Select SA if using TBS Unify Pro VTx
Select TR if using Stealth Race VTx or Tramp HV VTx
STEALTH RACE VTX TRAMP HV VTX

33
PIDs tunning on Betaflight OSD
From Betaflight OSD menu use stick go to: Main menu > Profile > PID
Thanks for using our product