fiesta mk5
DESCRIPTION
Ford Fiesta ManualTRANSCRIPT

Feel the differenceFordFiestaOwner's handbook

The information contained in this publication was correct at the time of going to print. In the interest ofdevelopment the right is reserved to change specifications, design or equipment at any time withoutnotice and without incurring any obligations. This publication, or part thereof, may not be reproducednor translated without our approval. Errors and omissions excepted.
© Ford Motor Company 2008
All rights reserved.
Part number: 9V2J-19A321-ADA (CG3545en) 05/2008 20080618134945

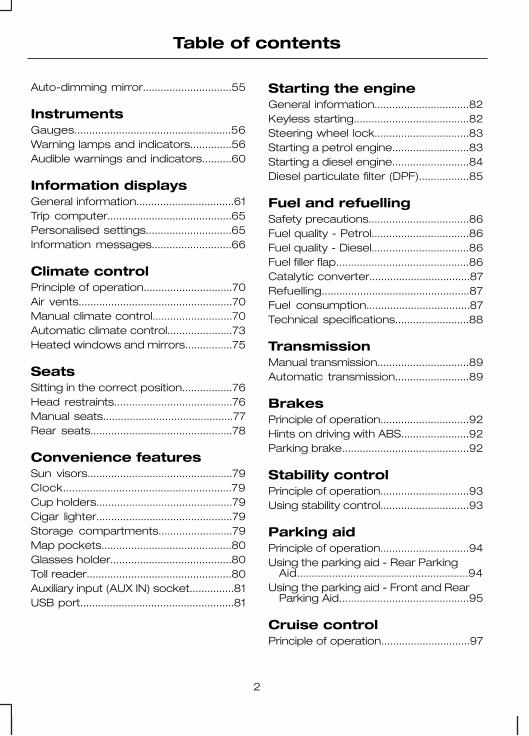
IntroductionAbout this handbook................................5Symbols glossary......................................5Parts and accessories..............................5
Quick startQuick start..................................................8
Child safetyChild seats................................................15Child seat positioning..............................16Booster cushions.....................................18ISOFIX anchor points...............................19Child safety locks.....................................21
Occupant protectionPrinciple of operation..............................22Fastening the seat belts........................24Seat belt height adjustment..................24Seat belt reminder..................................25Using seat belts during pregnancy......25Disabling the passenger airbag............25
Keys and remotecontrols
General information on radiofrequencies...........................................27
Using the key...........................................27Programming the remote control........27Changing the remote control
battery...................................................27
LocksLocking and unlocking...........................29Keyless entry............................................31
Engine immobiliserPrinciple of operation..............................34Coded keys.............................................34Arming the engine immobiliser.............34
Disarming the engine immobiliser........34
AlarmPrinciple of operation..............................35Arming the alarm.....................................35Disarming the alarm................................35
Steering wheelAdjusting the steering wheel.................36Audio control...........................................36Voice control............................................37
Wipers and washersWindscreen wipers.................................38Windscreen washers.............................39Rear window wiper and washers.........40Adjusting the windscreen washer
jets..........................................................41Checking the wiper blades....................41Changing the wiper blades....................41
LightingLighting control........................................43Autolamps................................................44Front fog lamps.......................................44Rear fog lamps........................................44Headlamp levelling..................................45Hazard warning flashers........................46Direction indicators.................................46Interior lamps...........................................46Removing a headlamp...........................47Changing a bulb......................................47Bulb specification chart...........................51
Windows and mirrorsElectric windows.....................................53Exterior mirrors........................................54Electric exterior mirrors..........................55Interior mirror...........................................55
1
Table of contents
Auto-dimming mirror..............................55
InstrumentsGauges.....................................................56Warning lamps and indicators..............56Audible warnings and indicators..........60
Information displaysGeneral information.................................61Trip computer..........................................65Personalised settings.............................65Information messages...........................66
Climate controlPrinciple of operation..............................70Air vents....................................................70Manual climate control...........................70Automatic climate control......................73Heated windows and mirrors................75
SeatsSitting in the correct position.................76Head restraints........................................76Manual seats............................................77Rear seats................................................78
Convenience featuresSun visors.................................................79Clock.........................................................79Cup holders..............................................79Cigar lighter..............................................79Storage compartments.........................79Map pockets............................................80Glasses holder.........................................80Toll reader.................................................80Auxiliary input (AUX IN) socket...............81USB port....................................................81
Starting the engineGeneral information................................82Keyless starting.......................................82Steering wheel lock................................83Starting a petrol engine..........................83Starting a diesel engine..........................84Diesel particulate filter (DPF).................85
Fuel and refuellingSafety precautions..................................86Fuel quality - Petrol.................................86Fuel quality - Diesel.................................86Fuel filler flap.............................................86Catalytic converter..................................87Refuelling..................................................87Fuel consumption...................................87Technical specifications.........................88
TransmissionManual transmission...............................89Automatic transmission.........................89
BrakesPrinciple of operation..............................92Hints on driving with ABS.......................92Parking brake...........................................92
Stability controlPrinciple of operation..............................93Using stability control..............................93
Parking aidPrinciple of operation..............................94Using the parking aid - Rear Parking
Aid..........................................................94Using the parking aid - Front and Rear
Parking Aid............................................95
Cruise controlPrinciple of operation..............................97
2
Table of contents
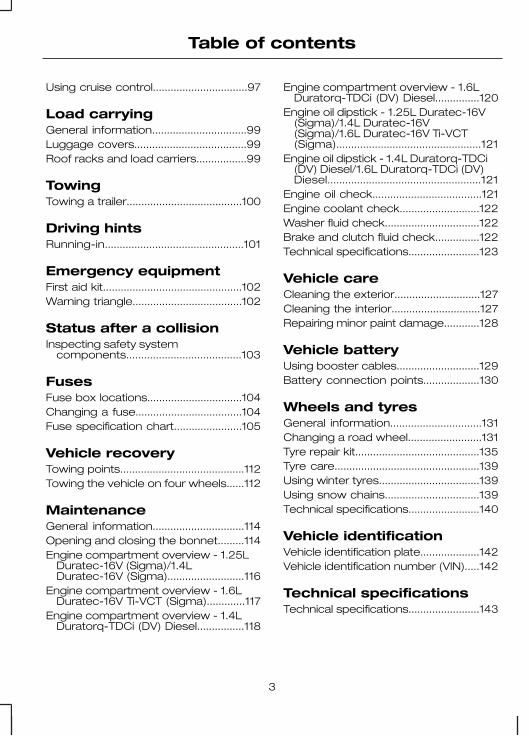
Using cruise control................................97
Load carryingGeneral information................................99Luggage covers......................................99Roof racks and load carriers.................99
TowingTowing a trailer.......................................100
Driving hintsRunning-in...............................................101
Emergency equipmentFirst aid kit...............................................102Warning triangle.....................................102
Status after a collisionInspecting safety system
components.......................................103
FusesFuse box locations................................104Changing a fuse....................................104Fuse specification chart.......................105
Vehicle recoveryTowing points..........................................112Towing the vehicle on four wheels......112
MaintenanceGeneral information...............................114Opening and closing the bonnet.........114Engine compartment overview - 1.25L
Duratec-16V (Sigma)/1.4LDuratec-16V (Sigma)..........................116
Engine compartment overview - 1.6LDuratec-16V Ti-VCT (Sigma).............117
Engine compartment overview - 1.4LDuratorq-TDCi (DV) Diesel................118
Engine compartment overview - 1.6LDuratorq-TDCi (DV) Diesel...............120
Engine oil dipstick - 1.25L Duratec-16V(Sigma)/1.4L Duratec-16V(Sigma)/1.6L Duratec-16V Ti-VCT(Sigma).................................................121
Engine oil dipstick - 1.4L Duratorq-TDCi(DV) Diesel/1.6L Duratorq-TDCi (DV)Diesel....................................................121
Engine oil check.....................................121Engine coolant check...........................122Washer fluid check................................122Brake and clutch fluid check...............122Technical specifications........................123
Vehicle careCleaning the exterior.............................127Cleaning the interior..............................127Repairing minor paint damage............128
Vehicle batteryUsing booster cables............................129Battery connection points...................130
Wheels and tyresGeneral information...............................131Changing a road wheel.........................131Tyre repair kit..........................................135Tyre care.................................................139Using winter tyres..................................139Using snow chains................................139Technical specifications........................140
Vehicle identificationVehicle identification plate....................142Vehicle identification number (VIN).....142
Technical specificationsTechnical specifications........................143
3
Table of contents
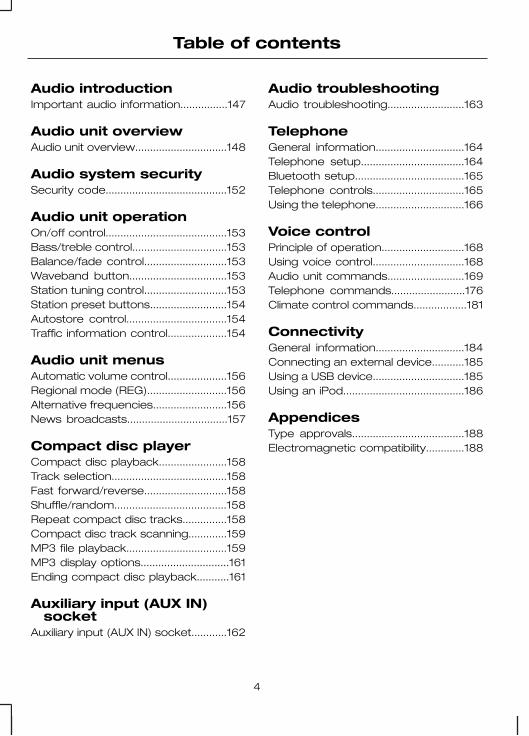
Audio introductionImportant audio information................147
Audio unit overviewAudio unit overview...............................148
Audio system securitySecurity code.........................................152
Audio unit operationOn/off control.........................................153Bass/treble control................................153Balance/fade control............................153Waveband button.................................153Station tuning control............................153Station preset buttons..........................154Autostore control..................................154Traffic information control....................154
Audio unit menusAutomatic volume control....................156Regional mode (REG)...........................156Alternative frequencies.........................156News broadcasts..................................157
Compact disc playerCompact disc playback.......................158Track selection.......................................158Fast forward/reverse............................158Shuffle/random......................................158Repeat compact disc tracks...............158Compact disc track scanning.............159MP3 file playback..................................159MP3 display options..............................161Ending compact disc playback...........161
Auxiliary input (AUX IN)socket
Auxiliary input (AUX IN) socket............162
Audio troubleshootingAudio troubleshooting..........................163
TelephoneGeneral information..............................164Telephone setup...................................164Bluetooth setup.....................................165Telephone controls...............................165Using the telephone..............................166
Voice controlPrinciple of operation............................168Using voice control...............................168Audio unit commands..........................169Telephone commands.........................176Climate control commands..................181
ConnectivityGeneral information..............................184Connecting an external device...........185Using a USB device...............................185Using an iPod.........................................186
AppendicesType approvals......................................188Electromagnetic compatibility.............188
4
Table of contents
ABOUT THIS HANDBOOK
Thank you for choosing Ford. Werecommend that you take some time toget to know your vehicle by reading thishandbook. The more that you know aboutit, the greater the safety and pleasure youwill get from driving it.
Note: This handbook describes productfeatures and options available throughoutthe range, sometimes even before theyare generally available. It may describeoptions not fitted to your vehicle.
Note: Always use and operate yourvehicle in line with all applicable laws andregulations.
Note: Pass on this handbook whenselling your vehicle. It is an integral part ofthe vehicle.
SYMBOLS GLOSSARY
Symbols in this handbook
WARNING
You risk death or serious injury toyourself and others if you do notfollow the instructions highlighted
by the warning symbol.
CAUTION
You risk damaging your vehicle if youdo not follow the instructionshighlighted by the caution symbol.
Symbols on your vehicle
When you see these symbols, read andfollow the relevant instructions in thishandbook before touching or attemptingadjustment of any kind.
PARTS AND ACCESSORIES
Now you can be sure that yourFord parts are Ford parts
Your Ford has been built to the higheststandards using high quality Ford OriginalParts. As a result, you can enjoy driving itfor many years.
Should the unexpected occur and a majorpart needs replacing, we recommend thatyou accept nothing less than Ford OriginalParts.
The use of Ford Original Parts ensuresthat your vehicle is repaired to itspre-accident condition and maintains itsmaximum residual value.
Ford Original Parts match Ford's stringentsafety requirements and high standardsof fit, finish and reliability. Quite simply, theyrepresent the best overall repair value,including parts and labour costs.
Now it is easier to tell if you have reallybeen given Ford Original Parts. The Fordlogo is clearly visible on the following partsif they are Ford Original Parts. If yourvehicle has to be repaired, look for theclearly visible Ford branding and makesure that only Ford Original Parts havebeen used.
Look for the Ford logo on thefollowing parts
Sheet metal
• Bonnet
• Wing
• Doors
• Luggage compartment lid
5
Introduction
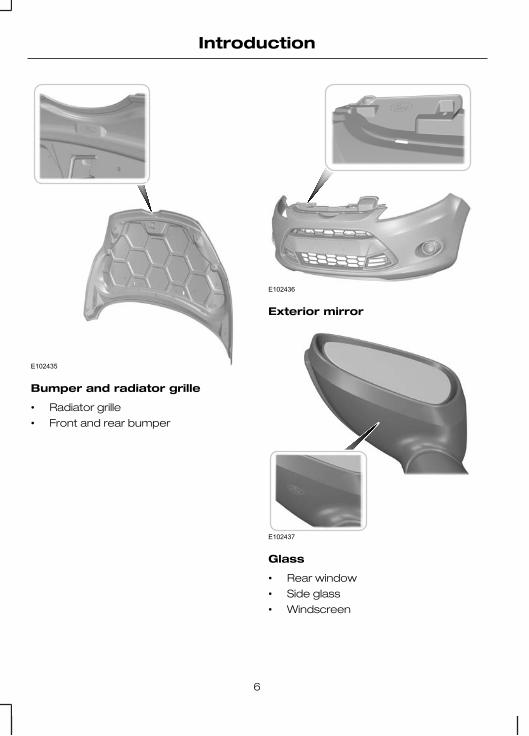
E102435
Bumper and radiator grille
• Radiator grille
• Front and rear bumper
E102436
Exterior mirror
E102437
Glass
• Rear window
• Side glass
• Windscreen
6
Introduction
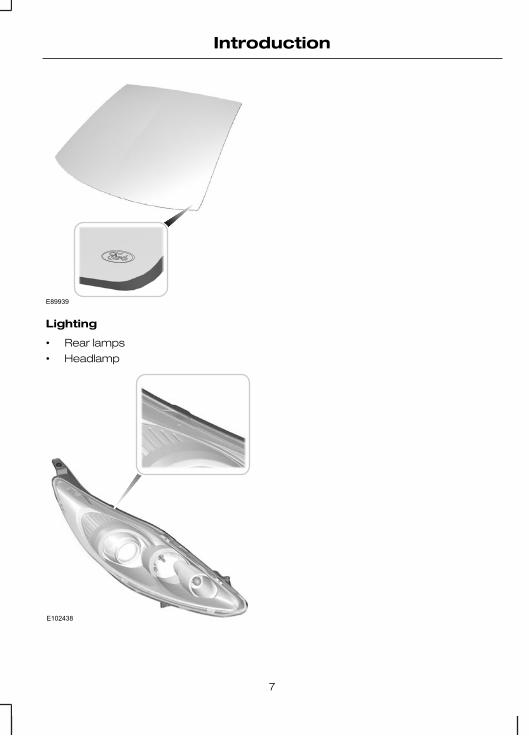
E89939
Lighting
• Rear lamps
• Headlamp
E102438
7
Introduction

QUICK START
Instrument panel overview
Left-hand drive
E102562
HGFEDCBA
S R Q P O N M L JK I
8
Quick start
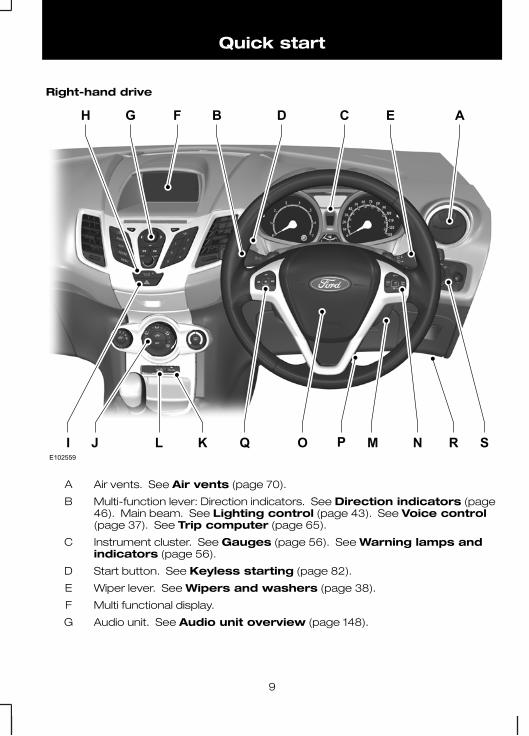
Right-hand drive
E102559
AECDBFGH
I J L K Q O P NM SR
Air vents. See Air vents (page 70).A
Multi-function lever: Direction indicators. See Direction indicators (page46). Main beam. See Lighting control (page 43). See Voice control(page 37). See Trip computer (page 65).
B
Instrument cluster. See Gauges (page 56). See Warning lamps andindicators (page 56).
C
Start button. See Keyless starting (page 82).D
Wiper lever. See Wipers and washers (page 38).E
Multi functional display.F
Audio unit. See Audio unit overview (page 148).G
9
Quick start
Door lock button. See Locking and unlocking (page 29).H
Hazard warning flasher switch. See Hazard warning flashers (page 46).I
Climate controls. See Climate control (page 70).J
Parking aid warning lamp. See Using the parking aid (page 95).K
Passenger airbag deactivation warning lamp. See Disabling thepassenger airbag (page 25).
L
Ignition switch.M
Cruise control. See Using cruise control (page 97).N
Horn.O
Steering wheel adjustment. See Adjusting the steering wheel (page36).
P
Audio control. See Audio control (page 36).Q
Bonnet release lever. See Opening and closing the bonnet (page 114).R
Lighting control. See Lighting control (page 43). Front fog lamps. SeeFront fog lamps (page 44). Rear fog lamp. See Rear fog lamps (page44).
S
Locking and unlocking
Unlocking the vehicle
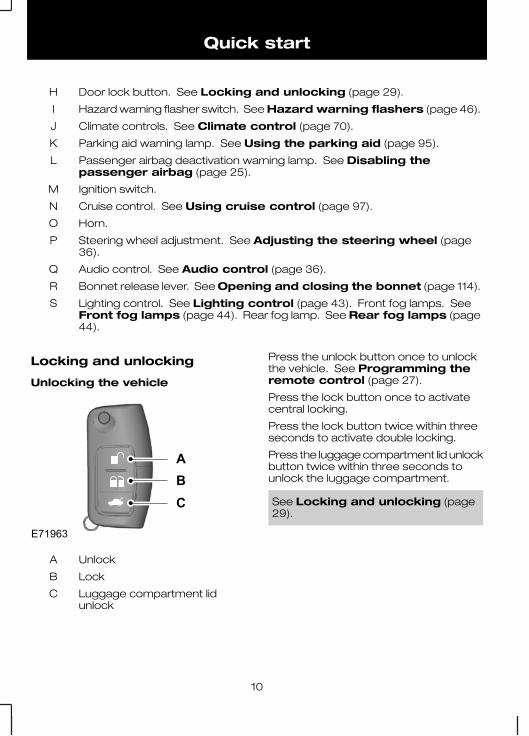
E71963
ABC
UnlockA
LockB
Luggage compartment lidunlock
C
Press the unlock button once to unlockthe vehicle. See Programming theremote control (page 27).
Press the lock button once to activatecentral locking.
Press the lock button twice within threeseconds to activate double locking.
Press the luggage compartment lid unlockbutton twice within three seconds tounlock the luggage compartment.
See Locking and unlocking (page29).
10
Quick start
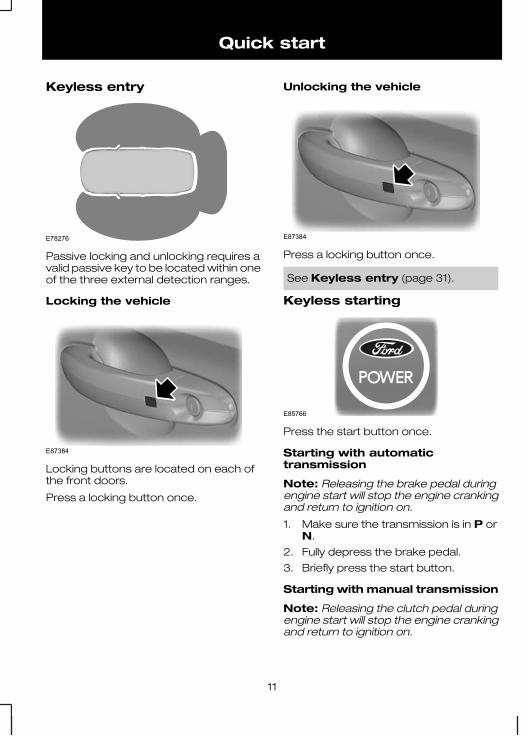
Keyless entry
E78276
Passive locking and unlocking requires avalid passive key to be located within oneof the three external detection ranges.
Locking the vehicle
E87384
Locking buttons are located on each ofthe front doors.
Press a locking button once.
Unlocking the vehicle
E87384
Press a locking button once.
See Keyless entry (page 31).
Keyless starting
E85766
Press the start button once.
Starting with automatictransmission
Note: Releasing the brake pedal duringengine start will stop the engine crankingand return to ignition on.
1. Make sure the transmission is in P orN.
2. Fully depress the brake pedal.
3. Briefly press the start button.
Starting with manual transmission
Note: Releasing the clutch pedal duringengine start will stop the engine crankingand return to ignition on.
11
Quick start

1. Fully depress the clutch pedal.
2. Briefly press the start button.
See Keyless starting (page 82).
Soot overload warning lamp
E95449
It will illuminate when aregeneration is due. SeeDiesel particulate filter
(DPF) (page 85).
CAUTIONSIf it illuminates with the malfunctionindicator lamp, it indicates anoverload of soot. Have this checked
by a properly trained technician as soonas possible.
If it illuminates with the powertrainwarning lamp, your diesel particulatefilter may need replacing. Have this
checked by a properly trained technicianimmediately.
Adjusting the steering wheel
WARNING
Never adjust the steering wheelwhen the vehicle is moving.
1
2
2
E95178
WARNING
Make sure that you fully engage thelocking lever when returning it to itsoriginal position.
3E95179
See Adjusting the steering wheel(page 36).
Manual climate control
Defrosting and demisting thewindscreen
E102397
12
Quick start

Heating the interior quickly
E102393
Cooling the interior quickly
E102396
See Manual climate control (page70).
Automatic climate control
Windscreen defrosting anddemisting
E91392
Press the windscreen defrosting anddemisting button.
See Automatic climate control(page 73).
Autolamps
E70719
The headlamps will come on and go offautomatically depending on the ambientlight.
See Lighting control (page 43).
Direction indicators
E102016
If the lever is tapped up or down, thedirection indicators will flash three times.
See Direction indicators (page 46).
13
Quick start
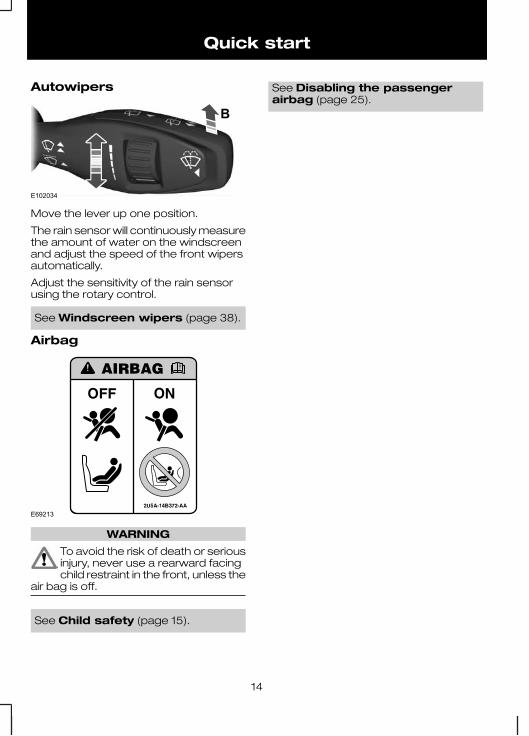
Autowipers
E102034
B
Move the lever up one position.
The rain sensor will continuously measurethe amount of water on the windscreenand adjust the speed of the front wipersautomatically.
Adjust the sensitivity of the rain sensorusing the rotary control.
See Windscreen wipers (page 38).
Airbag
E69213
WARNING
To avoid the risk of death or seriousinjury, never use a rearward facingchild restraint in the front, unless the
air bag is off.
See Child safety (page 15).
See Disabling the passengerairbag (page 25).
14
Quick start
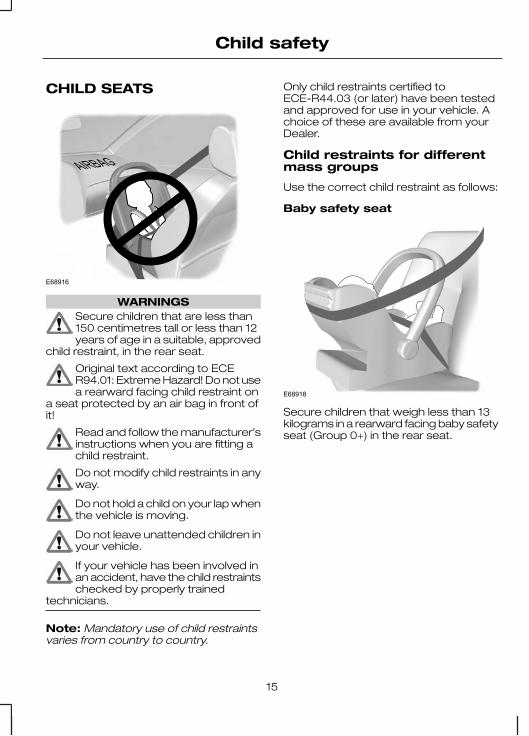
CHILD SEATS
E68916
WARNINGSSecure children that are less than150 centimetres tall or less than 12years of age in a suitable, approved
child restraint, in the rear seat.
Original text according to ECER94.01: Extreme Hazard! Do not usea rearward facing child restraint on
a seat protected by an air bag in front ofit!
Read and follow the manufacturer’sinstructions when you are fitting achild restraint.
Do not modify child restraints in anyway.
Do not hold a child on your lap whenthe vehicle is moving.
Do not leave unattended children inyour vehicle.
If your vehicle has been involved inan accident, have the child restraintschecked by properly trained
technicians.
Note: Mandatory use of child restraintsvaries from country to country.
Only child restraints certified toECE-R44.03 (or later) have been testedand approved for use in your vehicle. Achoice of these are available from yourDealer.
Child restraints for differentmass groups
Use the correct child restraint as follows:
Baby safety seat
E68918
Secure children that weigh less than 13kilograms in a rearward facing baby safetyseat (Group 0+) in the rear seat.
15
Child safety
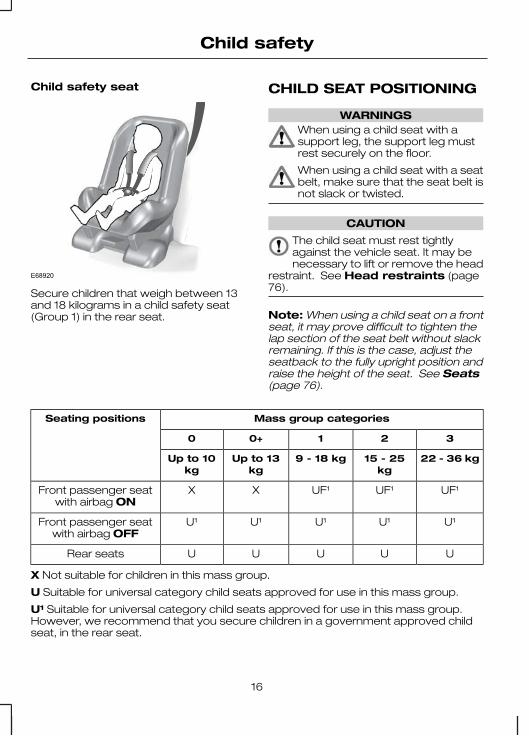
Child safety seat
E68920
Secure children that weigh between 13and 18 kilograms in a child safety seat(Group 1) in the rear seat.
CHILD SEAT POSITIONING
WARNINGSWhen using a child seat with asupport leg, the support leg mustrest securely on the floor.
When using a child seat with a seatbelt, make sure that the seat belt isnot slack or twisted.
CAUTION
The child seat must rest tightlyagainst the vehicle seat. It may benecessary to lift or remove the head
restraint. See Head restraints (page76).
Note: When using a child seat on a frontseat, it may prove difficult to tighten thelap section of the seat belt without slackremaining. If this is the case, adjust theseatback to the fully upright position andraise the height of the seat. See Seats(page 76).
Mass group categoriesSeating positions
3210+0
22 - 36 kg15 - 25kg
9 - 18 kgUp to 13kg
Up to 10kg
UF¹UF¹UF¹XXFront passenger seatwith airbag ON
U¹U¹U¹U¹U¹Front passenger seatwith airbag OFF
UUUUURear seats
X Not suitable for children in this mass group.
U Suitable for universal category child seats approved for use in this mass group.
U¹ Suitable for universal category child seats approved for use in this mass group.However, we recommend that you secure children in a government approved childseat, in the rear seat.
16
Child safety
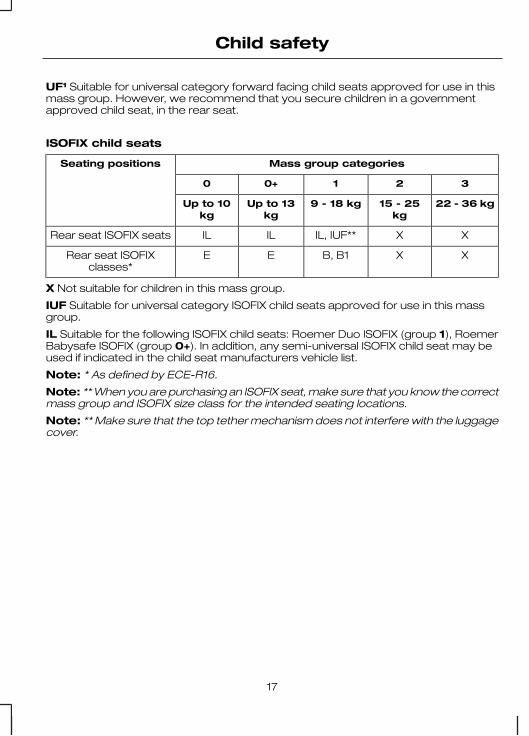
UF¹ Suitable for universal category forward facing child seats approved for use in thismass group. However, we recommend that you secure children in a governmentapproved child seat, in the rear seat.
ISOFIX child seats
Mass group categoriesSeating positions
3210+0
22 - 36 kg15 - 25kg
9 - 18 kgUp to 13kg
Up to 10kg
XXIL, IUF**ILILRear seat ISOFIX seats
XXB, B1EERear seat ISOFIXclasses*
X Not suitable for children in this mass group.
IUF Suitable for universal category ISOFIX child seats approved for use in this massgroup.
IL Suitable for the following ISOFIX child seats: Roemer Duo ISOFIX (group 1), RoemerBabysafe ISOFIX (group 0+). In addition, any semi-universal ISOFIX child seat may beused if indicated in the child seat manufacturers vehicle list.
Note: * As defined by ECE-R16.
Note: ** When you are purchasing an ISOFIX seat, make sure that you know the correctmass group and ISOFIX size class for the intended seating locations.
Note: ** Make sure that the top tether mechanism does not interfere with the luggagecover.
17
Child safety
BOOSTER CUSHIONS
WARNINGSDo not install a booster seat or abooster cushion with only the lapstrap of the seat belt.
Do not install a booster seat or abooster cushion with a seat belt thatis slack or twisted.
Do not put the seat belt under yourchild’s arm or behind its back.
Do not use pillows, books or towelsto boost your child’s height.
Make sure that your children sit inan upright position.
Secure children that weigh morethan 15 kilograms but are less than150 centimetres tall in a booster
seat or a booster cushion.
CAUTION
When using a child seat on a rearseat, make sure that the child seatrests tightly against the vehicle seat.
It may be necessary to lift or remove thehead restraint. See Head restraints(page 76).
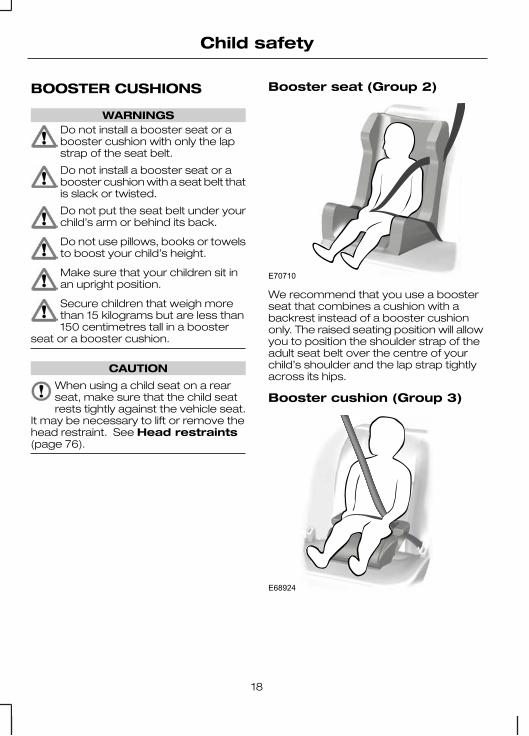
Booster seat (Group 2)
E70710
We recommend that you use a boosterseat that combines a cushion with abackrest instead of a booster cushiononly. The raised seating position will allowyou to position the shoulder strap of theadult seat belt over the centre of yourchild’s shoulder and the lap strap tightlyacross its hips.
Booster cushion (Group 3)
E68924
18
Child safety
ISOFIX ANCHOR POINTS
WARNING
Use an anti-rotation device whenusing the ISOFIX system. Werecommend the use of a top tether
or support leg.
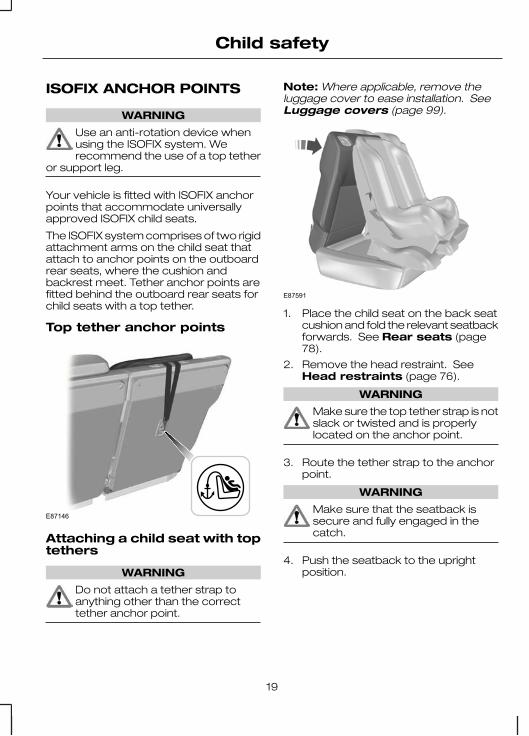
Your vehicle is fitted with ISOFIX anchorpoints that accommodate universallyapproved ISOFIX child seats.
The ISOFIX system comprises of two rigidattachment arms on the child seat thatattach to anchor points on the outboardrear seats, where the cushion andbackrest meet. Tether anchor points arefitted behind the outboard rear seats forchild seats with a top tether.
Top tether anchor points
E87146
Attaching a child seat with toptethers
WARNING
Do not attach a tether strap toanything other than the correcttether anchor point.
Note: Where applicable, remove theluggage cover to ease installation. SeeLuggage covers (page 99).
E87591
1. Place the child seat on the back seatcushion and fold the relevant seatbackforwards. See Rear seats (page78).
2. Remove the head restraint. SeeHead restraints (page 76).
WARNING
Make sure the top tether strap is notslack or twisted and is properlylocated on the anchor point.
3. Route the tether strap to the anchorpoint.
WARNING
Make sure that the seatback issecure and fully engaged in thecatch.
4. Push the seatback to the uprightposition.
19
Child safety
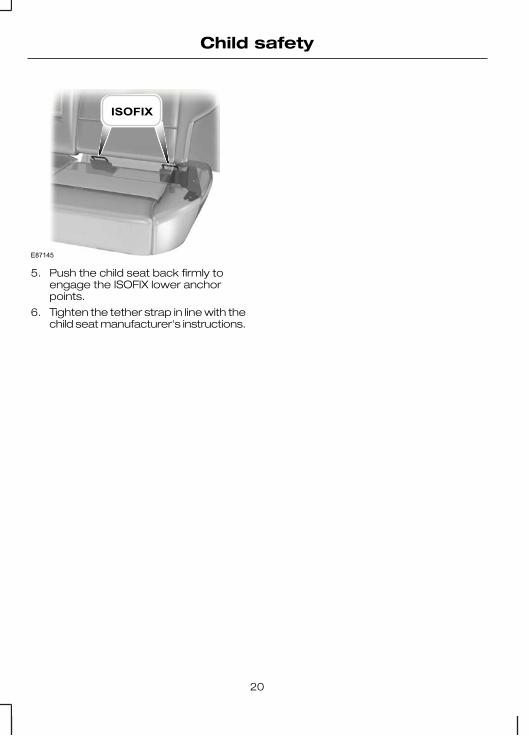
E87145
5. Push the child seat back firmly toengage the ISOFIX lower anchorpoints.
6. Tighten the tether strap in line with thechild seat manufacturer's instructions.
20
Child safety
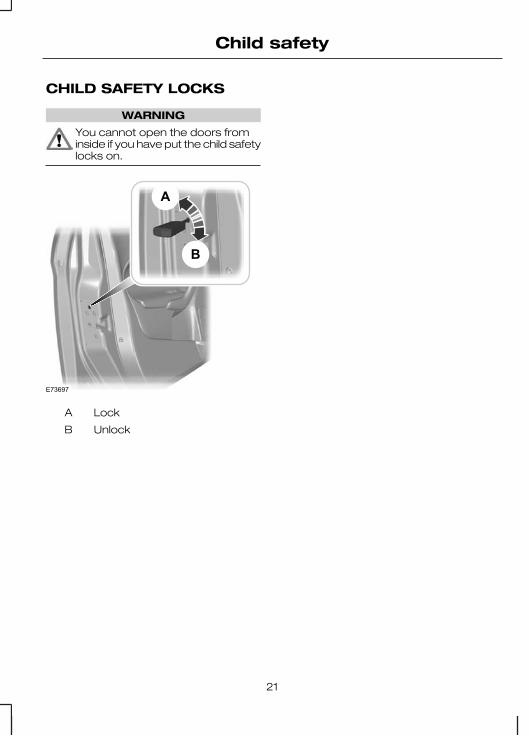
CHILD SAFETY LOCKS
WARNING
You cannot open the doors frominside if you have put the child safetylocks on.
E73697
A
B
LockA
UnlockB
21
Child safety
PRINCIPLE OF OPERATION
Airbags
WARNINGSDo not modify the front of yourvehicle in any way. This couldadversely affect deployment of the
airbags.
Original text according to ECER94.01: Extreme Hazard! Do not usea rearward facing child restraint on
a seat protected by an airbag in front ofit!
Wear a seat belt and keep sufficientdistance between yourself and thesteering wheel. Only when you use
the seat belt properly, can it hold you in aposition that allows the airbag to achieveits optimum effect. See Sitting in thecorrect position (page 76).
Have repairs to the steering wheel,steering column, seats, airbags andseat belts carried out by a properly
trained technician.
Keep the areas in front of theairbags free from obstruction. Donot affix anything to or over the
airbag covers.
Do not poke sharp objects intoareas where airbags are fitted. Thiscould damage and adversely affect
deployment of the airbags.
Use seat covers designed for seatswith side airbags. Have these fittedby a properly trained technician.
Note: You will hear a loud bang and seea cloud of harmless powdery residue if anairbag deploys. This is normal.
Note: Only wipe airbag covers with adamp cloth.
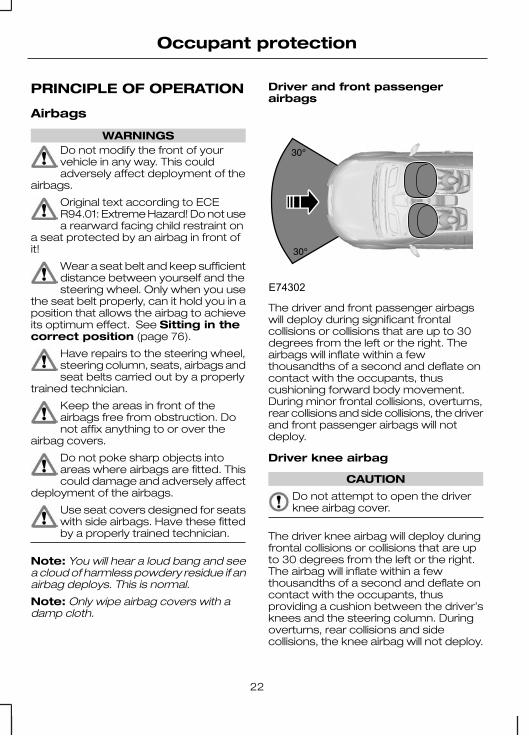
Driver and front passengerairbags
E74302
The driver and front passenger airbagswill deploy during significant frontalcollisions or collisions that are up to 30degrees from the left or the right. Theairbags will inflate within a fewthousandths of a second and deflate oncontact with the occupants, thuscushioning forward body movement.During minor frontal collisions, overturns,rear collisions and side collisions, the driverand front passenger airbags will notdeploy.
Driver knee airbag
CAUTION
Do not attempt to open the driverknee airbag cover.
The driver knee airbag will deploy duringfrontal collisions or collisions that are upto 30 degrees from the left or the right.The airbag will inflate within a fewthousandths of a second and deflate oncontact with the occupants, thusproviding a cushion between the driver’sknees and the steering column. Duringoverturns, rear collisions and sidecollisions, the knee airbag will not deploy.
22
Occupant protection
For item location: See Quick start(page 8).
Note: The knee airbag has a lowerdeployment threshold than the frontairbags. During a minor collision, it ispossible that only the knee airbagdeploys.
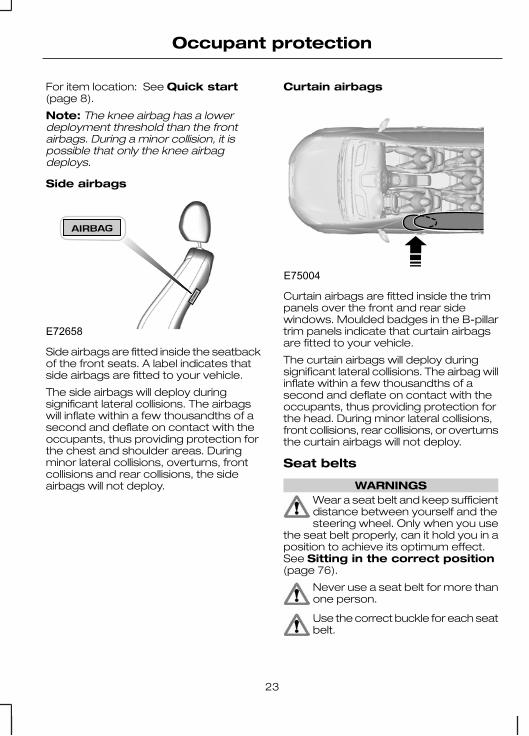
Side airbags
E72658
Side airbags are fitted inside the seatbackof the front seats. A label indicates thatside airbags are fitted to your vehicle.
The side airbags will deploy duringsignificant lateral collisions. The airbagswill inflate within a few thousandths of asecond and deflate on contact with theoccupants, thus providing protection forthe chest and shoulder areas. Duringminor lateral collisions, overturns, frontcollisions and rear collisions, the sideairbags will not deploy.
Curtain airbags
E75004
Curtain airbags are fitted inside the trimpanels over the front and rear sidewindows. Moulded badges in the B-pillartrim panels indicate that curtain airbagsare fitted to your vehicle.
The curtain airbags will deploy duringsignificant lateral collisions. The airbag willinflate within a few thousandths of asecond and deflate on contact with theoccupants, thus providing protection forthe head. During minor lateral collisions,front collisions, rear collisions, or overturnsthe curtain airbags will not deploy.
Seat belts
WARNINGSWear a seat belt and keep sufficientdistance between yourself and thesteering wheel. Only when you use
the seat belt properly, can it hold you in aposition to achieve its optimum effect.See Sitting in the correct position(page 76).
Never use a seat belt for more thanone person.
Use the correct buckle for each seatbelt.
23
Occupant protection
WARNINGSDo not use a seat belt that is slackor twisted.
Do not wear thick clothing. The seatbelt must fit tightly around your bodyto achieve its optimum effect.
Position the shoulder strap of theseat belt over the centre of yourshoulder and position the lap strap
tightly across your hips.
The driver and front passenger seat beltretractors are fitted with a seat beltpretensioner. Seat belt pretensionershave a lower deployment threshold thanthe airbags. During minor collisions, it ispossible that only the seat beltpretensioners will deploy.
FASTENING THE SEATBELTS
WARNING
Insert the tongue into the buckleuntil you hear a distinct click. Youhave not fastened the seat belt
properly if you do not hear a click.
E74124
E85817
Pull the belt out steadily. It may lock if youpull it sharply or if the vehicle is on a slope.
Press the red button on the buckle torelease the belt. Let it retract completelyand smoothly.
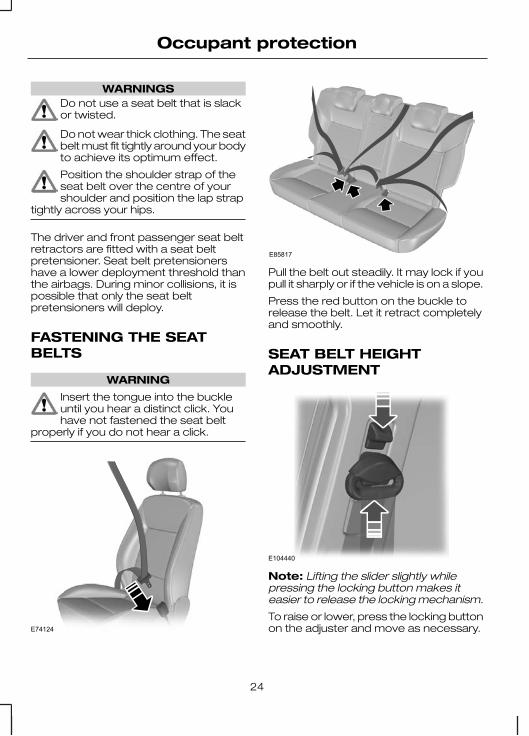
SEAT BELT HEIGHTADJUSTMENT
E104440
Note: Lifting the slider slightly whilepressing the locking button makes iteasier to release the locking mechanism.
To raise or lower, press the locking buttonon the adjuster and move as necessary.
24
Occupant protection
SEAT BELT REMINDER
WARNING
Do not sit on top of a fastened seatbelt to prevent the seat beltreminder from coming on. The
occupant protection system will onlyprovide optimum protection when youuse the seat belt properly.
The seat belt reminder warninglamp illuminates and an audiblewarning will sound if you or your
front seat passenger have not fastenedyour seat belts and the vehicle exceeds25 km/h (16 mph). It will also illuminate ifyour seat belts are unfastened when thevehicle is moving. The audible warning willgo off after five minutes but the seat beltreminder warning lamp will remain on untilyou fasten your seat belts.
Deactivating the seat beltreminder
See your dealer.
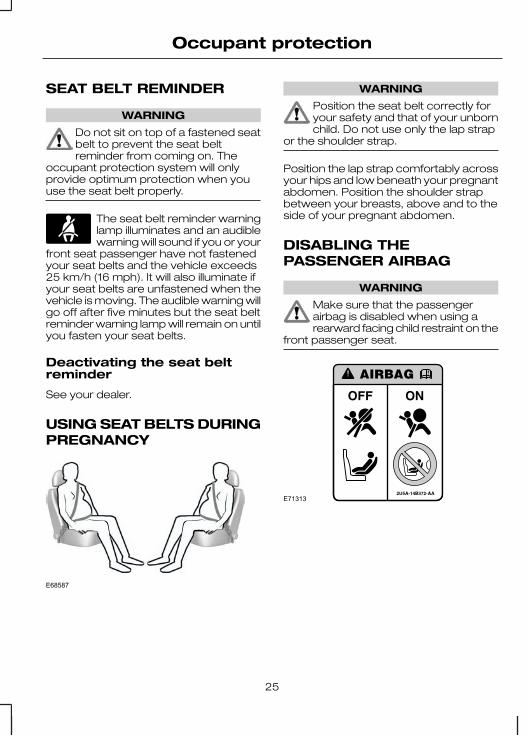
USING SEAT BELTS DURINGPREGNANCY
E68587
WARNING
Position the seat belt correctly foryour safety and that of your unbornchild. Do not use only the lap strap
or the shoulder strap.
Position the lap strap comfortably acrossyour hips and low beneath your pregnantabdomen. Position the shoulder strapbetween your breasts, above and to theside of your pregnant abdomen.
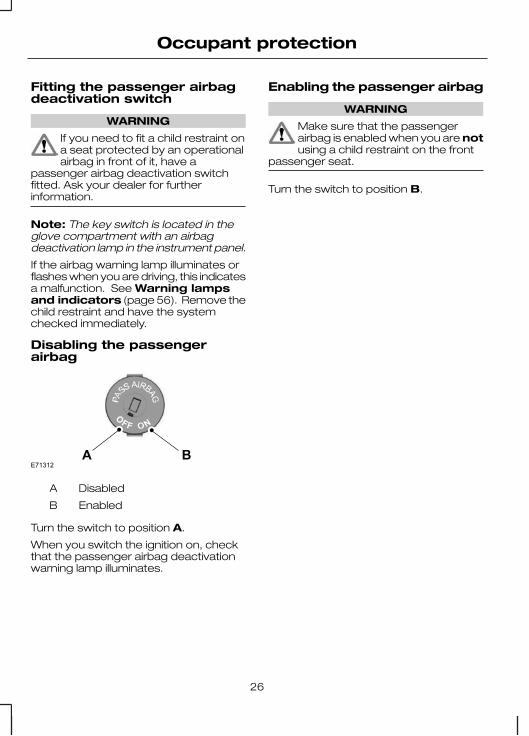
DISABLING THEPASSENGER AIRBAG
WARNING
Make sure that the passengerairbag is disabled when using arearward facing child restraint on the
front passenger seat.
E71313
25
Occupant protection
Fitting the passenger airbagdeactivation switch
WARNING
If you need to fit a child restraint ona seat protected by an operationalairbag in front of it, have a
passenger airbag deactivation switchfitted. Ask your dealer for furtherinformation.
Note: The key switch is located in theglove compartment with an airbagdeactivation lamp in the instrument panel.
If the airbag warning lamp illuminates orflashes when you are driving, this indicatesa malfunction. See Warning lampsand indicators (page 56). Remove thechild restraint and have the systemchecked immediately.
Disabling the passengerairbag
A BE71312
DisabledA
EnabledB
Turn the switch to position A.
When you switch the ignition on, checkthat the passenger airbag deactivationwarning lamp illuminates.
Enabling the passenger airbag
WARNING
Make sure that the passengerairbag is enabled when you are notusing a child restraint on the front
passenger seat.
Turn the switch to position B.
26
Occupant protection
GENERAL INFORMATIONON RADIO FREQUENCIES
CAUTION
The radio frequency used by yourremote control can also be used byother short distance radio
transmissions (e.g. amateur radios,medical equipment, wireless headphones,remote controls and alarm systems). Ifthe frequencies are jammed, you will notbe able to use your remote control. Youcan lock and unlock the doors with thekey.
Note: You could unlock the doors if youpress the buttons on the remote controlunintentionally.
The operating range between yourremote control and your vehicle variesdepending on the environment.
USING THE KEY
Remote control with flip keyblade
E74382
PROGRAMMING THEREMOTE CONTROL
You can programme a maximum of eightremote controls to use with your vehicle(including any supplied with your vehicle).Ask your dealer for instructions.
CHANGING THE REMOTECONTROL BATTERY
Remote control with a foldingkey blade
E74383
1
1. Insert a screwdriver as far as possibleinto the slot on the side of the remotecontrol, push it towards the key bladeand remove the key blade.
E743842
2. Twist the screwdriver in the positionshown to start separating the twohalves of the remote control.
27
Keys and remote controls
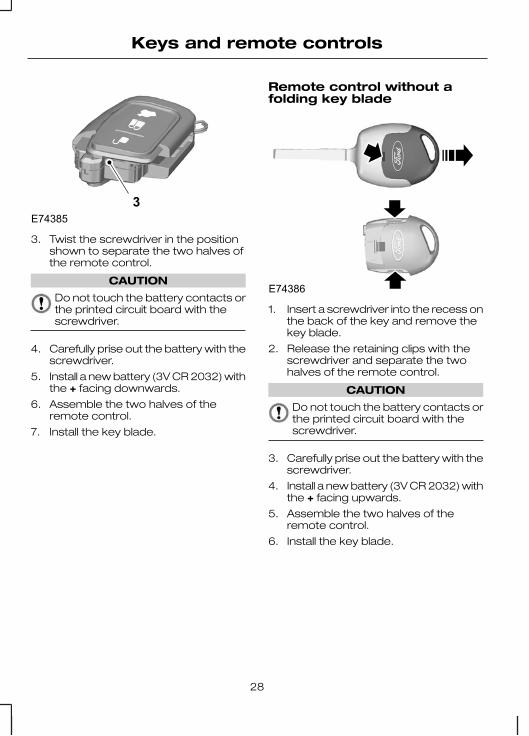
3E74385
3. Twist the screwdriver in the positionshown to separate the two halves ofthe remote control.
CAUTION
Do not touch the battery contacts orthe printed circuit board with thescrewdriver.
4. Carefully prise out the battery with thescrewdriver.
5. Install a new battery (3V CR 2032) withthe + facing downwards.
6. Assemble the two halves of theremote control.
7. Install the key blade.
Remote control without afolding key blade
E74386
1. Insert a screwdriver into the recess onthe back of the key and remove thekey blade.
2. Release the retaining clips with thescrewdriver and separate the twohalves of the remote control.
CAUTION
Do not touch the battery contacts orthe printed circuit board with thescrewdriver.
3. Carefully prise out the battery with thescrewdriver.
4. Install a new battery (3V CR 2032) withthe + facing upwards.
5. Assemble the two halves of theremote control.
6. Install the key blade.
28
Keys and remote controls
LOCKING AND UNLOCKING
Central locking
You can only centrally lock the doors ifthey are all closed.
Note: The driver’s door can be unlockedwith the key. This needs to be used if theremote control or keyless entry is notfunctioning.
Double locking
WARNING
Do not activate double locking whenpersons or animals are inside thevehicle. You will not be able to
unlock the doors from the inside if youhave double locked them.
Double locking is a theft protection featurethat prevents someone from opening thedoors from the inside. You can onlydouble lock the doors if they are all closed.
Locking and unlockingconfirmation
When you unlock the doors, the directionindicators will flash once.
When you lock the doors, the directionindicators will flash twice.
Note: If your vehicle has double locking,the direction indicators will only flash twiceonce you have activated double locking.
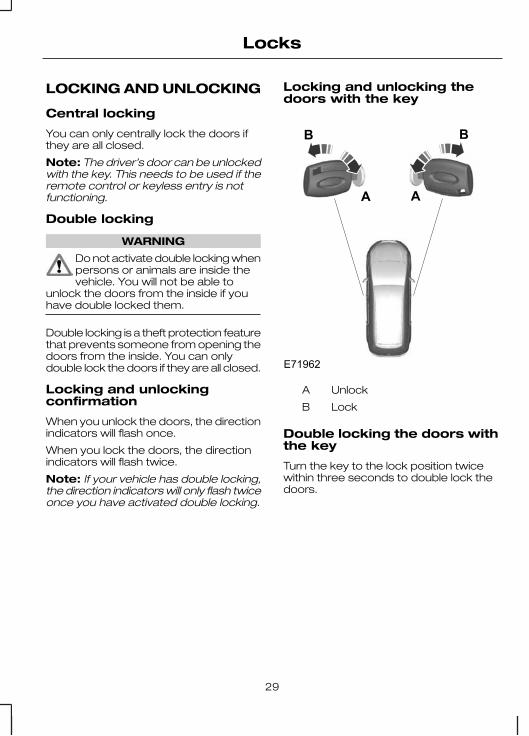
Locking and unlocking thedoors with the key
B
E71962
A
B
A
UnlockA
LockB
Double locking the doors withthe key
Turn the key to the lock position twicewithin three seconds to double lock thedoors.
29
Locks
Locking and unlocking thedoors and the luggagecompartment lid with theremote control
E87379
A B C
UnlockA
LockB
Luggage compartment lidunlock
C
Locking the doors and the luggagecompartment lid with the remotecontrol
Press button B once.
Double locking the doors and theluggage compartment lid with theremote control
Press button B twice within threeseconds.
Locking and unlocking thedoors from inside
E102566
For item location. See Quickstart (page 8).
Luggage compartment lid
Opening the luggage compartmentlid with the remote control
Press button C on the remote controltwice within three seconds.
Closing the luggage compartmentlid
E89132
A recessed grip is incorporated inside theluggage compartment lid to facilitateclosing.
Automatic relocking
The doors will relock automatically if youdo not open a door within 45 seconds ofunlocking the doors with the remotecontrol. The door locks and the alarm willreturn to their previous state.
Reprogramming the unlockingfunction
If the unlocking function is reprogrammedso that only the driver’s door is unlocked( See Programming the remotecontrol (page 27). ), note the following:
When you press the unlock button eitherall the doors are unlocked or only thedriver’s door is unlocked. Pressing theunlock button again unlocks all the doors.
30
Locks
KEYLESS ENTRY
General information
WARNING
The keyless entry system may notfunction if the key is close to metalobjects or electronic devices such
as mobile phones.
The passive entry system will not functionif:• The vehicle battery is flat.
• The passive key frequencies arejammed.
• The passive key battery is flat.
Note: If the passive entry system doesnot function, you will need to use the keyblade to lock and unlock your vehicle.
The keyless system allows the driver tooperate the vehicle without the use of akey or remote control.
E78276
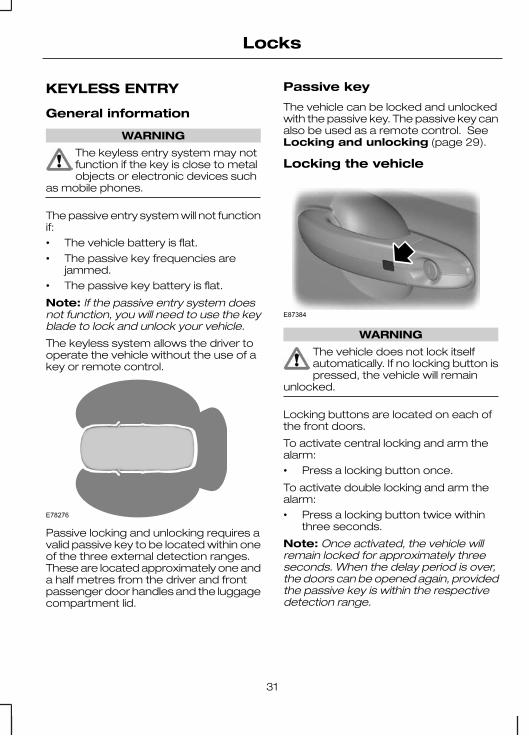
Passive locking and unlocking requires avalid passive key to be located within oneof the three external detection ranges.These are located approximately one anda half metres from the driver and frontpassenger door handles and the luggagecompartment lid.
Passive key
The vehicle can be locked and unlockedwith the passive key. The passive key canalso be used as a remote control. SeeLocking and unlocking (page 29).
Locking the vehicle
E87384
WARNING
The vehicle does not lock itselfautomatically. If no locking button ispressed, the vehicle will remain
unlocked.
Locking buttons are located on each ofthe front doors.
To activate central locking and arm thealarm:• Press a locking button once.
To activate double locking and arm thealarm:• Press a locking button twice within
three seconds.
Note: Once activated, the vehicle willremain locked for approximately threeseconds. When the delay period is over,the doors can be opened again, providedthe passive key is within the respectivedetection range.
31
Locks
Two short flashes of the directionindicators confirms that all the doors andthe luggage compartment lid have beenlocked and that the alarm has beenarmed.
Luggage compartment lid
Note: The luggage compartment lidcannot be closed and, will pop back up ifthe passive key is located inside theluggage compartment with the doorslocked.
Note: If a second valid passive key islocated within the luggage compartmentlid detection range, the luggagecompartment lid can be closed.
Unlocking the vehicle
Note: If the vehicle remains locked forlonger than three days, the keylesssystem will enter an energy-saving mode.This is to reduce the discharge of thevehicle battery. When the vehicle isunlocked while in this mode, the reactiontime of the system may be a little longerthan normal. Unlocking the vehicle oncewill deactivate the energy-saving mode.
E87384
Press a locking button once.
Note: A valid passive key must belocated within the detection range of thatdoor.
One long flash of the direction indicatorsconfirms that all the doors and theluggage compartment lid have beenunlocked and that the alarm has beendisarmed.
Unlocking only the driver's door
If the unlocking function is reprogrammedso that only the driver’s door is unlocked( See Programming the remotecontrol (page 27). ), note the following:
If the driver’s door is the first door whichis opened, the other doors and theluggage compartment lid will remainlocked. All the other doors can beunlocked from inside the vehicle bypressing the unlock button on theinstrument panel. For item location: SeeQuick start (page 8). Doors can beunlocked individually by pulling the interiordoor handles on those doors.
If the front passenger door is the first doorwhich is opened, all the doors and theluggage compartment lid will be unlocked.
Disabled keys
Any keys left inside the vehicle interiorwhen it is locked will be disabled.
A disabled key cannot be used to turn theignition on or start the engine.
In order to use these passive keys again,they have to be enabled.
To enable all your passive keys, unlockthe vehicle using a passive key or theremote control unlocking function.
All passive keys will then be enabled if theignition is turned on or the vehicle isstarted using a valid key.
32
Locks
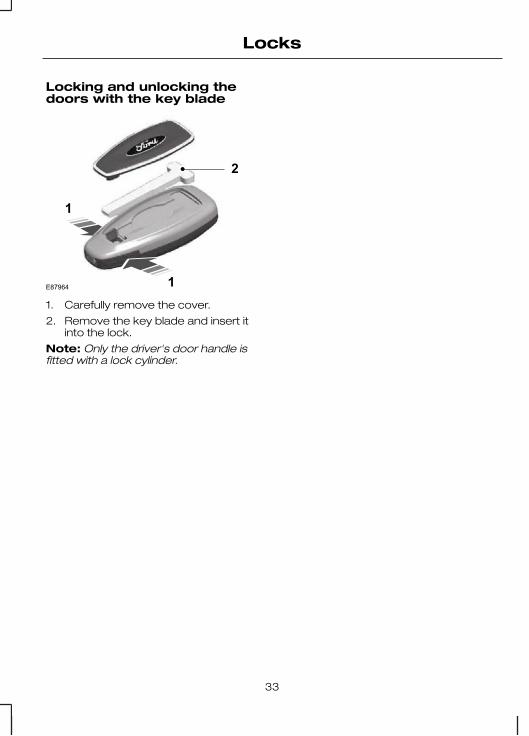
Locking and unlocking thedoors with the key blade
1
2
1
E87964
1. Carefully remove the cover.
2. Remove the key blade and insert itinto the lock.
Note: Only the driver's door handle isfitted with a lock cylinder.
33
Locks
PRINCIPLE OF OPERATION
The engine immobiliser is a theftprotection system that prevents someonefrom starting the engine with anincorrectly coded key.
CODED KEYS
Note: Do not shield your keys with metalobjects. This may prevent the receiverfrom recognising your key as a valid one.
Note: Have all of your remaining keyserased and recoded if you lose a key. Askyour dealer for further information. Havereplacement keys recoded together withyour existing keys.
If you lose a key, you can obtain areplacement from your Ford Dealer. Ifpossible, provide them with the keynumber from the tag provided with theoriginal keys. You can also obtainadditional keys from your Ford Dealer.
ARMING THE ENGINEIMMOBILISER
The engine immobiliser is armedautomatically a short time after you haveswitched the ignition off.
DISARMING THE ENGINEIMMOBILISER
The engine immobiliser is disarmedautomatically when you switch the ignitionon with a correctly coded key.
The indicator in the instrument cluster willcome on for approximately three secondsand then go out. If the indicator stays onfor one minute or flashes forapproximately one minute and thenrepeatedly at irregular intervals, your keyhas not been recognised. Remove thekey and try again.
If you are unable to start the engine witha correctly coded key, this indicates amalfunction. Have the immobiliserchecked immediately.
34
Engine immobiliser
PRINCIPLE OF OPERATION
The alarm is a deterrent againstunauthorised access to your vehiclethrough the doors and the bonnet. It alsoprotects the audio unit.
Triggering the alarm
Once armed, the alarm is triggered in anyof the following ways:
• If someone opens a door, the luggagecompartment or the bonnet withouta valid key or remote control.
• If someone removes the audiosystem.
• If someone turns the ignition toposition I, II or III without a valid key.
If the alarm is triggered, the alarm horn willsound for 30 seconds and the hazardwarning flashers will flash for five minutes.
Any further attempts to perform one ofthe above will trigger the alarm again.
ARMING THE ALARM
The system is armed as soon as thevehicle is locked and acts as a deterrentto unauthorised persons who attempt toopen the doors, bonnet or luggagecompartment, or remove the audiosystem.
The alarm sounds for 30 seconds if anunauthorised person opens a door, theluggage compartment or the bonnet. Thehazard flasher lights will flash for fiveminutes.
Any attempt to start the engine without avalid key or to remove the audio systemsounds the alarm again.
Automatic arming delay
The 12 seconds arming delay beginswhen the bonnet, luggage compartmentand all doors are closed.
DISARMING THE ALARM
Disarm and silence the alarm by unlockingthe doors with the key and switching theignition on with a correctly coded key, orunlocking the doors with the remotecontrol.
35
Alarm
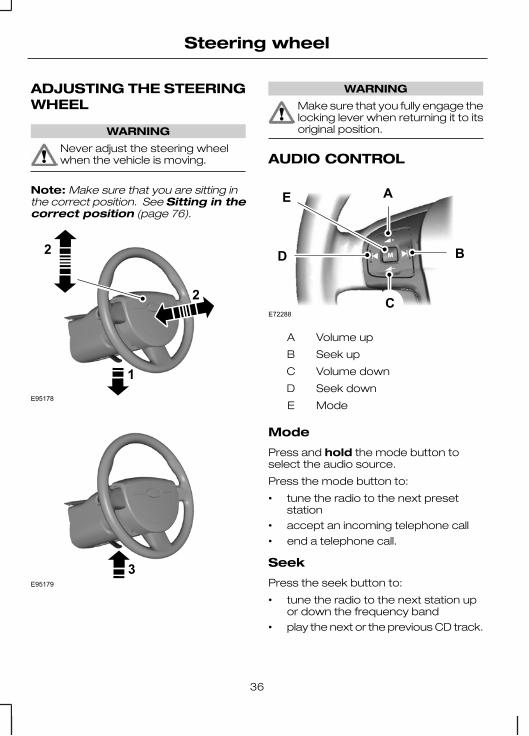
ADJUSTING THE STEERINGWHEEL
WARNING
Never adjust the steering wheelwhen the vehicle is moving.
Note: Make sure that you are sitting inthe correct position. See Sitting in thecorrect position (page 76).
1
2
2
E95178
3E95179
WARNING
Make sure that you fully engage thelocking lever when returning it to itsoriginal position.
AUDIO CONTROL
E72288
A
C
BD
E
Volume upA
Seek upB
Volume downC
Seek downD
ModeE
Mode
Press and hold the mode button toselect the audio source.
Press the mode button to:
• tune the radio to the next presetstation
• accept an incoming telephone call
• end a telephone call.
Seek
Press the seek button to:
• tune the radio to the next station upor down the frequency band
• play the next or the previous CD track.
36
Steering wheel

Press and hold the seek button to:
• tune the radio up or down thefrequency band
• seek through a CD track.
VOICE CONTROL
E102756
Press the button to select or deselectvoice control.
For further information See Voicecontrol (page 168).
37
Steering wheel
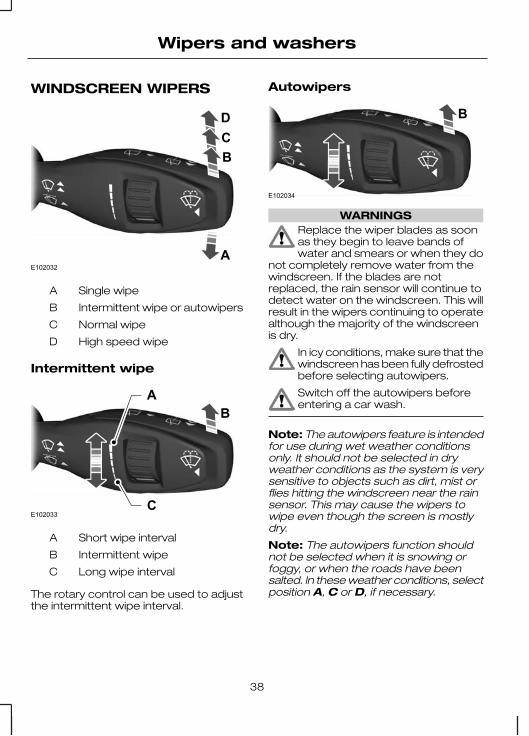
WINDSCREEN WIPERS
DCB
AE102032
Single wipeA
Intermittent wipe or autowipersB
Normal wipeC
High speed wipeD
Intermittent wipe
E102033
B
C
A
Short wipe intervalA
Intermittent wipeB
Long wipe intervalC
The rotary control can be used to adjustthe intermittent wipe interval.
Autowipers
E102034
B
WARNINGSReplace the wiper blades as soonas they begin to leave bands ofwater and smears or when they do
not completely remove water from thewindscreen. If the blades are notreplaced, the rain sensor will continue todetect water on the windscreen. This willresult in the wipers continuing to operatealthough the majority of the windscreenis dry.
In icy conditions, make sure that thewindscreen has been fully defrostedbefore selecting autowipers.
Switch off the autowipers beforeentering a car wash.
Note: The autowipers feature is intendedfor use during wet weather conditionsonly. It should not be selected in dryweather conditions as the system is verysensitive to objects such as dirt, mist orflies hitting the windscreen near the rainsensor. This may cause the wipers towipe even though the screen is mostlydry.
Note: The autowipers function shouldnot be selected when it is snowing orfoggy, or when the roads have beensalted. In these weather conditions, selectposition A, C or D, if necessary.
38
Wipers and washers
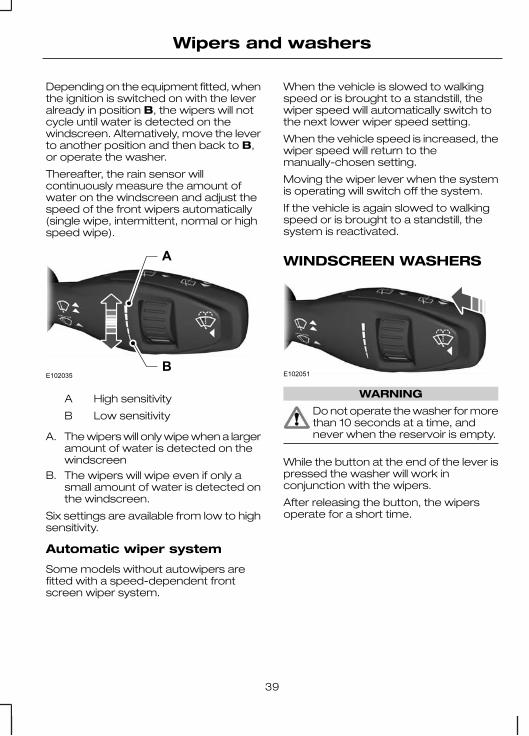
Depending on the equipment fitted, whenthe ignition is switched on with the leveralready in position B, the wipers will notcycle until water is detected on thewindscreen. Alternatively, move the leverto another position and then back to B,or operate the washer.
Thereafter, the rain sensor willcontinuously measure the amount ofwater on the windscreen and adjust thespeed of the front wipers automatically(single wipe, intermittent, normal or highspeed wipe).
E102035B
A
High sensitivityA
Low sensitivityB
A. The wipers will only wipe when a largeramount of water is detected on thewindscreen
B. The wipers will wipe even if only asmall amount of water is detected onthe windscreen.
Six settings are available from low to highsensitivity.
Automatic wiper system
Some models without autowipers arefitted with a speed-dependent frontscreen wiper system.
When the vehicle is slowed to walkingspeed or is brought to a standstill, thewiper speed will automatically switch tothe next lower wiper speed setting.
When the vehicle speed is increased, thewiper speed will return to themanually-chosen setting.
Moving the wiper lever when the systemis operating will switch off the system.
If the vehicle is again slowed to walkingspeed or is brought to a standstill, thesystem is reactivated.
WINDSCREEN WASHERS
E102051
WARNING
Do not operate the washer for morethan 10 seconds at a time, andnever when the reservoir is empty.
While the button at the end of the lever ispressed the washer will work inconjunction with the wipers.
After releasing the button, the wipersoperate for a short time.
39
Wipers and washers
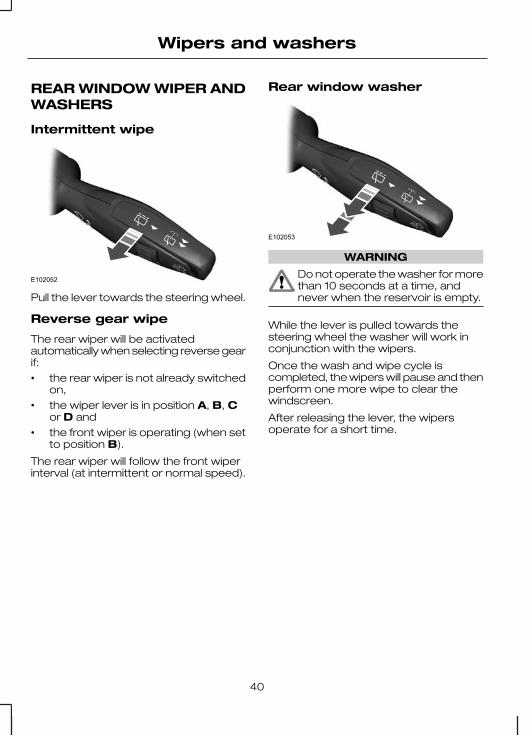
REAR WINDOW WIPER ANDWASHERS
Intermittent wipe
E102052
Pull the lever towards the steering wheel.
Reverse gear wipe
The rear wiper will be activatedautomatically when selecting reverse gearif:• the rear wiper is not already switched
on,• the wiper lever is in position A, B, C
or D and• the front wiper is operating (when set
to position B).
The rear wiper will follow the front wiperinterval (at intermittent or normal speed).
Rear window washer
E102053
WARNING
Do not operate the washer for morethan 10 seconds at a time, andnever when the reservoir is empty.
While the lever is pulled towards thesteering wheel the washer will work inconjunction with the wipers.
Once the wash and wipe cycle iscompleted, the wipers will pause and thenperform one more wipe to clear thewindscreen.
After releasing the lever, the wipersoperate for a short time.
40
Wipers and washers
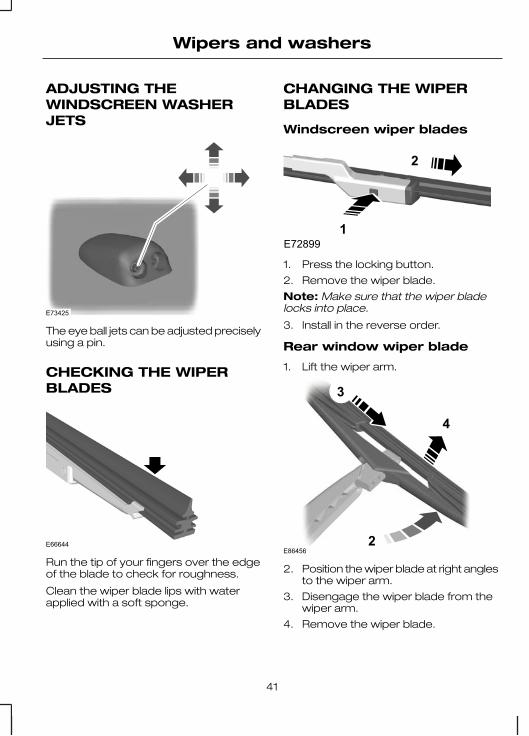
ADJUSTING THEWINDSCREEN WASHERJETS
E73425
The eye ball jets can be adjusted preciselyusing a pin.
CHECKING THE WIPERBLADES
E66644
Run the tip of your fingers over the edgeof the blade to check for roughness.
Clean the wiper blade lips with waterapplied with a soft sponge.
CHANGING THE WIPERBLADES
Windscreen wiper blades
E728991
2
1. Press the locking button.
2. Remove the wiper blade.
Note: Make sure that the wiper bladelocks into place.
3. Install in the reverse order.
Rear window wiper blade
1. Lift the wiper arm.
2
3
4
E86456
2. Position the wiper blade at right anglesto the wiper arm.
3. Disengage the wiper blade from thewiper arm.
4. Remove the wiper blade.
41
Wipers and washers

Note: Make sure that the wiper bladelocks into place.
5. Install in the reverse order.
42
Wipers and washers
LIGHTING CONTROL
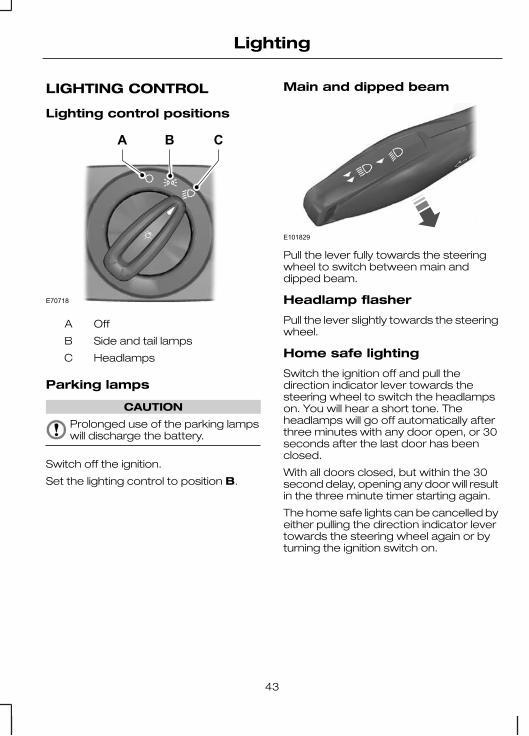
Lighting control positions
E70718
A B C
OffA
Side and tail lampsB
HeadlampsC
Parking lamps
CAUTION
Prolonged use of the parking lampswill discharge the battery.
Switch off the ignition.
Set the lighting control to position B.
Main and dipped beam
E101829
Pull the lever fully towards the steeringwheel to switch between main anddipped beam.
Headlamp flasher
Pull the lever slightly towards the steeringwheel.
Home safe lighting
Switch the ignition off and pull thedirection indicator lever towards thesteering wheel to switch the headlampson. You will hear a short tone. Theheadlamps will go off automatically afterthree minutes with any door open, or 30seconds after the last door has beenclosed.
With all doors closed, but within the 30second delay, opening any door will resultin the three minute timer starting again.
The home safe lights can be cancelled byeither pulling the direction indicator levertowards the steering wheel again or byturning the ignition switch on.
43
Lighting
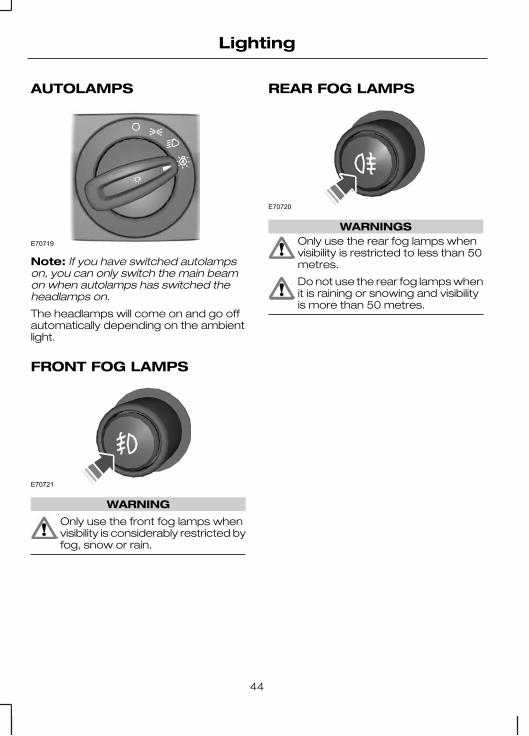
AUTOLAMPS
E70719
Note: If you have switched autolampson, you can only switch the main beamon when autolamps has switched theheadlamps on.
The headlamps will come on and go offautomatically depending on the ambientlight.
FRONT FOG LAMPS
E70721
WARNING
Only use the front fog lamps whenvisibility is considerably restricted byfog, snow or rain.
REAR FOG LAMPS
E70720
WARNINGSOnly use the rear fog lamps whenvisibility is restricted to less than 50metres.
Do not use the rear fog lamps whenit is raining or snowing and visibilityis more than 50 metres.
44
Lighting
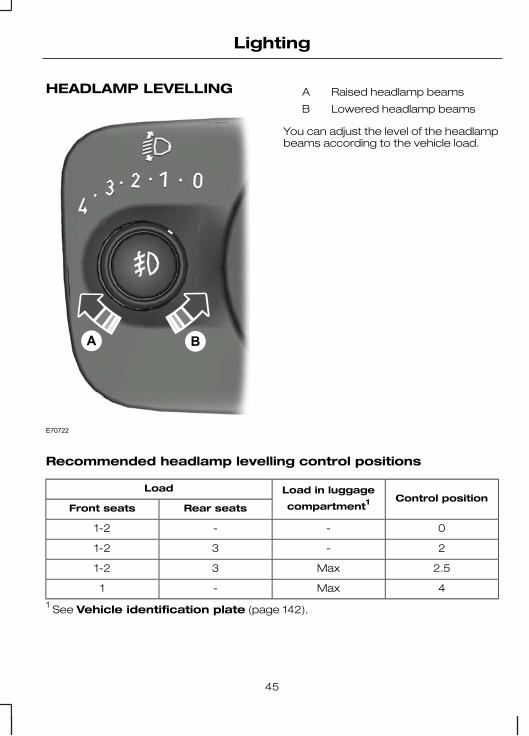
HEADLAMP LEVELLING
E70722
A B
Raised headlamp beamsA
Lowered headlamp beamsB
You can adjust the level of the headlampbeams according to the vehicle load.
Recommended headlamp levelling control positions
Control positionLoad in luggage
compartment1Load
Rear seatsFront seats
0--1-2
2-31-2
2.5Max31-2
4Max-1
1 See Vehicle identification plate (page 142).
45
Lighting
HAZARD WARNINGFLASHERS
E71943
For item location: See Quick start(page 8).
DIRECTION INDICATORS
E102016
Note: Tap the lever up or down to makethe direction indicators flash only threetimes.
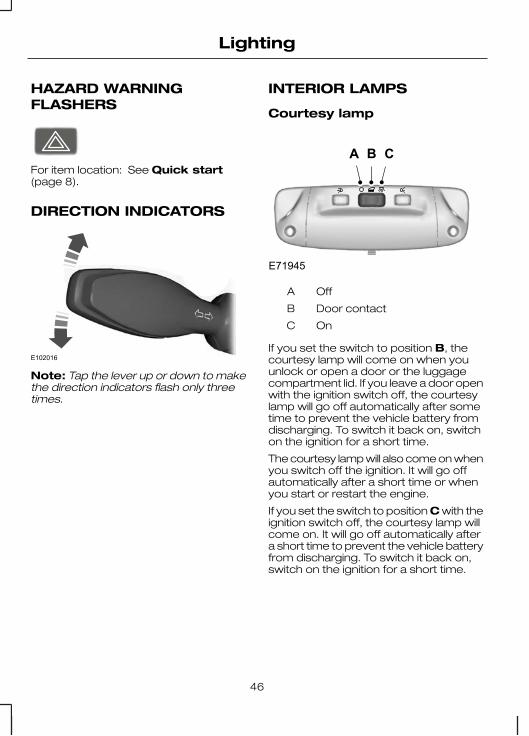
INTERIOR LAMPS
Courtesy lamp
CBA
E71945
OffA
Door contactB
OnC
If you set the switch to position B, thecourtesy lamp will come on when youunlock or open a door or the luggagecompartment lid. If you leave a door openwith the ignition switch off, the courtesylamp will go off automatically after sometime to prevent the vehicle battery fromdischarging. To switch it back on, switchon the ignition for a short time.
The courtesy lamp will also come on whenyou switch off the ignition. It will go offautomatically after a short time or whenyou start or restart the engine.
If you set the switch to position C with theignition switch off, the courtesy lamp willcome on. It will go off automatically aftera short time to prevent the vehicle batteryfrom discharging. To switch it back on,switch on the ignition for a short time.
46
Lighting
Reading lamps
E71946
If you switch off the ignition, the readinglamps will go off automatically after sometime to prevent the vehicle battery fromdischarging. To switch them back on,switch on the ignition for a short time.
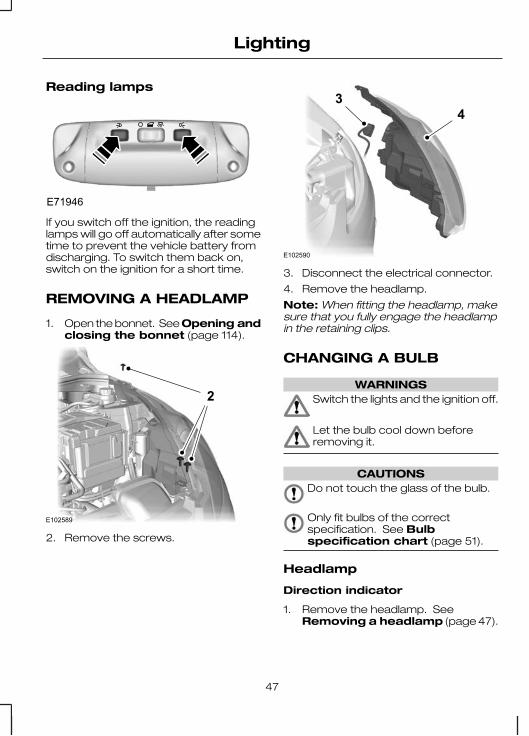
REMOVING A HEADLAMP
1. Open the bonnet. See Opening andclosing the bonnet (page 114).
E102589
2
2. Remove the screws.
E102590
34
3. Disconnect the electrical connector.
4. Remove the headlamp.
Note: When fitting the headlamp, makesure that you fully engage the headlampin the retaining clips.
CHANGING A BULB
WARNINGSSwitch the lights and the ignition off.
Let the bulb cool down beforeremoving it.
CAUTIONSDo not touch the glass of the bulb.
Only fit bulbs of the correctspecification. See Bulbspecification chart (page 51).
Headlamp
Direction indicator
1. Remove the headlamp. SeeRemoving a headlamp (page 47).
47
Lighting
E102593
2
4
2. Remove the cover.
3. Turn the bulb holder anti-clockwiseand remove it.
4. Gently press the bulb into the bulbholder, turn it anti-clockwise andremove it.
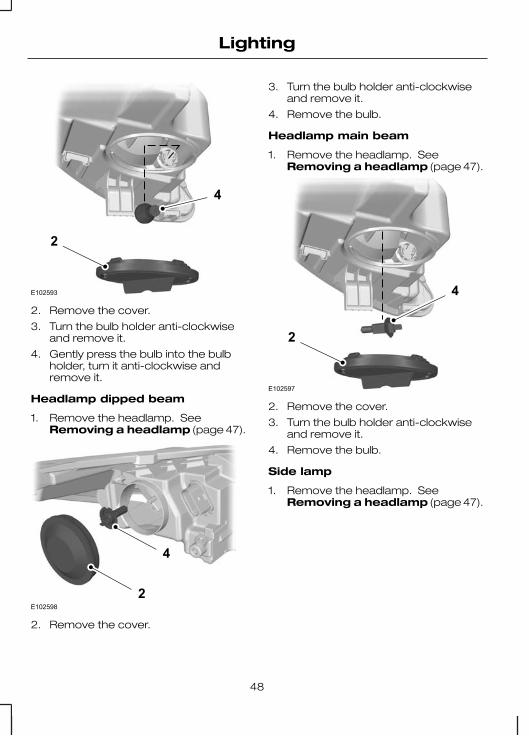
Headlamp dipped beam
1. Remove the headlamp. SeeRemoving a headlamp (page 47).
E102598
2
4
2. Remove the cover.
3. Turn the bulb holder anti-clockwiseand remove it.
4. Remove the bulb.
Headlamp main beam
1. Remove the headlamp. SeeRemoving a headlamp (page 47).
E102597
2
4
2. Remove the cover.
3. Turn the bulb holder anti-clockwiseand remove it.
4. Remove the bulb.
Side lamp
1. Remove the headlamp. SeeRemoving a headlamp (page 47).
48
Lighting
E102596
2
3
2. Remove the cover.
3. Pull the bulb holder and remove it.Remove the bulb.
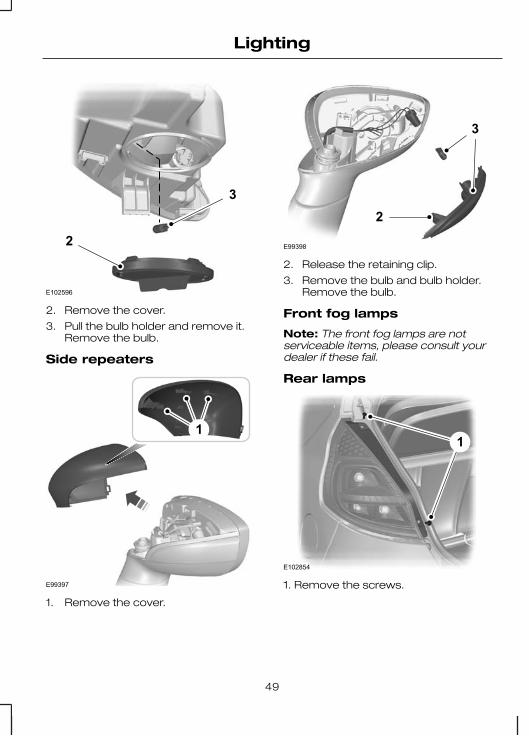
Side repeaters
1
E99397
1. Remove the cover.
2
3
E99398
2. Release the retaining clip.
3. Remove the bulb and bulb holder.Remove the bulb.
Front fog lamps
Note: The front fog lamps are notserviceable items, please consult yourdealer if these fail.
Rear lamps
E102854
1
1. Remove the screws.
49
Lighting
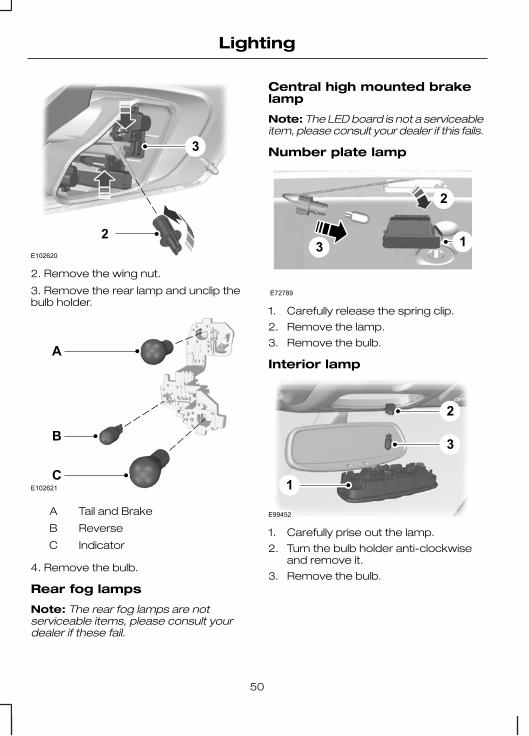
E102620
2
3
2. Remove the wing nut.
3. Remove the rear lamp and unclip thebulb holder.
B
C
A
E102621
Tail and BrakeA
ReverseB
IndicatorC
4. Remove the bulb.
Rear fog lamps
Note: The rear fog lamps are notserviceable items, please consult yourdealer if these fail.
Central high mounted brakelamp
Note: The LED board is not a serviceableitem, please consult your dealer if this fails.
Number plate lamp
E72789
3
2
1
1. Carefully release the spring clip.
2. Remove the lamp.
3. Remove the bulb.
Interior lamp
E99452
2
3
1
1. Carefully prise out the lamp.
2. Turn the bulb holder anti-clockwiseand remove it.
3. Remove the bulb.
50
Lighting
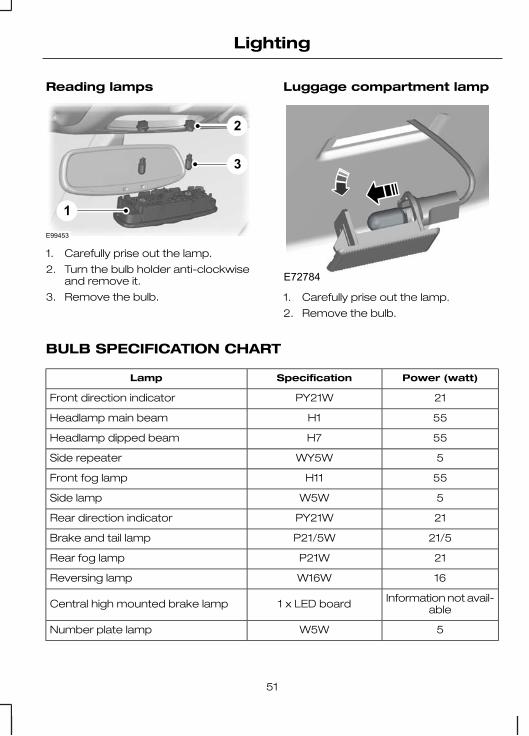
Reading lamps
E99453
2
3
1
1. Carefully prise out the lamp.
2. Turn the bulb holder anti-clockwiseand remove it.
3. Remove the bulb.
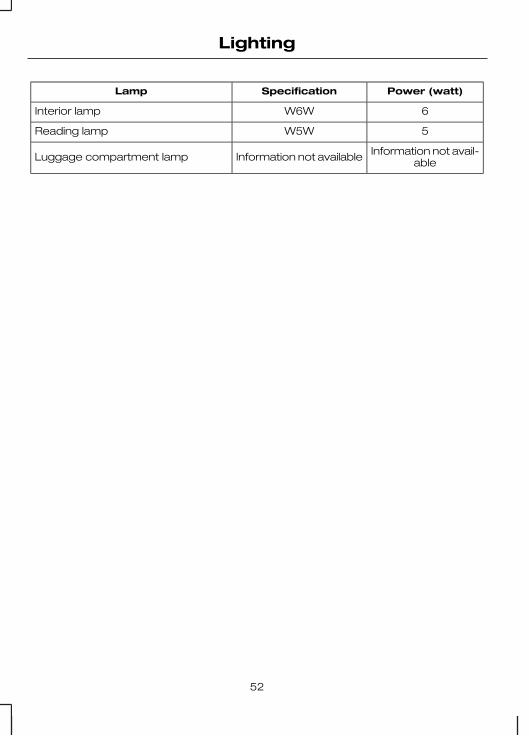
Luggage compartment lamp
E72784
1. Carefully prise out the lamp.
2. Remove the bulb.
BULB SPECIFICATION CHART
Power (watt)SpecificationLamp
21PY21WFront direction indicator
55H1Headlamp main beam
55H7Headlamp dipped beam
5WY5WSide repeater
55H11Front fog lamp
5W5WSide lamp
21PY21WRear direction indicator
21/5P21/5WBrake and tail lamp
21P21WRear fog lamp
16W16WReversing lamp
Information not avail-able1 x LED boardCentral high mounted brake lamp
5W5WNumber plate lamp
51
Lighting
Power (watt)SpecificationLamp
6W6WInterior lamp
5W5WReading lamp
Information not avail-ableInformation not availableLuggage compartment lamp
52
Lighting
ELECTRIC WINDOWS
WARNING
Do not operate the electric windowsunless they are free fromobstruction.
Note: If you operate the switches oftenduring a short period of time, the systemmight become inoperable for a certaintime to prevent damage due tooverheating.
Switch on the ignition to operate theelectric windows.
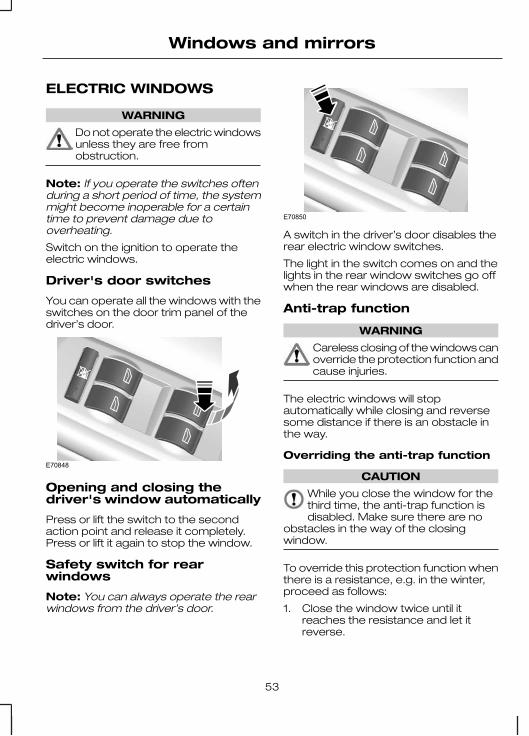
Driver's door switches
You can operate all the windows with theswitches on the door trim panel of thedriver’s door.
E70848
Opening and closing thedriver's window automatically
Press or lift the switch to the secondaction point and release it completely.Press or lift it again to stop the window.
Safety switch for rearwindows
Note: You can always operate the rearwindows from the driver’s door.
E70850
A switch in the driver’s door disables therear electric window switches.
The light in the switch comes on and thelights in the rear window switches go offwhen the rear windows are disabled.
Anti-trap function
WARNING
Careless closing of the windows canoverride the protection function andcause injuries.
The electric windows will stopautomatically while closing and reversesome distance if there is an obstacle inthe way.
Overriding the anti-trap function
CAUTION
While you close the window for thethird time, the anti-trap function isdisabled. Make sure there are no
obstacles in the way of the closingwindow.
To override this protection function whenthere is a resistance, e.g. in the winter,proceed as follows:
1. Close the window twice until itreaches the resistance and let itreverse.
53
Windows and mirrors
2. Close the window a third time to theresistance. The anti-trap function isdisabled and you cannot close thewindow automatically. The window willoverride the resistance and you canclose it fully.
3. If the window does not close after thethird attempt, have it checked by anexpert.
Resetting the memory of theelectric windows
WARNING
The anti-trap function is deactivateduntil you have reset the memory.
After the battery has been disconnectedfrom the vehicle you must reset thememory separately for each window:
1. Lift the switch until the window is fullyclosed. Hold the switch lifted for onemore second.
2. Release the switch and lift it again, twoor three times, for one more second.
3. Open the window and try to close itautomatically.
4. Reset and repeat procedure if thewindow does not close automatically.
EXTERIOR MIRRORS
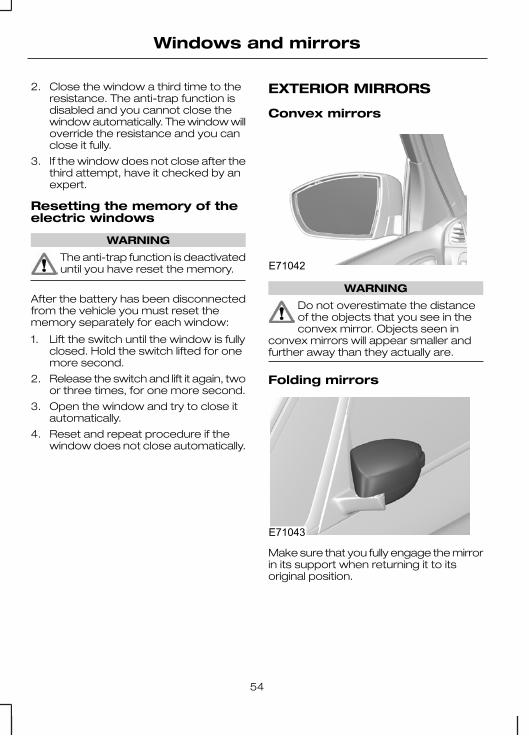
Convex mirrors
E71042
WARNING
Do not overestimate the distanceof the objects that you see in theconvex mirror. Objects seen in
convex mirrors will appear smaller andfurther away than they actually are.
Folding mirrors
E71043
Make sure that you fully engage the mirrorin its support when returning it to itsoriginal position.
54
Windows and mirrors
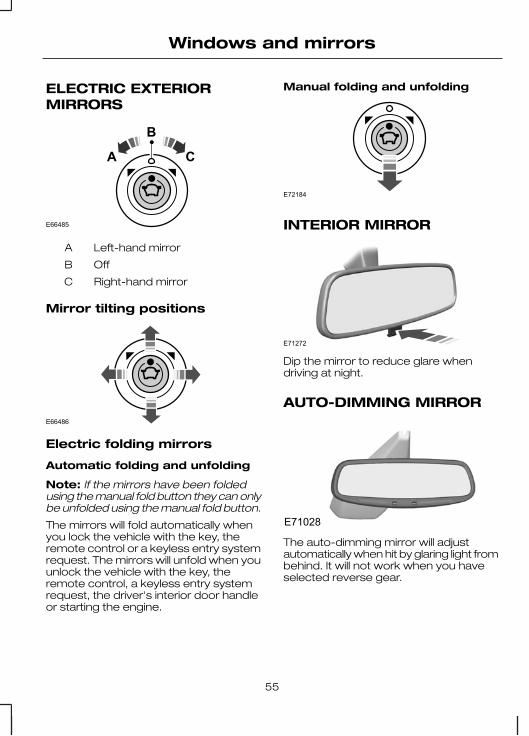
ELECTRIC EXTERIORMIRRORS
E66485
A
B
C
Left-hand mirrorA
OffB
Right-hand mirrorC
Mirror tilting positions
E66486
Electric folding mirrors
Automatic folding and unfolding
Note: If the mirrors have been foldedusing the manual fold button they can onlybe unfolded using the manual fold button.
The mirrors will fold automatically whenyou lock the vehicle with the key, theremote control or a keyless entry systemrequest. The mirrors will unfold when youunlock the vehicle with the key, theremote control, a keyless entry systemrequest, the driver's interior door handleor starting the engine.
Manual folding and unfolding
E72184
INTERIOR MIRROR
E71272
Dip the mirror to reduce glare whendriving at night.
AUTO-DIMMING MIRROR
E71028
The auto-dimming mirror will adjustautomatically when hit by glaring light frombehind. It will not work when you haveselected reverse gear.
55
Windows and mirrors
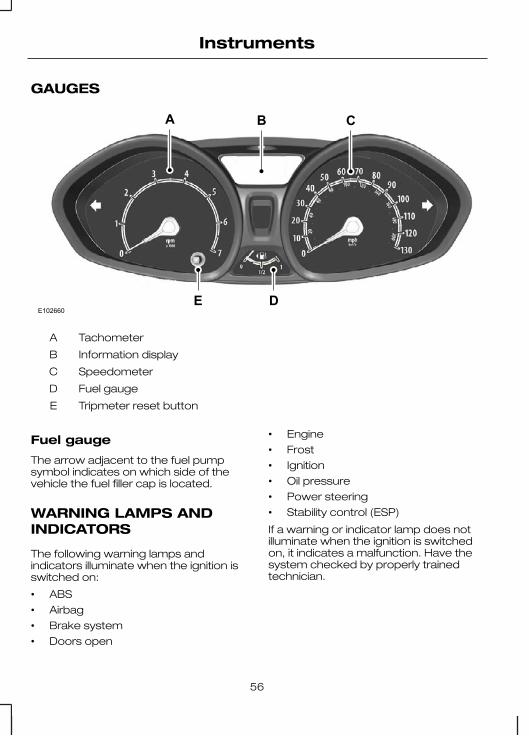
GAUGES
E102660
CA
DE
B
TachometerA
Information displayB
SpeedometerC
Fuel gaugeD
Tripmeter reset buttonE
Fuel gauge
The arrow adjacent to the fuel pumpsymbol indicates on which side of thevehicle the fuel filler cap is located.
WARNING LAMPS ANDINDICATORS
The following warning lamps andindicators illuminate when the ignition isswitched on:
• ABS
• Airbag
• Brake system
• Doors open
• Engine
• Frost
• Ignition
• Oil pressure
• Power steering
• Stability control (ESP)
If a warning or indicator lamp does notilluminate when the ignition is switchedon, it indicates a malfunction. Have thesystem checked by properly trainedtechnician.
56
Instruments
ABS warning lamp
If it illuminates when driving, thisindicates a malfunction. Havethe system checked by a
properly trained technician. You willcontinue to have normal braking (withoutABS) but have this checked as soon aspossible.
Airbag warning lamp
If it illuminates when driving, thisindicates a malfunction. Havethe system checked by a
properly trained technician.
Brake system warning lamp
WARNING
Reduce your speed gradually. Useyour brakes with great care. Do notstep on the brake pedal abruptly.
If it illuminates when driving, thisindicates a malfunction in oneof the brake circuits. Check the
brake fluid level. See Brake and clutchfluid check (page 122).
WARNING
Have this checked immediately.
If the brake system warning lampilluminates with the ABS warning lamp,this indicates a malfunction. Stop yourvehicle as soon as it is safe to do so andhave this checked before continuing youjourney.
Coolant temperature warninglamp
CAUTION
Do not resume your journey if itilluminates despite the level beingcorrect. Have the system checked
by a properly trained technicianimmediately.
If it stays on after starting orilluminates when driving, thisindicates a malfunction. Stop
your vehicle as soon as it is safe to do soand switch the engine off. Check thecoolant level. See Engine coolantcheck (page 122).
Cruise control indicator
E71340
It will illuminate when the systemis in use.
Direction indicator
Flashes during operation. Asudden increase in the rate offlashing warns of a failed
indicator bulb. See Changing a bulb(page 47).
Doors open warning lamp
Illuminates when the ignition isswitched on and remains on ifany door, the bonnet or the
luggage compartment is not closedproperly.
57
Instruments
Engine warning lamps
Malfunction indicator lamp
Powertrain warning lamp
All vehicles
If either lamp illuminates when the engineis running, this indicates a fault. The enginewill continue to run but it may have limitedpower. If it flashes when you are driving,reduce the speed of your vehicleimmediately. If it continues to flash,avoid heavy acceleration or deceleration.Have the system checked by a properlytrained technician immediately.
WARNING
Have this checked immediately.
If both lamps illuminate together, stopyour vehicle as soon as it is safeto do so (continued use may causereduced power and cause the engine tostop). Turn the ignition off and attempt torestart the engine. If the engine restartshave the system checked by a properlytrained technician immediately. If theengine does not restart the vehicle mustbe checked before continuing yourjourney.
Front fog lamp indicator
It will illuminate when you switchthe front fog lamps on.
Frost warning lamp
WARNING
Even if the temperature rises toabove +4ºC there is no guaranteethat the road is free of hazards
caused by inclement weather.
It will illuminate and glow orangewhen the outside airtemperature is between 4ºC
and 0ºC. It will glow red when thetemperature is below 0ºC.
Fuel in oil warning lamp
It will illuminate when the engineoil has been diluted with fuel.Have the engine oil changed as
soon as possible.
Glow plug indicator
If it illuminates, wait until itextinguishes before starting.
Headlamp indicator
It will illuminate when you switchthe headlamp dipped beam orthe side and tail lamps on.
Ignition warning lamp
If it illuminates when driving, thisindicates a malfunction. Switchoff all unnecessary electrical
equipment. Have the system checked bya properly trained technician immediately.
Low fuel level warning lamp
If it illuminates, refuel as soon aspossible.
58
Instruments
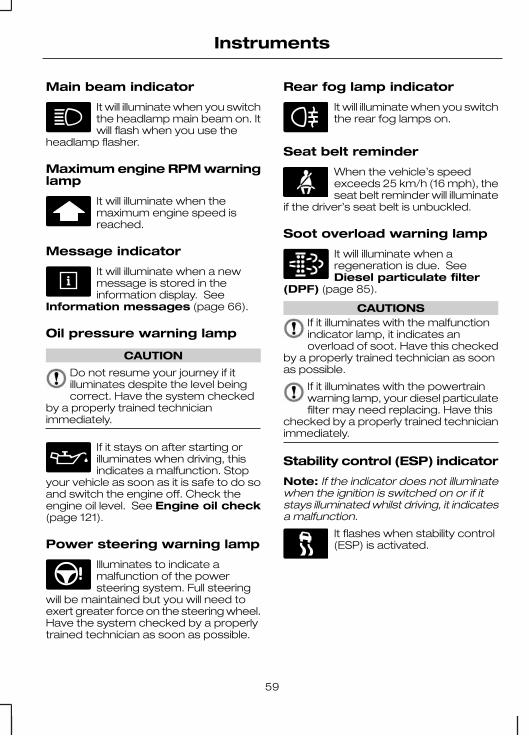
Main beam indicator
It will illuminate when you switchthe headlamp main beam on. Itwill flash when you use the
headlamp flasher.
Maximum engine RPM warninglamp
It will illuminate when themaximum engine speed isreached.
Message indicator
It will illuminate when a newmessage is stored in theinformation display. See
Information messages (page 66).
Oil pressure warning lamp
CAUTION
Do not resume your journey if itilluminates despite the level beingcorrect. Have the system checked
by a properly trained technicianimmediately.
If it stays on after starting orilluminates when driving, thisindicates a malfunction. Stop
your vehicle as soon as it is safe to do soand switch the engine off. Check theengine oil level. See Engine oil check(page 121).
Power steering warning lamp
Illuminates to indicate amalfunction of the powersteering system. Full steering
will be maintained but you will need toexert greater force on the steering wheel.Have the system checked by a properlytrained technician as soon as possible.
Rear fog lamp indicator
It will illuminate when you switchthe rear fog lamps on.
Seat belt reminder
When the vehicle’s speedexceeds 25 km/h (16 mph), theseat belt reminder will illuminate
if the driver’s seat belt is unbuckled.
Soot overload warning lamp
E95449
It will illuminate when aregeneration is due. SeeDiesel particulate filter
(DPF) (page 85).
CAUTIONSIf it illuminates with the malfunctionindicator lamp, it indicates anoverload of soot. Have this checked
by a properly trained technician as soonas possible.
If it illuminates with the powertrainwarning lamp, your diesel particulatefilter may need replacing. Have this
checked by a properly trained technicianimmediately.
Stability control (ESP) indicator
Note: If the indicator does not illuminatewhen the ignition is switched on or if itstays illuminated whilst driving, it indicatesa malfunction.
It flashes when stability control(ESP) is activated.
59
Instruments
AUDIBLE WARNINGS ANDINDICATORS
Automatic transmission
If position P is not selected, a warningchime will sound when the driver’s dooris opened.
Frost
WARNING
Even if the temperature rises toabove +4ºC there is no guaranteethat the road is free of hazards
caused by inclement weather.
A warning chime will sound in the followingconditions:• +4ºC or lower: frost warning
• 0ºC or lower: danger of icy roads
Key outside car
Vehicles with the keyless system
If the engine is running and a passive keyis no longer detected within the vehicleinterior, a warning chime will sound assoon as the door is closed.
Lights on
A warning chime will sound if the driver’sdoor is opened with the exterior lightsswitched on and the ignition switched off.
Low fuel
A warning chime will sound when the lowfuel warning lamp illuminates.
Seat belt reminder
WARNINGSThe seat belt reminder remains instand-by mode when the front seatbelts have been fastened. It will be
reactivated if either seat belt isunfastened.
Do not sit on top of a fastened seatbelt to prevent the seat beltreminder from coming on. The
occupant protection system will onlyprovide optimum protection when youuse the seat belt properly.
When the vehicle’s speed exceeds thepre-determined limit, a warning chime willsound if either of the front seat belts areunfastened. The chime will stop after fiveminutes.
60
Instruments
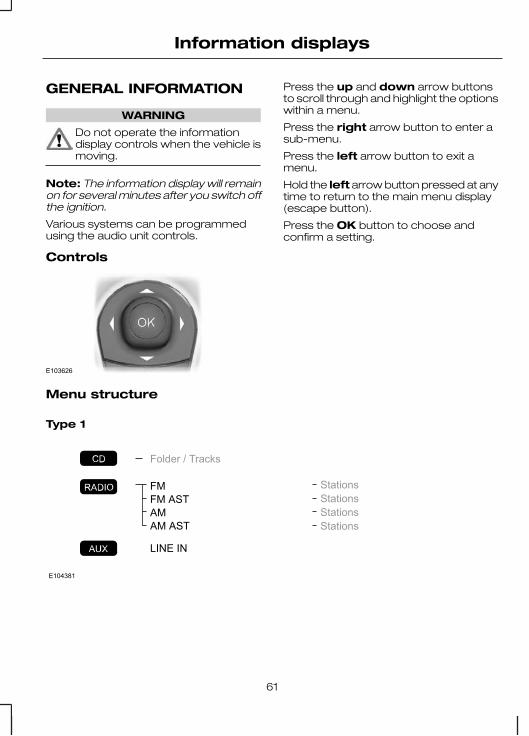
GENERAL INFORMATION
WARNING
Do not operate the informationdisplay controls when the vehicle ismoving.
Note: The information display will remainon for several minutes after you switch offthe ignition.
Various systems can be programmedusing the audio unit controls.
Controls
E103626
Press the up and down arrow buttonsto scroll through and highlight the optionswithin a menu.
Press the right arrow button to enter asub-menu.
Press the left arrow button to exit amenu.
Hold the left arrow button pressed at anytime to return to the main menu display(escape button).
Press the OK button to choose andconfirm a setting.
Menu structure
Type 1
AM ASTAMFM ASTFM
Folder / Tracks
LINE IN
StationsStationsStationsStations
E104381
61
Information displays
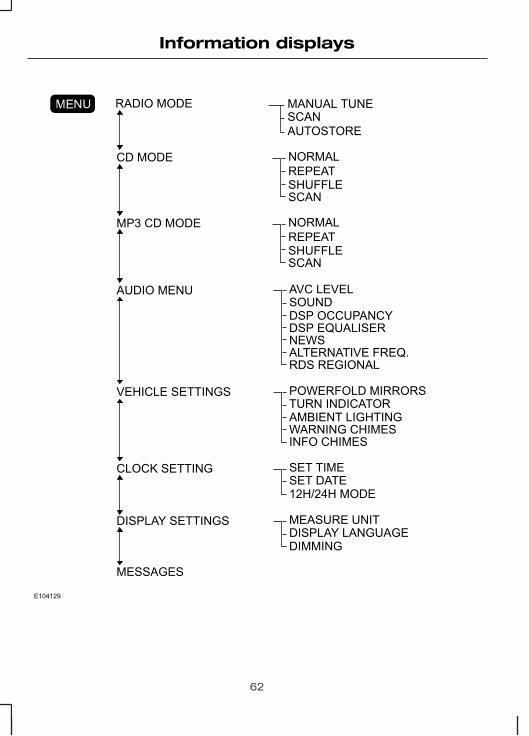
RADIO MODE MANUAL TUNESCANAUTOSTORE
AVC LEVELSOUNDDSP OCCUPANCYDSP EQUALISERNEWSALTERNATIVE FREQ.RDS REGIONAL
NORMALREPEATSHUFFLESCAN
CD MODE
AUDIO MENU
POWERFOLD MIRRORSTURN INDICATORAMBIENT LIGHTINGWARNING CHIMESINFO CHIMES
VEHICLE SETTINGS
NORMALREPEATSHUFFLESCAN
MP3 CD MODE
SET TIMESET DATE12H/24H MODE
CLOCK SETTING
MEASURE UNITDISPLAY LANGUAGEDIMMING
DISPLAY SETTINGS
MESSAGES
E104129
62
Information displays

Type 2
Note: Phone menu depends on phonecapabilities and call status etc.
Use the MENU button and left arrow keyto access the menus.
63
Information displays
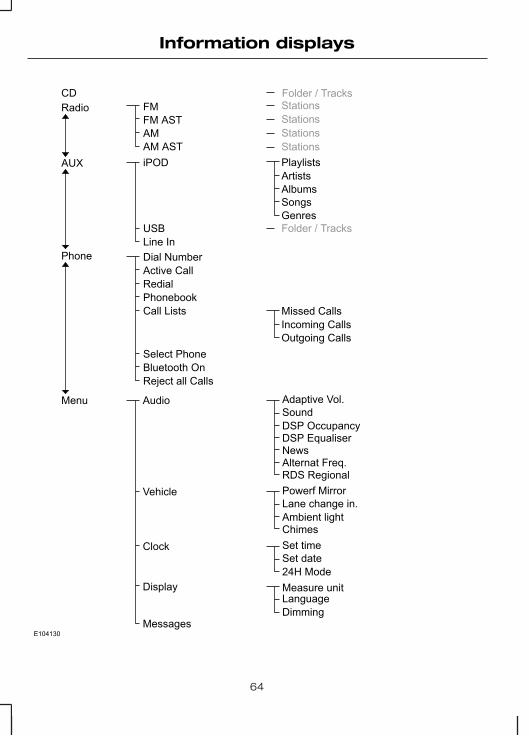
Adaptive Vol.SoundDSP OccupancyDSP EqualiserNewsAlternat Freq.RDS Regional
AudioMenu
Phone
AUX
Dial NumberActive CallRedialPhonebookCall Lists
Select PhoneBluetooth OnReject all Calls
Missed CallsIncoming CallsOutgoing Calls
Powerf MirrorLane change in.Ambient lightChimes
Vehicle
Set timeSet date24H Mode
Clock
Measure unitLanguageDimming
Display
MessagesE104130
USB
iPODAM ASTAMFM ASTFM
Folder / Tracks
Line In
PlaylistsArtistsAlbumsSongsGenresFolder / Tracks
RadioCD
StationsStationsStationsStations
64
Information displays

TRIP COMPUTER
E103499
A
B
C
Outside air temperatureA
Trip computerB
OdometerC
Trip computer
E102759
Press the button to scroll through thedisplays.
To reset the trip and average speed, scrollto the required display and press and holdthe button.
The trip computer includes the followinginformation displays:
Trip
Registers the mileage of individualjourneys.
Distance to empty
Indicates the approximate distance thevehicle will travel on the fuel remaining inthe tank. Changes in driving pattern maycause the value to vary.
Average fuel consumption
Indicates the average fuel consumptionsince the function was last reset.
Average speed
Indicates the average speed calculatedsince the function was last reset.
Odometer
Registers the total mileage of the vehicle.
PERSONALISED SETTINGS
Measure units
To toggle between metric and imperialunits, scroll to this display and press theOK button.
Toggling the measure units using thisdisplay will affect the following displays:• Distance to empty
• Average fuel consumption
• Instantaneous fuel consumption
• Average speed
Chime deactivation
The following chimes can be deactivated:• Warning messages.
• Information messages.
65
Information displays
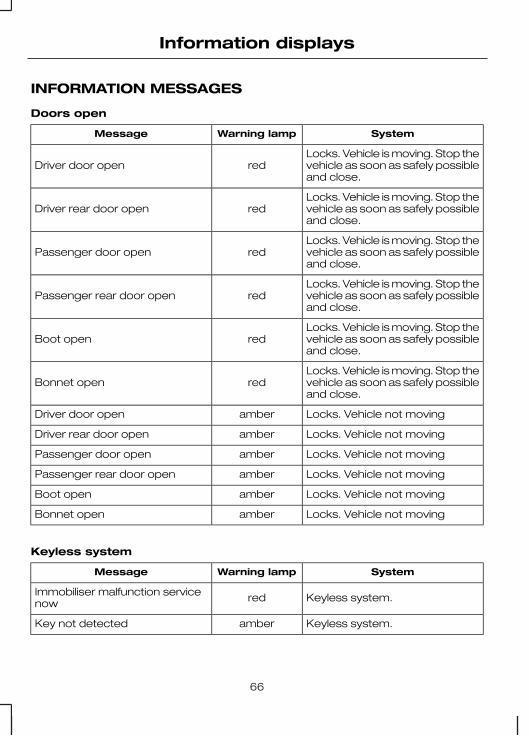
INFORMATION MESSAGES
Doors open
SystemWarning lampMessage
Locks. Vehicle is moving. Stop thevehicle as soon as safely possibleand close.
redDriver door open
Locks. Vehicle is moving. Stop thevehicle as soon as safely possibleand close.
redDriver rear door open
Locks. Vehicle is moving. Stop thevehicle as soon as safely possibleand close.
redPassenger door open
Locks. Vehicle is moving. Stop thevehicle as soon as safely possibleand close.
redPassenger rear door open
Locks. Vehicle is moving. Stop thevehicle as soon as safely possibleand close.
redBoot open
Locks. Vehicle is moving. Stop thevehicle as soon as safely possibleand close.
redBonnet open
Locks. Vehicle not movingamberDriver door open
Locks. Vehicle not movingamberDriver rear door open
Locks. Vehicle not movingamberPassenger door open
Locks. Vehicle not movingamberPassenger rear door open
Locks. Vehicle not movingamberBoot open
Locks. Vehicle not movingamberBonnet open
Keyless system
SystemWarning lampMessage
Keyless system.redImmobiliser malfunction servicenow
Keyless system.amberKey not detected
66
Information displays
SystemWarning lampMessage
Keyless system.amberKey outside car
Locks.amberKey battery low replace battery
Keyless system.amberTurn ignition off use POWERbutton
Keyless system.-To start press brake
Keyless system.-To start press clutch
Keyless system.-Close boot or use spare key
Lighting
SystemWarning lampMessage
Lighting.-Left indicator malfunction changebulb
Lighting.-Right indicator malfunctionchange bulb
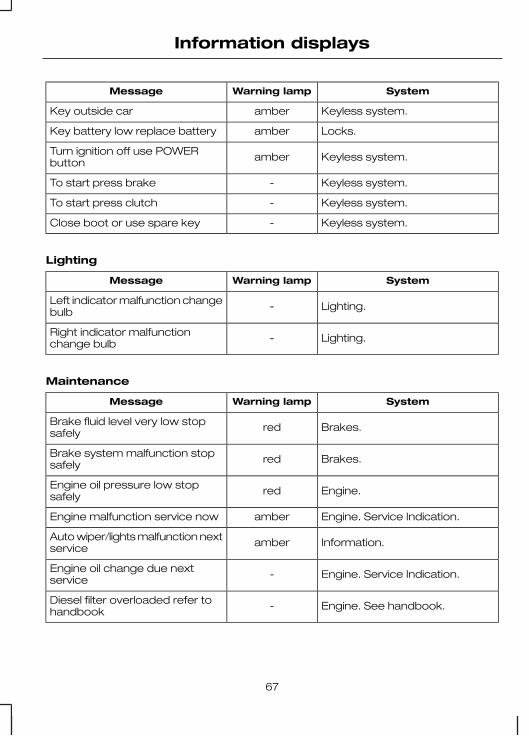
Maintenance
SystemWarning lampMessage
Brakes.redBrake fluid level very low stopsafely
Brakes.redBrake system malfunction stopsafely
Engine.redEngine oil pressure low stopsafely
Engine. Service Indication.amberEngine malfunction service now
Information.amberAuto wiper/lights malfunction nextservice
Engine. Service Indication.-Engine oil change due nextservice
Engine. See handbook.-Diesel filter overloaded refer tohandbook
67
Information displays

Steering
SystemWarning lampMessage
SteeringredSteering malfunction service now
SteeringredSteering malfunction stop safely
Power steering. Full steering willbe maintained but you will needto exert greater force on thesteering wheel. Have the systemchecked by an expert as soon aspossible.
amberPower steering malfunctionservice now
Steering-Steering locked retry unlock
Transmission
SystemWarning lampMessage
Transmission.redTransmission malfunction servicenow
Transmission. Under certaindriving conditions it is possiblethat the clutches in the transmis-sion can overheat. In thesecircumstances it is necessary topress the brake pedal and stop
redTransmission overtemp. stopsafely the vehicle to prevent damage to
the transmission. Select N(NEUTRAL) or P (PARK) andapply the parking brake until thetransmission has cooled and themessage disappears from thedisplay.
Transmission.-Vehicle not in PARK select P
Transmission.-To start select N or P
Transmission.-To start press brake
Transmission.-To start select N
Transmission.-Door open apply brake
68
Information displays
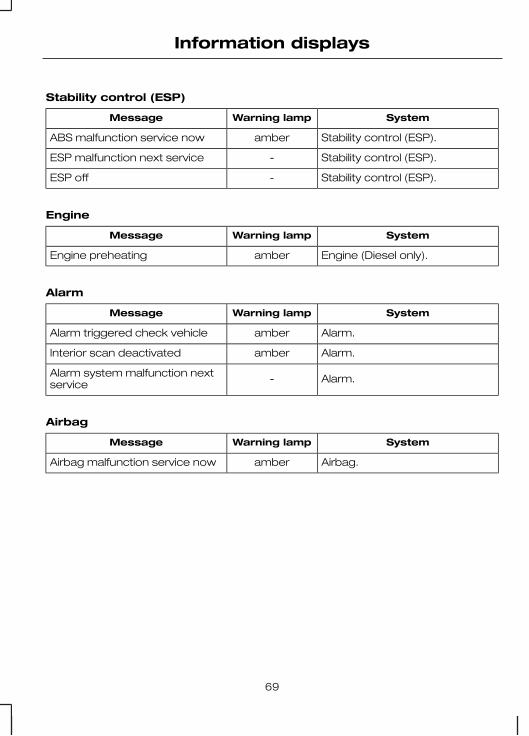
Stability control (ESP)
SystemWarning lampMessage
Stability control (ESP).amberABS malfunction service now
Stability control (ESP).-ESP malfunction next service
Stability control (ESP).-ESP off
Engine
SystemWarning lampMessage
Engine (Diesel only).amberEngine preheating
Alarm
SystemWarning lampMessage
Alarm.amberAlarm triggered check vehicle
Alarm.amberInterior scan deactivated
Alarm.-Alarm system malfunction nextservice
Airbag
SystemWarning lampMessage
Airbag.amberAirbag malfunction service now
69
Information displays
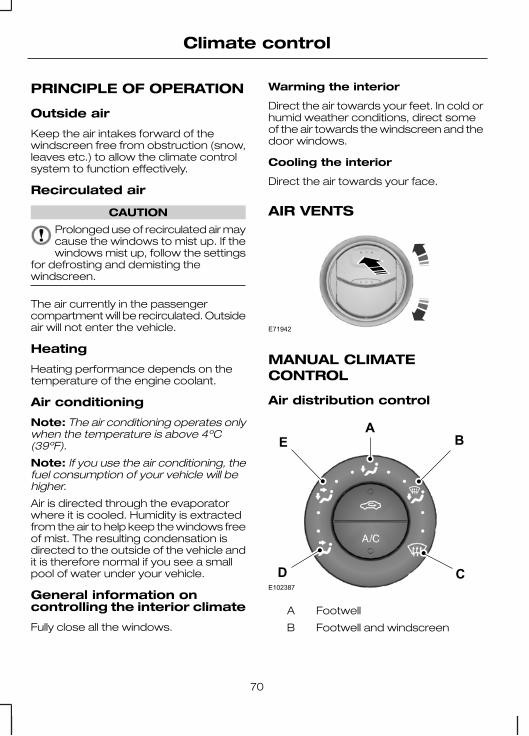
PRINCIPLE OF OPERATION
Outside air
Keep the air intakes forward of thewindscreen free from obstruction (snow,leaves etc.) to allow the climate controlsystem to function effectively.
Recirculated air
CAUTION
Prolonged use of recirculated air maycause the windows to mist up. If thewindows mist up, follow the settings
for defrosting and demisting thewindscreen.
The air currently in the passengercompartment will be recirculated. Outsideair will not enter the vehicle.
Heating
Heating performance depends on thetemperature of the engine coolant.
Air conditioning
Note: The air conditioning operates onlywhen the temperature is above 4ºC(39ºF).
Note: If you use the air conditioning, thefuel consumption of your vehicle will behigher.
Air is directed through the evaporatorwhere it is cooled. Humidity is extractedfrom the air to help keep the windows freeof mist. The resulting condensation isdirected to the outside of the vehicle andit is therefore normal if you see a smallpool of water under your vehicle.
General information oncontrolling the interior climate
Fully close all the windows.
Warming the interior
Direct the air towards your feet. In cold orhumid weather conditions, direct someof the air towards the windscreen and thedoor windows.
Cooling the interior
Direct the air towards your face.
AIR VENTS
E71942
MANUAL CLIMATECONTROL
Air distribution control
A
CD
BE
E102387
FootwellA
Footwell and windscreenB
70
Climate control
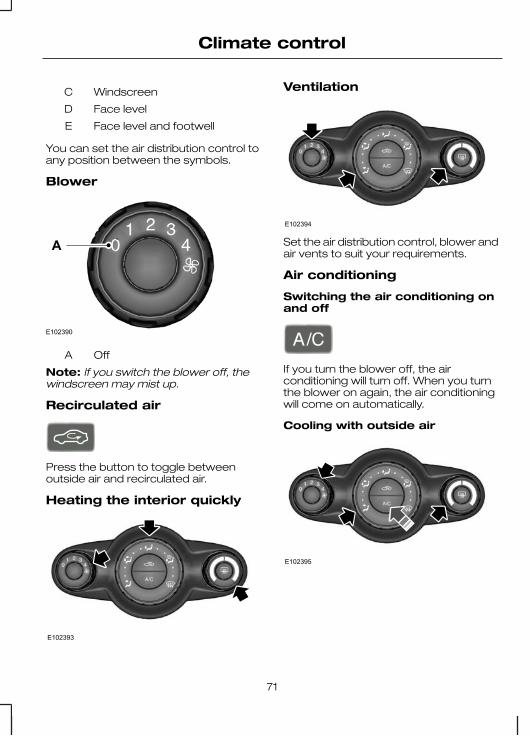
WindscreenC
Face levelD
Face level and footwellE
You can set the air distribution control toany position between the symbols.
Blower
E102390
A
OffA
Note: If you switch the blower off, thewindscreen may mist up.
Recirculated air
Press the button to toggle betweenoutside air and recirculated air.
Heating the interior quickly
E102393
Ventilation
E102394
Set the air distribution control, blower andair vents to suit your requirements.
Air conditioning
Switching the air conditioning onand off
If you turn the blower off, the airconditioning will turn off. When you turnthe blower on again, the air conditioningwill come on automatically.
Cooling with outside air
E102395
71
Climate control
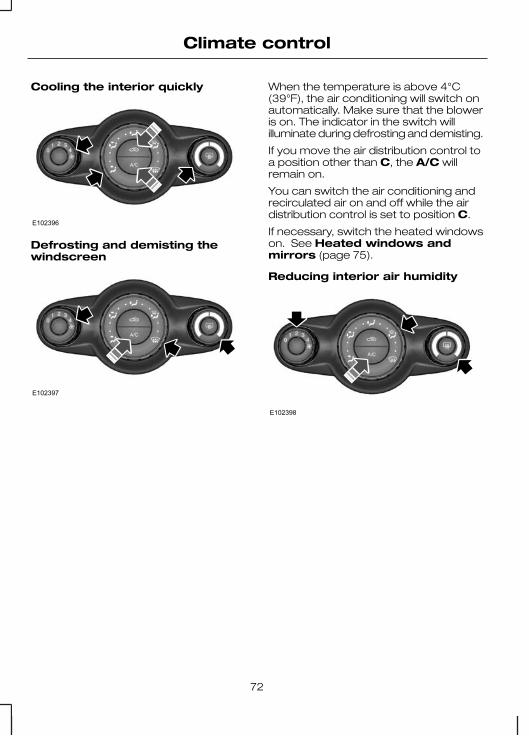
Cooling the interior quickly
E102396
Defrosting and demisting thewindscreen
E102397
When the temperature is above 4°C(39°F), the air conditioning will switch onautomatically. Make sure that the bloweris on. The indicator in the switch willilluminate during defrosting and demisting.
If you move the air distribution control toa position other than C, the A/C willremain on.
You can switch the air conditioning andrecirculated air on and off while the airdistribution control is set to position C.
If necessary, switch the heated windowson. See Heated windows andmirrors (page 75).
Reducing interior air humidity
E102398
72
Climate control
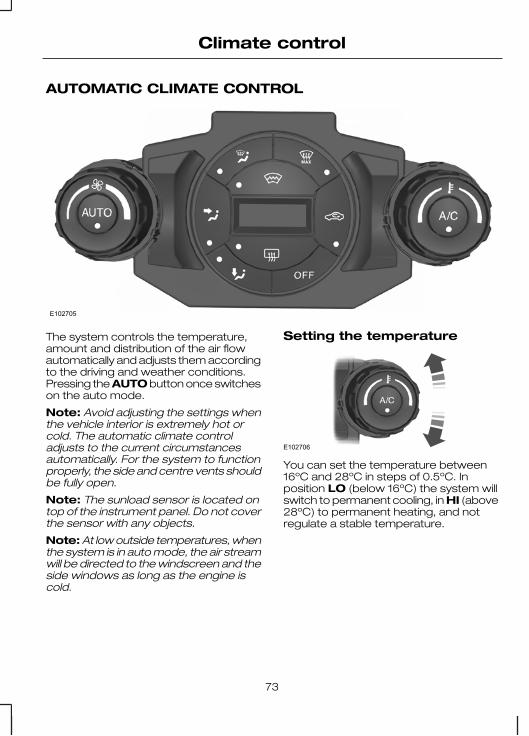
AUTOMATIC CLIMATE CONTROL
E102705
The system controls the temperature,amount and distribution of the air flowautomatically and adjusts them accordingto the driving and weather conditions.Pressing the AUTO button once switcheson the auto mode.
Note: Avoid adjusting the settings whenthe vehicle interior is extremely hot orcold. The automatic climate controladjusts to the current circumstancesautomatically. For the system to functionproperly, the side and centre vents shouldbe fully open.
Note: The sunload sensor is located ontop of the instrument panel. Do not coverthe sensor with any objects.
Note: At low outside temperatures, whenthe system is in auto mode, the air streamwill be directed to the windscreen and theside windows as long as the engine iscold.
Setting the temperature
E102706
You can set the temperature between16ºC and 28ºC in steps of 0.5ºC. Inposition LO (below 16ºC) the system willswitch to permanent cooling, in HI (above28ºC) to permanent heating, and notregulate a stable temperature.
73
Climate control
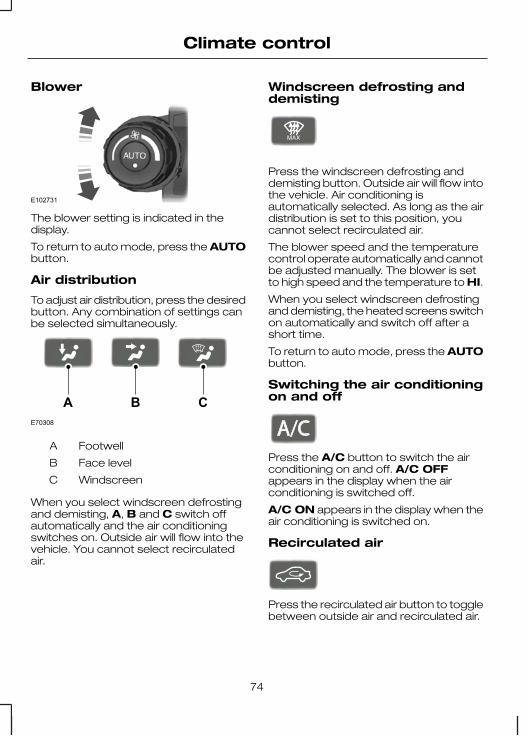
Blower
E102731
The blower setting is indicated in thedisplay.
To return to auto mode, press the AUTObutton.
Air distribution
To adjust air distribution, press the desiredbutton. Any combination of settings canbe selected simultaneously.
E70308
A B C
FootwellA
Face levelB
WindscreenC
When you select windscreen defrostingand demisting, A, B and C switch offautomatically and the air conditioningswitches on. Outside air will flow into thevehicle. You cannot select recirculatedair.
Windscreen defrosting anddemisting
E91392
Press the windscreen defrosting anddemisting button. Outside air will flow intothe vehicle. Air conditioning isautomatically selected. As long as the airdistribution is set to this position, youcannot select recirculated air.
The blower speed and the temperaturecontrol operate automatically and cannotbe adjusted manually. The blower is setto high speed and the temperature to HI.
When you select windscreen defrostingand demisting, the heated screens switchon automatically and switch off after ashort time.
To return to auto mode, press the AUTObutton.
Switching the air conditioningon and off
E91393
Press the A/C button to switch the airconditioning on and off. A/C OFFappears in the display when the airconditioning is switched off.
A/C ON appears in the display when theair conditioning is switched on.
Recirculated air
Press the recirculated air button to togglebetween outside air and recirculated air.
74
Climate control
Note: When the system is in auto modeand the interior and exterior temperaturesare quite hot, the system selectsrecirculated air automatically to maximisecooling of the interior. Once the selectedtemperature is reached, the system willreselect outside air automatically.
Switching off the automaticclimate control
E91394
Press the OFF button.
When switched off, the heating, ventilationand air conditioning system is switchedoff and recirculated air is selected.
HEATED WINDOWS ANDMIRRORS
Heated windows
Use the heated windows to defrost ordemist the windscreen or rear window.
Note: The heated windows operate onlywhen the engine is running.
Heated windscreen
E103392
Heated rear window
E72507
Heated exterior mirrors
Electric exterior mirrors are fitted with aheating element that will defrost or demistthe mirror glass. They will switch onautomatically when you switch the heatedrear window on.
75
Climate control
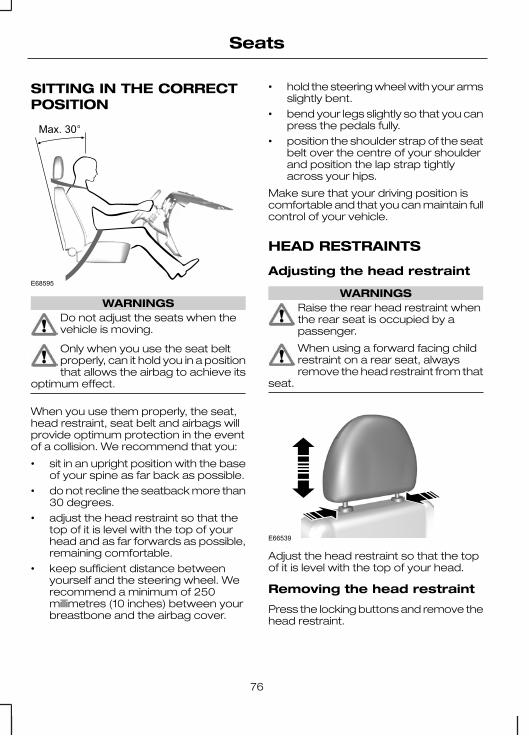
SITTING IN THE CORRECTPOSITION
E68595
WARNINGSDo not adjust the seats when thevehicle is moving.
Only when you use the seat beltproperly, can it hold you in a positionthat allows the airbag to achieve its
optimum effect.
When you use them properly, the seat,head restraint, seat belt and airbags willprovide optimum protection in the eventof a collision. We recommend that you:
• sit in an upright position with the baseof your spine as far back as possible.
• do not recline the seatback more than30 degrees.
• adjust the head restraint so that thetop of it is level with the top of yourhead and as far forwards as possible,remaining comfortable.
• keep sufficient distance betweenyourself and the steering wheel. Werecommend a minimum of 250millimetres (10 inches) between yourbreastbone and the airbag cover.
• hold the steering wheel with your armsslightly bent.
• bend your legs slightly so that you canpress the pedals fully.
• position the shoulder strap of the seatbelt over the centre of your shoulderand position the lap strap tightlyacross your hips.
Make sure that your driving position iscomfortable and that you can maintain fullcontrol of your vehicle.
HEAD RESTRAINTS
Adjusting the head restraint
WARNINGSRaise the rear head restraint whenthe rear seat is occupied by apassenger.
When using a forward facing childrestraint on a rear seat, alwaysremove the head restraint from that
seat.
E66539
Adjust the head restraint so that the topof it is level with the top of your head.
Removing the head restraint
Press the locking buttons and remove thehead restraint.
76
Seats

MANUAL SEATS
WARNINGSDo not use any accessory seatcovers that are not specificallydesigned for seats with side airbags.
These seat covers must be fitted byproperly trained technicians.
Do not adjust the seats while thevehicle is moving.
Moving the seats forwards orbackwards
E70728
WARNING
Rock the seat backwards andforwards after releasing the lever tomake sure that it is fully engaged in
its catch.
Adjusting the lumbar support
E70729
Adjusting the height of thedriver’s seat
E70730
Each pull or press on the lever will raiseor lower the height by a small amount.
77
Seats
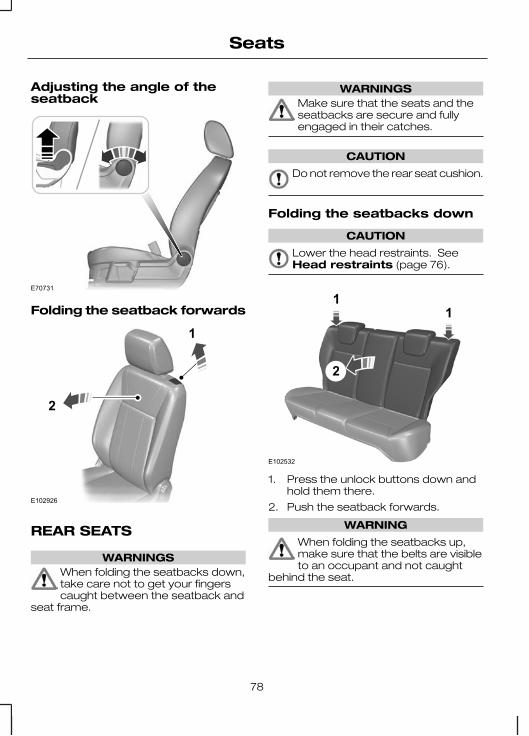
Adjusting the angle of theseatback
E70731
Folding the seatback forwards
E102926
1
2
REAR SEATS
WARNINGSWhen folding the seatbacks down,take care not to get your fingerscaught between the seatback and
seat frame.
WARNINGSMake sure that the seats and theseatbacks are secure and fullyengaged in their catches.
CAUTION
Do not remove the rear seat cushion.
Folding the seatbacks down
CAUTION
Lower the head restraints. SeeHead restraints (page 76).
1
2
1
E102532
1. Press the unlock buttons down andhold them there.
2. Push the seatback forwards.
WARNING
When folding the seatbacks up,make sure that the belts are visibleto an occupant and not caught
behind the seat.
78
Seats
SUN VISORS
E72973
CLOCK
Note: You can set the clock using thehour and minute buttons next to thedisplay. Press buttons H and Mrespectively to advance the time.
Switch the ignition on.
CUP HOLDERS
WARNING
Do not place hot drinks in the cupholders when the vehicle is moving.
CIGAR LIGHTER
CAUTIONSIf you use the socket when theengine is not running, the batterymay discharge.
Do not hold the cigar lighter elementpressed in.
Note: You can use the socket to power12 volt appliances that have a maximumcurrent rating of 15 Amperes. Use onlyFord accessory connectors or connectorsspecified for use with SAE standardsockets.
E103382
Press the element in to use the cigarlighter. It will pop out automatically.
STORAGE COMPARTMENTS
WARNING
Do not drive with any storagecompartment lid open. Make surethat you secure the lid before
setting off.
CAUTION
Do not keep heat-sensitive items andliquids in any storage compartment.
79
Convenience features

E72980
MAP POCKETS
E74686
GLASSES HOLDER
E75193
TOLL READER
E99272
40
13
70
120
On vehicles with an anti-heat windscreen,toll readers should be placed in the areaas shown (all measurements shown inmillimetres), otherwise communicationperformance with toll stations may bereduced.
The toll reader should be placed on thepassenger side to prevent the readerfrom obscuring the driver’s vision (e.g. attraffic lights).
80
Convenience features

AUXILIARY INPUT (AUX IN)SOCKET
E102671
See Auxiliary input (AUX IN) socket(page 162).
USB PORT
E102670
See Connectivity (page 184).
81
Convenience features
GENERAL INFORMATION
General points on starting
If the battery has been disconnected thevehicle may exhibit some unusual drivingcharacteristics for approx. 8 kilometres(5 miles) after reconnecting the battery.
This is because the engine managementsystem must realign itself with the engine.Any unusual driving characteristics duringthis period may be disregarded.
Starting the engine by towingor pushing
WARNING
To prevent damage you must notpush or tow start your vehicle. Usebooster cables and a booster
battery. See Using booster cables(page 129).
KEYLESS STARTING
WARNINGSThe keyless starting system may notfunction if the key is close to metalobjects or electronic devices such
as mobile phones.
Always check that the steeringwheel lock is deactivated beforeattempting to move your vehicle.
Note: A valid passive key must belocated inside the vehicle to switch theignition on and start the engine.
Note: To start your engine you must alsofully depress the brake or clutch pedal,depending on the transmission fitted.
E85766
Ignition on
Press the start button once. All electricalcircuits are operational, warning lampsand indicators illuminate.
Starting with automatictransmission
Note: Releasing the brake pedal duringengine start will stop the engine crankingand return to ignition on.
1. Make sure the transmission is in P orN.
2. Fully depress the brake pedal.
3. Briefly press the start button.
Starting with manualtransmission
Note: Releasing the clutch pedal duringengine start will stop the engine crankingand return to ignition on.
1. Fully depress the clutch pedal.
2. Briefly press the start button.
Starting a diesel engine
Note: Engine cranking will notcommence until the engine glow plugcycle has been completed. This may takeseveral seconds in extremely coldconditions.
Note: Continue to press the clutch orbrake pedal until engine cranking begins.
82
Starting the engine

Failure to start
The passive starting system will notfunction if:• The passive key frequencies are
jammed.• The passive key battery is flat.
If you are unable to start your vehicle carryout the following procedure.
E99666
1. Hold the key next to the steeringcolumn shroud exactly as shown.
2. With the key in this position you canuse the start button to switch theignition on and start your vehicle.
Stopping the engine
When your vehicle is stationary, press thestart button to stop the engine. Theignition, all electrical circuits, warninglamps and indicators will be switched off.
STEERING WHEEL LOCK
WARNING
Always check that the steering isunlocked before attempting tomove your vehicle.
Vehicles without keylessstarting
To activate the steering wheel lock;
1. Remove the key from the ignitionswitch.
2. Turn the steering wheel.
Vehicles with keyless starting
Your vehicle has an electronicallycontrolled steering wheel lock. Thisoperates automatically.
The steering wheel lock is activated if theignition is off, the engine not running andyour vehicle is stationary.
The steering wheel lock is deactivatedwhen the ignition is switched on.
STARTING A PETROLENGINE
Note: You can only operate the starterfor a maximum of 30 seconds at a time.
Cold or hot engine
All vehicles
CAUTION
When the temperature is below-20ºC (-4ºF), switch the ignition onfor at least one second before
starting the engine. This will make surethat the maximum fuel pressure isestablished for starting the engine.
Vehicles with manual transmission
Note: Do not touch the acceleratorpedal.
1. Fully depress the clutch pedal.
2. Start the engine.
Vehicles with automatictransmission
Note: Do not touch the acceleratorpedal.
83
Starting the engine
1. Select park or neutral.
2. Fully depress the brake pedal.
3. Start the engine.
All vehicles
If the engine does not start within 15seconds, wait for a short period and tryagain.
If the engine does not start after threeattempts, wait 10 seconds and follow theFlooded engine procedure.
If you have difficulty starting the enginewhen the temperature is below -25ºC(-13ºF), press the accelerator pedalbetween ¼ to ½ of its travel and try again.
Flooded engine
Vehicles with manual transmission
1. Fully depress the clutch pedal.
2. Fully depress the accelerator pedaland hold it there.
3. Start the engine.
Vehicles with automatictransmission
1. Select park or neutral.
2. Fully depress the accelerator pedaland hold it there.
3. Fully depress the brake pedal.
4. Start the engine.
All vehicles
If the engine does not start, repeat theCold or hot engine procedure.
Engine idle speed afterstarting
The speed at which the engine idlesimmediately after starting will varydepending on the engine temperature.
If the engine is cold then the idle speedwill automatically be increased in order toheat the catalytic converter as quickly aspossible. This ensures that vehicleemissions are kept to an absoluteminimum.
The idle speed will slowly decrease to thenormal level as the catalytic converterwarms up.
STARTING A DIESELENGINE
Cold or hot engine
All vehicles
Note: When the temperature is below-15ºC (5ºF), you may need to crank theengine for up to 25 seconds. If youconsistently operate the vehicle in suchtemperatures, we recommend that youhave an engine block heater fitted.
Note: Continue cranking the engine untilit starts.
Note: You can only operate the starterfor a maximum of 30 seconds at a time.
Switch the ignition on and waituntil the glow plug indicatorgoes off.
Vehicles with manual transmission
Note: Do not touch the acceleratorpedal.
1. Fully depress the clutch pedal.
2. Start the engine.
Vehicles with automatictransmission
1. Select park or neutral.
2. Fully depress the brake pedal.
3. Start the engine.
84
Starting the engine
DIESEL PARTICULATEFILTER (DPF)
The DPF forms part of the emissionsreduction systems fitted to your vehicle.It filters harmful diesel particulates (soot)from the exhaust gas.
Regeneration
WARNING
Do not park or idle your vehicle overdry leaves or dry grass or othercombustible material. The
regeneration process requires very highexhaust gas temperatures and theexhaust will radiate a considerableamount of heat during and afterregeneration, and after you have switchedthe engine off. This is a potential firehazard.
Unlike a normal filter which requiresperiodic replacement, the DPF has beendesigned to regenerate, or clean itself tomaintain operating efficiency. Theregeneration process takes placeautomatically. However, some drivingconditions mean that you may need tosupport the regeneration process.
If you drive only short distances or yourjourneys contain frequent stopping andstarting, you must initiate the regenerationprocess if the soot overload warning lampin the instrument cluster illuminates. SeeWarning lamps and indicators(page 56). When safe to do so:
• Drive your vehicle on a free flowingjourney for up to 30 minutes, avoidingprolonged idling.
• Do not switch off the ignition.
• Use a lower gear than normal tomaintain a higher engine speed duringthis journey.
This process may have to be repeated.The warning lamp will go out when theregeneration process is successful.
85
Starting the engine
SAFETY PRECAUTIONS
WARNINGSStop refuelling after the fuel nozzlestops the second time. Additionalfuel will fill the expansion space in
the fuel tank which could lead to fueloverflowing. Fuel spillage could behazardous to other road users.
Do not use any kind of flames orheat near the fuel system. The fuelsystem is under pressure. There is
a risk of injury if the fuel system is leaking.
FUEL QUALITY - PETROL
Note: We recommend that you use onlyhigh quality fuel without additives or otherengine treatments.
CAUTION
Do not use leaded petrol or petrolwith additives containing othermetallic compounds (e.g.
manganese-based). They could damagethe emission system.
Use minimum 95 octane unleadedpetrol that meets the specification definedby EN 228, or equivalent.
FUEL QUALITY - DIESEL
Note: We recommend that you use onlyhigh quality fuel without additives or otherengine treatments.
WARNING
Do not mix diesel with oil, petrol orother liquids. This could cause achemical reaction.
CAUTION
Do not add kerosene, paraffin orpetrol to diesel. This could causedamage to the fuel system.
Note: We do not recommend theprolonged use of additives intended toprevent fuel waxing.
Use diesel that meets the specificationdefined by EN 590, or equivalent.
You can use diesel that contains up to 5%RME (bio diesel).
FUEL FILLER FLAP
WARNINGSTake care when refuelling to avoidspilling any residual fuel from the fuelpipe nozzle.
We recommend that you wait atleast 10 seconds before removingthe fuel pipe nozzle to allow any
residual fuel to drain into the fuel tank.
CAUTION
If you use a high pressure spray towash your vehicle, only spray the fuelfiller flap briefly from a distance not
less than 20 centimetres (8 inches).
E103203
86
Fuel and refuelling
Press the flap to open it. Open the flapfully until it engages.
When you insert the fuel pipe nozzle, aspring loaded inhibitor will open if thecorrect size nozzle is detected. This willprevent filling up with the wrong fuel.
Insert the fuel pipe nozzle up to the firstnotch on the nozzle, and keep it inposition on the fuel filler opening.
Vehicles with diesel engine
Vehicles with tyre repair kit
A funnel is located in the spare wheel well.Use this when refilling with a fuel can.
Vehicles without tyre repair kit
A funnel is located in the glove box. Usethis when refilling with a fuel can.
CATALYTIC CONVERTER
Driving with a catalyticconverter
CAUTIONSAvoid running out of fuel.
Do not crank the engine for longperiods.
Do not run the engine when a sparkplug lead is disconnected.
Do not push-start or tow-start yourvehicle. Use booster cables. SeeUsing booster cables (page 129).
Do not switch the ignition off whendriving.
Parking
WARNING
Do not park your vehicle over dryleaves or dry grass. The exhaust willcontinue to radiate a considerable
amount of heat after you have switchedthe engine off. This is a potential firehazard.
REFUELLING
CAUTION
Do not attempt to start the engine ifyou have filled the fuel tank with theincorrect fuel. This could damage the
engine. Have the system checked by aproperly trained technician immediately.
FUEL CONSUMPTION
The CO2 and fuel consumption figuresare derived from laboratory testsaccording to EEC Directive 80/1268/EECand subsequent amendments and arecarried out by all vehicle manufacturers.
They are intended as a comparisonbetween makes and models of vehicles.They are not intended to represent thereal world fuel consumption you may getfrom your vehicle. Real world fuelconsumption is governed by many factorsincluding; driving style, high speed driving,stop/start driving, air conditioning usage,the accessories fitted and towing etc.
Your Ford dealer can give you advice onimproving your fuel consumption.
87
Fuel and refuelling
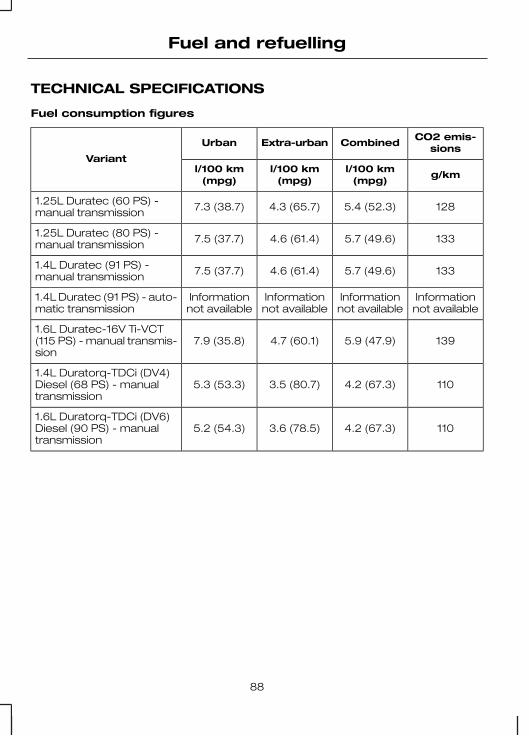
TECHNICAL SPECIFICATIONS
Fuel consumption figures
CO2 emis-sionsCombinedExtra-urbanUrban
Variant
g/kml/100 km(mpg)
l/100 km(mpg)
l/100 km(mpg)
1285.4 (52.3)4.3 (65.7)7.3 (38.7)1.25L Duratec (60 PS) -manual transmission
1335.7 (49.6)4.6 (61.4)7.5 (37.7)1.25L Duratec (80 PS) -manual transmission
1335.7 (49.6)4.6 (61.4)7.5 (37.7)1.4L Duratec (91 PS) -manual transmission
Informationnot available
Informationnot available
Informationnot available
Informationnot available
1.4L Duratec (91 PS) - auto-matic transmission
1395.9 (47.9)4.7 (60.1)7.9 (35.8)1.6L Duratec-16V Ti-VCT(115 PS) - manual transmis-sion
1104.2 (67.3)3.5 (80.7)5.3 (53.3)1.4L Duratorq-TDCi (DV4)Diesel (68 PS) - manualtransmission
1104.2 (67.3)3.6 (78.5)5.2 (54.3)1.6L Duratorq-TDCi (DV6)Diesel (90 PS) - manualtransmission
88
Fuel and refuelling

MANUAL TRANSMISSION
All vehicles
CAUTIONSDo not engage reverse gear whenthe vehicle is moving. This can causedamage to the transmission.
Do not apply any undue lateral forceto the gear lever when changing from5th to 4th gear. This could lead to the
inadvertent selection of 2nd gear and cancause damage to the transmission.
Selecting reverse gear
On some vehicles it is necessary to raisethe collar whilst selecting reverse gear.
E99067
AUTOMATICTRANSMISSION
General information
This transmission also allows you tochange gear manually (similar to a manualtransmission).
Selector lever positions
E78310
ParkP
ReverseR
NeutralN
DriveD
Manual shiftingM
WARNING
Apply the brakes before moving theselector lever and keep themapplied until you are ready to move
off.
Note: A cold engine has a higher idlespeed. This will increase the tendency foryour vehicle to creep when you haveselected a drive gear.
Press the button on the selector lever toselect reverse and park.
The selector lever position will be shownin the information display.
Park
WARNINGSSelect park only when your vehicleis stationary.
89
Transmission
WARNINGSApply the parking brake andselect park before leavingyour vehicle. Make sure that the
selector lever is latched in position.
Note: An audible warning will sound if youopen the driver's door and you have notselected park.
Note: The battery saver will deactivatethe warning chime after a period of time.
In this position, power is not transmittedto the drive wheels and the transmissionis locked. You can start the engine withthe selector lever in this position.
Reverse
WARNING
Select reverse only when yourvehicle is stationary and the engineis at idle speed.
Neutral
In this position, power is not transmittedto the drive wheels but the transmissionis not locked. You can start the enginewith the selector lever in this position.
Drive
Select drive to shift automatically throughthe forward gears.
Manual shifting
Note: A shift will occur only when thevehicle speed and the engine speed areappropriate.
Select manual shifting to shift manuallythrough the forward gears. Push theselector lever forwards to shift down andpull it backwards to shift up.
WARNING
Do not hold the selector leverpermanently in – or +.
Gears can be skipped by moving theselector lever repeatedly at short intervals.
Manual mode also provides a kickdownfunction. See Kickdown.
The transmission will automaticallydownshift when the engine speed is toolow and upshift when to high.
Drive modes
The transmission will select theappropriate gear for optimumperformance based on ambienttemperature, road gradient, vehicle loadand driver input.
Hints on driving with anautomatic transmission
Moving off
WARNING
It is not possible to tow-start orpush-start a vehicle fitted with anautomatic transmission. See Using
booster cables (page 129).
1. Release the parking brake.
2. Release the brake pedal and pressthe accelerator pedal.
Stopping
1. Release the accelerator pedal andpress the brake pedal.
2. Apply the parking brake.
90
Transmission
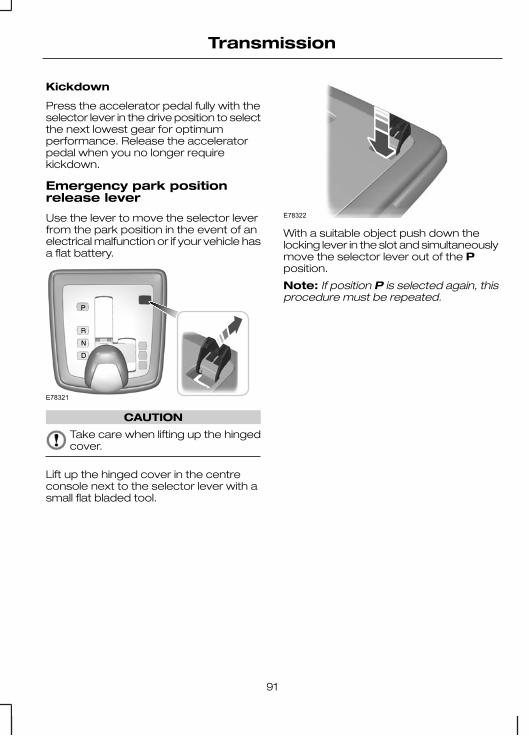
Kickdown
Press the accelerator pedal fully with theselector lever in the drive position to selectthe next lowest gear for optimumperformance. Release the acceleratorpedal when you no longer requirekickdown.
Emergency park positionrelease lever
Use the lever to move the selector leverfrom the park position in the event of anelectrical malfunction or if your vehicle hasa flat battery.
E78321
CAUTION
Take care when lifting up the hingedcover.
Lift up the hinged cover in the centreconsole next to the selector lever with asmall flat bladed tool.
E78322
With a suitable object push down thelocking lever in the slot and simultaneouslymove the selector lever out of the Pposition.
Note: If position P is selected again, thisprocedure must be repeated.
91
Transmission
PRINCIPLE OF OPERATION
Disc brakes
Wet brake discs result in reduced brakingefficiency. Dab the brake pedal whendriving from a car wash to remove the filmof water.
ABS
WARNING
The ABS does not relieve you ofyour responsibility to drive with duecare and attention.
The ABS helps you to maintain full steeringand directional stability when you brakeheavily in an emergency, by preventingthe road wheels from locking.
HINTS ON DRIVING WITHABS
When the ABS is operating, the brakepedal will pulse. This is normal. Maintainpressure on the brake pedal.
The ABS will not eliminate the dangersinherent when:• you drive too close to the vehicle in
front of you.• the vehicle is aquaplaning.
• you take corners too fast.
• the road surface is poor.
PARKING BRAKE
All vehicles
WARNING
Vehicles with an automatictransmission should always be leftwith the selector lever in position P.
• Press the foot brake pedal firmly.
• Pull the parking brake lever up smartlyto its fullest extent.
• Do not press the release button whilepulling the lever up.
• If your vehicle is parked on a hill andfacing uphill, select first gear and turnthe steering wheel away from thekerb.
• If your vehicle is parked on a hill andfacing downhill, select reverse gearand turn the steering wheel towardsthe kerb.
To release the parking brake, press thebrake pedal firmly, pull the lever up slightly,depress the release button and push thelever down.
92
Brakes
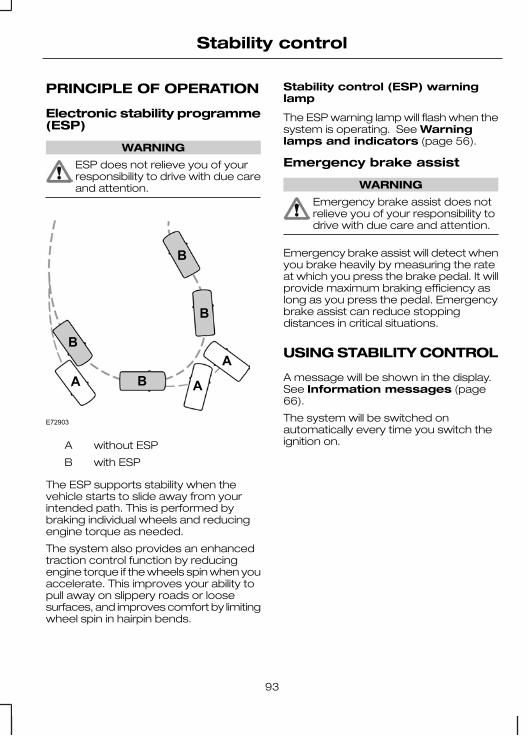
PRINCIPLE OF OPERATION
Electronic stability programme(ESP)
WARNING
ESP does not relieve you of yourresponsibility to drive with due careand attention.
E72903
A A
AB
B
B
B
without ESPA
with ESPB
The ESP supports stability when thevehicle starts to slide away from yourintended path. This is performed bybraking individual wheels and reducingengine torque as needed.
The system also provides an enhancedtraction control function by reducingengine torque if the wheels spin when youaccelerate. This improves your ability topull away on slippery roads or loosesurfaces, and improves comfort by limitingwheel spin in hairpin bends.
Stability control (ESP) warninglamp
The ESP warning lamp will flash when thesystem is operating. See Warninglamps and indicators (page 56).
Emergency brake assist
WARNING
Emergency brake assist does notrelieve you of your responsibility todrive with due care and attention.
Emergency brake assist will detect whenyou brake heavily by measuring the rateat which you press the brake pedal. It willprovide maximum braking efficiency aslong as you press the pedal. Emergencybrake assist can reduce stoppingdistances in critical situations.
USING STABILITY CONTROL
A message will be shown in the display.See Information messages (page66).
The system will be switched onautomatically every time you switch theignition on.
93
Stability control
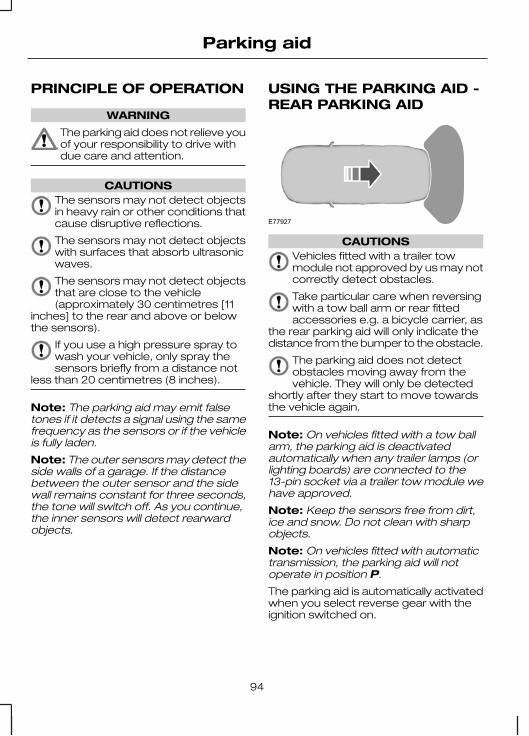
PRINCIPLE OF OPERATION
WARNING
The parking aid does not relieve youof your responsibility to drive withdue care and attention.
CAUTIONSThe sensors may not detect objectsin heavy rain or other conditions thatcause disruptive reflections.
The sensors may not detect objectswith surfaces that absorb ultrasonicwaves.
The sensors may not detect objectsthat are close to the vehicle(approximately 30 centimetres [11
inches] to the rear and above or belowthe sensors).
If you use a high pressure spray towash your vehicle, only spray thesensors briefly from a distance not
less than 20 centimetres (8 inches).
Note: The parking aid may emit falsetones if it detects a signal using the samefrequency as the sensors or if the vehicleis fully laden.
Note: The outer sensors may detect theside walls of a garage. If the distancebetween the outer sensor and the sidewall remains constant for three seconds,the tone will switch off. As you continue,the inner sensors will detect rearwardobjects.
USING THE PARKING AID -REAR PARKING AID
E77927
CAUTIONSVehicles fitted with a trailer towmodule not approved by us may notcorrectly detect obstacles.
Take particular care when reversingwith a tow ball arm or rear fittedaccessories e.g. a bicycle carrier, as
the rear parking aid will only indicate thedistance from the bumper to the obstacle.
The parking aid does not detectobstacles moving away from thevehicle. They will only be detected
shortly after they start to move towardsthe vehicle again.
Note: On vehicles fitted with a tow ballarm, the parking aid is deactivatedautomatically when any trailer lamps (orlighting boards) are connected to the13-pin socket via a trailer tow module wehave approved.
Note: Keep the sensors free from dirt,ice and snow. Do not clean with sharpobjects.
Note: On vehicles fitted with automatictransmission, the parking aid will notoperate in position P.
The parking aid is automatically activatedwhen you select reverse gear with theignition switched on.
94
Parking aid
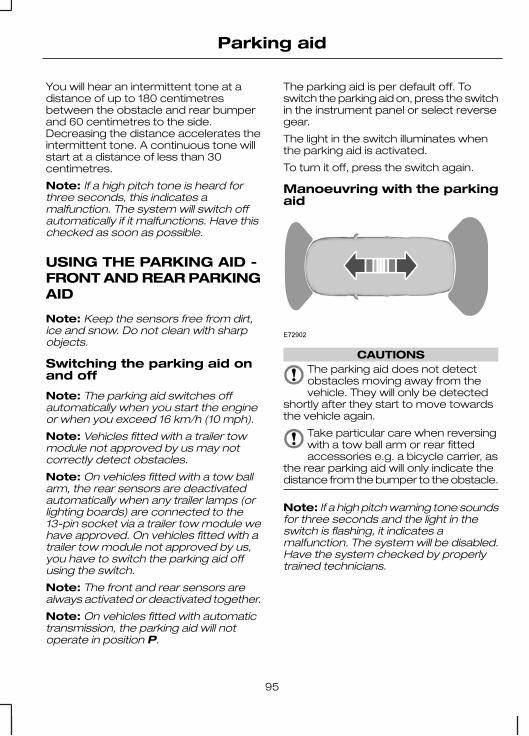
You will hear an intermittent tone at adistance of up to 180 centimetresbetween the obstacle and rear bumperand 60 centimetres to the side.Decreasing the distance accelerates theintermittent tone. A continuous tone willstart at a distance of less than 30centimetres.
Note: If a high pitch tone is heard forthree seconds, this indicates amalfunction. The system will switch offautomatically if it malfunctions. Have thischecked as soon as possible.
USING THE PARKING AID -FRONT AND REAR PARKINGAID
Note: Keep the sensors free from dirt,ice and snow. Do not clean with sharpobjects.
Switching the parking aid onand off
Note: The parking aid switches offautomatically when you start the engineor when you exceed 16 km/h (10 mph).
Note: Vehicles fitted with a trailer towmodule not approved by us may notcorrectly detect obstacles.
Note: On vehicles fitted with a tow ballarm, the rear sensors are deactivatedautomatically when any trailer lamps (orlighting boards) are connected to the13-pin socket via a trailer tow module wehave approved. On vehicles fitted with atrailer tow module not approved by us,you have to switch the parking aid offusing the switch.
Note: The front and rear sensors arealways activated or deactivated together.
Note: On vehicles fitted with automatictransmission, the parking aid will notoperate in position P.
The parking aid is per default off. Toswitch the parking aid on, press the switchin the instrument panel or select reversegear.
The light in the switch illuminates whenthe parking aid is activated.
To turn it off, press the switch again.
Manoeuvring with the parkingaid
E72902
CAUTIONSThe parking aid does not detectobstacles moving away from thevehicle. They will only be detected
shortly after they start to move towardsthe vehicle again.
Take particular care when reversingwith a tow ball arm or rear fittedaccessories e.g. a bicycle carrier, as
the rear parking aid will only indicate thedistance from the bumper to the obstacle.
Note: If a high pitch warning tone soundsfor three seconds and the light in theswitch is flashing, it indicates amalfunction. The system will be disabled.Have the system checked by properlytrained technicians.
95
Parking aid
You will hear an intermittent tone at adistance of up to 180 centimetres (71inches) between the obstacle and rearbumper, 80 centimetres (31 inches)between the obstacle and front bumperand 60 centimetres (24 inches) to theside. Decreasing the distance acceleratesthe intermittent tone. A continuous tonewill start at a distance of less than 30centimetres (11 inches).
You will hear an alternating tone from thefront and rear if obstacles are closer than30 centimetres (11 inches) to the front andrear bumpers.
96
Parking aid

PRINCIPLE OF OPERATION
Cruise control allows you to control yourspeed using the switches on the steeringwheel. You can use cruise control whenyou exceed approximately 30 km/h (20mph).
USING CRUISE CONTROL
WARNING
Do not use cruise control in heavytraffic, on twisty roads or when theroad surface is slippery.
Switching cruise control on
E102679
Note: The system is ready for you to seta speed.
Setting a speed
E102680
Press to store and maintain your currentspeed. The cruise control indicator willilluminate. See Warning lamps andindicators (page 56).
Changing the set speed
WARNING
When you are going downhill, yourspeed may increase above the setspeed. The system will not apply the
brakes. Change down a gear and pressthe SET- switch to assist the system inmaintaining the set speed.
Note: If you accelerate by pressing theaccelerator pedal, the set speed will notchange. When you release theaccelerator pedal, you will return to thespeed that you previously set.
E102681B
A
AccelerateA
DecelerateB
97
Cruise control

Cancelling the set speed
E102682
Press the brake pedal or the CAN RESswitch.
Note: The system will no longer controlyour speed. The cruise control indicatorwill not illuminate but the system will retainthe speed that you previously set.
Resuming the set speed
E102682
The cruise control indicator will illuminateand the system will attempt to resumethe speed that you previously set.
Switching cruise control off
E102683
The system will not retain the speed thatyou previously set. The cruise controlindicator will not illuminate.
98
Cruise control
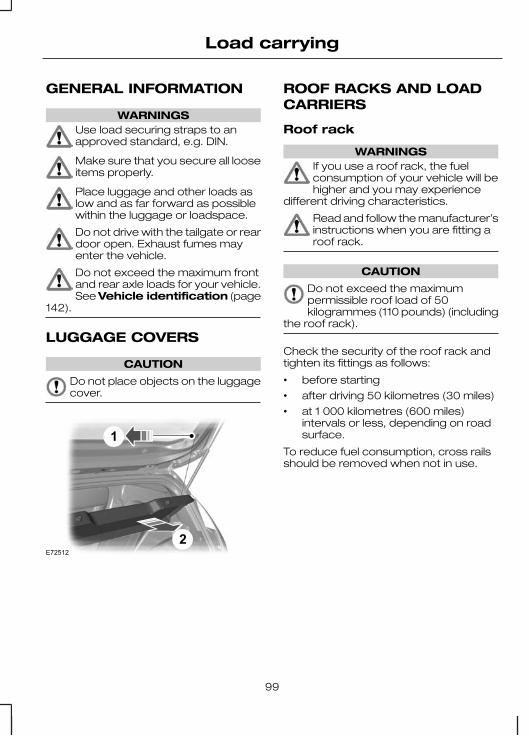
GENERAL INFORMATION
WARNINGSUse load securing straps to anapproved standard, e.g. DIN.
Make sure that you secure all looseitems properly.
Place luggage and other loads aslow and as far forward as possiblewithin the luggage or loadspace.
Do not drive with the tailgate or reardoor open. Exhaust fumes mayenter the vehicle.
Do not exceed the maximum frontand rear axle loads for your vehicle.See Vehicle identification (page
142).
LUGGAGE COVERS
CAUTION
Do not place objects on the luggagecover.
1
2E72512
ROOF RACKS AND LOADCARRIERS
Roof rack
WARNINGSIf you use a roof rack, the fuelconsumption of your vehicle will behigher and you may experience
different driving characteristics.
Read and follow the manufacturer’sinstructions when you are fitting aroof rack.
CAUTION
Do not exceed the maximumpermissible roof load of 50kilogrammes (110 pounds) (including
the roof rack).
Check the security of the roof rack andtighten its fittings as follows:
• before starting
• after driving 50 kilometres (30 miles)
• at 1 000 kilometres (600 miles)intervals or less, depending on roadsurface.
To reduce fuel consumption, cross railsshould be removed when not in use.
99
Load carrying

TOWING A TRAILER
WARNING
Do not exceed the maximumvehicle and trailer weight stated onthe vehicle identification plate. See
Vehicle identification plate (page142).
CAUTION
The electrical system is not suitablefor towing trailers with more than onerear fog lamp.
Note: Not all vehicles are suitable orapproved to have tow bars fitted. Checkwith your dealer first.
Place loads as low and central to theaxle(s) of the trailer as possible. If you aretowing with an unladen vehicle, the loadin the trailer should be placed toward thenose, within the maximum nose load, asthis gives the best stability.
Note: The maximum trailer nose weightcan be found in the original vehicledocuments (confirmation of conformity).Alternatively refer to your dealer.
The stability of the vehicle to trailercombination is very much dependant onthe quality of the trailer.
In high altitude regions, the stipulatedmaximum permitted gross train weightmust be reduced by 10% for every 1 000metres (3 281 feet).
Steep gradients
WARNING
The overrun brake on a trailer is notcontrolled by ABS.
Change down a gear before you reach asteep downhill gradient.
100
Towing
RUNNING-IN
Tyres
WARNING
New tyres need to be run-in forapproximately 500 kilometres (300miles). During this time, you may
experience different drivingcharacteristics.
Brakes and clutch
WARNING
Avoid heavy use of the brakes andclutch if possible for the first 150kilometres (100 miles) in town and
for the first 1 500 kilometres (1 000 miles)on motorways.
Engine
CAUTION
Avoid driving too fast during the first1 500 kilometres (1 000 miles). Varyyour speed frequently and change
up through the gears early. Do not labourthe engine.
101
Driving hints

FIRST AID KIT
Space is provided in the spare wheel well.
WARNING TRIANGLE
Space is provided in the spare wheel well.
102
Emergency equipment

INSPECTING SAFETYSYSTEM COMPONENTS
Seat belts
Belts subjected to strain, as a result of anaccident, should be renewed and theanchorages checked by a properlytrained technician.
103
Status after a collision
FUSE BOX LOCATIONS
Engine compartment fuse box
E78332
Passenger compartment fusebox
This fuse box is located behind the glovebox. Open the glove box and empty thecontents. Press the sides inwards andswivel the glove box downwards.
CHANGING A FUSE
WARNINGSDo not modify the electrical systemof your vehicle in any way. Haverepairs to the electrical system and
the replacement of relays and high currentfuses carried out by properly trainedtechnicians.
Switch the ignition and all electricalequipment off before touching orattempting to change a fuse.
CAUTION
Fit a replacement fuse with the samerating as the one you have removed.
Note: You can identify a blown fuse bya break in the filament.
Note: All fuses, except high currentfuses, are a push fit.
104
Fuses
FUSE SPECIFICATION CHART
Engine compartment fuse box
Circuits protectedAmpereratingFuse
ABS module401
ABS ESP module301
Cooling system fan high speed602
Cooling system fan403
Cooling system fan low speed303
Heater blower304
Passenger compartment fuse box supply (battery)605
Body control module (BCM)306
Passenger compartment fuse box supply (ignition)607
Glow plugs608
Heated windscreen609
Not used-10
Starter relay3011
Main beam left-hand relay1012
Main beam right-hand relay1013
Dipped beam left-hand relay1014
Dipped beam right-hand relay1015
Powertrain control module (PCM), high and low coolingfan1516
Heated oxygen (HEGO) sensors (Petrol engines)1517
Power supply module (Diesel engines)2017
Powertrain control module (PCM)1018
Not used-19
Not used-20
105
Fuses

Circuits protectedAmpereratingFuse
Not used-21
Lighting control battery supply1522
Front fog lamps1523
Direction indicators1524
Daytime running lamps1025
Electric exterior mirrors switch, electric folding mirrors,power window (driver's door)7.526
PCM7.527
ABS module, ESP2028
Air conditioning clutch1029
Not used-30
Not used-31
Horn, battery saver, keyless vehicle module2032
Heated rear window2033
Fuel pump relay, diesel fuel heater2034
Not used-35
Not used-36
Not used-37
Not used-38
Not used-39
Not used-40
Circuits switchedRelay
Cooling system fanR1
Glow plugsR2
PCMR3
Main beamR4
106
Fuses
Circuits switchedRelay
Dipped beamR5
Daytime running lampsR6
Engine cooling fanR7
StarterR8
Air conditioning clutchR9
Front fog lampsR10
Fuel pump, fuel heaterR11
Reverse lampR12
Heater blowerR13
Passenger compartment fuse box - Type 1
Circuits protectedAmpere ratingFuse
Ignition, rain sensor, heatedwindscreen7.51
Stop lamps102
Reversing lamp7.53
Headlamp levelling7.54
Windscreen wipers205
Rear window wiper156
Washer pump107
Trailer module, parking aid(vehicles with front parkingaid)
108
Not used109
Heated seats7.510
Not used-11
Airbag module1012
107
Fuses
Circuits protectedAmpere ratingFuse
Ignition, electric powerassisted steering (EPAS),instrument cluster, passiveanti theft system (PATS),ABS
1013
PCM, gear selector lever,fuel pump,7.514
Audio system, instrumentcluster7.515
Heated exterior mirror7.516
Ignition switch1517
Instrument Cluster7.518
Data link connector1519
Multi functional display,clock, internal scanner,heating ventilating, airconditioning (HVAC) panel
7.520
Audio system, Bluetooth1521
Cigar lighter, front powerpoint2022
Trailer module2023
Not used-24
Power windows (front)3025
Not used-26
Not used-27
Circuits switchedRelay
IgnitionR1
108
Fuses
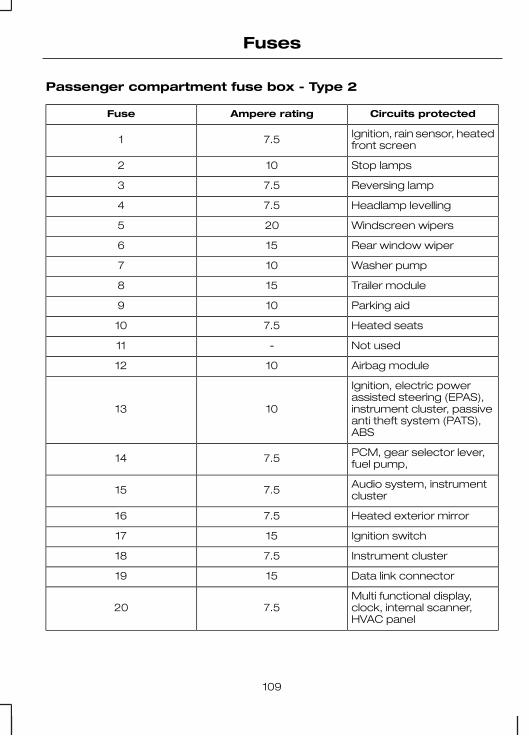
Passenger compartment fuse box - Type 2
Circuits protectedAmpere ratingFuse
Ignition, rain sensor, heatedfront screen7.51
Stop lamps102
Reversing lamp7.53
Headlamp levelling7.54
Windscreen wipers205
Rear window wiper156
Washer pump107
Trailer module158
Parking aid109
Heated seats7.510
Not used-11
Airbag module1012
Ignition, electric powerassisted steering (EPAS),instrument cluster, passiveanti theft system (PATS),ABS
1013
PCM, gear selector lever,fuel pump,7.514
Audio system, instrumentcluster7.515
Heated exterior mirror7.516
Ignition switch1517
Instrument cluster7.518
Data link connector1519
Multi functional display,clock, internal scanner,HVAC panel
7.520
109
Fuses
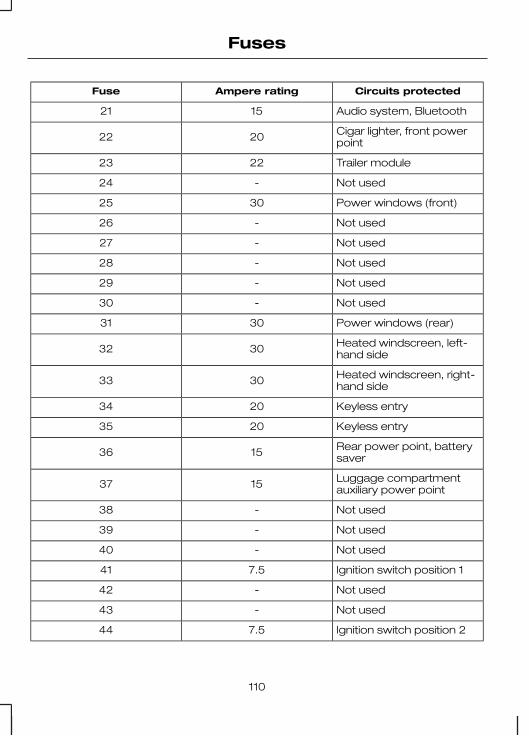
Circuits protectedAmpere ratingFuse
Audio system, Bluetooth1521
Cigar lighter, front powerpoint2022
Trailer module2223
Not used-24
Power windows (front)3025
Not used-26
Not used-27
Not used-28
Not used-29
Not used-30
Power windows (rear)3031
Heated windscreen, left-hand side3032
Heated windscreen, right-hand side3033
Keyless entry2034
Keyless entry2035
Rear power point, batterysaver1536
Luggage compartmentauxiliary power point1537
Not used-38
Not used-39
Not used-40
Ignition switch position 17.541
Not used-42
Not used-43
Ignition switch position 27.544
110
Fuses
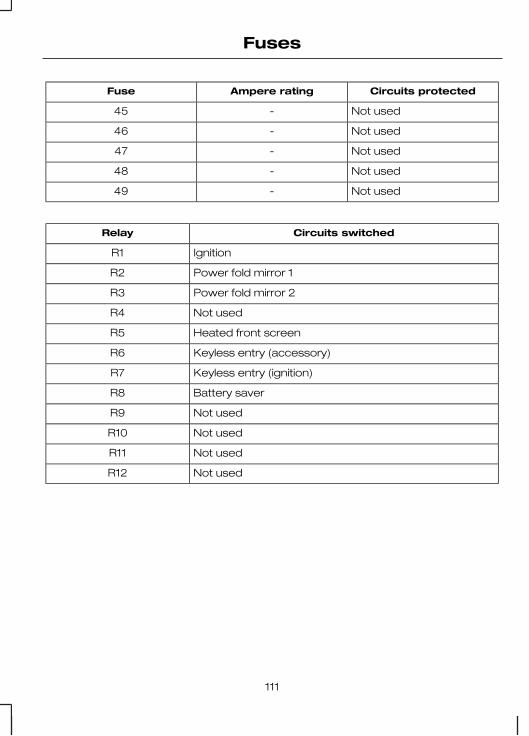
Circuits protectedAmpere ratingFuse
Not used-45
Not used-46
Not used-47
Not used-48
Not used-49
Circuits switchedRelay
IgnitionR1
Power fold mirror 1R2
Power fold mirror 2R3
Not usedR4
Heated front screenR5
Keyless entry (accessory)R6
Keyless entry (ignition)R7
Battery saverR8
Not usedR9
Not usedR10
Not usedR11
Not usedR12
111
Fuses

TOWING POINTS
Front towing eye
E99490
Space is provided in the spare wheel well.
The towing eye must always be carriedin the vehicle.
Prise off the cover and install the towingeye.
CAUTION
The screw-in towing eye has aleft-hand thread. Turn itanti-clockwise to install it.
Rear towing hook
E102895
Prise off the cover.
Note: On vehicles with a tow bar,use the tow bar to tow a vehicle.
TOWING THE VEHICLE ONFOUR WHEELS
All vehicles
WARNINGSSwitch the ignition on when yourvehicle is being towed. The steeringlock will engage and the direction
indicators and brake lamps will not workif you do not.
The brake servo and the powersteering pump do not operateunless the engine is running. Press
the brake pedal harder and allow forincreased stopping distances and heaviersteering.
CAUTIONSToo much tension in the tow ropecould cause damage to your vehicleor the vehicle that is towing.
Do not use a rigid tow bar on thefront towing eye.
Drive off slowly and smoothly withoutjerking the vehicle that is towing.
Vehicles with automatictransmission
CAUTIONSDo not tow your vehicle faster than50 km/h (30 mph) or further than 50kilometres (30 miles).
If a speed of 50 km/h (30 mph) anda distance of 50 kilometres (30 miles)is to be exceeded the drive wheels
must be lifted clear of the ground.
In the event of a mechanical failureof the transmission the drive wheelsmust be lifted clear of the ground.
Do not tow your vehicle backwards.
112
Vehicle recovery
CAUTIONSSelect neutral when your vehicle isbeing towed.
113
Vehicle recovery
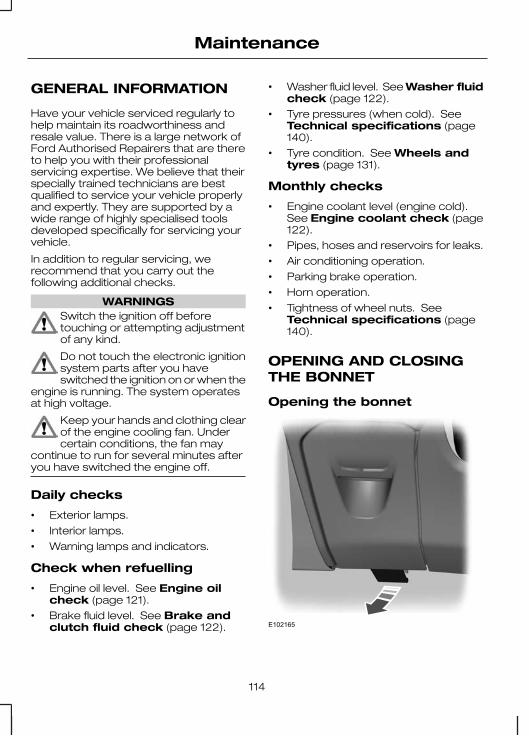
GENERAL INFORMATION
Have your vehicle serviced regularly tohelp maintain its roadworthiness andresale value. There is a large network ofFord Authorised Repairers that are thereto help you with their professionalservicing expertise. We believe that theirspecially trained technicians are bestqualified to service your vehicle properlyand expertly. They are supported by awide range of highly specialised toolsdeveloped specifically for servicing yourvehicle.
In addition to regular servicing, werecommend that you carry out thefollowing additional checks.
WARNINGSSwitch the ignition off beforetouching or attempting adjustmentof any kind.
Do not touch the electronic ignitionsystem parts after you haveswitched the ignition on or when the
engine is running. The system operatesat high voltage.
Keep your hands and clothing clearof the engine cooling fan. Undercertain conditions, the fan may
continue to run for several minutes afteryou have switched the engine off.
Daily checks
• Exterior lamps.
• Interior lamps.
• Warning lamps and indicators.
Check when refuelling
• Engine oil level. See Engine oilcheck (page 121).
• Brake fluid level. See Brake andclutch fluid check (page 122).
• Washer fluid level. See Washer fluidcheck (page 122).
• Tyre pressures (when cold). SeeTechnical specifications (page140).
• Tyre condition. See Wheels andtyres (page 131).
Monthly checks
• Engine coolant level (engine cold).See Engine coolant check (page122).
• Pipes, hoses and reservoirs for leaks.
• Air conditioning operation.
• Parking brake operation.
• Horn operation.
• Tightness of wheel nuts. SeeTechnical specifications (page140).
OPENING AND CLOSINGTHE BONNET
Opening the bonnet
E102165
114
Maintenance

For item location: See Quick start(page 8).
E102884
Raise the bonnet slightly and move thecatch towards the left-hand side of thevehicle.
E87786
Open the bonnet and support it with thestrut.
Closing the bonnet
WARNING
Make sure that the bonnet is closedproperly.
Lower the bonnet and allow it to dropfrom under its own weight for the last20 – 30 centimetres (8 - 11 inches).
115
Maintenance
ENGINE COMPARTMENT OVERVIEW - 1.25L DURATEC-16V(SIGMA)/1.4L DURATEC-16V (SIGMA)
E103505
A B C
H G FI
D E
Engine coolant reservoir*: See Engine coolant check (page 122).A
Brake and clutch fluid reservoir (right-hand drive)*: See Brake and clutchfluid check (page 122).
B
Engine oil filler cap*: See Engine oil check (page 121).C
Battery: See Vehicle battery (page 129).D
Brake and clutch fluid reservoir (left-hand drive)*: See Brake and clutchfluid check (page 122).
E
Engine compartment fuse box. See Fuses (page 104).F
Windscreen and rear window washer fluid reservoir: See Washer fluidcheck (page 122).
G
116
Maintenance
Air cleaner: No maintenance necessary.H
Engine oil dipstick*: See Engine oil check (page 121).I* The filler caps and the engine oil dipstick are coloured for easy identification.
ENGINE COMPARTMENT OVERVIEW - 1.6L DURATEC-16VTI-VCT (SIGMA)
E103507
A B C
H G FI
D E
Engine coolant reservoir*: See Engine coolant check (page 122).A
Brake and clutch fluid reservoir (right-hand drive)*: See Brake and clutchfluid check (page 122).
B
Engine oil filler cap*: See Engine oil check (page 121).C
Battery: See Vehicle battery (page 129).D
117
Maintenance

Brake and clutch fluid reservoir (left-hand drive)*: See Brake and clutchfluid check (page 122).
E
Engine compartment fuse box: See Fuses (page 104).F
Windscreen and rear window washer fluid reservoir*: See Washer fluidcheck (page 122).
G
Air cleaner: No maintenance necessary.H
Engine oil dipstick*: See Engine oil check (page 121). See Engine oilcheck (page 121).
I
*For easy identification, filler caps and the engine oil dipstick are marked in colour.
ENGINE COMPARTMENT OVERVIEW - 1.4L DURATORQ-TDCI (DV) DIESEL
E103508
A B C
H G FI
D E
118
Maintenance
Engine coolant reservoir*: See Engine coolant check (page 122).A
Brake and clutch fluid reservoir (right-hand drive)*: See Brake and clutchfluid check (page 122).
B
Engine oil filler cap*: See Engine oil check (page 121).C
Battery: See Vehicle battery (page 129).D
Brake and clutch fluid reservoir (left-hand drive)*: See Brake and clutchfluid check (page 122).
E
Engine compartment fuse box. See Fuses (page 104).F
Windscreen and rear window washer fluid reservoir: See Washer fluidcheck (page 122).
G
Air cleaner: No maintenance necessary.H
Engine oil dipstick*: See Engine oil check (page 121).I* The filler caps and the engine oil dipstick are coloured for easy identification.
119
Maintenance
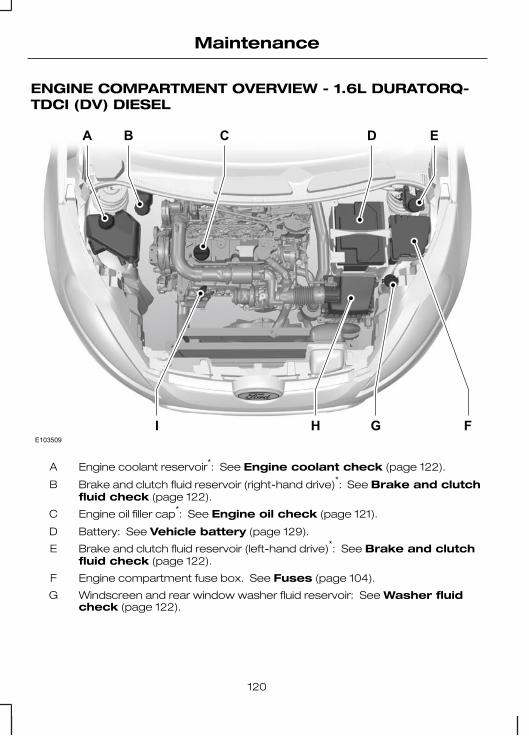
ENGINE COMPARTMENT OVERVIEW - 1.6L DURATORQ-TDCI (DV) DIESEL
E103509
A B C
H G FI
D E
Engine coolant reservoir*: See Engine coolant check (page 122).A
Brake and clutch fluid reservoir (right-hand drive)*: See Brake and clutchfluid check (page 122).
B
Engine oil filler cap*: See Engine oil check (page 121).C
Battery: See Vehicle battery (page 129).D
Brake and clutch fluid reservoir (left-hand drive)*: See Brake and clutchfluid check (page 122).
E
Engine compartment fuse box. See Fuses (page 104).F
Windscreen and rear window washer fluid reservoir: See Washer fluidcheck (page 122).
G
120
Maintenance

Air cleaner: No maintenance necessary.H
Engine oil dipstick*: See Engine oil check (page 121).I* The filler caps and the engine oil dipstick are coloured for easy identification.
ENGINE OIL DIPSTICK -1.25L DURATEC-16V(SIGMA)/1.4L DURATEC-16V(SIGMA)/1.6L DURATEC-16VTI-VCT (SIGMA)
E95540
BA
MINA
MAXB
ENGINE OIL DIPSTICK - 1.4LDURATORQ-TDCI (DV)DIESEL/1.6L DURATORQ-TDCI (DV) DIESEL
E90983
A B
MINA
MAXB
ENGINE OIL CHECK
CAUTION
Do not use oil additives or otherengine treatments. Under certainconditions, they could damage the
engine.
Note: The oil consumption of newengines reaches its normal level afterapproximately 5 000 kilometres (3 000miles).
Checking the oil level
CAUTION
Make sure that the level is betweenthe MIN and the MAX marks.
Note: Check the level before starting theengine.
Note: Make sure that your vehicle is onlevel ground.
Note: Oil expands when it is hot. The levelmay therefore extend a few millimetresbeyond the MAX mark.
Remove the dipstick and wipe it with aclean, lint free cloth. Replace the dipstickand remove it again to check the oil level.
If the level is at the MIN mark, top upimmediately.
121
Maintenance
Topping up
WARNINGSOnly top up when the engine is cold.If the engine is hot, wait 10 minutesfor the engine to cool down.
Do not remove the filler cap whenthe engine is running.
Remove the filler cap.
CAUTION
Do not top up further than the MAXmark.
Top up with fluid that meets the Fordspecification. See Technicalspecifications (page 123).
ENGINE COOLANT CHECK
Checking the coolant level
WARNING
Do not allow the fluid to touch yourskin or eyes. If this happens, rinsethe affected areas immediately with
plenty of water and contact your doctor.
CAUTION
Make sure that the level is betweenthe MIN and the MAX marks.
Note: Coolant expands when it is hot.The level may therefore extend beyondthe MAX mark.
If the level is at the MIN mark, top upimmediately.
Topping up
WARNINGSOnly top up when the engine is cold.If the engine is hot, wait 10 minutesfor the engine to cool down.
Do not remove the filler cap whenthe engine is running.
Do not remove the filler cap whenthe engine is hot. Wait for the engineto cool down.
Unscrew the cap slowly. Any pressurewill escape slowly as you unscrew thecap.
CAUTIONSDo not spill coolant on any part of theengine.
Do not top up further than the MAXmark.
Top up with fluid that meets the Fordspecification. See Technicalspecifications (page 123).
WASHER FLUID CHECK
Note: The front and rear washer systemsare supplied from the same reservoir.
BRAKE AND CLUTCH FLUIDCHECK
WARNING
Do not allow the fluid to touch yourskin or eyes. If this happens, rinsethe affected areas immediately with
plenty of water and contact your doctor.
122
Maintenance
CAUTION
Make sure that the level is betweenthe MIN and the MAX marks.
Note: The brake and the clutch systemsare supplied from the same reservoir.
If the level is at the MIN mark, top upimmediately.
Topping up
Remove the filler cap.
CAUTION
Do not top up further than the MAXmark.
Top up with fluid that meets the Fordspecification. See Technicalspecifications (page 123).
TECHNICAL SPECIFICATIONS
Vehicle fluids
SpecificationRecommended fluidItem
WSS-M2C913-BFord or MotorcraftFormula E SAE 5W-30
Engine Oil*Engine oil
WSS-M97B44-DMotorcraft SuperPlus Anti-freezeCoolant
ESD-M6C57-AFord or Motorcraft SuperDOT 4 Brake FluidBrake fluid
* You can use an alternative SAE 5W-30 engine oil, providing it meets the specificationdefined by WSS-M2C913-B.
Note: If you operate your vehicle in temperatures below -20°C (-4°F), you must notuse SAE 10W-40 engine oil.
Topping up the oil: If you are unable to find an oil that meets the specification definedby WSS-M2C913-B, you must use SAE 5W-30 (preferred), SAE 5W-40 (exceptFlexfuel vehicles) or SAE 10W-40 that meets the specification defined by either ACEAA1/B1 (preferred) or ACEA A3/B3. Using these oils can result in longer engine crankingperiods, reduced engine performance, reduced fuel economy and increased emissionlevels.
Capacities
Capacity in litres(gallons)ItemVariant
2.5 (0.6)Windscreen and rearwindow washer systemAll
123
Maintenance
Capacity in litres(gallons)ItemVariant
3.8 (0.8)Engine lubrication system -including the oil filter
1.25L Duratec-16V (Sigma)-60PS-Manual
3.5 (0.8)Engine lubrication system -excluding the oil filter
1.25L Duratec-16V (Sigma)-60PS-Manual
5.5 (1.2)Engine cooling system1.25L Duratec-16V (Sigma)-60PS-Manual
42 (9.2)Fuel tank1.25L Duratec-16V (Sigma)-60PS-Manual
3.8 (0.8)Engine lubrication system -including the oil filter
1.25L Duratec-16V (Sigma)-80PS-Manual
3.5 (0.8)Engine lubrication system -excluding the oil filter
1.25L Duratec-16V (Sigma)-80PS-Manual
5.5 (1.2)Engine cooling system1.25L Duratec-16V (Sigma)-80PS-Manual
42 (9.2)Fuel tank1.25L Duratec-16V (Sigma)-80PS-manual transmission
3.8 (0.8)Engine lubrication system -including the oil filter
1.4L Duratec-16V (Sigma)-91PS-manual transmission
3.5 (0.8)Engine lubrication system -excluding the oil filter
1.4L Duratec-16V (Sigma)-91PS-manual transmission
5.5 (1.2)Engine cooling system1.4L Duratec-16V (Sigma)-91PS-manual transmission
42 (9.2)Fuel tank1.4L Duratec-16V (Sigma)-91PS-manual transmission
3.8 (0.8)Engine lubrication system -including the oil filter
1.4L Duratec-16V (Sigma)-91PS-automatic transmis-sion
3.5 (0.8)Engine lubrication system -excluding the oil filter
1.4L Duratec-16V (Sigma)-91PS-automatic transmis-sion
5.5 (1.2)Engine cooling system1.4L Duratec-16V (Sigma)-91PS-automatic transmis-sion
124
Maintenance
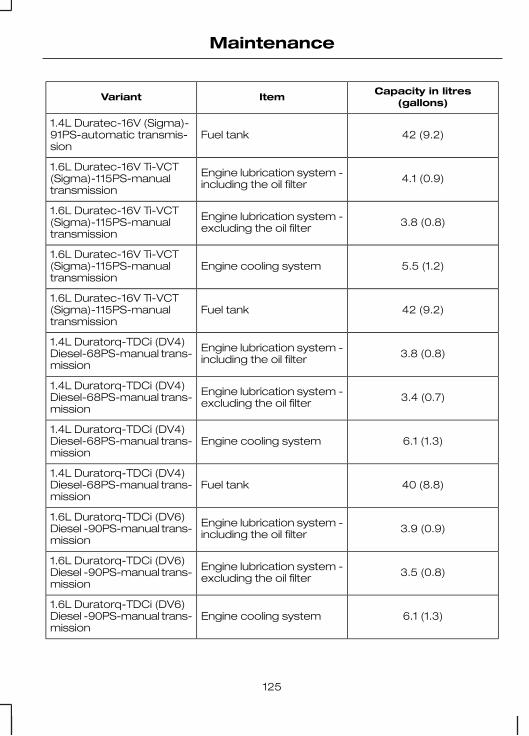
Capacity in litres(gallons)ItemVariant
42 (9.2)Fuel tank1.4L Duratec-16V (Sigma)-91PS-automatic transmis-sion
4.1 (0.9)Engine lubrication system -including the oil filter
1.6L Duratec-16V Ti-VCT(Sigma)-115PS-manualtransmission
3.8 (0.8)Engine lubrication system -excluding the oil filter
1.6L Duratec-16V Ti-VCT(Sigma)-115PS-manualtransmission
5.5 (1.2)Engine cooling system1.6L Duratec-16V Ti-VCT(Sigma)-115PS-manualtransmission
42 (9.2)Fuel tank1.6L Duratec-16V Ti-VCT(Sigma)-115PS-manualtransmission
3.8 (0.8)Engine lubrication system -including the oil filter
1.4L Duratorq-TDCi (DV4)Diesel-68PS-manual trans-mission
3.4 (0.7)Engine lubrication system -excluding the oil filter
1.4L Duratorq-TDCi (DV4)Diesel-68PS-manual trans-mission
6.1 (1.3)Engine cooling system1.4L Duratorq-TDCi (DV4)Diesel-68PS-manual trans-mission
40 (8.8)Fuel tank1.4L Duratorq-TDCi (DV4)Diesel-68PS-manual trans-mission
3.9 (0.9)Engine lubrication system -including the oil filter
1.6L Duratorq-TDCi (DV6)Diesel -90PS-manual trans-mission
3.5 (0.8)Engine lubrication system -excluding the oil filter
1.6L Duratorq-TDCi (DV6)Diesel -90PS-manual trans-mission
6.1 (1.3)Engine cooling system1.6L Duratorq-TDCi (DV6)Diesel -90PS-manual trans-mission
125
Maintenance

Capacity in litres(gallons)ItemVariant
40 (8.8)Fuel tank1.6L Duratorq-TDCi (DV6)Diesel -90PS-manual trans-mission
126
Maintenance
CLEANING THE EXTERIOR
WARNING
If you use a car wash with a waxingcycle, make sure that you removethe wax from the windscreen.
CAUTIONSSome car wash installations usewater at high pressure. This coulddamage certain parts of your vehicle.
Remove the aerial before using anautomatic car wash.
Switch the heater blower off toprevent contamination of the freshair filter.
We recommend that you wash yourvehicle with a sponge and lukewarmwater containing a car shampoo.
Cleaning the headlamps
CAUTIONSDo not scrape the headlamp lensesor use abrasives, alcoholic solventsor chemical solvents to clean them.
Do not wipe the headlamps whenthey are dry.
Cleaning the rear window
CAUTION
Do not scrape the inside of the rearwindow or use abrasives or chemicalsolvents to clean it.
Use a clean, lint free cloth or a dampchamois leather to clean the inside of therear window.
Cleaning the chrome trim
CAUTION
Do not use abrasives or chemicalsolvents. Use soapy water.
Body paintwork preservation
CAUTIONSDo not polish your vehicle in strongsunshine.
Do not allow polish to touch plasticsurfaces. It could be difficult toremove.
Do not apply polish to the windscreenor rear window. This could cause thewipers to become noisy and they
may not clear the window properly.
We recommend that you wax thepaintwork once or twice a year.
CLEANING THE INTERIOR
Seat belts
WARNINGSDo not use abrasives, or chemicalsolvents to clean them.
Do not allow moisture to penetratethe seat belt retractor mechanism.
Clean the seat belts with interior cleaneror water applied with a soft sponge. Letthe seat belts dry naturally, away fromartificial heat.
127
Vehicle care

Instrument cluster screens,LCD screens, radio screens
WARNING
Do not use abrasives, alcoholicsolvents or chemical solvents toclean them.
REPAIRING MINOR PAINTDAMAGE
CAUTION
Remove apparently harmless lookingsubstances from the paintworkimmediately (e.g. bird droppings, tree
resins, insect remains, tar spots, road saltand industrial fall out).
You should repair paintwork damagecaused by stones from the road or minorscratches as soon as possible. A choiceof products is available from your FordDealer. Read and follow themanufacturer’s instructions.
128
Vehicle care
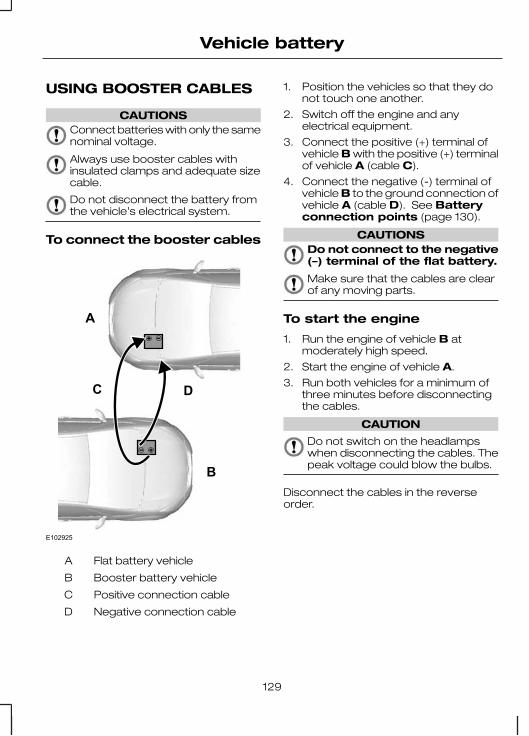
USING BOOSTER CABLES
CAUTIONSConnect batteries with only the samenominal voltage.
Always use booster cables withinsulated clamps and adequate sizecable.
Do not disconnect the battery fromthe vehicle’s electrical system.
To connect the booster cables
A
B
C D
E102925
Flat battery vehicleA
Booster battery vehicleB
Positive connection cableC
Negative connection cableD
1. Position the vehicles so that they donot touch one another.
2. Switch off the engine and anyelectrical equipment.
3. Connect the positive (+) terminal ofvehicle B with the positive (+) terminalof vehicle A (cable C).
4. Connect the negative (-) terminal ofvehicle B to the ground connection ofvehicle A (cable D). See Batteryconnection points (page 130).
CAUTIONSDo not connect to the negative(–) terminal of the flat battery.
Make sure that the cables are clearof any moving parts.
To start the engine
1. Run the engine of vehicle B atmoderately high speed.
2. Start the engine of vehicle A.
3. Run both vehicles for a minimum ofthree minutes before disconnectingthe cables.
CAUTION
Do not switch on the headlampswhen disconnecting the cables. Thepeak voltage could blow the bulbs.
Disconnect the cables in the reverseorder.
129
Vehicle battery
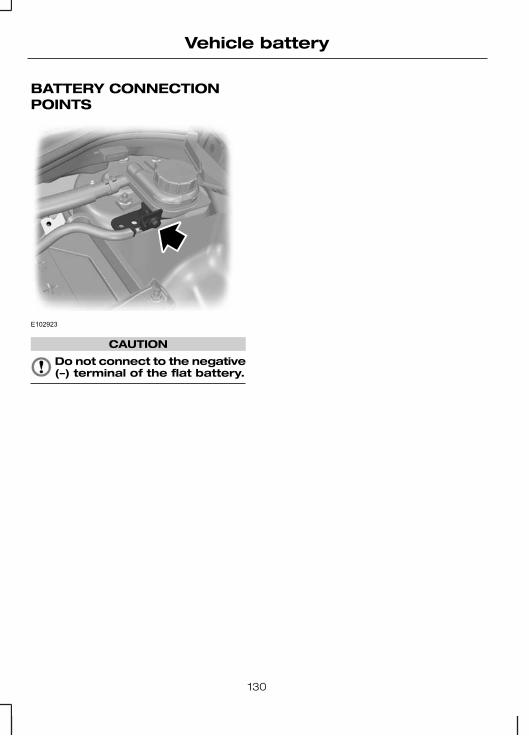
BATTERY CONNECTIONPOINTS
E102923
CAUTION
Do not connect to the negative(–) terminal of the flat battery.
130
Vehicle battery
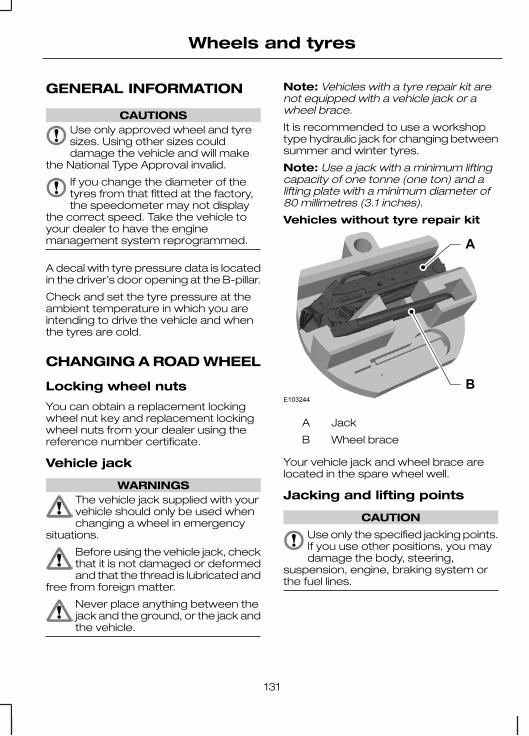
GENERAL INFORMATION
CAUTIONSUse only approved wheel and tyresizes. Using other sizes coulddamage the vehicle and will make
the National Type Approval invalid.
If you change the diameter of thetyres from that fitted at the factory,the speedometer may not display
the correct speed. Take the vehicle toyour dealer to have the enginemanagement system reprogrammed.
A decal with tyre pressure data is locatedin the driver’s door opening at the B-pillar.
Check and set the tyre pressure at theambient temperature in which you areintending to drive the vehicle and whenthe tyres are cold.
CHANGING A ROAD WHEEL
Locking wheel nuts
You can obtain a replacement lockingwheel nut key and replacement lockingwheel nuts from your dealer using thereference number certificate.
Vehicle jack
WARNINGSThe vehicle jack supplied with yourvehicle should only be used whenchanging a wheel in emergency
situations.
Before using the vehicle jack, checkthat it is not damaged or deformedand that the thread is lubricated and
free from foreign matter.
Never place anything between thejack and the ground, or the jack andthe vehicle.
Note: Vehicles with a tyre repair kit arenot equipped with a vehicle jack or awheel brace.
It is recommended to use a workshoptype hydraulic jack for changing betweensummer and winter tyres.
Note: Use a jack with a minimum liftingcapacity of one tonne (one ton) and alifting plate with a minimum diameter of80 millimetres (3.1 inches).
Vehicles without tyre repair kit
E103244
B
A
JackA
Wheel braceB
Your vehicle jack and wheel brace arelocated in the spare wheel well.
Jacking and lifting points
CAUTION
Use only the specified jacking points.If you use other positions, you maydamage the body, steering,
suspension, engine, braking system orthe fuel lines.
131
Wheels and tyres

E102950
B
A
Emergency use onlyA
MaintenanceB
132
Wheels and tyres

E93184
A
Indentations in the sills A show thelocation of the jacking points.
E93020
Vehicles with side skirts
E95345
Removing a road wheel
WARNINGSPark your vehicle in such a positionthat neither the traffic nor you arehindered or endangered.
Set up a warning triangle.
WARNINGSMake sure that the vehicle is on firm,level ground with the wheelspointing straight ahead.
Switch off the ignition and apply theparking brake.
If your vehicle has a manualtransmission, select first or reversegear. If it has an automatic
transmission, select park.
Have the passengers leave thevehicle.
Secure the diagonally oppositewheel with an appropriate block orwheel chock.
Make sure that the arrows ondirectional tyres point in the directionof rotation when the vehicle is
moving forwards. If you have to fit a sparewheel with the arrows pointing in theopposite direction, have the tyre refittedin the correct direction by a properlytrained technician.
Do not work underneath the vehiclewhen it is supported only by a jack.
Make sure that the jack is vertical tothe jacking point and the base is flaton the ground.
CAUTION
Do not lay alloy wheels face down onthe ground, this will damage thepaint.
Note: The spare wheel is located underthe floor cover in the luggagecompartment.
1. Insert the flat end of the wheel bracebetween the rim and the hub coverand carefully remove the hub cap orcover.
133
Wheels and tyres
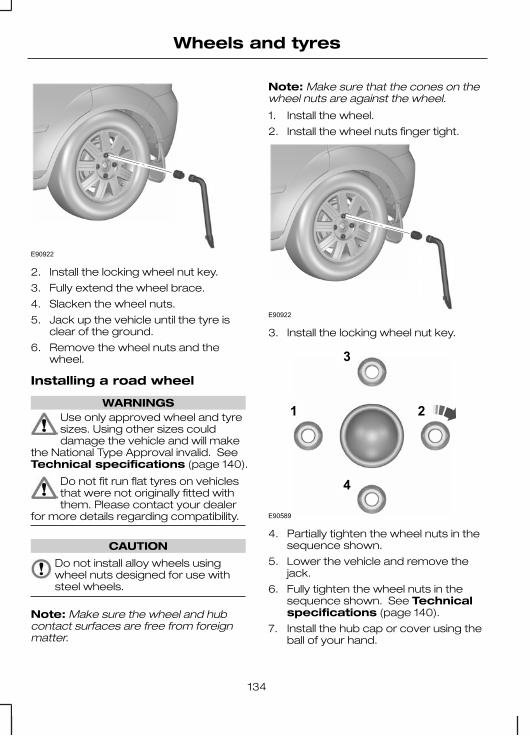
E90922
2. Install the locking wheel nut key.
3. Fully extend the wheel brace.
4. Slacken the wheel nuts.
5. Jack up the vehicle until the tyre isclear of the ground.
6. Remove the wheel nuts and thewheel.
Installing a road wheel
WARNINGSUse only approved wheel and tyresizes. Using other sizes coulddamage the vehicle and will make
the National Type Approval invalid. SeeTechnical specifications (page 140).
Do not fit run flat tyres on vehiclesthat were not originally fitted withthem. Please contact your dealer
for more details regarding compatibility.
CAUTION
Do not install alloy wheels usingwheel nuts designed for use withsteel wheels.
Note: Make sure the wheel and hubcontact surfaces are free from foreignmatter.
Note: Make sure that the cones on thewheel nuts are against the wheel.
1. Install the wheel.
2. Install the wheel nuts finger tight.
E90922
3. Install the locking wheel nut key.
1 2
3
4
E90589
4. Partially tighten the wheel nuts in thesequence shown.
5. Lower the vehicle and remove thejack.
6. Fully tighten the wheel nuts in thesequence shown. See Technicalspecifications (page 140).
7. Install the hub cap or cover using theball of your hand.
134
Wheels and tyres

WARNING
Have the wheel nuts checked fortightness and the tyre pressurechecked as soon as possible.
Note: If the spare wheel is different in sizeor construction to the road wheels, havethis replaced as soon as possible.
TYRE REPAIR KIT
Your vehicle may not have a spare tyre.In this case it will have an emergency tyrerepair kit that can be used to repair oneflat tyre.
The tyre repair kit is located in the sparewheel well.
General information
WARNINGSDepending on the type and extentof tyre damage, some tyres canonly be partially sealed or not sealed
at all. Loss of tyre pressure can affectvehicle handling, leading to loss of vehiclecontrol.
Do not use the tyre repair kit if thetyre has already been damaged asa result of being driven under
inflated.
Do not try to seal damage otherthan that located within the visibletread of the tyre.
Do not try to seal damage to thetyre’s sidewall.
The tyre repair kit seals most tyrepunctures [with a diameter of up to sixmillimetres (1/4 inch)] to temporarilyrestore mobility.
Observe the following rules when usingthe kit:
• Drive with caution and avoidmaking sudden steering ordriving manoeuvres, especially ifthe vehicle is heavily loaded or you aretowing a trailer.
• The kit will provide you with anemergency temporary repair, enablingyou to continue your journey to thenext vehicle or tyre dealer, or to drivea maximum distance of200 kilometres (125 miles).
• Do not exceed a maximum speedof 80 km/h (50 mph).
• Keep the kit out of the reach ofchildren.
• Only use the kit when the ambienttemperature is between –30°C (-22°F)and +70°C (+158°F).
Using the tyre repair kit
WARNINGSCompressed air can act as anexplosive or propellant.
Never leave the tyre repair kitunattended while in use.
CAUTION
Do not keep the compressoroperating for more than 10 minutes.
Note: Use the tyre repair kit only for thevehicle with which it was supplied.
• Park your vehicle at the roadside sothat you do not obstruct the flow oftraffic and so that you are able to usethe kit without being in danger.
• Apply the parking brake, even if youhave parked on a level road, to makesure that the vehicle will not move.
• Do not attempt to remove foreignobjects like nails or screws penetratingthe tyre.
135
Wheels and tyres
• Leave the engine running while the kitis in use, but not if the vehicle is in anenclosed or poorly ventilated area (forexample, inside a building). In thesecircumstances, switch thecompressor on with the engine turnedoff.
• Replace the sealant bottle with a newone before the expiry date (see topof bottle) is reached.
• Inform all other users of the vehiclethat the tyre has been temporarilysealed with the tyre repair kit andmake them aware of the specialdriving conditions to be observed.
Inflating the tyre
WARNINGSCheck the sidewall of the tyre priorto inflation. If there are any cracks,bumps or similar damage, do not
attempt to inflate the tyre.
WARNINGSDo not stand directly beside the tyrewhile the compressor is pumping.
Watch the sidewall of the tyre. If anycracks, bumps or similar damageappear, turn off the compressor and
let the air out by means of the pressurerelief valve I. Do not continue driving withthis tyre.
The sealant contains natural rubberlatex. Avoid contact with skin andclothing. If this happens, rinse the
affected areas immediately with plenty ofwater and contact your doctor.
If the tyre inflation pressure does notreach 1.8 bar (26 psi) within 10minutes, the tyre may have suffered
excessive damage, making a temporaryrepair impossible. In this case, do notcontinue driving with this tyre.
136
Wheels and tyres
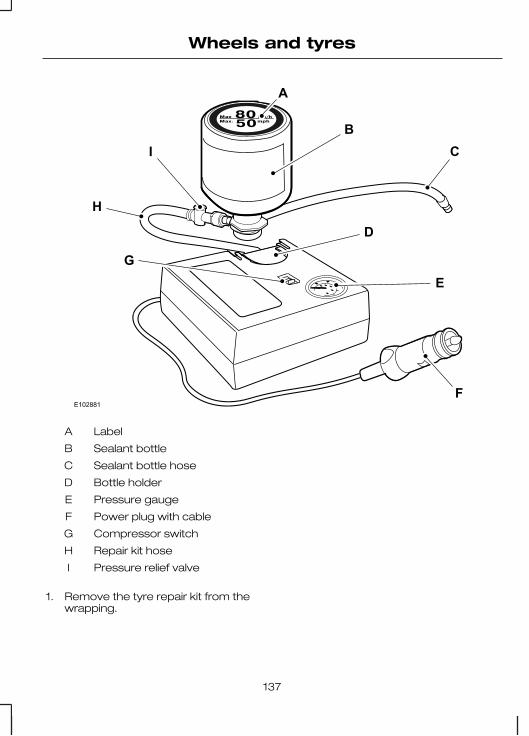
E102881
A
BC
D
E
F
G
H
I
LabelA
Sealant bottleB
Sealant bottle hoseC
Bottle holderD
Pressure gaugeE
Power plug with cableF
Compressor switchG
Repair kit hoseH
Pressure relief valveI
1. Remove the tyre repair kit from thewrapping.
137
Wheels and tyres
2. Peel off the label A showing themaximum permissible speed of80 km/h (50 mph) from the sealantbottle and attach it to the instrumentpanel in the driver’s field of view. Makesure the label does not obscureanything important.
3. Take the hose H with the pressurerelieve valve I and the power plug withcable F out of the kit.
4. Connect the hose H with the pressurerelieve valve I to the sealant bottle B.
5. Engage the sealant bottle B into thebottle holder D.
6. Remove the valve cap from thedamaged tyre.
7. Screw the sealant bottle hose C firmlyonto the valve of the damaged tyre.
8. Make sure that the compressor switchG is in position 0.
9. Insert the power plug F into the cigarlighter socket or auxiliary powersocket. See Cigar lighter (page 79).
10. Start the engine.
11. Move the compressor switch G toposition 1.
12. Inflate the tyre for no longer than 10minutes to an inflation pressure ofminimum 1.8 bar (26 psi) and amaximum of 3.5 bar (51 psi). Movethe compressor switch G to position0 and check the current tyrepressure with pressure gauge E.
Note: If a tyre pressure of 1.8 bar (26 psi)is not reached do not continue.
Note: When pumping in the sealantthrough the tyre valve, the pressure mayrise up to 6 bar (87 psi) but will drop againafter about 30 seconds.
13. Remove the power plug F from thecigar lighter socket or auxiliary powersocket.
14. Quickly unscrew the hose C fromthe tyre valve. Fasten the valve capagain.
15. Leave the sealant bottle B in thebottle holder D.
16. Make sure the kit is stored safely, butstill easily accessible in the vehicle.The kit will be required again whenyou check the tyre pressure.
17. Immediately drive approximatelythree kilometres (two miles) so thatthe sealant can seal the damagedarea.
WARNING
If you experience heavy vibrations,unsteady steering behaviour ornoises while driving, reduce your
speed and drive with caution to a placewhere it is safe for you to stop the vehicle.Recheck the tyre and its pressure. If thetyre pressure is less than 1 bar (14.7 psi)or if there are any cracks, bumps or similardamage visible, do not continue drivingwith this tyre.
18. Stop the vehicle after drivingapproximately three kilometres(two miles). Check, and wherenecessary, adjust the pressure ofthe damaged tyre.
19. Attach the kit and read the tyrepressure from the pressure gaugeE.
20. Adjust it to the specified pressure.See Technical specifications(page 140).
21. Once you have inflated the tyre toits correct tyre pressure, move thecompressor switch G to position 0,remove the power plug F from thesocket, unscrew the hose C andfasten the valve cap.
138
Wheels and tyres
22. Leave hose C and H connected tothe sealant bottle B and store the kitaway safely.
23. Drive to the nearest tyre specialist toget the damaged tyre replaced.Before the tyre is removed from therim, inform your tyre dealer that thetyre contains sealant. Renew thesealant bottle B and hose C as soonas possible after they have beenused.
Note: Remember that emergencyroadside tyre repair kits only providetemporary mobility. Regulationsconcerning tyre repair after usage of tyrerepair kit may differ from country tocountry. You should consult a tyrespecialist for advice.
WARNING
Before driving, make sure the tyreis adjusted to the recommendedinflation pressure. See Technical
specifications (page 140). Monitor thetyre pressure until the sealed tyre isreplaced.
Empty sealant bottles can be disposedof together with normal household waste.Return remains of sealant to your dealeror dispose of it in compliance with localwaste disposal regulations.
TYRE CARE
E70415
To make sure the front and rear tyres ofyour vehicle wear evenly and last longer,we recommend that you swap the tyresfrom front to rear and vice versa at regularintervals of between 5 000 and 10 000km (3 000 and 6 000 miles).
CAUTION
Do not scrub the sidewalls of thetyres when you are parking.
If you have to mount a kerb, do so slowlyand approach it with the wheels atright-angles to the kerb.
Examine the tyres regularly for cuts,foreign objects and uneven wear of thetread. Uneven wear could mean that thewheel alignment is outside specification.
Check the tyre pressures (including thespare) when cold, every two weeks.
USING WINTER TYRES
CAUTION
Make sure that you use the correctwheel nuts for the type of wheel thewinter tyres are fitted to.
If winter tyres are used, make sure thatthe tyre pressures are correct. SeeTechnical specifications (page 140).
USING SNOW CHAINS
WARNINGSDo not exceed 50 km/h (30 mph).
Do not use snow chains onsnow-free roads.
Only fit snow chains to specifiedtyres. See Technicalspecifications (page 140).
139
Wheels and tyres
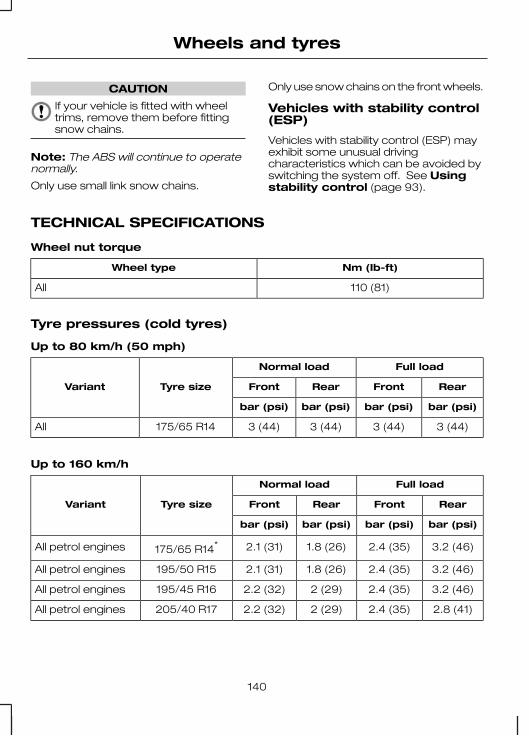
CAUTION
If your vehicle is fitted with wheeltrims, remove them before fittingsnow chains.
Note: The ABS will continue to operatenormally.
Only use small link snow chains.
Only use snow chains on the front wheels.
Vehicles with stability control(ESP)
Vehicles with stability control (ESP) mayexhibit some unusual drivingcharacteristics which can be avoided byswitching the system off. See Usingstability control (page 93).
TECHNICAL SPECIFICATIONS
Wheel nut torque
Nm (Ib-ft)Wheel type
110 (81)All
Tyre pressures (cold tyres)
Up to 80 km/h (50 mph)
Full loadNormal load
Tyre sizeVariant RearFrontRearFront
bar (psi)bar (psi)bar (psi)bar (psi)
3 (44)3 (44)3 (44)3 (44)175/65 R14All
Up to 160 km/h
Full loadNormal load
Tyre sizeVariant RearFrontRearFront
bar (psi)bar (psi)bar (psi)bar (psi)
3.2 (46)2.4 (35)1.8 (26)2.1 (31)175/65 R14*All petrol engines
3.2 (46)2.4 (35)1.8 (26)2.1 (31)195/50 R15All petrol engines
3.2 (46)2.4 (35)2 (29)2.2 (32)195/45 R16All petrol engines
2.8 (41)2.4 (35)2 (29)2.2 (32)205/40 R17All petrol engines
140
Wheels and tyres
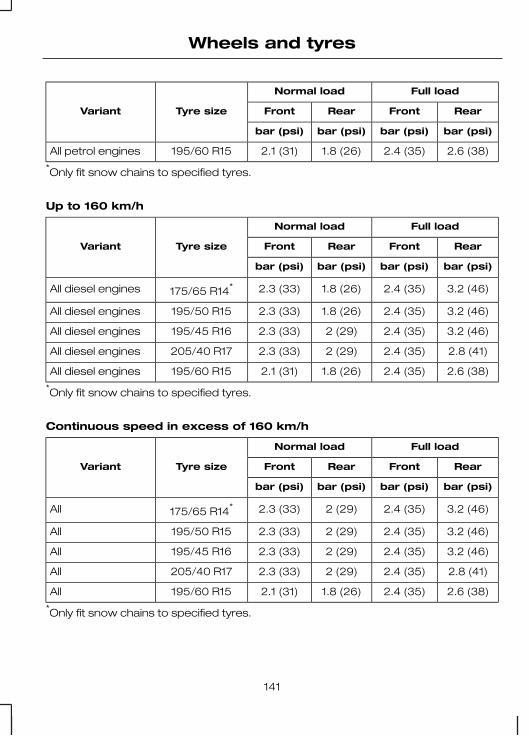
Full loadNormal load
Tyre sizeVariant RearFrontRearFront
bar (psi)bar (psi)bar (psi)bar (psi)
2.6 (38)2.4 (35)1.8 (26)2.1 (31)195/60 R15All petrol engines
*Only fit snow chains to specified tyres.
Up to 160 km/h
Full loadNormal load
Tyre sizeVariant RearFrontRearFront
bar (psi)bar (psi)bar (psi)bar (psi)
3.2 (46)2.4 (35)1.8 (26)2.3 (33)175/65 R14*All diesel engines
3.2 (46)2.4 (35)1.8 (26)2.3 (33)195/50 R15All diesel engines
3.2 (46)2.4 (35)2 (29)2.3 (33)195/45 R16All diesel engines
2.8 (41)2.4 (35)2 (29)2.3 (33)205/40 R17All diesel engines
2.6 (38)2.4 (35)1.8 (26)2.1 (31)195/60 R15All diesel engines
*Only fit snow chains to specified tyres.
Continuous speed in excess of 160 km/h
Full loadNormal load
Tyre sizeVariant RearFrontRearFront
bar (psi)bar (psi)bar (psi)bar (psi)
3.2 (46)2.4 (35)2 (29)2.3 (33)175/65 R14*All
3.2 (46)2.4 (35)2 (29)2.3 (33)195/50 R15All
3.2 (46)2.4 (35)2 (29)2.3 (33)195/45 R16All
2.8 (41)2.4 (35)2 (29)2.3 (33)205/40 R17All
2.6 (38)2.4 (35)1.8 (26)2.1 (31)195/60 R15All
*Only fit snow chains to specified tyres.
141
Wheels and tyres
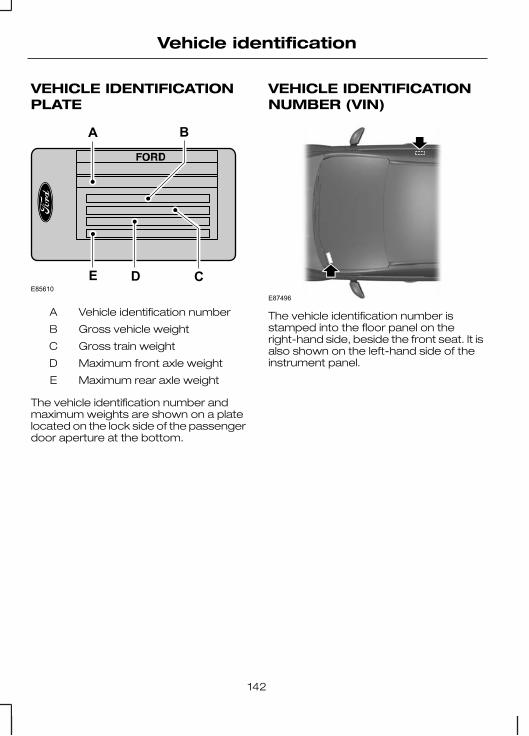
VEHICLE IDENTIFICATIONPLATE
E85610C
B
E D
A
Vehicle identification numberA
Gross vehicle weightB
Gross train weightC
Maximum front axle weightD
Maximum rear axle weightE
The vehicle identification number andmaximum weights are shown on a platelocated on the lock side of the passengerdoor aperture at the bottom.
VEHICLE IDENTIFICATIONNUMBER (VIN)
E87496
The vehicle identification number isstamped into the floor panel on theright-hand side, beside the front seat. It isalso shown on the left-hand side of theinstrument panel.
142
Vehicle identification
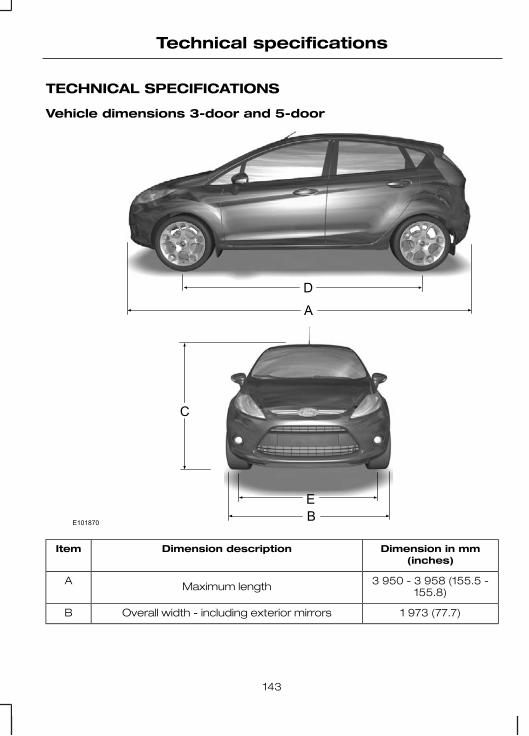
TECHNICAL SPECIFICATIONS
Vehicle dimensions 3-door and 5-door
D
A
C
EBE101870
Dimension in mm(inches)
Dimension descriptionItem
3 950 - 3 958 (155.5 -155.8)Maximum lengthA
1 973 (77.7)Overall width - including exterior mirrorsB
143
Technical specifications
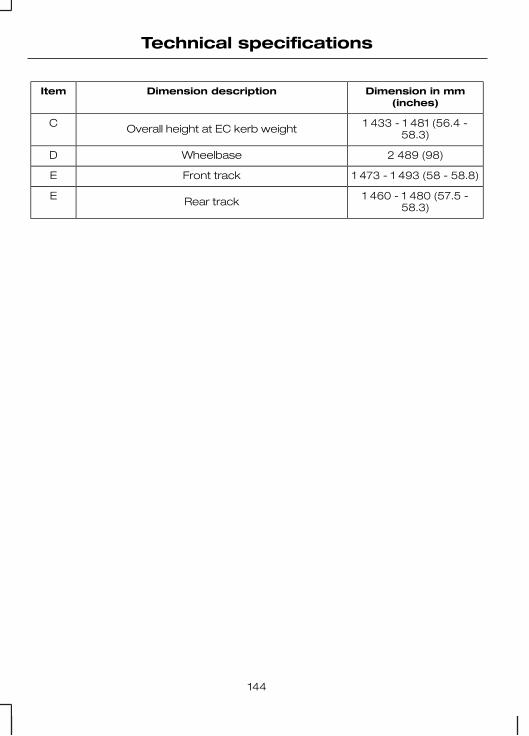
Dimension in mm(inches)
Dimension descriptionItem
1 433 - 1 481 (56.4 -58.3)Overall height at EC kerb weightC
2 489 (98)WheelbaseD
1 473 - 1 493 (58 - 58.8)Front trackE
1 460 - 1 480 (57.5 -58.3)Rear trackE
144
Technical specifications

Towing equipment dimensions 3-door and 5-door
A
B
GF
E
C
D
E101872
Dimension in mm(inches)
Dimension descriptionItem
124 (4.9)Bumper – end of tow ballA
7 (0.3)Attachment point – centre of tow ballB
761 (29.9)Wheel centre – centre of tow ballC
512 (20.2)Centre of tow ball – side memberD
1 024 (40.3)Outer side of side memberE
145
Technical specifications
Dimension in mm(inches)
Dimension descriptionItem
267 (10.5)Centre of first attachment point – centre of secondattachment point
F
584 (23)Centre of tow ball – centre of second attachmentpoint
G
146
Technical specifications
IMPORTANT AUDIOINFORMATION
WARNINGSDue to technical incompatibility,recordable (CD-R) and rewritable(CD-RW) discs may not function
correctly.
These CD radio units will playcompact discs that conform to theInternational Red Book standard
audio specification. Copy protected CDsfrom some manufacturers do not conformto this standard and playback cannot beguaranteed.
Dual format, dual sided discs (DVDPlus, CD-DVD format), adopted bythe music industry, are thicker than
normal CDs and consequently playbackcannot be guaranteed, and jammingcould occur. Irregular shaped CDs andCDs with a scratch protection film or selfadhesive labels attached should not beused. Warranty claims, where this type ofdisc is found to be inside an audio unitreturned for repair, will not be accepted.
All CD units are designed to playcommercially pressed 12 cm audiocompact discs only.
The audio unit may be damaged ifunsuitable items like credit cards orcoins are pushed inside the CD
aperture.
Audio unit labels
E66256
E66257
Disc labels
Audio CD
E66254
MP3
E66255
147
Audio introduction
AUDIO UNIT OVERVIEW Note: Units have an integrated multifunction display situated above the CDaperture. This shows importantinformation regarding control of youraudio unit. Additionally, there are variousicons placed around the display screenwhich light up when a function is active(for example CD, Radio or Aux.)
Type 1
E103293
A B ED
FO
G
K
L
M
N
J HI
C
CD eject. See Compact disc player (page 158).A
Navigation arrowsB
CD aperture. See Compact disc player (page 158).C
OKD
InformationE
Traffic announcement. See Traffic information control (page 154).F
148
Audio unit overview
Station presets. See Station preset buttons (page 154).G
Seek up. CD track selection. See Station tuning control (page 153). SeeTrack selection (page 158).
H
On/off and volume controlI
Seek down. CD track selection. See Station tuning control (page 153).See Track selection (page 158).
J
Menu selectK
Sound menu select. See Bass/treble control (page 153). SeeBalance/fade control (page 153).
L
Auxiliary select. See Auxiliary input (AUX IN) socket (page 81). SeeAuxiliary input (AUX IN) socket (page 162).
M
Radio select. See Audio unit operation (page 153).N
CD select. See Compact disc player (page 158).O
Type 2
E104157 A
1 2 3 4
Descriptions for functionbuttons 1-4
A
149
Audio unit overview
E103294
A B EDT
H
F
G
P
Q
R
S
MO N J IKL
C
CD eject. See Compact disc player (page 158).A
Navigation arrowsB
CD aperture. See Compact disc player (page 158).C
OKD
InformationE
Traffic announcement. See Traffic information control (page 154).F
Sound menu select. See Bass/treble control (page 153). SeeBalance/fade control (page 153).
G
Telephone keypad and station presets. See Using the telephone (page166). See Station preset buttons (page 154).
H
Function 4I
Function 3J
Seek up. CD track selection. See Station tuning control (page 153). SeeTrack selection (page 158).
K
150
Audio unit overview

On/off and volume controlL
Seek down. CD track selection. See Station tuning control (page 153).See Track selection (page 158).
M
Function 2N
Function 1O
Menu selectP
Phone select. See Telephone (page 164).Q
Auxiliary, USB and iPod select. See Auxiliary input (AUX IN) socket(page 81). See Auxiliary input (AUX IN) socket (page 162). SeeConnectivity (page 184).
R
Radio select. See Audio unit operation (page 153).S
CD select. See Compact disc player (page 158).T
Function buttons 1 to 4 are contextdependent, and change according to thecurrent unit mode. Descriptions for thefunctions are shown at the bottom of thescreen display.
151
Audio unit overview
SECURITY CODE
Each unit incorporates a unique code thatis linked to the vehicle identificationnumber (VIN). The system willautomatically check that the audio unitand vehicle match before allowingoperation.
If a security code message appears,please see your dealer.
152
Audio system security
ON/OFF CONTROL
Press the on/off control. This will alsooperate the unit for up to one hour withthe ignition turned off.
The radio will switch off automatically afterone hour.
BASS/TREBLE CONTROL
• Press the sound menu button.
• Use the up and down arrow buttonsto select the required setting.
• Use the left and right arrow buttons tomake the necessary adjustment.
The display indicates the level selected.Press the OK button to confirm the newsettings.
BALANCE/FADE CONTROL
The fade control is used to adjust thesound distribution from front to rear invehicles equipped with rear speakers.
The balance control is used to adjust thesound distribution between the left andright speakers.
• Press the sound menu button.
• Use the up and down arrow buttonsto select the required setting.
• Use the left and right arrow buttons tomake the necessary adjustment.
The display indicates the level selected.Press the OK button to confirm the newsettings.
WAVEBAND BUTTON
Press the RADIO button to select fromthe wavebands available.
The selector can also be used to returnto radio reception when you have beenlistening to another source.
Alternatively, press the left arrow buttonto display the available wavebands. Scrollto the required waveband and press OK.
STATION TUNING CONTROL
Seek tuning
Select a waveband and briefly press oneof the seek buttons. The unit will stop atthe first station it finds in the direction youhave chosen.
Manual tuning
Type 1
• Press the MENU button.
• Select RADIO mode and thenMANUAL TUNE.
• Press one of the arrows to tune downor up the waveband in smallincrements or press and hold toincrement quickly, until you find astation you want to listen to.
• Press OK to continue listening to astation.
Type 2
• Press function button 2.
• Then press one of the arrows to tunedown or up the waveband in smallincrements or press and hold toincrement quickly, until you find astation you want to listen to.
• Press OK to continue listening to astation.
Scan tuning
SCAN allows you to listen to a fewseconds of each station detected.
153
Audio unit operation

Type 1
• Press the MENU button.
• Select RADIO mode and then SCAN.
• Use the arrow buttons to scan up ordown the selected waveband.
• Press OK to continue listening to astation.
Type 2
• Press function button 3.
• Use the seek buttons to scan up ordown the selected waveband.
• Press function button 3 again, tocontinue listening to a station.
STATION PRESET BUTTONS
This feature allows you to store yourfavourite stations so that they can berecalled by selecting the appropriatewaveband and pressing one of the presetbuttons.
• Select a waveband.
• Tune to the station required.
• Press and hold one of the presetbuttons. A progress bar and messagewill appear. When the progress barcompletes the station has beenstored. The audio unit will also mutemomentarily as confirmation.
This can be repeated on each wavebandand for each preset button.
Whilst in radio mode, stored stations canalso be selected by pressing the arrowup, down, right or OK buttons. Then scrollto the desired preset station and pressOK.
Note: When you drive to another part ofthe country, FM stations that broadcaston alternative frequencies, and are storedon preset buttons, may be updated withthe correct frequency for that area.
AUTOSTORE CONTROL
AutoStore can be used to store thestations with the strongest signalsavailable, either from the AM or the FMwaveband.
• Press and hold function button 1 orthe RADIO button.
• When the search is complete, soundis restored and the strongest signalsare stored on the AutoStore presets.
Note: AutoStore will store up to amaximum of the 10 strongest signalsavailable and overwrite the previouslystored stations.
Note: The AutoStore waveband can alsobe used to store stations manually in thesame way as other wavebands.
TRAFFIC INFORMATIONCONTROL
Many stations broadcast on the FMwaveband have a TP code to signify thatthey carry traffic programme information.
Activating trafficannouncements
Before you can receive trafficannouncements, you must press the TAbutton. A ‘TA’ display will appear to showthe feature is switched on.
If you are already tuned to a station thatbroadcasts traffic information, ‘TP’ will alsobe displayed. Otherwise the unit willsearch for a traffic programme.
When traffic information is broadcast, itwill automatically interrupt normal radio orCD playback and ‘Traffic announcement(TA)’ will appear in the display.
If a non-traffic station is selected orrecalled using a preset button, the audiounit will remain on that station unless:
154
Audio unit operation
• TA is turned off, then on again.
• On certain models, the volume controlis set to zero for four minutes afterwhich the audio unit will retune toanother traffic station.
Traffic announcement volume
Traffic announcements interrupt normalbroadcasts at a preset minimum level thatis usually louder than normal listeningvolumes.
To adjust the preset volume:
• Use the volume control to make thenecessary adjustment during anincoming TA broadcast. The displaywill show the level selected.
Ending traffic announcements
The audio unit will return to normaloperation at the end of each trafficannouncement. To end theannouncement prematurely, press TAduring the announcement.
Note: If you press TA at any other timeit will switch all announcements off.
155
Audio unit operation
AUTOMATIC VOLUMECONTROL
When available, automatic volume control(AVC) adjusts the volume level tocompensate for engine noise and roadspeed noise.
• Press the MENU button and selectAUDIO.
• Select AVC LEVEL or ADAPTIVE VOL.
• Use the left or right arrow button toadjust the AVC setting.
• Press the OK button to confirm yourselection.
• Press the MENU button to return.
REGIONAL MODE (REG)
Regional mode (REG) controls thebehaviour of AF switching betweenregionally related networks of a parentbroadcaster. A broadcaster may run afairly large network across a large part ofthe country. At various times of the daythis large network may be broken downinto a number of smaller regionalnetworks, typically centred on majortowns or cities. When the network is notsplit into regional variants, the wholenetwork caries the same programming.
Regional mode ON: This prevents'random' AF switches when neighbouringregional networks are not carrying thesame programming.
Regional mode OFF: This allows a largercoverage area if neighbouring regionalnetworks are carrying the sameprogramming, but can cause 'random'AF switches if they are not.
• Press the MENU button.
• Select AUDIO.
• Scroll to RDS REGIONAL and turn onor off with the OK button.
• Press the MENU button to return.
ALTERNATIVEFREQUENCIES
Many programmes broadcast on the FMwaveband have a programmeidentification (PI) code, which can berecognised by audio units.
If your radio has alternative frequencies(AF) tuning switched on and you movefrom one transmission area to another,this facility will search for and switch to astronger station signal, if one can befound.
Under certain conditions, however, AFtuning may temporarily disrupt normalreception.
When selected, the unit continuallyevaluates signal strength and, if a bettersignal becomes available, the unit willswitch to that alternative. It mutes while itchecks a list of alternative frequenciesand, if necessary, it will search onceacross the selected waveband for agenuine alternative frequency.
It will restore radio reception when it findsone or, if one is not found, the unit willreturn to the original stored frequency.
When selected, ‘AF’ will be shown in thedisplay.
• Press the MENU button.
• Select AUDIO.
• Scroll to ALTERNAT. FREQ. and turnon or off with the OK button.
• Press the MENU button to return.
156
Audio unit menus
NEWS BROADCASTS
Some audio units interrupt normalreception to broadcast news bulletinsfrom stations on the FM waveband orradio data system (RDS) and enhancedother network (EON) linked stations, inthe same way as traffic information isprovided.
During news broadcasts, the display willindicate there is an incomingannouncement. News interrupts arebroadcast at the same preset volumelevel as traffic announcements.
• Press the MENU button.
• Select AUDIO.
• Scroll to NEWS and turn on or off withthe OK button.
• Press the MENU button to return.
157
Audio unit menus
COMPACT DISC PLAYBACK
Note: During playback, the displayindicates the disc, track and time that haselapsed since the start of the track.
During radio reception, press the CDbutton once to start CD playback.
Playback will start immediately after a discis loaded.
TRACK SELECTION
• Press the seek up button once tomove to the next track or press itrepeatedly to access later tracks.
• Press the seek down button once toreplay the current track. If pressedwithin two seconds of the start of atrack, the previous track will beselected.
• Press the seek down buttonrepeatedly to select previous tracks.
An alternative method of track selectionis direct track access via the OK andarrow buttons. Pressing the up or downarrow buttons will access the completetrack listing. Navigate to the required trackand select using the OK button. Playbackwill commence from the selected track.
Type 2
The desired track number may beentered using the numeric keypad. Dialthe required track number until complete(for example 1 then 2 for track 12), or dialthe number and directly press OK.
FAST FORWARD/REVERSE
• Press and hold the seek down or upbuttons to search backwards orforwards within the tracks on the disc.
SHUFFLE/RANDOM
Random track playback, also known asshuffle, plays all tracks on the CD inrandom order.
Type 1
• Press the MENU button and select CDMODE.
• Select SHUFFLE, which then enablesthe function to be selected on or off.
• When an MP3 CD is playing, optionsinclude SHUFFLE for the whole CD, orto play all the tracks in the folder in arandom order.
Type 2
• Press function button 2.
• When an MP3 CD is playing, optionsinclude SHUFFLE for the whole CD, orto play all the tracks in the folder in arandom order. Repeat presses offunction button 2 will toggle theseoptions.
Use the seek up or down button to selectthe next track to shuffle if required.
REPEAT COMPACT DISCTRACKS
Type 1
• Press the MENU button and select CDMODE.
• Select REPEAT, which then enablesthe function to be selected on or off.The track will replay once ended.
• When an MP3 CD is playing, optionsinclude REPEAT for the track, or torepeat all the tracks in the folder.
158
Compact disc player
Type 2
• Press function button 1.
• When an MP3 CD is playing, optionsinclude REPEAT for the track, or torepeat all the tracks in the folder.Repeat presses of function button 1will toggle these options.
COMPACT DISC TRACKSCANNING
The SCAN function allows you to previeweach track for approximately 5 seconds.
Type 1
Various scan modes are possible,according to the type of CD currentlyplaying.
• Press the MENU button and select CDMODE.
• Select SCAN, which then enables thefunction to be selected on or off.
• When an MP3 CD is playing, optionsinclude SCAN for the CD, or just thetracks in the folder.
• Press the OK button to stop the scanmode.
Type 2
• Press function button 3.
• When an MP3 CD is playing, optionsinclude SCAN for the CD, or just thetracks in the folder. Repeat pressesof function button 3 will toggle theseoptions.
• Press function button 3 again to stopthe scan mode.
MP3 FILE PLAYBACK
MP3 (MPEG 1 Audio Layer-3) is astandard technology and format forcompressing audio data. This allows amore efficient use of the media.
You can play MP3 files recorded onCD-ROMs, CD-Rs, and CD-RWs. The discmust be in the ISO 9660 level 1 or level 2format, or Joliet or Romeo in theexpansion format. You can also use a discrecorded in Multi Session.
ISO 9660 format
This is the most common internationalstandard for the logical format of files andfolders on a CD-ROM.
There are several specification levels. InLevel 1, file names must be in the 8.3format (no more than 8 characters in thename, no more than 3 characters in theextension “.MP3”) and in capital letters.
Folder names can be no longer than 8characters. There can be no more than8 folder levels (trees). Level 2specifications allow file names up to 31characters long.
Each folder can have up to 8 trees.
For Joliet or Romeo in the expansionformat, please consider these restrictionswhen configuring your CD writingsoftware.
Multi session
This is a recording method that enablesadding of data using the Track-At-Oncemethod.
Conventional CDs begin at a CD controlarea called the Lead-in and end at an areacalled Lead-out. A Multi Session CD is aCD having multiple sessions, with eachsegment from Lead-in to Lead-outregarded as a single session.
159
Compact disc player

• CD-Extra: The format that recordsaudio (audio CD data) as tracks onsession 1, and records data as trackson session 2.
• Mixed CD: In this format, data isrecorded as track 1, and audio (audioCD data) is recorded as track 2.
File formats
• With formats other than ISO 9660 level1 and level 2, folder names or filenames may not be displayed correctly.
• When naming, be sure to add the fileextension “.MP3” to the file name.
• If you put the extension “.MP3” to afile other than MP3, the unit cannotrecognize the file properly and willgenerate random noise that coulddamage your speakers.
• The following discs take a longer timeto start playback.• a disc recorded with complicated
tree structure.• a disc recorded in Multi Session.
• a non-finalised disc to which datacan be added.
Playing a multi session disc
When the first track of the firstsession is audio CD data
Only audio CD data of the first session isplayed back. Non-audio CD data/MP3 fileinformation (track number, time, etc.) isdisplayed with no sound.
When the first track of the firstsession is not audio CD data
• If an MP3 file is in the disc, only MP3file(s) play back and other data isskipped. (Audio CD data is notrecognised.)
• If no MP3 file is in the disc, nothing isplayed back. (Audio CD data is notrecognised.)
MP3 files playback order
The playback order of the folders and filesis as shown.
Note: A folder that does not include anMP3 file is skipped.
Playback tip: To specify a desiredplayback order, before the folder or filename, input the order by number (e.g.,“01,” “02”), then record contents onto adisc. (The order differs depending on thewriting software.)
E104206
ID3 Tag Version 2
The following occurs when an MP3 filecontaining ID3 tag ver.2 is played:
160
Compact disc player
• When skipping a portion of ID3 tagver.2 (at the beginning of the track),sound is not output. Skip timechanges depending ID3 tag ver.2capacity. Example: At 64 kbytes, it isabout 2 seconds (with RealJukebox).
• The displayed elapsed playing timewhen skipping a portion of ID3 tagver.2 is inaccurate. For MP3 files of abit rate other than 128 kbps, time isnot displayed accurately duringplayback.
• When an MP3 file is created with MP3conversion software (e.g.RealJukebox - a registered trademarkof RealNetworks Inc), ID3 ver.2 willautomatically be written.
MP3 navigation
MP3 tracks may be recorded on the CDin several ways. They can all be placed inthe root directory like a conventional audioCD, or they can be placed in folders thatmay represent, for example, an album, anartist, or a genre.
The normal playing sequence on CDs withmultiple folders is to play the tracks withinthe root (top level) first, then the tracks inany folder(s) within the root, then moveonto the second folder, and so forth.
• Press the up or down arrow buttonsto enter the track list.
• Navigate the hierarchy using the arrowbuttons to select another folder ortrack (file).
• Press OK to select a highlighted track.
MP3 DISPLAY OPTIONS
Note: Type 1 units may require repeatedbutton presses of the INFO button todisplay all the available track information.
When an MP3 disc is playing, certaininformation encoded in each track can bedisplayed. Such information will normallyinclude:
• The file name
• The folder name
• ID3 information which might be thealbum or artist’s name
The unit will normally show the file namethat is playing. To select one of the otheritems of information:
• Press the INFO button.
CD text display options
When an audio disc with CD text isplaying, limited information encoded ineach track can be displayed. Suchinformation will normally include:
• The disc name
• The artist name
• The track name
These display options are selected in thesame way as MP3 displays.
ENDING COMPACT DISCPLAYBACK
To restore radio reception on all units:
• Press the RADIO button.
Note: This will not eject the CD; the discwill merely pause at the point where radioreception was restored.
To resume CD playback, press the CDbutton again.
161
Compact disc player
AUXILIARY INPUT (AUX IN)SOCKET
Note: For optimum performance whenusing any auxiliary device set the volumeon the device high. This will reduce audiointerference when charging the devicevia the vehicle power supply socket.
When fitted the Auxiliary input (AUX IN)socket permits an auxiliary device, suchas an MP3 player, to be linked into thevehicle audio system. Output can beplayed through the vehicle speakers.
To connect an auxiliary device, plug it intothe AUX IN socket using a 3.5 mmconventional audio jack connector.
Select the auxiliary input via the AUXbutton and playback will be heard throughthe vehicle speakers. LINE IN will appearin the vehicle audio unit display. Volume,treble and bass can be adjusted on thevehicle audio unit as normal.
The vehicle audio unit buttons can alsobe used to restore playback from thevehicle audio unit, while the auxiliarydevice remains connected.
162
Auxiliary input (AUX IN) socket

AUDIO TROUBLESHOOTING
RectificationAudio unit display
General error message for CD fault conditions, suchas cannot read the CD, data-CD inserted, etc. Ensure
disc is loaded correct way up. Clean and re-try, orreplace disc with known music disc. If error persists
contact your dealer.
PLEASE CHECK CD
General error message for CD fault conditions suchas possible mechanism fault.
CD DRIVE MALFUNCTION
Ambient temperature too hot – unit will not work untilit has cooled down.
CD DRIVE HIGH TEMP
General error message for iPod fault conditions, suchas cannot read the data. Ensure iPod is inserted
correctly. If error persists contact your dealer.
IPOD ERROR READINGDEVICE
163
Audio troubleshooting
GENERAL INFORMATION
CAUTION
Using the system with the engine offwill drain the battery.
This section describes the functions andfeatures of the Bluetooth mobile phonehands free system.
The Bluetooth mobile phone part of thesystem provides interaction with the audiosystem and your mobile phone. It allowsyou to use the audio system to make andreceive calls without having to use yourmobile phone.
Compatibility of phones
CAUTION
As no common agreement exists,mobile phone manufacturers are ableto implement a variety of profiles in
their Bluetooth devices. Because of this,an incompatibility can occur between thephone and hands-free system, which insome cases may significantly degrade thesystem performance. To avoid thissituation, only recommended phonesshould be used.
Please visit the website www.ford-mobile-connectivity.com for fulldetails.
Phones with Symbian operatingsystem
Note: Certain phones require a specialfile to be installed to enable full phonebookaccess via Bluetooth.
This is referred to as a SIS file and will beavailable to download via the Ford websitewww.ford-mobile-connectivity.com.
TELEPHONE SETUP
Phonebook
Note: It may be necessary to confirmphonebook access to the Bluetoothsystem via the mobile phone.
After start up access to the phonebooklist can be delayed for several minutes,depending upon the size.
Phonebook categories
Note: Entries may be displayed withouta category attachment.
The category is indicated as an icon:
E87990
Phone
E87991
Mobile
E87992
Home
E87993
Office
E87994
Fax
Making a phone an activephone
When using the system for the first time,no phone is connected to the system.
After switching on the ignition and theaudio unit, the Bluetooth phone must bebonded to the system.
Bluetooth phone
After bonding a Bluetooth phone to thesystem, this becomes the active phone.For further information refer to the phonemenu.
164
Telephone
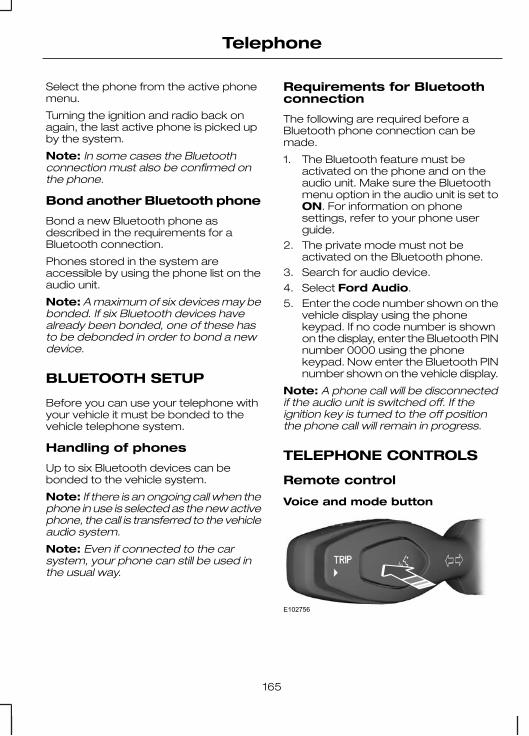
Select the phone from the active phonemenu.
Turning the ignition and radio back onagain, the last active phone is picked upby the system.
Note: In some cases the Bluetoothconnection must also be confirmed onthe phone.
Bond another Bluetooth phone
Bond a new Bluetooth phone asdescribed in the requirements for aBluetooth connection.
Phones stored in the system areaccessible by using the phone list on theaudio unit.
Note: A maximum of six devices may bebonded. If six Bluetooth devices havealready been bonded, one of these hasto be debonded in order to bond a newdevice.
BLUETOOTH SETUP
Before you can use your telephone withyour vehicle it must be bonded to thevehicle telephone system.
Handling of phones
Up to six Bluetooth devices can bebonded to the vehicle system.
Note: If there is an ongoing call when thephone in use is selected as the new activephone, the call is transferred to the vehicleaudio system.
Note: Even if connected to the carsystem, your phone can still be used inthe usual way.
Requirements for Bluetoothconnection
The following are required before aBluetooth phone connection can bemade.
1. The Bluetooth feature must beactivated on the phone and on theaudio unit. Make sure the Bluetoothmenu option in the audio unit is set toON. For information on phonesettings, refer to your phone userguide.
2. The private mode must not beactivated on the Bluetooth phone.
3. Search for audio device.4. Select Ford Audio.5. Enter the code number shown on the
vehicle display using the phonekeypad. If no code number is shownon the display, enter the Bluetooth PINnumber 0000 using the phonekeypad. Now enter the Bluetooth PINnumber shown on the vehicle display.
Note: A phone call will be disconnectedif the audio unit is switched off. If theignition key is turned to the off positionthe phone call will remain in progress.
TELEPHONE CONTROLS
Remote control
Voice and mode button
E102756
165
Telephone
Incoming calls can be accepted bypressing the MODE button once. Pressthe button again to end the call.
USING THE TELEPHONE
Note: Refer to your audio guide fordetails of the controls. See Audio unitoverview (page 148).
This chapter describes the phonefunctions of the audio unit.
An active phone must be present.
Even if connected to the audio unit, yourphone can still be used in the usual way.
Note: You can exit the phone menu bypressing any source button CD, RADIOor AUX.
Making a call
Dialling a number using voicecontrol
Phone numbers can be dialled using voicecontrol. See Telephone commands(page 176).
Dialling a number using theaddress book
You can access your phone addressbook via Bluetooth. The entries will appearin the unit display.
1. Press the PHONE button.
2. Press the arrow buttons until thephone book is shown.
3. Press the OK button
4. Press the up/down arrow buttons toselect the desired phone number.
Note: Press and hold the up/down arrowbuttons to skip to the next number.
5. Press the OK button to dial theselected phone number.
Dialling a number using thetelephone keypad
If you have an audio unit with a telephonekeypad (buttons 0-9, * and #):
1. Press the PHONE button.
2. Dial the number using the telephonekeypad on the audio unit.
3. Press the OK button.
Note: If you enter an incorrect digit whilstentering a phone number, press functionbutton 3 to erase the last digit. A longpress will erase the complete string ofdigits.
Ending a call
Calls can be ended by pressing functionbutton 4.
Audio units without a telephone keypadcan also end a call by pressing the MODEbutton on the remote control.
Redialling a number
1. Press the PHONE button.
2. Press the arrow buttons until CALLLISTS is displayed.
3. Press the OK button.
Note: If the active phone does notprovide a call out list, the last outgoing callnumber/entry can be redialled.
4. Press the up/down buttons to selectthe desired call list.
5. Press the OK button.
6. Press the up/down buttons to selectthe desired phone number.
7. Press the OK button.
Redialling the last dialled number
1. Press the PHONE button.
2. Press the arrow buttons until REDIALis displayed.
166
Telephone
3. Press the OK button.
If you have an audio unit with a telephonekeypad:
1. Press the PHONE button.
2. Press the OK button.
3. Press function button 2.
Receiving an incoming call
Accepting an incoming call
Incoming calls can be accepted bypressing function button 1 or the MODEbutton on the remote control.
Rejecting an incoming call
Incoming calls can be rejected bypressing function button 4.
Receiving a second incomingcall
Note: The second incoming call functionmust be activated in your phone.
If there is an incoming call whilst there isan ongoing call, a beep will be heard andyou will have the option to end the activecall and to accept the incoming call.
Accepting a second incoming call
Note: The first incoming call will bedisconnected and replaced by thesecond incoming call.
Second incoming calls can be acceptedby pressing function button 1.
Rejecting a second incoming call
Second incoming calls can be rejected bypressing function button 4.
Muting the microphone
Note: During a call, it is possible to mutethe microphone. Whilst muted,confirmation will appear in the display.
Press function button 1. Press the buttononce again to turn this function off.
Changing the active phone
Note: Phones must be bonded to thesystem before they can be made active.
Note: After bonding a phone to thesystem, this becomes the active phone.
1. Press the PHONE button.
2. Press the up/down buttons untilSELECT PHONE is shown.
3. Press the OK button.
4. Scroll through the different storedphones by using the up/down buttonsto display the bonded phones.
5. Press the OK button to select thephone which is to be the active phone.
Debonding a bonded phone
A bonded phone can be deleted from thesystem at any time, unless a phone call isin progress.
1. Press the PHONE button.
2. Press the up/down buttons untilSELECT PHONE is shown.
3. Press the OK button.
4. Press function button 1.
167
Telephone
PRINCIPLE OF OPERATION
CAUTION
Using the system with the engine offwill drain the battery.
Voice recognition enables operation ofthe system without the need to divert yourattention from the road ahead in order tochange settings, or receive feedbackfrom the system.
Whenever you issue one of the definedcommands with the system active, thevoice recognition system converts yourcommand into a control signal for thesystem. Your inputs take the form ofdialogues or commands. You are guidedthrough these dialogues byannouncements or questions.
Please familiarise yourself with thefunctions of the system before using voicerecognition.
Supported commands
The voice control system allows you tocontrol the following vehicle functions:
• Bluetooth phone
• radio
• CD Player
• external device (USB)
• external device (iPod)
• automatic climate control
Note: The voice control system islanguage specific. If you require thesystem to operate in another languageplease consult your dealer.
System response
As you work through a voice session thesystem will prompt you with a beep toneeach time the system is ready to proceed.
Do not try to give any commands until thebeep tone has been heard. The voicecontrol system will repeat each spokencommand back to you.
If you are not sure how to continue say"HELP" for assistance or "CANCEL" if youdo not wish to continue.
The "HELP" function provides only asubset of the available voice commands.Detailed explanations of all possible voicecommands can be found on the followingpages.
Voice commands
All voice commands should be given usinga natural speaking voice, as if speaking toa passenger or on the phone. Your voicelevel should be dependant on thesurrounding noise level inside or outsidethe vehicle but do not shout.
USING VOICE CONTROL
System operation
The order and content of the voicecontrols are given in the following lists. Thetables show the sequence of user voicecommands and system responses foreach available function.
<> indicates a number or stored name tagto be inserted by the user.
Short cuts
There are a number of voice commandshort cuts available, which allow you tocontrol some vehicle features withouthaving to follow the complete commandmenu. These are:
168
Voice control
• phone: "MOBILE NAME", "DIALNUMBER", "DIAL NAME", and"REDIAL"
• automatic climate control:"TEMPERATURE", "AUTO MODE","DEFROSTING/DEMISTING ON" and"DEFROSTING/DEMISTING OFF"
• radio: "TUNE NAME"
• external device (USB): "TRACK"
• external device (iPod): "TRACK"
Start communicating with thesystem
Before you can start talking to the systemyou first have to press the VOICE orMODE button for each operation andwait until the system answers with a beep.See Voice control (page 37).
Press the button again to cancel the voicesession.
Name tag
The name tag functionality can supportthe phone, audio and navigation featuresby using the "STORE NAME" function. Youcan assign name tags to items such asfavourite radio stations and personalphone contacts. See Audio unitcommands (page 169). See Telephonecommands (page 176).
• Store up to 20 name tags per function.
• The average recording time for eachname tag is approximately 2-3seconds.
AUDIO UNIT COMMANDS
CD Player
You can control playback directly by voicecontrol.
Overview
The overview below shows the availablevoice commands. The following lists willgive further information about thecomplete command menu in selectedexamples.
"CD PLAYER"
"HELP"
"PLAY"
"TRACK"*
"SHUFFLE ALL"
"SHUFFLE FOLDER"**
"SHUFFLE OFF"
"REPEAT FOLDER"**
"REPEAT TRACK"
169
Voice control
"CD PLAYER"
"REPEAT OFF"
* Can be used as a shortcut.
** Only available if the CD contains audio data files like MP3 or WMA.
Track
You can choose a track on your CDdirectly.
System answerUser saysSteps
"CD PLAYER""CD PLAYER"1
"TRACK NUMBER PLEASE""TRACK"*2
"TRACK <number>""<a number between 1 and 99>"**3
* Can be used as a shortcut.
** Additionally, numbers can be spoken as up to four single digits (for example "2", "4","5" for track 245)
Shuffle all
To set random playback.
System answerUser saysSteps
"CD PLAYER""CD PLAYER"1
"SHUFFLE ALL"2
Radio
The radio voice commands support thefunctionality of the radio and allow you totune radio stations by voice control.
Overview
The overview below shows the availablevoice commands. The following lists willgive further information about thecomplete command menu.
"RADIO"
"HELP"
"AM"
170
Voice control
"RADIO"
"FM"
"TUNE NAME"*
"DELETE NAME"
"DELETE DIRECTORY"
"PLAY DIRECTORY"
"STORE NAME"
"PLAY"
* Can be used as a shortcut.
Tune frequency
This function allows you to tune your radioby voice commands.
System answerUser saysSteps
"RADIO""RADIO"1
"AM FREQUENCY PLEASE""AM"2
"FM FREQUENCY PLEASE""FM"
"TUNE <frequency>""<frequency>"*3
* The frequency may be entered in a variety of ways. Refer below for representativeexamples.
FM band: 87.5 - 108.0 in increments of 0.1
• "Eighty nine point nine" (89.9)
• "Ninety" (90.0)
• "One hundred point five" (100.5)
• "One zero one point one" (101.1)
• "One zero eight" (108.0)
AM/MW band: 531 - 1602 in incrementsof 9
AM/LW band: 153 - 281 in increments of1
• "Five thirty one" (531)
• "Nine hundred" (900)
• "Fourteen forty" (1440)
• "Fifteen zero three" (1503)
• "Ten eighty" (1080)
Store name
If you have tuned a radio station, you canstore it with a name in the directory.
171
Voice control

System answerUser saysSteps
"RADIO""RADIO"1
"STORE NAME""STORE NAME"2"NAME PLEASE"
"REPEAT NAME PLEASE""<name>"3
"STORING NAME""<name>"4"<name> STORED"
Tune name
This function allows you to call up a storedradio station.
System answerUser saysSteps
"RADIO""RADIO"1
"NAME PLEASE""TUNE NAME"*2
"TUNE <name>""<name>"3
* Can be used as a shortcut.
Delete name
This function allows you to delete a storedradio station.
System answerUser saysSteps
"RADIO""RADIO"1
"NAME PLEASE""DELETE NAME"2
"DELETE <name>""<name>"3"CONFIRM YES OR NO"
"DELETED""YES"4
"COMMAND CANCELLED""NO"
172
Voice control
Play directory This function allows you to let the systemtell you all of the stored radio stations.
System answerUser saysSteps
"RADIO""RADIO"1
"PLAY <DIRECTORY>""PLAY DIRECTORY"2
Delete directory
This function allows you to delete allstored radio stations at once.
System answerUser saysSteps
"RADIO""RADIO"1
"DELETE DIRECTORY""DELETE DIRECTORY"2"CONFIRM YES OR NO"
"RADIO DIRECTORY DELETED""YES"3
"COMMAND CANCELLED""NO"
Play
This function switches the audio sourceto the radio mode.
System answerUser saysSteps
"RADIO""RADIO"1
"PLAY"2
External devices - USB
These voice commands support thefunctionality of an external USB devicewhich may be connected to the audiounit.
Overview
The overview below shows the availablevoice commands. The following lists willgive further information about thecomplete command menu in selectedexamples.
173
Voice control

"EXTERNAL DEVICE", "USB"
"HELP"
"PLAY"
"TRACK"*
"PLAYLIST"**
"FOLDER"**
"SHUFFLE ALL"
"SHUFFLE FOLDER"
"SHUFFLE PLAYLIST"
"SHUFFLE OFF"
"REPEAT TRACK"
"REPEAT FOLDER"
"REPEAT OFF"
* Can be used as a shortcut.
** Playlists and folders activated by voice control must be assigned special filenames.See General information (page 184).
USB play
This function allows you to switch theaudio source to the attached USB device.
System answerUser saysSteps
"EXTERNAL DEVICE""EXTERNAL DEVICE"1
"USB""USB"2
"PLAY"3
USB Track
You can choose a track on your USBdevice directly.
174
Voice control
System answerUser saysSteps
"EXTERNAL DEVICE""EXTERNAL DEVICE"1
"USB""USB"2
"TRACK NUMBER PLEASE""TRACK"3
"TRACK <number>""<a number between 1 and 99>"*4
* Additionally, numbers can be spoken as up to four single digits (for example "2", "4","5" for track 245)
External devices - iPod
These voice commands support thefunctionality of an iPod which may beconnected to the audio unit.
Overview
The overview below shows the availablevoice commands. The following lists willgive further information about thecomplete command menu in selectedexamples.
"EXTERNAL DEVICE", "IPOD"
"HELP"
"PLAY"
"TRACK"*
"PLAYLIST"**
"SHUFFLE ALL"
"SHUFFLE PLAYLIST"
"SHUFFLE OFF"
"REPEAT TRACK"
"REPEAT OFF"
* Can be used as a shortcut.
** Playlists activated by voice control must be assigned special filenames. See Generalinformation (page 184).
175
Voice control
iPod Track You can choose a track off the all titles listof your iPod directly.
System answerUser saysSteps
"EXTERNAL DEVICE""EXTERNAL DEVICE"1
"IPOD""IPOD"2
"TRACK NUMBER PLEASE""TRACK"*3
"TRACK <number>""<a number between 1 and 99>"**4
* Can be used as a shortcut.
** Additionally, numbers can be spoken as up to five single digits (for example "5", "2","4", "5", "3" for track 52453), to a limit of 65535.
iPod playlist
You can choose a playlist from your iPoddirectly.
System answerUser saysSteps
"EXTERNAL DEVICE""EXTERNAL DEVICE"1
"IPOD""IPOD"2
"PLAYLIST NUMBER PLEASE""PLAYLIST"*3
"PLAYLIST <number>""<a number between 1 and 10>"4
* Playlists activated by voice control must be assigned special filenames. See Generalinformation (page 184).
TELEPHONE COMMANDS
Phone
Your phone system allows you to createan additional phonebook. The storedentries can be dialled by voice control.Phone numbers stored by using voicecontrol are stored on the vehicle systemand not in your phone.
Overview
The overview below shows the availablevoice commands. The following lists willgive further information about thecomplete command menu in selectedexamples.
176
Voice control
"PHONE"
"HELP"
"MOBILE NAME"*
"DIAL NUMBER"*
"DIAL NAME"*
"DELETE NAME"
"DELETE DIRECTORY"
"PLAY DIRECTORY"
"STORE NAME"
"REDIAL"*
"ACCEPT CALLS"
"REJECT CALLS"
* Can be used as a shortcut.
Create a phonebook
Store name
New entries can be stored with the"STORE NAME" command. This featurecan be used to dial a number by callingup the name instead of the full phonenumber.
System answerUser saysSteps
"PHONE""PHONE"1
"STORE NAME""STORE NAME"2"NAME PLEASE"
"REPEAT NAME PLEASE""<name>"3
"STORING NAME""<name>"4"<name> STORED""NUMBER PLEASE"
177
Voice control
System answerUser saysSteps
"<phone number>""<phone number>"5
"STORING NUMBER""STORE"6"<phone number>"
"NUMBER STORED"
Delete name
Stored names can also be deleted fromthe directory.
System answerUser saysSteps
"PHONE""PHONE"1
"NAME PLEASE""DELETE NAME"2
"DELETE <name>""<name>"3"CONFIRM YES OR NO"
"<name> DELETED""YES"4
"COMMAND CANCELLED""NO"
Play directory
Use this function to let the system tell youall stored entries.
System answerUser saysSteps
"PHONE""PHONE"1
"PLAY DIRECTORY""PLAY DIRECTORY"2
Delete directory
This function allows you to delete allentries in one go.
System answerUser saysSteps
"PHONE""PHONE"1
"DELETE DIRECTORY""DELETE DIRECTORY"2
178
Voice control
System answerUser saysSteps
"CONFIRM YES OR NO"
"DIRECTORY DELETED""YES"3
"COMMAND CANCELLED""NO"
Phone functions
Mobile name
This function allows you to access phonenumbers stored with a name tag in yourmobile phone.
System answerUser saysSteps
"PHONE""PHONE"1
"MOBILE NAME" "<phonedependent dialogue>"
"MOBILE NAME"*2
* Can be used as a shortcut.
Dial number
Phone numbers can be dialled after givingthe name tag voice command.
System answerUser saysSteps
"PHONE""PHONE"1
"NUMBER PLEASE""DIAL NUMBER"*2
"<phone number>"<phone number>"3CONTINUE?"
"DIALLING""DIAL"4
"<repeat last part of number>"CORRECTION"CONTINUE?"
* Can be used as a shortcut.
179
Voice control
Dial name Phone numbers can be dialled after givingthe name tag voice command.
System answerUser saysSteps
"PHONE""PHONE"1
"NAME PLEASE""DIAL NAME"*2
"DIAL <name>""<name>"3"CONFIRM YES OR NO"
"DIALLING""YES"4
"COMMAND CANCELLED""NO"
* Can be used as a shortcut.
Redial
This function allows you to redial the lastdialled phone number.
System answerUser saysSteps
"PHONE""PHONE"1
"REDIAL""REDIAL"*2"CONFIRM YES OR NO"
"DIALLING""YES"3
"COMMAND CANCELLED""NO"
* Can be used as a shortcut.
DTMF (Tone dialling)
This function transfers spoken numbersinto DTMF tones. For example, to makea remote enquiry to your home answeringmachine or to enter a PIN number etc.
Note: DTMF can only be used during anongoing call. Press the VOICE button andwait for the system prompt.
Can only be used with vehicles installedwith a dedicated VOICE button.
System answerUser saysSteps
"NUMBER PLEASE"1
"<numbers 1 to 9, zero, hash, star>"2
180
Voice control
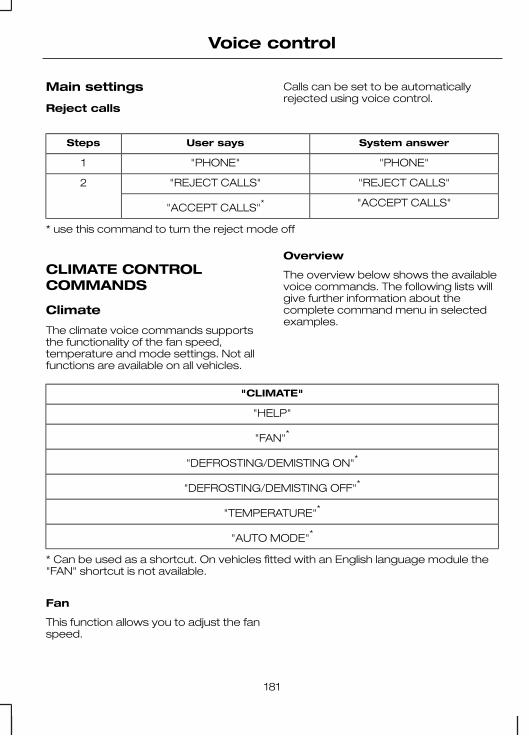
Main settings
Reject calls
Calls can be set to be automaticallyrejected using voice control.
System answerUser saysSteps
"PHONE""PHONE"1
"REJECT CALLS""REJECT CALLS"2
"ACCEPT CALLS""ACCEPT CALLS"*
* use this command to turn the reject mode off
CLIMATE CONTROLCOMMANDS
Climate
The climate voice commands supportsthe functionality of the fan speed,temperature and mode settings. Not allfunctions are available on all vehicles.
Overview
The overview below shows the availablevoice commands. The following lists willgive further information about thecomplete command menu in selectedexamples.
"CLIMATE"
"HELP"
"FAN"*
"DEFROSTING/DEMISTING ON"*
"DEFROSTING/DEMISTING OFF"*
"TEMPERATURE"*
"AUTO MODE"*
* Can be used as a shortcut. On vehicles fitted with an English language module the"FAN" shortcut is not available.
Fan
This function allows you to adjust the fanspeed.
181
Voice control

System answerUser saysSteps
"CLIMATE""CLIMATE"1
"FAN SPEED PLEASE""‘FAN"*2
"FAN MINIMUM""MINIMUM"
3 "FAN <number>""<a number between 0 and 7>"
"FAN MAXIMUM""MAXIMUM"
* Can be used as a shortcut. On vehicles fitted with an English language module the"FAN" shortcut is not available.
Defrosting/Demisting
System answerUser saysSteps
"CLIMATE""CLIMATE"1
"DEFROSTING ON/DEMISTING ON""DEFROSTING ON/DEMISTING
ON"*
2"DEFROSTING OFF/DEMISTING
OFF""DEFROSTING OFF/DEMISTING
OFF"*
* Can be used as a shortcut.
Temperature
This function allows you to adjust thetemperature.
System answerUser saysSteps
"CLIMATE""CLIMATE"1
"TEMPERATURE PLEASE""TEMPERATURE"*2
"TEMPERATURE MINIMUM""MINIMUM"
3"TEMPERATURE <number>"
"<a number between 15 and 29 °Cwith 0.5 increments>" or "<a
number between 59 and 84 °F>"
182
Voice control
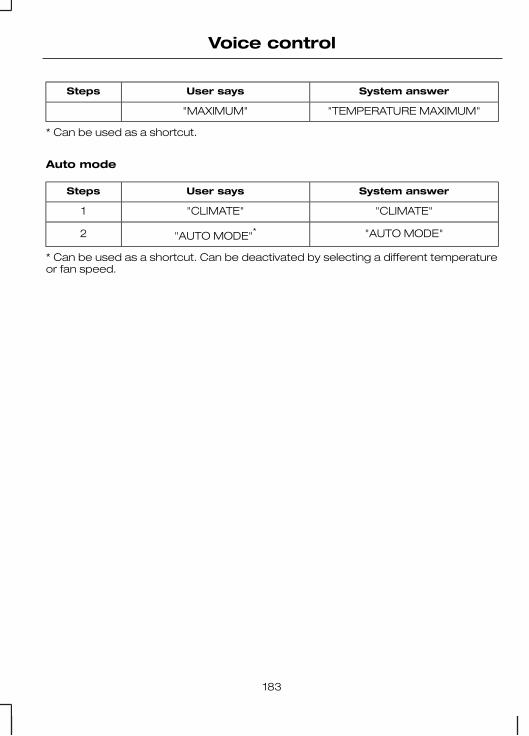
System answerUser saysSteps
"TEMPERATURE MAXIMUM""MAXIMUM"
* Can be used as a shortcut.
Auto mode
System answerUser saysSteps
"CLIMATE""CLIMATE"1
"AUTO MODE""AUTO MODE"*2
* Can be used as a shortcut. Can be deactivated by selecting a different temperatureor fan speed.
183
Voice control
GENERAL INFORMATION
CAUTIONSTake care when handling externaldevices with exposed electricalconnectors (such as the USB plug).
Always replace the protective cap/shieldwhen possible. There may be a risk ofelectrostatic discharge causing damageto the device.
Do not touch or handle the USBsocket in the vehicle. Cover thesocket when not in use.
Only use USB Mass-Storage devicecompliant devices.
Always switch your audio unit to adifferent source (for example theradio) before unplugging the USB
device.
Do not install or connect USB hubsor splitters.
Note: The system is only designed torecognize and read suitable audio filesfrom a USB device that conforms to theUSB Mass-Storage device class or aniPod. Not all available USB devices can beguaranteed to function with the system.
Note: It is possible to connect compatibledevices with a trailing USB lead as well asthose that plug into the vehicle USBsocket directly (for example USB memorysticks and pen drives).
Note: Some USB devices with a higherpower consumption may not becompatible (for example some larger harddrives).
Note: Access time to read the files onthe external device will vary dependingupon factors such as the file structure,size and device content.
The system supports a range of externaldevices, to fully integrate with your audiounit via the USB and auxiliary inputsockets. Once connected, control of theexternal device is possible via the audiounit.
A list of typical compatible devices areshown below:• USB memory sticks
• USB portable hard drives
• MP3 players with USB connection
• iPod media players (refer towww.ford-mobile-connectivity.com for latestcompatibility list).
The system is USB 2.0 full speedcompatible, USB 1.1 host compliant andsupports FAT 16/32 file systems.
Information on audio filestructures for external devices
USB
Create only a single partition on the USBdevice.
If playlists are created, they must containcorrect file paths referenced to the USBdevice. It is recommended to create theplaylist after the audio files have beentransferred to the USB device.
Playlists must be created in .m3u format.
Audio files must be in .mp3 format.
Do not exceed the following limits:• 1000 items per folder (files, folders and
playlists)• 5000 folders per USB device
(including playlists)• 8 subfolder levels.
184
Connectivity
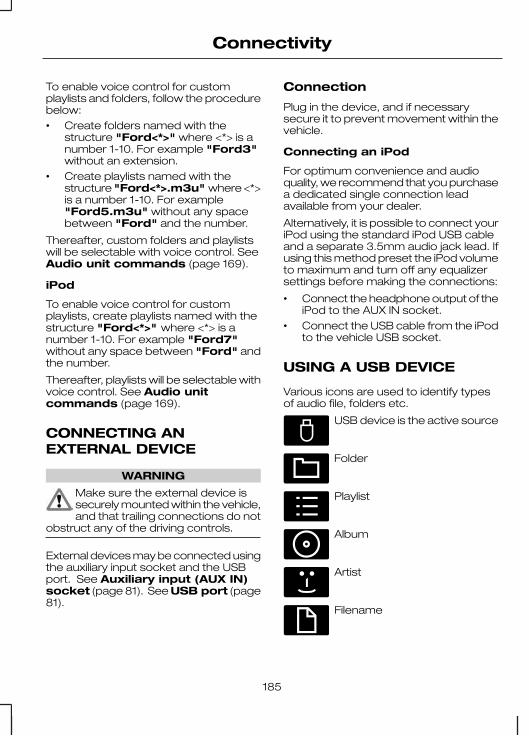
To enable voice control for customplaylists and folders, follow the procedurebelow:• Create folders named with the
structure "Ford<*>" where <*> is anumber 1-10. For example "Ford3"without an extension.
• Create playlists named with thestructure "Ford<*>.m3u" where <*>is a number 1-10. For example"Ford5.m3u" without any spacebetween "Ford" and the number.
Thereafter, custom folders and playlistswill be selectable with voice control. SeeAudio unit commands (page 169).
iPod
To enable voice control for customplaylists, create playlists named with thestructure "Ford<*>" where <*> is anumber 1-10. For example "Ford7"without any space between "Ford" andthe number.
Thereafter, playlists will be selectable withvoice control. See Audio unitcommands (page 169).
CONNECTING ANEXTERNAL DEVICE
WARNING
Make sure the external device issecurely mounted within the vehicle,and that trailing connections do not
obstruct any of the driving controls.
External devices may be connected usingthe auxiliary input socket and the USBport. See Auxiliary input (AUX IN)socket (page 81). See USB port (page81).
Connection
Plug in the device, and if necessarysecure it to prevent movement within thevehicle.
Connecting an iPod
For optimum convenience and audioquality, we recommend that you purchasea dedicated single connection leadavailable from your dealer.
Alternatively, it is possible to connect youriPod using the standard iPod USB cableand a separate 3.5mm audio jack lead. Ifusing this method preset the iPod volumeto maximum and turn off any equalizersettings before making the connections:
• Connect the headphone output of theiPod to the AUX IN socket.
• Connect the USB cable from the iPodto the vehicle USB socket.
USING A USB DEVICE
Various icons are used to identify typesof audio file, folders etc.
E100029
USB device is the active source
E100022
Folder
E100023
Playlist
E100024
Album
E100025
Artist
E100026
Filename
185
Connectivity
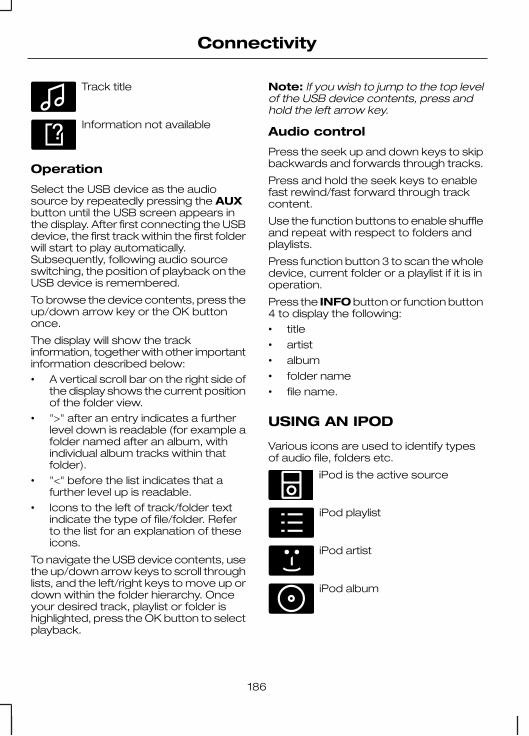
E100027
Track title
E100028
Information not available
Operation
Select the USB device as the audiosource by repeatedly pressing the AUXbutton until the USB screen appears inthe display. After first connecting the USBdevice, the first track within the first folderwill start to play automatically.Subsequently, following audio sourceswitching, the position of playback on theUSB device is remembered.
To browse the device contents, press theup/down arrow key or the OK buttononce.
The display will show the trackinformation, together with other importantinformation described below:• A vertical scroll bar on the right side of
the display shows the current positionof the folder view.
• ">" after an entry indicates a furtherlevel down is readable (for example afolder named after an album, withindividual album tracks within thatfolder).
• "<" before the list indicates that afurther level up is readable.
• Icons to the left of track/folder textindicate the type of file/folder. Referto the list for an explanation of theseicons.
To navigate the USB device contents, usethe up/down arrow keys to scroll throughlists, and the left/right keys to move up ordown within the folder hierarchy. Onceyour desired track, playlist or folder ishighlighted, press the OK button to selectplayback.
Note: If you wish to jump to the top levelof the USB device contents, press andhold the left arrow key.
Audio control
Press the seek up and down keys to skipbackwards and forwards through tracks.
Press and hold the seek keys to enablefast rewind/fast forward through trackcontent.
Use the function buttons to enable shuffleand repeat with respect to folders andplaylists.
Press function button 3 to scan the wholedevice, current folder or a playlist if it is inoperation.
Press the INFO button or function button4 to display the following:• title
• artist
• album
• folder name
• file name.
USING AN IPOD
Various icons are used to identify typesof audio file, folders etc.
E100030
iPod is the active source
E100031
iPod playlist
E100032
iPod artist
E100033
iPod album
186
Connectivity
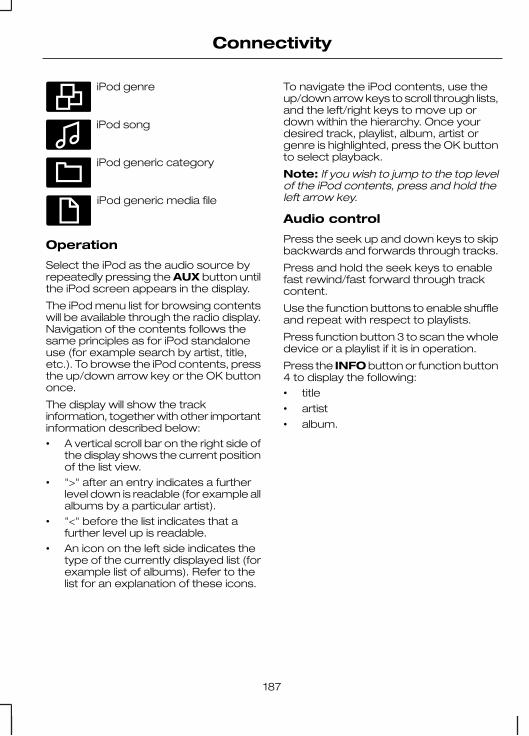
E100034
iPod genre
E100035
iPod song
E100036
iPod generic category
E100037
iPod generic media file
Operation
Select the iPod as the audio source byrepeatedly pressing the AUX button untilthe iPod screen appears in the display.
The iPod menu list for browsing contentswill be available through the radio display.Navigation of the contents follows thesame principles as for iPod standaloneuse (for example search by artist, title,etc.). To browse the iPod contents, pressthe up/down arrow key or the OK buttononce.
The display will show the trackinformation, together with other importantinformation described below:• A vertical scroll bar on the right side of
the display shows the current positionof the list view.
• ">" after an entry indicates a furtherlevel down is readable (for example allalbums by a particular artist).
• "<" before the list indicates that afurther level up is readable.
• An icon on the left side indicates thetype of the currently displayed list (forexample list of albums). Refer to thelist for an explanation of these icons.
To navigate the iPod contents, use theup/down arrow keys to scroll through lists,and the left/right keys to move up ordown within the hierarchy. Once yourdesired track, playlist, album, artist orgenre is highlighted, press the OK buttonto select playback.
Note: If you wish to jump to the top levelof the iPod contents, press and hold theleft arrow key.
Audio control
Press the seek up and down keys to skipbackwards and forwards through tracks.
Press and hold the seek keys to enablefast rewind/fast forward through trackcontent.
Use the function buttons to enable shuffleand repeat with respect to playlists.
Press function button 3 to scan the wholedevice or a playlist if it is in operation.
Press the INFO button or function button4 to display the following:• title
• artist
• album.
187
Connectivity
TYPE APPROVALS
FCC/INDUSTRY CANADANOTICE
This device complies with Part 15 of theFCC Rules. Operation is subject to thefollowing two conditions: (1) this devicemay not cause harmful interference, and(2) this device must accept anyinterference received, includinginterference that may cause undesiredoperation.
FCC ID: OW3RX-42
IC: 661AA-RX42
Changes or modifications to your devicenot expressly approved by the partyresponsible for compliance can void theuser's authority to operate the equipment.
RX-42 - declaration ofconformity
We, the party responsible for compliance,declare under our sole responsibility thatthe Handset Integration product RX-42 isin conformity with the provisions of thefollowing Council Directive: 1999/5/EC. Acopy of the Declaration of Conformity canbe found at:
www.nokia.com/phones/declaration_of_conformity
The Bluetooth word mark and logos areowned by the Bluetooth SIG, Inc. and anyuse of such marks by Ford MotorCompany is under license. Othertrademarks and trade names are thoseof their respective owners.
ELECTROMAGNETICCOMPATIBILITY
WARNINGSYour vehicle has been tested andcertified to European legislationsrelating to electromagnetic
compatibility (2004/104/EC). It is yourresponsibility to ensure that anyequipment you have fitted complies withapplicable local legislations. Have anyequipment fitted by properly trainedtechnicians.
Radio frequency (RF) transmitterequipment (e.g. cellular telephones,amateur radio transmitters etc.) may
only be fitted to your vehicle if they complywith the parameters shown in the tablebelow. There are no special provisions orconditions for installations or use.
Do not mount any transceiver,microphones, speakers, or anyother item in the deployment path
of the airbag system.
Do not fasten antenna cables tooriginal vehicle wiring, fuel pipes andbrake pipes.
Keep antenna and power cables atleast 100mm from any electronicmodules and airbags.
188
Appendices
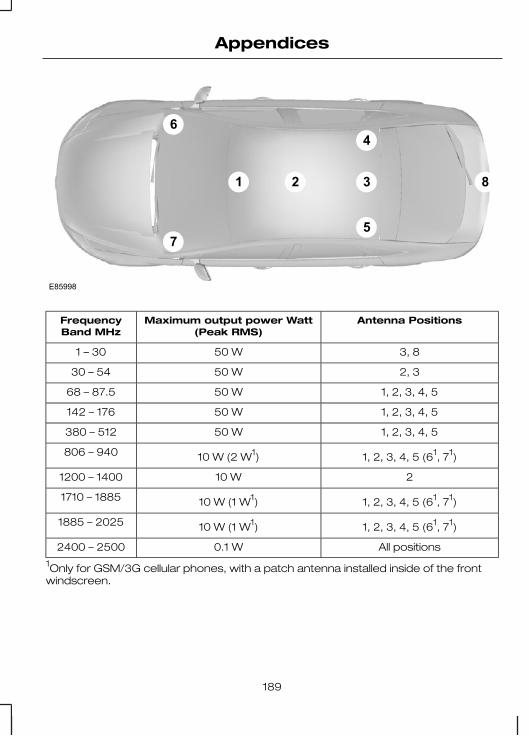
E85998
6
7
1 2 3 8
4
5
Antenna PositionsMaximum output power Watt(Peak RMS)
FrequencyBand MHz
3, 850 W1 – 30
2, 350 W30 – 54
1, 2, 3, 4, 550 W68 – 87.5
1, 2, 3, 4, 550 W142 – 176
1, 2, 3, 4, 550 W380 – 512
1, 2, 3, 4, 5 (61, 71)10 W (2 W1)806 – 940
210 W1200 – 1400
1, 2, 3, 4, 5 (61, 71)10 W (1 W1)1710 – 1885
1, 2, 3, 4, 5 (61, 71)10 W (1 W1)1885 – 2025
All positions0.1 W2400 – 2500
1Only for GSM/3G cellular phones, with a patch antenna installed inside of the frontwindscreen.
189
Appendices
Note: After the installation of RFtransmitters, check for disturbances fromand to all electrical equipment in thevehicle, both in the standby and transmitmodes.
Check all electrical equipment:• with the ignition ON• with the engine running
• during a road test at various speeds.
Check that electromagnetic fieldsgenerated inside the vehicle cabin by thetransmitter installed do not exceed humanexposure limits specified in EU directive2004/40/EC.
190
Appendices
AA/C
See: Climate control.....................................70About this handbook................................5ABS
See: Brakes...................................................92ABS driving hints
See: Hints on driving with ABS...................92Accessories
See: Parts and accessories..........................5Adjusting the steering wheel.................36Adjusting the windscreen washer
jets...........................................................41Air conditioning
See: Climate control.....................................70Air vents....................................................70Alarm.........................................................35
Principle of operation...................................35Alternative frequencies.........................156Appendices............................................188Arming the alarm.....................................35
Automatic arming delay..............................35Arming the engine immobiliser.............34Audible warnings and indicators..........60
Automatic transmission..............................60Frost...............................................................60Key outside car.............................................60Lights on........................................................60Low fuel.........................................................60Seat belt reminder.......................................60
Audio control...........................................36Mode..............................................................36Seek...............................................................36
Audio introduction.................................147Audio system security..........................152Audio troubleshooting..........................163Audio unit commands..........................169
CD Player.....................................................169External devices - iPod..............................175External devices - USB..............................173Radio.............................................................170
Audio unit menus..................................156Audio unit operation..............................153Audio unit overview...............................148Auto-dimming mirror..............................55Autolamps................................................44
Automatic climate control......................73Air distribution................................................74Blower............................................................74Recirculated air.............................................74Setting the temperature..............................73Switching off the automatic climate
control........................................................75Switching the air conditioning on and
off................................................................74Windscreen defrosting and
demisting...................................................74Automatic transmission.........................89
Drive modes..................................................90Emergency park position release
lever............................................................91General information.....................................89Hints on driving with an automatic
transmission..............................................90Selector lever positions...............................89
Automatic volume control....................156Autostore control..................................154Auxiliary input (AUX IN) socket......81, 162
BBalance/fade control............................153Bass/treble control................................153Battery connection points...................130Bluetooth setup.....................................165
Handling of phones....................................165Requirements for Bluetooth
connection..............................................165Bonnet lock
See: Opening and closing the bonnet......114Booster cables
See: Using booster cables........................129Booster cushions.....................................18
Booster cushion (Group 3)..........................18Booster seat (Group 2)................................18
Brake and clutch fluid check...............122Topping up...................................................123
Brakes.......................................................92Principle of operation...................................92
Bulb changingSee: Changing a bulb..................................47
Bulb specification chart...........................51
191
Index

CCar wash
See: Cleaning the exterior.........................127Catalytic converter..................................87
Driving with a catalytic converter...............87Parking...........................................................87
Changing a bulb......................................47Central high mounted brake lamp............50Front fog lamps............................................49Headlamp......................................................47Interior lamp..................................................50Luggage compartment lamp......................51Number plate lamp......................................50Reading lamps...............................................51Rear fog lamps.............................................50Rear lamps....................................................49Side repeaters..............................................49
Changing a fuse....................................104Changing a road wheel.........................131
Installing a road wheel...............................134Jacking and lifting points............................131Locking wheel nuts.....................................131Removing a road wheel............................133Vehicle jack...................................................131
Changing the remote controlbattery....................................................27Remote control with a folding key
blade...........................................................27Remote control without a folding key
blade..........................................................28Changing the wiper blades....................41
Rear window wiper blade............................41Windscreen wiper blades............................41
Checking the wiper blades....................41Child safety...............................................15Child safety locks.....................................21Child seat positioning..............................16Child seats................................................15
Child restraints for different massgroups........................................................15
Cigar lighter..............................................79Cleaning the exterior.............................127
Body paintwork preservation...................127Cleaning the chrome trim..........................127Cleaning the headlamps............................127Cleaning the rear window.........................127
Cleaning the interior..............................127Instrument cluster screens, LCD screens,
radio screens..........................................128Seat belts.....................................................127
Climate control........................................70Principle of operation...................................70
Climate control commands..................181Climate..........................................................181
Clock.........................................................79Coded keys.............................................34Compact disc playback.......................158Compact disc player.............................158Compact disc track scanning.............159
Type 1............................................................159Type 2...........................................................159
Connecting an external device...........185Connection..................................................185
Connectivity...........................................184General information....................................184
Convenience features............................79Coolant check
See: Engine coolant check.......................122Cruise control...........................................97
Principle of operation...................................97Cruise control
See: Using cruise control............................97Cup holders..............................................79
DDiesel particulate filter (DPF).................85
Regeneration................................................85Direction indicators.................................46Disabling the passenger airbag............25
Disabling the passenger airbag.................26Enabling the passenger airbag..................26Fitting the passenger airbag deactivation
switch.........................................................26Disarming the alarm................................35Disarming the engine immobiliser........34DPF
See: Diesel particulate filter (DPF)..............85Driving hints.............................................101
192
Index
EElectric exterior mirrors..........................55
Electric folding mirrors.................................55Mirror tilting positions...................................55
Electric windows.....................................53Anti-trap function..........................................53Driver's door switches.................................53Opening and closing the driver's window
automatically.............................................53Resetting the memory of the electric
windows....................................................54Safety switch for rear windows.................53
Electromagnetic compatibility.............188Emergency equipment........................102Ending compact disc playback...........161Engine compartment overview.................Engine coolant check...........................122
Checking the coolant level........................122Topping up...................................................122
Engine immobiliser..................................34Principle of operation...................................34
Engine oil check.....................................121Checking the oil level..................................121Topping up...................................................122
Engine oil dipstick........................................Exterior mirrors........................................54
Convex mirrors.............................................54Folding mirrors..............................................54
FFastening the seat belts........................24Fast forward/reverse............................158First aid kit...............................................102Front fog lamps.......................................44Fuel and refuelling...................................86
Technical specifications..............................88Fuel consumption
See: ................................................................88Fuel consumption...................................87Fuel filler flap.............................................86
Vehicles with diesel engine.........................87Fuel quality....................................................Fuse box locations................................104
Engine compartment fuse box................104Passenger compartment fuse box.........104
Fuses.......................................................104
Fuse specification chart.......................105Engine compartment fuse box................105Passenger compartment fuse box - Type
1.................................................................107Passenger compartment fuse box - Type
2................................................................109
GGauges.....................................................56
Fuel gauge.....................................................56Gearbox
See: Transmission........................................89General information on radio
frequencies............................................27Glasses holder.........................................80
HHandbrake
See: Parking brake.......................................92Hazard warning flashers........................46Headlamp levelling..................................45
Recommended headlamp levelling controlpositions....................................................45
Head restraints........................................76Adjusting the head restraint........................76Removing the head restraint......................76
Heated windows and mirrors................75Heated exterior mirrors...............................75Heated windows..........................................75
HeatingSee: Climate control.....................................70
Hints on driving with ABS.......................92
IImmobiliser
See: Engine immobiliser..............................34Important audio information................147
Audio unit labels..........................................147Disc labels....................................................147
Information displays.................................61General information......................................61
Information messages...........................66Inspecting safety system
components........................................103Seat belts.....................................................103
193
Index
Instruments..............................................56Interior lamps...........................................46
Courtesy lamp..............................................46Reading lamps..............................................47
Interior mirror...........................................55Introduction................................................5ISOFIX anchor points...............................19
Attaching a child seat with toptethers........................................................19
Top tether anchor points.............................19
JJump starting
See: Using booster cables........................129
KKeyless entry............................................31
Disabled keys................................................32General information......................................31Locking and unlocking the doors with the
key blade...................................................33Locking the vehicle.......................................31Passive key....................................................31Unlocking the vehicle...................................32
Keyless starting.......................................82Failure to start...............................................83Ignition on......................................................82Starting a diesel engine...............................82Starting with automatic transmission........82Starting with manual transmission.............82Stopping the engine....................................83
Keys and remote controls.....................27Keys
See: Using the key.......................................27
LLighting control........................................43
Headlamp flasher.........................................43Home safe lighting.......................................43Lighting control positions............................43Main and dipped beam...............................43Parking lamps...............................................43
Lighting.....................................................43Load carriers
See: Roof racks and load carriers.............99
Load carrying...........................................99General information.....................................99
Locking and unlocking...........................29Automatic relocking.....................................30Central locking..............................................29Double locking..............................................29Double locking the doors with the
key..............................................................29Locking and unlocking confirmation.........29Locking and unlocking the doors and the
luggage compartment lid with theremote control..........................................30
Locking and unlocking the doors frominside..........................................................30
Locking and unlocking the doors with thekey..............................................................29
Luggage compartment lid..........................30Reprogramming the unlocking
function......................................................30Locks.........................................................29Luggage covers......................................99
MMaintenance...........................................114
General information....................................114Technical specifications.............................123
Manual climate control...........................70Air conditioning..............................................71Air distribution control..................................70Blower.............................................................71Heating the interior quickly..........................71Recirculated air..............................................71Ventilation.......................................................71
Manual seats............................................77Adjusting the angle of the seatback..........78Adjusting the height of the driver’s
seat.............................................................77Adjusting the lumbar support.....................77Folding the seatback forwards..................78Moving the seats forwards or
backwards.................................................77Manual transmission...............................89
All vehicles.....................................................89Selecting reverse gear................................89
Map pockets............................................80Message centre
See: Information displays.............................61
194
Index
MirrorsSee: Heated windows and mirrors............75See: Windows and mirrors.........................53
MP3 display options..............................161CD text display options..............................161
MP3 file playback..................................159File formats..................................................160ID3 Tag Version 2........................................160ISO 9660 format.........................................159MP3 files playback order...........................160MP3 navigation............................................161Multi session................................................159Playing a multi session disc.......................160
NNews broadcasts..................................157
OOccupant protection..............................22
Principle of operation...................................22Oil check
See: Engine oil check..................................121On/off control.........................................153Opening and closing the bonnet.........114
Closing the bonnet......................................115Opening the bonnet....................................114
PParking aid................................................94
Principle of operation...................................94Parking aid
See: Using the parking aid...............................See: Using the parking aid...............................
Parking brake...........................................92All vehicles.....................................................92
Parts and accessories..............................5Look for the Ford logo on the following
parts .............................................................5Now you can be sure that your Ford parts
are Ford parts.............................................5Personalised settings.............................65
Chime deactivation......................................65Measure units...............................................65
Programming the remote control........27
QQuick start..................................................8
RRear fog lamps........................................44Rear seats................................................78
Folding the seatbacks down......................78Rear window wiper and washers.........40
Intermittent wipe..........................................40Rear window washer...................................40Reverse gear wipe.......................................40
Refuelling..................................................87Regional mode (REG)...........................156Remote control battery
See: Changing the remote controlbattery........................................................27
Remote control programmingSee: Programming the remote control.....27
Removing a headlamp...........................47Repairing minor paint damage............128Repeat compact disc tracks...............158
Type 1............................................................158Type 2...........................................................159
Roof racks and load carriers.................99Roof rack.......................................................99
Running-in...............................................101Brakes and clutch.......................................101Engine...........................................................101Tyres..............................................................101
SSafety precautions..................................86Seat belt height adjustment..................24Seat belt reminder..................................25
Deactivating the seat belt reminder..........25Seats.........................................................76Security code.........................................152Shuffle/random......................................158
Type 1............................................................158Type 2...........................................................158
Sitting in the correct position.................76Snow chains
See: Using snow chains............................139Speed control
See: Cruise control.......................................97
195
Index
Stability control........................................93Principle of operation...................................93
Stability controlSee: Using stability control..........................93
Starting a diesel engine..........................84Cold or hot engine.......................................84
Starting a petrol engine..........................83Cold or hot engine.......................................83Engine idle speed after starting.................84Flooded engine.............................................84
Starting the engine.................................82General information.....................................82
Station preset buttons..........................154Station tuning control............................153
Manual tuning..............................................153Scan tuning..................................................153Seek tuning..................................................153
Status after a collision...........................103Steering wheel lock................................83
Vehicles with keyless starting.....................83Vehicles without keyless starting...............83
Steering wheel.........................................36Storage compartments.........................79Sun visors.................................................79Symbols glossary......................................5
Symbols in this handbook.............................5Symbols on your vehicle...............................5
TTechnical specifications........................143
Technical specifications.............................143Telephone commands.........................176
Create a phonebook..................................177Main settings................................................181Phone...........................................................176Phone functions..........................................179
Telephone controls...............................165Remote control...........................................165
Telephone setup...................................164Bond another Bluetooth phone...............165Making a phone an active phone............164Phonebook..................................................164Phonebook categories..............................164
Telephone...............................................164General information....................................164
TelephoneSee: Using the telephone..........................166
Toll reader.................................................80Towing a trailer.......................................100
Steep gradients..........................................100Towing points..........................................112Towing the vehicle on four wheels......112
All vehicles....................................................112Vehicles with automatic transmission......112
Towing.....................................................100Track selection.......................................158
Type 2...........................................................158Traffic information control....................154
Activating traffic announcements............154Ending traffic announcements.................155Traffic announcement volume.................155
Transmission............................................89Trip computer..........................................65
Odometer......................................................65Trip computer...............................................65
Type approvals......................................188FCC/INDUSTRY CANADA NOTICE..........188RX-42 - declaration of conformity...........188
Tyre care.................................................139Tyre pressures
See: ..............................................................140Tyre repair kit..........................................135
General information....................................135Inflating the tyre...........................................136Using the tyre repair kit..............................135
TyresSee: Wheels and tyres................................131
UUSB port....................................................81Using an iPod.........................................186
Audio control...............................................187Operation.....................................................187
Using a USB device...............................185Audio control...............................................186Operation.....................................................186
Using booster cables............................129To connect the booster cables................129To start the engine.....................................129
196
Index
Using cruise control................................97Cancelling the set speed............................98Changing the set speed..............................97Resuming the set speed............................98Setting a speed.............................................97Switching cruise control off........................98Switching cruise control on.........................97
Using seat belts during pregnancy......25Using snow chains................................139
Vehicles with stability control (ESP).........140Using stability control..............................93Using the key...........................................27
Remote control with flip key blade............27Using the parking aid...................................
Manoeuvring with the parking aid.............95Switching the parking aid on and off.........95
Using the telephone..............................166Changing the active phone.......................167Debonding a bonded phone....................167Making a call................................................166Muting the microphone.............................167Receiving an incoming call........................167Receiving a second incoming call............167
Using voice control...............................168Name tag.....................................................169System operation.......................................168
Using winter tyres..................................139
VVehicle battery.......................................129Vehicle care............................................127Vehicle identification number
(VIN).......................................................142Vehicle identification plate....................142Vehicle identification..............................142Vehicle recovery.....................................112Ventilation
See: Climate control.....................................70Vents
See: Air vents................................................70VIN
See: Vehicle identification number(VIN)..........................................................142
Voice control....................................37, 168Principle of operation.................................168
WWarning lamps and indicators..............56
ABS warning lamp........................................57Airbag warning lamp....................................57Brake system warning lamp.......................57Coolant temperature warning lamp..........57Cruise control indicator...............................57Direction indicator.........................................57Doors open warning lamp..........................57Engine warning lamps.................................58Front fog lamp indicator..............................58Frost warning lamp......................................58Fuel in oil warning lamp...............................58Glow plug indicator......................................58Headlamp indicator......................................58Ignition warning lamp...................................58Low fuel level warning lamp.......................58Main beam indicator....................................59Maximum engine RPM warning lamp.......59Message indicator.......................................59Oil pressure warning lamp..........................59Power steering warning lamp....................59Rear fog lamp indicator...............................59Seat belt reminder.......................................59Soot overload warning lamp......................59Stability control (ESP) indicator..................59
Warning triangle.....................................102Washer fluid check................................122Washers
See: Wipers and washers...........................38Washing
See: Cleaning the exterior.........................127Waveband button.................................153Wheels and tyres...................................131
General information....................................131Technical specifications.............................140
Windows and mirrors.............................53Windscreen washers.............................39Windscreen wipers.................................38
Automatic wiper system.............................39Autowipers....................................................38Intermittent wipe..........................................38
Winter tyresSee: Using winter tyres..............................139
Wipers and washers...............................38
197
Index

198


Feel the difference
9V2J-19A321-ADA(C
G3545en)