ecu flashing instructions for: mini f56 (2014 2018 ......ecu flashing instructions for: mini f56...
TRANSCRIPT

Tech Support: [email protected] Page 1 of 20 Installation Guide#: BT-FA56-JAN-2018
ECU FLASHING INSTRUCTIONS FOR: MINI F56 (2014 – 2018)
SOFTWARE IS NOT CARB APPROVED. FOR OFF ROAD USE ONLY.
WARNING:
CONSUMER AGREES TO ALL BYTETRONIK, INC
TERMS AND CONDITIONS. BYTETRONIK, INC. IS NOT
RESPONSIBLE FOR PROPERTY DAMAGE, BODILY
INJURY OR CONSEQUENTIAL LOSSES.
READ OUT YOUR ECU AND SUBMIT YOUR SOFTWARE
REQUEST BEFORE STARTING INSTALLATION. YOUR ECU
MUST BE STOCK.

Tech Support: [email protected] Page 2 of 20 Installation Guide#: BT-FA56-JAN-2018
TABLE OF CONTENTS
Page 3: Chapter 1: Installing the FlashAccess Software A1: Installing the FlashAccess Software Application A2: Manual Driver Installation A3: Clearing DTC for Automatic Transmission (Post Flash)
Page 7: Chapter 2: Querying Your ECU Page 10: Chapter 3: Flashing a Tune Onto the ECU Page 19: Chapter 4: FAQs & Troubleshooting Error Messages Page 20: Chapter 5: Flashing the ECU back to Stock
Introduction: Thank you for purchasing the Bytetronik FlashAccess MINI-F Programming Tool.
To program your vehicle through the OBD2 port using a PC
laptop, you will need to use the FA56 OBD2 programming tool
together with our FlashAccess application program
(downloaded from our website).
www.bytetronik.com/download/.
This instruction manual is a step-by-step guide and terms and
conditions of use.
Bytetronik recommends that you do a pre- installation check.
ECU must contain OEM stock software
Make sure the vehicle has been correctly serviced and all
factory recalls have been performed.
Vehicle ignition must be ON.
Connect the car to a battery charger.
If you run into any errors during installation, refer to
appendix for instructions.
***Disclaimer***
Bytetronik, Inc. is not responsible for damage that may occur
and/or due to the use of 3rd party “piggyback” units or
aftermarket exhaust valve control products installed prior to,
during, or after the installation of FlashAccess Software.

Tech Support: [email protected] Page 3 of 20 Installation Guide#: BT-FA56-JAN-2018
Chapter 1: Installing the FlashAccess Software & Drivers
A1: Download and Install the FlashAccess Software Application
Figure 1
Step 1:
Download the FlashAccess program onto your laptop
Leave the checkboxes at default values and click “Next”
Figure 2
Step 2:
Click on “Install” to execute the installation process.
Figure 3
Step 3:
Once the installation has completed, connect the FlashAccess OBD2 Device to your laptop
The FA56 OBD Device will illuminate a blinking “green” light once it’s connected.
Then click on “Finish” to move forward to the next step.

Tech Support: [email protected] Page 4 of 20 Installation Guide#: BT-FA56-JAN-2018
Figure 4
Step 4:
The “Terms & Conditions” window will pop up; click “I Agree” to Continue to Figure 4.
***Verify that the FA56 Flash Module is connected to your PC at this time ***
Click “Next” to proceed.
Figure 5
Step 5:
Software will conduct a hardware check and display the results.
Green means it is good to go.
Click “Next” to proceed.
Figure 6
Step 6:
Figure 6 will appear, make sure to read the warning messages on the screen.
Click “Next” to proceed.

Tech Support: [email protected] Page 5 of 20 Installation Guide#: BT-FA56-JAN-2018
Figure 7A
Steps 7A: ***If Figure 7A Appears, then proceed to Step 8 to Manually install the USB driver*** Note: You may encounter an issue with your driver where it does not auto-install.
Proceed to Step 8 to Manually install the USB Drivers for the FlashAccess OBD Module.
Figure 7B
Steps 7B: *** If Figure 7B Appears, then skip ahead and proceed to Chapter 2 ***
This screen indicates that the software and hardware are able to communicate properly.
The “USB device voltage too low” indicates that the OBD Device is not currently connected to the vehicle’s OBD2 Port.
Proceed to Chapter 2.
Figure 8
Step 8:
Open “Computer Management” and check Device Manager
Look for the device name “XDEVICE USB kpCAN”
Right-click and select “Update Driver”

Tech Support: [email protected] Page 6 of 20 Installation Guide#: BT-FA56-JAN-2018
Figure 9
Step 9:
Select “Browse my computer for driver software”
Click Browse and point to the default folder: C:\Program Files (x86)\FLASH ACCESS MINI F\driver
Note: If you changed the installation path, then you’ll have to point to the program location on your local hard drive.
Click “Next” and install the USB Driver
Figure 10
Step 10:
Figure 10 shows driver has been successfully installed.
Click “Close” and exit out.
Figure 11
Step 11:
Figure 11 indicates the XDEVICE USB kpCAN driver is good to go…
*** Congratulations!! You can proceed to Chapter 2 for Flashing instructions ***

Tech Support: [email protected] Page 7 of 20 Installation Guide#: BT-FA56-JAN-2018
Chapter 2: Querying Your ECU
Summary: Before we can send you a tune file for your car, we need to gather some information about your
ECU/DME.
Step 12: Connect FA56 OBD Module to your PC via the MINI USB port. Connect the OBD end to the car’s OBD2 port. Turn Ignition switch to “ON” position Launch FlashAccess software.
Buckle the driver seat belt and leave driver door open.
Step 13: Make sure the items under System Status are all Green.
Step 14: Make sure the USB cable is plug in directly to the PC and not via a USB Hub. Hit Next to Continue…
Tech Support: [email protected] Page 8 of 20 Installation Guide#: BT-FA56-JAN-2018
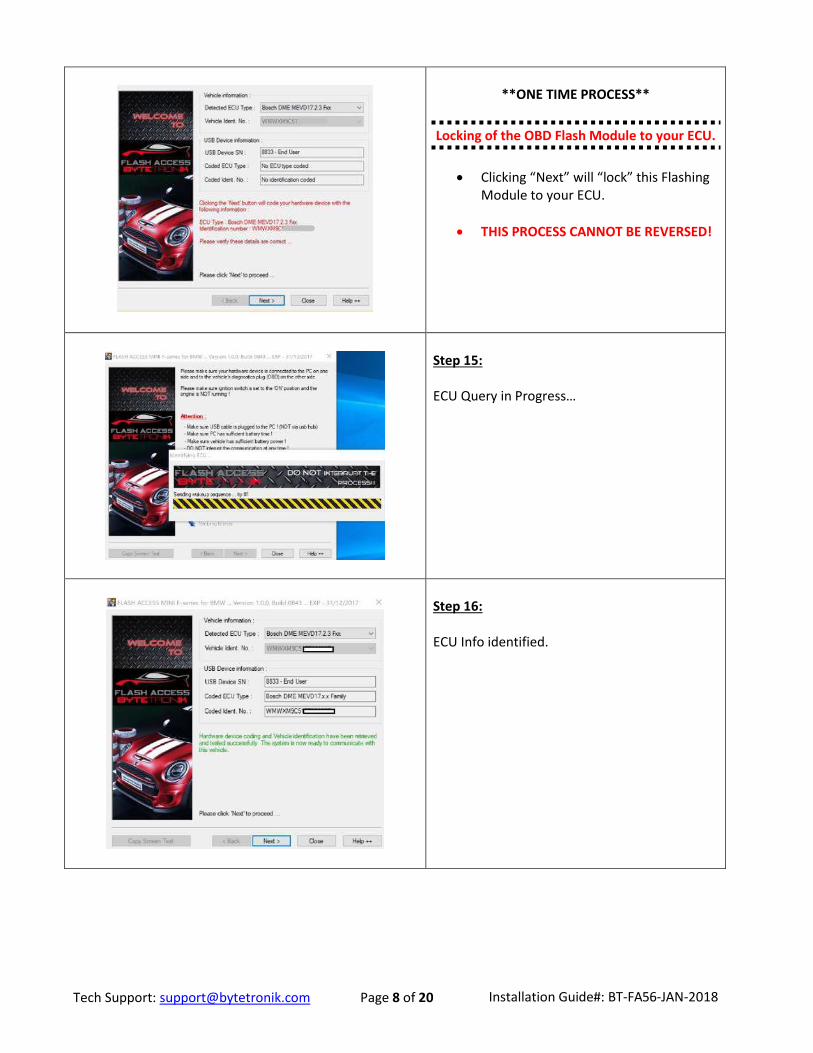
**ONE TIME PROCESS**
Locking of the OBD Flash Module to your ECU.
Clicking “Next” will “lock” this Flashing Module to your ECU.
THIS PROCESS CANNOT BE REVERSED!
Step 15: ECU Query in Progress…
Step 16: ECU Info identified.

Tech Support: [email protected] Page 9 of 20 Installation Guide#: BT-FA56-JAN-2018
Step 17: DETAILED ECU info has been gathered; we need this info! Hit the box that says: “Copy Screen Text”
Step 18: Screen text has been copied, need to paste this onto a Notepad. Open Notepad (press the “Windows” key and type in “Notepad”, hit Enter.
Step 19: Paste the detailed ECU info onto Notepad.
Step 20: Save this file as txt and email to: [email protected] Be sure to also include your device Serial number.
NOTE: Once we have received your ECU info, Bytetronik will reply back with your
tune file within ONE BUSINESS DAY (EXCLUDING WEEKEND AND HOLIDAYS).

Tech Support: [email protected] Page 10 of 20 Installation Guide#: BT-FA56-JAN-2018
Chapter 3: Flash Tuning Your MINI Cooper F56
Before you begin, make certain you have downloaded your TUNE FILE onto your local hard drive (either via
email or DropBox).
Figure 21
Step 21:
Connect FA56 OBD Module to your PC via the MINI USB port. Connect the OBD end to the car’s OBD2 port.
Make sure all other electrical components (eg. Headlights, A/C, etc.) are turned off.
It is also recommended that a battery charger is connected to the car battery.
Turn Ignition switch to “ON” position
Click “Next” to continue.
Figure 22
Step 22:
Buckle the driver side seatbelt and don’t touch any electronics inside
the car or close any doors!
Make sure to connect an external battery charger to your car battery!
Make sure your laptop is connected to a power supply!
Buckle the driver side seat belt!
Tech Support: [email protected] Page 11 of 20 Installation Guide#: BT-FA56-JAN-2018
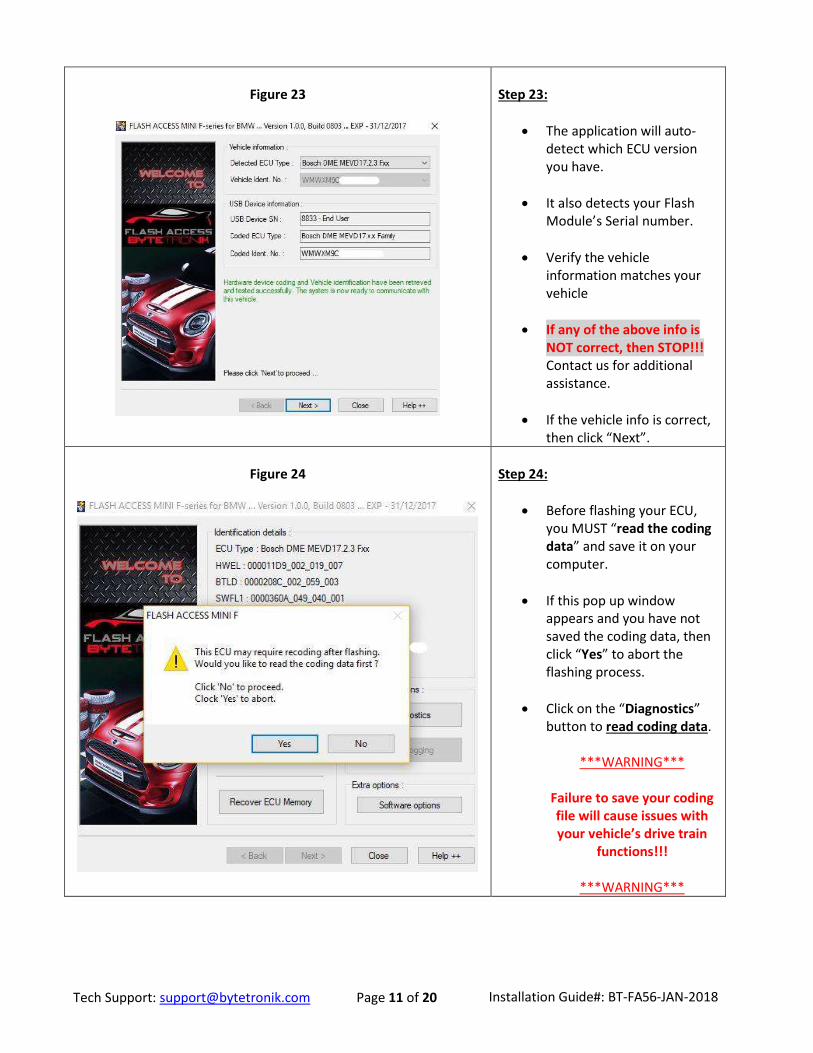
Figure 23
Step 23:
The application will auto-detect which ECU version you have.
It also detects your Flash Module’s Serial number.
Verify the vehicle information matches your vehicle
If any of the above info is NOT correct, then STOP!!! Contact us for additional assistance.
If the vehicle info is correct, then click “Next”.
Figure 24
Step 24:
Before flashing your ECU, you MUST “read the coding data” and save it on your computer.
If this pop up window appears and you have not saved the coding data, then click “Yes” to abort the flashing process.
Click on the “Diagnostics” button to read coding data.
***WARNING***
Failure to save your coding file will cause issues with your vehicle’s drive train
functions!!!
***WARNING***

Tech Support: [email protected] Page 12 of 20 Installation Guide#: BT-FA56-JAN-2018
Figure 25
Step 25:
DO NOT “Read ECU Memory”!!!!
To save a copy of your Coding Data, click the “Diagnostics” button.
Figure 26
Step 26: Saving Coding Data
Click “Read Coding Data”

Tech Support: [email protected] Page 13 of 20 Installation Guide#: BT-FA56-JAN-2018
Figure 27
Step 27:
Save the “Coding Data” on to your computer and give it a name. In this example, we named the file “my coding”; you may give it your unique file name. DO NOT LOSE THIS FILE!
Remember the location of this file because you will need to “Recode” your ECU after it has been flashed.
Figure 28
Step 28: Programming the ECU
With the Coding Data saved, it is safe to proceed with Flashing
Select “Program ECU Memory”

Tech Support: [email protected] Page 14 of 20 Installation Guide#: BT-FA56-JAN-2018
Figure 29
Step 29:
Select the Tuning file to flash (This would be the tune file received from Bytetronik).
Click “Open” and follow the prompts on the screen.
Figure 30
Step 30:
Programming in progress.
Tech Support: [email protected] Page 15 of 20 Installation Guide#: BT-FA56-JAN-2018
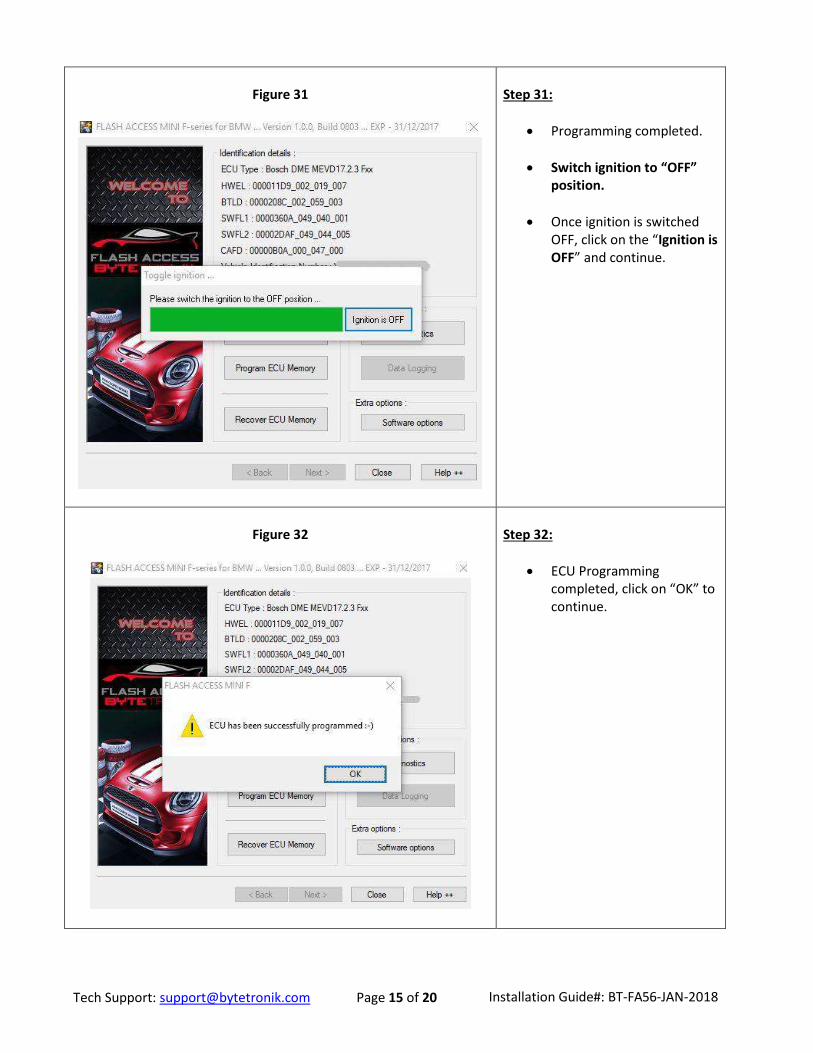
Figure 31
Step 31:
Programming completed.
Switch ignition to “OFF” position.
Once ignition is switched OFF, click on the “Ignition is OFF” and continue.
Figure 32
Step 32:
ECU Programming completed, click on “OK” to continue.

Tech Support: [email protected] Page 16 of 20 Installation Guide#: BT-FA56-JAN-2018
Figure 33
Step 33: Recoding the ECU
Click “OK” to continue with recoding of your ECU.
Turn Ignition switch to “ON” position
Figure 34
Step 34:
Click the “Diagnostics” button.

Tech Support: [email protected] Page 17 of 20 Installation Guide#: BT-FA56-JAN-2018
Figure 35
Step 35:
Select the “Coding Data” that was saved prior to the flashing of the ECU. In this example, we named our coding file “my coding”; your file may be different than ours.
Click the “Open” button to recode the ECU.
Figure 36
Step 36:
Recoding completed; click “OK” and hit the “Close” button.
Click on the second “Close” go back to previous screen.
NOTE: The Processor inside your ECU can only be reprogrammed 60 times!! So try to avoid unnecessary flashing.
End of Reprogramming for Manual Vehicles!!!

Tech Support: [email protected] Page 18 of 20 Installation Guide#: BT-FA56-JAN-2018
A3: Clearing DTC for Automatic Transmission (Post Flash).
*** END OF Chapter 3 ***
Figure 37
Step 37: Clearing DTC for Automatic transmission!
For vehicles with Automatic transmission, the follow error will show up (Figure 27).
Figure 38
Step 38:
Turn Ignition switch to “ON” position
Simply click the button “Clear Trouble Codes” to clear this DTC.
End of Reprogramming for Automatic Vehicles!!!

Tech Support: [email protected] Page 19 of 20 Installation Guide#: BT-FA56-JAN-2018
Chapter 4: FAQs & Troubleshooting Error Messages
Error: “Drivetrain Malfunction” error post flash on a F56 Automatic, how do I clear it?
Answer: Refer to Step #27 above… and read the Installation Guide one more time.
Error: “Crypto routine error”?
Answer: Your tuned file may have been corrupted
by your email security routine. If your tune file has
been sent to you unzipped, you may wish to
request it be resent in a zipped format.
Error: “Version expired”…
Answer: You need to download the newest version from the Bytetronik website.
Error: Forgot to read out the Coding Data, post-flash, the car behaves “funny”…
Answer: You will need to pay a BMW/MINI shop to recode your car using the factory BMW Tool.
Question 1: In the FlashAccess software, there is a “read function”. Can I read out my ECU and then flash it back into my ECU?
Answer: No. Doing this will BRICK your ECU. Don’t even try!!! You will get a copy of your OEM Tune that you can use to flash your ECU with stock mappings. And all tune files will come from Bytetronik; so there’s no need for you to read anything out from your ECU.
Question 2: How much is to recover a BRICKED ECU?
Answer: It cost $500 to recover a BRICKED ECU, plus you have to cover Round-trip shipping.
Question 3: What is the ECU Read function for?
Answer: That’s a function reserved for Dealers. The End-User cable is not able to read the entire usable rom. You have been warned (for the second time).
Question 4: I have exceeded the 60-flash limit on my ECU and it won’t let me flash it anymore, what now?
Answer: You’ll have to send the ECU back to us for a recovery and to reset the counter. The cost of this service is $200 plus round-trip shipping prepaid.
Question 5: Does the Flash Module data-log?
Answer: No, not yet. We are working on this feature.

Tech Support: [email protected] Page 20 of 20 Installation Guide#: BT-FA56-JAN-2018
Chapter 5: Flashing the ECU back to Stock If you wish to revert back to your ECU back to Stock, then follow the below steps. The Stock Rom
should have been emailed to along with your Tune or Structure ROM file. Locate your Stock Rom
and place this file onto your PC’s Desktop.
Figure 39
Step 39:
Open FlashAccess and advance to this screen to the left.
Click on “Program ECU Memory” button on the bottom left.
Step 40:
Since you should already have the coding file for this MINI; so click “NO” to proceed.
Buckle the driver side seatbelt and avoid closing any doors!
Step 41:
Select the “Return_ROM_xxx” MOD file to flash (This would be the tune file received from Bytetronik).
Click “Open” and follow the prompts on the screen.
ECU will be flashed back to Stock.
Then follow the same steps as illustrated above (from Step 30 through Step 38).
*** END OF Chapter 5***