boostbysmith’s ecu flashing interface … device is for off-road use only! failure to tune an...
TRANSCRIPT
This device is for Off-Road use Only! Failure to tune an engine properly can result in damage!
BOOSTBYSMITH’S ECU FLASHING INTERFACE
(Gen II Hayabusa, B-King, & K7-K8 GSXR1000)
Contact Information: Greg Smith www.boostbysmith.com [email protected] (517)743-3666 (I have a normal day job and get home after 6PM Eastern Time)
This device is for Off-Road use Only! Failure to tune an engine properly can result in damage!
INDEX I. Hardware Included II. ECU1.0 Basics III. Installation Directions IV. Software Installation V. Troubleshooting VI. Using your Device VII. Warranty VIII. Windows Vista Users LOOK HERE WARNING!!! This product is meant for Off-Road use only and is NOT street legal. BoostBySmith is not responsible for mis-use of this product. Owner assumes responsibility for his or her own actions when using this product. You should always obey all traffic laws when on your motorcycle, and should never purposely defeat emissions devices to gain performance. ENJOY!
This device is for Off-Road use Only! Failure to tune an engine properly can result in damage!
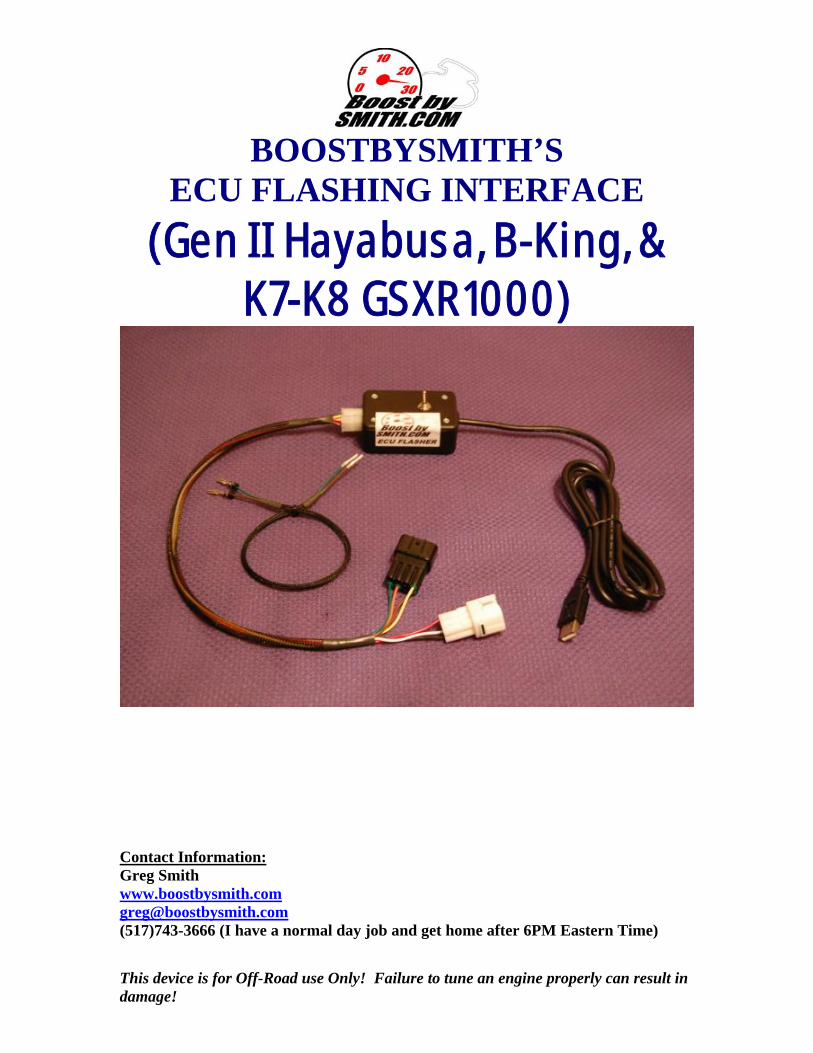
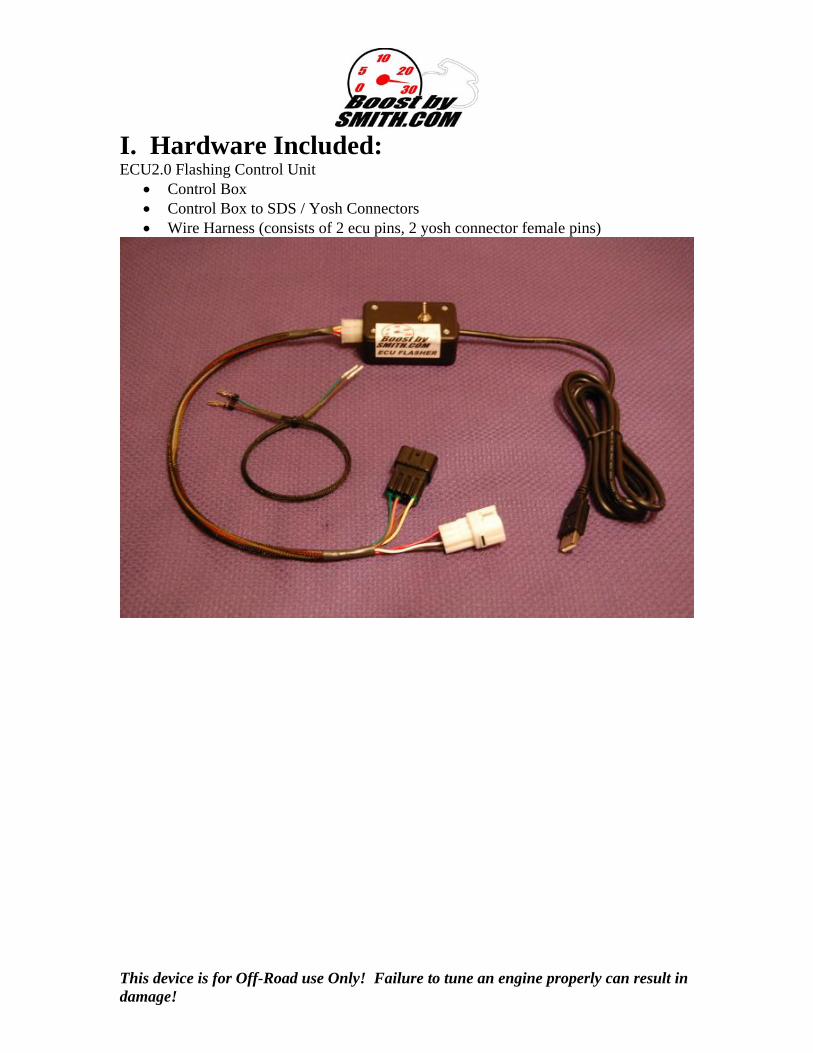
I. Hardware Included: ECU2.0 Flashing Control Unit
Control Box Control Box to SDS / Yosh Connectors Wire Harness (consists of 2 ecu pins, 2 yosh connector female pins)
This device is for Off-Road use Only! Failure to tune an engine properly can result in damage!
II. ECU Flashing Basics Your Gen II Suzuki Hayabusa is equipped from the factory with a high tech, racing, 32 bit processor to control all of your fuel injection needs. The only problem is that until recently, there hasn’t been a product that will let you adjust all of it’s variables. This is no longer true, with the ECU Flasher Interface along with PetriK’s ECU Editor 2.0 software you are able to unlock the full potential of your motorcycle’s fuel injection system. Some of the tuning parameters are:
Ability to view all sensors data with a laptop connected Ability to change fueling maps (both IAP and TPS maps), ram air compensation Ability to change ignition maps (you can add timing in the lower gears like a TRE
does without messing up your gear based fuel curves) Increase your factory rev limiter Remove the 6th gear speed restriction with the click of a button Turn your ECU into an ignition / fuel kill box for use with an air/co2 shifter Switch-able map selection for NOS, different turbo boost levels, fuel types etc Share maps with people across the world and contribute to new exciting features
constantly being introduced and implemented.
This device is for Off-Road use Only! Failure to tune an engine properly can result in damage!
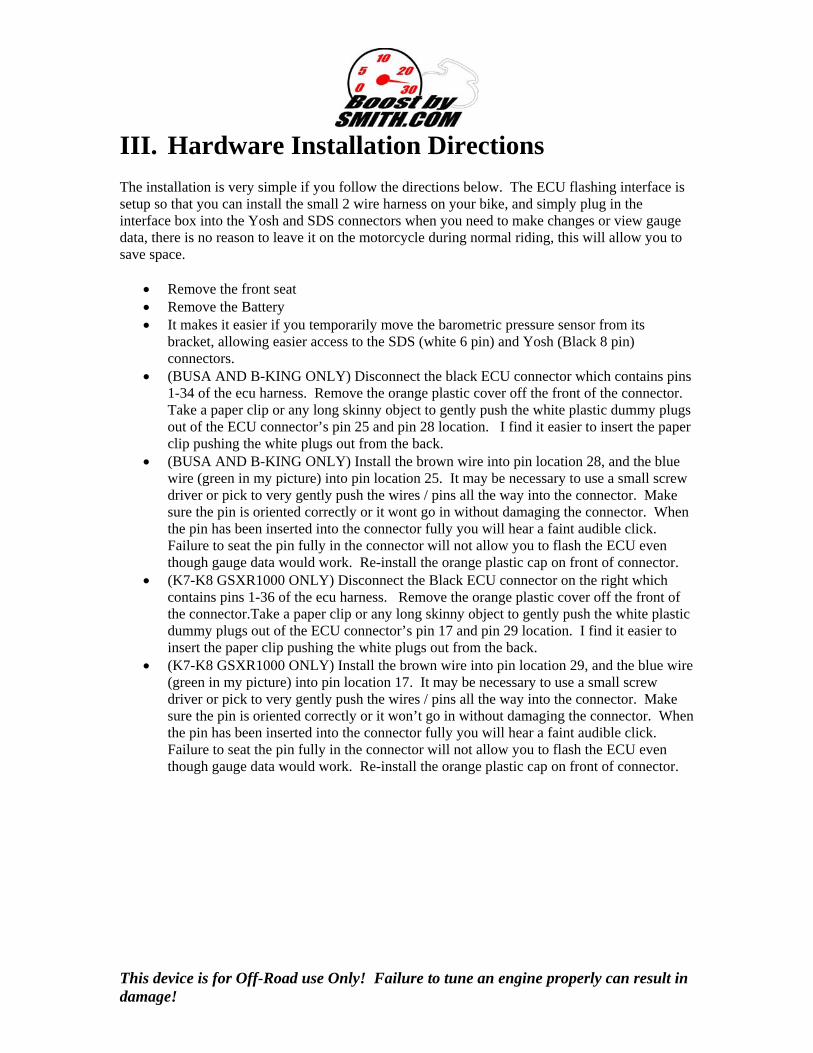
III. Hardware Installation Directions The installation is very simple if you follow the directions below. The ECU flashing interface is setup so that you can install the small 2 wire harness on your bike, and simply plug in the interface box into the Yosh and SDS connectors when you need to make changes or view gauge data, there is no reason to leave it on the motorcycle during normal riding, this will allow you to save space.
Remove the front seat Remove the Battery It makes it easier if you temporarily move the barometric pressure sensor from its
bracket, allowing easier access to the SDS (white 6 pin) and Yosh (Black 8 pin) connectors.
(BUSA AND B-KING ONLY) Disconnect the black ECU connector which contains pins 1-34 of the ecu harness. Remove the orange plastic cover off the front of the connector. Take a paper clip or any long skinny object to gently push the white plastic dummy plugs out of the ECU connector’s pin 25 and pin 28 location. I find it easier to insert the paper clip pushing the white plugs out from the back.
(BUSA AND B-KING ONLY) Install the brown wire into pin location 28, and the blue wire (green in my picture) into pin location 25. It may be necessary to use a small screw driver or pick to very gently push the wires / pins all the way into the connector. Make sure the pin is oriented correctly or it wont go in without damaging the connector. When the pin has been inserted into the connector fully you will hear a faint audible click. Failure to seat the pin fully in the connector will not allow you to flash the ECU even though gauge data would work. Re-install the orange plastic cap on front of connector.
(K7-K8 GSXR1000 ONLY) Disconnect the Black ECU connector on the right which contains pins 1-36 of the ecu harness. Remove the orange plastic cover off the front of the connector.Take a paper clip or any long skinny object to gently push the white plastic dummy plugs out of the ECU connector’s pin 17 and pin 29 location. I find it easier to insert the paper clip pushing the white plugs out from the back.
(K7-K8 GSXR1000 ONLY) Install the brown wire into pin location 29, and the blue wire (green in my picture) into pin location 17. It may be necessary to use a small screw driver or pick to very gently push the wires / pins all the way into the connector. Make sure the pin is oriented correctly or it won’t go in without damaging the connector. When the pin has been inserted into the connector fully you will hear a faint audible click. Failure to seat the pin fully in the connector will not allow you to flash the ECU even though gauge data would work. Re-install the orange plastic cap on front of connector.
This device is for Off-Road use Only! Failure to tune an engine properly can result in damage!
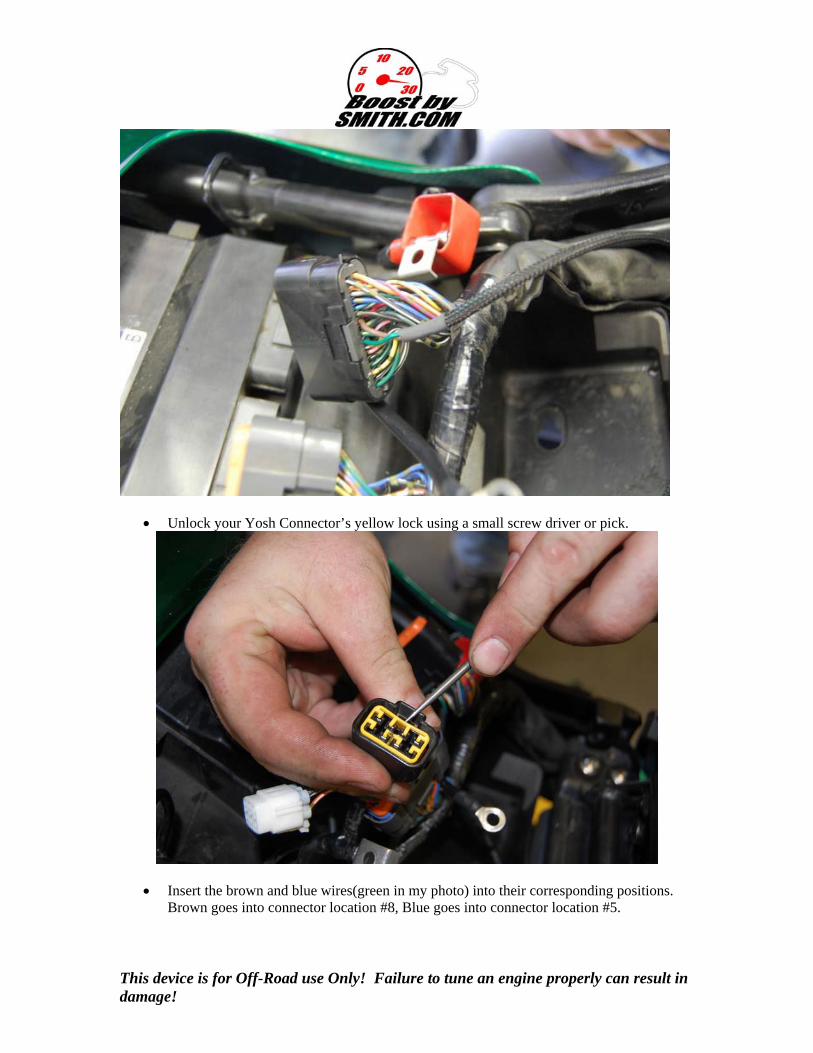
Unlock your Yosh Connector’s yellow lock using a small screw driver or pick.
Insert the brown and blue wires(green in my photo) into their corresponding positions. Brown goes into connector location #8, Blue goes into connector location #5.
This device is for Off-Road use Only! Failure to tune an engine properly can result in damage!
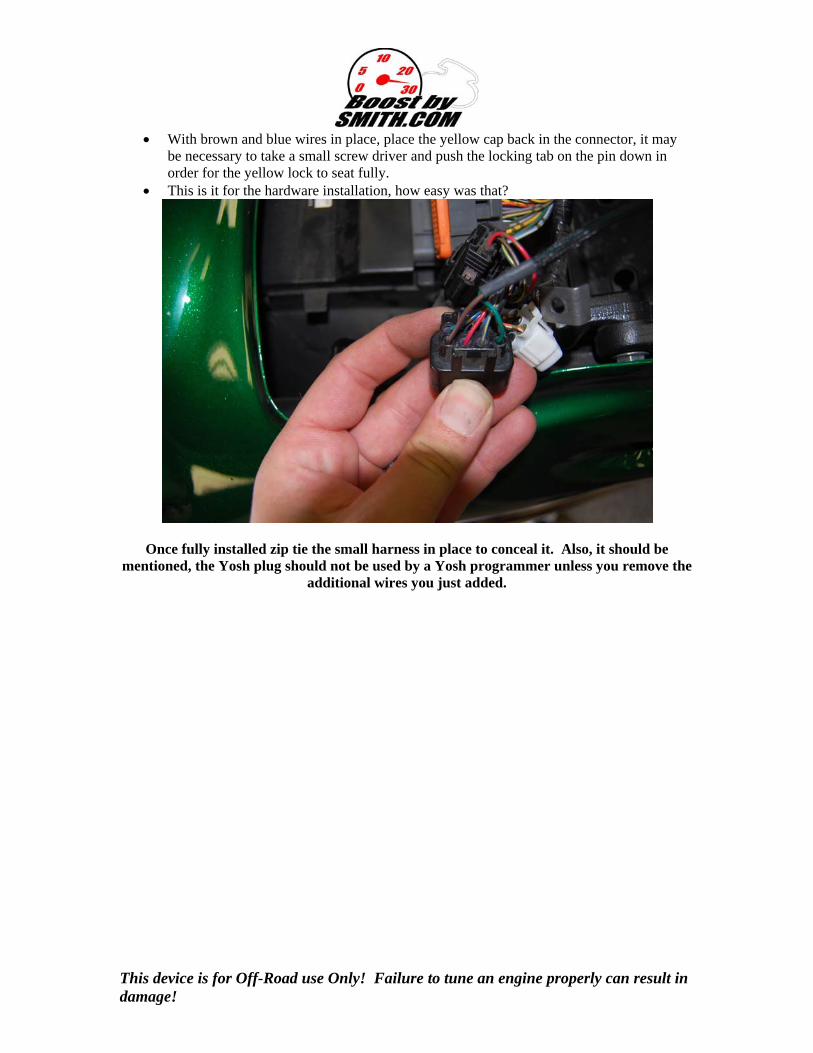
With brown and blue wires in place, place the yellow cap back in the connector, it may be necessary to take a small screw driver and push the locking tab on the pin down in order for the yellow lock to seat fully.
This is it for the hardware installation, how easy was that?
Once fully installed zip tie the small harness in place to conceal it. Also, it should be mentioned, the Yosh plug should not be used by a Yosh programmer unless you remove the
additional wires you just added.

This device is for Off-Road use Only! Failure to tune an engine properly can result in damage!
The programming toggle switch has 3 positions Center: Not Used
Up: ECU Flash mode (push the toggle up towards the white connector)
Down: Engine Data mode (pull the toggle down away from the white connector)
IV. Software Installation
This device is for Off-Road use Only! Failure to tune an engine properly can result in damage!
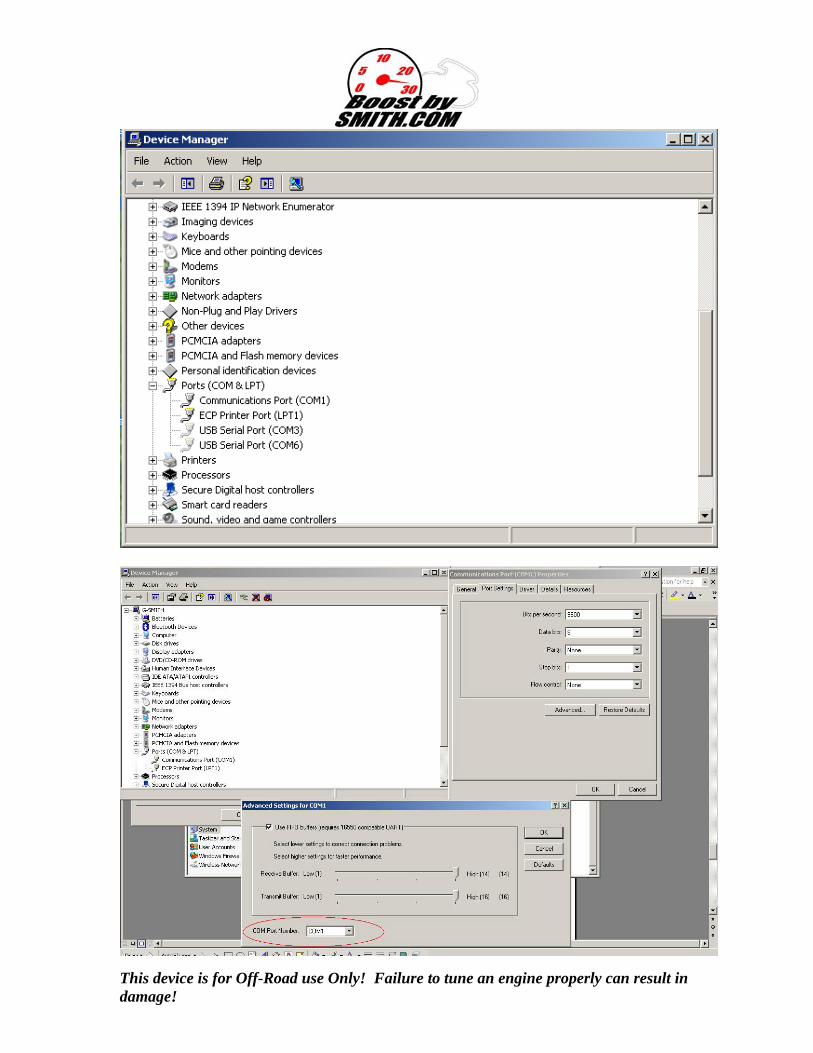
WINDOWS VISTA USERS: please refer to Section VIII of the directions once all software is installed, you must run ECU Editor as an administrator or you will be unable to see the com port of the USB cable. WINDOWS 7 USERS: You must create a true administrator account to access ecueditor etc. Click on Programs, Accessories, right click on command prompt and click run as administrator. Then type net user administrator /active:yes Hit enter after typing that line and you should get a message saying command completely successfully, at this point click start, logoff, and log back on using the new administrator icon account you see, you will have to use this account to download and install ecu editor, and to do your flashing etc. Please download ECU Editor 2.4 or later from: http://www.ecueditor.com Once software has been installed you can open it by going to your start menu, then Petrik, the open the software. Inside the software at the top of the screen you can select File, New K8, then you need to install the com port drivers by clicking Setup, Install Com Port Drivers. This is a MUST. For more information and directions regarding this software I have put together 5 tutorial videos (one of them is Gen II specific, and the other 4 cover Gen I) which are included on the installation CD. Also, please visit the ecu hack forum for further information. http://www.activeboard.com/forum.spark?forumID=99460&subForumID=469024&p=2 Choosing a com port 1-8 is VERY important for flashing to work correctly. If it comes up at 9 or higher, you will need to change the com port number to a lower one. You may have to open your control panel. Go to Start, settings, control panel, then system, then hardware, then device manager to view your ports (com and LPT). If you need to change a com port, right mouse click and hit properties, then click port settings, then advanced. Towards the bottom of the window you should be able to select a different com port number from a drop down menu. Click okay to close out this window, unplug the ECU flasher, then plug it back in, you should see the com port show up as a different number now.
This device is for Off-Road use Only! Failure to tune an engine properly can result in damage!
This device is for Off-Road use Only! Failure to tune an engine properly can result in damage!
*** For advanced users, it may be necessary to delete some of the current com ports to get flashing working correctly. You will need to open a command window. Click Start, then Run, then type in CMD When the dos window pops up type: set devmgr_show_nonpresent_devices=1 (hit enter) start devmgmt.msc (hit enter) this will launch device manager with a nice feature, you can click view, then show hidden devices, this will show all com ports assigned to your computer, simply go in and delete ones you want to remove, then plug ECU flasher back in and re-assign to the proper number, I normally use 2 or 3 with good results. [see screenshot on previous page] With any further technical assistance needed, contact Greg Smith at [email protected] A big to PetriK for his wonderful ECU Editor software, and for the late Dave Owen for all of his hard work with R&D on this software.
This device is for Off-Road use Only! Failure to tune an engine properly can result in damage!
V. Using your ECU Flashing / Engine Data Reading Device. First things first, to view data or flash an ECU, it needs to be powered up. To power it up, your bike needs to be in Neutral, with run switch on, and key on. If any of these conditions aren’t met you won’t be able to connect to the ECU. Connect the flashing device to the bike by plugging in the black Yosh connector and the white SDS connector under the seat. Operation is fairly intuitive. But when you open the software you will want to click File, then New K8 to start off with a generic bin file. Place your toggle switch in the down position (engine data). Next click on the Connect for engine data button. It will give you an error message telling you to set com port. Click on the drop down menu and select your com port, then click connect. You should now see datastream activity letting you know that its working. YOU MUST SET COM PORT before doing anything. Windows Vista users will need to review the last section of the directions to do this properly. Always make sure to save your .bin file prior to flashing to make sure you have a record of it for the future when making changes. Simply click file, then save, then give it a name that you will understand later on down the road. There are 2 modes of flashing in Ecu Editor 2.0. Normal (which flashes the entire bin file, and can be time consuming depending on the speed of your computer) and Fast (which only flashes things that you have changed, and is much faster. For making large changes such as adding the shifter sub-routine, its recommended to do a normal flash. A battery tender may be needed on the bike’s battery. To flash the current settings to your ECU, make sure your bike is in neutral, run switch on, key is on, flip toggle switch up (flash position) and push the Flash the ECU button located at the lower left hand corner of the button menu. There are a ton of new features related to ECU Editor 2.0, and I don’t control the programming, its best to become a member of the ECU hack forum and follow the progress of new and up coming features there. Check back often for new versions of software.
This device is for Off-Road use Only! Failure to tune an engine properly can result in damage!
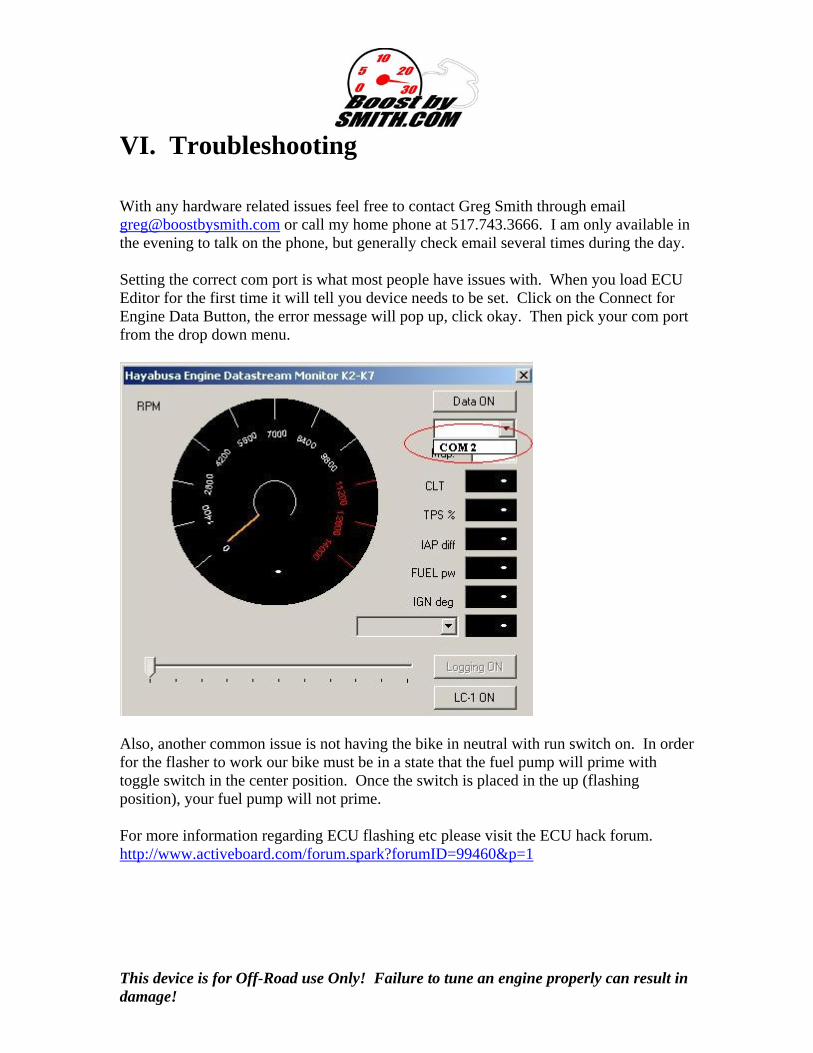
VI. Troubleshooting With any hardware related issues feel free to contact Greg Smith through email [email protected] or call my home phone at 517.743.3666. I am only available in the evening to talk on the phone, but generally check email several times during the day. Setting the correct com port is what most people have issues with. When you load ECU Editor for the first time it will tell you device needs to be set. Click on the Connect for Engine Data Button, the error message will pop up, click okay. Then pick your com port from the drop down menu.
Also, another common issue is not having the bike in neutral with run switch on. In order for the flasher to work our bike must be in a state that the fuel pump will prime with toggle switch in the center position. Once the switch is placed in the up (flashing position), your fuel pump will not prime. For more information regarding ECU flashing etc please visit the ECU hack forum. http://www.activeboard.com/forum.spark?forumID=99460&p=1
This device is for Off-Road use Only! Failure to tune an engine properly can result in damage!
VII. Warranty BoostBySmith warranties this product to be free from defects in parts and workmanship for 1 year from date of purchase. If there is a defect in parts or workmanship BoostBySmith will replace the part or repair the existing part. Proof of purchase date must be provided when shipping item back to BoostBySmith. Tampering with or abuse of the item will result in voided warranty.
This device is for Off-Road use Only! Failure to tune an engine properly can result in damage!
VIII. Windows Vista What I have found is you need to set the "Hayabusa ECUeditor for K2-K7 models" program to "Run as administrator". Because it's not like other std programs you can't just find the .exe file in a folder and right click and then click "Run as administrator" like you will for the Flashing software. You have to go through a few different steps. 1st) Go to the file "Hayabusa ECUeditor for K2-K7 models" and open the file the normal way you would do it. 2nd) Once you have it running hold down the keys "Crtl and Alt and Delete" then let go and Vista will pull up a screen giving you a few options. You want to click on "Start Task Manager". 3rd) The Start Task Manager program opens and usually it will have "Applications" showing 1st that are currently running. You should see "Hayabusa ECU......." under Task. Just to the right of "Applications" tab is a Tab called "Processes" click on that. This will show you all the .exe files. You will find "Hayabusa ECUeditor.exe" there. Right click on "Hayabusa ECUeditor" and click on "Properties" 4th) When the "Properties" window opens click on the tab "Compatibility" and down at the bottom left you will see a Box you can click for "Run this program as an administrator" click on the box so it has a check mark and then just click the OK button. Now you have done all that just close the "Windows Task Manager" window. Close your "Hayabusa ECUeditor......." program and then restart your "HayabusaECUeditor......." again but this time it should have a "User account control" window pop up, just click "Allow" and now your program should be up and running properly.