dribbling & volleying - pelinks4u
TRANSCRIPT
Dribbling & Volleying Unit Plan
Created by Katherine Power
& Cory Medina

Table of Contents 1. BLOCK PLAN 2. PARENT LETTER 3. LESSON PLANS 1-30 4. ASSESSMENTS 5. TASK CARDS 6. SKILL CHARTS 7. EQUIPMENT LIST 8. INSTANT ACTIVITIES 9. RESOURCE LIST *Some instant activities are included in the lesson plans
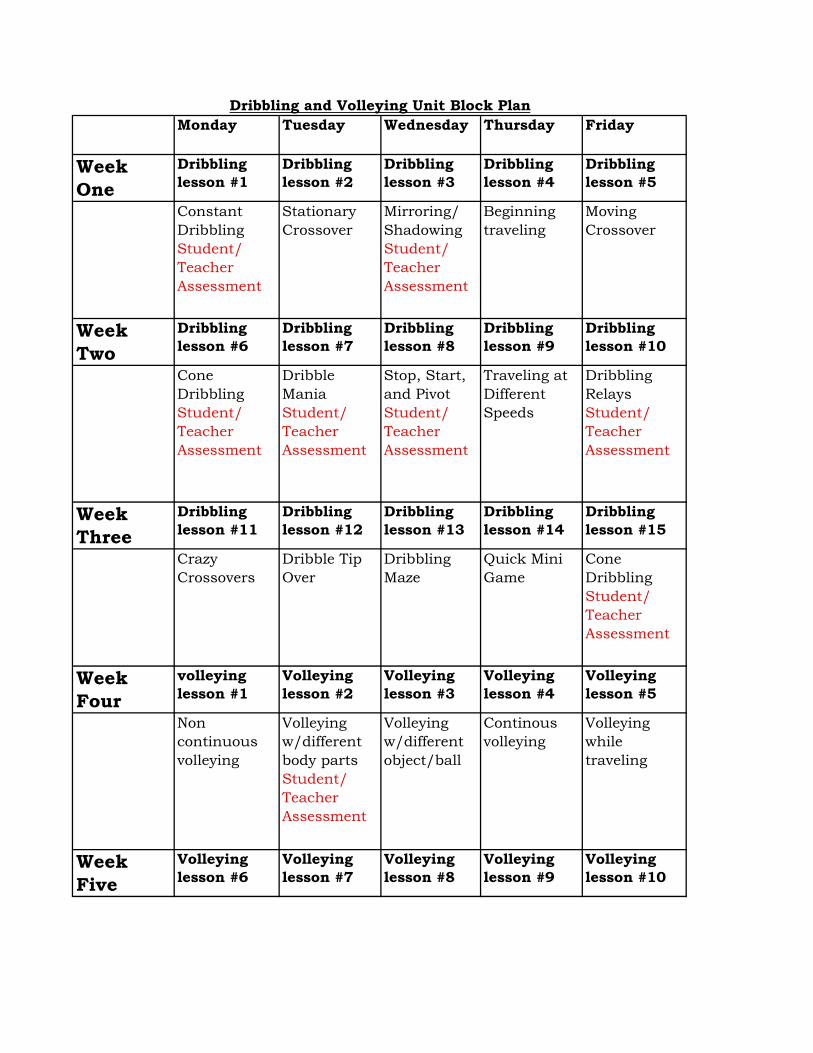
Dribbling and Volleying Unit Block PlanMonday Tuesday Wednesday Thursday Friday
Week One
Dribbling lesson #1
Dribbling lesson #2
Dribbling lesson #3
Dribbling lesson #4
Dribbling lesson #5
Constant Dribbling Student/ Teacher Assessment
Stationary Crossover
Mirroring/ Shadowing Student/ Teacher Assessment
Beginning traveling
Moving Crossover
Week Two
Dribbling lesson #6
Dribbling lesson #7
Dribbling lesson #8
Dribbling lesson #9
Dribbling lesson #10
Cone Dribbling Student/ Teacher Assessment
Dribble Mania Student/ Teacher Assessment
Stop, Start, and Pivot Student/ Teacher Assessment
Traveling at Different Speeds
Dribbling Relays Student/ Teacher Assessment
Week Three
Dribbling lesson #11
Dribbling lesson #12
Dribbling lesson #13
Dribbling lesson #14
Dribbling lesson #15
Crazy Crossovers
Dribble Tip Over
Dribbling Maze
Quick Mini Game
Cone Dribbling Student/ Teacher Assessment
Week Four
volleying lesson #1
Volleying lesson #2
Volleying lesson #3
Volleying lesson #4
Volleying lesson #5
Non continuous volleying
Volleying w/different body parts Student/ Teacher Assessment
Volleying w/different object/ball
Continous volleying
Volleying while traveling
Week Five
Volleying lesson #6
Volleying lesson #7
Volleying lesson #8
Volleying lesson #9
Volleying lesson #10

Volleying with foot Student/ Teacher Assessment
Volleying the "Pass"
Volleying the "Set"
Volleying to atarget
Volleying over the net Student/ Teacher Assessment
Week Six Volleying lesson #11
Volleying lesson #12
Volleying lesson #13
Volleying lesson #14
Volleying lesson #15
Volleying to a partner
Serving to a target
Serving over the net
Spiking Modified Volleyball game
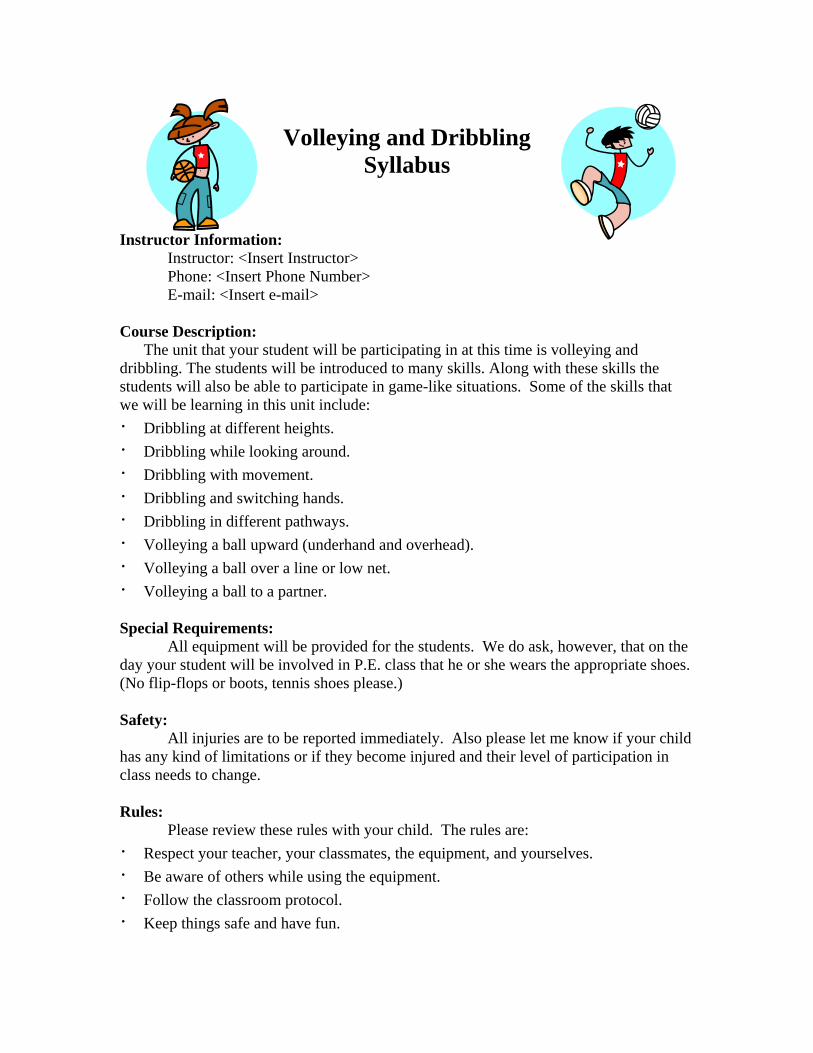
Volleying and Dribbling
Syllabus
Instructor Information: Instructor: <Insert Instructor> Phone: <Insert Phone Number> E-mail: <Insert e-mail> Course Description:
The unit that your student will be participating in at this time is volleying and dribbling. The students will be introduced to many skills. Along with these skills the students will also be able to participate in game-like situations. Some of the skills that we will be learning in this unit include: · Dribbling at different heights. · Dribbling while looking around. · Dribbling with movement. · Dribbling and switching hands. · Dribbling in different pathways. · Volleying a ball upward (underhand and overhead).
Volleying a ball over a line or low net. artner.
students. We do ask, however, that on the ay your student will be involved in P.E. class that he or she wears the appropriate shoes.
flops or boots, tennis shoes please.)
o be reported immediately. Also please let me know if your child as any kind of limitations or if they become injured and their level of participation in
eds to change.
he rules are: mates, the equipment, and yourselves.
ent. m protocol.
Kee
· · Volleying a ball to a p Special Requirements: All equipment will be provided for thed(No flip- Safety: All injuries are thclass ne Rules: Please review these rules with your child. T· sRespect your teacher, your clas Be aware of others while using the equipm·
· Follow the classroo· p things safe and have fun.
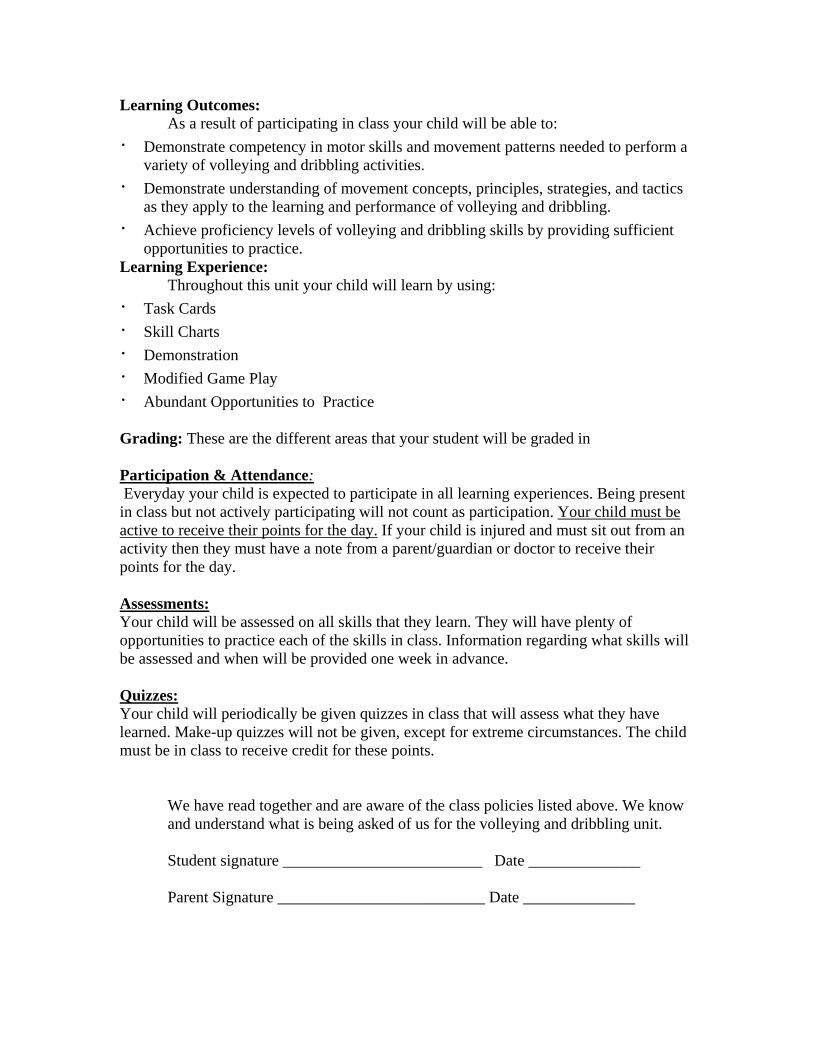
Learning Outcomes: As a result of participating in class your c hild will be able to:
g and performance of volleying and dribbling.
Ach ills by providing sufficient to practice.
ea ience: this unit your child will learn by using:
Modified Game Play Practice
· Demonstrate competency in motor skills and movement patterns needed to perform a variety of volleying and dribbling activities.
· Demonstrate understanding of movement concepts, principles, strategies, and tacticslearninas they apply to the
· ieve proficiency levels of volleying and dribbling skopportunities
L rning Exper Throughout · Task Cards · Skill Charts · Demonstration · · Abundant Opportunities to Grading: These are the different areas that your student will be graded in Participation & Attendance: Everyday your child is expected to participate in all learning experiences. Being present in class but not actively participating will not count as participation. Your child must be active to receive their points for the day. If your child is injured and must sit out from an
ir
Assessments:
activity then they must have a note from a parent/guardian or doctor to receive thepoints for the day.
will be assessed on all skills that they learn. They will have plenty of ill
uizzes:
Your childopportunities to practice each of the skills in class. Information regarding what skills wbe assessed and when will be provided one week in advance.
Q Your child will periodically be given quizzes in class that will assess what they have learnedmust be
e have read together and are aware of the class policies listed above. We know nit.
Student signature _________________________ Date ______________ Parent Signature __________________________ Date ______________
. Make-up quizzes will not be given, except for extreme circumstances. The child in class to receive credit for these points.
Wand understand what is being asked of us for the volleying and dribbling u

Basketball

Physical Education Teacher Education Program Central Washington University Beginning Dribbling Lesson #1
Objectives (Specific, Behavioral, Assessable) A. Students
1. By the end of class the students will be able to dribble the ball while stationary correctly using the pads of their fingertips. (EALR 1.1, 1.2, NASPE 1, 3)
2. The students will be able to dribbling at high, low and middle height, using only the pads of their fingers. (EALR 1.1,1.2, NASPE 1, 3)
B. Teacher Equipment: (for a class of 30 students)
• 30 woman’s basketballs • 30 Hand printout • 4 cones • 30 Pencils

Instant Activity: “Freeze Tag” I will need three volunteer taggers. Please raise you hand if you want to be a tagger. When I say go the taggers are going to start trying to tag people using their hands. If you are a tagger, please tag the person softly with out being rough. If you get tagged then you are frozen! In order to get back into the game you must have a class member slide under your legs. The tagger cannot tag someone who is underneath someone. Everyone must stay within the boundaries of the basketball court, if you go outside the boundaries you will be frozen at the place you went out at. We will play for one minute then I will get three different volunteers. Set Induction: Today we are going to practice our dribbling skills. By a show of hands, how many of you have ever seen a basketball game? Good, now out of those of you that have seen a game, did you ever see a player dribbling a basketball? Dribbling is a very important part of the game of basketball. Over the next couple of days we are going to start learning how to dribble. There are skill cards that are taped to the wall with pictures showing how to dribble correctly. You can use these are reminders if you forget the cues. Informing Task: When I say “GO”, get a ball and spread out in the gym in your own personal space and begin dribbling the ball without moving. I want you to use your finger pads when you are dribbling. Who can tell me why I want you to use your finger pads? Yes because you can control the ball better. I also want you to push the ball straight down, so the ball will come straight back up. GO!
MAF/Instructional techniques
Extensions Refinements Applications
• Children scattered in personal space, each with a woman’s basketball.
• Clearly mark boundaries of practice area with cones/stackers.
• Remind student that skill cards are on the walls of the gym to remind them of the cues.
Try to keep the ball at a medium level, which is about your waist level. Dribbling the ball at the middle level is the most common level.
• Scattered formation • Students are told to
get into personal space and begin practicing the task.
•
Now try to keep the ball at a low level which is about your knees. When would you want to dribble the ball at a low level? Yes incase you are around a bunch of people because it’s harder for someone to knock away.
1. Try to keep your head up. Why would you want to keep your head up? Yes to see people so you don’t bump in to them, also to stay away from people who are trying to steal the ball. 2. Push the ball towards the ground using finger pads.
3. Remember to keep your hand on top of the ball. 4. Keep your knees bent
I will give you 15 second; see how many times you can dribble the ball at a low level in those 15 seconds.
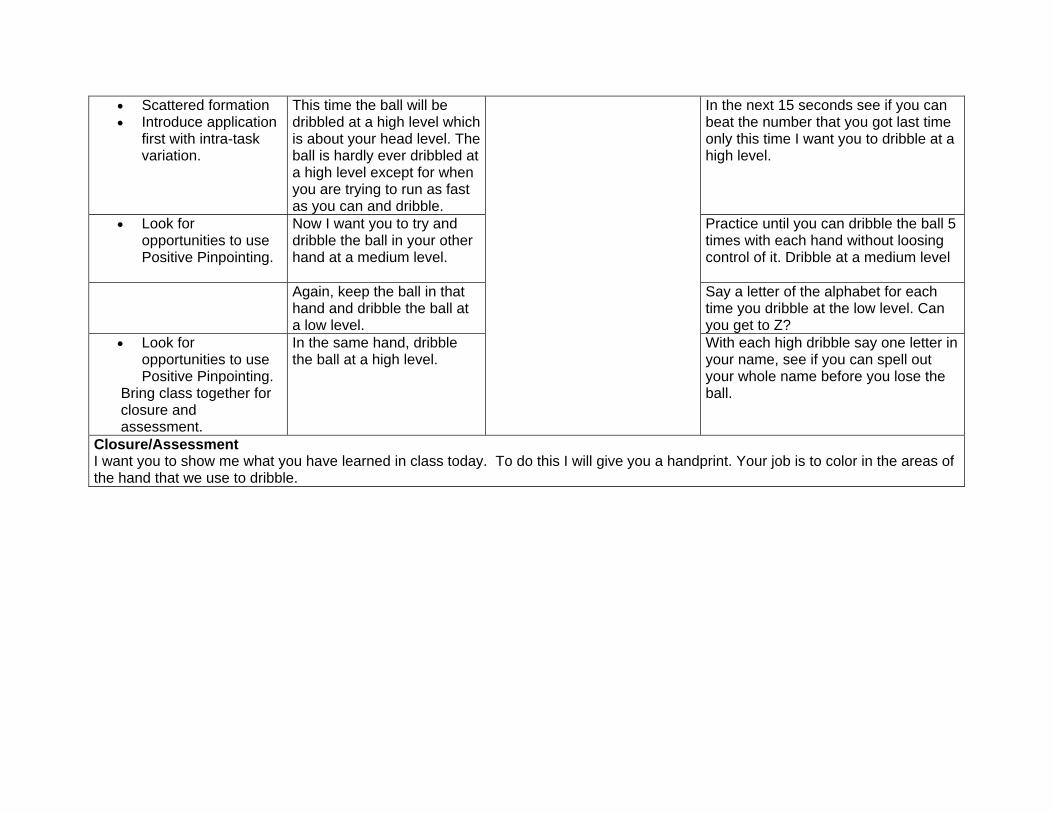
• Scattered formation • Introduce application
first with intra-task variation.
This time the ball will be dribbled at a high level which is about your head level. The ball is hardly ever dribbled at a high level except for when you are trying to run as fast as you can and dribble.
In the next 15 seconds see if you can beat the number that you got last time only this time I want you to dribble at a high level.
• Look for opportunities to use Positive Pinpointing.
Now I want you to try and dribble the ball in your other hand at a medium level.
Practice until you can dribble the ball 5 times with each hand without loosing control of it. Dribble at a medium level
Again, keep the ball in that hand and dribble the ball at a low level.
Say a letter of the alphabet for each time you dribble at the low level. Can you get to Z?
• Look for opportunities to use Positive Pinpointing.
Bring class together for closure and assessment.
In the same hand, dribble the ball at a high level.
With each high dribble say one letter in your name, see if you can spell out your whole name before you lose the ball.
Closure/Assessment I want you to show me what you have learned in class today. To do this I will give you a handprint. Your job is to color in the areas of the hand that we use to dribble.

Name _______________________ Grade ______________________ Teacher ____________________ 1. Color, with a pencil, what part of your hand should touch the ball when you are dribbling.
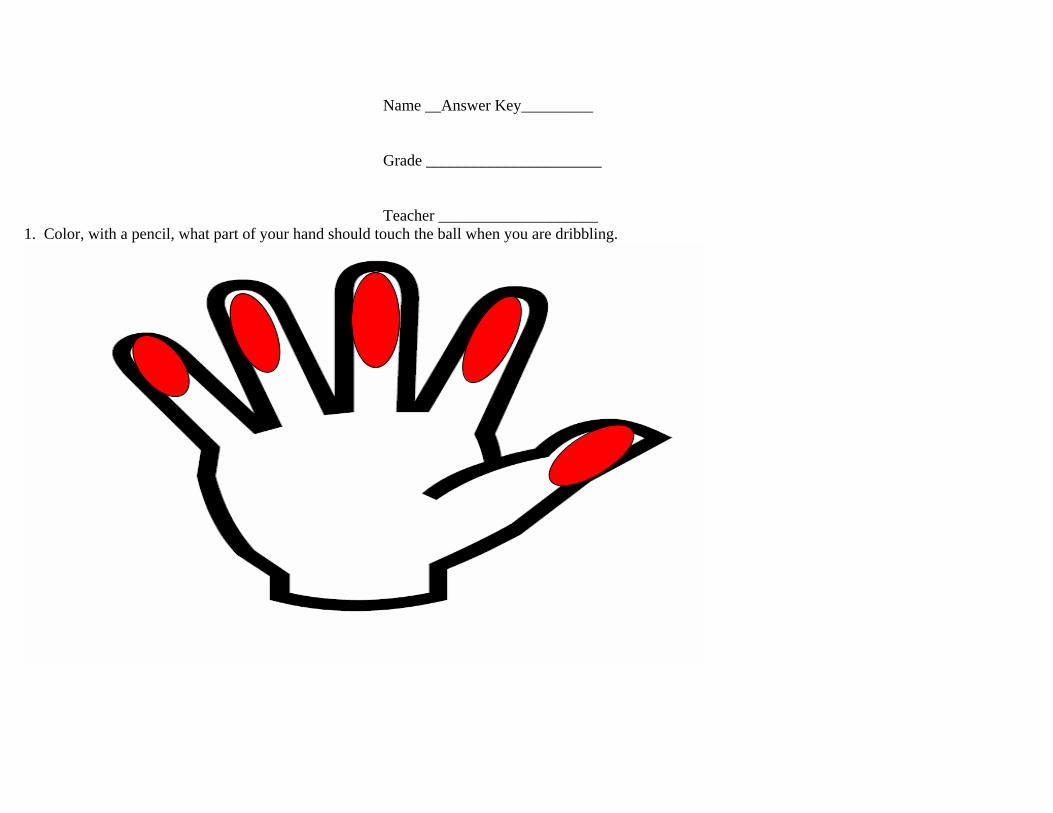
Name __Answer Key_________ Grade ______________________ Teacher ____________________
1. Color, with a pencil, what part of your hand should touch the ball when you are dribbling.

Physical Education Teacher Education Program Central Washington University Beginning Dribbling Lesson #2
Objectives (Specific, Behavioral, Assessable)
A. Students 1. The student will be able to verbally describe the following keys to dribbling. (EALR 1.1, 1.2, NASPE 1, 3)
a. Push the ball towards the ground using finger pads b. Keep your knees bent. c. Make sure that your hand is always on top of the ball. d. Keep your head up while dribbling.
2. The student will be able to dribble the ball from one hand to the other without losing it. (EALR 1.1, 1.2, NASPE 1, 3)
B. Teacher Equipment: (for a class of 30 students)
o 30 women basketballs o 30 pencils o 30 sheets of white computer paper
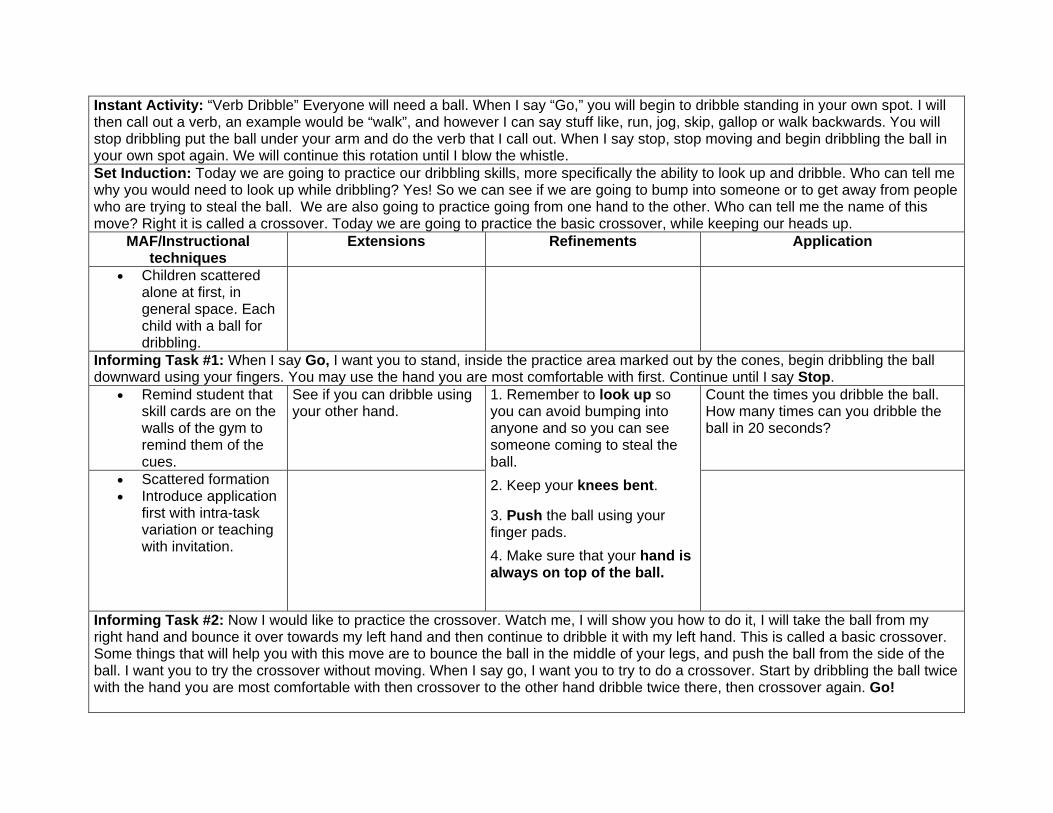
Instant Activity: “Verb Dribble” Everyone will need a ball. When I say “Go,” you will begin to dribble standing in your own spot. I will then call out a verb, an example would be “walk”, and however I can say stuff like, run, jog, skip, gallop or walk backwards. You will stop dribbling put the ball under your arm and do the verb that I call out. When I say stop, stop moving and begin dribbling the ball in your own spot again. We will continue this rotation until I blow the whistle. Set Induction: Today we are going to practice our dribbling skills, more specifically the ability to look up and dribble. Who can tell me why you would need to look up while dribbling? Yes! So we can see if we are going to bump into someone or to get away from people who are trying to steal the ball. We are also going to practice going from one hand to the other. Who can tell me the name of this move? Right it is called a crossover. Today we are going to practice the basic crossover, while keeping our heads up.
MAF/Instructional techniques
Extensions Refinements Application
• Children scattered alone at first, in general space. Each child with a ball for dribbling.
Informing Task #1: When I say Go, I want you to stand, inside the practice area marked out by the cones, begin dribbling the ball downward using your fingers. You may use the hand you are most comfortable with first. Continue until I say Stop.
• Remind student that skill cards are on the walls of the gym to remind them of the cues.
See if you can dribble using your other hand.
Count the times you dribble the ball. How many times can you dribble the ball in 20 seconds?
• Scattered formation • Introduce application
first with intra-task variation or teaching with invitation.
1. Remember to look up so you can avoid bumping into anyone and so you can see someone coming to steal the ball. 2. Keep your knees bent.
3. Push the ball using your finger pads. 4. Make sure that your hand is always on top of the ball.
Informing Task #2: Now I would like to practice the crossover. Watch me, I will show you how to do it, I will take the ball from my right hand and bounce it over towards my left hand and then continue to dribble it with my left hand. This is called a basic crossover. Some things that will help you with this move are to bounce the ball in the middle of your legs, and push the ball from the side of the ball. I want you to try the crossover without moving. When I say go, I want you to try to do a crossover. Start by dribbling the ball twice with the hand you are most comfortable with then crossover to the other hand dribble twice there, then crossover again. Go!
• Scattered formation • Introduce application
first with intra-task variation or teaching with invitation.
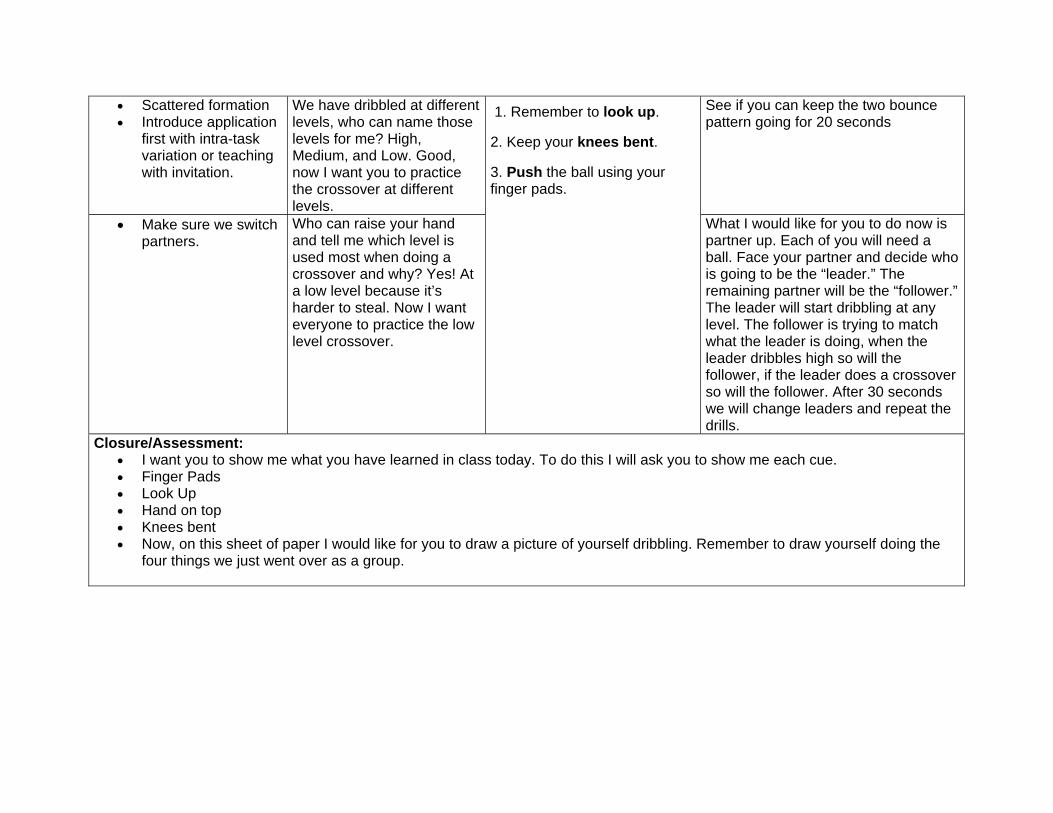
We have dribbled at different levels, who can name those levels for me? High, Medium, and Low. Good, now I want you to practice the crossover at different levels.
See if you can keep the two bounce pattern going for 20 seconds
• Make sure we switch partners.
Who can raise your hand and tell me which level is used most when doing a crossover and why? Yes! At a low level because it’s harder to steal. Now I want everyone to practice the low level crossover.
1. Remember to look up.
2. Keep your knees bent.
3. Push the ball using your finger pads.
What I would like for you to do now is partner up. Each of you will need a ball. Face your partner and decide who is going to be the “leader.” The remaining partner will be the “follower.” The leader will start dribbling at any level. The follower is trying to match what the leader is doing, when the leader dribbles high so will the follower, if the leader does a crossover so will the follower. After 30 seconds we will change leaders and repeat the drills.
Closure/Assessment: • I want you to show me what you have learned in class today. To do this I will ask you to show me each cue. • Finger Pads • Look Up • Hand on top • Knees bent • Now, on this sheet of paper I would like for you to draw a picture of yourself dribbling. Remember to draw yourself doing the
four things we just went over as a group.

Physical Education Teacher Education Program Central Washington University Beginning Dribbling Lesson #3
Objectives (Specific, Behavioral, Assessable)
A. Students 1. The student will be able to demonstrate different drills that will help their ball handling. (EALR 1.1, 1.2, NASPE 1, 3) 2. The students will be able to demonstrate the following cues whiles dribbling the basketball (EALR 1.1, 1.2, NASPE 1, 3):
a. Push the ball towards the ground using finger pads b. Keep your knees bent. c. Make sure that your hand is always on top of the ball. d. Keep your head up while dribbling.
B. Teacher Equipment: (for a class of 30 students)
o 30 Women basketballs o 5 Hula Hoops o Stations sheets o 30 Pencils

Instant Activity: “Dribble to the Beat” Everyone needs to get a ball and stand in general space. I will turn some music on and you are to dribble to the beat of the music without moving. I will call out crossover, and I want you to use the other hand and continue to dribble to the beat. After the first two crossovers, begin moving your body to the beat and continue to stay in your spot. Set Induction: A lot of you have watched basketball whether it was on TV or at the high school. Most of the people who dribble the ball have great ball control. Ball control is being able to dribble the ball without losing it. In order to get away from people or to keep the ball from getting stolen you have to have good ball control. Basketball players do drills to help them keep control of the ball. Today we are going to learn some of those drills altogether, then we will break up and do stations. MAF/Instructional techniques
Extensions Refinements Application
Informing Task #1: The first three drills are drills that we have already learned; the first is dribbling at a low level, which is about knee high. The second is dribbling at a medium level, which is about waist high. And the last is at a high level, which is about as high as your head. When I say go I want you to get a ball and spread out, and then start dribbling at a low level first. Who can tell me when you would want to use a low dribble? Yes, when you around a lot of people that might want to steal the ball.
• Children scattered in personal space, each with a woman’s basketball.
How many times in a row can you dribble the ball at a low level without losing it?
• Look for opportunities to use positive pinpointing.
Dribble the ball at a medium level. When would you use a medium level dribble? Right, when you are not around people who might steal it. Correct, it is also the most common level to dribble at.
Can you dribbling at a medium level 15 times in a row without losing the ball?
• Remind student that skill cards are on the walls of the gym to remind them of the cues.
Dribble the ball at a high level. When would you use a high level dribble? Yes, when you are trying to run fast. Is it used very often? You are right, it’s not used very often, one reason is because it’s easy to steal if you around people.
1. Push the ball towards the ground using finger pads 2. Keep your knees bent. 3. Make sure that your hand is always on top of the ball. 4. Keep your head up while dribbling.
How many times in a row can you dribble the ball at a high level without losing it?
Informing Task #2: The next three drills are also similar to each other; the first one is circling around your feet. Don’t let the ball hit the floor, and remember to use the cues that we have learned, even if you are not dribbling still keep the ball on your finger pads and your head up, just like if you were dribbling. Next drill will be circling the waist, and last will be circling the head or neck area. As you
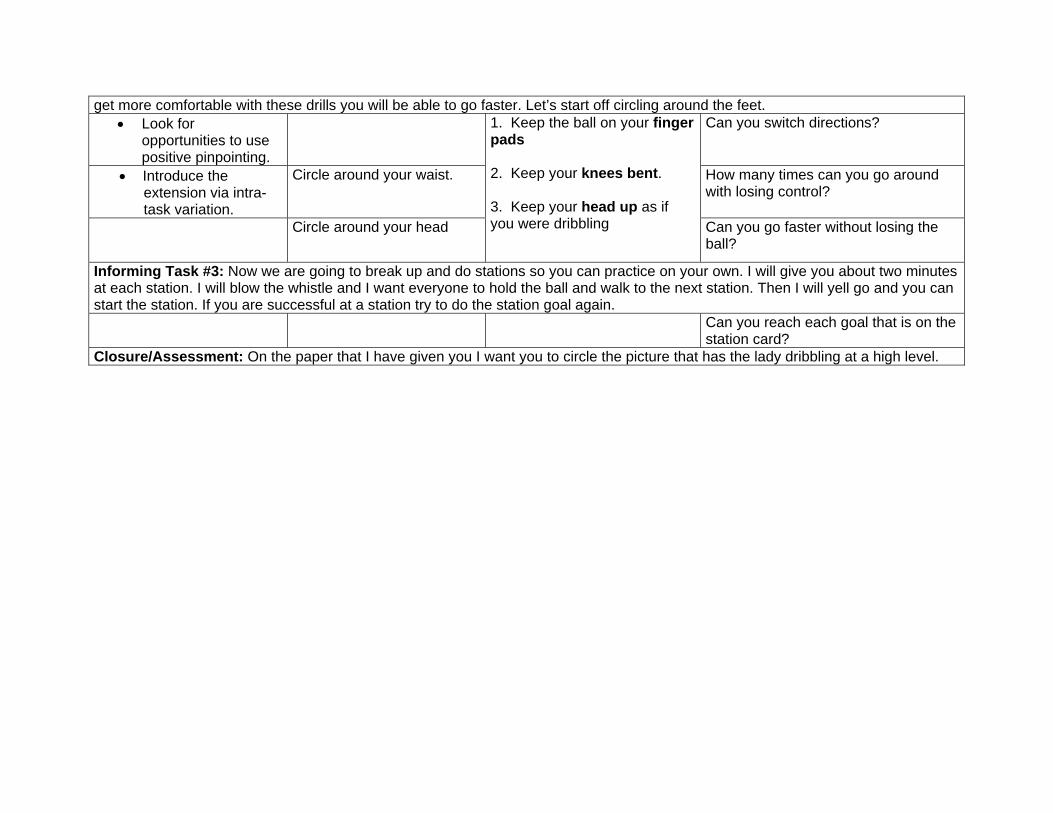
get more comfortable with these drills you will be able to go faster. Let’s start off circling around the feet. • Look for
opportunities to use positive pinpointing.
Can you switch directions?
• Introduce the extension via intra-task variation.
Circle around your waist. How many times can you go around with losing control?
Circle around your head
1. Keep the ball on your finger pads 2. Keep your knees bent. 3. Keep your head up as if you were dribbling
Can you go faster without losing the ball?
Informing Task #3: Now we are going to break up and do stations so you can practice on your own. I will give you about two minutes at each station. I will blow the whistle and I want everyone to hold the ball and walk to the next station. Then I will yell go and you can start the station. If you are successful at a station try to do the station goal again.
Can you reach each goal that is on the station card?
Closure/Assessment: On the paper that I have given you I want you to circle the picture that has the lady dribbling at a high level.

Name_______________ Teacher______________ Grade_______________
Circle the picture that is dribbling at a HIGH Level.
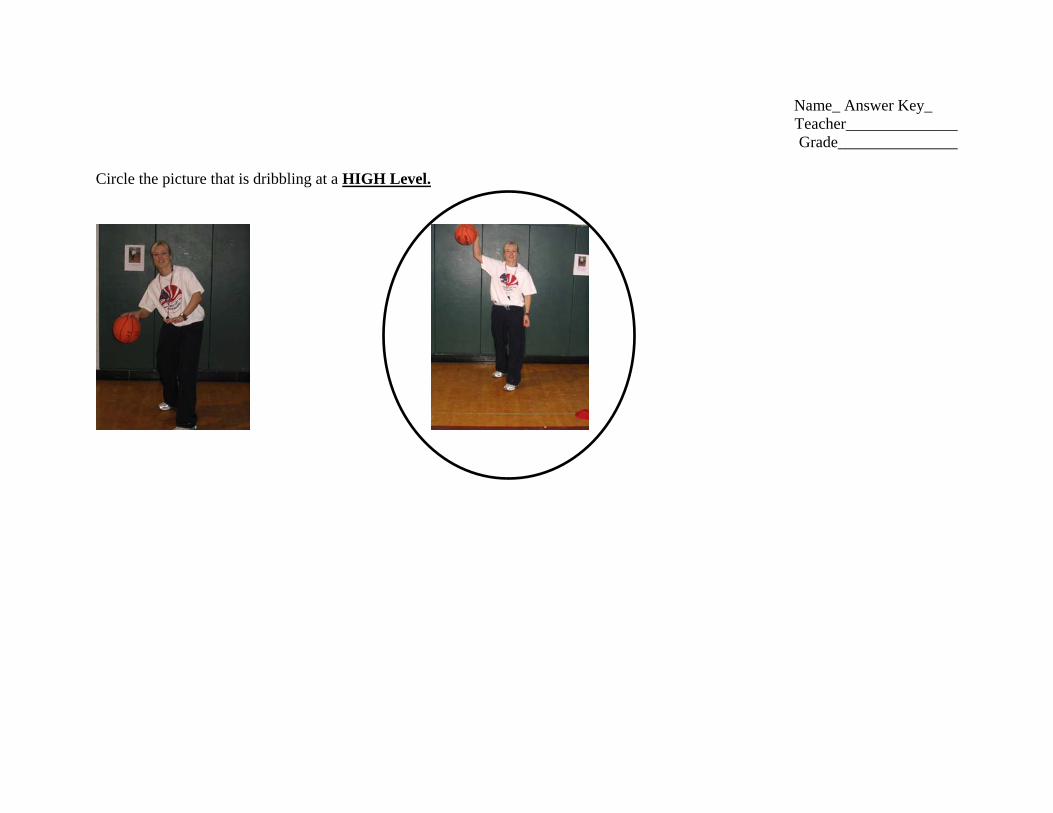
Name_ Answer Key_ Teacher______________ Grade_______________
Circle the picture that is dribbling at a HIGH Level.

Physical Education Teacher Education Program Central Washington University
Dribbling While Traveling Beginning Dribbling Lesson #4
Objectives (Specific, Behavioral, Assessable)
A. Student 1. The student will be able to dribble a ball while walking in a general space without bumping into anyone. (EALR 1.1, 1.2,
NASPE 1, 3) 2. The student will be able to dribble the ball in different pathways. (EALR 1.1, 1.2, NASPE 1, 3)
B. The teacher
Equipment: (for a class of 30 students) o 30 Basketballs o 5 Hula Hoops

Instant Activity: “Verb Dribble” Everyone will need a ball. When I say “Go,” you will begin to dribble standing in your own spot. I will then call out a verb, an example would be “walk”, and however I can say stuff like, run, jog, skip, gallop or walk backwards. You will stop dribbling put the ball under your arm and do the verb that I call out. When I say stop, stop moving and begin dribbling the ball in your own spot again. We will continue this rotation until I blow the whistle. Set Induction: The couple of days we have been working on dribbling while standing stationary, today we are going to work on moving while dribbling the ball. This is an important skill for playing basketball. I know most of you have watched basketball before who can tell me something cool that you have seen during a basketball game that has to do with dribbling? Good, you have seen someone go between their legs or around their back. I have seen people do that too. Before you can do that you have to practice more common ways like walking with the ball or jogging or even running. After you learn those then you can start trying to go through the legs and all those other fancy moves.
MAF/Instructional techniques
Extensions Refinements Application
• Basketball placed in hula hoops at the front of the class.
• Students in general space.
Informing Task #1: When I say GO, I want you to get a basketball and find a spot in general space where you can begin to dribble the ball with whatever hand is comfortable to you, at any level while standing still. GO!
• Remind student that skill cards are on the walls of the gym to remind them of the cues.
Begin walking forward; as you are walking forward push the ball out in front of you a little. If you don’t then you will leave the ball behind.
How many steps you can take while maintaining control of the ball.
Now try to walk a little faster. You will have to push the ball in front of you a little more now.
Can you make it from one side of the gym to the other with out losing the ball?
Now try dribbling the ball using your non-dominant hand only, while walking forward slowly. You still have to push the ball out ahead of you.
1. Remember to look up so you can avoid bumping into anyone and so you can see someone coming to steal the ball. 2. Keep your knees bent.
3. Push the ball using your finger pads. 4. Make sure that your hand is always on top of the ball.
Try to take 10 steps forward without losing your ball while dribbling with your non-dominant hand.
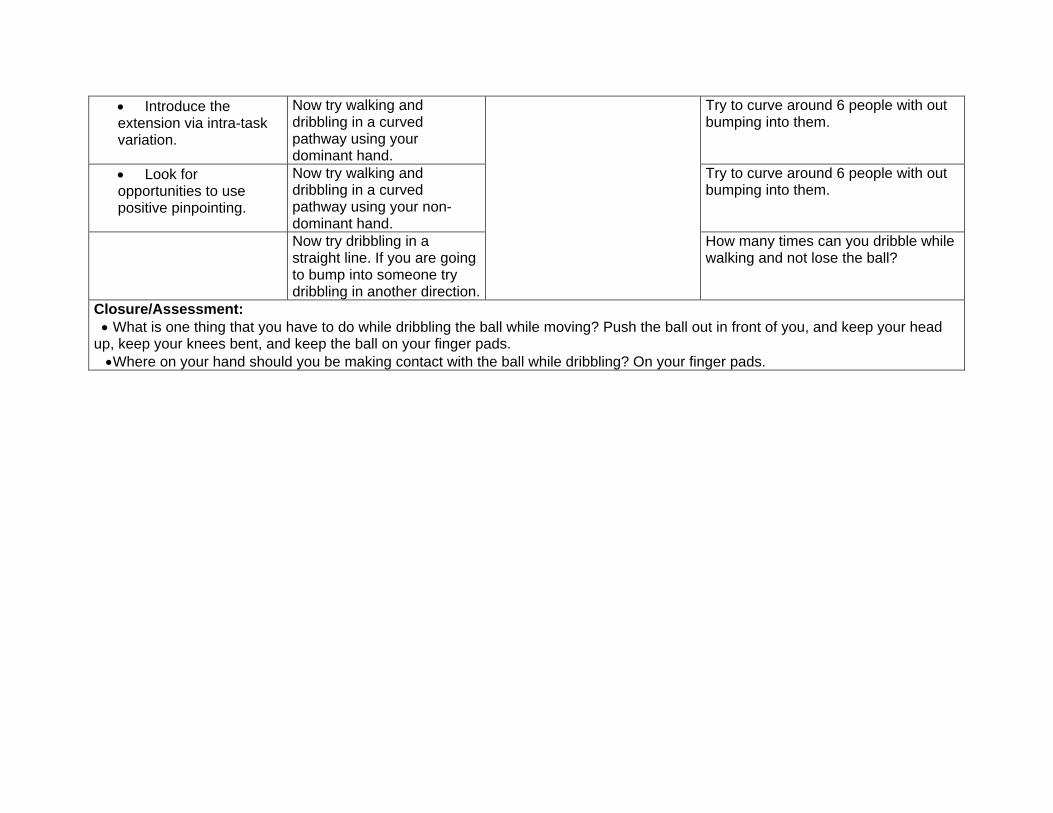
• Introduce the extension via intra-task variation.
Now try walking and dribbling in a curved pathway using your dominant hand.
Try to curve around 6 people with out bumping into them.
• Look for opportunities to use positive pinpointing.
Now try walking and dribbling in a curved pathway using your non-dominant hand.
Try to curve around 6 people with out bumping into them.
Now try dribbling in a straight line. If you are going to bump into someone try dribbling in another direction.
How many times can you dribble while walking and not lose the ball?
Closure/Assessment: • What is one thing that you have to do while dribbling the ball while moving? Push the ball out in front of you, and keep your head up, keep your knees bent, and keep the ball on your finger pads. •Where on your hand should you be making contact with the ball while dribbling? On your finger pads.
Physical Education Teacher Education Program Central Washington University Beginning Dribbling Lesson #5
Objectives (Specific, Behavioral, Assessable)
A. Students 1. The students will be able to verbally describe the keys to doing a crossover while moving. (EALR 1.1, 1.2, NASPE 1, 3)
a. Push the ball out in front of you a little bit. b. Look up when dribbling. c. Hand is on the side of the ball
2. The students will be able to demonstrate a crossover to the opposite hand while traveling in general space. (EALR 1.1, 1.2, NASPE 1, 3)
B. Teacher
Equipment: (for a class of 30 students)
o 30 basketballs o Stereo o Cones

Instant Activity: “Freeze Tag” I will need three volunteer taggers. Please raise you hand if you want to be a tagger. When I say go the taggers are going to start trying to tag people using their hands. If you are a tagger, please tag the person softly with out being rough. If you get tagged then you are frozen! In order to get back into the game you must have a class member slide under your legs. The tagger cannot tag someone who is underneath someone. Everyone must stay within the boundaries of the basketball court, if you go outside the boundaries you will be frozen at the place you went out at. We will play for one minute then I will get three different volunteers. Set Induction: Today we are going to practice how to crossover while we are moving. Being able to crossover with out losing the ball, would make you a very good basketball player. Can anyone raise their hand and name a famous basketball player that can do the crossover. Good, Lebron James is a perfect example of someone who uses the crossover. Who can remind me of some of the things we have to remember when doing a crossing over? Good, bounce the ball in the middle of your legs, and push the ball from the side of the ball. Now to do a crossover while you are moving, you have to add one more thing, you also have to push the ball in front of you.
MAF/Instructional techniques
Extensions Refinements Applications
• Students scattered throughout the gym. Each with a basketball in possession
• Clearly mark boundaries of practice area with Cones.
Informing Task #1: What I would like for you to do is when I say go, find a place in general space and begin dribbling while walking. Dribble the ball with which ever hand is most comfortable. GO!
• Remind student that skill cards are on the walls of the gym to remind them of the cues.
• Scattered formation • Students get in place
with their basketballs and begin the task.
Now, when I blow the whistle I want you to crossover to the other hand and continue walking. I will blow the whistle twice when I want you to stop and listen.
1. Remember to look up so you can avoid bumping into anyone and so you can see someone coming to steal the ball. 2. Keep your knees bent.
3. Push the ball using your finger pads.
Can you crossover every time I blow the whistle without messing up?

• Scattered formation Introduce application first with intra-task variation or teaching by invitation
Crossover twice when I blow the whistle and continue walking. Start with the ball in the right hand, then I want you to crossover to the left hand, and then back to the right hand.
Count how many times in a row you can do the double crossover with out losing control.
Start with your other hand, and continue doing the double crossover.
4. Make sure your hand is on the side of the ball.
Count how many times in a row you can do the double crossover with out losing control.
Informing Task #2: This time we are going to continue practicing the crossover; however we are going to use different types of movement. Before we start can anyone tell me when you would want to use a crossover? Yes, to keep the ball away from the other players, and when you are changing directions. When I say go begin dribbling and walking in general space. Each time you meet someone, crossover, and continue to walk and dribble. GO!
• Bring students back together for explanation.
Now, try to crossover while jogging, keep dribbling the ball
Count how many times you are able to crossover while jogging in 30 seconds,
• Introduce the extension via intratask variation.
Now, try to crossover while skipping, keep dribbling the ball
How many times were you able to complete a crossover while skipping within 25 seconds?
• Look for opportunities to use Positive Pinpointing.
Now, try to crossover while doing a bunny hop, keep dribbling the ball
1. Remember to look up so you can avoid bumping into anyone and so you can see someone coming to steal the ball. 2. Keep your knees bent.
3. Push the ball using your finger pads.
4. Make sure your hand is on the side of the ball.
How many times can you crossover while bunny hopping in 20 seconds?
Closure/Assessment I want you to show me what you have learned in today’s class. To do this I will evaluate each one of you. Each of you will show me how to do a crossover. Students who are not being evaluated need to continue to practice in their own self-space. I will be looking for the dribbler to keep their head up, their knees bent, dribbling the ball with their finger pads, and that their hand is on the side of the ball when doing a crossover. I will also be looking for the dribbler to keep control of the ball.

Physical Education Teacher Education Program Central Washington University Beginning Dribbling Lesson #6
Objectives (Specific, Behavioral, Assessable) A. Student
1. The student will be able to verbally describe the keys to dribbling. (EALR 1.1, 1.2, NASPE 1, 3) a. Push the ball towards the ground using finger pads b. Keep your knees bent. c. Make sure that your hand is always on top of the ball. d. Keep your head up while dribbling.
2. The student will be able to demonstrate a mature manner of dribbling. (EALR 1.1, 1.2, NASPE 1, 3) B. Teacher Equipment: (for a class of 30 students)
o 30 basketballs o 30 Partner assessment worksheet o 30 Pencils o Radio o 14 Cones
Instant Activity: “Dribble to the Beat” Everyone needs to get a ball and stand in general space. I will turn some music on and you are to dribble to the beat of the music without moving. I will call out crossover, and I want you to use the other hand and continue to dribble to the beat. After the first two crossovers, begin moving your body to the beat and continue to stay in your spot. Set Induction: You all have been introduced to the skill of dribbling. You have also been introduced to moving and dribbling. This is important in the event of getting down the basketball court successfully while still have possession of the ball. We have learned to dribble at different levels, and to travel in different pathways, as well as in different speeds. While we were learning to dribble I kept telling you things to remember, can someone raise their hand and tell me one of those things? Good, dribble using your finger pads. Yes, that’s very important too, to keep your head up. Good, Keep your knees bent. And the last one, good push the ball straight down. Today we are going to put these altogether and you are going to partner up and evaluate each other. I want you to partner up and one of you comes get a paper and a pencil.
MAF/Instructional techniques
Extensions Refinements Applications
• Partner #1 in single file line. Partner #2 observing partner #1. Partner #1 holding a ball.
• Assessment sheet for each student
Informing Task: When I say “Go,” partner #1 dribbles forward (walking) around the orange cone and back to the end of the line. The next player in line repeats the task. Partner #2 is to observe partner #1 and complete the worksheet, focusing solely on the different height levels partner #1 is dribbling at. First try a medium dribble. Watch for the dribbler to use finger pads and keep the ball at waist high.
Remind student that skill cards are on the walls of the gym to remind them of the cues.
Students switch roles. Partner #2 performs while partner #1 evaluates.
Now the dribbler is going to try and dribble at a HIGH level.
Partner #2 counts how many times partner #1 looks down to completes this task one time. Record this on the worksheet.
• Students switch roles. Partner #1 performs while
Now the dribbler is going to dribble at a LOW level.
1. Push the ball towards the ground using finger pads 2. Keep your knees bent. 3. Make sure that your hand is always on top of the ball. 4. Keep your head up while dribbling.
Partner #1 counts how many times partner #2 looks down to completes this task one time. Record this on the

partner #2 evaluates. worksheet. See if you can make it without losing
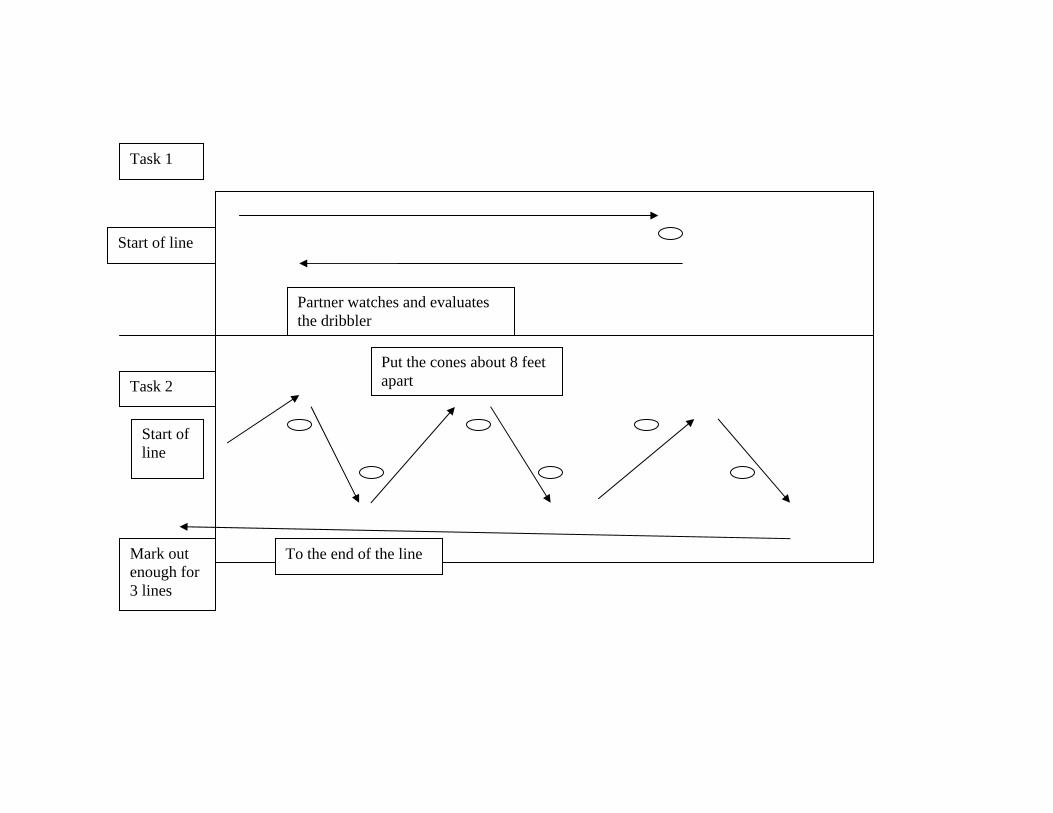
control of the ball. Informing Task #2: We are now going to combine dribbling, moving, and a crossover into one task. There will be three lines and six cones will be positioned about eight feet apart. The players at the head of the lines start off and then come back to the end of the line when complete. You are going to zig-zag through the cones, keeping the ball away from the cones by switching hands. I want you to start of walking and dribbling. Take turns completing this task until I say “Stop.”
• Bring students back together for explanation. They are lined up in three single file line at one end line of the gym.
Once you come up to a cone, crossover to the other hand and keep your eyes up.
Can you complete the obstacle course without losing control of your ball?
• Introduce the extension via intra-task variation.
Try getting through the obstacles while switching hands and jogging.
Can you get through the obstacle course in less than 30 seconds?
•. Look for opportunities to use positive pinpointing.
1. Push the ball towards the ground using finger pads 2. Keep your knees bent. 3. Make sure that your hand is always on top of the ball. 4. Keep your head up while dribbling.
Can you use tall dribbles to get through the obstacle course this time?
Closure/Assessment: Everyone get into pairs of 2. Now one of you will be partner #1 and the other will be #2. Decide now which numbers you will be. Now partner #1 tell your partner one cue that you used today. Now partner #2 tell your partner one cue that you learned today. Good who can raise your hand and tell me one? Good they are, a. Push the ball towards the ground using finger pads b. Keep your knees bent. c. Make sure that your hand is always on top of the ball. d. Keep your head up while dribbling.

Start of line
To the end of the line
Put the cones about 8 feet apart
Mark out enough for 3 lines
Task 2
Task 1
Start of line
Partner watches and evaluates the dribbler

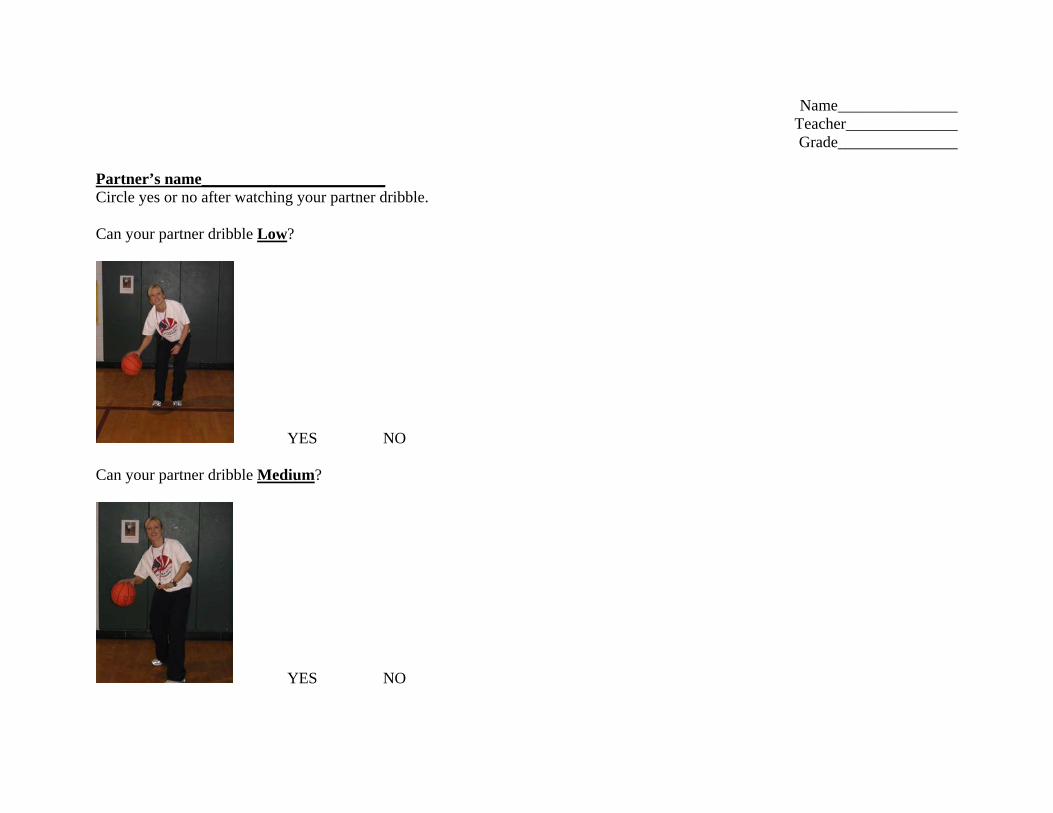
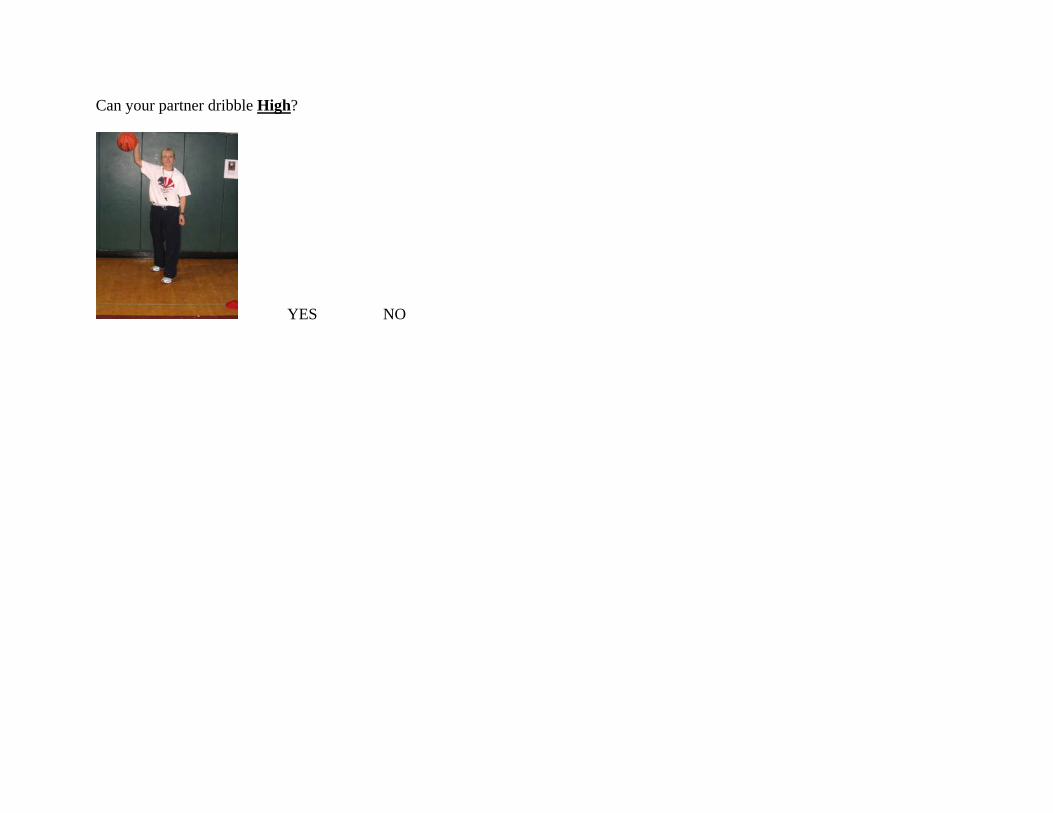
Name_______________ Teacher______________ Grade_______________
Partner’s name_______________________ Circle yes or no after watching your partner dribble. Can your partner dribble Low?
YES NO Can your partner dribble Medium?
YES NO

Can your partner dribble High?
YES NO
Physical Education Teacher Education Program Central Washington University Beginning Dribbling Lesson #7
Objectives (Specific, Behavioral, Assessable) A. Students
1. Students will be able to use and demonstrate all the cues that they have learned this far. (EALR 1.1, 1.2, NASPE 1, 3)
a. Push the ball towards the ground using finger pads b. Keep your knees bent. c. Make sure that your hand is always on top of the ball. d. Keep your head up while dribbling.
2. The students will stay active for at least 15 consecutive minutes. (EALR 1.1,1.2, NASPE 1, 3)
B. Teacher Equipment: (for a class of 30 students)
• 30 women basketballs • 12 cones • 30 copies of assessment • 30 pencils
Instant Activity: “Verb Dribble” Everyone will need a ball. When I say “Go,” you will begin to dribble standing in your own spot. I will then call out a verb, an example would be “walk”, and however I can say stuff like, run, jog, skip, gallop or walk backwards. You will stop dribbling put the ball under your arm and do the verb that I call out. When I say stop, stop moving and begin dribbling the ball in your own spot again. We will continue this rotation until I blow the whistle. Set Induction: Today we are going to relax a little, and try to put all the skills that we have learned so far to use. Can anyone tell me some of the cues that we have learned so far? Finger tips, keep the ball on your finger tips for control; knees bent, like you are ready to jump really high or run fast; and maybe the most important one, keep your head up, so you can see who is coming and where you are going. Today we are going to play a game called dribble mania!!
MAF/Instructional techniques
Extensions Refinements Applications
Informing Task: In this game, everyone is going to need a ball. One rule in this game is that you must be dribbling the ball the whole time. The object is to knock away other students’ basketballs while continuing to dribble your own ball. You can only knock the ball away using your free hand. If your ball is knocked out of the square or you lose control of it, you must dribble one time around the whole basketball court without losing the ball, and then you may re-enter the game. I already have all the boundaries marked out by the cones, you must stay within the cones or you are out. When I say go I want everyone to go grab a ball from the rack and spread out in the marked area and start dribbling at any level. GO!
• Remind student that skill cards are on the walls of the gym to remind them of the cues.
• Cone off an area that is about 20x20 feet.
• Clearly mark boundaries of play area with cones/stackers.
Now I want you to keep the ball at a low level. Keep playing the game but dribble at a low level.
• Look for opportunities to use Positive Pinpointing.
Now I want you to try and dribble the ball in your non-dominate hand.
1. Push the ball towards the ground using finger pads 2. Keep your knees bent. 3. Make sure that your hand is always on top of the ball. 4. Keep your head up while dribbling.

• Introduce application
first with intra-task variation.
Ok now you can dribble with any hand you want, however I want you to try jogging. Remember for safety keep your head up so you don’t bump into anyone.
• After 3-5 minutes, make the square smaller so that it becomes more difficult.
The next step is to try running, I want you to try to go fast, but remember to keep your head up so you don’t bump into anyone.
Closure/Assessment Now that we had a chance to use the skills that we have learned this far, can someone name one for me? (Keep your head up) Good! Can you tell me how or when you used that cue? (When someone was coming at me I saw them) What is another one? (Finger pads) Good! Can you give me an example of when you used this? (To keep control of the ball, when someone tried to steal it.) And how about the last one? (keep your knees bent) Very good! And how did you use that cue? (I kept my knees bent so I could move quicker and get away when someone tried to steal the ball) Good!! Now I want each one of you to grab one of these papers and a pencil and circle the picture of the lady dribbling at a low level. Remember to put your name on the picture.

Name_______________ Teacher______________ Grade_______________
Circle the picture that is dribbling LOW.
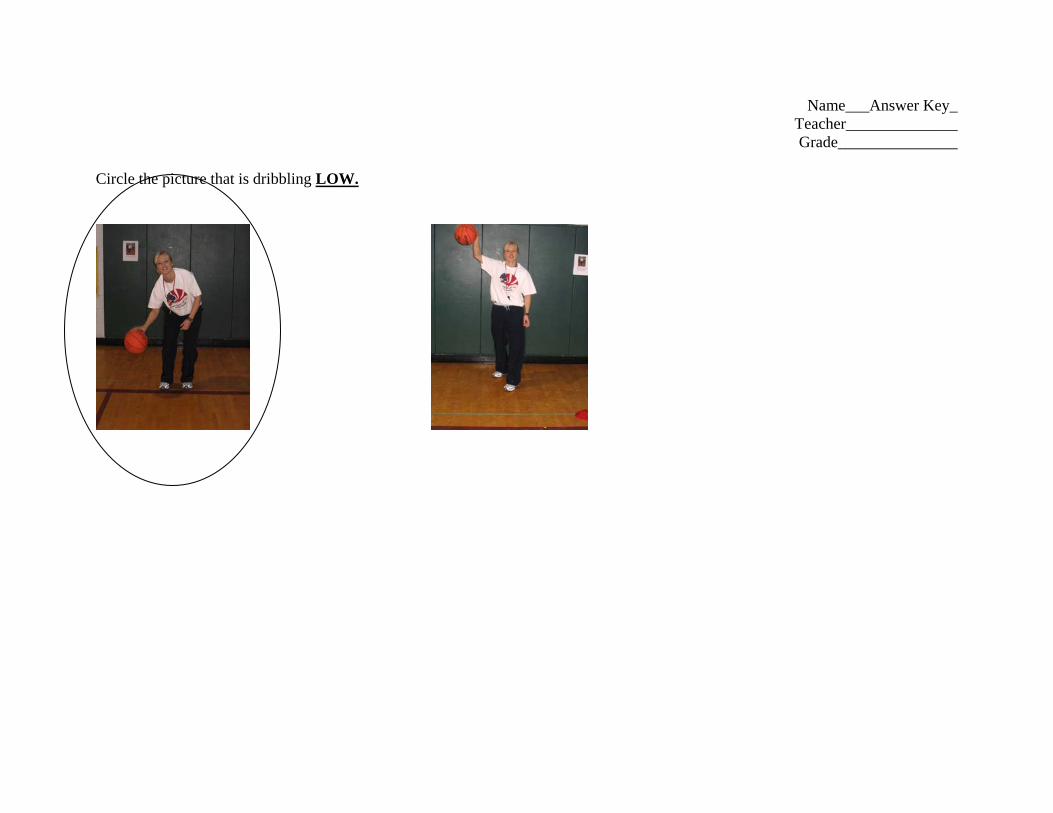
Name___Answer Key_ Teacher______________ Grade_______________
Circle the picture that is dribbling LOW.
Physical Education Teacher Education Program Central Washington University Beginning Dribbling Lesson #8
Objectives (Specific, Behavioral, Assessable)
A. Students 1. The student will be able to verbally describe the keys to stopping, and starting while dribbling. (EALR 1.1, 1.2, NASPE 1, 3)
a. Be able to stop suddenly, squash that bug! b. Transition from a stationary position to a starting position smoothly.
2. The student will be able to demonstrate a mature manner of stop, start, and turning while moving. (EALR 1.1, 1.2, NASPE 1, 3)
B. Teacher Equipment: (for a class of 30 students)
o 30 basketballs o 30 Pencils o 30 copies of assessment sheet
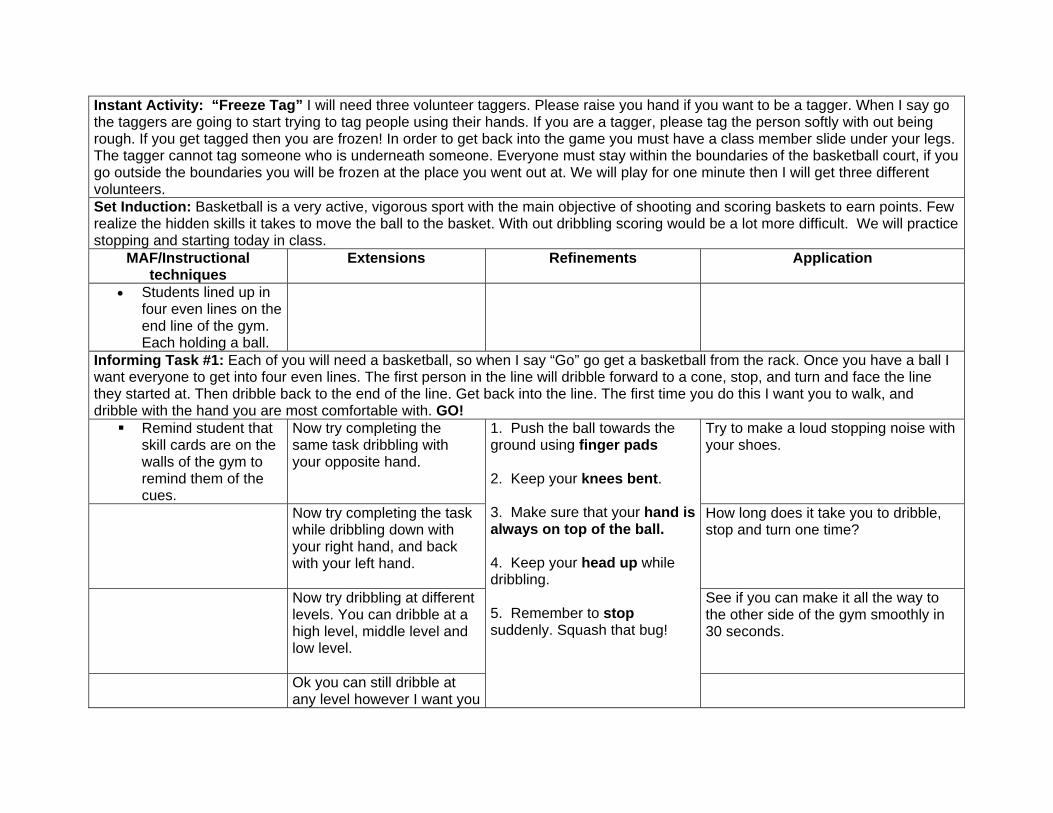
Instant Activity: “Freeze Tag” I will need three volunteer taggers. Please raise you hand if you want to be a tagger. When I say go the taggers are going to start trying to tag people using their hands. If you are a tagger, please tag the person softly with out being rough. If you get tagged then you are frozen! In order to get back into the game you must have a class member slide under your legs. The tagger cannot tag someone who is underneath someone. Everyone must stay within the boundaries of the basketball court, if you go outside the boundaries you will be frozen at the place you went out at. We will play for one minute then I will get three different volunteers. Set Induction: Basketball is a very active, vigorous sport with the main objective of shooting and scoring baskets to earn points. Few realize the hidden skills it takes to move the ball to the basket. With out dribbling scoring would be a lot more difficult. We will practice stopping and starting today in class.
MAF/Instructional techniques
Extensions Refinements Application
• Students lined up in four even lines on the end line of the gym. Each holding a ball.
Informing Task #1: Each of you will need a basketball, so when I say “Go” go get a basketball from the rack. Once you have a ball I want everyone to get into four even lines. The first person in the line will dribble forward to a cone, stop, and turn and face the line they started at. Then dribble back to the end of the line. Get back into the line. The first time you do this I want you to walk, and dribble with the hand you are most comfortable with. GO!
Remind student that skill cards are on the walls of the gym to remind them of the cues.
Now try completing the same task dribbling with your opposite hand.
Try to make a loud stopping noise with your shoes.
Now try completing the task while dribbling down with your right hand, and back with your left hand.
How long does it take you to dribble, stop and turn one time?
Now try dribbling at different levels. You can dribble at a high level, middle level and low level.
See if you can make it all the way to the other side of the gym smoothly in 30 seconds.
Ok you can still dribble at any level however I want you
1. Push the ball towards the ground using finger pads 2. Keep your knees bent. 3. Make sure that your hand is always on top of the ball. 4. Keep your head up while dribbling. 5. Remember to stop suddenly. Squash that bug!
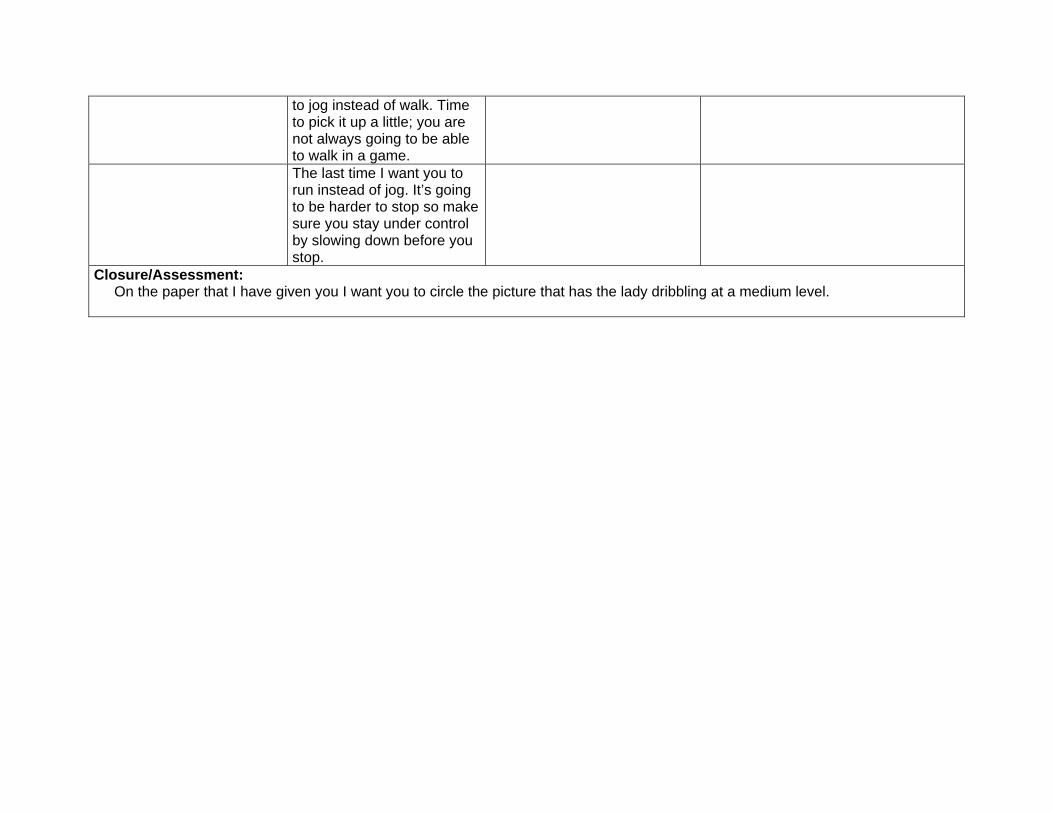
to jog instead of walk. Time to pick it up a little; you are not always going to be able to walk in a game.
The last time I want you to run instead of jog. It’s going to be harder to stop so make sure you stay under control by slowing down before you stop.
Closure/Assessment: On the paper that I have given you I want you to circle the picture that has the lady dribbling at a medium level.

Name_______________ Teacher______________ Grade_______________
Circle the picture that is dribbling MEDIUM.

Name_Answer Key____ Teacher______________ Grade_______________
Circle the picture that is dribbling MEDIUM.

Physical Education Teacher Education Program Central Washington University Beginning Dribbling Lesson # 9
Objectives (Specific, Behavioral, Assessable) A. Students
1. Students will be able to demonstrate mature dribbling, while dribbling at different speeds. (EALR 1.1, 1.2, NASPE 1, 3)
2. Students will be able to recall prior cues used in past lessons. (EALR 1.1,1.2, NASPE 1, 3)
1. Push the ball towards the ground using finger pads 2. Keep your knees bent. 3. Make sure that your hand is always on top of the ball. 4. Keep your head up while dribbling.
B. Teacher Equipment: (for a class of 30 students)
• 30 woman’s basketballs • Cones (12)
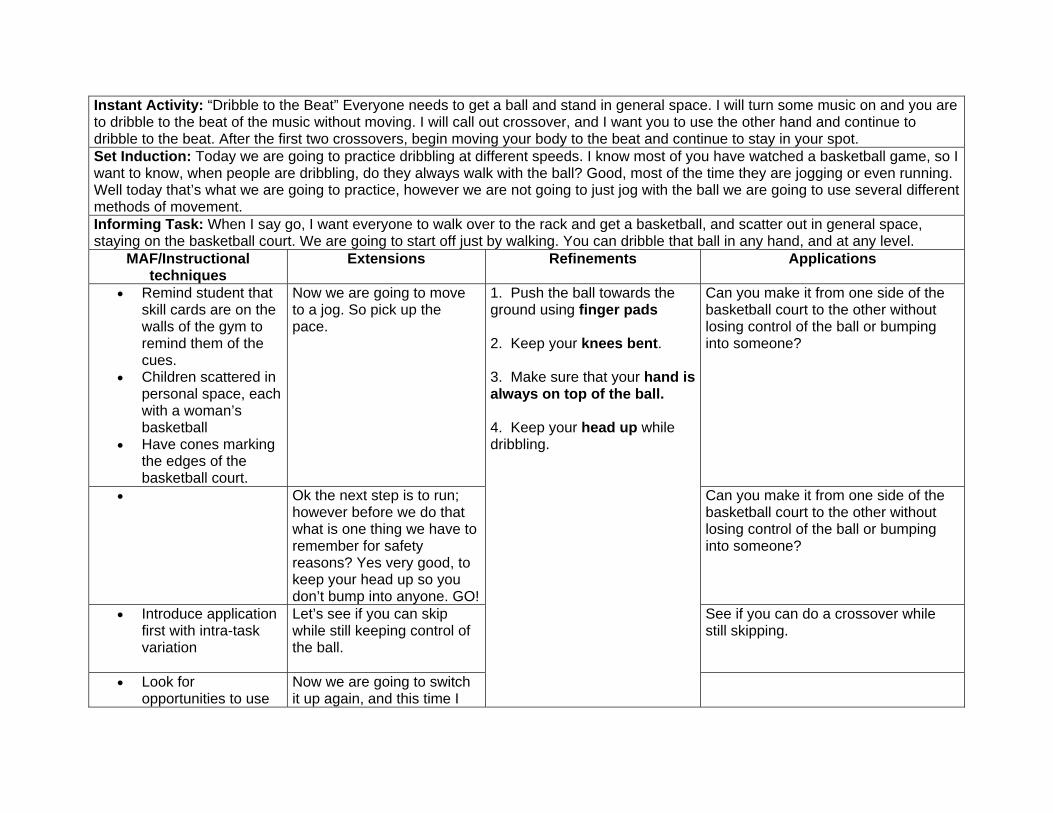
Instant Activity: “Dribble to the Beat” Everyone needs to get a ball and stand in general space. I will turn some music on and you are to dribble to the beat of the music without moving. I will call out crossover, and I want you to use the other hand and continue to dribble to the beat. After the first two crossovers, begin moving your body to the beat and continue to stay in your spot. Set Induction: Today we are going to practice dribbling at different speeds. I know most of you have watched a basketball game, so I want to know, when people are dribbling, do they always walk with the ball? Good, most of the time they are jogging or even running. Well today that’s what we are going to practice, however we are not going to just jog with the ball we are going to use several different methods of movement. Informing Task: When I say go, I want everyone to walk over to the rack and get a basketball, and scatter out in general space, staying on the basketball court. We are going to start off just by walking. You can dribble that ball in any hand, and at any level.
MAF/Instructional techniques
Extensions Refinements Applications
• Remind student that skill cards are on the walls of the gym to remind them of the cues.
• Children scattered in personal space, each with a woman’s basketball
• Have cones marking the edges of the basketball court.
Now we are going to move to a jog. So pick up the pace.
Can you make it from one side of the basketball court to the other without losing control of the ball or bumping into someone?
• Ok the next step is to run; however before we do that what is one thing we have to remember for safety reasons? Yes very good, to keep your head up so you don’t bump into anyone. GO!
Can you make it from one side of the basketball court to the other without losing control of the ball or bumping into someone?
• Introduce application first with intra-task variation
Let’s see if you can skip while still keeping control of the ball.
See if you can do a crossover while still skipping.
• Look for opportunities to use
Now we are going to switch it up again, and this time I
1. Push the ball towards the ground using finger pads 2. Keep your knees bent. 3. Make sure that your hand is always on top of the ball. 4. Keep your head up while dribbling.
Positive Pinpointing. want you to gallop while still dribbling.
Closure/Assessment How many different ways do people dribble in a game? Right at least three. What are those different methods? Walking, running, skipping, and jogging. Good, tomorrow we are going to practice these a little more!!
Physical Education Teacher Education Program Central Washington University
Beginning Dribbling Lesson # 10
Objectives (Specific, Behavioral, Assessable) A. Students
1. Students will be able to demonstrate good sportsmanship while in competition. (EALR 1.1, 1.2, NASPE 1, 3) 2. Students will be able to recall prior cues used in past lessons. (EALR 1.1,1.2, NASPE 1, 3)
B. Teacher
Equipment: (for a class of 30 students)
• 30 woman’s basketballs • 30 Color crayons
Instant Activity: “Verb Dribble” Everyone will need a ball. When I say “Go,” you will begin to dribble standing in your own spot. I will then call out a verb, an example would be “walk”, and however I can say stuff like, run, jog, skip, gallop or walk backwards. You will stop dribbling put the ball under your arm and do the verb that I call out. When I say stop, stop moving and begin dribbling the ball in your own spot again. We will continue this rotation until I blow the whistle. Set Induction: Today we are going to have a little friendly competition. We are going to have relay races; we will do a couple different formats. How many of have every watch a track meet, maybe the Olympics. At all Olympics they have relay races. We are going to do relay races only we are going to be dribbling a basketball. Informing Task: I need everyone to line up from shortest to tallest, and then I want you to count off by 5. Ones are going to be in the first line, and twos in the second line, and so on. The first person in line will go get a ball from the rack. When I say go, I want you to run to the other side of the court and back dribbling the ball with whatever hand is comfortable for you. Once you get back stop at the line of tape, and pass it to the next person in line. Continue this till everyone has gone through and had a chance to dribble. After everyone has gone through the whole line must sit down.
MAF/Instructional techniques
Extensions Refinements Applications
• Remind student that skill cards are on the walls of the gym to remind them of the cues.
• Try to make sure the teams are evenly matched. Make changes if necessary.
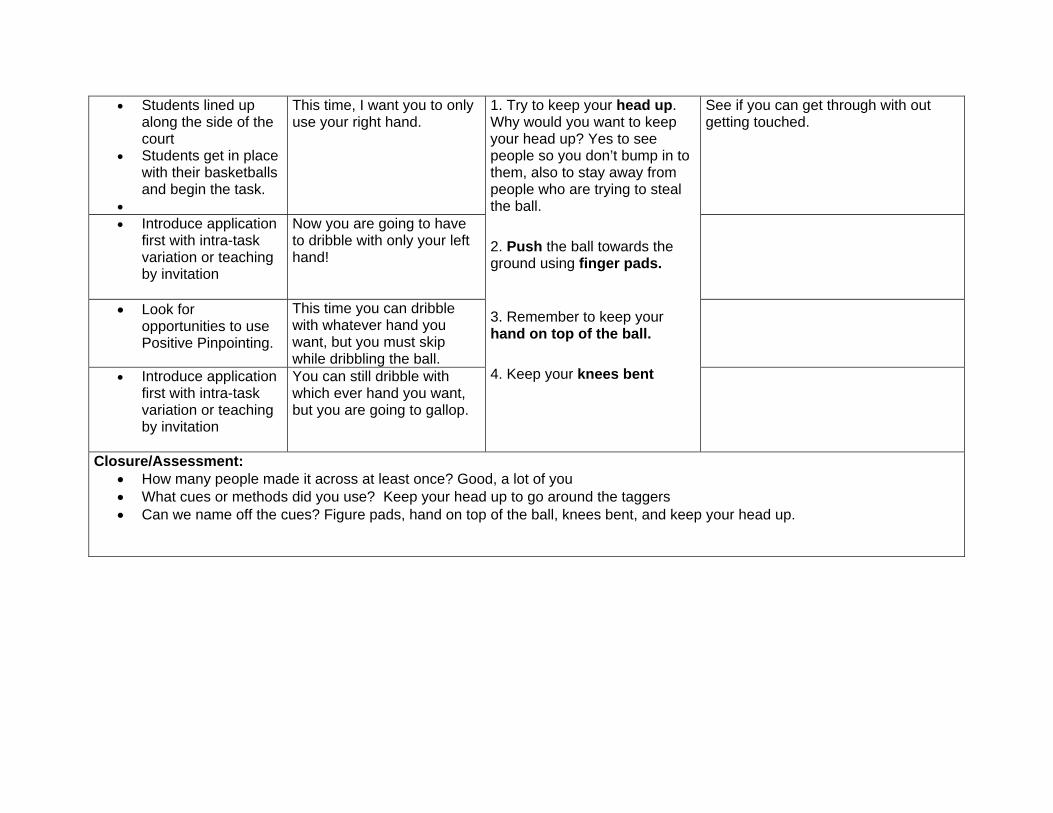
This time I want you to only dribble with your right hand.
Try to see how fast you can go through the whole line.
• Introduce application first with intra-task variation
Now I want you to try it using only your left hand.
• Look for opportunities to use Positive Pinpointing.
Now I want you to try and dribble down with your right hand and back with your left hand.
1. Try to keep your head up. Why would you want to keep your head up? Yes to see people so you don’t bump in to them, also to stay away from people who are trying to steal the ball. 2. Push the ball towards the ground using finger pads.
3. Remember to keep your hand on top of the ball. 4. Keep your knees bent
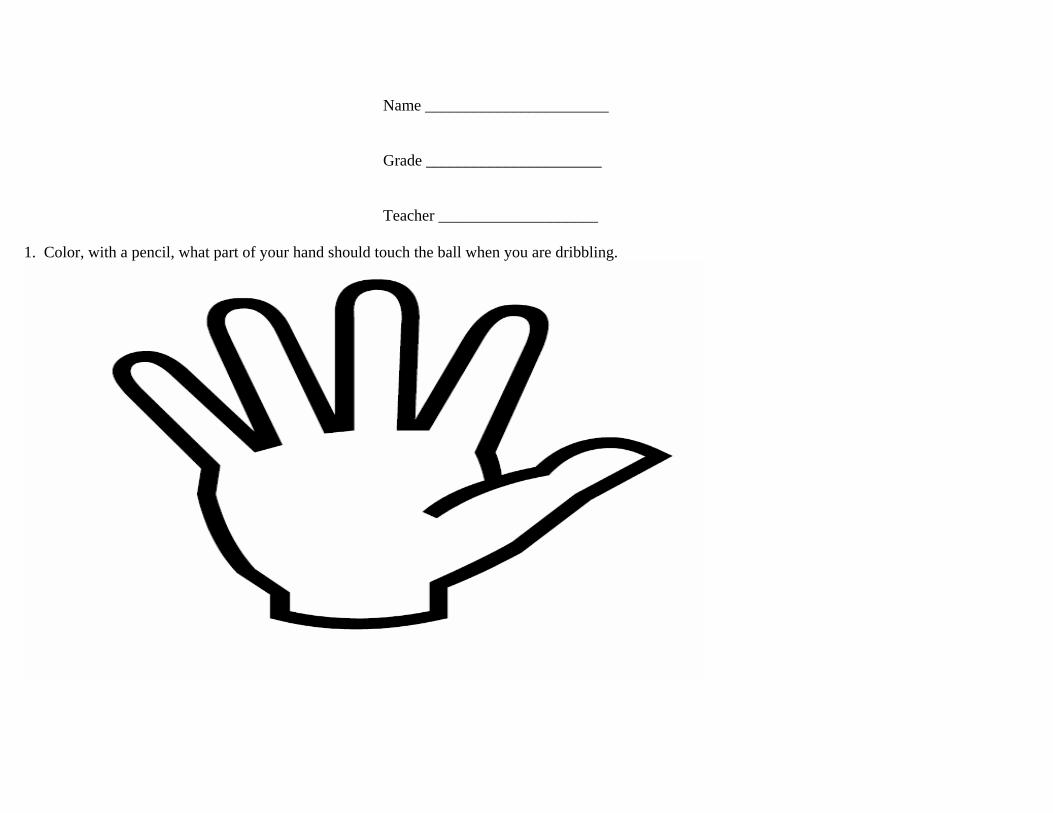
Closure/Assessment I want you to show me what you have learned in class today. To do this I will give you a handprint. Your job is to shade with a pencil, in the areas of the hand that we use to dribble.

Name __Answer Key___________ Grade ______________________ Teacher ____________________
1. Color, with a pencil, what part of your hand should touch the ball when you are dribbling.
Name _______________________ Grade ______________________ Teacher ____________________
1. Color, with a pencil, what part of your hand should touch the ball when you are dribbling.
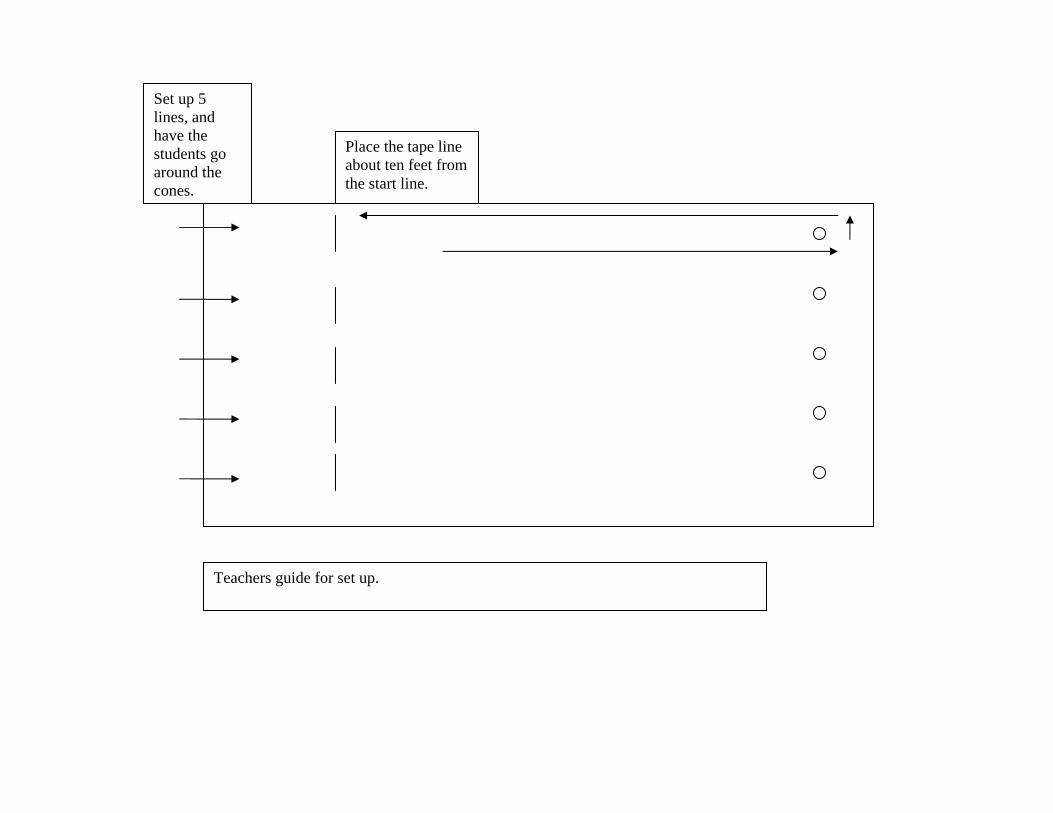
Place the tape line about ten feet from the start line.
Teachers guide for set up.
Set up 5 lines, and have the students go around the cones.
Physical Education Teacher Education Program Central Washington University
Beginning Dribbling Lesson # 11
Objectives (Specific, Behavioral, Assessable) A. Students
1. The student will be able to dribble a ball through their legs by keeping it close to their body. (EALR 1.1, 1.2, NASPE 1, 3) 2. The student will be able to dribble the ball around their back at least in one direction. (EALR 1.1, 1.2, NASPE 1, 3)
B. Teacher
Equipment: (for a class of 30 students)
o 30 Basketballs o 5 Hula hoop
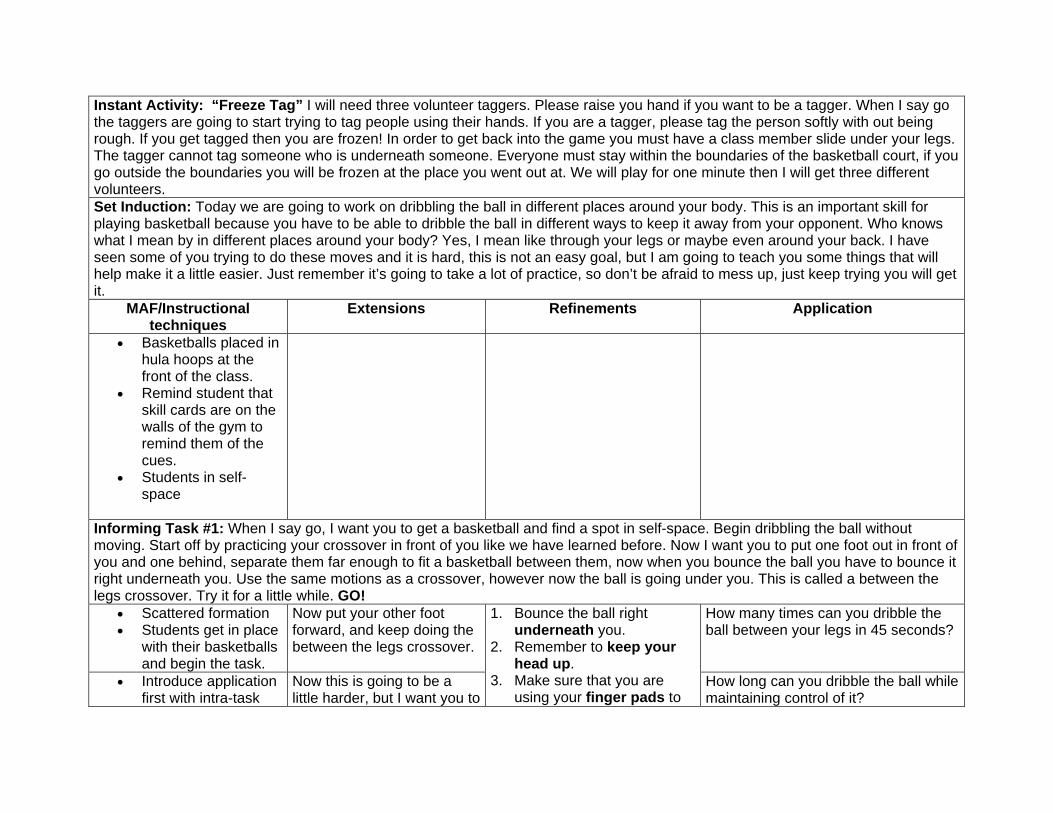
Instant Activity: “Freeze Tag” I will need three volunteer taggers. Please raise you hand if you want to be a tagger. When I say go the taggers are going to start trying to tag people using their hands. If you are a tagger, please tag the person softly with out being rough. If you get tagged then you are frozen! In order to get back into the game you must have a class member slide under your legs. The tagger cannot tag someone who is underneath someone. Everyone must stay within the boundaries of the basketball court, if you go outside the boundaries you will be frozen at the place you went out at. We will play for one minute then I will get three different volunteers. Set Induction: Today we are going to work on dribbling the ball in different places around your body. This is an important skill for playing basketball because you have to be able to dribble the ball in different ways to keep it away from your opponent. Who knows what I mean by in different places around your body? Yes, I mean like through your legs or maybe even around your back. I have seen some of you trying to do these moves and it is hard, this is not an easy goal, but I am going to teach you some things that will help make it a little easier. Just remember it’s going to take a lot of practice, so don’t be afraid to mess up, just keep trying you will get it.
MAF/Instructional techniques
Extensions Refinements Application
• Basketballs placed in hula hoops at the front of the class.
• Remind student that skill cards are on the walls of the gym to remind them of the cues.
• Students in self-space
Informing Task #1: When I say go, I want you to get a basketball and find a spot in self-space. Begin dribbling the ball without moving. Start off by practicing your crossover in front of you like we have learned before. Now I want you to put one foot out in front of you and one behind, separate them far enough to fit a basketball between them, now when you bounce the ball you have to bounce it right underneath you. Use the same motions as a crossover, however now the ball is going under you. This is called a between the legs crossover. Try it for a little while. GO!
• Scattered formation • Students get in place
with their basketballs and begin the task.
Now put your other foot forward, and keep doing the between the legs crossover.
How many times can you dribble the ball between your legs in 45 seconds?
• Introduce application first with intra-task
Now this is going to be a little harder, but I want you to
1. Bounce the ball right underneath you.
2. Remember to keep your head up.
3. Make sure that you are using your finger pads to
How long can you dribble the ball while maintaining control of it?

variation or teaching by invitation
start with your right foot forward, crossover between your legs, and then jump and switch your left leg forward. This is a hard task so keep trying it. You can get it.
dribble the ball. 4. Remember to keep your
hands to the side of the ball like you are doing a crossover.
Informing Task #2: Now that we started practicing a between the legs crossover, lets try it while walking. I want you to start walking and when I blow the whistle I want you to slow down and crossover between the legs, and keep dribbling. Remember to bounce the ball underneath you, and change directions.
• Look for students to pinpoint.
If you can try to crossover a little faster if you feel comfortable.
1. Bounce the ball right underneath you. 2. Remember to keep your head up. 3. Make sure that you are using your finger pads to dribble the ball. 4. Remember to keep your hands to the side of the ball like you are doing a crossover.
Closure/Assessment: · Where do you want to bounce the ball when doing a between the legs crossover? Right underneath you · Where on your hand should you be making contact with the ball when dribbling? On your finger pads
Physical Education Teacher Education Program Central Washington University
Beginning Dribbling Lesson # 12
Objectives (Specific, Behavioral, Assessable) A. Students
1. Students will be able to use all the cues that they have learn this far. (EALR 1.1, 1.2, NASPE 1, 3) 1. Push the ball towards the ground using finger pads 2. Keep your knees bent. 3. Make sure that your hand is always on top of the ball. 4. Keep your head up while dribbling.
2. Students will demonstrate the ability to keep the ball from getting stolen. (EALR 1.1, 1.2, NASPE 1, 3)
B. Teacher
Equipment: (for a class of 30 students)
o 30 Basketballs o 30 poly spot o 12 cones o Stereo
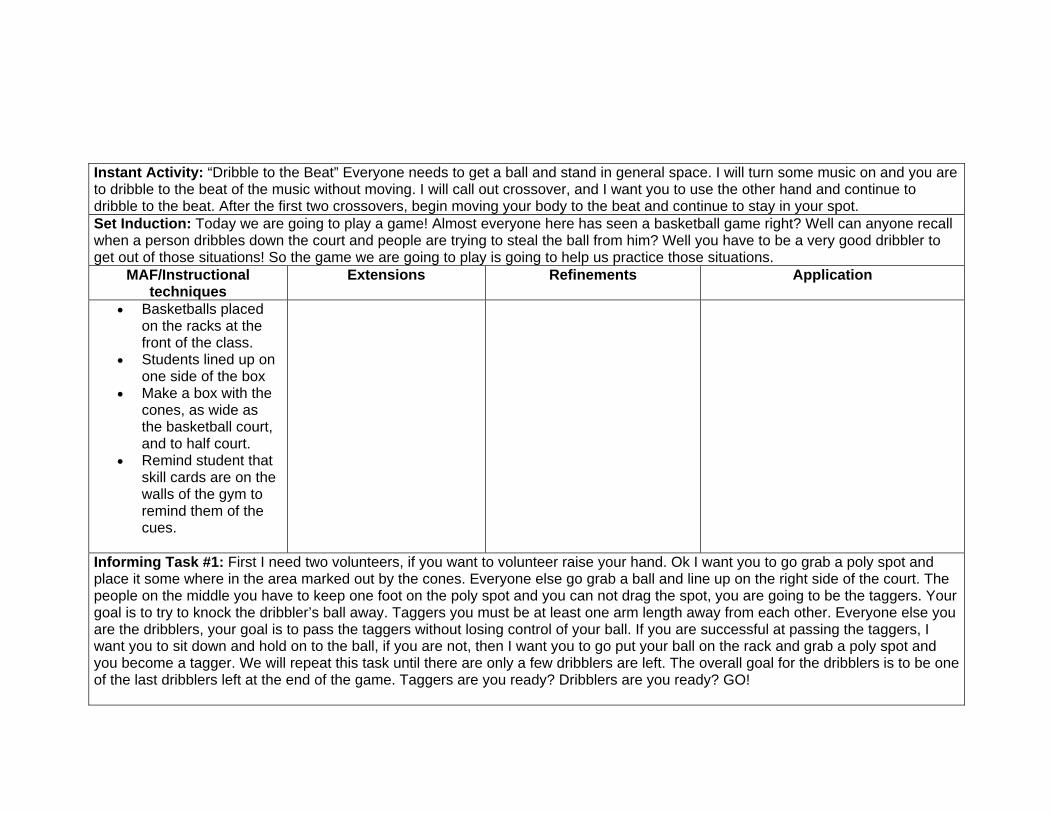
Instant Activity: “Dribble to the Beat” Everyone needs to get a ball and stand in general space. I will turn some music on and you are to dribble to the beat of the music without moving. I will call out crossover, and I want you to use the other hand and continue to dribble to the beat. After the first two crossovers, begin moving your body to the beat and continue to stay in your spot. Set Induction: Today we are going to play a game! Almost everyone here has seen a basketball game right? Well can anyone recall when a person dribbles down the court and people are trying to steal the ball from him? Well you have to be a very good dribbler to get out of those situations! So the game we are going to play is going to help us practice those situations.
MAF/Instructional techniques
Extensions Refinements Application
• Basketballs placed on the racks at the front of the class.
• Students lined up on one side of the box
• Make a box with the cones, as wide as the basketball court, and to half court.
• Remind student that skill cards are on the walls of the gym to remind them of the cues.
Informing Task #1: First I need two volunteers, if you want to volunteer raise your hand. Ok I want you to go grab a poly spot and place it some where in the area marked out by the cones. Everyone else go grab a ball and line up on the right side of the court. The people on the middle you have to keep one foot on the poly spot and you can not drag the spot, you are going to be the taggers. Your goal is to try to knock the dribbler’s ball away. Taggers you must be at least one arm length away from each other. Everyone else you are the dribblers, your goal is to pass the taggers without losing control of your ball. If you are successful at passing the taggers, I want you to sit down and hold on to the ball, if you are not, then I want you to go put your ball on the rack and grab a poly spot and you become a tagger. We will repeat this task until there are only a few dribblers are left. The overall goal for the dribblers is to be one of the last dribblers left at the end of the game. Taggers are you ready? Dribblers are you ready? GO!
• Students lined up along the side of the court
• Students get in place with their basketballs and begin the task.
•
This time, I want you to only use your right hand.
See if you can get through with out getting touched.
• Introduce application first with intra-task variation or teaching by invitation
Now you are going to have to dribble with only your left hand!
• Look for opportunities to use Positive Pinpointing.
This time you can dribble with whatever hand you want, but you must skip while dribbling the ball.
• Introduce application first with intra-task variation or teaching by invitation
You can still dribble with which ever hand you want, but you are going to gallop.
1. Try to keep your head up. Why would you want to keep your head up? Yes to see people so you don’t bump in to them, also to stay away from people who are trying to steal the ball. 2. Push the ball towards the ground using finger pads.
3. Remember to keep your hand on top of the ball. 4. Keep your knees bent
Closure/Assessment: • How many people made it across at least once? Good, a lot of you • What cues or methods did you use? Keep your head up to go around the taggers • Can we name off the cues? Figure pads, hand on top of the ball, knees bent, and keep your head up.

Taggers
Dribblers start on one side and try to make it to the other side without losing control of the ball
If the dribblers lose control then they become taggers.
After adding new taggers, have the remaining dribblers try to return to the other side. Continue this until only a few dribblers are left.
Physical Education Teacher Education Program Central Washington University
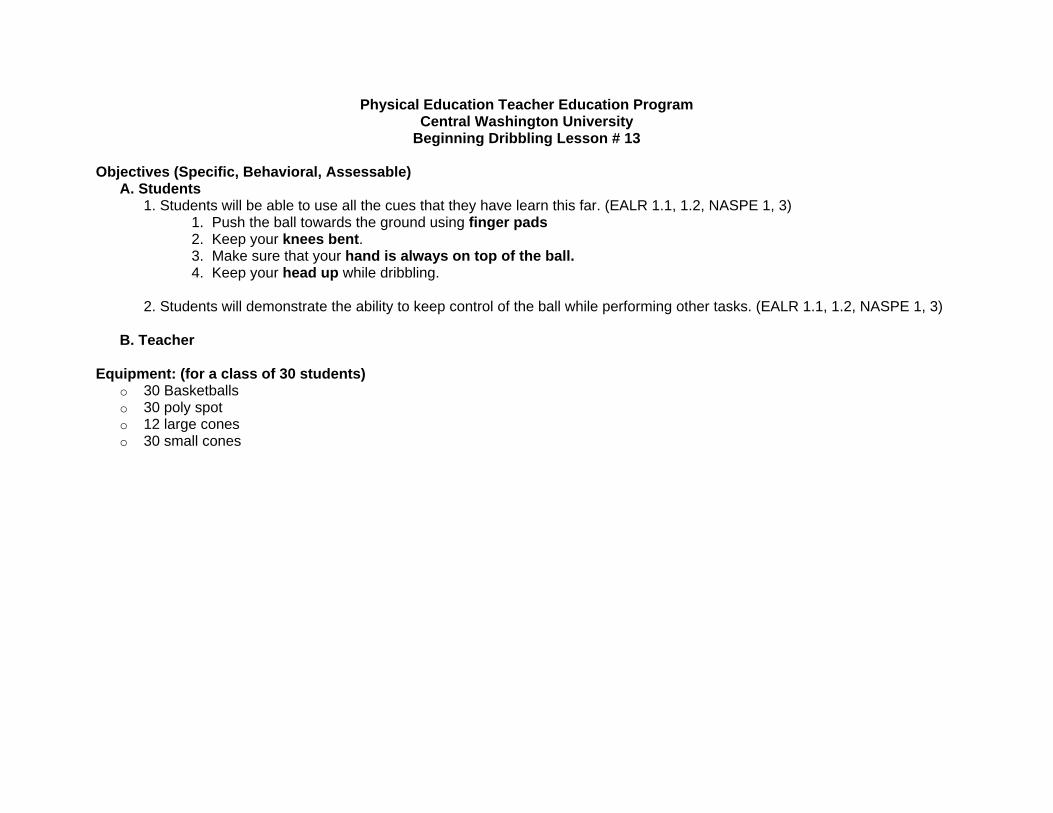
Beginning Dribbling Lesson # 13
Objectives (Specific, Behavioral, Assessable) A. Students
1. Students will be able to use all the cues that they have learn this far. (EALR 1.1, 1.2, NASPE 1, 3) 1. Push the ball towards the ground using finger pads 2. Keep your knees bent. 3. Make sure that your hand is always on top of the ball. 4. Keep your head up while dribbling.
2. Students will demonstrate the ability to keep control of the ball while performing other tasks. (EALR 1.1, 1.2, NASPE 1, 3)
B. Teacher
Equipment: (for a class of 30 students)
o 30 Basketballs o 30 poly spot o 12 large cones o 30 small cones

Instant Activity: “Verb Dribble” Everyone will need a ball. When I say “Go,” you will begin to dribble standing in your own spot. I will then call out a verb, an example would be “walk”, and however I can say stuff like, run, jog, skip, gallop or walk backwards. You will stop dribbling put the ball under your arm and do the verb that I call out. When I say stop, stop moving and begin dribbling the ball in your own spot again. We will continue this rotation until I blow the whistle. Set Induction: Today we are going to continue to practice the moves that we have learned this far. Let’s review the stuff that we learned. The first day we practiced using what part of our hands? (finger tips) Good and we were standing still right? (yup) Next we learned how to? (Crossover, while standing still) Good. Then we starting dribbling while…? (We were moving) that’s right! And we practice a bunch of different methods right? (yup) And of course we worked on the moving crossover next. So today, we are going to try and put all of those tasks together!
MAF/Instructional techniques
Extensions Refinements Application
• Remind student that skill cards are on the walls of the gym to remind them of the cues.
• Basketballs placed on the racks at the front of the class.
• Make a box with the large cones, as wide as the basketball court, and to half court.
Informing Task #1: As you can see, I already have the boundaries marked with the big cones. Now I need two volunteers to raise your hand quickly, ok you two were the first two. I need you to grab those small cones and go scatter them out through out the play area, try to put them far from each other. While they are doing that, I need everyone to find a partner quickly. Ok one person is going to be Player A, and the other is going to be Player B. All the A’s come over here; all the B’s stand over there. Team A your team is going to be trying to knock all the cones down, team B you are going to be picking them up. You can only use your hand to pick up or knock down the cones. You are only going to have a short time, so be quick. Remember!! To keep your head up so you don’t run into anyone.
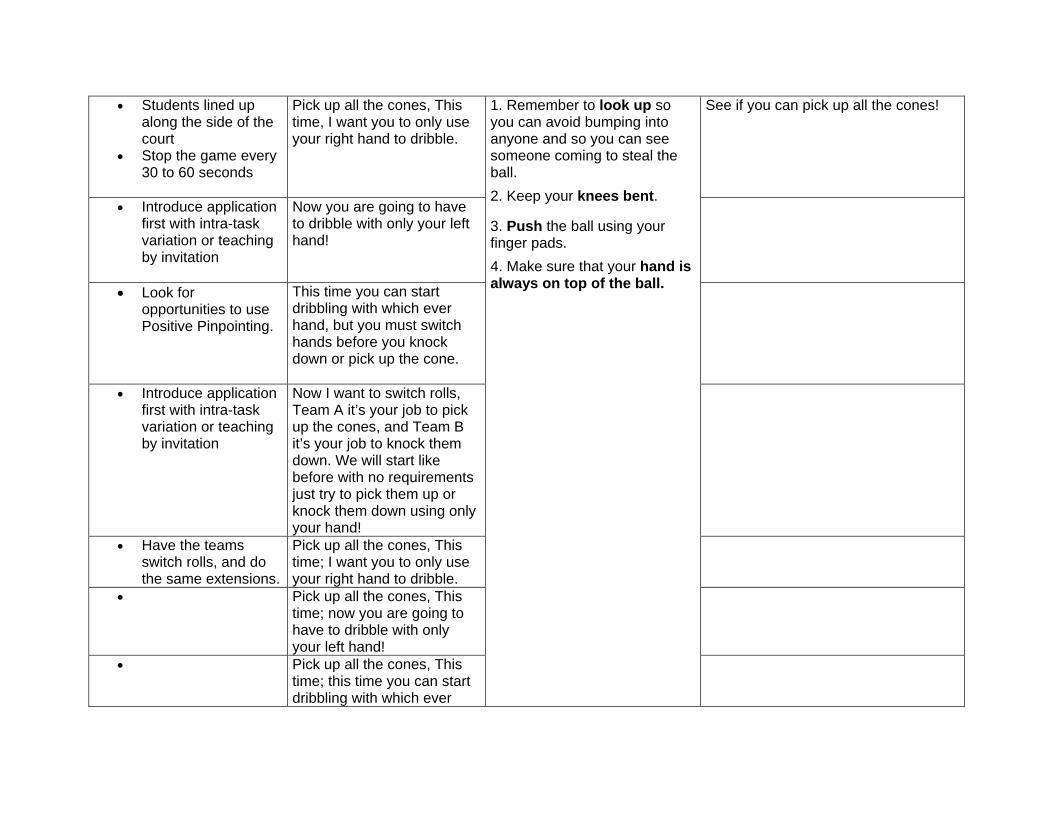
• Students lined up along the side of the court
• Stop the game every 30 to 60 seconds
Pick up all the cones, This time, I want you to only use your right hand to dribble.
See if you can pick up all the cones!
• Introduce application first with intra-task variation or teaching by invitation
Now you are going to have to dribble with only your left hand!
• Look for opportunities to use Positive Pinpointing.
This time you can start dribbling with which ever hand, but you must switch hands before you knock down or pick up the cone.
• Introduce application first with intra-task variation or teaching by invitation
Now I want to switch rolls, Team A it’s your job to pick up the cones, and Team B it’s your job to knock them down. We will start like before with no requirements just try to pick them up or knock them down using only your hand!
• Have the teams switch rolls, and do the same extensions.
Pick up all the cones, This time; I want you to only use your right hand to dribble.
• Pick up all the cones, This time; now you are going to have to dribble with only your left hand!
• Pick up all the cones, This time; this time you can start dribbling with which ever
1. Remember to look up so you can avoid bumping into anyone and so you can see someone coming to steal the ball. 2. Keep your knees bent.
3. Push the ball using your finger pads. 4. Make sure that your hand is always on top of the ball.
hand, but you must switch hands before you knock down or pick up the cone.
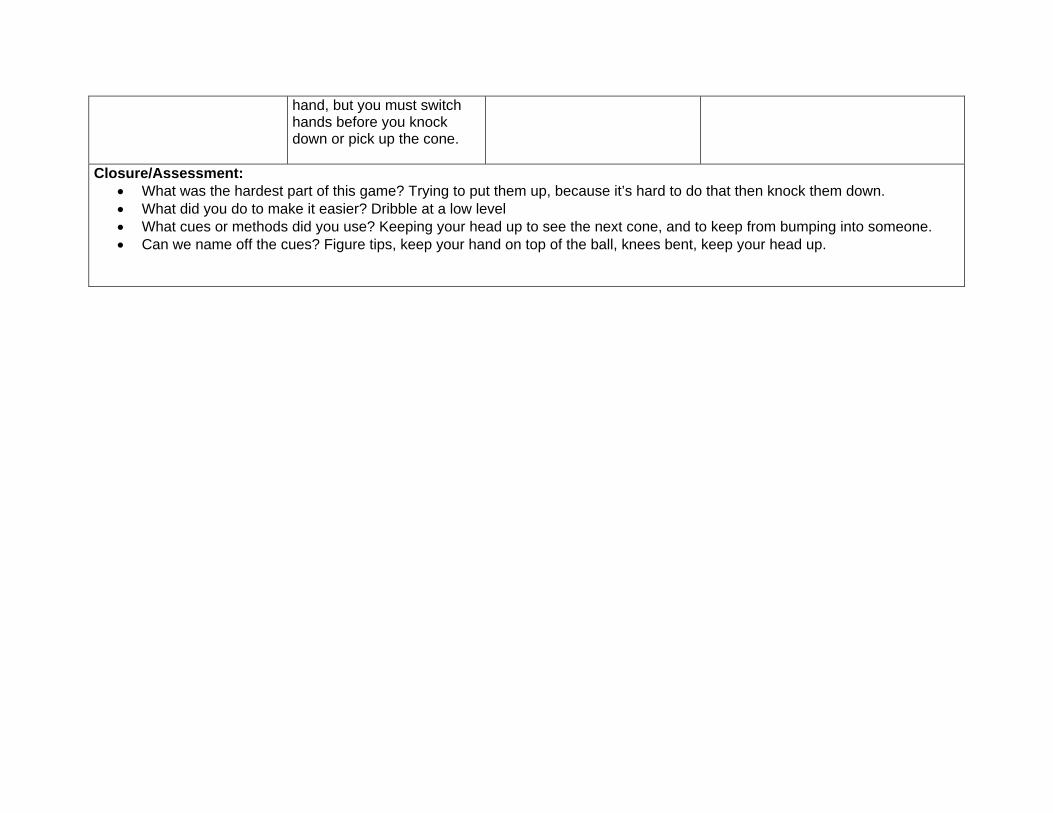
Closure/Assessment: • What was the hardest part of this game? Trying to put them up, because it’s hard to do that then knock them down. • What did you do to make it easier? Dribble at a low level • What cues or methods did you use? Keeping your head up to see the next cone, and to keep from bumping into someone. • Can we name off the cues? Figure tips, keep your hand on top of the ball, knees bent, keep your head up.
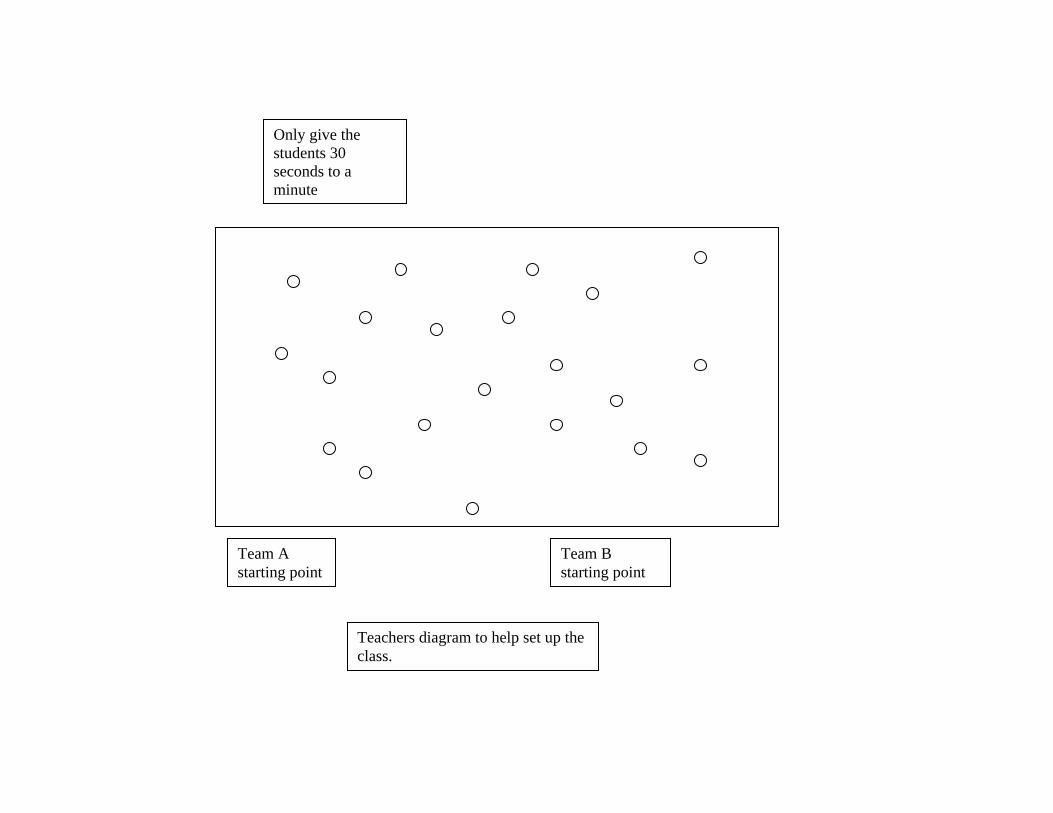
Team A starting point
Team B starting point
Only give the students 30 seconds to a minute
Teachers diagram to help set up the class.

Physical Education Teacher Education Program Central Washington University
Beginning Dribbling Lesson # 14
Objectives (Specific, Behavioral, Assessable) A. Students
1. Students will be able demonstrate dribbling in a mature manner while in a game like situation. (EALR 1.1, 1.2, NASPE 1, 3) 2. Students will demonstrate the ability to keep control of the ball and head up in a game like situation. (EALR 1.1, 1.2,
NASPE 1, 3) B. Teacher
Equipment: (for a class of 30 students)
o 3 Basketballs o 15 blue colored jerseys o 15 red colored jerseys o 2 Large cones o A stop watch

Instant Activity: “Freeze Tag” I will need three volunteer taggers. Please raise you hand if you want to be a tagger. When I say go the taggers are going to start trying to tag people using their hands. If you are a tagger, please tag the person softly with out being rough. If you get tagged then you are frozen! In order to get back into the game you must have a class member slide under your legs. The tagger cannot tag someone who is underneath someone. Everyone must stay within the boundaries of the basketball court, if you go outside the boundaries you will be frozen at the place you went out at. We will play for one minute then I will get three different volunteers. Set Induction: Let’s imagine we are watching a basketball game, what are some of the things that the players have to do? (Dribble, shoot, pass, play defense, block people) Good that’s a lot of things a basketball player has to think about. Well today we are going to practice in a game like situation just like we imagined! However instead of worrying about those other things, just concentrate on protecting the ball, and keeping it under control, just like we have been practicing and lets have some fun.
MAF/Instructional techniques
Extensions Refinements Application
• Remind student that skill cards are on the walls of the gym to remind them of the cues.
• Place two basketballs on the racks at the front of the class.
• Put the two large cones at the corner of half court and the side lines, on each side.
• All fouls are inbound throws, no free throws.
Informing Task #1: The first thing we need to do is partner up. One person is going to be an A, and the other is going to be a B. All the A’s go and get a blue jersey, all the B’s go get a red jersey. Now I want you to line up behind the cones, A’s are here and B’s are over there. When lining up make it boy-girl-boy-girl. Now the first 5 people from each line come out to the court, We are going to play a basketball game, blue is going this way, red is going that way. After each basket is scored or 30 seconds go by the players on the court will come off, and then the next 5 players will come in. Before the new 5 players can come in, the 5 old players must run back here and touch the cone! No one can leave till everyone has touched the cone. If your team scores a basket, it’s the other teams ball. If time runs out, then it will still be your team’s ball. Everyone must be paying attention or you might be playing with only 3 players.
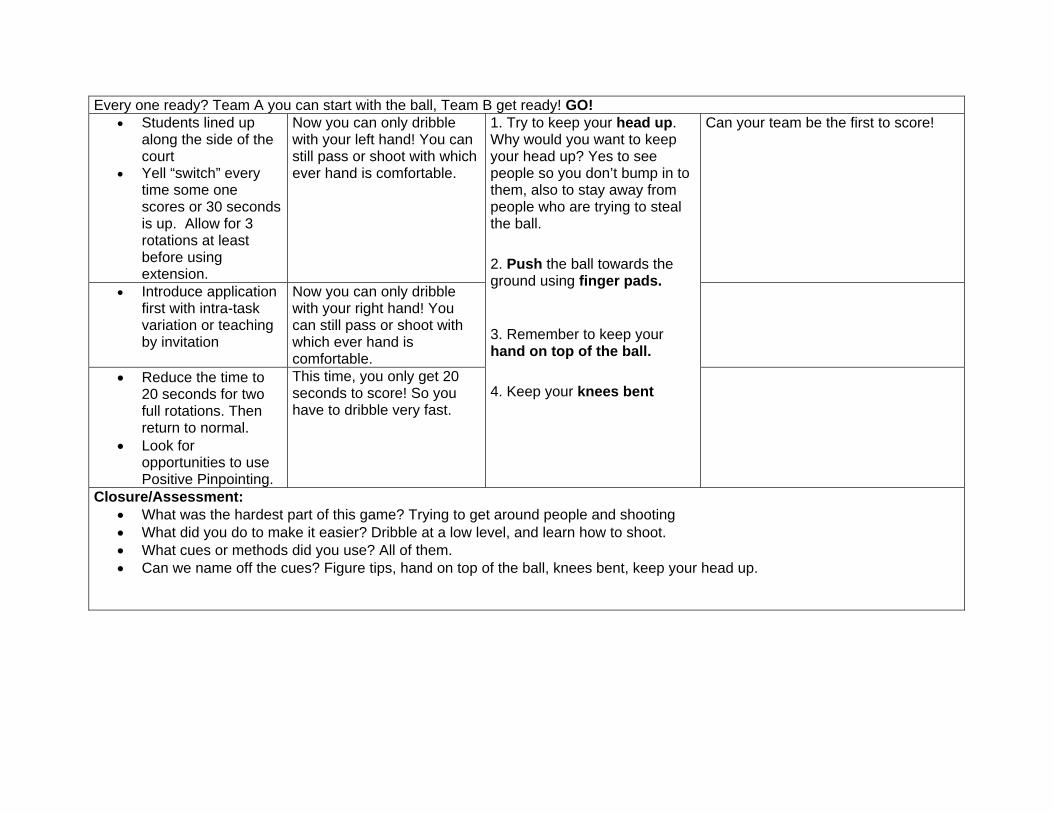
Every one ready? Team A you can start with the ball, Team B get ready! GO! • Students lined up
along the side of the court
• Yell “switch” every time some one scores or 30 seconds is up. Allow for 3 rotations at least before using extension.
Now you can only dribble with your left hand! You can still pass or shoot with which ever hand is comfortable.
Can your team be the first to score!
• Introduce application first with intra-task variation or teaching by invitation
Now you can only dribble with your right hand! You can still pass or shoot with which ever hand is comfortable.
• Reduce the time to 20 seconds for two full rotations. Then return to normal.
• Look for opportunities to use Positive Pinpointing.
This time, you only get 20 seconds to score! So you have to dribble very fast.
1. Try to keep your head up. Why would you want to keep your head up? Yes to see people so you don’t bump in to them, also to stay away from people who are trying to steal the ball. 2. Push the ball towards the ground using finger pads.
3. Remember to keep your hand on top of the ball. 4. Keep your knees bent
Closure/Assessment: • What was the hardest part of this game? Trying to get around people and shooting • What did you do to make it easier? Dribble at a low level, and learn how to shoot. • What cues or methods did you use? All of them. • Can we name off the cues? Figure tips, hand on top of the ball, knees bent, keep your head up.
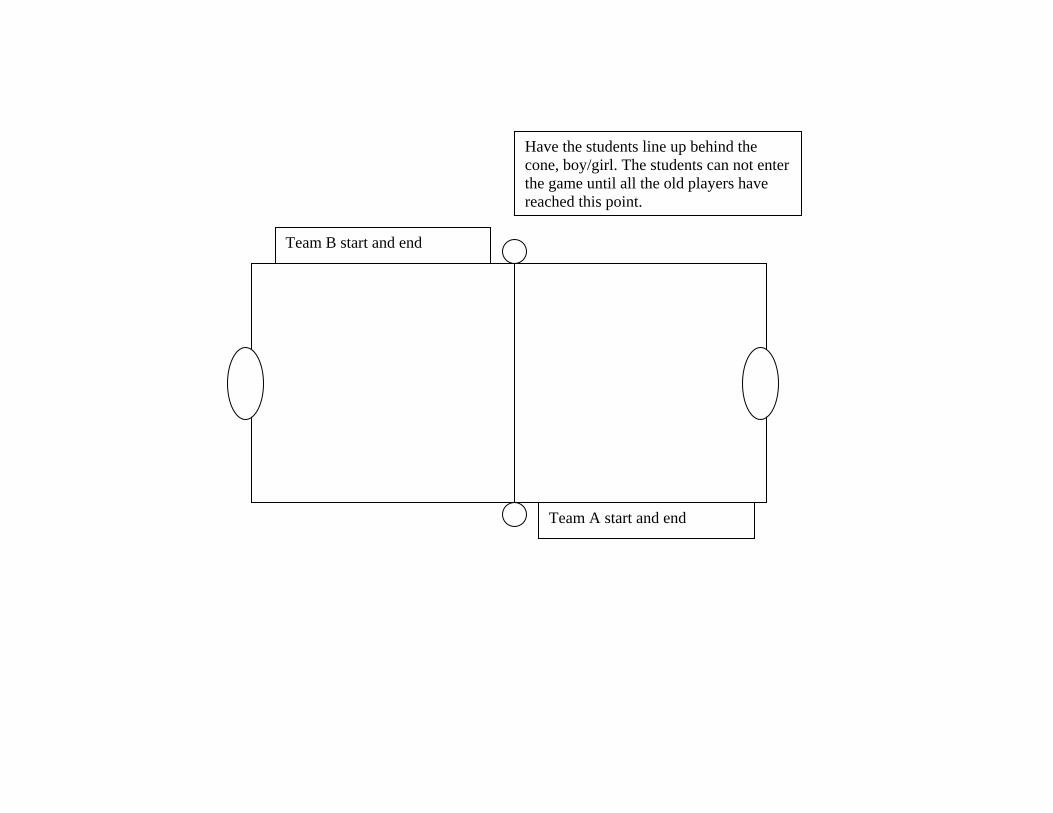
Team B start and end
Team A start and end
Have the students line up behind the cone, boy/girl. The students can not enter the game until all the old players have reached this point.
Physical Education Teacher Education Program Central Washington University
Beginning Dribbling Lesson #15 Objectives (Specific, Behavioral, Assessable)
A. Student 1. The student will be able to verbally describe the keys to dribbling. (EALR 1.1, 1.2, NASPE 1, 3)
a. Push the ball towards the ground using finger pads b. Keep your knees bent. c. Make sure that your hand is always on top of the ball. d. Keep your head up while dribbling.
2. The student will be able to demonstrate a mature manner of dribbling. (EALR 1.1, 1.2, NASPE 1, 3) B. Teacher Equipment: (for a class of 30 students)
o 30 basketballs o 30 Partner assessment worksheet o 30 Pencils o Radio o 14 Cones

Instant Activity: “Dribble to the Beat” Everyone needs to get a ball and stand in general space. I will turn some music on and you are to dribble to the beat of the music without moving. I will call out crossover, and I want you to use the other hand and continue to dribble to the beat. After the first two crossovers, begin moving your body to the beat and continue to stay in your spot. Set Induction: You all have been introduced to the skill of dribbling. You have also been introduced to moving and dribbling. This is important in the event of getting down the basketball court successfully while still have possession of the ball. We have learned to dribble at different levels, and to travel in different pathways, as well as in different speeds. While we were learning to dribble I kept telling you things to remember, can someone raise their hand and tell me one of those things? Good, dribble using your finger pads. Yes, that’s very important too, to keep your head up. Good, Keep your knees bent. And the last one, good push the ball straight down. Today we are going to put these altogether and you are going to partner up and evaluate each other. I want you to partner up and one of you comes get a paper and a pencil.
MAF/Instructional techniques
Extensions Refinements Applications
• Partner #1 in single file line. Partner #2 observing partner #1. Partner #1 holding a ball.
• Assessment sheet for each student
Informing Task: When I say “Go,” partner #1 dribbles forward (walking) around the orange cone and back to the end of the line. The next player in line repeats the task. Partner #2 is to observe partner #1 and complete the worksheet, focusing solely on the different height levels partner #1 is dribbling at. First try a medium dribble. Watch for the dribbler to use finger pads and keep the ball at waist high.
Remind student that skill cards are on the walls of the gym to remind them of the cues.
Students switch roles. Partner #2 performs while partner #1 evaluates.
Now the dribbler is going to try and dribble at a HIGH level.
Partner #2 counts how many times partner #1 looks down to completes this task one time. Record this on the worksheet.
• Students switch roles. Partner #1 performs while partner #2 evaluates.
Now the dribbler is going to dribble at a LOW level.
1. Push the ball towards the ground using finger pads 2. Keep your knees bent. 3. Make sure that your hand is always on top of the ball. 4. Keep your head up while dribbling.
Partner #1 counts how many times partner #2 looks down to completes this task one time. Record this on the worksheet.
See if you can make it without losing control of the ball.
Informing Task #2: We are now going to combine dribbling, moving, and a crossover into one task. There will be three lines and six cones will be positioned about eight feet apart. The players at the head of the lines start off and then come back to the end of the line when complete. You are going to zig-zag through the cones, keeping the ball away from the cones by switching hands. I want you to start of walking and dribbling. Take turns completing this task until I say “Stop.”
• Bring students back together for explanation. They are lined up in three single file line at one end line of the gym.
Once you come up to a cone, crossover to the other hand and keep your eyes up.
Can you complete the obstacle course without losing control of your ball?
• Introduce the extension via intra-task variation.
Try getting through the obstacles while switching hands and jogging.
Can you get through the obstacle course in less than 30 seconds?
•. Look for opportunities to use positive pinpointing.
1. Push the ball towards the ground using finger pads 2. Keep your knees bent. 3. Make sure that your hand is always on top of the ball. 4. Keep your head up while dribbling.
Can you use tall dribbles to get through the obstacle course this time?
Closure/Assessment: Everyone get into pairs of 2. Now one of you will be partner #1 and the other will be #2. Decide now which numbers you will be. Now partner #1 tell your partner one cue that you used today. Now partner #2 tell your partner one cue that you learned today. Good who can raise your hand and tell me one? Good they are, a. Push the ball towards the ground using finger pads b. Keep your knees bent. c. Make sure that your hand is always on top of the ball. d. Keep your head up while dribbling.
Start of line
To the end of the line
Put the cones about 8 feet apart
Mark out enough for 3 lines
Task 2
Task 1
Start of line
Partner watches and evaluates the dribbler
Name_______________ Teacher______________ Grade_______________
Partner’s name_______________________ Circle yes or no after watching your partner dribble. Can your partner dribble Low?
YES NO Can your partner dribble Medium?
YES NO
Can your partner dribble High?
YES NO
Physical Education Teacher Education Program Central Washington University
Volleying Non-continuously Lesson #1
Objectives: (Specific, Behavioral, Assessable) Students
1. The student will be able to verbally describe the keys to volleying a balloon non-continuously. (EALR 1.1, 1.2 NASPE 1, 3) 2. The student will be able to demonstrate the proper technique for volleying. (EALR 1.1,1.2 NASPE 1, 3)
a. Exhibiting the use of a flat surface. b. Watching the balloon hit the volleying surface. c. Keep knees bent and feet shoulder width apart.
Teacher Equipment: (for a class of 30 students)
o 1 Volleyball o 40 Balloons o 8 Cones for boundaries o 5 Nerf Frisbees o 5 Foam balls o 1 Bucket
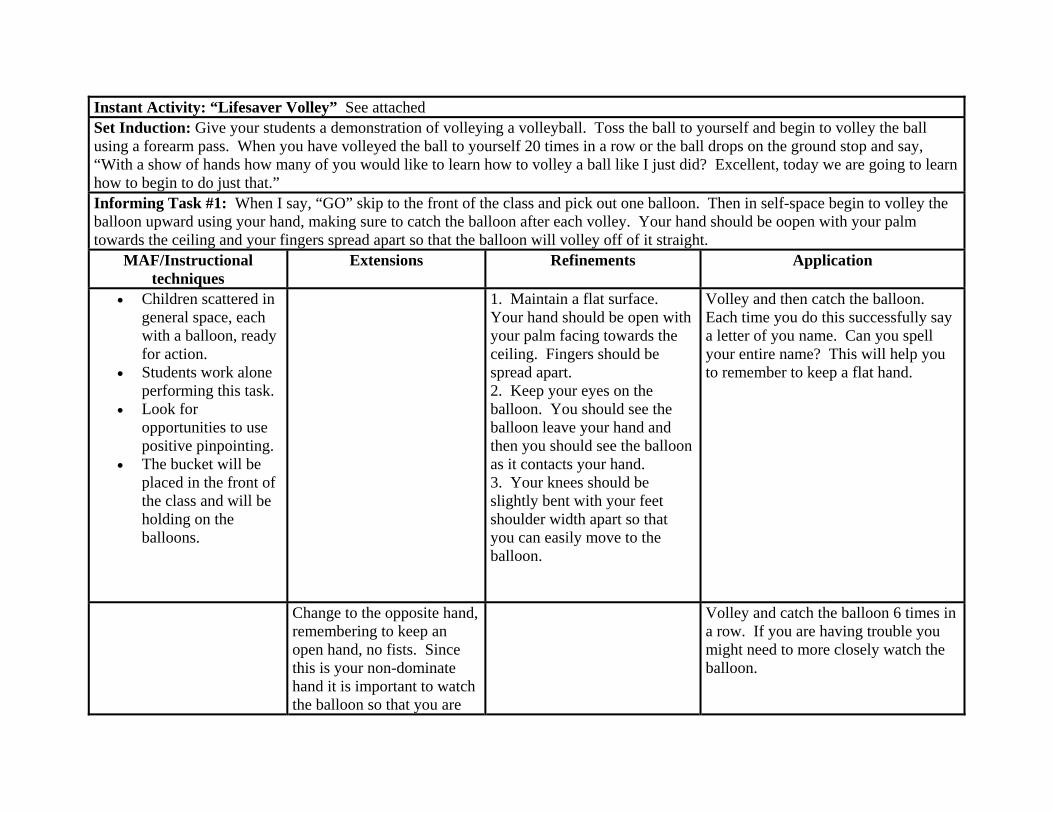
Instant Activity: “Lifesaver Volley” See attached Set Induction: Give your students a demonstration of volleying a volleyball. Toss the ball to yourself and begin to volley the ball using a forearm pass. When you have volleyed the ball to yourself 20 times in a row or the ball drops on the ground stop and say, “With a show of hands how many of you would like to learn how to volley a ball like I just did? Excellent, today we are going to learn how to begin to do just that.” Informing Task #1: When I say, “GO” skip to the front of the class and pick out one balloon. Then in self-space begin to volley the balloon upward using your hand, making sure to catch the balloon after each volley. Your hand should be oopen with your palm towards the ceiling and your fingers spread apart so that the balloon will volley off of it straight.
MAF/Instructional techniques
Extensions Refinements Application
• Children scattered in general space, each with a balloon, ready for action.
• Students work alone performing this task.
• Look for opportunities to use positive pinpointing.
• The bucket will be placed in the front of the class and will be holding on the balloons.
1. Maintain a flat surface. Your hand should be open with your palm facing towards the ceiling. Fingers should be spread apart. 2. Keep your eyes on the balloon. You should see the balloon leave your hand and then you should see the balloon as it contacts your hand. 3. Your knees should be slightly bent with your feet shoulder width apart so that you can easily move to the balloon.
Volley and then catch the balloon. Each time you do this successfully say a letter of you name. Can you spell your entire name? This will help you to remember to keep a flat hand.
Change to the opposite hand, remembering to keep an open hand, no fists. Since this is your non-dominate hand it is important to watch the balloon so that you are
Volley and catch the balloon 6 times in a row. If you are having trouble you might need to more closely watch the balloon.

able to volley it properly. Now, try volleying using
either open hand without catching the balloon. By keeping a flat open hand it will make the balloon less likely to go off in a crazy direction. You also must really watch the balloon well since you are not catching the balloon in-between volleys.
How many volleys can you complete without dropping or catching the balloon? Keeping a flat open hand and your eye on the balloon will increase the number of volleys you will be able to make in a row.
Informing Task #2: This time when I say, “GO” in the same self-space volley the balloon upward using your foot and catch the balloon between each volley. Your toes should be pointed towards the ceiling with your foot straight. Now volley with the
opposite foot. Since this is your non-dominate foot it is important to watch the balloon so that you are able to volley it properly.
1. Maintain a flat surface. Your toes should be pointed towards the ceiling and your foot should be straight. 2. Keep your eyes on the balloon. You should see the balloon leave your hand and then you should see the balloon as it contacts your foot. 3. Your knees should be slightly bent with your feet shoulder width apart so that you can easily move to the balloon.
Can you volley and catch 8 times in a row using your foot? This will help you to work on keeping your foot straight and your toes to the ceiling.
Next volley the balloon using either of your feet without catching the balloon. This will help you to work
How many times can you volley the balloon using your feet without the balloon touching the floor or catching it? Make sure that your knees are bent
on your movement as well as making sure that your eyes are focused on the balloon.
so that you can easily move to the ball.
Closure/Assessment: Show me what kind of surface you want to volley a balloon with if you are using your hand. Now show me what your foot will look like if you were going to volley using it. Raise your hand and tell me what you should keep your eyes focused on and why.
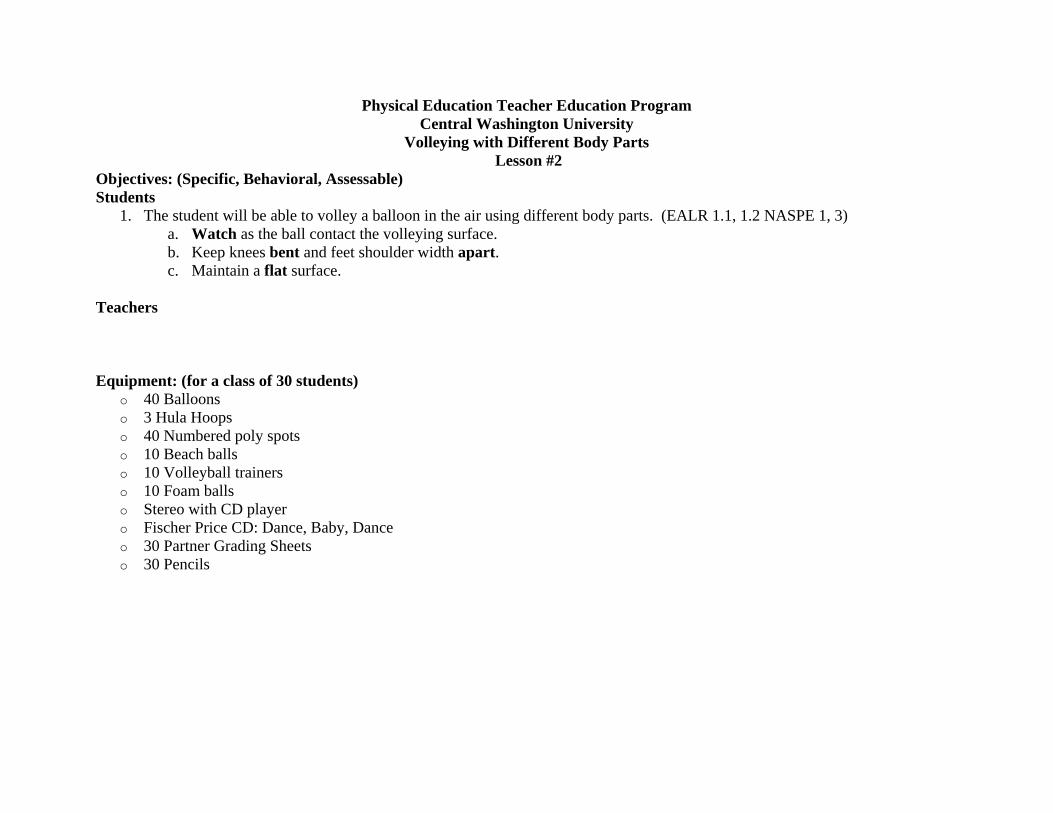
Physical Education Teacher Education Program Central Washington University
Volleying with Different Body Parts Lesson #2
Objectives: (Specific, Behavioral, Assessable) Students
1. The student will be able to volley a balloon in the air using different body parts. (EALR 1.1, 1.2 NASPE 1, 3) a. Watch as the ball contact the volleying surface. b. Keep knees bent and feet shoulder width apart. c. Maintain a flat surface.
Teachers Equipment: (for a class of 30 students)
o 40 Balloons o 3 Hula Hoops o 40 Numbered poly spots o 10 Beach balls o 10 Volleyball trainers o 10 Foam balls o Stereo with CD player o Fischer Price CD: Dance, Baby, Dance o 30 Partner Grading Sheets o 30 Pencils
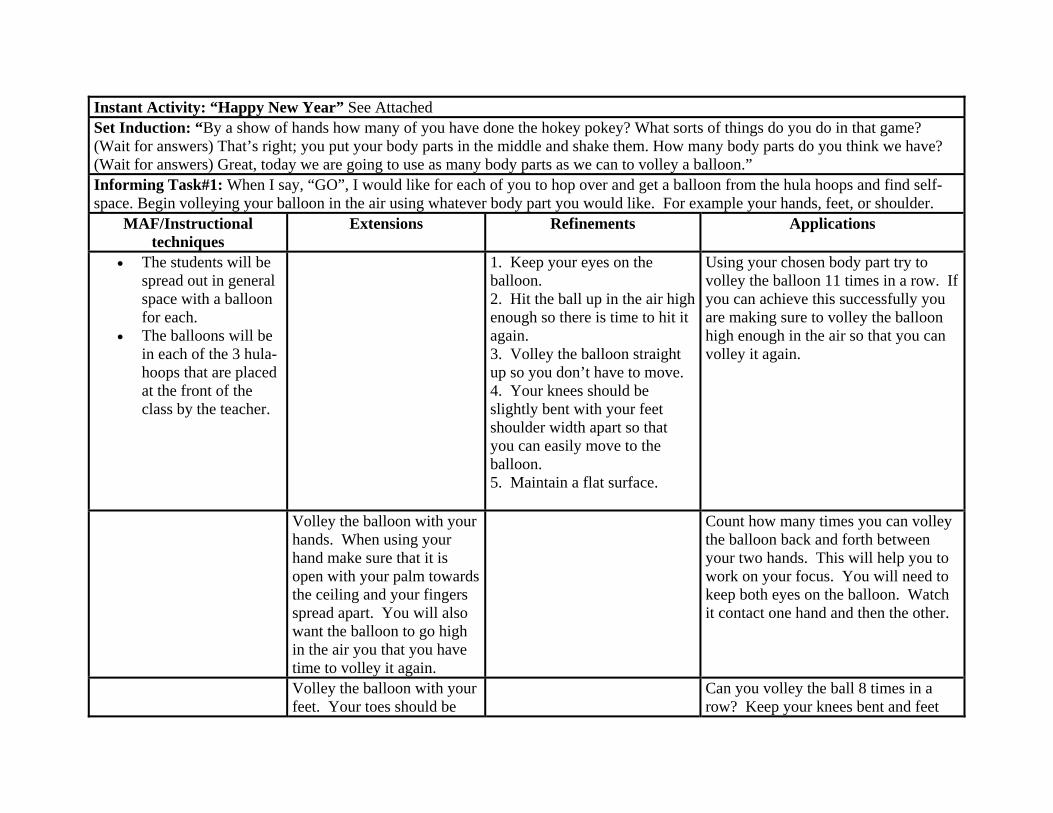
Instant Activity: “Happy New Year” See Attached Set Induction: “By a show of hands how many of you have done the hokey pokey? What sorts of things do you do in that game? (Wait for answers) That’s right; you put your body parts in the middle and shake them. How many body parts do you think we have? (Wait for answers) Great, today we are going to use as many body parts as we can to volley a balloon.” Informing Task#1: When I say, “GO”, I would like for each of you to hop over and get a balloon from the hula hoops and find self-space. Begin volleying your balloon in the air using whatever body part you would like. For example your hands, feet, or shoulder.
MAF/Instructional techniques
Extensions Refinements Applications
• The students will be spread out in general space with a balloon for each.
• The balloons will be in each of the 3 hula-hoops that are placed at the front of the class by the teacher.
1. Keep your eyes on the balloon. 2. Hit the ball up in the air high enough so there is time to hit it again. 3. Volley the balloon straight up so you don’t have to move. 4. Your knees should be slightly bent with your feet shoulder width apart so that you can easily move to the balloon. 5. Maintain a flat surface.
Using your chosen body part try to volley the balloon 11 times in a row. If you can achieve this successfully you are making sure to volley the balloon high enough in the air so that you can volley it again.
Volley the balloon with your hands. When using your hand make sure that it is open with your palm towards the ceiling and your fingers spread apart. You will also want the balloon to go high in the air you that you have time to volley it again.
Count how many times you can volley the balloon back and forth between your two hands. This will help you to work on your focus. You will need to keep both eyes on the balloon. Watch it contact one hand and then the other.
Volley the balloon with your feet. Your toes should be
Can you volley the ball 8 times in a row? Keep your knees bent and feet

towards the ceiling when you contact the balloon.
shoulder width apart so that you can move to the balloon and keep your volley going.
Volley the balloon with your head. To do this the balloon should hit you on the forehead. Your eyes will really need to focus on the balloon so make sure to give yourself plenty of space.
How many times can you volley the balloon without dropping it? Ten, twenty, thirty times in a row? If this is hard make sure to really work on volley the balloon straight up and high so that you have plenty of time to volley the balloon again.
Volley the balloon using your thigh. Pretend you are sitting in a chair. That is what one of your legs should look like as you volley the balloon with your thigh.
Try to volley the balloon as many times as you have letters in your name. It will be very important to keep your knees bent and your feet shoulder width apart so that you may move to the balloon.
Informing Task #2: When I say, “GO” in self-space begin to create your own volleying combination using 4 different body parts. You may use the parts we have already practice or choose 4 new ones.
1. Keep your eyes on the balloon. 2. Hit the ball up in the air high enough so there is time to hit it again. 3. Volley the balloon straight up so you don’t have to move. 4. Your knees should be slightly bent with your feet shoulder width apart so that you can easily move to the balloon. 5. Maintain a flat surface.
Practice your combination three times in a row. Remember to volley the balloon high between each body part so that you have time to volley the balloon again.
Informing Task #3: When I say, “Go” you have 5 seconds to partner up with the person next to you. The shortest person is #1 and the
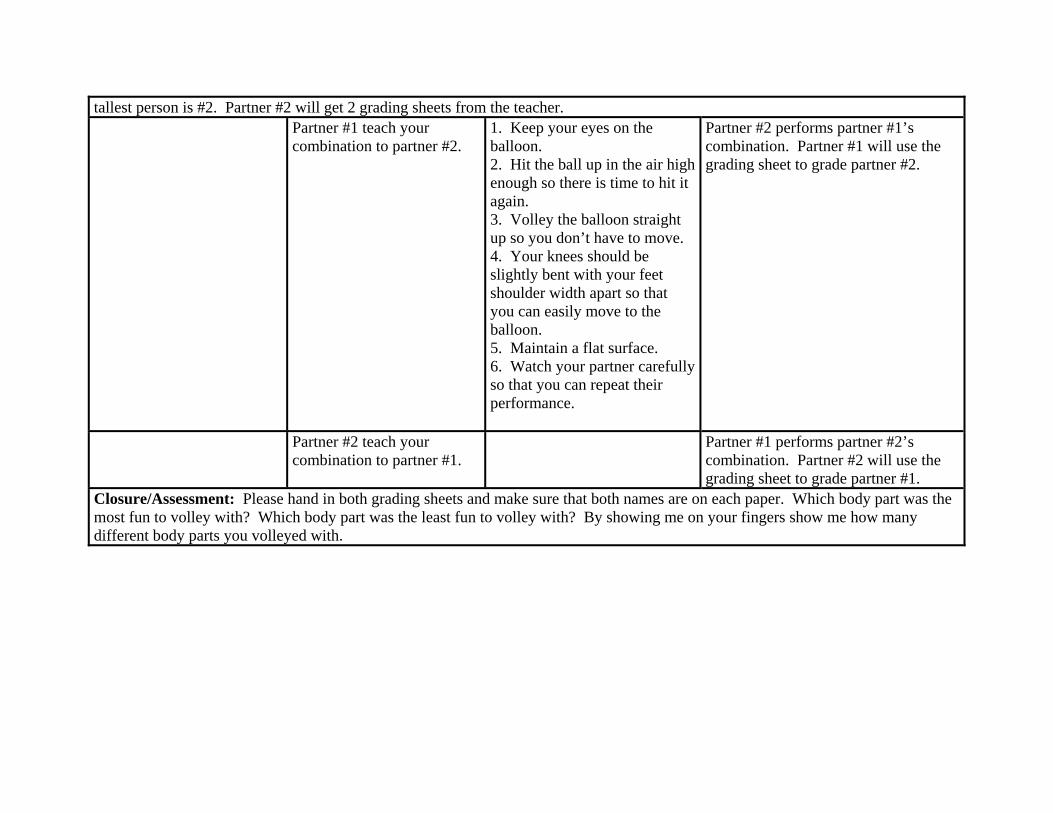
tallest person is #2. Partner #2 will get 2 grading sheets from the teacher. Partner #1 teach your
combination to partner #2. 1. Keep your eyes on the balloon. 2. Hit the ball up in the air high enough so there is time to hit it again. 3. Volley the balloon straight up so you don’t have to move. 4. Your knees should be slightly bent with your feet shoulder width apart so that you can easily move to the balloon. 5. Maintain a flat surface. 6. Watch your partner carefully so that you can repeat their performance.
Partner #2 performs partner #1’s combination. Partner #1 will use the grading sheet to grade partner #2.
Partner #2 teach your combination to partner #1.
Partner #1 performs partner #2’s combination. Partner #2 will use the grading sheet to grade partner #1.
Closure/Assessment: Please hand in both grading sheets and make sure that both names are on each paper. Which body part was the most fun to volley with? Which body part was the least fun to volley with? By showing me on your fingers show me how many different body parts you volleyed with.
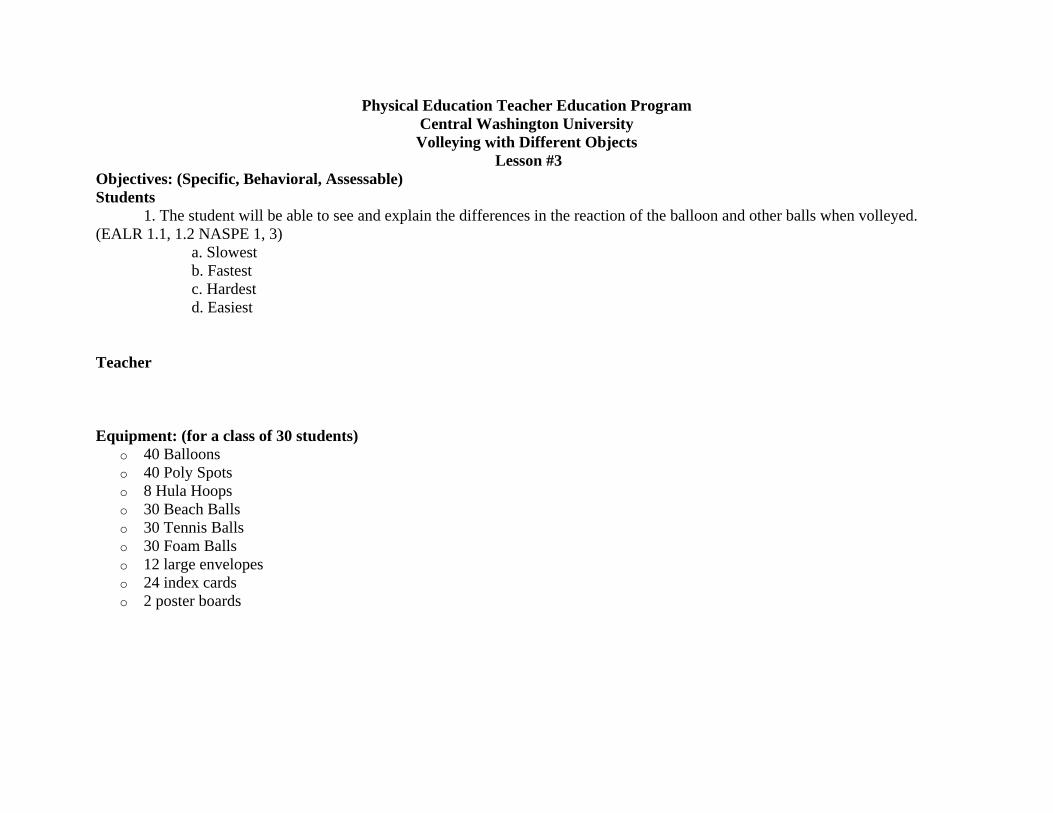
Physical Education Teacher Education Program Central Washington University Volleying with Different Objects
Lesson #3 Objectives: (Specific, Behavioral, Assessable) Students
1. The student will be able to see and explain the differences in the reaction of the balloon and other balls when volleyed. (EALR 1.1, 1.2 NASPE 1, 3)
a. Slowest b. Fastest c. Hardest d. Easiest
Teacher Equipment: (for a class of 30 students)
o 40 Balloons o 40 Poly Spots o 8 Hula Hoops o 30 Beach Balls o 30 Tennis Balls o 30 Foam Balls o 12 large envelopes o 24 index cards o 2 poster boards
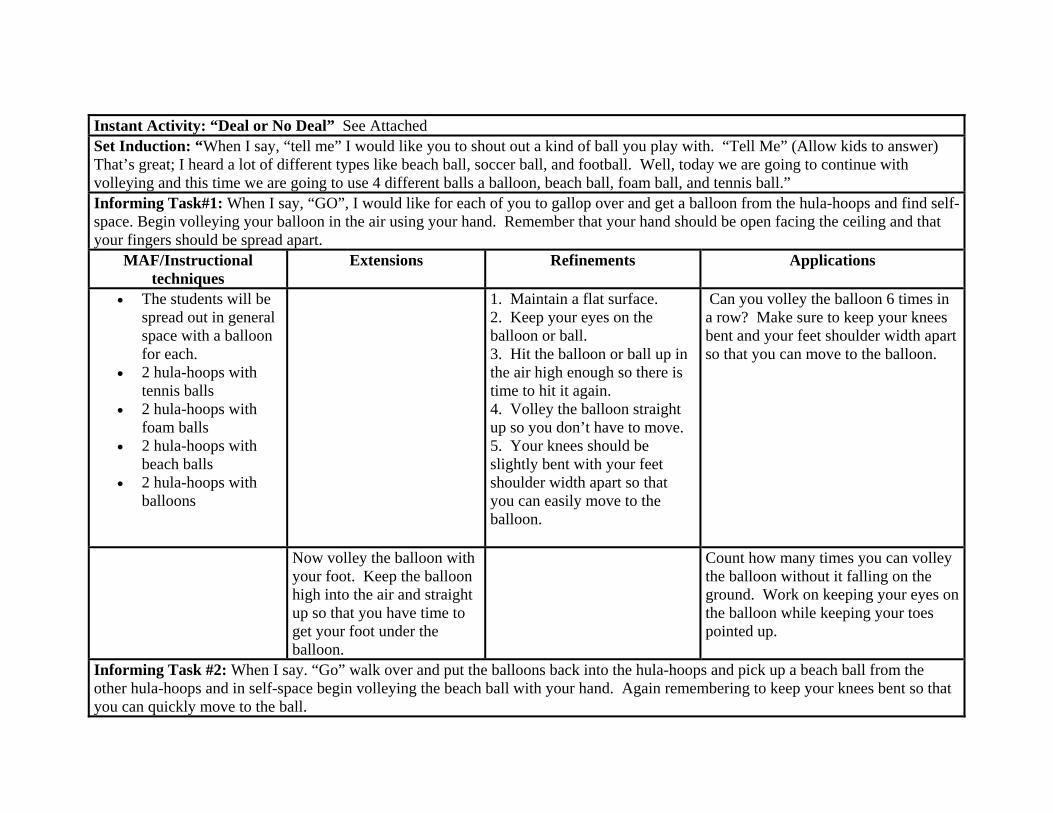
Instant Activity: “Deal or No Deal” See Attached Set Induction: “When I say, “tell me” I would like you to shout out a kind of ball you play with. “Tell Me” (Allow kids to answer) That’s great; I heard a lot of different types like beach ball, soccer ball, and football. Well, today we are going to continue with volleying and this time we are going to use 4 different balls a balloon, beach ball, foam ball, and tennis ball.” Informing Task#1: When I say, “GO”, I would like for each of you to gallop over and get a balloon from the hula-hoops and find self-space. Begin volleying your balloon in the air using your hand. Remember that your hand should be open facing the ceiling and that your fingers should be spread apart.
MAF/Instructional techniques
Extensions Refinements Applications
• The students will be spread out in general space with a balloon for each.
• 2 hula-hoops with tennis balls
• 2 hula-hoops with foam balls
• 2 hula-hoops with beach balls
• 2 hula-hoops with balloons
1. Maintain a flat surface. 2. Keep your eyes on the balloon or ball. 3. Hit the balloon or ball up in the air high enough so there is time to hit it again. 4. Volley the balloon straight up so you don’t have to move. 5. Your knees should be slightly bent with your feet shoulder width apart so that you can easily move to the balloon.
Can you volley the balloon 6 times in a row? Make sure to keep your knees bent and your feet shoulder width apart so that you can move to the balloon.
Now volley the balloon with your foot. Keep the balloon high into the air and straight up so that you have time to get your foot under the balloon.
Count how many times you can volley the balloon without it falling on the ground. Work on keeping your eyes on the balloon while keeping your toes pointed up.
Informing Task #2: When I say. “Go” walk over and put the balloons back into the hula-hoops and pick up a beach ball from the other hula-hoops and in self-space begin volleying the beach ball with your hand. Again remembering to keep your knees bent so that you can quickly move to the ball.
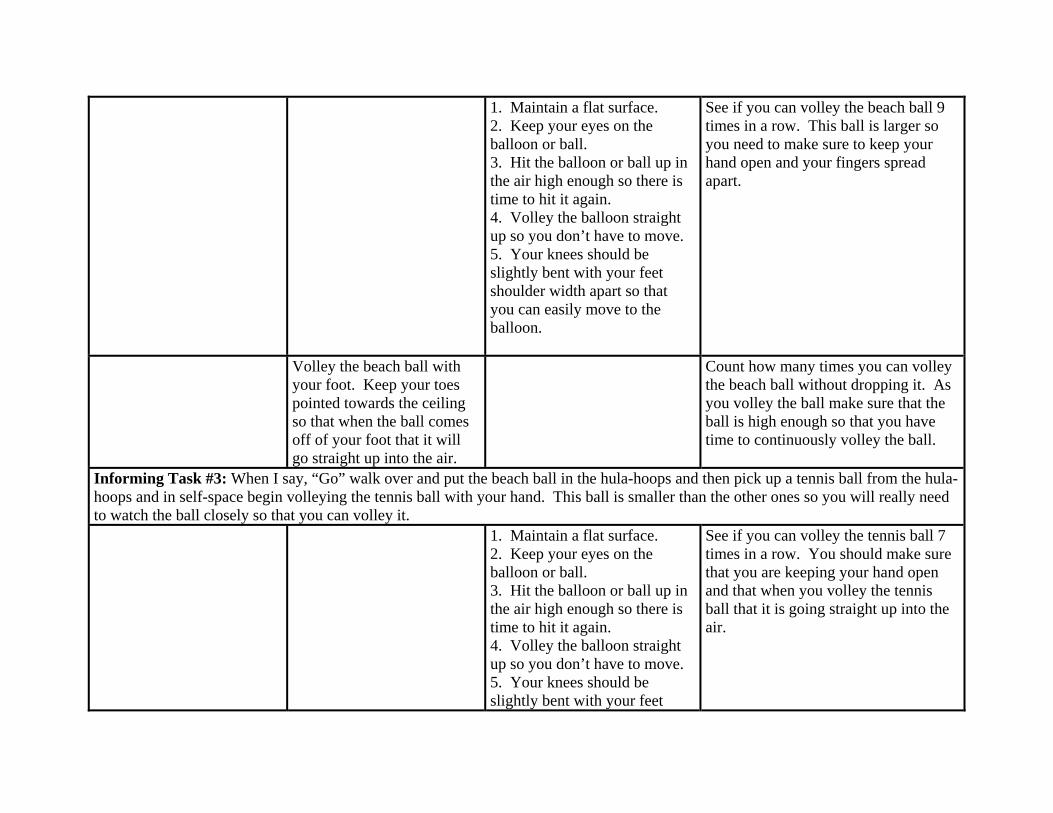
1. Maintain a flat surface. 2. Keep your eyes on the balloon or ball. 3. Hit the balloon or ball up in the air high enough so there is time to hit it again. 4. Volley the balloon straight up so you don’t have to move. 5. Your knees should be slightly bent with your feet shoulder width apart so that you can easily move to the balloon.
See if you can volley the beach ball 9 times in a row. This ball is larger so you need to make sure to keep your hand open and your fingers spread apart.
Volley the beach ball with your foot. Keep your toes pointed towards the ceiling so that when the ball comes off of your foot that it will go straight up into the air.
Count how many times you can volley the beach ball without dropping it. As you volley the ball make sure that the ball is high enough so that you have time to continuously volley the ball.
Informing Task #3: When I say, “Go” walk over and put the beach ball in the hula-hoops and then pick up a tennis ball from the hula-hoops and in self-space begin volleying the tennis ball with your hand. This ball is smaller than the other ones so you will really need to watch the ball closely so that you can volley it.
1. Maintain a flat surface. 2. Keep your eyes on the balloon or ball. 3. Hit the balloon or ball up in the air high enough so there is time to hit it again. 4. Volley the balloon straight up so you don’t have to move. 5. Your knees should be slightly bent with your feet
See if you can volley the tennis ball 7 times in a row. You should make sure that you are keeping your hand open and that when you volley the tennis ball that it is going straight up into the air.

shoulder width apart so that you can easily move to the balloon.
Volley the tennis ball with your foot. Keep your knees bent and feet shoulder width apart and your toes pointing towards the ceiling.
Count how many times you can volley the tennis ball without dropping it. While trying to count make sure to keep the tennis ball in your sight and that it goes high enough in the air that you can move to it and volley it again.
Informing Task #4: When I say, “Go” walk over and put the tennis ball in the hula-hoops and then pick up a foam ball from the hula-hoops and in self-space begin volleying the foam ball with your hand. While keeping an open hand make sure to volley the ball high to allow you time to get to the foam ball and volley it again.
1. Maintain a flat surface. 2. Keep your eyes on the balloon or ball. 3. Hit the balloon or ball up in the air high enough so there is time to hit it again. 4. Volley the balloon straight up so you don’t have to move. 5. Your knees should be slightly bent with your feet shoulder width apart so that you can easily move to the balloon.
See if you can volley the foam ball 13 times in a row. By volleying the ball straight into the air you will not need to move as much and will be able to volley the foam ball for longer.
Volley the foam ball with your foot. Keep your toes pointed towards the ceiling so that when the ball comes off of your foot that it will go high into the air.
Count how many times you can volley the foam ball without dropping it. Make sure to focus on keeping your knees bent and your feet shoulder width apart so that you can smoothly move to the foam ball.
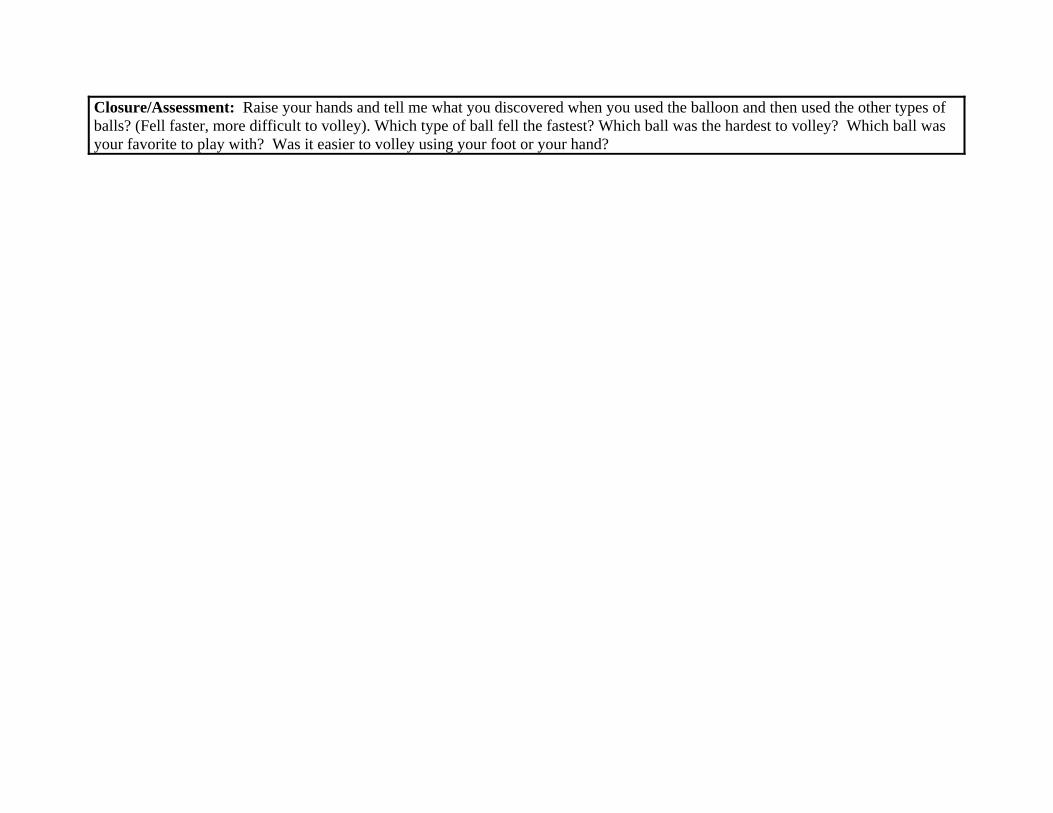
Closure/Assessment: Raise your hands and tell me what you discovered when you used the balloon and then used the other types of balls? (Fell faster, more difficult to volley). Which type of ball fell the fastest? Which ball was the hardest to volley? Which ball was your favorite to play with? Was it easier to volley using your foot or your hand?
Physical Education Teacher Education Program Central Washington University
Volleying Continuously Lesson #4
Objectives: (Specific, Behavioral, Assessable) Students
1. The student will be able to verbally describe the keys to volleying a balloon continuously. (EALR 1.1, 1.2 NASPE 1, 3) 2. The student will be able to demonstrate the proper technique for volleying. (EALR 1.1, 1.2 NASPE 1, 3)
a. Exhibiting the use of a flat surface. b. Watching the balloon hit the volleying surface.
Teacher Equipment: (for a class of 30 students)
o 1 Volleyball o 40 Balloons o 3 Hula-hoops o 8 Cones for boundaries o 5 Nerf Frisbees o 5 Foam Balls
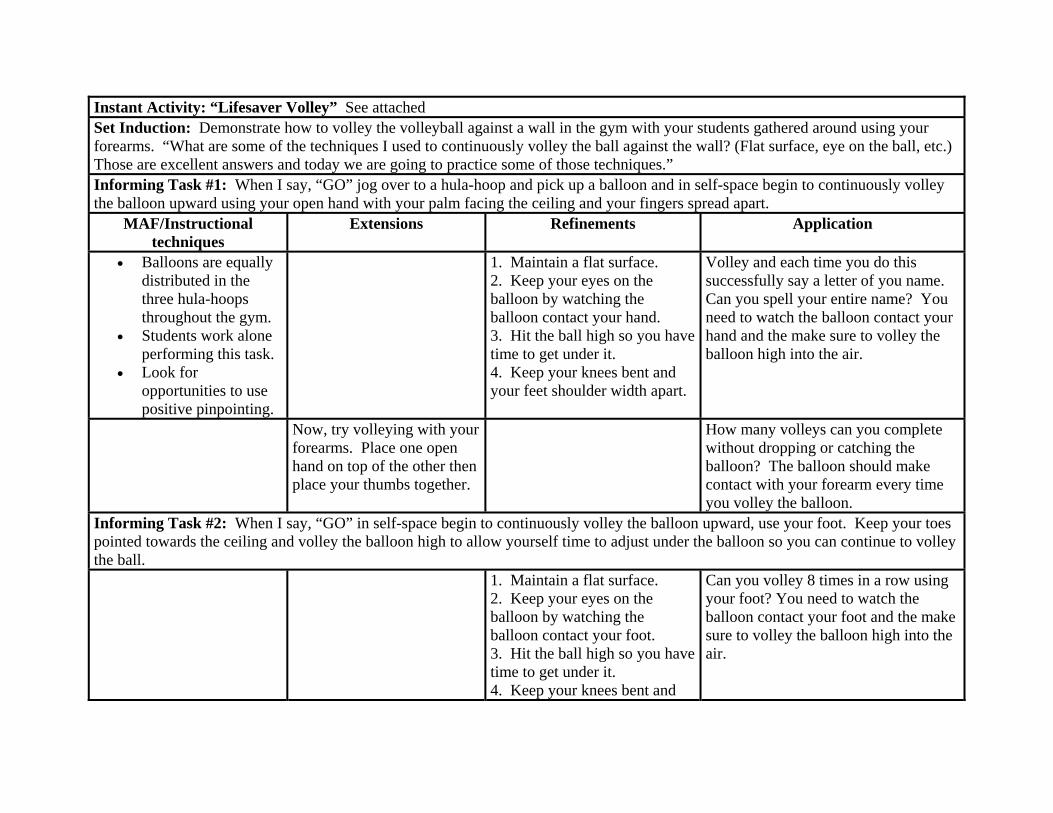
Instant Activity: “Lifesaver Volley” See attached Set Induction: Demonstrate how to volley the volleyball against a wall in the gym with your students gathered around using your forearms. “What are some of the techniques I used to continuously volley the ball against the wall? (Flat surface, eye on the ball, etc.) Those are excellent answers and today we are going to practice some of those techniques.” Informing Task #1: When I say, “GO” jog over to a hula-hoop and pick up a balloon and in self-space begin to continuously volley the balloon upward using your open hand with your palm facing the ceiling and your fingers spread apart.
MAF/Instructional techniques
Extensions Refinements Application
• Balloons are equally distributed in the three hula-hoops throughout the gym.
• Students work alone performing this task.
• Look for opportunities to use positive pinpointing.
1. Maintain a flat surface. 2. Keep your eyes on the balloon by watching the balloon contact your hand. 3. Hit the ball high so you have time to get under it. 4. Keep your knees bent and your feet shoulder width apart.
Volley and each time you do this successfully say a letter of you name. Can you spell your entire name? You need to watch the balloon contact your hand and the make sure to volley the balloon high into the air.
Now, try volleying with your forearms. Place one open hand on top of the other then place your thumbs together.
How many volleys can you complete without dropping or catching the balloon? The balloon should make contact with your forearm every time you volley the balloon.
Informing Task #2: When I say, “GO” in self-space begin to continuously volley the balloon upward, use your foot. Keep your toes pointed towards the ceiling and volley the balloon high to allow yourself time to adjust under the balloon so you can continue to volley the ball. 1. Maintain a flat surface.
2. Keep your eyes on the balloon by watching the balloon contact your foot. 3. Hit the ball high so you have time to get under it. 4. Keep your knees bent and
Can you volley 8 times in a row using your foot? You need to watch the balloon contact your foot and the make sure to volley the balloon high into the air.
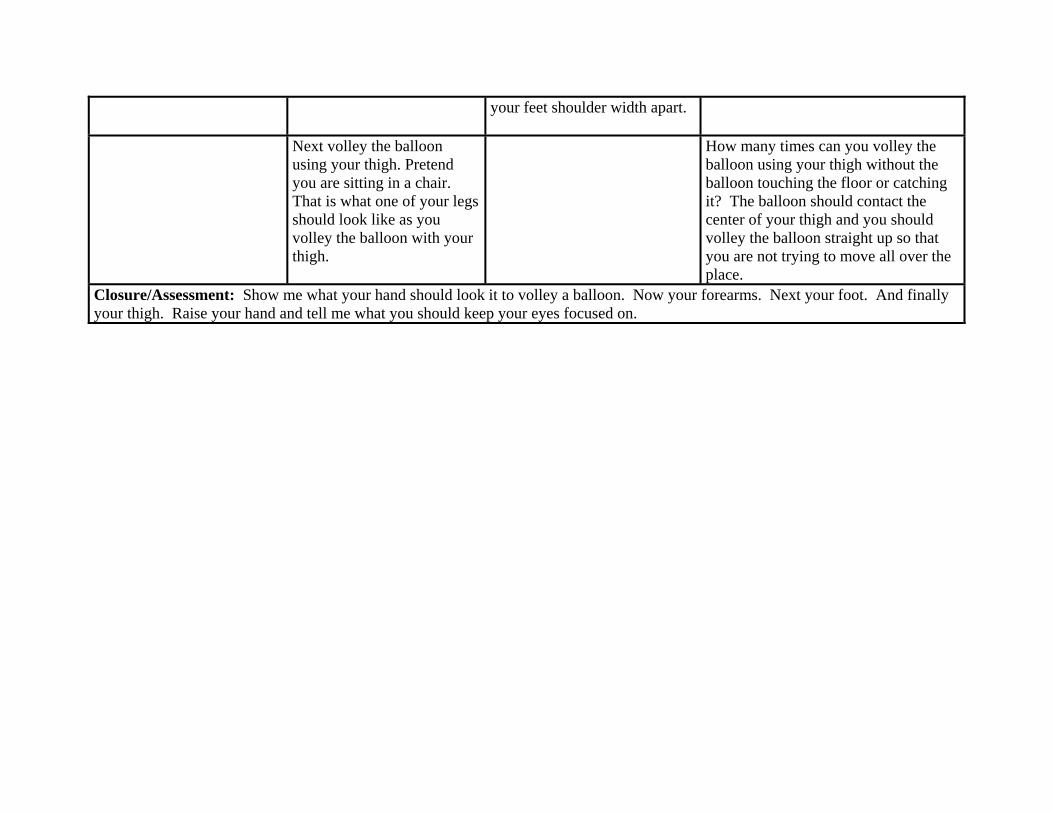
your feet shoulder width apart.
Next volley the balloon using your thigh. Pretend you are sitting in a chair. That is what one of your legs should look like as you volley the balloon with your thigh.
How many times can you volley the balloon using your thigh without the balloon touching the floor or catching it? The balloon should contact the center of your thigh and you should volley the balloon straight up so that you are not trying to move all over the place.
Closure/Assessment: Show me what your hand should look it to volley a balloon. Now your forearms. Next your foot. And finally your thigh. Raise your hand and tell me what you should keep your eyes focused on.
Physical Education Teacher Education Program Central Washington University
Volleying While Traveling Lesson #5
Objectives: (Specific, Behavioral, Assessable) Students
1. Students will be able to volley a balloon while traveling. (EALR 1.1, 1.2 NASPE 1, 3) a. Remembering to watch the balloon b. Keeping their feet quick
Teacher Equipment: (for a class of 30 students)
o 3 Hoops o 40 Balloons o 40 Numbered poly spots o 10 Beach balls o 10 Volleyball trainers o 10 Foam balls o Stereo with CD player o Fischer Price CD: Dance, Baby, Dance
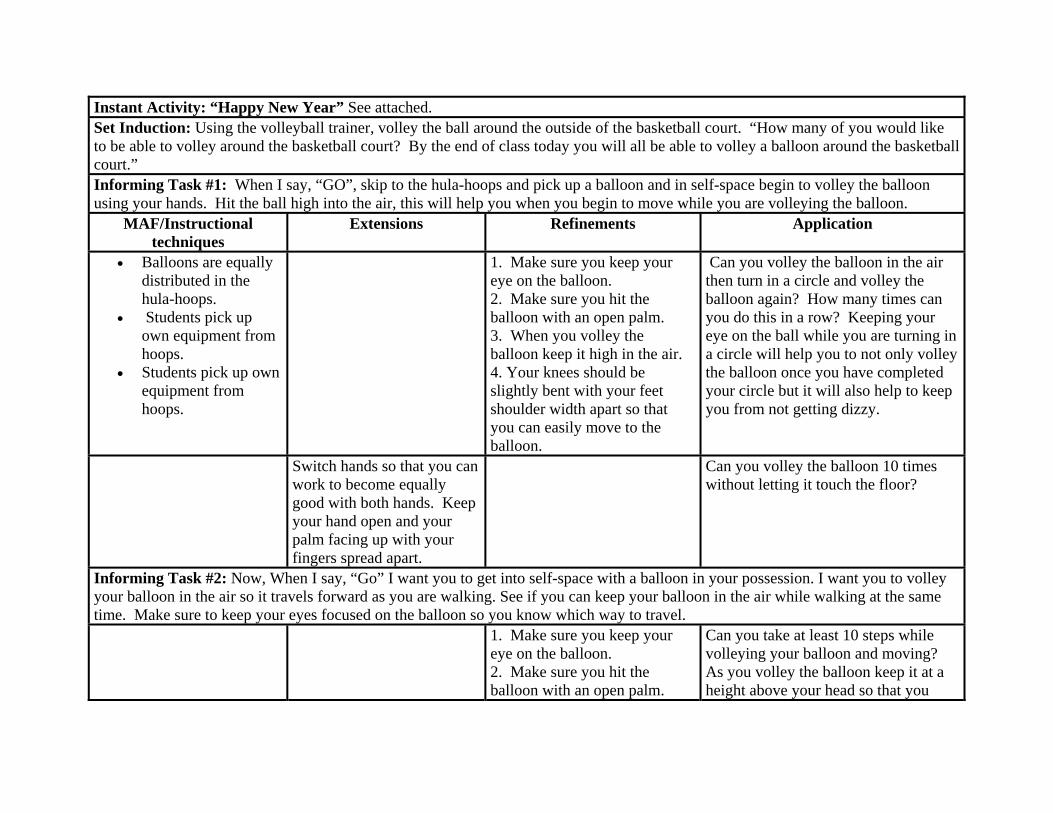
Instant Activity: “Happy New Year” See attached. Set Induction: Using the volleyball trainer, volley the ball around the outside of the basketball court. “How many of you would like to be able to volley around the basketball court? By the end of class today you will all be able to volley a balloon around the basketball court.” Informing Task #1: When I say, “GO”, skip to the hula-hoops and pick up a balloon and in self-space begin to volley the balloon using your hands. Hit the ball high into the air, this will help you when you begin to move while you are volleying the balloon.
MAF/Instructional techniques
Extensions Refinements Application
• Balloons are equally distributed in the hula-hoops.
• Students pick up own equipment from hoops.
• Students pick up own equipment from hoops.
1. Make sure you keep your eye on the balloon. 2. Make sure you hit the balloon with an open palm. 3. When you volley the balloon keep it high in the air. 4. Your knees should be slightly bent with your feet shoulder width apart so that you can easily move to the balloon.
Can you volley the balloon in the air then turn in a circle and volley the balloon again? How many times can you do this in a row? Keeping your eye on the ball while you are turning in a circle will help you to not only volley the balloon once you have completed your circle but it will also help to keep you from not getting dizzy.
Switch hands so that you can work to become equally good with both hands. Keep your hand open and your palm facing up with your fingers spread apart.
Can you volley the balloon 10 times without letting it touch the floor?
Informing Task #2: Now, When I say, “Go” I want you to get into self-space with a balloon in your possession. I want you to volley your balloon in the air so it travels forward as you are walking. See if you can keep your balloon in the air while walking at the same time. Make sure to keep your eyes focused on the balloon so you know which way to travel. 1. Make sure you keep your
eye on the balloon. 2. Make sure you hit the balloon with an open palm.
Can you take at least 10 steps while volleying your balloon and moving? As you volley the balloon keep it at a height above your head so that you
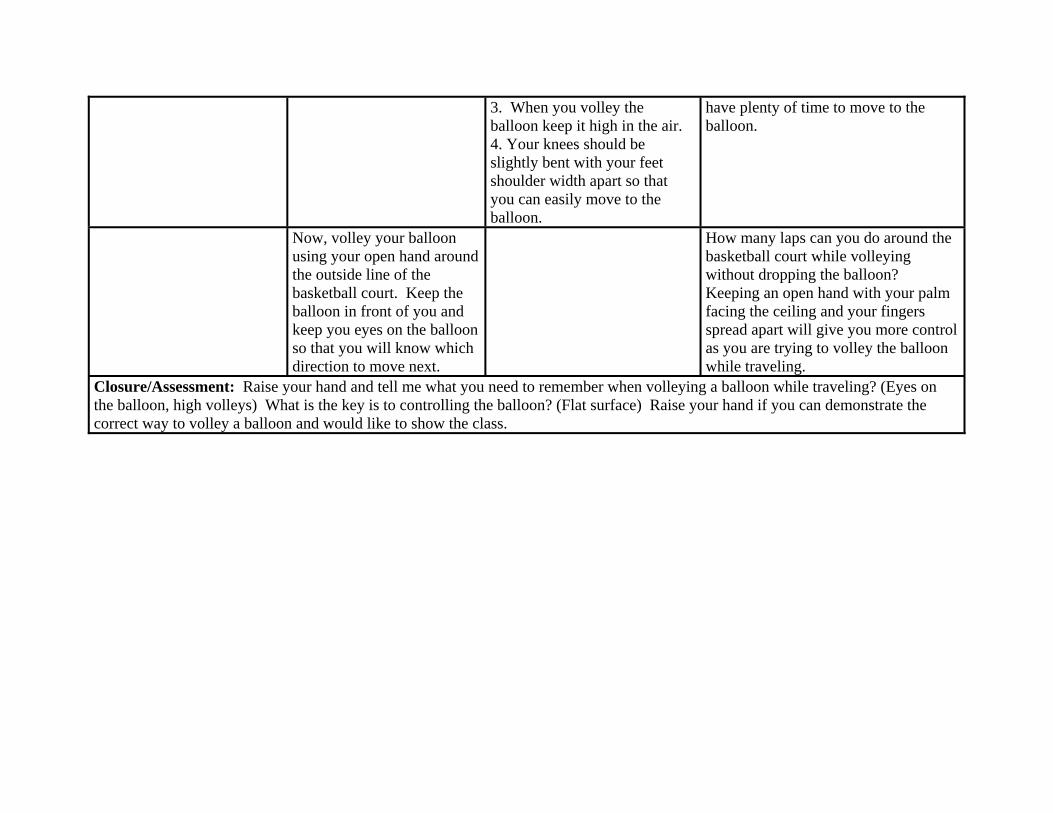
3. When you volley the balloon keep it high in the air. 4. Your knees should be slightly bent with your feet shoulder width apart so that you can easily move to the balloon.
have plenty of time to move to the balloon.
Now, volley your balloon using your open hand around the outside line of the basketball court. Keep the balloon in front of you and keep you eyes on the balloon so that you will know which direction to move next.
How many laps can you do around the basketball court while volleying without dropping the balloon? Keeping an open hand with your palm facing the ceiling and your fingers spread apart will give you more control as you are trying to volley the balloon while traveling.
Closure/Assessment: Raise your hand and tell me what you need to remember when volleying a balloon while traveling? (Eyes on the balloon, high volleys) What is the key is to controlling the balloon? (Flat surface) Raise your hand if you can demonstrate the correct way to volley a balloon and would like to show the class.
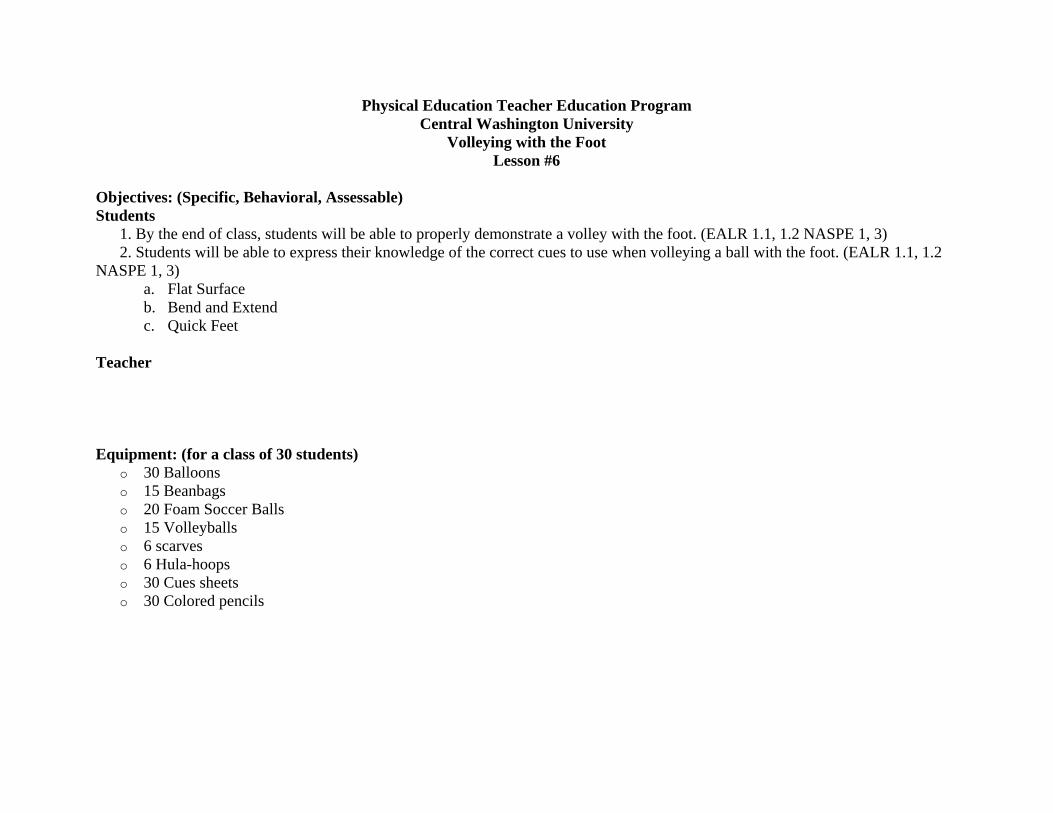
Physical Education Teacher Education Program Central Washington University
Volleying with the Foot Lesson #6
Objectives: (Specific, Behavioral, Assessable) Students
1. By the end of class, students will be able to properly demonstrate a volley with the foot. (EALR 1.1, 1.2 NASPE 1, 3) 2. Students will be able to express their knowledge of the correct cues to use when volleying a ball with the foot. (EALR 1.1, 1.2
NASPE 1, 3) a. Flat Surface b. Bend and Extend c. Quick Feet
Teacher Equipment: (for a class of 30 students)
o 30 Balloons o 15 Beanbags o 20 Foam Soccer Balls o 15 Volleyballs o 6 scarves o 6 Hula-hoops o 30 Cues sheets o 30 Colored pencils
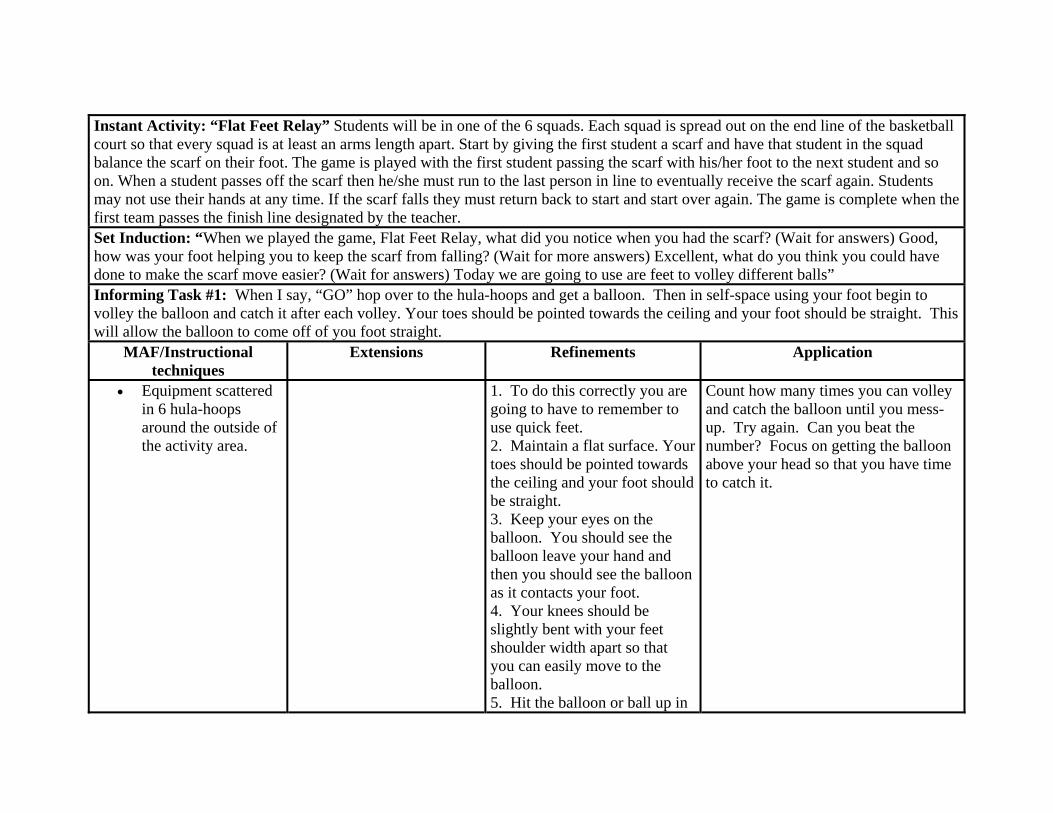
Instant Activity: “Flat Feet Relay” Students will be in one of the 6 squads. Each squad is spread out on the end line of the basketball court so that every squad is at least an arms length apart. Start by giving the first student a scarf and have that student in the squad balance the scarf on their foot. The game is played with the first student passing the scarf with his/her foot to the next student and so on. When a student passes off the scarf then he/she must run to the last person in line to eventually receive the scarf again. Students may not use their hands at any time. If the scarf falls they must return back to start and start over again. The game is complete when the first team passes the finish line designated by the teacher. Set Induction: “When we played the game, Flat Feet Relay, what did you notice when you had the scarf? (Wait for answers) Good, how was your foot helping you to keep the scarf from falling? (Wait for more answers) Excellent, what do you think you could have done to make the scarf move easier? (Wait for answers) Today we are going to use are feet to volley different balls” Informing Task #1: When I say, “GO” hop over to the hula-hoops and get a balloon. Then in self-space using your foot begin to volley the balloon and catch it after each volley. Your toes should be pointed towards the ceiling and your foot should be straight. This will allow the balloon to come off of you foot straight.
MAF/Instructional techniques
Extensions Refinements Application
• Equipment scattered in 6 hula-hoops around the outside of the activity area.
1. To do this correctly you are going to have to remember to use quick feet. 2. Maintain a flat surface. Your toes should be pointed towards the ceiling and your foot should be straight. 3. Keep your eyes on the balloon. You should see the balloon leave your hand and then you should see the balloon as it contacts your foot. 4. Your knees should be slightly bent with your feet shoulder width apart so that you can easily move to the balloon. 5. Hit the balloon or ball up in
Count how many times you can volley and catch the balloon until you mess-up. Try again. Can you beat the number? Focus on getting the balloon above your head so that you have time to catch it.

the air high enough so there is time to hit it again.
Now try to volley the balloon using your foot without catching the balloon between volleys. Focus on getting the balloon above your head so that you have time to volley it again.
How long can you keep the balloon in the air? Count out loud the number of times in a row that you volley the balloon. Use quick feet to keep the balloon in the air. This will also help you to keep the balloon high above your head.
Informing Task #2: When I say, “GO” skip your balloon to the hula-hoop and pick up your choice of a beanbag, volleyball, or foam soccer ball. In self-space using your foot begin to volley the ball and then catch it. Now that you are using an unfamiliar ball it is important to remember to keep your toe pointed up so that the ball will go into the air straight. 1. To do this correctly you are
going to have to remember to use quick feet. 2. Maintain a flat surface. Your toes should be pointed towards the ceiling and your foot should be straight. 3. Keep your eyes on the balloon. You should see the balloon leave your hand and then you should see the balloon as it contacts your foot. 4. Your knees should be slightly bent with your feet shoulder width apart so that you can easily move to the balloon. 5. Hit the balloon or ball up in
Count how many times you can volley and catch the balloon until you mess-up. Try again. Can you beat the number? Keep your knees bent and feet shoulder width apart so that you can quickly move to the balloon.
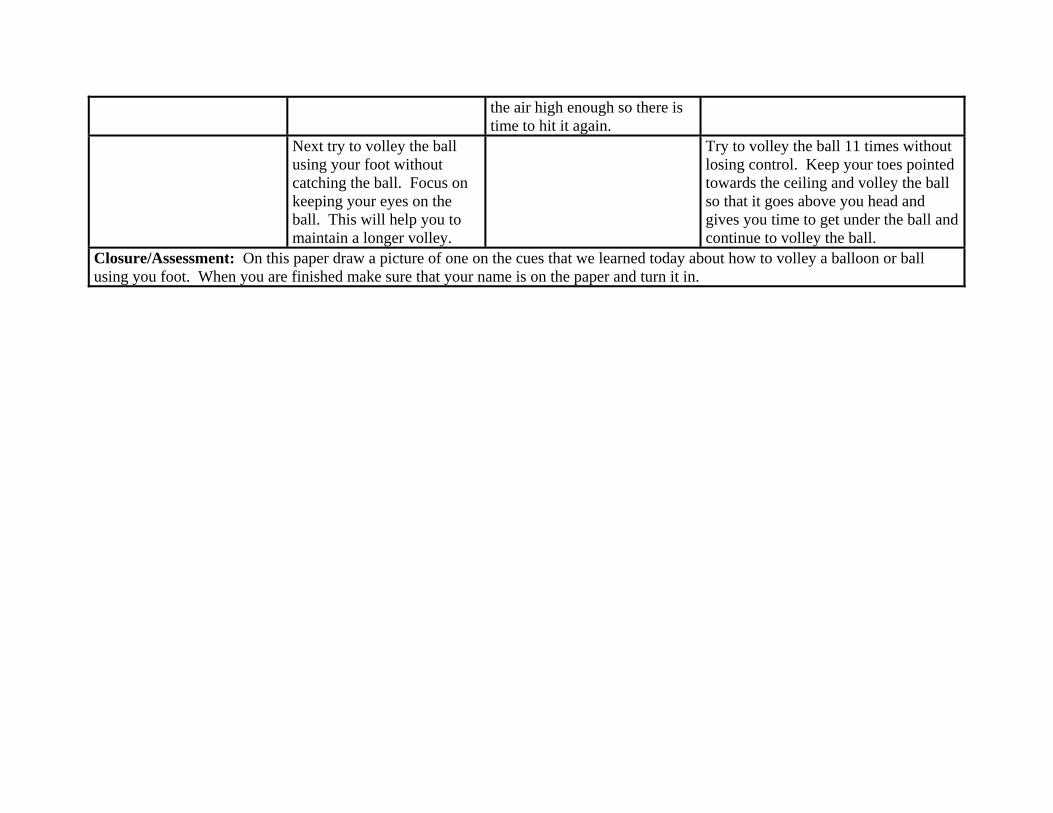
the air high enough so there is time to hit it again.
Next try to volley the ball using your foot without catching the ball. Focus on keeping your eyes on the ball. This will help you to maintain a longer volley.
Try to volley the ball 11 times without losing control. Keep your toes pointed towards the ceiling and volley the ball so that it goes above you head and gives you time to get under the ball and continue to volley the ball.
Closure/Assessment: On this paper draw a picture of one on the cues that we learned today about how to volley a balloon or ball using you foot. When you are finished make sure that your name is on the paper and turn it in.

Physical Education Teacher Education Program Central Washington University
Volleying (The Pass) Lesson # 7
Objectives: (Specific, Behavioral, Assessable) Students
1. Students will be able to show the correct form of a forearm pass (EALR 1.1, 1.2 NASPE 1, 3). a. Flat Surface: extend arms forward, forearms together b. Extend to target: extend arms upward on contact c. Quick Feet: move your feet quickly to be in the ready position d. Have your eyes on the ball e. Keep your knees bent
Teacher Equipment: (for a class of 30 students)
o 30 Volleyball Trainer o 3 Hula-hoops o 12 large envelopes o 24 index cards o 2 poster boards o 4 Enlarged Passing skill charts
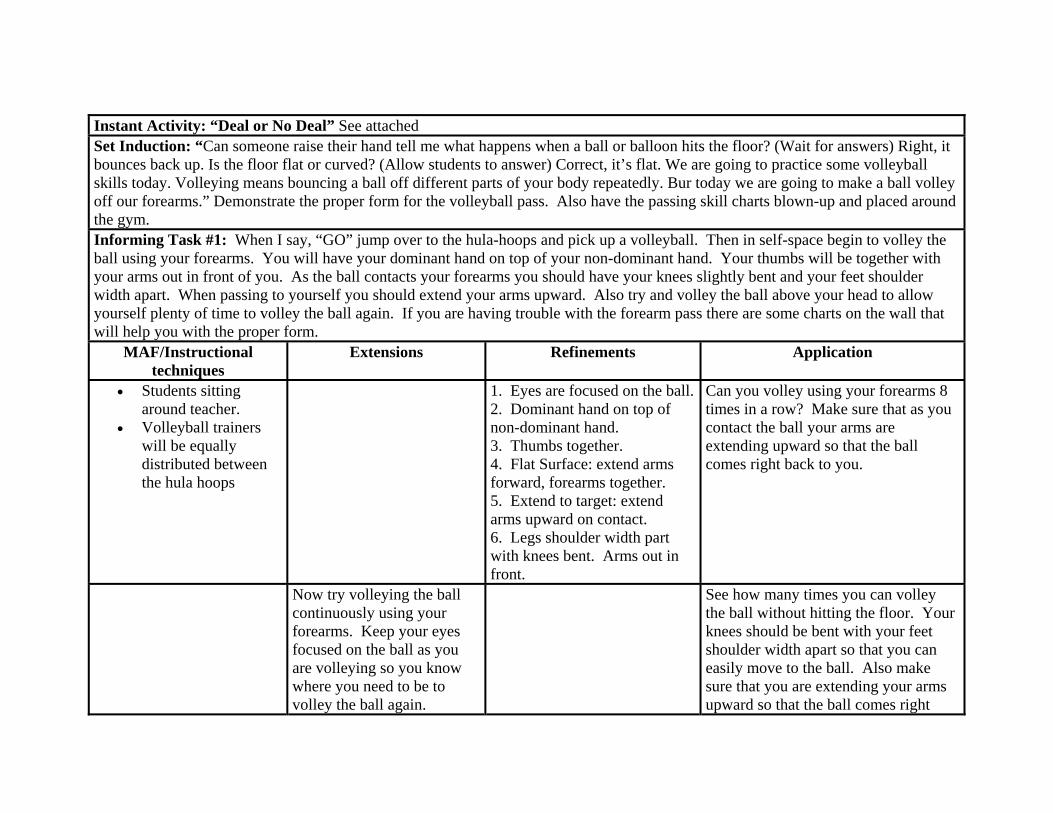
Instant Activity: “Deal or No Deal” See attached Set Induction: “Can someone raise their hand tell me what happens when a ball or balloon hits the floor? (Wait for answers) Right, it bounces back up. Is the floor flat or curved? (Allow students to answer) Correct, it’s flat. We are going to practice some volleyball skills today. Volleying means bouncing a ball off different parts of your body repeatedly. Bur today we are going to make a ball volley off our forearms.” Demonstrate the proper form for the volleyball pass. Also have the passing skill charts blown-up and placed around the gym. Informing Task #1: When I say, “GO” jump over to the hula-hoops and pick up a volleyball. Then in self-space begin to volley the ball using your forearms. You will have your dominant hand on top of your non-dominant hand. Your thumbs will be together with your arms out in front of you. As the ball contacts your forearms you should have your knees slightly bent and your feet shoulder width apart. When passing to yourself you should extend your arms upward. Also try and volley the ball above your head to allow yourself plenty of time to volley the ball again. If you are having trouble with the forearm pass there are some charts on the wall that will help you with the proper form.
MAF/Instructional techniques
Extensions Refinements Application
• Students sitting around teacher.
• Volleyball trainers will be equally distributed between the hula hoops
1. Eyes are focused on the ball.2. Dominant hand on top of non-dominant hand. 3. Thumbs together. 4. Flat Surface: extend arms forward, forearms together. 5. Extend to target: extend arms upward on contact. 6. Legs shoulder width part with knees bent. Arms out in front.
Can you volley using your forearms 8 times in a row? Make sure that as you contact the ball your arms are extending upward so that the ball comes right back to you.
Now try volleying the ball continuously using your forearms. Keep your eyes focused on the ball as you are volleying so you know where you need to be to volley the ball again.
See how many times you can volley the ball without hitting the floor. Your knees should be bent with your feet shoulder width apart so that you can easily move to the ball. Also make sure that you are extending your arms upward so that the ball comes right

back to you. Informing Task #2: When I say, “GO” line up from tallest to shortest on the basketball sideline. (Then number the students 1-15) Now find the person with the same number as you and choose one person to put their ball back into the hula-hoops. The person that did not put their ball away will gently toss the volleyball trainer to their partner and their partner will volley the ball back to them using their forearms. As you are volleying the ball to your partner make sure that you are extending your arms towards your partner. This is the same pass as before so remember to keep your dominant hand on top of your non-dominant hand and your thumbs should be together. The partner who tossed the ball will then catch the ball and repeat this action. Toss the ball to your partner 20 times. And remember that if you are having trouble that you can refer to the charts on the wall to see what the forearm pass looks like. • The students will be
placed in a line tallest to shortest and then numbered 1-15. The students will then be partnered with the person who has the same number they do.
1. Eyes are focused on the ball.2. Dominant hand on top of non-dominant hand. 3. Thumbs together. 4. Flat Surface: extend arms forward, forearms together. 5. Extend to target: extend arms upward on contact. 6. Legs shoulder width part with knees bent. Arms out in front.
Can you volley the ball back to your partner 13 times without making your partner chase the ball? As you are volleying the ball back to your partner make sure that your body is facing your partner as you are passing. Keep your knees bent and feet shoulder width apart so that you can move more quickly to the ball.
Switch roles so that who ever was tossing is now volleying. Toss the ball to the new passer 20 times. Remember to extend towards your partner and keep your knees bent with your feet shoulder width apart.
Now it is your turn to see if you can volley the ball back to your partner 13 times without making your partner chase the ball. You will have your dominant hand on top of your non-dominant hand. Your thumbs will be together with your arms out in front of you.
Closure/Assessment 1. Everyone show me the way our forearms should be when we are volleying a balloon or ball upward. Right, flat. 2. Raise your hand and tell me what to do with my arms when the ball contacts my forearms? Good, I extend. 3. What do we want to do with our feet when we are going to volley a ball? Right, quick feet. 4. Everyone show me what we should do with our knees as we are making contact with the volleyball. Great, they should be
bent.
5. Raise your hand and tell me what your eyes should be focused on. The ball, that is correct.
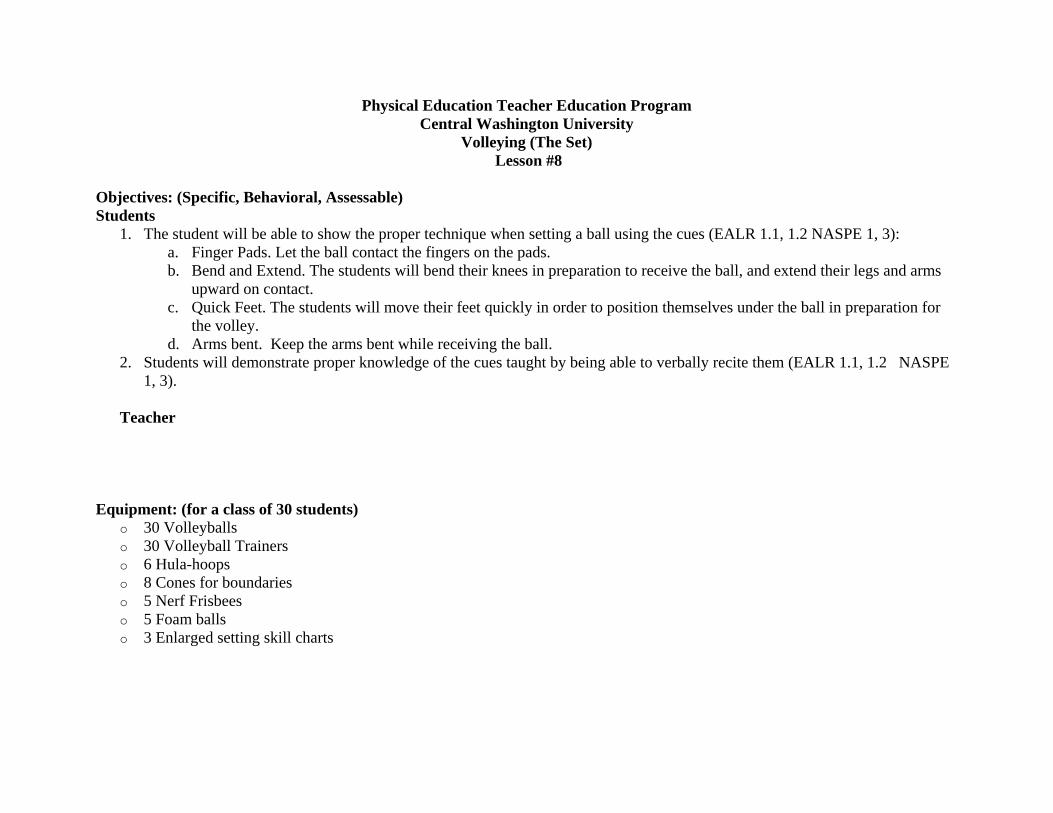
Physical Education Teacher Education Program Central Washington University
Volleying (The Set) Lesson #8
Objectives: (Specific, Behavioral, Assessable) Students
1. The student will be able to show the proper technique when setting a ball using the cues (EALR 1.1, 1.2 NASPE 1, 3): a. Finger Pads. Let the ball contact the fingers on the pads. b. Bend and Extend. The students will bend their knees in preparation to receive the ball, and extend their legs and arms
upward on contact. c. Quick Feet. The students will move their feet quickly in order to position themselves under the ball in preparation for
the volley. d. Arms bent. Keep the arms bent while receiving the ball.
2. Students will demonstrate proper knowledge of the cues taught by being able to verbally recite them (EALR 1.1, 1.2 NASPE 1, 3).
Teacher
Equipment: (for a class of 30 students)
o 30 Volleyballs o 30 Volleyball Trainers o 6 Hula-hoops o 8 Cones for boundaries o 5 Nerf Frisbees o 5 Foam balls o 3 Enlarged setting skill charts
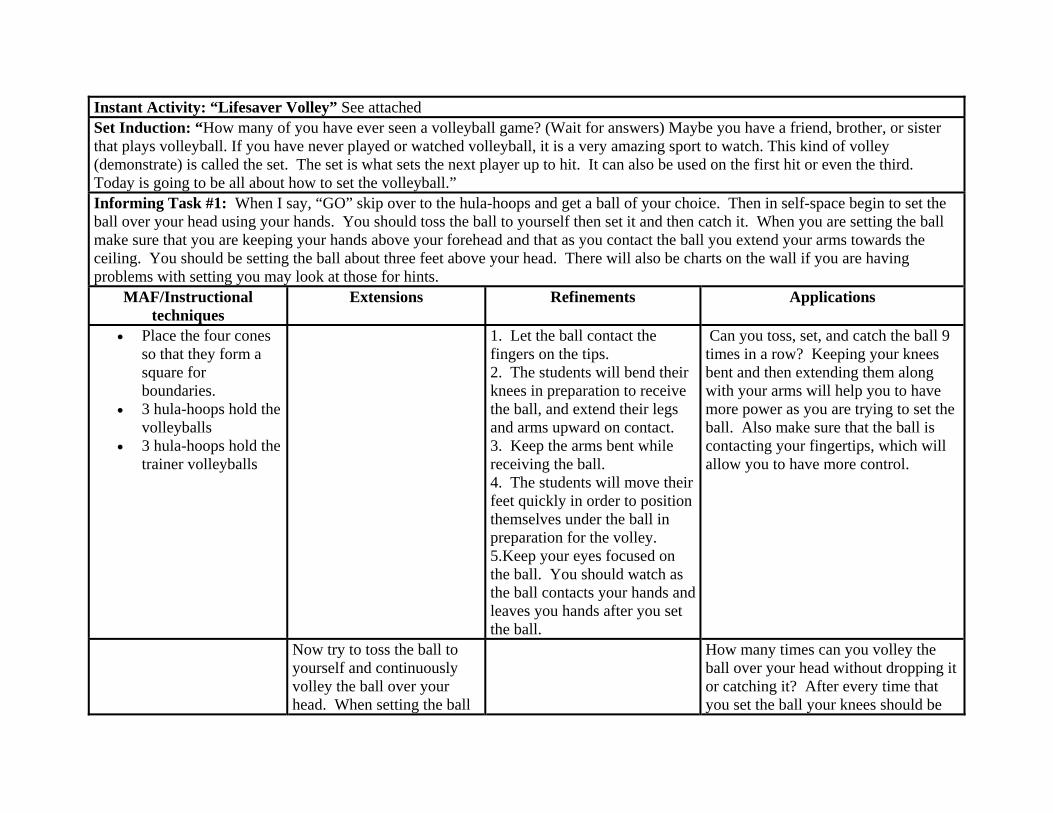
Instant Activity: “Lifesaver Volley” See attached Set Induction: “How many of you have ever seen a volleyball game? (Wait for answers) Maybe you have a friend, brother, or sister that plays volleyball. If you have never played or watched volleyball, it is a very amazing sport to watch. This kind of volley (demonstrate) is called the set. The set is what sets the next player up to hit. It can also be used on the first hit or even the third. Today is going to be all about how to set the volleyball.” Informing Task #1: When I say, “GO” skip over to the hula-hoops and get a ball of your choice. Then in self-space begin to set the ball over your head using your hands. You should toss the ball to yourself then set it and then catch it. When you are setting the ball make sure that you are keeping your hands above your forehead and that as you contact the ball you extend your arms towards the ceiling. You should be setting the ball about three feet above your head. There will also be charts on the wall if you are having problems with setting you may look at those for hints.
MAF/Instructional techniques
Extensions Refinements Applications
• Place the four cones so that they form a square for boundaries.
• 3 hula-hoops hold the volleyballs
• 3 hula-hoops hold the trainer volleyballs
1. Let the ball contact the fingers on the tips. 2. The students will bend their knees in preparation to receive the ball, and extend their legs and arms upward on contact. 3. Keep the arms bent while receiving the ball. 4. The students will move their feet quickly in order to position themselves under the ball in preparation for the volley. 5.Keep your eyes focused on the ball. You should watch as the ball contacts your hands and leaves you hands after you set the ball.
Can you toss, set, and catch the ball 9 times in a row? Keeping your knees bent and then extending them along with your arms will help you to have more power as you are trying to set the ball. Also make sure that the ball is contacting your fingertips, which will allow you to have more control.
Now try to toss the ball to yourself and continuously volley the ball over your head. When setting the ball
How many times can you volley the ball over your head without dropping it or catching it? After every time that you set the ball your knees should be
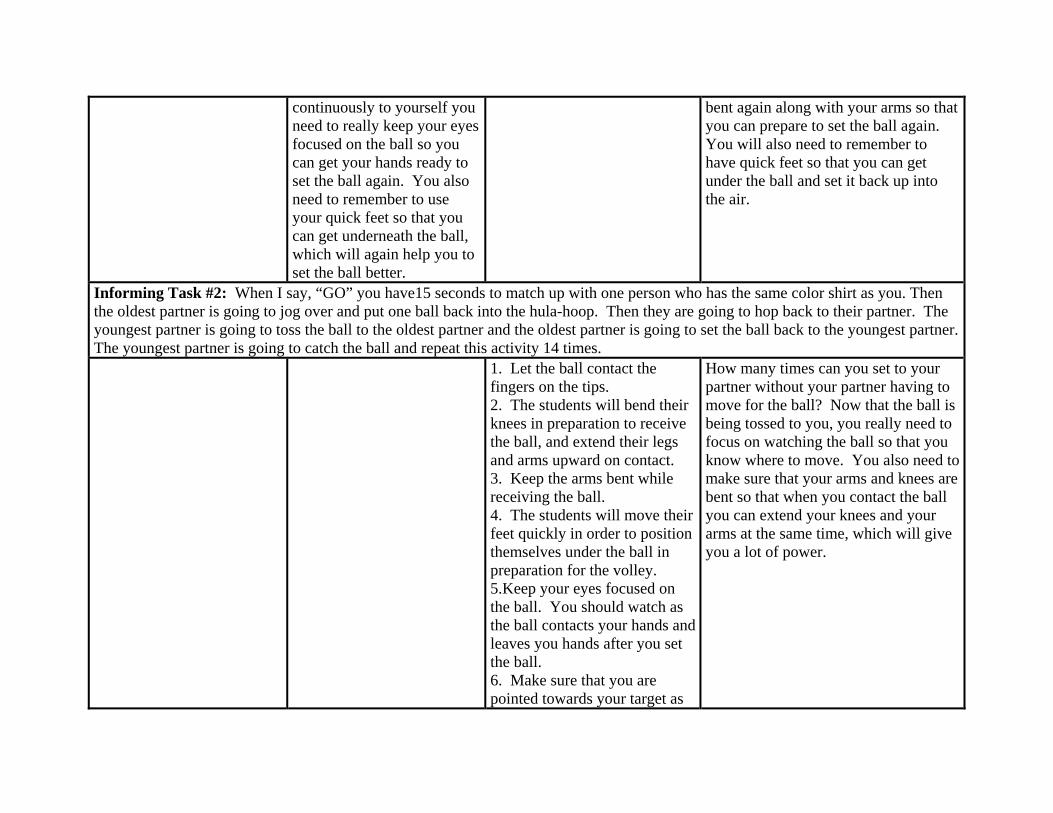
continuously to yourself you need to really keep your eyes focused on the ball so you can get your hands ready to set the ball again. You also need to remember to use your quick feet so that you can get underneath the ball, which will again help you to set the ball better.
bent again along with your arms so that you can prepare to set the ball again. You will also need to remember to have quick feet so that you can get under the ball and set it back up into the air.
Informing Task #2: When I say, “GO” you have15 seconds to match up with one person who has the same color shirt as you. Then the oldest partner is going to jog over and put one ball back into the hula-hoop. Then they are going to hop back to their partner. The youngest partner is going to toss the ball to the oldest partner and the oldest partner is going to set the ball back to the youngest partner. The youngest partner is going to catch the ball and repeat this activity 14 times.
1. Let the ball contact the fingers on the tips. 2. The students will bend their knees in preparation to receive the ball, and extend their legs and arms upward on contact. 3. Keep the arms bent while receiving the ball. 4. The students will move their feet quickly in order to position themselves under the ball in preparation for the volley. 5.Keep your eyes focused on the ball. You should watch as the ball contacts your hands and leaves you hands after you set the ball. 6. Make sure that you are pointed towards your target as
How many times can you set to your partner without your partner having to move for the ball? Now that the ball is being tossed to you, you really need to focus on watching the ball so that you know where to move. You also need to make sure that your arms and knees are bent so that when you contact the ball you can extend your knees and your arms at the same time, which will give you a lot of power.
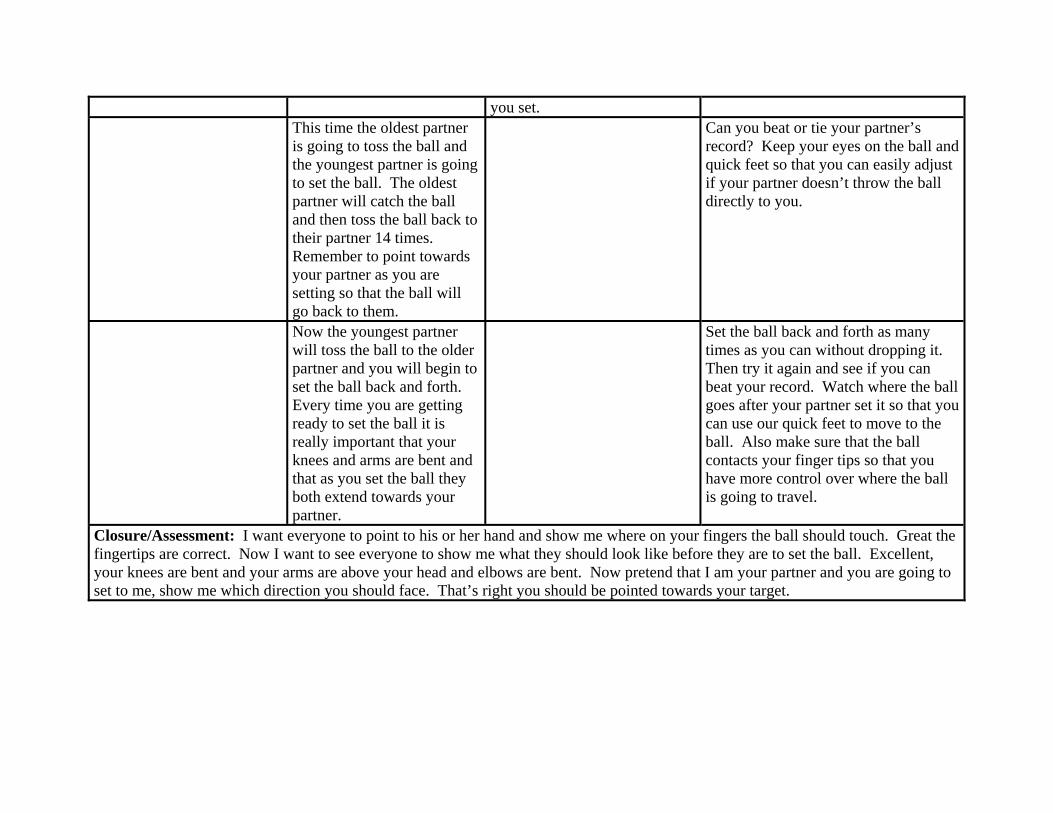
you set. This time the oldest partner
is going to toss the ball and the youngest partner is going to set the ball. The oldest partner will catch the ball and then toss the ball back to their partner 14 times. Remember to point towards your partner as you are setting so that the ball will go back to them.
Can you beat or tie your partner’s record? Keep your eyes on the ball and quick feet so that you can easily adjust if your partner doesn’t throw the ball directly to you.
Now the youngest partner will toss the ball to the older partner and you will begin to set the ball back and forth. Every time you are getting ready to set the ball it is really important that your knees and arms are bent and that as you set the ball they both extend towards your partner.
Set the ball back and forth as many times as you can without dropping it. Then try it again and see if you can beat your record. Watch where the ball goes after your partner set it so that you can use our quick feet to move to the ball. Also make sure that the ball contacts your finger tips so that you have more control over where the ball is going to travel.
Closure/Assessment: I want everyone to point to his or her hand and show me where on your fingers the ball should touch. Great the fingertips are correct. Now I want to see everyone to show me what they should look like before they are to set the ball. Excellent, your knees are bent and your arms are above your head and elbows are bent. Now pretend that I am your partner and you are going to set to me, show me which direction you should face. That’s right you should be pointed towards your target.

Physical Education Teacher Education Program Central Washington University
Volleying to a Target Lesson #9
Objectives: (Specific, Behavioral, Assessable) Students
1. The student will be able to demonstrate how to volley a ball to a target on the ground (EALR 1.1, 1.2 NASPE 1, 3). a. Face the target b. Knees bent c. Keep a flat surface
Teacher Equipment: (for a class of 30 students)
o 45 Hula-hoops o 15 Volleyballs o 15 Poly spots
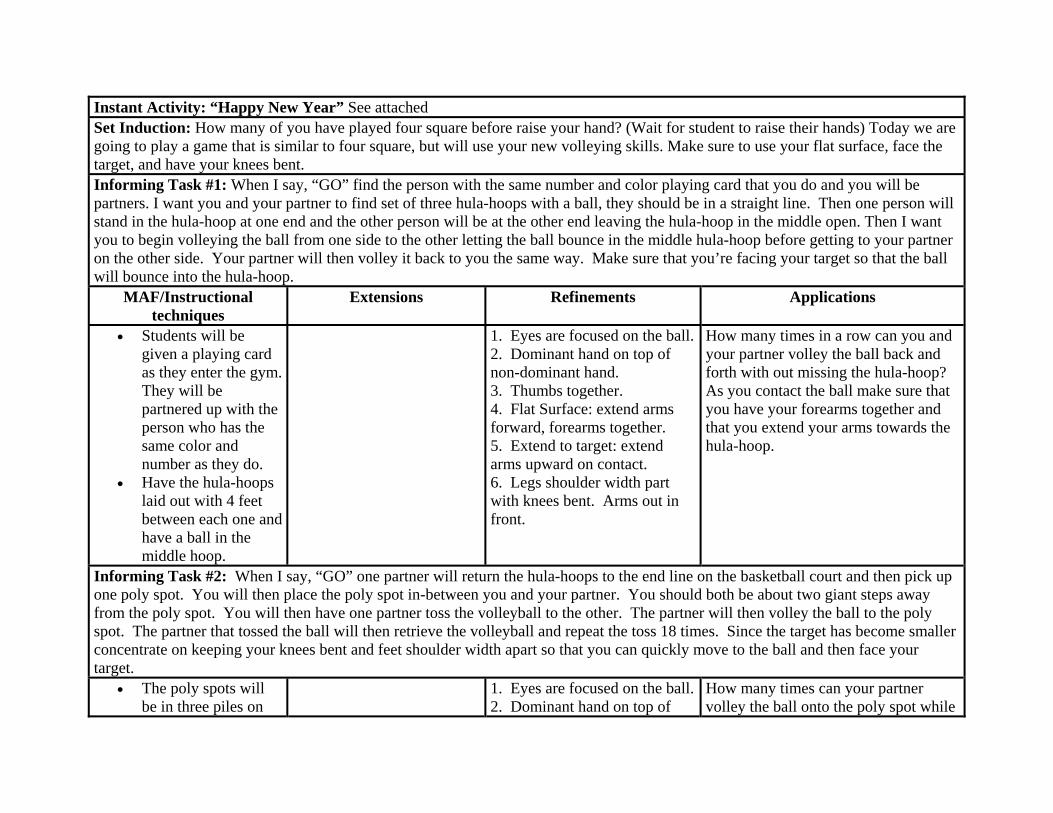
Instant Activity: “Happy New Year” See attached Set Induction: How many of you have played four square before raise your hand? (Wait for student to raise their hands) Today we are going to play a game that is similar to four square, but will use your new volleying skills. Make sure to use your flat surface, face the target, and have your knees bent. Informing Task #1: When I say, “GO” find the person with the same number and color playing card that you do and you will be partners. I want you and your partner to find set of three hula-hoops with a ball, they should be in a straight line. Then one person will stand in the hula-hoop at one end and the other person will be at the other end leaving the hula-hoop in the middle open. Then I want you to begin volleying the ball from one side to the other letting the ball bounce in the middle hula-hoop before getting to your partner on the other side. Your partner will then volley it back to you the same way. Make sure that you’re facing your target so that the ball will bounce into the hula-hoop.
MAF/Instructional techniques
Extensions Refinements Applications
• Students will be given a playing card as they enter the gym. They will be partnered up with the person who has the same color and number as they do.
• Have the hula-hoops laid out with 4 feet between each one and have a ball in the middle hoop.
1. Eyes are focused on the ball.2. Dominant hand on top of non-dominant hand. 3. Thumbs together. 4. Flat Surface: extend arms forward, forearms together. 5. Extend to target: extend arms upward on contact. 6. Legs shoulder width part with knees bent. Arms out in front.
How many times in a row can you and your partner volley the ball back and forth with out missing the hula-hoop? As you contact the ball make sure that you have your forearms together and that you extend your arms towards the hula-hoop.
Informing Task #2: When I say, “GO” one partner will return the hula-hoops to the end line on the basketball court and then pick up one poly spot. You will then place the poly spot in-between you and your partner. You should both be about two giant steps away from the poly spot. You will then have one partner toss the volleyball to the other. The partner will then volley the ball to the poly spot. The partner that tossed the ball will then retrieve the volleyball and repeat the toss 18 times. Since the target has become smaller concentrate on keeping your knees bent and feet shoulder width apart so that you can quickly move to the ball and then face your target.
• The poly spots will be in three piles on
1. Eyes are focused on the ball.2. Dominant hand on top of
How many times can your partner volley the ball onto the poly spot while

the end line of the basketball court.
non-dominant hand. 3. Thumbs together. 4. Flat Surface: extend arms forward, forearms together. 5. Extend to target: extend arms upward on contact. 6. Legs shoulder width part with knees bent. Arms out in front.
it is their turn? If they are having a tough time remind them to have their dominant hand onto top of their non-dominant hand and to keep their thumbs together as they pass the ball facing their target.
Now it is time to switch roles. If you were tossing you are now volleying and if you were volleying you are now tossing. The thrower is going to toss the ball 18 times to their partner. Keep your eyes on the ball and watch it as it makes contact with your forearms making sure to keep your body facing the target as you pass the ball.
Can you hit the poly spot the same number of times that your partner did? Can you beat that number? Make sure that as you pass the ball your forearms are maintaining a flat surface. You can do this by making sure that your dominant hand is on top of your non-dominant hand and that your thumbs are together.
Closure/Assessment: Raise your hand and tell me what you discovered when you had to volley the ball so that it bounced in the hula-hoop? Great answers! That’s right you had to make sure to face your target. What did you discover when you had to volley the ball so that it hit the poly spot? Excellent, keeping your knees bent helped you to face your target. Raise your hand and tell me which was easier to hit the poly spot or the hula-hoop? Those are very interesting answers.
Physical Education Teacher Education Program Central Washington University
Volleying to a Partner Lesson #10
Objectives: (Specific, Behavioral, Assessable) Students The students will be able to volley back and forth to a partner continuously from several different distances and ways (EALR 1.1, 1.2 NASPE 1, 3). Teacher Equipment: (for a class of 30 students)
o 15 Volleyball trainers o 5 Hula-hoops o 12 Large envelopes o 24 Index cards o 2 Poster boards o 8 Poster size Task Card printouts o 30 Evaluations
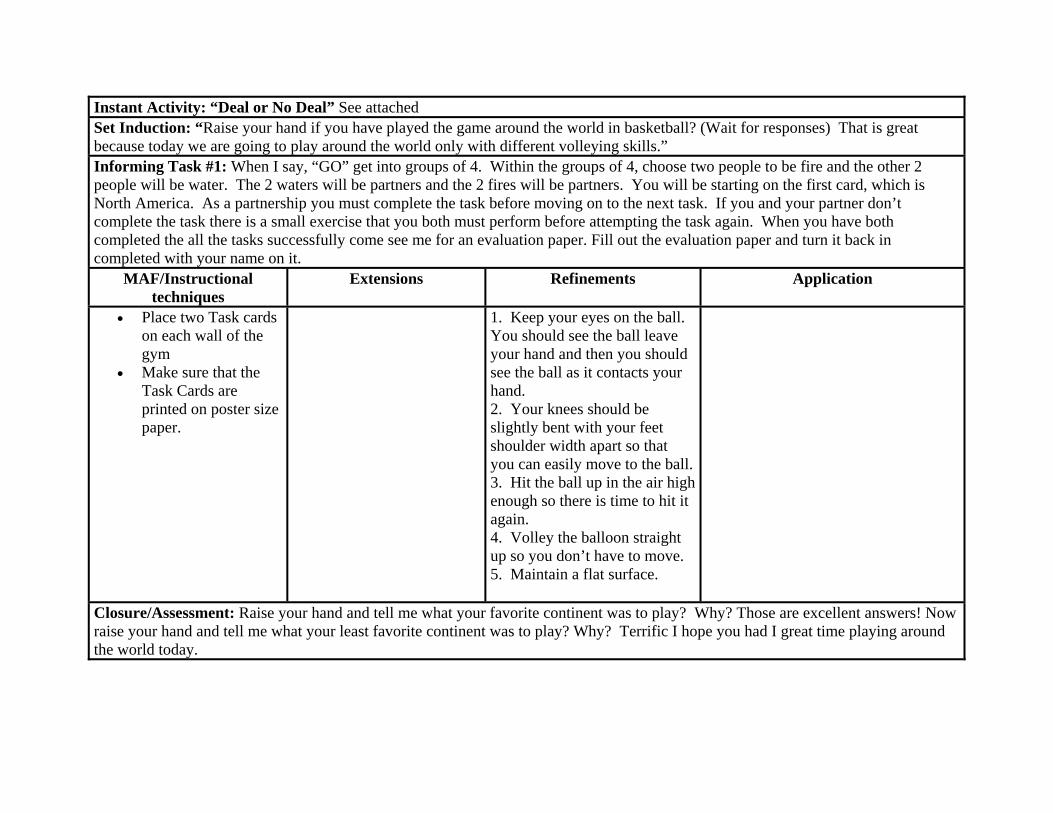
Instant Activity: “Deal or No Deal” See attached Set Induction: “Raise your hand if you have played the game around the world in basketball? (Wait for responses) That is great because today we are going to play around the world only with different volleying skills.” Informing Task #1: When I say, “GO” get into groups of 4. Within the groups of 4, choose two people to be fire and the other 2 people will be water. The 2 waters will be partners and the 2 fires will be partners. You will be starting on the first card, which is North America. As a partnership you must complete the task before moving on to the next task. If you and your partner don’t complete the task there is a small exercise that you both must perform before attempting the task again. When you have both completed the all the tasks successfully come see me for an evaluation paper. Fill out the evaluation paper and turn it back in completed with your name on it.
MAF/Instructional techniques
Extensions Refinements Application
• Place two Task cards on each wall of the gym
• Make sure that the Task Cards are printed on poster size paper.
1. Keep your eyes on the ball. You should see the ball leave your hand and then you should see the ball as it contacts your hand. 2. Your knees should be slightly bent with your feet shoulder width apart so that you can easily move to the ball.3. Hit the ball up in the air high enough so there is time to hit it again. 4. Volley the balloon straight up so you don’t have to move. 5. Maintain a flat surface.
Closure/Assessment: Raise your hand and tell me what your favorite continent was to play? Why? Those are excellent answers! Now raise your hand and tell me what your least favorite continent was to play? Why? Terrific I hope you had I great time playing around the world today.
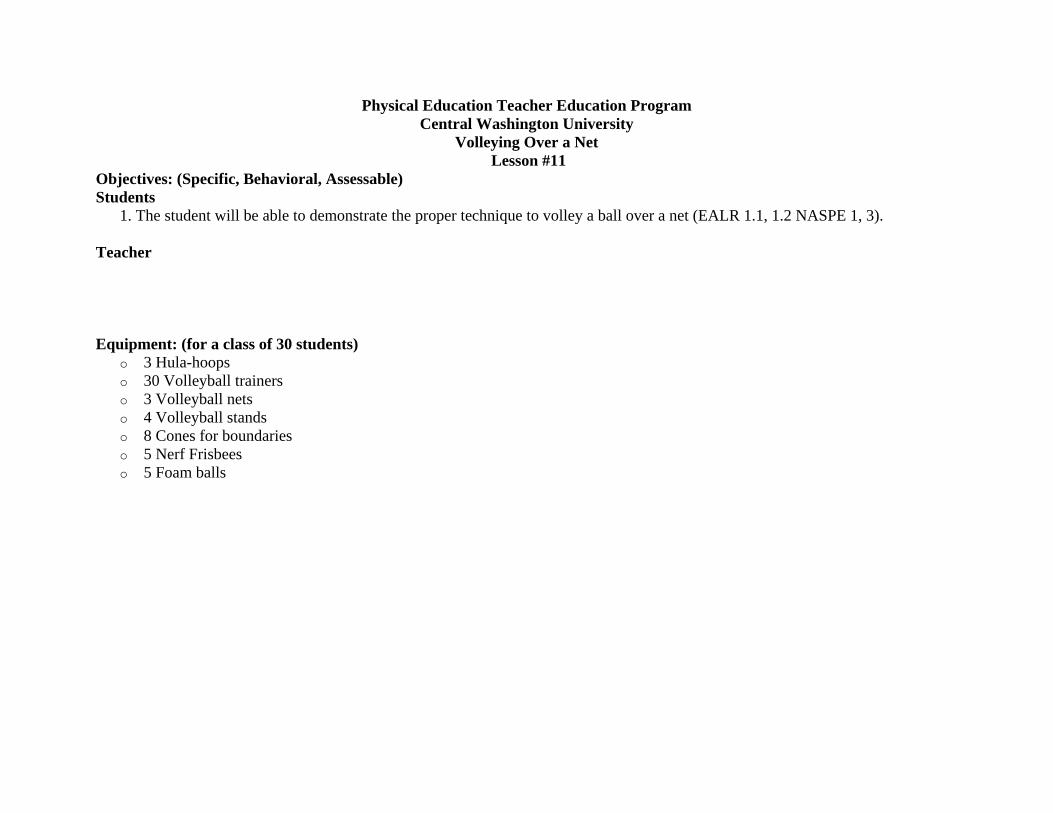
Physical Education Teacher Education Program Central Washington University
Volleying Over a Net Lesson #11
Objectives: (Specific, Behavioral, Assessable) Students
1. The student will be able to demonstrate the proper technique to volley a ball over a net (EALR 1.1, 1.2 NASPE 1, 3). Teacher Equipment: (for a class of 30 students)
o 3 Hula-hoops o 30 Volleyball trainers o 3 Volleyball nets o 4 Volleyball stands o 8 Cones for boundaries o 5 Nerf Frisbees o 5 Foam balls
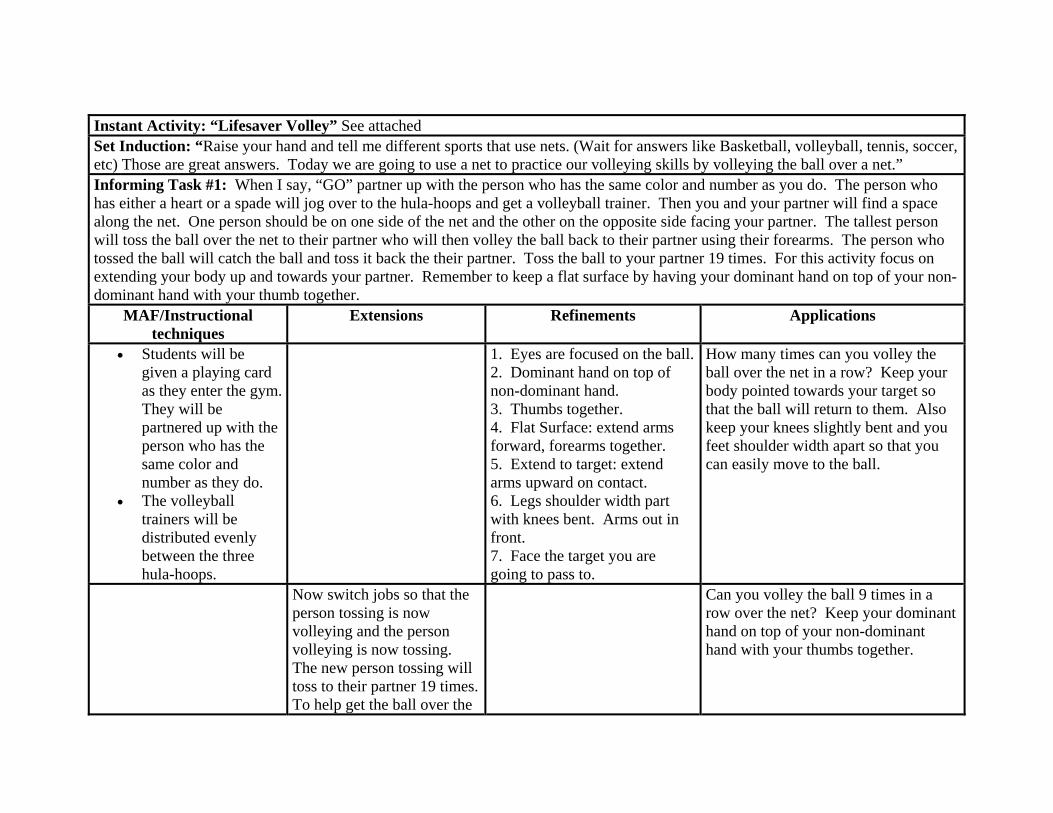
Instant Activity: “Lifesaver Volley” See attached Set Induction: “Raise your hand and tell me different sports that use nets. (Wait for answers like Basketball, volleyball, tennis, soccer, etc) Those are great answers. Today we are going to use a net to practice our volleying skills by volleying the ball over a net.” Informing Task #1: When I say, “GO” partner up with the person who has the same color and number as you do. The person who has either a heart or a spade will jog over to the hula-hoops and get a volleyball trainer. Then you and your partner will find a space along the net. One person should be on one side of the net and the other on the opposite side facing your partner. The tallest person will toss the ball over the net to their partner who will then volley the ball back to their partner using their forearms. The person who tossed the ball will catch the ball and toss it back the their partner. Toss the ball to your partner 19 times. For this activity focus on extending your body up and towards your partner. Remember to keep a flat surface by having your dominant hand on top of your non-dominant hand with your thumb together.
MAF/Instructional techniques
Extensions Refinements Applications
• Students will be given a playing card as they enter the gym. They will be partnered up with the person who has the same color and number as they do.
• The volleyball trainers will be distributed evenly between the three hula-hoops.
1. Eyes are focused on the ball.2. Dominant hand on top of non-dominant hand. 3. Thumbs together. 4. Flat Surface: extend arms forward, forearms together. 5. Extend to target: extend arms upward on contact. 6. Legs shoulder width part with knees bent. Arms out in front. 7. Face the target you are going to pass to.
How many times can you volley the ball over the net in a row? Keep your body pointed towards your target so that the ball will return to them. Also keep your knees slightly bent and you feet shoulder width apart so that you can easily move to the ball.
Now switch jobs so that the person tossing is now volleying and the person volleying is now tossing. The new person tossing will toss to their partner 19 times. To help get the ball over the
Can you volley the ball 9 times in a row over the net? Keep your dominant hand on top of your non-dominant hand with your thumbs together.
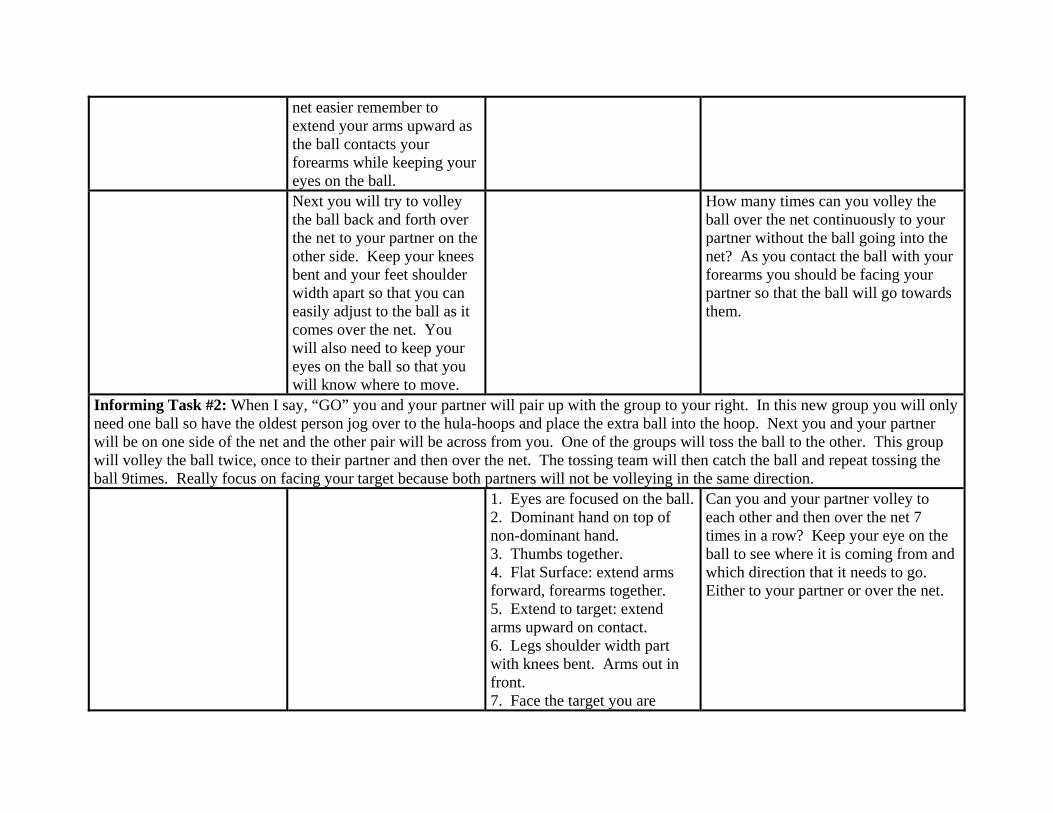
net easier remember to extend your arms upward as the ball contacts your forearms while keeping your eyes on the ball.
Next you will try to volley the ball back and forth over the net to your partner on the other side. Keep your knees bent and your feet shoulder width apart so that you can easily adjust to the ball as it comes over the net. You will also need to keep your eyes on the ball so that you will know where to move.
How many times can you volley the ball over the net continuously to your partner without the ball going into the net? As you contact the ball with your forearms you should be facing your partner so that the ball will go towards them.
Informing Task #2: When I say, “GO” you and your partner will pair up with the group to your right. In this new group you will only need one ball so have the oldest person jog over to the hula-hoops and place the extra ball into the hoop. Next you and your partner will be on one side of the net and the other pair will be across from you. One of the groups will toss the ball to the other. This group will volley the ball twice, once to their partner and then over the net. The tossing team will then catch the ball and repeat tossing the ball 9times. Really focus on facing your target because both partners will not be volleying in the same direction.
1. Eyes are focused on the ball.2. Dominant hand on top of non-dominant hand. 3. Thumbs together. 4. Flat Surface: extend arms forward, forearms together. 5. Extend to target: extend arms upward on contact. 6. Legs shoulder width part with knees bent. Arms out in front. 7. Face the target you are
Can you and your partner volley to each other and then over the net 7 times in a row? Keep your eye on the ball to see where it is coming from and which direction that it needs to go. Either to your partner or over the net.

going to pass to. Now your groups need to
switch jobs so that the tossing group is now volleying and the volleying group is now tossing. The new tossing group will toss and catch a total of 9 times. Remember to have a flat surface to volley off of so that the ball goes the direction that you are facing. You can do this by keeping your dominant hand on top of your non-dominant hand and your thumbs together not on top of each other.
Can you and your partner volley to each other and then over the net 7 times in a row? How about 8 or 9 times? Face your target for a more accurate volley.
Next try to volley the ball to your partner and then over the net, only instead of catching the ball try to volley it to your partner and then over the net again. This should be back and forth between the two groups of partners. It is important to watch the ball and when the ball makes contact with your forearms to extend towards your target with your arms and your feet.
How many times in a row can the two sets of partners volley the ball back and forth over the net? Keep your knees bent and your feet shoulder width apart so that you can move quickly to the ball so that the rally can continue.
Closure/Assessment: Raise your hand and tell me if it was it easier to volley the ball to your partner or over the net to the other group? That is interesting, why do you think that was easier? Now raise your hand and tell me what are three cues that we need to

remember when volleying the ball over a net? (eyes on the ball, knees bent, and face the target)
Physical Education Teacher Education Program Central Washington University
Serving Over a Net Lesson #12
Objectives: (Specific, Behavioral, Assessable) Students
1. The student will be able to verbally describe the keys to serving the volleyball over a net (EALR 1.1, 1.2 NASPE 1, 3. a. Watch the ball (until the striking arm contacts it). b. Extend to target (extend the striking arm toward the target, over the net).
2. The student will be able to demonstrate the proper technique to serve the volleyball over a net (EALR 1.1, 1.2 NASPE 1, 3. Teacher Equipment: (for a class of 30 students)
o 30 Volleyball trainers o 3 Volleyball net o 4 Volleyball stands o 3 Hula-hoops o Marking tape for wall o 40 Numbered poly spots o 10 Beach balls o 10 Volleyball trainers o 10 Foam balls o Stereo with CD player o Fischer Price CD: Dance, Baby, Dance o 3 Enlarged serving skill charts

Instant Activity: “Happy New Year” See attached Set Induction: If you can jump serve, demonstrate a jump serve, otherwise demonstrate a regular volleyball serve. “Wouldn’t it be awesome if you could serve like that. It took me a long time to learn how to jump serve but I started by learning how to serve a regular volleyball serve like you are going to do today!” Informing Task #1: When I say, “GO” everyone needs to skip to the hula-hoops and get a volleyball. Then line up in front of the masking tape that is on the wall. Then put your back to the wall and take 4 big steps forward and then turn around and face the wall. Begin to serve the ball towards the wall. To serve you are going to start with your dominant hand by your ear and your non-dominant hand is going to hold the ball out in front of you. With your non-dominant hand you are going to toss the ball 3 feet above your head. As the ball comes back down take the hand by your ear and extend it up as you swing through the ball. You should follow your swing through straight.
MAF/Instructional techniques
Extensions Refinements Application
• The balls will be evenly distributed between the three hula-hoops
• Students facing a wall, working independently at this task.
• Have a masking taped line 7 feet 6 inches above the ground on the walls around the gym.
1. Arm pulled back by your ear, with the ball out in front. 2. Contact the ball high and slightly in front of you. 3. Extend to target (extend the serving arm toward the target, over the net). 4. Watch the ball (until the serving arm contacts it).
Can you hit the wall with the ball 11 times in a row? Keep your body square to the wall which means that your feet and shoulders are pointing towards the wall.
Next, I want you to try and serve the ball so that it hits the wall above the masking tape. Really concentrate on contacting the ball high in the air and slightly in front of you. This will also help to
How many times in a row can you serve the ball and hit the wall above the tape? Watch the ball until you make contact with the ball. You will be able to see if you are contacting the ball in front of you or not.
make your serve more accurate.
Informing Task #2: When I say “GO” partner up with someone who wears the same color shirt you have on. You have 10 seconds. The oldest partner will jump to the hula-hoops and place one of the balls back and then return to their partner. You will both then find a space across from each other along the net. You should be about four big steps away from the net. The youngest person will begin to serve the ball over the net while the older partner will roll the ball back to them. Serve the ball 12 times. Your arm should be back by your ear with the ball out in front of you in your non-dominant hand. Remember to toss the ball 3 feet high and slightly in front of you. 1. Arm pulled back by your
ear, with the ball out in front. 2. Contact the ball high and slightly in front of you. 3. Extend to target (extend the serving arm toward the target, over the net). 4. Watch the ball (until the serving arm contacts it). 5. Face your partner when you are serving.
Can you serve the ball over the net 6 times in a row? For accurate serving, after you contact the ball your serving hand should follow straight through.
Now switch so that the person that was serving is now rolling the ball back. The server should serve the ball 12 times. Make sure that you are square to your partner, which means to have your toes and shoulders facing them. Also keep your eyes on the ball until you make contact with it.
Can you clear the net with the ball 6 times out of 12? Extend your serving arm towards the target on the other side of the net which should be at your partner.
Closure/Assessment: By a show of hands how many people thought that it was harder to serve over the net than above the tape on the wall? That is interesting because the first time you served the ball over the net you were the same distance from the net as to the wall and the net is at the same height as the tape on the wall. Someone raise their hand and tell me two cues we went over today. (watch the

ball, extend to the target, arm by your ear, etc)
Physical Education Teacher Education Program Central Washington University
Serving to a Target Lesson #13
Objectives: (Specific, Behavioral, Assessable) Students
1. The student will be able to verbally describe the keys to serving the volleyball to a target (EALR 1.1, 1.2 NASPE 1, 3. a. Watch the ball (until the striking arm contacts it). b. Extend to target (extend the striking arm toward the target, over the net). c. Face your target
2. The student will be able to demonstrate the proper technique of serving the volleyball to a target (EALR 1.1, 1.2 NASPE 1, 3. Teacher Equipment: (for a class of 30 students)
o 15 Volleyball trainers o 3 Volleyball nets o 4 Volleyball stands o 12 Large envelopes o 24 Index cards o 2 Poster boards o 3 Hula-hoops
Instant Activity: “Deal or No Deal” See attached Set Induction: “I want everyone to close your eyes. Now imagine that you are in the forest and you come upon a huge fence. Now imagine that a deer comes up next to you. You realize that the only way that you can get over the fence is to climb it, which can be difficult and dangerous. Just as you get ready to begin your climb you watch in amazement as the deer jumps with ease over the fence. You longingly wish that it were going to be that easy for you. Now you may open your eyes. Today we are going to work on serving over a volleyball net which will look a lot like that deer jumping over the fence with ease.” Informing Task #1: When I say, “GO” partner up with the person who has the same color and number as you do. The partner with the diamond or club card will jog to the hula-hoops and get a volleyball. With your partner you will practice serving over a net. Partner #1, how was holding the heart or spade card will stand at the 10 foot line and serve the ball over the net. Partner #2 retrieves the ball and then serves it back over the net standing on the 10-foot line on the opposite side of the net. Remember to serve you are going to start with your dominant hand by your ear and your non-dominant hand is going to hold the ball out in front of you. With your non-dominant hand you are going to toss the ball 3 feet above your head. As the ball comes back down take the hand by your ear and extend it up as you swing through the ball. You should follow your swing through straight.
MAF/Instructional techniques
Extensions Refinements Application
• Students will be given a playing card as they enter the gym. They will be partnered up with the person who has the same color and number as they do.
• The balls will be evenly distributed between the hula-hoops.
• The volleyball nets will already be set up in the gym as the students come in.
1. Arm pulled back by your ear, with the ball out in front. 2. Contact the ball high and slightly in front of you. 3. Extend to target (extend the serving arm toward the target, over the net). 4. Watch the ball (until the serving arm contacts it).
How many times can you serve the ball over the net in a row? Is it more or less than your partner? Keep your body square to the net and your partner. Your toes should be pointing towards the net and your shoulders should be parallel to the net.
Now, try serving the ball Count how many times out of 15 tries
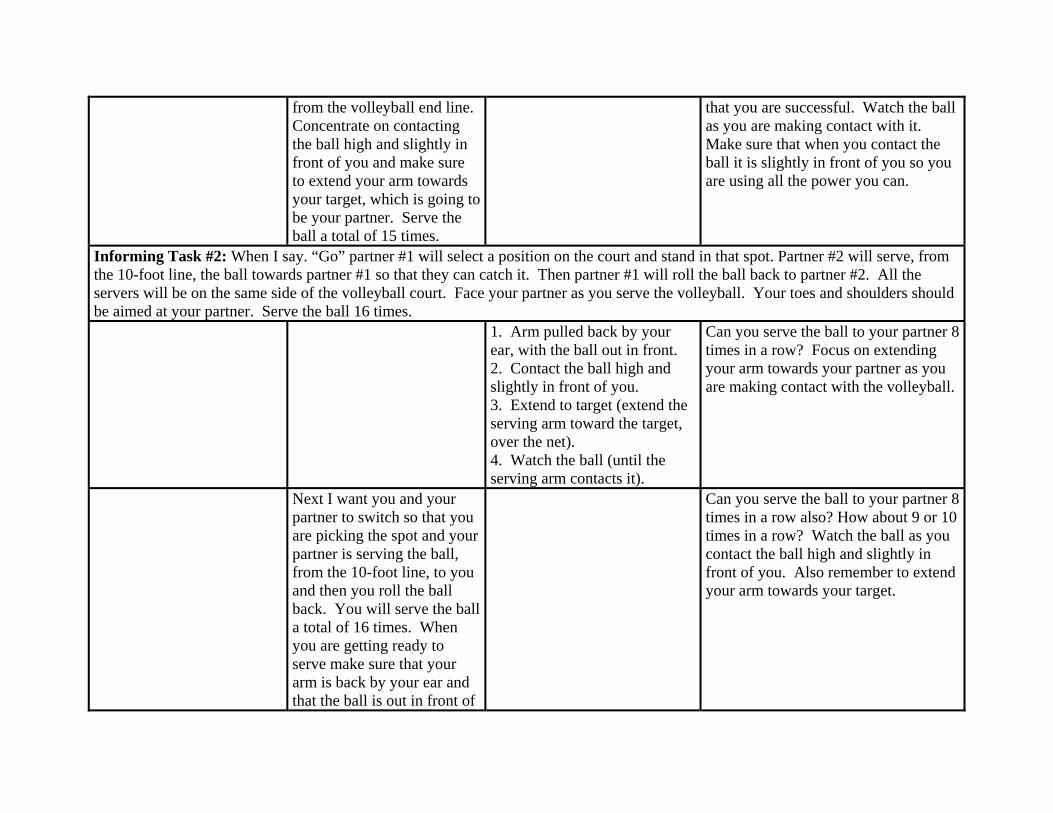
from the volleyball end line. Concentrate on contacting the ball high and slightly in front of you and make sure to extend your arm towards your target, which is going to be your partner. Serve the ball a total of 15 times.
that you are successful. Watch the ball as you are making contact with it. Make sure that when you contact the ball it is slightly in front of you so you are using all the power you can.
Informing Task #2: When I say. “Go” partner #1 will select a position on the court and stand in that spot. Partner #2 will serve, from the 10-foot line, the ball towards partner #1 so that they can catch it. Then partner #1 will roll the ball back to partner #2. All the servers will be on the same side of the volleyball court. Face your partner as you serve the volleyball. Your toes and shoulders should be aimed at your partner. Serve the ball 16 times.
1. Arm pulled back by your ear, with the ball out in front. 2. Contact the ball high and slightly in front of you. 3. Extend to target (extend the serving arm toward the target, over the net). 4. Watch the ball (until the serving arm contacts it).
Can you serve the ball to your partner 8 times in a row? Focus on extending your arm towards your partner as you are making contact with the volleyball.
Next I want you and your partner to switch so that you are picking the spot and your partner is serving the ball, from the 10-foot line, to you and then you roll the ball back. You will serve the ball a total of 16 times. When you are getting ready to serve make sure that your arm is back by your ear and that the ball is out in front of
Can you serve the ball to your partner 8 times in a row also? How about 9 or 10 times in a row? Watch the ball as you contact the ball high and slightly in front of you. Also remember to extend your arm towards your target.

you in your non-dominant hand ready to be tossed.
Closure/Assessment: Everyone needs to form a line from the door back. As you leave the classroom today I would like you to tell me one cue for serving the ball to a target. You may not repeat the same cues as the person in front of you. (Answers will include square to your target, watch the ball, contact the ball high, etc)
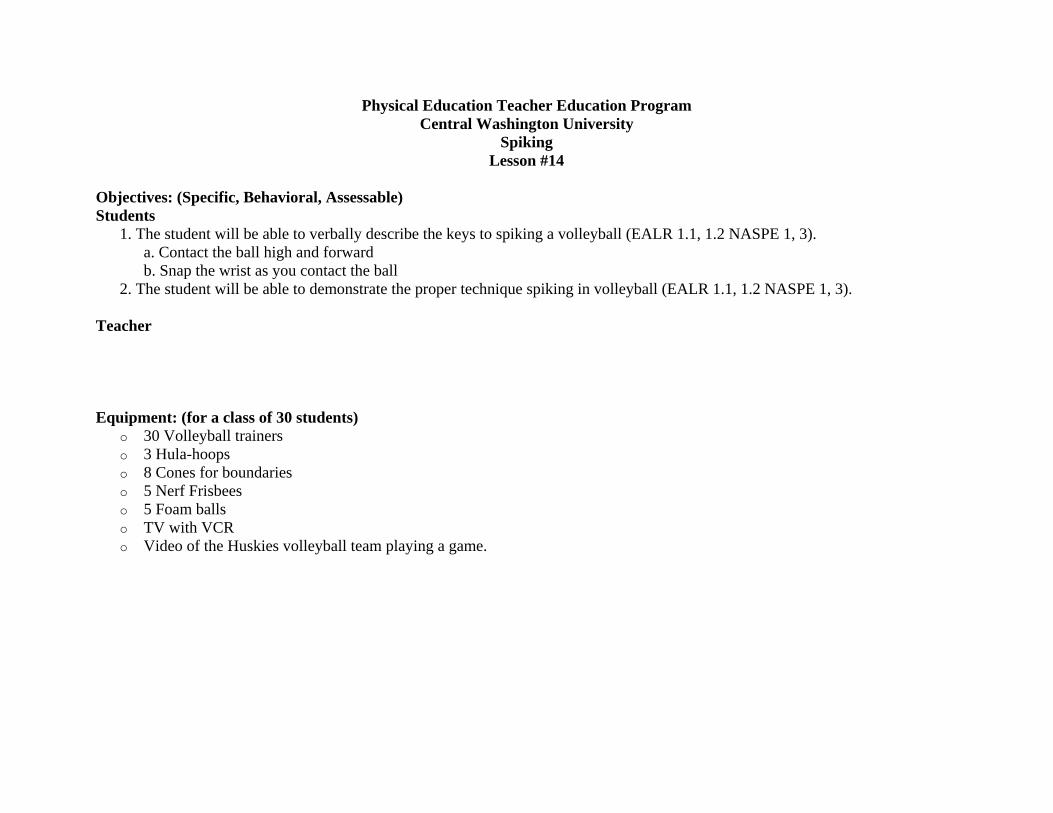
Physical Education Teacher Education Program Central Washington University
Spiking Lesson #14
Objectives: (Specific, Behavioral, Assessable) Students
1. The student will be able to verbally describe the keys to spiking a volleyball (EALR 1.1, 1.2 NASPE 1, 3). a. Contact the ball high and forward b. Snap the wrist as you contact the ball
2. The student will be able to demonstrate the proper technique spiking in volleyball (EALR 1.1, 1.2 NASPE 1, 3). Teacher Equipment: (for a class of 30 students)
o 30 Volleyball trainers o 3 Hula-hoops o 8 Cones for boundaries o 5 Nerf Frisbees o 5 Foam balls o TV with VCR o Video of the Huskies volleyball team playing a game.
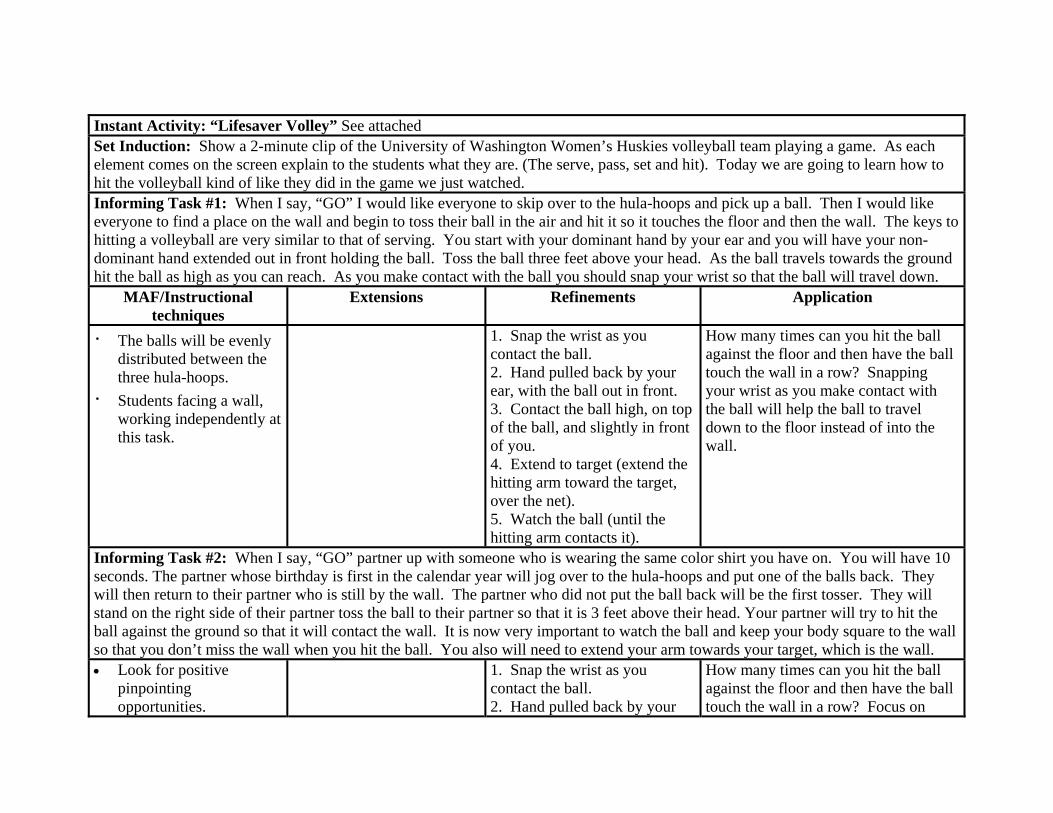
Instant Activity: “Lifesaver Volley” See attached Set Induction: Show a 2-minute clip of the University of Washington Women’s Huskies volleyball team playing a game. As each element comes on the screen explain to the students what they are. (The serve, pass, set and hit). Today we are going to learn how to hit the volleyball kind of like they did in the game we just watched. Informing Task #1: When I say, “GO” I would like everyone to skip over to the hula-hoops and pick up a ball. Then I would like everyone to find a place on the wall and begin to toss their ball in the air and hit it so it touches the floor and then the wall. The keys to hitting a volleyball are very similar to that of serving. You start with your dominant hand by your ear and you will have your non-dominant hand extended out in front holding the ball. Toss the ball three feet above your head. As the ball travels towards the ground hit the ball as high as you can reach. As you make contact with the ball you should snap your wrist so that the ball will travel down.
MAF/Instructional techniques
Extensions Refinements Application
· The balls will be evenly distributed between the three hula-hoops.
· Students facing a wall, working independently at this task.
1. Snap the wrist as you contact the ball. 2. Hand pulled back by your ear, with the ball out in front. 3. Contact the ball high, on top of the ball, and slightly in front of you. 4. Extend to target (extend the hitting arm toward the target, over the net). 5. Watch the ball (until the hitting arm contacts it).
How many times can you hit the ball against the floor and then have the ball touch the wall in a row? Snapping your wrist as you make contact with the ball will help the ball to travel down to the floor instead of into the wall.
Informing Task #2: When I say, “GO” partner up with someone who is wearing the same color shirt you have on. You will have 10 seconds. The partner whose birthday is first in the calendar year will jog over to the hula-hoops and put one of the balls back. They will then return to their partner who is still by the wall. The partner who did not put the ball back will be the first tosser. They will stand on the right side of their partner toss the ball to their partner so that it is 3 feet above their head. Your partner will try to hit the ball against the ground so that it will contact the wall. It is now very important to watch the ball and keep your body square to the wall so that you don’t miss the wall when you hit the ball. You also will need to extend your arm towards your target, which is the wall. • Look for positive
pinpointing opportunities.
1. Snap the wrist as you contact the ball. 2. Hand pulled back by your
How many times can you hit the ball against the floor and then have the ball touch the wall in a row? Focus on
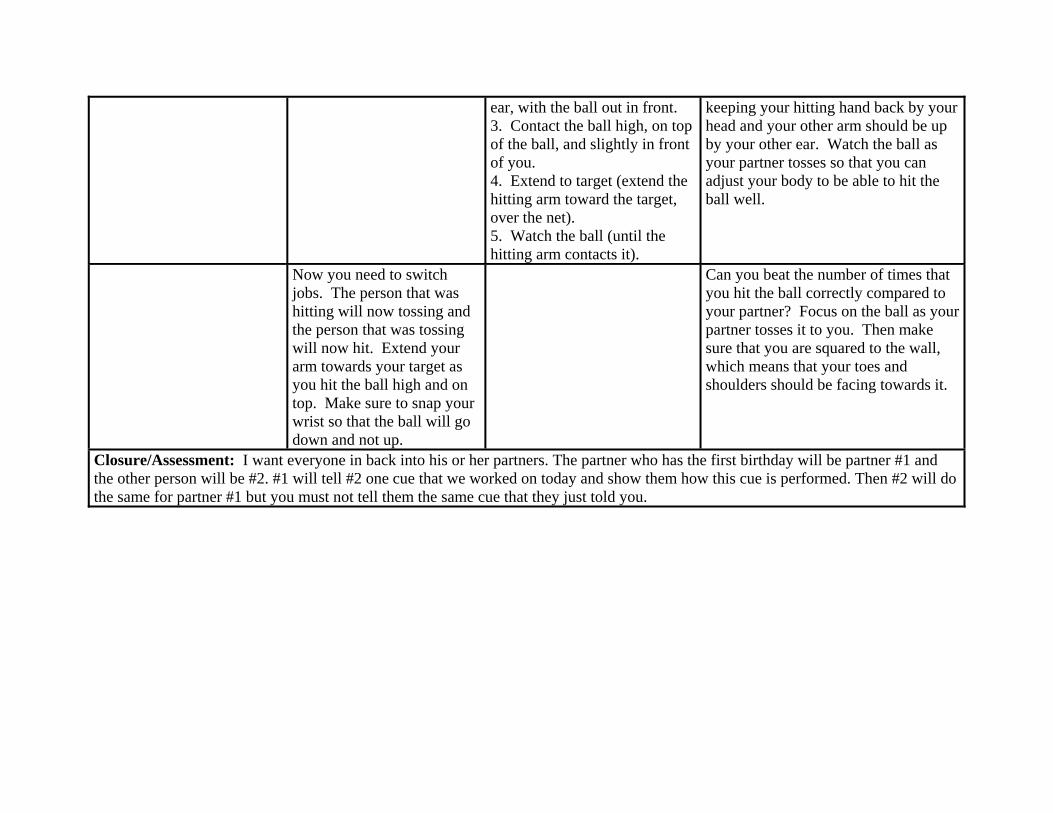
ear, with the ball out in front. 3. Contact the ball high, on top of the ball, and slightly in front of you. 4. Extend to target (extend the hitting arm toward the target, over the net). 5. Watch the ball (until the hitting arm contacts it).
keeping your hitting hand back by your head and your other arm should be up by your other ear. Watch the ball as your partner tosses so that you can adjust your body to be able to hit the ball well.
Now you need to switch jobs. The person that was hitting will now tossing and the person that was tossing will now hit. Extend your arm towards your target as you hit the ball high and on top. Make sure to snap your wrist so that the ball will go down and not up.
Can you beat the number of times that you hit the ball correctly compared to your partner? Focus on the ball as your partner tosses it to you. Then make sure that you are squared to the wall, which means that your toes and shoulders should be facing towards it.
Closure/Assessment: I want everyone in back into his or her partners. The partner who has the first birthday will be partner #1 and the other person will be #2. #1 will tell #2 one cue that we worked on today and show them how this cue is performed. Then #2 will do the same for partner #1 but you must not tell them the same cue that they just told you.

Physical Education Teacher Education Program Central Washington University
Modified Volleyball Game Lesson #15
Objectives: (Specific, Behavioral, Assessable) Students
1. The students will be able to demonstrate all of the skills that they learned throughout the volleying lesson (EALR 1.1, 1.2 NASPE 1, 3). 2. Students will use the cues (EALR 1.1, 1.2 NASPE 1, 3): a. Keep your eye on the ball b. Use a flat surface c. Move your feet d. Keep your knees bent e. Face your target
Teacher Equipment: (for a class of 30 students)
o 3 Volleyball trainers o 3 Volleyball net o 4 Volleyball stands o 40 Numbered poly spots o 10 Beach balls o 10 Volleyball trainers o 10 Foam balls o Stereo with CD player o Fischer Price CD: Dance, Baby, Dance
Instant Activity: “Happy New Year” See attached Set Induction: “Raise your hand and tell me one of the skills that we have learned during this lesson. (volleying different ways, setting, hitting, and serving) Today we are going to play a game that will use all those skills except for hitting.” Informing Task #1: When I say, “GO” teams will be formed by separating the students into teams that have the same number card. You should be in teams of four. The aces and two will be on court one; the threes and fours on court two, and the fives and sixes on court three. You will play paper, rock, and scissors to determine which team will serve first. They team that serves first will have one player serve from behind the volleyball court end line. The team on the opposite side will then catch the serve and toss it to one of the players on their team who will then volley the ball to another teammate who will set the ball over the net. The receiving team this time will then do the same thing. If the ball drops on the ground or the team does not catch the ball that comes over the net then play stops and the next player serves. After each player on that team has served it is the next teams chance to serve. Each game will last 5 minutes. After 5 minutes teams will rotate to the left and face a new opponent. (For the more skilled game play have the player volley the first ball instead of catch it)
MAF/Instructional techniques
Extensions Refinements Application
• As the students enter the gym class they will be given a playing card. The teams will be formed by separating the students into teams that have the same number card. They should be in teams of four.
• The nets will already be set up as the students enter the gym.
• Look for opportunities to use positive pinpointing.
Passing 1. Eyes are focused on the ball.2. Dominant hand on top of non-dominant hand. 3. Thumbs together. 4. Flat Surface: extend arms forward, forearms together. 5. Extend to target: extend arms upward on contact. 6. Legs shoulder width part with knees bent. Arms out in front. Setting 7. Let the ball contact the fingers on the tips. 8. The students will bend their knees in preparation to receive the ball, and extend their legs

and arms upward on contact. 9. Keep the arms bent while receiving the ball. 10. The students will move their feet quickly in order to position themselves under the ball in preparation for the volley. 11.Keep your eyes focused on the ball. You should watch as the ball contacts your hands and leaves you hands after you set the ball. Serving 12. Arm pulled back by your ear, with the ball out in front. 13. Contact the ball high and slightly in front of you. 14. Extend to target (extend the serving arm toward the target, over the net). 15. Watch the ball (until the serving arm contacts it).
Closure/Assessment: On your way out of the class I would like each of you to tell me one of the cues that we used to play the game today? (Setting, serving, passing, etc) Please don’t repeat the same cue that the person in front of you used.

ASSESSMENT INSTRUCTIONS
All formal assessments will be administered though knowledge-based quizzes, as well as performance based and criteria specific tests. These assessments are given throughout the unit according to the block schedule. Quizzes, whether they are verbal or paper, are to be given at the end of class time. Performance test are used to assess the individual students outcome of a specific skill, without assessing particular refinements or cues related to the skill or movement. Criterion test are used to assess the particular refinements and cues used to demonstrate the still or movement correctly. Individual out comes of each movement are not assessed in a criterion test. Specific instructions for each test are given in detail following this page.

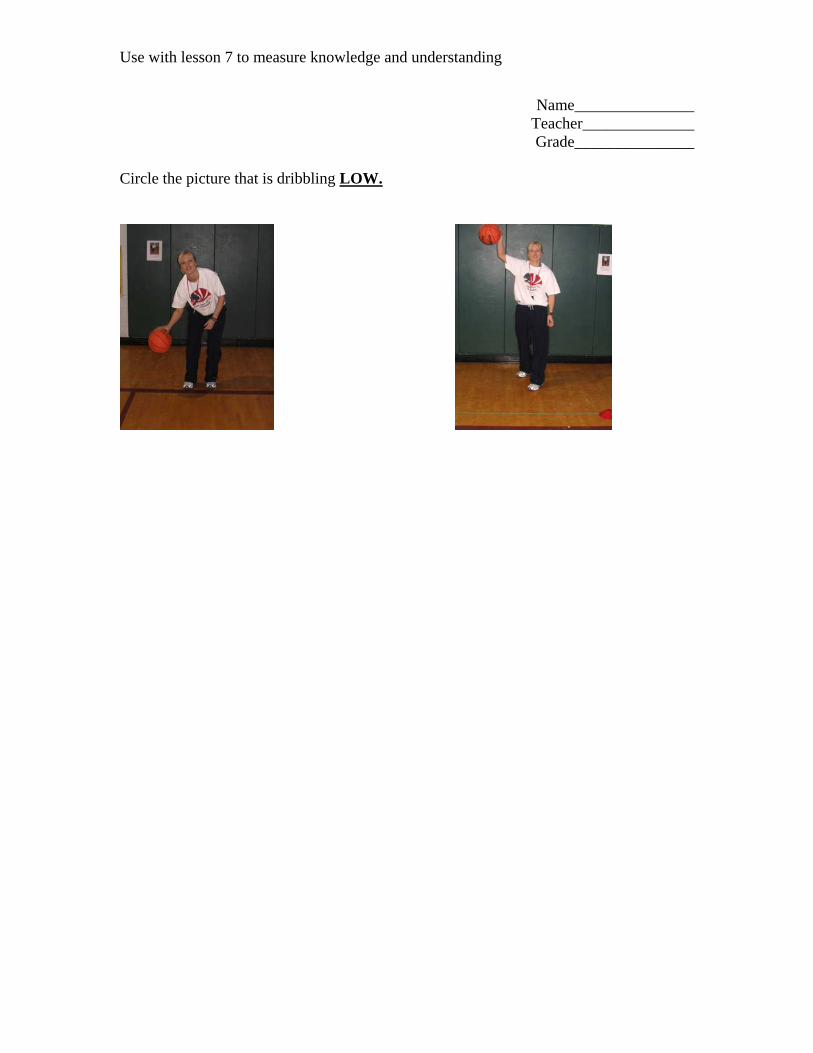
Use with lesson 7 to measure knowledge and understanding
Name_______________ Teacher______________ Grade_______________
Circle the picture that is dribbling LOW.
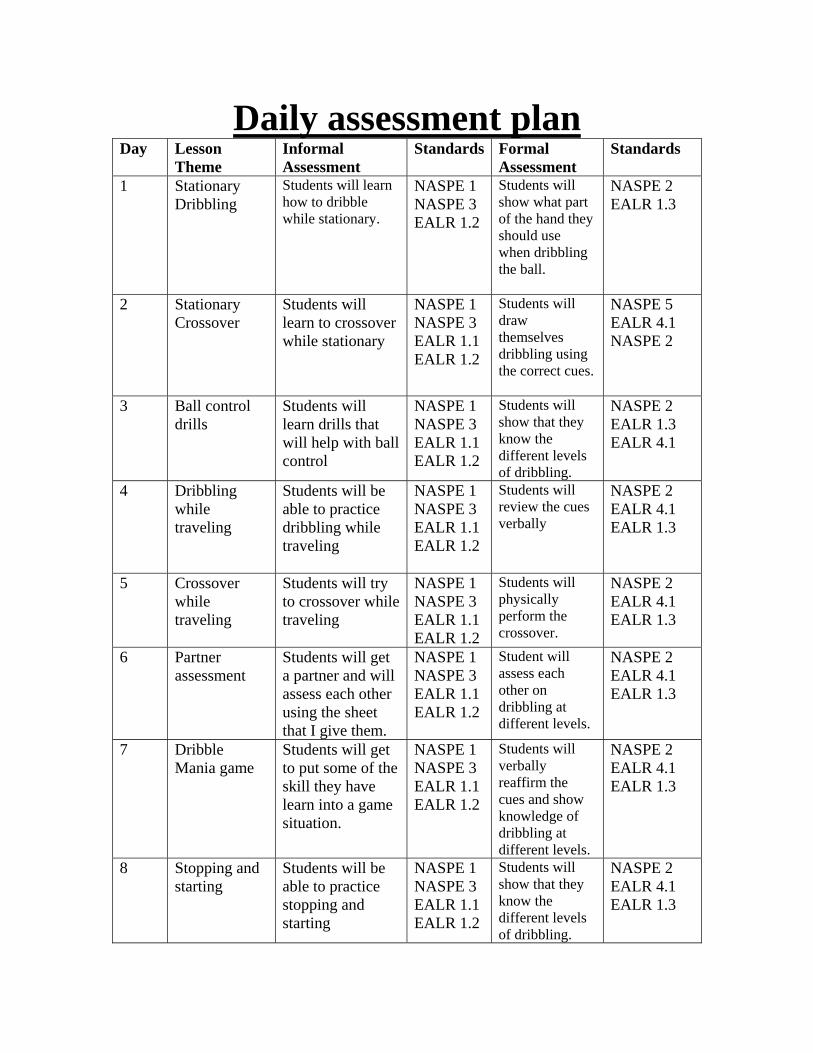
Daily assessment planDay Lesson
Theme Informal Assessment
Standards Formal Assessment
Standards
1 Stationary Dribbling
Students will learn how to dribble while stationary.
NASPE 1 NASPE 3 EALR 1.2
Students will show what part of the hand they should use when dribbling the ball.
NASPE 2 EALR 1.3
2 Stationary Crossover
Students will learn to crossover while stationary
NASPE 1 NASPE 3 EALR 1.1 EALR 1.2
Students will draw themselves dribbling using the correct cues.
NASPE 5 EALR 4.1 NASPE 2
3 Ball control drills
Students will learn drills that will help with ball control
NASPE 1 NASPE 3 EALR 1.1 EALR 1.2
Students will show that they know the different levels of dribbling.
NASPE 2 EALR 1.3 EALR 4.1
4 Dribbling while traveling
Students will be able to practice dribbling while traveling
NASPE 1 NASPE 3 EALR 1.1 EALR 1.2
Students will review the cues verbally
NASPE 2 EALR 4.1 EALR 1.3
5 Crossover while traveling
Students will try to crossover while traveling
NASPE 1 NASPE 3 EALR 1.1 EALR 1.2
Students will physically perform the crossover.
NASPE 2 EALR 4.1 EALR 1.3
6 Partner assessment
Students will get a partner and will assess each other using the sheet that I give them.
NASPE 1 NASPE 3 EALR 1.1 EALR 1.2
Student will assess each other on dribbling at different levels.
NASPE 2 EALR 4.1 EALR 1.3
7 Dribble Mania game
Students will get to put some of the skill they have learn into a game situation.
NASPE 1 NASPE 3 EALR 1.1 EALR 1.2
Students will verbally reaffirm the cues and show knowledge of dribbling at different levels.
NASPE 2 EALR 4.1 EALR 1.3
8 Stopping and starting
Students will be able to practice stopping and starting
NASPE 1 NASPE 3 EALR 1.1 EALR 1.2
Students will show that they know the different levels of dribbling.
NASPE 2 EALR 4.1 EALR 1.3
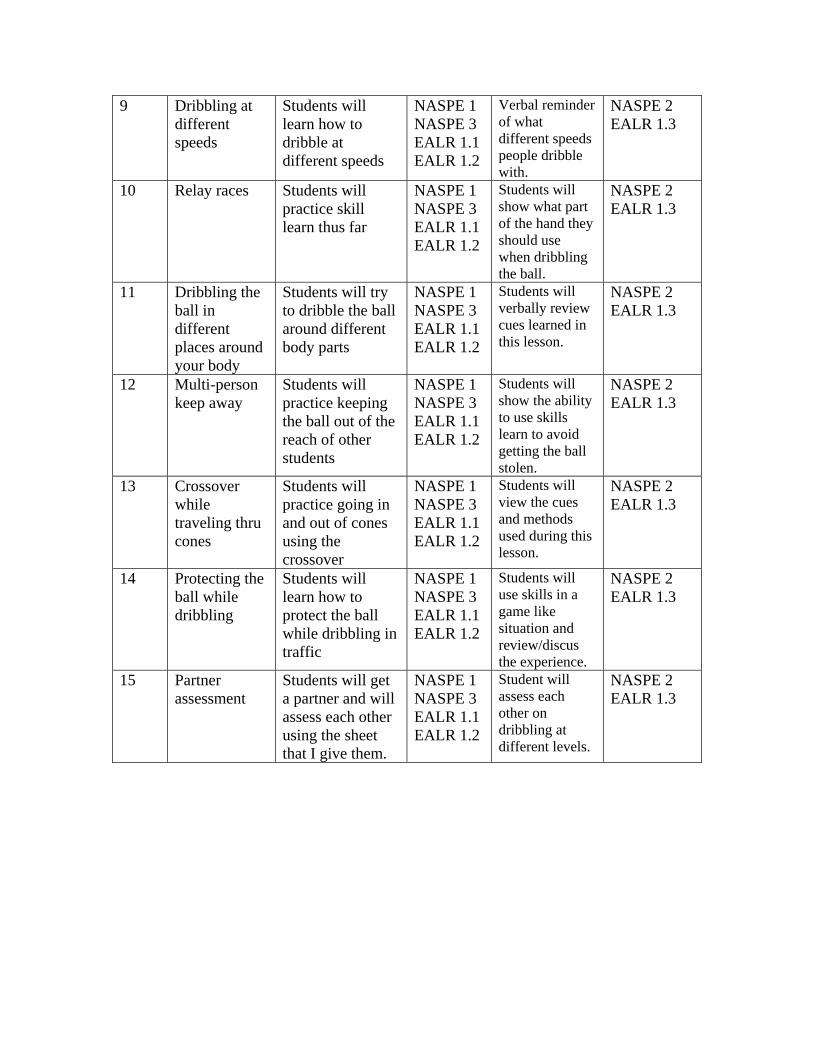
9 Dribbling at different speeds
Students will learn how to dribble at different speeds
NASPE 1 NASPE 3 EALR 1.1 EALR 1.2
Verbal reminder of what different speeds people dribble with.
NASPE 2 EALR 1.3
10 Relay races Students will practice skill learn thus far
NASPE 1 NASPE 3 EALR 1.1 EALR 1.2
Students will show what part of the hand they should use when dribbling the ball.
NASPE 2 EALR 1.3
11 Dribbling the ball in different places around your body
Students will try to dribble the ball around different body parts
NASPE 1 NASPE 3 EALR 1.1 EALR 1.2
Students will verbally review cues learned in this lesson.
NASPE 2 EALR 1.3
12 Multi-person keep away
Students will practice keeping the ball out of the reach of other students
NASPE 1 NASPE 3 EALR 1.1 EALR 1.2
Students will show the ability to use skills learn to avoid getting the ball stolen.
NASPE 2 EALR 1.3
13 Crossover while traveling thru cones
Students will practice going in and out of cones using the crossover
NASPE 1 NASPE 3 EALR 1.1 EALR 1.2
Students will view the cues and methods used during this lesson.
NASPE 2 EALR 1.3
14 Protecting the ball while dribbling
Students will learn how to protect the ball while dribbling in traffic
NASPE 1 NASPE 3 EALR 1.1 EALR 1.2
Students will use skills in a game like situation and review/discus the experience.
NASPE 2 EALR 1.3
15 Partner assessment
Students will get a partner and will assess each other using the sheet that I give them.
NASPE 1 NASPE 3 EALR 1.1 EALR 1.2
Student will assess each other on dribbling at different levels.
NASPE 2 EALR 1.3
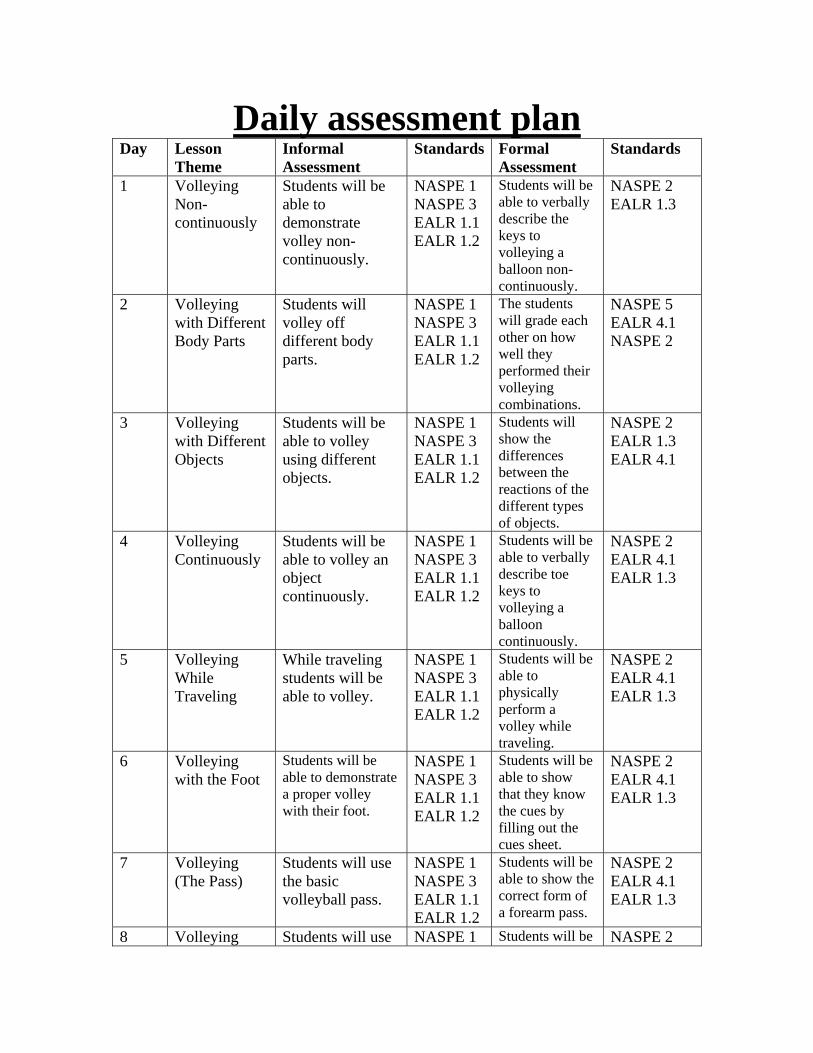
Daily assessment planDay Lesson
Theme Informal Assessment
Standards Formal Assessment
Standards
1 Volleying Non-continuously
Students will be able to demonstrate volley non-continuously.
NASPE 1 NASPE 3 EALR 1.1 EALR 1.2
Students will be able to verbally describe the keys to volleying a balloon non-continuously.
NASPE 2 EALR 1.3
2 Volleying with Different Body Parts
Students will volley off different body parts.
NASPE 1 NASPE 3 EALR 1.1 EALR 1.2
The students will grade each other on how well they performed their volleying combinations.
NASPE 5 EALR 4.1 NASPE 2
3 Volleying with Different Objects
Students will be able to volley using different objects.
NASPE 1 NASPE 3 EALR 1.1 EALR 1.2
Students will show the differences between the reactions of the different types of objects.
NASPE 2 EALR 1.3 EALR 4.1
4 Volleying Continuously
Students will be able to volley an object continuously.
NASPE 1 NASPE 3 EALR 1.1 EALR 1.2
Students will be able to verbally describe toe keys to volleying a balloon continuously.
NASPE 2 EALR 4.1 EALR 1.3
5 Volleying While Traveling
While traveling students will be able to volley.
NASPE 1 NASPE 3 EALR 1.1 EALR 1.2
Students will be able to physically perform a volley while traveling.
NASPE 2 EALR 4.1 EALR 1.3
6 Volleying with the Foot
Students will be able to demonstrate a proper volley with their foot.
NASPE 1 NASPE 3 EALR 1.1 EALR 1.2
Students will be able to show that they know the cues by filling out the cues sheet.
NASPE 2 EALR 4.1 EALR 1.3
7 Volleying (The Pass)
Students will use the basic volleyball pass.
NASPE 1 NASPE 3 EALR 1.1 EALR 1.2
Students will be able to show the correct form of a forearm pass.
NASPE 2 EALR 4.1 EALR 1.3
8 Volleying Students will use NASPE 1 Students will be NASPE 2
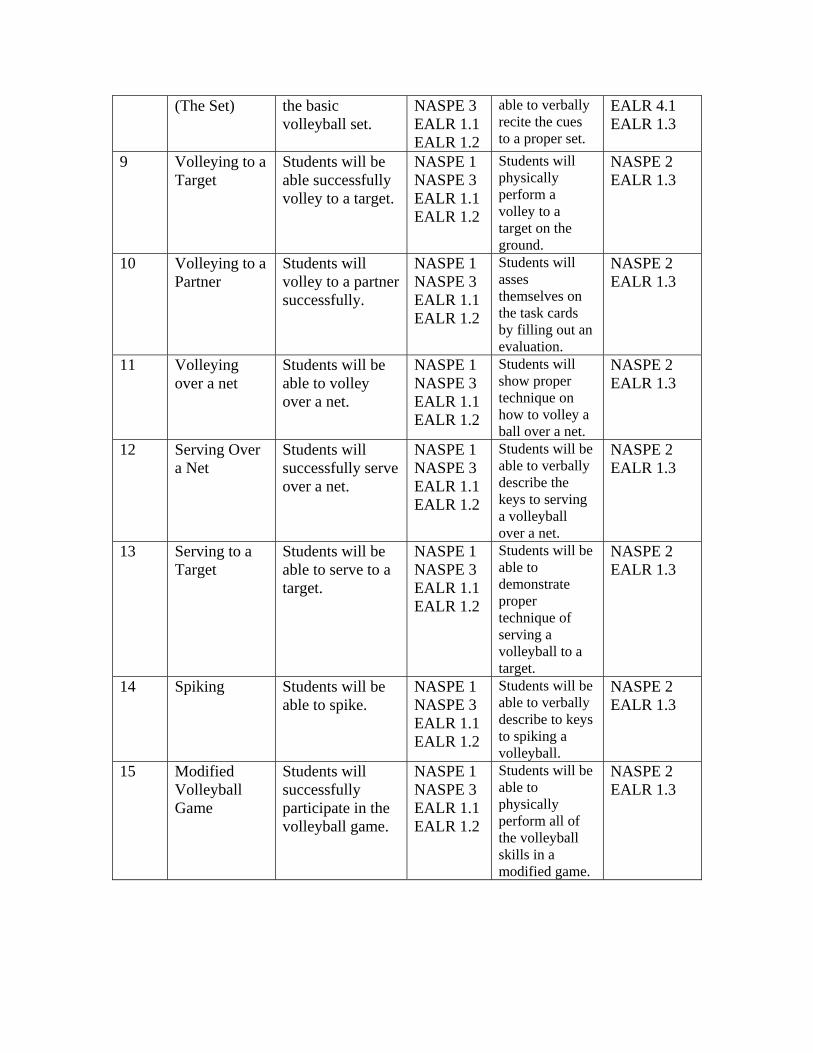
(The Set)
the basic volleyball set.
NASPE 3 EALR 1.1 EALR 1.2
able to verbally recite the cues to a proper set.
EALR 4.1 EALR 1.3
9 Volleying to a Target
Students will be able successfully volley to a target.
NASPE 1 NASPE 3 EALR 1.1 EALR 1.2
Students will physically perform a volley to a target on the ground.
NASPE 2 EALR 1.3
10 Volleying to a Partner
Students will volley to a partner successfully.
NASPE 1 NASPE 3 EALR 1.1 EALR 1.2
Students will asses themselves on the task cards by filling out an evaluation.
NASPE 2 EALR 1.3
11 Volleying over a net
Students will be able to volley over a net.
NASPE 1 NASPE 3 EALR 1.1 EALR 1.2
Students will show proper technique on how to volley a ball over a net.
NASPE 2 EALR 1.3
12 Serving Over a Net
Students will successfully serve over a net.
NASPE 1 NASPE 3 EALR 1.1 EALR 1.2
Students will be able to verbally describe the keys to serving a volleyball over a net.
NASPE 2 EALR 1.3
13 Serving to a Target
Students will be able to serve to a target.
NASPE 1 NASPE 3 EALR 1.1 EALR 1.2
Students will be able to demonstrate proper technique of serving a volleyball to a target.
NASPE 2 EALR 1.3
14 Spiking Students will be able to spike.
NASPE 1 NASPE 3 EALR 1.1 EALR 1.2
Students will be able to verbally describe to keys to spiking a volleyball.
NASPE 2 EALR 1.3
15 Modified Volleyball Game
Students will successfully participate in the volleyball game.
NASPE 1 NASPE 3 EALR 1.1 EALR 1.2
Students will be able to physically perform all of the volleyball skills in a modified game.
NASPE 2 EALR 1.3
Name: ____________________ Class: _____________ Date: _________________
Cues Sheet
Directions: In the space below draw one of the cues that we learned today. Make sure to label all parts.
Name: ____________________ Class: _____________ Date: _________________
Around the World Evaluation
Directions: Using complete sentences please answer the following questions. 1. What was your favorite continent to play at? 2. Why? 3. What was your least favorite continent? 4. Why?
Name: ____________________ Class: _____________ Date: _________________
Partner Performance Grading Sheet
Directions: Please place a smiley face next to the volley they did really well, a star if they did the volley ok, and a check if they did not complete the volley. Also below the space please write in what body part your partner is supposed to volley off of.
1. Volley #1__________ 2. Volley #2__________
3. Volley #3__________
4. Volley #4__________

Task Cards
Task cards are in 3 dribbling lessons and in one volleying lesson. Before sending the students to do
the stations give the students a brief overview of what the stations are. Using the stations give the students a chance to practice on their own. Each station is set up with a picture for help, and a goal for the students to try and reach. Post the stations
through out the gym, and allow the students to practice the stations and then have them rotate to
the next stations.
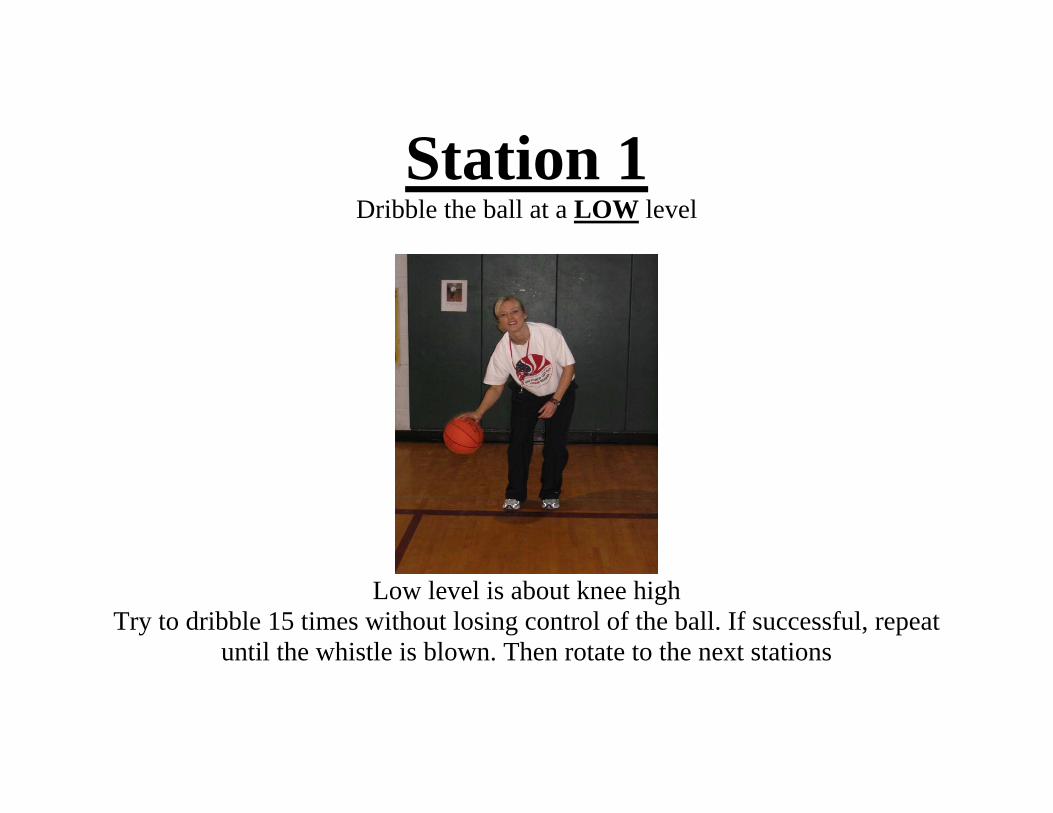
Station 1 Dribble the ball at a LOW level
Low level is about knee high
Try to dribble 15 times without losing control of the ball. If successful, repeat until the whistle is blown. Then rotate to the next stations
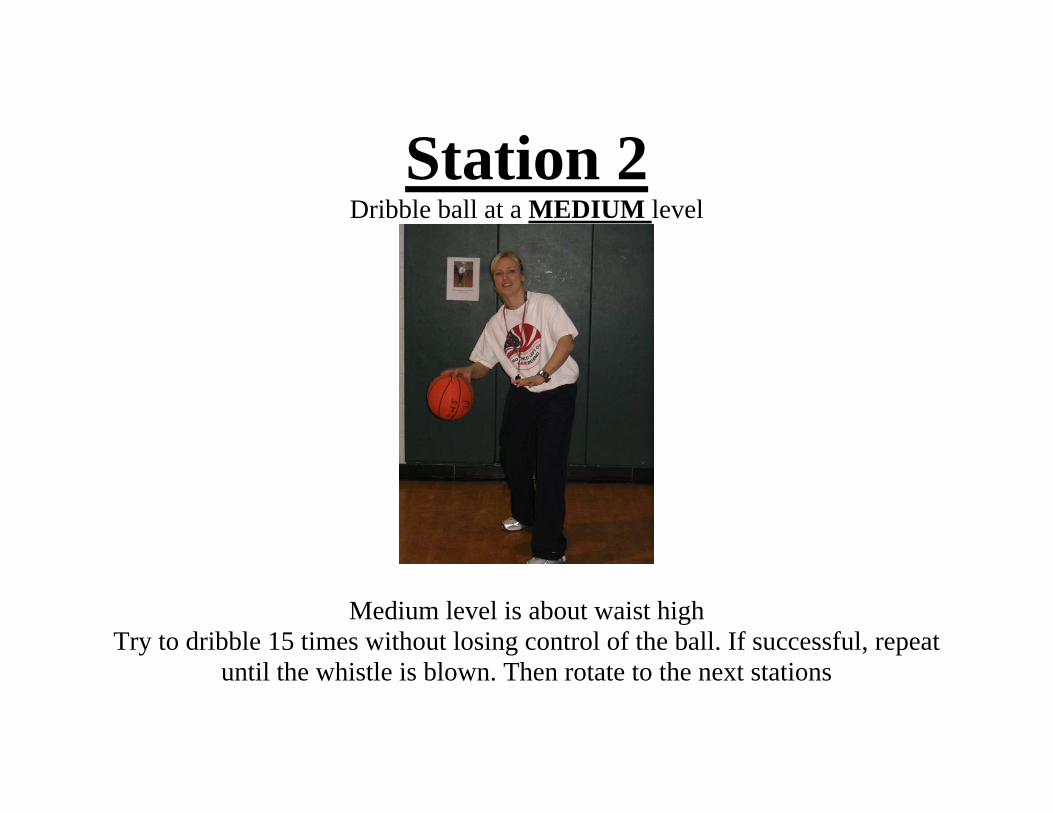
Station 2Dribble ball at a MEDIUM level
Medium level is about waist high Try to dribble 15 times without losing control of the ball. If successful, repeat
until the whistle is blown. Then rotate to the next stations

Station 3 Dribble the ball at a HIGH level
High level is about head high
Try to dribble 15 times without losing control of the ball. If successful, repeat until the whistle is blown. Then rotate to the next stations
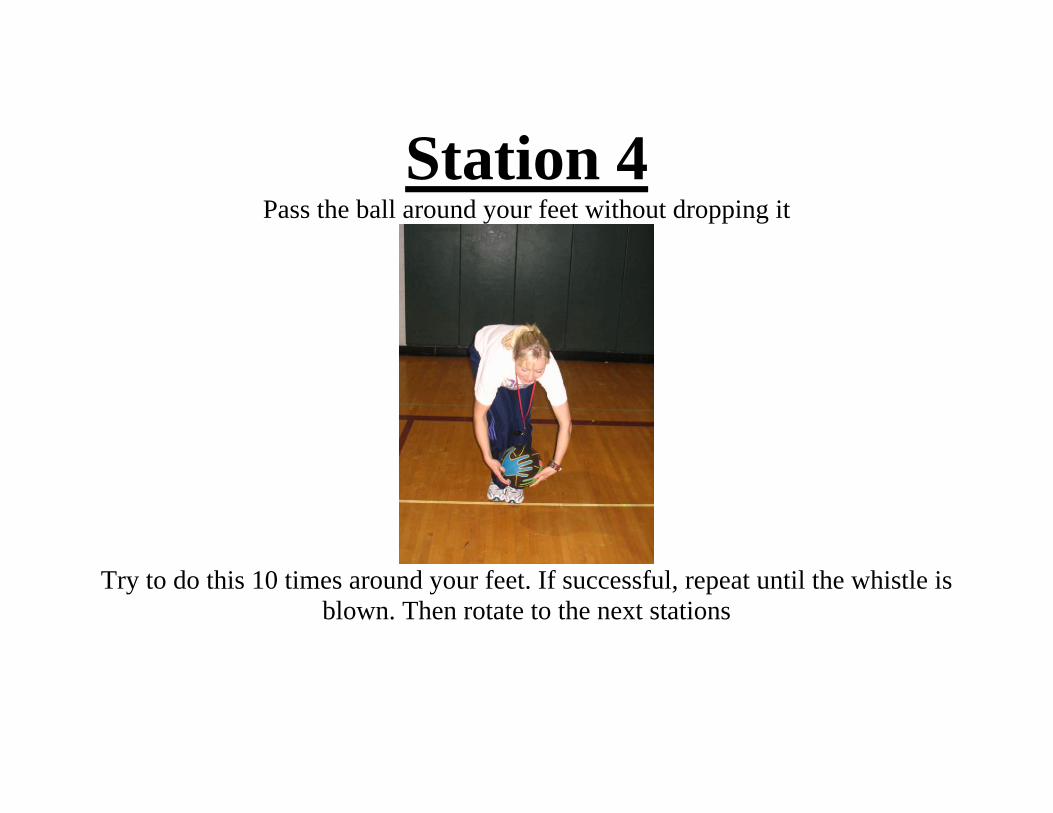
Station 4 Pass the ball around your feet without dropping it
Try to do this 10 times around your feet. If successful, repeat until the whistle is
blown. Then rotate to the next stations

Station 5 Pass the ball around your waist without dropping it
Try to do this 10 times around your waist. If successful, repeat until the whistle
is blown. Then rotate to the next stations
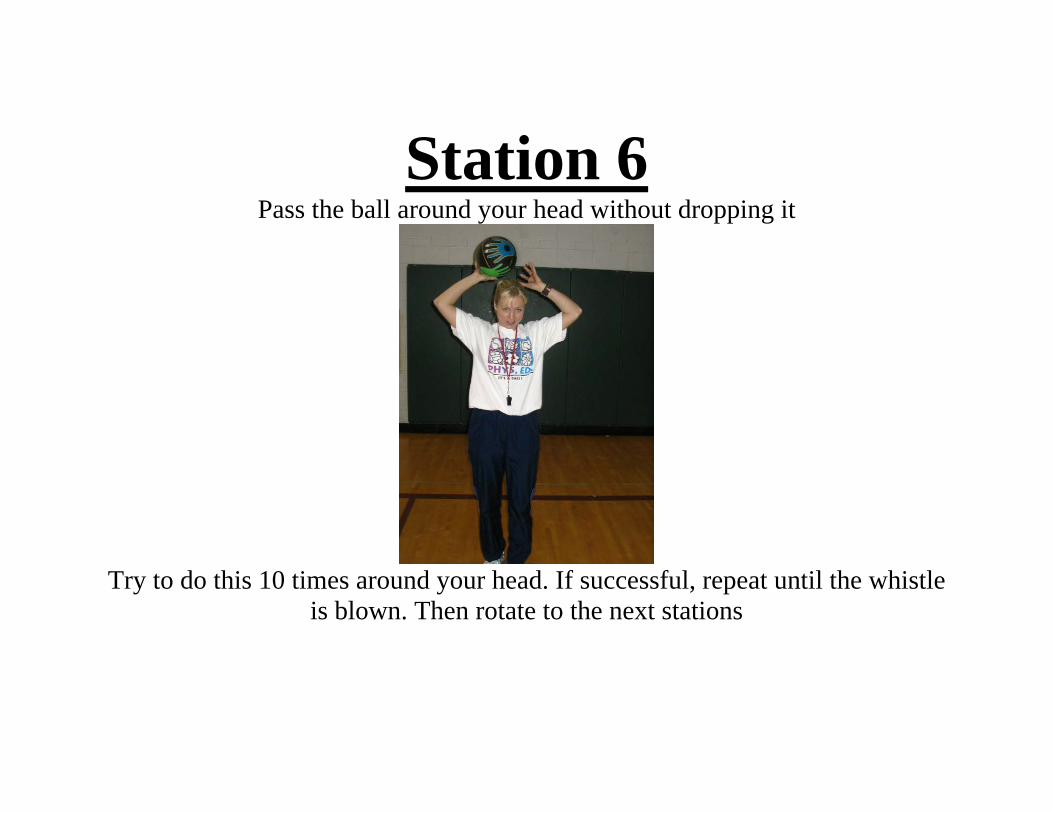
Station 6 Pass the ball around your head without dropping it
Try to do this 10 times around your head. If successful, repeat until the whistle
is blown. Then rotate to the next stations
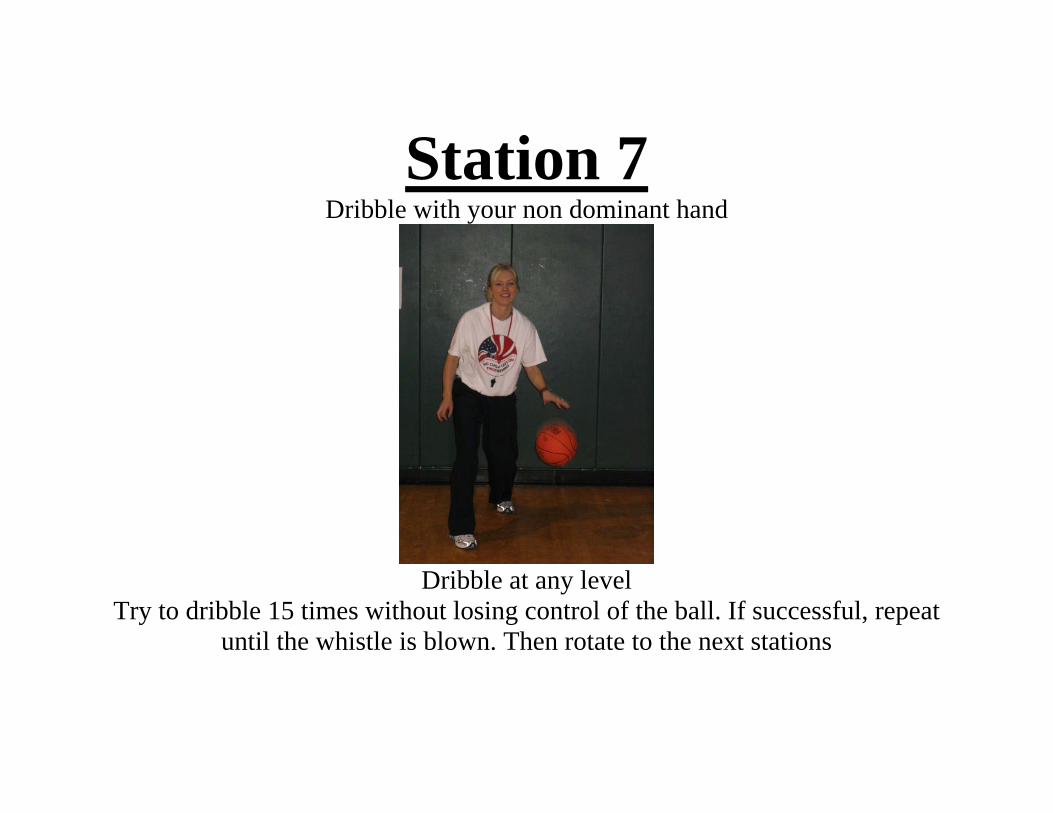
Station 7 Dribble with your non dominant hand
Dribble at any level
Try to dribble 15 times without losing control of the ball. If successful, repeat until the whistle is blown. Then rotate to the next stations

YOU DID IT! CONGRATULATIONS! Take a seat and wait for the rest of the class.
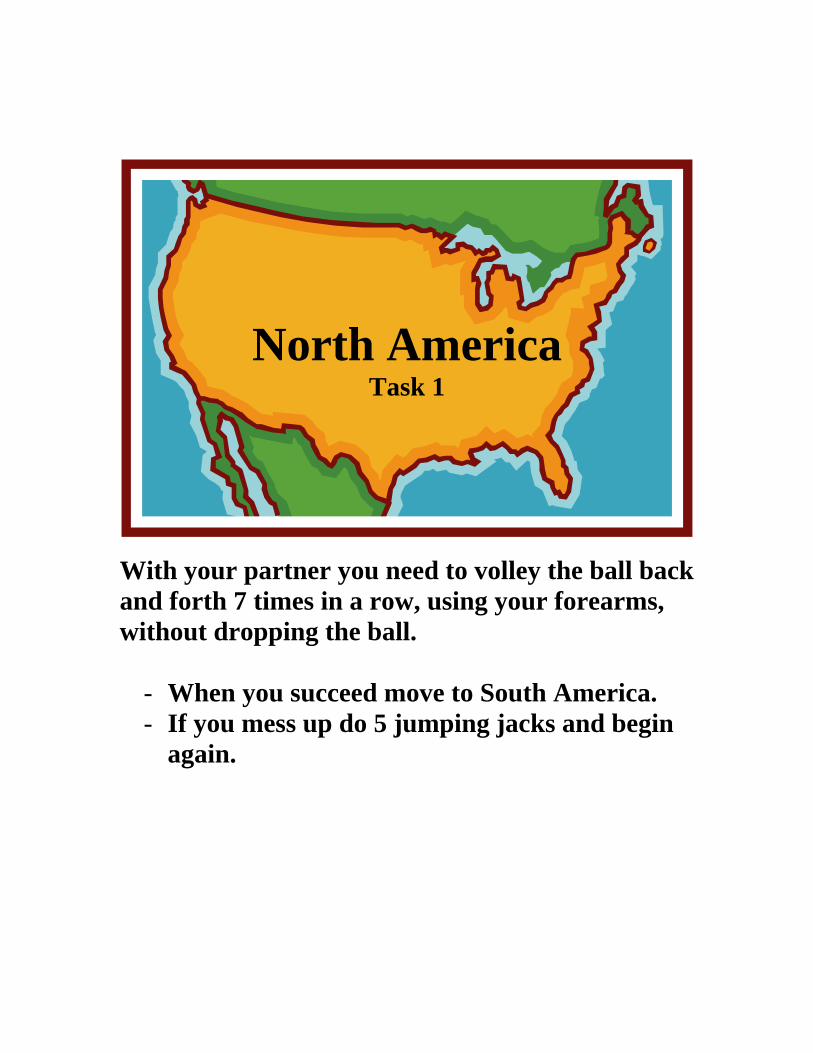
North America Task 1
With your partner you need to volley the ball back and forth 7 times in a row, using your forearms, without dropping the ball.
- When you succeed move to South America. - If you mess up do 5 jumping jacks and begin
again.
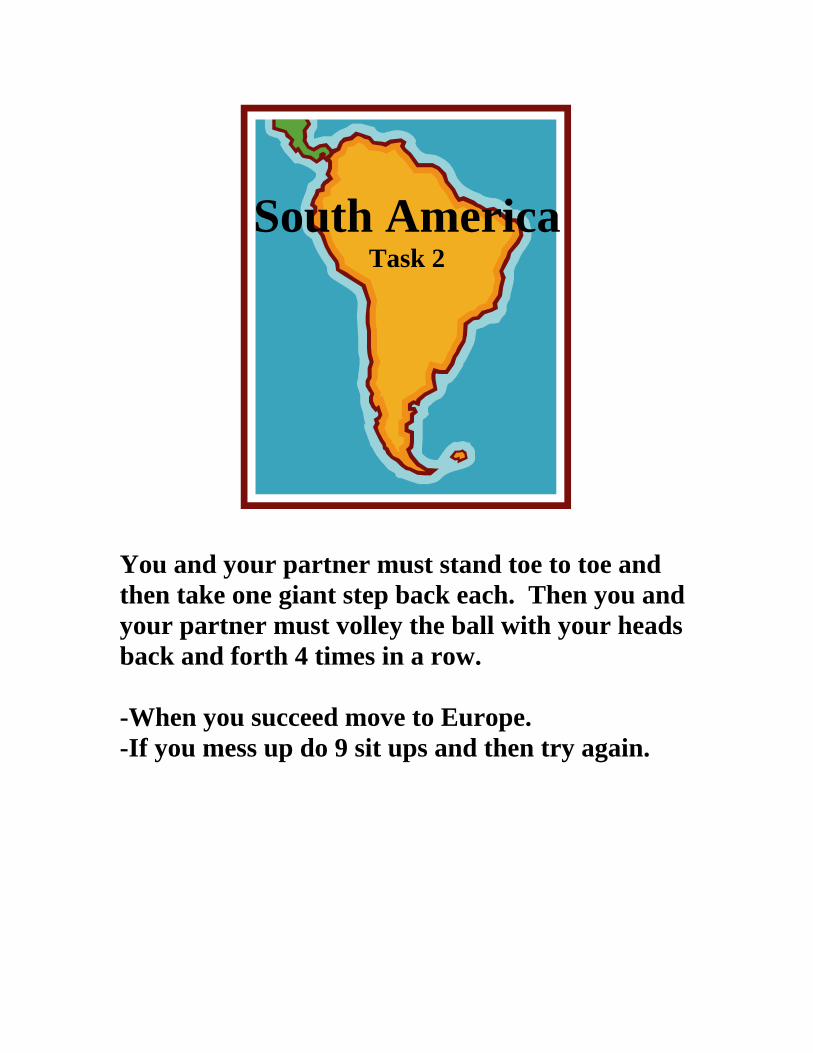
South America Task 2
You and your partner must stand toe to toe and then take one giant step back each. Then you and your partner must volley the ball with your heads back and forth 4 times in a row. -When you succeed move to Europe. -If you mess up do 9 sit ups and then try again.

Europe
Task 3
With your partner toss the ball to each other 9 times in a row and volley the ball using your foot successfully back to your partner. Then switch roles. -When you succeed move to Asia. -If you mess up perform 4 push-ups and then try again.

Asia Task 4
You and your partner will volley the ball, using your overhead set, first at two giant steps apart and then increasing the distance by one step until you are six giant steps apart. You can only take a step back when you have successfully volleyed the ball at that distance one time each. -When you reach six steps move to Africa.
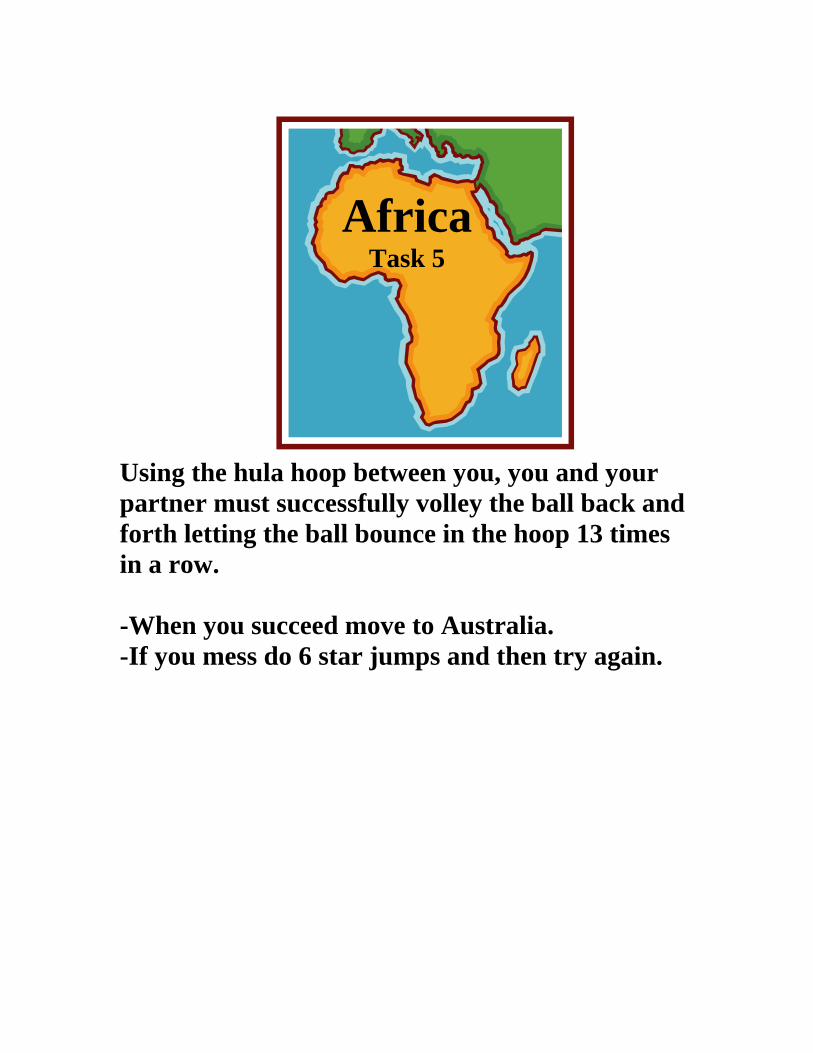
Africa Task 5
Using the hula hoop between you, you and your partner must successfully volley the ball back and forth letting the ball bounce in the hoop 13 times in a row. -When you succeed move to Australia. -If you mess do 6 star jumps and then try again.

Australia
Task 6
With your partner volley the ball, using your hands, back and forth 17 times in a row. -When you succeed move to Antarctica. -If you mess up perform 3 tuck jumps and then try again.
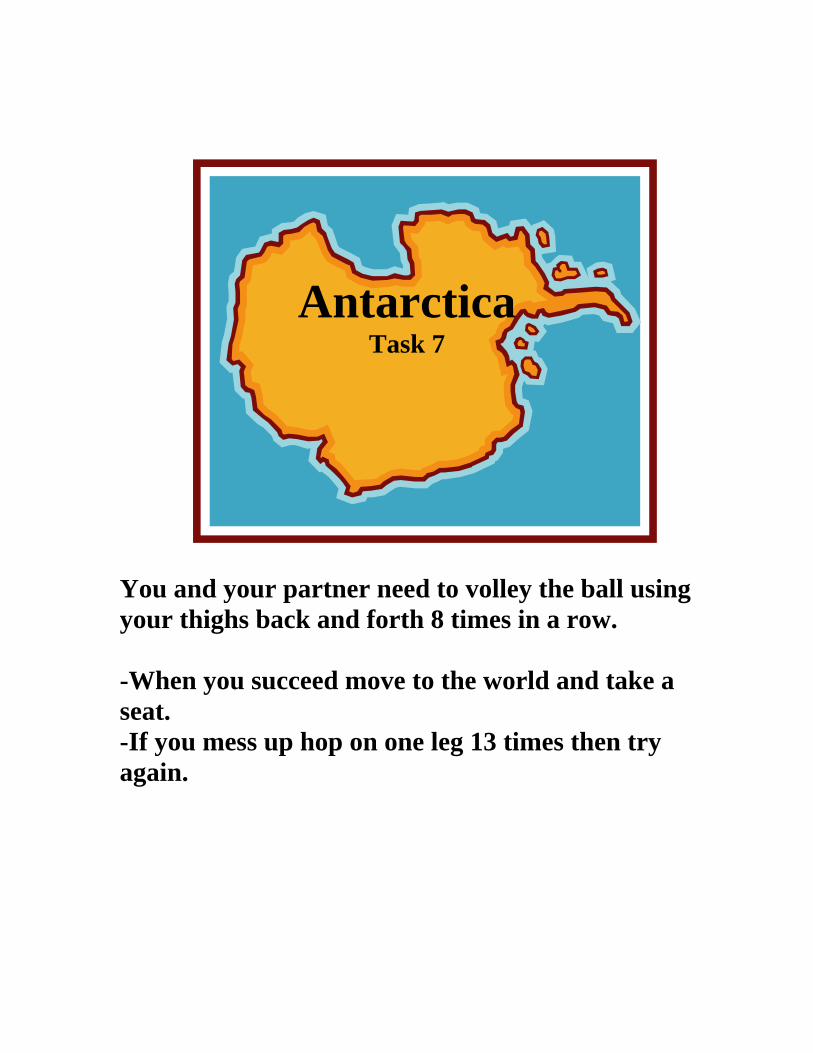
Antarctica
Task 7
You and your partner need to volley the ball using your thighs back and forth 8 times in a row. -When you succeed move to the world and take a seat. -If you mess up hop on one leg 13 times then try again.
Skill Chart Instructions
Use as a reference in addition to any cues and refinements. Print off and make them available for students to view throughout the unit as a visual. In the past teachers have enlarged and displayed them in the
activity area to additionally assist students in mastering the skills.

Push the ball towards the ground using finger pads.
Keep your knees bent like you are ready to pounce on someone.
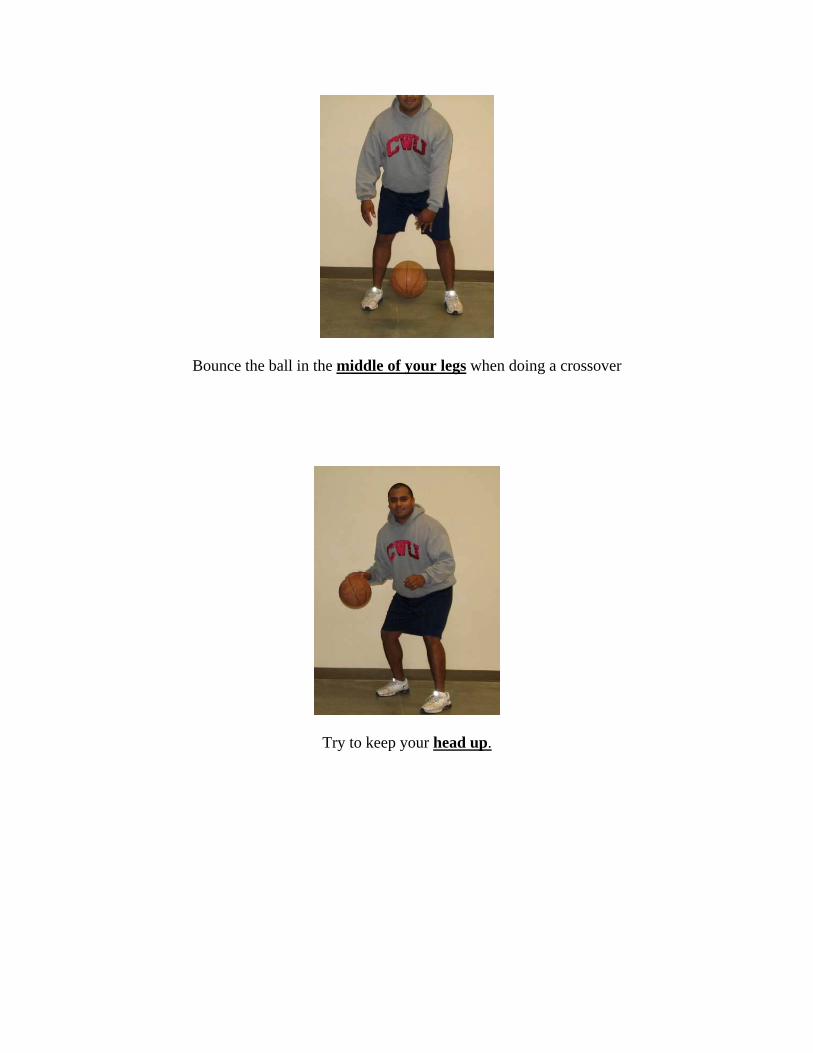
Bounce the ball in the middle of your legs when doing a crossover
Try to keep your head up.
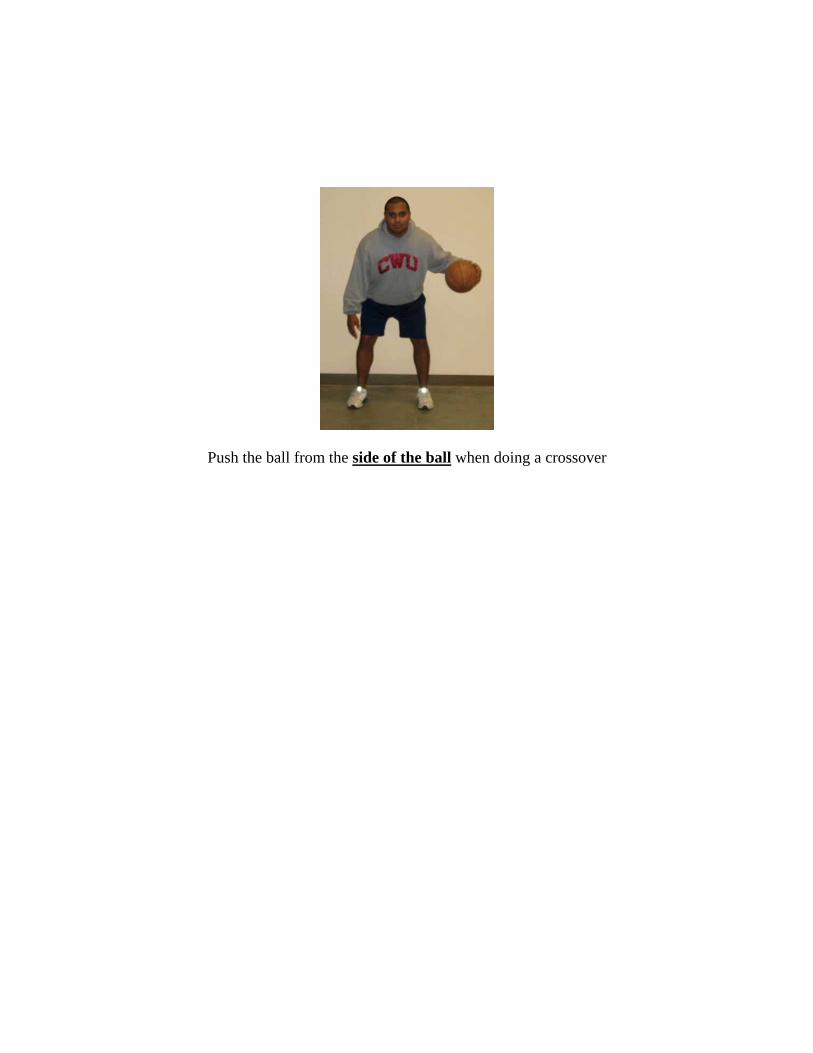
Push the ball from the side of the ball when doing a crossover
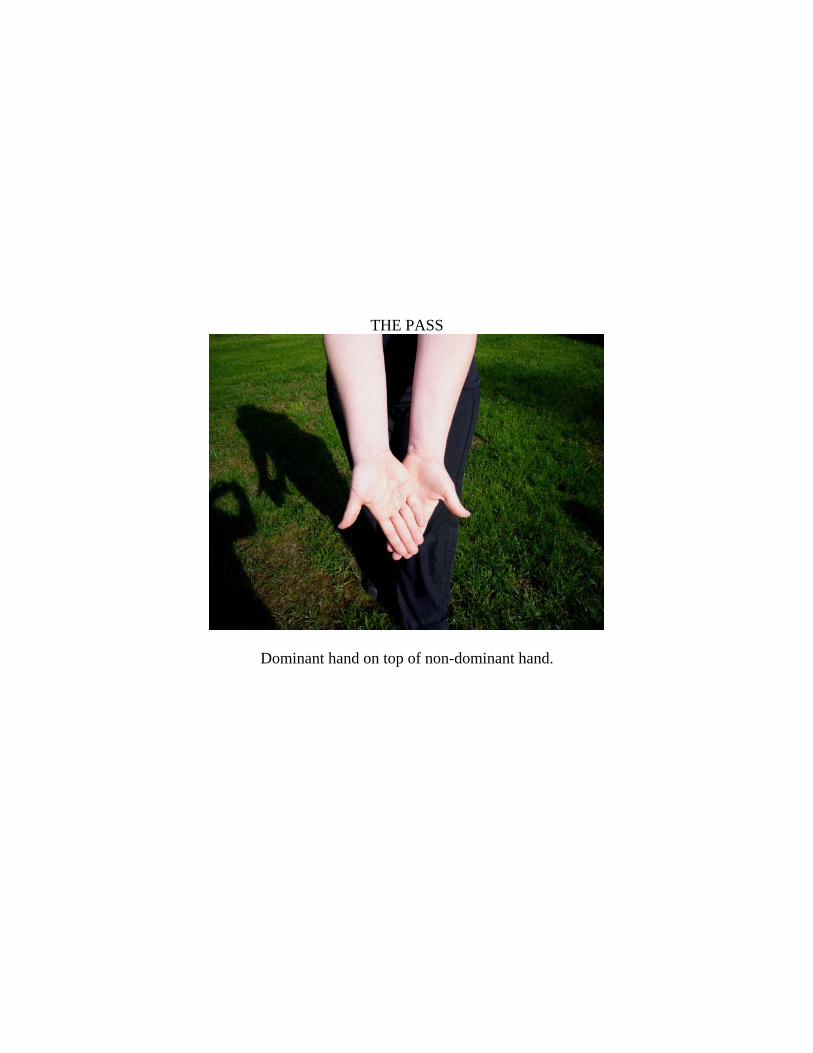
THE PASS
Dominant hand on top of non-dominant hand.
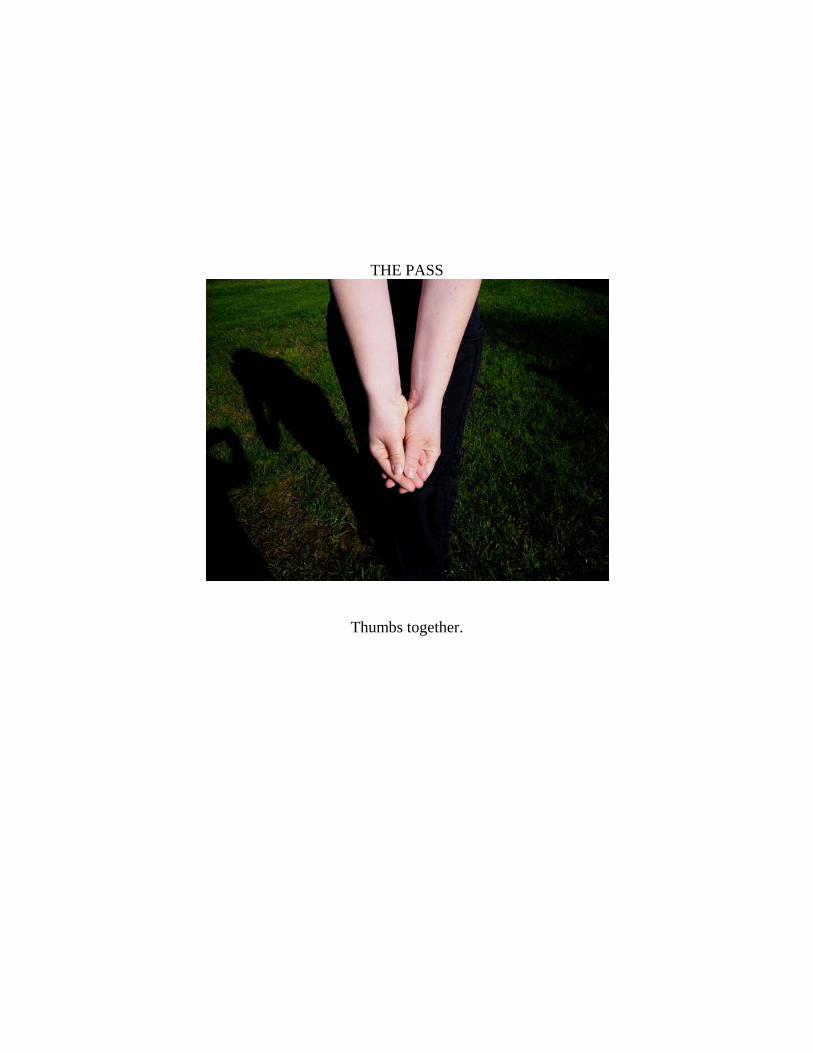
THE PASS
Thumbs together.

THE PASS
Legs shoulder width apart with knees bent. Arms out in front.
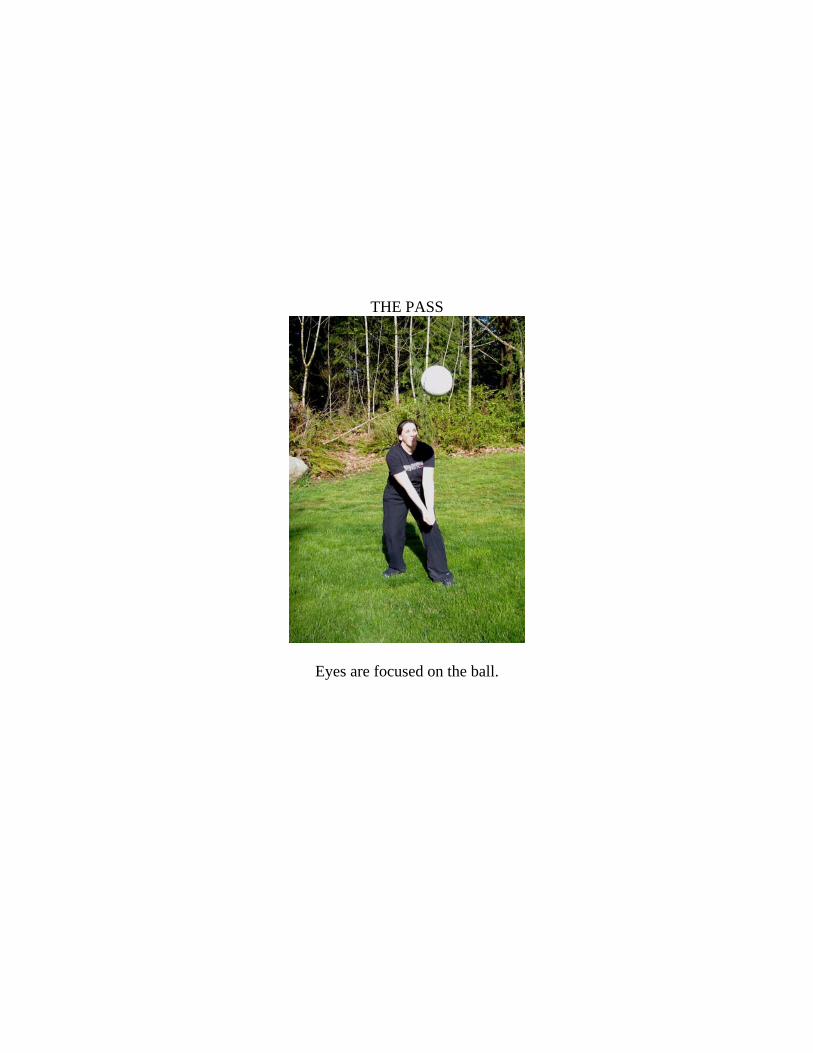
THE PASS
Eyes are focused on the ball.
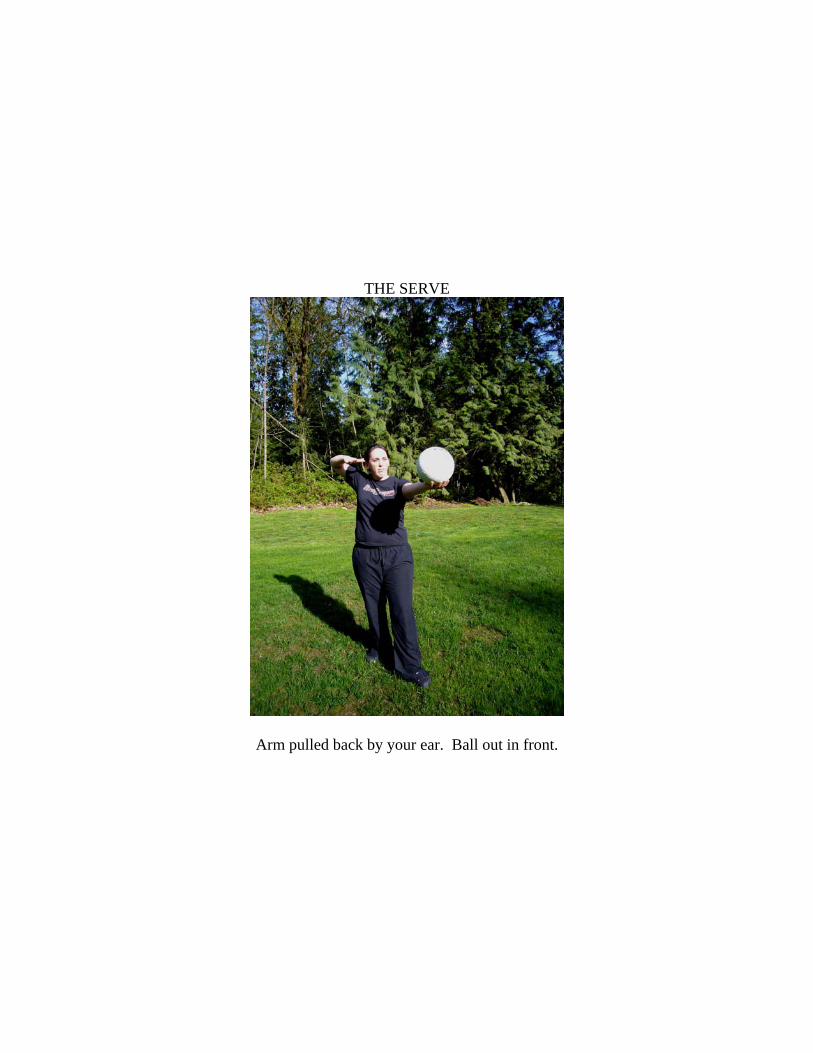
THE SERVE
Arm pulled back by your ear. Ball out in front.

THE SERVE
Contact the ball high and in front.
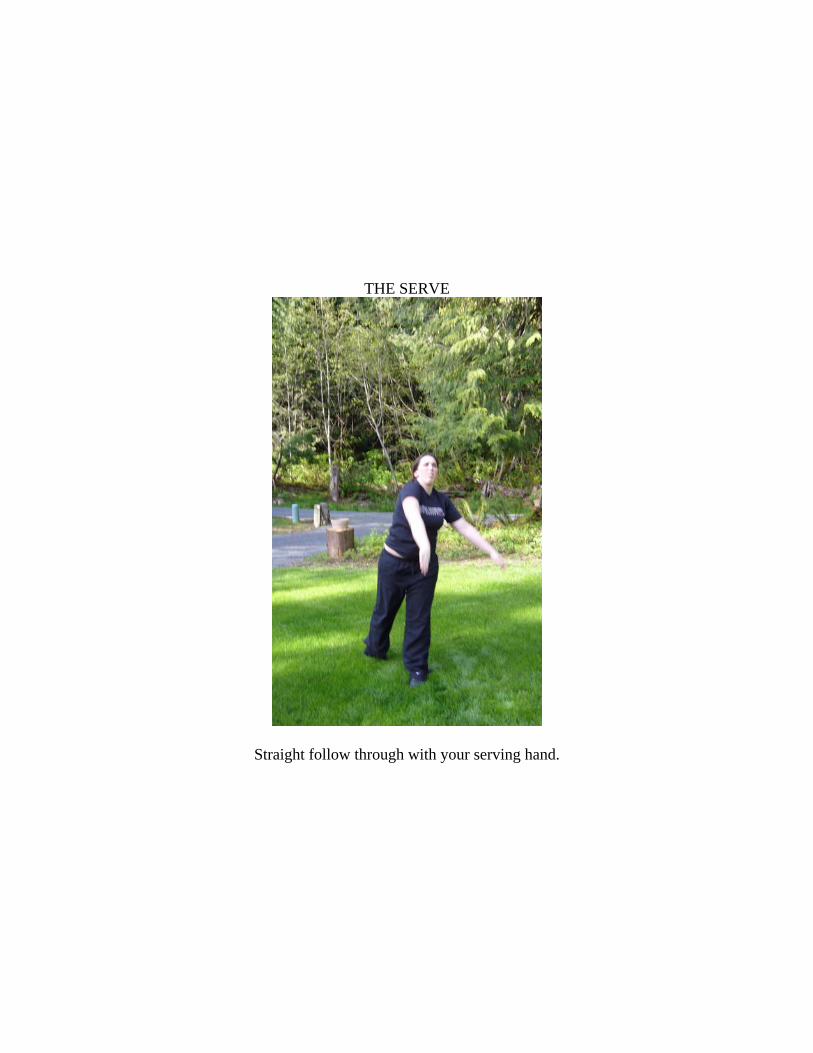
THE SERVE
Straight follow through with your serving hand.

THE SET
Ball shaped hands above the forehead.
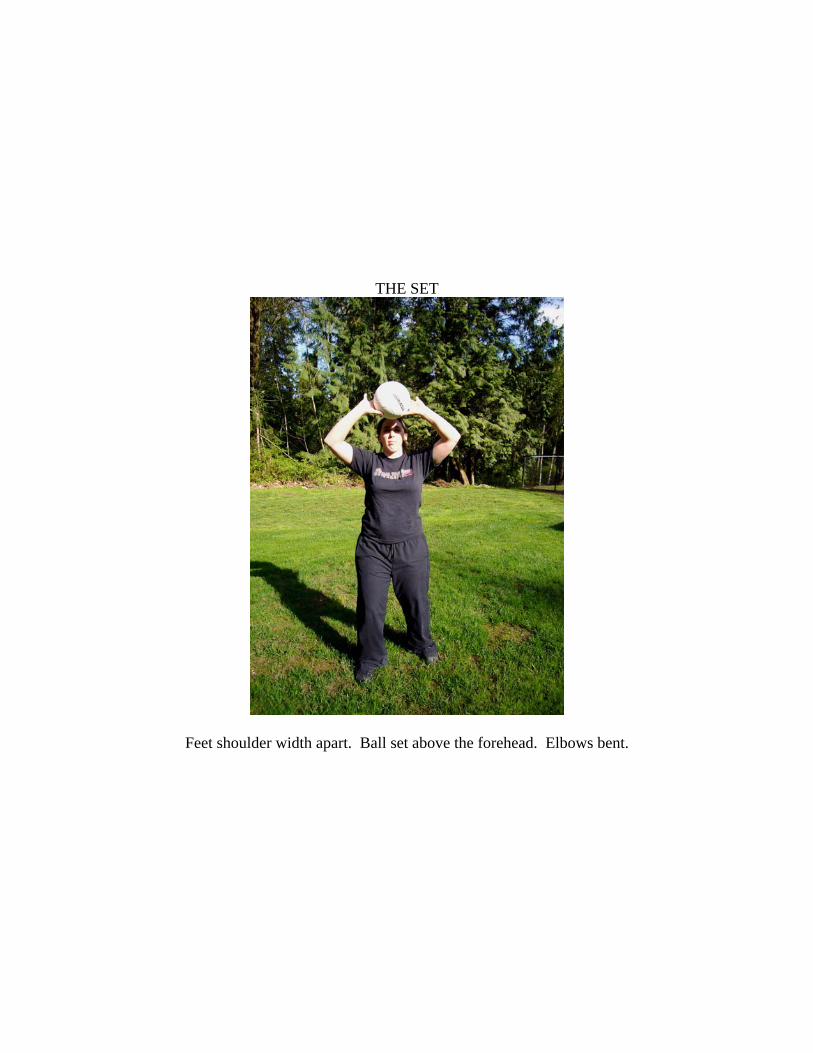
THE SET
Feet shoulder width apart. Ball set above the forehead. Elbows bent.

THE SET
Arms extended straight out.
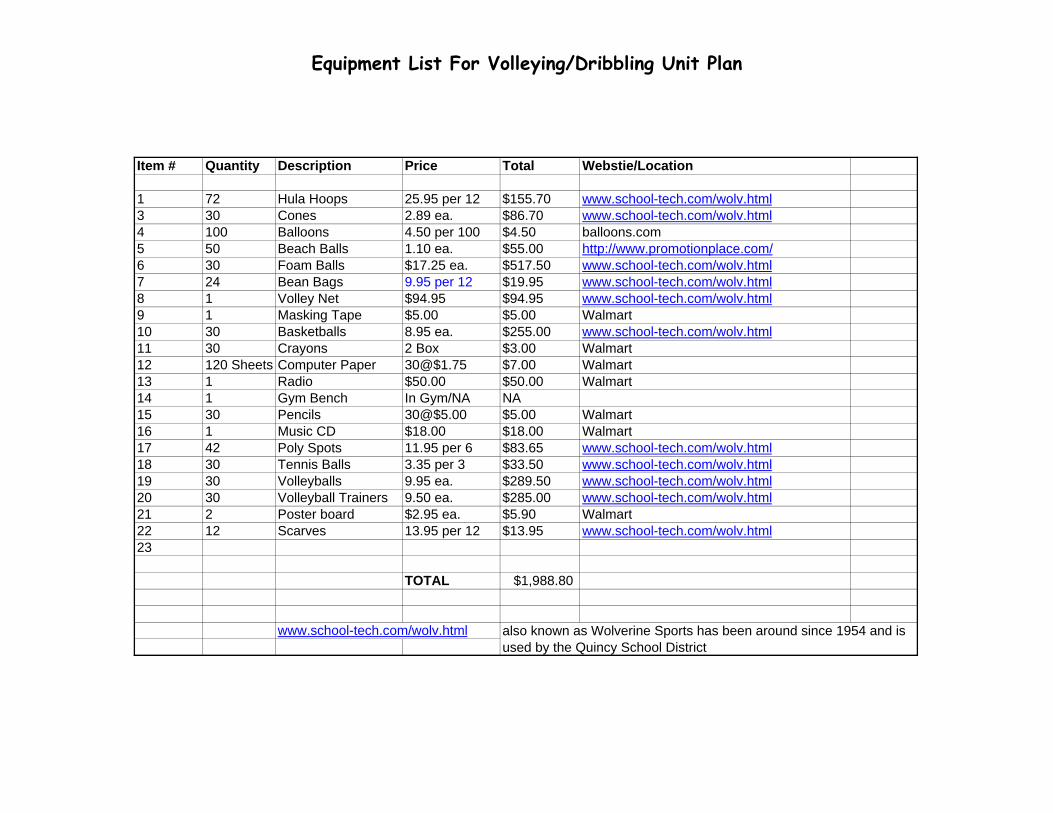
Equipment List For Volleying/Dribbling Unit Plan
Item # Quantity Description Price Total Webstie/Location
1 72 Hula Hoops 25.95 per 12 $155.70 www.school-tech.com/wolv.html3 30 Cones 2.89 ea. $86.70 www.school-tech.com/wolv.html4 100 Balloons 4.50 per 100 $4.50 balloons.com5 50 Beach Balls 1.10 ea. $55.00 http://www.promotionplace.com/6 30 Foam Balls $17.25 ea. $517.50 www.school-tech.com/wolv.html7 24 Bean Bags 9.95 per 12 $19.95 www.school-tech.com/wolv.html8 1 Volley Net $94.95 $94.95 www.school-tech.com/wolv.html9 1 Masking Tape $5.00 $5.00 Walmart10 30 Basketballs 8.95 ea. $255.00 www.school-tech.com/wolv.html11 30 Crayons 2 Box $3.00 Walmart12 120 Sheets Computer Paper 30@$1.75 $7.00 Walmart13 1 Radio $50.00 $50.00 Walmart14 1 Gym Bench In Gym/NA NA15 30 Pencils 30@$5.00 $5.00 Walmart16 1 Music CD $18.00 $18.00 Walmart17 42 Poly Spots 11.95 per 6 $83.65 www.school-tech.com/wolv.html18 30 Tennis Balls 3.35 per 3 $33.50 www.school-tech.com/wolv.html19 30 Volleyballs 9.95 ea. $289.50 www.school-tech.com/wolv.html20 30 Volleyball Trainers 9.50 ea. $285.00 www.school-tech.com/wolv.html21 2 Poster board $2.95 ea. $5.90 Walmart22 12 Scarves 13.95 per 12 $13.95 www.school-tech.com/wolv.html23
TOTAL $1,988.80
www.school-tech.com/wolv.html also known as Wolverine Sports has been around since 1954 and is used by the Quincy School District
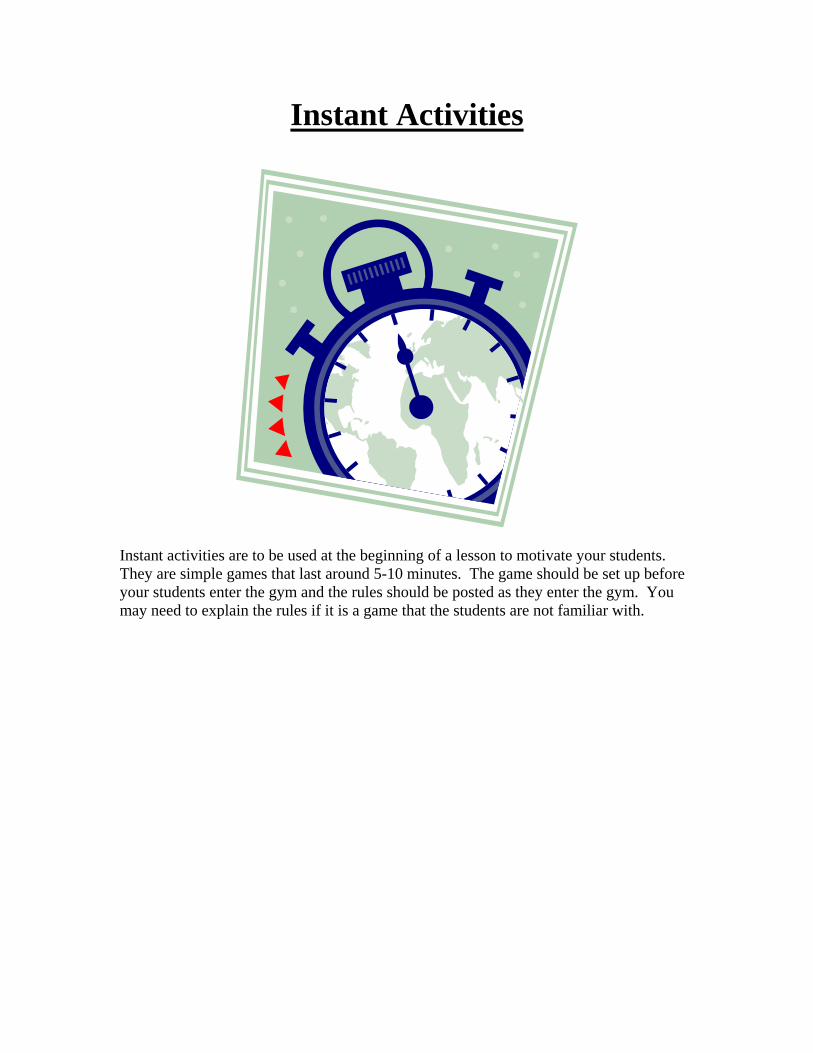
Instant Activities
Instant activities are to be used at the beginning of a lesson to motivate your students. They are simple games that last around 5-10 minutes. The game should be set up before your students enter the gym and the rules should be posted as they enter the gym. You may need to explain the rules if it is a game that the students are not familiar with.

Directions Cut out each of the following phrases and paste them on the front of an envelope.
Push-Ups Sit-Ups Jumping Jacks Skiers Star Jumps Jump Side to Side Jump Up and Down Hop on One Leg Lay Downs Spike Approaches Lay Ups Wall Sits
Directions Cut out each of the following numbers and paste them onto an index card.
1 2 3 4 5 6 7 8 9 10 11 12 13 14 15

16 17 18 19 20 21 22 23 24


Name of Activity: Deal or No Deal
Suggested Grade Level: 4-5
Materials Needed: Several large envelopes, index cards, 2 poster boards labeled "deal" or "no deal".
Description of Idea
This activity is based on the popular TV Show "Deal or no Deal". We have several envelopes labeled by their type of exercise such as "push-ups", "jumping jacks", "sit-ups, "mountain climbers", "jogging", etc. The teacher plays the roll of the banker and offers a "deal" to a selected student or group regarding the # of reps for a certain exercise. For example, the banker might say "I'm prepared to offer the class 7 push-ups, deal or no deal?" The student/groups either takes the deal by picking up the "deal" poster and does the 7 push-ups or chooses "no deal" by picking up the "no deal" poster. If they choose the "no deal" sign, the banker opens up the envelope for push-ups to see what number is on the index card. This # may be larger or smaller. That is how many reps the class must do. Then the banker moves on to a new exercise and repeats this process over again. We have between 10-12 envelopes of activities and change the index cards each day!
Variations:
Instead of have one index card in each envelope, have several cards in each and let the students pick one out! Also, instead of "deal" or "no deal" posters, use something creative to signal deal or no deal such as popping a balloon by sitting on it!
Adaptations for Students with Disabilities:
Depending on the disabilities, the exercise/activities may have to be modified.
Name of Activity: Happy New Year
Suggested Grade Level: K-5
Materials Needed: Numbered Poly Spots (manufactured this way or you can put a number on them), Balloons (best for K-2), Beach balls, Volleyball Trainers, Foam balls, Music.
Description of Idea
Before students arrive to class, scatter 40 numbered poly spots throughout the activity area. The poly spots are numbered between 1-10. (Four sets of 10) Balloons, beach balls, and volleyball trainers are placed outside the playing area so they are easy to pick up.
As students arrive, music is playing and students begin to skip around the room. When the music stops, students safely move to the side of the playing areas and choose their volleying equipment (i.e., balloon, beach ball, volleyball trainer as appropriate to student's skill level), then stand on a numbered poly spot.
Now, the countdown begins! If their poly spot is Number 7, they begin the verbal countdown from Number 7 by counting down by one number each time they strike the ball towards the ceiling. "7 - 6 - 5 - 4 - 3 - 2 - 1 - (Then yell) - HAPPY NEW YEAR!" It is now time to find a new poly spot, which in this case would be Number 6. (We are still counting down so they repeat the above direction but they start at Number 6.) When the students have finished striking at poly spot #1, they search for poly spot #10.
When the music begins playing again, students begin to travel throughout general space using the locomotor movement that the teacher specifies, holding their equipment as they travel.
Variations:
Students choose different body parts they want to use (elbow, head, knee, shoulder, wrist).
Students practice the forearm pass.
Students practice the overhead pass.

Students create a pattern, (i.e., head - shoulder - hand; head - shoulder - hand. Or, forearm pass - forearm pass - overhead pass - catch; forearm pass - forearm pass - overhead pass - catch)
Besides New Year's Day on January 1, other dates to celebrate a "Happy New Year" include the first day of school, the Chinese New Year, Jewish New Year, etc. Check to see what Holidays your students might celebrate!
Name of Activity: Lifesaver Volley
Suggested Grade Level: 3-5
Materials Needed: Cones for boundaries, 3-5 Nerf Frisbees, and 3-5 foam balls
Description of Idea
Set up cones to establish playing boundaries. Select 3-5 students to be the taggers and give them each a Nerf Frisbee. Select 3-5 students to be the 'lifesavers' and give them each a foam ball. Then have one of the 'lifesavers' and another student demonstrate volleying a foam ball 4 times in a row (this is how the 'lifesavers' will free a tagged or frozen student in the activity).
On the teacher's "GO" signal, the taggers try to tag as many students as they can, but the Nerf Frisbee must be in the tagger's hand. Students who are tagged with a Nerf Frisbee become frozen. However, students who are 'lifesavers' cannot be tagged. The 'lifesavers' are to save or unfreeze the tagged students. To unfreeze a student, the 'lifesaver' and the tagged student must volley the foam ball 4 times in a row. After the ball is volleyed 4 consecutive times, the student who was frozen now becomes the new 'lifesaver' and the previous lifesaver can now be tagged.
Students enjoy this game because most of them get to be the lifesaver where they can 'save' someone and it is also a fun way to reinforce volleying skills.
Teaching Suggestions:
Make sure to switch taggers during the activity.
Have students walk during the activity first.
Instead of using foam balls, the 'lifesavers' could use balloons, small beach balls, or any other ball appropriate for volleying.
Instead of using Nerf Frisbees, the taggers could use yarn balls, bean bags, or any other object appropriate for tagging.
Have the 'lifesaver' and the frozen student volleying the ball 5 or more consecutive times to unfreeze the tagged student.

Instead of volleying, incorporate other skills such as kicking, throwing, etc.
RESOURCE LIST
Graham, Shirley Anne Holt-Hale, and Melissa Parker. Children Moving: A
Reflective Approach to Teaching Physical Education. 6th Ed. New York: McGraw-
Hill, 2004.
Griffin, Stephen A. Mitchell, and Judith L. Oslin. Teaching Sport Concepts and
Skills: A Tactical Games Approach. Champaign Illinois: Human Kinetics, 1997.
PE Central. Http://pecentral.com. Instant Activity Section and Basketball Dribbling
section.
Siedentop, Daryl. Sport Education: Quality PE Through Positive Sport Experiences.
Champaign Illinois: Human Kinetics, 1994.
Wolverine Sports. www.school-tech.com/wolv.html. Site where you can order good
quality equipment.