dpp users’ guide - workshopwizard.net doh dpp users... · dpp users’ guide . prepared by coaw,...
TRANSCRIPT

DPP Users’ Guide
Prepared by COAW, the Consortium for Older Adult Wellness ©2015, 2016, 2017 Updated 6/30/17

Workshop Wizard Users’ Guide 1
DPP Workshop Wizard Users’ Guide
Table of Contents
1.0 Login: Logging on the Website ......................................................................................... 3
2.0 My Workshops ................................................................................................................. 4
2.1 Print My Workshop Roster........................................................................................................4
2.2 Manage My DPP Workshops .....................................................................................................5
2.2.1 Weight and Activity ...............................................................................................................5
2.2.2 Printing and Emailing Charts ..................................................................................................7
3. People Tab ......................................................................................................................... 9
3.1 Searching in the People Tab ......................................................................................................9
3.2 Adding a Person in the People Tab .......................................................................................... 10
3.3 Special Characters in Names ................................................................................................... 10
3.4 Editing in the People Tab ........................................................................................................ 11
3.5 Merging People ...................................................................................................................... 11
3.6 Classes in the People Tab ........................................................................................................ 13
3.7 Certificates in the People Tab ................................................................................................. 15
3.8 Adding/Editing Access in the People Tab ................................................................................. 18
3.9 To reset an Account locked due to excessive invalid login attempts ......................................... 19
3.10 To set minimal Access specifically for a Leader/Lifestyle Coach/Instructor ............................. 19
4. Sites Tab .......................................................................................................................... 20
4.1 Editing or Adding a Site ........................................................................................................... 20
4.2 Merging Sites ......................................................................................................................... 21
4.3 Sites Report............................................................................................................................ 22
5. Workshops/Trainings Tab ................................................................................................ 23
5.1 General on the Workshops/Trainings Tab ............................................................................... 23
5.2 Membership on the Workshops/Trainings Tab ........................................................................ 23
5.3 Workshop Paperwork ............................................................................................................. 24
5.4 Printing Reports from the Workshop Tab ................................................................................ 25
5.5 Exporting from the Workshop Tab .......................................................................................... 26
6. Referring Entities ............................................................................................................. 27
7. Referring Individuals ........................................................................................................ 28
Workshop Wizard Users’ Guide 2
8. Referrals .......................................................................................................................... 29
8.1 My Referrals........................................................................................................................... 29
8.2 General .................................................................................................................................. 30
8.3 Tracking and Enrolling Referrals .............................................................................................. 31
8.4 Next Contact Tracking of Referrals .......................................................................................... 33
8.5 Past Contact Tracking of Referrals ........................................................................................... 34
8.7 Printing Referral Reports ........................................................................................................ 36
8.8 Referral Statistics- Progress Report ......................................................................................... 37
9. Participants Tab ............................................................................................................... 39
9.1 Adding Participants Manually ................................................................................................. 39
10. Reports Tab ................................................................................................................... 41
10.1 Generating a Participant Report ‘using a new configuration’ .................................................. 41
10.2 Generating a Participant Report with “Saved Configurations” ................................................ 44
10.3 Generating a Workshop Report ............................................................................................. 46
10.4 Generating a Grantee Report ................................................................................................ 46
10.5 Generating a Diabetes Prevention Recognition Program (DPRP) Green/Red Report ................ 46
10.6 Generating a Diabetes Prevention Recognition Program (DPRP) Annual Report ..................... 47
10.7 Generating a Diabetes Prevention Recognition Program (DPRP) Weight Graph ...................... 49
10.8 Generating a Pay Per Milestone(PPM) Report ....................................................................... 50
10.9 Exporting Participant Data .................................................................................................... 51
11. Updates ......................................................................................................................... 53
12. Help and Reporting Errors .............................................................................................. 53
Appendix A. Suggested Access Guide ................................................................................... 55
A.1 The Access Points available .................................................................................................... 55
A.2 Suggested Access Settings: ..................................................................................................... 56
Appendix B. CDC DPP Export ................................................................................................ 60
B.1 Introduction ........................................................................................................................... 60
B.2 Preparing Data ....................................................................................................................... 60
B.3 CDC Organization Code ........................................................................................................... 60
B.4 Access .................................................................................................................................... 61
B.5 Creating the Upload File ......................................................................................................... 61
Appendix C. Glossary ........................................................................................................... 62

Workshop Wizard Users’ Guide 3
1.0 Login: Logging on the Website
1. Log on to the Workshop Wizard website using the Userid and Password provided. If you have not yet received a Userid and/or Password contact the system administrator.
2. Hit the “Login” button. Notice that the button turns from blue to red when selected.
3. On the left side of the screen you will then see the access Tabs that have been pre-set for your use. The number and the names of the Tabs you see will be determined by the areas that have been pre-set for you, so they may not be the same as the images in this manual.
4. If someone tries to Login using an incorrect Userid and/or Password they will be allowed to try a total of five times. If they are still not using the correct Userid and/or Password they will be locked out. The Administrator will need to reset their Userid and/or Password. See People Tab, 4.6 Access in the People Tab for more details.

Workshop Wizard Users’ Guide 4
2.0 My Workshops Leaders, Instructors and Lifestyle Coaches can view and print only their own specific Workshops from this tab. Leaders, Instructors and Lifestyle Coaches may also be given access to other tabs, or they may only be given access to this tab and their own specific information alone. After choosing “My Workshops” you will see two tabs at the top of the screen: Print Roster and Manage DPP Workshops. Once indicated as a teacher for a specific Workshop their list will show only their specific Workshops. The Manage DPP Workshops Tab will only show to those who are participating in NDPP/DPP Workshops. For information on exporting DPP data to the Centers for Disease Control and preventions see Appendix B. CDC DPP Export
2.1 Print My Workshop Roster 1. To view a Workshop roster select “Print Roster” from the list of available
options. Students will only appear on the roster if (1) they are listed on the “Workshops” tab under “Membership,” or (2) they have been entered under “Referrals,” or (3) they have been entered in "Participants" using their name.
2. The roster for the selected Workshop will be generated as a PDF file. You may then print the PDF or save it.

Workshop Wizard Users’ Guide 5
2.2 Manage My DPP Workshops Workshop Wizard allows Lifestyle Coaches to track Diabetes Prevention Program workshop participants’ weight and activity levels. DPP/NDPP Workshop participants’ progress may also be viewed, printed, or emailed from this tab.
2.2.1 Weight and Activity To enter Workshop information from the Manage DPP Workshops tab select “Enter Weight and Activity Info”.
1. Choose from the list of Workshops then click the “Next” button.

Workshop Wizard Users’ Guide 6
2. Now select whether you want to “Enter Weight and Activity Info” or “Print or Email Graphs”.
3. You can also choose to Delete a Session or Delete a Class Participant.
4.Click on the “Use this session” button if you wish to add to or edit one of the listed session within the DPP Workshop series you selected
5. Choose the “Add new session” button if you are adding a new session to the
DPP Workshop series. Then click on the “Next” button.

Workshop Wizard Users’ Guide 7
6. You may now enter the information for the new session. Indicate the date by selecting it on the calendar.
7. You also can select the “Session Type” being added: Core, Post Core, or Make-up. Then click on the “Next” button.
8. Participants’ information will continue to populate on the next session entered. 9. Make sure to click on the “Save Changes” button. 10. To “Add Another Participant” click on that button, add the information and
then make sure to click on the “Save Changes” button. 11. From the “Enter Weight and Activity Screen” you can also adjust the Session
Type from the pull down menu, and the Session Date. Make sure to enter the Weight and Activity data and to check the Attended Session box for the appropriate participant(s).
12. You will then see this message.
2.2.2 Printing and Emailing Charts 1. From the “What do you want to do” menu you can select to “Print or Email
Graphs”.

Workshop Wizard Users’ Guide 8
2. “Print graphs for all participants” by choosing the first button. 3. You can “Print a Graph” for an individual participant by choosing the bottom
button and using the pull-down menu to select the class participant whose graph you wish to print.
4. You can also choose to “Email Graphs” to all participants with email addresses entered.
5. You can also choose to “Email Graphs” to an individual participant by choosing that button and using the pull-down menu to select the participant.
6. Once you have made your choice, click on the “Next” button.

Workshop Wizard Users’ Guide 9
3. People Tab
The People Tab is designed to hold information on Contacts, Leaders, Instructors, Master Trainers, Lifestyle Coaches, Referral Handlers, Program Coordinators, Staff, Volunteers, Media, etc. This is not the area where workshop Referrals (see section 15) or Participants (see section 17) are entered. When you first click on the People Tab, you will see the Search screen. Notice you can “Search” by any of the fields including First Name, Last Name, Email, Met Through (see Section 4), Taught Recently, and so on. You can also search by using the People Type boxes you set (see Section 5).
3.1 Searching in the People Tab 1. Under the “People” tab bring up all records by just hitting “Search”. 2. To “Search” for a particular record enter information into any of the fields and
then hit “Search”. 3. You are now able to view the individual record by clicking on it in the list on the
left side of the window. The tabs at the top of the screen will allow you to make changes, additions or deletions to the record in the areas of General information, Classes, Certificates, and Access. You can also Print and Export information.

Workshop Wizard Users’ Guide 10
3.2 Adding a Person in the People Tab 1. Under the “People” tab bring up all records by hitting “Search”. 2. To “Search” for a particular record, enter information into any of the fields
and hit “Search”. 3. Check to make sure the individual is not already in the system. If they are, you
will want to edit the information, rather than adding a new record. 4. To add a person, select the “General” tab. 5. Click on the “Add Person” button at the bottom of the screen. This will take
you to the “Main” tab within the “General” tab. 6. Fill in all the information (First Name, Last Name, Gender, Ethnicity and Race,
etc.). Select the “Addresses” tab to enter either home and/or work address information. Select the “Types” tab to turn on the appropriate to check the box with identifying this person as a Site Contact, Referral Handler, Organization Contact, Leader, etc.
7. Notice that until the new record is saved by clicking the “Add Person” button, the record still shows as a New Person in the left hand column.
8. Once the new record has been “Saved,” the name will be added to the list.
3.3 Special Characters in Names Special characters in names can be added in this way: 1 Press and hold the ALT key on your keyboard.

Workshop Wizard Users’ Guide 11
2 On the numeric keyboard (not on the main keyboard) type one of the following numbers including the leading zero.
0241 for ñ 0225 for á 0233 for é 0237 for í 0243 for ó 0250 for ú
3 When you've typed in the code, release the ALT key and the character will appear.
3.4 Editing in the People Tab 1. Under the “People” tab bring up all records by hitting “Search”. 2. To “Search” for a particular record enter information into any of the fields and
hit “Search”. 3. Select the record from the choices available in left column by clicking on it. You
will see the record will be highlighted in blue. 4. Select the “General” tab. The selected record is now available for you to edit.
Make changes in the desired fields on the “General” page or move to the other tabs across the top to view “Classes”, “Certificates” and “Access”.
Remember to hit the blue “Save Changes” button on the “General,” “Certificates”, or “Paperwork” tabs as you make changes or add to the information on each page. (It is not necessary to hit “Save Changes” for changes made to the “Classes” tab.)
Should you decide to “Delete” a person you will be asked to confirm your action.
3.5 Merging People If you have the same person entered into Workshop Wizard twice, it’s typically because the person’s names are slightly different such as “Bob Smith” and “Robert Smith”. When that happens, you can merge the two copies of the person with the “Merge” tab. 1. In order to maintain one record over the other, determine which record has the
correct information. For example is “Carol” or “Corrolle” the correct record. 2. Select the record in the right hand column that is to remain, or be merged into.

Workshop Wizard Users’ Guide 12
3. Select the record in the left hand column that will be merged into the record selected in the right hand column.
4. Press the “Merge” button. When you merge two people, you’ll end up with just one record. All their relationships, such as the workshops they led and the certificates they hold will be combined and duplicate information eliminated.

Workshop Wizard Users’ Guide 13
3.6 Classes in the People Tab
1. The pull down menu “All Roles” will allow you to choose to view 1) “All Roles,” 2)those classes/workshops where the person served in the role “As Leader,” 3) those classes/workshops where the person was in the role “As Student,” in other words a training, and 4) where the person was in the role “As Fidelity” meaning they were responsible for conducting a fidelity visit or observation of a class/workshop.
2. By selecting a record you can remove it from the list by clicking on the blue “Remove” button.
3. By using the pull down menu “All Timeframes” you can view activities by 1) “All Timeframes,” “Past,” “Present,” or “Future” as well as by the different roles.
4. You can also print a “Standard Report” or the “Personal History Report” on selected records. If you see a list of names appearing in the left hand column a report will be prepared automatically for every name on the list. To prepare a report on a single person, first search for the individual by name so that only one name is seen in the left hand column. A. In a “Standard Report” you can include the address, phone numbers and
email address. You can have the list sorted alphabetically by first name or by last name. This report is generated as a PDF document.

Workshop Wizard Users’ Guide 14
B. In a “Personal History Report” you will see the classes and trainings by date attached to the individual. This report is generated as a PDF document.
5. By selecting the “Export” tab you will be able to generate a CSV file of the
information seen in the “Standard Report.” First Name, Name (First and Last Name), Postal Address, Phone Numbers, and Email are the options. This information can be pasted into other documents for formatting. For example, for a group email you may need to “Export” only the First Name and Email. For a traditional mailing you will want to “Export” the Name (First and Last Name) and Postal Address.

Workshop Wizard Users’ Guide 15
3.7 Certificates in the People Tab
Every Curriculum has a set of rules that govern the expiration of certificates. This means, for example, that you could have certificates expire if a leader hasn't taught a workshop for 12 months for one curriculum, but have them expire if a leader hasn't taught at least 2 workshops in 18 months for two different curriculums.

Workshop Wizard Users’ Guide 16
As a Leader/Instructor Training is entered into the website, the Students in the training are automatically recorded as having the status indicated in the rules set for certification in the “Configuration” tab under “Curriculums”.
Circumstances may require an override of the information automatically set if, for example, a Leader is trained outside of your state. Here is the process to reset or override the certification.
1. Under the “People” Tab, bring up or search for the desired record. 2. Click on the “Certificates” tab 3. On the bottom of the right side, click on the “Add Certificate” button. 4. Choose the curriculum from the list at the top of the workbox. 5. Using the pull down menu set the “State” of Certification to
A. “Pending”: Person has passed the course, but must do additional work (such as teaching) before getting a certificate.
B. “Active”: The certificate can be used. C. “Expired”: The certificate is out of date. D. “Inactive”: The person is no longer teaching. E. Using the pull down menu select the “Certifying Curriculum” from the menu
of curriculum titles. G. Enter the “Manual Expiration” date for this specific curriculum. I. Hit the blue “Save Changes” button. J. Repeat the process for each Leader, Instructor and Master Trainer
Certification needed for this individual.

Workshop Wizard Users’ Guide 17

Workshop Wizard Users’ Guide 18
3.8 Adding/Editing Access in the People Tab
Please Note: There is a suggested Access Guide in Appendix A.
1. On the main “People” tab select an individual and then choose the “Access” tab. If you do not see this tab, you have not been given authority to add or edit access. Contact your system administrator to obtain this authority.
2. If you have been given authority to make changes in “Access” you can select a record and then you will notice the top checkbox indicates whether a person has been given the ability to login to the website.
3. If this box is checked, then you will see a Login and Password for the website has been established for this individual. Each person accessing the website needs to be issued their own specific Userid and Password.
4. Both the Login and Password must be letters and numbers only with no special characters (!*?). Letters in both the Login and Password are not case sensitive.
5. To view the current “Access” for a given person see the list of pull down menus. Each area has its own functions setting allowing you to set the access levels in each area independently. For your ease, there is a default setting to “None”. There are three levels of access available for each section of the website. Set each section individually using the pull down menu: A. None- this person will not see the tab and will not be able to view, add to, or
alter the data. B. View- the tab will be seen. The info can be seen, but cannot be edited, added
to, or deleted.

Workshop Wizard Users’ Guide 19
C. Full- the tab is seen, the data is live and can be edited, added to, deleted, etc.
6. The blue buttons “All “None”, “All View” and “All Full” will allow you to quickly set all the access to one level.
3.9 To reset an Account locked due to excessive invalid login attempts 1. If you are asked to reset Access for someone who has been locked out of the
system due to excessive invalid login attempts, first “Search” for the individual by name from the People tab and Select their record.
2. Click on the “Access” tab. 3. At the bottom of the screen you will see a marked checkbox “Account is locked
due to excessive invalid login attempts”. Un-check the box and remind the User of their current Login and Password, or set a new Login and Password for the User.
4. Make sure to hit the Save Changes button.
3.10 To set minimal Access specifically for a Leader/Lifestyle Coach/Instructor 1. On the main “People” tab, select an individual and then choose the “Access” tab.
If you do not see this tab, you have not been given authority to add or edit access. Contact your system administrator to obtain this authority.
2. If you have been given authority to make changes in “Access,” you can select a record and then you will notice the top box indicates whether a person has been given the ability to login to the website.
3. If this box is checked, then you will see a Login and Password for the website has been established for this individual. Each person accessing the website needs to be issued their own specific Userid.
4. Click on “Full” for Access to the My Workshops pull down menu. Do not give Access to any other areas. This will allow the User to login and see only the My Workshops option on the left side of the site. By clicking on My Workshops the leader can choose to “Print Roster” or “Manage DPP”. No other information will be available. Until there are scheduled workshops for this individual in the role of “Teacher” no information will be displayed when the “My Workshops” tab is selected. For more information see the My Workshops section 1.0.

Workshop Wizard Users’ Guide 20
4. Sites Tab
4.1 Editing or Adding a Site 1. To edit one of the listed “Sites”, click to highlight it. The information will now
show in the main workspace. The “Sites” fields are editable to allow you to keep the information current. Add information such as phone numbers, email address, and comments for easy reference. After adding information click on the blue “Save Changes” button.
2. Once a Site has been selected or entered, the “Site Contact” can be chosen from the pull down menu. The Site Contact list is comprised of those on the People tab with the checked box as a “Site Contact”.
3. Using the “Site Identifier” is a matter of your personal preference. The Site Identifier is not required. However you may find it helpful to number sites by the order they are entered into your system. or you may want to assisgn and start each Site Identifier with a number specific to each Licence Holder, each major partner, or each region of your state.

Workshop Wizard Users’ Guide 21
4.2 Merging Sites If you have the same site entered twice on the sites list, you can merge them by using the “Merge” tab.
Choose one of the sites on the left-hand column, and the other on the right-hand column, and press the “Merge” button. Workshop Wizard will merge the two sites into a single site. The single site will have all the workshops and people that were associated with the two original sites.

Workshop Wizard Users’ Guide 22
4.3 Sites Report Reports listing information on your Sites can be printed by choosing the “Print” tab and then using the pull down menu to select “Show just site number and name” or “Show details”. The details will include address, contact information, and Organization.

Workshop Wizard Users’ Guide 23
5. Workshops/Trainings Tab
5.1 General on the Workshops/Trainings Tab 1. To add a “Workshop” first click on the “General Tab” and then the blue “Add
Workshop” button. 2. Add the information into each field. 3. Make sure to save any changes by clicking on the blue “Save Changes” button.
**Please Note: By leaving the Student Count field set at 0, the count will be automatically calculated through the information entered on the “Participants” tab. The automatically calculated Student Count will show in the Reports tab, and on the Workshop tab it will remain at 0. The Student Count will be total number of students attending one or more sessions.
5.2 Membership on the Workshops/Trainings Tab 1. On the Membership Tab you can Search for and choose the
Leaders/Teachers/Instructors for your workshop. 2. You can indicate the person tasked with the Fidelity Visit. 3. If you are setting trainings you can add the people who will be Students. This
area is to track those students who are training to become Leaders and/or Instructors or Lifestyle Coaches. This is not the area to track Participants in

Workshop Wizard Users’ Guide 24
community-based workshops. For that information see the section on Participants.
5.3 Workshop Paperwork The Paperwork Tab in the Workshop field allows you to indicate what paperwork will be collected and when it has been submitted to you. Keeping this information accurate will also allow you to “Search” for Paperwork not yet received for follow-up. Once all the paperwork with a specific Workshop has been completed check the “Paperwork Complete” box. 1. Set the fields needed by checking the appropriate boxes. Remember to click on
the blue “Save Changes” button. 2. Fill in the dates as paperwork is received. Remember to click on the blue “Save
Changes” button. 3. Make any relevent comments in the “Comments” box. Remember to click on the
blue “Save Changes” button. 4. Once all Paperwork is received check the “All Paperwork Complete” button. 5. To find Workshops with missing paperwork go to the Search screen, click on
the boxes and press the “Search” button. You will see a list of Workshops on the left hand side of the screen that meet the critieria you have chosen.

Workshop Wizard Users’ Guide 25
6. Make the edits as needed and remember to click on the blue “Save Changes” button.
5.4 Printing Reports from the Workshop Tab There are four types of reports that can be produced from the Print area of the Workshops Tab. 1. A basic report of Workshops that you have selected through the “Search”
area. This report can be sorted by Site Number or Site Name, Title of Workshop, Date, License Holder, Project, and Funding Source. A PDF document will be generated.

Workshop Wizard Users’ Guide 26
2. A Paperwork Report when selected will generate a list of all missing items for all workshops selected from the “Search” area. A PDF document will be produced.
3. A Statistics Report will provide the basics of how many classes and how many people are in the system for the criteria selected from the Search area. Keep in mind this is not Participant information, only a count of the number of classes and the attendees recorded. This PDF report can be sorted by Month or by Curriculum.
4. Class Roster will generate a PDF document with the selected information on the Workshop including those indicated as Teachers and Fidelity on the Membership Tab. If this is training, the roster will also show Students who are training to be Leaders, Instructors, or Lifestyle Coaches. Keep in mind this is not the area where Participants in community workshops are tracked.
5.5 Exporting from the Workshop Tab

Workshop Wizard Users’ Guide 27
By using the Export tab rather than Print you will be generating a CSV file that can be placed in an Excel document for editing. You can select to include the Site, Site identification, Title, Start, End, Day, Time, and Contact for your Export. You can also choose to Sort the information by Site Identification, Site Name, Title, or Start Date.
6. Referring Entities Referring Entities lets you establish the groups or organizations sending referrals. Within each Referring Entity you will be establishing Referring Individuals. For example, a specific physician would be a Referring Individual and her practice would be the Referring Entity. You can view the list of Referring Entities already set on the left side of the screen. 1. To edit a “Referring Entity” just select the entity you want by clicking once.
You will see the name appear in the “Name” field and the Health System in that field. Make the changes needed and then click on the “Save Changes” button.
2. To “Delete Entity”, select it so the name appears in the name field. Then click on “Delete Entity”.
3. You can add an “Entity” by choosing “Add”, giving it a name in the appropriate field and then clicking on the “Save Changes” button.

Workshop Wizard Users’ Guide 28
7. Referring Individuals Referring Individuals lets you track referrals made by specific people within each of the Referring Entities. For example, a specific physician would be a Referring Individual and her practice would be the Referring Entity. You can view the list already set on the left side of the screen. 1. To edit “Referring Individuals” just select the option you want by clicking once.
You will see the information appear in the “Name” field as well as the “Referring Entity” drop down list, Email, Phone, Fax, and Address. Make the changes needed and then click on the “Save Changes” button.
2. To “Delete Individual”, select it so the name appears in the name field. Then click on “Delete Individual”.
3. You can “Add Individual” by choosing “Add,” completing the appropriate fields and then clicking on the “Save Changes” button.

Workshop Wizard Users’ Guide 29
8. Referrals Referrals are, in general, the people that Referring Individuals have sent to you to be enrolled in your programs. You will receive daily emails to remind you of due dates you have set for active referrals and those needing attention.
8.1 My Referrals Your referrals are displayed based on certain criteria that you determine in the "Show These Referrals" section. Your options are listed below. 1. Pick: You can select referrals based on “My Organization” or “My Referrals”. 2. Referring Entity: You can select from a list of entities. 3. Referring Individual: You can select from a list of individuals.
Referrals will display accordingly to indicate what works needs to be done based on the categories below.
• Unassigned Referrals - This lists any referrals which do not have a handler assigned.

Workshop Wizard Users’ Guide 30
• Referrals Needing Work - This lists any referrals which need some attention, such as calling the participant back, setting a due date for the referral, or looking into why a workshop hasn't been scheduled yet for the curriculum.
• Referrals on Hold - This lists referrals for which the due date hasn't arrived yet, or for which a workshop hasn't been scheduled yet.
• Closed Referrals - This lists referrals which have been closed; that is, the participant has been registered for a workshop, the participant has declined to register for a workshop, or you've been unable to reach the participant.
8.2 General To edit or change a record, select it and the name will appear in the name field on the General tab. Make the additions or changes needed. Make sure to click on the “Save Changes” button. You can Delete a Referral by selecting the record so the name appears on the General tab. Then click on “Delete Referral”. You can add a “Referral” by choosing “Add Referral,” entering the information and then clicking on the “Save Changes” button. PLEASE NOTE: To make your contacts more effective be sure to fill in and refer to the following information: best time to call, ok to leave a message, and preferred language.

Workshop Wizard Users’ Guide 31
1. Each Referral can be assigned to a Handler, who is the person designated to track communications with the person being referred. (To see this, choose "Referrals" from the menu, search for one or more referrals, and go to the "general" tab. You will see the "referral handled by" drop-down near the bottom.
2. To add people to the "Referral Handled By" drop-down, use the "People" tab to add or change a person, then turn on the "Referral Handler" checkbox in people types list on the General page of the “People” tab.
3. If you wish, you can prevent anyone but the Handler for a referral from being able to access the information. If you wish to have this limitation placed on your Referrals, contact your Administrator.
4. If access is limited to only the designated Handler, the Administrator may choose to designate one or more people as "Super Users". These people will be able to access referrals even if they are not assigned as that referral's Handler.
8.3 Tracking and Enrolling Referrals You will want to document all interactions with Referrals. This allows you and everyone so designated on your team to view progress with each person. This will also allow you to generate reports to the Referring Entities and Referring Individuals so that they, too, can see these interactions. 1. Once the basic information is in your system you will be contacting the Referral
with the goal of assisting them in becoming Enrolled in a Workshop/Class.
The options you can choose for a contact of the referral are:
• Contact not made • Declined to enroll • Uncommitted about enrolling • Enrolled
2. By using the pull down menu, select the Result of your contact with the
referral.

Workshop Wizard Users’ Guide 32
3. By using the pull down menu, you can Select the chosen Curriculum based on the curriculums you have entered in the system.
4. By using the pull down menu, you can Select the Workshop/Class based on the curriculums you have entered in the system. If a curriculum was selected, only workshops will display based on that curriculum. Workshops not yet started will be shown in green. Clicking the orange “Edit” button will take you to the Workshops Tab if you find you need to add or edit a Workshop.
NOTE: If workshops are available for the curriculum but the workshop won’t work for the referral because of one reason or another such as location, then, check the box for No workshops available right now.
Workshop Wizard Users’ Guide 33
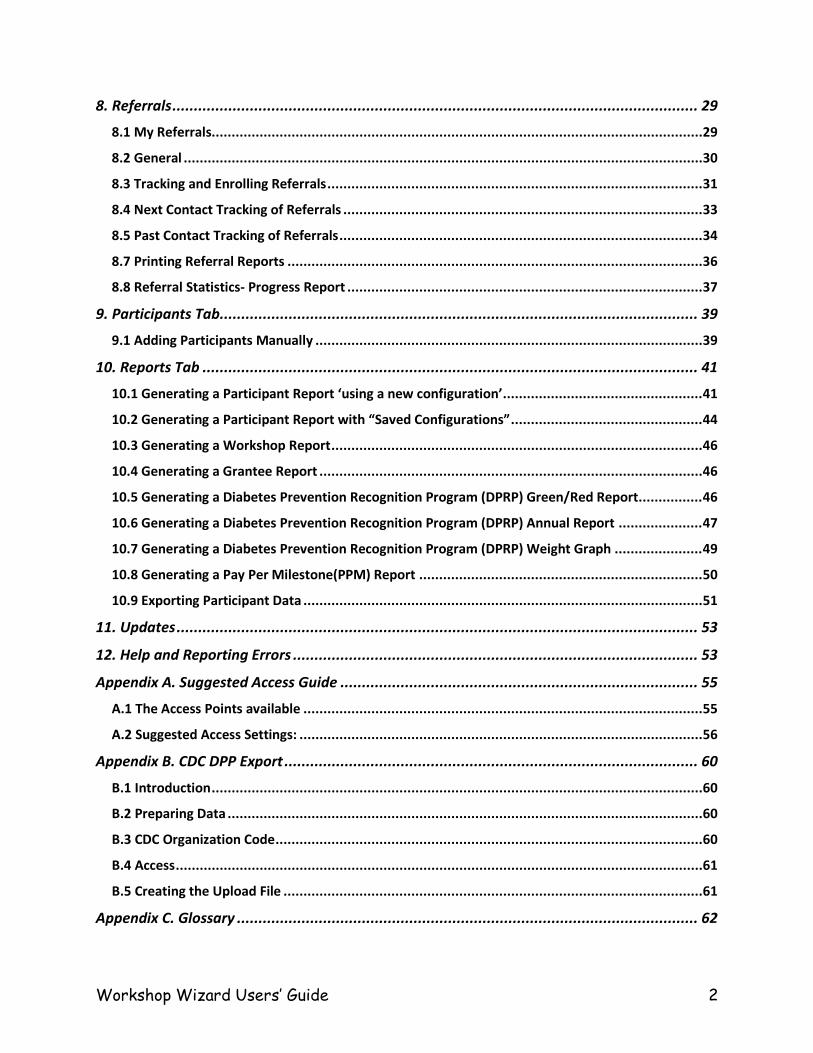
8.4 Next Contact Tracking of Referrals 1. If needed, select the “Due Date Needed” checkbox. 2. Choose a date from the calendar by selecting it so it shows as highlighted. You will be
encouraged to set “due dates” for most active referrals. When you set a “due date”, you can choose from three different actions below. • “Call Participant again” – Lets you know to call the participant back on the due
date. Note that there is a pull down menu with common choices including Monday, Tuesday, in 1 week, in 2 weeks, etc.
• “Participant should have called back by now” – Lets you know to either close the referral or call the participant back on the due date.
• “Workshop should have been scheduled by now” - Lets you know to look into why a workshop wasn’t scheduled as expected by the due date.
3. In the About box, you can note the purpose of the contact. For example: have they checked on their work schedule, are they ready to enroll in the upcoming class, etc.
4. Make sure to click on the “Save Changes” button.
PLEASE NOTE: Every weekday, all Referral Handlers will receive an email summarizing the work needed for their Referrals.

Workshop Wizard Users’ Guide 34
8.5 Past Contact Tracking of Referrals 1. Once the Referral has been selected and is seen on the General tab in the
Referrals area, move to the Past Contacts tab. You will see on the upper left side the list of Past Contacts that have been documented. To view one of these Past Contacts, click on the date to select the item. You can make any changes needed. Make sure to hit the “Save Changes” button before moving on.
2. To add a contact click on the blue “Add Contact” button. You will then be able to select who is making, or “Handling”, the interaction from the pull-down menu. You can add the “Date” the contact was made. In the “Description” box note the information. It may be something like ‘Left Voice Mail Message at 6:15pm,” or detailed reasons why the referral is not able to attend a workshop. This information is valuable not only for your future interactions, but also for providing the Referring Individuals and Referring Entities with help in addressing barriers when working with their referred client/patient.
3. Enter or Edit Past Contacts on the “Past Contacts” tab. It lets you indicate the result of the attempt to contact the referral:
The results you can choose for calling a contact are:
• No answer • Message left • Contact made
Remember that this field records what happened when you tried to reach the person, not what the person decided to do about the referral. To record what the person decided about the referral, use the “General” tab:
4. Make sure to click on the “Save Changes” button before moving on.

Workshop Wizard Users’ Guide 35
5. When you record contacting a referral, you can indicate when you should
contact them again with the "call again" field. Note that there is a pull down menu with common choices including Monday, Tuesday, in 1 week, in 2 weeks, etc.
8.6 My Referrals
There are five sections to the “My Referrals” tab. They are : 1. A Search feature to define which Referrals you want to see. 2. Unassigned Referrals is a list in the light blue box. It is any referral which
does not yet have a handler assigned. 3. Referrals Needing Work is the light pink box. This lists any referrals which
need attention, such as calling the participant back, setting a due date for the referral, or looking in to why a workshop has not been set within a given curriculum.

Workshop Wizard Users’ Guide 36
4. Referrals on Hold, in the light yellow box, lists those referrals for which the due date has not arrived, or for a workshop that has not yet been set.
5. Closed Referrals, in the pale green box, is for referrals closed because the participant has been enrolled in a workshop, the participant has declined to register for a workshop, or you have been unable to reach the participant after a given number of attempts.
8.7 Printing Referral Reports 1. From the Search tab you can decide if you want to produce a report for a
specific Referring Entity, Referring Individual, or Workshop/Class. 2. Once the search has given you the appropriate records move to the Print tab. 3. Select how you want the records to be show in your report. Click in the top set
of circles to indicate the order you wish the records to be shown. 4. The bottom set of checkboxes allows you to decide what information is needed
in the reports. 5. When you have made your selections hit the blue “Go” button. The report will be
generated as a PDF file. Remember, this is protected health information and needs to be handled appropriately.

Workshop Wizard Users’ Guide 37
8.8 Referral Statistics- Progress Report Workshop Wizard has the ability to report statistics about your referrals. To create reports showing the aggregate results of referrals, use the “Referrals > Print” tab and choose the “Referral Progress Report”:
You can choose any of the following options for what each row of the report should represent:
• One participant • One referring entity

Workshop Wizard Users’ Guide 38
• One referring individual • One handling organization
The report will be slightly different depending upon which of these options you choose, but it will look similar to this:
As you can see, there are 4 columns with “Contact” in the heading. These columns show the results of trying to contact the person who was referred. There are 5 columns with “Result” in the heading, and they show the result of the overall referral.

Workshop Wizard Users’ Guide 39
9. Participants Tab
9.1 Adding Participants Manually Some Workshop Wizard users may import participants from the NCOA website. Even if you are importing some participants, you may want to add participants manually for other curriculums not handled by the NCOA. The participant tab has two parts: the data from the paper Session 1 Form, and Other data.
1. Select the Participants tab, and the select the “General” tab. 2. Select the “Add Participant” button at the bottom of the screen.
Please Note: Different fields will be displayed depending on the curriculum you select. There are different Session 1 Forms for CDSME, DPP, MOB, and Other. You will only see the fields that apply to the chosen curriculum.
3. Add the information into each field for each participant. Please Note: When entering DPP/NDPP participants, there is a built in calculator that will let you determine the participant’s BMI.

Workshop Wizard Users’ Guide 40
Please Note: When entering CDSME participants, you can enter as either their age or enter their date of birth. You do NOT have to enter both. The same is true with whether live alone or enter the number of people in the household. Again, you do NOT have to enter both.
4. To record additional information, including Attendance, click on the “Other” tab. There is a checkbox for “Session 0” which allows you to keep track of whether or not the participant attended “Session 0”. Note: “Session 0” Attendance does not affect whether or not the participant is counted as a ‘completer’. Note: If no attendance information is available, click on the “Attendance Unknown” box.
5. The “Other” tab also contains the ability to hold a participants full name, as required for research tracking purposes. This is also where the State, County, Zip Code, etc. are entered.

Workshop Wizard Users’ Guide 41
6. Make sure to save any changes by clicking on the blue “Save Changes” button. 7. If the workshop is using Surveys, the corresponding additional tabs (Single-Use
Survey, Pre-Survey, Post-Survey, and Follow-up-Survey) will automatically appear. You can use these tabs to enter the survey information for the participant.
10. Reports Tab
10.1 Generating a Participant Report ‘using a new configuration’ 1. On the “Reports” tab choose the ‘Create a report using a new configutation’.
Hit the blue “Next” button. (If you have not previously saved a configuration, you won’t see the “Create a report using a new configuration” option. In this case, simply press the “Next” button.)
2. From the General Screen use the three lines given to title or identify your report.
3. The General screen also lets you choose from the pull-down menu a ‘1-column report’ or a ‘2-column report’. This pull-down menu also lets you choose between creating a report on participants or a report on workshops.
4. A pull-down menu will show the ‘Type of Reports’ available. The default is set to the ‘Participant Report’.
5. If you wish to include survey information in the report, choose a single-use or multi-use survey (or both). If you choose to include surveys in a report, you will only be able to report on workshops which use those surveys.

Workshop Wizard Users’ Guide 42
6. You will now see a Define Left Column screen. You can choose the criteria for
the workshops you are reporting, including License Holder, Curriculum, Organization, and more.
6. When you have completed the desired paramaters for the Left Column hit the
blue “Next” button at the bottom of the page. 7. The next screen allows you to choose from all the Workshops held within the
parameters you have chosen. The default is All the Workshops selected. You can de-select all workshops by using the “Select None” box and then checking the workshops you want to include. Or you can “Select All” and then by clicking any of the selected Workshops de-select them.

Workshop Wizard Users’ Guide 43
8. When you have finished, press the blue “Next” button. 9 You have now completed the options for the left column of the report. If you
have selected a 2-column report, you will follow the same procedure to select options for the right column.
10. Next comes the Completion screen. On it you can indicate you want to save this report configuation and give it a title. When you have finished, press the blue “Next” button.
11. The Download Report screen gives you the blue “Download” button to click. It
may take a monent for the report to appear. You can also choose to “Create Another Report” by clicking on the blue button at the bottom of the Download screen.

Workshop Wizard Users’ Guide 44
12. This sample shows just the first few lines of a demographic report. The report is generated as a Word document which can be edited to include your logo, contact information, or footnotes on the data, and then saved as a new Word document.
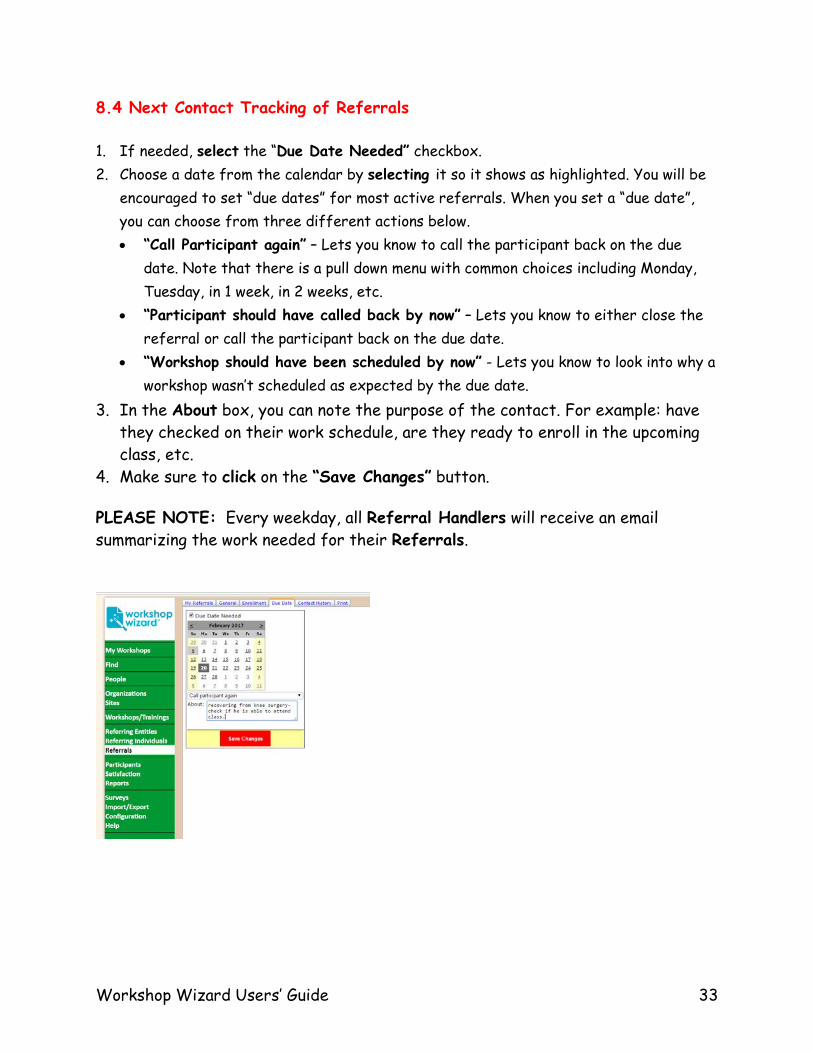
10.2 Generating a Participant Report with “Saved Configurations” The previous section showed you how to tell Workshop Wizard all the details of the report you want. When you are done, you have the chance to save those details for future use. These details are called a “configuration.” When you choose the “Reports” tab, the second option (“use the configuration I’ve saved previously”) lets you retrieve the details of the configuration, and then modify them before producing a new report. The third option (“produce a report
Workshop Wizard Users’ Guide 45
from this configuraiton I’ve saved previously”) will produce a report from the configuration without allowing you to modify any of the details for the report (which can save you time if you don’t need to modify any of those details).

Workshop Wizard Users’ Guide 46
10.3 Generating a Workshop Report The General screen has pull-down menu to select from the ‘Type of Reports’ available. The ‘Workshop Report’ will allow you to choose from the same parameters as the ‘Participant Report’, however rather than reporting on participants within the workshops, this report will report the number of workshops.
10.4 Generating a Grantee Report From the General screen elect ‘Grantee Report’from the ‘Type of Reports’ available. This is designed only for programs reporting on Administration for Community Living grants. This report may be submitted in lieu of a report generated from the National Council on Aging website.
10.5 Generating a Diabetes Prevention Recognition Program (DPRP) Green/Red Report From the General screen’s pull-down menu to select ‘DPRP Green/Red Report’ from the ‘Type of Reports’ available.
You can then set the criteria as you would with a ‘Participant Report’. The Word document that will be generated shows the selected data as compared to the DPRP standards established by the Centers for Disease Control and Prevention. The
Workshop Wizard Users’ Guide 47
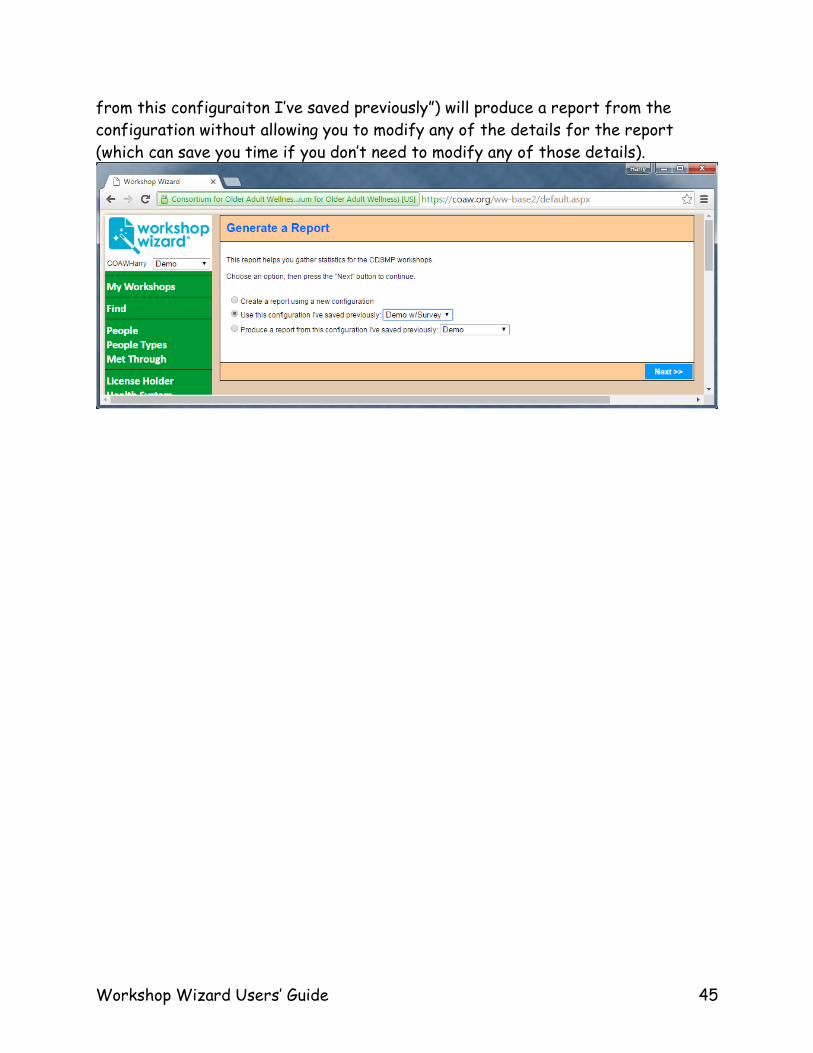
‘DPRP Green/Red Report’ shows standards met in green and those not yet being met in red.
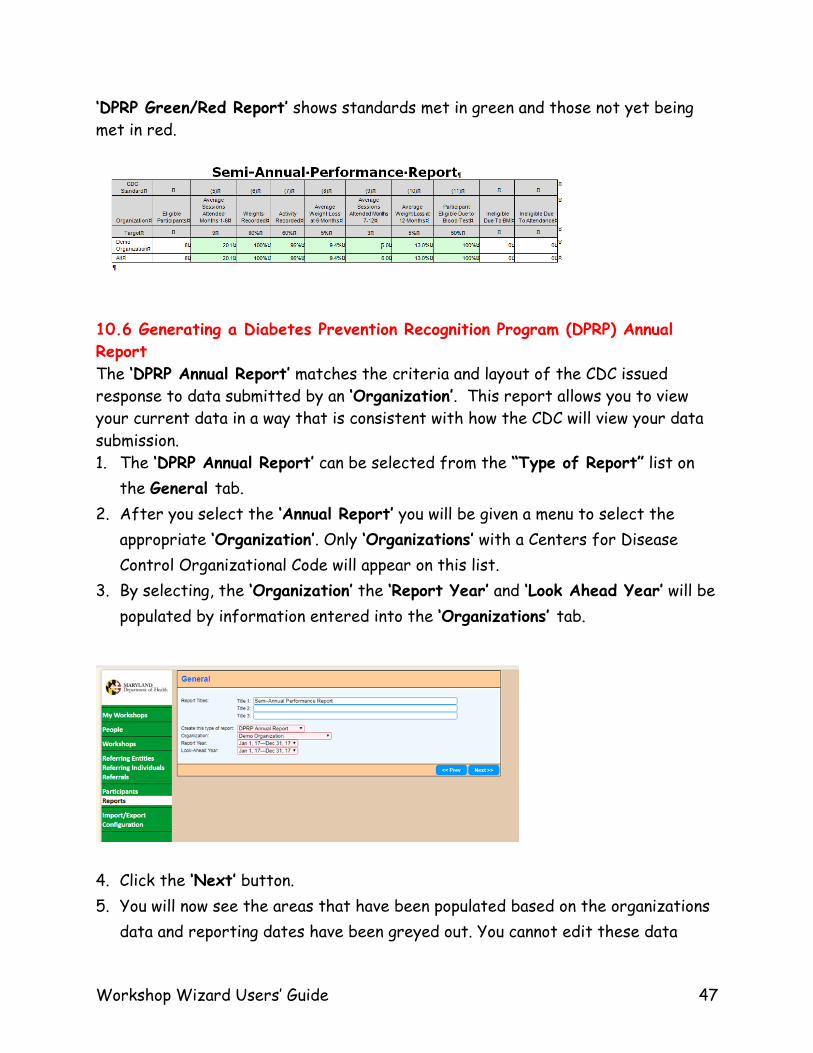
10.6 Generating a Diabetes Prevention Recognition Program (DPRP) Annual Report The ‘DPRP Annual Report’ matches the criteria and layout of the CDC issued response to data submitted by an ‘Organization’. This report allows you to view your current data in a way that is consistent with how the CDC will view your data submission. 1. The ‘DPRP Annual Report’ can be selected from the “Type of Report” list on
the General tab. 2. After you select the ‘Annual Report’ you will be given a menu to select the
appropriate ‘Organization’. Only ‘Organizations’ with a Centers for Disease Control Organizational Code will appear on this list.
3. By selecting, the ‘Organization’ the ‘Report Year’ and ‘Look Ahead Year’ will be populated by information entered into the ‘Organizations’ tab.
4. Click the ‘Next’ button. 5. You will now see the areas that have been populated based on the organizations
data and reporting dates have been greyed out. You cannot edit these data

Workshop Wizard Users’ Guide 48
fields. You may choose to include or exclude ‘Sites’, select the ‘Counties’, or select a specific ‘Lifestyle Coach/Leader’.
6. Click the ‘Next’ button. 7. The next screen will show you all the Workshops that meet your selection
criteria. You may change your selection by clicking on the buttons. 8. Click the ‘Next’ button. 9. You will then move through the screens confirming and allowing for the ‘Saving’
of the report. 10. When the message indicates the report is ready, click on the ‘Download’ button
and a Word document file will appear at the bottom left side of your screen.

Workshop Wizard Users’ Guide 49
10.7 Generating a Diabetes Prevention Recognition Program (DPRP) Weight Graph 1. Selecting ‘Weight Graph’ from the menu will populate the data range to match
the DPRP report time frame.
2. Click the ‘Next’ button. 3.As with the ‘Annual Report’ option, much of the information has been pre-set.
You will have the ability to select ‘Sites’, select the ‘Counties’, or select a specific ‘Lifestyle Coach/Leader’
4. Click the ‘Next’ button. 5. The next screen will show you all the workshops that meet your selection
criteria. You may change the selection by clicking on the buttons. 6. Click the ‘Next’ button. 7. You will then move through the screens confirming and allowing for the ‘Saving’
of the report. 8. When the message indicates the report is ready, click on the ‘Download’ button
and a pdf document will appear at the bottom left side of your screen. 9. Page one of the document is a graphic that shows the weight loss recorded for
each Workshop over time. Each Workshop series is in a different color/pattern. In this case solid blue and black. The average of all the workshops is shown as a solid line in red.

Workshop Wizard Users’ Guide 50
10. The second page outlines the ‘Organization’, and the ‘Site’ for each reported
‘Workshop’ with a legend of how each is shown on the graph.
10.8 Generating a Pay Per Milestone(PPM) Report 1. From the General page choose ‘PPM Report’ from the ‘Type of Report’ menu.
2. From the ‘Rule Set’ menu choose the pre-set criteria for payment based on a
participant meeting a milestone within the DPP. A rule set may be created by agency, managed care organization, or private payer.
3. Select from the ‘Show’ menu whether you want to ‘Show each workshop and participant’ or ‘Show each workshop’.
4. The ‘Acceptances Box’ allows for the generating of the PPM Report using selection criteria already established.
5. You can then set the criteria as you would with a ‘Participant Report’.

Workshop Wizard Users’ Guide 51
6. Click the ‘Next’ button. 7. The next screen will show you all the Workshops that meet your selection
criteria. You may change the selection by clicking on the buttons. 8. Click the ‘Next’ button. 9. You will then move through the screens confirming and allowing for the ‘Saving’
of the report. 10. When the message indicates the report is ready, click on the ‘Download’ button
and a Word document will appear at the bottom left side of your screen. 11. The Word document shows a table of participants indicating which milestones
have been met. Each milestone achieved (starting the program, attendance goals, percentage of weight loss) correlates with a possible financial reimbursement based on the selected ’Rule Set’.
10.9 Exporting Participant Data The most common way to see participant data is to use the “Reports” tab to create participant reports. However, sometimes you need to work with the raw data. To do this, you go to the “Participants > export” tab:
This tab will create an Excel spreadsheet containing the data. You can use the “Participants > Search” tab to select the data to be included (such as including data within a particular date range).

Workshop Wizard Users’ Guide 52
Each row of the spreadsheet can have up to 5 different areas, which are identified by having 5 different colors in the header rows:
1. The organization 2. The site 3. The workshop 4. The participant 5. The survey(s)
The first 3 areas will normally be duplicated on several rows. For example, the organization data will be included in all the rows for participants in workshops sponsored by a particular organization. The participant area will always be present; you can use the options on the “Participants > Export” tab to turn on or off the other 4 sections:
The last option on the “Participants > Export” tab lets you include or exclude identifiers for each organization, site, workshop, and participant. Those identifiers look like this in a spreadsheet:

Workshop Wizard Users’ Guide 53
Each organization, site, workshop, and participant will have a unique identifier. If you want a way to distinguish one item from another in the spreadsheet, this will be helpful.
11. Updates Workshop Wizard license holders and primary contacts are added you to a mailing list named “WW News”. We use this mailing list to send announcements about Workshop Wizard to all users; these are mainly announcements of new features. You will be receiving such an email as updates and changes are made between the revisions to the Users’ Guide.
12. Help and Reporting Errors 1 Up to three people in your organization can be designated to contact COAW if
there are items in your website that appear to not be working properly. You can set the "help" entry for these designated people in the "access" tab in the People section. This controls whether or not the "help" entry appears on the menu.
2 If an item doesn’t work properly, please send [email protected] the steps you have taken that led to the error so we can follow them to cause the error to happen again. Once it can be duplicated, we can fix it.

Workshop Wizard Users’ Guide 54
3 Send a screen shot of the error message you received by hitting “Alt” and “Print Screen” on your keyboard. Paste this screenshot into an email and send it to COAW with the steps mentioned in number 1 above.
4 COAW will let you know when the problem has been fixed.

Workshop Wizard Users’ Guide 55
Appendix A. Suggested Access Guide Access is defined as
• “None” meaning the option does not show in the green field at the left of the screen.
• “View” meaning the field shows in the green area on the left of the screen and the information can be viewed, but not changed.
• “Full” meaning the information can be viewed and modified. Each Access point can be set separately for each individual. To make the process easier, you can also set all of the options to “None”, “View”, or “Full” and then de-select only those access points needed. A.1 The Access Points available for each individual are: • My Workshops • Find • People • Access • People Types • Met Through • License Holder • Health System • Organizations • Sites • Curriculums • Workshops • Referring Entities: • Referring Individuals • Referrals • Participants • Reports
o Can produce reports for all organizations o Can produce reports only for these organizations
• Import/Export • Log • Surveys

Workshop Wizard Users’ Guide 56
• Public Website\ • Help
A.2 Suggested Access Settings: 1 Overall Statewide Program Coordination- “Full” Access to all 2 Statewide Program for Demonstration Only- “View” Access to all 3 Program Coordinators- “Full” Access to these areas only. All others set to
“None”
• My Workshops • Find • People • Access • People Types • Met Through • Health System • Organizations • Sites • Workshops • Referring Entities: • Referring Individuals • Referrals • Participants • Reports
o Can produce reports only for these organizations 4 NDPP Lifestyle Coaches- No Coordinator Duties “Full” Access to these areas
only. All others set to “None” • My Workshops • People • Reports • Can produce reports only for these organizations

Workshop Wizard Users’ Guide 57
5 NDPP Lifestyle Coaches- Also Setting up Workshops “Full” Access to these areas only. All others set to “None” • My Workshops • People • Organizations • Sites • Workshops • Referring Entities: • Referring Individuals • Referrals • Reports • Can produce reports only for these organizations
6 Master Trainers Also Setting up Workshops “Full” Access to these areas only.
All others set to “None” • My Workshops • People • Organizations • Sites • Workshops • Referring Entities: • Referring Individuals • Referrals • Reports • Can produce reports only for these organizations
7 Leaders with No Coordinator Duties “Full” Access to these areas only. All
others set to “None” • My Workshops • People • Reports • Can produce reports only for these organizations

Workshop Wizard Users’ Guide 58
8 Leaders/Lifestyle Coaches AND Referral Handlers “Full” Access to these areas only. All others set to “None” • My Workshops • Find • People • Met Through • Health System • Organizations • Sites • Workshops • Referring Entities: • Referring Individuals • Referrals • Reports • Can produce reports only for these organizations
9 Designated Participant Data Entry People- with Coordinator Duties- “Full”
Access to these areas only. All others set to “None” • Find • People • Organizations • Sites • Workshops • Referring Entities: • Referring Individuals • Referrals • Participants • Reports • Can produce reports only for these organizations
10 Designated Participant Data Entry - “Full” Access to these areas only. All
others set to “None” • Participants

Workshop Wizard Users’ Guide 59
• Reports • Can produce reports only for these organizations

Workshop Wizard Users’ Guide 60
Appendix B. CDC DPP Export
B.1 Introduction Periodically, you will need to export the DPP data into a file and upload that file to the CDC website. (The CDC provides instructions on how to upload a file, and will send you email reminders when it is time to upload a new file.) This document explains the steps you should go through to prepare your data for upload and then create the upload file.
B.2 Preparing Data Most of the data (name, email address, weekly weight, weekly activity, and attendance) are entered using the “My Workshops” tab, and this is normally done by the leader for each workshop. But the data entered using “My Workshops” isn’t the only data necessary to create the CDC upload file—you also need to collect the following:
• Your organization code (see details in the next section). • The tests which led to the prediabetes diagnosis: FPG, OGTT, A1C, GDM, CDC Risk
Test. • Date of birth. • Sex. • Race (white, black, etc.) and ethnicity (Hispanic or not). • Height.
All of this information should be entered, and you can enter it (except for the organization code) by using the “Participants” tab. (An error will be displayed if you try to create a CDC export file without entering this data.)
B.3 CDC Organization Code You were assigned an organization code by the CDC. You should enter this code using either the “organizations” tab or the “license holder” tab. Which tab you use depends upon who the CDC organization code belongs to. There are two possibilities: 1 If you will be uploading data only for workshops which were managed by a single
organization, then you should use the “organization” tab to enter the CDC

Workshop Wizard Users’ Guide 61
organization code. If this is the case, you should also choose that organization when you use the “import/export” tab to create the upload file (described in a later section).
2 If you will be uploading data for all the workshops managed by a single license holder, then you should use the “license holder” tab to enter the CDC organization code. If this is the case, you should also choose that license holder when you use the “import/export” tab to create the upload file (described in a later section).
B.4 Access In order to create the upload file, you will need to use the “import/export” tab. If you don’t see the “import/export” tab when you log on to Workshop Wizard, then you probably don’t have access to it. Here’s how you can give yourself access to the tab:
• Go to the “people” tab. • Search for yourself. • Use the “access” tab to give yourself full access to “import/export”.
B.5 Creating the Upload File Here’s how you can create the upload file:
• Go to the “import/export” tab. • Choose the “export” tab. • Choose the “Export DPP data to the CDC” option. • Choose either the organization or the license holder you are exporting data for.
You can choose both if you wish. (You cannot leave both the organization and the license holder set to “-All-“.) If you choose an individual organization, you should also have set the CDC organization code for that organization. If you leave the organization set to “-All-” then you should have set the CDC organization code for the license holder you select.
• Choose the range of dates you are exporting data for. (Be careful not to upload any of the same dates to the CDC more than once.)
• Press the “export” button. You should save the export file someplace you will remember, because you will need to find it when you go to the CDC website to upload the file.

Workshop Wizard Users’ Guide 62
Appendix C. Glossary
• Access determines if you have been given permission to view, enter, or modify information. Each individual’s access is to be set separately for each area as:
o “Full” meaning the information can be viewed and modified. o “None” meaning the option does not show in the green field on the
menu bar at the left of the screen. o “View” meaning the field shows in the green area on the menu bar at
the left of the screen and the information can be viewed, but not modified.
o Capability to produce reports only for “designated organizations” o Capability to produce reports only for “all organizations”
• CDSMP is the Chronic Disease Self-Management Program created and owned
by Stanford University. The curriculum is known by different names in different communities including Healthier Living Colorado™, Be Well, MyCD, and Live Well. When referring to the series of curriculums produced by Stanford CDSME, (E for education) is used. Your organization will determine the name, and the acronym to be used.
• Classes are also known as Workshops.
• COAW is the Consortium for Older Adult Wellness. COAW is a non-profit organization based in Colorado. COAW trains and implements falls prevention, self-management, and diabetes prevention programs and created Workshop Wizard.
• Curriculum is the name of the subject being taught in Workshops or
Trainings. For example, CDSMP, NDPP, Health Coach Training, Kitchen Creations, and A Matter of Balance are all curriculums. The curriculums are abbreviated in order to make the lists shorter and easier to read. Commonly used abbreviations in the Curriculum pull down menus may include:
o CDSMP- the Chronic Disease Self-Management Program o NDPP/DPP – the National Diabetes Prevention Program o CTS – the Cancer Surviving and Surviving self-management program o CPSM – the Chronic Pain Self-Management Program

Workshop Wizard Users’ Guide 63
o Manejo/Sp DSMP – Programa de Manejo Personal de la Diabetes, the Spanish version of the Diabetes Self-Management Program.
o Tomando/Sp CDSMP – Tomando Control de su Salud, the Spanish version of the Chronic Disease Self-Management Program
o MOB – A Matter of Balance falls prevention curriculum o SO – Stepping On falls Prevention curriculum o KC – Kitchen Creations – a healthy eating and nutrition curriculum o KC-AA – Kitchen Creations for African Americans o KC-SP - Creaciones de la Cocina is the Spanish version of Kitchen
Creations o TCMB – Tai Chi Moving for Better Balance is a falls prevention
curriculum o LD Trng – Leader Training, for example LD TRNG – CDSMP is leader
Training in the Chronic Disease Self-Management Program o LDXT – Leader Cross Training, for example LDXT- CPSM is leader
cross training of those with CDSMP in the Chronic Pain Self-Management curriculum.
o LSCT – Lifestyle Coach Training in the NDPP/DPP program. o MT- Master Training in the indicated curriculum, such as MT-CDSMP
or MT-NDPP o MTXT- Master Training Cross Training, for example MTXT- CPSM is a
Master Training cross training of those with MT’s in CDSMP in the Chronic Pain Self-Management curriculum.
• DPP is the Diabetes Prevention Program. This is a curriculum written by the Centers for Disease Control and Prevention (CDC). If an organization is seeking recognition, or is recognized by the CDC, the program is identified as NDPP (National Diabetes Prevention Program™).
• Fidelity is also known as a Fidelity Visit or Fidelity Observation. This is a way to assure that the curriculum is being taught in the community workshops/classes as intended. This is a part of what maintains the high standards of evidence-based programming.
• Find is a map showing how Workshop Wizard connects the different types
of information within the system. On the left side is the Workshop workflow information and on the right side is the workflow for Referrals.

Workshop Wizard Users’ Guide 64
• Health System refers to the overall umbrella under which multiple health care entities may be organized. For example, the University Hospital System may include two hospitals in different communities, three urgent care centers, a home health agency, and five primary care practices each with multiple care providers.
• Import/Export refers to the functions that allow you to download or add
data from given data sources, and upload or copy data to given data sources. This includes data that may be reported to the NCOA.
• License Holder is the name for the organization given permission to train in
and implement a specific curriculum. Licensure is required for each Curriculum. This tab also may be used to track which organization is seeking Accreditation of a curriculum. For example, CDSME requires the organization to have an active license granted by Stanford University. DPP/NDPP require an organization to be registered with as pending recognition or as recognized. Licensure and Accreditation usually include reporting, tracking, fidelity requirements and the payment of fees. Workshop Wizard allows you to enter multiple License Holders/Accreditations for each Curriculum and multiple Curriculums for each Organization.
• Log gives program coordinators and other authorized users a look at who has logged into Workshop Wizard and what actions they have taken.
• Membership is on the Workshop tab and includes may include the roles of Student, Teacher and Fidelity.
• Met Through is for tracking how this person became aware of your work.
• My Workshops are classes or workshops that are attached to the person
who has logged into Workshop Wizard. On the My Workshops tab, only my workshops will display under my login.

Workshop Wizard Users’ Guide 65
• NCOA is the National Council on Aging, the technical assistance provider for grantees receiving funding from the Administration for Community Living (ACL).
• NDPP is the National Diabetes Prevention Program™ out of the Centers for Disease Control and Prevention. NDPP denotes that the program offering this curriculum is accredited or seeking accreditation from the CDC.
• Organizations are the groups that sponsor Workshops or Trainings. They may also hold classes at their Site, or at multiple Sites. For example, the Volunteers of America is an Organization that holds classes at Sites including the Northbridge VOA meal site, the Southport VOA senior center, and the Central City VOA offices. Organizations have their contact person in the People tab indicated by the People Type, Organizational Contact.
• Participants are the people who enroll in Workshops and complete
demographic and/or survey paperwork. Usually data is entered after the Workshop is completed. Usually no names are attached to the data. The exception is for those Participants who are in Workshops where data is collected at several points of time; their information may need to be followed by name or by unique identifiers.
• People includes everyone you want to keep track of for all your programs
with the exception of Workshop Participants and Referrals. Participants are tracked under the Participant tab and Referrals are tracked under the Referral tab. People may include leaders, instructors, funders, potential leaders, vendors, staff, and anyone else that you want to contact.
• People Types are the categories you establish that help you define the
people you are entering into your system. This does not include Participants, as they are tracked under the Participant tab and Referrals that are tracked under the Referrals tab. Site Contact, Organization Contact, Workshop Contact, Staff, Referral Handler, Leader, Master Trainer, Lifestyle Coach are all examples of People Types. Some People Types have been pre-set within Workshop Wizard. You can add others through the People Types tab on the menu bar in the green field on the left side of your screen.

Workshop Wizard Users’ Guide 66
• Public Website refers to what Workshop Wizard information can be viewed on your organization’s website. Through Workshop Wizard, designated people are given Access to post information as needed. Public Websites can also include information such as Workshop calendars and registration information pulled from your Workshop Wizard.
• Referral Handler is a person assigned by their program to contact a
referred individual, track contacts attempted, track contacts made, track follow-up needed, and ultimately enroll the person in a Workshop is called a Referral Handler.
• Referrals are the people/community members/clients/patients that are sent to you to be contacted and enrolled in a Workshop.
• Referring Entities are the separate organizations or practices that may fall
under the umbrella of a Health System. For example, under University Hospital as a Health System you may have the following who are all Referring Entities: two hospitals in different communities, two urgent care centers, a home health agency, and five primary care practices each with multiple care providers.
• Referring Individuals are the individual people making and sending in referrals. They may be a part of a Referring Entity, such as the Mountain Sea Medical Practice, and a Health System such as the University Hospital system.
• Reports refer to the information available for you to view, print, or export. Reports on Participant data can be found on a tab on the menu bar in the green field on the left side of the Workshop Wizard screen. There is also information specific to certain designated areas in the People, Workshops and Referral tabs.
• Sites are the physical locations hosting Workshops or Trainings.
Workshops may be the same name and location as the sponsoring Organization, or they may be at a different location, or Site. For example, the Volunteers of America is an Organization that holds classes at Sites including their offices at the Central City VOA, Northbridge VOA meal site,

Workshop Wizard Users’ Guide 67
and the Southport VOA senior center. Site Contacts have their information in the People tab indicated by the People Type, Site Contact.
• Students in the Workshop Membership tab are the people attending the Trainings or Workshops (classes). Entering the Students gives you the ability to create Workshop or Training rosters. The definition of a particular group of Students is defined by the type of activity taking place. For example, Students in a Training for CDSME Leaders are leaders-in-training and will be entered in Workshop Wizard to create a roster for the Training and the subsequent tracking of Workshops and Certifications. The Students within a Workshop may be added to generate a class roster for an Instructor or Leader to use in a community class. Note: The data for Workshop Students is held in the Participant tab.
• Surveys are the questions asked in addition to what is available in the Participant tab. Within Workshop Wizard, you can have as many additional Surveys as needed, based on the additional information you need for specified Workshops. For example, you may create a Survey for only NDPP classes asking if they have family members with diabetes. If this set of questions is only asked of attendees once, it is a Single-Use Survey. You might also need to create a Survey that is asked both as the Participant starts the class, and when they have finished the program, making this a Multi-Use Survey.
• Teacher is the person in front of a group of Students. The definition will
vary based on the type of activity. For example, the role of Teacher in a CDSME Workshop is also called a Leader. In A Matter of Balance™, the Teacher is also known as an Instructor. In NDPP, the Teacher role is called a Lifestyle Coach. In a training situation, the Teacher is called a Master Trainer, Master Trainer Select, or T-Trainer.
• Workshop Wizard is a web-based system to manage your program’s data. This is software-as-a-service provided to your organization through a contract with COAW.
• Workshops are also known as Classes.