dobe acrobat xi pro - himmelfarb health sciences library · pdf fileintermediate adobe acrobat...
TRANSCRIPT

Intermediate Adobe Acrobat XI Pro is licensed under the Creative Commons Attribution-NonCommercial-NoDerivatives 4.0 International License. To view a copy of this license, visit http://creativecommons.org/licenses/by-nc-nd/4.0/deed.en_US.
dobe Acrobat XI Pro
Digital Signatures


Table of Contents
INTRODUCTION ................................................................................................................................................. 1
ABOUT DIGITAL SIGNATURES ............................................................................................................................... 1
CREATE DIGITAL SIGNATURES/IDS/CERTIFICATES .................................................................................................... 2
Create a Digital Signature ......................................................................................................................... 2
Create Your Digital ID/Certificate ............................................................................................................. 4
Share Your Digital Certificate with Others ................................................................................................ 7
Digitally Sign Your Document.................................................................................................................... 8
VALIDATE DIGITAL SIGNATURES ......................................................................................................................... 10
Configure How You Validate Others’ Signatures .................................................................................... 10
Accept a Shared Digital Certificate ......................................................................................................... 11
Validate a Digital Signature ..................................................................................................................... 13
Detecting Modifications to a Document Following the Original Signing ................................................ 19
Remove a Digital ID ................................................................................................................................. 20


INTRODUCTION
This tutorial will cover how to create secure PDF documents using digital signatures. It will also explain how to validate digital signatures in files that you receive from others. The handout assumes a basic familarity with Adobe Acrobat XI.
ABOUT DIGITAL SIGNATURES
Digital signatures are the electronic equivalent of pen and paper signatures in that people use them to vouch for the integrity of a document’s information. A digital signature can serve various purposes: to certify authorship, to approve a document’s contents, to indicate that someone has reviewed a document, among others. Any subsequent changes to the document, whether authorized or unauthorized, will be noted by Acrobat. In signing a document, a person can even opt to lock the file so that it may not be altered.
In order to use a digital signature, you must also create a digital ID. This is the electronic equivalent of a driver’s license or passport in that it proves your identity to others in an online environment. A digital ID usually holds your name, email address, the name of the company that issued the ID, a serial number, and the ID’s expiration date. People commonly request a digital ID online from a third-party vendor. Acrobat XI Pro offers a way to create your own digital ID from within the program. This method does not offer the same degree of security as going to a third party vendor, but will suffice for documents in most situations.
Contained in the digital ID is a digital signing certificate. You should send the certificate to those to whom you intend to email documents digitally signed by you. It is this certificate that contains technology permitting recipients to prove that the signature on your document actually came from you and not someone pretending to be you.
1

CREATE DIGITAL SIGNATURES/IDS/CERTIFICATES
Create a Digital Signature
The first step is to create the digital signature. To do this,
• Go to Edit > Preferences • Choose Signatures from the list of
categories on the left. • Click on ‘More’ by ‘Creation and
Appearance’.
A number of options appear in this dialog box.
• It’s important that you select ‘View documents in Preview Mode’ under ‘When signing’.
Then,
• Under ‘Appearances’, click ‘New’.
2

• Give your Digital Signature a descriptive title that will enable you to identify it easily (in case you create multiple signatures).
Under Configure Graphic, you may opt to add an image to your signature. To do so,
• Select ‘Imported Graphic’ • Click on the ‘File…’ button to locate the
image.
Under Configure Text, you would generally select to appear as part of your digital signature:
• Your name • Date • Reason for the signature (e.g., document
approval)
When done,
• Click OK in the ‘Configure Signature Appearance’ dialog box.
3

Create Your Digital ID/Certificate
Back in the Preferences menu,
• Click on More by ‘Identities and Trusted Certificates’.
• Click on ‘Digital IDs’ in the top left corner of the dialog box.
• Next, click on ‘Add ID’.
In the Add Digital ID dialog box,
• Select ‘A New Digital ID I want to Create Now’ and then press ‘Next’.
• Select New PKCS#12 digital ID file, if it isn’t already selected, and press ‘Next’.
4
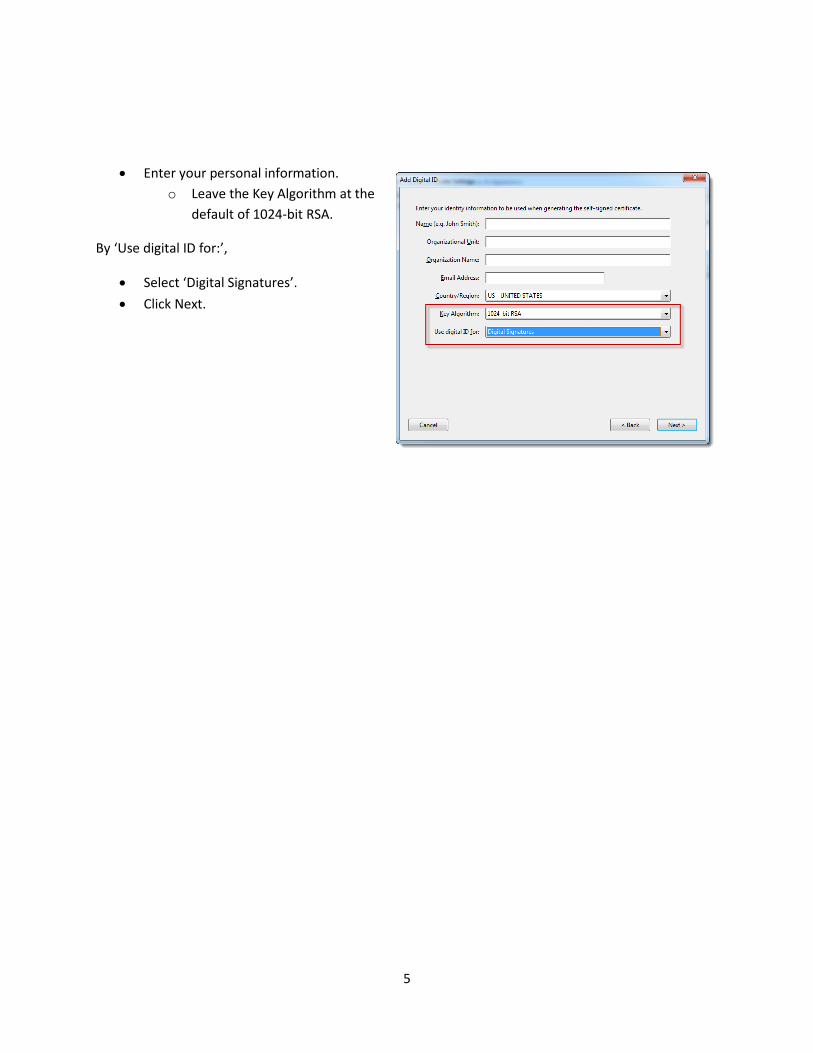
• Enter your personal information. o Leave the Key Algorithm at the
default of 1024-bit RSA.
By ‘Use digital ID for:’,
• Select ‘Digital Signatures’. • Click Next.
5

The following screen allows you to choose the location on your computer to store your digital ID, and prompts you to create a password.
Make sure you remember your password, but never share it with anyone. Passwords are case sensitive.
• Click Finish when done.
Your digital ID displays in the Digital ID and Trusted Certificates Settings dialog box. The digital certificate is embedded in your ID.
To view certificate details,
• Double-click on your digital id listing.
Information about the certificate is displayed in the various tabs within the Certificate Viewer.
• Click OK when done and then close out the dialog box.
6

Share Your Digital Certificate with Others
You will probably want to email in advance a copy of your digital signing certificate to those to whom you intend to send digitally signed documents. Those who receive copies of the certificate will have your name added to their list of trusted identities and can easily vouch for the authenticity of your digital signature.
In the Digital ID and Trusted Certificate Settings dialog box,
• Choose Export.
• Choos he data to a file’ and click Next. • Select a file location and then save
the file.
You’ll see the message: Save operation complete.
• Click OK.
Log into your email and send this file as an attachment to people who will be receiving digitally signed documents from you.
7

Digitally Sign Your Document
To add a digital signature to a PDF file,
• Click on the ‘Sign’ button located on the Taskbar. • Click on ‘Work with Certificates’.
A message appears explaining how to create a signature field.
• Click ‘Drag New Signature Rectangle…’
Your mouse pointer will change to a crosshair so that you can draw a box over the portion of your document where you wish to add your signature.
8
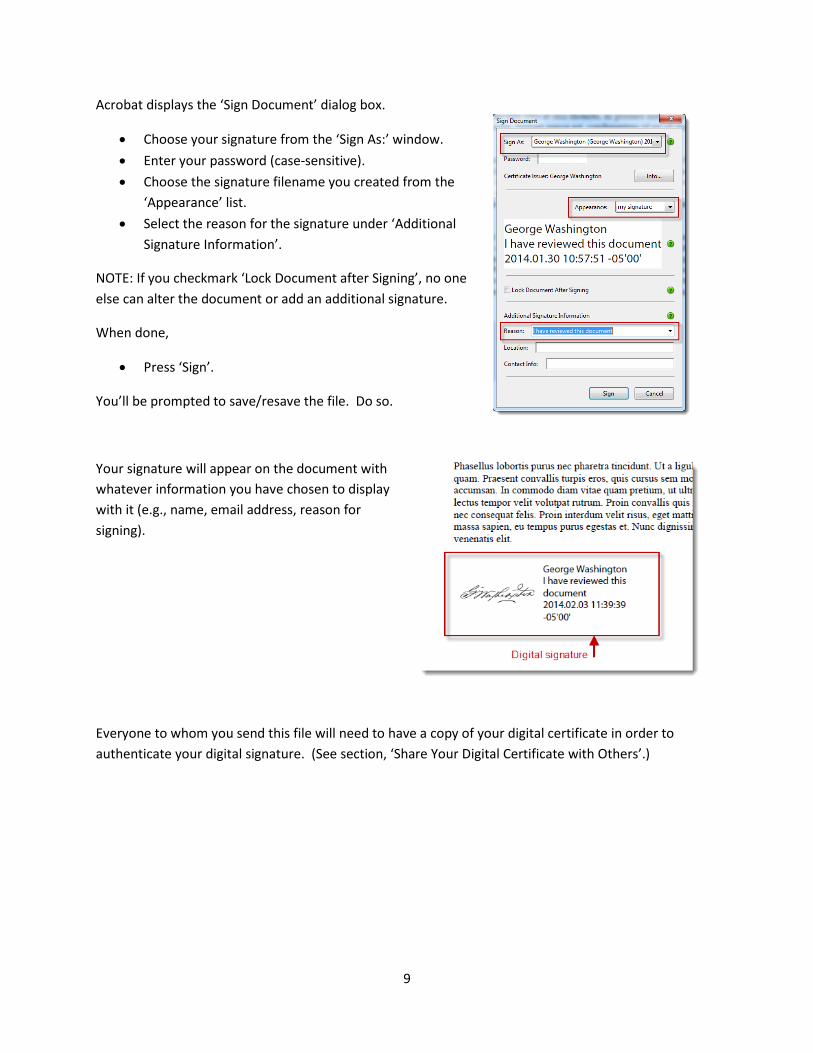
Acrobat displays the ‘Sign Document’ dialog box.
• Choose your signature from the ‘Sign As:’ window. • Enter your password (case-sensitive). • Choose the signature filename you created from the
‘Appearance’ list. • Select the reason for the signature under ‘Additional
Signature Information’.
NOTE: If you checkmark ‘Lock Document after Signing’, no one else can alter the document or add an additional signature.
When done,
• Press ‘Sign’.
You’ll be prompted to save/resave the file. Do so.
Your signature will appear on the document with whatever information you have chosen to display with it (e.g., name, email address, reason for signing).
Everyone to whom you send this file will need to have a copy of your digital certificate in order to authenticate your digital signature. (See section, ‘Share Your Digital Certificate with Others’.)
9
VALIDATE DIGITAL SIGNATURES
Configure How You Validate Others’ Signatures
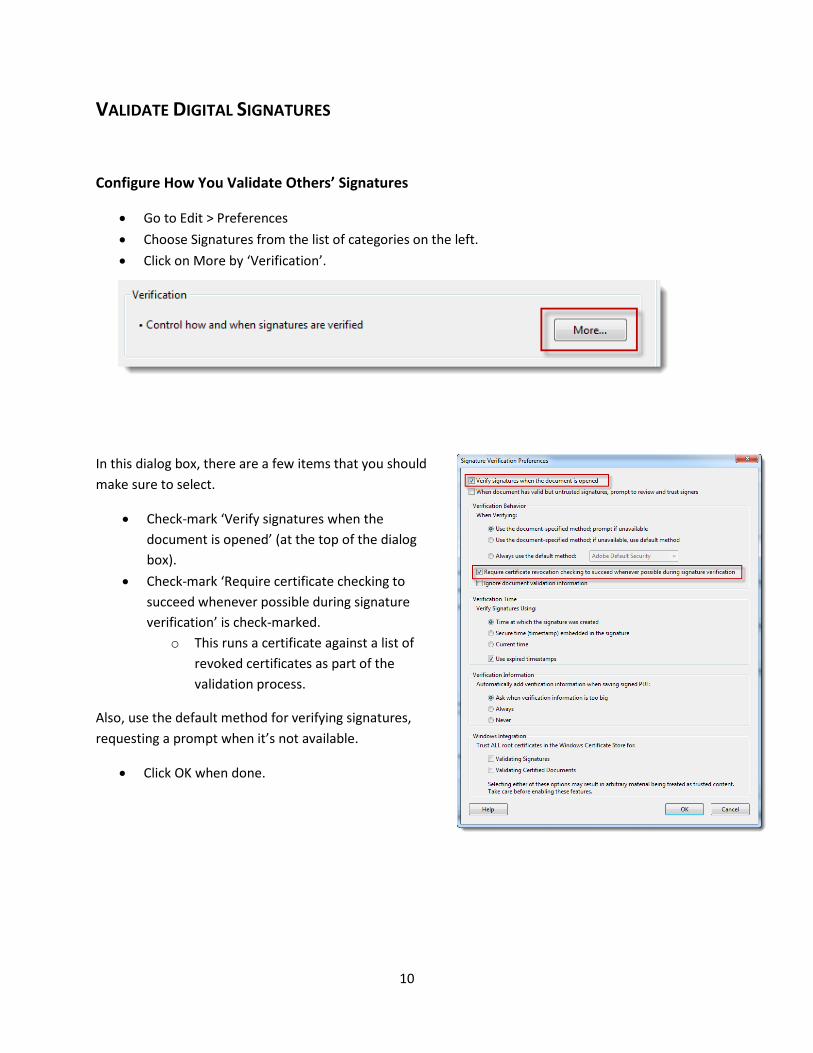
• Go to Edit > Preferences • Choose Signatures from the list of categories on the left. • Click on More by ‘Verification’.
In this dialog box, there are a few items that you should make sure to select.
• Check-mark ‘Verify signatures when the document is opened’ (at the top of the dialog box).
• Check-mark ‘Require certificate checking to succeed whenever possible during signature verification’ is check-marked.
o This runs a certificate against a list of revoked certificates as part of the validation process.
Also, use the default method for verifying signatures, requesting a prompt when it’s not available.
• Click OK when done.
10

Accept a Shared Digital Certificate
If someone emails you his or her digital certificate in advance of sending you a digitally signed document, you’ll see a ‘Data Exchange File – Import Contact’ dialog box when you attempt to open it.
• Go to File > Open • In the lower right area of the window, choose ‘All Files’. • Find and click on the certificate and then click ‘Open’.
• Click on ‘Set Contact Trust…’ In the ‘Import Contact Settings’ dialog box,
11

• Checkmark ‘Use this certificate as a trusted root’.
To allow actions that could potentially compromise document security, such as playing embedded video segments,
• Checkmark ‘Certified documents’ and any of the boxes listed beneath it that you choose.
• Click OK when done.
You’ll see a message indicating that the import has succeeded.
• Click OK to close the message.
An “Import Complete” message appears.
• Click OK and then click Close.
When you open a file containing that digital signature, you should see an indication that the signature is valid.
12

If you do not see this message, it probably means that Acrobat is not configured to scan automatically for digital certificates on your computer as you open the file. You can still validate the signature, using the steps outlined in the next section.
Validate a Digital Signature
If you receive a PDF file with a digital signature that you have not validated, you will see an error message stating, “At least one signature has problems.”
You will need to validate the signature.
• Click on the Signature button in the Signature Panel to the left of the document.
You’ll see the signature listed and highlighted in blue. If it is not highlighted in blue,
• Click once on the listing.
13
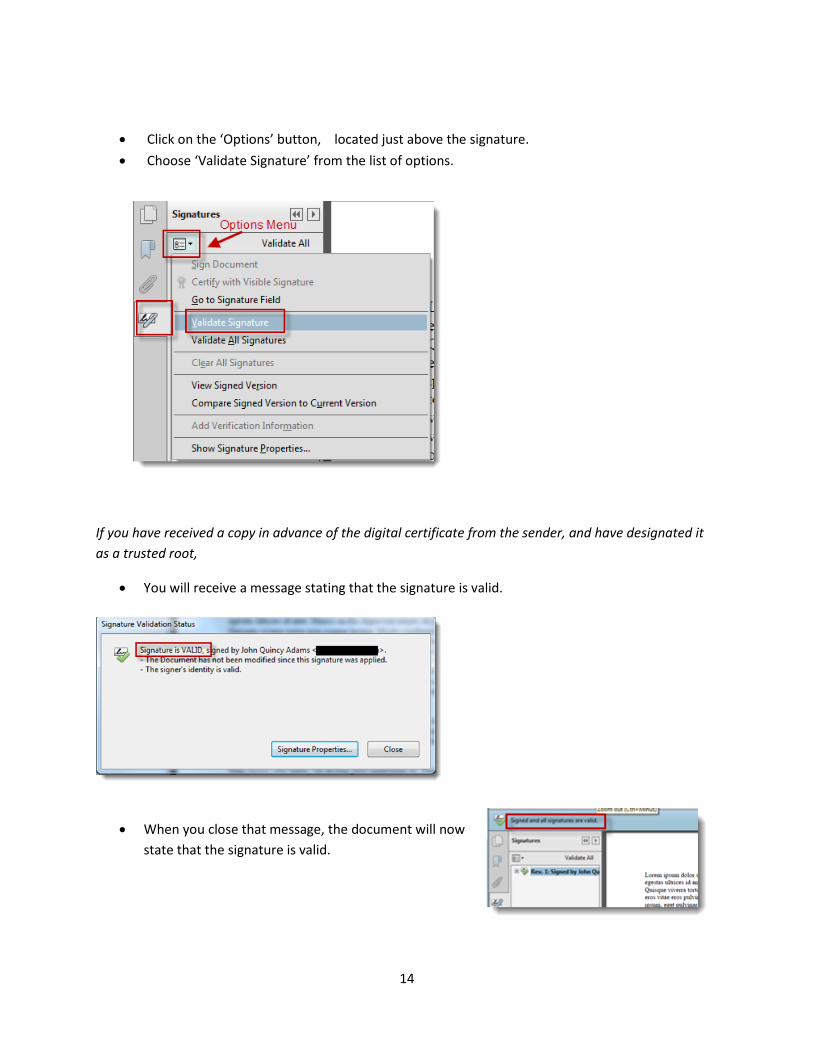
• Click on the ‘Options’ button, located just above the signature. • Choose ‘Validate Signature’ from the list of options.
If you have received a copy in advance of the digital certificate from the sender, and have designated it as a trusted root,
• You will receive a message stating that the signature is valid.
• When you close that message, the document will now state that the signature is valid.
14

If you do not have the digital certificate of the person who signed,
• You will receive the following message, stating that the signature has not been validated:
You have two options for validating the digital signature as outlined below.
Request digital certificate from sender
The easiest way to obtain the certificate is to have the person send it to you. Once you have it, you may save it anywhere on your computer. Adobe Acrobat will remember the location. Then open the certificate and establish the person as a trusted identity. (See section, “Accept a Shared Digital Certificate.”)
When you go to validate the signature, you should see a message displaying that the signature is VALID.
Import a Certificate from a Digital Signature Contained in a PDF File
If you have not been sent someone’s digital certificate in advance of receiving a signed document from him/her, you can add the certificate to your trusted identities by contacting the creator and comparing the certificate details you see to those of the creator’s original certificate.
15

In the ‘Signature Validation Status’ window,
• Click on ‘Signature Properties’.
In the ‘Signature Properties’ window,
• Click on ‘Show Signer’s Certificate’.
16

If the certificate is self-signed,
• Contact the creator of the certificate to confirm that the information in the Details tab of the ‘Certificate Viewer’ matches the details in his/her own certificate.
Once you have confirmed the validity of the certificate,
• Click the ‘Trust’ tab in the ‘Certificate Viewer’. • Click ‘Add to Trusted Certificates’.
You will see a security message.
• Click OK at the prompt.
17

In the ‘Import Contact Settings’ dialog box
• Checkmark, “Use this certificate as a trusted root.”
• Select any other trust options as needed and click OK.
• Click OK once more in the ‘Trust’ tab.
Click on ‘Validate Signature’ in the ‘Signature Properties’ window and you should see at the top that the signature is now valid.
• Click Close when done.
18

Detecting Modifications to a Document Following the Original Signing
If someone alters the document in any way after the document is initially signed, those changes will be noted in the Signature Panel.
In the illustration above, John Quincy Adams was the document creator and signed his name first. Later, George Washington reviewed the document, made some modifications, and then added his signature. The recipient of the document would notice the indication: 2 Miscellaneous Change(s). Annotations Created.
Had the original signer, John Quincy Adams, opted to lock the document in the ‘Sign Document’ dialog box, then George Washington would not have been able to change anything or add his own signature.
19
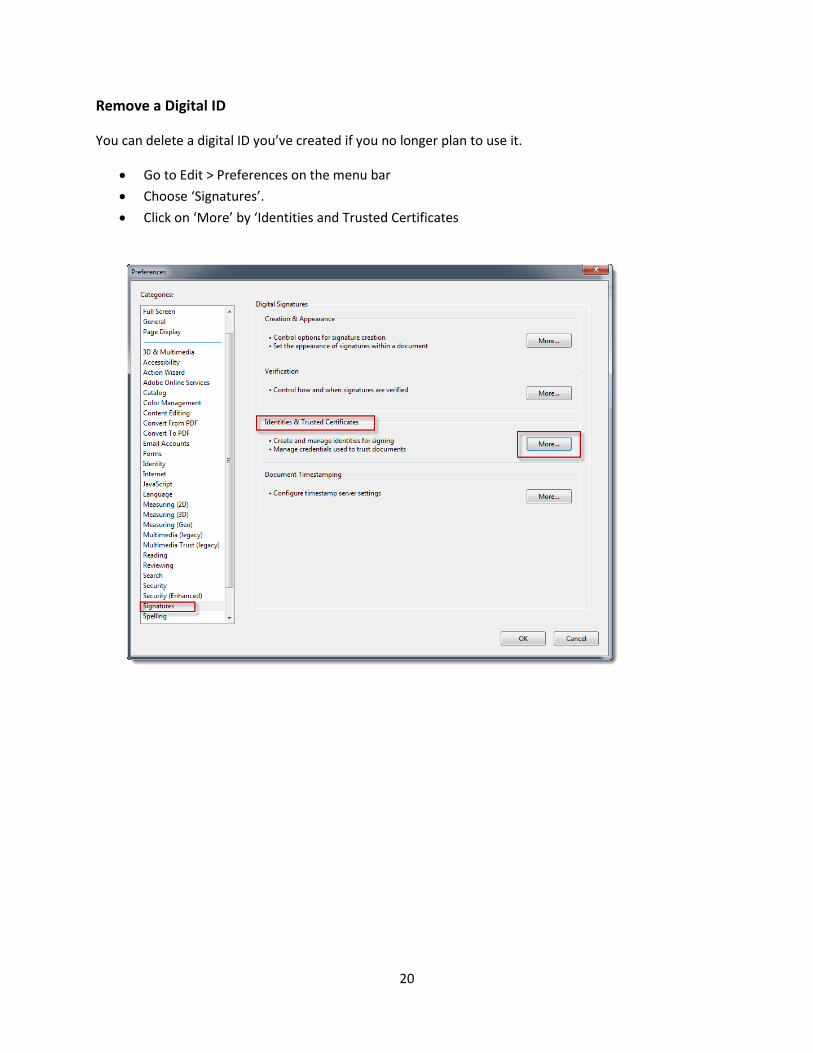
Remove a Digital ID
You can delete a digital ID you’ve created if you no longer plan to use it.
• Go to Edit > Preferences on the menu bar • Choose ‘Signatures’. • Click on ‘More’ by ‘Identities and Trusted Certificates
20

• Click once on the digital ID you intend to remove and select ‘Remove ID’. • Click OK at the next prompt to confirm the deletion.
21