dna extraction protocol – demo kit - genomic vision · dna extraction protocol – demo kit...
TRANSCRIPT
DNA Extraction Protocol – Demo Kit Version 1 - IFU-EXT10-EN-01_160728 REF: EXT-001-10 July 2016


FiberPrep® DNA Extraction_Demo Kit User Guide
IFU-EXT10-EN-01_160728 3
TABLE OF CONTENTS
1. INTENTED USE ................................................................................................. 4
2. STORAGE CONDITIONS AND TRANSPORTATION .............................................. 4
3. PRODUCT USE LIMITATIONS ............................................................................ 4
4. INTRODUCTION ................................................................................................ 5
5. PRINCIPLE OF PROCEDURE .............................................................................. 5
6. KIT REAGENTS ................................................................................................. 6
7. ADDITIONAL MATERIALS AND INSTRUMENTS REQUIRED ................................ 7
8. SAFETY PRECAUTIONS AND WARNINGS .......................................................... 7
9. ASSAY PROCEDURE ......................................................................................... 8
9.1. Preparation of cells ...................................................................................................... 8
9.2. Plug preparation: Embedding cells into agarose plugs ........................................ 9
9.3. Protein digestion treatment of plugs ..................................................................... 10
9.4. Preparation of DNA solution from DNA plug ........................................................ 11
10. TROUBLE SHOOTING GUIDE ........................................................................... 13
11. ORDERING INFORMATION & RELATED PRODUCTS ......................................... 17

FiberPrep® DNA Extraction_Demo Kit User Guide
IFU-EXT10-EN-01_160728 4
1. INTENTED USE The FiberPrep® DNA Extraction kit is intended for the extraction of DNA from fresh blood samples or cultured cells for Molecular Combing applications. This kit has the characteristic to deliver very high molecular weight DNA (average size: 400 kb).
2. STORAGE CONDITIONS AND TRANSPORTATION
The complete kit is divided into two parts according to the conditions of storage (+2°C to +8°C and -25°C to -10°C). Each element is necessary for the entire process of extraction.
3. PRODUCT USE LIMITATIONS
For general laboratory use.

FiberPrep® DNA Extraction_Demo Kit User Guide
IFU-EXT10-EN-01_160728 5
4. INTRODUCTION This FiberPrep® DNA Extraction Kit has been designed to be used specifically for Molecular Combing, using Silanized Coverslips (Genomic Vision, Paris, France) and a FiberComb® Molecular Combing System (Genomic Vision, Paris, France).
Molecular Combing is a proprietary technology used for many applications and particularly for studying:
- DNA replication: physical characteristics and kinetic parameters of DNA replication can be studied (replication origin location, firing and fork velocity) by monitoring the incorporation of modified nucleotides in growing cells. This is a valuable tool for the evaluation of the efficacy of a certain class of anti-cancer molecules;
- Large genetic rearrangements: by use of specific labeled probes, rearrangements of a wide range of lengths (from 1kb to several Mb) can be detected. This includes duplications, deletions, contractions or expansions and CNVs generally, as well as balanced translocations, inversions, etc.
The extraction step allows delivering high quality DNA solutions for Molecular Combing. The DNA is then stretched onto Silanized Coverslips using the FiberComb® Molecular Combing System. Several hundreds of single DNA molecules are stretched in a parallel way and with a constant stretching factor, enabling to establish a correspondence between a physical measure and the DNA length (1µm=2Kb). The hybridization and detection steps are followed by scanning (FiberVision®) and analysis with a dedicated software (FiberStudio®).
5. PRINCIPLE OF PROCEDURE This protocol is used to purify and store genomic DNA molecules protected from mechanical stress. The extraction kit is designed for pelleted cells from either cultured eukaryotic cell lines or purified peripheral blood monocytic cells. After embedding cells in an agarose plug, proteins are digested by a proteinase and cell membranes solubilized by a surfactant, under inhibition of DNase activity. The treated DNA plugs are then available for preparation of a high molecular weight DNA solution by agarase digestion.

FiberPrep® DNA Extraction_Demo Kit User Guide
IFU-EXT10-EN-01_160728 6
6. KIT REAGENTS
• The 2-8°C part of the FiberPrep® DNA Extraction Kit contains:
Buffers Volume in the kit Storage temperature
Buffer 2 (Plug Buffer)* 1ml + 2°C to +8°C
Buffer 3 (Proteinase Buffer) 2,5ml + 2°C to +8°C
Buffer 4 (Washing Buffer) 5ml + 2°C to +8°C
Buffer 5 (Storage Buffer) 28ml + 2°C to +8°C
Buffer 7 (Combing Buffer) 25ml + 2°C to +8°C
Component 3 (Proteinase) 0,3ml + 2°C to +8°C
• The -20°C part of the FiberPrep® DNA Extraction Kit contains:
Buffers Volume in the kit Storage temperature
Buffer 1 (Suspension Buffer)** 0,5ml -25°C to -10°C **
Component 7 (Agarase) 17,5µl -25°C to -10°C
* Buffer 2 can be stored 1 month after first usage ** Buffer 1 is only used for extraction of DNA from cultured cells. If you extract your DNA from blood, please replace Buffer 1 by standard cell culture grade PBS (Phosphate-Buffered Saline). Once an aliquot of Buffer 1 is opened it should be stored at 2-8°C for 1 month maximum.
The FiberPrep® DNA Extraction Kit contains reagents to perform extractions on 5 samples, using 2 plugs per sample.

FiberPrep® DNA Extraction_Demo Kit User Guide
FiberPrep® DNA Extraction Kit_Demo Kit 7
7. ADDITIONAL MATERIALS AND INSTRUMENTS REQUIRED
- FiberComb® Molecular Combing System (Genomic Vision) - Silanized Coverslips (Genomic Vision) - Disposable DNA Reservoirs (Genomic Vision) - Gel Plug Mold (Bio-Rad, Hercules, CA, USA, ref: 1703713) - Water bath (42, 50, 68°C) - Cell culture CO2 incubator - Counting chamber - Test tube (15ml and 50ml) - Round-bottom centrifuge tube (2ml) - Cell culture flask - Centrifuge for cell samples - Phosphate Buffer Saline (PBS) of cell culture grade (for extractions from blood samples)
Optional :
- YOYO-1 (Invitrogen) - Mounting medium: Vectashield (Vector laboratories, USA), Slowfade (Invitrogen), Prolong
(Invitrogen)
8. SAFETY PRECAUTIONS AND WARNINGS • Wear a suitable lab coat, disposable gloves and protective goggles when handling reagents
and samples. Thoroughly wash hands before and after handling them. • Do not pipette by mouth. • Samples and reagents of human origin, as well as, contaminated material and products
must be discarded in a contaminated residue container. • If liquid containing human material is spilt, clean the affected area with laboratory detergent
and water, and then with 1% (v/v) sodium hypochlorite.
For more information, please consult the appropriate material safety data sheets (MSDS).

FiberPrep® DNA Extraction_Demo Kit User Guide
FiberPrep® DNA Extraction Kit_Demo Kit 8
9. ASSAY PROCEDURE
9.1. Preparation of cells
The number of cells to be embedded in a plug depends on the downstream application:
• For replication studies using approximately 100,000-200,000 cells / plug are recommended.
• For physical cartography (hybridization) applications, typically 500,000 – 1,000,000 cells / plug are recommended.
• Optimal cell number has to be decided by users for their own applications.
Dimension your cell culture appropriately for the number of plugs you intend to prepare and the number of cells / plug. For blood samples, good results are obtained with white blood cells

FiberPrep® DNA Extraction_Demo Kit User Guide
FiberPrep® DNA Extraction Kit_Demo Kit 9
purified by either red blood cell lysis or Ficoll® gradient centrifugation. Blood should be fresh or have a maximum storage time of 5 days at 4°C. The procedure is not validated for extraction from frozen blood. Tested anticoagulants are EDTA, ACD.
Counting may be performed after white blood cell purification, and the number of plugs adjusted to obtain approximately 500,000 – 1,000,000 cells / plug.
Follow instructions of your cells’ or lab’s manuals to cultivate your cells, or to purify white blood cells from blood samples. Refer to the above paragraph (Preparation of cells) for instructions relative to the number of cells.
9.2. Plug preparation: Embedding cells into agarose plugs Before starting cell manipulation, set two water baths at 68°C and 50°C. Melt the Buffer 2 at 68°C for 10 min and verify that the gel is completely melted. Homogenize the melted solution by inverting tube and keep it at 50°C. Seal the bottom of a DNA plug mold with adhesive tape. Respect safety measures associated with the type of cells you are manipulating. Cells should be considered intact until step C (ESP treatment of cells) is completed. After the last washes in step B, samples may be manipulated as naked DNA. It is important that any clumps of cell have been removed prior to embed cells into agarose plug. At the end of cell purification, verify cell suspension is homogeneous and no clump is visible.
Step A
1. Centrifuge cells at 162 g for 5 min at room temperature. 2. Decant the supernatant of cell suspension gently. Remove remaining supernatant by
pipette as much as possible.
Step B
3. 45 µl of Buffer 1 is needed for 1 plug. If cells are extracted from blood, DO NOT use
Buffer 1 but cell culture grade PBS instead (After cell lysis steps, cells are more fragile and may be degraded by Buffer 1). If you are using cultured cells, use Buffer 1 as suspension reagent, it will help avoiding cell aggregates.
Calculate and add the appropriate volume of Buffer 1 or PBS to the cell pellet (e.g. if you intend to prepare plugs at 1 million cells/plug and you estimate your cell culture contains 10 million cells, and is thus sufficient for 10 plugs, 10x45 µl = 450 µl of Buffer 1 should be used to resuspend the cell pellet).
4. Homogenize well by pipetting (10 times up and down). 5. Warm the cell suspension at 50°C for 10 seconds.

FiberPrep® DNA Extraction_Demo Kit User Guide
FiberPrep® DNA Extraction Kit_Demo Kit 10
6. Add a volume of Buffer 2 identical to the volume previously calculated for Buffer 1 or PBS into the tube of cell suspension.
7. Homogenize the solution well at 50 °C by pipetting (10 times up and down). 8. Dispense the cell suspension quickly into DNA plug molds. The volume of one well is
approximately 90 µl. keep the solution into the waterbath while dispensing. 9. Set the DNA plug mold at 4 °C (in a box to prevent agarose gel from evaporation) for
30 min.
9.3. Protein digestion treatment of plugs Step C
1. 250 µl of ESP buffer is necessary for 1 plug. Prepare the appropriate volume by
mixing a 9:1 volume of Buffer 3: Component 3 (e.g. for 10 plugs, add 250 µL of Component 3 to 2250 µL of Buffer 3). This must be done extemporaneously. Discard any remains.
2. Plugs from the same origin may be incubated together. If 5 plugs or less are prepared simultaneously, a 15 ml-tube should be used. If more than 5 plugs are prepared, the use of a 50 ml-tube is preferred, as this will avoid plugs floating out of the solution during the incubation. Dispense the required volume of ESP buffer in the appropriate tube(s).
3. Push the solidified plug out into the ESP Buffer using a plastic plunger. 4. Warm up the tube containing the plugs at 50°C. Since the tubes contain small volume
of solution, make sure the tubes are held vertically in a water bath. 5. After 30 min at 50°C, swirl gently the tubes to homogenize the solution. 6. Keep the tubes at 50°C overnight (16-18 hours). 7. The following day, dilute enough Buffer 4 in a proportion 1:100 with nuclease-free
water for the following four washing steps. If possible, autoclave diluted Buffer 4 in advance or use only recently diluted Buffer. Do not store it.
8. Transfer DNA plugs to 15 ml-tube(s) filled with diluted Buffer 4 (max 3 plugs / tube) with a spatula. Be careful when manipulating the plugs as they are fragile.
9. Wash the plugs for 1 hour on a test tube rotator. 10. Change the diluted Buffer 4 and wash again for 1 hour with rotation. Repeat twice (in
total 3 washes). 11. If you store the plugs, put the plugs individually in 1ml of Buffer 5 in a 2ml round-
bottom microtube, or in 5ml of Buffer 5 in a 15 ml tube for up to 3 plugs, or in 10 ml of Buffer 5 in a 50ml tube for a maximum of 10 plugs and store at 4°C. Plugs can be stored for 1 year at 4 °C in Buffer 5.
FiberPrep® DNA Extraction_Demo Kit User Guide
FiberPrep® DNA Extraction Kit_Demo Kit 11
12. If you use this DNA plug immediately for DNA solution preparation, change once again the diluted Buffer 4 in the tube and wash for 3.5 hours with rotation. Then go directly to step 2 of the next section (D. Preparation of DNA solution from DNA plug).
9.4. Preparation of DNA solution from DNA plug Step D
If DNA plug is freshly prepared, go to step 2.
1. If DNA plug is stored in Buffer 5, wash the plug in 15 ml of diluted Buffer 4 (proportion 1:100 Buffer 4: Nuclease-free water) in a 15 ml tube for 60 min at room temperature, on a test tube rotator. Repeat twice (in total 3 washes).
2. Using a spatula, transfer one washed plug to a 2ml round-bottom microtube.
Optional: If you want to visualize directly combed DNA on Silanized Coverslips, you can pre-stain DNA into the plugs. Note: this option is not recommended as the presence of prestaining dye can increase the background level of the corresponding color which result in a worse contrast for replication or hybridization.
Alternatively (see the Note below), DNA may be stained after combing. If you do not intend to pre-stain DNA, you may proceed directly to step 8. If you do want to perform the pre-staining, follow steps 3-7 below.
3. Mix 100 µl of PBS + 0.3 µl of 1 mM YOYO-1 (not included in the kit) and add to the tube of DNA plug.
4. Check the plug is completely immersed. If not, tap the tube gently on the bench until the plug drops to the bottom of the tube.
5. Keep the tube at room temperature for 1 hour, protected from light. From this step on, the plugs and DNA solutions should be protected from light whenever possible.
6. Set a water bath at 68°C. 7. Pour the plug and solution out of the microtube onto plastic wrapping paper and
then put the plug back into the microtube with a spatula.

FiberPrep® DNA Extraction_Demo Kit User Guide
FiberPrep® DNA Extraction Kit_Demo Kit 12
Start here from step 2 if you don’t perform the pre-staining:
8. Add 1 ml of Buffer 7 to the microtube. 9. Check the plug is completely immersed. If not, tap the tube gently on the bench until
the plug drops to the bottom of the tube. 10. Set the tube on fixed microtube holder and confirm that the microtube is not moved
by current of water bath. Incubate at 68 °C for 20 min. Important! From this step on, manipulate DNA solutions with care, as DNA is no longer protected from mechanical shearing. Avoid any shaking, vibration, shock, etc.
11. During this incubation, equilibrate another water bath at 42 °C. 12. After 20 min at 68 °C, quickly transfer the microtube to the water bath at 42 °C. DO
NOT leave the microtube at room temperature between the two water baths. 13. Incubate the microtube at 42 °C for 10 min. NO SHAKING. 14. Add 1.5 µl of component 7 to the microtube. DO NOT MIX the solution. Let the
component 7 diffuse spontaneously. 15. Incubate the microtube overnight (16-18 hours) at 42 °C. NO SHAKING. 16. The following day, remove the microtube from the water bath. 17. Add 1200 µl of Buffer 7 into a Disposable DNA Reservoir in advance. 18. Pour gently the DNA solution into the Disposable DNA Reservoir. Fill the Reservoir
with additional Buffer 7 if necessary (up to a few millimeters below the top). The DNA solution is ready to be combed on a Combicoverslip with the FiberComb® Molecular Combing System.
Note: the quality of DNA Extraction can be checked under a fluorescence microscope after the Molecular Combing step by mounting the coverslip with mounting medium. If the DNA is pre-stained (see section C.2. above – Preparation of DNA solution from plug), it can be directly visualized with filters sets adapted for Yoyo-1 fluorescence spectrum e.g. FITC. If no pre-staining is performed, it is still possible to include Yoyo-1 in the mounting medium (recommended concentration 1:10000) to stain combed DNA directly.

FiberPrep® DNA Extraction_Demo Kit User Guide
FiberPrep® DNA Extraction Kit_Demo Kit 13
10. TROUBLE SHOOTING GUIDE
Problem Possible Cause Suggestion
1.Low combing density = Low concentration of DNA in the solution (low density of combed DNA on CombiCoverslip)
1.a) Low cell count Make sure the cells were completely resuspended and homogenized when adding the Suspension Buffer, and later on, the Plug Buffer, by pipetting up and down at least 10 times.
1.b) Loss of Proteinase activity Verify the Proteinase is being stored at the correct temperature and be sure to avoid any contamination sources when handling the Component. Use a new Proteinase aliquot.
1.c) pH degradation of Combing Buffer
Measure the pH of Combing Buffer. If it is not 5.5, change Buffer 7.
2.High combing density = Too high concentration of DNA in the solution : wavy or entangled molecules
2.a) DNA solution is too concentrated in DNA material
Diluting solution with Combing buffer is a possibility but may result in fiber breakage.
2.b) High cell count If initial material / sample is still available: decrease the number of cells used during plug preparation (prepare DNA plug with lower concentration of cells). If no initial material is available, use half or part of a plug.
3. Linearity of DNA fibers = Combed DNA shows wavy molecules on CombiCoverslip
3.a) Combing DNA solution while vibrating environment
Avoid any source of vibration close to MCS while combing.
3.b) Insufficient washing Washing time may be too short: try again with extended washing time.
3.c) Problem (localized or not) on combing substrate (CombiCoverslip)
Change substrate batch or surface.
3.d) Mechanical stress after combing (during labeling process)
Comb a new CombiCoverslip from the same solution and re-start the labeling process.
3.e) pH degradation of Combing Buffer
Cf. 1.c)

FiberPrep® DNA Extraction_Demo Kit User Guide
FiberPrep® DNA Extraction Kit_Demo Kit 14
Problem Possible Cause Suggestion
4.Short DNA fibers = Length of combed DNA on CombiCoverslip is too short (DNA breakage)
4.a) Sharp handling of the DNA solution
From step 10 of section D (Preparation of DNA solution from DNA plug) the DNA is no longer protected from mechanical stress. Avoid any shaking, vibration or sharp movements when handling the DNA solutions.
4.b) Insufficient washing Washing timing may be too low: try again with extended washing time.
4.c) Degraded starting sample material (cells)
If the starting material is not in optimal conditions (using old or frozen blood, for example), it is not possible to obtain a high quality DNA solution.
4.d) Contamination with DNase Avoid contamination sources and/or change buffers.
4.e) Water bath temperature (> 68°C)
Check temperature of your water baths with a validated thermometer.
4.f) Time of water bath (> 20 min) Check duration of water baths steps.
4.g) Vibrating source around DNA cf. 4.a)
4.h) Washing Buffer has been diluted with contaminated water and/or stored in diluted form.
Prepare a fresh solution of Washing Buffer and autoclave it. If it is not possible, always use recently diluted Buffer. Do not store it.
4.i) Buffer 2 is too old or damaged and the gel can no longer protect the DNA from mechanical breaks.
Use a new bottle of buffer 2 or a new kit.
4.j) DNA is shorten during real time observation -> not inherently broken but breakage is photosensible (using long exposition under microscope light)
Lower lamp intensity / power or reduce exposition time. Baking your coverslip in an oven at 60°C for 4h will reduce photobreaking. -> Note: DNA solution is not in cause and can still be used for another combing for direct observation or hybridization (DNA molecules are not broken in solution).
FiberPrep® DNA Extraction_Demo Kit User Guide
FiberPrep® DNA Extraction Kit_Demo Kit 15
Problem Possible Cause Suggestion
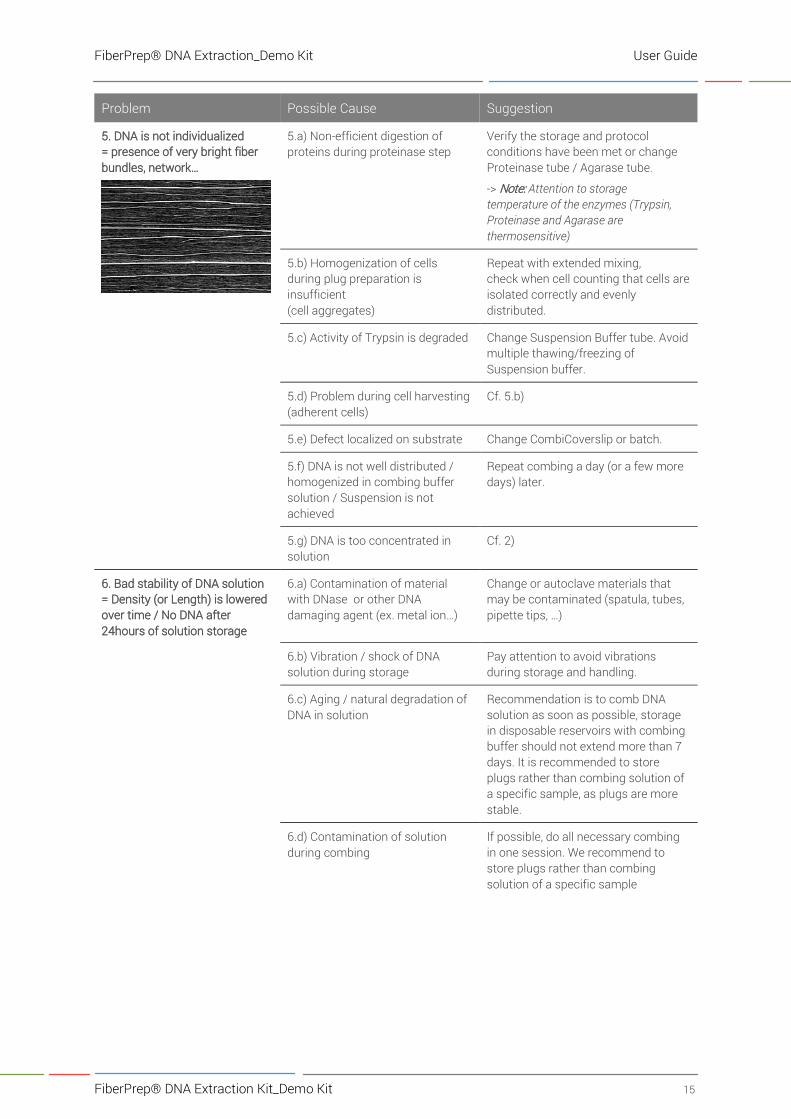
5. DNA is not individualized = presence of very bright fiber bundles, network…
5.a) Non-efficient digestion of proteins during proteinase step
Verify the storage and protocol conditions have been met or change Proteinase tube / Agarase tube.
-> Note: Attention to storage temperature of the enzymes (Trypsin, Proteinase and Agarase are thermosensitive)
5.b) Homogenization of cells during plug preparation is insufficient (cell aggregates)
Repeat with extended mixing, check when cell counting that cells are isolated correctly and evenly distributed.
5.c) Activity of Trypsin is degraded Change Suspension Buffer tube. Avoid multiple thawing/freezing of Suspension buffer.
5.d) Problem during cell harvesting (adherent cells)
Cf. 5.b)
5.e) Defect localized on substrate Change CombiCoverslip or batch.
5.f) DNA is not well distributed / homogenized in combing buffer solution / Suspension is not achieved
Repeat combing a day (or a few more days) later.
5.g) DNA is too concentrated in solution
Cf. 2)
6. Bad stability of DNA solution = Density (or Length) is lowered over time / No DNA after 24hours of solution storage
6.a) Contamination of material with DNase or other DNA damaging agent (ex. metal ion…)
Change or autoclave materials that may be contaminated (spatula, tubes, pipette tips, …)
6.b) Vibration / shock of DNA solution during storage
Pay attention to avoid vibrations during storage and handling.
6.c) Aging / natural degradation of DNA in solution
Recommendation is to comb DNA solution as soon as possible, storage in disposable reservoirs with combing buffer should not extend more than 7 days. It is recommended to store plugs rather than combing solution of a specific sample, as plugs are more stable.
6.d) Contamination of solution during combing
If possible, do all necessary combing in one session. We recommend to store plugs rather than combing solution of a specific sample

FiberPrep® DNA Extraction_Demo Kit User Guide
FiberPrep® DNA Extraction Kit_Demo Kit 16
Problem Possible Cause Suggestion
7. Contrast of combed DNA = Low signal/noise ratio, signals are very low intensity and high background.
7.a) Premature aging of CombiCoverslip or CombiCoverslip defect
Repeat operation changing CombiCoverslip.
7.b) Mounting medium is not homogenized enough
Repeat operation after homogenizing mounting medium (vortex).
7.c) Mounting medium is too concentrated in marker (Yoyo-1)
Prepare a new mounting medium making sure to have an adequate concentration.
8. Residues in solution = Visible colored or white residues (pellet or fiber) remain in the Genomic DNA solution
8.a) Entangled DNA molecules You may try to reach the residue using the tip of a pipette (autoclaved), and take it out of the solution. However, resulting DNA solution can be broken or still entangled.
8.b) DNA aggregates due to a bad homogenization of cells during plug preparation
When possible, repeat plug preparation with extended mixing and check when cell counting that cells are isolated correctly and evenly distributed.
9. Defect on CombiCoverslip not linked to DNA solution (white or black structure or stains, crystals, scratch, …)
9.a) If defects are visible on combed coverslip, check if defects are also present at the limit of combing (where the surface has not been dipped into DNA solution) : if so, it may be defects coming from CombiCoverslip
This is not a defect coming from the solution. Try to comb again using another coverslip or coverslip batch.
9.b) Scratch performed during manipulation
Pay attention to avoid touching the surface you want to observe. If your CombiCoverslip falls down on the bench, you may try to lift it using a small piece of tape or tweezers, avoiding any friction against material. Best option remains to comb another CombiCoverslip.
10. Colored Suspension Buffer -> normal colour = pink/reddish but it may turn yellow/purple depending on pH concentration or degradation
10.a) pH of solution is not correct Do not use the Suspension buffer. Use another aliquot.
10.b) Suspension Buffer has been left to ambient temperature instead of 4°C after first thawing of -20°C aliquot
Do not use the Suspension buffer. Use another aliquot.
11. White precipitate in Combing Buffer = salt crystals, …
11.a) Water has evaporated from the buffer, or temperature of solution was excessively cooled (below 4°C) and precipitates have formed
Concentration in salts may not be correct. Do not use the Combing Buffer. Use another aliquot.
12. Combing Buffer has turned slightly yellow
12.a) Inappropriate storage condition (Combing Buffer should be stored in refrigerator at 4°C)
Do not use the Combing Buffer. Use another aliquot.

FiberPrep® DNA Extraction_Demo Kit User Guide
FiberPrep® DNA Extraction Kit_Demo Kit 17
11. ORDERING INFORMATION & RELATED PRODUCTS
Product Contents Reference
FiberPrep® DNA Extraction Kit 100 extractions EXT-001
FiberComb® Molecular Combing System
Combing device MCS-001
Coverslip Clip Holder Holder with 2 positions CLI-001
Disposable Reservoirs Pack of 10 units RES-001
Reservoir Supports Provided by 2 units SUP-001
Bench Reservoir Holder Holder with 10 positions POR-001
Silanized Coverslips Box of 50 units COV-001
To place an order, please contact us at [email protected]
or visit our website http://www.genomicvision.com/gv-store/

Our experts are available to answer your questions http://www.genomicvision.com
[email protected] +331499085441
Intellectual Property Rights
This product or the use of this product is subject to proprietary rights (EP2007/059299,
IB2009/007197). The Molecular Combing technology and products are covered by patents
(FR2716206, FR 2716263, FR 2737574, FR 2755149) owned by Genomic Vision S.A.
Quality Control
The FiberPrep® DNA Extraction Kits undergo strict Quality Controls performed in Genomic
Vision’s laboratories. Should you nevertheless experience problems with the product, please
contact the technical support team.
Trademarks:
FiberComb® and FiberPrep® are registered trademarks of Genomic Vision S.A.
Genomic Vision S.A. 80-84 rue des meuniers 92220 Bagneux France www.genomicvision.com