dna extraction lab - towson university · pdf filemaryland loaner lab teacher packet ......
TRANSCRIPT

Meischer’s Discovery A DNA Extraction Laboratory
Maryland Loaner Lab Teacher Packet
Written and developed by Towson University & TIGR.
www.towson.edu/cse/beop/ Version 01-04-2012_dp

1 | P a g e
T E A C H E R M A T E R I A L S
Maryland Loaner Lab Overview 2
Maryland Science Core Learning Goals 3
Meischer’s Discovery: Introduction 5
Pre-Laboratory Activity: Making a Cell 8
Laboratory Explanation 10
Teacher Laboratory Preparation 12
S T U D E N T A C T I V I T Y H A N D O U T S
Laboratory Protocol S-1

MARYLAND LOANER LAB OVERVIEW
2 | P a g e
Meischer’s Discovery has two parts: A classroom pre-laboratory activity that introduces the concept of the cell and DNA.
A DNA isolation laboratory activity that allows students to extract and visualize DNA from different types of cells (plant and animal) with an introduction to scientific procedures.
Teachers and students who will be performing the Meischer’s Discovery laboratory activity must first complete the pre-laboratory classroom activity. The conceptual aspects of the curriculum will be reinforced with the laboratory activity. Supplied By Maryland Loaner Lab: (for one class with ten stations)
Description Quantity Comments Must be Returned
Pipette pumps 10 Pump used with pipettes to measure liquids Return
Plastic pipettes: -10 “DNA Buffer” -10 “Alcohol” -10 “Experimental” -10 “dH2O”
40 Size: 10 ml; Each student group needs 4 pipettes – one of each
Clean, dry and return
Salmon cells “+” 2 tubes Each group gets 2 ml in “+” tube (Keep refrigerated) Clean, dry and return
DNA Buffer 10 tubes 8 ml per “DNA Buffer” tube, 1 for each group Clean, dry and return
Empty 15 ml “alcohol” tubes
10 tubes Fill with 8 ml of alcohol, 1 for each group Clean, dry and return
Distilled water (dH2O) tubes
10 tubes 10 ml per tube, 1 for each group Clean, dry and return
Wooden sticks 10 1 for each group Return unused only
Capped test tubes 30 (empty tubes) 3 for each student group “E” & “-” & “+” Clean, dry and return
Container Disinfectant Wipes
1 Return
Supplied By Teacher:
Description Quantity Comments
Fruit/Vegetable varies Per student group - ½ of a medium or large strawberry, ½-inch slice of banana, ¼ of a kiwi or the equivalent
Isopropyl or Ethyl Alcohol (70%)
80 ml per class
8 ml per group. Best if used chilled. Note: 70% isopropyl or ethyl alcohol will work, but 90% is preferred.
Zip-lock bag 10 1 for each group to prepare experimental sample
Cheesecloth
Roll of cloth
(Optional) for straining solid particles of fruit/vegetable during extraction.
Test tube racks 10 1 per group
Beaker or cup 10 1 per group. Small in size, to hold approximately 20 ml.
IMPORTANT: The teacher must also supply all the materials for the Pre-Lab Activity found on page 8 if they wish to perform this activity with their students. SAFETY: The classroom teacher must instruct students about basic laboratory safety rules and provide gloves and goggles for student use with the laboratory activity.

These classroom and laboratory activities meet several of the Maryland Science Content Standards: Goal 1.0 Skills and Processes
1.4.9 Use analyzed data to confirm, modify, or reject a hypothesis.*
1.2.1 The student will identify meaningful, answerable scientific questions.
1.2.2NTBThe student will pose meaningful answerable scientific questions.
1.2.3 The student will formulate a working hypothesis.
1.2.4NTBThe student will test a working hypothesis.
1.2.6 The student will identify appropriate methods for conducting an investigation (independent and dependent variables, proper controls, repeat trials, appropriate
sample size, etc.
1.3.1NTBThe student will develop and demonstrate skills in using lab and field equipment to perform investigative techniques. **
1.3.2 The student will recognize safe laboratory procedures. **
1.3.3NTBThe student will demonstrate safe handling of the chemicals and materials of science. **
1.3.4NTB The student will learn the use of new instruments and equipment by following instructions in a manual or from oral direction. **
1.5.1 The student will demonstrate the ability to summarize data (measurements/observations).
1.7.5 Students will investigate career possibilities in the various areas of science. ***
Goal 3.0 Concepts of Biology
3.1.1 The student will be able to describe the unique characteristics of chemical substances and macromolecules utilized by living systems. (specifically DNA)*
* Italicized CLG’s are the primary focus of the laboratory activity. The other indicators are addressed, but can also be used as a guide to determine the focus of the lesson plans for the pre-lab and post-lab extension activities. ** All labs include all assessment limits/indicators for Goal 1. Expectation 3: The student will carry out scientific investigations effectively and employ the instruments, systems of measurement, and materials of science appropriately. *** The provided DVD, MdBio Tech Council of Maryland, Careers in Biotechnology addresses 1.7.5.
3| P a g e

DNA Exploration Middle School VSC 1. A.1: Design, analyze, or carry out simple investigations and formulate appropriate conclusions based on data obtained or provided. 1. A.1.c: Explain and provide examples that all hypotheses are valuable, even if they turn out not to be true, if they lead to fruitful investigations. 1. B.1: Review data from a simple experiment, summarize the data, and construct a logical argument about the cause and effect relationship in the experiment. 1. B.1.d: Describe the reasoning that lead to the interpretation of data and conclusions drawn.
4| P a g e

MEISCHER’S DISCOVERY: INTRODUCTION
5 | P a g e
This DNA extraction laboratory is an activity to facilitate learning about cells and the structures inside of them. All living things are made of cells. Inside cells are smaller structures called organelles that work to perform different functions, or jobs, within the cell. Included are a pre-laboratory activity to aid in understanding organelle functions and a laboratory activity in which students will isolate and observe DNA from two types of cells.
Background Information
All living things are made of cells. Cells are the basic unit of life and make up all plants, animals and bacteria. In plants and animals, cells often work together to form tissues; groups of these tissues are called organs. For example, heart cells make up heart tissue, which in turn makes up the organ called the heart. The cells in your heart work together to push red blood cells through your body. Red blood cells carry oxygen to all parts of your body and oxygen is used to produce energy so your body can survive. Inside cells are smaller structures called organelles. These tiny structures act like factories that help the cell perform certain tasks such as general repairs, removing waste, and reproduction. The three main parts of the cell are the nucleus, which holds DNA, the cell membrane, which surrounds and protects the cell, and the cytoplasm, which is the jelly-like part of the cell between the membrane and the nucleus. All of the smaller organelles, such as mitochondria, are found in the cytoplasm.
Cell Part Function in the Cell
Cell Membrane Security guard: checks what goes in and out of the cell
Mitochondria Powerhouses: generates energy for the cell
Membrane Receptors Gather information and deliver it to the nucleus
Nucleus The “brain” or control center for the cell
DNA Contains instructions for the cell, found in the nucleus
Deoxyribonucleic acid or DNA is the molecule that controls everything that happens in the cell. DNA contains the genetic code or commands that direct the

MEISCHER’S DISCOVERY: INTRODUCTION
6 | P a g e
activities of cells and ultimately, the body. DNA is present in all living things from bacteria to animals. In animals, it is found in almost all cell types except for usually in red blood cells. DNA is made of two spiral strands that wind around each other like a twisted ladder. The rungs of the ladder are made up of nucleotides: adenine (A), thymine (T), cytosine (C), and guanine (G). These nucleotides pair together: adenine with thymine and cytosine with guanine. These A-T and C-G pairs make up the rungs of the ladder. The different nucleotides are like a four-letter alphabet and can spell out different words or codes. A gene is a long series of the four letters (nucleotides) that contains instructions for the cell to make a particular protein. DNA is the largest known molecule. A single unbroken strand can contain millions of atoms. When DNA is released from a cell it typically breaks up into tiny fragments. These tiny fragments have a slightly negative electric charge. Salt ions, common in many solutions, are attracted to the negative charges on the DNA fragments and prevent them from adhering to one another. By controlling the salt concentration of the solution containing the DNA fragments, DNA can remain fragmented or become very “sticky” and form large globs of molecular material. Since DNA is an essential molecule to all living things (with the exception of some viruses), it is not surprising that elaborate mechanisms to protect it have evolved. In order to extract DNA successfully, it is helpful to understand these protective mechanisms. The simplest organisms do not have the protection of a nucleus; this group of organisms is called prokaryotes. Common prokaryotes are bacteria. The DNA of bacteria floats around in the cytoplasm and is protected from invading viral DNA by restriction enzymes that can cut foreign DNA into small pieces. So how do the bacteria prevent their own DNA from being digested by these enzymes? The bacterial DNA has chemical groups called methyl groups attached to it which prevents the restriction enzymes from cutting it. Bacteria have a relatively simple protection mechanism. As organisms get more complex, so does the protection of their own DNA.
Eukaryotic organisms keep their DNA contained within a nucleus, protecting it from activities going on in the cytoplasm. Plants have the extra protection of a cell wall. All eukaryotes have DNAse enzymes floating around in their cytoplasm that can cut DNA. In order to extract spoolable DNA, it is necessary to denature, or breakdown, these enzymes before rupturing the nucleus. Heat or pH changes are often used to denature proteins and enzymes. DNA is a relatively sturdy

MEISCHER’S DISCOVERY: INTRODUCTION
7 | P a g e
molecule but it is very long and can break when it is removed from the nucleus. If the DNA is broken or sheared in too many places, it won’t spool and is harder to capture effectively. It is important to be relatively gentle in the last steps of DNA extraction and to avoid violent shaking or mixing that would shear the DNA. The process of isolating DNA requires that it be released from a cell whether it is a plant (which has extra protection with a cell wall), animal, fungi, or bacterium. Detergents and soaps breakdown cell membranes and proteins so that the DNA can be released. Protein enzymes or proteases, like those in contact lens cleaner or “Ultra” forms of laundry detergent, can be used to further this process of breaking down proteins. Once the DNA fragments are released into solution, the DNA can be spooled together by using ice-cold alcohol. A small layer of alcohol is added to the top of the solution containing the cellular fragments. The DNA will collect at the interface between the alcohol and the cell solution. The DNA can then be captured, or spooled, onto a wooden stick or glass rod. The alcohol allows the DNA fragments to stick together once again and you have a blob of DNA to examine. Although this method is effective at isolating DNA, the DNA is by no means pure. Other materials like protein and cell fragments are carried along. Additional steps can be completed to remove proteins and cellular debris, thereby purifying the isolated DNA.

PRE-LABORATORY ACTIVITY: MAKING A CELL
8 | P a g e
NOTE: Groups using the Maryland loaner lab must first complete a pre-laboratory discussion. This should include cell structure and DNA background information found on pages 5-7 and also information about the laboratory protocol including Meischer’s memo found on page 13. The conceptual aspects of the curriculum will be reinforced with the laboratory activity. An additional pre-laboratory activity is the following: making a cell, which can also be used to
discuss cell structure and DNA (optional).
Objective
This classroom activity allows students to construct a model of a nerve cell and some of its parts using items in the classroom and the students. This is an excellent model to show how a cell functions. The nerve cell that the students, acting as parts of the cell, will make is a model of those in their own bodies. Explain that a cell, like a city, has many parts that interact and depend on one another. Parts of the cells the students are creating:
Cell Membrane Holds the cell and all its organelles together Membrane Receptors The eyes and ears of the cell; gather information and take it
to the nucleus Mitochondria Supply energy to the cell DNA A set of instructions the nucleus uses to tell all the other
parts what to do Nucleus Membrane-bound organelle that holds the DNA and acts as
the “brain” or control center for the cell
Materials
Markers Colored Paper Ribbon Scissors Tape
Procedure
1. Use the marker and paper to make labels for each part of the cell: Nucleus (1 label), DNA (1 label), Mitochondria (4 labels), Cell Membrane (1 label), and Membrane Receptors (6 labels).
2. Cut lengths of ribbons to represent DNA. Have students label sections of the DNA with
commands the cell could follow. The commands may include:
Sense heat – help! Mitochondria make more energy Energy made Pull hand away
3. Push four desks together in the center of the classroom and have one student sit on the
desks. Have that student tape the label “Nucleus” to their shirt. These desks and student will represent the nucleus of the cell. Place the ribbons of DNA on top of the desk since the DNA is located inside the nucleus. Have the two commands “Mitochondria make more energy” and “Pull hand away” attached to the ribbons.

PRE-LABORATORY ACTIVITY: MAKING A CELL
9 | P a g e
4. Tape the Cell Membrane label to the wall of the classroom. The Cell Membrane holds all its organelles together, protects, and acts as a gatekeeper allowing only certain molecules in and out of the cell.
5. Have six students volunteer to be Membrane Receptors and tape the membrane receptor labels onto their shirts. Five should stand in various positions around the classroom and one should be positioned outside the classroom by the door. The membrane receptors are the eyes and ears of the cell and gather information to take back to the nucleus and other organelles. Have the membrane receptor outside of the classroom hold the command “Sense heat – help!”
6. Have four other students volunteer to be Mitochondria and tape the mitochondria label
onto their shirts. Mitochondria stand in various positions around the nucleus holding the commands “Energy made.” They supply energy to the cell.
7. Pretend the model you have just made is a nerve cell in the arm. Write the following
message on a piece of paper and hold up to the class: THE HAND IS TOUCHING SOMETHING HOT—PULL AWAY!!!
8. Have students in the class explain what sequence of events has to happen in the cell for
this command to be obeyed by the body.
The sequence of events is as follows:
▪ The membrane receptor outside of the door knocks on the door and hands the command “Sense heat – help!” to a membrane receptor standing inside the classroom (cell)
▪ The membrane receptor delivers the command “Sense heat – help!” to the nucleus
▪ The nucleus give four membrane receptors the commands “Mitochondria make more energy” which the membrane receptors deliver to all four mitochondria
▪ After receiving the command to make more energy, the four mitochondria give the command “Energy made” to the four membrane receptors, which deliver the commands to the nucleus
▪ The nucleus gives the command “Pull hand away” to a membrane receptor that brings the command to the door and hands the command off to the membrane receptor outside of the classroom (cell)
9. Explain that in the human body, all nerve cells in the arm would get this message at about
the same time. The result would be that the hand would pull away from the heat.

MEISCHER’S DISCOVERY: LABORATORY EXPLANATION
10 | P a g e
The purpose of the laboratory activity is to allow students to extract and visualize DNA from different types of cells (plants and animals). The objectives are as follows:
Formulate a hypothesis Use positive and negative controls during an experiment Perform a DNA isolation Interpret the results of the experiment
Before performing the laboratory activity, have a discussion with the students about where DNA is found. Since DNA is found only inside of cells (in the nucleus in eukaryotic organisms and floating in the cytoplasm in prokaryotic organisms), discuss how DNA could be extracted from a cell (break cell wall and nucleus). Prior to beginning the laboratory activity, give students the memo and laboratory protocol from Johann Meischer. The story is that the students are going back in time and are laboratory assistants to Johann Meischer. Meischer (1844 – 1895), the physiological chemist from Basel in Switzerland, is attributed as being the first scientist to discover DNA. It was while working on pus cells that Meischer made his fundamental discovery. It was thought that such cells were made largely of protein, but Meischer noted the presence of something that “cannot belong among any of the protein substances known hitherto.” In fact, he was able to show that it was not protein at all because it was not digested by protease. He also showed that the new substance was derived from the nucleus of the cell alone and consequently named it nuclein. Meischer was soon able to show that nuclein could be obtained from many other cells. Albrecht Kossel eagerly took up Meischer’s work on nuclein and succeeded in recognizing the four nucleic acid bases. Nuclein was later renamed nucleic acid by Richard Altmann in 1889; James Watson and Francis Crick revealed its structure in 1953. We now call nuclein, deoxyribose nucleic acid or DNA. The laboratory activity involves forming a hypothesis and using positive and negative controls in an experiment. A hypothesis is a proposed explanation based on prior knowledge, background information and observations. Scientists use positive and negative controls for comparison of experimental samples and to ensure that results obtained are valid (verifying the conditions of an experiment). In the memo left by Meischer, students are told that he has previously extracted DNA from salmon but not from water – these samples will be used as the positive and negative control. In this laboratory activity, the negative control is water, which has no DNA; the positive control is salmon sperm, which is known to contain DNA. Meischer instructs the students in the memo to experiment to see if there is DNA in plants (testing fruits or vegetables) using his protocol. On the laboratory protocol sheet, the students will formulate a hypothesis about the material they are testing

MEISCHER’S DISCOVERY: LABORATORY EXPLANATION
11 | P a g e
(fruit or vegetable) which will contain a comparison to either the positive or negative control, depending on whether they believe the experimental sample contains DNA. An example would be: “The fruit sample is from a living thing and, therefore, will contain DNA. Because of this, it should resemble the positive control.” After performing the experiment, students can be sure that their results are valid if the positive control contains DNA and the negative control does not. The hypothesis the students formulate should be based on the fact that DNA is found in all living things. Before beginning the laboratory activity, help the students formulate their own hypothesis about the experiment. Explain to students that hypotheses are never “right or wrong” - we either support or not support them; this is how we learn through experimentation.
TEACHER LABORATORY PREPARATION
12 | P a g e
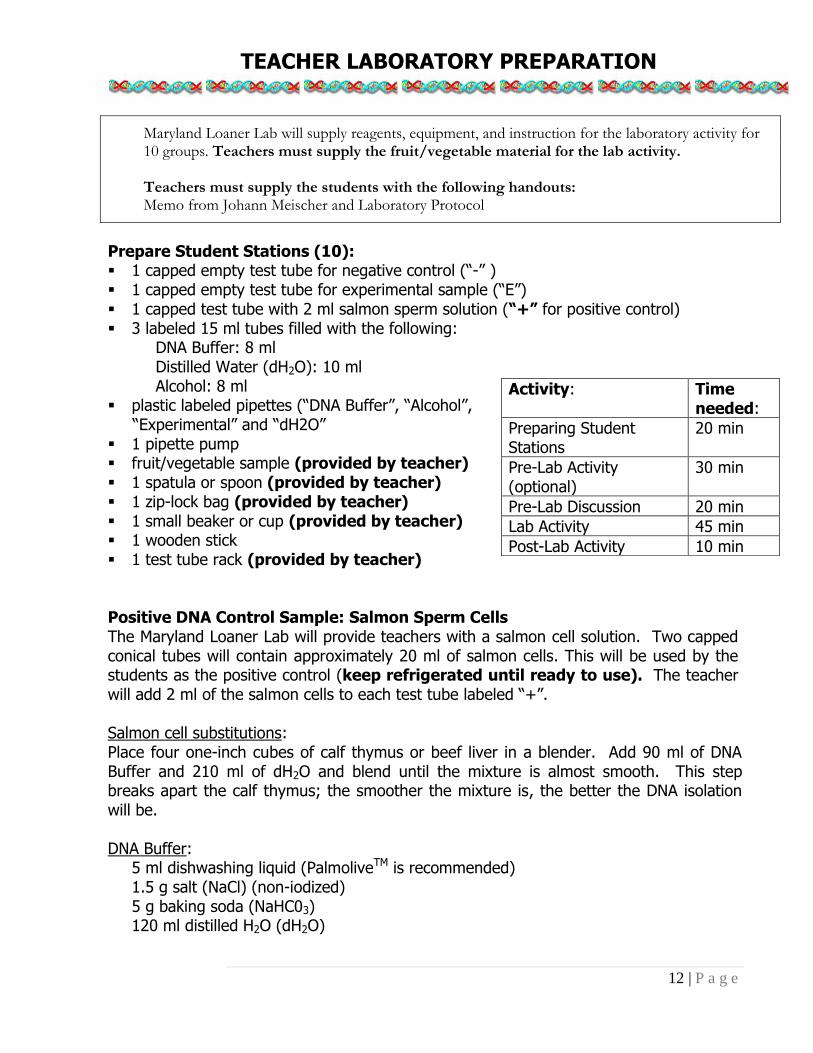
Maryland Loaner Lab will supply reagents, equipment, and instruction for the laboratory activity for 10 groups. Teachers must supply the fruit/vegetable material for the lab activity. Teachers must supply the students with the following handouts: Memo from Johann Meischer and Laboratory Protocol
Prepare Student Stations (10): 1 capped empty test tube for negative control (“-” ) 1 capped empty test tube for experimental sample (“E”) 1 capped test tube with 2 ml salmon sperm solution (“+” for positive control) 3 labeled 15 ml tubes filled with the following:
DNA Buffer: 8 ml Distilled Water (dH2O): 10 ml Alcohol: 8 ml
plastic labeled pipettes (“DNA Buffer”, “Alcohol”, “Experimental” and “dH2O” 1 pipette pump fruit/vegetable sample (provided by teacher) 1 spatula or spoon (provided by teacher) 1 zip-lock bag (provided by teacher) 1 small beaker or cup (provided by teacher) 1 wooden stick 1 test tube rack (provided by teacher) Positive DNA Control Sample: Salmon Sperm Cells The Maryland Loaner Lab will provide teachers with a salmon cell solution. Two capped conical tubes will contain approximately 20 ml of salmon cells. This will be used by the students as the positive control (keep refrigerated until ready to use). The teacher will add 2 ml of the salmon cells to each test tube labeled “+”. Salmon cell substitutions: Place four one-inch cubes of calf thymus or beef liver in a blender. Add 90 ml of DNA Buffer and 210 ml of dH2O and blend until the mixture is almost smooth. This step breaks apart the calf thymus; the smoother the mixture is, the better the DNA isolation will be.
DNA Buffer: 5 ml dishwashing liquid (PalmoliveTM is recommended) 1.5 g salt (NaCl) (non-iodized) 5 g baking soda (NaHC03) 120 ml distilled H2O (dH2O)
Activity: Time needed:
Preparing Student Stations
20 min
Pre-Lab Activity (optional)
30 min
Pre-Lab Discussion 20 min
Lab Activity 45 min
Post-Lab Activity 10 min

TEACHER LABORATORY PREPARATION
13 | P a g e
Preparing Experimental Samples (fruit/vegetable): The teacher will supply a fruit or vegetable for the experimental sample. The fruits that work best are strawberries, raspberries, kiwi, or banana. Soft, ripe fruit will give the best results. While the activity directs the students to prepare the fruit/vegetable solution, the teacher may prepare this in advance if there is a time constraint. Provide students with one of the following: ½ of a medium to large strawberry, ½-inch slice of banana, ¼ of a kiwi, or an equivalent amount of the fruit of your choice. Make sure students remove all the air from the zip-lock bag while fruit is being crushed and mixed well with distilled water and DNA buffer (a mortar and pestle can be used in place of the zip-lock bag). Make sure the fruit is well mashed; you really want a fruit pulp liquid without solid chunks. Students will pour off ONLY the liquid (no solid parts) into a small beaker or cup (this mixture could be filtered through two layers of cheesecloth in a funnel if desired). Students will pipette 2 ml of this liquid into their experimental sample tube trying to avoid seeds and/or solid pieces of fruit.
Negative Control: Distilled Water Tubes of distilled water are provided in the kit. Students will pipette 2 ml of distilled water into their negative DNA control tube.
DNA Isolation The students will add 1 ml of DNA Buffer to each of the three capped test tubes (positive and negative controls and experimental sample). After re-capping these tubes, mix the contents well by inverting the tubes 2 or 3 times.
When adding the 2 ml of alcohol, pipette it slowly down the side of each test tube to form a layer that floats on top of the sample. It is best to add the alcohol while the tube is held at a slight angle. DO NOT MIX OR INVERT THESE TUBES. Gently place tubes in rack.
If there is DNA present in any of the samples, it should precipitate out at the interface between the two layers. Look for white or clear clumps; it may look like cobwebs or threads. There are often bubbles attached to the DNA. Students may use the wooden stick to spool out the DNA clumps and place them on black paper for observation.
Results and Analysis The students should record their results and answer the questions on the laboratory protocol worksheet. Have the students reflect on their hypothesis and if they were supported. Results may vary. Both the salmon sperm cells (positive control) and fruit/vegetable (experimental) should have DNA. It’s possible that the fruit/vegetable sample may appear to have less visible DNA than the positive control. The water (negative control) should not have any DNA present.

TEACHER LABORATORY PREPARATION
14 | P a g e
Helpful Hint: How to Use a Pipette Pump Secure the plastic pipette into the pump by using a pushing and twisting motion. Use the wheel to draw liquid into the pipette by rolling it forward; reverse the wheel’s direction to let the liquid out. Always hold the pipettes when attached to the pump upright, or the liquid will go inside the pump and become contaminated and volume will be lost.
The 10 ml plastic pipettes have two scales on them, which run in opposite directions. When measuring liquid, use the scale that has the “1 ml” at the bottom tip and “10 ml” at the top. Also make sure to use the bottom of the meniscus (the curved part of the liquid in the pipette) to determine the volume level.
When transferring liquid, make sure the container you are transferring the liquid into is physically close to the container from which you are taking the liquid. Liquids will sometimes drip out of the pipette tip, so the transfer must take place quickly. The labeled pipettes should be used only with the corresponding liquids (they can be reused with the same liquid only), otherwise the pipettes and samples risk contamination and inaccurate results may be obtained. When using the pipettes, the tip shouldn’t touch the insides of the tubes you are dispensing the liquid into, to also prevent contamination.

Name: Laboratory Protocol – DNA Extraction
S-1 | P a g e
V_08_23_2011_jm
Lab associates, This past week I have made an amazing discovery – inside of different cells I have found a material I have never seen before! Unlike the proteins that we have found in cells, this new substance comes from the nucleus of the cell and is not damaged by protease enzymes. Thus, it cannot possibly be anything we already know of. I have been calling it nuclein. It is very interesting to try different cells and materials to see what contains nuclein. Through my experiments, I have found nuclein in both cells from a cow and from salmon, but have not been able to find any in water. I am very interested to see if nuclein is also in plants and would like for you to set-up an experiment using a fruit or vegetable.
Good luck!
Johann
v08.11.2011_nd

Laboratory Protocol – DNA Extraction
S-2 | P a g e
1. Write what samples will be used for your experiment today:
Positive Control: This is a sample that is known to contain DNA.
Negative Control: This is a sample known to not contain DNA
Experimental: This is the sample you will try and determine if it contains DNA.
2. Write a hypothesis about your experimental samples. Make sure your
hypothesis includes:
whether you think your experimental sample will or will not contain DNA
whether you think your experimental sample will look like the positive or negative control
why you think your experimental sample will or will not contain DNA
3. Be sure you have the following test tubes:
negative control (-) experimental sample (E) positive control (+) dH2O DNA Buffer Alcohol
4. Be sure you have four labeled plastic pipettes:
DNA Buffer Alcohol dH2O Experimental
5. Obtain an experimental (fruit/vegetable) sample from your teacher.
Laboratory Protocol – DNA Extraction
S-3 | P a g e
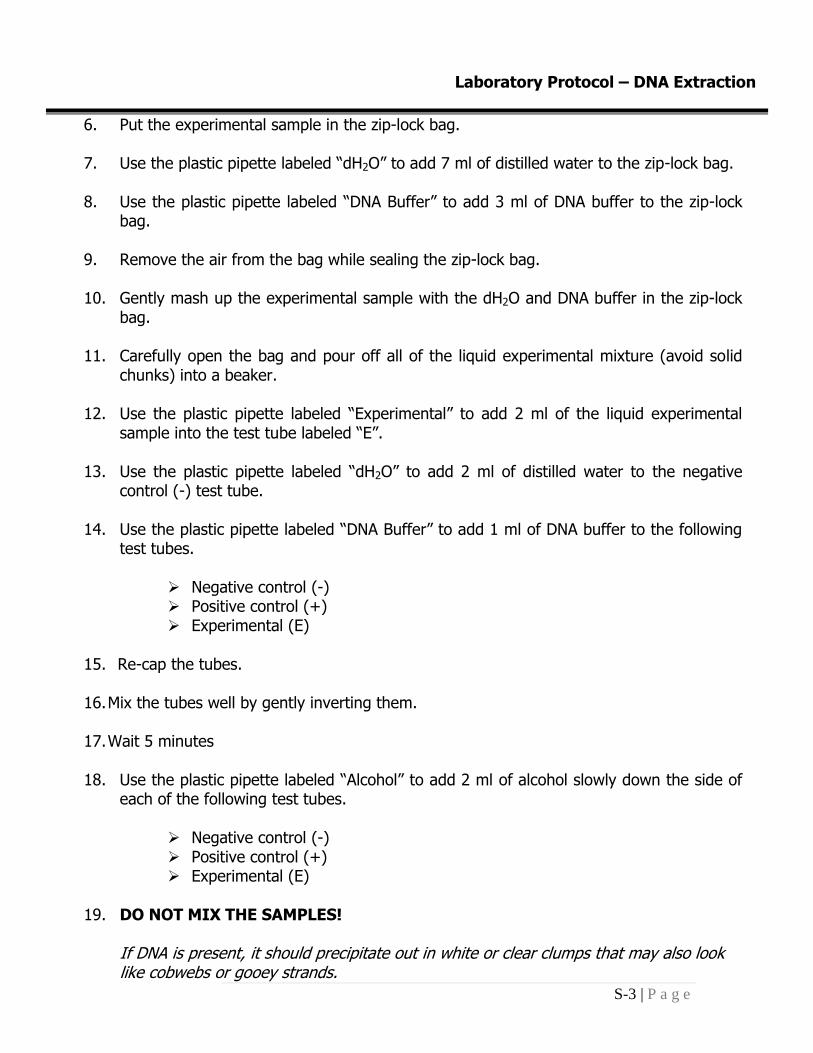
6. Put the experimental sample in the zip-lock bag.
7. Use the plastic pipette labeled “dH2O” to add 7 ml of distilled water to the zip-lock bag. 8. Use the plastic pipette labeled “DNA Buffer” to add 3 ml of DNA buffer to the zip-lock
bag.
9. Remove the air from the bag while sealing the zip-lock bag. 10. Gently mash up the experimental sample with the dH2O and DNA buffer in the zip-lock
bag. 11. Carefully open the bag and pour off all of the liquid experimental mixture (avoid solid
chunks) into a beaker. 12. Use the plastic pipette labeled “Experimental” to add 2 ml of the liquid experimental
sample into the test tube labeled “E”. 13. Use the plastic pipette labeled “dH2O” to add 2 ml of distilled water to the negative
control (-) test tube. 14. Use the plastic pipette labeled “DNA Buffer” to add 1 ml of DNA buffer to the following
test tubes.
Negative control (-) Positive control (+) Experimental (E)
15. Re-cap the tubes. 16. Mix the tubes well by gently inverting them. 17. Wait 5 minutes 18. Use the plastic pipette labeled “Alcohol” to add 2 ml of alcohol slowly down the side of
each of the following test tubes.
Negative control (-) Positive control (+) Experimental (E)
19. DO NOT MIX THE SAMPLES!
If DNA is present, it should precipitate out in white or clear clumps that may also look like cobwebs or gooey strands.

Laboratory Protocol – DNA Extraction
S-4 | P a g e
20. Which samples contained DNA?
Circle your answers:
Positive Control: YES NO Negative Control: YES NO Experimental: YES NO
What does the presence or absence of DNA in the experimental sample indicate about it? _______________________________________________________________________ _______________________________________________________________________ Was your hypothesis supported? _____________________________________________________________ _____________________________________________________________ _____________________________________________________________