disassembly instructions · 5) place the bolt face on a block of wood and compress the bolt. 6)...
TRANSCRIPT

# Part Description1 Bolt Body2 Extractor3 Cocking Piece4 Safety Screw5 Safety Lever6 Striker Spring7 Striker8 Bolt Head9 Striker Spring Retainer
Disassembly Instructions
Page 1 of 16Collecting and Shooting the Steyr-Mannlicher m95 Carbine - Bolt Disassembly and Reassembly
12/26/2003http://www.surplusrifle.com/steyrm95/bolt/hs.asp

1) Point rifle in safe direction and make sure rifle is not loaded.
Open the bolt and pull to rear.
2) Press trigger forward (as shown in figure 2).
3) Remove bolt from receiver.
4) Figure 4 displays the removed bolt.
NOTE: The bolt head needs to be extended and aligned with extractor to be returned to the receiver.
Page 2 of 16Collecting and Shooting the Steyr-Mannlicher m95 Carbine - Bolt Disassembly and Reassembly
12/26/2003http://www.surplusrifle.com/steyrm95/bolt/hs.asp

5) Place the bolt face on a block of wood and compress the bolt.
6) Pull the cocking piece to the rear. Set the safety lever so the cocking piece rests upon it while extended.
7) Rotate the cocking piece counter clockwise.
8) Rotate the cocking piece until it can be removed.
Page 3 of 16Collecting and Shooting the Steyr-Mannlicher m95 Carbine - Bolt Disassembly and Reassembly
12/26/2003http://www.surplusrifle.com/steyrm95/bolt/hs.asp

9) Place exposed rear threaded tip of striker on wood and push (as shown in figure 9).
10) Remove bolt head and extractor from bolt body.
11) Set aside extractor.
Page 4 of 16Collecting and Shooting the Steyr-Mannlicher m95 Carbine - Bolt Disassembly and Reassembly
12/26/2003http://www.surplusrifle.com/steyrm95/bolt/hs.asp

12) The safety lever is held in place by the safety screw (as shown in figure 12).
13) Turn safety screw counter clockwise.
14) Remove safety screw and set aside.
Page 5 of 16Collecting and Shooting the Steyr-Mannlicher m95 Carbine - Bolt Disassembly and Reassembly
12/26/2003http://www.surplusrifle.com/steyrm95/bolt/hs.asp

15) Note position of safety lever before removal (as shown in figure 15).
16) Remove Safety. NOTE: The striker assembly while assembled is under considerable tension because of the striker spring. When disassembled, the striker spring can fly out and cause bodily harm or damage to your surroundings.
17) Place rear of the striker against block of wood (as shown in figure 17) and turn striker spring retainer counter clockwise.
Page 6 of 16Collecting and Shooting the Steyr-Mannlicher m95 Carbine - Bolt Disassembly and Reassembly
12/26/2003http://www.surplusrifle.com/steyrm95/bolt/hs.asp

18) Allow striker spring to expand slowly.
19) Remove striker spring retainer.
20) Remove striker spring and striker from bolt head.
Page 7 of 16Collecting and Shooting the Steyr-Mannlicher m95 Carbine - Bolt Disassembly and Reassembly
12/26/2003http://www.surplusrifle.com/steyrm95/bolt/hs.asp
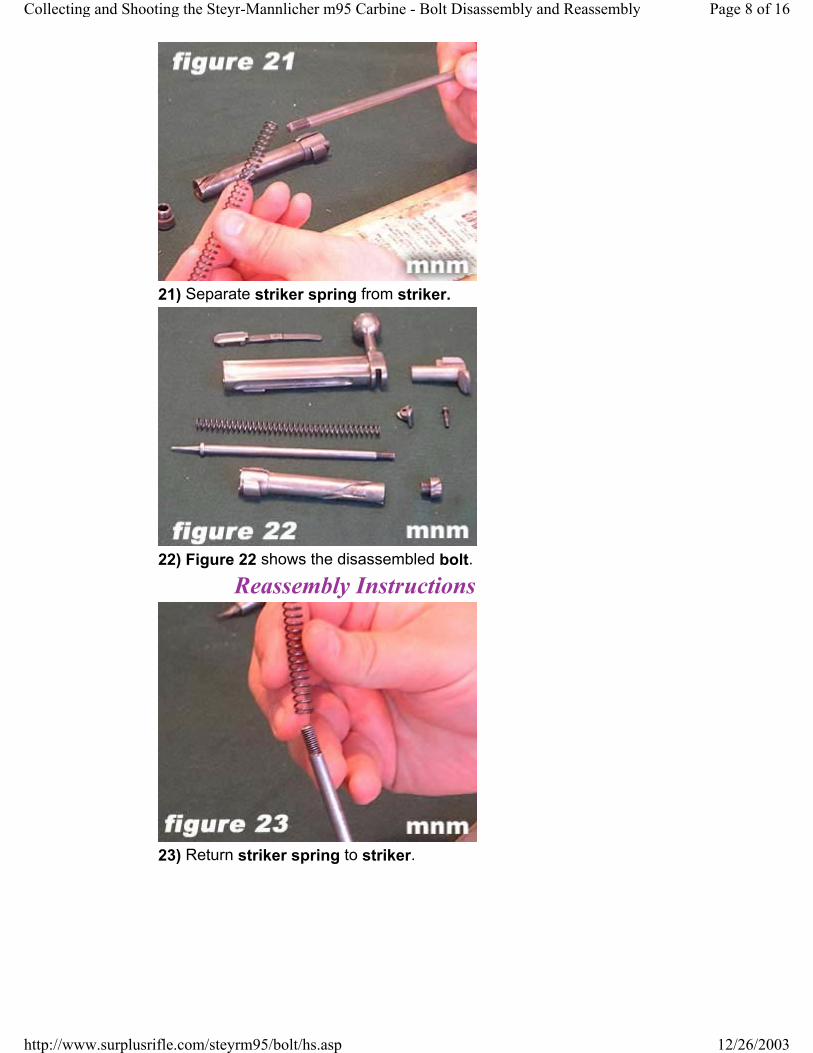
21) Separate striker spring from striker.
22) Figure 22 shows the disassembled bolt.
Reassembly Instructions
23) Return striker spring to striker.
Page 8 of 16Collecting and Shooting the Steyr-Mannlicher m95 Carbine - Bolt Disassembly and Reassembly
12/26/2003http://www.surplusrifle.com/steyrm95/bolt/hs.asp

24) Place striker and striker spring inside bolt head.
25) Return striker spring retainer and compress striker spring.
26) Turn striker spring retainer clockwise.
Page 9 of 16Collecting and Shooting the Steyr-Mannlicher m95 Carbine - Bolt Disassembly and Reassembly
12/26/2003http://www.surplusrifle.com/steyrm95/bolt/hs.asp

27) Figure 27 shows how the striker spring retainer and bolt head flutes should be aligned.
28) Figure 28 shows the correct alignment of the flat side of the striker to the bolt body when reassembling.
29) Push bolt head about midway into bold body (as shown in figure 29).
Page 10 of 16Collecting and Shooting the Steyr-Mannlicher m95 Carbine - Bolt Disassembly and Reassembly
12/26/2003http://www.surplusrifle.com/steyrm95/bolt/hs.asp

30) Insert extractor (as shown in figure 30) into channel in bolt body.
31) Align bolt head lugs with extractor (as shown in figure 31).
32) Place the bolt face against a block of wood and depress until the rear of the striker is fully extended to the rear.
Page 11 of 16Collecting and Shooting the Steyr-Mannlicher m95 Carbine - Bolt Disassembly and Reassembly
12/26/2003http://www.surplusrifle.com/steyrm95/bolt/hs.asp

33) Return safety (as shown in figure 33).
34) Insert safety screw.
35) Turn safety screw clockwise until tight.
Page 12 of 16Collecting and Shooting the Steyr-Mannlicher m95 Carbine - Bolt Disassembly and Reassembly
12/26/2003http://www.surplusrifle.com/steyrm95/bolt/hs.asp

36) Note position of compressed bolt head. In this position the bolt cannot be returned to the receiver.
37) Return cocking piece to threaded rear of striker.
38) Turn striker clockwise only ONE complete revolution and leave in position shown in figure 38.
Page 13 of 16Collecting and Shooting the Steyr-Mannlicher m95 Carbine - Bolt Disassembly and Reassembly
12/26/2003http://www.surplusrifle.com/steyrm95/bolt/hs.asp

39) Place threaded rear of striker on block of wood and press striker forward as far as it will go.
40) You may have to pull bolt head a little further out and align it as shown in figure 40 so it can be returned to the receiver.Tip Submitted by Reader:Had a tip on the Steyr I wanted to share. On my rifle, the bolt head absolutely will not stay extended when either removing or re-installing the bolt. Actually, it pretty much won't stay extended if it's out of the rifle. It's a real pain, to say the least, since it has to be extended to slip down the guide rails on the receiver properly. What I had to do was add a dime to my cleaning kit. I just stick the dime flat on the top of the bolt, wedging it (gently) in between the extended bolt head and the bolt body. This prevents the head from contracting, and stays neatly out of the way for removal/insertion.
Page 14 of 16Collecting and Shooting the Steyr-Mannlicher m95 Carbine - Bolt Disassembly and Reassembly
12/26/2003http://www.surplusrifle.com/steyrm95/bolt/hs.asp

41) Pull cocking piece to the rear and turn it clockwise.
42) Turn the cocking piece clockwise until the rear tip of the striker is flush with surface of rear of cocking piece (as shown in figure 42).
43) Make sure bolt head and extractor are extended and aligned (as shown in figure 43).
Page 15 of 16Collecting and Shooting the Steyr-Mannlicher m95 Carbine - Bolt Disassembly and Reassembly
12/26/2003http://www.surplusrifle.com/steyrm95/bolt/hs.asp

Copyright 2003© Jamie Mangrum
44) Note in figure 44 that the bottom of the bolt body has lugs or guides that fit into a channel in the rear of the receiver.
45) Insert lugs into channel in receiver and push bolt forward and lock into place.
Page 16 of 16Collecting and Shooting the Steyr-Mannlicher m95 Carbine - Bolt Disassembly and Reassembly
12/26/2003http://www.surplusrifle.com/steyrm95/bolt/hs.asp