design of a percussion and electric primer gun firing ... of a percussion and electric primer gun...
TRANSCRIPT

Design of a Percussion and Electric Primer Gun Firing
Power Supply
by Peter T. Bartkowski
ARL-TR-6987 July 2014
Approved for public release; distribution is unlimited.

NOTICES
Disclaimers
The findings in this report are not to be construed as an official Department of the Army position unless
so designated by other authorized documents.
Citation of manufacturer’s or trade names does not constitute an official endorsement or approval of the
use thereof.
Destroy this report when it is no longer needed. Do not return it to the originator.

Army Research Laboratory Aberdeen Proving Ground, MD 21005-5069
ARL-TR-6987 July 2014
Design of a Percussion and Electric Primer Gun Firing
Power Supply
Peter T. Bartkowski
Weapons and Materials Research Directorate, ARL
Approved for public release; distribution is unlimited.
ii
REPORT DOCUMENTATION PAGE Form Approved OMB No. 0704-0188
Public reporting burden for this collection of information is estimated to average 1 hour per response, including the time for reviewing instructions, searching existing data sources, gathering and maintaining the data needed, and completing and reviewing the collection information. Send comments regarding this burden estimate or any other aspect of this collection of information, including suggestions for reducing the burden, to Department of Defense, Washington Headquarters Services, Directorate for Information Operations and Reports (0704-0188), 1215 Jefferson Davis Highway, Suite 1204, Arlington, VA 22202-4302. Respondents should be aware that notwithstanding any other provision of law, no person shall be subject to any penalty for failing to comply with a collection of information if it does not display a currently valid OMB control number.
PLEASE DO NOT RETURN YOUR FORM TO THE ABOVE ADDRESS.
1. REPORT DATE (DD-MM-YYYY)
July 2014
2. REPORT TYPE
Final
3. DATES COVERED (From - To)
December 2013 4. TITLE AND SUBTITLE
Design of a Percussion and Electric Primer Gun Firing Power Supply
5a. CONTRACT NUMBER
5b. GRANT NUMBER
5c. PROGRAM ELEMENT NUMBER
6. AUTHOR(S)
Peter T. Bartkowski
5d. PROJECT NUMBER
5e. TASK NUMBER
5f. WORK UNIT NUMBER
7. PERFORMING ORGANIZATION NAME(S) AND ADDRESS(ES)
U.S. Army Research Laboratory
ATTN: RDRL-WMP-E
Aberdeen Proving Ground, MD 21005-5069
8. PERFORMING ORGANIZATION REPORT NUMBER
ARL-TR-6987
9. SPONSORING/MONITORING AGENCY NAME(S) AND ADDRESS(ES)
10. SPONSOR/MONITOR’S ACRONYM(S)
11. SPONSOR/MONITOR'S REPORT NUMBER(S)
12. DISTRIBUTION/AVAILABILITY STATEMENT
Approved for public release; distribution is unlimited.
13. SUPPLEMENTARY NOTES
14. ABSTRACT
The U.S. Army Research Laboratory has designed and built a new power supply to fire laboratory guns in support of armor
research. The new power supply is specifically designed to drive a solenoid into a percussion primer or ignite the M52A3B1
electric primer. To reduce power requirements, it uses charged capacitor banks to drive the solenoid or ignite the primer. This
report details the design and construction of the power supplies.
15. SUBJECT TERMS
power supply, gun, percussion, electric primer, capacitor
16. SECURITY CLASSIFICATION OF: 17. LIMITATION OF ABSTRACT
UU
18. NUMBER OF PAGES
30
19a. NAME OF RESPONSIBLE PERSON
Peter T. Bartkowski a. REPORT
Unclassified
b. ABSTRACT
Unclassified
c. THIS PAGE
Unclassified
19b. TELEPHONE NUMBER (Include area code)
410-278-0210
Standard Form 298 (Rev. 8/98)
Prescribed by ANSI Std. Z39.18

iii
Contents
List of Figures iv
1. Introduction 1
2. The Existing System 1
3. New System Design 1
4. Circuit Design 2
5. Unit Construction 3
6. Field Testing 4
7. Conclusions 6
Appendix A. Circuit Schematic 7
Appendix B. Circuit Board Layout 9
Appendix C. Component List 11
Appendix D. Instrument Panels 15
Appendix E. Instrument Case Interior 19
Appendix F. Photo of Completed Unit 21
Distribution List 23

iv
List of Figures
Figure 1. Electric primer signals. .....................................................................................................4
Figure 2. Percussion primer signals. ................................................................................................5
Figure 3. Signals for measuring time delays. ...................................................................................5

1
1. Introduction
The U.S. Army Research Laboratory has multiple laboratory gun firing ranges that use both
percussion and electric primers for initiation. Currently, a combination of a linear power supply
and a switch button panel is used to fire the guns. After replacement power supplies failed to
adequately perform, an analysis was conducted to determine the power supply requirements. It
was found that the design of a dedicated firing unit was the most appropriate way to replace the
old hardware, as commercial laboratory gun firing products do not exist.
2. The Existing System
The existing firing system consisted of a Hewlett Packard no. 895A linear power supply
(0–320 volts of direct current [VDC], 0–1.5 amperes [A]) connected to the firing line via a
mechanical switch or solid-state relay to fire the gun. The voltage was varied on the power
supply depending on whether a percussion or electric primer was used.
New replacement switching power supplies failed to adequately activate the solenoid used to
initiate the percussion primer. The new power supplies could not provide enough surge current
for the initial pull of the solenoid, which can be over 50 A. The old linear power supply has large
filter capacitors on its output, which does provide the surge current to fire the solenoid. Modern
switching power supplies have a much lower capacitance output and are electronically current
limiting. Buying a new switching power supply with the necessary current capability would
require a unit over 3500 W and necessitate upgrading the electrical power to support the device.
It was decided that a custom-designed dedicated capacitor-based power supply was a better
approach.
3. New System Design
The new power supply is designed to fire both the M52A3B1 electric primer and percussion
primers. The percussion primer is initiated using a Trombetta solenoid model Q610-A1V24. The
M52A3B1electric primer is designed to function with a 2-µF capacitor charged to 160 VDC.
Due to the long length of some of the firing lines in use and the large surge currents, a 60-µF
capacitor charged to 190 VDC was chosen. The Trombetta solenoid has a specified operating
voltage of 24 VDC. Solenoids can typically be over driven to a certain extent if they are used in a

2
pulsed mode of operation that has no continuous draw. Tests were conducted to evaluate the
impact power of the solenoid using the existing original power supply and compare the results to
various combinations of capacitance and voltage to be used in the new power supply. The tests
indicated that a 34-mF capacitor bank charged to 65 VDC resulted in better impact performance
than the original power supplies set to 160 VDC. Lowering the voltage results in a reduced
probability of solenoid failure.
As new instrumentation techniques such as high-speed video and laser interferometry have been
introduced into our gun testing, event timing has become critical. To improve the initiation
timing, input and output trigger signals became desirable and were included in the new design. A
debounce circuit was incorporated to clean up the manual push-button signal to fire the gun and
reduce jitter.
The entire firing system including the power supplies is now enclosed within a single 3-U rack
mount enclosure. A keyswitch is present to control the system power and a toggle switch selects
between electric and percussion primers. Two push-button switches are available for firing the
gun. One is the main fire switch, which incorporates a debouncing circuit, while the other is a
back-up firing switch to be used if the main fire switch fails. It directly connects the charged
capacitor to the firing line, bypassing all of the debouncing circuit should it fail to perform. The
trigger input can be used to allow an external device to fire the gun. A single trigger output can
be used to trigger other devices or monitor timing. Light-emitting diode (LED) indicators on the
front panel indicate power on (Power) and fully charged capacitor bank (Ready). The firing line
connects to the unit using a military-style circular bayonet connector.
4. Circuit Design
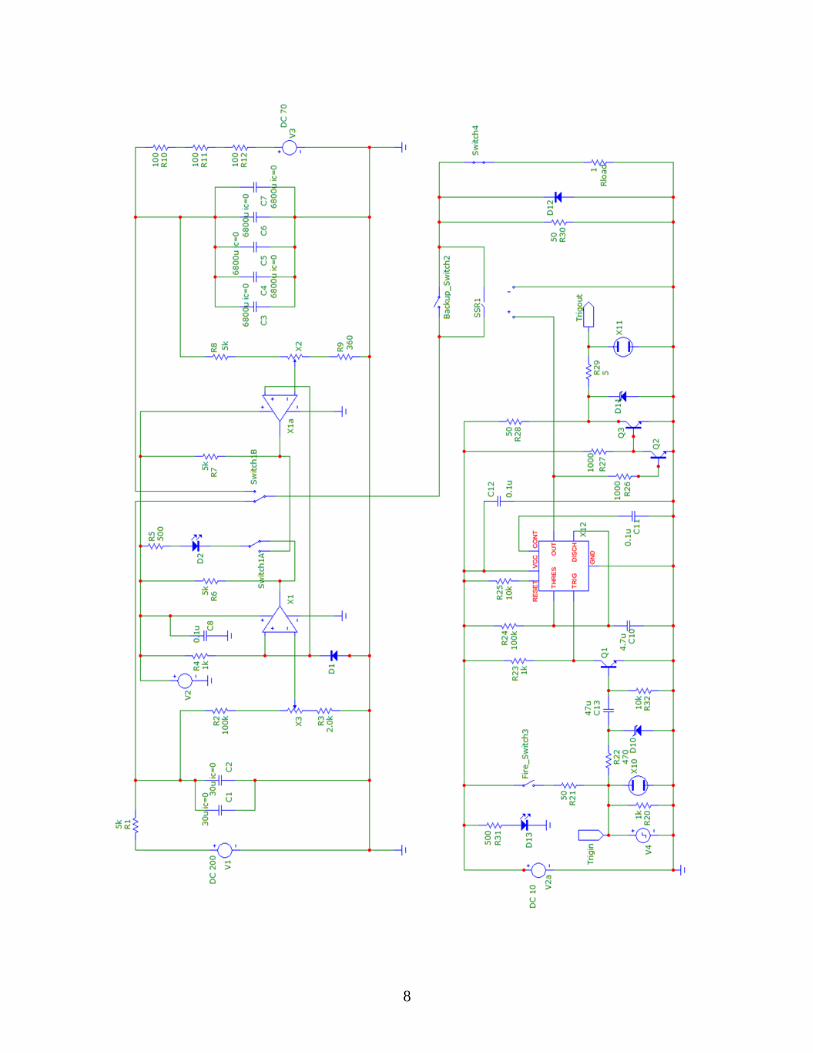
The circuit schematic (appendix A) has two sections. The top encompasses the capacitor banks
and voltage charged (Ready) indicator while the bottom section includes the input, output, and
debounce circuitry.
There are two capacitor banks, each with its own power supply. The electric primer bank
consists of capacitors C1 and C2 and is charged by the 200-VDC power supply V1. Resistor R1
limits charging current to 40 mA. Even though charging occurs in a few seconds, this resistor is
mounted to a thermal heat sink to allow for the possible fault condition in which a capacitor or
firing line may become shorted. The percussion primer bank consists of capacitors C3–C7 and is
charged by a 70-VDC power supply V3. Resistors R10–R12 limit the charging current to
233 mA and are also mounted to thermal heat sinks to handle a possible fault condition. An
LM393 dual voltage comparator chip (X1) monitors the charge voltage of each bank through a
voltage divider network and compares it to a reference voltage of 4.7 V from the zener diode D1.
The comparator chip will sink current from the LED D2 to indicate when the capacitor bank is

3
greater than approximately 95% charged. Switch 1 (A and B) is a double-pole double-throw
switch that adjusts the system for firing either the electric or percussion primer. Pole A of
Switch 1 connects the LED D2 to the output of the comparator that corresponds to either the
electric or percussion capacitor bank. Pole B of Switch 1 connects the solid-state fire relay to
either the electric or percussion capacitor bank.
The trigger circuitry is powered by a 10-VDC power supply V2. The LED D13 indicates that
power is on. The unit can be fired by depressing the Fire button or providing a positive pulse to
the Trig In BNC connector. Any signal higher than 1.0 V will trigger the unit. Overvoltage of the
input is prevented by a combination of spark gap X10 and transient voltage diode D10. The
spark gap clamps input voltage to 75 V. Resistor R22 limits the surge current while diode D10
further clamps the voltage to 15 V. A 555 timer chip (X12) provides debouncing of the switch
while sending a monostable 250-ms pulse to the solid-state relay to fire the primer. Transistor Q1
pulls the trig line of the 555 timer low when the fire button is depressed, or a positive pulse is
received at the Trig In connector. The timer then puts out a 10-V pulse to solid-state relay
(SSR) 1 to connect the capacitor bank to the firing line, thus initiating the primer. Resistor R30 is
in parallel with the firing line connector to dump the energy from the capacitor bank should the
firing line not be connected while firing. Diode D12 is a flyback diode to eliminate voltage
reversals from the solenoid during operation. The Trig Out signal is provided by transistors Q2
and Q3. This output is protected from overvoltage by transient voltage diode D11 and spark gap
X11 with resistor R29 limiting surge current. The output signal is a 6.8-V positive pulse.
A back-up momentary fire switch is also provided on the front panel. This is intended to be used
only if the main firing switch fails to initiate the primer. It bypasses all the trigger conditioning
and directly connects the capacitor bank to the firing line. In this mode of operation, no Trig Out
signal will be present.
The circuit performance was modeled using MicroCap 10.0 software prior to circuit board
construction. Prototype circuit boards were fabricated by a printed circuit board manufacturer
(appendix B). A full list of all components used can be found in appendix C.
5. Unit Construction
The enclosure is dismantled to cut the panel face, rear, top, and bottom panels with a laser or
waterjet (appendix D). The face panel is cut to accept all the buttons, switches, indicators, and
connectors. The rear panel is cut to accept a power cord receptacle. The top and bottom panels
are cut to provide cooling vents and mounting holes for the power supplies and the circuit board.
The circuit board is populated with components and soldered in place by hand. It is then bench
tested and adjustments made to the two potentiometers X2 and X3 to ensure the ready indicator
lights up when the two capacitor banks are approximately 95% charged.
4
After installing the photoresist printed face and rear plates, all the indicators, switches, and
connectors are then mounted to the front and rear panels. The two power supplies and circuit
board are mounted to the bottom panel. Final wiring is done by connecting all the front and rear
panel components and power supplies to the circuit board with hook-up wire. Then the enclosure
is reassembled to complete the unit.
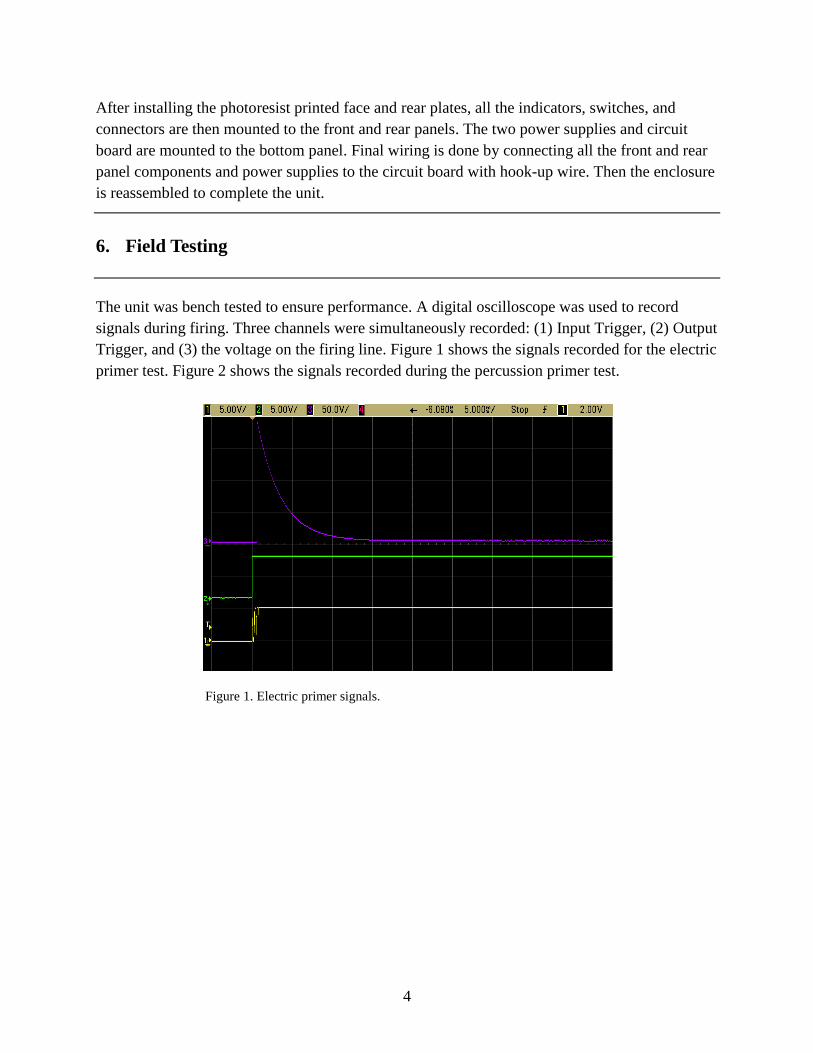
6. Field Testing
The unit was bench tested to ensure performance. A digital oscilloscope was used to record
signals during firing. Three channels were simultaneously recorded: (1) Input Trigger, (2) Output
Trigger, and (3) the voltage on the firing line. Figure 1 shows the signals recorded for the electric
primer test. Figure 2 shows the signals recorded during the percussion primer test.
Figure 1. Electric primer signals.

5
Figure 2. Percussion primer signals.
To measure circuit time delays, the test was repeated with a faster oscilloscope time base. As
seen in figure 3, the time delay between input and output triggers is less than 10 µs. The delay
between trigger input and firing line voltage is 600 µs due to the turn on time delay of the
solid-state relay. Note the noise present on the input trigger line. The fire button was used to
trigger the unit, and bouncing of the switch is obvious. The trigger out line and the voltage on the
firing line is clean, however, due to the debouncing circuit.
Figure 3. Signals for measuring time delays.

6
7. Conclusions
The new firing unit is a reliable upgrade to the previous firing system. It was specifically
engineered to fire both percussion and electric primers. The debounce circuit produces more
accurate timing and firing with modern instrumentation techniques. The addition of trigger input
and trigger output gives the unit more flexibility in interfacing with other instruments during
testing. Lowering the voltage and increasing the capacitance driving the solenoid will increase
the reliability and life of the solenoid. All the delays in the electronics are very repeatable and
less than 1 ms—short compared with the 10s of milliseconds required to fire the guns.

7
Appendix A. Circuit Schematic
This appendix appears in its original form, without editorial change.
8

9
Appendix B. Circuit Board Layout
This appendix appears in its original form, without editorial change.

10

11
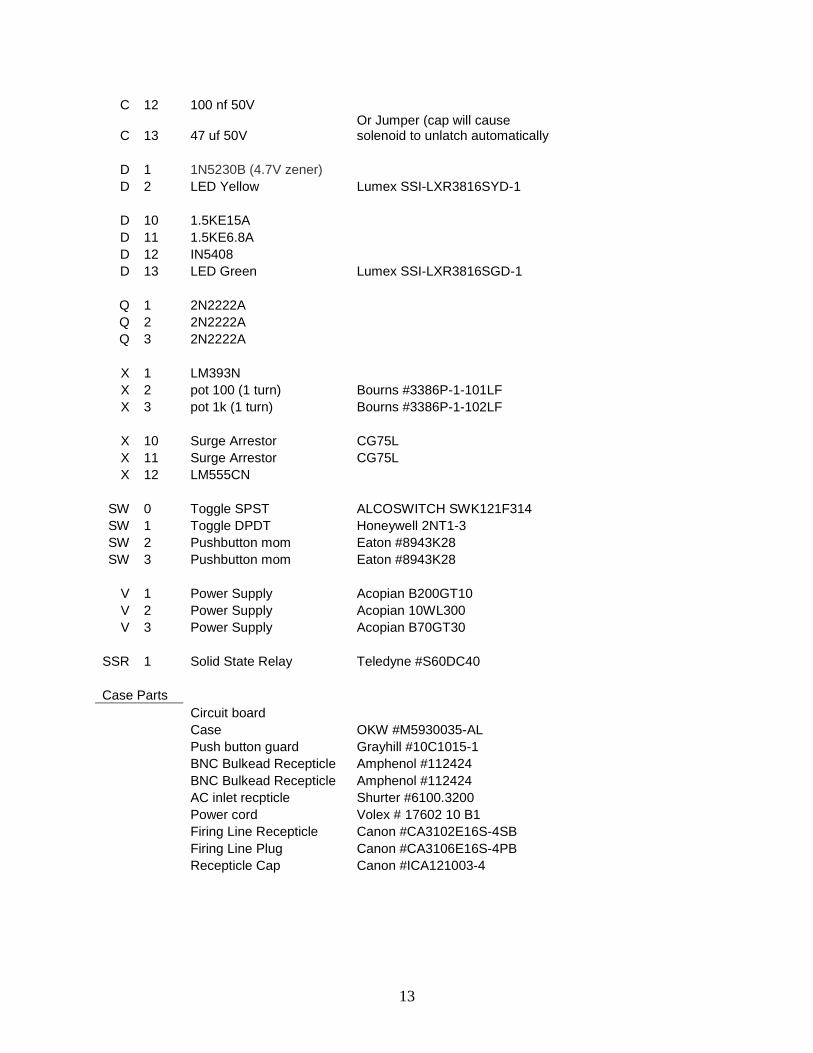
Appendix C. Component List
This appendix appears in its original form, without editorial change.

12
Nomenclature Manufacturer Part #
(All resistors 1/4 watt unless otherwise specified)
R 1 5k 8W TO220 Ohmite TCH35P5K10JE
R 2 100k 1W R 3 2k R 4 1k R 5 500 R 6 5k R 7 5k R 8 5k 3W R 9 360 R 10 100 6W TO220 Ohmite TBH25P100RJE
R 11 100 6W TO220 Ohmite TBH25P100RJE
R 12 100 6W TO220 Ohmite TBH25P100RJE
R 13 1k
Heat Sink Ohmite #FA-T220-25E
Heat Sink Ohmite #FA-T220-25E
Heat Sink Ohmite #FA-T220-25E
Heat Sink Ohmite #FA-T220-25E
R 20 1k R 21 50 1W R 22 470 0.5W R 23 1k R 24 100k R 25 10k R 26 1k R 27 1k R 28 50 3W R 29 5 1W R 30 50 2W R 31 500 R 32 10k
Fuse Holder 5mm, PCB mount Fuse 1.25A, 5mm
C 1 30uf 250VDC film Genteq 41L2300
C 2 30uf 250VDC film Genteq 41L2300
C 3 6800 uf 80-100VDC SLPX682M100H9P3
C 4 6800 uf 80-100VDC SLPX682M100H9P3
C 5 6800 uf 80-100VDC SLPX682M100H9P3
C 6 6800 uf 80-100VDC SLPX682M100H9P3
C 7 6800 uf 80-100VDC SLPX682M100H9P3
C 8 100 nf 50V
C 10 4.7uf 50V C 11 100 nf 50V
13
C 12 100 nf 50V
C 13 47 uf 50V Or Jumper (cap will cause solenoid to unlatch automatically
D 1 1N5230B (4.7V zener) D 2 LED Yellow Lumex SSI-LXR3816SYD-1
D 10 1.5KE15A D 11 1.5KE6.8A D 12 IN5408 D 13 LED Green Lumex SSI-LXR3816SGD-1
Q 1 2N2222A Q 2 2N2222A Q 3 2N2222A
X 1 LM393N X 2 pot 100 (1 turn) Bourns #3386P-1-101LF
X 3 pot 1k (1 turn) Bourns #3386P-1-102LF
X 10 Surge Arrestor CG75L
X 11 Surge Arrestor CG75L
X 12 LM555CN
SW 0 Toggle SPST ALCOSWITCH SWK121F314
SW 1 Toggle DPDT Honeywell 2NT1-3
SW 2 Pushbutton mom Eaton #8943K28
SW 3 Pushbutton mom Eaton #8943K28
V 1 Power Supply Acopian B200GT10
V 2 Power Supply Acopian 10WL300
V 3 Power Supply Acopian B70GT30
SSR 1 Solid State Relay Teledyne #S60DC40
Case Parts
Circuit board
Case OKW #M5930035-AL
Push button guard Grayhill #10C1015-1
BNC Bulkead Recepticle Amphenol #112424
BNC Bulkead Recepticle Amphenol #112424
AC inlet recpticle Shurter #6100.3200
Power cord Volex # 17602 10 B1
Firing Line Recepticle Canon #CA3102E16S-4SB
Firing Line Plug Canon #CA3106E16S-4PB
Recepticle Cap Canon #ICA121003-4

14
INTENTIONALLY LEFT BLANK.

15
Appendix D. Instrument Panels
This appendix appears in its original form, without editorial change.

16
Front Panel Graphics

17
Cutouts for Front and Rear Panels

18
Cutouts for Top and Bottom Panels (identical)

19
Appendix E. Instrument Case Interior
This appendix appears in its original form, without editorial change.

20

21
Appendix F. Completed Unit
This appendix appears in its original form, without editorial change.

22

23
1 DEFENSE TECHNICAL
(PDF) INFORMATION CTR
DTIC OCA
2 DIRECTOR
(PDF) US ARMY RESEARCH LAB
RDRL CIO LL
IMAL HRA MAIL & RECORDS MGMT
1 GOVT PRINTG OFC
(PDF) A MALHOTRA
1 DIR USARL
(PDF) RDRL WMP E
P BARKOWSKI

24
INTENTIONALLY LEFT BLANK.