ctk-811ex - warning will robinson ctk811... · gm sound keyboard ctk-811ex jul.1998 ctk-811 2-way...
TRANSCRIPT

GM SOUND KEYBOARD
CTK-811EXJUL.1998
CTK-811
2-WAYBASS REFLEX SPEAKER
MODULATION
PITCH BEND
2-WAYBASS REFLEX SPEAKER
232 TONES
16 CHANNEL MIXER
TEMPO REGISTRATION
BANK A B C D E STORE
EXTERNAL CH1
UPPER1INTERNALMIXER SELECT TONE EXPANDER ACCOMP SEQUENCER TRACK
DSP
CONTRAST
FREESESSION
ONE TOUCHPRESET
TONE
RHYTHM
LAYER/AUTO HARMONIZE
SPLIT
CH2
UPPER2
CH3
LOWER1
CH4
LOWER2
CH5
ACC VOL.
CH6
CHORD1
CH7
CHORD2
CH8
CHORD3
CH9
BASS
CH10
RHYTHN
CH11
TR1
CH12
TR2
CH13
TR3
CH14
TR4
CH15
TR5
CH16
0
1
4
7
2
5
8
3
6
9
TR6
10DSP
ENVELOPE
CURSOR
SYNTH
DELETE
/NO /YESDISK
ENTER
TOUCHRESPONSE
TRANSPOSE/TUNE/MIDI
PITCHENVELOPE
MAIN MENU/CHANNEL VOLUMESUB MENU/CHANNEL SELECT
:
:
00 FLAT
01-17 VIBRATO
AMPENVELOPE
PARAMETER RESET
DECAY
ENTER
SUSTAIN
18-45 OTHERS
DEMO
110 RHYTHMS
POWER MODE
SEQUENCER
FULL RANGECHORD
USER RHYTHM100 ‘109
FINGERED
SONG
INTRONORMAL/
FILL-INVARIATION/
FILL-INSYNCHRO/
ENDINGSTART/STOP
PATTERN
CASIO CHORD
VOLUME
MAX
MIN
RECORD
— 1 —
CONTENTS
Safety Notice ----------------------------------------------------------------------------------------------- 2
Specifications ---------------------------------------------------------------------------------------------- 3
Important Operation ------------------------------------------------------------------------------------- 5
Block Diagram --------------------------------------------------------------------------------------------- 6
Circuit Description --------------------------------------------------------------------------------------- 7
Diagnostic Program ------------------------------------------------------------------------------------ 22
Major Waveformes -------------------------------------------------------------------------------------- 28
Printed Circuit Board ---------------------------------------------------------------------------------- 29
Exploded View ------------------------------------------------------------------------------------------- 31
Parts List --------------------------------------------------------------------------------------------------- 32
Schematic Diagrams ----------------------------------------------------------------------------------- 35
— 2 —
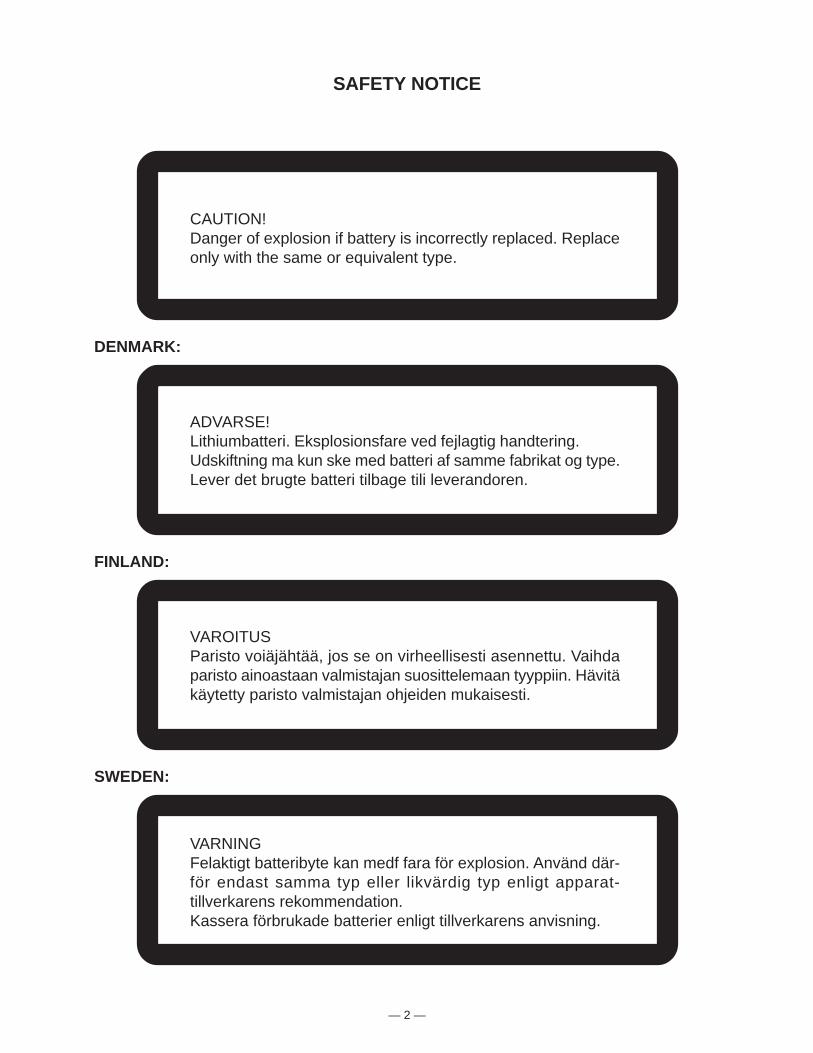
SAFETY NOTICE
CAUTION!Danger of explosion if battery is incorrectly replaced. Replaceonly with the same or equivalent type.
ADVARSE!Lithiumbatteri. Eksplosionsfare ved fejlagtig handtering.Udskiftning ma kun ske med batteri af samme fabrikat og type.Lever det brugte batteri tilbage tili leverandoren.
VAROITUSParisto voiäjähtää, jos se on virheellisesti asennettu. Vaihdaparisto ainoastaan valmistajan suosittelemaan tyyppiin. Hävitäkäytetty paristo valmistajan ohjeiden mukaisesti.
VARNINGFelaktigt batteribyte kan medf fara för explosion. Använd där-för endast samma typ eller likvärdig typ enligt apparat-tillverkarens rekommendation.Kassera förbrukade batterier enligt tillverkarens anvisning.
DENMARK:
FINLAND:
SWEDEN:

— 3 —
SPECIFICATIONS
GENERAL
Keyboard: 61 standard-size keys, 5 octaves (with touch response on/off; ExLight/Light/Normal/Heavy touch)
Tones: 232 (128 General MIDI, 64 variation, 8 drum, 32 user); with layer andsplit
Rhythm instrument tones: 53Polyphony: 32 notes maximum (16 for certain tones)Digital effects: 10 (REVERB 1, 2, 3; CHORUS; TREMOLO; PHASE SHIFTER; OR-
GAN SPEAKER; ENHANCER; FLANGER; EQ LOUDNESS)Auto accompaniment
Rhythm patterns: 110 (100 + 10 user rhythms)Tempo: Variable (226 steps, = 30 to 255)Chords: 3 fingering methods (CASIO CHORD, FINGERED, FULL RANGE
CHORD)Rhythm controller: Start/Stop, Intro, Normal/Normal Fill-In, Variation/Variation Fill-In,
Synchro/EndingAccomp volume: 0 to 127 (128 steps)One touch presets: Recalls settings for tone, tempo, layer, and Auto Harmonize in accor-
dance with rhythm.Auto harmonize: Automatic addition of notes that harmonize with melody note in ac-
cordance with specified Auto Accompaniment chords.Free session
Number of patterns: 100 (Auto Accompaniment function based on preset chord progres-sions.)
Song sequencerSongs: 2Recording tracks: 6 (2 through 6 are melody tracks)Recording method: Real-timeMemory capacity(total for two songs): Approximately 4,900 notesPunch in: Supported
Pattern sequencerNumber of patterns: 10 (Rhythm numbers 100 to 109)Memory capacity: Approximately 7,000 notesElements: Intro, Normal, Variation, Normal Fill-In, Variation Fill-In, EndingParts: Chord 1, 2, 3; Bass; RhythmRecording method: Real-time
Registration memoryNumber of setups: 20 (5 setups × 4 banks)Memory contents: Tone, Rhythm, Tempo, Split on/off, Split point, Layer on/off, Auto Har-
monize on/off, Mixer settings, Keyboard channel on/off, DSP (digitaleffect) on/off, DSP (digital effect) settings, Accompaniment mode,Touch Response settings, Assignable jack setting, Transpose, Tun-ing, Pitch Bend range, Sound range shift on/off
Demo tunes: 2Synthesizer
Parameters: PCM set, amp envelope set, attack rate, release rate, pitch envelopeset, pitch, level, touch sensitivity, pan, filter sensitivity, filter level, trans-pose
MixerChannels: 16Modes: Internal, External, External/Solo, External/PlayParameters: Program change number, volume, expression, pan, coarse tuning,
fine tuning, Effect SendMIDI: 16-channel multi-timbre receive, General MIDI Level 1
— 4 —
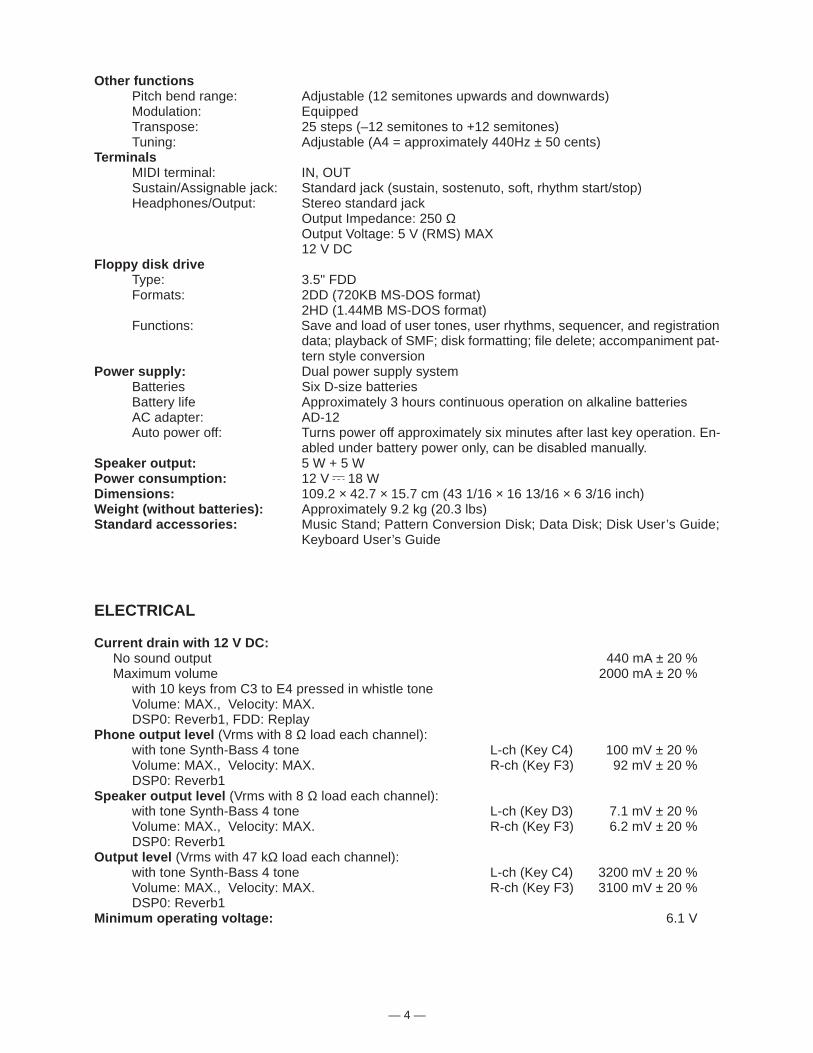
Other functionsPitch bend range: Adjustable (12 semitones upwards and downwards)Modulation: EquippedTranspose: 25 steps (–12 semitones to +12 semitones)Tuning: Adjustable (A4 = approximately 440Hz ± 50 cents)
TerminalsMIDI terminal: IN, OUTSustain/Assignable jack: Standard jack (sustain, sostenuto, soft, rhythm start/stop)Headphones/Output: Stereo standard jack
Output Impedance: 250 ΩOutput Voltage: 5 V (RMS) MAX12 V DC
Floppy disk driveType: 3.5" FDDFormats: 2DD (720KB MS-DOS format)
2HD (1.44MB MS-DOS format)Functions: Save and load of user tones, user rhythms, sequencer, and registration
data; playback of SMF; disk formatting; file delete; accompaniment pat-tern style conversion
Power supply: Dual power supply systemBatteries Six D-size batteriesBattery life Approximately 3 hours continuous operation on alkaline batteriesAC adapter: AD-12Auto power off: Turns power off approximately six minutes after last key operation. En-
abled under battery power only, can be disabled manually.Speaker output: 5 W + 5 WPower consumption: 12 V 18 WDimensions: 109.2 × 42.7 × 15.7 cm (43 1/16 × 16 13/16 × 6 3/16 inch)Weight (without batteries): Approximately 9.2 kg (20.3 lbs)Standard accessories: Music Stand; Pattern Conversion Disk; Data Disk; Disk User’s Guide;
Keyboard User’s Guide
ELECTRICAL
Current drain with 12 V DC:No sound output 440 mA ± 20 %Maximum volume 2000 mA ± 20 %
with 10 keys from C3 to E4 pressed in whistle toneVolume: MAX., Velocity: MAX.DSP0: Reverb1, FDD: Replay
Phone output level (Vrms with 8 Ω load each channel):with tone Synth-Bass 4 tone L-ch (Key C4) 100 mV ± 20 %Volume: MAX., Velocity: MAX. R-ch (Key F3) 92 mV ± 20 %DSP0: Reverb1
Speaker output level (Vrms with 8 Ω load each channel):with tone Synth-Bass 4 tone L-ch (Key D3) 7.1 mV ± 20 %Volume: MAX., Velocity: MAX. R-ch (Key F3) 6.2 mV ± 20 %DSP0: Reverb1
Output level (Vrms with 47 kΩ load each channel):with tone Synth-Bass 4 tone L-ch (Key C4) 3200 mV ± 20 %Volume: MAX., Velocity: MAX. R-ch (Key F3) 3100 mV ± 20 %DSP0: Reverb1
Minimum operating voltage: 6.1 V
— 5 —
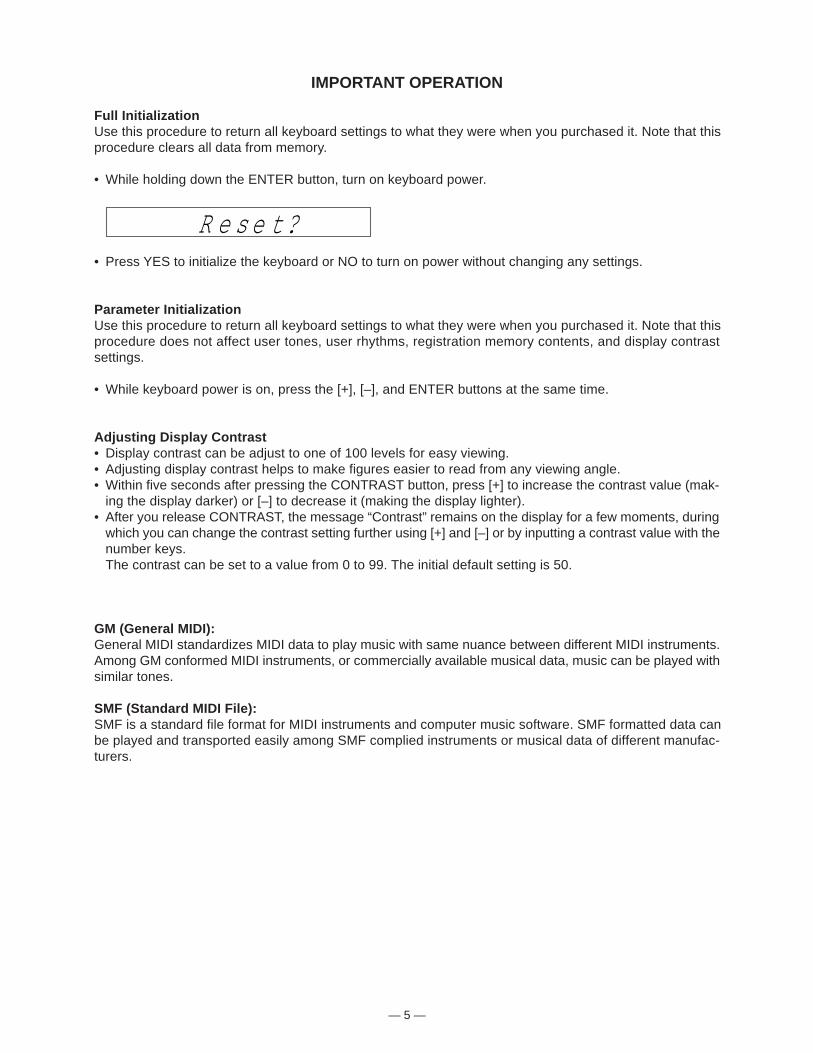
IMPORTANT OPERATION
Full InitializationUse this procedure to return all keyboard settings to what they were when you purchased it. Note that thisprocedure clears all data from memory.
• While holding down the ENTER button, turn on keyboard power.
• Press YES to initialize the keyboard or NO to turn on power without changing any settings.
Parameter InitializationUse this procedure to return all keyboard settings to what they were when you purchased it. Note that thisprocedure does not affect user tones, user rhythms, registration memory contents, and display contrastsettings.
• While keyboard power is on, press the [+], [–], and ENTER buttons at the same time.
Adjusting Display Contrast• Display contrast can be adjust to one of 100 levels for easy viewing.• Adjusting display contrast helps to make figures easier to read from any viewing angle.• Within five seconds after pressing the CONTRAST button, press [+] to increase the contrast value (mak-
ing the display darker) or [–] to decrease it (making the display lighter).• After you release CONTRAST, the message “Contrast” remains on the display for a few moments, during
which you can change the contrast setting further using [+] and [–] or by inputting a contrast value with thenumber keys.The contrast can be set to a value from 0 to 99. The initial default setting is 50.
GM (General MIDI):General MIDI standardizes MIDI data to play music with same nuance between different MIDI instruments.Among GM conformed MIDI instruments, or commercially available musical data, music can be played withsimilar tones.
SMF (Standard MIDI File):SMF is a standard file format for MIDI instruments and computer music software. SMF formatted data canbe played and transported easily among SMF complied instruments or musical data of different manufac-turers.
R e s e t?

— 6 —
BLOCK DIAGRAM
Back Light Driver
NT-07Q501, Q502
ROM2MSM23C3210MC
-12CA89LSI3 (32Mbit)
ROM1MSM27C802CZ-465
LSI2 (8Mbit)
RAM2TC551001BFL-70L
LSI8 (1Mbit)
VBR VBR
VBRAVDDDVDDFVDDCVDDVCCVDDVC
VDD
APO
NMI
SWCK
LSDT
S1
IC1
LWR, RD S1 HWR, RD
HWRRD
RD
, HW
R,
LWR
RD
, HW
R,
LWR
1RD, 1HWR, 1LWRTEND, DREQ, CS2, CS3, B1-5
A0 ~ A15
KI0 ~ KI7
KC0 ~ KC8
SEG1 ~ SEG40
OUTMIDI
IN
COM1 ~ COM16
LEDA ~ LEDFLEDCK, LEDCL
D0 ~ D15D0
D7
~ D8
D15
~ D8
D15
~
Chip SelectorTC74HC08
IC4
S-RegisterTC74HC164
IC302
S-RegisterTC74HC164
IC301
LCD
FDD Controller
HD63266F
LSI6
3.5" FDD UnitDF354HO64A
Back upPower
CR2032
Power Supply Circuit
IC204, Q203Q204, Q208, Q210
Q205,Q206
CPU
HD6473042F16-465
LSI9
WorkingRAM
TC55257GFL-70L
LSI5(256Kbit)
LPF(L)
LPF(R)
D8 ~ D15 RESET
RESET
RD,HWR
ECEB, EOEB
EWEB
RESB
RESB
PBO
LCD Driver
SED1278F2A
LSI501
DB4~DB7
CONT,LRS,LR/W
LE
Key Board
SI0 ~ SI7FI0 ~ FI7
KC0~
KC7
WOK1SOLPBOK
RAM1TC551001BFL-70L
LSI7 (1Mbit)
Key ControllerTC190C020AF-001
LSI10
Reset ICRN5VD40A
IC3
Out put
(L) (R)Speakers
LEDs
VDD
Buttons
A1 ~ A4
D0 ~ D15
RA0 ~ RA20
ED0 ~ ED8
EA0 ~ EA14
RD0 ~ RD15
MainVolume
D/A ConverterµPD6376GS
LSI1
Power Amp.LA4620IC201
DSP
HG51B155FD
LSI4
A0 ~ A3
Back Light

— 7 —
KC0 KC1 KC2 KC3 KC4 KC5 KC6 KC7
FI0 C2 1 C#2 1 D2 1 D#2 1 E2 1 F2 1 F#2 1 G2 1
SI0 C2 2 C#2 2 D2 2 D#2 2 E2 2 F2 2 F#2 2 G2 2
FI1 G#2 1 A2 1 A#2 1 B2 1 C3 1 C#3 1 D3 1 D#3 1
SI1 G#2 2 A2 2 A#2 2 B2 2 C3 2 C#3 2 D3 2 D#3 2
FI2 E3 1 F3 1 F#3 1 G3 1 G#3 1 A3 1 A#3 1 B3 1
SI2 E3 2 F3 2 F#3 2 G3 2 G#3 2 A3 2 A#3 2 B3 2
FI3 C4 1 C#4 1 D4 1 D#4 1 E4 1 F4 1 F#4 1 G4 1
SI3 C4 2 C#4 2 D4 2 D#4 2 E4 2 F4 2 F#4 2 G4 2
FI4 G#4 1 A4 1 A#4 1 B4 1 C5 1 C#5 1 D5 1 D#5 1
SI4 G#4 2 A4 2 A#4 2 B4 2 C5 2 C#5 2 D5 2 D#5 2
FI5 E5 1 F5 1 F#5 1 G5 1 G#5 1 A5 1 A#5 1 B5 1
SI5 E5 2 F5 2 F#5 2 G5 2 G#5 2 A5 2 A#5 2 B5 2
FI6 C6 1 C#6 1 D6 1 D#6 1 E6 1 F6 1 F#6 1 G6 1
SI6 C6 2 C#6 2 D6 2 D#6 2 E6 2 F6 2 F#6 2 G6 2
FI7 G#6 1 A6 1 A#6 1 B6 1 C7 1
SI7 G#6 2 A6 2 A#6 2 B6 2 C7 2
CIRCUIT DESCRIPTION
KEY MATRIX
Note: Each key has two contacts, the first conatct 1 and second contact 2.
Key
Second contact 2 First contact 1
FI
KC
SI
NOMENCLATURE OF KEYS
F#3 G#3 A#3 C#4 D#4 F#4 G#4 A#4 C#5 D#5 F#5 G#5 A#5
F3 G3 A3 B3 C4 D4 E4 F4 G4 A4 B4 C5 D5 E5 F5 G5 A5 B5 C6
D#3
C2 D2 E2 F2 G2 A2 B2 C3 D3 E3 B6A6G6F6E6D6 C7
C#3A#2G#2F#2D#2C#2 A#6G#6F#6D#6C#6

— 8 —
KI0 KI1 KI2 KI3 KI4 KI5 KI6 KI7
KC0 MODE INTRO CH8 A CH16 SPLIT
KC1 RECORD CH1 CH9 B E 2
KC2 SONG CH2 CH10 C H RHYTHM 5
KC3 PATTERN CH3 CH11 D ENTER TONE 8
KC4 DSP CH4 CH12 E DISK 0
KC5 CH5 CH13 STORE 1 3
KC6 CH6 CH14 G 4 6
KC7 BANK CH7 CH15 F SYNTH 7 9
BUTTON MATRIX
LED-B
FINGERD
LED-A
FULL RANGECHORD
LED MATRIX
LED-C
CASIO CHORD
LED-E
SYNTH
LED-D
FREESESSION
LED-F
DISK
CON-TRAST
FREESESSION
ONE TOUCHPRESET
NORMAL/FILL-IN
VARIATION/FILL-IN
SYNCHRO/ENDING
START/STOP
TEMPOG
TEMPOH
MIXERSELECT
TOUCHRESPONSE
TRANS-POSE
LAYER/AUTO HARMO
H/NO—
G/YES+
DMSW DEMO

— 9 —
MEMORY DEVICES
Each memory device has the following data.
1 RAM1 :S-RAM for operation program, Register, Pattern, Songand SMF data from FDD. (Lower part of data bus)
2 RAM2 :S-RAM for operation program, Register, Pattern, Songand SMF data from FDD. (Upper part of data bus)
3 Internal ROM of CPU :Main program data for system operation
4 Internal RAM of CPU :Work area for system operation
5 ROM1 :Demo, Accompaniment data, Song, Pattern, Synth, Diskmode
6 ROM2 :Sound Waveforms/Tone data Digital sound effect
7 Working RAM :Work area for DSP
CPU
RAM11
1 MbitLSI7
ROM
RAM
3
4
512 kbit
16 kbit
DSP
LSI9
LSI4
Working RAM7
256 kbitLSI5
Internal Memory
ROM15
8 MbitLSI2
RAM22
1 MbitLSI8
ROM26
32 MbitLSI3
VDDBattery set
RESET
CPUHD6473042F16-465
LSI9
FDD ControllerHD63266F
LSI6RESET
Power Supply Circuit
DSPHG51B155FD
LSI4RESB
RESBKey Controller
TC190C020AF-001LSI10
DVDD
DVDD
DVDD
VDD
DVDD
RESET
APOPWSW
From power switch
RES
NMI
PB0
PA7
RESET
PW/SW ON
APO
DVDD(5V)
Initial resetWhen batteries are set or an AC adapter is connected, the reset IC provides a low pulse to the CPU.When the power switch is pressed, the CPU receives a low pulse of POWER signal. The CPU first raisesAPO signal to +5 V to generate DVDD voltage, then raises RESET signal to +5 V. During this period theDSP, the key controller and FDD controller LSIs initialize their internal circuits.
RESET CIRCUIT

— 10 —
POWER SUPPLY CIRCUIT
The power supply circuit provides various voltages as shown below.The voltage VDD (+5 V) is provided as long as batteries or AC adaptor is set.Other voltages are controlled by APO (Auto Power Off) signal from CPU.
The regulator IC BA9700A generates square waveform from pin 5 as PWM (Pulse Wide Modulation).The LC filter makes stable output voltage (+5 V) for each circuit as shown above.
LC FilterSwitchingTransistors
Regulator IC
From Batteries or AC Adaptor (To back light)
(To LCD)
(To FDD)
(To digital)
(To analog)
+9V ~ +12 V
LC Filter
CPUHD6473042F16-465
LSI9
PA7
NMI
PW/SW
APO
NMI
PW/ON
APO

— 11 —
DSP and DAC CIRCUIT
The DSP (Digital Signal Processor) and DAC (Digital Analog Converter) consists of the following circuits.
RA22
Working RAM (256K-bit)TC55257DFL-70L
LSI5
ROM2MX23C3210MC-12CA89
LSI3 (32Mbit)
ROM1MSM27CB02CZ-465
LSI2 (8Mbit)
SOLP
BOK
WOK1
EA0 ~EA14
D0 ~D15
ED0 ~ED15
KC0 ~KC7
SI0 ~ SI7FI0 ~ FI7
RA0 ~RA18
RA0 ~ RA20
CS
RA23
CE A0 ~ A18 Q0 ~ Q15 CE A0 ~ A20 Q0 ~ Q15
WEOE
D0 ~ D15 A0 ~ A14
PG
24.576 MHz
DAC
UPD6376GS
LOUT
ROUT
SOLP: Sound dataBOK: Bit clockWOK1: Word clock
SI
CLK
LRCK
DSP
HG51B155FD
LSI4
CPU
HD6473042F16-465
LSI9
Key Controller
TC190C020AF-001
LSI10
RD0 ~ RD15
RA0 ~RA20
D8 ~ D15
Control data
keydata
key data
Key board
— 12 —
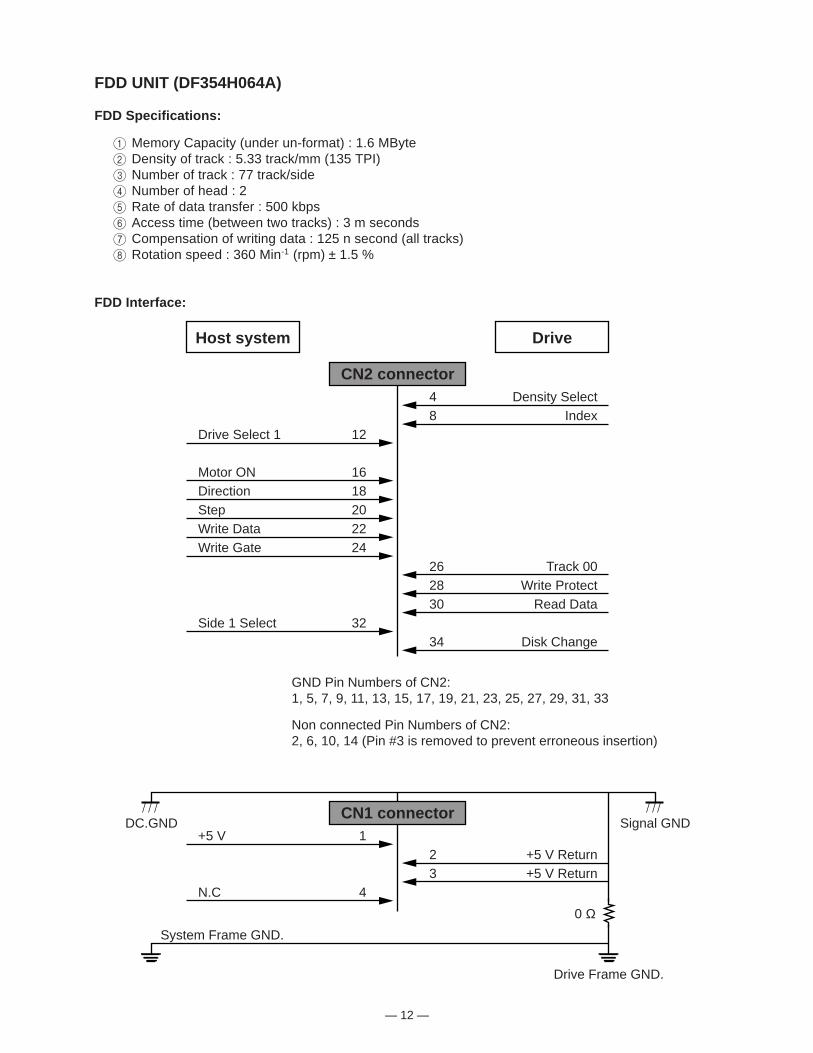
FDD UNIT (DF354H064A)
FDD Specifications:
1 Memory Capacity (under un-format) : 1.6 MByte2 Density of track : 5.33 track/mm (135 TPI)3 Number of track : 77 track/side4 Number of head : 25 Rate of data transfer : 500 kbps6 Access time (between two tracks) : 3 m seconds7 Compensation of writing data : 125 n second (all tracks)8 Rotation speed : 360 Min-1 (rpm) ± 1.5 %
FDD Interface:
Host system Drive
CN2 connector
Index8Density Select4
Drive Select 1 12
Motor ON 16Direction 18Step 20Write Data 22Write Gate 24
Track 0026Write Protect28
Read Data30Side 1 Select 32
Disk Change34
+5 VDC.GND
System Frame GND.
Drive Frame GND.
0 Ω
1+5 V Return2+5 V Return3
N.C 4
CN1 connectorSignal GND
GND Pin Numbers of CN2:1, 5, 7, 9, 11, 13, 15, 17, 19, 21, 23, 25, 27, 29, 31, 33
Non connected Pin Numbers of CN2:2, 6, 10, 14 (Pin #3 is removed to prevent erroneous insertion)

— 13 —
LCD BACKLIGHT
When voltage CVDD is supplied, transistors Q501 and Q502 start oscillation.From the oscillation voltage, transformer T501 generates about 600 V which is necessary for lighting thebacklight.
10 1
1 1
C502
(Bottom View)
NT-07
T501
CFL1
L501
LHL08TB101K
1
1
12
DG
CV
DD
C104F
A
C104M
2SD
965R2S
D965R
C501
R501
4.7KQ
501
CP
14
Q502
C516
1
12
23
32
2
HMBV26BG1W63N/AZG
DE0405-979SL180J2K2
1 2
2
3
4
5
8
9
7
5
— 14 —
Pin No. Terminal In/Out Function
1 VCC In VCC (5 V) source.
2 ~ 5 PB0 ~ PB3 Out Data bus for LCD driver.
6 PB4 Out Chip enable signal for LCD driver.
7 PB5 Out Read/write signal for LCD driver.
8 DREQ0 — DMA (Direct Memory Access) request.
9 PB7 Out Register selection signal for LCD driver.
10 RES0 In Not used.
11 VSS In Ground terminal (0 V).
12 TXD0 Out MIDI signal output.
13, 15 ~ 17 P91, P93~P95 In Key input signal from buttons.
14 RXD0 In MIDI signal input.
18 ~ 21D0 ~ D15 In/Out Data bus.23 ~ 34
22 VSS In Ground terminal (0 V).
35 VCC In Vcc (5 V) source.
36 ~ 43,A0 ~ A19 Out Address bus.45 ~ 56
44, 57 VSS In Ground terminal (0 V).
55, 59, 60 P52, P61, P62 In Key input signal from buttons.
58 WAIT — Not used.
61 CLKOUT Out Clock signal (16 MHz).
62 STBY — Not used.
63 RES In Reset signal at VDD (5 V) supplied.
64 NMI In Power ON signal input.
65 VSS In Ground terminal (0 V).
66, 67 EXTAL, XTAL In Clock (16 MHz) input.
68 VCC In Vcc (5 V) source.
69 AS — Not used.
70 RD Out Read signal.
71 HWR Out Write signal for upper data bus.
72 LWR Out Write signal for lower data bus.
73 ~ 75 MD0 ~ MD2 In Mode selection terminals.
76, 77 AVCC, VREF In Power source and reference voltage for internal A/D, D/A.
78 AN0 In Battery voltage detection (Not used).
79 AN1 In Pitch bender voltage detection.
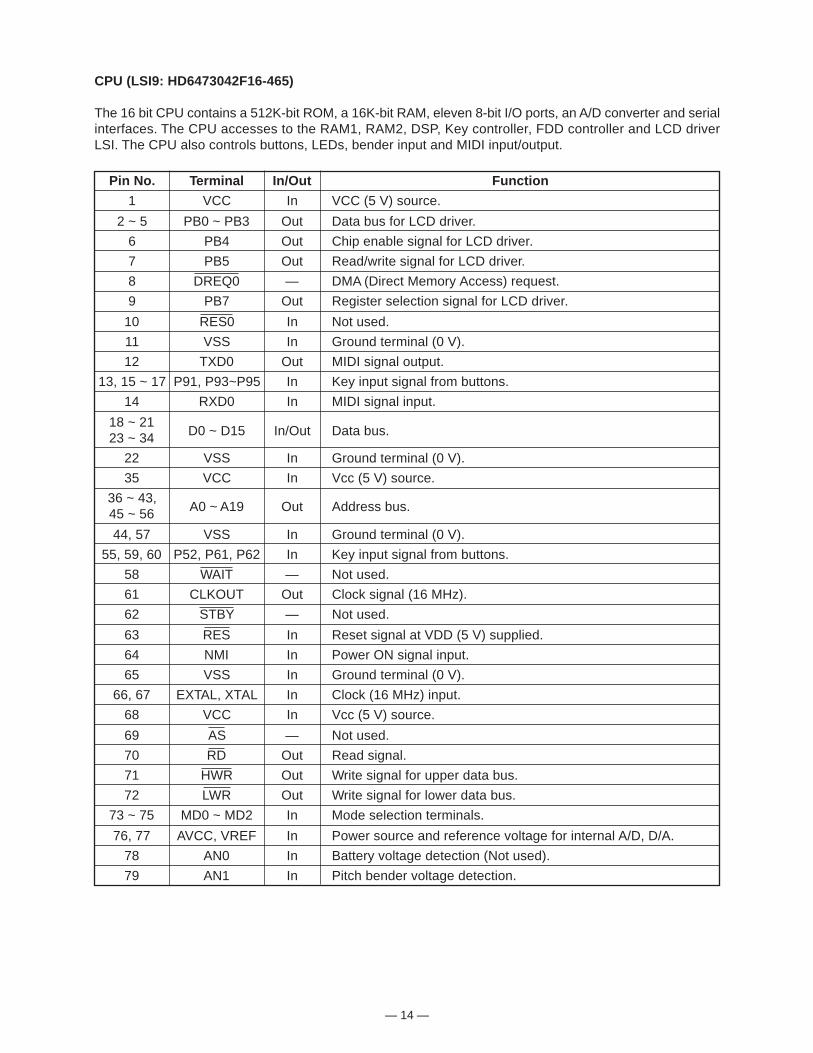
CPU (LSI9: HD6473042F16-465)
The 16 bit CPU contains a 512K-bit ROM, a 16K-bit RAM, eleven 8-bit I/O ports, an A/D converter and serialinterfaces. The CPU accesses to the RAM1, RAM2, DSP, Key controller, FDD controller and LCD driverLSI. The CPU also controls buttons, LEDs, bender input and MIDI input/output.
— 15 —
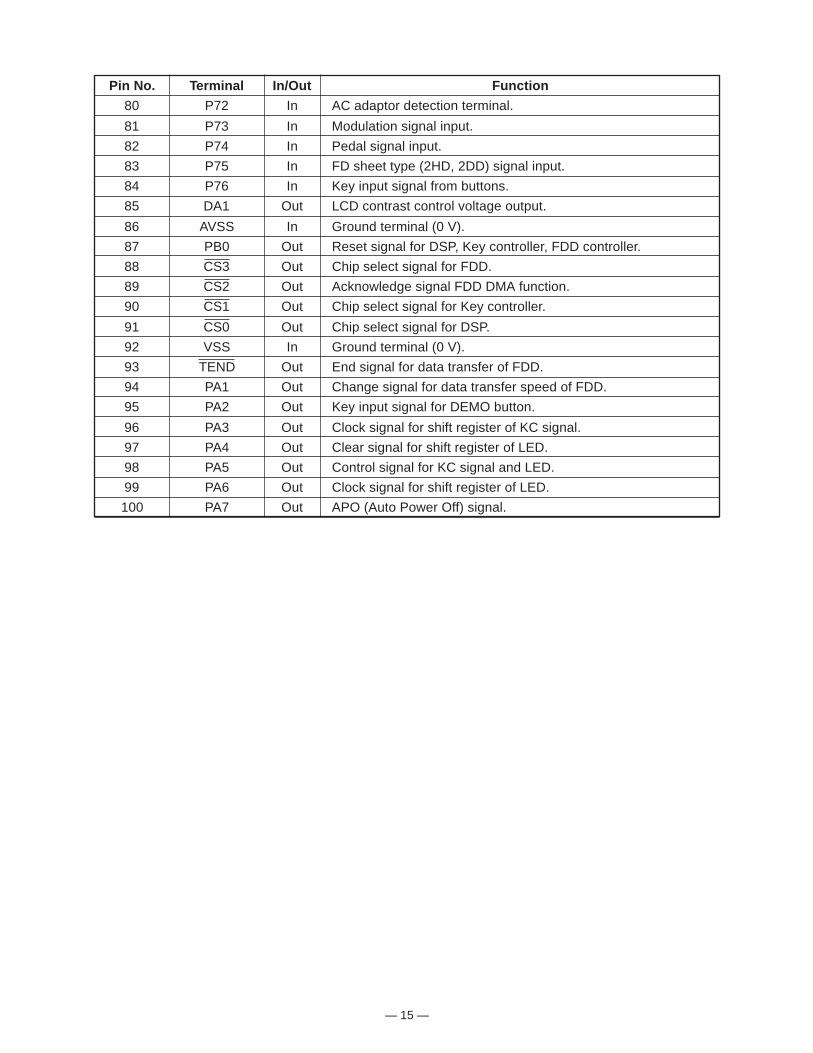
Pin No. Terminal In/Out Function
80 P72 In AC adaptor detection terminal.
81 P73 In Modulation signal input.
82 P74 In Pedal signal input.
83 P75 In FD sheet type (2HD, 2DD) signal input.
84 P76 In Key input signal from buttons.
85 DA1 Out LCD contrast control voltage output.
86 AVSS In Ground terminal (0 V).
87 PB0 Out Reset signal for DSP, Key controller, FDD controller.
88 CS3 Out Chip select signal for FDD.
89 CS2 Out Acknowledge signal FDD DMA function.
90 CS1 Out Chip select signal for Key controller.
91 CS0 Out Chip select signal for DSP.
92 VSS In Ground terminal (0 V).
93 TEND Out End signal for data transfer of FDD.
94 PA1 Out Change signal for data transfer speed of FDD.
95 PA2 Out Key input signal for DEMO button.
96 PA3 Out Clock signal for shift register of KC signal.
97 PA4 Out Clear signal for shift register of LED.
98 PA5 Out Control signal for KC signal and LED.
99 PA6 Out Clock signal for shift register of LED.
100 PA7 Out APO (Auto Power Off) signal.
— 16 —
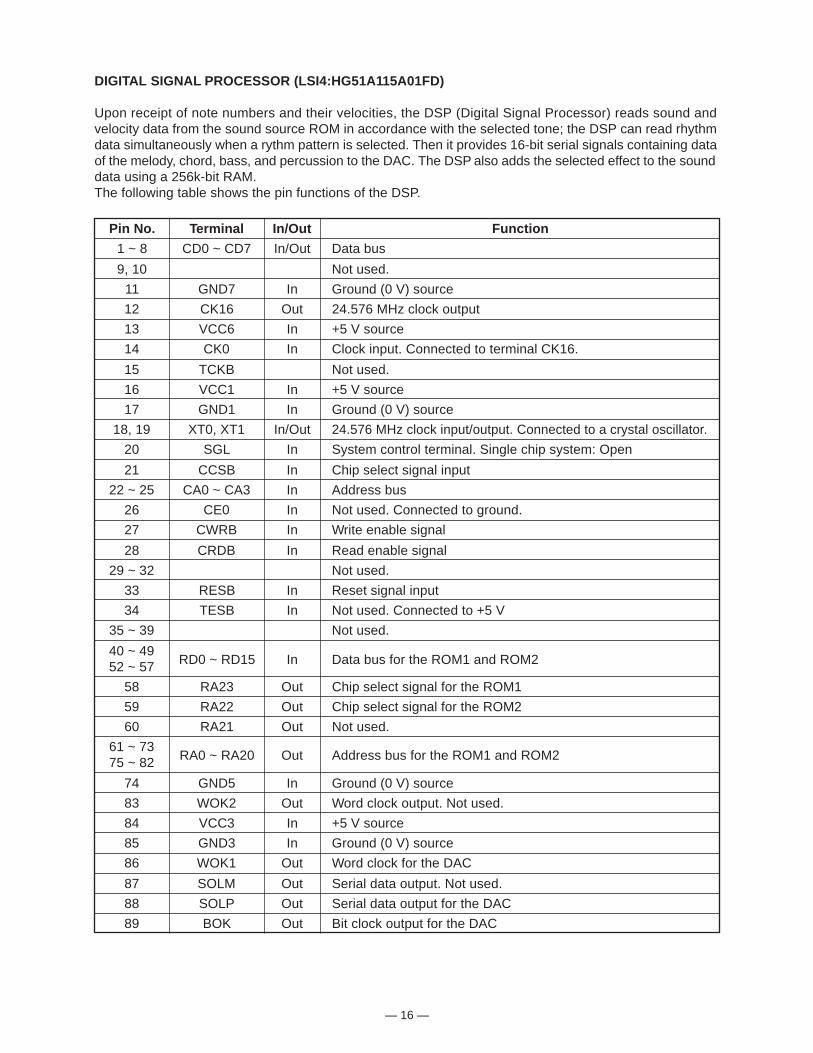
DIGITAL SIGNAL PROCESSOR (LSI4:HG51A115A01FD)
Upon receipt of note numbers and their velocities, the DSP (Digital Signal Processor) reads sound andvelocity data from the sound source ROM in accordance with the selected tone; the DSP can read rhythmdata simultaneously when a rythm pattern is selected. Then it provides 16-bit serial signals containing dataof the melody, chord, bass, and percussion to the DAC. The DSP also adds the selected effect to the sounddata using a 256k-bit RAM.The following table shows the pin functions of the DSP.
Pin No. Terminal In/Out Function
1 ~ 8 CD0 ~ CD7 In/Out Data bus
9, 10 Not used.
11 GND7 In Ground (0 V) source
12 CK16 Out 24.576 MHz clock output
13 VCC6 In +5 V source
14 CK0 In Clock input. Connected to terminal CK16.
15 TCKB Not used.
16 VCC1 In +5 V source
17 GND1 In Ground (0 V) source
18, 19 XT0, XT1 In/Out 24.576 MHz clock input/output. Connected to a crystal oscillator.
20 SGL In System control terminal. Single chip system: Open
21 CCSB In Chip select signal input
22 ~ 25 CA0 ~ CA3 In Address bus
26 CE0 In Not used. Connected to ground.
27 CWRB In Write enable signal
28 CRDB In Read enable signal
29 ~ 32 Not used.
33 RESB In Reset signal input
34 TESB In Not used. Connected to +5 V
35 ~ 39 Not used.
40 ~ 49RD0 ~ RD15 In Data bus for the ROM1 and ROM252 ~ 57
58 RA23 Out Chip select signal for the ROM1
59 RA22 Out Chip select signal for the ROM2
60 RA21 Out Not used.
61 ~ 73RA0 ~ RA20 Out Address bus for the ROM1 and ROM275 ~ 82
74 GND5 In Ground (0 V) source
83 WOK2 Out Word clock output. Not used.
84 VCC3 In +5 V source
85 GND3 In Ground (0 V) source
86 WOK1 Out Word clock for the DAC
87 SOLM Out Serial data output. Not used.
88 SOLP Out Serial data output for the DAC
89 BOK Out Bit clock output for the DAC
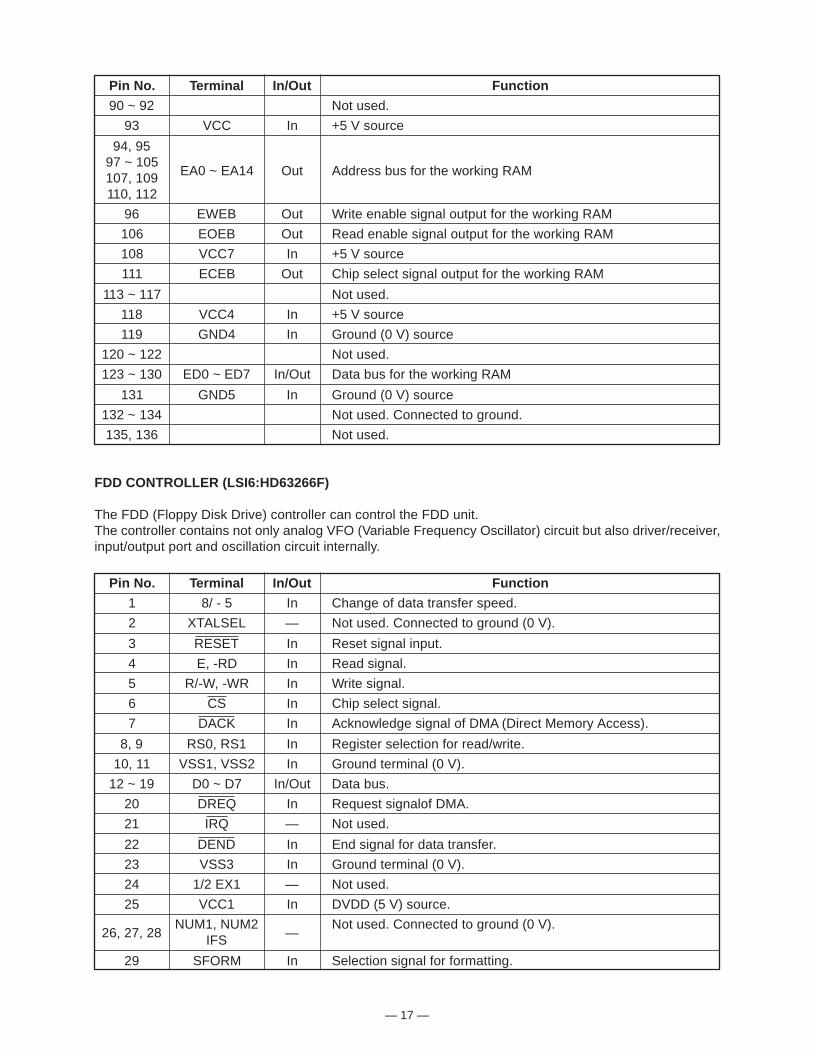
— 17 —
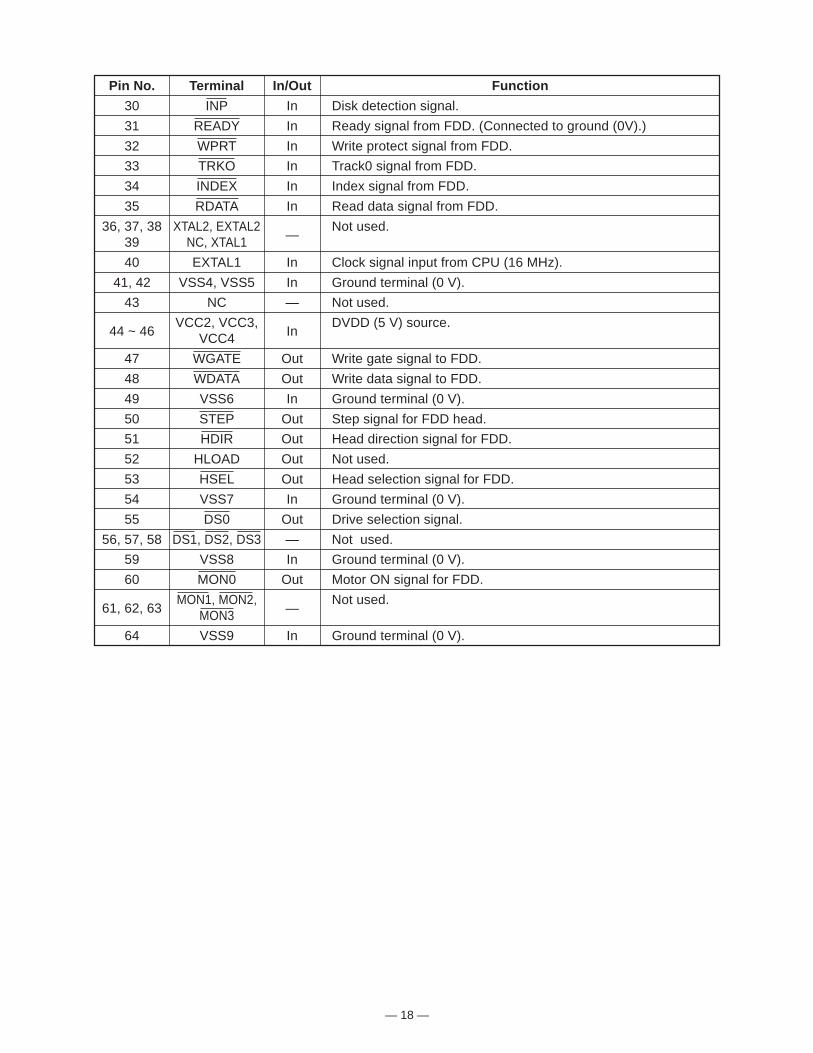
FDD CONTROLLER (LSI6:HD63266F)
The FDD (Floppy Disk Drive) controller can control the FDD unit.The controller contains not only analog VFO (Variable Frequency Oscillator) circuit but also driver/receiver,input/output port and oscillation circuit internally.
Pin No. Terminal In/Out Function
1 8/ - 5 In Change of data transfer speed.
2 XTALSEL — Not used. Connected to ground (0 V).
3 RESET In Reset signal input.
4 E, -RD In Read signal.
5 R/-W, -WR In Write signal.
6 CS In Chip select signal.
7 DACK In Acknowledge signal of DMA (Direct Memory Access).
8, 9 RS0, RS1 In Register selection for read/write.
10, 11 VSS1, VSS2 In Ground terminal (0 V).
12 ~ 19 D0 ~ D7 In/Out Data bus.
20 DREQ In Request signalof DMA.
21 IRQ — Not used.
22 DEND In End signal for data transfer.
23 VSS3 In Ground terminal (0 V).
24 1/2 EX1 — Not used.
25 VCC1 In DVDD (5 V) source.
26, 27, 28NUM1, NUM2
—Not used. Connected to ground (0 V).
IFS
29 SFORM In Selection signal for formatting.
Pin No. Terminal In/Out Function
90 ~ 92 Not used.
93 VCC In +5 V source
94, 9597 ~ 105
EA0 ~ EA14 Out Address bus for the working RAM107, 109110, 112
96 EWEB Out Write enable signal output for the working RAM
106 EOEB Out Read enable signal output for the working RAM
108 VCC7 In +5 V source
111 ECEB Out Chip select signal output for the working RAM
113 ~ 117 Not used.
118 VCC4 In +5 V source
119 GND4 In Ground (0 V) source
120 ~ 122 Not used.
123 ~ 130 ED0 ~ ED7 In/Out Data bus for the working RAM
131 GND5 In Ground (0 V) source
132 ~ 134 Not used. Connected to ground.
135, 136 Not used.
— 18 —
Pin No. Terminal In/Out Function
30 INP In Disk detection signal.
31 READY In Ready signal from FDD. (Connected to ground (0V).)
32 WPRT In Write protect signal from FDD.
33 TRKO In Track0 signal from FDD.
34 INDEX In Index signal from FDD.
35 RDATA In Read data signal from FDD.
36, 37, 38 XTAL2, EXTAL2—
Not used.39 NC, XTAL1
40 EXTAL1 In Clock signal input from CPU (16 MHz).
41, 42 VSS4, VSS5 In Ground terminal (0 V).
43 NC — Not used.
44 ~ 46VCC2, VCC3,
InDVDD (5 V) source.
VCC4
47 WGATE Out Write gate signal to FDD.
48 WDATA Out Write data signal to FDD.
49 VSS6 In Ground terminal (0 V).
50 STEP Out Step signal for FDD head.
51 HDIR Out Head direction signal for FDD.
52 HLOAD Out Not used.
53 HSEL Out Head selection signal for FDD.
54 VSS7 In Ground terminal (0 V).
55 DS0 Out Drive selection signal.
56, 57, 58 DS1, DS2, DS3 — Not used.
59 VSS8 In Ground terminal (0 V).
60 MON0 Out Motor ON signal for FDD.
61, 62, 63MON1, MON2,
—Not used.
MON3
64 VSS9 In Ground terminal (0 V).

— 19 —
KEY TOUCH LSI (LSI10: TC190C020AF-001)
By counting the time between first-key input signal FI and second-key SI from the keyboard unit, the keytouch LSI detects key velocity of 256-step. Then the LSI sends the CPU the note number and its velocitydata.
Pin No. Terminal In/Out Function
1 WRB In Write signal from CPU.
2 ~ 11, 13,D0 ~ D15 In/Out Data bus.14, 16 ~ 19
12 VSS In Ground terminal (0 V).
15 VDD In VDD (5 V) source.
20 ~ 23 CA0 ~ CA3 In Address bus.
24 VSS In Ground terminal (0 V).
25 ~ 32, FI0 ~ FI4,In Key input signal.34, 35 SI0 ~ SI4
33 VDD In VDD (5 V) source.
36 ~ 38,KC0 ~ KC7 Out Key scan signal.40 ~ 44
39 VSS In Ground terminal (0 V).
45 VDD In VDD (5 V) source.
46 ~ 51FI5 ~ FI7
In Key input signal.SI5 ~ SI7
52 VSS In Ground terminal (0 V).
53 ~ 58,FI8 ~ FI10
60 ~ 62SI8 ~ SI10 In Key input signal (Not used).KI0 ~ KI2
59 VDD In VDD (5 V) source.
63, 64 MODE0, MODE1 — Not used.
65 VSS In Ground terminal (0 V).
66 KCKI In Clock signal for key common/input.
67 ~ 72,— Not used.74 ~ 77
73 VDD In VDD (5 V) source.
78 RESB In Reset signal from CPU.
79 CSB In Chip selection signal.
80 RDB In Read signal from CPU.
— 20 —
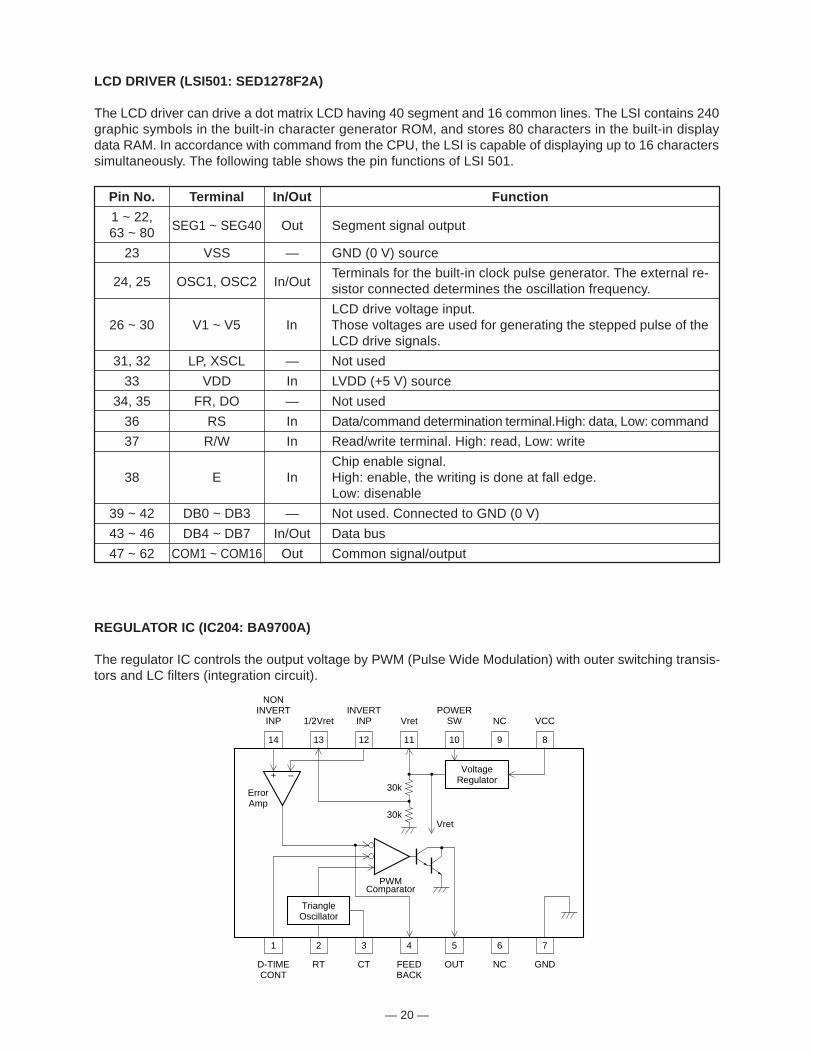
LCD DRIVER (LSI501: SED1278F2A)
The LCD driver can drive a dot matrix LCD having 40 segment and 16 common lines. The LSI contains 240graphic symbols in the built-in character generator ROM, and stores 80 characters in the built-in displaydata RAM. In accordance with command from the CPU, the LSI is capable of displaying up to 16 characterssimultaneously. The following table shows the pin functions of LSI 501.
Pin No. Terminal In/Out Function
1 ~ 22,SEG1 ~ SEG40 Out Segment signal output63 ~ 80
23 VSS — GND (0 V) source
24, 25 OSC1, OSC2 In/OutTerminals for the built-in clock pulse generator. The external re-sistor connected determines the oscillation frequency.
LCD drive voltage input.26 ~ 30 V1 ~ V5 In Those voltages are used for generating the stepped pulse of the
LCD drive signals.
31, 32 LP, XSCL — Not used
33 VDD In LVDD (+5 V) source
34, 35 FR, DO — Not used
36 RS In Data/command determination terminal.High: data, Low: command
37 R/W In Read/write terminal. High: read, Low: write
Chip enable signal.38 E In High: enable, the writing is done at fall edge.
Low: disenable
39 ~ 42 DB0 ~ DB3 — Not used. Connected to GND (0 V)
43 ~ 46 DB4 ~ DB7 In/Out Data bus
47 ~ 62 COM1 ~ COM16 Out Common signal/output
REGULATOR IC (IC204: BA9700A)
The regulator IC controls the output voltage by PWM (Pulse Wide Modulation) with outer switching transis-tors and LC filters (integration circuit).
14
1
13
2
12
3
11
4
10
5
9
6
8
NONINVERT
INP 1/2VretINVERT
INP VretPOWER
SW NC VCC
7
D-TIMECONT
ErrorAmp
Vret
30k
RT CT FEEDBACK
OUT NC GND
TriangleOscillator
PWMComparator
VoltageRegulator+ –
30k

— 21 —
DAC (LSI1: UPD6376GS)
UPD6376GS is a two-channel 16-bit Digital to Analog Convertor consisting of resistor string, output ampli-fier and zero offset circuit.The DAC receives 16-bit serial data output from the DSP. The data contains digital sound data of themelody, chord, bass, and percussion for the right and left channels. The DAC converts the data into analogwaveforms by each channel and output them separately.
POWER AMPLIFIER (IC301: LA4620)
The power amplifier is a two-channel amplifier with standby switch.
6
16 2 10 11 13
12
Pre-driveAmp.
InputAmp.
PowerAmp.
+
–
Pre-driveAmp.
InputAmp.
PowerAmp.
+
–
9
7
3
5
+
–InputAmp.
Pre-driveAmp.
PowerAmp.
+
–InputAmp.
Pre-driveAmp.
PowerAmp.
4
19
20
21
22
23
1
18
17
15
148
RL ShortProtector
RL ShortProtector
TerminalProtectionCircuit
Pop NoisePreventionCircuit
RippleFilter
IN11+
IN11–
IN12–
IN21+
IN21–
IN22–
NC DC MUTE ADJ
Boot11
OUT11
PoGND1
OUT12
Boot12
VCC1
Boot21
OUT21
PoGND2
OUT22
Boot22
VCC2
PriGND
Pin No. Terminal In/Out Function
1 SEL In Mode selection terminal. Connected to ground.
2 D.GND In Ground (0 V) source for internal digital circuit
3 NC Not used.
4 DVDD In +5 V source for internal digital circuit
5 A.GND In Ground (0 V) source for internal analog circuit
6 R.OUT Out Sound waveform output
7 A.VDD In +5 V source for internal analog circuit
8 A.VDD In +5 V source for internal analog circuit
9 R.REF In Reference voltage terminal. Connected to a capacitor.
10 L.REF In Reference voltage terminal. Connected to a capacitor.
11 L.OUT Out Left channel sound waveform output
12 A.GND In Ground (0 V) source for internal analog circuit
13 LRCK In Word clock (L/R separation signal) input.
14 LRSEL In Not used. Connected to ground.
15 SI In Sound data input
16 CLK In Bit clock input

— 22 —
DIAGNOSTIC PROGRAM
To enter diagnostic mode
1. While pressing down “0” and “ACCOMP CHORD MODE” buttons, press “POWER” button for turningon.
2. The instrument is set in diagnostic mode and display indicates “Test”.
Button check
1. Press “0” button.
2. Display indicates “Console”.
3. Press buttons in the following order
Display shows the button number to be pressed. When the pressed button functions properly, the instru-ment emits a verification signal and indicates next button number.If the button malfunctions, an error alarm sounds and display indicates “Cons ER”.When wrong button is pressed, the alarm sound is also emitted. In that case, re-press the correct button.
16 CHANNEL MIXER
TEMPO REGISTRATION
BANK A B C D E STORE
EXTERNAL CH1
UPPER1INTERNALMIXER SELECT TONE EXPANDER ACCOMP SEQUENCER TRACK
DSP
CONTRAST
FREESESSION
ONE TOUCHPRESET
TONE
RHYTHM
LAYER/AUTO HARMONIZE
SPLIT
CH2
UPPER2
CH3
LOWER1
CH4
LOWER2
CH5
ACC VOL.
CH6
CHORD1
CH7
CHORD2
CH8
CHORD3
CH9
BASS
CH10
RHYTHN
CH11
TR1
CH12
TR2
CH13
TR3
CH14
TR4
CH15
TR5
CH16
0
1
4
7
2
5
8
3
6
9
TR6
CURSOR
SYNTH
DELETE
/NO /YESDISK
ENTER
TOUCHRESPONSE
TRANSPOSE/TUNE/MIDI
DEMO
POWER MODE
SEQUENCER
FULL RANGECHORD
FINGERED
SONG
INTRONORMAL/
FILL-INVARIATION/
FILL-INSYNCHRO/
ENDINGSTART/STOP
PATTERN
CASIO CHORD
VOLUME
MAX
MIN
RECORD
4
)
1 2 3
5 6 7 8 9 0 A B C D E F G s
p ro
q
xb c j k
d i l
e h m
f g n
a
_
]
H
I
J
K
L M N O P Q R S T U V W X Y Z [ \
w
v
u
t
) MODE button1 RECORD button2 SONG button3 PATTERN button4 INTRO button5 NORMAL/FILL-IN
button6 VARIATION/FILL-IN
button7 SYNCHRO/ENDING
button8 START/STOP button9 TEMPO button down0 TEMPO button upA BANK buttonB REGISTRATION
buttons AC REGISTRATION
buttons BD REGISTRATION
buttons C
E REGISTRATIONbuttons D
F REGISTRATIONbuttons E
G STORE buttonH DSP (digital effect)
buttonI CONTRAST buttonJ FREE SESSION
buttonK ONE TOUCH
PRESET buttonL MIXER SELECT
buttonM CHANNEL button
CH1N CH2O CH3P CH4Q CH5
R CH6S CH7T CH8U CH9V CH10W CH11X CH12Y CH13Z CH14[ CH15\ CH16] SPLIT button_ LAYER/AUTO
HARMONIZE buttona RHYTHM buttonb TONE buttonc Number key 7d Number key 4e Number key 1f Number key 0
g Number key –h Number key 2i Number key 5j Number key 8k Number key 9l Number key 6m Number key 3n Number key +o Cursor key Upp Cursor key Leftq Cursor key Downr Cursor key Rights ENTER buttont DISK buttonu TOUCH RESPONSE
buttonv TRANSPOSE/
TUNING/MIDI buttonw SYNTH buttonx DEMO button
— 23 —
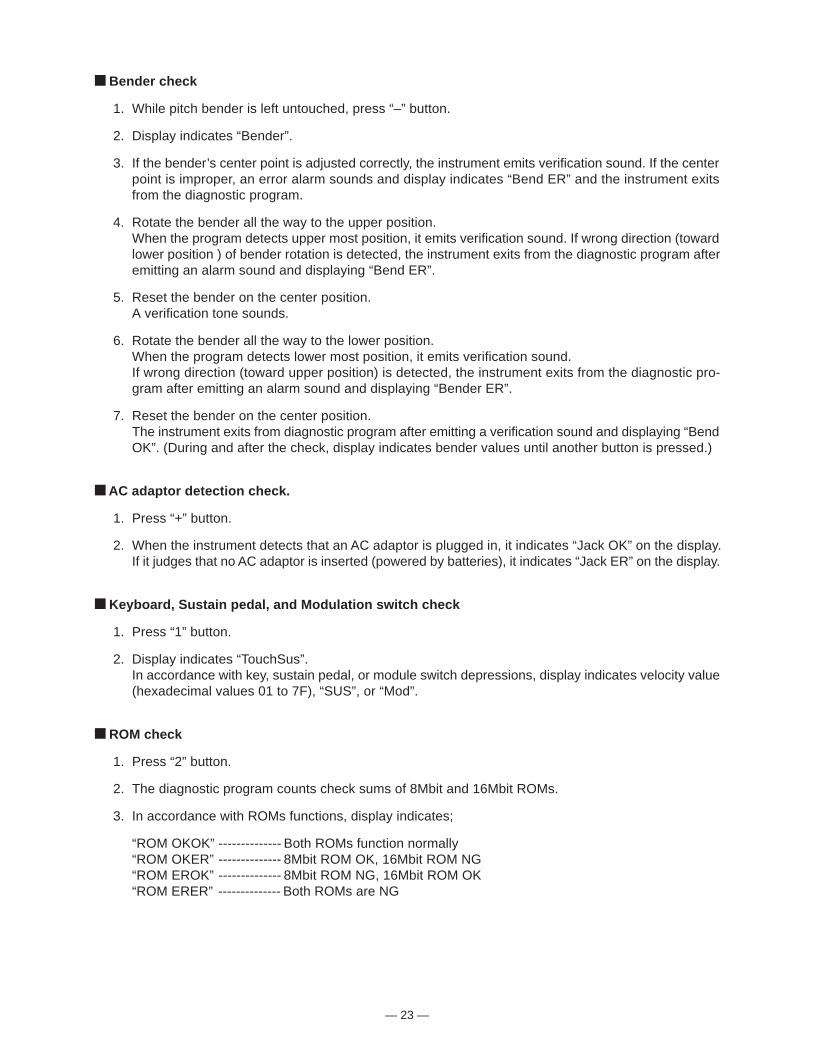
Bender check
1. While pitch bender is left untouched, press “–” button.
2. Display indicates “Bender”.
3. If the bender’s center point is adjusted correctly, the instrument emits verification sound. If the centerpoint is improper, an error alarm sounds and display indicates “Bend ER” and the instrument exitsfrom the diagnostic program.
4. Rotate the bender all the way to the upper position.When the program detects upper most position, it emits verification sound. If wrong direction (towardlower position ) of bender rotation is detected, the instrument exits from the diagnostic program afteremitting an alarm sound and displaying “Bend ER”.
5. Reset the bender on the center position.A verification tone sounds.
6. Rotate the bender all the way to the lower position.When the program detects lower most position, it emits verification sound.If wrong direction (toward upper position) is detected, the instrument exits from the diagnostic pro-gram after emitting an alarm sound and displaying “Bender ER”.
7. Reset the bender on the center position.The instrument exits from diagnostic program after emitting a verification sound and displaying “BendOK”. (During and after the check, display indicates bender values until another button is pressed.)
AC adaptor detection check.
1. Press “+” button.
2. When the instrument detects that an AC adaptor is plugged in, it indicates “Jack OK” on the display.If it judges that no AC adaptor is inserted (powered by batteries), it indicates “Jack ER” on the display.
Keyboard, Sustain pedal, and Modulation switch check
1. Press “1” button.
2. Display indicates “TouchSus”.In accordance with key, sustain pedal, or module switch depressions, display indicates velocity value(hexadecimal values 01 to 7F), “SUS”, or “Mod”.
ROM check
1. Press “2” button.
2. The diagnostic program counts check sums of 8Mbit and 16Mbit ROMs.
3. In accordance with ROMs functions, display indicates;
“ROM OKOK” -------------- Both ROMs function normally“ROM OKER” -------------- 8Mbit ROM OK, 16Mbit ROM NG“ROM EROK” -------------- 8Mbit ROM NG, 16Mbit ROM OK“ROM ERER” -------------- Both ROMs are NG
— 24 —
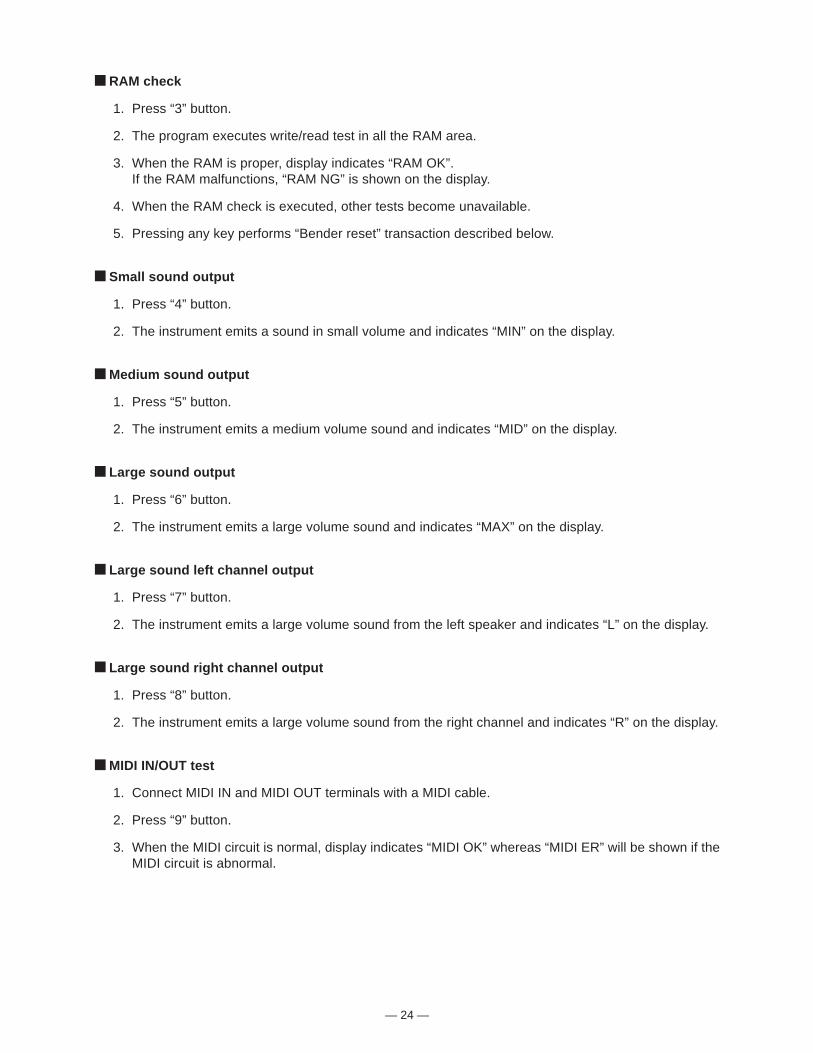
RAM check
1. Press “3” button.
2. The program executes write/read test in all the RAM area.
3. When the RAM is proper, display indicates “RAM OK”.If the RAM malfunctions, “RAM NG” is shown on the display.
4. When the RAM check is executed, other tests become unavailable.
5. Pressing any key performs “Bender reset” transaction described below.
Small sound output
1. Press “4” button.
2. The instrument emits a sound in small volume and indicates “MIN” on the display.
Medium sound output
1. Press “5” button.
2. The instrument emits a medium volume sound and indicates “MID” on the display.
Large sound output
1. Press “6” button.
2. The instrument emits a large volume sound and indicates “MAX” on the display.
Large sound left channel output
1. Press “7” button.
2. The instrument emits a large volume sound from the left speaker and indicates “L” on the display.
Large sound right channel output
1. Press “8” button.
2. The instrument emits a large volume sound from the right channel and indicates “R” on the display.
MIDI IN/OUT test
1. Connect MIDI IN and MIDI OUT terminals with a MIDI cable.
2. Press “9” button.
3. When the MIDI circuit is normal, display indicates “MIDI OK” whereas “MIDI ER” will be shown if theMIDI circuit is abnormal.
— 25 —
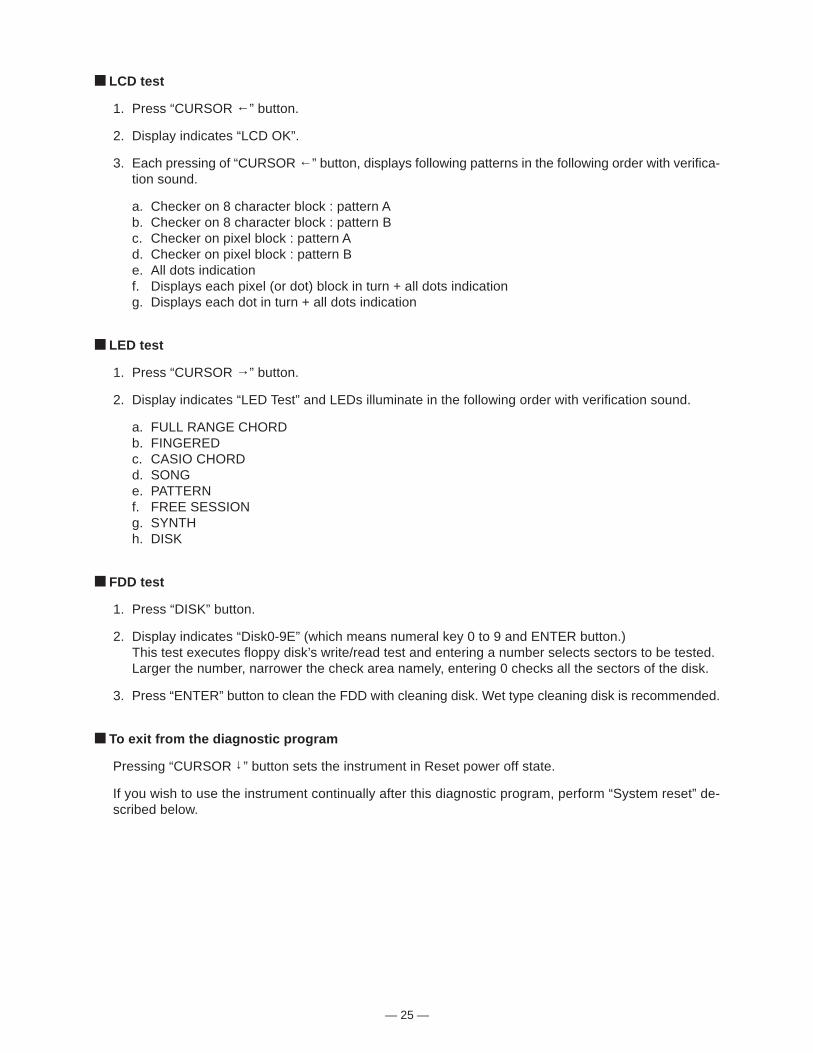
LCD test
1. Press “CURSOR ←” button.
2. Display indicates “LCD OK”.
3. Each pressing of “CURSOR ←” button, displays following patterns in the following order with verifica-tion sound.
a. Checker on 8 character block : pattern Ab. Checker on 8 character block : pattern Bc. Checker on pixel block : pattern Ad. Checker on pixel block : pattern Be. All dots indicationf. Displays each pixel (or dot) block in turn + all dots indicationg. Displays each dot in turn + all dots indication
LED test
1. Press “CURSOR →” button.
2. Display indicates “LED Test” and LEDs illuminate in the following order with verification sound.
a. FULL RANGE CHORDb. FINGEREDc. CASIO CHORDd. SONGe. PATTERNf. FREE SESSIONg. SYNTHh. DISK
FDD test
1. Press “DISK” button.
2. Display indicates “Disk0-9E” (which means numeral key 0 to 9 and ENTER button.)This test executes floppy disk’s write/read test and entering a number selects sectors to be tested.Larger the number, narrower the check area namely, entering 0 checks all the sectors of the disk.
3. Press “ENTER” button to clean the FDD with cleaning disk. Wet type cleaning disk is recommended.
To exit from the diagnostic program
Pressing “CURSOR ↓” button sets the instrument in Reset power off state.
If you wish to use the instrument continually after this diagnostic program, perform “System reset” de-scribed below.

— 26 —
<Other utilities>
Bender reset
Sets bender’s center point in initial value.
1. While pressing down “ENTER” and “ACCOMP CHORD MODE” buttons, turn the power on.
2. Display shows “BndReset” indicating that pitch bender’s center point is initialized.
3. Perform the “System reset” described below.
System reset
1. While pressing down “ENTER” button, turn power on.
2. Display indicates “Reset?”.
3. Pressing “+” button initializes the instrument.Pressing “–” button invalidates system reset.
4. The instrument turns on automatically.
Touch off max
1. While pressing down “RHYTHM” and “ACCOMP CHORD MODE” buttons, turn the power on.
2. Display indicates “TouchMax”.
3. The instrument is set in touch off max mode.In this state, sound volume in touch response off mode becomes maximum.
— 27 —
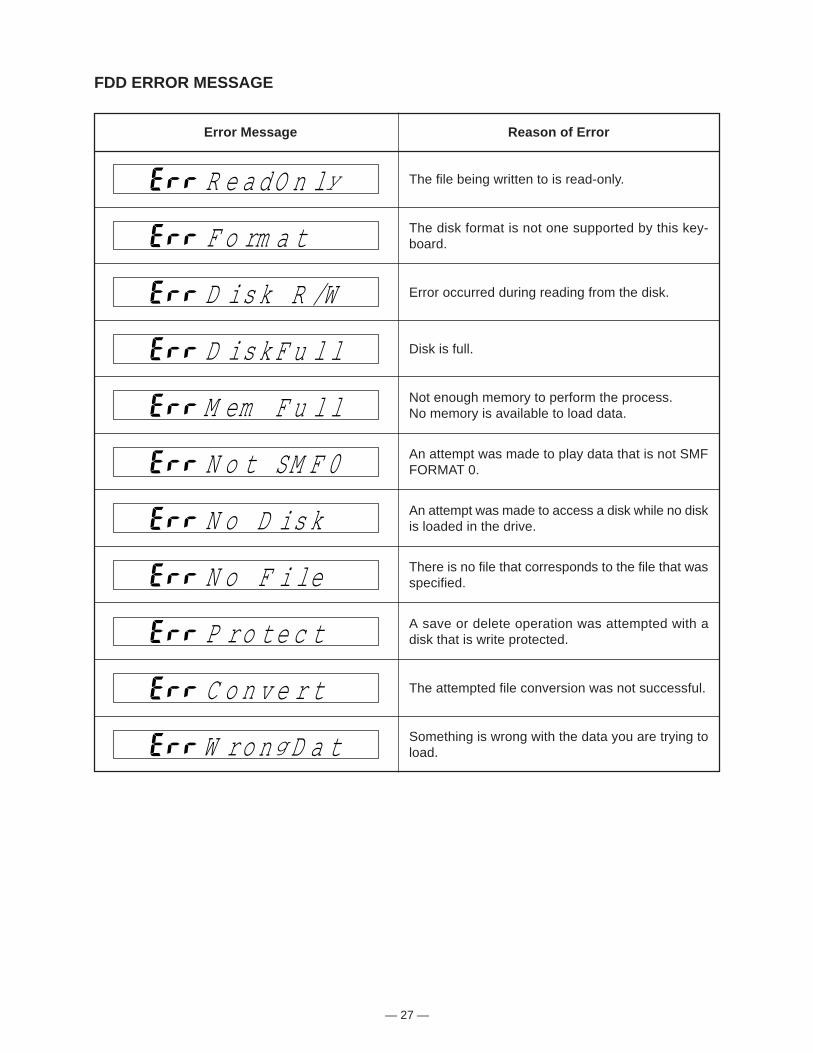
FDD ERROR MESSAGE
Error Message Reason of Error
The file being written to is read-only.
The disk format is not one supported by this key-board.
Error occurred during reading from the disk.
Disk is full.
Not enough memory to perform the process.No memory is available to load data.
An attempt was made to play data that is not SMFFORMAT 0.
An attempt was made to access a disk while no diskis loaded in the drive.
There is no file that corresponds to the file that wasspecified.
A save or delete operation was attempted with adisk that is write protected.
The attempted file conversion was not successful.
Something is wrong with the data you are trying toload.
R e adO n ly
F o rm a t
D is k R /W
D is k F u l l
M em F u l l
N o tS SM F 0
N o D is k
N o F i le
P ro te c t
C o n v e r t
W ro n gD a t
— 28 —
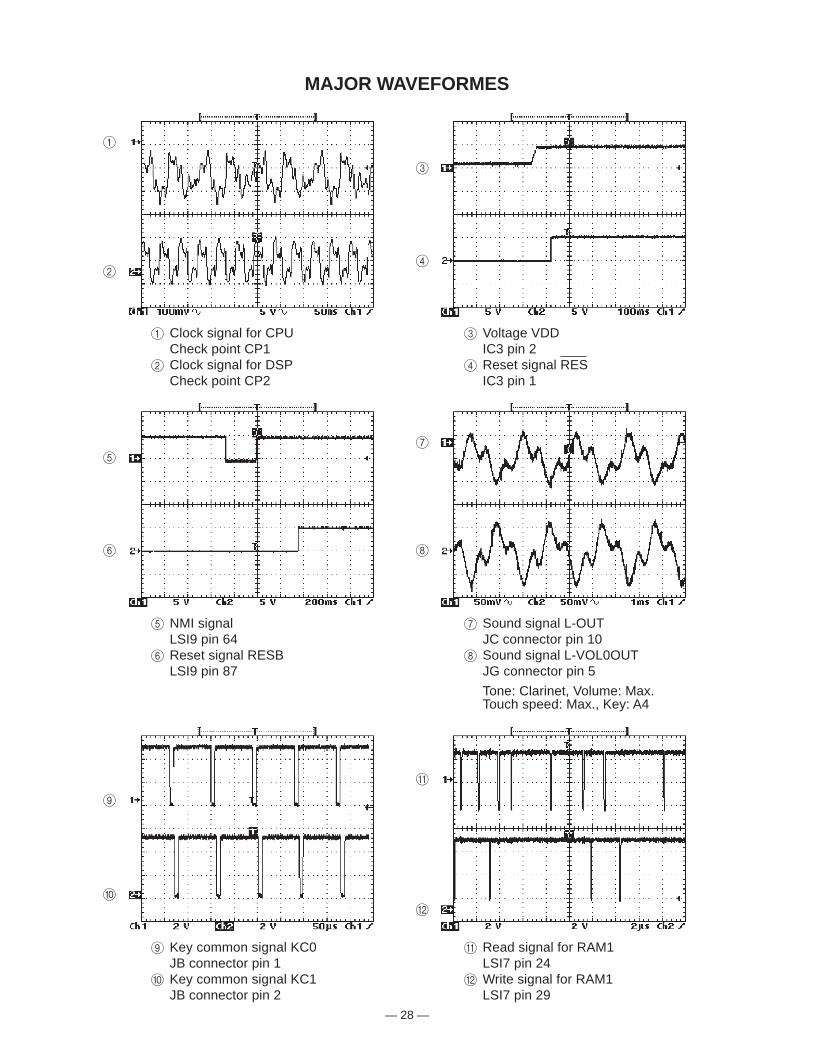
MAJOR WAVEFORMES
1 Clock signal for CPUCheck point CP1
2 Clock signal for DSPCheck point CP2
3 Voltage VDDIC3 pin 2
4 Reset signal RESIC3 pin 1
1
2
3
4
5 NMI signalLSI9 pin 64
6 Reset signal RESBLSI9 pin 87
7 Sound signal L-OUTJC connector pin 10
8 Sound signal L-VOL0OUTJG connector pin 5
Tone: Clarinet, Volume: Max.Touch speed: Max., Key: A4
5
6
7
8
9 Key common signal KC0JB connector pin 1
0 Key common signal KC1JB connector pin 2
A Read signal for RAM1LSI7 pin 24
B Write signal for RAM1LSI7 pin 29
9
0
A
B
— 29 —
6 5
29 10
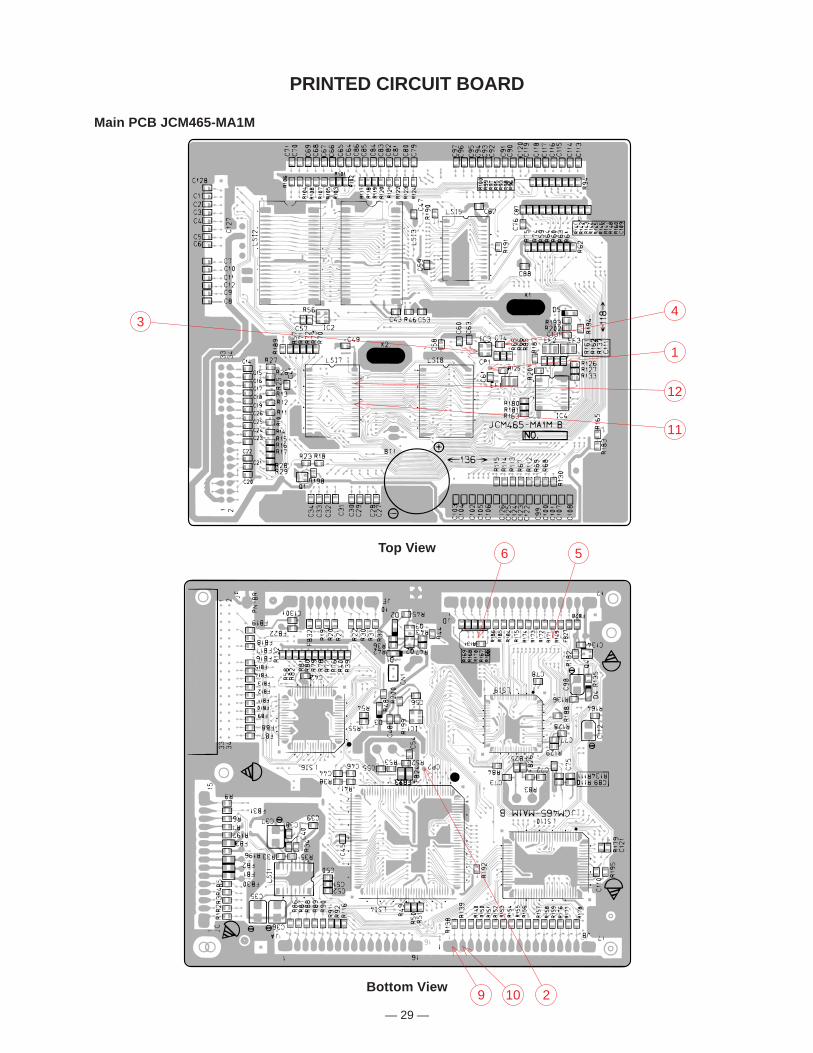
PRINTED CIRCUIT BOARD
Main PCB JCM465-MA1M
Top View
Bottom View
1
12
11
43

— 30 —
Sub PCB JCM465-MA2M
Top View
7
8

— 3
1 —
EXPLODED VIEW
1
43
424644
26
25
4548
48
47
47
3
4
7
24 23
32
29
38
37
36
35
30
31
34
4039
41
40 33
22
11
12
14
13
15
16
17
19
20
27
21
22
28
23
18
8
9
10
5
6
2
R-1
R-3
BT1
R-4
R-2

— 32 —
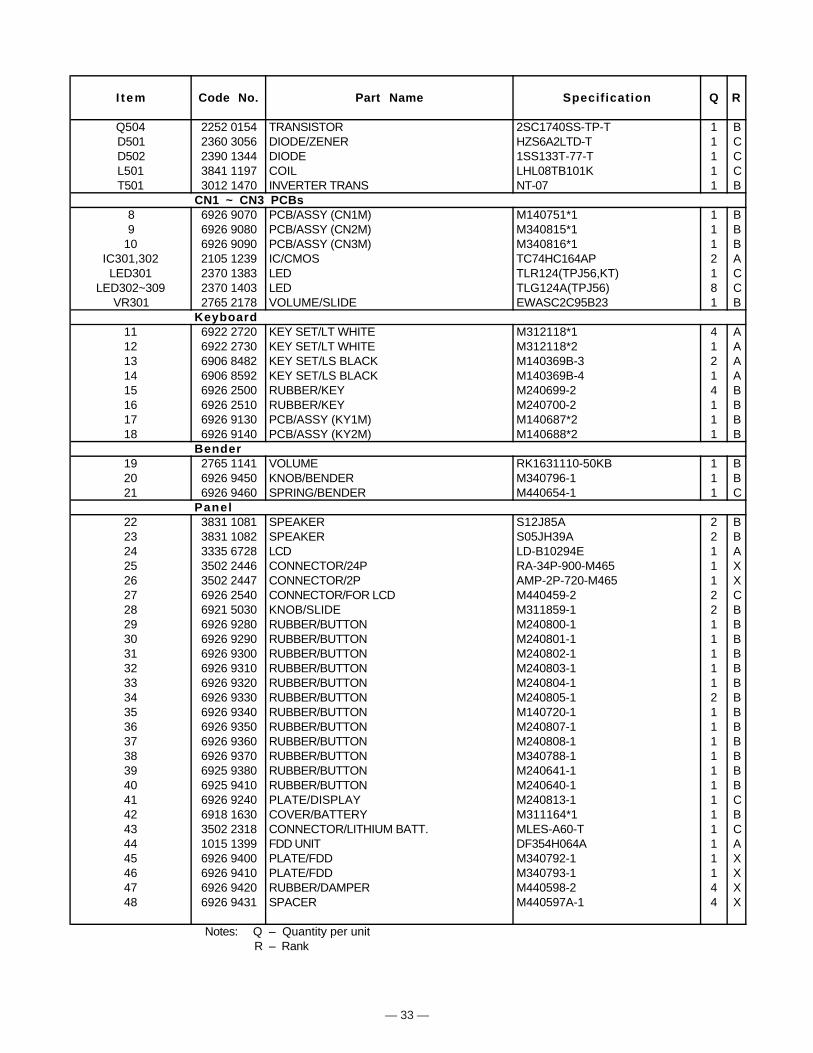
I t em Code No. Parts Name Specification Q R
MA1M PCB1 6926 8930 PCB/ASSY (MA1M) M240837*1 1 A
LSI1 2114 4221 LSI UPD6376GS-E1 1 ALSI2 2012 6135 LSI MX23C8100MC-12CA99 1 A
(LSI2) (2012 6062) (LSI) (MSM27C802CZ-465) (1) (A)LSI3 2012 6064 LSI MX23C3210MC-12CA89 1 ALSI4 2011 7434 LSI HG51B155FD 1 ALSI5 2012 5572 LSI TC55257DFL-70L(EL) 1 ALSI6 2010 9990 LSI HD63266F 1 A
LSI7/LSI8 2012 5947 LSI TC551001BFL-70L(EL) 2 ALSI9 2012 6132 LSI HD6433042SB51F 1 A
(LSI9) (2012 6060) (LSI) (HD6473042F16-465) (1) (A)LSI10 2012 5987 LSI TC190C020AF-001 1 AIC1 2105 1561 IC/CMOS TC7S04F(TE85R) 1 BIC2 2105 6355 IC/CMOS TC7S00F(TE85R) 1 BIC3 2012 1883 IC/MOS RN5VD40AA-TR 1 BIC4 2105 4935 IC/CMOS TC74VHC08F(TP1) 1 B
Q1,Q3,Q4 2252 1169 TRANSISTOR/CHIP 2SC4081-T106S 1 BQ2 2250 1169 TRANSISTOR/CHIP 2SA1576A-T106S 1 B
D1,D3,D4 2390 1820 DIODE/CHIP 1SS355TE-17 3 CD2 2360 3057 DIODE/ZENER/CHIP UDZTE-173.3B 1 CX1 2590 2748 OSCILLATOR/CERAMIC CSA16.00-MXZ243 1 CX2 2590 2107 OSCILLATOR/CRYSTAL HC-49S24A 1 C
BT1 3815 0707 BATTERY/LITHIUM CR2032-1HM 1 AMA2M PCB
2 6926 8990 PCB/ASSY (MA2M) M140750*1 1 BIC201 2114 1883 IC/MONOLITHIC LA4620 1 BIC204 2113 0084 IC/MONOLITHIC BA9700A 1 B
IC202,205 2114 1799 IC/MONOLITHIC M5218APR 2 BIC203 2114 1421 IC/PHOTO COUPLER PC900V 1 BQ205 2251 0672 TRANSISTOR 2SB1548-P.CS 1 B
Q204,206,209 2252 0154 TRANSISTOR 2SC1740SS-TP-T 3 BQ208 2252 1253 TRANSISTOR 2SB1566F 1 B
Q203,210 2250 0133 TRANSISTOR 2SA933SS-TP-T 2 BD201,204~207, 2390 1344 DIODE 1SS133T-77-T 6 C
210D208 2360 1085 DIODE/ZENER HZS6B1LTD-T 1 C
D202,203,209 2390 1463 DIODE/SHOTTKY SB20-03B 3 CJ201 3501 5012 JACK/DC HEC2305-01-920 1 CJ202 3612 0665 JACK YKB21-5006 1 CJ203 3612 0789 JACK YKB21-5010 1 CJ204 3501 4816 JACK/DIN YKF51-5051 1 C
L201,203,204, 3841 2154 COIL/COMMON MODE SH-432 4 C208
L202,205 3841 2175 COIL/COMMON MODE SH-S132 2 CL206 3841 2177 COIL OH-022Z 1 C
BL ass'y3 6926 9030 BL/ASSY M240682*2 1 A4 6926 9050 PCB/ASSY (LD1M) M240838*1 1 A5 3122 3558 CFL HMBV26BG1W63N/AZG 1 A6 5861 3522 HOLDER/CFL HRB-0256 2 C7 6925 9490 PLATE/BL M340602-1 1 C
LSI501 2012 6018 LSI SED1278F2A 1 AQ501/502 2253 0710 TRANSISTOR 2SD965-R(TA) 2 B
Q503 2250 0133 TRANSISTOR 2SA933SS-TP-T 1 B Notes: Q – Quantity per unit
R – Rank
PARTS LIST
— 33 —
I t em Code No. Part Name Specification Q R
Q504 2252 0154 TRANSISTOR 2SC1740SS-TP-T 1 BD501 2360 3056 DIODE/ZENER HZS6A2LTD-T 1 CD502 2390 1344 DIODE 1SS133T-77-T 1 CL501 3841 1197 COIL LHL08TB101K 1 CT501 3012 1470 INVERTER TRANS NT-07 1 B
CN1 ~ CN3 PCBs8 6926 9070 PCB/ASSY (CN1M) M140751*1 1 B9 6926 9080 PCB/ASSY (CN2M) M340815*1 1 B
10 6926 9090 PCB/ASSY (CN3M) M340816*1 1 BIC301,302 2105 1239 IC/CMOS TC74HC164AP 2 ALED301 2370 1383 LED TLR124(TPJ56,KT) 1 C
LED302~309 2370 1403 LED TLG124A(TPJ56) 8 CVR301 2765 2178 VOLUME/SLIDE EWASC2C95B23 1 B
Keyboard11 6922 2720 KEY SET/LT WHITE M312118*1 4 A12 6922 2730 KEY SET/LT WHITE M312118*2 1 A13 6906 8482 KEY SET/LS BLACK M140369B-3 2 A14 6906 8592 KEY SET/LS BLACK M140369B-4 1 A15 6926 2500 RUBBER/KEY M240699-2 4 B16 6926 2510 RUBBER/KEY M240700-2 1 B17 6926 9130 PCB/ASSY (KY1M) M140687*2 1 B18 6926 9140 PCB/ASSY (KY2M) M140688*2 1 B
Bender19 2765 1141 VOLUME RK1631110-50KB 1 B20 6926 9450 KNOB/BENDER M340796-1 1 B21 6926 9460 SPRING/BENDER M440654-1 1 C
Panel22 3831 1081 SPEAKER S12J85A 2 B23 3831 1082 SPEAKER S05JH39A 2 B24 3335 6728 LCD LD-B10294E 1 A25 3502 2446 CONNECTOR/24P RA-34P-900-M465 1 X26 3502 2447 CONNECTOR/2P AMP-2P-720-M465 1 X27 6926 2540 CONNECTOR/FOR LCD M440459-2 2 C28 6921 5030 KNOB/SLIDE M311859-1 2 B29 6926 9280 RUBBER/BUTTON M240800-1 1 B30 6926 9290 RUBBER/BUTTON M240801-1 1 B31 6926 9300 RUBBER/BUTTON M240802-1 1 B32 6926 9310 RUBBER/BUTTON M240803-1 1 B33 6926 9320 RUBBER/BUTTON M240804-1 1 B34 6926 9330 RUBBER/BUTTON M240805-1 2 B35 6926 9340 RUBBER/BUTTON M140720-1 1 B36 6926 9350 RUBBER/BUTTON M240807-1 1 B37 6926 9360 RUBBER/BUTTON M240808-1 1 B38 6926 9370 RUBBER/BUTTON M340788-1 1 B39 6925 9380 RUBBER/BUTTON M240641-1 1 B40 6925 9410 RUBBER/BUTTON M240640-1 1 B41 6926 9240 PLATE/DISPLAY M240813-1 1 C42 6918 1630 COVER/BATTERY M311164*1 1 B43 3502 2318 CONNECTOR/LITHIUM BATT. MLES-A60-T 1 C44 1015 1399 FDD UNIT DF354H064A 1 A45 6926 9400 PLATE/FDD M340792-1 1 X46 6926 9410 PLATE/FDD M340793-1 1 X47 6926 9420 RUBBER/DAMPER M440598-2 4 X48 6926 9431 SPACER M440597A-1 4 X
Notes: Q – Quantity per unitR – Rank

— 34 —
I t em Code No. Part Name Specification Q R
Accessory6926 9540 STAND/MUSIC M140744-1 1 C6926 9210 DISK/FLOPPY 811FD-PRG 1 X6926 9220 DISK/FLOPPY (Others) 811FD-SMP-1 1 X6926 9230 DISK/FLOPPY (USA,CANADA only) 811FD-SMP-2 1 X
Notes: Q – Quantity per unitR – Rank

— 35 —
SCHEMATIC DIAGRAMSMainPCB JCM465-MA1M
DSP
ROM1
RAM1
D/A Converter
To FDD Unit
FDD Controller
Backup Power
ROM2
RAM2
Reset IC
CPU
Key Controller
WorkingRAM
12
11
2
3
5
109
6
4
1
— 36 —
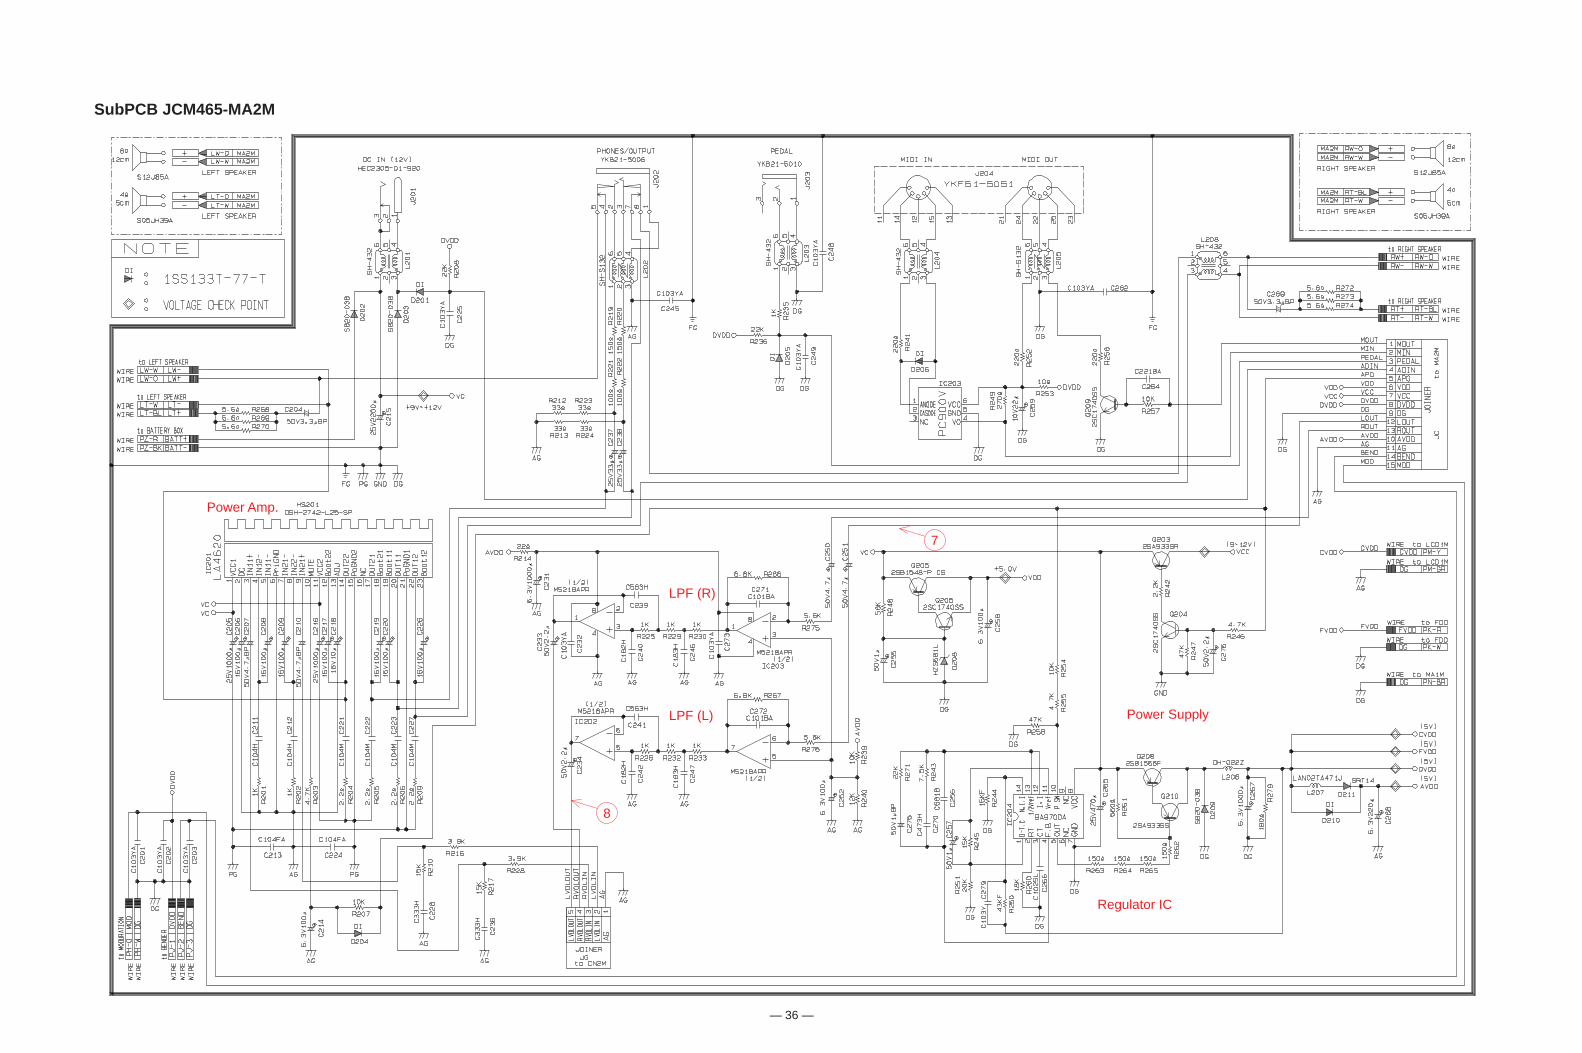
SubPCB JCM465-MA2M
Power Amp.
LPF (R)
Power Supply
Regulator IC
LPF (L)
7
8

— 37 —
S-RegisterS-Register
Console PCBs JCM465-CN1M/CN2M/CN3M

— 38 —
LCD Driver
CA
UT
ION
Hig
h V
olta
ge
VoltageRegulator
Bac
k Li
ght C
ircui
t
LCD Driver PCB JCM465-LCD1M

— 39 —
Keyboard PCBs JCM618T-KY1M/KY2M

CASIO TECHNO CO.,LTD.Overseas Service Division
8-11-10, Nishi-ShinjukuShinjuku-ku, Tokyo 160-0023, Japan