crossfit journal - issue 55
DESCRIPTION
CrossFit Journal - Issue 55TRANSCRIPT

ISSUE FIFTY-FIVE
March 2007
Putting Out FiresLon Kilgore
PerceptionThe Commander of Our MovementsEva Twardokens
The Suitcase Deadlift, Dumbbell StyleMichael Rutherford
The Business of Guerilla FitnessDoug Chapman
Performance and HealthTony Leyland
UC Riverside Women’s BasketballOff-Season Strength & ConditioningJosh Everett
Using Worldwide Erg Data to Fine-Tune Your Training Judy Geer
Popular Biomechanics Mark Rippetoe
Pulling Positions for the SnatchMike Burgener, withTony Budding
The Left HookBecca Borawski
Kettlebell CleanJeff Martone
The GrinderCrossFit FRAGO #8, “SHANE”continued page ... 2
Lon Kilgore
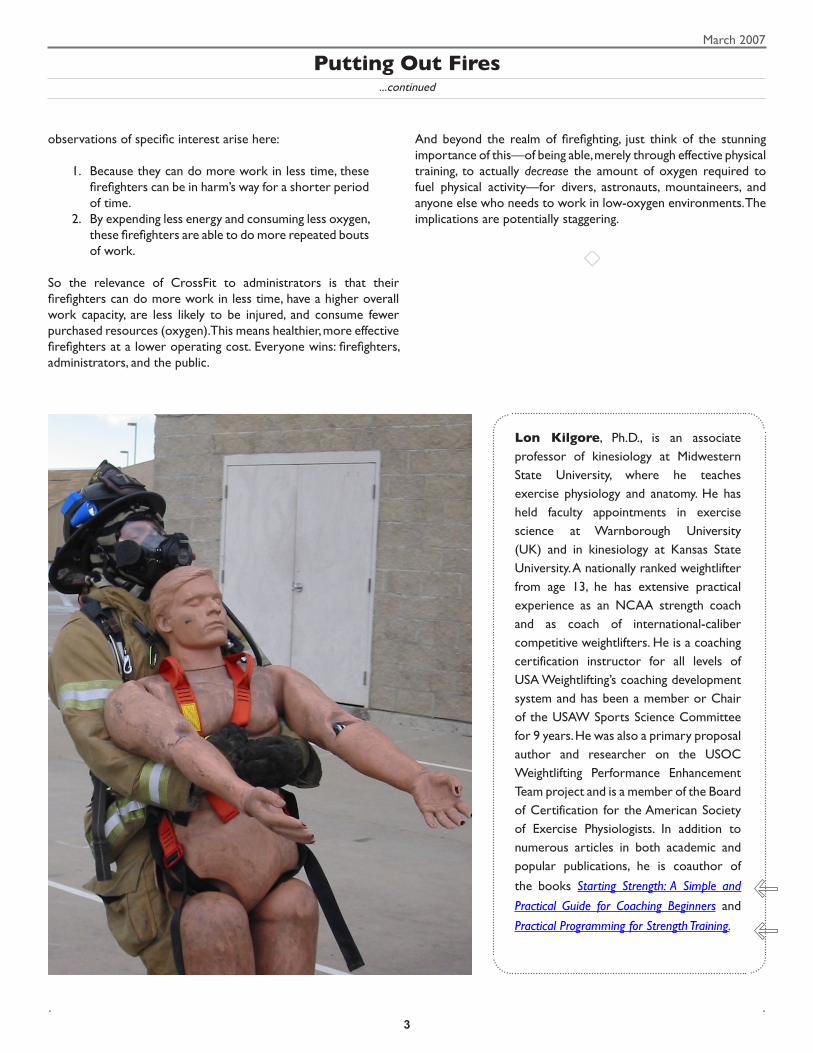
Honolulu Fire Department, Hawaii; Orange Country Fire Authority and Oakland Fire Department, California; Woodinville Fire and Life Safety District, Washington; Marietta Fire Department, Georgia; Parker Fire District, Colorado. What do all of these fire departments have in common?
Putting Out Fires
page 4
page 9
page 11
page 1
page 26
page 29
page 34
page 31
page 13
page 15
page 19
page 22
March 2007
�
You’ve probably already guessed part of the answer: They use CrossFit, officially or unofficially, to prepare for the rigors of their profession. But there’s more. In firefighter competitions around the country, it seems that whenever CrossFit-trained personnel enter, they end up at the top of the field. We might even say that fire companies like those above dominate the competition.
For those of us familiar with CrossFit and its results, this success is not terribly surprising. However, we have observed a phenomenon in these competitions that is curious indeed. In the parts of the competitions that require contestants to use oxygen tanks, CrossFit-trained firefighters consumed less from their oxygen bottles than other competitors. At first this seems odd—winners using less oxygen? The conventional understanding is that the more fit you are, the more oxygen you can consume (i.e., the greater your VO2 max), the higher levels of exertion you can sustain, and the faster you can get the job done. Doing the same amount of work in less time should require at least the same amount of oxygen, if not more. So why would these athletes show a reduction in oxygen consumed? This flies in the face of all accepted wisdom on the subject.
Did the CrossFit-trained firefighters somehow become better at oxygen handling? Is there some kind of elaborate respiratory adaptation occurring that is related to an improved aerobic capacity? It is really tempting to look for some elegant explanation involving gas transport kinetics, enzymatic energy of activation, and a whole bunch of other scientific jargon. Let’s cut to the chase though and say that the short answer is “no” to all of the above; it’s not nearly that complex an explanation.
The first point to consider is that CrossFit-trained firefighters are more efficient machines than
their competitors. They are performing equivalent competition work at a lower metabolic cost compared to their rivals because they are performing less extraneous work. This is an adaptation in neuromuscular efficiency rather than an oxygen kinetics phenomenon. Traditional physical training used by lots of firefighters is often limited to linear aerobic movement (running) and linear strength training (machines). Neither of these modalities is applicable to the multiplanar challenges of a firefighter competition course—or, for that matter, to the actual job demands of a firefighter. CrossFit training, with its hugely variant exercise menu, develops multiple motor and metabolic pathways in every plane of motion and articulates well with real-
world (and competition) motor challenges.
So, OK, they are more efficient neurally and metabolically. But how does this reduce oxygen consumption? The single largest contributor to this reduction is an improvement in body control across a variety of movement patterns. CrossFit establishes and develops motor pathways relevant to sport and occupational effort. A well-developed motor pathway reduces the amount of external work done by the body and thereby reduces oxygen consumed. Think of it this way. Remember your first ring dip? Remember how wiggly your arms were and how much anterior-posterior and medial-lateral movement there was? Now fast-forward to today and your mastery of the ring dip. How much wiggling is there now? The movement is more coordinated and each repetition takes less time than those first few brutally hard and spastic dips. Regular CrossFit training has eliminated the extra work you used to do when you used a bunch of extra muscles to stabilize your body on the rings. Reducing the amount of working muscle reduces metabolic cost (calories burned and oxygen consumed). This will result in either the ability to perform an activity for a longer period of time or, in this instance with firefighters, in consuming less oxygen per unit work.
Another factor that contributes to the improvement in efficiency is the increase in strength that results from CrossFit training. It is not intuitive, but it is strongly evident in the research literature that strength training increases running performance without increasing VO2 max. It is frequently thought that strength training somehow improves running economy by subtly altering technique. However, I find it difficult to believe, except in instances of gross strength imbalances and deficits, that one could hone technique for a specific skill with a general activity. I would propose that after you get stronger, the aerobic activity now represents a lower level of intensity and requires fewer motor units (less active muscle) to accomplish the same amount of work. Less muscle activity requires less ATP and requires less oxygen.
So, my explanation of the observed phenomenon in the firefighter competitions is that CrossFit-trained firefighters become more neurally efficient and stronger. Both of these phenomena contribute to a lower muscular demand for oxygen and leave more of it in the bottle. Both also contribute to winning competitions. While these results are from competitions that simulate the real world of firefighting, they point strongly to the fact that CrossFit training prepares firefighters for the rigors of the profession better than other training systems.
But let’s go beyond the individual firefighter. Let’s consider the missions of fire departments. Within the context of those missions, maximizing the safety of employees is important, as is having equipment and personnel capable of safeguarding the public. Administrators are also concerned with the fiscal bottom line as they have only so many dollars to provide a critical public service. If we think about these firefighting competition wins from the administrator’s perspective (beyond the PR perks), two
A well-developed motor pathway reduces the amount of external work done by the body and thereby reduces oxygen
...continued
Putting Out Fires
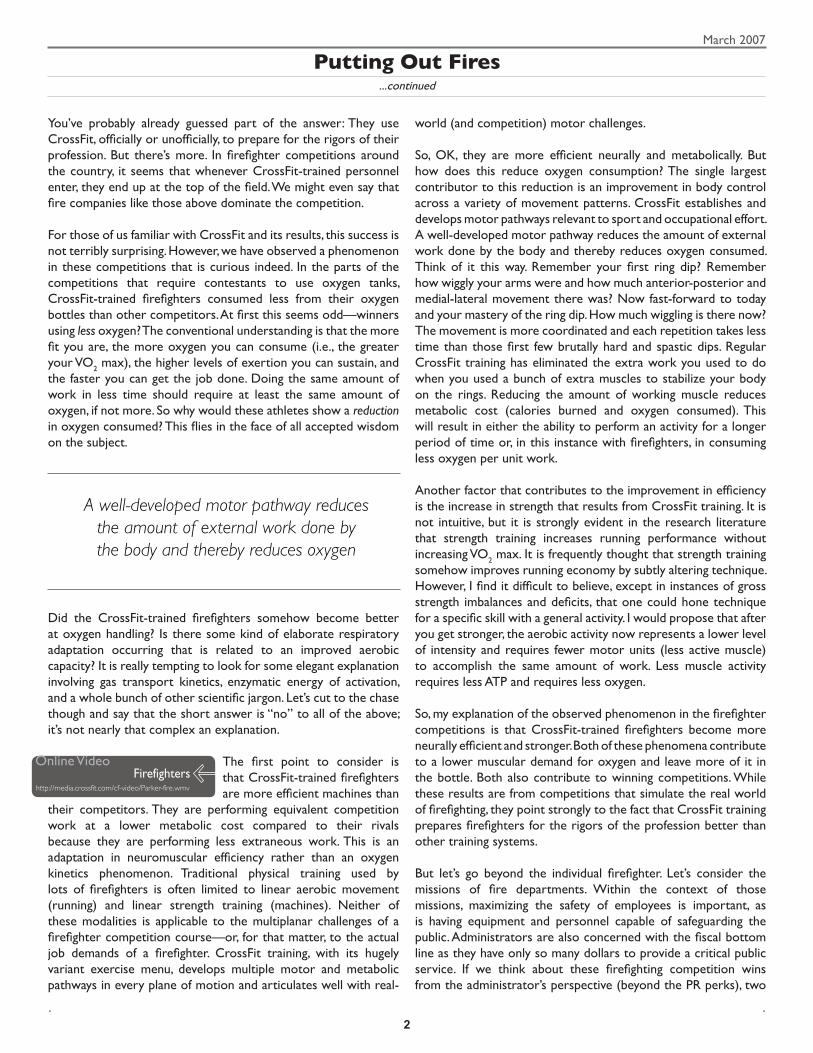
http://media.crossfit.com/cf-video/Parker-fire.wmv
Online VideoFirefighters
March 2007
�
...continued
Putting Out Fires
observations of specific interest arise here:
1. Because they can do more work in less time, these firefighters can be in harm’s way for a shorter period of time.
2. By expending less energy and consuming less oxygen, these firefighters are able to do more repeated bouts of work.
So the relevance of CrossFit to administrators is that their firefighters can do more work in less time, have a higher overall work capacity, are less likely to be injured, and consume fewer purchased resources (oxygen). This means healthier, more effective firefighters at a lower operating cost. Everyone wins: firefighters, administrators, and the public.
And beyond the realm of firefighting, just think of the stunning importance of this—of being able, merely through effective physical training, to actually decrease the amount of oxygen required to fuel physical activity—for divers, astronauts, mountaineers, and anyone else who needs to work in low-oxygen environments. The implications are potentially staggering.
Lon Kilgore, Ph.D., is an associate professor of kinesiology at Midwestern State University, where he teaches exercise physiology and anatomy. He has held faculty appointments in exercise science at Warnborough University (UK) and in kinesiology at Kansas State University. A nationally ranked weightlifter from age 13, he has extensive practical experience as an NCAA strength coach and as coach of international-caliber competitive weightlifters. He is a coaching certification instructor for all levels of USA Weightlifting’s coaching development system and has been a member or Chair of the USAW Sports Science Committee for 9 years. He was also a primary proposal author and researcher on the USOC Weightlifting Performance Enhancement Team project and is a member of the Board of Certification for the American Society of Exercise Physiologists. In addition to numerous articles in both academic and popular publications, he is coauthor of
the books Starting Strength: A Simple and
Practical Guide for Coaching Beginners and
Practical Programming for Strength Training.
March 2007
�

Athletes looking to improve their skills often concentrate on how they move, but they’d be wise to focus also on which movements they select and how quickly they respond. Training to reduce response time through enhanced perception—as if by instinct—can make for better performance on demand.
Perception is a topic that’s generating wide general interest these days. In his bestselling book Blink: The Power of Thinking Without Thinking, Malcolm Gladwell examines what happens inside a person’s brain during the nanosecond between when it receives stimuli and then prompts decisions and actions the person isn’t even aware of. Gladwell scrutinizes the way the brain absorbs information immediately and then generates responses that we often consider to be intuition but that, in reality, are part of a complicated process of neural actions and reactions.
“When you walk out into the street and suddenly realize that a truck is bearing down on you, do you have time to think through all your options? Of course not,” he writes. “The only way that human beings could ever have survived as a species for as long as we have is that we’ve developed another kind of decision-making apparatus that’s capable of making very quick judgments based on very little information.”
Gladwell could be describing the skills used in military, LEO, and athletic endeavors. Typical athletes and soldiers don’t perform movements by consciously thinking their way around every obstacle, through every movement, or over every hurdle. Instead, they rely on a combination of sensory input, subsequent motor responses, and learned skills for a safe and hopefully effective performance.
While trainers and coaches have spent decades trying to help students refine their motor responses, it’s still standard to talk about the body and the mind as separate entities. For example, most movement analyses consider only the performer’s motor output. In reality, however, the majority of skills are composed of a triad of factors—i.e., the individual’s sensor-motor-feedback loop.
So what, exactly, is perception? In essence, it’s the sensory input identified in the brain as a recognizable impression. It is first step in the acquisition of skills. Perception is critical to the selection of motor response, or the movement component of a skill.
There are three basic stages of perception (figure 1):
1.) The identification of the stimulus: What is it?2.) The selection of the response: What to do?3.) The response programming: Get ready; go!
This article was originally written specifically about the role of perception in alpine skiing. It was written by my father, George Twardokens (“Dr. T.,” as he is known), and was published in the journal Professional Ski Instructors of America. We wanted to bring some new concepts and prescriptions to the CrossFit community to get “black boxed” and refined. This article uses some of the words of my father’s article verbatim and removes most of the skiing specifics to discuss the importance of perception in training for all types of athletes, as well as soldiers, police, firefighters and others who depend on their physical readiness.
PERCEPTUAL
INPUT
STIMULUS IDENTIFICATION
WHERE IS IT? WHAT IS IT?
HOW DANGEROUS IS IT?
WHERE AM I
IN
RELATION
TO IT?
RESPONSE SELECTION
ADVANCE?
STOP?
RETREAT?
RESPONSE PROGRAMMING
Retrieval from skills
repertoire in the brain and
alerting the selected program
into action, e.g.,
RETREAT!
MOTOR OUTPUT
Motor Pattern= movement pattern
Spinal Cord= nerves, pathways, reflexes
Muscles=sequential movement in the joints
Environment= interaction between human and physical elements
FEEDBACK
1. Human sensations from receptors.
2. Measured outcome (e.g.,time)
3. Evaluated outcome (e.g., rank)
DODGE?
Figure 1
Eva Twardokens
PerceptionThe Commander of Our Movements
March 2007
�

...continued
Perception: The Commander of Our Movements
The elements influencing outcomes are:
1.) Reaction time (RT): Neural processing of unexpectedly presented stimuli.
2.) Movement time (MT): The physical response.3.) Response time (RES): The sum of the reaction time and
the movement time.
Deficiency in perception may lead to incorrect selection of the appropriate movement in response. Proficiency in perception is a hallmark of master performers in the fields of MIL/LEO and elite athletics. This group of people can make the appropriate movement choices quickly and accurately, which can be life saving, tactical, or victorious.
Now, the questions are: Can we improve perception? If so, how?The answer is yes, we can improve perception through training. There are numerous options in how you can train perception, but I suggest keeping it simple.
The best way to begin is to work on some basic movement categories: advancing, stopping, retreating, and dodging. Remember that we are not training the movements themselves here, but the decision of what movement to make and the ability to make that decision and response quickly. Here are a few proposed ways to start perception training and also incorporate some CrossFit moves.
Advance or retreat (muscle-ups)
A muscle-up is a three-stage movement in which it is possible to stop the trainee mid-movement and have them make a decision. The three stages consist of the pull, the transition, and the dip. The trainer could have the trainee begin the movement and, at the transition stage, give a signal whether to advance or retreat. Remember, the more simple the signal (such as a thumbs up or down), the better the training, since we want the response to be fast. In the field, the trainee would make the decision whether to advance or retreat based the stimuli perceived in the situation—for example, seeing an advancing opponent, an enemy with a gun, or a room full of fire. The
bottom line is that the signal is all about interpretation, and you don’t want to be teaching your trainees how to analytically interpret things, but how to react immediately to the stimulus.
With the muscle-up, unless you are working with a super-advanced athlete (or gymnast), you will probably be working with one rep at a time. Let the trainee rest after each rep of whatever response programming they have performed (continuing or discontinuing the completion of the muscle-up). Five to ten reps should be sufficient to benefit the trainee.
The transition stage, where the signal of thumbs up or thumbs down should be given.
The trainer gives the thumbs up signal and the trainee continues with the dip portion of the movement.
The trainee gets the thumbs down and retreats, letting himself down.
http://media.crossfit.com/cf-video/PerceptionMUs.mov
http://media.crossfit.com/cf-video/PerceptionMUs.wmv
Online VideoMuscle Ups
March 2007
�

...continued
Perception: The Commander of Our Movements
Dodging (avoiding a person or object)
Dodge ball against a wall or in a circle with a group is a great way to train dodging reactions. I like using this mode because the trainee will have to decide weather to duck, jump, or move laterally away from an object. This is a very pure form of training because all the interpretation and decision-making is totally up to the trainees. They respond instantly, and almost intuitively, to a moving ball, and do not have to determine what a hand signal means or make any other interpretations.
You may do this in timed intervals and have the trainee or trainees dodge for three to five sets of 30-second to 1-minute intervals. Keep them somewhat fresh at first so they have the opportunity to succeed. Don’t turn it into a dodge-ball massacre; rather, increase the difficulty and intensity incrementally.
Advancing (moving toward a person or object)
Advancing toward an object is another basic and universal movement where perception is required. Throw a tennis ball or a light Dynamax ball toward the trainee and instruct them to catch it. Throw high, low, to the left, and to the right. You can also incorporate some squat practice into this by having the low catch at the bottom of the squat, the high catch at a moderate vertical jump for the trainee, and by having the
lateral component just far enough away that the trainee will have to move from side to side. The variety of directional movement required to catching the object provides not only good perceptual training but also productive metabolic training and varied muscle recruitment as well. Use the same time intervals and sets as described above for the dodge-ball drills.
The trainee advances about a step toward the ball. He can also jump or squat to catch it. He returns the ball to the trainer as soon as he catches it, and the trainer throws it back at him in a new direction.
The trainee dodges laterally and down.
http://media.crossfit.com/cf-video/PerceptionApproach.mov
http://media.crossfit.com/cf-video/PerceptionApproach.wmv
Online VideoAdvancing
http://media.crossfit.com/cf-video/PerceptionAvoid.mov
http://media.crossfit.com/cf-video/PerceptionAvoid.wmv
Online VideoDodging
March 2007
�
...continued
Perception: The Commander of Our Movements
One exercise for perceptual training that Dr. T included in his ski clinics over the years involved planting a pole as a marker on a gentle slope and having skiers assemble about 60 feet above the marker. One person (the “tester”) stands about ten feet below the marker, facing the skiers as they descend. Instruct the skiers to descend, one at a time, in a straight run directly toward the marker. As each skier approaches the marker, the tester gives one of three hand signals: to indicate a right turn, a left turn, or a stop. In the initial trial, the tester gives the signal twenty feet before each skier reaches the marker. The degree of difficulty in correctly performing the tester’s commands increases with the skier’s speed on the descent. You could perform similar exercises in other arenas, off the slopes, as well.
Programming
I suggest doing some form of perceptual training once in every three days of training for a total of about two times a week. The session can happen at the end of a workout and the net work time per trainee should be about five to ten minutes.
In the big picture of human performance, perception training is uncharted territory and highly theoretical. So far, we know relatively little about it compared to our knowledge of the motor aspects of training. Remember, there are many skills that are called “habitual skills” (where the environment is fixed, like in typing where the keyboard is always the same, or in a handstand where the floor is level and still.) In these activities, perception is not an important element. But, when you perform what are known as “perceptual skills,” the setting changes constantly (combat, rescue and games), and therefore, accurate perception and response is an essential aspect component. The potential benefits of this sort of training will set CrossFitters yet further ahead of the pack.
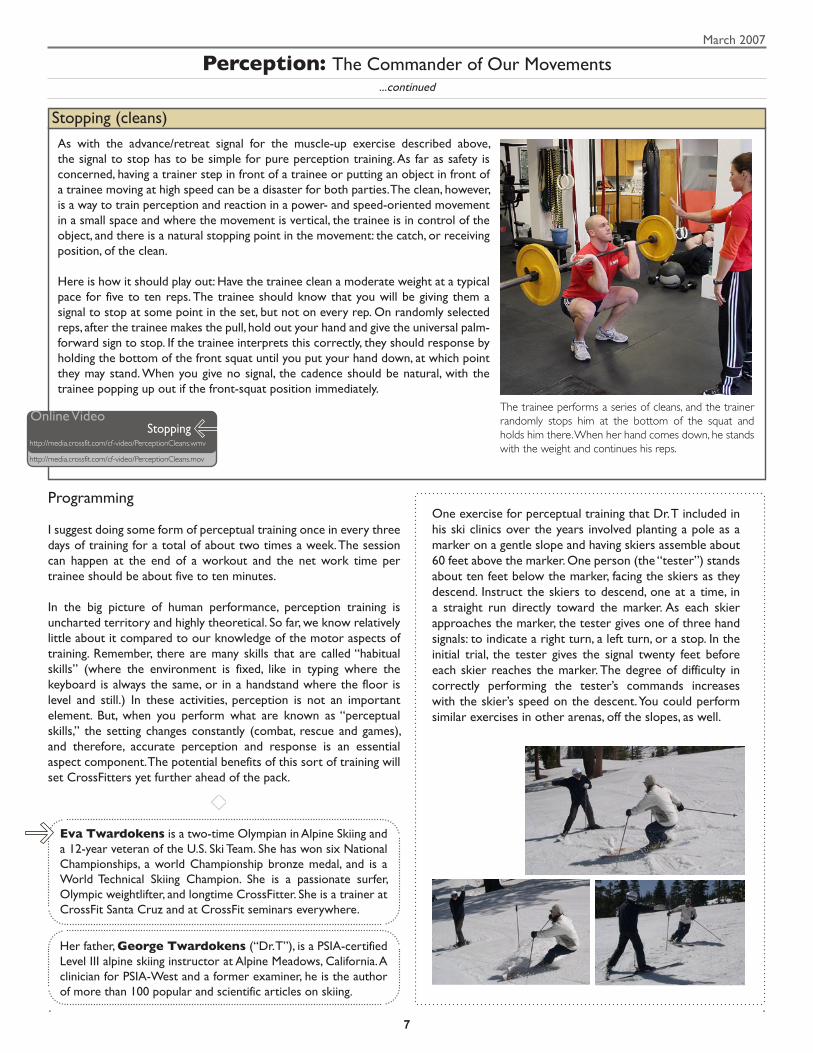
Stopping (cleans)
As with the advance/retreat signal for the muscle-up exercise described above, the signal to stop has to be simple for pure perception training. As far as safety is concerned, having a trainer step in front of a trainee or putting an object in front of a trainee moving at high speed can be a disaster for both parties. The clean, however, is a way to train perception and reaction in a power- and speed-oriented movement in a small space and where the movement is vertical, the trainee is in control of the object, and there is a natural stopping point in the movement: the catch, or receiving position, of the clean.
Here is how it should play out: Have the trainee clean a moderate weight at a typical pace for five to ten reps. The trainee should know that you will be giving them a signal to stop at some point in the set, but not on every rep. On randomly selected reps, after the trainee makes the pull, hold out your hand and give the universal palm-forward sign to stop. If the trainee interprets this correctly, they should response by holding the bottom of the front squat until you put your hand down, at which point they may stand. When you give no signal, the cadence should be natural, with the trainee popping up out if the front-squat position immediately.
Eva Twardokens is a two-time Olympian in Alpine Skiing and a 12-year veteran of the U.S. Ski Team. She has won six National Championships, a world Championship bronze medal, and is a World Technical Skiing Champion. She is a passionate surfer, Olympic weightlifter, and longtime CrossFitter. She is a trainer at CrossFit Santa Cruz and at CrossFit seminars everywhere.
Her father, George Twardokens (“Dr. T”), is a PSIA-certified Level III alpine skiing instructor at Alpine Meadows, California. A clinician for PSIA-West and a former examiner, he is the author of more than 100 popular and scientific articles on skiing.
The trainee performs a series of cleans, and the trainer randomly stops him at the bottom of the squat and holds him there. When her hand comes down, he stands with the weight and continues his reps.
http://media.crossfit.com/cf-video/PerceptionCleans.mov
http://media.crossfit.com/cf-video/PerceptionCleans.wmv
Online VideoStopping
March 2007
�

March 2007
�

Michael Rutherford
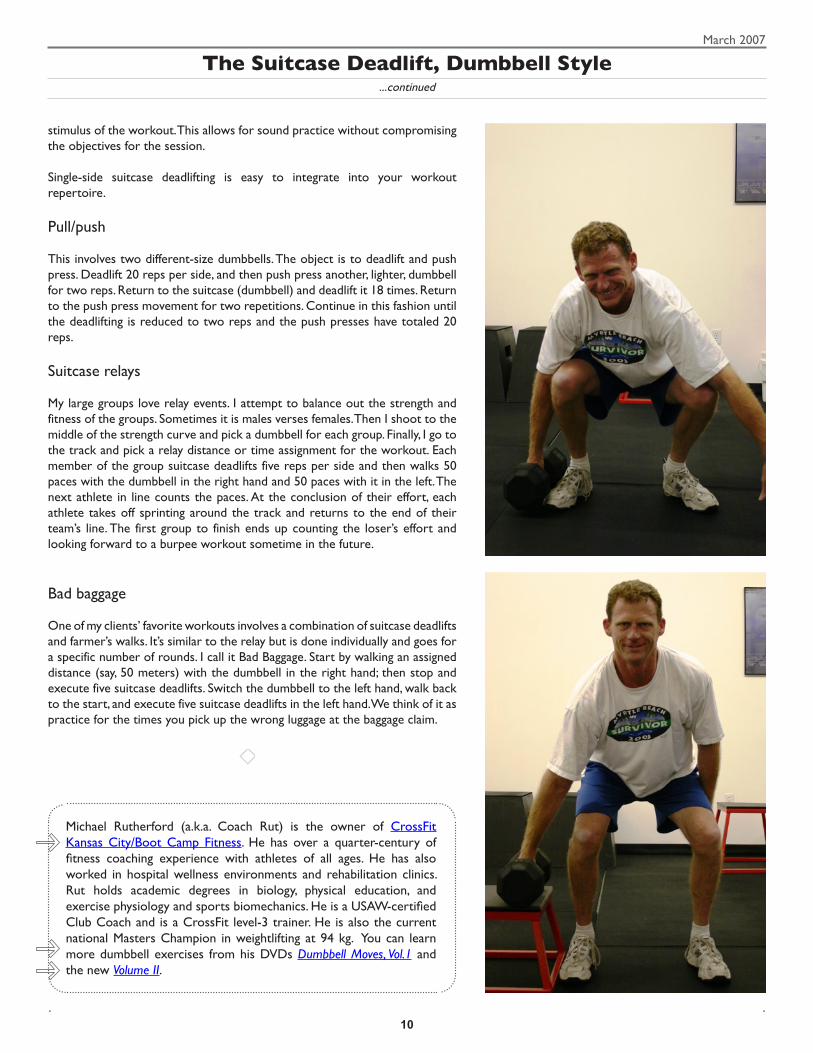
The health lift, known more commonly as the deadlift, is the most basic of essential movements. If an athlete were to do little more than deadlift they would most certainly stay very functional and possesses good strength. I view the deadlift as a sign of vitality and independence. The simple task of squatting to the deck and picking up an implement represents baseline functionality. When someone can no longer squat and pick up their belongings, their independence is gone.
Deadlifting is traditionally executed straight on; facing the bar/dumbbell/dog food/landscape mulch, but deadlifting an object at the side is a different and equally useful skill. It can involve just about any object with a handle. Those living in rural areas or raised on a farm are accustomed to picking up their stuff and moving by foot to the destination.
Suitcase deadlifting with two objects allows for greater overall load and trains the grip and shoulder girdle stabilizers simultaneously. However, suitcase deadlifting is actually easier to manage with two objects, assuming the loads are reasonable, than with one. The counterbalancing of the loads reduces the stabilization requirements. This is why my suitcase deadlift workouts generally involve one dumbbell.
There are plenty of occasions when you need to stand with an object held at your side, such as luggage, grocery bags, a bucket, a baby seat, an ammo can, or any number of objects. Then there is the situation when you sling a load to the shoulder. The weight is to the side and you need to dip (squat) to launch it. This uneven load increases the demand for lateral and rotational torso stabilization, requires
minimal equipment—which makes is it especially well-suited for groups—and has greater applicability to real-life situations.
The dumbbell suitcase deadlift is initiated by placing the dumbbell to the side. The feet are spaced evenly about shoulder width. The athlete squats to grasp the dumbbell and initiates extension by tightening the midsection and pressing through the heels while maintaining a firm and fixed flat back position. Spotters or trainers need to look for hips racing ahead and finishing their extension before the back rises. The posture and angle of the back should remained fixed from lift-off to full extension. Trainers should also insure that the hand with the load is straight and doing nothing more than holding onto the load, bit bending at the elbow or shrugging from the shoulder. The other arm is used as a balancing aid. Once the movement has been practiced successfully, then the opposite hand can be placed on the hip or the head.
Not all athletes have the mobility to squat this deep. Tall athletes already have challenges with squatting to an elevated barbell. If the athlete cannot assume a correct starting position, with eyes forward, chest up, and back flat, then the load should be elevated. Solid surfaces can be created at appropriate heights by stacking bumper plates or using supine benches or pulling blocks. Just make sure that your athlete is protected.
Three suitcase deadlift ideas
I use a wide range of repetitions when prescribing this movement—typically anywhere from three to fifteen repetitions per side, depending on the weight of the dumbbells and the intended
The Suitcase Deadlift, Dumbbell StyleMarch 2007
�
...continued
The Suitcase Deadlift, Dumbbell Style
stimulus of the workout. This allows for sound practice without compromising the objectives for the session.
Single-side suitcase deadlifting is easy to integrate into your workout repertoire.
Pull/push
This involves two different-size dumbbells. The object is to deadlift and push press. Deadlift 20 reps per side, and then push press another, lighter, dumbbell for two reps. Return to the suitcase (dumbbell) and deadlift it 18 times. Return to the push press movement for two repetitions. Continue in this fashion until the deadlifting is reduced to two reps and the push presses have totaled 20 reps.
Suitcase relays
My large groups love relay events. I attempt to balance out the strength and fitness of the groups. Sometimes it is males verses females. Then I shoot to the middle of the strength curve and pick a dumbbell for each group. Finally, I go to the track and pick a relay distance or time assignment for the workout. Each member of the group suitcase deadlifts five reps per side and then walks 50 paces with the dumbbell in the right hand and 50 paces with it in the left. The next athlete in line counts the paces. At the conclusion of their effort, each athlete takes off sprinting around the track and returns to the end of their team’s line. The first group to finish ends up counting the loser’s effort and looking forward to a burpee workout sometime in the future.
Bad baggage
One of my clients’ favorite workouts involves a combination of suitcase deadlifts and farmer’s walks. It’s similar to the relay but is done individually and goes for a specific number of rounds. I call it Bad Baggage. Start by walking an assigned distance (say, 50 meters) with the dumbbell in the right hand; then stop and execute five suitcase deadlifts. Switch the dumbbell to the left hand, walk back to the start, and execute five suitcase deadlifts in the left hand. We think of it as practice for the times you pick up the wrong luggage at the baggage claim.
Michael Rutherford (a.k.a. Coach Rut) is the owner of CrossFit Kansas City/Boot Camp Fitness. He has over a quarter-century of fitness coaching experience with athletes of all ages. He has also worked in hospital wellness environments and rehabilitation clinics. Rut holds academic degrees in biology, physical education, and exercise physiology and sports biomechanics. He is a USAW-certified Club Coach and is a CrossFit level-3 trainer. He is also the current national Masters Champion in weightlifting at 94 kg. You can learn more dumbbell exercises from his DVDs Dumbbell Moves, Vol.1 and the new Volume II.
March 2007
�0
Doug Chapman
When structural steel was created, it ushered in an era of design innovation that transformed skylines around the world. Likewise, the raw material of CrossFit is not only revamping the way we build programs and train athletes, it is also changing the landscape of the fitness business.
Traditional marketing is heavily dependent on advertising and promotions. The glossy ads and catchy slogans promise much and deliver little. They’re all sizzle and no steak. They are effective at their intended aim: separating consumers from their money. The conventional commercial gym model is based on renting the same space to as many people as possible, based on the knowledge that many who rent won’t actually ever come in and take up any space. The focus of the system is selling memberships, not delivering service—essentially, exploiting clients’ weaknesses.
The big-box gym industry targets the 24- to 30-year-old crowd, positioning the gym as a place to meet people—a bar without alcohol, if you like. Big-box gyms make a good deal of money by being a great place to meet people, not necessarily a great place to train, and they tend to be designed and constructed accordingly, frustrating those who are serious about fitness and spurring them to join running clubs, recreation centers, pools and the like. Their hope is to get enough space and be left alone to work out.
CrossFit’s revisionist approach to fitness carries over into the business realm, providing an opportunity for affiliates to throw traditional marketing out the door. Fitness that is timed, measured, and scored is different from the traditional approach, and it can and should be marketed as such. Other fitness offerings play on the same old theme: Lose weight; look great. Everyone claims to deliver elite results. So how can CrossFit affiliates demonstrate the real difference between what we offer and much of the rest of the industry?
Traditional marketing focuses on demographics such as like age, gender, income, education, and location. Within a certain radius of a location, it seems logical to check traffic flows, major employers, and population and then drop a training facility in a likely spot. I can’t help but think of a storefront on a major avenue that is dependent on walk-in traffic and visibility to sell its wares. It is everything CrossFit is not.
The line between CrossFit and traditional fitness needs to be glaringly apparent and readily demonstrated. The main reason
consumers stop patronizing most businesses is neglect. The traditional gym member does not hear from anyone at the club unless there is a billing issue or it is time to renew. When was the last time a “regular” gym sent you a note asking you why you haven’t been in? Or a phone call? If a gym sends out a newsletter, it is full of pleas to “bring a friend to the club,” advertisements for supplements, and bad nutritional and training advice. The big box model is all about appearance of fitness and near-total neglect of real, relevant service.
In my opinion, the main thrust of affiliates’ “marketing” efforts should be to develop a local community. The efforts should be centered on providing exceptional service, information, follow-up, and a sense of belonging that is missing in nearly all other aspects of modern life, and certainly in most of the fitness industry. Keeping in contact with clients help them feel valued, appreciated, like they’re part of a team—a fundamental difference between CrossFit and the globo gyms of the world. It also gives you constant feedback on how your clients are doing, how they are responding to your programming, and what their concerns are.
The Internet provides a timely, cost-effective, and high-impact way to keep connected with your existing clients and demonstrate some of what you have to offer to new ones, Unlike direct mail, advertising, going to fitness fairs, and similar outreach methods, the Internet is dependent not on large expenditures of money for small return but on some modest computer savvy, a good database, and the investment of time.
Show me a traditional fitness chain that has a blog. Yeah, I didn’t think so. Their websites never show actual people actually working out. All the theoretically great trainers never post what workouts or results. Their websites show fitness models flexing in tight clothing. The underlying impression is if you go to their gyms, you too can be in an ultimate state of flex and you will become popular. Your life will resemble a light beer commercial.
In contrast, scan the blogs of any number of CrossFit affiliates. CrossFit blogs show real people, some frumpy, some stunning, some muscular, some thin, some male, some female, and every race, creed, color, and national origin. All these different types of people are shown putting in max effort, giving 100 percent, and usually smiling. Not fake, airbrushed supermodel smiles, but genuine “thank god that is over” smiles that communicate what really happens after a CrossFit workout. They’re smiles that convey a sense of accomplishment.
Accomplishment leads to pride, which leads to that “Hey, you’ll never guess what I did today” conversation at the water cooler. Pictures of these amazing accomplishments on a blog, or videos of workouts on a blog or posted to a site like YouTube, provide a vehicle for these very proud clients to show their family and friends exactly what they did today that seems, on the surface, entirely unbelievable. Imagine the scenario: A happy client sends
The Business of Guerilla Fitness
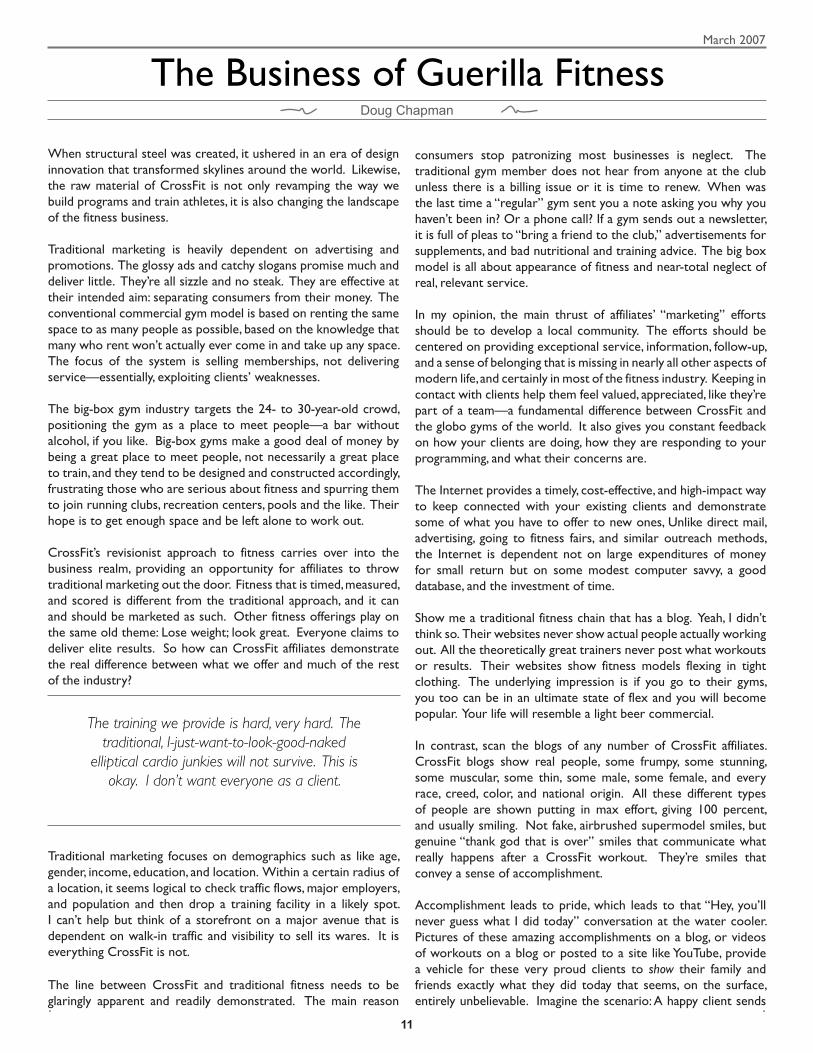
The training we provide is hard, very hard. The traditional, I-just-want-to-look-good-naked
elliptical cardio junkies will not survive. This is okay. I don’t want everyone as a client.
March 2007
��

a link to a video on your blog to ten people in his social network. Now you’ve got ten possible clients thinking “Hey, I think I could do that too!”
When I first started a blog for CrossFit AnnArbor in November 2005, I didn’t know what to expect. I started posting interesting
information, funny pictures, and people working out and having fun doing it. My clients loved it. Before I started blogging, I thought other affiliates who used blogs were too cheap to develop a “good” website. This was another one of those occasions I was wrong. Dead wrong. (It happens more often than I like to admit.)
The personal touch of taking the time to take, edit, and post a photo spoke more to my clients about the sincerity of my concern for them than any other service arrangement. When I took time to post about someone, not only did they see it, everyone else did. And they told their friends. I didn’t know what that was worth until Coach Glassman recommended I read the ClueTrain Manifesto. Having finally learned to listen and act when Coach tells me something, I started reading. It reinforced my view of CrossFit marketing: that the people who recognize quality will find you. My experience in marketing is that it generally attracts the wrong folks. So, my marketing budget is zero. Doing traditional marketing for a CrossFit affiliate is like using wood construction techniques when you are building with steel. New methods call for new means.
Needless to say, the blog transformed my business. Each evolution, each development is chronicled there. Each good idea, bad idea, and brain fart is there. It is weird to write your own history in the moment and then go back and read it. When I look back at a class from 2005, a couple of astonishing things are apparent. First, how many people are still with us. The average gym loses over a third of its membership every year. In order to grow, it needs to replace those people and attract more. The financial demand to bring in new people takes valuable dollars away from service-related activities. At CrossFit, the “right” people stay with it, the others don’t. It’s that simple. I don’t let people sign up until they have taken a class. After that they can join or not. That is basically our whole sales process. I send a follow-up e-mail letting them know where the link is and that they can sign up if they want. It is like crack: First hit is free, then you are either hooked or not.
A second thing that becomes apparent in looking back is how much stronger those same clients are (and look) now. Only a handful of people could do a pull-up before we moved to our new facility. Now we have complete classes that do WODs unmodified. There are few limitations to how I can train my clients.
I said that traditional marketing—like the traditional gym layout—attracts the wrong folks. So, who are the right folks? They are people who are intelligent enough to find something on the Internet and recognize bullshit when they see it. People like you. The training we provide is hard, very hard. The traditional, I-just-want-to-look-good-naked elliptical cardio junkies will not survive.
This is okay. I don’t want everyone as a client. The person who has the character to do more, who will go the extra mile and truly wants to be fit is who I want. That is in a nutshell my client base. Look at the pictures. They are 30 to 60 years old, professional, 60 percent women, 40 percent men (roughly) and have tried everything in fitness and then found a home with us.
What we are doing here, all of us, is guerilla fitness—and guerilla business. Changing the way business is traditionally done, exploiting systematic weaknesses and challenging all assumptions are the ways of the guerilla. Within a two-mile radius of my gym are a Bally’s, a Gold’s, an athletic club, a brand-new YMCA, and two county recreation centers, as well as a bevy of training, Pilates, and yoga studios. Is it too much competition? Absolutely not! (In fact, I link to them all on my blog.) If I had my way, I would put a CrossFit facility in the parking lot of every Bally’s around the country. I believe the average CrossFitter revels in competition and has a strong desire to win and be the best. Why else would we die for points? Globo gym may not know it yet, but the war is on. The more dissatisfied, underappreciated clients globo gym produces, the better our business will be.
The fundamentals of successfully marketing a CrossFit affiliate mirror CrossFit’s fundamental approach to training: Don’t go with the status quo and don’t rely on traditionally accepted strategies. Simply showing what we do will attract attention. By showing those who embrace what we do that we appreciate their support and hard work, that we care about their welfare, and that we consider them part of a training community, we retain clients who are our constant ambassadors. This is better advertising than we could ever afford.
...continued
The Business of Guerilla Fitness
Doug Chapman is the owner of Hyperfit USA/CrossFit Ann Arbor, where he runs a successful “Boot Camp” program that employs best practices from his experience as a Command Fitness Leader for the U.S. Navy. His diverse experience includes membership on the NCAA All-American Wrestling Team in 1987, 1988, and 1989, as well as the United States National Wresting Team from 1990 to 1996. He has served as wresting coach at several Michigan universities and for the Department of Defense at the Sigonella Naval Air Station in Sicily, Italy. Chapman holds a bachelor of science degree in finance from Ferris State University and a master of business administration degree from Eastern Michigan University.
Some of the content for this article is adapted from a post on Doug’s Guerilla Fitness blog.
March 2007
��

Tony Leyland
Performance and Health
Do your friends and family think you are a little crazy for doing CrossFit? At the very least I think that the majority of CrossFitters are viewed as a group highly devoted to elite fitness, conscious of their bodies and diets, and perhaps “taking it all a bit too far.” My wife thinks my love of CrossFit is all part of my midlife crisis but harmless enough—despite the fact that I spent a couple thousand dollars on my garage gym. (Of course, with a good friend getting a classic Lotus Elan when he turned 50, my wife thinks she is way ahead.)
Maybe seeing the term “Forging Elite Fitness” on the website is why some view CrossFit as being for a select few, but I would suggest the main reason is the standard understanding that “fitness for health” means traditional cardio exercise and maybe some low-weight, high-repetition resistance training (with machines and/or springs).
Obviously, our military, police, firefighters, coast guard, and other first responders are striving for an exceptionally elite level of functional fitness, as their vocations—and lives—depend on it in a very real and immediate sense. And equally obvious, martial arts fighters and competitive athletes will also benefit greatly from CrossFit programming. However, what is less obvious is what CrossFit athletes like me are doing in the program (and reading the daily posts reveals that there are plenty of us middle-aged CrossFit followers). I am 50. In addition to three or four CrossFit workouts a week, I play over-40 masters soccer, singles tennis, and occasionally squash. However, the LA Galaxy didn’t offer me a deal like David Beckham’s and the latest reports are that Roger Federer isn’t too concerned by my improving fitness level. So with the realization I am not going to make a living out of my sport and am not in the police, military, or the like, what I am doing here? Why don’t I just do my twenty minutes on an elliptical trainer, some nice, comfortable, low-weight, high-rep, machine-based resistance work and shuffle off home like a good boy?
Well to put it simply, I believe appropriately scaled CrossFit programming is the best way to protect the health of people of all ages. I could write a book on the research and personal training/coaching experiences to back that statement up, but for this month I’ll just discuss some examples.
In CFJ #53 I talked about the need to focus on physiological and performance parameters and not things like bodyfat levels. In that article I showed a list of fitness components from the ExRx website’s description of the components of fitness:
Fitness components
Health Related Performance Related
• Body composition • Cardiovascular endurance • Muscular strength • Muscular endurance [i.e. stamina]• Flexibility
• Power • Speed & quickness • Agility • Balance • Motor skill [i.e., coordination & accuracy]
This list is a good example of the typical but misleading separation of fitness components in mainstream thinking. By separating the components, the fitness industry, and many academics, are saying that you don’t need to worry about the performance side of things. When people view anything as separate and give them different labels, they create a hierarchy. And obviously we all “know” that the general public should be concerned with health and that only athletes need worry about performance. Right?
Wrong.
Now this could be the start of a book-length discussion, so to keep things manageable I’ll explain why this thinking is a mistake by giving some brief examples. Back injuries and motor control
Many people misguidedly think that back injuries are caused by lifting things that are too heavy. On the contrary, the most common causes of back injury are:
• poorly conditioned muscles, • muscle imbalances in the trunk,• inflexibility in muscles crossing the shoulders and hips, • poor lifting technique, and • poor motor control of the spinal musculature.
The first observation is obvious. We probably all know many people who have “lifted their way out of back trouble.” If you do not use muscles they become weak and vulnerable to injury. That is—or should be—obvious.
The other points are less intuitive. Dr. Stuart McGill is a spinal biomechanist at the University of Waterloo, Canada. Because of the inherent instability of the spine, McGill argues that spine stiffness, and hence stability, is achieved by a complex interaction of stiffening structures (muscles and ligaments) along the spine and forming the torso wall. Balancing stiffness on all sides of the spine is more critical to ensuring stability than having high forces on a single side. In fact McGill argues, absolute endurance and strength is probably secondary in importance to the relationship between muscle groups, as it is thought muscle imbalances are a primary cause of back problems. For example, McGill points out that people with low back problems often have weaker extensor strength relative to their flexor strength (rather than actually having weak muscles). This is not uncommon even among athletes, who are likely to be better at sit-ups than at back extensions. (The number of “abdominal exercisers” on the market is amazing and yet depressing. Do people really think focusing on one muscle group is a good idea?)
Conditioning of the muscles on all sides of the trunk is obviously important, but this discussion has focused on a health component in the above list, namely muscular endurance. However, Cholewicki and McGill (1996) also blame poor motor control as a potential contributing factor to the risk of back injury. Modeling data from
March 2007
��

...continued
Performance and Health
their research shows that the spine “can easily buckle” during a task as benign as picking up a pencil from the floor. Even when muscle forces are low, a small motor control error can cause rotation of a single spinal joint, placing all bending support responsibility on the passive tissues (ligaments and disks). So we need to challenge the control of our balanced trunk musculature, and sitting on a chair with a back rest pushing a bar overhead attached to a pulley and weight stack isn’t going to do that.
So here is one of the eminent academics in the field of spinal biomechanics arguing that motor control of the spinal musculature is essential to back health. If the research shows that 80 percent or more of the North American population will experience back problems in their lifetime, is motor control not a health-related component of fitness?
Fall prevention and balance training
Statistics show that 40 percent of those 75 years and over fall each year. And 40 percent of seniors who move into residential care do so because of a fall. When it comes to seniors, falls are right up there with heart disease and cancer as a major cause of death. I have a better 40 percent statistic for you though: strength and balance training can reduce falls by 40 percent. And this training is particularly effective in people over 80 years of age.
The longer you can do dips, or assisted dips, as you age, the longer you are gong to be able to push yourself out of a chair. The longer you can do squats and lunges, the stronger your legs will be and the longer you’ll be able to handle stairs. The more deadlifting you do, the longer you’ll be independent and able to lift groceries, etc.
Steve Wolf et al. (1996) showed that tai-chi and computerized balance training helped reduce falls by seniors. This study was part of a large group of studies that showed that tai-chi (which for seniors is essentially strength and balance training) was the best exercise modality (of those studied) to prevent falls. CrossFit challenges and improves your balance by using free weights in a dynamic fashion and by incorporating gymnastic movements.
Eighty-four percent of injury-related hospitalizations of seniors are from falls, 40 percent hospitalized from a fall have a hip fracture, 90 percent of hip fractures are caused by a fall, and 20 to 25 percent of seniors who suffer a hip fracture die with in one year (and of those that survive that year, 50 percent never fully regain their pre-fracture functioning). Is balance not a health-related component of fitness?
What happens when you slip or lose balance? You attempt to right yourself by rapidly driving your center of gravity back inside your base of support. Fall-prevention strategies include vigorous cross-steps or shooting out an arm or two to grab something. Are these slow methodical movements? Obviously not; they are fast, powerful movements. So, for example, dumbbell snatches even with very light dumbbells will help protect people’s muscles from injury when they have to react quickly.
Functional movements
What about coordination of movements required to achieve a functional outcome? I read recently about a physiotherapist who trains seniors who are frail and fearful of falling by getting them to lie down and get back up again (as part of a general strength program). This functional exercise not only helps the physical side of things but comforts the seniors in the knowledge that if they fall they can get up and get to the phone to call for help. Brilliant! (By the way, if you haven’t tried Turkish get-ups with a dumbbell locked out over your head, why not?)
I said at the beginning that I believe appropriately scaled CrossFit workouts are the best way to protect health. CrossFit encourages people to vary and adapt the workouts (for example, see this video, posted recently on CrossFit.com). How about the following for a CrossFit workout for a relatively frail senior?
Walk around the block briskly; come back inside and do ten wall push-ups, get down on the ground, lie flat then and get back up again (repeat 5 times), do 10 modified pull-ups (probably pulling on a low bar or rope with feet still on the ground and body at a slight incline), sit in a comfy chair and push yourself up to standing (repeat 10 times). Repeat whole cycle 2 or 3 times, depending on the individual.
Your training is limited only by your imagination and a mainstream fitness industry that doesn’t have any imagination to begin with.
The fitness industry has taken skill out of exercise, yet the examples I have discussed above show that motor coordination and balance work incorporated into functional exercises are very important “health” components of fitness. I am sure you can think of other examples that debunk the notion that we should only focus on these so-called “health components”. The bottom line is that performance and health are inseparable and the fitness industry shouldn’t confuse this fact.
Studies and text cited in this article:Cholewicki, J., and McGill, S.M. 1996. Mechanical stability of the in vivo lumbar
spine: Implications for injury and chronic low back pain. Clinical Biomechanics, 11(1): 1-15.
McGill, S.M. 2002. Low Back Disorders: Evidence-Based Prevention and Rehabilitation. Champaign, IL: Human Kinetics.
Wolf, S.L., Barnhart, H.X., Kutner, N.G., McNeely, E., Coogler, C. and Xu, T. 1996. Reducing frailty and falls in older persons: An investigation of Tai Chi and computerized balance training. Journal of The American Geriatrics Society, 44(5): 489-97.
Tony Leyland is Senior Lecturer at the School of Kinesiology in Vancouver, Canada. He has taught at the university level for 24 years and has been heavily involved in competitive sports such as soccer, tennis, squash, and rugby as both an athlete and a coach for over 40 years. He is a professional member of the National Strength and Conditioning Association, a Canadian National B-licensed soccer coach, and a level-1 CrossFit trainer. He can be reached at [email protected]
March 2007
��
In my article in last month’s journal, I described our baseball team’s strength and conditioning
training this past fall. This month, I will outline an entire year of our women’s basketball training, taking into account the demands and interruptions of student athletes’ schedules.
Before I delve into describing the team’s the training regimen, here’s a little background information. This off-season began on the heels of our first Big West Conference tournament championship and the team making it to the NCAA tournament for the first time in school history. The best news is that we did this with mostly freshman, two sophomores, and two seniors. Way back in August 2005 I knew we had a special group that would one day be conference champions, even before I had ever seen most of them dribble a basketball. The crop of frosh that year were athletic, hardworking, and coachable. I knew our outstanding basketball coaches would be able to take these young women to the top.
Our trip to last year’s NCAA tournament was a short one, as we drew #1-seeded UNC in the opening round. We simply were unable to compete with their size, athleticism, and skill. The head coach came back and asked me if we could put 20 pounds on all the players so we could be more competitive the next year. I told him that 20 pounds of muscle would be essentially impossible for our team, but that 10 was an achievable goal. (We ended up getting an average weight gain of 6 pounds.) My goal for the off-season was for us to be able to physically dominate the teams in our conference and to narrow the gap between us and the schools of the Pac 10, ACC, Big 10, etc. No amount of training will see our athletes pass up those at women’s basketball powerhouse schools like UNC, but we can work to narrow the gap. Here is how we went about doing so.
During spring quarter, our focus was on increasing size and strength. By NCAA rule, last year we were allowed eight hours a week of training in the off season. Four could be spent on basketball and four on anything else. Our anything else was a hardcore strength phase. The program we used was one by Tony Ciarelli that I picked up from mikesgym.org. As I’ve said before, I may not be very smart, but I’m smart enough to know to borrow from good coaches, and Ciarelli is one of the best. He has been highly successful as a strength, football, track, and Olympic lifting coach, and I adapted his program to fit our basketball team’s needs. Figure 1 in the download package shows what our program looked like for April.
After the first four weeks we shifted to lower reps and added cleans and snatches (see Figure 2).
That completed our “strength” phase of training, and then I wanted to add in some athleticism and metabolic conditioning work. We
finished out the school year by starting to mix basic tumbling, plyo work, short “CrossFits,” and sprints in with our core strength lifts of cleans, squats, and presses (see Figure 3).
After that, we moved into summer training. Most of our teams at UCR were given a summer workout program very similar to the one I describe here. I really like this format, as an effective way to cover most of the elements of fitness thoroughly without burning out the athletes. I did overshoot a little bit though, in that I think there are too many strength exercises in this program on the days we also do “CrossFits.” I saw this early on in the summer and adjusted the workouts for our teams’ training by cutting back to one or two strength moves before the day’s CrossFit workout.
During the first phase of the summer, the women’s basketball team was off on their own. They went home from mid-June until the last week of July. During this time, one athlete followed the workouts religiously (she made huge gains in all aspects of her fitness), most
Josh Everett
UC Riverside Women’s BasketballOff-Season Strength & Conditioning
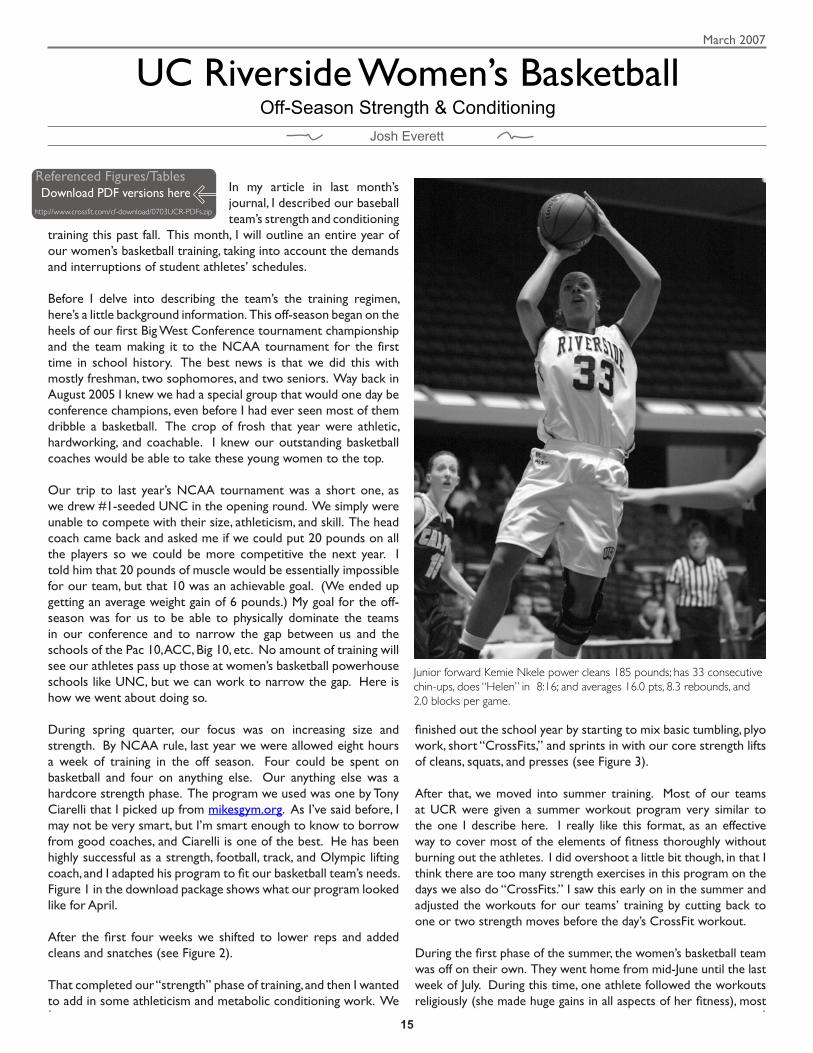
Junior forward Kemie Nkele power cleans 185 pounds; has 33 consecutive chin-ups, does “Helen” in 8:16; and averages 16.0 pts, 8.3 rebounds, and 2.0 blocks per game.
http://www.crossfit.com/cf-download/0703UCR-PDFs.zip
Referenced Figures/TablesDownload PDF versions here
March 2007
��
...continued
UC Riverside Women’s Basketball: Off-Season Strength & Conditioning
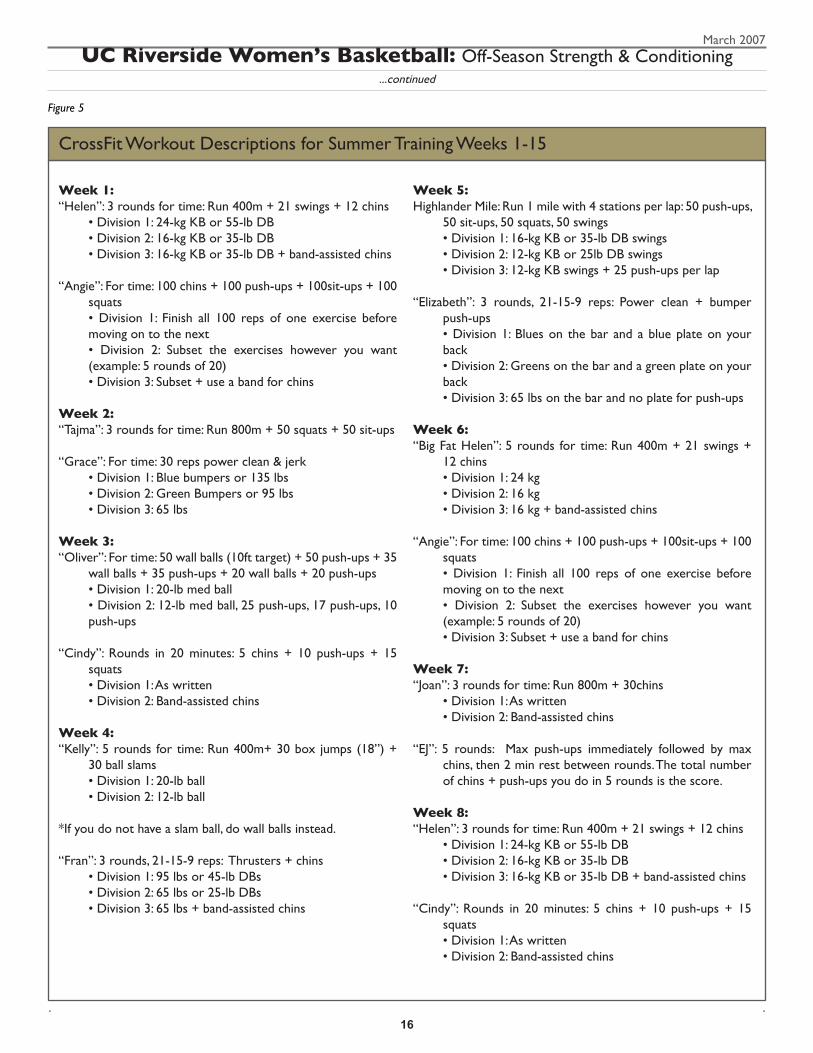
Week 1:“Helen”: 3 rounds for time: Run 400m + 21 swings + 12 chins • Division 1: 24-kg KB or 55-lb DB • Division 2: 16-kg KB or 35-lb DB • Division 3: 16-kg KB or 35-lb DB + band-assisted chins
“Angie”: For time: 100 chins + 100 push-ups + 100sit-ups + 100 squats
• Division 1: Finish all 100 reps of one exercise before moving on to the next
• Division 2: Subset the exercises however you want (example: 5 rounds of 20)
• Division 3: Subset + use a band for chins
Week 2:“Tajma”: 3 rounds for time: Run 800m + 50 squats + 50 sit-ups
“Grace”: For time: 30 reps power clean & jerk • Division 1: Blue bumpers or 135 lbs • Division 2: Green Bumpers or 95 lbs • Division 3: 65 lbs
Week 3:“Oliver”: For time: 50 wall balls (10ft target) + 50 push-ups + 35
wall balls + 35 push-ups + 20 wall balls + 20 push-ups • Division 1: 20-lb med ball • Division 2: 12-lb med ball, 25 push-ups, 17 push-ups, 10
push-ups
“Cindy”: Rounds in 20 minutes: 5 chins + 10 push-ups + 15 squats
• Division 1: As written • Division 2: Band-assisted chins
Week 4: “Kelly”: 5 rounds for time: Run 400m+ 30 box jumps (18”) +
30 ball slams • Division 1: 20-lb ball • Division 2: 12-lb ball
*If you do not have a slam ball, do wall balls instead.
“Fran”: 3 rounds, 21-15-9 reps: Thrusters + chins • Division 1: 95 lbs or 45-lb DBs • Division 2: 65 lbs or 25-lb DBs • Division 3: 65 lbs + band-assisted chins
Week 5: Highlander Mile: Run 1 mile with 4 stations per lap: 50 push-ups,
50 sit-ups, 50 squats, 50 swings • Division 1: 16-kg KB or 35-lb DB swings • Division 2: 12-kg KB or 25lb DB swings • Division 3: 12-kg KB swings + 25 push-ups per lap
“Elizabeth”: 3 rounds, 21-15-9 reps: Power clean + bumper push-ups
• Division 1: Blues on the bar and a blue plate on your back
• Division 2: Greens on the bar and a green plate on your back
• Division 3: 65 lbs on the bar and no plate for push-ups
Week 6:“Big Fat Helen”: 5 rounds for time: Run 400m + 21 swings +
12 chins • Division 1: 24 kg • Division 2: 16 kg • Division 3: 16 kg + band-assisted chins
“Angie”: For time: 100 chins + 100 push-ups + 100sit-ups + 100 squats
• Division 1: Finish all 100 reps of one exercise before moving on to the next
• Division 2: Subset the exercises however you want (example: 5 rounds of 20)
• Division 3: Subset + use a band for chins
Week 7: “Joan”: 3 rounds for time: Run 800m + 30chins • Division 1: As written • Division 2: Band-assisted chins
“EJ”: 5 rounds: Max push-ups immediately followed by max chins, then 2 min rest between rounds. The total number of chins + push-ups you do in 5 rounds is the score.
Week 8: “Helen”: 3 rounds for time: Run 400m + 21 swings + 12 chins • Division 1: 24-kg KB or 55-lb DB • Division 2: 16-kg KB or 35-lb DB • Division 3: 16-kg KB or 35-lb DB + band-assisted chins
“Cindy”: Rounds in 20 minutes: 5 chins + 10 push-ups + 15 squats
• Division 1: As written • Division 2: Band-assisted chins
CrossFit Workout Descriptions for Summer Training Weeks 1-15
Figure 5
March 2007
��

...continued
UC Riverside Women’s Basketball: Off-Season Strength & Conditioning
Week 9:“Tajma”: 3 rounds for time: Run 800m + 50 squats + 50 sit-
ups
“Tabata This”: Chins, push-ups, sit-ups, squats: 20 seconds work, 10 seconds rest, for 8 consecutive sets. One-minute break between exercises. Count total number of reps completed as your score.
Week 10:“Oliver”: For time: 50 wall balls (10ft target) + 50 push-ups +
35 wall balls + 35 push-ups + 20 wall balls + 20 push-ups
• Division 1: 20-lb med ball • Division 2: 12-lb med ball, 25 push-ups, 17 push-ups, 10
push-ups
“Grace”: For time: 30 reps power clean & jerk • Division 1: Blue bumpers or 135 lbs • Division 2: Green Bumpers or 95 lbs • Division 3: 65 lbs
Week 11:“Kelly”: 5 rounds for time: Run 400m+ 30 box jumps (18”) +
30 ball slams • Division 1: 20-lb ball • Division 2: 12-lb ball
*If you do not have a slam ball, do wall balls instead.
“Diane”: 3 rounds, 21-15-9 reps: Handstand push-ups + deadlift 225 lbs.
• Division 1: As written • Division 2: Reduce weight on DL, substitute push press
for HSPU
Week 12: Max out on chins!
Week 13:“Joan”: 3 rounds for time: Run 800m + 30chins • Division 1: As written • Division 2: Band-assisted chins
“Fran”: 3 rounds, 21-15-9 reps: Thrusters + chins • Division 1: 95 lbs or 45-lb DBs • Division 2: 65 lbs or 25-lb DBs • Division 3: 65 lbs + band-assisted chins
Week 14: “Helen”: 3 rounds for time: Run 400m + 21 swings + 12
chins • Division 1: 24-kg KB or 55-lb DB • Division 2: 16-kg KB or 35-lb DB • Division 3: 16-kg KB or 35-lb DB + band-assisted
chins
“EJ”: 5 rounds: Max push-ups immediately followed by max chins, then 2 min rest between rounds. The total number of chins + push-ups you do in 5 rounds is the score.
Week 15: “Kelly”: 5 rounds for time: Run 400m+ 30 box jumps (18”) +
30 ball slams. • Division 1: 20-lb ball • Division 2: 12-lb ball
*If you do not have a slam ball, do wall balls instead.
“Tabata This”: Chins, push-ups, sit-ups, squats: 20 seconds work, 10 seconds rest, for 8 consecutive sets. One-minute break between exercises. Count total number of reps completed as your score.
CrossFit Workout Descriptions for Summer Training Weeks 1-15 ...continued
March 2007
��
trained a few days a week (and came back slightly weaker and less fit), and one or two did nothing during this six-week period (and were dying during the warm-up on the first day back). This is the frustrating part of being a college strength coach: you spend a lot of time just getting kids back to where they were before summer break or Christmas break.
Figures 4 and 5 describe what we did during that time. The general pattern is as follows:
Mondays: Speed and power. Cleans, plyometrics, medicine ball throws, agility drills, and short sprints with full recovery between reps. Mondays were the perfect day for this type of training as speed and power are highly nervous-system-dependent and the nervous system and body were rested after having Sunday off.
Tuesdays: Strength work and running-based CrossFit workouts.
Wednesdays: Off/recovery
Thursdays: Speed and power. Same as Monday except the sprints were longer and the recovery time between reps was shorter.
Fridays: Strength work followed by a weight-room-based CrossFit workout.
Saturdays: Track intervals. Only one woman on the basketball team did any of these workouts though, so this part of the program wasn’t relevant to our results.
The team came back the last week of July, as they were all enrolled in second-session summer school, and we began the second phase of summer training (See Figure 6), which looked much like the first with a few modifications. Our summer workouts lasted no longer than an hour and 10 minutes.
When school began, the coaches wanted to take over the team’s running and conditioning training, so in the weight room we shifted to a more traditional strength program (See Figure 7).
Once the season started, we moved to two lifting days a week. The first day consisted of a pretty basic routine; on the second lifting day, we took those exercises and put them into a Crossfit circuit (See Figure 8). We stayed with this programming through January.
In February, we shifted to a largely kettlebell-based workout (See Figure 9). At this point the idea was to maintain strength while keeping the athletes as fresh as possible. Kettlebell lifting by nature is lighter than barbell lifting (the women use 12-kg KBs) and hopefully will be less fatiguing and easier on the body. It’s a long, physically draining season, and we want to be strong and sharp heading into the post-season. Another advantage to using KBs is
that if we happen to be traveling for post-season play, we can pack a few KBs and continue our program on the road.
Here are some of the results we’ve had with this program. As of February 20, we are in first place in the conference, with a conference record of 11-1. The highlight of our non-conference games was victory over then-undefeated Wisconsin of the Big-10. As you read the lifting statistics, keep in mind that four of the players are brand-new to the program this year and have not had time to achieve great numbers as our intensity drops greatly once November rolls around. On the power clean, we have five athletes lifting 150 pounds or more, and seven who have power cleaned more than their body weight. Three have squatted 200+ pounds (we need work here), and eight have 20+ chin-ups, with three of those being able to do 30 or more (and, remember, these are not gymnast-sized athletes). We have eight players with a sub-10-minute “Helen” time (with a 16-kg Russian swing), with three of those under 9:00 and two of them under 8:30.
You can follow our results and find a schedule of games if you’d like to watch them in action at http://www.athletics.ucr.edu/wbasketball/wbkfront.html. You are also welcome to come watch any of our teams train in the weight room here at UCR. Just send me a note at [email protected] and we can set something up.
Download Referred Figures / SheetsPDF: http://www.crossfit.com/cf-download/0703UCR-PDFs.zipOriginals: http://www.crossfit.com/cf-download/0703UCR-Originals.zip
...continued
UC Riverside Women’s Basketball: Off-Season Strength & Conditioning
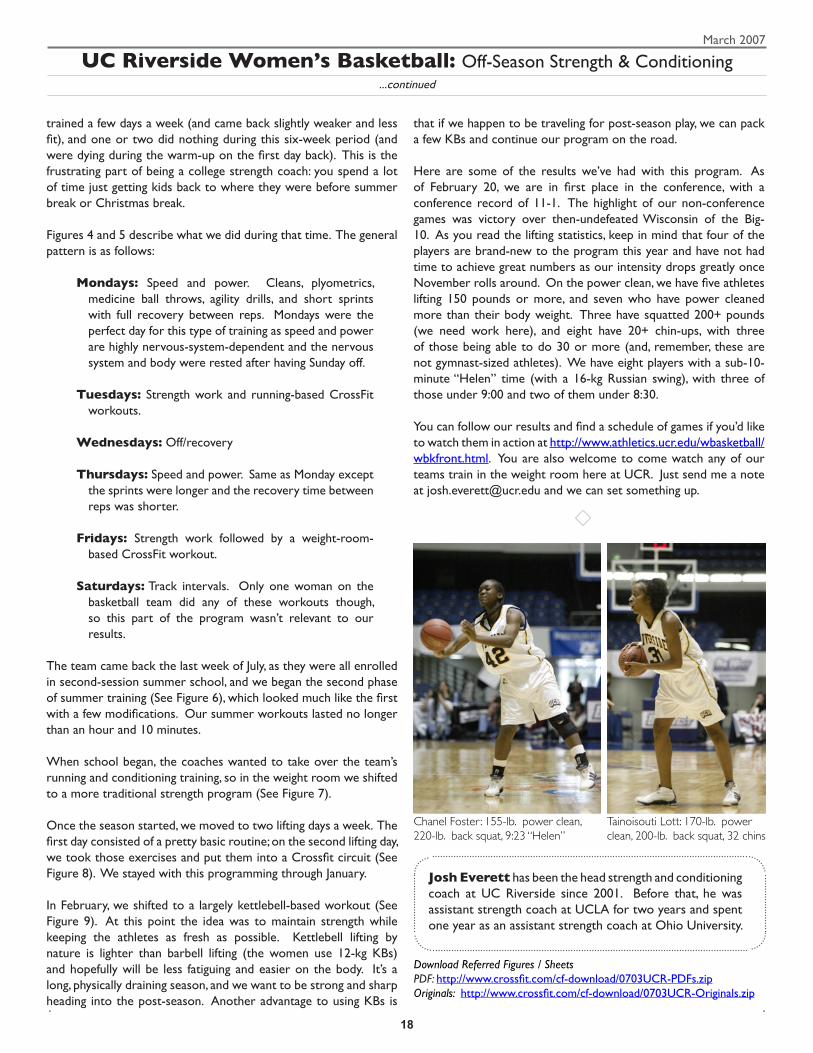
Chanel Foster : 155-lb. power clean, 220-lb. back squat, 9:23 “Helen”
Josh Everett has been the head strength and conditioning coach at UC Riverside since 2001. Before that, he was assistant strength coach at UCLA for two years and spent one year as an assistant strength coach at Ohio University.
Tainoisouti Lott: 170-lb. power clean, 200-lb. back squat, 32 chins
March 2007
��

Would you like to hone your indoor rowing training to target the specific areas where you need it most?
There’s a powerful source of international training data available on the Internet. Since 1999, rowers all over the world have been entering their personal best times for a variety of race distances on Concept2 rowers into a database called the Online World Ranking. The tests range from a 500-meter sprint to the 42-kilometer marathon, and the age groups range from under 18 to over 80. Men, women, lightweights, and heavyweights have all been submitting their times. There are now thousands of data points collected here. The database is easy to access, free, and searchable, so it’s easy to pull out just the data that you want.
OK, great. But why should you care about someone else’s rowing results? How can other people’s data help you to become faster and fitter?
There are a number of ways that you can use this data to improve your own fitness, from setting goals to monitoring progress to analyzing strengths and weaknesses.
First, though, here’s how to access the database:1. Go to www.concept2.com.2. Click on Ranking & Log in the upper right corner.3. Click on Rankings in the upper right corner.4. Now choose the distance, age group, gender, and weight
class that interests you. You can choose to specify city, state, and country, but for our purposes it’s best to leave these blank in order to get the biggest data pool.
5. Note that the ranking season ends on April 30. The later in the season it is, the more data there will be. If it’s early in a season, it would be more informative to use the prior season’s data.
6. Click Continue to start the search. Within a few seconds, the results you requested will be displayed.
7. The fastest performance to date during the season specified will be shown at the top of the list. Above the table, you will find the scores that correspond to the 90th, 75th, 50th, and 25th percentiles for the data pool you requested, as well as the average score.
How good is this data? The Performance Monitor on the Concept2 Indoor Rower is not just a simple revolution counter. It carefully measures the acceleration and deceleration of the flywheel on every stroke and uses that data to calculate the actual power being dissipated by the flywheel, which it then converts to speed, pace, watts, and calories for the display. It also recalibrates itself with every stroke to account for environmental conditions. And every flywheel is calibrated at the factory so as to keep the calculations accurate to within .01%. This accuracy is what makes
it possible to compare scores rowed anywhere in the world. Indeed this accuracy makes the Online World Ranking possible.
Now that you have all this data at your fingertips, here’s how you can use it to improve your own training.
Test yourselfUse the pre-set workout function of the Performance Monitor (PM) to set the exact distance for your time-trial. As you row, the PM will count down the meters to zero and then display your time at the end. Record your time. You can also use the memory function to obtain additional information about your workout, such as average pace.
Rank yourselfGo to concept2.com and set up a personal logbook, if you don’t already have one. Enter your time-trial result and click the Rank button to rank your piece. Now click the Ranked Workouts tab to view your standing. You can also go back to the searchable Online Ranking itself, enter your event, age group, gender, and weight class, and find yourself in the list. Now that you’ve done this for one distance, try a few more. The more you do, the more you will learn about your own conditioning relative to everyone else who has entered data.
Challenge yourselfNow that you know where you stand, you can start to set goals. Take a look at the fastest times for the different distances. There is always the ultimate goal of besting everyone else…and bringing home a world record in one or more categories. Or maybe you just want to set a goal of improving your percentile ranking by five or ten points for each ranking distance. See how high you can get in the rankings by April 30, when the ’07 season closes.
Analyze your strengths and weaknessesThe most powerful way to use the data, though, is to compare your own personal best scores for all the different distances to the accumulated data for your age/gender/weight class, you can learn a lot about your relative strengths and weaknesses. At which distance is your percentile ranking the highest? At which distance is it the lowest? Are you in 90th percentile for the 500-meter piece, but only average for the 10k? Armed with this information, you can then focus your training program where it will benefit your conditioning the most.
As an example, the following tables contain data obtained from the online ranking for men’s and women’s age 30-39 heavyweight categories. (“Heavyweight” is an old rowing term that means over 165 pounds for men and over 135 pounds for women.) The first column contains the time-trial distance in meters. The second
Judy Geer
Using Worldwide Erg Data to Fine-Tune Your Training
March 2007
��

...continued
Using Worldwide Erg Data to Fine-Tune Your Training
column, “2007 Record,” is the fastest time that has been posted for that distance since May 1, 2006. The third column, “Record pace,” indicates the pace per 500 meters that was required to achieve the record time. It is helpful to understand pace since the PM displays it while you are rowing. It’s just like time per mile in running. The faster you go, the lower your pace number because it is taking you less time to row 500 meters.
Add your own data to the last two columns. If you didn’t record your pace, you can use the pace calculator at http://www.concept2.com/us/training/tools/calculators/pacecalculator.asp to quickly calculate it from your time.
Women 30-39 heavy – 2007 data
Distance (m)
2007 Record
Record pace
90th %ile
75th %ile
50th %ile
25th %ile
Average time
Average pace
Your time
Your pace
500 01:37.7 01:37.7 01:47.2 01:53.4 02:03.0 02:13.4 02:06.6 02:06.61000 03:39.2 01:49.6 03:46.3 03:55.9 04:16.6 04:33.4 04:25.4 02:12.72000 07:09.9 01:47.5 07:36.0 08:08.0 08:43.1 09:39.8 09:03.9 02:16.05000 19:46.4 01:58.6 21:03.0 22:15.0 23:51.0 25:36.7 24:18.4 02:25.86000 24:09.4 02:00.8 25:18.7 26:32.8 28:00.0 30:00.9 28:34.7 02:22.910000 40:57.8 02:02.9 42:47.9 44:46.0 46:40.6 50:12.0 47:55.1 02:23.8
Men 30-39 heavy – 2007 data
Distance (m)
2007 Record
Record pace
90th %ile
75th %ile
50th %ile
25th %ile
Average time
Average pace
Your time
Your pace
500 01:17.5 01:17.5 01:26.7 01:32.0 01:37.6 01:44.9 01:39.6 01:39.6
1000 02:48.3 01:24.2 03:10.0 03:18.3 03:30.2 03:51.7 03:37.6 01:48.4
2000 05:46.7 01:26.7 06:38.8 06:57.1 07:23.1 07:56.0 07:33.0 01:53.3
5000 15:55.3 01:35.5 17:59.1 18:44.1 19:44.7 21:12.0 20:11.5 02:01.1
6000 19:57.1 01:39.8 21:38.5 22:30.6 23:46.9 25:54.0 24:28.7 02:02.4
10000 34:23.8 01:43.2 37:07.2 38:27.5 40:27.6 43:12.6 41:11.2 02:03.6
Now let’s plot the data to get a visual sense of what’s going on. These plots show the time-trial distance along the x-axis (horizontal) and the pace (in time per 500 meters) on the y-axis (vertical).
As expected, as the time-trial distance gets longer, the pace slows, and thus the pace number gets larger.
Men's �0-�� Heavyweight
00:00.0
00:17.3
00:34.6
00:51.8
01:09.1
01:26.4
01:43.7
02:01.0
02:18.2
500 1000 2000 5000 6000 10000
distance (m)
pac
e (t
ime/
�00m
)
record pace
average pace
March 2007
�0

...continued
Using Worldwide Erg Data to Fine-Tune Your Training
Women's �0-�� Heavyweight
00:00.000:17.300:34.600:51.801:09.1
01:26.401:43.702:01.002:18.202:35.5
500 1000 2000 5000 6000 10000
distance (m)
pac
e (t
ime/
�00m
)record pace
average pace
Men's �0-�� Heavy - example
00:00.0
00:17.3
00:34.6
00:51.8
01:09.1
01:26.4
01:43.7
02:01.0
02:18.2
500 1000 2000 5000 6000 10000
distance (m)
pac
e (t
ime/
�00m
)
record pace
average pace
example
Now comes the best part. Add your own data to this graph and see where it falls.
Below is an example. Note that our sample person is performing very close to the records for the short time-trial distances, but fades to average and even slower than average as the length of the test increases. This person needs to work on the aerobic system by doing more training at levels at or just below his anaerobic threshold and by building his endurance.
A person with the opposite curve—average on short pieces and better than average at longer pieces—will need to do more anaerobic work. Short intense intervals at high intensity should be worked into the training program on a regular basis.
All that data is waiting; take advantage of it. Test yourself, rank yourself, analyze your strengths and weaknesses, and then take the steps you need to take to improve.
Judy Geer was a member of three U.S. Olympic Rowing Teams (1976, 1980, 1984). She placed sixth in both 1976 and 1984; 1980 was the boycott year. Since then, she and her husband Dick Dreissigacker (also an Olympic rower) have raised three children, now ages 15, 18, and 20, who are national-level competitive athletes in their own right. Judy continues to train and race in sculling, running, Nordic skiing, and biathlon.
March 2007
��

Mark Rippetoe
The most useful theories are those that simplify our understanding of apparently complicated things. The theory of evolution explains the rather interesting fact that frogs and humans both have two forearm bones, that grasshoppers and catfish share the common pattern of repeated trunk segmentation, and that all of us, including bacteria, use pretty much the same high-energy phosphate system to move things around inside our cells. My observations will never be this profound, interesting, or important. They will not even be that original. But since you apparently have nothing better to read right now, let’s just enjoy these next few minutes together as though they will be useful.
Barbell training has been the focus of my attention for the last couple of decades. I am not bored with it yet. Whenever I have the opportunity to train a group of interested, motivated, bright people, I learn as much as they do. It has recently come to my attention that there are objective ways to describe proper form for the basic barbell exercises that are valid for everybody that does them, regardless of their anthropometry. For example, it doesn’t matter how long your femurs or how short your back, the bar is going to come off the ground in a deadlift when the bar is directly under the shoulder blades. (For a detailed discussion of
the deadlift, see my article “A New, Rather Long Analysis of the Deadlift.”) This position will place the shoulders slightly forward of the bar and the arms at a slight angle back to it. This is a function of the mechanics of the skeleton, and is true even when form is bad: if the bar is too far away from the shins, and not right against them in a position that minimizes the torque against the hip joint, the bar still leaves the ground from a position plumb to the scapulas. Even if you wanted your back vertical due to the mistaken idea that a vertical back is “safer” than an inclined back, ultimately it doesn’t matter because your skeleton cannot pull a heavy weight this way. But any correct pull from the floor—for deadlift, clean, or snatch—will start with the bar directly under the scapulas and against the shins. Any video of a heavy deadlift, clean, or snatch from the side will demonstrate this fact. It will also show that the bar leaves the ground when it is right above the middle one-third of the foot (fig. 1). Why the middle one-third of the foot? Because the weight of the load is distributed over the whole plantar surface of the foot if the load is in balance, and the load in question is the combined weight of you and the bar acting at the ground directly under the center of mass (COM) of this lifter/barbell system. If the weight is disproportionately on the toes or heels, the COM is either forward or behind where it should be to achieve its greatest distribution against the ground. When the weight is light, the mass of the body is the primary factor in balance. As the bar becomes heavier—as you get stronger—it becomes a larger percentage of the load, and the COM of the system gets closer to the COM of the bar. For this reason it is possible to do light weights with form that will be wrong, or ineffectual, at heavier weights, but heavy weights are unforgiving of errors in form that result in unbalanced loads.
It is also a fact that a squat is only in balance when the bar is directly over that same middle one-third of the foot. It doesn’t matter where the bar is on your back or shoulders, if the bar is moving straight down or up as it will in any heavy squat that doesn’t get dumped on the floor, the bar will never deviate much from a position directly above this place. If it does, it gets out of balance and slows down until it either gets back in balance or gets missed.
With this in mind, it is possible to identify certain aspects of any correct squat, regardless of bar position.
At the top of the squat: • All the skeletal components that support the bar—the
knees, hips, and spine—will be locked in extension so that the muscular components have to exert only enough force to maintain this resting position
• The bar will be directly over the mid-foot
Popular Biomechanics
Figure 1
March 2007
��

...continued
Popular Biomechanics
At the bottom of the squat:• The spine will be held rigid in lumbar and thoracic
extension• The bar will be directly vertical to the middle of the
foot• The feet will be flat on the ground• The thighs will be parallel to the vertical plane of the
foot• The acetabulum, or hip joint, will be lower than the top
of the patella
Now, you’re free to deviate a little between top and bottom, but if you don’t start and stop as described, you’re wrong mechanically and the squat will be harder than if you were right. And, actually, if the bar stays in the correct vertical position over the mid-foot on the way down and up, you are doing it right. Your skeleton is solving the problem of how most efficiently to use your muscles to get the job of squatting done. It does so within the constraints imposed on it by the physics of the barbell/body/gravity system we all lift within. (And no, this does not vindicate the Smith machine. There is a gigantic, bottomless ocean of willingly misunderstood difference between a machine that makes the bar path vertical and a squat that is executed correctly enough to have a vertical bar path. Muscle and skeleton should do the job of keeping the bar path vertical, not grease fittings and floor bolts.)
If the bar path is vertical, two other squat variables can be analyzed. The angle of the back—that is, the general plane of the torso—will vary with the position of the bar on the torso, either on the back for a back squat or on the frontal deltoids for a front squat. And the position of the knees—the front-to-back distance from the back of the butt to the front of the knees—will vary with both back angle and stance. If the above five non-varying criteria for the bottom position are met, bar position and stance will control all the other position variables in all styles of squat.
The position of the bar on your back determines what the trip down and up will look like from the side. In a deadlift, the bar is always hanging from the arms and is always under the scapulas until it passes the knees, so the back angle is essentially predetermined,
though of course it varies according to individual anthropometry. But the front squat, high-bar back squat, and low-bar back squat are all done with different back angles. Each causes the skeleton to move in a different way between the top and the bottom of the movement. This is because the bar position on the trunk varies relative to the hip and knee. When the bar is on the back, either on top of the traps in the high-bar or “Olympic” squat or just below the spine of the scapula in the low-bar squat, the back will be inclined forward at an angle that will place the bar over the mid-foot. The higher the bar on the back, the more vertical the back angle will be to make this happen (fig. 2). This means that a high-bar squat must have a steeper back angle than a low-bar squat if form is to be correct. A front squat places the bar at roughly the same level as a high-bar squat, but across the depth of the chest on the anterior deltoids, requiring the back angle to be so steep as to approach vertical.
A near-vertical back will result in a knee position much forward of that in a low-bar back squat; the high-bar squat is intermediate between the two. A knees-forward back-vertical position at the bottom produces a more acute knee angle, an already shortened hamstring, and a more extended hip. The front squat is therefore a much more quad- and glute-dominant movement than the low-bar back squat, since these are the muscles that remain in a position to contribute to the lift. This is also what’s wrong with knees too far forward in the back squat: it is undesirable not because having the knees too far forward will destroy them but because of the detrimental effect it has on hip extension.
The vertical back position of the front squat seems like it would result in a more direct compressional load on the spine than the back squat’s inclined angle would produce. This is partially true. The lower back is in a nearly vertical position, but the upper back has a much tougher job because the load it is holding up is farther away from the spine. The bar in a back squat, low-bar or Olympic, sits directly on top of the muscles that are holding it directly over the mid-foot. The front squat places the bar all the way across the depth of the chest, which in a bigger guy might be 12 inches away from where it would be sitting in a back squat. This is a much longer lever arm than no inches at all and presents a mechanical challenge to the muscles that maintain thoracic extension (it is very common to get pretty sore between and just below the shoulder blades when first starting the exercise). So while the lower back is vertically compressed, unless you are flexible enough to be capable of actually leaning back a little with the bar on your anterior delts, your thoracic erector muscles have a lot of work to do. This results in a gradual shift from compression to torque from low back to upper back, so things are not as simple as they may seem. The load on the lumbar spine in the front squat is friendlier (partly because it will be lighter) as long as the upper erectors are able to maintain position, and for this reason many people find it easier on the low back to front squat. And anything that gets too heavy gets dropped automatically before death can occur.
Figure 2
March 2007
��

...continued
Popular Biomechanics
The upshot of all this technical analysis is that back angle is determined by bar position. But wherever the bar is on your back, it will be right over the middle of your foot, and your feet will be flat on the floor, or your mechanics will be less than efficient.
Another immutable criterion for correct form is that your thighs will be aligned with your feet. This also keeps the feet flat, removes any non-linear loading (twisting) of the knees, and ensures the participation of the adductors in the lift if the stance is wide enough to require it. Toe angle—and therefore knee angle if the feet are parallel to the thighs—is determined largely by stance width. A close-stance squat can be done either with toes out or toes pointing forward with only a slight angle, maybe just five or ten degrees. But the knees have to move straight forward to keep the thighs parallel to the feet; the knees always follow the toes to preserve the linear relationship between the patella, the patellar tendon, and the tibial plateau. These three things need to stay in a nice straight line if the knee is to continue to work without undue wear, especially under a load. And this is why the knee voluntarily lines up this way in any unweighted squat. Next time you stand up from a seated position take note of the alignment of your knees and feet.
The wider the stance, the wider the foot angle and the wider the knees will have to be to keep the thighs parallel to the feet. At closer stances, with more forward-pointing toes, the knees will travel farther forward than they do at wider knee angles. This is because the narrower the stance, the longer the distance from the front of the knee to the back of hip. And the longer this distance, the more the knees must travel forward to accommodate it (fig. 3). A close stance with toes pointed out will display the same knees-forward position that a moderate stance at the same foot angle will. At very wide stances like those favored by powerlifters using squat suits, there is very little forward travel of the knee at all, and the shins tend to stay nearly vertical. But a wide stance will not work if the toes are pointed forward, because of the twist it places in the knee; this is about the only squat stance that is really anatomically wrong. I prefer heels at shoulder width for the generalized effects, but other stances can be used correctly as long as the knee is not twisted.
Feet flat on the ground are another important indicator of balance, and the coach learns to look for “air” under the heels as a sign of subtle mechanical problems. Most people who squat in those stupid “shocks” running shoes have learned how to squat balanced on the ball of the foot out of necessity, so it can be done. The point is that optimum engagement of the hip extensor muscles, the “posterior chain,” cannot take place in this position, and that is what makes it wrong (that is also what makes weightlifting shoes a good place to spend a little money). Lots of form problems get embedded in lots of motor pathways; the reason we are having this discussion about objective technical markers for good form is to help identify the why and how of correct. Feet flat on the ground are absolutely essential for the engagement of all the muscles that make a squat correct. And “flat” refers to the pressure of the
weight distributed evenly across the sole of the foot, not the angle of the foot against the floor that might well be the product of a weightlifting shoe. The depth of the squat is determined empirically by observing the relationship between the hip joint and the top of the patella. These landmarks are easy to see from the side: the hip joint is behind the apex (the most pointy part) of the folds in the shorts made when the hips bend, and the top of the kneecap is clearly visible on the knee even through sweats. Depth is important for hundreds of reasons you already know, so I won’t go into it here. Just remember: if in doubt, it’s high. Ass-to-ankles is not absolutely necessary, and if it requires a relaxation of the lower back arch to get there, it’s wrong. Breaking the plane of parallel is good enough, deeper is better, but excessive depth to satisfy an arbitrary ideal that cannot be attained with useful weights is counterproductive.
The press can be described in a similar way.
In the starting position for the press:• Knees, hips, and lumbar and thoracic spine are all locked
in extension• The bar rests on the deltoids or chest, depending on
individual flexibility and body shape• Elbows are in front of the bar• The bar is directly over the mid-foot
At the top of the press (fig. 4): • Knees, hips, lumbar and thoracic spine, and elbows are all
locked in extension• Scapulas are elevated (i.e., “active shoulders”) • The bar, the scapulas, and the mid-foot will be vertically
aligned
Figure 3
March 2007
��

...continued
Popular Biomechanics
During the trip up from the starting position to the top, the bar path should also be vertical and directly over the mid-foot. If it deviates from this position a little as it travels forward around the head, the COM is kept over the mid-foot by leaning back slightly, to the extent necessary to balance the bar deviation. This should be minimized by keeping the bar close to the face during the press so that the bar doesn’t get so far away forward that it cannot be pressed efficiently.
The clean and the snatch are more complicated than the slow lifts because they travel so much farther and utilize movement around so many joints. But like the press, any deviation of the bar from alignment over the mid-foot is compensated for by movement of the body that keeps the COM of the system in balance over that point. Both lifts start and finish with the bar in the same relationship to the mid-foot that the other barbell exercises do, with a bunch of added complexity in between to keep the bodybuilders away from the bumper plates. Any discussion of the subtleties therein is best left to my betters.
The point of this rather dry discussion is that there are objective ways to quantify proper form in the basic barbell movements, to allow us to understand better what we’re seeing when we watch people lift. These criteria are based on skeletal considerations that do not vary with anthropometry, even though the individual expression of these criteria will. There are many ways to screw up the lifts, but an understanding of what we should be looking for at crucial places in the movements reduces the number of ways we are likely to do so. It also gives us some objective anatomical data to on which to base our discussions of good form and best practices for lifting.
Mark Rippetoe is the owner of Wichita Falls Athletic Club/CrossFit Wichita Falls. He has 28 years experience in the fitness industry and 10 years as a competitive powerlifter. He has been certified as an NSCA Certified Strength and Conditioning Specialist since 1985 and is a USA Weightlifting Level III Coach and Senior Coach, as well as a USA Track and Field Level I Coach. He has published articles in the Strength and Conditioning Journal, is a regular contributor to the CrossFit Journal, and is the coauthor of the books Starting Strength: A Simple and Practical Guide for Coaching Beginners and Practical Programming for Strength Training.
Illustrations courtesy of Lon Kilgore figure 4
March 2007
��

In January, we took you through a series of exercises designed to teach the high-hang power snatch (“high-hang” means starting the movement in a standing position with the barbell or dowel at hip height; “power” means the barbell is received in a partial squat). In February, we took you through a series of exercises designed to teach how to receive the snatch in the full squat position. The final movement in that progression was the high-hang squat snatch. Now we continue the lesson by learning the various positions the barbell travels when snatching from the floor.
The high-hang power snatch is a relatively simple movement that anyone can learn. The high-hang squat snatch is more complicated because receiving the bar overhead at the bottom of the squat requires a higher degree of flexibility, coordination, accuracy, agility, and balance, even at very light weight. The benefits of learning and training the movement are immense. In our experience, almost everyone who can do an overhead squat can learn to perform the high-hang squat snatch correctly with light weight.
In this article, we’ll introduce a series of exercises that develop the positioning pulls of weightlifting. In basic terms, this means moving the barbell from the floor to the bottom of the jumping position. In concept, it is very simple: Deadlift the barbell to mid thigh and then transition into the jumping position. But for some reason, most people have a difficult time with it.
The positioning pulls are unique to the barbell lifts. The main problem that needs to be resolved is that, in order for the bar to travel vertically, the knees have to get out of the way. In the starting position from the ground, the knees are over the bar. In the proper jumping position, the torso is vertical and the knees are below the bar. In the first pull, the legs extend, pushing the knees back. In the transition, the knees rebend and get under the bar again. Cleaning or snatching dumbbells, medicine balls, ammo cans, and most other odd objects doesn’t raise the same issue with the knees.
The three pulls
There are three pulls in Olympic-style weightlifting. The first pull brings the barbell from the ground to over the knees (mid-thigh). This is very similar to a standard deadlift. There is then a transition to the bottom of the jumping position. This transition is also called the scoop or double knee bend. Teaching the scoop is controversial, with many great coaches disagreeing about it. We believe that while practicing it slowly helps build the muscle memory and teach the proper positions, the scoop can’t be consciously performed during a full clean or snatch.
After the transition, the torso is vertical, the arms are straight, and the knees are slightly bent. Ideally, the weight is on the full foot with most of the weight distributed toward the heels. This begins the second pull, which is an explosive extension/jump against the ground. This is the most important part of the lift, both in terms of
making the lift and maximizing adaptation. This violent ankle, knee, and hip extension generates momentum and elevation on the barbell, making it temporarily weightless so that the athlete can pull himself aggressively down against the bar into the receiving position. This is the third pull. The athlete does not merely drop under the bar. Frame by frame analysis of elite lifters shows downward movement of the hips and torso that is much faster than gravity. This speed would not be possible without downward force against the bar by the arms. The arms don’t pull the bar up, they pull the body down during the third pull.
Exercises
Mike Burgener, with Tony Budding
Pulling Positions for the Snatch
Photo 1
Step 1
Make sure that you are confident in your ability to perform the high-hang squat snatch as described in the last month’s issue of the CrossFit Journal, at least with a dowel. We have not seen a high success rate of athletes developing a proper full (from the ground) squat snatch without first developing the high-hang squat snatch.
Once the high-hang squat snatch is solid, we can begin to work our way down. The key position is the bottom of the jumping position, which is also the “down” of the “down and up” part of the Burgener warm-up (see photo 1).The torso is vertical, the arms straight, the knees bent, and the heels down. You have to get to this position in every clean and snatch (as well as in the jerk, but with the hands up and the bar resting on the shoulders). From here, there is only one direction to go, and that is straight up. This is key for a successful lift. Beginners often make the mistake of not getting the bar and body into the proper position to be explosive vertically. Snatching from the high hang is much easier because the bar and torso are in the proper position from the beginning. (See high-hang snatch video.)
http://media.crossfit.com/cf-video/HighHangSnatch.mov
http://media.crossfit.com/cf-video/HighHangSnatch.wmv
Online VideoHigh Hang Snatch
March 2007
��

http://media.crossfit.com/cf-video/Transition.mov
http://media.crossfit.com/cf-video/ToKSnatch.mov
...continued
Pulling Positions for the Snatch
http://media.crossfit.com/cf-video/ToKSnatch.wmv
Online VideoHang Snatch
http://media.crossfit.com/cf-video/Transition.wmv
Online VideoTransition
Step 2
From the down position, take the barbell to mid-thigh by pushing the butt back and straightening the knees (see photo 2). It should be noted that the phrases “mid-thigh” and “top of knees” are approximate. Each athlete’s body is unique it its proportions. From the mid-thigh position we want to practice the transition or scoop. When cleaning and snatching, this is an automatic movement and we really don’t focus on it. We just jump, and the body does it naturally. For teaching the snatch and clean, we cover all the mechanics of the lifts and show the athletes what really happens. We want to practice going from mid-thigh to transition and then into the second pull (see transition video). We want to make sure the athlete has a handle on this and practice it several times before moving on to step 3. First we practice just moving back and forth between mid-thigh and the “down” position. Then we practice hang snatches from the mid-thigh position (see hang snatch video). This practice works well to create a basic understanding of what must happen when one performs the snatch. It is essential that the knees rebend, the torso get vertical, and the arms stay straight before the explosive second pull begins.
Photo 2
Step 3
The next step is to move the bar (or dowel) below the knees. From the mid-thigh position, continue pushing the butt back to get it down almost to the level of the knees (keep the back arched!). As soon as the bar passes the knees, maintain the torso angle and bend the knees to lower the bar to mid-shin. The shoulders should remain in front of the bar (see photo 3). Getting the bar back to mid-thigh is what this drill is all about. The back angle must stay the same while the knees are pushed back and the bar, hips, and shoulders all raise at the same rate. You should practice going back and forth between mid-shin and mid-thigh (see shins-to-thighs video). When you’re comfortable with that, practice mid-shins to mid-thighs, transition, mid-thighs to mid-shins, back and forth, over and over again.
Photo 3
http://media.crossfit.com/cf-video/ShinsThighs.mov
http://media.crossfit.com/cf-video/ShinsThighs.wmv
Online VideoShins-to-thighs
March 2007
��

http://media.crossfit.com/cf-video/FullSnatch.wmv
Online VideoFull Snatch
...continuedPulling Positions for the Snatch
Photo 3
Mike Burgener, owner of Mike’s Gym (a CrossFit affiliate and USAW Regional Training Center), is a USAW Senior International Coach, former junior World team (1996-2004) and senior World team coach (2005), and strength and conditioning coach at Rancho Buena Vista High School in Vista, Calif.
Tony Budding is a trainer at CrossFit Santa Cruz. Somehow, his broadly varied background—from financial analyst in mergers and acquisitions to gym owner to manager of a small non-profit foundation to high school English and PE teacher—brought him to CrossFit, and he is now the multimedia guru for CrossFit.com.
Caruso snatch video courtesy of Ironmind and Randall J. Strossen.
Step 4
The final progression is practicing the full snatch (see full snatch and Caruso snatch videos). Note that in the starting position (photo 3), the lifter has a tight back, the hips are above the knees, the weight is on the full foot, and the shoulders are in front of the bar. In addition, the elbows are slightly rotated outward with the wrist in a neutral position. The bar is raised to mid-thigh (i.e., to the end of the first pull) by extending the legs only. One must understand that the back, the shoulders, the bar all rise at the same time, maintaining the angle of the back relative to the floor that it had in the starting position. As soon as the legs are extended, the lifter thinks “Jump!” This should automatically trigger the transition, knee bend, or scoop while raising the torso to vertical. The arms must remain straight throughout these movements. The bar comes into the hips as the lifter explodes into full extension. Only after triple extension do the arms bend, pulling the athlete down into the receiving position.
Practicing these drills by the numbers will aid the lifter in the basic understanding of what is required for the snatch and clean as well as the jerk. We will cover the specific mechanics of the clean and the jerk in later articles. In general, we have found that the more the athletes understand all the basic mechanics of the lifts, the more successful they become.
www.crossfit.com
The CrossFit Journal is an electronically distributed magazine chronicling a proven method of achieving elite fitness.
Subscription information and back issues are aailable at the CrossFit Store at http://store.crossfit.com
If you have any questions or comments, send them to [email protected]
If you have any questions or comments send them to [email protected].
Your input will be greatly appreciated and every effort will be made to answer emails.
EditorsGreg GlassmanLauren GlassmanCarrie Klumpar
AdvisorBrian Mulvaney
Design/LayoutOtto Lejeune
All Rights reserved 1006
CrossFit is a registered trademark of CrossFit Inc.
©®
®
Practicing these drills by the numbers will aid the lifter in the basic understanding of what is required for the snatch and clean as well as the jerk. We will cover the specific mechanics of the clean and the jerk in later articles. In general, we have found that the more the athletes understand all the basic mechanics of the lifts, the more successful they become.
http://media.crossfit.com/cf-video/FullSnatch.mov
http://media.crossfit.com/cf-video/CarusolSnatch.wmv
Online VideoCaruso Snatch
http://media.crossfit.com/cf-video/CarusoSnatch.mov
March 2007
��

Becca Borawski
Nothing quite catches the attention of an audience like a knockout, whether it be in boxing, kickboxing, or mixed martial arts. The left hook is a particularly famous knockout punch, and it is the focus of the second part of this four-part series on striking. However, it’s not just for knockouts. The left hook can be utilized in the gym to develop explosive power, hip movement, and coordination.
All techniques and stances in the article will be described for a right-handed individual; left-handed fighters will need to reverse the left and right directions for all the techniques (e.g., right foot forward in fighting stance and a right hook).
The left hook
There are three distances a fighter can work from: long, middle and tight. The left hook is a powerful tool for the tight distance, also known as “inside” fighting.
The left hook is typically a power punch and consequently a fighter puts his whole body into the punch. Fighters who do not train proper technique fall victim to what is termed an “arm punch,” or a punch without the power of the hip and bodyweight behind it, strictly swinging the arm. As with everything in CrossFit, our goal is to learn to use multiple joints and the entire body in coordination, with the end result being powerful explosive movement.
Like the right cross, the movement for the left hook originates in the foot. Beginning in fighting stance (see the detailed description of fighting stance in last month’s article on the jab and the right cross), you should transfer weight into your front foot, bending your knee, and pivoting your left foot outward. Your hip will follow the rotation of your knee in toward the target. As your hip turns inward, your upper body and shoulder follow as well, putting your entire body behind the shot as your fist lands.
Photo 2 is the standard fighting stance. Photo 3 shows where your feet should be when landing a left hook.
Different trainers teach different ways to hold the fist when throwing the left hook. When throwing a powerful left hook, Bridgett prefers to keep her fist parallel to the ground, with her knuckles up and her thumb toward her when the punch lands.
(Photo 4) Make sure that your elbow joint creates a ninety-degree angle in your arm and that your elbow is not above or too far below parallel with your fist. Keep your chin tucked down and your right hand up at your face. Protect yourself at all times, even when executing offensive movements
In this full body photograph (Photo 5), Bridgett’s left foot has pivoted inward and a higher percentage of her weight is over her left foot than in the fighting stance. Her knee has turned inward and her hip has followed. Her shoulder and hip are in line because her entire body has moved together to power her punch. Her
The Left Hook
Once again, as I describe the left hook, Bridgett “Baby Doll” Riley demonstrates proper form in the photographs. Bridgett is a former world champion boxer and a five-time world champion kickboxer. She trains and works at the world-famous Wild Card Boxing Gym in Hollywood, California, and also works as a stuntwoman and actress.
Coincidentally, Bridgett’s favorite punch is the left hook and several of her knockout wins have come courtesy of this strike.
Photo 2
Photo 3
Photo 1
March 2007
��

...continued
The Left Hook
arm is not swinging on its own. The snapping pivot of her core as a solid unit behind her arm makes a solid punch.
An alternate way to throw the left hook is to throw it with the thumb toward the ceiling. Bridgett uses this punch when she is throwing a wide “slapping” left hook. This is a distraction technique, or setup, as opposed to an intended knockout punch. She typically uses this slapping left hook to set up her right cross.
To add more power to the left hook, you can “sit down” into it. Bend your knee more and put more bodyweight behind the punch. You can throw the left hook to the body or to the head. A good combination to set up a left hook is a jab, followed by a right cross, followed by a left hook. You can also double up on the left hook. Opponents are frequently expecting left-right combos, not left-left combos, and it can be an effective way to catch them off guard with a damaging blow.
As with everything in CrossFit, our goal is to learn to use multiple joints and the entire body in coordination, with the end result being powerful explosive movement.
Becca Borawski, CSCS, teaches and trains at Petranek Fitness/CrossFit Los Angeles in Santa Monica. She has a master’s degree in film from the University of Southern California and a background in martial arts training. She has blended these skills to produce DVDs and build websites for professional fighters. Her main job is as the music editor on the TV show Scrubs. She currently trains Brazilian Jiu-Jitsu with Rey Diogo, a Carlson Gracie affiliate.
For examples of knockouts by left hook in Mixed Martial Arts, see the following fights: • Pride Total Elimination 2004 – Kevin Randleman vs. Mirko Filipovic • UFC 31 – Chuck Liddell vs. Kevin Randleman
Bridgett Riley is a former world champion boxer and a five-time world champion kickboxer. She trains and works at the world-famous Wild Card Boxing Gym in Hollywood, California, and also works as a stuntwoman and actress.
To see Bridgett in action, watch a clip online from her World Kickboxing Association championship fight
Photo 5Photo 4
March 2007
�0

Jeff Martone
The clean is a traditional and versatile kettlebell exercise that everyone needs to master. Its original purpose was to provide a safe means to get one or two kettlebells in position for overhead lifts. The clean is the precursor for the military press, push press, double jerk, etc. The clean can be used by itself as an exercise for strength and endurance or in combination with bodyweight exercises or other high-repetition kettlebell exercises. Many combination exercises will be addressed in future articles. For now, lets concentrate on mastering the KB clean.
Contrary to the belief of many beginners, the KB clean is not supposed to be a forearm-toughening exercise! When properly executed, it should land as light as a feather and cause no bruising or pain to either the forearm or shoulder. Make a permanent “note-to-self”: Sharp pain, consistent pain, or bruising usually means one thing—you are doing it wrong! Stop, assess the situation, make the necessary corrections, and then move on. The goal is training—not maiming.
Kettlebell Clean
The Standard
1. Start as if you were going to perform a one-arm Russian swing (described in CFJ # 53). All the points that apply to the swing also apply to the clean, minus the straight-arm requirement. The arms must stay loose, and the hips must do all the work of driving the kettlebell upward. Avoid the tendency to curl the KB.
2. The kettlebell should travel the shortest distance possible, following a vertical path, rather than an arc.
3. Pull the kettlebell into the body at shoulder height, allowing it to “roll” over onto the forearm on both the negative and on the positive. Do not allow the kettlebell to flip up and “crash” on your forearm.
4. The KB, the elbow, and torso must become one solid unit at the top of the clean. The shoulder must be pressed down, armpit squeezed tightly, triceps resting on the ribcage, and kettlebell resting between the forearm and the biceps, almost in the crook of the elbow.
5. Upon lockout, as the kettlebell lands on your forearm and upper arm, immediately tighten the abs and let out a little bit of air (similar to a boxer exhaling with a punch).
6. Keep the wrists straight and neutral; no flexion!
Tip: Contracting your glutes and abs hard will generate the power necessary to project the kettlebell.
March 2007
��
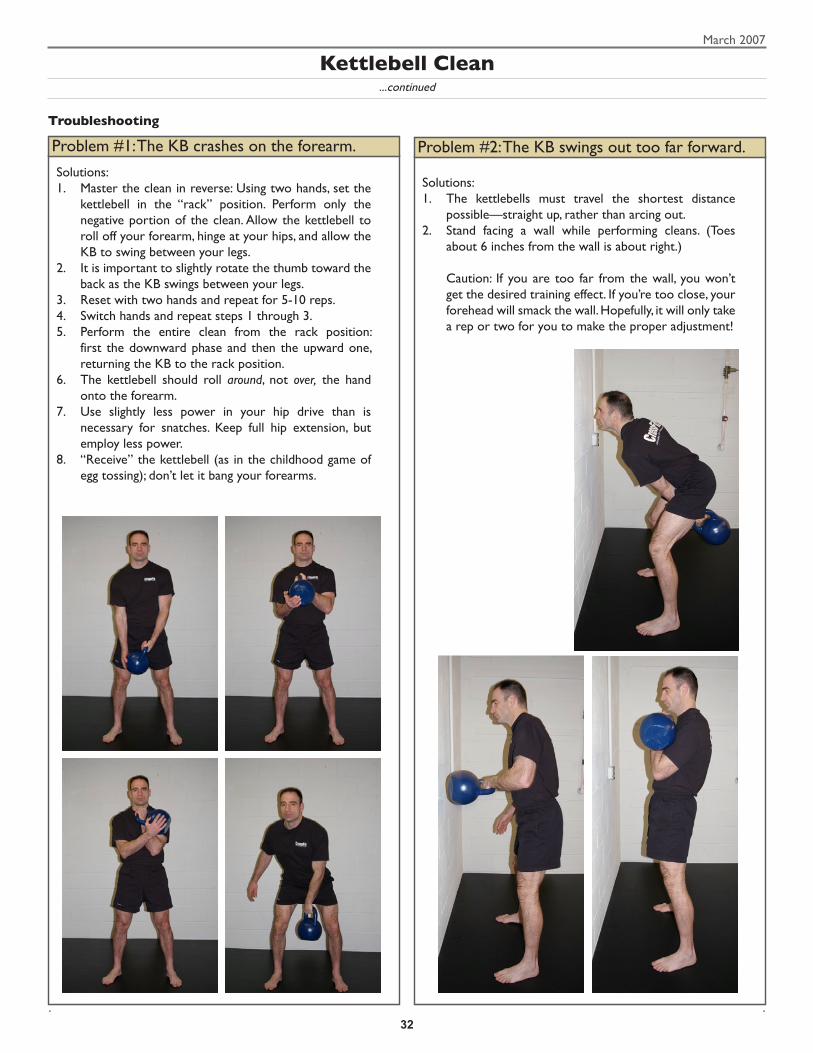
...continued
Kettlebell Clean
Problem #1: The KB crashes on the forearm.
Solutions:1. Master the clean in reverse: Using two hands, set the
kettlebell in the “rack” position. Perform only the negative portion of the clean. Allow the kettlebell to roll off your forearm, hinge at your hips, and allow the KB to swing between your legs.
2. It is important to slightly rotate the thumb toward the back as the KB swings between your legs.
3. Reset with two hands and repeat for 5-10 reps.4. Switch hands and repeat steps 1 through 3.5. Perform the entire clean from the rack position:
first the downward phase and then the upward one, returning the KB to the rack position.
6. The kettlebell should roll around, not over, the hand onto the forearm.
7. Use slightly less power in your hip drive than is necessary for snatches. Keep full hip extension, but employ less power.
8. “Receive” the kettlebell (as in the childhood game of egg tossing); don’t let it bang your forearms.
Problem #2: The KB swings out too far forward.
Solutions:1. The kettlebells must travel the shortest distance
possible—straight up, rather than arcing out.2. Stand facing a wall while performing cleans. (Toes
about 6 inches from the wall is about right.)
Caution: If you are too far from the wall, you won’t get the desired training effect. If you’re too close, your forehead will smack the wall. Hopefully, it will only take a rep or two for you to make the proper adjustment!
Troubleshooting
March 2007
��

Problem #3: The KB swings too far outside the shoulder.
Solutions:1. Perform the clean while standing with your side close to
a wall. 2. Squeeze your lats and press your upper arm against the
ribcage. (Imagine your are holding a book under your arm. If you let your elbow flare out, you will drop the book.)
...continued
Kettlebell Clean
Problem #4: Your wrist hurts.
Solutions:1. Do not flex or extend the wrist. Keep it straight and
neutral at all times. 2. You should be able to extend your fingers when the
kettlebell in the “rack position.” It is important that the kettlebell handle is placed diagonally across the your hand, similar to a “false grip” on the rings.
Problem #5: Your elbow hurts.
Solutions:1. Squeeze your fists, lats, abs, and glutes just before the KB
touches your forearm. 2. Gradually build up to heavy weights or high reps.
Problem #6: Your lower back hurts.
Solutions: 1. Sit back, rather than down.2. Keep your shins nearly vertical throughout the
movement.3. Keep intra-abdominal pressure and glute tension
high.4. Keep your chest “open” by pinching your shoulder
blades together.5. Inhale through your nose as the weight descends.
The kettlebell clean is a great alternative to the barbell clean, especially if you have wrist flexibility issues. It teaches your body to generate power from the hip and to absorb impact and decelerate force. The benefits of these skills transfer to many sports and occupations. As with all foundational lifts, invest extra time learning the basics, and you’ll soon be ready for the many variations.
Jeff Martone, owner of Tactical Athlete Training Systems, was one of the first certified senior kettlebell instructors in the United States. He is best known as the creator of “hand- 2-hand” kettlebell juggling, SHOT training, and the T.A.P.S. pull-up system. He is also the author of six training DVDs. He was the first to implement kettlebell training in a federal law enforcement agency and now offers instructor-level certifications. He has over 15 years of experience as a full-time defensive tactics, firearms, and special-response-team instructor.
March 2007
��

The GrinderCrossFit FRAGO #8, “SHANE”
CFHQSanta Cruz, CAUSA
01 Mar 07
OPS 09FRAGO 08 tO OPORd 01 — OP GRINdER
Ref: A. OPORd 01 01 Jul 06
task Organization: Annex A
1. SItUAtION. No Change.
2. MISSION“SHANE”: Complete as many rounds as possible in 20 minutes: 8
inverted burpees, 21 squats, and 12 burpees.
3. EXECUtION
a. Concept of Operations(1) Intent. Complete as many rounds of the exercises in 20
minutes as possible in a safe manner. this is a four-person-team team “time-specific” workout. the purpose of this workout is to develop cohesion and combat fitness under fatigue conditions through shared hardship, challenges, and competition.
(2) Scheme of Maneuver. the platoon will be divided into as many teams of four as possible. Each team will require a wall or other stable object to conduct the inverted burpees against. All teams will start at the same time. Each exercise must be completed before moving to the next one (all 8 inverted burpees must be finished before starting the squats and all squats finished before starting the burpees). the soldiers can take a rest at any time during the workout. Each team has to complete as many rounds as possible in the 20 minutes. the total number of complete rounds for each team member will be added together to obtain the total score for the team. For example, if soldier “A” completes 12 rounds, soldier “B” 15 rounds, soldier “C” 13 rounds, and soldier “d” 9, the total score for the team would be 49. Spotting is not permitted at any time.
(3) Main Effort. the safety of all personnel, and the development of unit cohesion and combat fitness through shared challenge and hardship.
March 2007
��

(4) End State. the safe and successful completion of all exercises.
b. Coordinating Instructions
(1) team Organization. Squad leaders can organize their soldiers however they wish. It is a leadership decision on how best to deploy each soldier to accomplish the mission.
(2) Scaling. the workout can be conducted in Pt gear or full battle gear to include vests with plates, depending on the fitness levels of your soldiers. the number of reps can be increased or decreased based on the skill level of your troops.
(3) Scoring. the final score for each team is the total of completed rounds by all members of the team; partial rounds are not counted. For example, if at the end of 20 minutes, a soldier has completes 12 rounds plus 6 inverted burpees of round 13, his score is 12. the team that has the most total rounds comes in first.
(4) Inverted Burpee. there are two methods of conducting the inverted burpee. For the first variation, the soldier begins supine on the ground, kips to standing, and then kicks up to handstand. However, few soldiers will be capable of kipping up to a standing position from their backs. For the second variation, the soldier begins in a standing position, squats down and rolls onto his back, and then, using momentum, rolls up to his feet and into a handstand (see Annex C). the two inverted burpee variations involve equal or greater work and greater skill than the traditional burpee.
(5) Safety. Ensure that all equipment is checked and serviceable before conducting the workout and that all soldiers are proficient in the required exercises. Safety is every member’s responsibility.
(6) Follow-on tasks. the next workout will require 2 x .50 Cal ammo cans and 2 x 25mm ammo cans per each four-man team. Soldiers must be proficient in the dead-lift, push-press, and thruster.
CrossFit FRAGO #8, “SHANE” ...continued
March 2007
��

CrossFit FRAGO #8, “SHANE” ...continued
3. SERVICE SUPPORt
a. Equipment Requirements. Each four-person team will require a wall or other tall, sturdy object to conduct the inverted burpees against; also, the use of a mat is recommended if conducting the inverted burpee on a hard surface such as a cement or wood floor.
b. time and Repetition Recording. One stopwatch for all teams and a method of recording each team’s rounds.
4. COMMANd ANd SIGNAL
a. timer/Score Recorder. Only one timekeeper is required for all teams. All four-man teams begin and end the workout at the same time. It is recommended that at least one person per team start his stopwatch to act as a backup in case the primary timekeeper’s stopwatch fails. A method of recording each team’s rounds is also required.
b. Instructor/Coach. to ensure proper conduct of the workout, use
of correct exercise form, and safety of execution, a designated member of the platoon can fill this billet.
Annexes:Annex A Workout diagram (AOO)
March 2007
��

CrossFit FRAGO #8, “SHANE” ...continued
Annex B Exercises Photos 1-6: Inverted burpee
1 2 3
4 5 6
March 2007
��

CrossFit FRAGO #8, “SHANE” ...continued
Annex B Exercises
March 2007
��