rossfit - · pdf filec the rossfit journalarticles c the rossfit journalarticles crossfit...
TRANSCRIPT
Cross itFthe
J O U R N A L A R T I C L E S
Cross itFthe
J O U R N A L A R T I C L E S
CrossFit Journal Article Reprint. First Published in CrossFit Journal Issue 51 - November 2006
© CrossFit is a registered trademark of CrossFit, Inc.® All rights reserved 2006
Subscription info at http://store.crossfit.comFeedback to [email protected]
Parkour BasicsJesse Woody
Mechanics, consistency, and intensity are the three pieces ofa complete foundation for a safe learning progression in anynew endeavor. Many of the elements inherent in the gradualand progressive creation of elite general physical preparednessapply equally to the pursuit of more specific skills and goals,including parkour, the ability to navigate your environmentfunctionally, confidently, and safely in a variety of situations.This month, I have collected into a single reference documentthe fundamental parkour moves I discussed in greater detailthroughout the past eight issues. I intend this to serve as akind of “getting started” reference manual for parkour,outlining a progression for learning proper technique thatenhances both the safety and the efficacy of the movementswhen applied to the varied challenges you may face.
A Compendium
Parkour articles in the CrossFit Journal
Introduction to Parkour #43 - March 2006
Environmental Awareness & the Roll #44 - April 2006
Two-Handed, Speed, & Lazy Vaults #45 - May 2006
Monkey, Dash, & Reverse Vaults #46 - June 2006
Jumping #47 - July 2006
Tic-Tac & Wall Run #48 - August 2006
Turn Vault & Cat Leap #49 - September 2006
Underbar & Gate Vault #50 - October 2006
1 of 10
Jesse Woody, age 26, father of two, has about eight years experiencein fitness and nutrition (though a lot of that was time wasted onbodybuilding). He works in various capacities for the Woodberry ForestSchool in Virginia, including working with the outdoor educationdepartment and, currently, transitioning to head strength and conditioningcoach. He’s been practicing parkour for three+ years (and CrossFit fora little over one), though he’s acted like a monkey his entire life. He isan administrator and frequent content contributor for the AmericanParkour website.
Cross itFthe
J O U R N A L A R T I C L E S
Parkour Basics: A Compendium (continued)
© CrossFit is a registered trademark of CrossFit, Inc.® All rights reserved 2006
Subscription info at http://store.crossfit.comFeedback to [email protected]
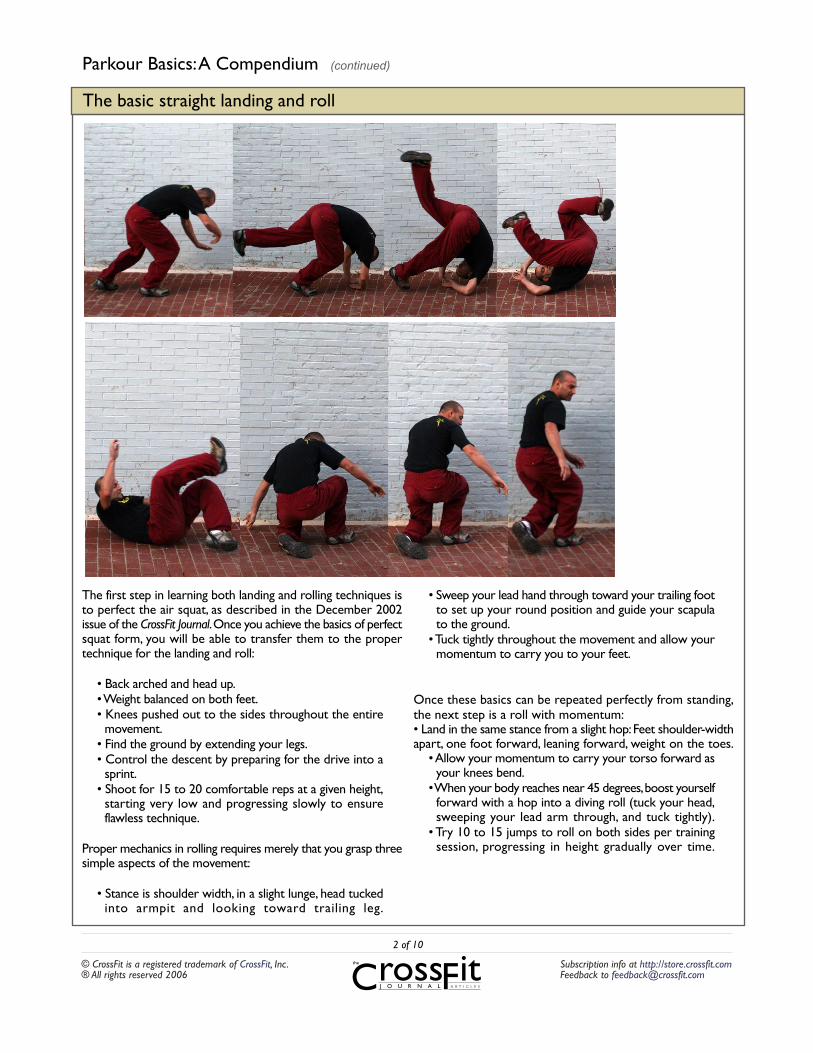
The first step in learning both landing and rolling techniques isto perfect the air squat, as described in the December 2002issue of the CrossFit Journal. Once you achieve the basics of perfectsquat form, you will be able to transfer them to the propertechnique for the landing and roll:
• Back arched and head up.• Weight balanced on both feet.• Knees pushed out to the sides throughout the entire
movement.• Find the ground by extending your legs.• Control the descent by preparing for the drive into a
sprint.• Shoot for 15 to 20 comfortable reps at a given height,
starting very low and progressing slowly to ensureflawless technique.
Proper mechanics in rolling requires merely that you grasp threesimple aspects of the movement:
• Stance is shoulder width, in a slight lunge, head tuckedinto armpit and looking toward trailing leg.
• Sweep your lead hand through toward your trailing footto set up your round position and guide your scapulato the ground.
• Tuck tightly throughout the movement and allow yourmomentum to carry you to your feet.
Once these basics can be repeated perfectly from standing,the next step is a roll with momentum:• Land in the same stance from a slight hop: Feet shoulder-widthapart, one foot forward, leaning forward, weight on the toes.
• Allow your momentum to carry your torso forward asyour knees bend.
• When your body reaches near 45 degrees, boost yourselfforward with a hop into a diving roll (tuck your head,sweeping your lead arm through, and tuck tightly).
• Try 10 to 15 jumps to roll on both sides per trainingsession, progressing in height gradually over time.
2 of 10
The basic straight landing and roll
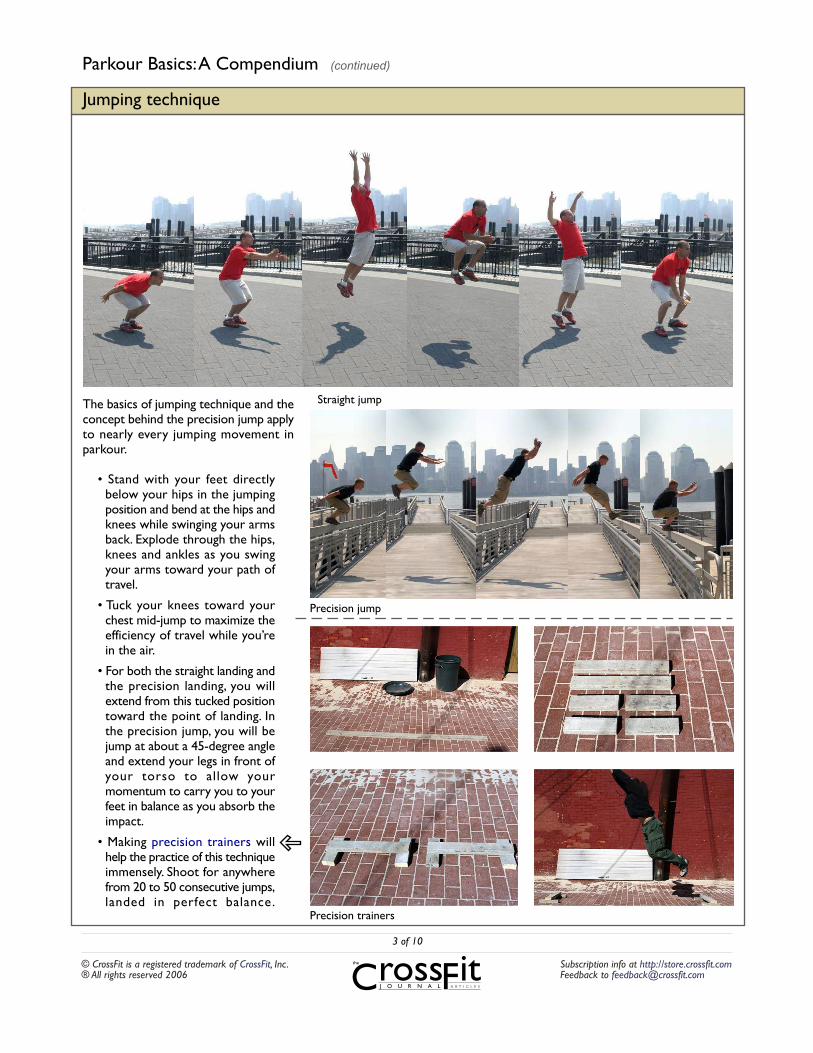
Precision trainers
Precision jump
Straight jump
Cross itFthe
J O U R N A L A R T I C L E S
Parkour Basics: A Compendium (continued)
© CrossFit is a registered trademark of CrossFit, Inc.® All rights reserved 2006
Subscription info at http://store.crossfit.comFeedback to [email protected]
3 of 10
Jumping technique
The basics of jumping technique and theconcept behind the precision jump applyto nearly every jumping movement inparkour.
• Stand with your feet directlybelow your hips in the jumpingposition and bend at the hips andknees while swinging your armsback. Explode through the hips,knees and ankles as you swingyour arms toward your path oftravel.
• Tuck your knees toward yourchest mid-jump to maximize theefficiency of travel while you’rein the air.
• For both the straight landing andthe precision landing, you willextend from this tucked positiontoward the point of landing. Inthe precision jump, you will bejump at about a 45-degree angleand extend your legs in front ofyour torso to allow yourmomentum to carry you to yourfeet in balance as you absorb theimpact.
• Making precision trainers willhelp the practice of this techniqueimmensely. Shoot for anywherefrom 20 to 50 consecutive jumps,landed in perfect balance.
Cross itFthe
J O U R N A L A R T I C L E S
Parkour Basics: A Compendium (continued)
© CrossFit is a registered trademark of CrossFit, Inc.® All rights reserved 2006
Subscription info at http://store.crossfit.comFeedback to [email protected]
4 of 10
Vaulting technique
Remember that every vaulting technique relies on the basicmovement pattern of using your approach momentum anda perfectly mixed effort between your upper and lower
body to make your way over an obstacle as efficiently aspossible.
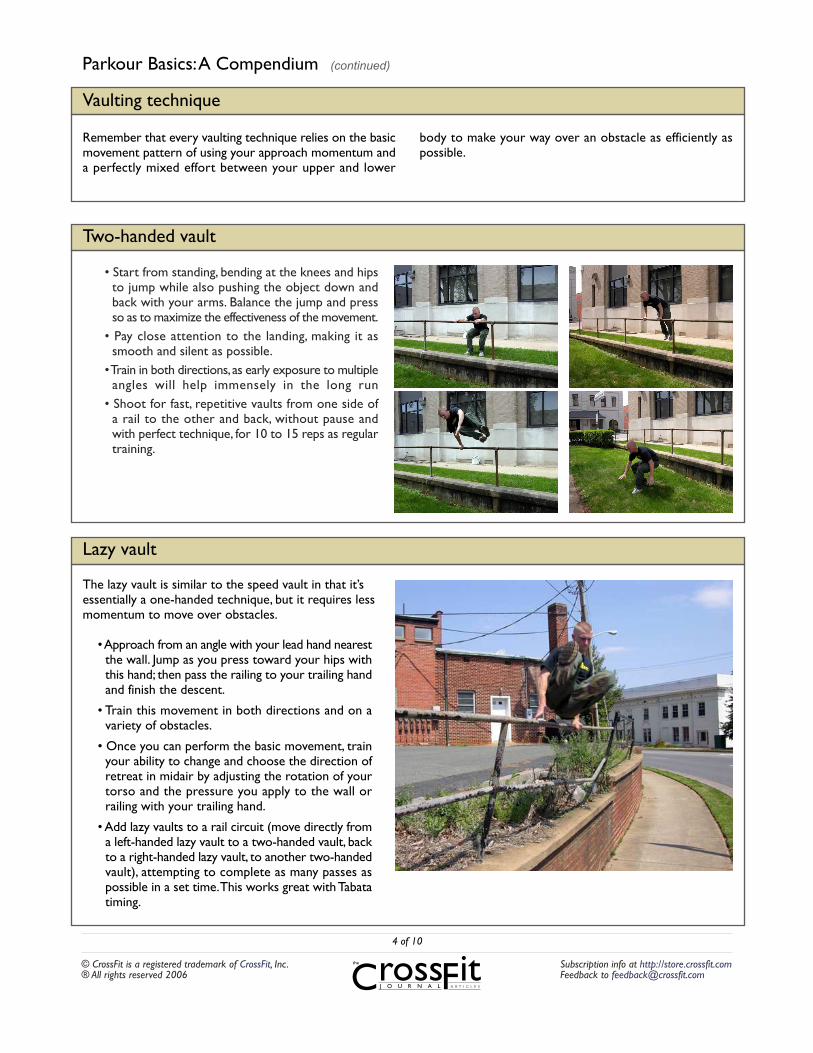
• Start from standing, bending at the knees and hipsto jump while also pushing the object down andback with your arms. Balance the jump and pressso as to maximize the effectiveness of the movement.
• Pay close attention to the landing, making it assmooth and silent as possible.
• Train in both directions, as early exposure to multipleangles will help immensely in the long run
• Shoot for fast, repetitive vaults from one side ofa rail to the other and back, without pause andwith perfect technique, for 10 to 15 reps as regulartraining.
Two-handed vault
The lazy vault is similar to the speed vault in that it’sessentially a one-handed technique, but it requires lessmomentum to move over obstacles.
• Approach from an angle with your lead hand nearestthe wall. Jump as you press toward your hips withthis hand; then pass the railing to your trailing handand finish the descent.
• Train this movement in both directions and on avariety of obstacles.
• Once you can perform the basic movement, trainyour ability to change and choose the direction ofretreat in midair by adjusting the rotation of yourtorso and the pressure you apply to the wall orrailing with your trailing hand.
• Add lazy vaults to a rail circuit (move directly froma left-handed lazy vault to a two-handed vault, backto a right-handed lazy vault, to another two-handedvault), attempting to complete as many passes aspossible in a set time. This works great with Tabatatiming.
Lazy vault

Cross itFthe
J O U R N A L A R T I C L E S
Parkour Basics: A Compendium (continued)
© CrossFit is a registered trademark of CrossFit, Inc.® All rights reserved 2006
Subscription info at http://store.crossfit.comFeedback to [email protected]
5 of 10
The speed vault takes the basic one-handed vault andadds extra approach speed. Commitment to a powerfulapproach is what sets this vault apart from the morebasic techniques.
• Try to minimize the impact on your hand byapproaching quickly and powerfully and attemptingto jump up and over the object in question, usingthe boost from your hand and arm as only thelast bit of propulsion needed to clear the obstacle.
• As with the two-handed vault, practice on bothsides from the beginning.
• Attempt to perfect fast and smooth speed vaultsfrom a variety of angles on a variety of obstacles.Once you can perform 8 to 10 fast speed vaultsin a row on both sides on a variety of terrain,you have reached a functional level of proficiency
Speed vault
For the monkey vault, a bit more commitment is required.To make this work, you have to make a powerful dive towardthe end of the object that puts your hips higher than yourhands.
• Get your hips high by diving in an arc and explodingwith a powerful push when your hands contact theobstacle.
• Your hands should be free of the object before yourfeet pass.
• When you can land a monkey vault on a variety ofobstacles with a slight run-up, progress to increasingyour approach speed and the speed of your retreat.You can also increase the depth of the objects thatyou’re vaulting.
• A monkey vault to roll, repeated 10 to 15 timeswith perfect technique, is a great drill to improvetwo techniques simultaneously.
Monkey vault
Cross itFthe
J O U R N A L A R T I C L E S
Parkour Basics: A Compendium (continued)
© CrossFit is a registered trademark of CrossFit, Inc.® All rights reserved 2006
Subscription info at http://store.crossfit.comFeedback to [email protected]
For the gate vault, use a powerful hip extension to propelyour legs up an over an object after you have folded at thewaist to position your torso on the opposite side. This is avery useful technique for taller objects that aren’t stableenough for a wall run (such as chain-link fences).
• The starting object for this movement is the sameas with the turn vault: a wall or railing with levelground on both sides.
• Once you grasp the technique from level ground,move to an object with a slight drop. From this pointyou can then find taller objects that will require ajump to put your hips at the proper height.
• Once you’re comfortable with the technique, you
can choose ana p p r o p r i a t eobs t a c l e andattempt to passover the object asmany times aspossible in fiveminutes using onlythe gate vault. Asyour techniqueimproves, yourtotal will improvealso.
6 of 10
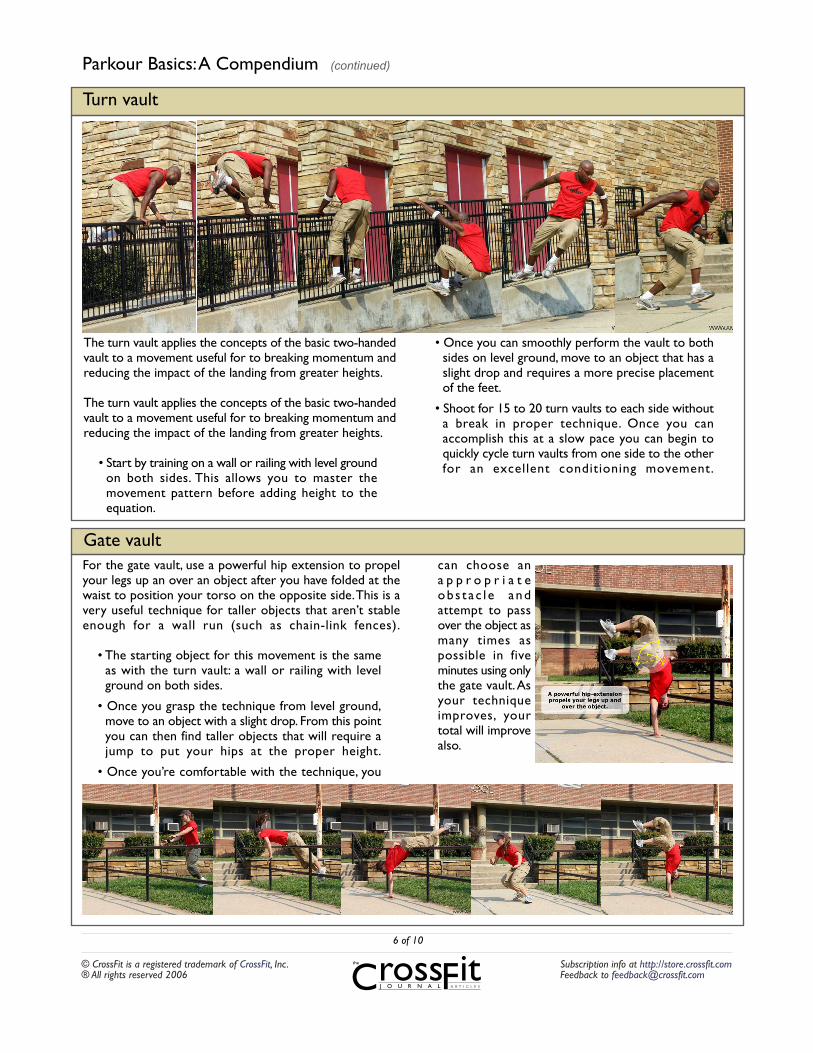
Turn vault
The turn vault applies the concepts of the basic two-handedvault to a movement useful for to breaking momentum andreducing the impact of the landing from greater heights.
The turn vault applies the concepts of the basic two-handedvault to a movement useful for to breaking momentum andreducing the impact of the landing from greater heights.
• Start by training on a wall or railing with level groundon both sides. This allows you to master themovement pattern before adding height to theequation.
• Once you can smoothly perform the vault to bothsides on level ground, move to an object that has aslight drop and requires a more precise placementof the feet.
• Shoot for 15 to 20 turn vaults to each side withouta break in proper technique. Once you canaccomplish this at a slow pace you can begin toquickly cycle turn vaults from one side to the otherfor an excellent conditioning movement.
Gate vault
Cross itFthe
J O U R N A L A R T I C L E S
Parkour Basics: A Compendium (continued)
© CrossFit is a registered trademark of CrossFit, Inc.® All rights reserved 2006
Subscription info at http://store.crossfit.comFeedback to [email protected]
7 of 10
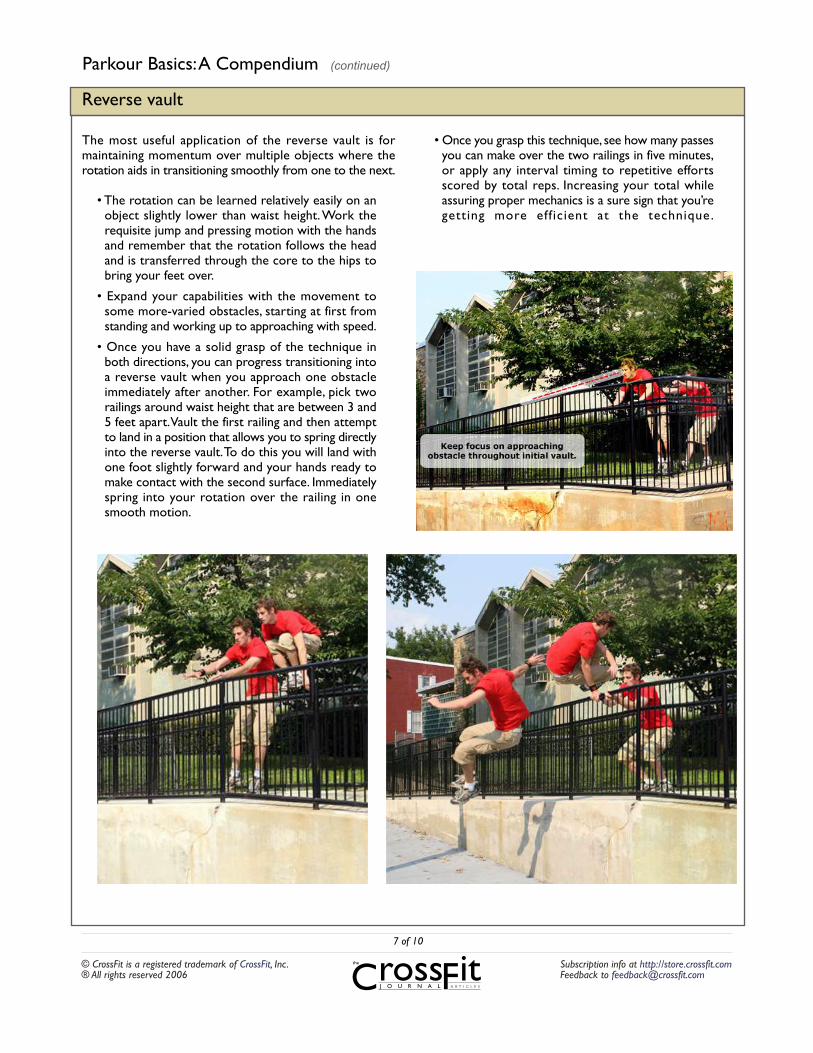
The most useful application of the reverse vault is formaintaining momentum over multiple objects where therotation aids in transitioning smoothly from one to the next.
• The rotation can be learned relatively easily on anobject slightly lower than waist height. Work therequisite jump and pressing motion with the handsand remember that the rotation follows the headand is transferred through the core to the hips tobring your feet over.
• Expand your capabilities with the movement tosome more-varied obstacles, starting at first fromstanding and working up to approaching with speed.
• Once you have a solid grasp of the technique inboth directions, you can progress transitioning intoa reverse vault when you approach one obstacleimmediately after another. For example, pick tworailings around waist height that are between 3 and5 feet apart. Vault the first railing and then attemptto land in a position that allows you to spring directlyinto the reverse vault. To do this you will land withone foot slightly forward and your hands ready tomake contact with the second surface. Immediatelyspring into your rotation over the railing in onesmooth motion.
• Once you grasp this technique, see how many passesyou can make over the two railings in five minutes,or apply any interval timing to repetitive effortsscored by total reps. Increasing your total whileassuring proper mechanics is a sure sign that you’regetting more eff icient at the technique.
Reverse vault
Cross itFthe
J O U R N A L A R T I C L E S
Parkour Basics: A Compendium (continued)
© CrossFit is a registered trademark of CrossFit, Inc.® All rights reserved 2006
Subscription info at http://store.crossfit.comFeedback to [email protected]
8 of 10
Climbing and swinging technique
For climbing-based techniques in parkour, the goal is tocoordinate your upper and lower body to propel yourselfupward as quickly and smoothly as possible. This skill carries
over to the running- and climbing-based techniques becausethey all require you to effectively transfer momentum fromthe run into vertical travel.
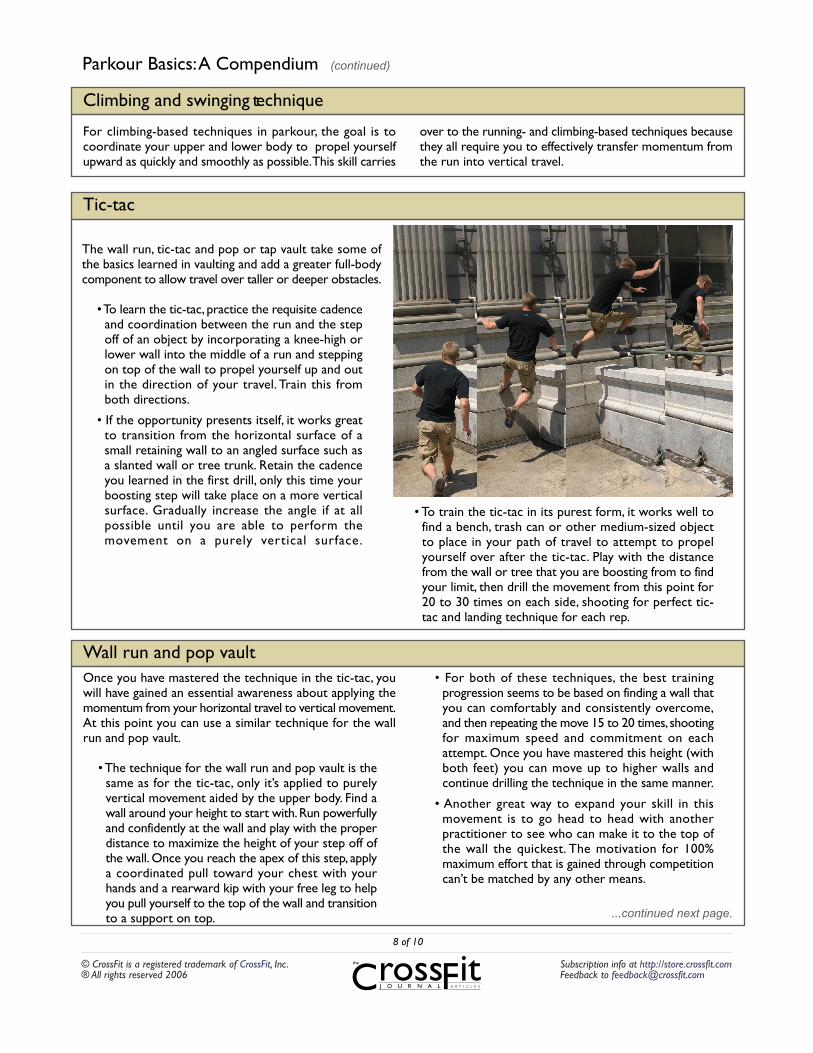
The wall run, tic-tac and pop or tap vault take some ofthe basics learned in vaulting and add a greater full-bodycomponent to allow travel over taller or deeper obstacles.
• To learn the tic-tac, practice the requisite cadenceand coordination between the run and the stepoff of an object by incorporating a knee-high orlower wall into the middle of a run and steppingon top of the wall to propel yourself up and outin the direction of your travel. Train this fromboth directions.
• If the opportunity presents itself, it works greatto transition from the horizontal surface of asmall retaining wall to an angled surface such asa slanted wall or tree trunk. Retain the cadenceyou learned in the first drill, only this time yourboosting step will take place on a more verticalsurface. Gradually increase the angle if at allpossible until you are able to perform themovement on a purely vertical surface.
Tic-tac
Wall run and pop vaultOnce you have mastered the technique in the tic-tac, youwill have gained an essential awareness about applying themomentum from your horizontal travel to vertical movement.At this point you can use a similar technique for the wallrun and pop vault.
• The technique for the wall run and pop vault is thesame as for the tic-tac, only it’s applied to purelyvertical movement aided by the upper body. Find awall around your height to start with. Run powerfullyand confidently at the wall and play with the properdistance to maximize the height of your step off ofthe wall. Once you reach the apex of this step, applya coordinated pull toward your chest with yourhands and a rearward kip with your free leg to helpyou pull yourself to the top of the wall and transitionto a support on top.
• For both of these techniques, the best trainingprogression seems to be based on finding a wall thatyou can comfortably and consistently overcome,and then repeating the move 15 to 20 times, shootingfor maximum speed and commitment on eachattempt. Once you have mastered this height (withboth feet) you can move up to higher walls andcontinue drilling the technique in the same manner.
• Another great way to expand your skill in thismovement is to go head to head with anotherpractitioner to see who can make it to the top ofthe wall the quickest. The motivation for 100%maximum effort that is gained through competitioncan’t be matched by any other means.
...continued next page.
• To train the tic-tac in its purest form, it works well tofind a bench, trash can or other medium-sized objectto place in your path of travel to attempt to propelyourself over after the tic-tac. Play with the distancefrom the wall or tree that you are boosting from to findyour limit, then drill the movement from this point for20 to 30 times on each side, shooting for perfect tic-tac and landing technique for each rep.

Cross itFthe
J O U R N A L A R T I C L E S
Parkour Basics: A Compendium (continued)
© CrossFit is a registered trademark of CrossFit, Inc.® All rights reserved 2006
Subscription info at http://store.crossfit.comFeedback to [email protected]
9 of 10
Wall run and pop vault ...continued
Cat leap
The cat leap is similar to both the wall run in its finishingtop-out and the turn-vault in its body position upon landing.This is a movement that takes a good bit of commitmentto work up to, but the gains in strength, coordination, andconfidence that are gained are worth the effort.
• A body-height wall at ground level is perfect to beginyour training on. Perform a broad jump, tucking yourlegs up and then extending them toward the wallto absorb the force of landing. Your hands will contactslightly after your feet, with elbows bent to absorbthe force of impact. From here the techniqueresembles the top-out of the wall run, where yougive a rearward kip with your free leg whileperforming a movement similar to a muscle-up toput yourself in a support position on top of the wall.
• Drill this ground-level technique to perfection, andthen you can begin to progress toward downwardcat leaps. In this technique, the surface from which
you jump will be at the same level as, if not slightlyhigher than, where your hands will contact thelanding surface. As the vertical distance between thetakeoff and landing points—and therefore the impactupon landing—increases, the technique becomesmore difficult. A good progression would be: 1)higher-level landing, 2) higher-level landing with alonger jump, 3) level of landing decreased by half-height (around knee-level from takeoff), 4) same-level landing, same-level landing with a longer jump.Drill each successive level 10 to 20 times in a session,striving for perfectly efficient technique with minimalextraneous impact.
• The technique can be broken in half, as you can drillthe jump and landing as one piece, then drill thetop-out repetitively for strength gains. This allowsthe pull to press movement of the top-out to beworked
Cross itFthe
J O U R N A L A R T I C L E S
Parkour Basics: A Compendium (continued)
© CrossFit is a registered trademark of CrossFit, Inc.® All rights reserved 2006
Subscription info at http://store.crossfit.comFeedback to [email protected]
10 of 10
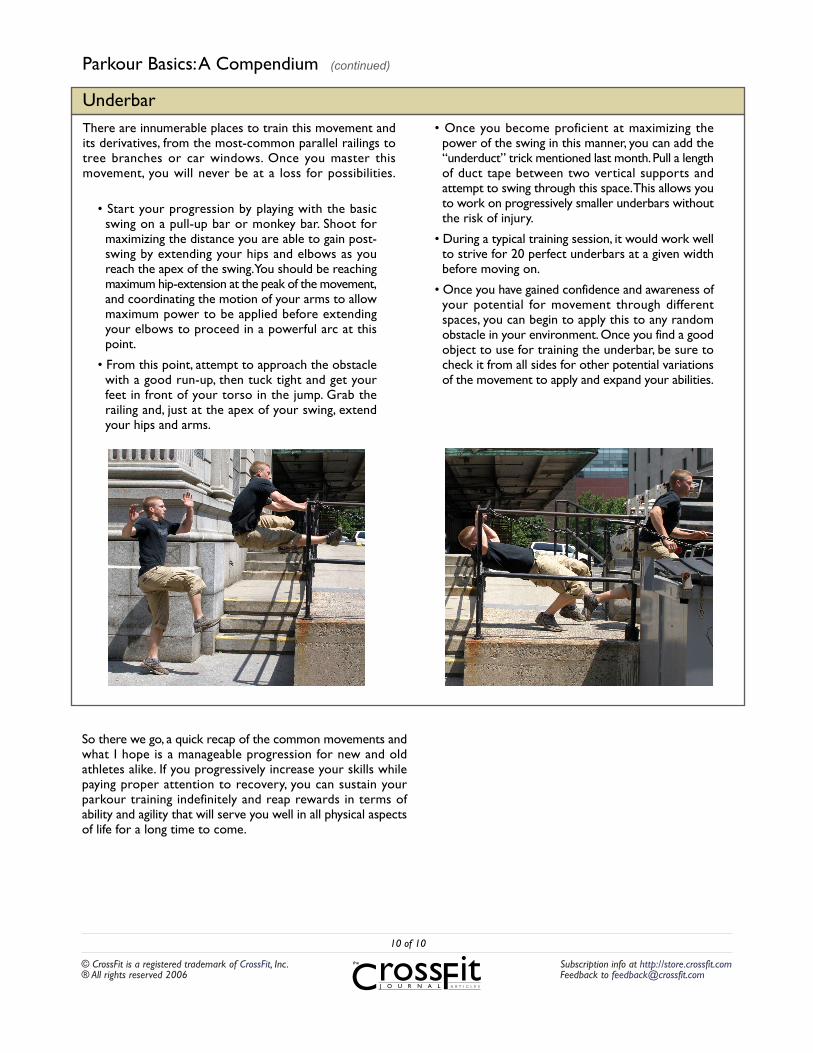
UnderbarThere are innumerable places to train this movement andits derivatives, from the most-common parallel railings totree branches or car windows. Once you master thismovement, you will never be at a loss for possibilities.
• Start your progression by playing with the basicswing on a pull-up bar or monkey bar. Shoot formaximizing the distance you are able to gain post-swing by extending your hips and elbows as youreach the apex of the swing. You should be reachingmaximum hip-extension at the peak of the movement,and coordinating the motion of your arms to allowmaximum power to be applied before extendingyour elbows to proceed in a powerful arc at thispoint.
• From this point, attempt to approach the obstaclewith a good run-up, then tuck tight and get yourfeet in front of your torso in the jump. Grab therailing and, just at the apex of your swing, extendyour hips and arms.
• Once you become proficient at maximizing thepower of the swing in this manner, you can add the“underduct” trick mentioned last month. Pull a lengthof duct tape between two vertical supports andattempt to swing through this space. This allows youto work on progressively smaller underbars withoutthe risk of injury.
• During a typical training session, it would work wellto strive for 20 perfect underbars at a given widthbefore moving on.
• Once you have gained confidence and awareness ofyour potential for movement through differentspaces, you can begin to apply this to any randomobstacle in your environment. Once you find a goodobject to use for training the underbar, be sure tocheck it from all sides for other potential variationsof the movement to apply and expand your abilities.
So there we go, a quick recap of the common movements andwhat I hope is a manageable progression for new and oldathletes alike. If you progressively increase your skills whilepaying proper attention to recovery, you can sustain yourparkour training indefinitely and reap rewards in terms ofability and agility that will serve you well in all physical aspectsof life for a long time to come.