contents · pdf filecontents declaration of conformity ... • no naked flame source, such...
TRANSCRIPT


ContentsDeclaration of Conformity ...................................................................................................................................................................... 3
Safety Considerations ............................................................................................................................................................................. 5
Information about this Hardware Guide ................................................................................................................................................ 6
What’s Included...................................................................................................................................................................................... 7
Setup ...................................................................................................................................................................................................... 8
Attaching the Speakers ................................................................................................................................................................... 8
Attaching the HD Video Conferencing Camera ................................................................................................................................ 9
Connecting to Other Devices ......................................................................................................................................................... 10
Connecting AC Power .................................................................................................................................................................... 11
Turning the Monitor On/Off ................................................................................................................................................................. 11
Setting up the Wireless Mouse and Keyboard ..................................................................................................................................... 12
Wireless Mouse ............................................................................................................................................................................. 12
Wireless Keyboard ......................................................................................................................................................................... 12
Using the Remote ................................................................................................................................................................................. 13
Using the Keypad .................................................................................................................................................................................. 15
Picture Menu ................................................................................................................................................................................. 16
Screen Menu .................................................................................................................................................................................. 18
Audio menu ................................................................................................................................................................................... 19
Picture in Picture menu ................................................................................................................................................................. 20
Configuration 1 .............................................................................................................................................................................. 21
Configuration 2 .............................................................................................................................................................................. 22
Advanced Option ........................................................................................................................................................................... 23
Troubleshooting ................................................................................................................................................................................... 24
Specifications ........................................................................................................................................................................................ 27
Limited Warranty .................................................................................................................................................................................. 29


Page 3INF7021/INF8021 Hardware Guide
Declaration of Conformity
Manufacturer: InFocus Corporation, 13190 SW 68th Parkway, Portland, Oregon 97223-8368 USA
Trademarks
Apple, Mac and Facetime are trademarks or registered trademarks of Apple, Inc. Microsoft, Windows, PowerPoint, Excel and Word are trademarks or registered trademarks of Microsoft Corporation. Adobe and Acrobat are trademarks or registered trademarks of Adobe Systems Incorporated. HDMI logo and “High Definition Multimedia Interface” are registered trademarks of HDMI Licensing LLC. Vidtel is a trademark of Vidtel, Inc. InFocus, In Focus, and INFOCUS (stylized) are either registered trademarks or trademarks of InFocus Corporation in the United States and other countries. All other trademarks are the property of their respective owners. Any other trademarks, service marks, personal names or product names are assumed to be the property of their respective owners and are used only for reference. There is no implied sponsorship, affiliation, certification, approval or endorsement if we use one of these terms.
FCC Warning
This equipment has been tested and found to comply with the limits for a Class A digital device, pursuant to part 15 of the FCC Rules. These limits are designed to provide reasonable protection against harmful interference when the equipment is operated in a commercial environment. This equipment generates, uses and can radiate radio frequency energy and, if not installed and used in accordance with the instruction manual, may cause harmful interference to radio communications.
Operation of the equipment in a residential area is likely to cause harmful interference in which case the user will be required to cor-rect the interference at his own expense. Changes or modifications not expressly approved by InFocus Corporation may void author-ity to operate the equipment.
This device complies with part 15 of the FCC Rules. Operation is subject to the following two conditions: (1) This device may not cause harmful interference and (2) this device must accept any interference received, including interference that may cause unde-sired operation.
INFORMATION FOR RADIO FREQUENCY DEVICES ONLY:
This device complies with part 15 of the FCC Rules / RSS-210. Operation is subject to the following two conditions: (1) This device may not cause harmful interference and (2) this device must accept any interference received, including interference that may cause undesired operation.
INFORMATION POUR LES DISPOSITIFS DE FRÉQUENCE RADIO SEULEMENT :
Cet appareil est conforme à l’article 15 des réglementations de la FCC / CNR-210. Le fonctionnement est subordonné aux deux condi-tions suivantes : (1) ce appareil ne doit pas provoquer d’interférences nuisibles, et (2) ce appareil doit accepter toute interférence reçue, y compris des interférences qui peuvent provoquer un fonctionnemnent non désiré.
INFORMATION FOR OPTICAL POINTING DEVICES ONLY:
This product has been tested to comply with International Standard IEC 60825-1: (1993), incld. Amd. 2(2001). This product uses LEDs that are inherently Class 1.

Page 4
INFORMATION POUR LES DISPOSITIFS DE POINTAGE OPTIQUE SEULEMENT :
Ce produit a été testé pour se conformer à la norme IEC 60825-1 : (1993), y comp. Amd. 2 (2001). Ce produit utilize des DEL qui sont, par nature, de classe 1.
Dongle Label:
FCC ID: E8HRG-0918
RG-0918
F C C ID: E 8HR G -0918
Model : R G -0918
C MIIT ID:2009DJ 2362IC :8150A-R G 0918
RG-0918IC : 8150A-RG0918CMIIT ID:2009DJ2362FCC ID: E8HRG-0918
This document applies to regulatory model: INF7021a, INF8021
Input ratings: 100-240VAC, 3A, 50/60Hz
InFocus reserves the right to alter product offerings and specifications at any time without notice.

Page 5INF7021/INF8021 Hardware Guide
Safety Considerations
Please read and follow all safety instructions provided below and on the monitor before connecting the monitor to a power source. Failure to comply with safety instructions may result in fire, electrical shock, or personal injury and may damage or impair protection provided by the equipment. Please save all safety instructions.
• This monitor is very heavy and should be moved and installed by at least two individuals. Do not attempt to move or install the monitor yourself, otherwise injury and/or damage may occur.
• When moving the monitor, always hold the monitor firmly using the handles and side or bottom bezels. Do not hold the top bezel.
• When moving the monitor carton, do not tilt or invert the carton. Always keep it in an upright orientation.
• Disconnect all accessories and cables before moving the monitor.
• If the monitor is installed against the wall, maintain a distance of at least 1.98” (5cm) between the monitor and the wall to pro-vide adequate ventilation.
• Refer to this guide for proper startup and shutdown procedures.
• Follow all warnings and cautions in this manual and on the monitor.
• Locate the monitor at least 4’ (1.2m) away from heating and cooling vents.
• Do not block ventilation openings. Locate the monitor in a well-ventilated area without obstructions to intake or exhaust vents.
• Do not install or use the monitor or speakers near any heat sources such as radiators, heat registers, stoves, or other devices (including amplifiers) that produce heat.
• Do not place the monitor in direct sunlight, humid, greasy or dusty places or in places where the monitor may come into contact with rain, smoke or steam.
• The monitor should not be used with the power cord near water, for instance, near a bathtub, washbowl, kitchen sink or swim-ming pool, etc.
• Do not use any components of the monitor, including the speakers, near water. Warning: To reduce the risk of fire or electric shock, do not expose this equipment or any component of this equipment to rain or moisture.
• Do not drop the monitor.
• Do not spill liquid on the monitor. Spilled liquid may damage the monitor.
• WARNING: This monitor must be securely attached to the floor/wall per installation instructions. Tipping, shaking, or rocking the machine may cause injury or death.
• The power outlet used to power this monitor should be readliy accessible for fast disconnection in case of emergency.
• No naked flame source, such as lighted candles, should be placed on the monitor.
• Use the power cord provided. Connect the power cord to a receptacle with a protective safety (earth) ground terminal. A surge-protected power strip is recommended. Do not overload wall outlets.
• It is recommended that the Class 1 monitor be grounded.
• Do not install the monitor in places subject to mechanical vibration.
• Do not place the monitor on an unstable surface, which could result in serious personal injuries and monitor damage. When mounting the monitor to a stand, be sure to following the manufacturer’s instructions. Use only the mounting hardware recom-mended by the manufacturer.
• When disconnecting the power cord, hold the plug, not the cord.

Page 6
• Protect the power cord from being walked on or pinched particularly at plugs, convenience receptacles and the point where they exit from the monitor.
• Unplug the monitor if you are not going to use it for an extensive period of time.
• Unplug the monitor if you need to clean it with the included microfiber cleaning cloth. The screen may be wiped with the clean-ing cloth when the power is off. Never use alcohol, solvents or ammonia-based liquids on this monitor.
• Wash hands after handling the cables supplied with this monitor.
• The monitor remote control, mouse and keyboard use batteries. Make sure the batteries’ polarity (+/-) is aligned correctly. Dis-pose of used batteries in accordance with local disposal laws.
• Only use properly rated wall and stand mounting hardware that meet this product’s specifications and follow the manufacturer installation instructions. The warranty does not cover any damage caused by use of improperly rated mounting hardware or from improper installation.
• Refer all service to qualified service personnel. Do not remove the cover or back. Servicing your own monitor can be dangerous to you and will void the warranty.
• Only use replacement parts specified by InFocus. Unauthorized substitutions may result in fire, electrical shock or injury and may void the warranty.
• When mounting the monitor to a wall, metric 8 (12mm) screws must be used. In addition, the mounting interface should comply with the UL1678 standard in North America. The mounting means should be strong enough to bear the weight of the monitor (approximately 114.2 lbs/51.8 kg without the stand).
• Follow these instructions to help ensure image quality over the life of the monitor. Failure to follow these instructions may affect the warranty.
• Lithium Battery (in PC Box) Caution: There is a risk of explosion if the battery is replaced by an incorrect type. The battery should only be replaced with an identical or equivalent type of battery as recommended by the manufacturer. Dispose of used batteries in accordance with local disposal laws.
Information about this Hardware Guide
Although this product comes pre-installed with the Mondopad software, you must first assemble the product. This Hardware Guide will assist you in setting up the INF7021 and INF8021.
After the product is fully installed, please refer to the Mondopad Software Guide at www.infocus.com/support for more information.

Page 7INF7021/INF8021 Hardware Guide
What’s Included
Quick SetupGuide
HOME
INFO
RESIZE
VOL UP
VOL DOWN
BACK
MUTE
CONTRASTBRIGHTNESS
INPUT MENU
OK
POWER
i
*Not included for all countries. For setup purposes, a keyboard and mouse are recommended. For additional accessory options, such as stands, feet, carts and wall mounts, see the InFocus website (www.infocus.com/store) or your local dealer.
Mounting brackets
Antennas
Power cord
Camera
Remote control (batteries not included)
Documentation
Stylus
Screws
1920 x 1080 monitor
These items are shipped in a sepa-
rate box
Speakers
Power cord
Wireless Keyboard & Mouse* (Batteries not included)
Also included but not shown above:
• 6' RCA AV cable
• 6' 3.5mm to L/R RCA cable
Screws

Page 8
Setup
Attaching the Speakers
The speakers can be installed as desired around the perimeter of the monitor using the supplied brackets, however InFocus recom-mends installing the speakers across the bottom of the monitor. NOTE: If you are not attaching the speakers, proceed to the next section, "Attaching the HD Video Conferencing Camera" on page 9.
1) Carefully place your monitor face-down on a clean, cushioned surface. Do NOT place the monitor on its back.
2) Attach the four small rectangular brackets to the speakers with the provided screws as shown below.
4x
3) Align the rectangular brackets with the screw holes on the monitor and using the provided screws, secure the speakers against the edge of the monitor in the desired position. Several placement options are shown below. Note: The bottom edge has mul-tiple screw hole positions allowing for the most flexibility of the different placement options.
Page 9INF7021/INF8021 Hardware Guide
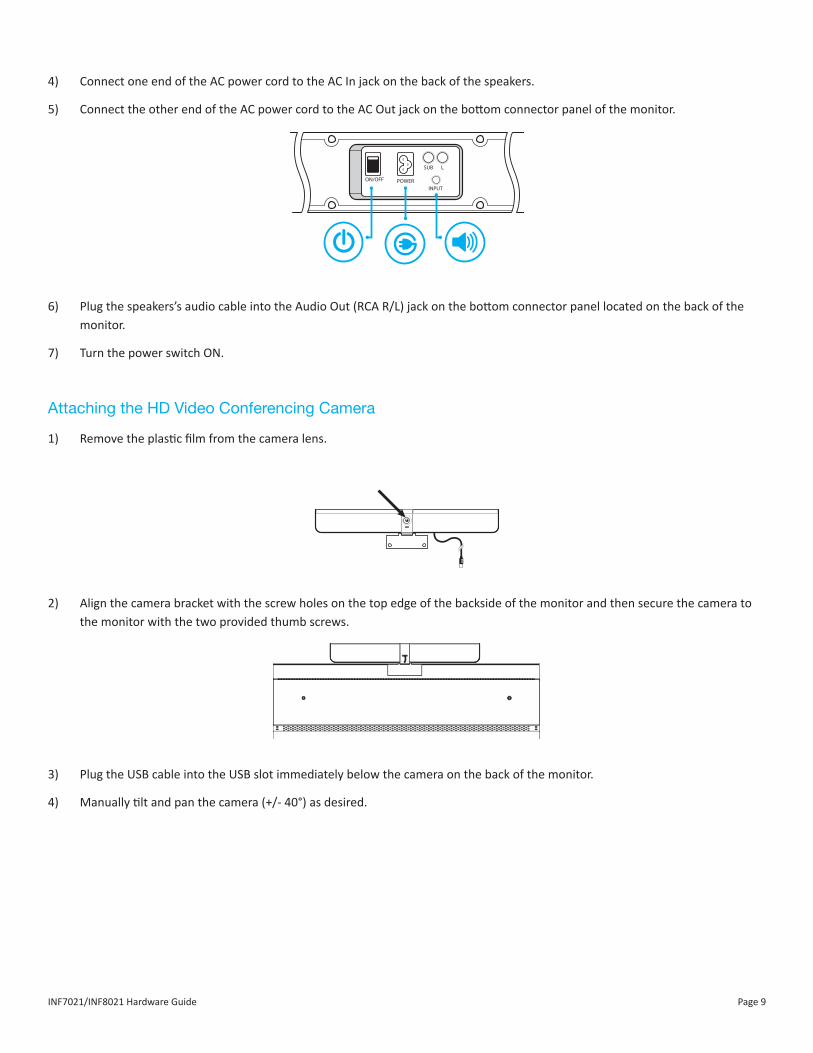
4) Connect one end of the AC power cord to the AC In jack on the back of the speakers.
5) Connect the other end of the AC power cord to the AC Out jack on the bottom connector panel of the monitor.
ON/OFF POWER
SUB L
INPUT
6) Plug the speakers’s audio cable into the Audio Out (RCA R/L) jack on the bottom connector panel located on the back of the monitor.
7) Turn the power switch ON.
Attaching the HD Video Conferencing Camera
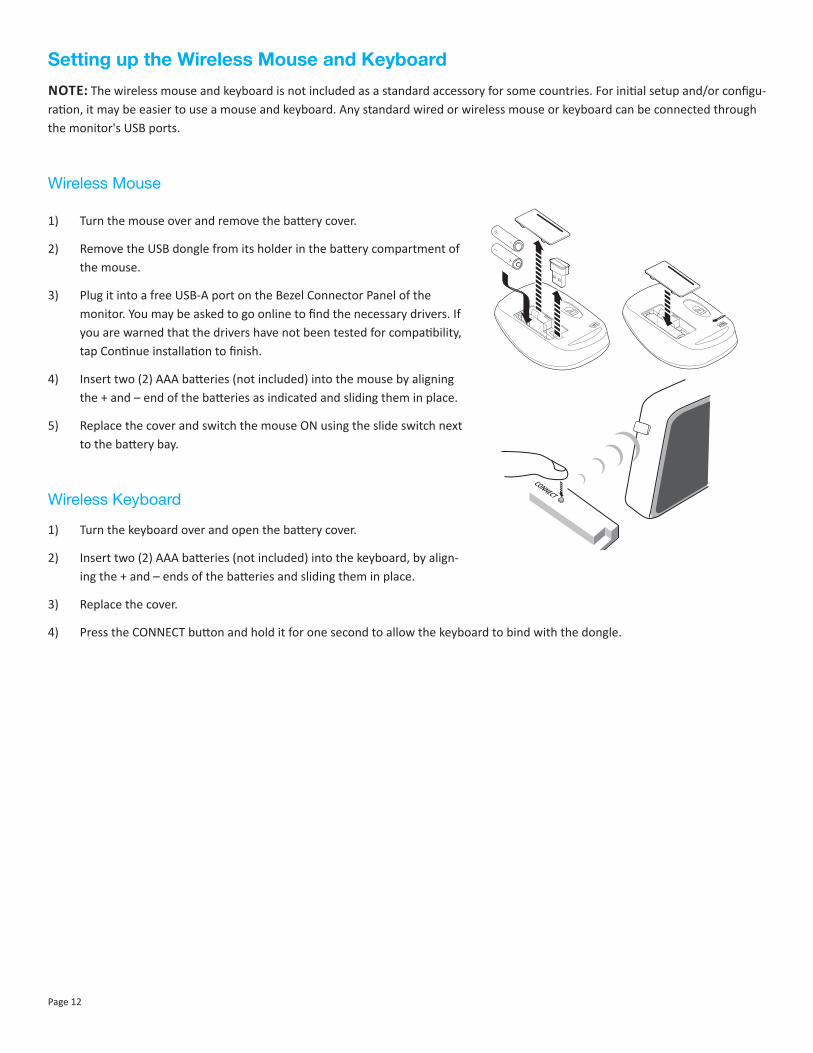
1) Remove the plastic film from the camera lens.
2) Align the camera bracket with the screw holes on the top edge of the backside of the monitor and then secure the camera to the monitor with the two provided thumb screws.
3) Plug the USB cable into the USB slot immediately below the camera on the back of the monitor.
4) Manually tilt and pan the camera (+/- 40°) as desired.

Page 10
Connecting to Other Devices
A full range of digital and analog video inputs and audio source devices can be connected to the connection panels on the back and side of the monitor. Available jacks include: HDMI In (2), HDMI Out (1), PC In (1), Composite Video (1), Component RCA (1), RS232 (1), Audio In 3.5mm (1), Audio In RCA (1-R/L), Audio Out RCA (1 – R/L), Microphone In (1), RJ45 (2), USB-B for touch control (1) and USB-A (6 total - 3 USB 2.0 and 3 USB 3.0).
RJ4
5U
SB-A
Antennas
LED
RS232
HDMI1HDMI2 COMPONENTVIDEO PC IN
TOUCHCONTROL
USB
L R
Audio
Audio OUT
IN 1
IN 2

Page 11INF7021/INF8021 Hardware Guide
Connecting AC Power
1) Connect one end of the AC power cord to the AC In jack on the back of the monitor.
2) Connect the other end of the AC power cord to an AC outlet.
3) Press the power switch. (The LED on the front of the monitor turns on.)
NOTES:
• Your monitor should only be operated from the power source indicated on the label.
• Always unplug the AC power cord from the power outlet when you are not using your monitor for an extended period of time.
Turning the Monitor On/Off
1) Verify that the power cord is connected to a power outlet and that the power switch is ON.
2) Press the Power button on the remote or the right side of the monitor. (The LED on the front of the monitor turns off.)
NOTES:
• If the monitor does not respond to normal power down procedures, press and hold the PC box Power button (located on the back of the monitor) for 7-8 seconds.
• By default, the monitor goes into system standby after 20 minutes of inactivity. To change this behavior, use the Daytime Power Management feature within the Mondopad software or make power option changes within the Windows Control panel.
Page 12
Setting up the Wireless Mouse and Keyboard
NOTE: The wireless mouse and keyboard is not included as a standard accessory for some countries. For initial setup and/or configu-ration, it may be easier to use a mouse and keyboard. Any standard wired or wireless mouse or keyboard can be connected through the monitor's USB ports.
Wireless Mouse
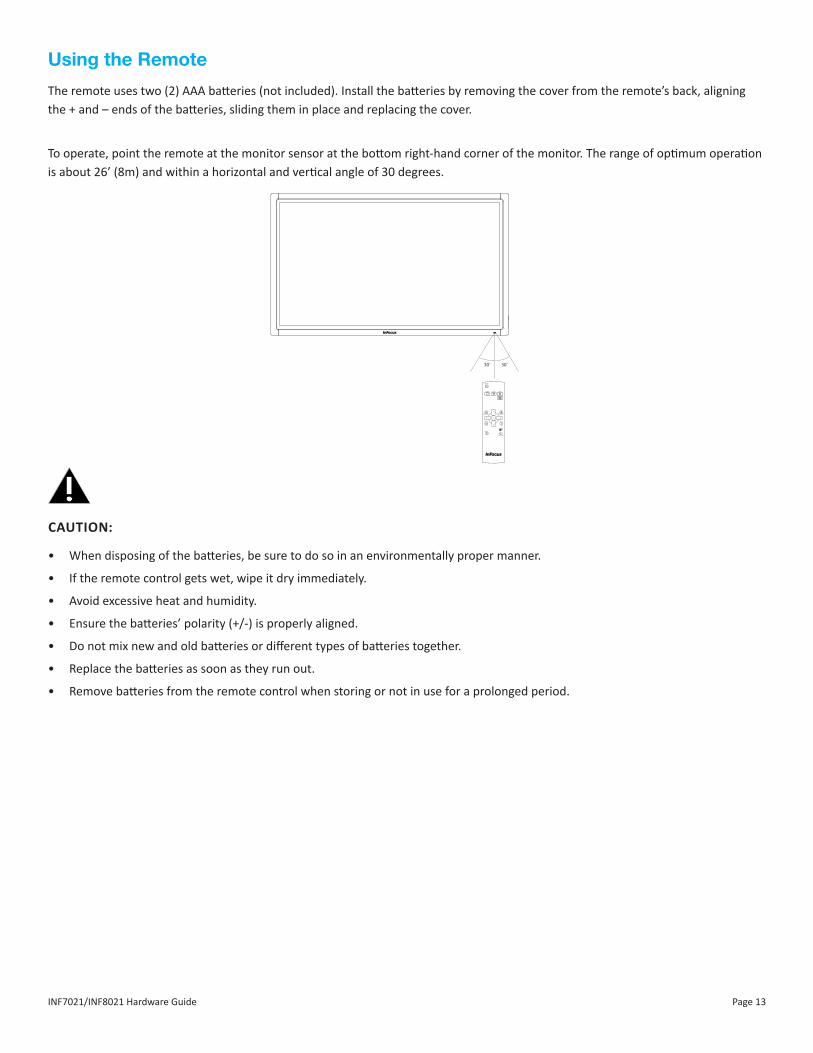
1) Turn the mouse over and remove the battery cover.
2) Remove the USB dongle from its holder in the battery compartment of the mouse.
3) Plug it into a free USB-A port on the Bezel Connector Panel of the monitor. You may be asked to go online to find the necessary drivers. If you are warned that the drivers have not been tested for compatibility, tap Continue installation to finish.
4) Insert two (2) AAA batteries (not included) into the mouse by aligning the + and – end of the batteries as indicated and sliding them in place.
5) Replace the cover and switch the mouse ON using the slide switch next to the battery bay.
Wireless Keyboard
1) Turn the keyboard over and open the battery cover.
2) Insert two (2) AAA batteries (not included) into the keyboard, by align-ing the + and – ends of the batteries and sliding them in place.
3) Replace the cover.
4) Press the CONNECT button and hold it for one second to allow the keyboard to bind with the dongle.
Page 13INF7021/INF8021 Hardware Guide
Using the Remote
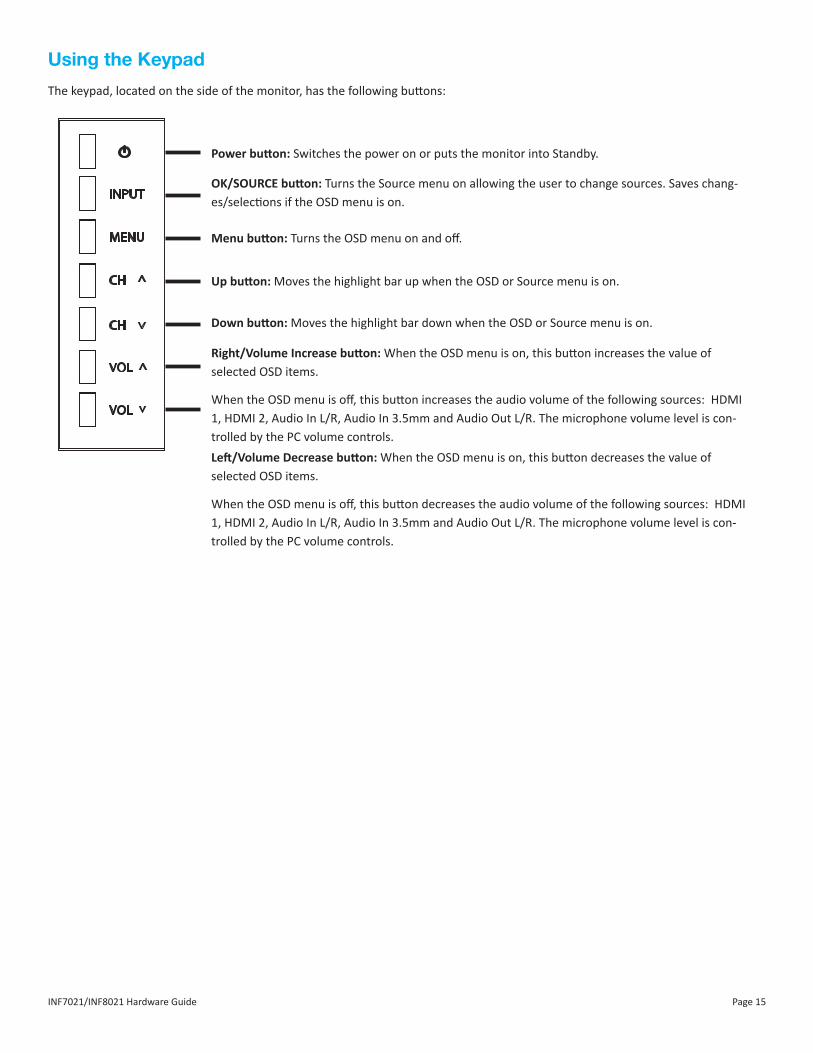
The remote uses two (2) AAA batteries (not included). Install the batteries by removing the cover from the remote’s back, aligning the + and – ends of the batteries, sliding them in place and replacing the cover.
To operate, point the remote at the monitor sensor at the bottom right-hand corner of the monitor. The range of optimum operation is about 26’ (8m) and within a horizontal and vertical angle of 30 degrees.
HOME
INFO
RESIZE
VOL UP
VOL DOWN
BACK
MUTE
CONTRASTBRIGHTNESS
INPUT MENU
OK
POWER
i
30˚ 30˚
CAUTION:
• When disposing of the batteries, be sure to do so in an environmentally proper manner.
• If the remote control gets wet, wipe it dry immediately.
• Avoid excessive heat and humidity.
• Ensure the batteries’ polarity (+/-) is properly aligned.
• Do not mix new and old batteries or different types of batteries together.
• Replace the batteries as soon as they run out.
• Remove batteries from the remote control when storing or not in use for a prolonged period.

Page 14
The remote has the following buttons:
HOME
INFO
RESIZE
VOL UP
VOL DOWN
BACK
MUTE
CONTRASTBRIGHTNESS
INPUT MENU
OK
POWER
i
POWER Power: Switches the power on or puts the monitor into Standby.
HOME Home: Changes the active source back to the embedded PC.
INPUT Input: Toggles the Input Source menu on and off, which allows the user to change sources. Options include: HDMI1, HDMI2, PC, and VGA.
MENU Menu: Turns the OSD menu on and off.
RESIZE Resize: Switches between screen modes. Modes vary based on the source.
BRIGHTNESS
Brightness: Opens the Brightness OSD menu. Use the right and left arrow buttons to adjust.
CONTRAST
Contrast: Opens the Contrast OSD menu. Use the right and left arrow buttons to adjust.
BACK Back: Returns the user to the previous menu.
OKLeft, Right, Up, Down Arrows and OK: Use these buttons to navi-gate through and make changes to the Onscreen Menu features.
INFO
iInfo: Displays source information.
VOL UP Vol up: Increases the audio volume of the following sources: HDMI 1, HDMI 2, Audio In L/R, Audio In 3.5mm and Audio Out L/R. The microphone volume level is controlled by the PC volume controls.
VOL DOWN
Vol down: Decreases the audio volume of the following sources: HDMI 1, HDMI 2, Audio In L/R, Audio In 3.5mm and Audio Out L/R. The microphone volume level is controlled by the PC volume controls.
MUTE Mute: Switches the audio on or off for the following sources: HDMI 1, HDMI 2, Audio In L/R, Audio In 3.5mm and Audio Out L/R.
Page 15INF7021/INF8021 Hardware Guide
Using the Keypad
The keypad, located on the side of the monitor, has the following buttons:
VOL
VOL ^
CH
CH ^
MENU
INPUT
^
^
Power button: Switches the power on or puts the monitor into Standby.
OK/SOURCE button: Turns the Source menu on allowing the user to change sources. Saves chang-es/selections if the OSD menu is on.
Menu button: Turns the OSD menu on and off.
Up button: Moves the highlight bar up when the OSD or Source menu is on.
Down button: Moves the highlight bar down when the OSD or Source menu is on.
Right/Volume Increase button: When the OSD menu is on, this button increases the value of selected OSD items.
When the OSD menu is off, this button increases the audio volume of the following sources: HDMI 1, HDMI 2, Audio In L/R, Audio In 3.5mm and Audio Out L/R. The microphone volume level is con-trolled by the PC volume controls.Left/Volume Decrease button: When the OSD menu is on, this button decreases the value of selected OSD items.
When the OSD menu is off, this button decreases the audio volume of the following sources: HDMI 1, HDMI 2, Audio In L/R, Audio In 3.5mm and Audio Out L/R. The microphone volume level is con-trolled by the PC volume controls.
Page 16
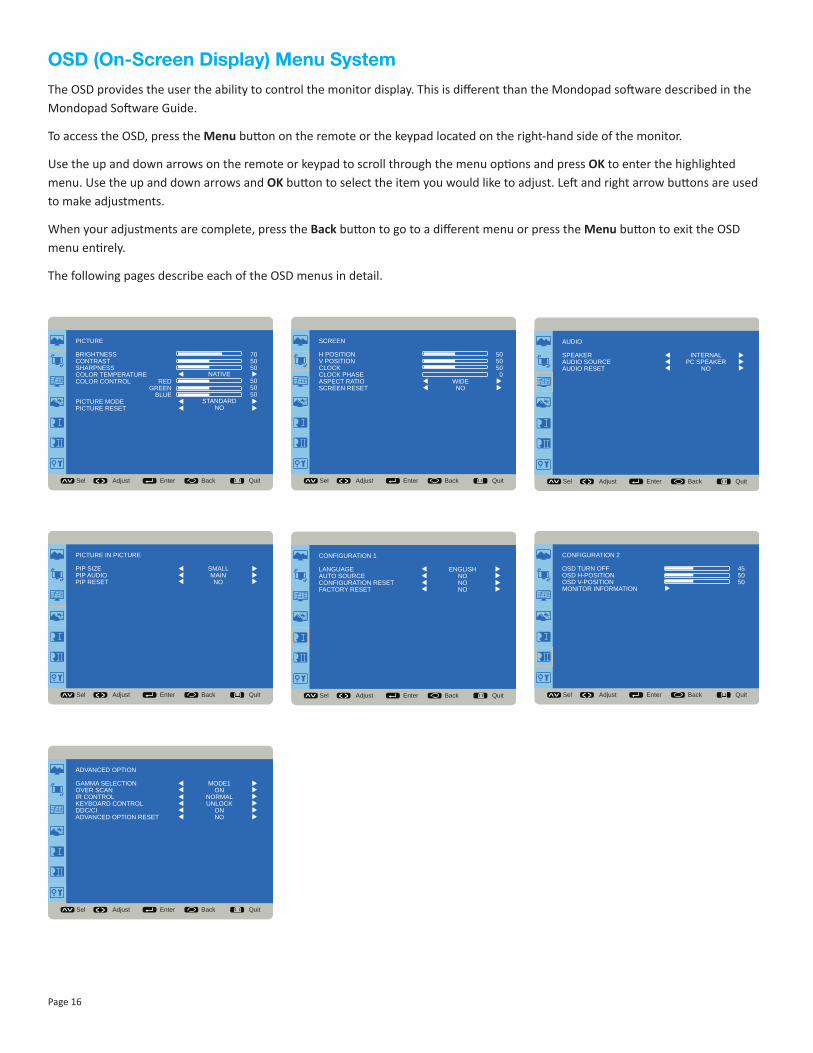
OSD (On-Screen Display) Menu System
The OSD provides the user the ability to control the monitor display. This is different than the Mondopad software described in the Mondopad Software Guide.
To access the OSD, press the Menu button on the remote or the keypad located on the right-hand side of the monitor.
Use the up and down arrows on the remote or keypad to scroll through the menu options and press OK to enter the highlighted menu. Use the up and down arrows and OK button to select the item you would like to adjust. Left and right arrow buttons are used to make adjustments.
When your adjustments are complete, press the Back button to go to a different menu or press the Menu button to exit the OSD menu entirely.
The following pages describe each of the OSD menus in detail.
Sel Adjust Enter Back Quit< >< <
PICTURE
BRIGHTNESSCONTRASTSHARPNESSCOLOR TEMPERATURECOLOR CONTROL
PICTURE MODEPICTURE RESET
NATIVE
STANDARDNO
705050
505050
REDGREEN
BLUE
Sel Adjust Enter Back Quit< >< <
SCREEN
H POSITIONV POSITIONCLOCKCLOCK PHASEASPECT RATIOSCREEN RESET
505050 0
WIDENO
Sel Adjust Enter Back Quit< >< <
AUDIO
SPEAKERAUDIO SOURCEAUDIO RESET
INTERNALPC SPEAKER
NO
Sel Adjust Enter Back Quit< >< <
PICTURE IN PICTURE
PIP SIZEPIP AUDIOPIP RESET
SMALLMAINNO
Sel Adjust Enter Back Quit< >< <
CONFIGURATION 1
LANGUAGEAUTO SOURCECONFIGURATION RESETFACTORY RESET
ENGLISHNONONO
Sel Adjust Enter Back Quit< >< <CONFIGURATION 2
OSD TURN OFFOSD H-POSITIONOSD V-POSITIONMONITOR INFORMATION
455050
Sel Adjust Enter Back Quit< >< <
ADVANCED OPTION
GAMMA SELECTIONOVER SCANIR CONTROLKEYBOARD CONTROLDDC/CIADVANCED OPTION RESET
MODE1ON
NORMALUNLOCK
ONNO
Page 17INF7021/INF8021 Hardware Guide
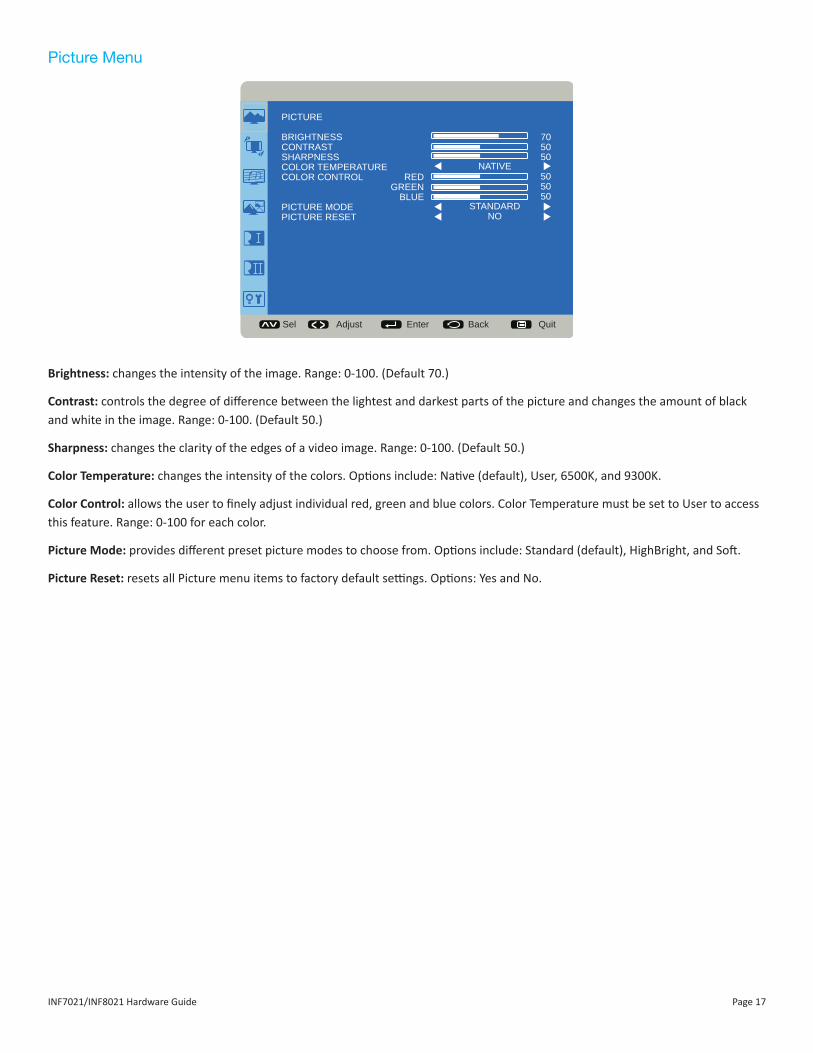
Picture Menu
Sel Adjust Enter Back Quit< >< <
PICTURE
BRIGHTNESSCONTRASTSHARPNESSCOLOR TEMPERATURECOLOR CONTROL
PICTURE MODEPICTURE RESET
NATIVE
STANDARDNO
705050
505050
REDGREEN
BLUE
Brightness: changes the intensity of the image. Range: 0-100. (Default 70.)
Contrast: controls the degree of difference between the lightest and darkest parts of the picture and changes the amount of black and white in the image. Range: 0-100. (Default 50.)
Sharpness: changes the clarity of the edges of a video image. Range: 0-100. (Default 50.)
Color Temperature: changes the intensity of the colors. Options include: Native (default), User, 6500K, and 9300K.
Color Control: allows the user to finely adjust individual red, green and blue colors. Color Temperature must be set to User to access this feature. Range: 0-100 for each color.
Picture Mode: provides different preset picture modes to choose from. Options include: Standard (default), HighBright, and Soft.
Picture Reset: resets all Picture menu items to factory default settings. Options: Yes and No.
Page 18
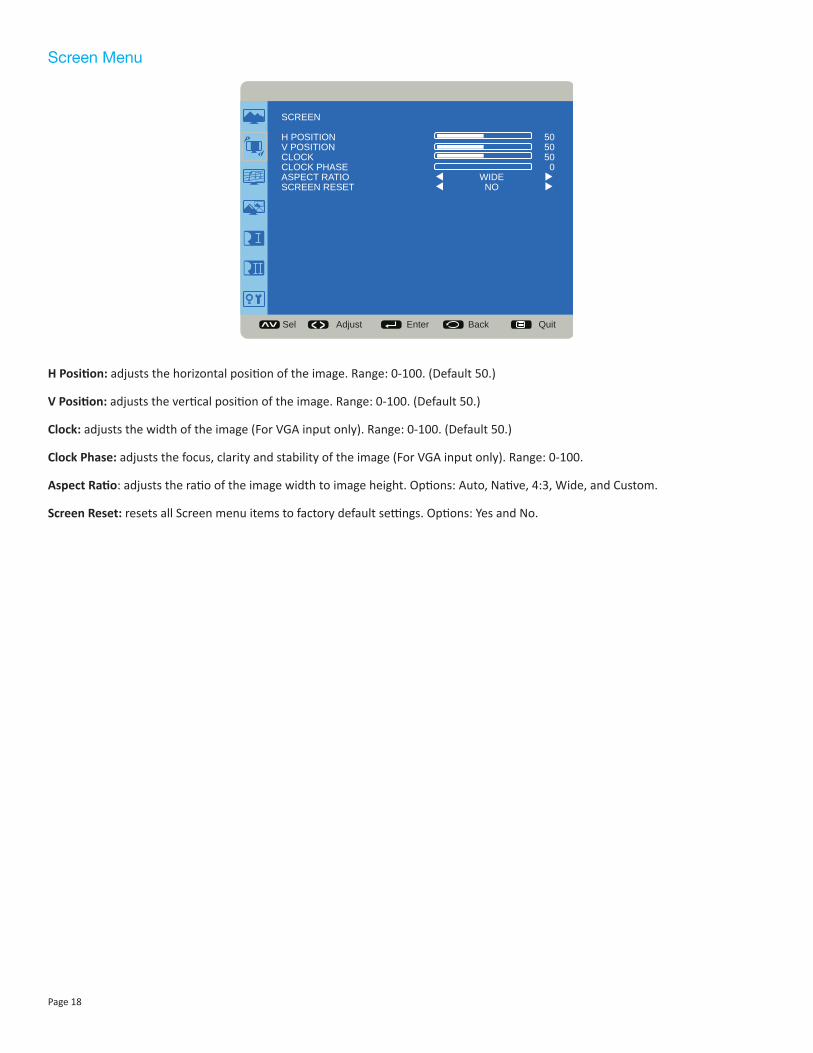
Screen Menu
Sel Adjust Enter Back Quit< >< <
SCREEN
H POSITIONV POSITIONCLOCKCLOCK PHASEASPECT RATIOSCREEN RESET
505050 0
WIDENO
H Position: adjusts the horizontal position of the image. Range: 0-100. (Default 50.)
V Position: adjusts the vertical position of the image. Range: 0-100. (Default 50.)
Clock: adjusts the width of the image (For VGA input only). Range: 0-100. (Default 50.)
Clock Phase: adjusts the focus, clarity and stability of the image (For VGA input only). Range: 0-100.
Aspect Ratio: adjusts the ratio of the image width to image height. Options: Auto, Native, 4:3, Wide, and Custom.
Screen Reset: resets all Screen menu items to factory default settings. Options: Yes and No.
Page 19INF7021/INF8021 Hardware Guide
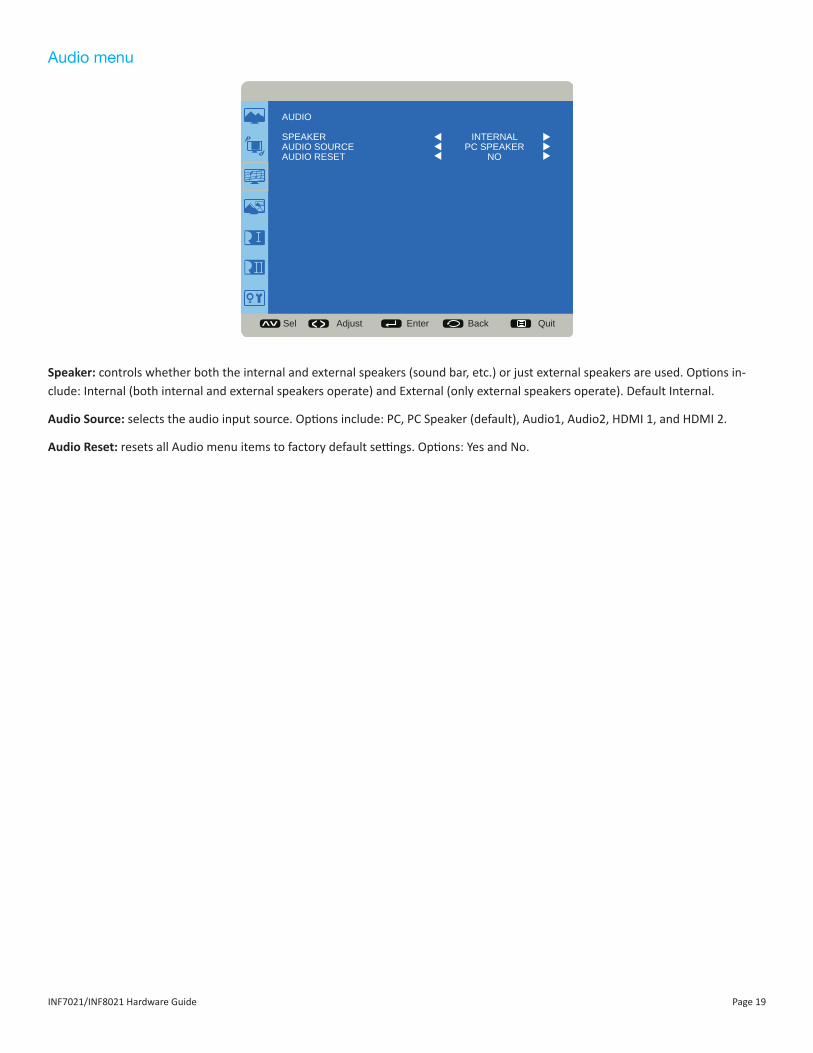
Audio menu
Sel Adjust Enter Back Quit< >< <
AUDIO
SPEAKERAUDIO SOURCEAUDIO RESET
INTERNALPC SPEAKER
NO
Speaker: controls whether both the internal and external speakers (sound bar, etc.) or just external speakers are used. Options in-clude: Internal (both internal and external speakers operate) and External (only external speakers operate). Default Internal.
Audio Source: selects the audio input source. Options include: PC, PC Speaker (default), Audio1, Audio2, HDMI 1, and HDMI 2.
Audio Reset: resets all Audio menu items to factory default settings. Options: Yes and No.

Page 20
Picture in Picture menu
Sel Adjust Enter Back Quit< >< <
PICTURE IN PICTURE
PIP SIZEPIP AUDIOPIP RESET
SMALLMAINNO
PIP Size: changes the size of the PiP window used in the Corner-to-Corner configuration. Options include: Small (default), Middle and Large.
PIP Audio: switches the audio source from the main source to the PiP source. Options include: Main (default) and Sub.
PIP Reset: resets all PIP menu items to factory default settings. Options: Yes and No.
The PiP feature allows the user to display two distinct sources simultaneously on the monitor. These are the supported combinations and configurations:
Input HDMI1 HDMI2 PC VGA Component CompositeHDMI1
HDMI2
PC
VGA
Component
Composite

Page 21INF7021/INF8021 Hardware Guide
Configuration 1
Sel Adjust Enter Back Quit< >< <
CONFIGURATION 1
LANGUAGEAUTO SOURCECONFIGURATION RESETFACTORY RESET
ENGLISHNONONO
Language: switches the OSD menu language.
Auto Source: automatically adjusts the display of an external VGA source image. Options: Yes and No.
Configuration Reset: resets all Configuration 1 and Configuration 2 menu items to factory default settings. Options: Yes and No.
Factory Reset: resets all menu items to factory default settings. Options: Yes and No.

Page 22
Configuration 2
Sel Adjust Enter Back Quit< >< <
CONFIGURATION 2
OSD TURN OFFOSD H-POSITIONOSD V-POSITIONMONITOR INFORMATION
455050
OSD Turn Off: controls how many seconds the OSD menu remains on the screen Range: 5-120 (seconds). (Default: 45)
OSD H-Position: adjusts the horizontal position of the OSD menu. Range: 0-100. (Default: 50)
OSD V-Position: adjusts the vertical position of the OSD menu. Range: 0-100. (Default: 50)
Monitor Information: This read-only submenu displays the model name, serial number, number of operation hours, and the firm-ware version.

Page 23INF7021/INF8021 Hardware Guide
Advanced Option
Sel Adjust Enter Back Quit< >< <
ADVANCED OPTION
GAMMA SELECTIONOVER SCANIR CONTROLKEYBOARD CONTROLDDC/CIADVANCED OPTION RESET
MODE1ON
NORMALUNLOCK
ONNO
Gamma Selection: adjusts the gamma value of the image and optimizes image brightness and contrast. Options include: Mode 1, Mode 2, Mode 3.
Over scan: removes noise around the edges of a video image. Options include: On and Off (default).
IR Control: disables and enables the IR sensor on the monitor. Options include: Normal (default; IR is enabled) and Lock (IR is dis-abled).
Keyboard Control: disables and enables the keypad on the right-hand side of the monitor. Options include: Lock (keypad is disabled) and Unlock (default; keypad is enabled).
DDC/CI: enables and disables DDC/CI communication. Options include: On (default) and Off.
Advanced Option Reset: resets all Advanced Option menu items to factory default settings. Options: Yes and No.

Page 24
Troubleshooting
Symptom Possible SolutionsNo power • Verify the power cord is properly connected to the power outlet and to the monitor.
• Verify the power switch is ON and that the Power button on the remote or keypad has been turned on (the front LED should be white).
• Plug another electrical device to the power outlet to verify that the outlet is supplying the proper voltage.
The monitor shuts down suddenly • Check the Sleep Timer setting in the Configuration 2 OSD menu. Disable the Sleep Timer.
• Verify that a source is active.
• The monitor may have overheated. Remove any objects blocking the vents.
• Review the Windows power settings of the monitor.No image • If attempting to display an external source, see “No image from external source” below.
• Verify that the monitor is turned on (the front LED should be white).
• Verify that the monitor's PC is turned on (the PC LED on the back of the monitor should be solid green).
No image from external source • Verify that the source is correct by reviewing the Settings>Input Source menu.
• Verify that connections between the source and the monitor have been made correctly.
• Verify that the cables are in good condition.
• Verify the correct input source is selected and that the input signal is compatible with the monitor.
• If the external source is not detected, the Video source menu defaults back to PC.The colors on the monitor do not look right
• Adjust the color settings in the Picture menu.
• Reset the picture settings.
• Verify that connections between the source and the monitor have been made correctly.
• Verify that the cables are in good condition.No touchpad activity with external computer
• Verify that the USB B to USB type A cable is plugged from the laptop into the monitor correctly.
• Verify that the laptop’s operating system is Windows® 7 or 8. (The monitor touchpad does not support any other operating systems.)
Touchpad functions are not function-ing consistently
• Remove all objects placed on the lip of the monitor and/or within 2” of the touchpad screen.
• Disable the PiP feature. The monitor works best when the Mondopad software is the main image displayed.
• Power the device off and back on after a few seconds. Re-booting the device helps the touchpad to re-synchronize.
Remote is not working • Make sure the batteries are installed in the proper orientation and are not dead.
• Verify the remote is turned on (the button is on the bottom of the remote).
• Verify you are pointing the remote at the table and are within 26’ (8m) and 30 degrees (horz/vert) of the sensor.
• Verify that the IR Control setting in the Advanced Option OSD menu is set to Normal.

Page 25INF7021/INF8021 Hardware Guide
Keypad and/or mouse is not working • Make sure the batteries are installed in the proper orientation and are not dead.
• Press the Connect button on the bottom of the keypad.
• Verify the USB adapter is installed into the monitor's USB port.
• Verify that the Keyboard Control setting in the Advanced Option OSD menu is set to Unlock.
Audio noise • If using external speakers, verify that "Analog Audio Out" within the Audio>Advanced Audio submenu, is set to Variable.
• If using external speakers, verify that "TV speaker" within the Audio menu, is set to Off.
• Noise can occur when infrared communication equipment (for example, infrared cord-less headphones) is used near the monitor. Move the infrared communication equip-ment away from the monitor to eliminate the noise.
No sound • If using the supplied speakers, verify that the speakers are connected properly and that the speaker's power switch is turned on.
• If the speakers or an external sound system is not being used, verify that the Speaker setting in the OSD Audio menu is set to Internal.
• If using an external source, such as component, verify that an audio cable is correctly installed between the device and the monitor.
• Using the remote, verify the volume is turned up enough and not muted.
• If using the Mondopad software, verify that the volume is not muted in the application. (Look at the speaker icon in the upper right-hand corner of the Mondopad software.)
• If playing a video, verify the playback has not been paused and that the video’s audio has not been muted.
• An HDMI® 1.3 (or higher) source and source device is required to hear audio via the HDMI cable.
Video camera is not in focus • Verify that the plastic protecting the camera lens has been removed.
LED Indicators
Front LED
(near IR sensor)
PC LED
(back of the monitor)
Solution
Off Off • The monitor is powered off. Press the Power button on the remote or keypad. If that does not work: 1) verify the power cord is properly con-nected to the power outlet and to the monitor; 2)verify that the power switch on the back of the unit is turned on; 3) plug another electrical de-vice to the power outlet to verify that the outlet is supplying the proper voltage.
Off Blinking Green • The monitor is in standby mode. Press the Power button on the remote or keypad.
White Green • The monitor is powered on.Orange n/a • Contact InFocus Support at www.infocus.com/support.
For Additional Troubleshooting Support, please contact:
InFocus CorporationTechnical Support


Page 27INF7021/INF8021 Hardware Guide
Specifications
To read the latest product specifications, be sure to visit our support website at www.infocus.com/support, as specifications are subject to change.
Model INF7021 INF8021Size (viewable) 69.38" (173.67cm) diagonal 79.88" (202.88cm) diagonalDimensions (without stand) 39.13” H x 65.63” W x 4.0" D
993.78mm H x 1666.88mm W x 101.6mm D44.25” H x 74.88” W x 4.0" D 1123.95mm H x 1901.83mm W x 101.6mm D
Weight (without stand) 156 lbs. (70.76kg) 176 lbs. (79.83kg)Monitor Type E-LEDRefresh Rate 120 HzMaximum Resolution 1920 x 1080Pixel Pitch 0.802mm x 0.802mmDynamic Contrast Ratio 1M:1Response Time 6msBrightness 350 nitsViewing Angle 1760 (H)/1760 (V)Inputs HDMI In (2), HDMI Out (1), PC In (1), Composite Video (1), Component RCA (1), RS232 (1),
Audio In 3.5mm (1), Audio In RCA (1-R/L), Microphone In (1), RJ45 (2), USB-B for touch con-trol (1) and USB-A (6 total - 3 USB 2.0, 3 USB 3.0)
Outputs Audio Out RCA (1 – R/L)Wireless Network 802.11nOSD Language English, Spanish, FrenchAmbient Light Sensor YesCertifications FCC Class AVoltage Range 100-240VAC, 3A, 50/60Hz
Camera
Resolution 1280 x 720 pixelsFrame rate 720p/30 fps HD MPEGLens and Field of View F/2.0, 3P Lens, FOV(D) 56.8° in HD mode, FOV(D) 50° in VGA mode 1.0x zoom, FOV(D) 30° in
VGA mode 1.6x zoomAudio support 4 built-in Unidirectional microphonesInterface USB 2.0 High SpeedFocus Auto focusTilt Up/down ±40˚, left/right 40˚Power Via USB
Page 28
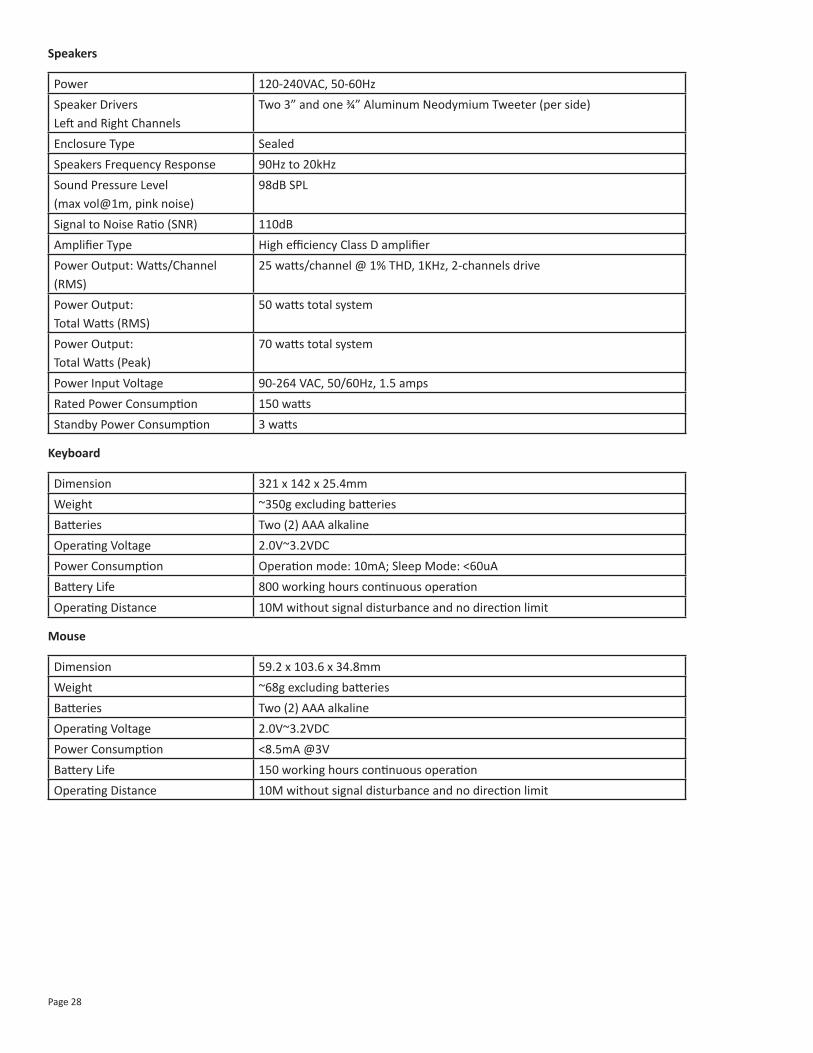
Speakers
Power 120-240VAC, 50-60HzSpeaker Drivers Left and Right Channels
Two 3” and one ¾” Aluminum Neodymium Tweeter (per side)
Enclosure Type SealedSpeakers Frequency Response 90Hz to 20kHzSound Pressure Level (max vol@1m, pink noise)
98dB SPL
Signal to Noise Ratio (SNR) 110dBAmplifier Type High efficiency Class D amplifierPower Output: Watts/Channel (RMS)
25 watts/channel @ 1% THD, 1KHz, 2-channels drive
Power Output: Total Watts (RMS)
50 watts total system
Power Output: Total Watts (Peak)
70 watts total system
Power Input Voltage 90-264 VAC, 50/60Hz, 1.5 ampsRated Power Consumption 150 wattsStandby Power Consumption 3 watts
Keyboard
Dimension 321 x 142 x 25.4mmWeight ~350g excluding batteriesBatteries Two (2) AAA alkaline Operating Voltage 2.0V~3.2VDCPower Consumption Operation mode: 10mA; Sleep Mode: <60uABattery Life 800 working hours continuous operationOperating Distance 10M without signal disturbance and no direction limit
Mouse
Dimension 59.2 x 103.6 x 34.8mmWeight ~68g excluding batteriesBatteries Two (2) AAA alkaline Operating Voltage 2.0V~3.2VDCPower Consumption <8.5mA @3VBattery Life 150 working hours continuous operationOperating Distance 10M without signal disturbance and no direction limit

Page 29INF7021/INF8021 Hardware Guide
Limited Warranty
InFocus Limited Warranty For InFocus Branded Hardware Products Only
LIMITED WARRANTY. InFocus’s warranty obligations for the hardware products are limited to the terms set forth herein. InFocus war-rants the InFocus-branded hardware products against defects in materials and workmanship under normal use for a period outlined in the Limited Warranty Periods section below from the date of retail purchase by the original end-user purchaser (“Warranty Period”). The Warranty Period starts on the date of purchase. Your dated sales or delivery receipt, showing the date of purchase of the product, is your proof of the purchase date. You may be required to provide proof of purchase and proof that the product was purchased new as a condition of receiving warranty service. If a hardware defect arises and a valid claim is received within the Warranty Period, at its op-tion and to the extent permitted by law, InFocus will either (1) repair the hardware defect at no charge, using new parts or refurbished parts that are equivalent to new in performance and reliability, (2) exchange the product with a product that is new or refurbished that is equivalent to new in performance and reliability and is at least functionally equivalent to the original product, or (3) refund the purchase price of the product. InFocus may request that you replace defective parts with customer-installable new or refurbished parts that InFocus provides in fulfillment of its warranty obligation (“Customer Self Repair”). A replacement product or part, including a Customer Self Repair part that has been installed in accordance with instructions provided by InFocus, assumes the remaining war-ranty of the original product or ninety (90) days from the date of replacement or repair, whichever provides longer coverage. When a product or part is exchanged, any replacement item becomes your property and the replaced item becomes InFocus’s property. Parts provided by InFocus in fulfillment of its warranty obligation must be used in products for which warranty service is claimed. When a refund is given, the product for which the refund is provided must be returned to InFocus and becomes InFocus’s property. This is your exclusive remedy for defective products.
Limited Warranty Periods are as follows:
• LCD monitors (including any embedded PCs), cameras, remotes, and sound bars: one (1) year from date of purchase.
• Accessory products: ninety (90) days from date of purchase.
The Accessory Product Limited Warranty covers the accessory items only and excludes normal wear and tear.
Remanufactured Products and Software Products are exempt from the foregoing Limited Warranty. Please refer to the appropriate Remanufactured Product Limited Warranty or Software Product Limited Warranty for applicable Warranty information.
EXCLUSIONS AND LIMITATIONS. This Limited Warranty applies only to the hardware products manufactured by or for InFocus, and sold by InFocus, its worldwide subsidiaries, authorized resellers or country distributors, that can be identified by the “InFocus” trademark, trade name, or logo affixed to it, and to required firmware. The Limited Warranty does not apply to any non-InFocus hardware products or peripherals external to the InFocus-branded hardware products (including but not limited to external storage subsystems, displays, printers, speakers or other peripherals), or to any software applications or programs, even if packaged or sold with the InFocus hard-ware. Manufacturers, suppliers, or publishers of products, software or peripherals, other than InFocus, may provide their own warran-ties to the end user purchaser, but InFocus, in so far as permitted by law, provides their products “AS IS” without the InFocus Limited Warranty. Software distributed by InFocus with or without the InFocus brand name (including, but not limited to system software) is not covered under this Limited Warranty. Refer to the licensing agreement accompanying the software for details of your rights with respect to its use.
InFocus does not warrant that the operation of the products will be uninterrupted or error-free. InFocus is not responsible for damage arising from failure to follow instructions relating to the products’ use.
INFOCUS IS NOT RESPONSIBLE FOR DAMAGE TO OR LOSS OF ANY PROGRAMS, DATA, OR REMOVABLE STORAGE MEDIA. INFOCUS IS NOT RESPONSIBLE FOR THE RESTORATION OR REINSTALLATION OF ANY PROGRAMS OR DATA OTHER THAN SOFTWARE INSTALLED BY INFOCUS WHEN THE PRODUCT IS MANUFACTURED.
To enable InFocus to provide the best possible support and service during the Limited Warranty Period, you will be required to:
• Maintain a proper and adequate environment, and use the InFocus hardware products in accordance with the instructions fur-nished.
• Verify configurations, load most recent firmware, install software patches, run InFocus diagnostics and utilities, and implement

Page 30
temporary procedures or workarounds provided by InFocus while InFocus works on permanent solutions.
• Allow InFocus to keep resident on your systems or sites certain system and network diagnosis and maintenance tools to facilitate the performance of warranty support (collectively referred to as “Proprietary Service Tools”); Proprietary Service Tools are and remain the sole and exclusive property of InFocus.
Additional Limitations:
• Products external to the system processor (CPU) box, such as external storage subsystems, printers and other peripherals, are covered by the applicable warranty for those products or options.
• An effective repair does not necessarily require the replacement of a defective part. For example, cleaning the heads of a floppy drive or updating revision levels of ROM BIOS on a PCA board are activities that in many instances deliver an effective repair.
• BIOS/Firmware upgrades are not covered under the Limited Warranty. Firmware that is an integral part of the option hardware board is not automatically upgraded when new versions of firmware are released.
• It is the responsibility of the customer to ensure that their software is compatible with the latest BIOS/firmware revision.
This Limited Warranty does not apply: (a) to consumable or expendable parts, such as batteries, or protective coatings designed to diminish over time unless failure has occurred due to a defect in materials or workmanship; (b) to cartons, carrying cases, ship-ping cases, external cabinets, accessories used in connection with the product; (c) to cosmetic damage, including but not limited to scratches, dents, and broken plastic on ports; (d) to damage caused by use with non-InFocus products; (e) to damage caused by ac-cident, abuse, misuse, improper ventilation, smoke exposure, contamination, improper or inadequate maintenance, cleaning or cali-bration, liquid contact, unusual physical or electrical stress and/or power surges, virus infection, fire, earthquake, disaster, lightning or other external causes; (f) to damage caused by operating the product outside the permitted or intended uses or usage parameters described by InFocus (including burned monitor screens and incorrect input voltage); (g) to damage caused by service (including upgrades and expansions) performed by anyone other than a representative of InFocus or an InFocus Authorized Service Provider (“ASP”) or your own installation of customer-installable parts as instructed by InFocus; (h) to a product or part that has been modified to alter functionality or capability without the written permission of InFocus (including use of an unauthorized mount); (i) to defects caused by normal wear and tear or otherwise due to the normal aging of the product; (j) to failure to follow maintenance procedures as outlined in the product user documentation including where a schedule is specified for regular cleaning of certain parts (based on usage and environment); (k) to loss or damage in transit; or (l) if the product is not used under normal operating conditions which are defined as use not in excess of 16 hours continuously per day with a minimum 8 hour period of continuous rest in the powered off state; or (m) if any InFocus serial number has been removed or defaced. In addition, LCD burn-in as a result of excessive display of static images on the product is not covered under the terms of this Limited Warranty.
Important: Do not open the hardware products unless otherwise directed by InFocus for the purposes of a Customer Self Repair (CSR). Opening the hardware products may cause damage that is not covered by this Limited Warranty. Only InFocus or an ASP should perform service on the hardware products.
TO THE EXTENT PERMITTED BY LAW, THIS WARRANTY AND THE REMEDIES SET FORTH ABOVE ARE EXCLUSIVE AND IN LIEU OF ALL OTHER WARRANTIES, REMEDIES AND CONDITIONS, WHETHER ORAL, WRITTEN, STATUTORY, EXPRESS OR IMPLIED. AS PERMITTED BY APPLICABLE LAW, INFOCUS SPECIFICALLY DISCLAIMS ANY AND ALL STATUTORY OR IMPLIED WARRANTIES, INCLUDING, WITHOUT LIMITATION, WARRANTIES OF MERCHANTABILITY AND FITNESS FOR A PARTICULAR PURPOSE AND WARRANTIES AGAINST HIDDEN OR LATENT DEFECTS. IF INFOCUS CANNOT LAWFULLY DISCLAIM STATUTORY OR IMPLIED WARRANTIES THEN TO THE EXTENT PERMITTED BY LAW, ALL SUCH WARRANTIES SHALL BE LIMITED IN DURATION TO THE DURATION OF THE EXPRESS WARRANTY AND TO THE REPAIR OR REPLACEMENT SERVICE AS DETERMINED BY INFOCUS IN ITS SOLE DISCRETION. NO INFOCUS RESELLER, AGENT, OR EMPLOYEE IS AUTHORIZED TO MAKE ANY MODIFICATION, EXTENSION, OR ADDITION TO THIS WARRANTY. IF ANY TERM IS HELD TO BE ILLEGAL OR UNENFORCEABLE, THE LEGALITY OR ENFORCEABILITY OF THE REMAINING TERMS SHALL NOT BE AFFECTED OR IMPAIRED.
EXCEPT AS PROVIDED IN THIS WARRANTY AND TO THE MAXIMUM EXTENT PERMITTED BY LAW, INFOCUS IS NOT RESPONSIBLE FOR

Page 31INF7021/INF8021 Hardware Guide
DIRECT, SPECIAL, INCIDENTAL OR CONSEQUENTIAL DAMAGES RESULTING FROM ANY BREACH OF WARRANTY OR CONDITION, OR UN-DER ANY OTHER LEGAL THEORY, INCLUDING BUT NOT LIMITED TO LOSS OF USE; LOSS OF REVENUE; LOSS OF ACTUAL OR ANTICIPATED PROFITS (INCLUDING LOSS OF PROFITS ON CONTRACTS); LOSS OF THE USE OF MONEY; LOSS OF ANTICIPATED SAVINGS; LOSS OF BUSI-NESS; LOSS OF OPPORTUNITY; LOSS OF GOODWILL; LOSS OF REPUTATION; LOSS OF, DAMAGE TO, COMPROMISE OR CORRUPTION OF DATA; OR ANY INDIRECT OR CONSEQUENTIAL LOSS OR DAMAGE HOWSOEVER CAUSED INCLUDING THE REPLACEMENT OF EQUIPMENT AND PROPERTY, ANY COSTS OF RECOVERING, PROGRAMMING OR REPRODUCING ANY PROGRAM OR DATA STORED IN OR USED WITH THE INFOCUS PRODUCT AND ANY FAILURE TO MAINTAIN THE CONFIDENTIALITY OF DATA STORED ON THE PRODUCT. THE FOREGOING LIMITATION SHALL NOT APPLY TO DEATH OR PERSONAL INJURY CLAIMS, OR ANY STATUTORY LIABILITY FOR INTENTIONAL AND GROSS NEGLIGENT ACTS AND/OR OMISSIONS. INFOCUS DISCLAIMS ANY REPRESENTATION THAT IT WILL BE ABLE TO REPAIR ANY PRODUCT UNDER THIS WARRANTY OR MAKE A PRODUCT EXCHANGE WITHOUT RISK TO OR LOSS OF PROGRAMS OR DATA.
LIMITATION ON BRINGING ACTION: NO ACTION, REGARDLESS OF FORM, ARISING OUT OF THE AGREEMENT TO PURCHASE THE PRODUCT MAY BE BROUGHT BY PURCHASER MORE THAN ONE YEAR AFTER THE CAUSE OF ACTION HAS ACCRUED. GOVERNING LAW: ANY ACTION, REGARDLESS OF FORM, ARISING OUT OF THE AGREEMENT TO PURCHASE THE PRODUCT IS GOVERNED BY THE LAWS OF THE STATE OF OREGON, U.S.A. MANDATORY ARBITRATION – ANY ACTION, REGARDLESS OF FORM, ARISING OUT OF THE AGREEMENT TO PURCHASE THE PRODUCT IS SUBJECT TO MANDATORY ARBITRATION.
ADDITIONAL RIGHTS. FOR CUSTOMERS, WHO ARE COVERED BY CONSUMER PROTECTION LAWS OR REGULATIONS IN THEIR COUN-TRY OF PURCHASE OR, IF DIFFERENT, THEIR COUNTRY OF RESIDENCE, THE BENEFITS CONFERRED BY THIS WARRANTY ARE IN AD-DITION TO ALL RIGHTS AND REMEDIES PROVIDED BY SUCH CONSUMER PROTECTION LAWS AND REGULATIONS. THIS WARRANTY DOES NOT EXCLUDE, LIMIT OR SUSPEND ANY RIGHTS OF CONSUMERS ARISING OUT OF NONCONFORMITY WITH A SALES CON-TRACT. SOME COUNTRIES, STATES AND PROVINCES DO NOT ALLOW THE EXCLUSION OR LIMITATION OF INCIDENTAL OR CONSE-QUENTIAL DAMAGES OR ALLOW LIMITATIONS ON HOW LONG AN IMPLIED WARRANTY OR CONDITION MAY LAST, SO THE LIMITA-TIONS OR EXCLUSIONS DESCRIBED BELOW MAY NOT APPLY TO YOU. THIS WARRANTY GIVES YOU SPECIFIC LEGAL RIGHTS, AND YOU MAY ALSO HAVE OTHER RIGHTS THAT VARY BY COUNTRY, STATE OR PROVINCE. INFOCUS, THE WARRANTOR UNDER THIS LIMITED WARRANTY, IS IDENTIFIED AT THE END OF THIS DOCUMENT.
EXTENDED WARRANTIES. InFocus extended product warranties are available for an additional charge. For further information on InFocus extended product warranties, please contact InFocus or your product reseller.
OBTAINING WARRANTY SERVICE. Please access and review the online help resources located at www.infocus.com/support before seeking warranty service. If the product is still not functioning properly after making use of these resources, please contact InFocus Technical Support or, if applicable, an ASP using the information provided below. When contacting InFocus via telephone, other charges may apply depending on your location. When calling, InFocus Technical Support or an ASP will help determine whether your product requires service and, if it does, will inform you how InFocus will provide it. You must assist in diagnosing issues with your product and follow InFocus’s warranty processes. InFocus may restrict service to the country where InFocus or its Authorized Distributors originally sold the hardware product. InFocus will provide warranty service either (i) at an ASP location, where service is performed at the loca-tion, or the ASP may send the product to an InFocus repair service location for service, (ii) by sending you prepaid way bills (and if you no longer have the original packaging, InFocus may send you packaging material at your cost) to enable you to ship the product to an InFocus repair service location, or (iii) by sending you customer-installable new or refurbished replacement parts to enable you to conduct Customer Self Repair, or (iv) by exchanging the product for a new or refurbished replacement.
Customer Self Repair InFocus products are designed with many Customer Self Repair (CSR) parts to minimize repair time and allow for greater flexibility in performing defective parts replacement. If during the diagnosis period, InFocus identifies that the repair can be accomplished by the use of a CSR part, InFocus will ship that part directly to you for replacement. There are two categories of CSR parts:
• Parts for which customer self repair is mandatory. If you request InFocus to replace these parts, you will be charged for the travel and labor costs of this service.
• Parts for which customer self repair is optional. These parts are also designed for customer self repair. If, however, you require that InFocus replace them for you, this may be done at no additional charge under the type of warranty service designated for your product.
Based on availability and where geography permits, InFocus will attempt to ship CSR parts out the next business day. Customer re-ceipt will vary based upon the actual part, customer location and shipping method. Next day, same-day or four-hour delivery may be offered at an additional charge where geography permits. If assistance is required, you can call the InFocus Technical Support Center and a technician will help you over the phone. InFocus specifies in the materials shipped with a replacement CSR part whether a

Page 32
defective part must be returned to InFocus. In cases where it is required to return the defective part to InFocus, you must ship the defective part back to InFocus within a defined period of time, normally five (5) business days, and clearly display the Return Material Authorization (RMA#) on the outside of the shipping carton or a similar package affording an equal degree of protection. The defec-tive part must be returned with the associated documentation in the provided shipping material. Failure to return the defective part may result in InFocus charging you for the replacement. With a Customer Self Repair, InFocus will pay all shipping and part return costs and determine the courier/carrier to be used.
InFocus may utilize a doorstep swap process, which involves an InFocus delivery person delivering the replacement product or CSR part to the Customer and picking up the defective product or part at the time of delivery for return to InFocus. Upon receipt of the replacement product or part, the original product or part becomes the property of InFocus and you agree to follow instructions, including arranging the return of original product or part to InFocus in a timely manner. When providing a product exchange or Customer Self Repair (CSR) part requiring the return of the original product or part, InFocus may require a credit card authorization as security for the retail price of the replacement product or part and applicable shipping costs. When returning product to InFocus, a Return Material Authorization Number (RMA #) is required and must be clearly displayed on the outside of the shipping carton or a similar package affording an equal degree of protection. Service options, parts availability and response times may vary according to the country in which service is requested. Service options are subject to change at any time. You may be responsible for shipping and handling charges if the product cannot be serviced in the country in which service is requested. If you seek service in a country that is not the country of original purchase, you will comply with all applicable import and export laws and regulations and be responsible for all custom duties, V.A.T. and other associated taxes and charges. Where international service is available, InFocus may repair or exchange defective products and parts with comparable products and parts that comply with local standards. In accordance with applicable law, InFocus may require that you furnish proof of purchase details and/or comply with registration requirements before receiving warranty service. Resources with more details on this and other matters on obtaining warranty service are described below.
PRIVACY. InFocus will maintain and use customer information in accordance with the InFocus Privacy Policy available at www.Infocus.com/privacy and InFocus’s applicable legal obligations.
BACKUP. If your product is capable of storing software programs, data and other information, you should protect its contents against possible operational failures. Before you deliver your product for warranty service it is your responsibility to keep a separate backup copy of the contents, remove all personal information and data that you want to protect and disable any security passwords. THE CONTENTS OF YOUR PRODUCT WILL BE DELETED AND THE STORAGE MEDIA REFORMATTED IN THE COURSE OF WARRANTY SERVICE. Your product or a replacement product will be returned to you as your product was configured when originally purchased, subject to applicable updates. InFocus may install system software updates as part of warranty service that will prevent the hardware from reverting to an earlier version of the system software. Third party applications installed on the hardware may not be compatible or work with the hardware as a result of the system software update. You will be responsible for reinstalling all other software pro-grams, data and passwords. Recovery and reinstallation of software programs and user data are not covered under this Limited War-ranty.
RESOURCES. Support and service information including Authorized Distributor and Authorized Service Provider locations is available at: www.infocus.com/support.
InFocus Corporation, 13190 SW 68th Parkway, Suite 200, Portland, OR 97223-8368 USA
© 2011-2014 InFocus Corp. All rights reserved. InFocus and the InFocus logo are trademarks of InFocus Corp., registered in the U.S. and other countries.

Page 33INF7021/INF8021 Hardware Guide