connect2go user manual rev23 2017-11-03 - night light...
TRANSCRIPT
Connect2Go User Guide rev1.0 PO Box 3382 Station Main, Meaford Ontario N4L 1A5 T: (+1) 647-503-3406 www.connect2go.com Page 1
Contents
1.0 About This Guide ........................................................................................................................ 4
2.0 Accessing Your Connect2Go Account From a Web Browser ...................................................... 4
2.1. Account Login .......................................................................................................................... 4
2.2. Landing Page .......................................................................................................................... 4
2.3. Left Vertical Menu and Device View ........................................................................................ 4
2.4. Web Portal Refresh ................................................................................................................. 5
3.0 Recent Activity ............................................................................................................................ 5
4.0 Account Settings ......................................................................................................................... 5
4.1. User Picture ............................................................................................................................. 5
4.2. User Information ...................................................................................................................... 5
4.2.1. Email/Account ID .............................................................................................................. 5
4.2.2. Time Zone - Account Settings ........................................................................................... 6
4.3. User Password ........................................................................................................................ 6
4.3.1. Change User Password .................................................................................................... 6
4.3.2. Lost User Password.......................................................................................................... 6
User Guide
Connect2Go User Guide rev1.0 PO Box 3382 Station Main, Meaford Ontario N4L 1A5 T: (+1) 647-503-3406 www.connect2go.com Page 2
4.3.3. User Password - Dealer Assistance .................................................................................. 7
4.4. Mobile Portal Link .................................................................................................................... 7
4.4.1. Bookmark Mobile Portal Link - iPhone Customers ............................................................ 8
4.4.2. Lost Smart Phone ............................................................................................................. 8
4.5. Privacy Settings ....................................................................................................................... 9
5.0 Mobile Portal Link ........................................................................................................................ 9
6.0 Manage Contacts ........................................................................................................................ 9
6.1. Create New Contact ................................................................................................................ 9
6.2. Verify New Contact - eMail .................................................................................................... 10
6.3. Verify New Contact - SMS ..................................................................................................... 10
6.4. Assign Devices ...................................................................................................................... 11
6.5. Change Contacts ................................................................................................................... 11
6.6. Delete Contacts ..................................................................................................................... 12
6.7. Special Notes About Contacts ............................................................................................... 12
7.0 Configuring Alerts ...................................................................................................................... 12
7.1. Alert Configuration for a New Contact .................................................................................... 12
7.2. Alert Types ............................................................................................................................ 13
7.3. Alert Configuration for an Existing Contact (Modifying) .......................................................... 14
8.0 Using Your Connect2Go System ............................................................................................... 14
8.1. Status .................................................................................................................................... 15
8.1.1. Partition Status ............................................................................................................... 15
8.1.2. Zone Status .................................................................................................................... 16
8.1.3. Function Commands - DSC Security System.................................................................. 16
8.1.4. Function Commands - Honeywell Security System ......................................................... 18
8.1.5. Arm Commands - DSC Security System ......................................................................... 19
8.1.6. Arm Commands - Honeywell Security System ................................................................ 20
8.1.7. Recent Zone activity ....................................................................................................... 22
8.2. Recent Events ....................................................................................................................... 22
8.3. Cameras ................................................................................................................................ 23
8.4. Thermostats........................................................................................................................... 24
8.5. Contacts ................................................................................................................................ 25
8.6. Time Stamps for Alerts and Push Notifications ...................................................................... 25
9.0 Connect2go Mobile App ............................................................................................................ 26
9.1. Installing the connect2go Mobile App .................................................................................... 26
Connect2Go User Guide rev1.0 PO Box 3382 Station Main, Meaford Ontario N4L 1A5 T: (+1) 647-503-3406 www.connect2go.com Page 3
9.2. Enable Push Notifications ...................................................................................................... 26
9.3. Connect2Go Mobile App Login .............................................................................................. 27
9.4. Connect2Go Mobile App - Navigation .................................................................................... 27
9.4.1. Summary Screen ............................................................................................................ 27
9.4.2. Events Screen ................................................................................................................ 27
9.4.3. Contacts - Configuring Alert Preferences ........................................................................ 28
9.5. Connect2Go Mobile App - Android Sound Preferences ......................................................... 28
9.6. Devices .................................................................................................................................. 29
9.7. App Logout ............................................................................................................................ 31
10.0 Manage Device Settings ........................................................................................................... 31
10.1. Manage .............................................................................................................................. 32
10.2. Plus Features ..................................................................................................................... 32
10.2.1. User Codes (DSC only) ............................................................................................... 32
10.2.2. Inactivity Timers .......................................................................................................... 33
10.2.3. Manage PGM Labels (DSC only) ................................................................................ 34
10.2.4. Manage Custom Sequences ....................................................................................... 34
10.3. General .............................................................................................................................. 34
10.3.1. Network Supervision ................................................................................................... 34
10.3.2. Auto-Time Updates (DSC Only) .................................................................................. 34
10.3.3. Set Timezone - Device Settings .................................................................................. 34
10.3.4. Reset Device Password/Reboot .................................................................................. 35
11.0 Help .......................................................................................................................................... 35
12.0 Logout ....................................................................................................................................... 35
13.0 Glossary .................................................................................................................................... 35
Connect2Go User Guide rev1.0 PO Box 3382 Station Main, Meaford Ontario N4L 1A5 T: (+1) 647-503-3406 www.connect2go.com Page 4
1.0 ABOUT THIS GUIDE
This User Guide provides information on how to use your connect2go system.
Throughout this user guide, unique terms will be referenced. Please take a moment to review the
Glossary located at the end of this guide prior to reading subsequent sections.
2.0 ACCESSING YOUR CONNECT2GO ACCOUNT FROM A WEB BROWSER
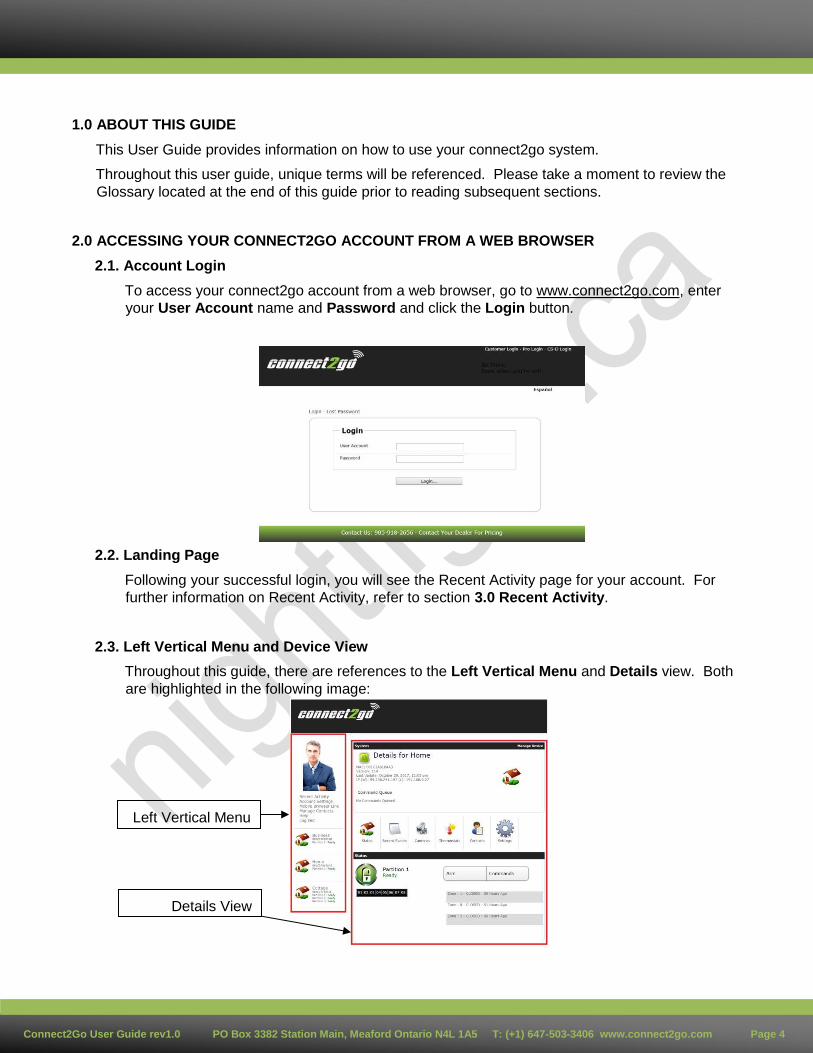
2.1. Account Login
To access your connect2go account from a web browser, go to www.connect2go.com, enter
your User Account name and Password and click the Login button.
2.2. Landing Page
Following your successful login, you will see the Recent Activity page for your account. For
further information on Recent Activity, refer to section 3.0 Recent Activity.
2.3. Left Vertical Menu and Device View
Throughout this guide, there are references to the Left Vertical Menu and Details view. Both
are highlighted in the following image:
Left Vertical Menu
Details View
Connect2Go User Guide rev1.0 PO Box 3382 Station Main, Meaford Ontario N4L 1A5 T: (+1) 647-503-3406 www.connect2go.com Page 5
2.4. Web Portal Refresh
The Web Portal refreshes automatically every 2 minutes. If you experience a screen change, this is
normal. The automatic Web Portal refresh ensures you are viewing the most recent information for
your account and Devices.
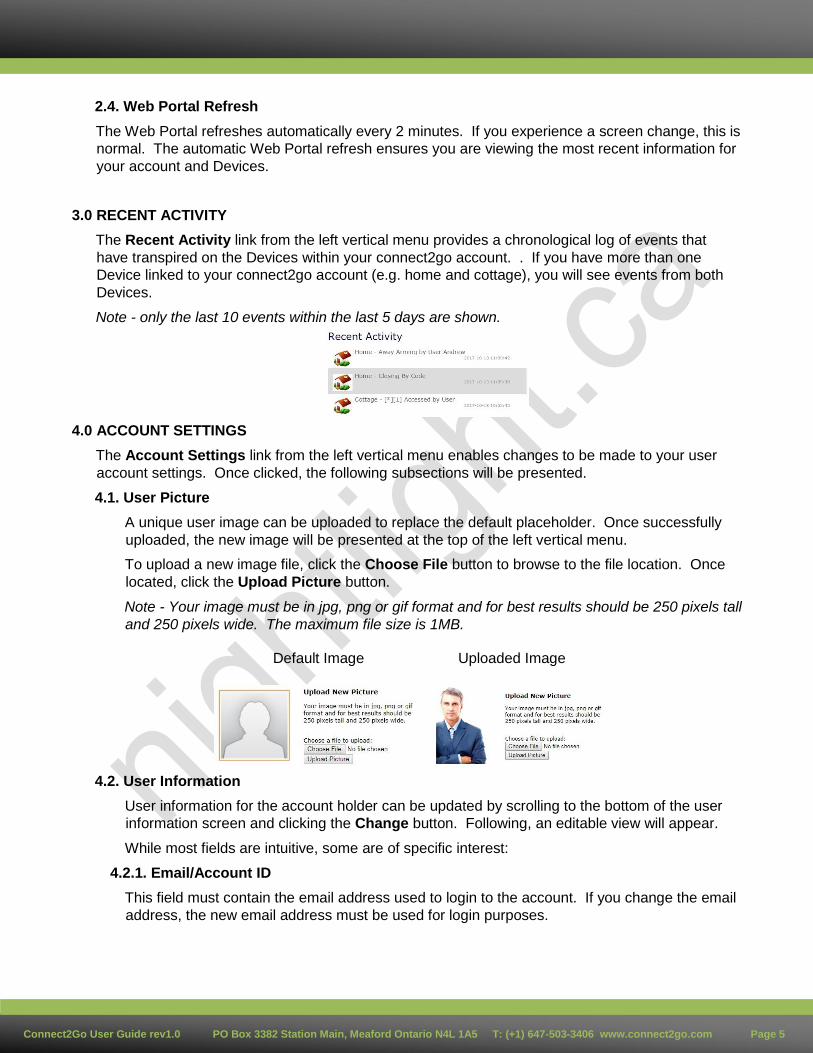
3.0 RECENT ACTIVITY
The Recent Activity link from the left vertical menu provides a chronological log of events that
have transpired on the Devices within your connect2go account. . If you have more than one
Device linked to your connect2go account (e.g. home and cottage), you will see events from both
Devices.
Note - only the last 10 events within the last 5 days are shown.
4.0 ACCOUNT SETTINGS
The Account Settings link from the left vertical menu enables changes to be made to your user
account settings. Once clicked, the following subsections will be presented.
4.1. User Picture
A unique user image can be uploaded to replace the default placeholder. Once successfully
uploaded, the new image will be presented at the top of the left vertical menu.
To upload a new image file, click the Choose File button to browse to the file location. Once
located, click the Upload Picture button.
Note - Your image must be in jpg, png or gif format and for best results should be 250 pixels tall
and 250 pixels wide. The maximum file size is 1MB.
Default Image Uploaded Image
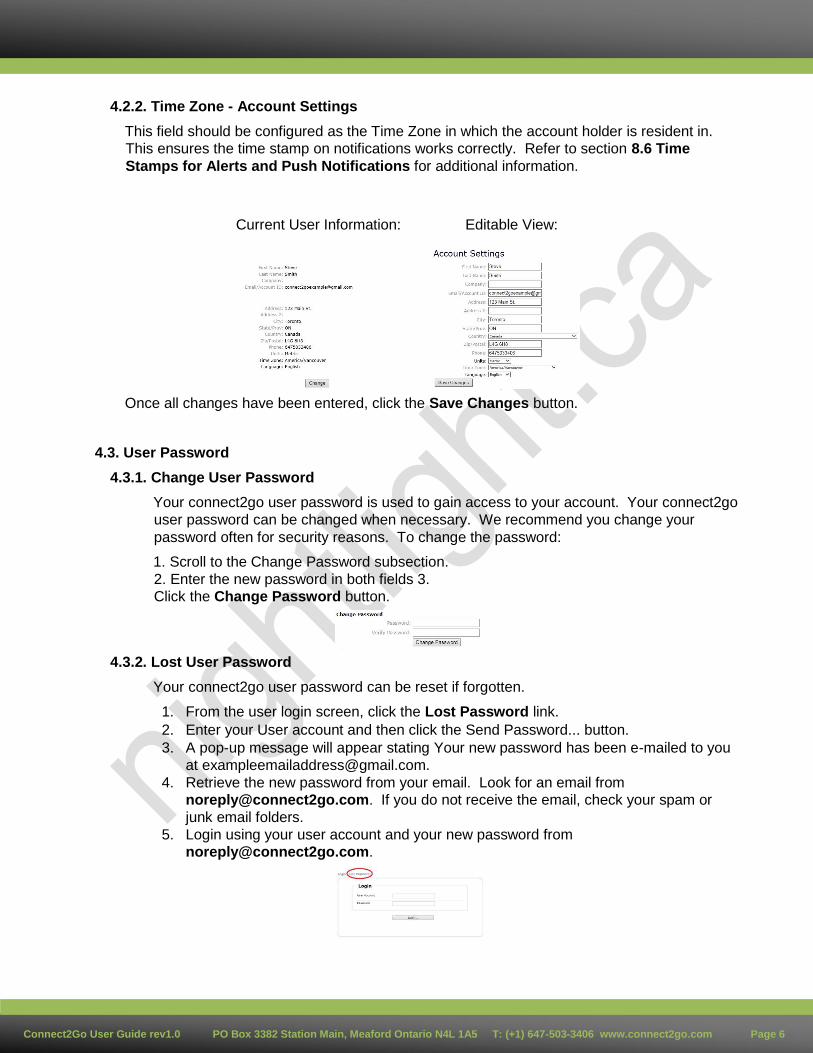
4.2. User Information
User information for the account holder can be updated by scrolling to the bottom of the user
information screen and clicking the Change button. Following, an editable view will appear.
While most fields are intuitive, some are of specific interest:
4.2.1. Email/Account ID
This field must contain the email address used to login to the account. If you change the email
address, the new email address must be used for login purposes.
Connect2Go User Guide rev1.0 PO Box 3382 Station Main, Meaford Ontario N4L 1A5 T: (+1) 647-503-3406 www.connect2go.com Page 6
4.2.2. Time Zone - Account Settings
This field should be configured as the Time Zone in which the account holder is resident in.
This ensures the time stamp on notifications works correctly. Refer to section 8.6 Time
Stamps for Alerts and Push Notifications for additional information.
Current User Information: Editable View:
Once all changes have been entered, click the Save Changes button.
4.3. User Password
4.3.1. Change User Password
Your connect2go user password is used to gain access to your account. Your connect2go
user password can be changed when necessary. We recommend you change your
password often for security reasons. To change the password:
1. Scroll to the Change Password subsection.
2. Enter the new password in both fields 3.
Click the Change Password button.
4.3.2. Lost User Password
Your connect2go user password can be reset if forgotten.
1. From the user login screen, click the Lost Password link.
2. Enter your User account and then click the Send Password... button.
3. A pop-up message will appear stating Your new password has been e-mailed to you
4. Retrieve the new password from your email. Look for an email from
[email protected]. If you do not receive the email, check your spam or
junk email folders.
5. Login using your user account and your new password from

Connect2Go User Guide rev1.0 PO Box 3382 Station Main, Meaford Ontario N4L 1A5 T: (+1) 647-503-3406 www.connect2go.com Page 7
4.3.3. User Password - Dealer Assistance
If you are unable to login to your connect2go account and you are unable to reset your
password, contact your dealer for assistance. Your dealer can reset your password if
required and can assist you with your login.
4.4. Mobile Portal Link
Note - if you have an iPhone or Android-based phone, we strongly recommend installing the
connect2go mobile app. In this situation, skip section 4.4 and proceed to section 9.0
Connect2go Mobile App for additional information.
If your smart phone does not have a native “app” (you are using a smart phone that is not IOS
or Android based), you will need to install the Mobile Portal via a web-app. An example of this
type of phone is Blackberry. The Mobile Portal Link provides most of the same functionality as
the Connect2Go app. One exception is the Mobile Portal Link does not support Push
Notifications.
To provide the mobile portal web-app on this type of smart phone, you will need to first create
the link and then send the link to your smart phone.
Note - sending a mobile portal link does not enable Alerts. Refer to section 7.0 Configuring
Alerts for additional information.
1. Click the Account Settings link from the left vertical menu.
2. Scroll down to the Mobile Portal Link.
3. Click the Create Link button.
4. A new page will pop-up prompting 'Success your link has been created!'. Click the
Finished button.
5. The link can be sent via email in one of two ways. If you would like to use the default
account email address, simply click the Email Link button. If you would like to use an
alternative email address, enter the address and then click the Email Link button.
6. Click the Finished button.
Note: Only one link can be active at a time. If you would like someone else to have mobile
access to your account, you should forward the current link to them (e.g. everyone must share
the current active link).
7. Once the email is received, open the email on your smart phone and click on the link to get
the mobile portal to open in your browser. The mobile portal should look like this:
Connect2Go User Guide rev1.0 PO Box 3382 Station Main, Meaford Ontario N4L 1A5 T: (+1) 647-503-3406 www.connect2go.com Page 8
8. To get the Mobile Portal Link to appear as an icon like any other App on your smart phone,
you need to bookmark the mobile portal to the home screen. The process to create a
bookmark for an iPhone is outlined on the following pages. For other device types, follow
the appropriate procedure to add an icon to the home screen as per the device
manufacturer.
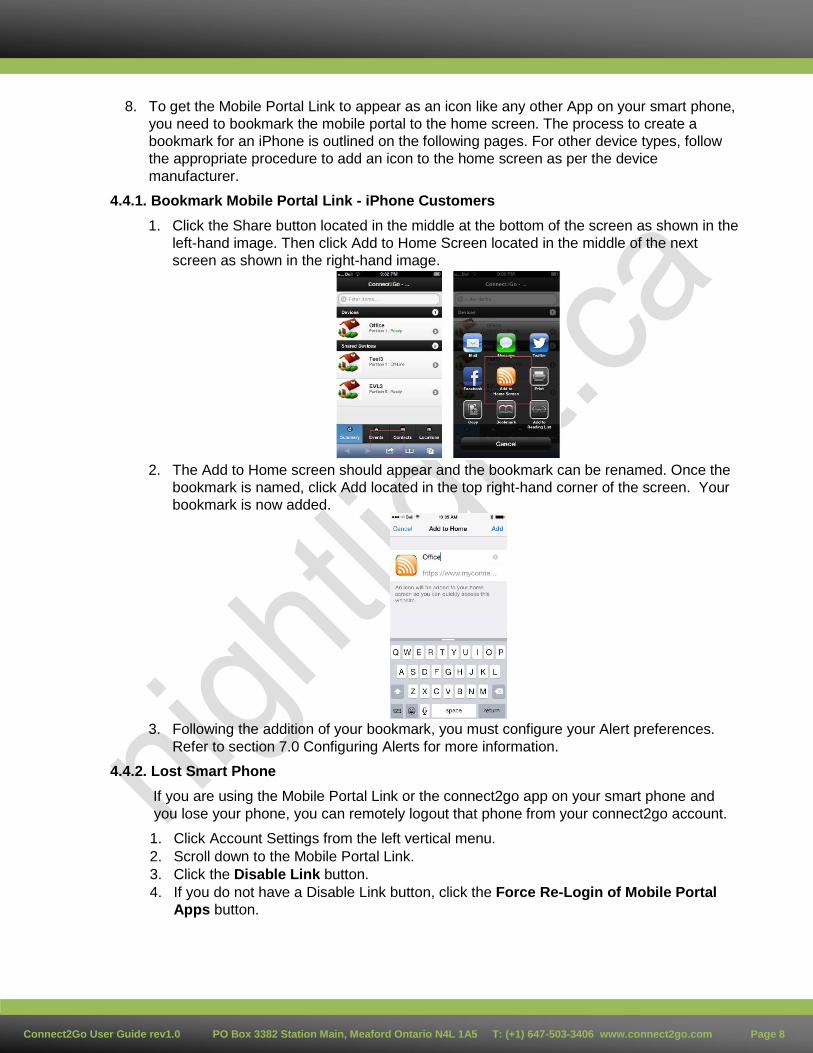
4.4.1. Bookmark Mobile Portal Link - iPhone Customers
1. Click the Share button located in the middle at the bottom of the screen as shown in the
left-hand image. Then click Add to Home Screen located in the middle of the next
screen as shown in the right-hand image.
2. The Add to Home screen should appear and the bookmark can be renamed. Once the
bookmark is named, click Add located in the top right-hand corner of the screen. Your
bookmark is now added.
3. Following the addition of your bookmark, you must configure your Alert preferences.
Refer to section 7.0 Configuring Alerts for more information.
4.4.2. Lost Smart Phone
If you are using the Mobile Portal Link or the connect2go app on your smart phone and
you lose your phone, you can remotely logout that phone from your connect2go account.
1. Click Account Settings from the left vertical menu.
2. Scroll down to the Mobile Portal Link.
3. Click the Disable Link button.
4. If you do not have a Disable Link button, click the Force Re-Login of Mobile Portal
Apps button.
Connect2Go User Guide rev1.0 PO Box 3382 Station Main, Meaford Ontario N4L 1A5 T: (+1) 647-503-3406 www.connect2go.com Page 9
5. Following the Disable Link / Force Re-Login, we recommend you change your user
account password. Refer to section 4.3.1 Change User Password for more
information.
Connect2Go User Guide rev1.0 PO Box 3382 Station Main, Meaford Ontario N4L 1A5 T: (+1) 647-503-3406 www.connect2go.com Page 10
4.5. Privacy Settings
Your dealer may have added one or more connect2go compatible Cameras on your account. If
enabled, your dealer can view your cameras if necessary (e.g. troubleshooting purposes). To enable your dealer to view your cameras, click the box to the right of the option titled Dealer
Can View Cameras and then click the Change Privacy button.
Note - this setting can be disabled at any time by the account holder by unchecking the box to
the right of the option and clicking the Change Privacy button.
Refer to section 8.3 for additional information regarding Cameras.
5.0 MOBILE PORTAL LINK
Refer to section 4.4 for additional information.
6.0 MANAGE CONTACTS
For the purpose of receiving Alerts from your system, users must configure Contacts. A Contact is
an unique alerting method. A Contact should not be thought of as an individual user of the system.
Rather, Contacts are configured for each unique Alert method desired.
There are three types of Contacts that can be configured:
1. Email
2. SMS
3. Mobile app push notifications
For example, Steve Smith is the sole user of a given system. Steve would like to receive Alerts from
his system via email and SMS. Steve must configure two unique Contacts on his system - one for
the email settings and another for the SMS settings.
Once unique contacts are configured in your account, each Contact can be configured to have
unique Alert preferences based on their specific needs. To create new contacts, configure new or existing contacts, and delete contacts, start by clicking the Manage Contacts link on the left vertical
menu.
6.1. Create New Contact
1. Click the Create New Contact button at the top of the Manage Contacts screen.
2. Enter the given name and surname of the new contact in the Contact Name field.
3. Select one of the two Alert preferences by clicking the appropriate radio button: a) eMail
b) SMS
4. For eMail alerts, enter the desired eMail Address for the contact.
5. For SMS alerts, enter the Cell Number for the contact. Then select the appropriate Carrier
associated with the Cell number using the drop-down menu.
6. Click the Add Contact button.

Connect2Go User Guide rev1.0 PO Box 3382 Station Main, Meaford Ontario N4L 1A5 T: (+1) 647-503-3406 www.connect2go.com Page 11
6.2. Verify New Contact - eMail
Following the creation of a new Contact with alerts to be sent via email, you will need to verify
the contact's email address with the connect2go server. The contact's email address will not
receive alerts until the email address is verified. To verify the contact's email address, login to
the email address entered for the contact and retrieve the email sent from connect2go.Select
one of the following two methods to verify the email address:
1. Email Link - Click the link at the bottom of the email to verify e.g.:
After clicking the link provided in email, a browser page will pop-up containing verification:
2. Enter the 6-digit PIN provided via email:
a. From the Manage Contacts page (select Manage Contacts from the left vertical
menu), locate the new contact with the parenthetical statement (Not Verified)beside
the contact name and click the Enter PIN button.
b. Enter the 6-digit PIN found in the email referenced in step (1) above and click the
Submit button:
6.3. Verify New Contact - SMS
Following the creation of a new Contact with alerts to be sent via SMS, you will need to verify
the contact's Cell Number with the connect2go server. The contact's Cell Number will not
receive alerts until the number is verified. To verify the Cell Number, locate the SMS message
received from connect2go. Verify the Cell Number as follows:
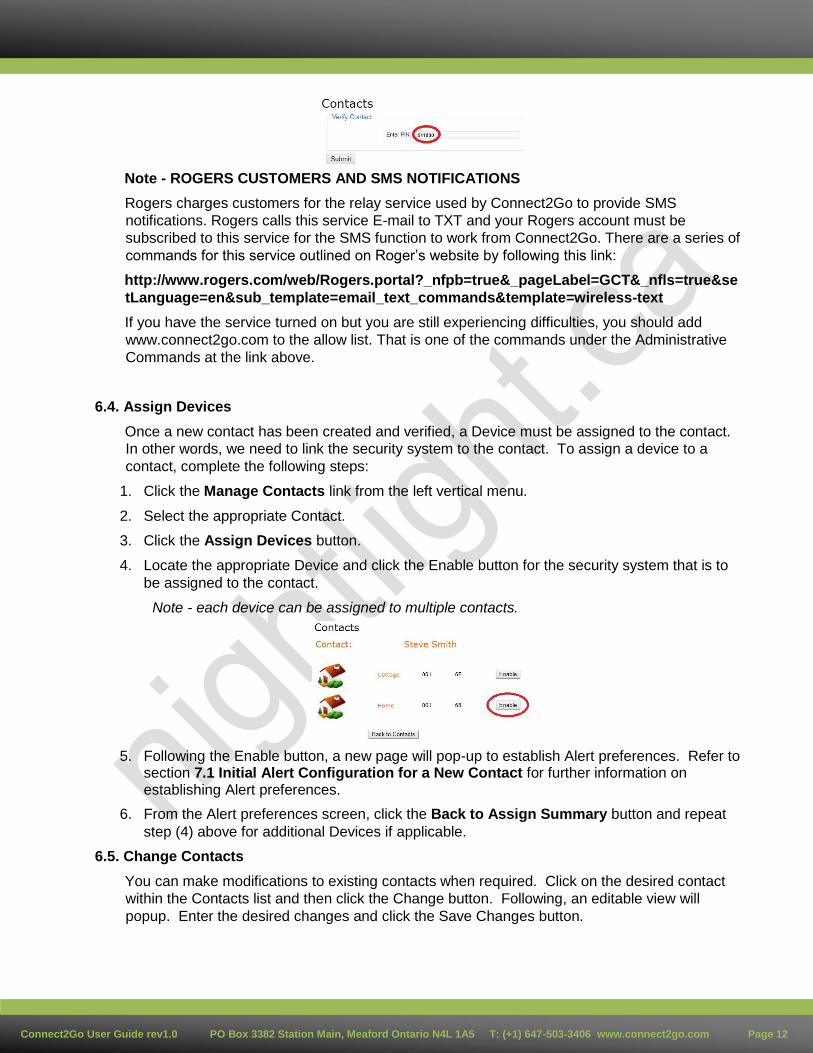
1. Enter the 6-digit PIN provided via SMS:
a. From the Manage Contacts page (select Manage Contacts from the left vertical
menu), locate the new contact with the parenthetical statement (Not Verified) beside
the contact name and click the Enter PIN button.
b. Enter the 6-digit PIN found in the SMS message and click the Submit button:
Connect2Go User Guide rev1.0 PO Box 3382 Station Main, Meaford Ontario N4L 1A5 T: (+1) 647-503-3406 www.connect2go.com Page 12
Note - ROGERS CUSTOMERS AND SMS NOTIFICATIONS
Rogers charges customers for the relay service used by Connect2Go to provide SMS
notifications. Rogers calls this service E-mail to TXT and your Rogers account must be
subscribed to this service for the SMS function to work from Connect2Go. There are a series of
commands for this service outlined on Roger’s website by following this link:
http://www.rogers.com/web/Rogers.portal?_nfpb=true&_pageLabel=GCT&_nfls=true&se
tLanguage=en&sub_template=email_text_commands&template=wireless-text
If you have the service turned on but you are still experiencing difficulties, you should add
www.connect2go.com to the allow list. That is one of the commands under the Administrative
Commands at the link above.
6.4. Assign Devices
Once a new contact has been created and verified, a Device must be assigned to the contact.
In other words, we need to link the security system to the contact. To assign a device to a
contact, complete the following steps:
1. Click the Manage Contacts link from the left vertical menu.
2. Select the appropriate Contact.
3. Click the Assign Devices button.
4. Locate the appropriate Device and click the Enable button for the security system that is to
be assigned to the contact.
Note - each device can be assigned to multiple contacts.
5. Following the Enable button, a new page will pop-up to establish Alert preferences. Refer to section 7.1 Initial Alert Configuration for a New Contact for further information on establishing Alert preferences.
6. From the Alert preferences screen, click the Back to Assign Summary button and repeat
step (4) above for additional Devices if applicable.
6.5. Change Contacts
You can make modifications to existing contacts when required. Click on the desired contact
within the Contacts list and then click the Change button. Following, an editable view will
popup. Enter the desired changes and click the Save Changes button.
Connect2Go User Guide rev1.0 PO Box 3382 Station Main, Meaford Ontario N4L 1A5 T: (+1) 647-503-3406 www.connect2go.com Page 13
Note - if you make any change to an existing Contact setup for email, you will need to re-verify
the contact. The steps involved are the same as those applicable to verifying a new contact
setup for email. Refer to section 6.2 Verify New Contact - eMail for more information.
6.6. Delete Contacts
You can delete Contacts when required. The steps involved are as follows:
Delete Contact setup for email - Click on the desired contact within the Contacts list and then
click the Delete button. A pop-up window will appear to confirm your selection. Select OK to
proceed.
Delete Contact setup for the connect2go app - Contacts relating to Android and iOS apps
can only be deleted by removing the app from the smart phone. The Contact will be
automatically removed by the connect2go server then next time an alert is attempted.
6.7. Special Notes About Contacts
1. The maximum number of contacts per account is 30. If you need more than 30 contacts, we
recommend creating an email distribution list.
2. When a new user logs in to their account for the first time, one contact will automatically be
created.
3. When a user installs the connect2go mobile app and logs in through that app for the first
time, a new contact will automatically be created.
4. Users are encouraged to Modify their Contact Names to avoid confusion between individual
contacts. For example, when a contact is automatically created for the connect2go mobile
app, it will have a generic contact name e.g. iPhone6,1. This could be changed to Steve
Smith mobile app to avoid confusion with another users mobile app.
7.0 CONFIGURING ALERTS
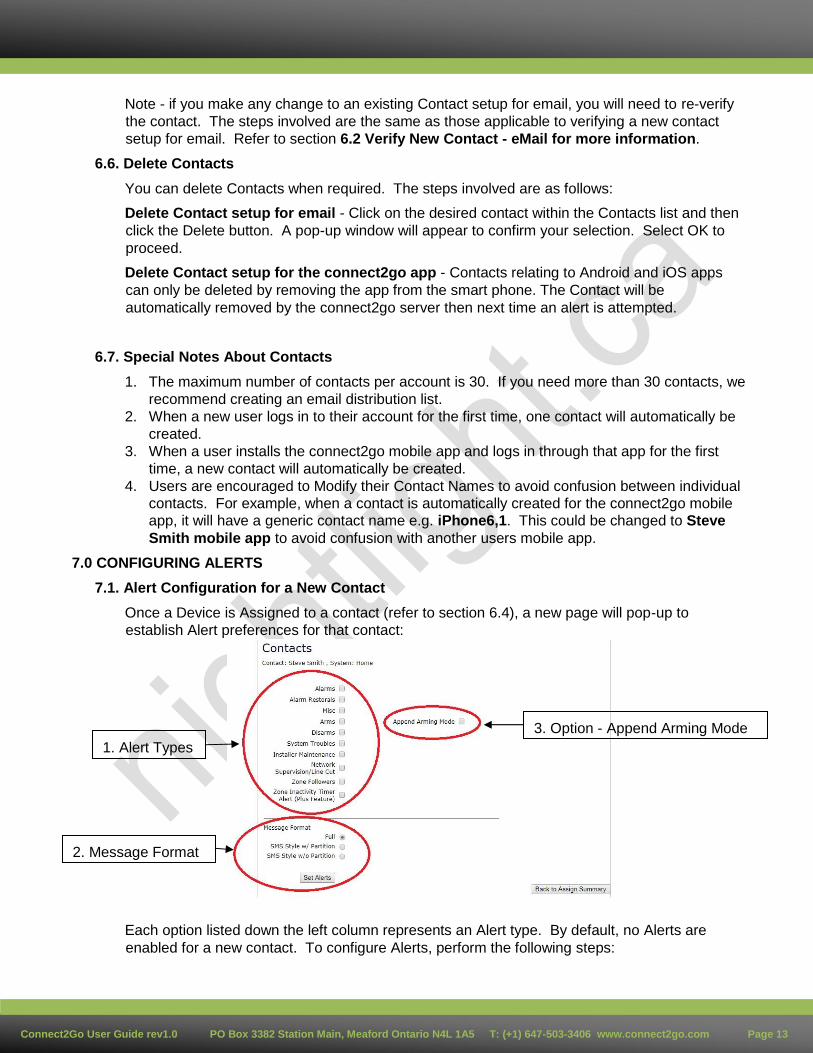
7.1. Alert Configuration for a New Contact
Once a Device is Assigned to a contact (refer to section 6.4), a new page will pop-up to
establish Alert preferences for that contact:
Each option listed down the left column represents an Alert type. By default, no Alerts are
enabled for a new contact. To configure Alerts, perform the following steps:
1 . Alert Types
2 . Message Format
3 . Option - Append Arming Mode
Connect2Go User Guide rev1.0 PO Box 3382 Station Main, Meaford Ontario N4L 1A5 T: (+1) 647-503-3406 www.connect2go.com Page 14
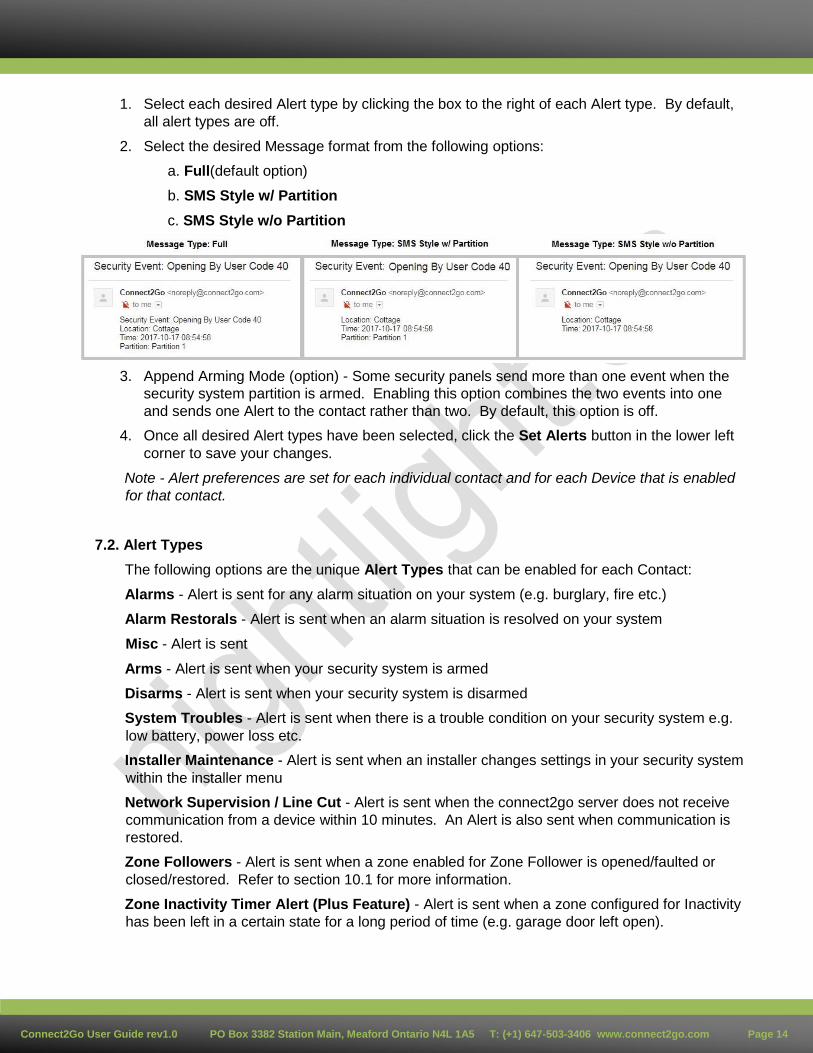
1. Select each desired Alert type by clicking the box to the right of each Alert type. By default,
all alert types are off.
2. Select the desired Message format from the following options:
a. Full(default option)
b. SMS Style w/ Partition
c. SMS Style w/o Partition
3. Append Arming Mode (option) - Some security panels send more than one event when the
security system partition is armed. Enabling this option combines the two events into one
and sends one Alert to the contact rather than two. By default, this option is off.
4. Once all desired Alert types have been selected, click the Set Alerts button in the lower left
corner to save your changes.
Note - Alert preferences are set for each individual contact and for each Device that is enabled
for that contact.
7.2. Alert Types
The following options are the unique Alert Types that can be enabled for each Contact:
Alarms - Alert is sent for any alarm situation on your system (e.g. burglary, fire etc.)
Alarm Restorals - Alert is sent when an alarm situation is resolved on your system
Misc - Alert is sent
Arms - Alert is sent when your security system is armed
Disarms - Alert is sent when your security system is disarmed
System Troubles - Alert is sent when there is a trouble condition on your security system e.g.
low battery, power loss etc.
Installer Maintenance - Alert is sent when an installer changes settings in your security system
within the installer menu
Network Supervision / Line Cut - Alert is sent when the connect2go server does not receive
communication from a device within 10 minutes. An Alert is also sent when communication is
restored.
Zone Followers - Alert is sent when a zone enabled for Zone Follower is opened/faulted or
closed/restored. Refer to section 10.1 for more information.
Zone Inactivity Timer Alert (Plus Feature) - Alert is sent when a zone configured for Inactivity
has been left in a certain state for a long period of time (e.g. garage door left open).
Connect2Go User Guide rev1.0 PO Box 3382 Station Main, Meaford Ontario N4L 1A5 T: (+1) 647-503-3406 www.connect2go.com Page 15
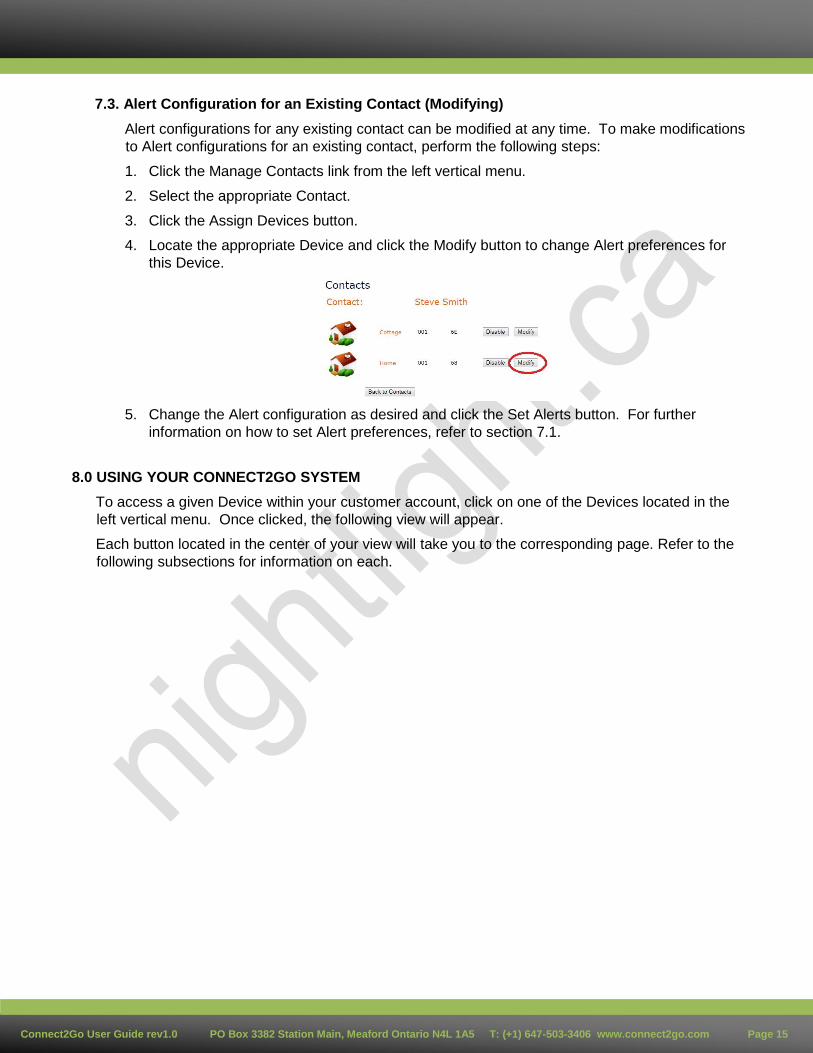
7.3. Alert Configuration for an Existing Contact (Modifying)
Alert configurations for any existing contact can be modified at any time. To make modifications
to Alert configurations for an existing contact, perform the following steps:
1. Click the Manage Contacts link from the left vertical menu.
2. Select the appropriate Contact.
3. Click the Assign Devices button.
4. Locate the appropriate Device and click the Modify button to change Alert preferences for
this Device.
5. Change the Alert configuration as desired and click the Set Alerts button. For further
information on how to set Alert preferences, refer to section 7.1.
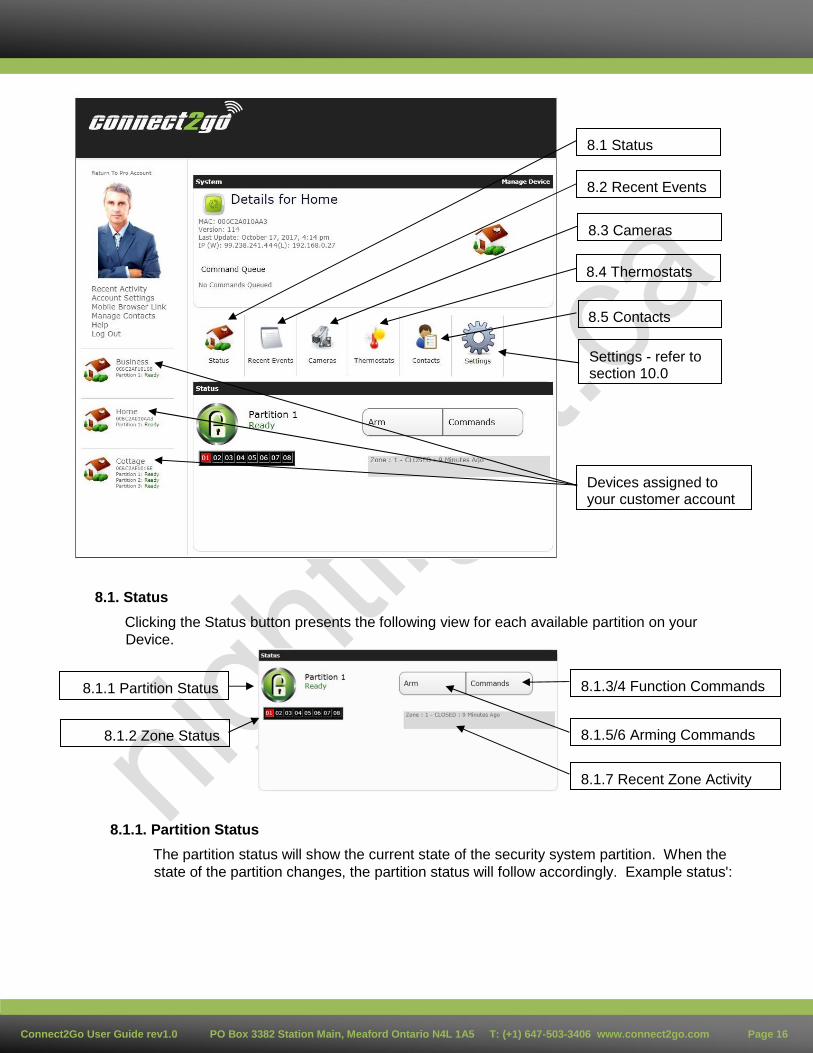
8.0 USING YOUR CONNECT2GO SYSTEM
To access a given Device within your customer account, click on one of the Devices located in the
left vertical menu. Once clicked, the following view will appear.
Each button located in the center of your view will take you to the corresponding page. Refer to the
following subsections for information on each.
Connect2Go User Guide rev1.0 PO Box 3382 Station Main, Meaford Ontario N4L 1A5 T: (+1) 647-503-3406 www.connect2go.com Page 16
8.1. Status
Clicking the Status button presents the following view for each available partition on your
Device.
8.1.1. Partition Status
The partition status will show the current state of the security system partition. When the
state of the partition changes, the partition status will follow accordingly. Example status':
8.1 Status
8.2 Recent Events
8.3 Cameras
8.4 Thermostats
8.5 Contacts
Devices assigned to your customer account
Settings - refer to section 10.0
8.1.1 Partition Status
8.1.2 Zone Status 8.1.5/6 Arming Commands
8.1.3/4 Function Commands
8.1.7 Recent Zone Activity
Connect2Go User Guide rev1.0 PO Box 3382 Station Main, Meaford Ontario N4L 1A5 T: (+1) 647-503-3406 www.connect2go.com Page 17
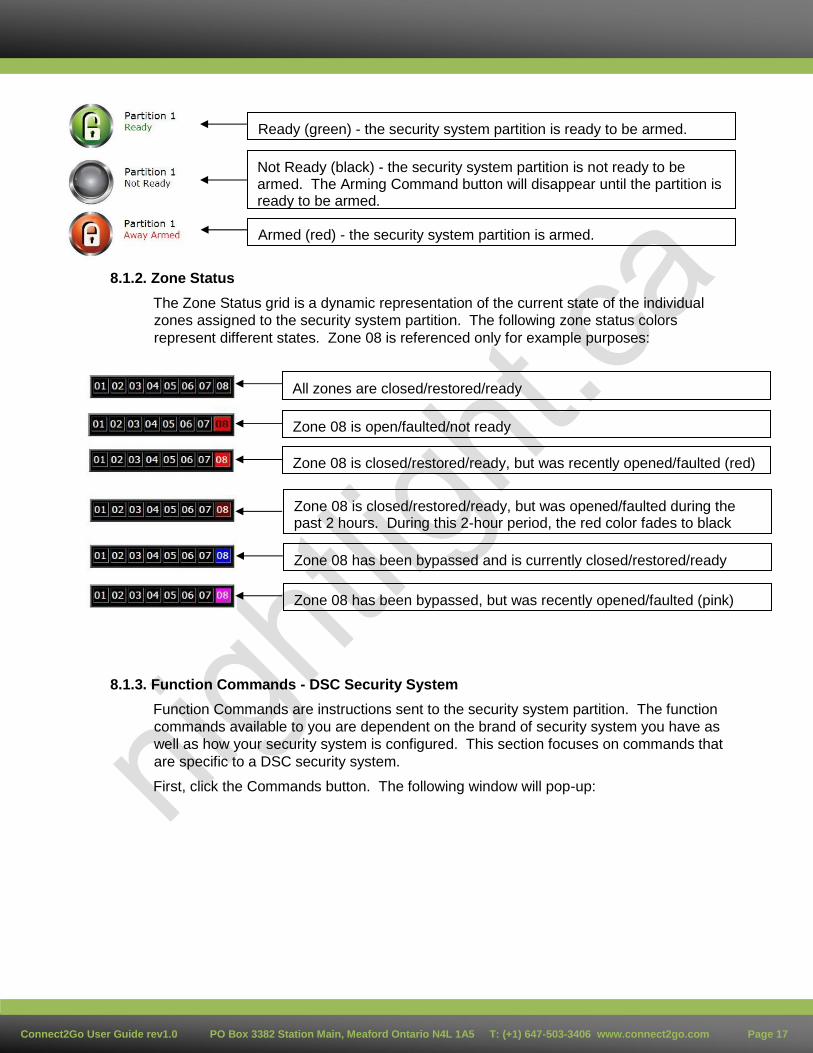
8.1.2. Zone Status
The Zone Status grid is a dynamic representation of the current state of the individual
zones assigned to the security system partition. The following zone status colors
represent different states. Zone 08 is referenced only for example purposes:
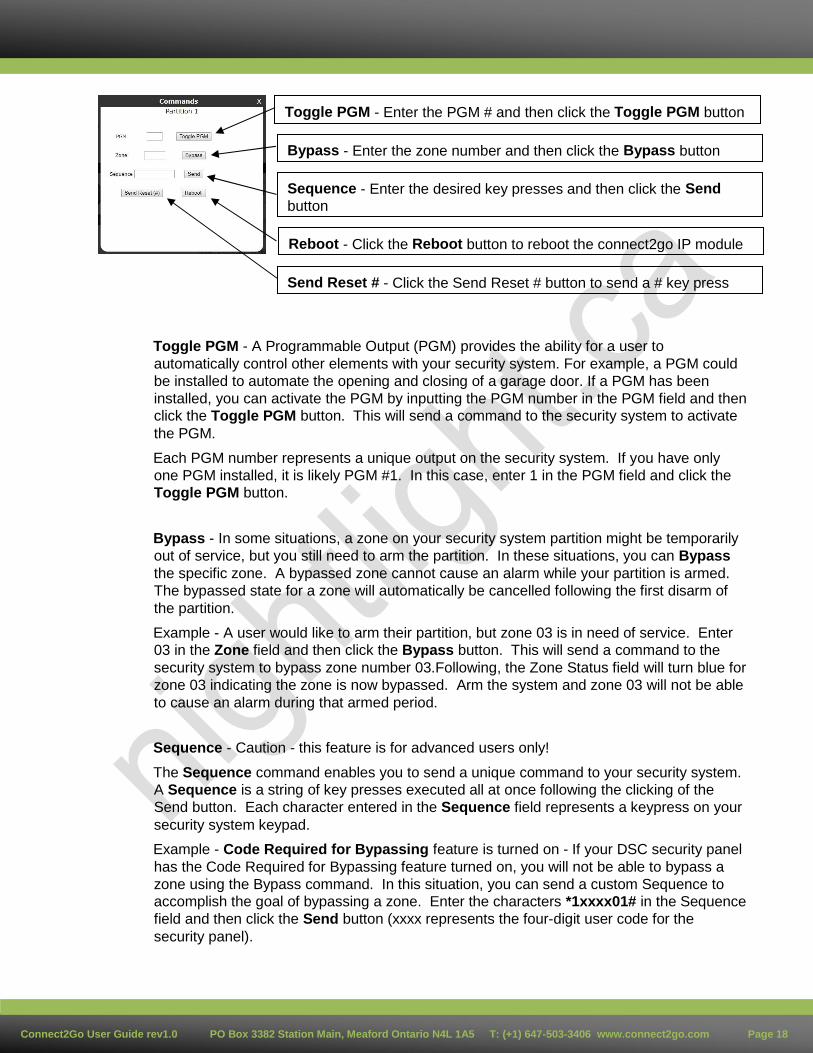
8.1.3. Function Commands - DSC Security System
Function Commands are instructions sent to the security system partition. The function
commands available to you are dependent on the brand of security system you have as
well as how your security system is configured. This section focuses on commands that
are specific to a DSC security system.
First, click the Commands button. The following window will pop-up:
Ready (green) - the security system partition is ready to be armed.
Not Ready (black) - the security system partition is not ready to be armed. The Arming Command button will disappear until the partition is ready to be armed.
Armed (red) - the security system partition is armed.
All zones are closed/restored/ready
Zone 08 is open/faulted/not ready
Zone 08 is closed/restored/ready, but was recently opened/faulted (red)
Zone 08 is closed/restored/ready, but was opened/faulted during the past 2 hours. During this 2-hour period, the red color fades to black
Zone 08 has been bypassed and is currently closed/restored/ready
Zone 08 has been bypassed, but was recently opened/faulted (pink)
Connect2Go User Guide rev1.0 PO Box 3382 Station Main, Meaford Ontario N4L 1A5 T: (+1) 647-503-3406 www.connect2go.com Page 18
Toggle PGM - A Programmable Output (PGM) provides the ability for a user to
automatically control other elements with your security system. For example, a PGM could
be installed to automate the opening and closing of a garage door. If a PGM has been
installed, you can activate the PGM by inputting the PGM number in the PGM field and then
click the Toggle PGM button. This will send a command to the security system to activate
the PGM.
Each PGM number represents a unique output on the security system. If you have only
one PGM installed, it is likely PGM #1. In this case, enter 1 in the PGM field and click the
Toggle PGM button.
Bypass - In some situations, a zone on your security system partition might be temporarily
out of service, but you still need to arm the partition. In these situations, you can Bypass
the specific zone. A bypassed zone cannot cause an alarm while your partition is armed.
The bypassed state for a zone will automatically be cancelled following the first disarm of
the partition.
Example - A user would like to arm their partition, but zone 03 is in need of service. Enter
03 in the Zone field and then click the Bypass button. This will send a command to the
security system to bypass zone number 03.Following, the Zone Status field will turn blue for
zone 03 indicating the zone is now bypassed. Arm the system and zone 03 will not be able
to cause an alarm during that armed period.
Sequence - Caution - this feature is for advanced users only!
The Sequence command enables you to send a unique command to your security system.
A Sequence is a string of key presses executed all at once following the clicking of the
Send button. Each character entered in the Sequence field represents a keypress on your
security system keypad.
Example - Code Required for Bypassing feature is turned on - If your DSC security panel
has the Code Required for Bypassing feature turned on, you will not be able to bypass a
zone using the Bypass command. In this situation, you can send a custom Sequence to
accomplish the goal of bypassing a zone. Enter the characters *1xxxx01# in the Sequence
field and then click the Send button (xxxx represents the four-digit user code for the
security panel).
Toggle PGM - Enter the PGM # and then click the Toggle PGM button
Bypass - Enter the zone number and then click the Bypass button
Sequence - Enter the desired key presses and then click the Send button
Send Reset # - Click the Send Reset # button to send a # key press
Reboot - Click the Reboot button to reboot the connect2go IP module
Connect2Go User Guide rev1.0 PO Box 3382 Station Main, Meaford Ontario N4L 1A5 T: (+1) 647-503-3406 www.connect2go.com Page 19
Note - A maximum of 15 characters can be sent in one Sequence command. However,
multiple Sequence commands can be sent one after another.
Send Reset (#) - Clicking the Send Reset # button is the same as pressing the # key on
your keypad.
Reboot - Clicking the Reboot button sends a command to restart the connect2go IP
module.
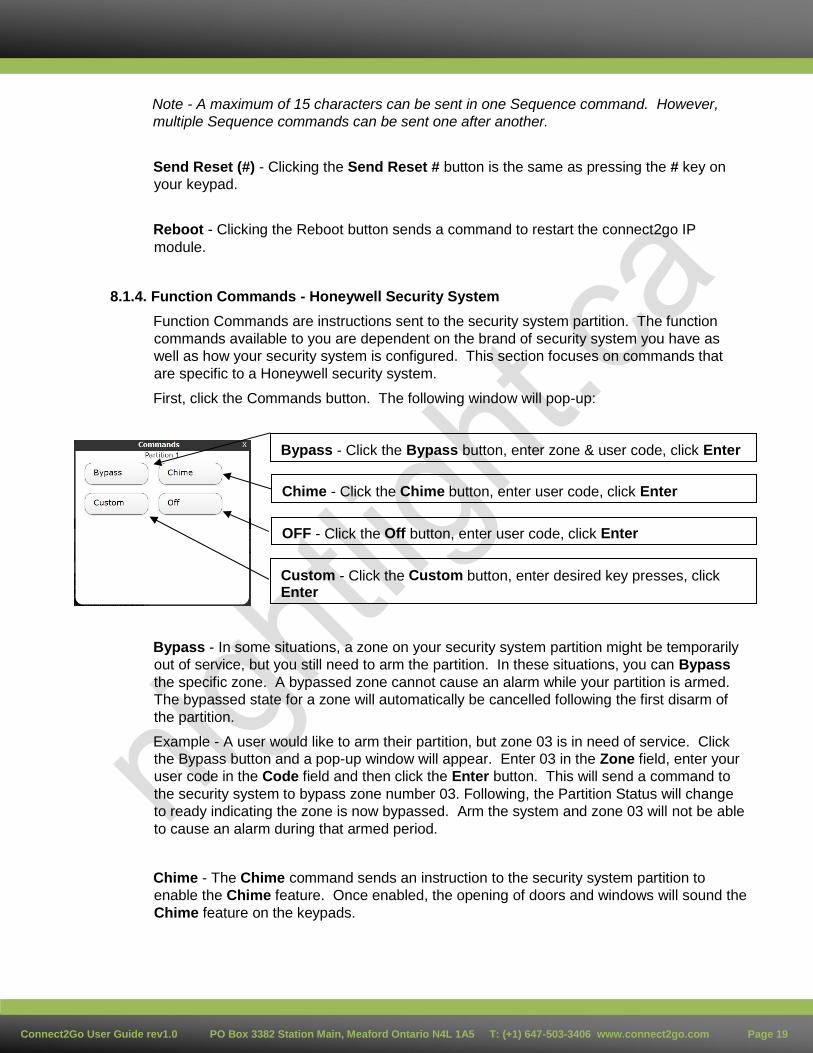
8.1.4. Function Commands - Honeywell Security System
Function Commands are instructions sent to the security system partition. The function
commands available to you are dependent on the brand of security system you have as
well as how your security system is configured. This section focuses on commands that
are specific to a Honeywell security system.
First, click the Commands button. The following window will pop-up:
Bypass - In some situations, a zone on your security system partition might be temporarily
out of service, but you still need to arm the partition. In these situations, you can Bypass
the specific zone. A bypassed zone cannot cause an alarm while your partition is armed.
The bypassed state for a zone will automatically be cancelled following the first disarm of
the partition.
Example - A user would like to arm their partition, but zone 03 is in need of service. Click
the Bypass button and a pop-up window will appear. Enter 03 in the Zone field, enter your
user code in the Code field and then click the Enter button. This will send a command to
the security system to bypass zone number 03. Following, the Partition Status will change
to ready indicating the zone is now bypassed. Arm the system and zone 03 will not be able
to cause an alarm during that armed period.
Chime - The Chime command sends an instruction to the security system partition to
enable the Chime feature. Once enabled, the opening of doors and windows will sound the
Chime feature on the keypads.
Bypass - Click the Bypass button, enter zone & user code, click Enter
Chime - Click the Chime button, enter user code, click Enter
Custom - Click the Custom button, enter desired key presses, click Enter
OFF - Click the Off button, enter user code, click Enter
Connect2Go User Guide rev1.0 PO Box 3382 Station Main, Meaford Ontario N4L 1A5 T: (+1) 647-503-3406 www.connect2go.com Page 20
To enable, click the Chime button, enter your user code in the pop-up window and then
click the Enter button.
Custom - Caution - this feature is for advanced users only!
The Custom command enables you to send a unique command to your security system.
A Sequence is a string of key presses executed all at once following the clicking of the
Send button. Each character entered in the Sequence field represents a key press on your
security system keypad.
Example - Activating a programmed Macro key - If you programmed a Macro Key on
your security panel partition, you can activate it using the Custom command. For instance,
if you have Macro Key 'A' programmed, you can activate it by entering the characters
Axxxx in the Sequence field and the click the Enter button (xxxx represents the four-digit
user code for the security panel).
Off - The Off command sends an instruction to the security system partition to disarm. To
execute the Off command, click the Off button, enter your user code in the pop-up window
and then click the Enter button.
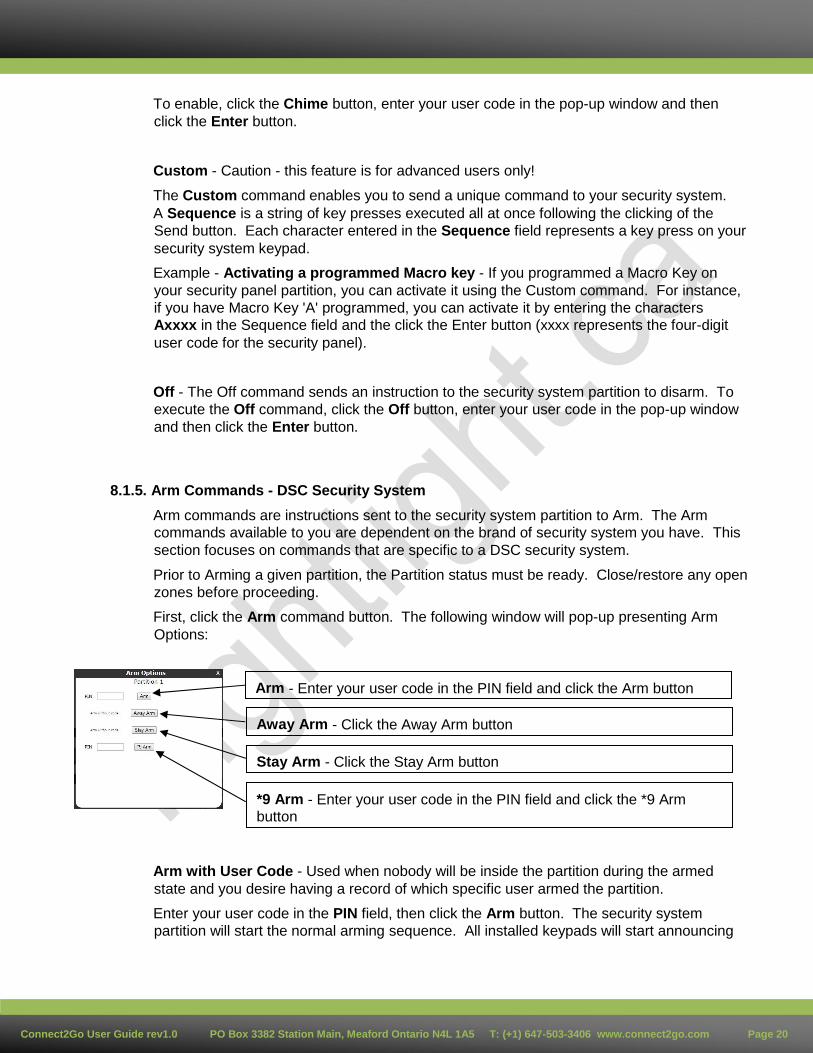
8.1.5. Arm Commands - DSC Security System
Arm commands are instructions sent to the security system partition to Arm. The Arm
commands available to you are dependent on the brand of security system you have. This
section focuses on commands that are specific to a DSC security system.
Prior to Arming a given partition, the Partition status must be ready. Close/restore any open
zones before proceeding.
First, click the Arm command button. The following window will pop-up presenting Arm
Options:
Arm with User Code - Used when nobody will be inside the partition during the armed
state and you desire having a record of which specific user armed the partition.
Enter your user code in the PIN field, then click the Arm button. The security system
partition will start the normal arming sequence. All installed keypads will start announcing
Arm - Enter your user code in the PIN field and click the Arm button
Away Arm - Click the Away Arm button
Stay Arm - Click the Stay Arm button
*9 Arm - Enter your user code in the PIN field and click the *9 Arm button

Connect2Go User Guide rev1.0 PO Box 3382 Station Main, Meaford Ontario N4L 1A5 T: (+1) 647-503-3406 www.connect2go.com Page 21
the standard exit delay tones. Normal exit delay timing will take place. Anyone present
inside the premises can exit before the exit delay time expires. Once armed, the Recent
Events log will contain two events:
Connect2Go User Guide rev1.0 PO Box 3382 Station Main, Meaford Ontario N4L 1A5 T: (+1) 647-503-3406 www.connect2go.com Page 22
2. Away Arm Mode
Away Arm without code - Used when nobody will be inside the partition during the armed
state and you do not desire having a record of which user armed the partition.
Click the Away Arm button. The security system partition will start the normal arming
sequence. All installed keypads will start announcing the standard exit delay tones.
Normal exit delay timing will take place. Anyone present inside the premises must exit
before the exit delay time expires.
Note - If nobody opens and closes an entry/exit door during the exit delay time, the arming
mode will change to Stay Armed.
Stay Arm without code - Used when people will be inside the premises during the armed
state. All interior zones will not be armed.
Click the Stay Arm button. The security system partition will start the Stay Arming
sequence. All installed keypads will beep announcing the start of Stay Arming exit delay,
but then be silent for the remainder of the exit delay time. Normal exit delay timing will
take place. Anyone present inside the premises can exit before the exit delay time
expires.
Note - If anyone opens and closes an entry/exit door during the exit delay time, the arming
mode will change to Away Armed.
*9 Arm with User Code - Used when people will be inside the premises during the armed
state and nobody will be entering the partition during the armed state. All zones normally
having an entry delay will have none.
Enter your user code in the PIN field, then click the *9 Arm button. The security system
partition will start the *9 arming sequence. All installed keypads will not announce any exit
delay tones. The Armed light on installed keypads will flash and normal exit delay timing
will take place. During the *9 armed state, the armed LED will continue to flash indicating
there is no entry delay. Once armed, the Recent Events log will contain three events:
1) Closing by User Code XX
2) No Entry Arm Mode
3) Away Arm Mode
Disarm - Used to disarm an armed partition.
Click the Disarm button and a pop-up window will appear. Enter your user code in the PIN
field and click the Disarm button. The security system will disarm.
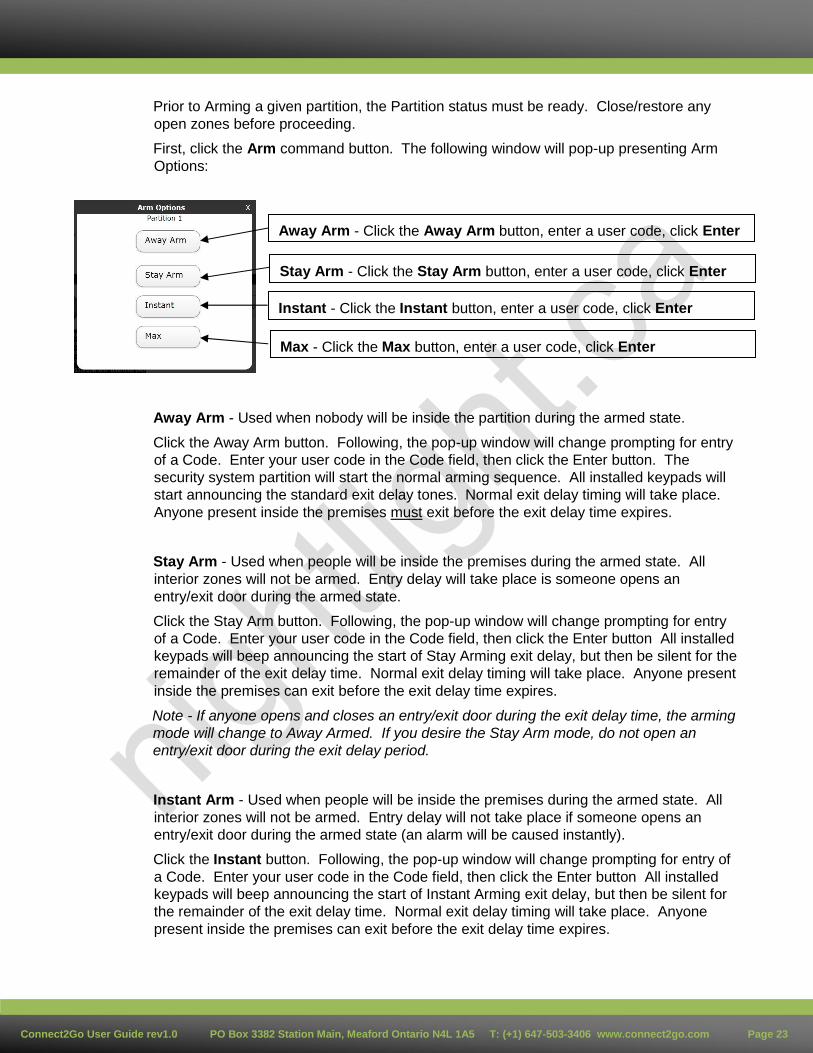
8.1.6. Arm Commands - Honeywell Security System
Arm commands are instructions sent to the security system partition to Arm. The Arm
commands available to you are dependent on the brand of security system you have. This
section focuses on commands that are specific to a Honeywell security system.
1 . Closing by User Code XX
Connect2Go User Guide rev1.0 PO Box 3382 Station Main, Meaford Ontario N4L 1A5 T: (+1) 647-503-3406 www.connect2go.com Page 23
Prior to Arming a given partition, the Partition status must be ready. Close/restore any
open zones before proceeding.
First, click the Arm command button. The following window will pop-up presenting Arm
Options:
Away Arm - Used when nobody will be inside the partition during the armed state.
Click the Away Arm button. Following, the pop-up window will change prompting for entry
of a Code. Enter your user code in the Code field, then click the Enter button. The
security system partition will start the normal arming sequence. All installed keypads will
start announcing the standard exit delay tones. Normal exit delay timing will take place.
Anyone present inside the premises must exit before the exit delay time expires.
Stay Arm - Used when people will be inside the premises during the armed state. All
interior zones will not be armed. Entry delay will take place is someone opens an
entry/exit door during the armed state.
Click the Stay Arm button. Following, the pop-up window will change prompting for entry
of a Code. Enter your user code in the Code field, then click the Enter button All installed
keypads will beep announcing the start of Stay Arming exit delay, but then be silent for the
remainder of the exit delay time. Normal exit delay timing will take place. Anyone present
inside the premises can exit before the exit delay time expires.
Note - If anyone opens and closes an entry/exit door during the exit delay time, the arming
mode will change to Away Armed. If you desire the Stay Arm mode, do not open an
entry/exit door during the exit delay period.
Instant Arm - Used when people will be inside the premises during the armed state. All
interior zones will not be armed. Entry delay will not take place if someone opens an
entry/exit door during the armed state (an alarm will be caused instantly).
Click the Instant button. Following, the pop-up window will change prompting for entry of
a Code. Enter your user code in the Code field, then click the Enter button All installed
keypads will beep announcing the start of Instant Arming exit delay, but then be silent for
the remainder of the exit delay time. Normal exit delay timing will take place. Anyone
present inside the premises can exit before the exit delay time expires.
Away Arm - Click the Away Arm button, enter a user code, click Enter
Stay Arm - Click the Stay Arm button, enter a user code, click Enter
Instant - Click the Instant button, enter a user code, click Enter
Max - Click the Max button, enter a user code, click Enter
Connect2Go User Guide rev1.0 PO Box 3382 Station Main, Meaford Ontario N4L 1A5 T: (+1) 647-503-3406 www.connect2go.com Page 24
Note - If anyone opens and closes an entry/exit door during the exit delay time, the arming
mode will change to Away Armed. If you desire the Instant Arm mode, do not open an
entry/exit door during the exit delay period.
Max Arm - Used when nobody will be inside the partition during the armed state and you
do not want entry delay on entry/exit doors.
Click the Max button. Following, the pop-up window will change prompting for entry of a
Code. Enter your user code in the Code field, then click the Enter button. The security
system partition will start the normal arming sequence. All installed keypads will start
announcing the standard exit delay tones. Normal exit delay timing will take place.
Anyone present inside the premises must exit before the exit delay time expires.
Note - If anyone opens an entry/exit door during the entry delay time, an alarm will be
caused.
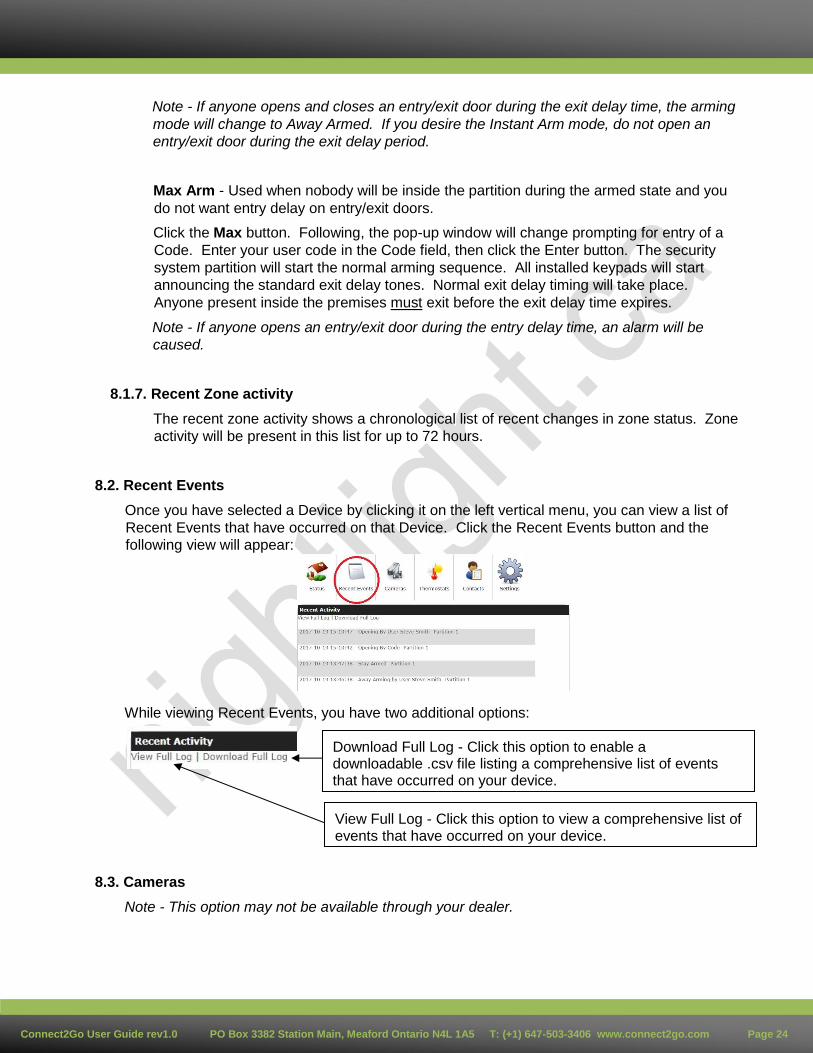
8.1.7. Recent Zone activity
The recent zone activity shows a chronological list of recent changes in zone status. Zone
activity will be present in this list for up to 72 hours.
8.2. Recent Events
Once you have selected a Device by clicking it on the left vertical menu, you can view a list of
Recent Events that have occurred on that Device. Click the Recent Events button and the
following view will appear:
8.3. Cameras
Note - This option may not be available through your dealer.
While viewing Recent Events, you have two additional options:
Download Full Log - Click this option to enable a downloadable .csv file listing a comprehensive list of events that have occurred on your device.
View Full Log - Click this option to view a comprehensive list of events that have occurred on your device.
Connect2Go User Guide rev1.0 PO Box 3382 Station Main, Meaford Ontario N4L 1A5 T: (+1) 647-503-3406 www.connect2go.com Page 25
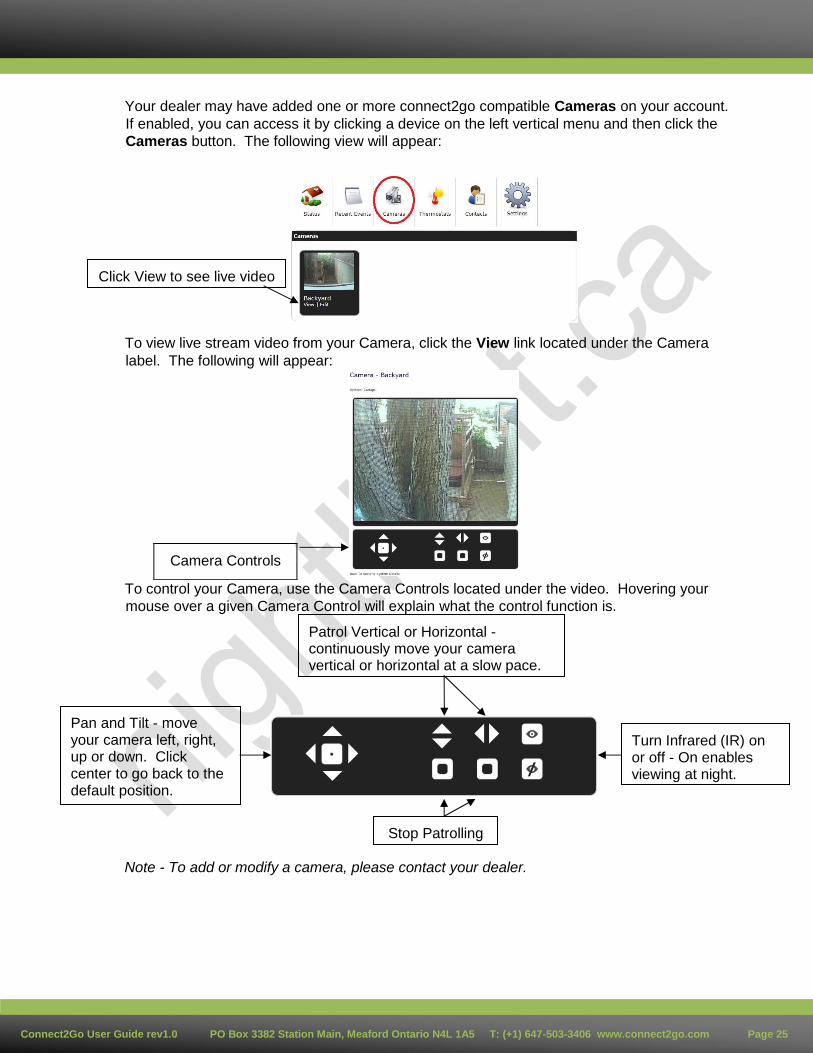
Your dealer may have added one or more connect2go compatible Cameras on your account.
If enabled, you can access it by clicking a device on the left vertical menu and then click the
Cameras button. The following view will appear:
To view live stream video from your Camera, click the View link located under the Camera
label. The following will appear:
Camera Controls
To control your Camera, use the Camera Controls located under the video. Hovering your
mouse over a given Camera Control will explain what the control function is.
Note - To add or modify a camera, please contact your dealer.
Click View to see live video
Pan and Tilt - move your camera left, right, up or down. Click center to go back to the default position.
Patrol Vertical or Horizontal - continuously move your camera vertical or horizontal at a slow pace.
Turn Infrared (IR) on or off - On enables viewing at night.
Stop Patrolling
Connect2Go User Guide rev1.0 PO Box 3382 Station Main, Meaford Ontario N4L 1A5 T: (+1) 647-503-3406 www.connect2go.com Page 26
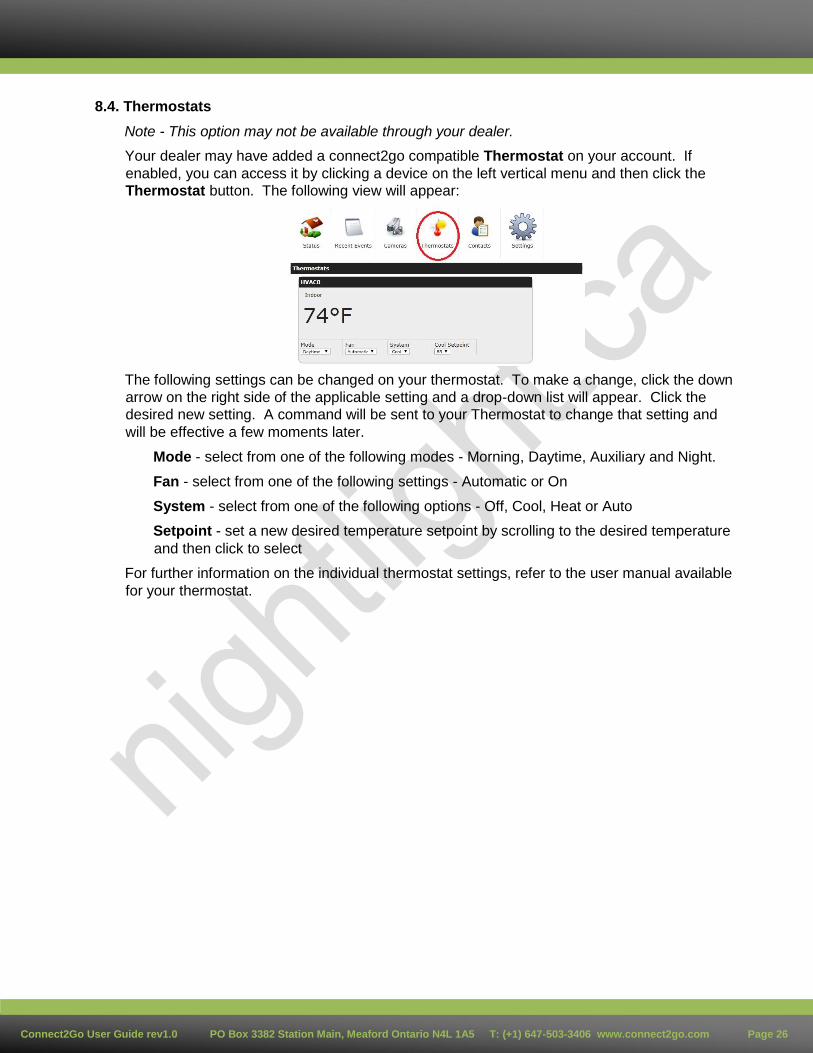
8.4. Thermostats
Note - This option may not be available through your dealer.
Your dealer may have added a connect2go compatible Thermostat on your account. If
enabled, you can access it by clicking a device on the left vertical menu and then click the
Thermostat button. The following view will appear:
The following settings can be changed on your thermostat. To make a change, click the down
arrow on the right side of the applicable setting and a drop-down list will appear. Click the
desired new setting. A command will be sent to your Thermostat to change that setting and
will be effective a few moments later.
Mode - select from one of the following modes - Morning, Daytime, Auxiliary and Night.
Fan - select from one of the following settings - Automatic or On
System - select from one of the following options - Off, Cool, Heat or Auto
Setpoint - set a new desired temperature setpoint by scrolling to the desired temperature
and then click to select
For further information on the individual thermostat settings, refer to the user manual available
for your thermostat.
Connect2Go User Guide rev1.0 PO Box 3382 Station Main, Meaford Ontario N4L 1A5 T: (+1) 647-503-3406 www.connect2go.com Page 27
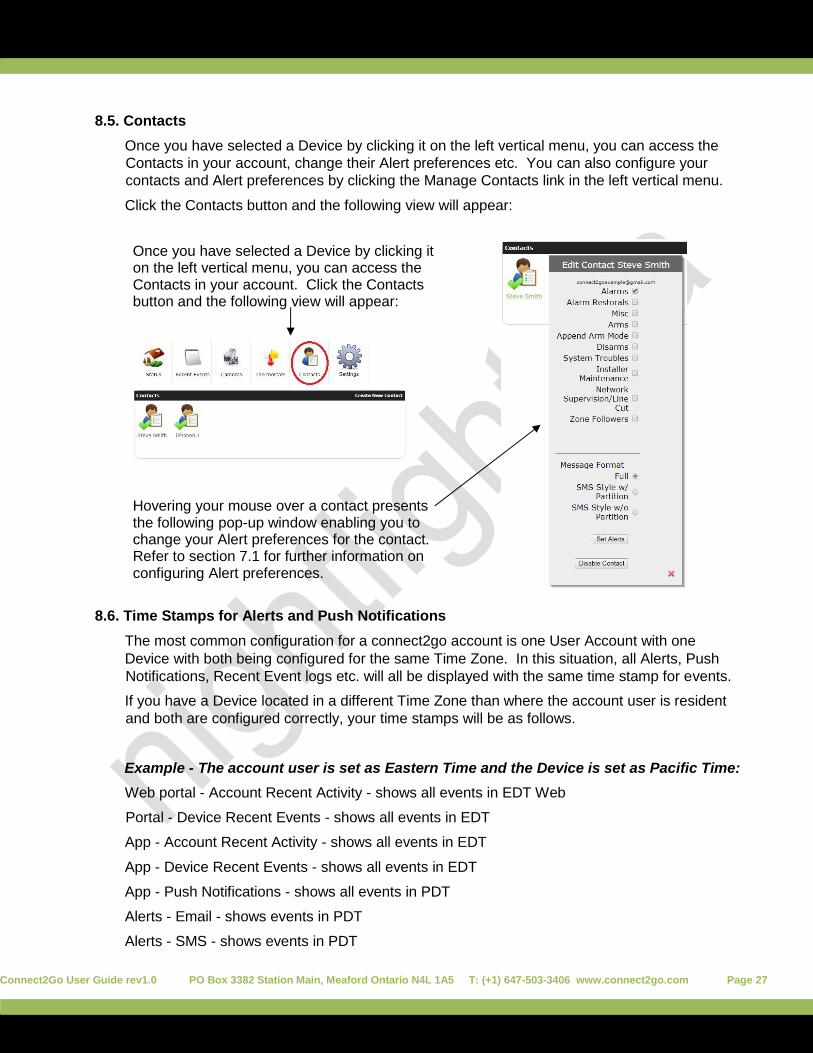
8.5. Contacts
Once you have selected a Device by clicking it on the left vertical menu, you can access the
Contacts in your account, change their Alert preferences etc. You can also configure your
contacts and Alert preferences by clicking the Manage Contacts link in the left vertical menu.
Click the Contacts button and the following view will appear:
8.6. Time Stamps for Alerts and Push Notifications
The most common configuration for a connect2go account is one User Account with one
Device with both being configured for the same Time Zone. In this situation, all Alerts, Push
Notifications, Recent Event logs etc. will all be displayed with the same time stamp for events.
If you have a Device located in a different Time Zone than where the account user is resident
and both are configured correctly, your time stamps will be as follows.
Example - The account user is set as Eastern Time and the Device is set as Pacific Time:
Web portal - Account Recent Activity - shows all events in EDT Web
Portal - Device Recent Events - shows all events in EDT
App - Account Recent Activity - shows all events in EDT
App - Device Recent Events - shows all events in EDT
App - Push Notifications - shows all events in PDT
Alerts - Email - shows events in PDT
Alerts - SMS - shows events in PDT
Once you have selected a Device by clicking it on the left vertical menu, you can access the Contacts in your account. Click the Contacts button and the following view will appear:
Hovering your mouse over a contact presents the following pop-up window enabling you to change your Alert preferences for the contact. Refer to section 7.1 for further information on configuring Alert preferences.

Connect2Go User Guide rev1.0 PO Box 3382 Station Main, Meaford Ontario N4L 1A5 T: (+1) 647-503-3406 www.connect2go.com Page 28
Refer to the following sections for additional information:
4.2.2 Time Zone - Account settings
10.3.3 Set Time Zone - Device Settings
9.0 CONNECT2GO MOBILE APP
Note - this section is applicable if you are using an iOS or Android-based smart phone. If you are
using a different type of smart phone, you will need to use the Mobile Portal link. Refer to section
4.4 Mobile Portal Link for more information.
9.1. Installing the connect2go Mobile App
The Connect2Go Mobile app is available for Android and iOS devices. Version 10+ of iOS is
required. If you do not have a supported device, refer to section 4.4 Mobile Portal Link and install
the Mobile Portal instead. The Mobile Portal provides most of the same functionality as the
Connect2Go app. One exception is the Mobile Portal Link does not support Push Notifications.
Android and iOS Customers
Go to either the Google Play Store or the Apple App Store and search for Connect2Go. The
Connect2Go Mobile app will appear and you install it like any other app.
9.2. Enable Push Notifications
Enabling Push Notifications for the connect2go app will allow your smart phone to prompt you with
Alerts real-time. Once installed, open the app. You will be prompted to enable Push Notifications.
Select Allow.
Select Allow
Example Push Notifications
Connect2Go User Guide rev1.0 PO Box 3382 Station Main, Meaford Ontario N4L 1A5 T: (+1) 647-503-3406 www.connect2go.com Page 29
Note - You can change your notification preferences at any time through your smart phone
notification preferences (e.g. enable or disable Push Notifications for the connect2go app). Refer to
your smart phone user manual for more information on configuring Notifications.
9.3. Connect2Go Mobile App Login
Once you have opened the connect2go mobile app and selected your preference for Push
Notifications, you will be prompted for your user account login credentials. The username and
password are the same username and password used to access your account using a web portal.
9.4. Connect2Go Mobile App - Navigation
9.4.1. Summary Screen
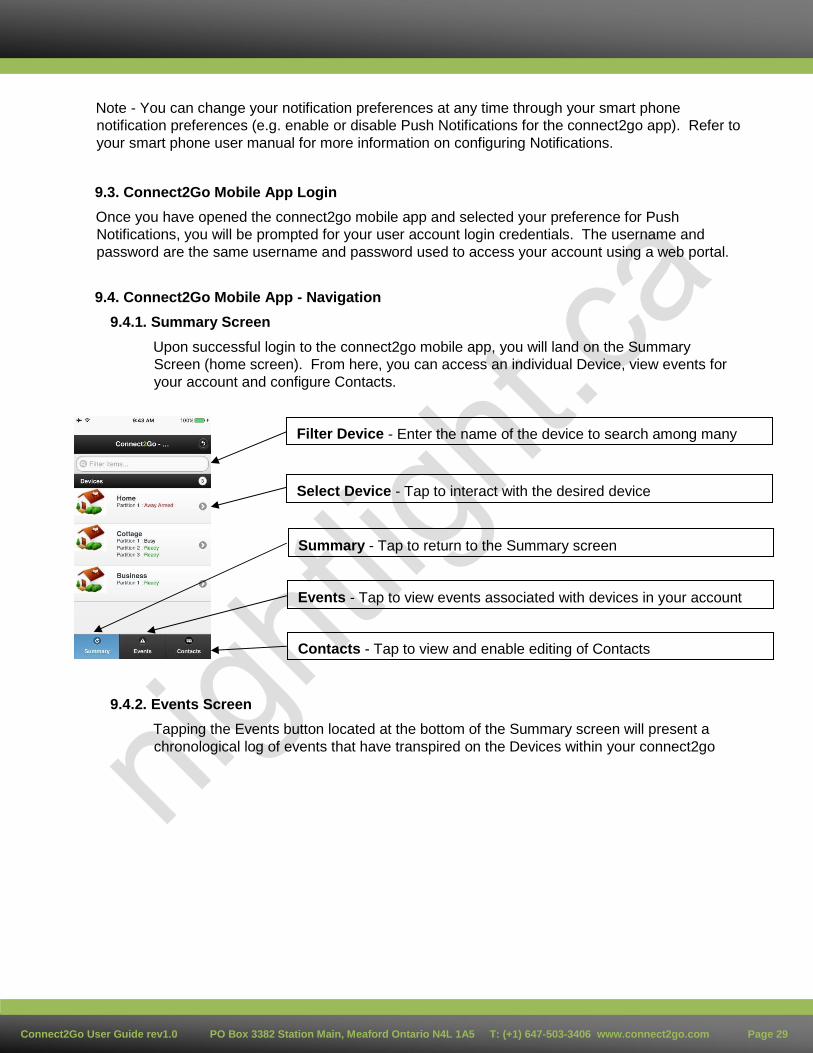
Upon successful login to the connect2go mobile app, you will land on the Summary
Screen (home screen). From here, you can access an individual Device, view events for
your account and configure Contacts.
9.4.2. Events Screen
Tapping the Events button located at the bottom of the Summary screen will present a
chronological log of events that have transpired on the Devices within your connect2go
Filter Device - Enter the name of the device to search among many
Select Device - Tap to interact with the desired device
Events - Tap to view events associated with devices in your account
Contacts - Tap to view and enable editing of Contacts
Summary - Tap to return to the Summary screen
account. If you have more than one Device linked to your connect2go account (e.g. home
and cottage), you will see events from both Devices.
Note - only the last 10 events within the last 5 days are shown.
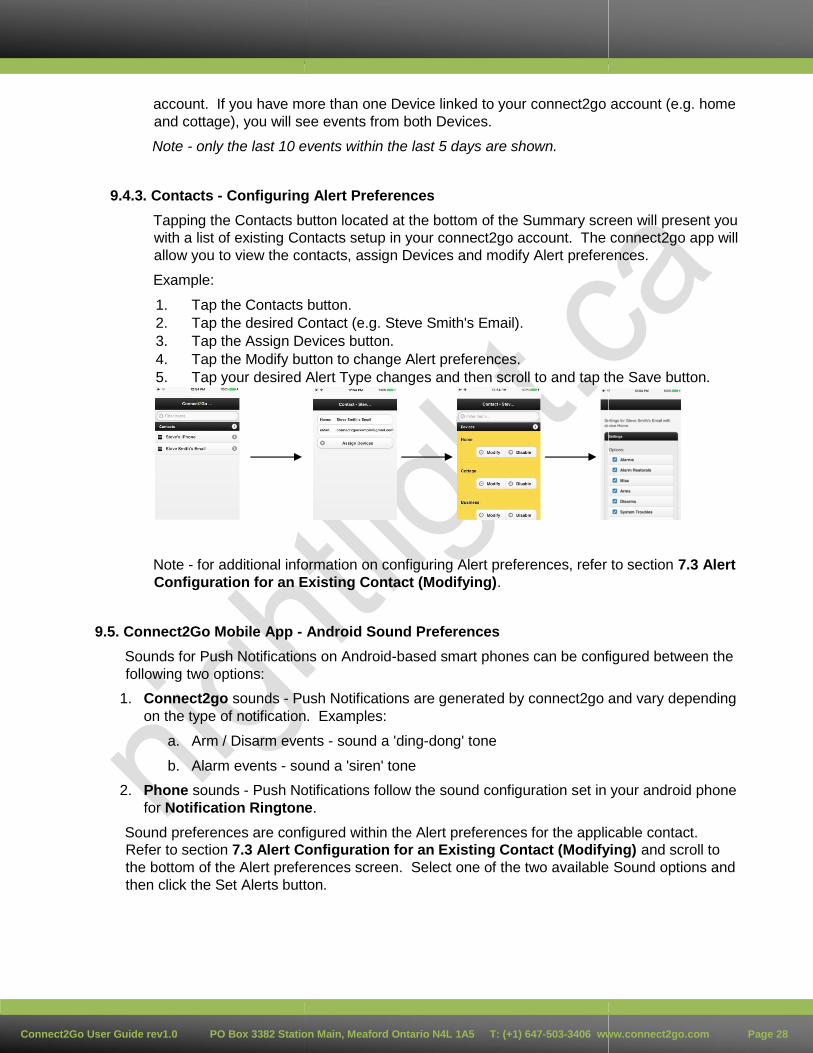
9.4.3. Contacts - Configuring Alert Preferences
Tapping the Contacts button located at the bottom of the Summary screen will present you
with a list of existing Contacts setup in your connect2go account. The connect2go app will
allow you to view the contacts, assign Devices and modify Alert preferences.
Example:
1. Tap the Contacts button.
2. Tap the desired Contact (e.g. Steve Smith's Email).
3. Tap the Assign Devices button.
4. Tap the Modify button to change Alert preferences.
5. Tap your desired Alert Type changes and then scroll to and tap the Save button.
Note - for additional information on configuring Alert preferences, refer to section 7.3 Alert
Configuration for an Existing Contact (Modifying).
9.5. Connect2Go Mobile App - Android Sound Preferences
Sounds for Push Notifications on Android-based smart phones can be configured between the
following two options:
1. Connect2go sounds - Push Notifications are generated by connect2go and vary depending
on the type of notification. Examples:
a. Arm / Disarm events - sound a 'ding-dong' tone
b. Alarm events - sound a 'siren' tone
2. Phone sounds - Push Notifications follow the sound configuration set in your android phone
for Notification Ringtone.
Sound preferences are configured within the Alert preferences for the applicable contact.
Refer to section 7.3 Alert Configuration for an Existing Contact (Modifying) and scroll to
the bottom of the Alert preferences screen. Select one of the two available Sound options and
then click the Set Alerts button.
Connect2Go User Guide rev1.0 PO Box 3382 Stati
on Main, Meaford Ontario N4L 1A5 T: (+1) 647-503-3406 w ww.connect2go.com Page 28
Connect2Go User Guide rev1.0 PO Box 3382 Station Main, Meaford Ontario N4L 1A5 T: (+1) 647-503-3406 www.connect2go.com Page 31
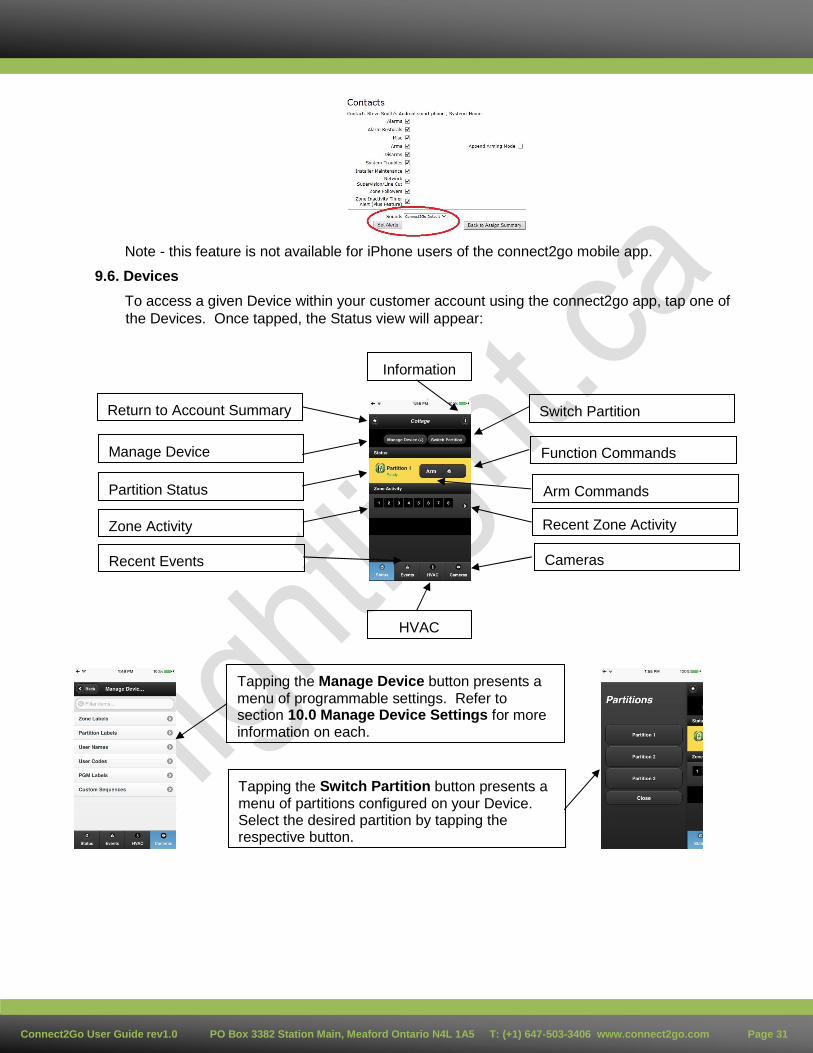
Note - this feature is not available for iPhone users of the connect2go mobile app.
9.6. Devices
To access a given Device within your customer account using the connect2go app, tap one of
the Devices. Once tapped, the Status view will appear:
Return to Account Summary
Manage Device
Zone Activity
Switch Partition
Recent Zone Activity
Function Commands
Recent Events Cameras
HVAC
Information
Partition Status
Tapping the Manage Device button presents a menu of programmable settings. Refer to section 10.0 Manage Device Settings for more information on each.
Tapping the Switch Partition button presents a menu of partitions configured on your Device. Select the desired partition by tapping the respective button.
Arm Commands
Connect2Go User Guide rev1.0 PO Box 3382 Stati on Main, Meaford Ontario N4L 1A5 T: (+1) 647-503-3406 w ww.connect2go.com Page 30
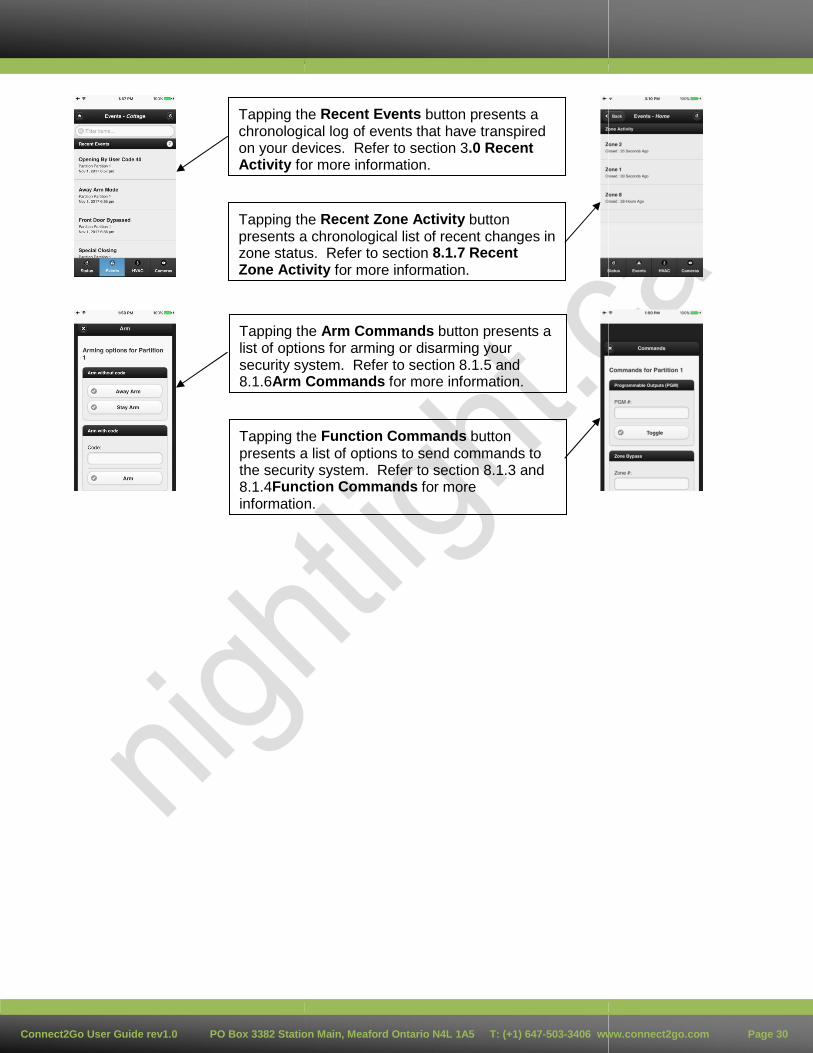
Tapping t chronolog on your d Activity f
Tapping t presents zone stat Zone Act
Tapping t list of opti security s 8.1.6 Arm
Tapping t presents the securi 8.1.4 Fun
informatio
he Recent Events button presents a ical log of events that have transpired evices. Refer to section 3 Recent .0 or more information.
he Recent Zone Activity button a chronological list of recent changes in us. Refer to section 8.1.7 Recent ivity for more information.
he Arm Commands button presents a ons for arming or disarming your ystem. Refer to section 8.1.5 and Commands for more information.
he Function Commands button a list of options to send commands to ty system. Refer to section 8.1.3 and ction Commands for more n.
Connect2Go User Guide rev1.0 PO Box 3382 Station Main, Meaford Ontario N4L 1A5 T: (+1) 647-503-3406 www.connect2go.com Page 33
9.7. App Logout
Once you have successfully logged in to the connect2go app, the app will remain logged in. To
logout, use one of the following two options:
1. Click the logout button on the app Summary screen
2. Remotely logout all smart phones using a web portal (refer to
section 4.4.2 Lost Smart Phone)
10.0 MANAGE DEVICE SETTINGS
For all devices, you are able to customize a number of different attributes to suit your needs.
Customizations are accessible using the Settings button.
1. To configure settings, select the appropriate Device located in the left vertical menu. Once
clicked, the following view will appear.
2. Click the Settings button.
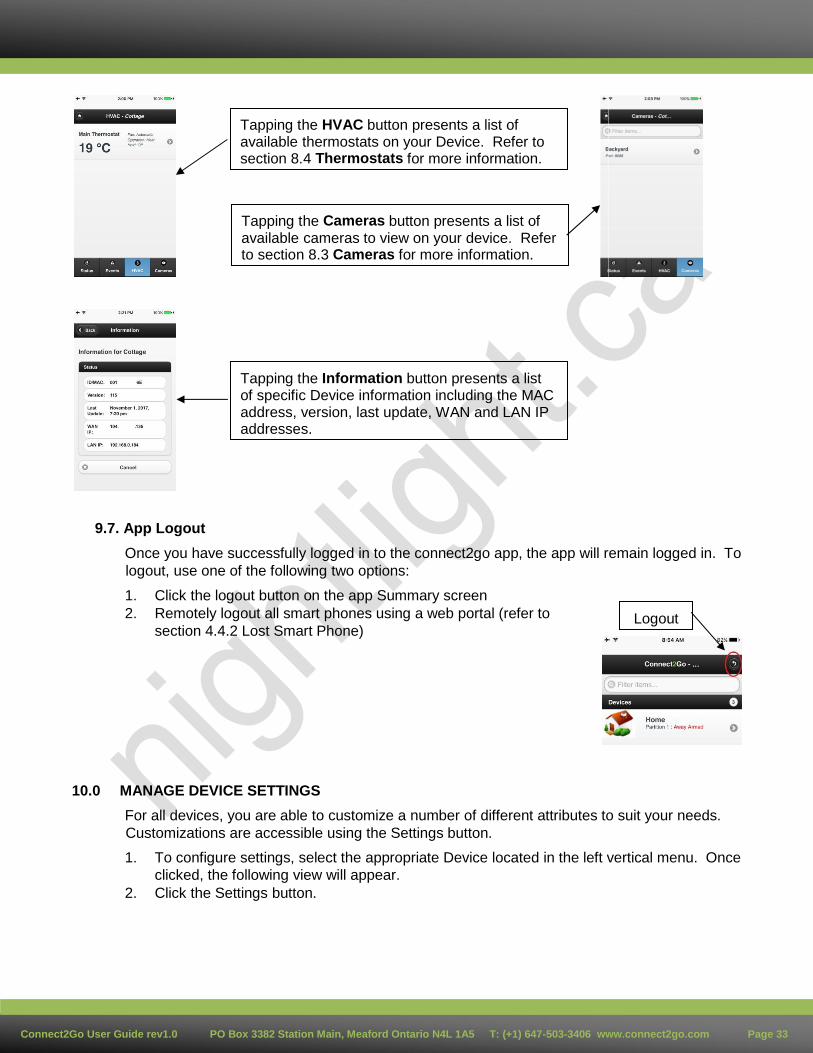
Tapping t available section 8.
Tapping t available to sectio
Tapping t of specifi address, addresse
he HVAC button presents a list of thermostats on your Device. Refer to
4 Thermostats for more information.
he Cameras button presents a list of cameras to view on your device. Refer
n 8.3 Cameras for more information.
he Information button presents a list c Device information including the MAC version, last upda te, WAN and LAN IP s.
Logout
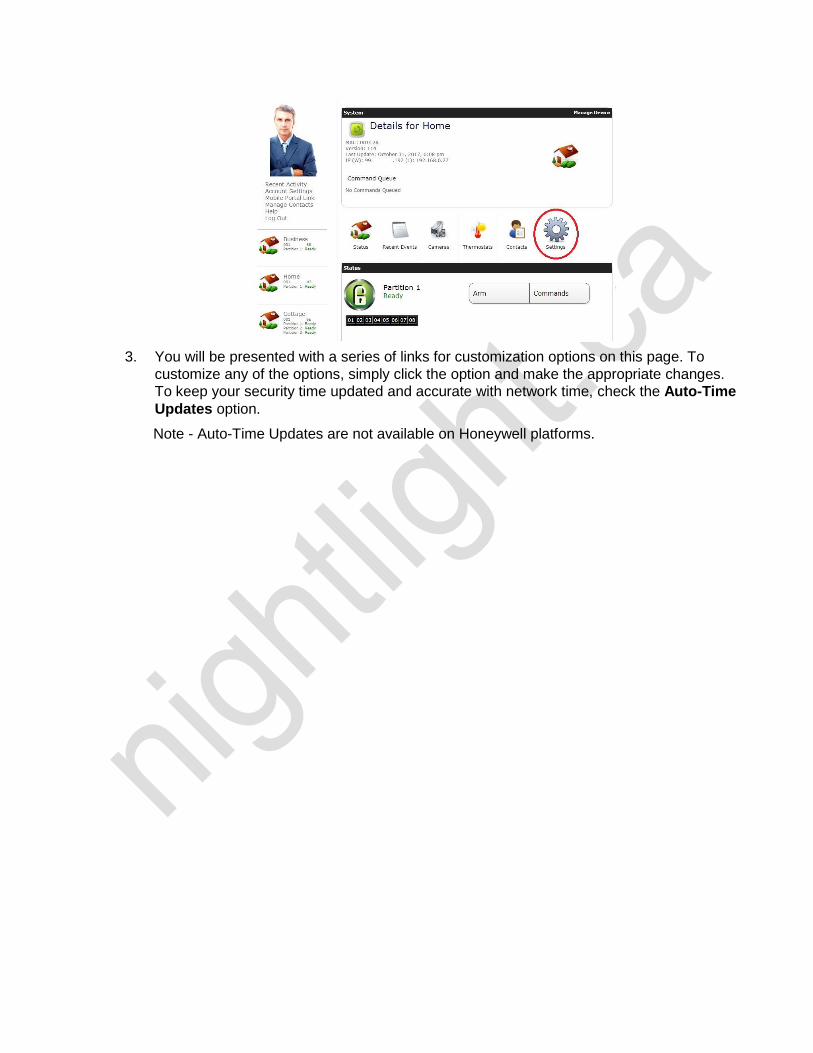
3. You will be presented with a series of links for customization options on this page. To
customize any of the options, simply click the option and make the appropriate changes.
To keep your security time updated and accurate with network time, check the Auto-Time
Updates option.
Note - Auto-Time Updates are not available on Honeywell platforms.
Connect2Go User Guide rev1.0 PO Box 3382 Station Main, Meaford Ontario N4L 1A5 T: (+1) 647-503-3406 www.connect2go.com Page 35
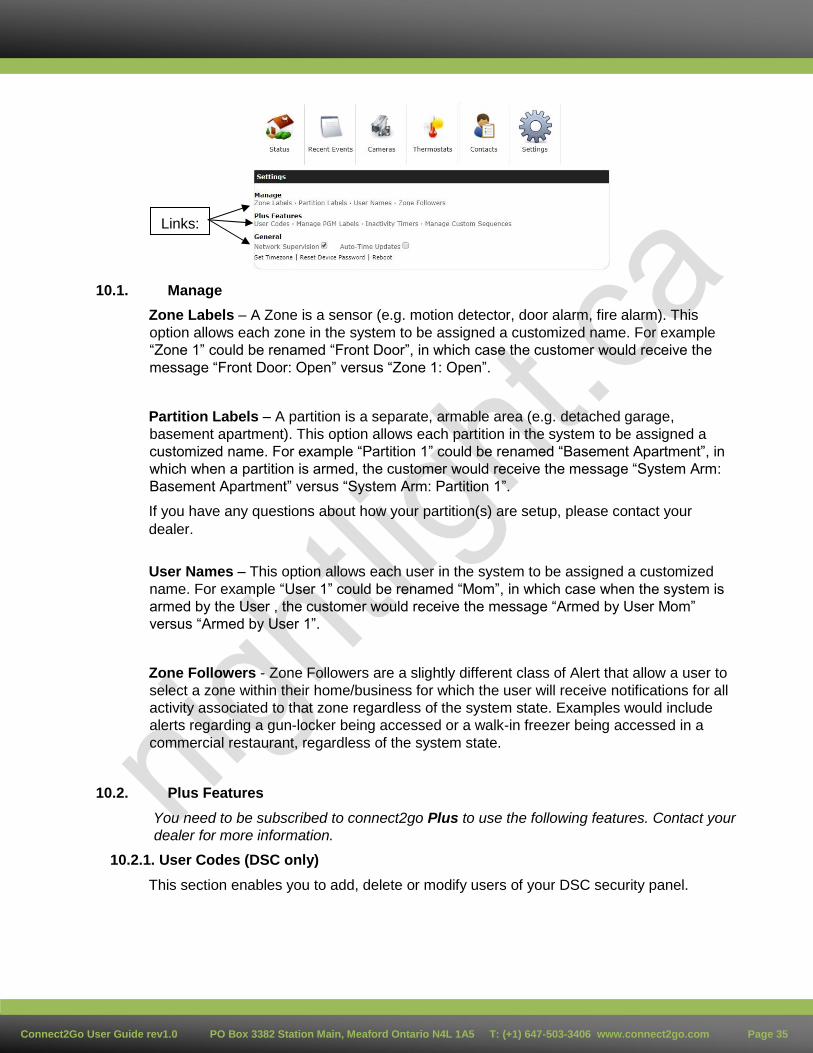
10.1. Manage
Zone Labels – A Zone is a sensor (e.g. motion detector, door alarm, fire alarm). This
option allows each zone in the system to be assigned a customized name. For example
“Zone 1” could be renamed “Front Door”, in which case the customer would receive the
message “Front Door: Open” versus “Zone 1: Open”.
Partition Labels – A partition is a separate, armable area (e.g. detached garage,
basement apartment). This option allows each partition in the system to be assigned a
customized name. For example “Partition 1” could be renamed “Basement Apartment”, in
which when a partition is armed, the customer would receive the message “System Arm:
Basement Apartment” versus “System Arm: Partition 1”.
If you have any questions about how your partition(s) are setup, please contact your
dealer.
User Names – This option allows each user in the system to be assigned a customized
name. For example “User 1” could be renamed “Mom”, in which case when the system is
armed by the User , the customer would receive the message “Armed by User Mom”
versus “Armed by User 1”.
Zone Followers - Zone Followers are a slightly different class of Alert that allow a user to
select a zone within their home/business for which the user will receive notifications for all
activity associated to that zone regardless of the system state. Examples would include
alerts regarding a gun-locker being accessed or a walk-in freezer being accessed in a
commercial restaurant, regardless of the system state.
10.2. Plus Features
You need to be subscribed to connect2go Plus to use the following features. Contact your
dealer for more information.
10.2.1. User Codes (DSC only)
This section enables you to add, delete or modify users of your DSC security panel.
Links:
Connect2Go User Guide rev1.0 PO Box 3382 Station Main, Meaford Ontario N4L 1A5 T: (+1) 647-503-3406 www.connect2go.com Page 36
Warning: This feature live syncs with your panel. If you delete a code using this
feature, it will remove it from your panel. If you add a code using this feature, it will
also add it to your panel.
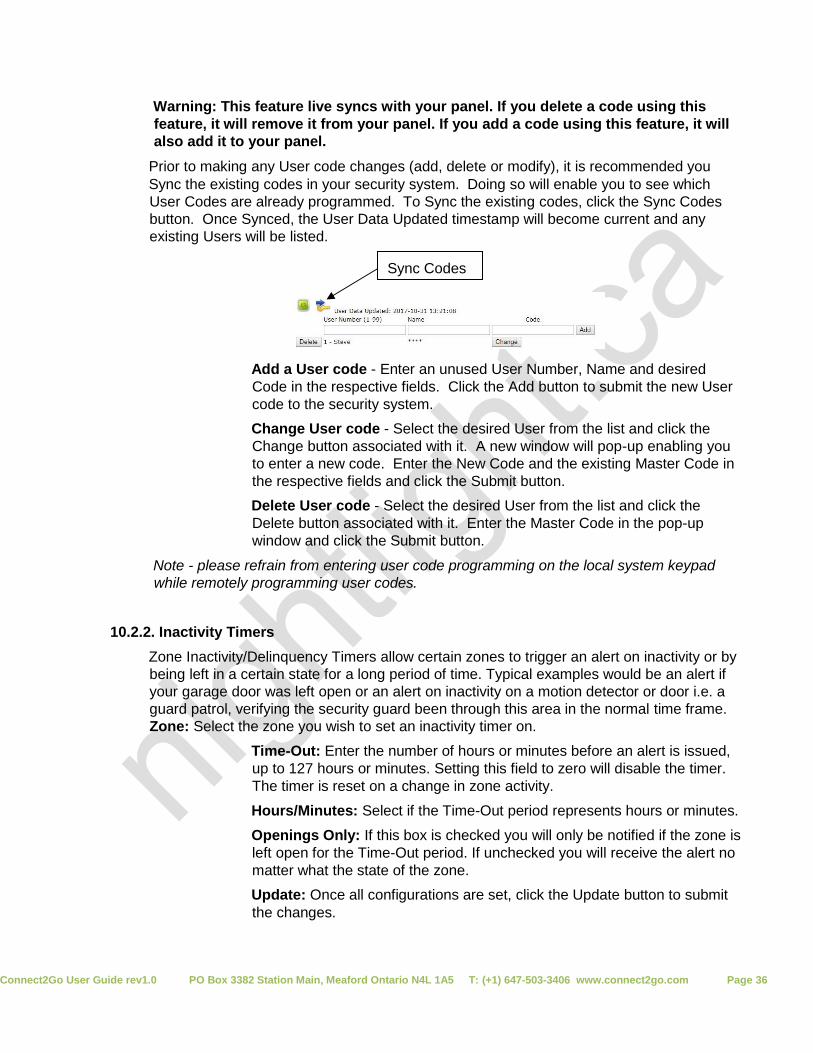
Prior to making any User code changes (add, delete or modify), it is recommended you
Sync the existing codes in your security system. Doing so will enable you to see which
User Codes are already programmed. To Sync the existing codes, click the Sync Codes
button. Once Synced, the User Data Updated timestamp will become current and any
existing Users will be listed.
Add a User code - Enter an unused User Number, Name and desired
Code in the respective fields. Click the Add button to submit the new User
code to the security system.
Change User code - Select the desired User from the list and click the
Change button associated with it. A new window will pop-up enabling you
to enter a new code. Enter the New Code and the existing Master Code in
the respective fields and click the Submit button.
Delete User code - Select the desired User from the list and click the
Delete button associated with it. Enter the Master Code in the pop-up
window and click the Submit button.
Note - please refrain from entering user code programming on the local system keypad
while remotely programming user codes.
10.2.2. Inactivity Timers
Zone Inactivity/Delinquency Timers allow certain zones to trigger an alert on inactivity or by
being left in a certain state for a long period of time. Typical examples would be an alert if
your garage door was left open or an alert on inactivity on a motion detector or door i.e. a
guard patrol, verifying the security guard been through this area in the normal time frame.
Zone: Select the zone you wish to set an inactivity timer on.
Time-Out: Enter the number of hours or minutes before an alert is issued,
up to 127 hours or minutes. Setting this field to zero will disable the timer.
The timer is reset on a change in zone activity.
Hours/Minutes: Select if the Time-Out period represents hours or minutes.
Openings Only: If this box is checked you will only be notified if the zone is
left open for the Time-Out period. If unchecked you will receive the alert no
matter what the state of the zone.
Update: Once all configurations are set, click the Update button to submit
the changes.
Sync Codes
Connect2Go User Guide rev1.0 PO Box 3382 Station Main, Meaford Ontario N4L 1A5 T: (+1) 647-503-3406 www.connect2go.com Page 37
Note: To receive these inactivity alerts you must have the "Zone Followers"
box checked in "Contacts" for the contact you wish to receive Alerts.
10.2.3. Manage PGM Labels (DSC only)
A PGM label is a programmable output label and only applies to DSC systems. A
programmable output provides the ability for the user to automatically control other
elements with their security system. For example, a PGM could be installed to automate
the opening and closing of a garage door. If a PGM has been installed it can be given a
customized label (e.g. Garage Door).
10.2.4. Manage Custom Sequences
A custom sequence is a string of key presses executed all at once. For example, if you
wish to by-pass a zone when arming the system, you could create a custom sequence to
do this automatically. Add detail about saving the custom sequence.
Within this configuration section, you can create and save custom sequence buttons that
are accessible from your Function Commands pop-up window. Enter the desired key
presses in the Custom Sequence field, Enter the name of the Function Command button in
the Label field, add any notes (if desired), select the applicable partition and then click the
Add button to save.
You can delete any saved Custom Sequences by clicking the Delete button beside the
saved Custom Sequence.
Refer to section 8.1.3 and 8.1.4 for additional information on using Custom Sequences.
10.3. General
10.3.1. Network Supervision
When the connect2go server does not receive communication from a device within 10
minutes, an Alert can be sent to Contacts. To enable this feature for a Device, click the
box to the right of the Network Supervision feature.
Note - to receive Alerts for this feature, you must also enable this Alert Type for each
desired Contact. Refer to section 7.2 for additional information on configuring Alert Types.
10.3.2. Auto-Time Updates (DSC Only)
When Daylight Savings changes take place, your security system can be set to
automatically update. To enable this feature for a Device, click the box to the right of the
Auto-Time Updates feature.
Note - this feature is only available on DSC security systems.
10.3.3. Set Timezone - Device Settings
The Time Zone setting must be programmed for each Device independently. The setting
should be configured in accordance with Time Zone in which the device is installed.
Connect2Go User Guide rev1.0 PO Box 3382 Station Main, Meaford Ontario N4L 1A5 T: (+1) 647-503-3406 www.connect2go.com Page 38
Some customers have more than one property and each are located in different time
zones. Configuring this setting correctly on each Device will ensure that Alerts and Push
Notifications have the correct timestamp representing the Time Zone for the Device.
Refer to section 4.2.2 Time Zone - Account Settings for more information.
Connect2Go User Guide rev1.0 PO Box 3382 Station Main, Meaford Ontario N4L 1A5 T: (+1) 647-503-3406 www.connect2go.com Page 39
10.3.4. Reset Device Password/Reboot
Allows you to reset the local device password and/or reboot the local device. This
password is not the Connect2Go Password.
11.0 HELP
To access the useful Help tips, click on the Help link located in the left vertical menu. Once
clicked, you will be presented with a number of different help topics. Simply hover over the desired
topic and click to select.
12.0 LOGOUT
Once you have completed your interactive browsing session using the web portal, we recommend
logging out for security reasons. To logout, click the Logout link in the left vertical menu.
13.0 GLOSSARY
Alerts Alerts are security system event notifications sent from connect2go to contacts within
your account based on the specific configurations. Refer to section 7.0 Configuring
Alerts for more information.
Contact A Contact is an unique alerting method. A Contact should not be thought of as an
individual user of the system. Rather, Contacts are configured for each unique Alert
method desired.
Device The connect2go term used to represent a security system that is setup on your account having a connect2go IP communicator module installed. Each 'Device' represents one security system and one connect2go IP communicator module.
If you have a home with a security system installed along with the connect2go IP communicator module, you have one Device.
If you have a home and a cottage each having a security system installed along with
the connect2go IP communicator module, you have two Devices.
Partition A partition is a separate, armable area in your security system (e.g. detached garage,
basement apartment).
Time
Zone There are two time zone settings applicable to your connect2go system:
Within Account Settings - This is the Time Zone in which the account holder is
resident in.
Within Device Settings - This is the Time Zone in which the device is installed and
must be configured for each device independently.
Connect2Go User Guide rev1.0 Night Light Inc, 7-23 McCleary Crt, Concord Ontario L4K 3R6 T: (+1) 905-731-4783 www.nightlight.ca Page 40
Zone A Zone is a sensor (e.g. motion detector, door alarm, fire alarm).