concrete pipe in stallion
TRANSCRIPT
8/3/2019 Concrete Pipe in Stallion
http://slidepdf.com/reader/full/concrete-pipe-in-stallion 1/2
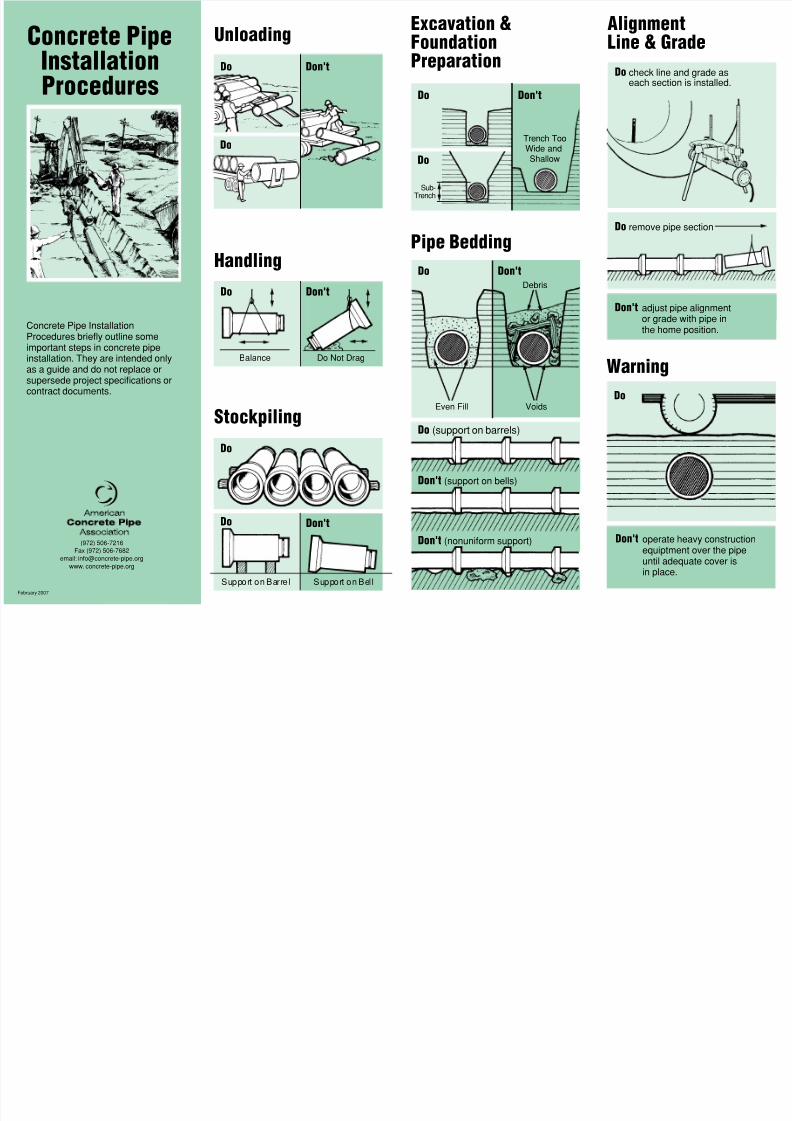
Do
Do
Don't
Do
Balance Do Not Drag
Support on Barrel Support on Bel l
Don't
Do
Do Don't
Do
Do
Don't
Do
Even Fill
Trench TooWide andShallow
Sub-Trench
Voids
Debris
Don't
Don't (nonuniform support)
Don't (support on bells)
Do (support on barrels)
Don't adjust pipe alignmentor grade with pipe inthe home position.
Don't operate heavy construction
equiptment over the pipeuntil adequate cover isin place.
Do remove pipe section
Do
Do check line and grade aseach section is installed.
Concrete PipeInstallationProcedures
Concrete Pipe InstallationProcedures briey outline someimportant steps in concrete pipeinstallation. They are intended onlyas a guide and do not replace orsupersede project specifcations orcontract documents.
(972) 506-7216
Fax (972) 506-7682email: [email protected]
www. concrete-pipe.org
UnloadingExcavation &FoundationPreparation
AlignmentLine & Grade
Handling
Stockpiling
Pipe Bedding
Warning
February 2007

8/3/2019 Concrete Pipe in Stallion
http://slidepdf.com/reader/full/concrete-pipe-in-stallion 2/2
Do Do Do
Do Don't Do Don't
Preparation & Jointing
Jointing Procedures
Backflling
Careully clean all dirt andoreign substances rom thejoining suraces o the bell orgroove end o pipe.
Lubricate bell jointing suraceliberally. Use a brush, cloth,sponge or gloves to coverentire surace. Only approvedlubricant should be used.
Careully clean spigot or tongueend o pipe, including the gasketrecess.
Lubricate the spigot or tongueend o the pipe, including thegasket recess.
Lubricate the gasket thoroughly(unless it is sel lubricating)beore it is placed on the spigotor tongue.
Fit the gasket careully.Equalize the rubber gasket
stretch by running a smooth,round object, inserted betweengasket and spigot, around theentire circumerence severaltimes.
Align bell and spigot o pipes
to be joined. Beore homing thejoint, check that the gasket isin contact with the entry taperaround the entire circumerence.Make sure pipe is aligned.
Improper prepared bell jointing
surace may prevent homing othe pipe.
A bell not lubricated or
improperly lubricated maycause gasket to roll andpossibly damage the bell.
Improperly prepared spigot and
gasket recess may prevent gasketrom sealing properly.
Gasket may twist out o recess
i lubricant in recess is lackingor insufcient.
Excessive orce will be required
to push the pipe to the homeposition i gasket is not welllubricated.
Unequal stretch could cause
bunching o gasket and maycause leaks in the joint orcrack the bell.
Improper alignment can dislodge
gasket causing leaks or possiblybreak the bell.
Wedge bar against a woodblock placed horizontallyacross the bell end o the pipe.Pressure on the bar pushes thepipe into the home position.
Mechanical pipe pullers or“come-along” devices areanchored to an installed pipesection several sections back
and connected by a cross beamto the section to be installed.By mechanical orce, thejoint is brought into the homeposition.
Join by placing a dead manblocking inside the installedpipe several sections backrom the last installed section.This is connected to a woodencross beam placed across thebell end o the pipe section
being installed by a chain orcable and mechanical pipepuller. By mechanical orce,the joint is brought into thehome position.
Approved backfll materialshould be placed careullyalong the pipe and compactedunder the haunches. Materialshould be brought up evenlyin layers on both sides o thepipe.
Backfll material should notbe bulldozed into the trenchor dropped directly on thepipe. Material should beplaced in such a mannerso as not to displace ordamage the installed pipe.
Backfll material should bereadily compactible and jobexcavated material shouldnot contain large stones,
boulders, rozen lumps orother objectionable material.Backfll should be placedand compacted in layers asspecifed.
WarningShoving pipesectionstogether withexcavatingequipmentshould beavoided unless
provisions aremade to preventlocalizedoverstressing othe pipe joint.
Small Pipe Medium Pipe Large Pipe
Backflling Around Pipe Final Backfll
D o i n g
P r e v e n t s