clearing print media jams
TRANSCRIPT

Clearing print media jams
Paper handling
Maintenance
Troubleshooting
Administration
Index
1Printing
www.lexmark.com
Lexmark W820
For tips on avoiding jams, see Avoiding jams.
If you do experience a jam, see the following instructions in this topic to clear the jam andcontinue printing.
• Understanding jam messages
• Locating jams with messages
• Clearing jams from the printer
• Clearing jams from the optional duplex unit
• Clearing jams from the optional envelope feeder
• Clearing jams from the optional mailbox
• Clearing jams from the optional finisher

Clearing print media jams
Paper handling
Maintenance
Troubleshooting
Administration
Index
2Printing
www.lexmark.com
Lexmark W820
Understanding jam messagesWhen a jam occurs, the printer displays a two-line 2xx Paper Jam message and stopsoperating. Although the location of the jam appears on the second line of the display, youmust clear all paper from the entire paper path. Press Go to clear the message and continueprinting.
See Paper path for an explanation about areas where you can access jams. Immediatelyfollowing Paper path see the illustrations of areas where you can access jams.
Note: If you have an optional finisher attached to your printer, the secondarymessage Leave Staple Job in Finisher or Clear Staple Job from Finisheralternates with the 2xx Paper Jam message.

Clearing print media jams
Paper handling
Maintenance
Troubleshooting
Administration
Index
3Printing
www.lexmark.com
Lexmark W820
Paper path
The paper path is the route paper travels as it makes its way from the selected paper sourcethrough the printer and into the selected output bin. To clear the paper in the path, start at thepaper source the printer is using for the current job. Open all doors and covers between thesource and the selected output bin. If you are not sure which source the printer is using, startwith tray 5, if installed; otherwise, start with tray 2.
See the following illustrations for a better understanding of the path the paper travels throughthe printer and its options. The jam numbers are listed based on location within the paperpath.
The doors and covers that give you access to paper in the path when a jam occurs arelabeled on the Message maps.

Clearing print media jams
Paper handling
Maintenance
Troubleshooting
Administration
Index
4Printing
www.lexmark.com
Lexmark W820
Paper path of standard trays and optional trays, optional duplex unit, andmultipurpose feeder
254
258
247
257
252
260
251
259
248
249
261
273 256
250, 253, 255
232, 233, 234
244
245
242
243
241
200
246
201,202
204208, 231 209, 210, 211

Clearing print media jams
Paper handling
Maintenance
Troubleshooting
Administration
Index
5Printing
www.lexmark.com
Lexmark W820
Paper path of optional envelope feeder in relation to trays, optional duplex unit,and path to the optional mailbox
271, 272

Clearing print media jams
Paper handling
Maintenance
Troubleshooting
Administration
Index
6Printing
www.lexmark.com
Lexmark W820
Paper path of optional mailbox in relation to printer and optional duplex unit
280282
281
281
284
For each bin, the curvedportion of the pathleading into the bin andthe path to the bin is 284
For each bin, this areais 285
Clearing print media jams
Paper handling
Maintenance
Troubleshooting
Administration
Index
7Printing
www.lexmark.com
Lexmark W820
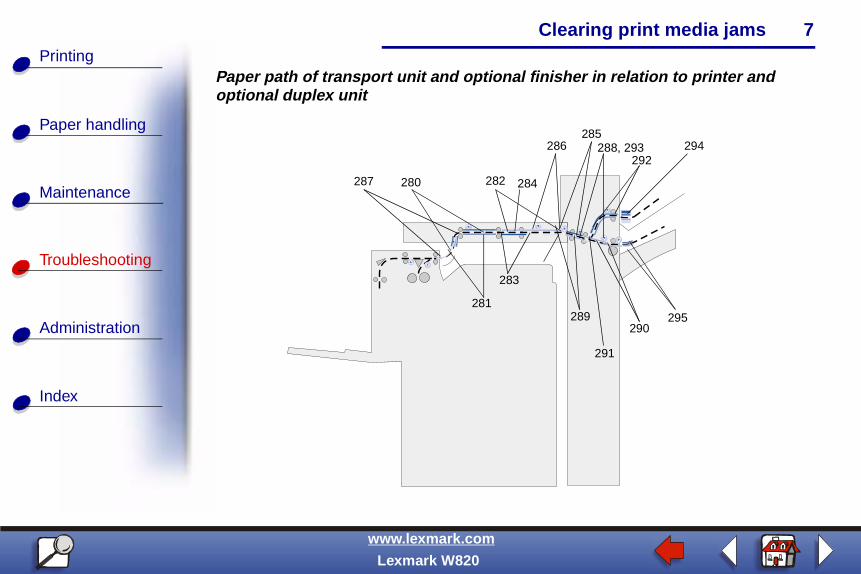
Paper path of transport unit and optional finisher in relation to printer andoptional duplex unit
285
284
283
282
281
287 280
294
290
291
288, 293
289
286292
295

Clearing print media jams
Paper handling
Maintenance
Troubleshooting
Administration
Index
8Printing
www.lexmark.com
Lexmark W820
Message maps
You can use the message map on the front of the printer (or on the transport unit if thefinisher is installed) to locate the doors, covers, and options you must open or remove to clearthe paper path.

Clearing print media jams
Paper handling
Maintenance
Troubleshooting
Administration
Index
9Printing
www.lexmark.com
Lexmark W820
Locating jams with messages
Message Area where jam occurs See:
200 Paper Jam Open Door A201 Paper Jam Open Door A202 Paper Jam Open Door A
Rollers under the print cartridge Tray 1 and the printcartridge area
204 Paper Jam Open Door A Fuser area Fuser area
208 Paper Jam Open Door A209 Paper Jam Open Door A
Duplex unit area or the fuserarea
step 5 on page 20
210 Paper Jam Open Door E Fuser area
211 Paper Jam Open Door A Fuser area
231 Paper Jam Open Door E232 Paper Jam Open Door E233 Paper Jam Open Door E234 Paper Jam Open Door E
Duplex unit Clearing jams from theoptional duplex unit
241 Paper Jam Open Door A Around tray 1 Tray 1 and the printcartridge area
241 Paper Jam Open Tray 1 In or behind tray 1 Behind trays 1, 2, and 3
242 Paper Jam Open Door B Around tray 2 Tray 2
Clearing print media jams
Paper handling
Maintenance
Troubleshooting
Administration
Index
10Printing
www.lexmark.com
Lexmark W820
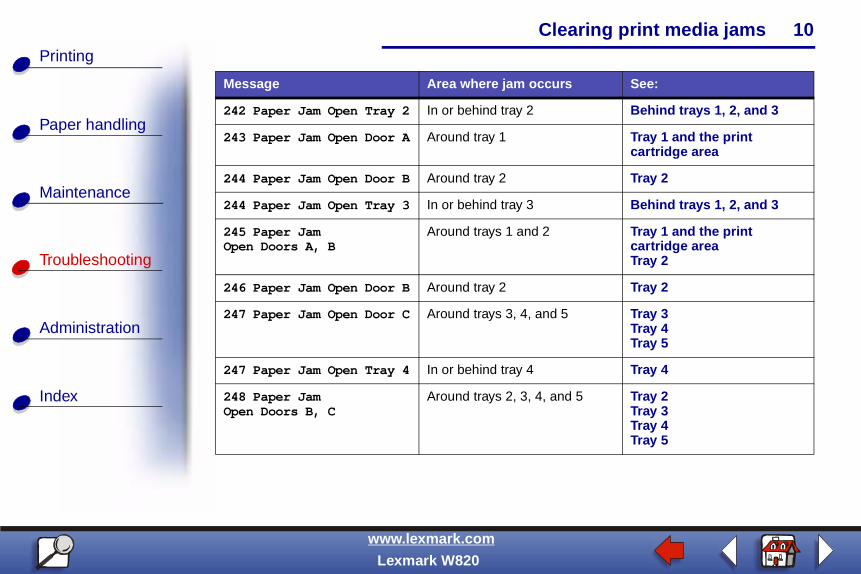
242 Paper Jam Open Tray 2 In or behind tray 2 Behind trays 1, 2, and 3
243 Paper Jam Open Door A Around tray 1 Tray 1 and the printcartridge area
244 Paper Jam Open Door B Around tray 2 Tray 2
244 Paper Jam Open Tray 3 In or behind tray 3 Behind trays 1, 2, and 3
245 Paper JamOpen Doors A, B
Around trays 1 and 2 Tray 1 and the printcartridge areaTray 2
246 Paper Jam Open Door B Around tray 2 Tray 2
247 Paper Jam Open Door C Around trays 3, 4, and 5 Tray 3Tray 4Tray 5
247 Paper Jam Open Tray 4 In or behind tray 4 Tray 4
248 Paper JamOpen Doors B, C
Around trays 2, 3, 4, and 5 Tray 2Tray 3Tray 4Tray 5
Message Area where jam occurs See:
Clearing print media jams
Paper handling
Maintenance
Troubleshooting
Administration
Index
11Printing
www.lexmark.com
Lexmark W820
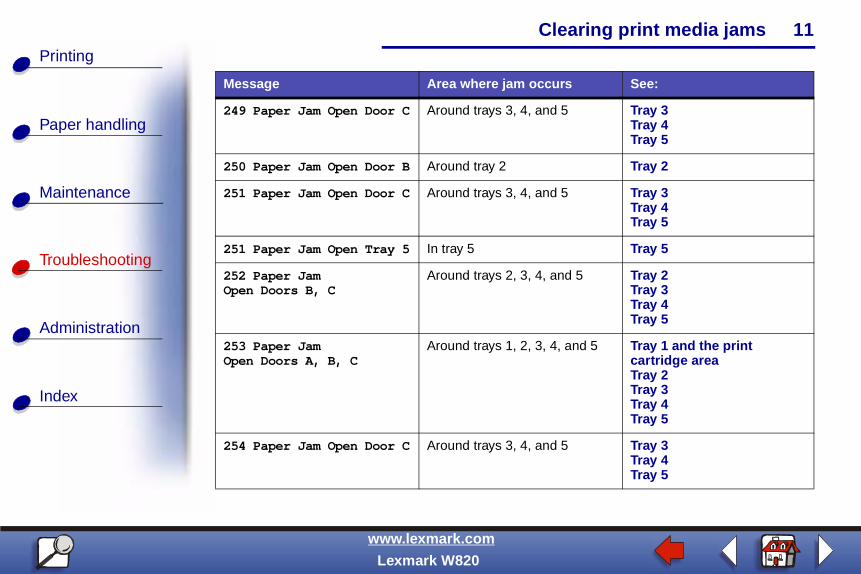
249 Paper Jam Open Door C Around trays 3, 4, and 5 Tray 3Tray 4Tray 5
250 Paper Jam Open Door B Around tray 2 Tray 2
251 Paper Jam Open Door C Around trays 3, 4, and 5 Tray 3Tray 4Tray 5
251 Paper Jam Open Tray 5 In tray 5 Tray 5
252 Paper JamOpen Doors B, C
Around trays 2, 3, 4, and 5 Tray 2Tray 3Tray 4Tray 5
253 Paper JamOpen Doors A, B, C
Around trays 1, 2, 3, 4, and 5 Tray 1 and the printcartridge areaTray 2Tray 3Tray 4Tray 5
254 Paper Jam Open Door C Around trays 3, 4, and 5 Tray 3Tray 4Tray 5
Message Area where jam occurs See:

Clearing print media jams
Paper handling
Maintenance
Troubleshooting
Administration
Index
12Printing
www.lexmark.com
Lexmark W820
254 Paper Jam Open Tray 5 In tray 5 Tray 5
255 Paper Jam Open Door A Around tray 1 Tray 1 and the printcartridge area
255 Paper JamRemove MP Feeder
Multipurpose feeder Multipurpose feeder
255 Paper JamRemove Envelope
Envelope feeder Clearing jams from theoptional envelope feeder
Removing the optionalenvelope feeder
256 Paper JamOpen Doors A, B
Around trays 1 and 2 Tray 1 and the printcartridge area
Tray 2
257 Paper JamOpen Door B
Around tray 2 Tray 2
258 Paper Jam Open Door C Around trays 3, 4, and 5 Tray 3Tray 4Tray 5
259 Paper Jam Open Door C Around trays 3, 4, and 5 Tray 3Tray 4Tray 5
Message Area where jam occurs See:

Clearing print media jams
Paper handling
Maintenance
Troubleshooting
Administration
Index
13Printing
www.lexmark.com
Lexmark W820
259 Open Tray 5 In tray 5 Tray 5
260 Paper Jam Open Door E In the duplex unit Clearing jams from theoptional duplex unit
261 Paper JamOpen Doors B, C
Around trays 2, 3, 4, and 5 Tray 2Tray 3Tray 4Tray 5
271 Paper JamRemove Env Feeder272 Paper JamRemove Env Feeder
Envelope feeder Clearing jams from theoptional envelope feeder
Removing the optionalenvelope feeder
273 Paper JamRemove Envelope
Envelope feeder Clearing jams from theoptional envelope feeder
273 Paper JamRemove MP Paper
Multipurpose feeder Multipurpose feeder
280 Paper Jam Open Cover H Transport unit If the print media is jammedinside the transport unitbetween the rollers:
280 Paper Jam Open Door D Mailbox Clearing jams from theoptional mailbox
Message Area where jam occurs See:
Clearing print media jams
Paper handling
Maintenance
Troubleshooting
Administration
Index
14Printing
www.lexmark.com
Lexmark W820
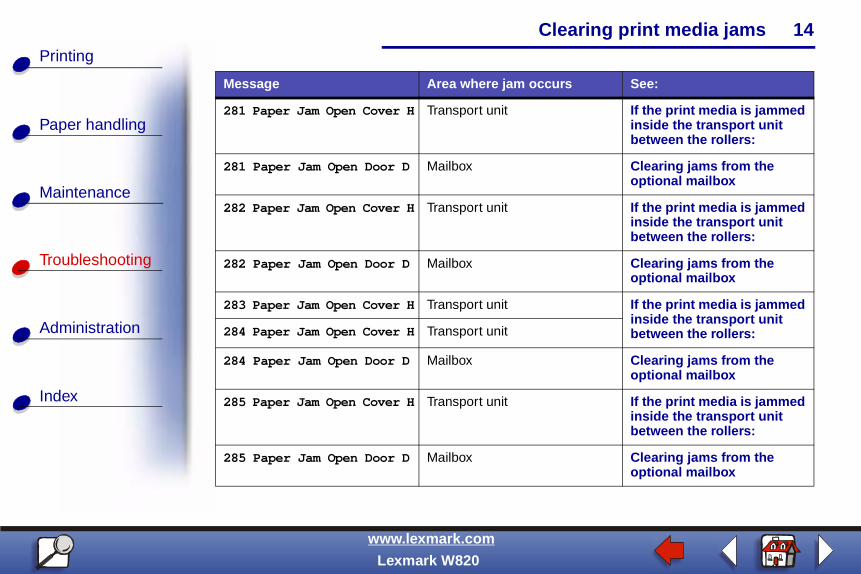
281 Paper Jam Open Cover H Transport unit If the print media is jammedinside the transport unitbetween the rollers:
281 Paper Jam Open Door D Mailbox Clearing jams from theoptional mailbox
282 Paper Jam Open Cover H Transport unit If the print media is jammedinside the transport unitbetween the rollers:
282 Paper Jam Open Door D Mailbox Clearing jams from theoptional mailbox
283 Paper Jam Open Cover H Transport unit If the print media is jammedinside the transport unitbetween the rollers:284 Paper Jam Open Cover H Transport unit
284 Paper Jam Open Door D Mailbox Clearing jams from theoptional mailbox
285 Paper Jam Open Cover H Transport unit If the print media is jammedinside the transport unitbetween the rollers:
285 Paper Jam Open Door D Mailbox Clearing jams from theoptional mailbox
Message Area where jam occurs See:

Clearing print media jams
Paper handling
Maintenance
Troubleshooting
Administration
Index
15Printing
www.lexmark.com
Lexmark W820
286 Paper Jam Open Cover H Transport unit If the print media is jammedinside the transport unitbetween the rollers:
287 Paper JamOpen Deflector G
Finisher - Deflector If the print media is jammedunder the divertor cover:
288 Paper Jam Open Door K Above the hole punch area page 73
289 Paper Jam Open Door K
290 Paper Jam Open Door K Above the stapler page 76
291 Paper Jam Open Door K Finisher Clearing jams from theoptional finisher
292 Paper Jam Open Cover J Finisher top cover page 72
293 Paper Jam Open Cover J Finisher top cover If the print media is jammedunder the finisher topcover:294 Paper Jam Open Cover J Finisher top cover
Message Area where jam occurs See:

Clearing print media jams
Paper handling
Maintenance
Troubleshooting
Administration
Index
16Printing
www.lexmark.com
Lexmark W820
Clearing jams from the printer
Tray 1 and the print cartridge area
Note: The following instructions are written assuming you are using themultipurpose feeder and the duplex unit. If you are using the envelopefeeder, you must remove it before opening the duplex unit door. Forinstructions, see Removing the optional envelope feeder.
295 Paper JamOpen Door K
This message alternates withthe following message:
Clear Staple Jobfrom Finisher
Finisher accumulator (areawhere sheets accumulate inorder to be stapled)
page 72
Message Area where jam occurs See:

Clearing print media jams
Paper handling
Maintenance
Troubleshooting
Administration
Index
17Printing
www.lexmark.com
Lexmark W820
1 Open the multipurpose feeder.

Clearing print media jams
Paper handling
Maintenance
Troubleshooting
Administration
Index
18Printing
www.lexmark.com
Lexmark W820
2 Push up on the latch to release the duplex unit door (Door E).
3 Gently lower the door to the open position.

Clearing print media jams
Paper handling
Maintenance
Troubleshooting
Administration
Index
19Printing
www.lexmark.com
Lexmark W820
4 Pull up on handle to open the printer side door (Door A).

Clearing print media jams
Paper handling
Maintenance
Troubleshooting
Administration
Index
20Printing
www.lexmark.com
Lexmark W820
5 Remove the paper based on what part is visible.
– If the paper is visible, pull it straight out and continue with step 9 on page 22.
– If the paper is not visible or there is not enough showing to grasp easily, it is still inthe tray. Complete step 6 on page 21 through step 9 on page 22.
– If the paper is not visible in the tray, the paper is lodged behind the tray andrequires that you remove the tray. See Behind trays 1, 2, and 3.

Clearing print media jams
Paper handling
Maintenance
Troubleshooting
Administration
Index
21Printing
www.lexmark.com
Lexmark W820
6 Pull tray 1 open.
7 Pull the paper to the right, and then straight out.
8 Close tray 1.
Clearing print media jams
Paper handling
Maintenance
Troubleshooting
Administration
Index
22Printing
www.lexmark.com
Lexmark W820
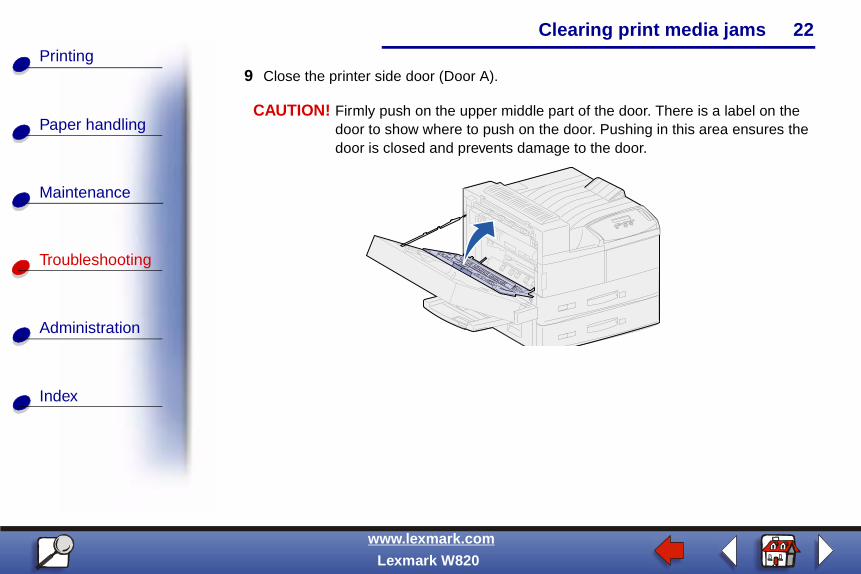
9 Close the printer side door (Door A).
CAUTION! Firmly push on the upper middle part of the door. There is a label on thedoor to show where to push on the door. Pushing in this area ensures thedoor is closed and prevents damage to the door.

Clearing print media jams
Paper handling
Maintenance
Troubleshooting
Administration
Index
23Printing
www.lexmark.com
Lexmark W820
10 Close the duplex unit door (Door E).
Tray 2
1 Pull up on handle to open the tray 2 side door (Door B).
Clearing print media jams
Paper handling
Maintenance
Troubleshooting
Administration
Index
24Printing
www.lexmark.com
Lexmark W820
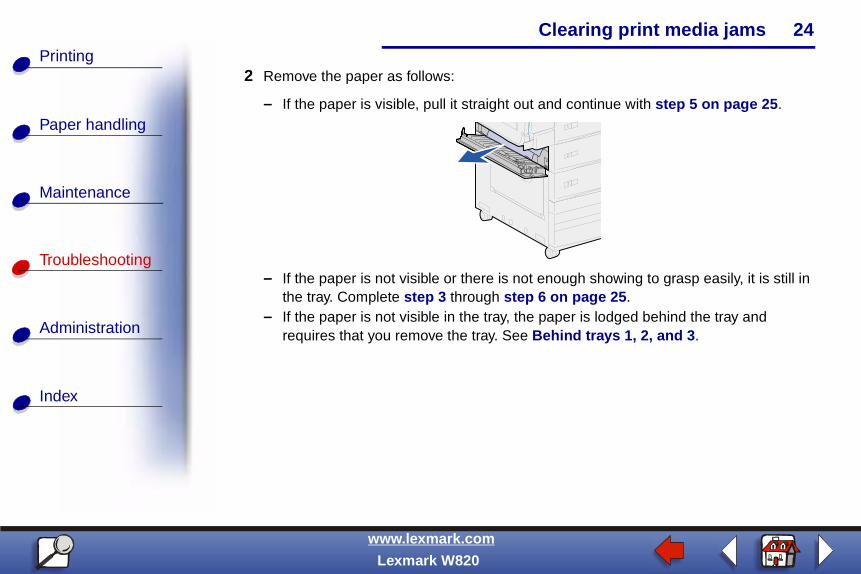
2 Remove the paper as follows:
– If the paper is visible, pull it straight out and continue with step 5 on page 25.
– If the paper is not visible or there is not enough showing to grasp easily, it is still inthe tray. Complete step 3 through step 6 on page 25.
– If the paper is not visible in the tray, the paper is lodged behind the tray andrequires that you remove the tray. See Behind trays 1, 2, and 3.

Clearing print media jams
Paper handling
Maintenance
Troubleshooting
Administration
Index
25Printing
www.lexmark.com
Lexmark W820
3 Pull tray 2 open.
4 Pull the paper to the right, and then straight out.
5 Close tray 2.
6 Close the tray 2 side door (Door B).

Clearing print media jams
Paper handling
Maintenance
Troubleshooting
Administration
Index
26Printing
www.lexmark.com
Lexmark W820
Tray 3
1 Open the side door of trays 3 and 4 (Door C).
2 Remove the paper as follows:
– If the paper is visible, pull it straight out and continue with step 6 on page 28.
Clearing print media jams
Paper handling
Maintenance
Troubleshooting
Administration
Index
27Printing
www.lexmark.com
Lexmark W820
– If the paper is not visible or there is not enough showing to grasp easily, it is still inthe tray. Complete step 3 through step 6 on page 28.
– If the paper is not visible in the tray, the paper is lodged behind the tray andrequires that you remove the tray. See Behind trays 1, 2, and 3 andBehind Tray 4.

Clearing print media jams
Paper handling
Maintenance
Troubleshooting
Administration
Index
28Printing
www.lexmark.com
Lexmark W820
3 Pull tray 3 open.
4 Pull the paper to the right, and then straight out.
5 Close tray 3.
6 Close the side door for trays 3 and 4 (Door C).

Clearing print media jams
Paper handling
Maintenance
Troubleshooting
Administration
Index
29Printing
www.lexmark.com
Lexmark W820
Tray 4
1 Pull up on handle to open the side door for trays 3 and 4 (Door C).
2 Remove the paper as follows:
– If the paper is visible, pull it straight out and continue with step 6 on page 30.

Clearing print media jams
Paper handling
Maintenance
Troubleshooting
Administration
Index
30Printing
www.lexmark.com
Lexmark W820
– If the paper is not visible or there is not enough showing to grasp easily, it is still inthe tray. Complete step 3 on page 30 through step 6 on page 30.
– If the paper is not visible in the tray, the paper is lodged behind the tray andrequires that you remove the tray. See Behind trays 1, 2, and 3 andBehind Tray 4.
3 Pull tray 4 open.
4 Pull the paper to the right, and then straight out.
5 Close tray 4.
6 Close the side door for trays 3 and 4 (Door C).

Clearing print media jams
Paper handling
Maintenance
Troubleshooting
Administration
Index
31Printing
www.lexmark.com
Lexmark W820
Tray 5
1 Pull tray 5 open.

Clearing print media jams
Paper handling
Maintenance
Troubleshooting
Administration
Index
32Printing
www.lexmark.com
Lexmark W820
2 Lift the plastic cover and hold it open.
3 Pull the paper to the right, and then straight out.

Clearing print media jams
Paper handling
Maintenance
Troubleshooting
Administration
Index
33Printing
www.lexmark.com
Lexmark W820
4 Close the plastic cover.
5 Close tray 5.
Note: If the print media cleared tray 5, the print media could be lodged behindDoor C. See Tray 3 to see how to clear a jam behind Door C.
Behind trays 1, 2, and 3
In rare cases, a piece of print media can become lodged behind a tray where it cannot bereached unless the tray is removed from the printer.
1 Pull the tray out to the stop position.
2 Grasp each side of the tray.

Clearing print media jams
Paper handling
Maintenance
Troubleshooting
Administration
Index
34Printing
www.lexmark.com
Lexmark W820
3 Pull the tray straight up, and then out toward you. Set the tray aside.
4 Pull the paper straight out.

Clearing print media jams
Paper handling
Maintenance
Troubleshooting
Administration
Index
35Printing
www.lexmark.com
Lexmark W820
5 Align the guides on the bottom of the tray with the slots in the printer.

Clearing print media jams
Paper handling
Maintenance
Troubleshooting
Administration
Index
36Printing
www.lexmark.com
Lexmark W820
6 Lift the tray up slightly and push it all the way into the printer.

Clearing print media jams
Paper handling
Maintenance
Troubleshooting
Administration
Index
37Printing
www.lexmark.com
Lexmark W820
Behind Tray 4
1 Pull the tray out to the stop position.
2 Push down the tab on the left side of the tray.
3 Grasp each side of the tray.
4 Pull the tray straight up, and then out toward you. Set the tray aside.
5 Pull the paper straight out.

Clearing print media jams
Paper handling
Maintenance
Troubleshooting
Administration
Index
38Printing
www.lexmark.com
Lexmark W820
6 Align the guides on the bottom of the tray with the tracks in the printer.
Note: You must align the guide properly or the tray will not slide into the printer.
7 Push the tray all the way into the printer.
Behind Tray 5
To access jams behind tray 5, remove tray 3, and tray 2 if necessary. Then, reach behind tray5 and pull the paper out.

Clearing print media jams
Paper handling
Maintenance
Troubleshooting
Administration
Index
39Printing
www.lexmark.com
Lexmark W820
Multipurpose feeder
Print media may jam in one of three locations in the multipurpose feeder. Remove the jambased on the print media location:
If print media jams as it begins to move from multipurpose feeder into the printer, pull thesheet straight out.

Clearing print media jams
Paper handling
Maintenance
Troubleshooting
Administration
Index
40Printing
www.lexmark.com
Lexmark W820
If print media jams after it enters the printer from the multipurpose feeder:
1 Push up on the latch to release the duplex unit door (Door E).
2 Gently lower the door to the open position.

Clearing print media jams
Paper handling
Maintenance
Troubleshooting
Administration
Index
41Printing
www.lexmark.com
Lexmark W820
3 Pull up on handle to open the printer side door (Door A).
4 Pull the sheet straight out.

Clearing print media jams
Paper handling
Maintenance
Troubleshooting
Administration
Index
42Printing
www.lexmark.com
Lexmark W820
If the sheet is too short to grasp:
a Close the printer side door (Door A) and close the duplex unit door (Door E).
The printer automatically cycles, forcing the sheet to move forward.
b Open the duplex unit door (Door E) and the printer side door (Door A).
c Pull the sheet straight out.
5 Close the printer side door (Door A).
6 Close the duplex unit door (Door E).

Clearing print media jams
Paper handling
Maintenance
Troubleshooting
Administration
Index
43Printing
www.lexmark.com
Lexmark W820
Fuser area
1 Push up on the latch to release the duplex unit door (Door E).
2 Gently lower the door to the open position.

Clearing print media jams
Paper handling
Maintenance
Troubleshooting
Administration
Index
44Printing
www.lexmark.com
Lexmark W820
3 Pull up on handle to open the printer side door (Door A).
CAUTION! The fuser may be hot. Allow time for it to cool before continuing.

Clearing print media jams
Paper handling
Maintenance
Troubleshooting
Administration
Index
45Printing
www.lexmark.com
Lexmark W820
4 Remove the paper based on what part of the paper is visible:
– If print media is jammed in the rollers, pull the sheet straight out.
Clearing print media jams
Paper handling
Maintenance
Troubleshooting
Administration
Index
46Printing
www.lexmark.com
Lexmark W820
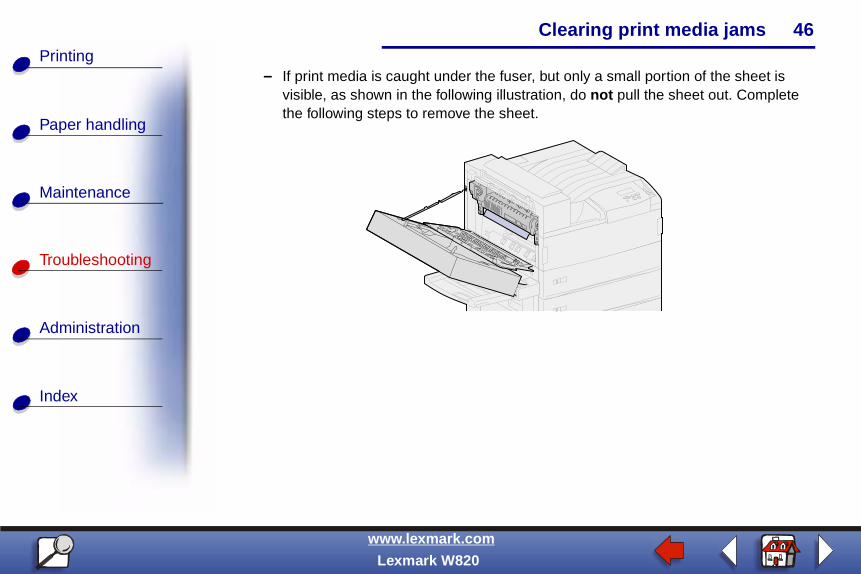
– If print media is caught under the fuser, but only a small portion of the sheet isvisible, as shown in the following illustration, do not pull the sheet out. Completethe following steps to remove the sheet.
Clearing print media jams
Paper handling
Maintenance
Troubleshooting
Administration
Index
47Printing
www.lexmark.com
Lexmark W820
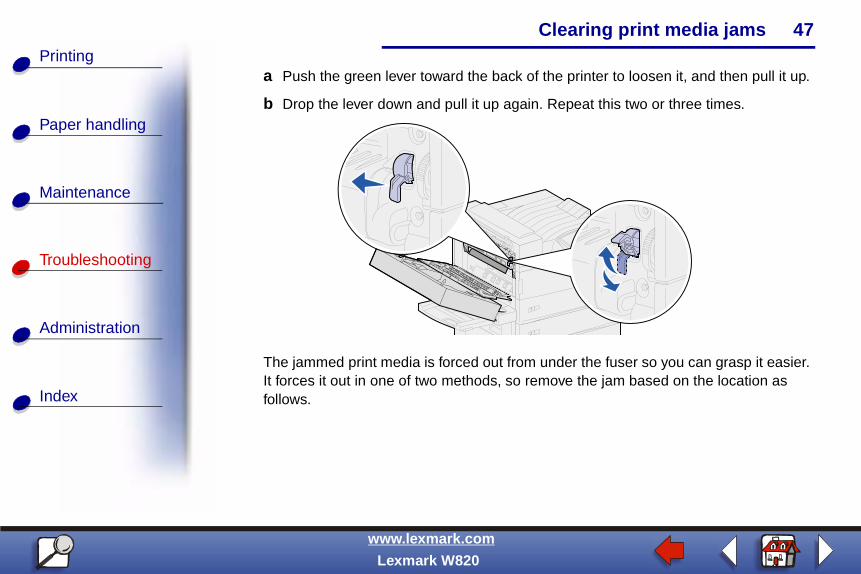
a Push the green lever toward the back of the printer to loosen it, and then pull it up.
b Drop the lever down and pull it up again. Repeat this two or three times.
The jammed print media is forced out from under the fuser so you can grasp it easier.It forces it out in one of two methods, so remove the jam based on the location asfollows.

Clearing print media jams
Paper handling
Maintenance
Troubleshooting
Administration
Index
48Printing
www.lexmark.com
Lexmark W820
– Print media exits to the standard bin, pull it straight out.

Clearing print media jams
Paper handling
Maintenance
Troubleshooting
Administration
Index
49Printing
www.lexmark.com
Lexmark W820
– If the print media exits to the top of the fuser, grasp the sheet on both sides andgently pull it out.
5 Close the printer side door (Door A).
6 Close the duplex unit door (Door E).

Clearing print media jams
Paper handling
Maintenance
Troubleshooting
Administration
Index
50Printing
www.lexmark.com
Lexmark W820
Clearing jams from the optional duplex unit
Note: If an optional envelope feeder is installed on the printer, you must remove itso you can open the duplex unit door. For instructions, see Removing theoptional envelope feeder.
1 Push up on the latch to release the duplex unit door (Door E).
2 Gently lower the door to the open position.

Clearing print media jams
Paper handling
Maintenance
Troubleshooting
Administration
Index
51Printing
www.lexmark.com
Lexmark W820
3 Remove the jammed sheet based on its location.
– If the sheet is jammed under the plastic grid in the duplex option:
a Raise the plastic grid.

Clearing print media jams
Paper handling
Maintenance
Troubleshooting
Administration
Index
52Printing
www.lexmark.com
Lexmark W820
b Pull the jammed sheet straight out.
c Lower the plastic grid.
Clearing print media jams
Paper handling
Maintenance
Troubleshooting
Administration
Index
53Printing
www.lexmark.com
Lexmark W820
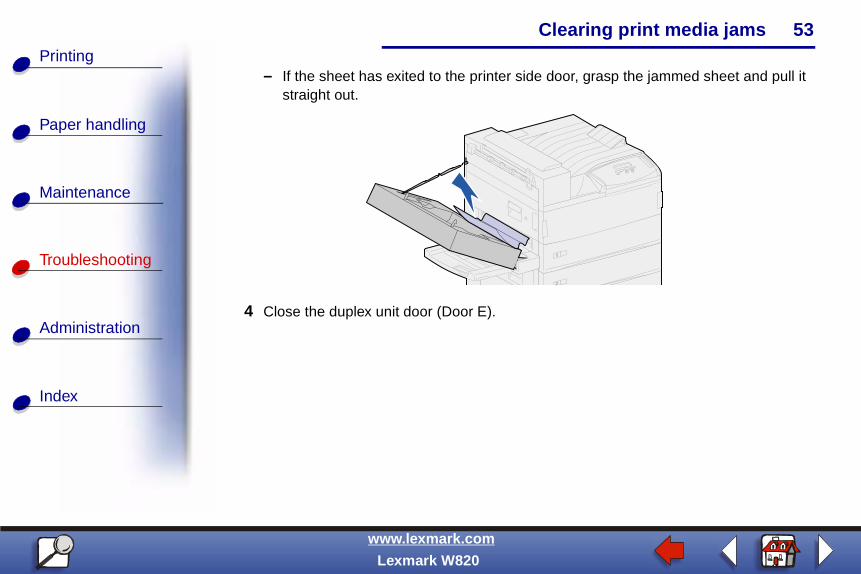
– If the sheet has exited to the printer side door, grasp the jammed sheet and pull itstraight out.
4 Close the duplex unit door (Door E).

Clearing print media jams
Paper handling
Maintenance
Troubleshooting
Administration
Index
54Printing
www.lexmark.com
Lexmark W820
Clearing jams from the optional envelope feeder1 Remove the envelope feeder. See Removing the optional envelope feeder.
2 Push up on the latch to release the duplex unit door (Door E).
3 Gently lower the door to the open position.
Clearing print media jams
Paper handling
Maintenance
Troubleshooting
Administration
Index
55Printing
www.lexmark.com
Lexmark W820
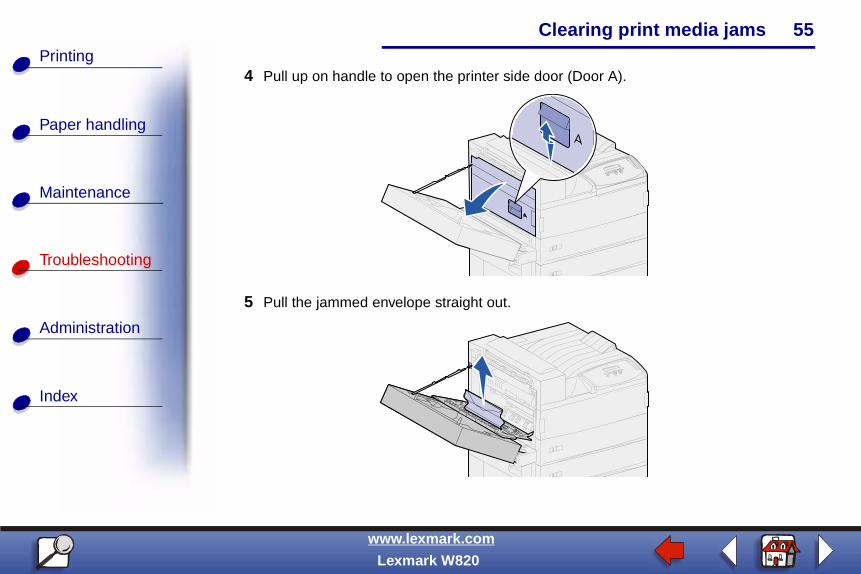
4 Pull up on handle to open the printer side door (Door A).
5 Pull the jammed envelope straight out.

Clearing print media jams
Paper handling
Maintenance
Troubleshooting
Administration
Index
56Printing
www.lexmark.com
Lexmark W820
6 Close the printer side door (Door A).
7 Close the duplex unit door (Door E).
8 Reinstall the envelope feeder. See Reinstalling the envelope feeder.

Clearing print media jams
Paper handling
Maintenance
Troubleshooting
Administration
Index
57Printing
www.lexmark.com
Lexmark W820
Clearing jams from the optional mailbox1 Open the mailbox door (Door D) by pulling the handhold to the right. The door swings
open.
2 Remove the jammed sheet based on its location.
Clearing print media jams
Paper handling
Maintenance
Troubleshooting
Administration
Index
58Printing
www.lexmark.com
Lexmark W820
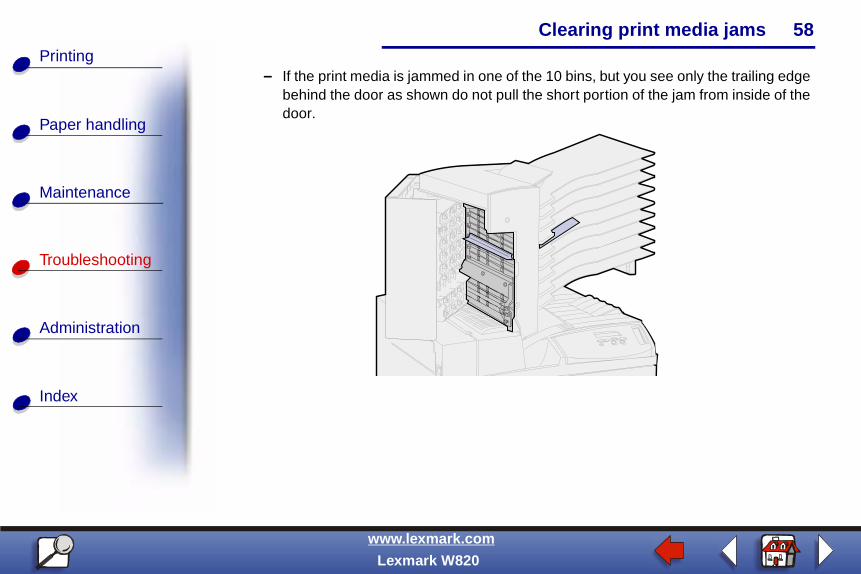
– If the print media is jammed in one of the 10 bins, but you see only the trailing edgebehind the door as shown do not pull the short portion of the jam from inside of thedoor.

Clearing print media jams
Paper handling
Maintenance
Troubleshooting
Administration
Index
59Printing
www.lexmark.com
Lexmark W820
a Instead locate the leading edge of the print media in one of the bins.
b Pull the print media straight out of the bin.

Clearing print media jams
Paper handling
Maintenance
Troubleshooting
Administration
Index
60Printing
www.lexmark.com
Lexmark W820
– If the print media is jammed between the fuser area and a mailbox bin, pull thesheet straight up.

Clearing print media jams
Paper handling
Maintenance
Troubleshooting
Administration
Index
61Printing
www.lexmark.com
Lexmark W820
– If only a small portion of the jammed print media is visible and the rest is caught inthe fuser area, see Fuser area for instructions on clearing the jam.
– The print media is jammed under the mailbox plastic deflector.
a Reach under the mailbox plastic deflector. Pull it to the right. The plastic deflectormoves up. Keep the plastic deflector in this up position.

Clearing print media jams
Paper handling
Maintenance
Troubleshooting
Administration
Index
62Printing
www.lexmark.com
Lexmark W820
b Pull the print media down and straight to the right from the standard bin.
3 Close the printer side door (Door A).
4 Close the duplex unit door (Door E).
5 Close the mailbox door (Door D).

Clearing print media jams
Paper handling
Maintenance
Troubleshooting
Administration
Index
63Printing
www.lexmark.com
Lexmark W820
Clearing jams from the optional finisherRemove the jam based on its location.
If the print media is jammed under the divertor cover:
1 Under the transport unit, locate the clear tab at the end of the clear plastic deflector.
2 Grasp the tab and pull to the right. The plastic deflector (Deflector G) moves up. Keepthe plastic deflector in this up position.
Divertor cover
Plasticdeflector
Tab

Clearing print media jams
Paper handling
Maintenance
Troubleshooting
Administration
Index
64Printing
www.lexmark.com
Lexmark W820
3 Pull the print media down and straight out from the standard bin.
Clearing print media jams
Paper handling
Maintenance
Troubleshooting
Administration
Index
65Printing
www.lexmark.com
Lexmark W820
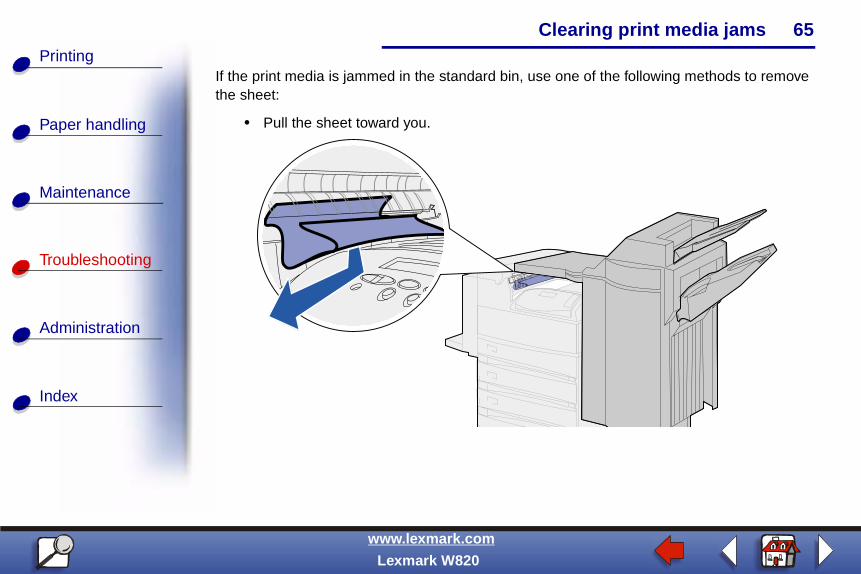
If the print media is jammed in the standard bin, use one of the following methods to removethe sheet:
• Pull the sheet toward you.

Clearing print media jams
Paper handling
Maintenance
Troubleshooting
Administration
Index
66Printing
www.lexmark.com
Lexmark W820
• If the sheet does not pull out easily:
1 Push the finisher latch.

Clearing print media jams
Paper handling
Maintenance
Troubleshooting
Administration
Index
67Printing
www.lexmark.com
Lexmark W820
2 Grasp the finisher and slide it to the right.
Clearing print media jams
Paper handling
Maintenance
Troubleshooting
Administration
Index
68Printing
www.lexmark.com
Lexmark W820
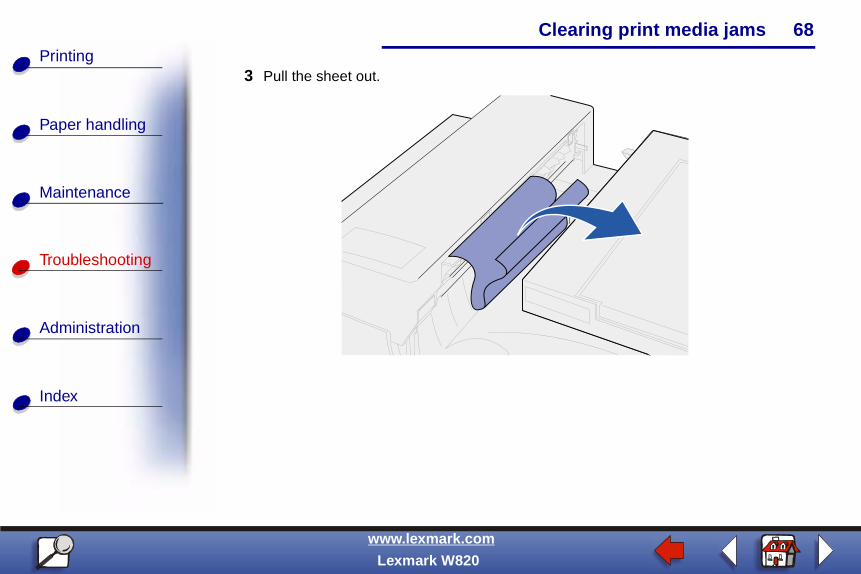
3 Pull the sheet out.

Clearing print media jams
Paper handling
Maintenance
Troubleshooting
Administration
Index
69Printing
www.lexmark.com
Lexmark W820
4 Push the finisher against the printer until the plastic spokes on the transport unit arefirmly seated in the holes on the divertor cover.
Hole
Transport unit
Plastic spoke
Hole
Divertorcover
Plastic spoke

Clearing print media jams
Paper handling
Maintenance
Troubleshooting
Administration
Index
70Printing
www.lexmark.com
Lexmark W820
If the print media is jammed inside the transport unit between the rollers:
1 Pull up on the handle to open the transport unit cover (Cover H).
2 Pull the sheet straight out.
3 Close the transport unit cover (Cover H).
Transport unit cover

Clearing print media jams
Paper handling
Maintenance
Troubleshooting
Administration
Index
71Printing
www.lexmark.com
Lexmark W820
If the print media is jammed under the finisher top cover:
CAUTION! To avoid rings on your hand being caught by the spring-loaded plasticplate in this area, remove your rings first. If your hand is caught in thisarea, press down on the plastic plate with your other hand to provide someclearance, and then pull your hand free.
1 Grasp the cutout handhold on the finisher top cover (Cover J) and pull up.
2 Pull the print media straight up.
Plastic plate

Clearing print media jams
Paper handling
Maintenance
Troubleshooting
Administration
Index
72Printing
www.lexmark.com
Lexmark W820
3 Close the finisher top cover (Cover J).
If the print media is jammed in one of the bins, pull the sheet to the right and then straight out.

Clearing print media jams
Paper handling
Maintenance
Troubleshooting
Administration
Index
73Printing
www.lexmark.com
Lexmark W820
If the print media is jammed between the transport unit and the finisher:
1 Open the finisher door (Door K).

Clearing print media jams
Paper handling
Maintenance
Troubleshooting
Administration
Index
74Printing
www.lexmark.com
Lexmark W820
2 In the top left corner inside the finisher, pull the green lever down and to the right. Holdit out of the way.
The leading edge of the print media is under the lever.

Clearing print media jams
Paper handling
Maintenance
Troubleshooting
Administration
Index
75Printing
www.lexmark.com
Lexmark W820
3 Pull the jammed sheet straight out.

Clearing print media jams
Paper handling
Maintenance
Troubleshooting
Administration
Index
76Printing
www.lexmark.com
Lexmark W820
If the print media is jammed above the green lever above the stapler:
1 Pull the green lever down and to the right. Hold it out of the way.
2 Pull print media straight out.
Lever

Clearing print media jams
Paper handling
Maintenance
Troubleshooting
Administration
Index
77Printing
www.lexmark.com
Lexmark W820
If there is not enough to grasp above the green lever above the stapler:
1 Locate the left green knob and turn it in the direction of the arrow. The print mediamoves so you can grasp it.

Clearing print media jams
Paper handling
Maintenance
Troubleshooting
Administration
Index
78Printing
www.lexmark.com
Lexmark W820
2 Pull the print media straight out.
3 Close the finisher door (Door K).

Clearing print media jams
Paper handling
Maintenance
Troubleshooting
Administration
Index
79Printing
www.lexmark.com
Lexmark W820
The print media exits to bin 2, but there is not enough to grasp from the bin:
1 Open the finisher door (Door K).
2 Locate the right green knob above the stapler and turn it in the direction of the arrow.More of the print media moves to the bin.
3 Pull the print media out of the bin. If the print media does not release easily, completestep 1 on page 80 to step 2 on page 80, and then close the finisher door (Door K).
Clearing print media jams
Paper handling
Maintenance
Troubleshooting
Administration
Index
80Printing
www.lexmark.com
Lexmark W820
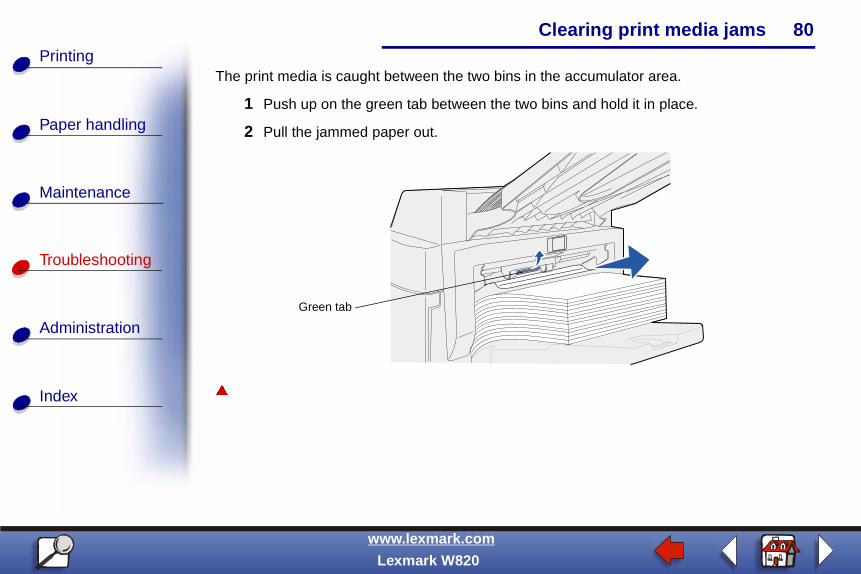
The print media is caught between the two bins in the accumulator area.
1 Push up on the green tab between the two bins and hold it in place.
2 Pull the jammed paper out.
�
Green tab