classroom technology guide · of powerpoint. see also section vii, using clickers. ... pdf or...
TRANSCRIPT
Classroom Podium Instructions 1
Classroom Technology Guide
I. Turn on the Computer
II. Turn on the Projector/Displays
III. Log in to the Computer/Access Personal Storage
IV. Adjust Volume
V. Use the SMART Board VI. Play a Video (DVD only)
VII. Use Clickers
VIII. Connect a Laptop
IX. Use the Elmo Document
Camera
X. Skype in the Classroom
XI. Shut Down
XII. Get Help
2 Classroom Podium Instructions
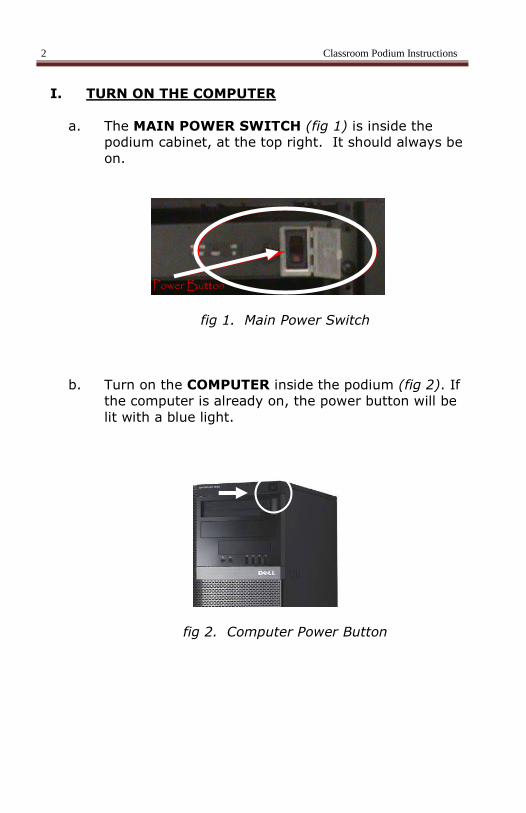
I. TURN ON THE COMPUTER
a. The MAIN POWER SWITCH (fig 1) is inside the
podium cabinet, at the top right. It should always be
on.
fig 1. Main Power Switch
b. Turn on the COMPUTER inside the podium (fig 2). If
the computer is already on, the power button will be
lit with a blue light.
fig 2. Computer Power Button
Classroom Podium Instructions 3
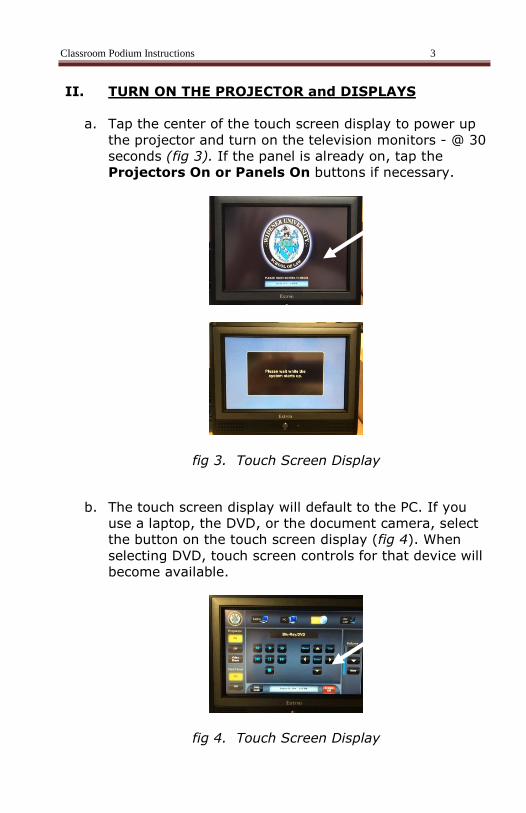
II. TURN ON THE PROJECTOR and DISPLAYS
a. Tap the center of the touch screen display to power up
the projector and turn on the television monitors - @ 30
seconds (fig 3). If the panel is already on, tap the
Projectors On or Panels On buttons if necessary.
fig 3. Touch Screen Display
b. The touch screen display will default to the PC. If you
use a laptop, the DVD, or the document camera, select
the button on the touch screen display (fig 4). When
selecting DVD, touch screen controls for that device will
become available.
fig 4. Touch Screen Display
4 Classroom Podium Instructions
III. LOG INTO THE CLASSROOM COMPUTER/ACCESS
PERSONAL STORAGE
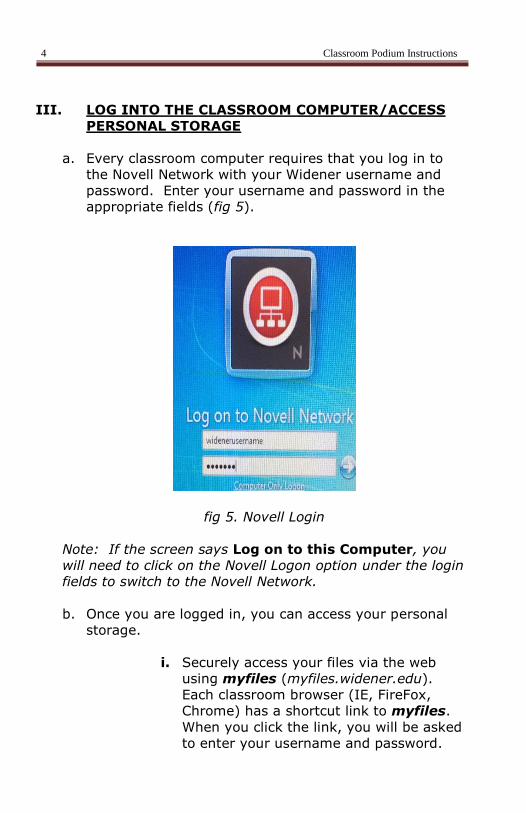
a. Every classroom computer requires that you log in to
the Novell Network with your Widener username and
password. Enter your username and password in the
appropriate fields (fig 5).
fig 5. Novell Login
Note: If the screen says Log on to this Computer, you
will need to click on the Novell Logon option under the login
fields to switch to the Novell Network.
b. Once you are logged in, you can access your personal
storage.
i. Securely access your files via the web
using myfiles (myfiles.widener.edu).
Each classroom browser (IE, FireFox,
Chrome) has a shortcut link to myfiles.
When you click the link, you will be asked
to enter your username and password.
Classroom Podium Instructions 5
This will open a web page showing all the
documents you have stored on your
personal storage drive. You can
download any file by clicking on the file
you want to use. For best results save
the document to the classroom
desktop. To upload an annotated
document or original document back to
your storage area, click on the Add Files
button and either browse for the
document, or drag and drop the file
where indicated.
ii. Alternatively, you can access your
personal storage drive by opening
Computer from the start menu. Open
your personal drive and select the
document you wish to open.
iii. Sign out of myfiles or close the browser
when done to log out of your personal
storage space.
Note: Once logged in to Novell, you can open any
document from your personal storage drive from within the
program you are going to use. When using clickers, you
must ALWAYS open the document from the file/open menu
of PowerPoint. See also Section VII, USING CLICKERS.
6 Classroom Podium Instructions
IV. ADJUST VOLUME
a. There are a few ways to adjust volume in the
classroom,
i. Click on the computer volume icon in the tray to
adjust sound (bottom right) ;
Note: a small red on the volume icon indicates
that sound is muted. Click on the volume icon
and unmute.
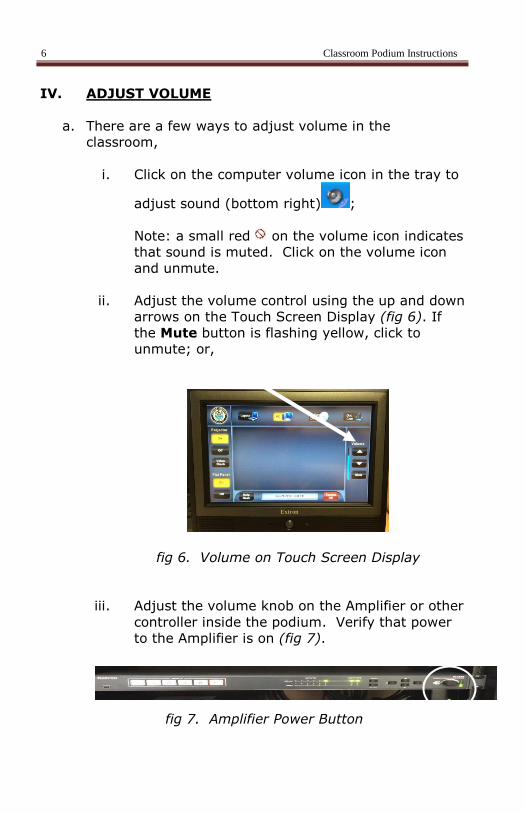
ii. Adjust the volume control using the up and down
arrows on the Touch Screen Display (fig 6). If
the Mute button is flashing yellow, click to
unmute; or,
fig 6. Volume on Touch Screen Display
iii. Adjust the volume knob on the Amplifier or other
controller inside the podium. Verify that power
to the Amplifier is on (fig 7).
fig 7. Amplifier Power Button

Classroom Podium Instructions 7
V. USE THE SMART BOARD and SMART NOTEBOOK
a. The SMART Board in each classroom is on and
activated when the projector is on. To quickly align the
board, click the button in the floating toolbar and tap
the center of each cross (there are 9).
b. Use the SMART pens to annotate your document.
Pick up any pen in the SMART Board tray to activate
the color. When you are done, return the pen to the
tray and click the arrow tool at the top of the toolbar.
c. To save your annotations (to share later), click on the
SMART Ink icon at the top of the page and select
. This will take a picture of the screen with
your document and annotations, and open it in the
SMART Notebook software program.
d. Once SMART Notebook is open, you can add slides, use
additional tools (magic pen, window shade, etc.) or
continue to annotate your document as desired.
e. When you are finished, you can save your annotated
document as a SMART Notebook file, or export it as a
PDF or PowerPoint presentation.
i. Save files in SMART Notebook.
If you save to SMART Notebook, you
will need the Notebook program on
your computer to open or edit the files
on your office PC.
ii. Export the file (from the file menu) as PDF
or PowerPoint to edit or share later.
When you export to PowerPoint, each
notebook screen becomes a separate
PowerPoint slide.

8 Classroom Podium Instructions
VI. PLAY A VIDEO (DVD only)
a. Blu-Ray DVD players are now available in each
classroom. To show a VHS tape, you will need to
request additional equipment from Media Services. To
show a DVD, open the Blu-Ray disk player (fig 8), and
insert the DVD into the unit.
fig 8. DVD Blu-Ray Disc Player
b. Select Blu-Ray/DVD on the Touch Screen Display
(fig 9). You can control the DVD and volume directly
from the touch screen display on the podium.
fig 9. DVD Controls for the Blu-Ray Player.

Classroom Podium Instructions 9
VII. USE CLICKERS
a. Permanent clicker receivers are installed in all
classrooms. You will need to request the clickers from
Media Services and distribute them to your audience.
If using a laptop, request a clicker receiver from
Media Services and insert the receiver into a USB slot.
b. If you are using a USB key/flash drive to store your
presentation, insert it into any available USB port. If
you store your presentation in your storage drive, make
sure you are properly connected (see Section III).
c. Open TurningPoint via the desktop shortcut .
Verify there is a valid receiver indicated on the
‘dashboard’, then click on PowerPoint Polling. The
receiver should be set to channel 41.
d. ** Open your TurningPoint presentation from the
File/Open menu of PowerPoint. **
e. From the TurningPoint menu, Reset the session
before beginning your presentation.
f. Press F5 to start your presentation in full screen mode.
At the interactive slide, the popup polling tab will open
and Polling Open will appear in green.
g. Ask the audience to vote using the clickers.
h. Using the fixed or remote mouse, click once to close
polling and show the results (this can take a few
seconds). Click again to advance the slide.
i. To save the clicker results, from the TurningPoint
menu click the Save Session icon. Save the results to
your USB key or other personal storage location.
j. End your presentation by pressing the ESC key on the
keyboard, close PowerPoint and then Turning Point.
10 Classroom Podium Instructions
VIII. CONNECT A LAPTOP
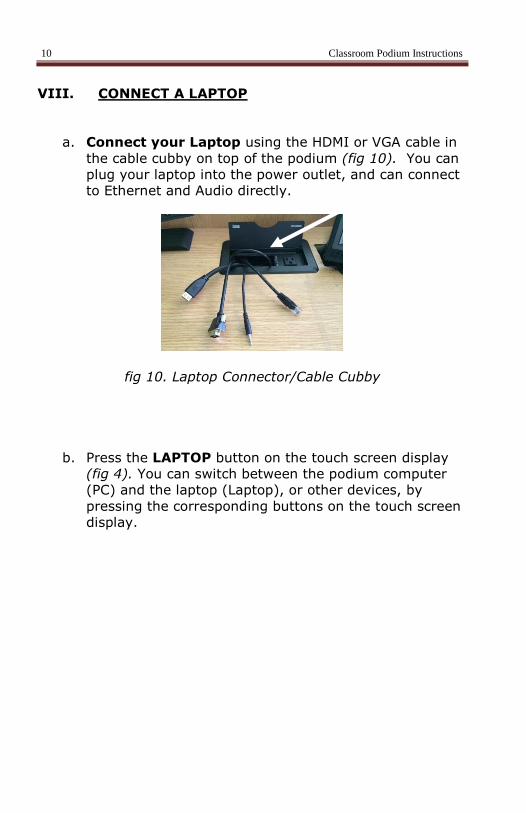
a. Connect your Laptop using the HDMI or VGA cable in
the cable cubby on top of the podium (fig 10). You can
plug your laptop into the power outlet, and can connect
to Ethernet and Audio directly.
fig 10. Laptop Connector/Cable Cubby
b. Press the LAPTOP button on the touch screen display
(fig 4). You can switch between the podium computer
(PC) and the laptop (Laptop), or other devices, by
pressing the corresponding buttons on the touch screen
display.
Classroom Podium Instructions 11
IX. USE THE ELMO DOCUMENT CAMERA
The ELMO Document Camera may be used with or without
the Image Mate program.
To use the ELMO for a quick display of an object or
text; do not use the ELMO Image Mate program:
a. With the Computer and Projector on (see Sections I
and II) select Document Camera on the touch screen
display.
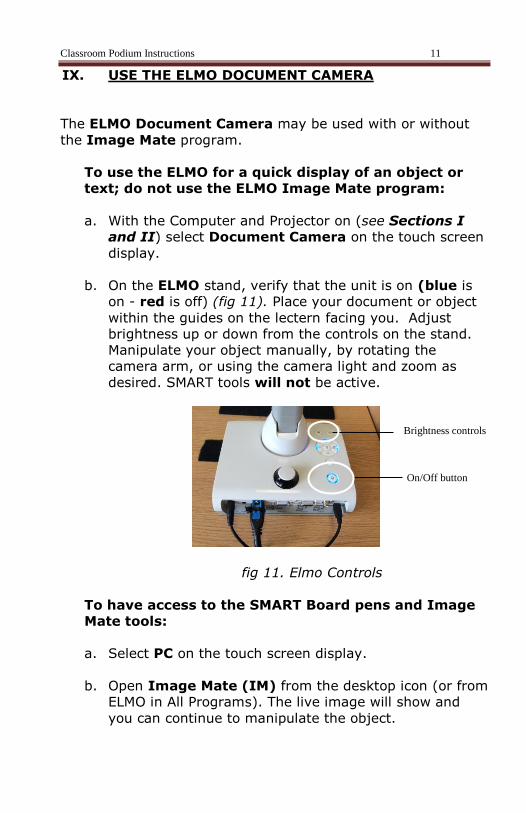
b. On the ELMO stand, verify that the unit is on (blue is
on - red is off) (fig 11). Place your document or object
within the guides on the lectern facing you. Adjust
brightness up or down from the controls on the stand.
Manipulate your object manually, by rotating the
camera arm, or using the camera light and zoom as
desired. SMART tools will not be active.
fig 11. Elmo Controls
To have access to the SMART Board pens and Image
Mate tools:
a. Select PC on the touch screen display.
b. Open Image Mate (IM) from the desktop icon (or from
ELMO in All Programs). The live image will show and
you can continue to manipulate the object.
Brightness controls
On/Off button
12 Classroom Podium Instructions
c. You can now annotate the object using either the
SMART Board Pens or the Image Mate pen tools.
d. To save your annotations, click on the SMART Ink
button at the top, and select (see Section V)
to open the annotated image in SMART Notebook.
e. In the Notebook program, you have access to additional
annotation tools as well as all the SMART Pens.
f. Continue annotating the image/document as desired.
g. When you are done annotating your text or object,
save your image and annotations from the File
menu, or export as either PowerPoint or PDF (see
Section V).
h. Quit the Notebook and Imagemate programs; turn off
the document camera light if it is on.
Classroom Podium Instructions 13
X. SKYPE IN THE CLASSROOM
The Elmo Document Camera in each classroom can also
be used as a camera and mic for Skype calls.
a. To use the Elmo to make a Skype call, Open Skype on
the computer. Log in with your Skype credentials.
Note: Skype is free, just sign up and you can have
up to 10 individuals connected in a single call. You
can also share documents while in Skype.
b. Point the document camera at the speaker. The
camera arm can twist and rotate to capture either the
lecturer at the podium, or the audience. Adjust the arm
so that your subject is centered in the camera window.
c. The Elmo also has a microphone built into the
camera arm. Make sure you test the microphone before
making your call. You may need to uncheck the “auto
adjust” button and move the slider bar before you see
that it is responding to your voice.
d. Make your call from the Skype program.
e. When finished, close out of Skype and make sure you
quit the program by right clicking on the Skype icon in
the task bar and selecting quit.

14 Classroom Podium Instructions
XI. SHUT DOWN THE COMPUTER and PROJECTOR
a. When you are done, log off of the computer to log out
of your personal drive and return to the Novell Logon
screen. DO NOT shut down the computer.
b. If there is no class following, click System Off on the
touch screen display, and Power Down (fig 12). This
will turn off the touch screen, the projector and display
screens. Do not press Projector Off or Flat Panel Off.
fig 12. System Off and Power Down Buttons
c. After the projector is turned off, the fan will continue to
run for a few minutes to cool. Once the projector turns
off, wait 2 minutes before starting the system back up.
d. Do NOT turn off the main power switch inside the
podium.
Classroom Podium Instructions 15
XII. GET HELP
A 2-way Intercom is now available to make it easier to get
assistance in the classroom when needed. The intercom is
located on the left side of the podium.
a. Technical Assistance: The first button labeled AV HELP will connect you to the Media Services office. Use
this button to get assistance with the classroom
equipment and technologies. This line is staffed by
members of Media Services from 8am to 10pm, Monday
through Thursday, and Friday from 8am-5pm.
You can also get assistance by calling Media Services at
302-477-2104 (M-Th 9am-10pm, F 9am-3pm)
or
Helpdesk 302-477-2196 (M-F 9am-5pm)
b. Emergency: The last button, labeled Security, will
connect you to the security office and is designed to be
used only in an emergency.

16 Classroom Podium Instructions
For further training or assistance with
technology
Contact Barbara Mindell
Educational Technology Specialist [email protected]
Widener Law School
Barbara Mindell
8.15.14