chapter 6 upholstery - automotive.comimage.automotive.com/...to...chapter_6_upholstery.pdf ·...
TRANSCRIPT
f all the decisions to be made when building a street rod, some of the most important have to do with the interior.
After all, that’s where you’ll spend your time driving your dream; if it’s not a hospitable environment you won’t want to be in there.
When it comes to interiors, there certainly are advantages to building a ’35-40 Ford with the generous interior dimensions they offer. As hot rods go, the coupes and open cars are plenty roomy and the sedans are downright cavernous. To make the best use of that space takes some planning and effort.
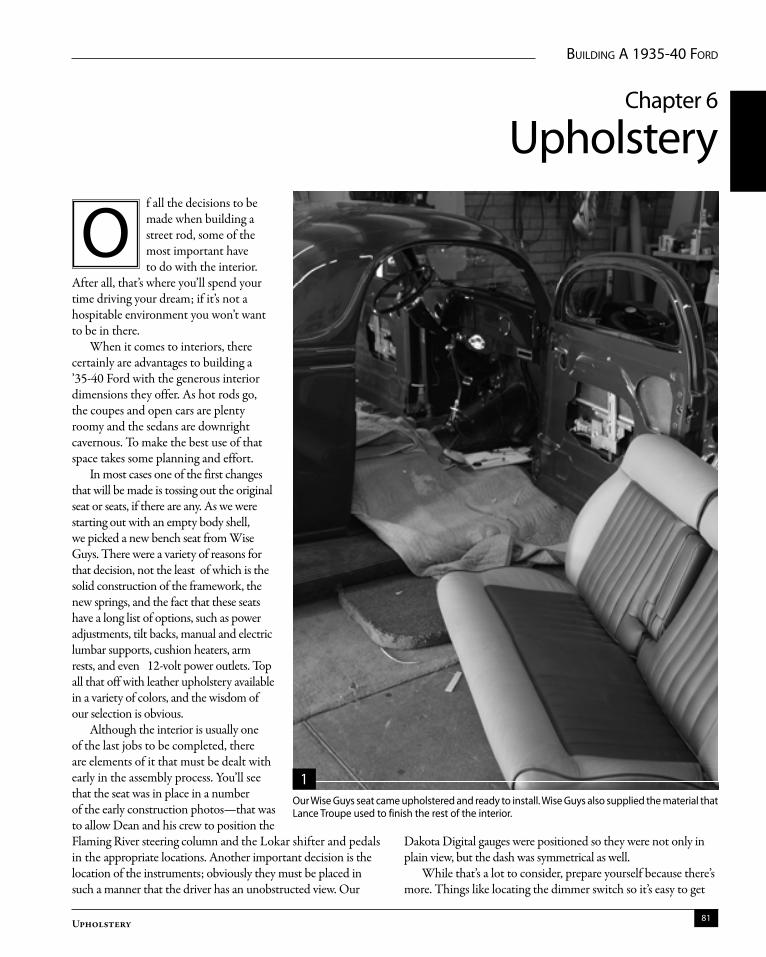
In most cases one of the first changes that will be made is tossing out the original seat or seats, if there are any. As we were starting out with an empty body shell, we picked a new bench seat from Wise Guys. There were a variety of reasons for that decision, not the least of which is the solid construction of the framework, the new springs, and the fact that these seats have a long list of options, such as power adjustments, tilt backs, manual and electric lumbar supports, cushion heaters, arm rests, and even 12-volt power outlets. Top all that off with leather upholstery available in a variety of colors, and the wisdom of our selection is obvious.
Although the interior is usually one of the last jobs to be completed, there are elements of it that must be dealt with early in the assembly process. You’ll see that the seat was in place in a number of the early construction photos—that was to allow Dean and his crew to position the Flaming River steering column and the Lokar shifter and pedals in the appropriate locations. Another important decision is the location of the instruments; obviously they must be placed in such a manner that the driver has an unobstructed view. Our
Dakota Digital gauges were positioned so they were not only in plain view, but the dash was symmetrical as well.
While that’s a lot to consider, prepare yourself because there’s more. Things like locating the dimmer switch so it’s easy to get
1Our Wise Guys seat came upholstered and ready to install. Wise Guys also supplied the material that Lance Troupe used to finish the rest of the interior.
Building A 1935-40 Ford
Upholstery 81
Chapter 6
Upholstery
O
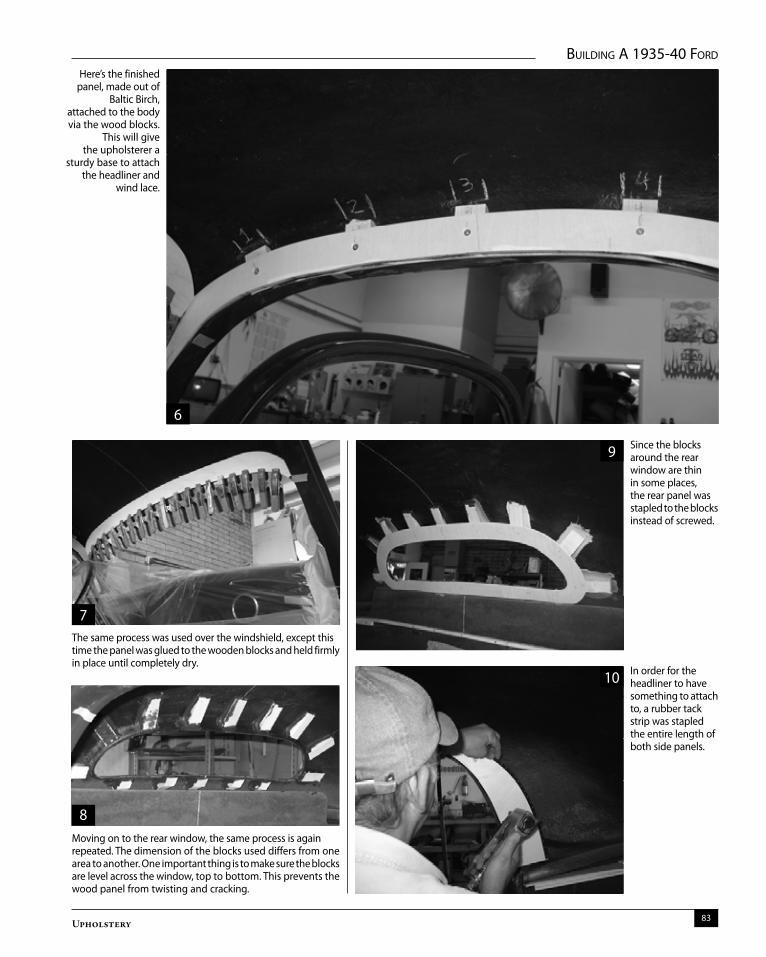
The ’36 used six blocks over the door to get the job done. These blocks need to be flush with the doorjamb to prevent interference with the closing of the door.
Obviously the panel needs to attach to the body somehow. The easiest way to do this in fiberglass cars is to glue small blocks of wood that the panel can attach to.
to, but not in the way. Are you going to have interior lights or storage pockets, and where is that fuse panel going to go? And what about seat belts, an emergency brake handle, window cranks or switches, and for that matter, door handles? The point is, the interior requires careful planning, and we haven’t even talked about style yet—but now is as good a time as any. The style of the interior is just a continuation of what you see on the outside. That simply means that you may not want old-school tuck ’n’ roll in a high-tech coupe, or velour in a vintage roadster.
Once all the styling decisions are made, it’s time to go looking for material. The biggest concern here is to choose automotive-grade material; it has the necessary UV tolerance and is better able to resist abrasion.
While actual stitching an interior is usually left to a professional, there is much more to the process than just sewing pieces of material together. That’s because before you can install an interior, there has to be something to attach it to. In the case of door and kick panels they are often held in place by clips that simply snap into the framework. But for other panels some attachment points or tack strips must be provided. In original steel and reproduction fiberglass bodies, those attachment provisions may or may not be in place.
While the Wise Guys seat was covered to our specs when it was delivered to Hot Rods by Dean, there was still plenty to do inside our three-window. Lance Troupe finished what needed to be done. Take a look at the following photos to see what it takes to create a first-class interior. n
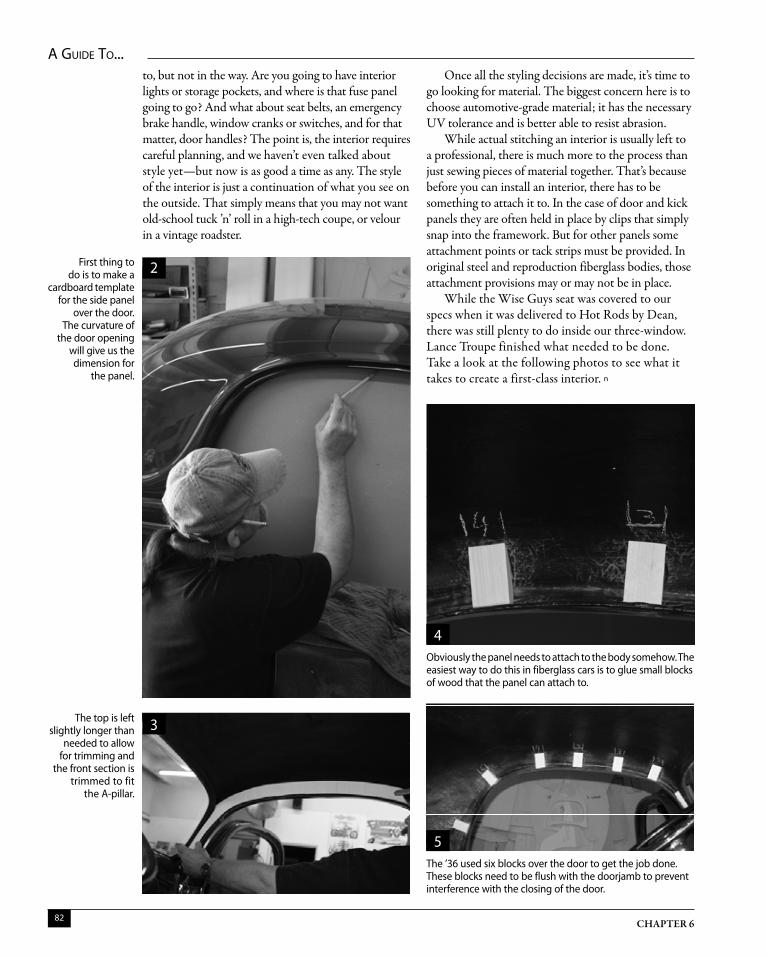
The top is left slightly longer than
needed to allow for trimming and
the front section is trimmed to fit
the A-pillar.
First thing to do is to make a
cardboard template for the side panel
over the door. The curvature of
the door opening will give us the dimension for
the panel.
4
2
3
5
A guide To...
CHAPTER 682
Building A 1935-40 Ford
Here’s the finished panel, made out of
Baltic Birch, attached to the body via the wood blocks.
This will give the upholsterer a
sturdy base to attach the headliner and
wind lace.
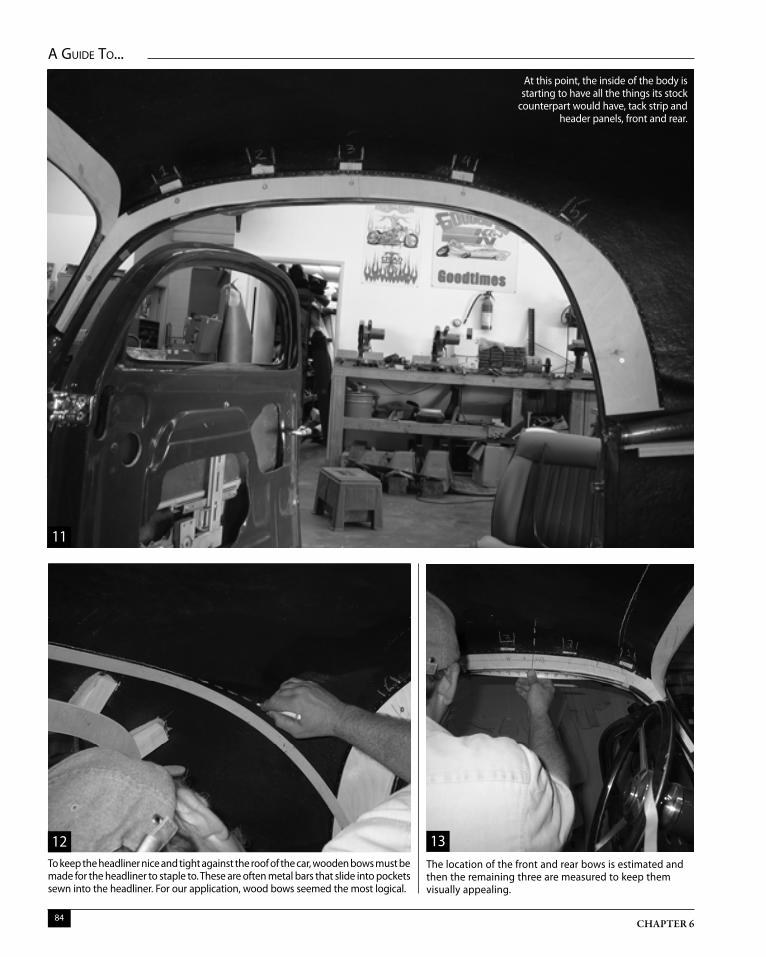
Moving on to the rear window, the same process is again repeated. The dimension of the blocks used differs from one area to another. One important thing is to make sure the blocks are level across the window, top to bottom. This prevents the wood panel from twisting and cracking.
The same process was used over the windshield, except this time the panel was glued to the wooden blocks and held firmly in place until completely dry.
In order for the headliner to have something to attach to, a rubber tack strip was stapled the entire length of both side panels.
Since the blocks around the rear window are thin in some places, the rear panel was stapled to the blocks instead of screwed.
7
6
9
8
10
A guide To... Building A 1935-40 Ford
Upholstery 83
The location of the front and rear bows is estimated and then the remaining three are measured to keep them visually appealing.
To keep the headliner nice and tight against the roof of the car, wooden bows must be made for the headliner to staple to. These are often metal bars that slide into pockets sewn into the headliner. For our application, wood bows seemed the most logical.
At this point, the inside of the body is starting to have all the things its stock
counterpart would have, tack strip and header panels, front and rear.
11
12 13
A guide To...
CHAPTER 684
Building A 1935-40 Ford
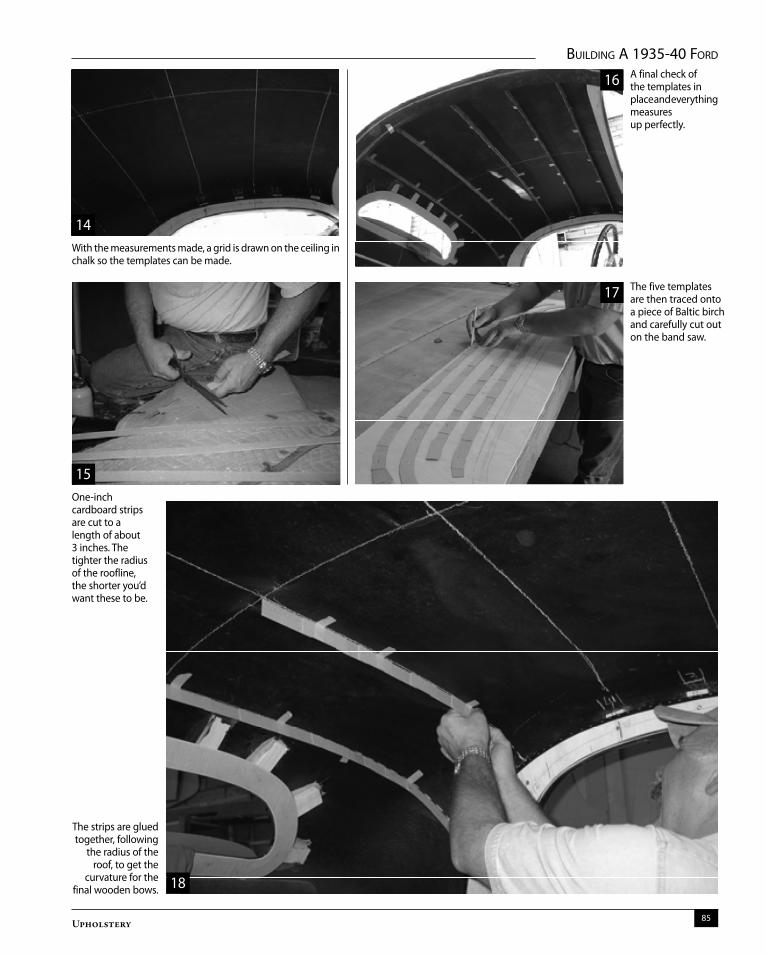
With the measurements made, a grid is drawn on the ceiling in chalk so the templates can be made.
A final check of the templates in place and everything measures up perfectly.
One-inch cardboard strips are cut to a length of about 3 inches. The tighter the radius of the roofline, the shorter you’d want these to be.
The strips are glued together, following
the radius of the roof, to get the
curvature for the final wooden bows.
The five templates are then traced onto a piece of Baltic birch and carefully cut out on the band saw.
14
18
15
17
16
A guide To... Building A 1935-40 Ford
Upholstery 85
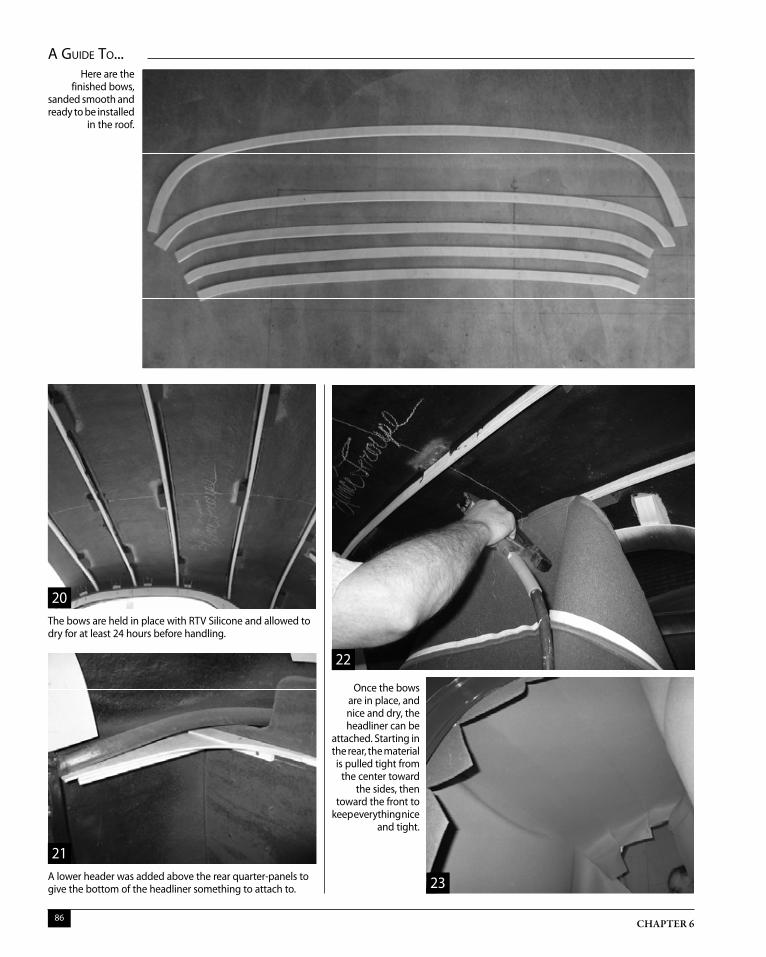
Once the bows are in place, and nice and dry, the headliner can be
attached. Starting in the rear, the material is pulled tight from
the center toward the sides, then
toward the front to keep everything nice
and tight.
The bows are held in place with RTV Silicone and allowed to dry for at least 24 hours before handling.
Here are the finished bows,
sanded smooth and ready to be installed
in the roof.
A lower header was added above the rear quarter-panels to give the bottom of the headliner something to attach to.
20
21
22
23
A guide To...
CHAPTER 686
Building A 1935-40 Ford

As you can see, the doorsill
doesn’t have enough meat to
securely attach the quarter-
panels without breaking through
the surface.
When the headliner is
attached to the four rear bows,
the material can be stapled to
the tack strips over the
side windows.
The solution to this is simply more wooden blocks. Like the rest of the panels, these need to be parallel as well.
Lastly, the rear of the headliner is
pulled tight and attached to the top of the rear window, then
pulled tight to the lower header.
Fiberglass resin was used to attach the blocks to the body, and masking tape holds them into place while they dry. The blocks are drilled out for 5/8-inch panel retainers.
25
24 26
27
28
A guide To... Building A 1935-40 Ford
Upholstery 87
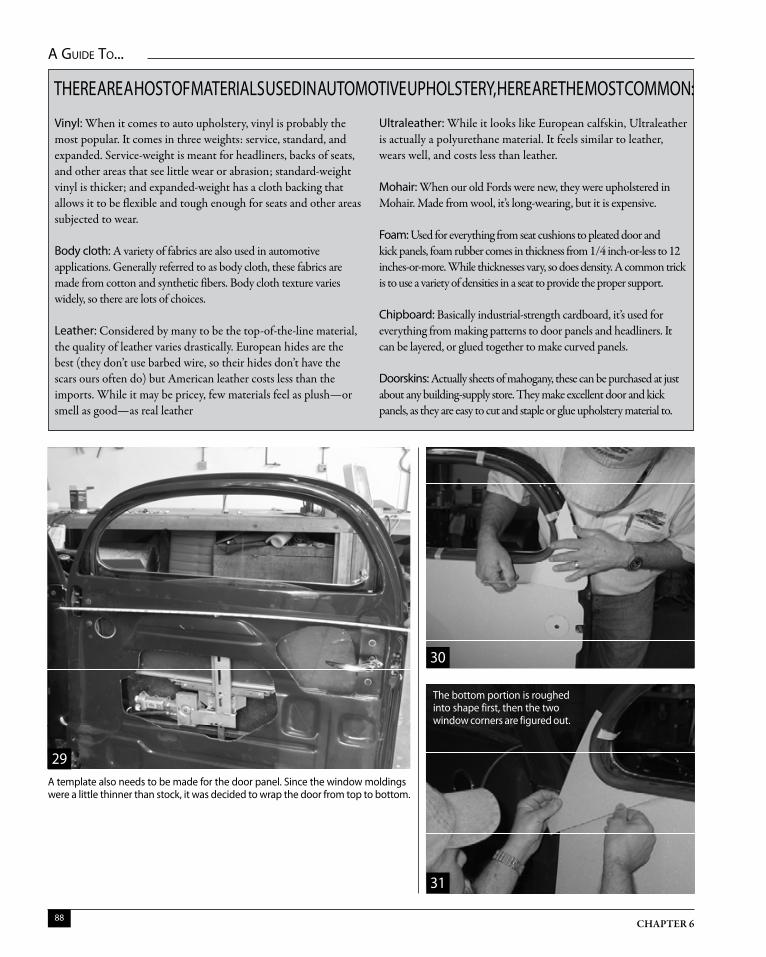
Vinyl: When it comes to auto upholstery, vinyl is probably the most popular. It comes in three weights: service, standard, and expanded. Service-weight is meant for headliners, backs of seats, and other areas that see little wear or abrasion; standard-weight vinyl is thicker; and expanded-weight has a cloth backing that allows it to be flexible and tough enough for seats and other areas subjected to wear.
Body cloth: A variety of fabrics are also used in automotive applications. Generally referred to as body cloth, these fabrics are made from cotton and synthetic fibers. Body cloth texture varies widely, so there are lots of choices.
Leather: Considered by many to be the top-of-the-line material, the quality of leather varies drastically. European hides are the best (they don’t use barbed wire, so their hides don’t have the scars ours often do) but American leather costs less than the imports. While it may be pricey, few materials feel as plush—or smell as good—as real leather
Ultraleather: While it looks like European calfskin, Ultraleather is actually a polyurethane material. It feels similar to leather, wears well, and costs less than leather. Mohair: When our old Fords were new, they were upholstered in Mohair. Made from wool, it’s long-wearing, but it is expensive.
Foam: Used for everything from seat cushions to pleated door and kick panels, foam rubber comes in thickness from 1/4 inch-or-less to 12 inches-or-more. While thicknesses vary, so does density. A common trick is to use a variety of densities in a seat to provide the proper support.
Chipboard: Basically industrial-strength cardboard, it’s used for everything from making patterns to door panels and headliners. It can be layered, or glued together to make curved panels.
Doorskins: Actually sheets of mahogany, these can be purchased at just about any building-supply store. They make excellent door and kick panels, as they are easy to cut and staple or glue upholstery material to.
A template also needs to be made for the door panel. Since the window moldings were a little thinner than stock, it was decided to wrap the door from top to bottom.
THeRe ARe A HOST OF MATeRIALS USeD In AUTOMOTIVe UpHOLSTeRy, HeRe ARe THe MOST COMMOn:
The bottom portion is roughed into shape first, then the two window corners are figured out.
29
30
31
A guide To...
CHAPTER 688
Building A 1935-40 Ford
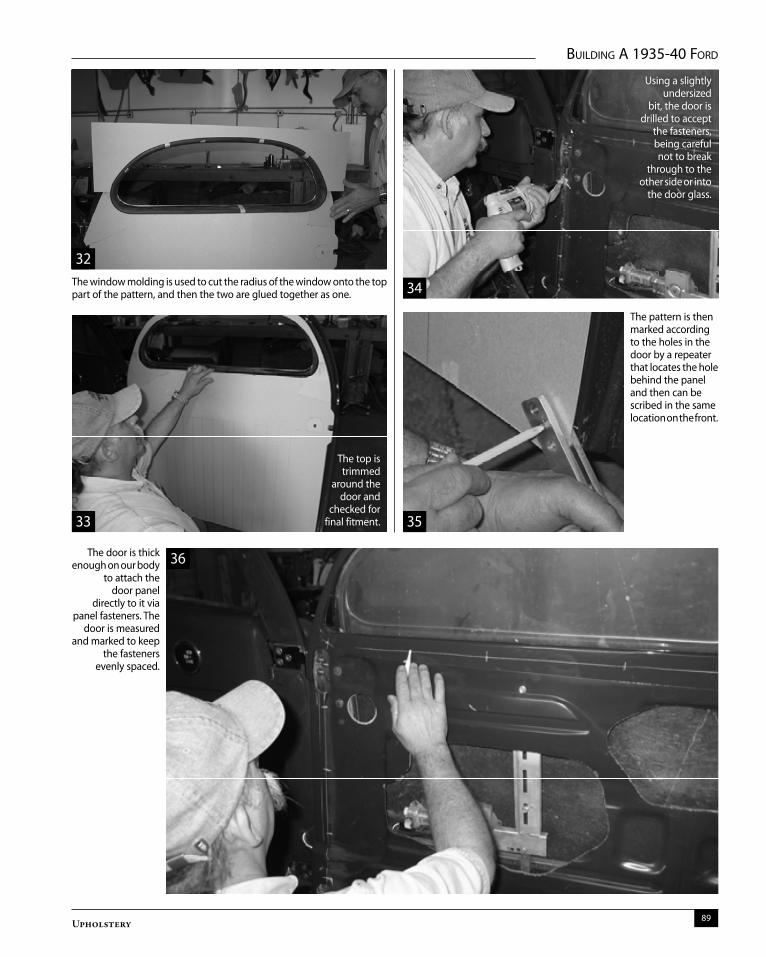
The window molding is used to cut the radius of the window onto the top part of the pattern, and then the two are glued together as one.
The door is thick enough on our body
to attach the door panel
directly to it via panel fasteners. The
door is measured and marked to keep
the fasteners evenly spaced.
Using a slightly undersized
bit, the door is drilled to accept
the fasteners, being careful not to break
through to the other side or into
the door glass.
The pattern is then marked according to the holes in the door by a repeater that locates the hole behind the panel and then can be scribed in the same location on the front.
The top is trimmed
around the door and
checked for final fitment.
32
34
33 35
36
A guide To... Building A 1935-40 Ford
Upholstery 89
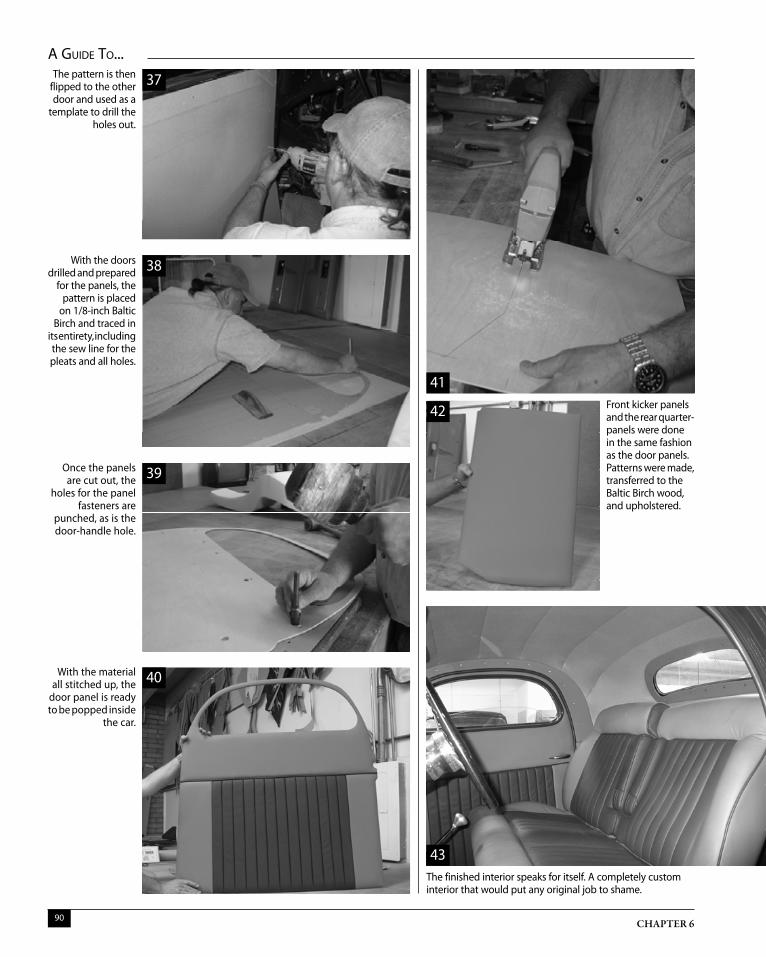
Front kicker panels and the rear quarter-panels were done in the same fashion as the door panels. patterns were made, transferred to the Baltic Birch wood, and upholstered.
With the doors drilled and prepared
for the panels, the pattern is placed
on 1/8-inch Baltic Birch and traced in
its entirety, including the sew line for the pleats and all holes.
The pattern is then flipped to the other door and used as a
template to drill the holes out.
Once the panels are cut out, the
holes for the panel fasteners are
punched, as is the door-handle hole.
With the material all stitched up, the
door panel is ready to be popped inside
the car.
37
38
39
40
41
42
The finished interior speaks for itself. A completely custom interior that would put any original job to shame.
43
A guide To...
CHAPTER 690
Building A 1935-40 Ford

Wise Guys seats come in a variety of configurations. Shown here is a frame assembly for a solid back bench seat (upper left). Split back seats are also available (small inset). Seat backs recline and there are a variety of folding arm rests available. Seat heaters, lumbar supports (both manual and electric) and even auxiliary power outlets are available. For the ultimate in adjustability, a six-way power base is available (upper right).
A guide To... Building A 1935-40 Ford
Upholstery 91