care repaireng ms6605 grasmaaier
TRANSCRIPT

8/3/2019 Care RepairEng MS6605 Grasmaaier
http://slidepdf.com/reader/full/care-repaireng-ms6605-grasmaaier 1/10
A step-by-step guide to maintaining your small engine
www.briggsandstratton.com
SMALL ENGINE ®

8/3/2019 Care RepairEng MS6605 Grasmaaier
http://slidepdf.com/reader/full/care-repaireng-ms6605-grasmaaier 2/10
FORM MS-6445-01/03
IMPORTANT SAFETY INFORMATION AND
INSTRUCTIONS FOR
ENGINE SELECTION
ENGINE INSTALLATION
ENGINE OPERATION
Keep these instructions for future reference.
In the USA and Canada,our 24 hour hotline is:
1-800-233-3723
Briggs & Stratton CorporationMilwaukee, Wisconsin 53201
www.briggsandstratton.com
Before installing and operating this engine
read and observe all warnings, cautions andinstructions on both sides of this sheet, on the engine,and in the operating & maintenance instructions.
NOTE: This sheet of instructions and safety information is not meant to cover allpossible conditions and situations that may occur. Read entire Operating &Maintenance Instructions for this engine AND the instructions for the equipmentthis engine powers. Failure to follow instructions and safety information couldresult in serious injury or death.
The safety alert symbol ( ) is used to identify safety
information about hazards that can result in personal injury.
A signal word (DANGER, WARNING, or CAUTION) is used with thealert symbol to indicate the likelihood and the potential severity ofinjury. In addition, a hazard symbol may be used to represent the typeof hazard.
DANGER indicates a hazard which, if not avoided,will result in death or serious injury.
WARNING indicates a hazard which, if notavoided, could result in death or serious injury.
CAUTION indicates a hazard which, if not avoided,might result in minor or moderate injury.
CAUTION, when used without the alert symbol,indicates a situation that could result in damage tothe engine.
HAZARD SYMBOLS AND MEANINGS
Explosion
Toxic Fumes
Moving Parts
ShockHot Surface
Kickback
Fire
(OVER)
8/3/2019 Care RepairEng MS6605 Grasmaaier
http://slidepdf.com/reader/full/care-repaireng-ms6605-grasmaaier 3/10
FORM MS-6445-01/03
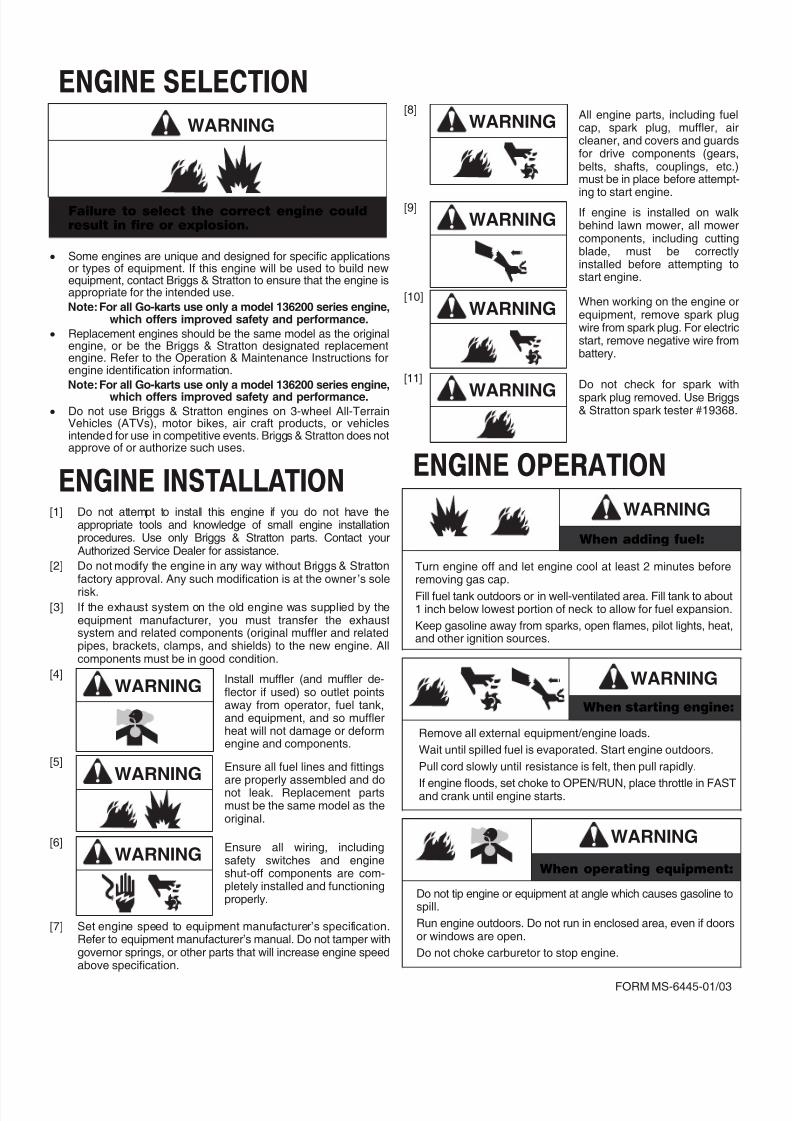
ENGINE SELECTION
WARNING
Failure to select the correct engine couldresult in fire or explosion.
• Some engines are unique and designed for specific applicationsor types of equipment. If this engine will be used to build newequipment, contact Briggs & Stratton to ensure that the engine isappropriate for the intended use.
Note: For all Go-karts use only a model 136200 series engine,which offers improved safety and performance.
• Replacement engines should be the same model as the originalengine, or be the Briggs & Stratton designated replacementengine. Refer to the Operation & Maintenance Instructions forengine identification information.
Note: For all Go-karts use only a model 136200 series engine,which offers improved safety and performance.
• Do not use Briggs & Stratton engines on 3-wheel All-TerrainVehicles (ATVs), motor bikes, air craft products, or vehiclesintended for use in competitive events. Briggs & Stratton does notapprove of or authorize such uses.
ENGINE INSTALLATION[1] Do not attempt to install this engine if you do not have the
appropriate tools and knowledge of small engine installationprocedures. Use only Briggs & Stratton parts. Contact yourAuthorized Service Dealer for assistance.
[2] Do not modify the engine in any way without Briggs & Strattonfactory approval. Any such modification is at the owner’s sole
risk.[3] If the exhaust system on the old engine was supplied by the
equipment manufacturer, you must transfer the exhaustsystem and related components (original muffler and relatedpipes, brackets, clamps, and shields) to the new engine. Allcomponents must be in good condition.
[4]
WARNINGInstall muffler (and muffler de-flector if used) so outlet pointsaway from operator, fuel tank,and equipment, and so mufflerheat will not damage or deformengine and components.
[5]
WARNINGEnsure all fuel lines and fittings
are properly assembled and donot leak. Replacement partsmust be the same model as theoriginal.
[6]
WARNINGEnsure all wiring, includingsafety switches and engineshut-off components are com-pletely installed and functioningproperly.
[7] Set engine speed to equipment manufacturer’s specification.Refer to equipment manufacturer’s manual. Do not tamper withgovernor springs, or other parts that will increase engine speedabove specification.
[8]
WARNINGAll engine parts, including fuelcap, spark plug, muffler, aircleaner, and covers and guardsfor drive components (gears,belts, shafts, couplings, etc.)must be in place before attempt-
ing to start engine.[9]
WARNINGIf engine is installed on walkbehind lawn mower, all mowercomponents, including cuttingblade, must be correctlyinstalled before attempting tostart engine.
[10]
WARNINGWhen working on the engine orequipment, remove spark plugwire from spark plug. For electricstart, remove negative wire frombattery.
[11]
WARNINGDo not check for spark withspark plug removed. Use Briggs& Stratton spark tester #19368.
ENGINE OPERATION
WARNING
When adding fuel:
Turn engine off and let engine cool at least 2 minutes beforeremoving gas cap.
Fill fuel tank outdoors or in well-ventilated area. Fill tank to about1 inch below lowest portion of neck to allow for fuel expansion.
Keep gasoline away from sparks, open flames, pilot lights, heat,and other ignition sources.
WARNING
When starting engine:
Remove all external equipment/engine loads.
Wait until spilled fuel is evaporated. Start engine outdoors.
Pull cord slowly until resistance is felt, then pull rapidly.
If engine floods, set choke to OPEN/RUN, place throttle in FASTand crank until engine starts.
WARNING
When operating equipment:
Do not tip engine or equipment at angle which causes gasoline tospill.
Run engine outdoors. Do not run in enclosed area, even if doorsor windows are open.
Do not choke carburetor to stop engine.

8/3/2019 Care RepairEng MS6605 Grasmaaier
http://slidepdf.com/reader/full/care-repaireng-ms6605-grasmaaier 4/10
Small engines must burn fuel and induceelectricity. Each of these involves specialsafety considerations—so you need toobserve the precautions for both. Keep inmind all operational procedures as outlinedin your owners manual when working with your engine. Additionally, by following thesimple safety rules for engine maintenance, you will simplify the job of safely operating,maintaining and repairing your small engine.
Safe maintenance
To make small engine maintenance andrepair tasks easier and safer:
• Make sure you have ample work space, with easy access to the tools you need.
• Use the correct tools for each job.
• Keep an approved fire extinguisher in afamiliar location near your work area.
• Learn engine shutoff procedures so youcan respond quickly in an emergency.
• Disengage the cutting blade, wheels orother equipment, if possible, beforestarting the engine.
• Disconnect the spark plug wire to preventaccidental starting when you are servicing
the engine.• Always disconnect the wire from the
negative terminal when servicing anelectric starter motor.
• Check that a spark plug or spark plugtester is attached to the engine beforecranking.
• Avoid contact with hot engine parts,such as the muffler, cylinder head orcooling fins.
• Never strike the flywheel with a hammeror hard object; it may cause the flywheel toshatter during operation.
I NTRODUCTION
W H E R E T O F I N D U S
You never have to look far to find Briggs
& Stratton support and service for your
small engine. Consult your Yellow Pages
under “Engines-Gasoline,” “Gasoline-
Engines,” “Lawn Mowers” or similar
categories. There are over 30,000 Briggs
& Stratton authorized service dealers worldwide who provide quality service.
You can also contact Briggs & Stratton
Customer Service by phone at 1-800-
233-3723, or on the Internet at
http://www.briggsandstratton.com.
• Make sure the air cleaner assembly andblower housing are in place before startingthe engine.
• Remove any fuel from the tank and closethe fuel shutoff valve before transportingan engine.
• Use only the original manufacturer’sreplacement parts; any other parts maydamage the engine and create safetyhazards.
• Keep engine speed settings withinmanufacturer specifications. Higher speedscan ruin the engine.
Protecting your health Fire, electric shock and asphyxiation are notthe only dangers when working with smallengines. Take care to avoid long-term orsudden injury to your eyes, ears, lungs, feetand back:
• Keep your feet, hands and clothingaway from moving engine and equip-ment components.
• Use eye protection when you work withengines or power tools.
• Wear ear protection to reduce the risk of gradual hearing loss from exposure to
engine noise.
• Wear a face mask, if required, when working with chemicals.
• Wear specially designed gloves toprotect against heat, harmful chemicalsand sharp objects.
• Wear safety shoes to protect against fallingobjects; safety shoes have soles that won’tdeteriorate when exposed to gasoline or oil.
• Use proper lifting techniques and seek help with heavy lifting.
Briggs & Stratton has been a majorforce behind the explosion in small enginepopularity. This quintessential Americancompany builds more than two-thirds of alllawn mower engines and is a major producerof four-stroke small engines for almost everyapplication. You may find many brands of mowers, tractors and other equipment at your power equipment retailer. Look closely:chances are good the engines are built byBriggs & Stratton. Retailers like to pointthis out because the name stands for qualityand experience.
Briggs & Stratton’s knowledge and expertiseis second to none. When you learn fromBriggs & Stratton technicians, you’re
learning from the company that has setthe industry standard for decades.
You’re also developing skills that applyto more than lawn equipment. With theinformation in this book, you can maintainand repair small engines on a variety of
power equipment—from generators andpressure washers, to hydraulic lifts. In thisbooklet, we’ll cover the basic proceduresfor maintaining your small engine. Formore in depth explanation of enginesystems, maintenance and repair,go to www.briggsandstratton.com or lookfor Briggs & Stratton Small Engine Care& Repair at your local Briggs & Strattonauthorized dealer.
S AFETY Contents Introduction to Engines &
Engine Components 3
Maintenance Checklist 4
Checking & Changing Oil 5
Checking & Replacing Spark Plugs 6
Checking & Changing Air Filters 7
Troubleshooting Guide
2 THE GUIDE TO SMALL ENGINES

8/3/2019 Care RepairEng MS6605 Grasmaaier
http://slidepdf.com/reader/full/care-repaireng-ms6605-grasmaaier 5/10
THE GUIDE TO SMALL ENGINES 3
T he four-stroke small engine that powers your lawn mower, tiller, generator and manyother types of equipment is a gasoline enginethat generates the precise amount of powernecessary to get the job done. Here’s how thecomponents in your engine interact.
Engine components &
their function
The rewind cord is pulled to start thecombustion process. On some models, astarter motor replaces the rewind, drawingon battery power to start the engine.
Revolving magnets work in conjunction with theignition armature and spark plug to produce aspark in the combustion chamber.
The carburetor draws in fuel from the fuel tankand outside air to form a combustible vapor thatis fed into the combustion chamber.
Intake and exhaust valves open and close atprecisely timed intervals to let air and fuel enterthe engine and to let spent gases exit.
The piston is pushed through the cylinder by theforce of expanding gases. The piston’s motioncauses the crankshaft to turn. Momentum thencarries the piston back toward the top of the cylinder.
Oil stored in the crankcase circulates throughthe engine to lubricate key components like thepiston and crankshaft and to provide generalizedcooling by drawing away heat from internalengine surfaces.
A flywheel brake and stop switch are includedon engines for equipment such as mowers thatrequire constant supervision. The two compon-ents are designed to stop the engine if yourelease the controls.
An air vane or flyweights monitor engine
RPMs so the governor can maintain the selectedengine speed.
Cooling fins help reduce engine tempera-tures when air circulates across the hottestengine surfaces.
I NTRODUCTION TO ENGINES
Parts of the small engine – front view Parts of the small engine – side view
Fuel tank and shroudFuel cap
Air cleaner cover
Cylinder head
Piston
Engine block
Crankshaft
Muffler
Intake valve
Exhaust valve
Rewind rope Rewind
Flywheel brake
Blower housing
Flywheel
Carburetor
Air cleaner element
Fuel tank and s
Spark plug
Cylinder head
Intake valve spring
Intake valve
Exhaust valve spring
Exhaust valve Cran
Di
Connecti
Cran
Oil fBlower housing
Rewind
FlywheelIgnition armature
Spark plug lead
Primer bulb
8/3/2019 Care RepairEng MS6605 Grasmaaier
http://slidepdf.com/reader/full/care-repaireng-ms6605-grasmaaier 6/10
4 THE GUIDE TO SMALL ENGINES
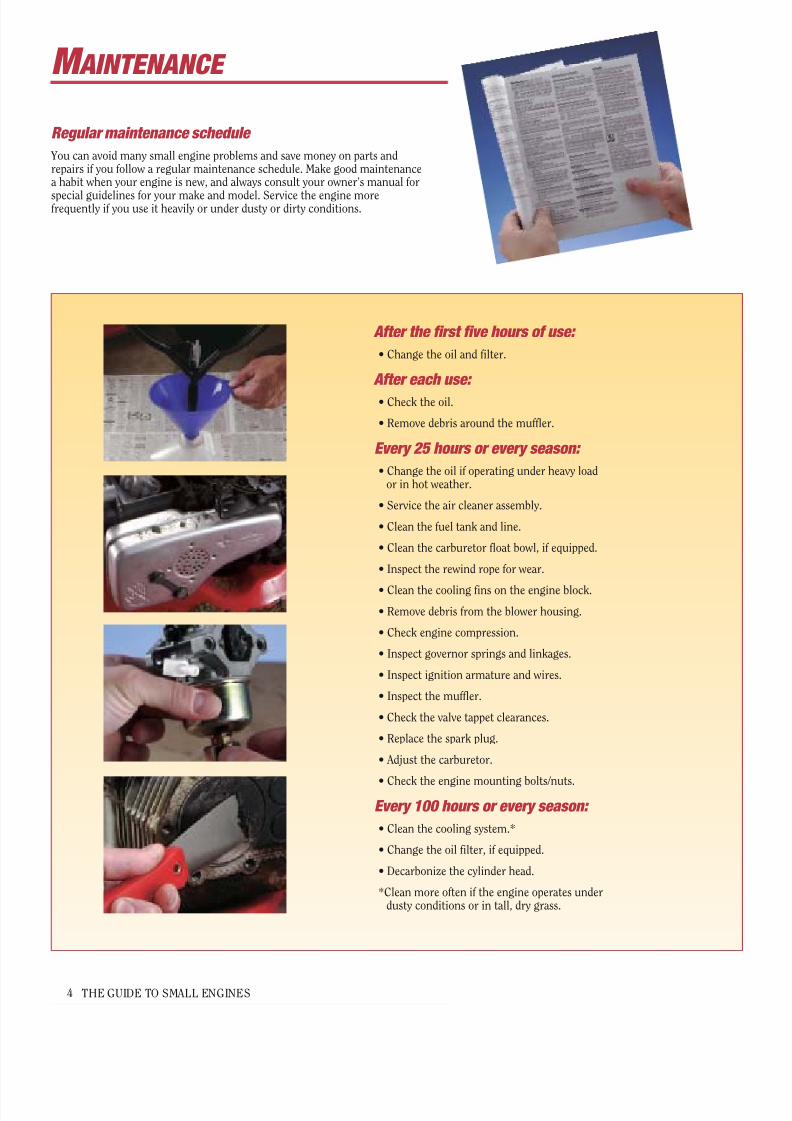
M AINTENANCE
After the first five hours of use:
• Change the oil and filter.
After each use:
• Check the oil.
• Remove debris around the muffler.
Every 25 hours or every season:
• Change the oil if operating under heavy loador in hot weather.
• Service the air cleaner assembly.
• Clean the fuel tank and line.
• Clean the carburetor float bowl, if equipped.
• Inspect the rewind rope for wear.
• Clean the cooling fins on the engine block.
• Remove debris from the blower housing.
• Check engine compression.
• Inspect governor springs and linkages.
• Inspect ignition armature and wires.
• Inspect the muffler.
• Check the valve tappet clearances.
• Replace the spark plug.
• Adjust the carburetor.
• Check the engine mounting bolts/nuts.
Every 100 hours or every season:
• Clean the cooling system.*
• Change the oil filter, if equipped.
• Decarbonize the cylinder head.
*Clean more often if the engine operates underdusty conditions or in tall, dry grass.
Regular maintenance schedule
You can avoid many small engine problems and save money on parts andrepairs if you follow a regular maintenance schedule. Make good maintenancea habit when your engine is new, and always consult your owner’s manual for
special guidelines for your make and model. Service the engine morefrequently if you use it heavily or under dusty or dirty conditions.
8/3/2019 Care RepairEng MS6605 Grasmaaier
http://slidepdf.com/reader/full/care-repaireng-ms6605-grasmaaier 7/10
8/3/2019 Care RepairEng MS6605 Grasmaaier
http://slidepdf.com/reader/full/care-repaireng-ms6605-grasmaaier 8/10
6 THE GUIDE TO SMALL ENGINES
Tools & materials:
Spark tester, spark plug
socket (sizes vary), socket
wrench, wire brush,
plug/point cleaner,
spark plug gauge.
Time required:
15 minutes.
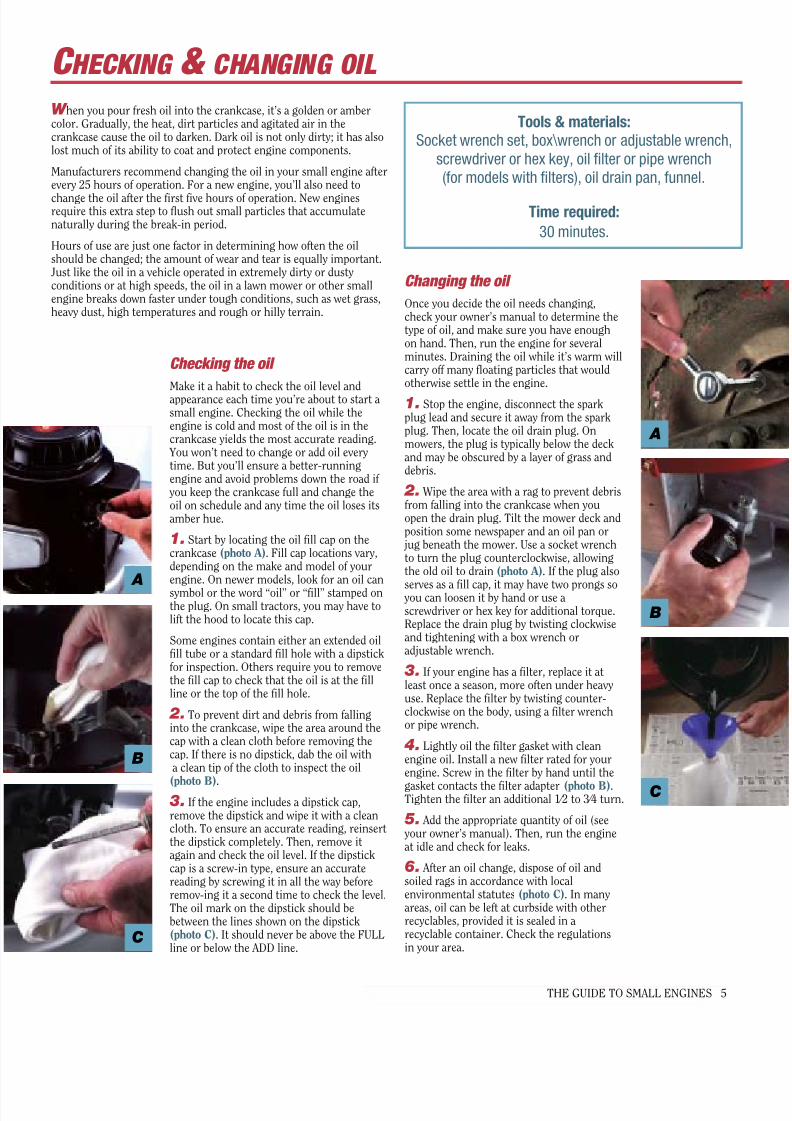
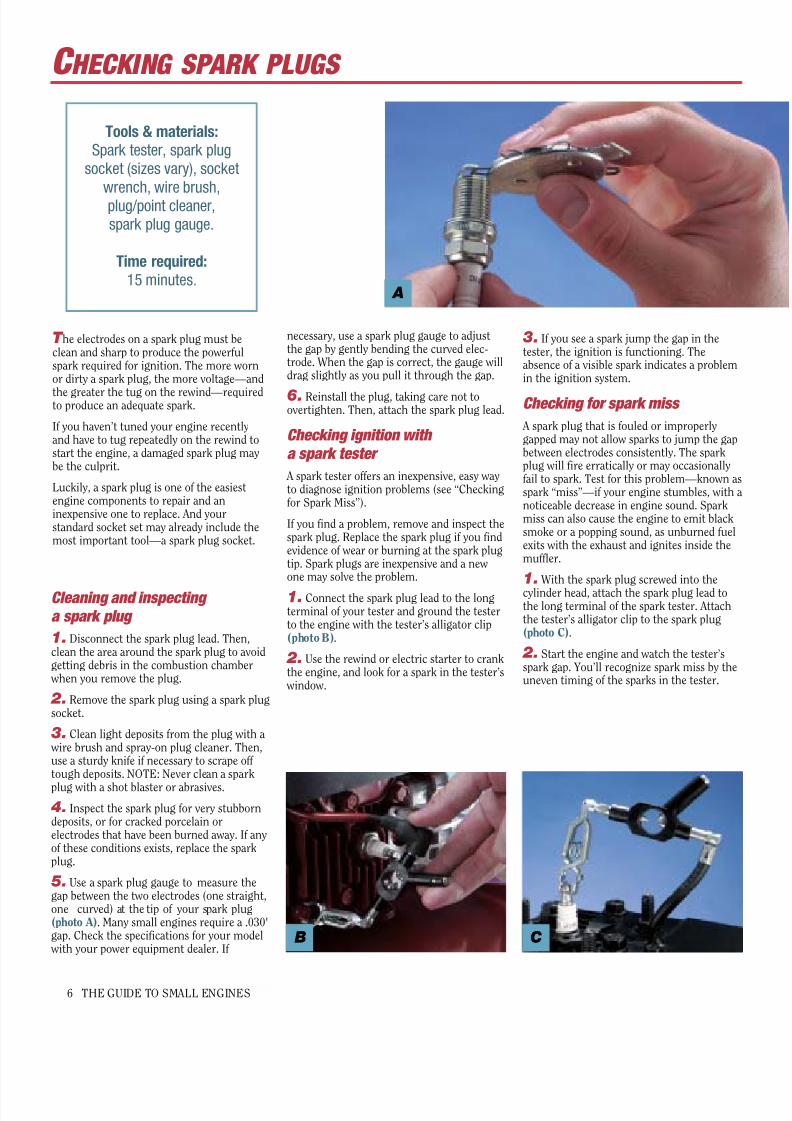
T he electrodes on a spark plug must beclean and sharp to produce the powerfulspark required for ignition. The more wornor dirty a spark plug, the more voltage—and
the greater the tug on the rewind—requiredto produce an adequate spark.
If you haven’t tuned your engine recentlyand have to tug repeatedly on the rewind tostart the engine, a damaged spark plug maybe the culprit.
Luckily, a spark plug is one of the easiestengine components to repair and aninexpensive one to replace. And yourstandard socket set may already include themost important tool—a spark plug socket.
Cleaning and inspecting
a spark plug
1. Disconnect the spark plug lead. Then,clean the area around the spark plug to avoidgetting debris in the combustion chamber when you remove the plug.
2. Remove the spark plug using a spark plugsocket.
3. Clean light deposits from the plug with a wire brush and spray-on plug cleaner. Then,use a sturdy knife if necessary to scrape off tough deposits. NOTE: Never clean a spark
plug with a shot blaster or abrasives.
4. Inspect the spark plug for very stubborndeposits, or for cracked porcelain orelectrodes that have been burned away. If anyof these conditions exists, replace the sparkplug.
5. Use a spark plug gauge to measure thegap between the two electrodes (one straight,one curved) at the tip of your spark plug(photo A). Many small engines require a .030"gap. Check the specifications for your model with your power equipment dealer. If
necessary, use a spark plug gauge to adjustthe gap by gently bending the curved elec-trode. When the gap is correct, the gauge willdrag slightly as you pull it through the gap.
6. Reinstall the plug, taking care not toovertighten. Then, attach the spark plug lead.
Checking ignition with
a spark tester
A spark tester offers an inexpensive, easy wayto diagnose ignition problems (see “Checkingfor Spark Miss”).
If you find a problem, remove and inspect thespark plug. Replace the spark plug if you findevidence of wear or burning at the spark plugtip. Spark plugs are inexpensive and a newone may solve the problem.
1. Connect the spark plug lead to the longterminal of your tester and ground the testerto the engine with the tester’s alligator clip(photo B).
2. Use the rewind or electric starter to crankthe engine, and look for a spark in the tester’s window.
3. If you see a spark jump the gap in thetester, the ignition is functioning. Theabsence of a visible spark indicates a problemin the ignition system.
Checking for spark miss
A spark plug that is fouled or improperlygapped may not allow sparks to jump the gapbetween electrodes consistently. The sparkplug will fire erratically or may occasionallyfail to spark. Test for this problem—known asspark “miss”—if your engine stumbles, with anoticeable decrease in engine sound. Sparkmiss can also cause the engine to emit blacksmoke or a popping sound, as unburned fuelexits with the exhaust and ignites inside themuffler.
1. With the spark plug screwed into the
cylinder head, attach the spark plug lead tothe long terminal of the spark tester. Attachthe tester’s alligator clip to the spark plug(photo C).
2. Start the engine and watch the tester’sspark gap. You’ll recognize spark miss by theuneven timing of the sparks in the tester.
A
B C
C HECKING SPARK PLUGS
8/3/2019 Care RepairEng MS6605 Grasmaaier
http://slidepdf.com/reader/full/care-repaireng-ms6605-grasmaaier 9/10
THE GUIDE TO SMALL ENGINES 7
S ERVICING AIR CLEANERS
A properly maintained air cleaner is your engine’s first line of defenseagainst the destructive effects of dirt. When the air cleaner is in goodcondition, it keeps airborne dirt particles from entering through thecarburetor. If the air cleaner is not maintained, dirt and dust willgradually make their way into the engine. And don’t underestimatedirt’s potential to cause damage. It can lead to a sharp drop in enginepower, or—worse—cause premature wear of critical enginecomponents.
Many types of air cleaners are used in small engines. Most contain afoam or pleated-paper element.
Dual-element air cleaners contain a pleated-paper element with afoam pre-cleaner, offering two layers of protection. Discard the paperelement when you can no longer remove dirt from the pleats bytapping the element on a hard, dry surface. You may be able to washand reuse the foam pre-cleaner. Foam elements can be cleaned withhot water and liquid dish detergent that contains a grease-cuttingagent.
Single-element air cleaners should be serviced every 25 hours (or oncea season). In a dual-element system, the pre-cleaner should be cleanedevery 25 hours. The cartridge should be cleaned every 100 hours.
Servicing a foam air cleaner
1. Loosen the screws or wing nuts that holdthe air cleaner assembly in place (photo A).Disassemble.
2. Inspect the foam element. Replace it if itis torn or shows signs of considerable wear.
4. Saturate the element with engine oil
(photo B). Then, squeeze it to spread the oilthroughout.
5. Inspect the rubbery sealing gasketbetween the air cleaner and carburetor.Replace it if it is worn.
6. Reassemble and reinstall the air cleaner.
Servicing a pleated-paper or
dual-element air cleaner
Dual-element air cleaners come in a varietyof designs. Two of the most common are
shown here.
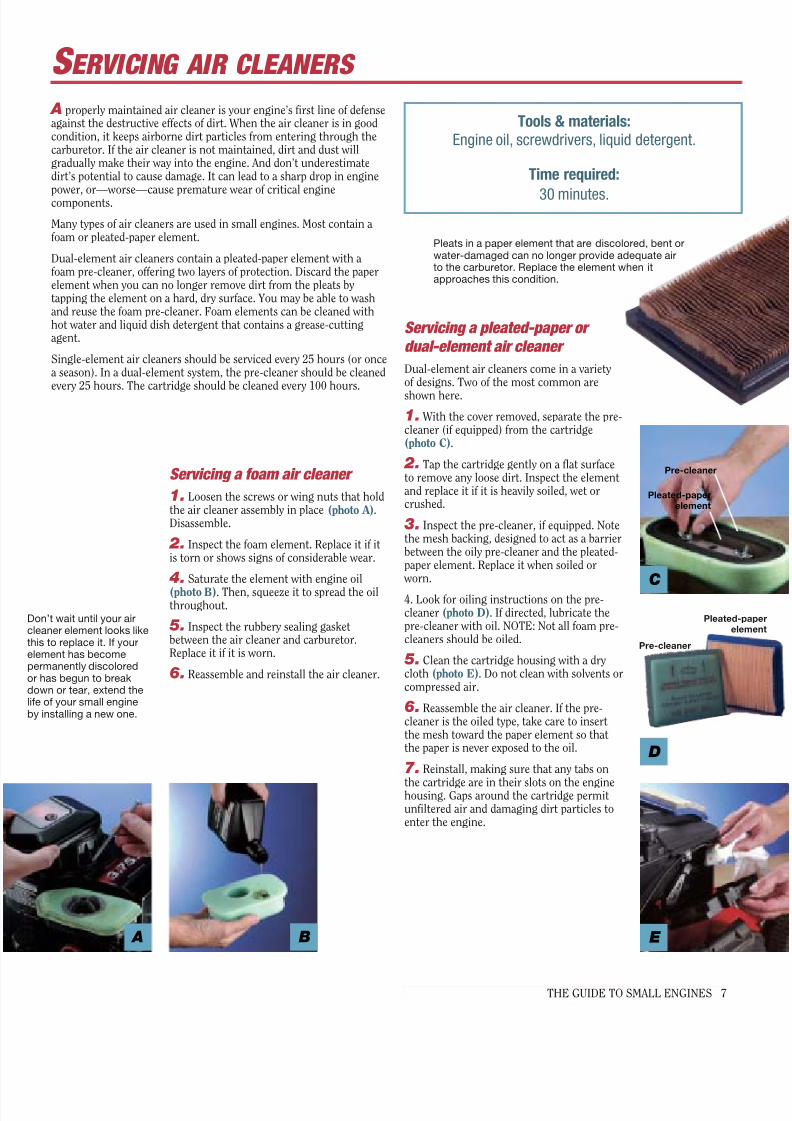
1. With the cover removed, separate the pre-cleaner (if equipped) from the cartridge(photo C).
2. Tap the cartridge gently on a flat surfaceto remove any loose dirt. Inspect the elementand replace it if it is heavily soiled, wet orcrushed.
3. Inspect the pre-cleaner, if equipped. Notethe mesh backing, designed to act as a barrierbetween the oily pre-cleaner and the pleated-paper element. Replace it when soiled or worn.
4. Look for oiling instructions on the pre-cleaner (photo D). If directed, lubricate thepre-cleaner with oil. NOTE: Not all foam pre-cleaners should be oiled.
5. Clean the cartridge housing with a drycloth (photo E). Do not clean with solvents orcompressed air.
6. Reassemble the air cleaner. If the pre-cleaner is the oiled type, take care to insertthe mesh toward the paper element so thatthe paper is never exposed to the oil.
7. Reinstall, making sure that any tabs on
the cartridge are in their slots on the enginehousing. Gaps around the cartridge permitunfiltered air and damaging dirt particles toenter the engine.
Tools & materials:
Engine oil, screwdrivers, liquid detergent.
Time required:
30 minutes.
E
D
C
A B
Don’t wait until your airleaner element looks likehis to replace it. If yourlement has becomeermanently discoloredr has begun to breakown or tear, extend thefe of your small enginey installing a new one.
Pleats in a paper element that are discolored, bent orwater-damaged can no longer provide adequate airto the carburetor. Replace the element when itapproaches this condition.
Pleated-paper
element
Pleated-p
elem
Pre-cleaner
Pre-cleaner

8/3/2019 Care RepairEng MS6605 Grasmaaier
http://slidepdf.com/reader/full/care-repaireng-ms6605-grasmaaier 10/10
T ROUBLESHOOTING
If the answer is yes:
If the engine won’t start
(Fuel line) Fill fuel tank; if engine
is still hot, wait until itcools before filling tank.
Open fuel shut-off valve.
Empty tank, replace fueland check for leaks infuel tank cap.
Disconnect inlet screenfrom engine and cleanusing compressed air.Do not use compressedair near engine.*
Make sure cap is ventedand air holes are notclogged.*
Remove spark plug leadand spark plug; pourteaspoon of fuel directlyinto cylinder; reinsertspark plug and lead;start engine; if it runsshortly before quitting,overhaul carburetor.*
Adjust float in fuel bowl,if adjustable; make surechoke isn’t set too high.*
Remove spark plug;clean contacts orreplace plug.
Remove spark plug;reset gap.
Test lead with sparktester, then test engine.
Repair or replace killswitch.*
Replace flywheel key,then try to start engine;if it still won’t start,check ignition arma-ture, wire connectionsor points.*
Perform compressiontest. If test indicatespoor compression,inspect valves, pistonand cylinder for damageand repair as needed.*
(Engine smokes)
(Engine overheats)
(Engine knocks)
(Spark plug missesunder load)
(Carburetor)
(Ignition)
(Compression)
Is the fuel tank empty?
Is the shut-off valve closed?
Is the fuel diluted with water?
Is the fuel line or inlet screenblocked?
Is the fuel tankcap clogged or unvented?
Is the engine
flooded?
Is the spark plug fouled?
Is the spark plug gap set incorrectly?
Is the spark pluglead faulty?
Is the kill switch shorted?
Is the flywheel key damaged?
Are the valves, piston, cylinder or connecting rod damaged?
Is the carburetor blocked?
Adjust the carburetor.*
Replace the air cleaner.
Clean the engine.*
Add oil to the engine.NOTE: Never add oil tothe gasoline for a four-stroke engine.*
Install new parts asneeded.*
Adjust the carburetor.*
Replace the gasket.*
Clean the fuel tank ventand fuel tank screen.*
Clean carbon from thepiston and head.*
Inspect the flywheel andkey; replace as needed.*
Clean the spark plug.
Replace the spark plugor adjust the sparkplug gap.
Install a solid-stateignition.*
Adjust the carburetor.
Replace the valve spring.
Adjust the valveclearance torecommended settings.
Is the fuel mixture
too rich?
Is the air filter plugged?
Is the engine dirty?
Is the oil level low?
Are any shrouds or cooling fins missing or broken?
Is there a leaky gasket?
Is the fuel tank vent or fuel tank screen plugged?
Does the combust-
ion chamber contain excess carbon?
Is the flywheel loose?
Is the spark plug fouled?
Is the spark plug faulty or gapincorrect?
Are the breaker points faulty?
Is the carburetor set incorrectly?
Is the valve spring weak?
Is the valveclearance setincorrectly?
Is the fuel mixturetoo lean?
Ask this question:
If the engine runs poorly
Ask this question:
If the answer is yes:
*Refer to Briggs & Stratton Small EngineCare & Repair for complete procedures.
Printed in U.S.A. © 2001 Briggs & Stratton Corporation Form MS-6605-2/01