bar code pro - fontshop Österreich · bar code pro is a software application that creates bar code...
TRANSCRIPT

Bar Code Pro®
Version 6.0
User’s Guide

2
Bar Code Pro® by Allen Lubow Programming: Xinying Gu, Wahidun Chowdhury, and Efim Steinzaig Documentation: Maharani Persaud Copyright © 1991-2005 SNX Software Inc. All rights reserved. The author and publisher have taken great care in preparation of the software and documentation but make no expressed or implied warranty of any kind and assume no responsibility for errors or omissions herein. No liability is assumed for incidental or consequential damages in connection with or arising out of the use of the information or programs contained herein. APPLE COMPUTER, INC. (“APPLE”) MAKES NO WARRANTIES, EXPRESS OR IMPLIED, INCLUDING WITHOUT LIMITATION THE IMPLIED WARRANTIES OF MERCHANTABILITY AND FITNESS FOR A PARTICULAR PURPOSE, REGARDING THE APPLE SOFTWARE. APPLE DOES NOT WARRANT, GUARANTEE OR MAKE ANY REPRESENTATIONS REGARDING THE USE OR THE RESULTS OF THE USE OF THE APPLE SOFTWARE IN TERMS OF ITS CORRECTNESS, ACCURACY, RELIABILITY, CURRENTNESS OR OTHERWISE. THE ENTIRE RISK AS TO THE RESULTS AND PERFORMANCE OF THE APPLE SOFTWARE IS ASSUMED BY YOU. THE EXCLUSION OF IMPLIED WARRANTIES IS NOT PERMITTED BY SOME STATES. THE ABOVE EXCLUSION MAY NOT APPLY TO YOU. IN NO EVENT WILL APPLE, ITS DIRECTORS, OFFICERS, EMPLOYEES OR AGENTS BE LIABLE TO YOU FOR ANY CONSEQUENTIAL, INCIDENTAL OR INDIRECT DAMAGES (INCLUDING DAMAGES FOR LOSS OF BUSINESS PROFITS, BUSINESS INTERRUPTION, LOSS OF BUSINESS INFORMATION, AND THE LIKE) ARISING OUT OF THE USE OR INABILITY TO USE THE APPLE SOFTWARE EVEN IF APPLE HAS BEEN ADVISED OF POSSIBILITY OF SUCH DAMAGES. BECAUSE SOME STATES DO NOT ALLOW THE EXCLUSION OR LIMITATION OF LIABILITY FOR CONSEQUENTIAL OR INCIDENTAL DAMAGES, THE ABOVE LIMITATIONS MAY NOT APPLY TO YOU. Bar Code Pro operates both on the Macintosh and Microsoft operating systems. Microsoft Windows is a registered trademark of Microsoft Corporation. An extension of MS-DOS, Microsoft Windows gives a standard look and feel to Bar Code Pro and all other Windows programs. To run Bar Code Pro under Microsoft Windows, you need to license and install Microsoft Windows. Apple is a registered trademark of Apple Computer, Inc. PageMaker is a registered trademark of Adobe, Inc. PostScript is a trademark of Adobe, Inc. Macintosh is a trademark of Apple Computer, Inc. Windows 95 and Windows NT are trademarks of Microsoft Corporation. Bar Code Pro is a registered trademark of SNX Software Inc. All other trademarks are trademarks of their respective holders. All rights reserved. No part of this publication may be reproduced, stored in a retrieval system, or transmitted, in any form or by any means, electronic, mechanical, photocopying, recording, or otherwise, without the prior written permission of the publisher. Printed in the United States of America. ISBN 1-880773-35-X SNX Software Inc. 90 Park Avenue 32nd Floor New York, NY 10016 www.snx.com

3
Table Of Contents
Package Contents ................................................................................................4
Introduction .........................................................................................................5
The User Interface...............................................................................................6
Bar Code Basics ....................................................................................................9
Symbology, Application And Variation .............................................................10
Customizing Bar Code Pro .................................................................................11
Importing A Bar Code Into A Desktop Publishing Application.........................19
Serialization – How To Create A Series Of Bar Codes ......................................20
What Is Veribar..................................................................................................21
Working With Templates ..................................................................................22
Index By Topic ....................................................................................................23
Contacting SNX Software Inc. ...........................................................................23
We encourage you to obtain the industry guidelines and/or standards set by your own industry. While we have made every effort to insure perfect dimensionality and quality graphics, Bar Code Pro can only do what is requested of it. You have the ultimate responsibility of using it properly. This manual is no substitute for the guidelines and specifications that you need to produce bar code to meet your own industry’s standards. Since Bar Code Pro is used by virtually every industry type, that information is too voluminous and changes too frequently to be contained herein. Always check your work before using bar code graphics in production.

4
Package Contents
Bar Code Pro Installer installs the software
After installation you should see the following items on your hard drive:
Bar Code Pro 6.0 (Folder) the software
Bar Code Pro the application
Bar Code Utilities (Folder) BCP6 Converter converts bar code
graphics from previous versions of *BCP to BCP 6.0
PGT (Folder) PGT patterns
BCP Manual.pdf the manual
ReadMe contains information added after the printing of this manual (if any)
Samples sample bar codes
Templates custom template(s)
created and saved in Bar Code Pro.
*Bar Code Pro

5
Introduction What Is Bar Code Pro?
Bar Code Pro is a software application that creates bar code graphics. The process involves selecting a symbology and variation, entering the data and clicking Save.
Of course, if you must alter any of the different variables of the bar code graphic, you may. Bar Code Pro does all of the work for you -- sizing the bars and spaces, calculating check-digits, adding quiet-zones, narrowing the bars to print perfectly on your printer and saving it as a graphic file.
Because Bar Code Pro makes bar code creation so simple, you can create custom bar codes for virtually any application.
How To Install Bar Code Pro?
We recommend that you close all applications and back up your work, if necessary, before installing Bar Code Pro. Make sure your serial number is accessible before installing the application; you can find the serial number in the confirmation email after purchase or on the CD sleeve. Insert the Bar Code Pro CD into your CD-ROM drive and double-click on Bar Code Pro 6.0 icon. You will be taken through the registration process. An Internet connection is required. You will also be required to have an email address.
After registering, double-click on Bar Code Pro Installer and follow the on-screen instructions.
For more detailed information about installation, please see the ReadMe file that is included on the CD or contact Technical Support.

6
The User Interface
The main window of Bar Code Pro opens when a user launches the program. The window provides access to all dialogs that affect the content of a bar code symbol.
The window is divided into four parts: the toolbar, popup menus, data entry and information window.
Title Bar Toolbar Popup Menus Variation Wizard 1 Close 5 Preferences 13 Symbology 18 Variation Wizard 2 Minimize 6 Symbol 14 Variation 3 Maximize 7 Text 4 Title 8 Additional Text Data Entry Fields Veribar 9 Color 15 Text Edit 19 Veribar ON/OFF 10 Serialization 16 Check Digit 11 Information 17 Add-On Text Edit 12 Save

7
Toolbar
The toolbar has eight buttons which give you access to all settings that affect a bar code symbol. The toolbar was designed to facilitate a logical flow in the bar code graphic creation process. These steps can be taken in any order.
Preferences: allows you to customize Bar Code Pro.
Symbol: provides settings that affect the bar code’s dimensionality.
Text: provides settings that affect the bar code’s human- readable text.
Additional Text: allows you to add additional text to the bar code’s graphic.
Color: provides settings that affect the bar code’s color.
Serialization: allows you to create a series of bar codes.
Information: allows you to preview the entire bar code graphic.
Save: allows you to save bar code graphic files.
NOTE: These dialogues can be accessed from the Barcode menu located in the desktop menu bar at the top of your screen.
Select the Help Menu to access Bar Code Pro’s Help and additional information, such as, check for new version, purchase additional copies, technical support and update customer database. Click the Variation Wizard button to see a sample and a brief description of the current variation.
8
Popup Menus
The popup menus allow the user to select either a symbology or an application, and variation.
Data Entry
After selecting a bar code symbology and variation, enter the data to be encoded. For each variation with the exception of FIM, two or three separate text edit fields appear. Except for Preferences, all buttons remain dimmed until the data is entered.
If a new symbology or variation is selected, any mandatory leading characters appear in the text edit field before the flashing cursor.
When Bar Code Pro is launched, the data from the last session appears in the text edit fields. As you begin entering new data, this data is replaced with new data.
Information
The Information Window allows the user to see a preview of the bar code graphic. Whenever the bar code appears in the information window, the minimum requirements have been met for Bar Code Pro to create a bar code.

9
Bar Code Basics What Is A Bar Code?
A bar code is a pattern of bars and spaces which represent numbers, letters, or characters.
What Does The Bar Code Represent
The pattern of black and white, thick and thin, bars and spaces carry the “message” representing the data. A typical bar code may hold ten to twenty characters.
Elements Of A Bar Code
All bar code symbologies share common elements which make up the symbol. These are the bars and spaces, the human-readables, and the quiet zone.
Bars and Spaces: The information contained in a bar code symbol is encoded in the bar and space pattern. Each symbology uses a different algorithm to create these patterns. The bars and spaces are readable by machine.
Human-Readables: This is usually the data represented by the bars and spaces, printed as text, for people to read.
The Quiet Zone: This is the clear area before and after the bars and spaces. A bar code cannot be read without quiet zones.

10
Symbology, Application and Variation
Symbology is a specific bar code language. Each bar code Symbology has advantages and disadvantages. Depending upon the inherent features of the bar code and what you need it to do, selecting the right symbology for the job is the most important decision you need to make. The characters you want encoded, print quality and the amount of space available for the bar code are some of the factors that may help determine which bar code symbology to use.
Certain requirements may make one code more suitable than another. In some cases, only a single bar code symbology will do. In other cases, industry standards dictate which bar code symbology must be used. There are times when the end user is left to his own devices to determine which symbology works best.
We strongly recommend, before using Bar Code Pro, that you obtain the necessary guidelines for the bar code symbology(s) you will be using. Application. A bar code application is a specific area of industry and/or business where bar codes can be applied in specified formats or variations. For example, PAPS (Pre-Arrival Processing System) is an application and it has been defined, in four different formats, for controlling US bound commercial vehicles. An application may have bar codes from different symbologies. For example, HIBC (Health Industry Bar Code) uses both Code 128 and Code 39 as its choices in defined formats.
Variation is a set of specifications that limit and create a unique use for a symbology. LOGMARS, for example, is a variation of Code 39, most concerned about the height and wide/narrow ratio of the bars/spaces.

11
Customizing Bar Code Pro The Preferences dialog allows you to customize Bar Code Pro.
1. Click the Preferences button to bring up the Preferences dialog.
2. Set Format, Unit of measure, File Name and Sound.
Check the Show measurement labels check box to draw arrows and measurements in the current Unit of Measure.
Format refers to the file format of the saved bar code. The three format options are EPS, PICT and PDF. EPS (Encapsulated PostScript) generates the highest quality bar code symbols and is used by most desktop publishing applications. PICT graphics are limited to resolution 72 dpi. PDF is standard for the electronic distribution and viewing of graphics. When

12
selecting a file format, you need to consider the intended application of the graphic.
Unit of measure refers to the measurements used to describe size, distance or dimensions in the various dialogs throughout the program. File Name refers to the name given to the bar code graphic when saving.
Select a Sound that you want to hear each time the program is launched.
Factory Reset allows you to return the program to its original state.

13
How To Create A Bar Code
The process of creating bar code requires setting options, entering data and saving. You can edit the bar code by accessing the buttons on the toolbar.
1. Double click Bar Code Pro icon. Bar Code Pro icon is located in the Bar Code Pro 6.0 folder on your hard drive.
2. Select the Symbology or Application and Variation from the Popup Menus. In this example, we selected UPC (A) for the symbology and UPC-A General for the variation.
3. Enter your numbers.
4. Click the Save button to save the bar code graphic.
NOTE: We encourage you to obtain the bar code guidelines and/or standards set by your own industry. Always check your work before using bar code graphics in production.

14
How To Edit The Text Of A Bar Code All settings related to human-readables are entered in the Text dialog which is accessed by selecting the Text button. 1. Click the Text button to bring up the Text dialog.
2. Select Type, options for particular bar code type, or options for treatment of check digits, spaces, hyphens or text print location here. Options which are unavailable are dimmed.
3. Click OK when you have finished making your selections.
NOTE: If you wish to include additional information such as Date to a bar code symbol, select Bar Code: Add Specifications...

15
How To Edit Additional Text Of A Bar Code
Additional Text allows you to add an additional line of text to the bar code graphic such as price, item number or description. In the example below, we added “US$5.99 Can$7.99” centered, above the bar code. In this example, the US$5.99 is larger with bold text. Here is how it is done.
1. Click the Additional Text button to bring up the
Additional Text dialog.
2. In the Text edit field type “US$5.99” and in the Suffix edit
field type “Can$7.99”. Remember to enter a space character (or two) to separate the text.
3. Set the Text to Bold, 12 pt. and set the Suffix to 10 pt. Set Align: to Center.
4. Click OK when the Text appears in the Information
window.
NOTE: Select Use Human-Readables As Text to use the human-readables as the additional text. Selecting this option causes the human- readables to be entered into Additional Text edit field. This is a convenient way to duplicate the human-readables and prevent errors by eliminating the need to reenter the data.

16
How To Edit Bar Code Colors
Each bar code symbol has two colors: one for the bars and text, and another for the spaces and quiet zones.
1. Click the Color button to bring up the Color dialog.
2. Select Bars/Text to set the color of bars and text. Enter the
color’s name precisely as it is spelled. This is important if you want the color to be handled with other elements of your work as a simple spot color.
3. Select Type: Spot or Process here.
4. Select Model: RGB, HSL or CMYK here. Set color values for each component of a color model here. The right side of the Color Display shows results of your settings. Click OK to accept changes.
NOTE: If you want to change the color of the Spaces/Quiet Zone, select Spaces/Quiet Zone, enter the color’s name and follow step 4 above. Never use bar code graphics without verifying them first; especially if you are using color.

17
How To Preview A Bar Code
The Information button on the toolbar allows you to preview the bar code graphic.
1. Click the Information button.
2. The information dialog shown below appears with detail
data regarding the bar code graphic.
3. Click the Close Window button to return to the main
window.
NOTE: Check the information shown here carefully. These are codes, after all, and the specifications are not always readily apparent to the causal visual inspection of your work.

18
How To Save A Bar Code
The Save button on the toolbar allows you to save bar code graphic files.
1. Click the Save button.
2. A Save dialog appears with the graphic default name in the
Save As text field. Change the name if necessary.
3. Select a location from the Where popup menu and click Save.
NOTE: Double-check all of your settings, before saving by looking at the choices made in each dialog box. It is difficult, if not impossible, to see incorrect settings with the naked eye.
Do not alter the graphic by stretching, resizing, magnifying, rotating, scaling or compressing after it has been saved. That would spoil its dimensionality. If you need to make changes, use Bar Code Pro. Do not make changes manually in your desktop publishing program.
19
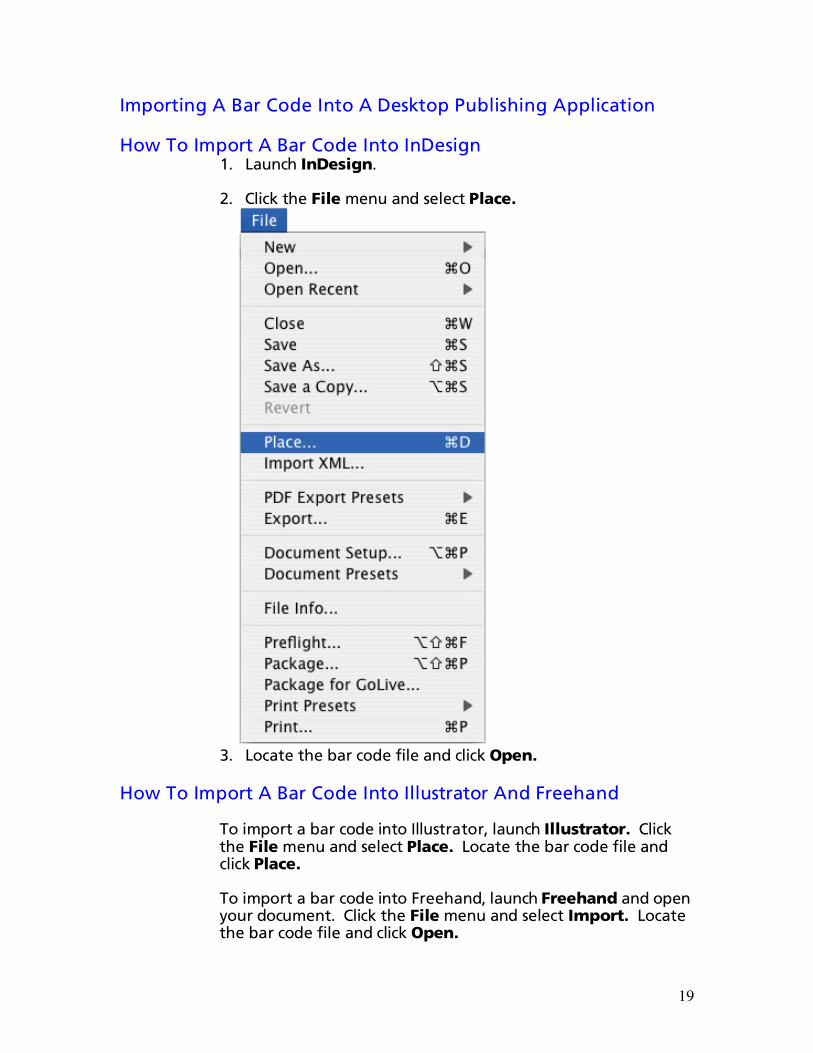
Importing A Bar Code Into A Desktop Publishing Application How To Import A Bar Code Into InDesign 1. Launch InDesign. 2. Click the File menu and select Place.
3. Locate the bar code file and click Open. How To Import A Bar Code Into Illustrator And Freehand
To import a bar code into Illustrator, launch Illustrator. Click the File menu and select Place. Locate the bar code file and click Place.
To import a bar code into Freehand, launch Freehand and open your document. Click the File menu and select Import. Locate the bar code file and click Open.

20
Serialization – How To Create A Series Of Bar Codes
One of the most frequently needed tasks in bar coding systems is serialization. Bar Code Pro provides great flexibility in this regard. Here is an example using Code 39 to create a series of five bar codes, starting with 1001.
1. Select the Symbology or Application and Variation from
the Popup Menus.
2. Enter your data. 3. Once the bar code appears in the information window, click the Serialization button.
4. Change the last number in the Stop field to 5 and click OK
when you are done. The Number in Series field will change to 5, indicating the total number of bar codes that will be created.
5. Click the Save button to save five bar code graphics.

21
What Is Veribar
Veribar is a print pattern, appearing as two rows of squares above the top of the symbol’s bars and spaces, running the width of the bar code symbol. Veribar allows you to determine a bar code’s dimensional accuracy by visual inspection. A magnifying lens is recommended for inspecting Veribar.
How To Use Veribar 1. Create the bar code and click on the Symbol button.
2. Select On from the Veribar popup menu and click OK.
3. Two lines of squares should now appear above to the top of the symbol’s bars and spaces.
4. Examine the checkerboard squares. If the corners of the
squares meet crisply and sharply, you have optimum quality. If they do not touch, the bar code is too thin. If they overlap, the bar code is too thick.

22
Working With Templates
Templates store all required settings for bar code graphics. Templates reside in the Templates folder as Bar Code Pro 6.0 application. Templates are a convenient way to store settings for future use.
How To Create A Template
1. Create a bar code.
2. Modify the bar code for your particular use. For example, you may wish to make a minimal height bar code and add a price. 3. After you have finished customizing your bar code, save it.
Saving a bar code is not the same as saving a template. 4. Select File: Save Template...
5. The Save dialog appears. Enter a name for the template and click OK.
NOTE: To use the template in the future, launch Bar Code Pro, select File: Open Template. Select the template and click Choose.

23
Index by Topic
A - B Add Specifications, 14 application, 10 Bar Code Basics, 9 Bar Code Colors, 16 Bar Code Pro, 5 Bars and Spaces, 9
C - D Colors, 16 Create A Bar Code, 13 Customizing, 11 Data Entry, 8
E - H Edit, 14 Edit Additional text, 15
Freehand, 19 Help, 6 Human-Readables, 9
I Illustrator, 19 Import, 19 InDesign, 19 Information, 7, 8, 15, 17 Install, 5 Introduction, 5
P Popup Menus, 8 Preview, 8, 17
S Save, 5, 7, 13, 18, 20, 22 Serialization, 7, 20 Symbol, 7 Symbology, 10, 13, 20
T Templates, 4, 22 The Quiet Zone, 9 Toolbar, 7
U - V User Interface, 6 Variation, 10, 13, 20 Variation Wizard, 7 Veribar, 21
Contacting SNX Software Inc. If for any reason, you need additional information concerning the performance or operation of Bar Code Pro please call or write SNX. To write SNX.: SNX 90 Park Avenue 32nd Floor New York, NY 10016 To call: (718) 499-6293 E-mail: [email protected] Website URL: www.snx.com SNX is genuinely interested in producing useful, quality software. If you are pleased with the program, please pass the word along to others. If you feel that it can be improved, let us hear from you. Thank you for your support.