arty s7: spartan 7 fpga board for makers and hobbyists · ... and instead is used by those familiar...
TRANSCRIPT

Arty S7: Spartan-7 FPGA Board for Makers and Hobbyists
410-352
The Arty S7 board features the new Xilinx Spartan-7 FPGA and is the latest member of the Arty FPGA
development board family from Digilent. The Spartan-7 FPGA offers the most size, performance, and
cost-conscious design engineered with the latest technologies from Xilinx and is fully compatible with
Vivado Design Suite. Putting this FPGA in the Arty form factor provides users with a wide variety of I/O
and expansion options. Use the dual row Arduino® connectors to mount one of the hundreds of hardware
compatible shields available, or use the Pmod ports with Digilent's pre-made Pmod IP blocks for a more
streamlined design experience. Arty S7 was designed to be MicroBlaze ready and comes out of the box
ready to use with the free Xilinx WebPack version of Vivado Design Suite.
Features
Xilinx Spartan-7 50 FPGA (xc7s50csga324-1) o 8,150 slices (each slice contains four 6-input LUTs and 8 flip-flops)
o 2,700 Kbits of fast block RAM
o Five clock management tiles, each with a phase-locked loop (PLL)
o 120 DSP slices
o Internal clock speeds exceeding 450MHz
o On-chip analog-to-digital converter (XADC)
o Programmable over JTAG and Quad-SPI Flash
Memory o 256MB DDR3L with a 16-bit bus @ 650MHz
o 16MB Quad-SPI Flash

Power o Powered from USB or any 7V-15V external power source
USB o USB-JTAG Programming circuitry
o USB-UART Bridge
Switches, Push-buttons, and LEDs o 4 Switches
o 4 Buttons
o 1 Reset Button
o 4 LEDs
o 2 RGB LEDs
Expansion Connectors o 4 Pmod ports
32 total FPGA I/O (16 shared with shield connector)
o Arduino/chipKIT Shield connector
45 total FPGA I/O (16 shared with Pmod connectors)
6 Single-ended 0-3.3V Analog inputs to XADC
3 Differential 0-1.0V Analog input pairs to XADC
Purchasing Options
The board is sold standalone, but requires either a micro USB cable or 7-15V external power supply to be
powered. The external power supply must have a coaxial, center-positive connector with 2.1 mm or 2.5
mm internal diameter. When purchased from Digilent, a micro USB cable or suitable 12V, 3A power
supply can added at the time of purchase.
You may see the Arty S7 referred to as the Arty S7-50 throughout some Digilent documentation. This is
to distinguish it from future variants of the Arty S7 that will be loaded with different versions of the
Spartan-7. These variants are not available yet.
Software Support
The Arty S7 is fully compatible with the high-performance Vivado ® Design Suite. It is supported under
the free WebPACK™ license, so designs can be implemented at no additional cost. This free license
includes the ability to create MicroBlaze™ soft-core processor designs, the Logic Analyzer, and High-
level Synthesis (HLS). The Logic Analyzer assists with debugging logic, and the HLS tool allows you to compile C code directly into HDL.
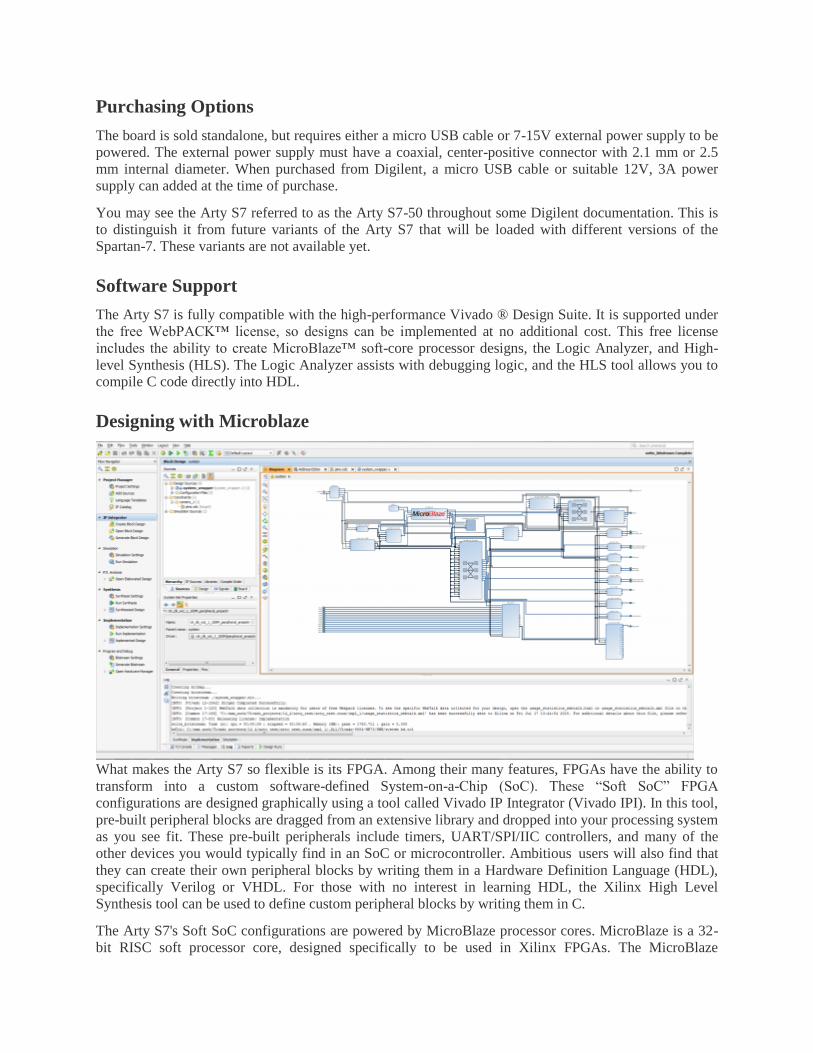
Designing with Microblaze
What makes the Arty S7 so flexible is its FPGA. Among their many features, FPGAs have the ability to
transform into a custom software-defined System-on-a-Chip (SoC). These “Soft SoC” FPGA
configurations are designed graphically using a tool called Vivado IP Integrator (Vivado IPI). In this tool,
pre-built peripheral blocks are dragged from an extensive library and dropped into your processing system
as you see fit. These pre-built peripherals include timers, UART/SPI/IIC controllers, and many of the
other devices you would typically find in an SoC or microcontroller. Ambitious users will also find that
they can create their own peripheral blocks by writing them in a Hardware Definition Language (HDL),
specifically Verilog or VHDL. For those with no interest in learning HDL, the Xilinx High Level
Synthesis tool can be used to define custom peripheral blocks by writing them in C.
The Arty S7's Soft SoC configurations are powered by MicroBlaze processor cores. MicroBlaze is a 32-
bit RISC soft processor core, designed specifically to be used in Xilinx FPGAs. The MicroBlaze
processor in an Arty S7 SoC configuration is typically run at 100 MHz, though it is possible to design
your SoC so that it can operate at over 200MHz. The Arty S7 supports large MicroBlaze programs with
demanding memory requirements by providing 16MB of non-volatile program memory and 256MB of DDR3L RAM.
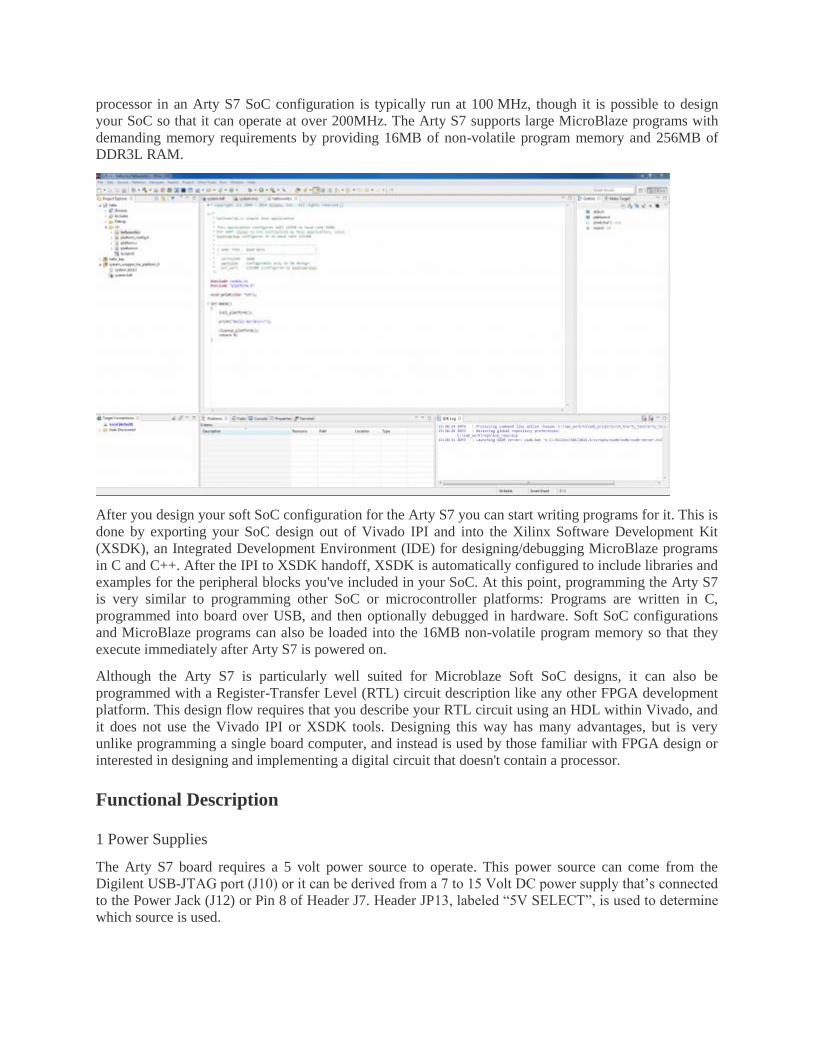
After you design your soft SoC configuration for the Arty S7 you can start writing programs for it. This is
done by exporting your SoC design out of Vivado IPI and into the Xilinx Software Development Kit
(XSDK), an Integrated Development Environment (IDE) for designing/debugging MicroBlaze programs
in C and C++. After the IPI to XSDK handoff, XSDK is automatically configured to include libraries and
examples for the peripheral blocks you've included in your SoC. At this point, programming the Arty S7
is very similar to programming other SoC or microcontroller platforms: Programs are written in C,
programmed into board over USB, and then optionally debugged in hardware. Soft SoC configurations
and MicroBlaze programs can also be loaded into the 16MB non-volatile program memory so that they
execute immediately after Arty S7 is powered on.
Although the Arty S7 is particularly well suited for Microblaze Soft SoC designs, it can also be
programmed with a Register-Transfer Level (RTL) circuit description like any other FPGA development
platform. This design flow requires that you describe your RTL circuit using an HDL within Vivado, and
it does not use the Vivado IPI or XSDK tools. Designing this way has many advantages, but is very
unlike programming a single board computer, and instead is used by those familiar with FPGA design or
interested in designing and implementing a digital circuit that doesn't contain a processor.
Functional Description
1 Power Supplies
The Arty S7 board requires a 5 volt power source to operate. This power source can come from the
Digilent USB-JTAG port (J10) or it can be derived from a 7 to 15 Volt DC power supply that’s connected
to the Power Jack (J12) or Pin 8 of Header J7. Header JP13, labeled “5V SELECT”, is used to determine
which source is used.
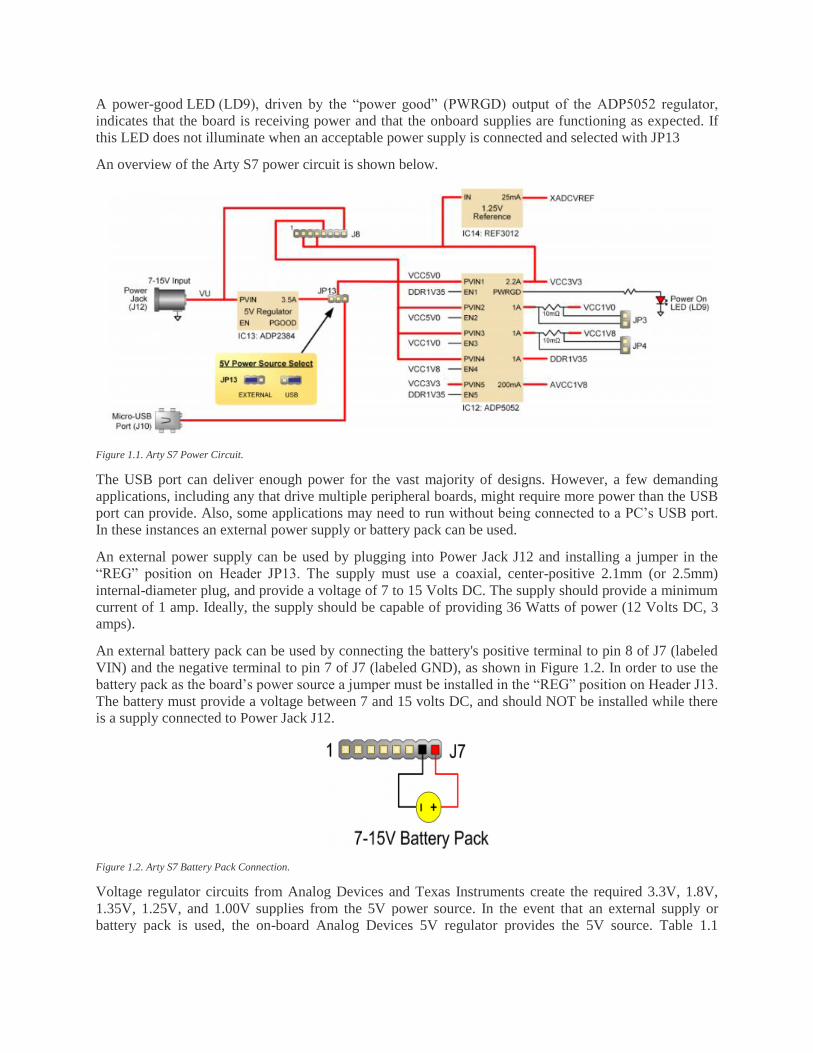
A power-good LED (LD9), driven by the “power good” (PWRGD) output of the ADP5052 regulator,
indicates that the board is receiving power and that the onboard supplies are functioning as expected. If
this LED does not illuminate when an acceptable power supply is connected and selected with JP13
An overview of the Arty S7 power circuit is shown below.
Figure 1.1. Arty S7 Power Circuit.
The USB port can deliver enough power for the vast majority of designs. However, a few demanding
applications, including any that drive multiple peripheral boards, might require more power than the USB
port can provide. Also, some applications may need to run without being connected to a PC’s USB port.
In these instances an external power supply or battery pack can be used.
An external power supply can be used by plugging into Power Jack J12 and installing a jumper in the
“REG” position on Header JP13. The supply must use a coaxial, center-positive 2.1mm (or 2.5mm)
internal-diameter plug, and provide a voltage of 7 to 15 Volts DC. The supply should provide a minimum
current of 1 amp. Ideally, the supply should be capable of providing 36 Watts of power (12 Volts DC, 3 amps).
An external battery pack can be used by connecting the battery's positive terminal to pin 8 of J7 (labeled
VIN) and the negative terminal to pin 7 of J7 (labeled GND), as shown in Figure 1.2. In order to use the
battery pack as the board’s power source a jumper must be installed in the “REG” position on Header J13.
The battery must provide a voltage between 7 and 15 volts DC, and should NOT be installed while there is a supply connected to Power Jack J12.
Figure 1.2. Arty S7 Battery Pack Connection.
Voltage regulator circuits from Analog Devices and Texas Instruments create the required 3.3V, 1.8V,
1.35V, 1.25V, and 1.00V supplies from the 5V power source. In the event that an external supply or
battery pack is used, the on-board Analog Devices 5V regulator provides the 5V source. Table 1.1

provides additional information (typical currents depend strongly on FPGA configuration and the values provided are typical of medium size/speed designs).
1.1 Current Monitoring
The 1.0V and 1.8V rails each have a 0.010 Ohm current sense resistor for monitoring the amount of
current being consumed by them. You can access them via JP3 for the 1.0V rail and JP4 for the 1.8V rail.
To calculate the current on each power rail, use Ohm's law with R=0.010 and V equal to the measured
voltage across the jumper. To measure the voltage you can use an external digital multimeter or
oscilloscope.
2 FPGA Configuration
After power-on, the Spartan-7 FPGA must be configured (or programmed) before it can perform any functions. You can configure the FPGA in one of two ways:
1. A PC can use the Digilent USB-JTAG circuitry (port J10) to program the FPGA any time the
power is on.
2. A file stored in the nonvolatile serial (SPI) flash device can be transferred to the FPGA using the
SPI port.
Figure 2.1. Arty S7 FPGA Configuration.

Figure 2.1 shows the different options available for configuring the FPGA. An on-board “mode” jumper (JP1) selects whether the FPGA will be programmed by the Quad-SPI flash on power up.
The FPGA configuration data is stored in files called bitstreams that have the .bit file extension. The
Vivado software from Xilinx can create bitstreams from VHDL, Verilog®, or block-level design.
Bitstreams are stored in volatile memory cells within the FPGA. This data defines the FPGA’s logic
functions and circuit connections, and it remains valid until it is erased by removing board power, by
pressing the reset button attached to the PROG input, or by writing a new configuration file using the
JTAG port.
A Spartan-7 50T bitstream is typically 17,536,096 bits. The time it takes to program the Arty S7 can be
decreased by compressing the bitstream before programming, and then allowing the FPGA to decompress
the bitstream itself during configuration. Depending on design complexity, compression ratios of 10x can
be achieved. Bitstream compression can be enabled within the Xilinx tools to occur during generation. For instructions on how to do this, consult the Xilinx documentation for the toolset being used.
After being successfully programmed, the FPGA will cause the “DONE” LED to illuminate. Pressing the
“PROG” button at any time will reset the configuration memory in the FPGA. After being reset, if JP1 is set then the FPGA will immediately attempt to reprogram itself from Quad SPI flash.
The following sections provide greater detail about programming the Arty S7 using the different methods available.
2.1 JTAG Configuration
The Xilinx tools typically communicate with FPGAs using the Test Access Port and Boundary-Scan
Architecture, commonly referred to as JTAG. During JTAG programming, a .bit file is transferred from
the PC to the FPGA using the onboard Digilent USB-JTAG circuitry (port J10) or an external JTAG
programmer, such as the Digilent JTAG-HS2, attached to port J9. You can perform JTAG programming
any time after the Arty S7 has been powered on, regardless of whether the mode jumper (JP1) is set. If the
FPGA is already configured, then the existing configuration is overwritten with the bitstream being
transmitted over JTAG. Not setting the mode jumper (seen in Figure 2.1) is useful to prevent the FPGA from being configured from Quad-SPI Flash until a JTAG programming occurs.
Programming the Arty S7 with an uncompressed bitstream using the on-board USB-JTAG circuitry usually takes around 6 seconds. JTAG programming can be done using the hardware manager in Vivado.
2.2 Quad-SPI Configuration
Since the FPGA's memory on the Arty S7 is volatile, it relies on the Quad-SPI flash memory to store the
configuration between power cycles. This configuration mode is called Master SPI. The blank FPGA
takes the role of master and reads the configuration file out of the flash device upon power-up. To that
effect, a configuration file needs to be downloaded first to the flash. When programming a non-volatile
flash device, a bitstream file is transferred to the flash in a two-step process. First, the FPGA is
programmed with a circuit that can program flash devices, and then data is transferred to the flash device
via the FPGA circuit (this complexity is hidden from the user by the Xilinx tools). This is called indirect
programming. After the flash device has been programmed, it can automatically configure the FPGA at a
subsequent power-on or reset event as determined by the mode jumper setting (see Figure 2.1).
Programming files stored in the flash device will remain until they are overwritten, regardless of power-cycle events.
Programming the flash can take as long as four to five minutes, which is mostly due to the lengthy erase
process inherent to the memory technology. Once written however, FPGA configuration can be very

fast—less than a second. Bitstream compression, SPI bus width, and configuration rate are factors
controlled by the Xilinx tools that can affect configuration speed. The Arty S7 supports x1, x2, and x4 bus
widths and data rates of up to 50 MHz for Quad-SPI programming.
Quad-SPI programming can be done using the hardware manager in Vivado.
3 DDR3L Memory
The Arty S7 includes one MT41K128M16JT-125 memory component, creating a single rank, 16-bit wide
interface. It is routed to a 1.35V-powered HR (High Range) FPGA bank with 50 ohm controlled single-
ended trace impedance. 50 ohm internal terminations in the FPGA are used to match the trace
characteristics. Similarly, on the memory side, on-die terminations (ODT) are used for impedance matching.
For proper operation of the memory, a memory controller and physical layer (PHY) interface needs to be
included in the FPGA design. The easiest way to accomplish this on the Arty S7 is to use the Xilinx 7-
series memory interface solutions core generated by the MIG (Memory Interface Generator) Wizard. The
MIG Wizard can generate a native FIFO-style or an AXI4 interface to connect to user logic. This
workflow allows the customization of several DDR parameters optimized for the particular application.
Table 3.1 below lists the MIG Wizard settings optimized for the Arty S7 (any settings not mentioned can
be left in default state).
For clocking, it is recommending that the System clock be set to “Single-ended”, and connected directly
to the onboard 100MHz oscillator on pin R2. The Reference clock should be set to “no buffer” and can be
connected to a 200 MHz clock generated from a clocking wizard elsewhere in the design. It is also
possible to generate the reference clock from the MIG itself by enabling “Select Additional Clocks” and
generating a clock with a 5007 ps period (199.69231 MHz). This clock will be within spec for the
reference clock requirements, and can be looped around back into the reference clock input of the MIG IP core.
The MIG Wizard will require the fixed pin-out of the memory signals to be entered and validated before
generating the IP core. For your convenience, an importable UCF file is provided on the Arty S7 resource
center to speed up this process.

Quad-SPI Flash
FPGA configuration files can be written to the Quad-SPI Flash (Spansion part number S25FL128S), and
setting the mode jumper will cause the FPGA to automatically read a configuration from this device at
power on. A Spartan-7 50T configuration file requires 17,536,096 bits of memory, leaving about 87% of
the flash device (or ~13.92 MB) available for user data. A common use for this extra memory is to store
Microblaze programs too big to fit in the onboard Block memory (typically 128 KB). These programs are
then loaded and executed using a smaller bootloader program that can fit in the block memory. It is
possible to automatically generate this bootloader, roll it into your bitstream, and then program the
bitstream and large microblaze program into the Quad SPI Flash using Xilinx SDK.
The contents of the memory can be manipulated by issuing certain commands on the SPI bus. The
implementation of this protocol is outside the scope of this document. Xilinx's AXI Quad SPI core can be
used to read/write the flash in a Microblaze design. Refer to Xilinx's product guide for this core to learn
more about using it, or to Spansion's datasheet for the flash device to learn how to implement a custom controller.
All signals in the SPI bus are general-purpose user I/O pins after FPGA configuration and can be used
like any other FPGA I/O, except for SCK. It can only be accessed by instantiating a special primitive
called STARTUPE2. The Xilinx AXI Quad SPI IP core has a configuration option that will automatically
instantiate the primitive for you, and this option should be enabled when using it with the Arty S7. For
information on instantiating the primitive from HDL, refer to the “Vivado Design Suite 7 Series FPGA and Zynq-7000 All Programmable SoC Libraries Guide” (UG953) from Xilinx.
Figure 4.1. Arty S7 SPI flash.
5 Oscillators/Clocks
The Arty S7 board includes a 12 MHz crystal oscillator connected to pin F14 (an MRCC input on bank
15) and a 100 MHz crystal oscillator connected to pin R2 (an MRCC input on bank 34).
The 12 MHz clock is intended to be used as a general purpose system clock. The clock can drive
MMCMs to generate clocks of various frequencies and with known phase relationships that may be
needed throughout a design. The 12 MHz input clock cannot directly drive a PLL because they have a
minimum input frequency of 19 MHz. Some rules restrict which MMCMs and PLLs may be driven by
the 12 MHz input clock. For a full description of these rules and of the capabilities of the Spartan-7
clocking resources, refer to the “7 Series FPGAs Clocking Resources User Guide” available from Xilinx.

Xilinx offers the Clocking Wizard IP core to help users generate the different clocks required for a
specific design. This wizard will properly instantiate the needed MMCMs and PLLs based on the desired
frequencies and phase relationships specified by the user. The wizard will then output an easy-to-use
wrapper component around these clocking resources that can be inserted into the user’s design. The
clocking wizard can be accessed from within the Vivado and IP Integrator tools.
The 100 MHz clock is intended to drive the system clock input of the Memory Interface Generator (MIG)
IP Core to allow for proper use of the DDR3L memory. Section 3 “DDR3L Memory” describes how to
use this clock properly with the MIG. For complete information on using the MIG, see the 7 Series
FPGAs Memory Interface Solutions User Guide (ug586) from Xilinx.
6 USB-UART Bridge (Serial Port)
The Arty S7 includes an FTDI FT2232HQ USB-UART bridge (attached to connector J10) that allows
you to use PC applications to communicate with the board using standard Windows COM port
commands. Free USB-COM port drivers, available from www.ftdichip.com under the “Virtual Com Port”
or VCP heading, convert USB packets to UART/serial port data. Serial port data is exchanged with the
FPGA using a two-wire serial port (TXD/RXD). After the drivers are installed, I/O commands can be
used from the PC directed to the COM port to produce serial data traffic on the V12 and R12 FPGA pins.
Two on-board status LEDs provide visual feedback on traffic flowing through the port: the
transmit LED (LD8) and the receive LED (LD7). Signal names that imply direction are from the point-of-
view of the DTE (Data Terminal Equipment), in this case the PC.
The FT2232HQ is also used as the controller for the Digilent USB-JTAG circuitry, but the USB-UART
and USB-JTAG functions behave entirely independent of one another. Programmers interested in using
the UART functionality of the FT2232 within their design do not need to worry about the JTAG circuitry
interfering with the UART data transfers, and vice-versa. The combination of these two features into a
single device allows the Arty S7 to be programmed, communicated with via UART, and powered from a
computer attached with a single Micro USB cable.
The CK_RST signal (see the Arty S7 Schematic) is also connected to the FT2232HQ device via JP2.
When JP2 is shorted, the FT2232HQ can trigger a Microblaze reset, mimicking the behavior of Arduino
and chipKIT boards when sketches are loaded. Note the CK_RST signal is also connected to the red
RESET button and the RST pin of J7 on the shield connector (these connections are not shown in Figure
6.1). It is recommended that this jumper is not shorted unless attempting to run Arduino IDE on Microblaze, because it can interfere with normal Microblaze function.
The connections between the FT2232HQ and the Spartan-7 are shown in Figure 6.1.
Figure 6.1. UART Connections.

7 Basic I/O
The Arty S7 board includes two tri-color LEDs, 4 switches, 4 push buttons, 4 individual LEDs, and a
reset button, as shown in Figure 8.1. The push buttons and slide switches are connected to the FPGA via
series resistors to prevent damage from inadvertent short circuits (a short circuit could occur if an FPGA
pin assigned to a push button or slide switch was inadvertently defined as an output). The four push
buttons are “momentary” switches that normally generate a low output when they are at rest, and a high
output only when they are pressed. Slide switches generate constant high or low inputs depending on their position.
The red reset button labeled “RESET” generates a high output when at rest and a low output when
pressed. The RESET button is intended to be used in Microblaze designs to reset the processor, but you
can also use it as a general purpose push button. Note that it is also tied to the RST pin on J7 of the shield
connector and to the FT2232 UART device via JP2, though these connections are not shown in the figure
below.
Figure 7.1. Arty S7 GPIO.
The four individual high-efficiency LEDs are anode-connected to the FPGA via 330-ohm resistors, so
they will turn on when a logic high voltage is applied to their respective I/O pin. Additional LEDs that are not user-accessible indicate power-on, FPGA programming status, and USB and Ethernet port status.
7.1 Tri-Color LEDs
The Arty S7 board contains two tri-color LEDs. Each tri-color LED has three input signals that drive the
cathodes of three smaller internal LEDs: one red, one blue, and one green. Driving the signal
corresponding to one of these colors high will illuminate the internal LED. The input signals are driven by
the FPGA through a transistor, which inverts the signals. Therefore, to light up the tri-color LED, the
corresponding signals need to be driven high. The tri-color LED will emit a color dependent on the
combination of internal LEDs that are currently being illuminated. For example, if the red and blue
signals are driven high and green is driven low, the tri-color LED will emit a purple color.

Note: Digilent strongly recommends the use of pulse-width modulation (PWM) when driving the tri-color
LEDs. Driving any of the inputs to a steady logic ‘1’ will result in the LED being illuminated at an
uncomfortably bright level. You can avoid this by ensuring that none of the tri-color signals are driven
with more than a 50% duty cycle. Using PWM also greatly expands the potential color palette of the tri-
color LED. Individually adjusting the duty cycle of each color between 50% and 0% causes the different colors to be illuminated at different intensities, allowing virtually any color to be displayed.
8 Pmod Connectors
Pmod connectors are 2×6, right-angle, 100-mil spaced female connectors that mate with standard 2×6 pin
headers. Each 12-pin Pmod connector provides two 3.3V VCC signals (pins 6 and 12), two Ground
signals (pins 5 and 11), and eight logic signals, as shown in Figure 8.1. The VCC and Ground pins can
deliver up to 1A of current, but care must be taken not to exceed any of the power budgets of the onboard
regulators or the external power supply (these are described in the “Power supplies” section).
Digilent produces a large collection of Pmod accessory boards that can attach to the Pmod expansion connectors to add ready-made functions like A/D’s, D/A’s, motor drivers, sensors, and other functions.
The Arty S7 has four Pmod connectors, some of which behave differently than others. Each Pmod
connector falls into one of two categories: standard or high-speed. Also, some Pmod connectors share
their connections with the inner rows of the shield connector, and should not be used at the same time as a
shield that requires those pins. Table 8.1 specifies which category each Pmod falls into, whether it shares
any pins with the shield connector, and also lists the FPGA pins they are connected to. The following sections describe the different types of Pmods.
Figure 8.1. Pmod connector.

8.1 Standard Pmod
The standard Pmod connectors are connected to the FPGA via 200 Ohm series resistors. The series
resistors prevent short circuits that can occur if the user accidentally drives a signal that is supposed to be
used as an input. The downside to this added protection is that these resistors can limit the maximum
switching speed of the data signals. If the Pmod being used does not require high-speed access, then the standard Pmod connector should be used to help prevent damage to the devices.
8.2 High-Speed Pmod
The High-speed Pmods use the standard Pmod connector, but have their data signals routed as
impedance matched differential pairs for maximum switching speeds. They have pads for
loading resistors for added protection, but the Arty S7 ships with these loaded as 0-Ohm shunts.
With the series resistors shunted, these Pmods offer no protection against short circuits, but allow
for much faster switching speeds. The signals are paired to the adjacent signals in the same row:
pins 1 and 2, pins 3 and 4, pins 7 and 8, and pins 9 and 10.
Traces are routed 100 ohm (+/- 10%) differential.
These connectors should be used only when high speed differential signaling is required or the
other Pmods are all occupied. If used as single-ended, coupled pairs may have significant
crosstalk. In applications where this is a concern, the standard Pmod connector shall be used.
Another option would be to ground one of the signals (drive it low from the FPGA) and use its
pair for the signal-ended signal.
Since the High-Speed Pmods have 0-ohm shunts instead of protection resistors, the operator
must take precaution to ensure that they do not cause any shorts.
9 Arduino/chipKIT Shield Connector
The Arty S7 can be connected to standard Arduino and chipKIT shields to add extended functionality.
Special care was taken while designing the Arty S7 to make sure it is compatible with the majority of
Arduino and chipKIT shields on the market. The shield connector has 45 pins connected to the FPGA for
general purpose Digital I/O. Due to the flexibility of FPGAs, it is possible to use these pins for just about
anything including digital read/write, SPI connections, UART connections, I2C connections, and PWM.
Six of these pins (labeled AN0-AN5) can also be used as single-ended analog inputs with an input range
of 0V-3.3V, and another four (labeled AN6-9) can be used as differential analog input pairs with an input
range of 0V-1.0V.
Note: The Arty S7 is not compatible with shields that output 5V digital or analog signals. Driving
pins on the Arty S7 shield connector above 5V may cause damage to the FPGA.
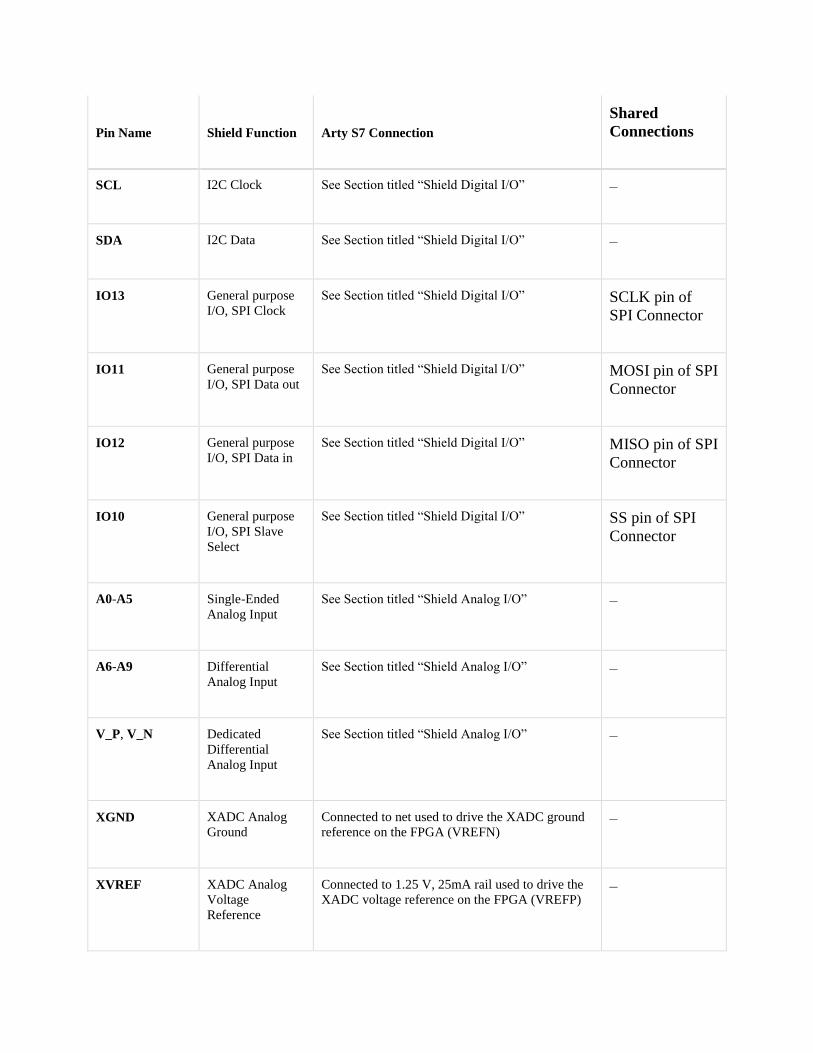
Figure 9.1 diagrams the pins found on the shield connector of the Arty S7.
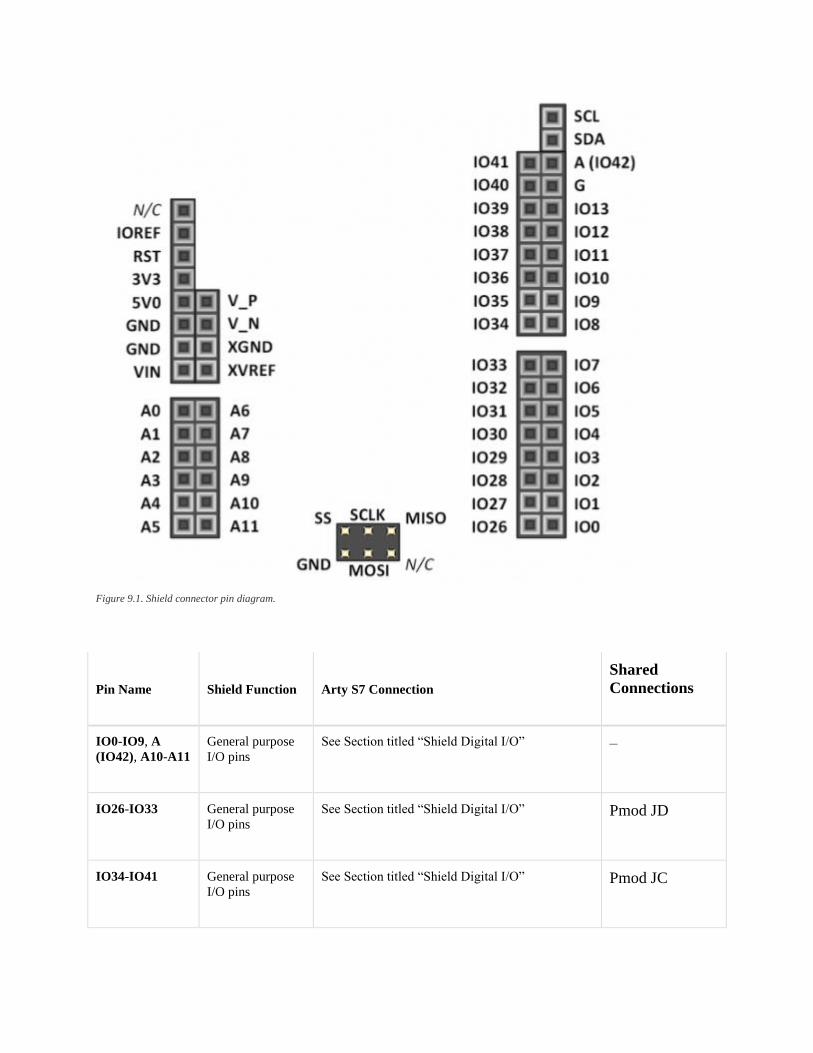
Figure 9.1. Shield connector pin diagram.
Pin Name Shield Function Arty S7 Connection
Shared
Connections
IO0-IO9, A
(IO42), A10-A11
General purpose
I/O pins
See Section titled “Shield Digital I/O” –
IO26-IO33 General purpose
I/O pins
See Section titled “Shield Digital I/O” Pmod JD
IO34-IO41 General purpose
I/O pins
See Section titled “Shield Digital I/O” Pmod JC
Pin Name Shield Function Arty S7 Connection
Shared
Connections
SCL I2C Clock See Section titled “Shield Digital I/O” –
SDA I2C Data See Section titled “Shield Digital I/O” –
IO13 General purpose
I/O, SPI Clock
See Section titled “Shield Digital I/O” SCLK pin of
SPI Connector
IO11 General purpose
I/O, SPI Data out
See Section titled “Shield Digital I/O” MOSI pin of SPI
Connector
IO12 General purpose
I/O, SPI Data in
See Section titled “Shield Digital I/O” MISO pin of SPI
Connector
IO10 General purpose
I/O, SPI Slave
Select
See Section titled “Shield Digital I/O” SS pin of SPI
Connector
A0-A5 Single-Ended
Analog Input
See Section titled “Shield Analog I/O” –
A6-A9 Differential
Analog Input
See Section titled “Shield Analog I/O” –
V_P, V_N Dedicated
Differential
Analog Input
See Section titled “Shield Analog I/O” –
XGND XADC Analog
Ground
Connected to net used to drive the XADC ground
reference on the FPGA (VREFN) –
XVREF XADC Analog
Voltage
Reference
Connected to 1.25 V, 25mA rail used to drive the
XADC voltage reference on the FPGA (VREFP) –
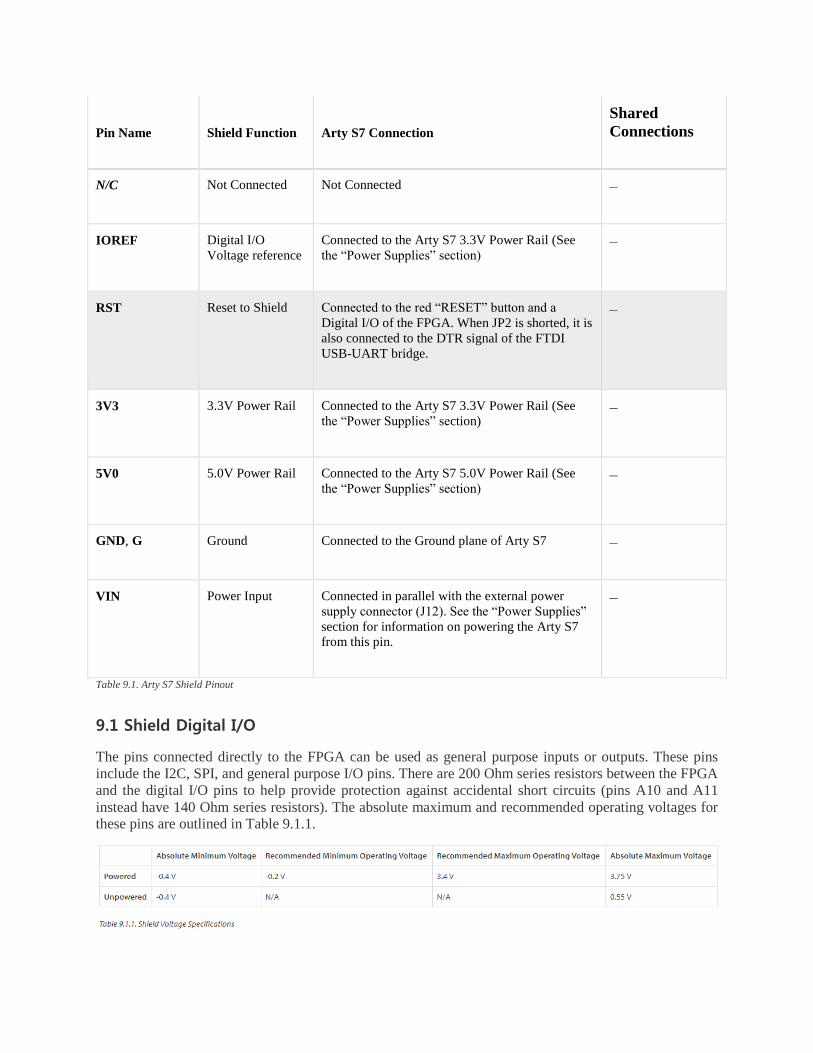
Pin Name Shield Function Arty S7 Connection
Shared
Connections
N/C Not Connected Not Connected –
IOREF Digital I/O
Voltage reference
Connected to the Arty S7 3.3V Power Rail (See
the “Power Supplies” section) –
RST Reset to Shield Connected to the red “RESET” button and a
Digital I/O of the FPGA. When JP2 is shorted, it is
also connected to the DTR signal of the FTDI
USB-UART bridge.
–
3V3 3.3V Power Rail Connected to the Arty S7 3.3V Power Rail (See
the “Power Supplies” section) –
5V0 5.0V Power Rail Connected to the Arty S7 5.0V Power Rail (See
the “Power Supplies” section) –
GND, G Ground Connected to the Ground plane of Arty S7 –
VIN Power Input Connected in parallel with the external power
supply connector (J12). See the “Power Supplies”
section for information on powering the Arty S7
from this pin.
–
Table 9.1. Arty S7 Shield Pinout
9.1 Shield Digital I/O
The pins connected directly to the FPGA can be used as general purpose inputs or outputs. These pins
include the I2C, SPI, and general purpose I/O pins. There are 200 Ohm series resistors between the FPGA
and the digital I/O pins to help provide protection against accidental short circuits (pins A10 and A11
instead have 140 Ohm series resistors). The absolute maximum and recommended operating voltages for these pins are outlined in Table 9.1.1.

The pins on the shield connector typically used for I2C signals are labeled as SCL and SDA. When using
these signals to implement an I2C bus it is necessary to attach a pull-up resistor to them. On the Arty S7,
this can be done by placing two shorting blocks horizontally across the J4 header.
9.2 Shield Analog I/O
The pins labeled A0-A9 and V_P/V_N are used as analog inputs to the XADC module of the FPGA. The
FPGA expects that the inputs range from 0-1 V. On the pins labeled A0-A5 we use an external circuit to
scale down the input voltage from 3.3V. This circuit is shown in Figure 9.2.1. This circuit allows the
XADC module to accurately measure any voltage between 0V and 3.3V (relative to the Arty S7's GND)
that is applied to any of these pins. If you wish to use the pins labeled A0-A5 as Digital inputs or outputs,
they are also connected directly to the FPGA before the resistor divider circuit (also shown in Figure 9.2.1).
Figure 9.2.1. Single-Ended Analog Inputs
The pins labeled A6-A9 are connected directly to 2 pairs of analog capable pins on the FPGA via an anti-
aliasing filter. This circuit is shown in Figure 9.2.2. These pairs of pins can be used as differential analog
inputs with a voltage difference between 0-1V. The even numbers are connected to the positive pins of
the pair and the odd numbers are connected to the negative pins (so A6 and A7 form an analog input pair
with A6 being positive and A7 being negative). Note that though the pads for the capacitor are present,
they are not loaded for these pins. Since the analog capable pins of the FPGA can also be used like
normal digital FPGA pins, it is also possible to use these pins for Digital I/O.
The pins labeled V_P and V_N are connected to the VP_0 and VN_0 dedicated analog inputs of the
FPGA. This pair of pins can also be used as a differential analog input with voltage between 0-1V, but
they cannot be used as Digital I/O. The capacitor in the circuit shown in Figure 9.2.2 for this pair of pins
is loaded on the Arty S7.
Figure 9.2.2. Differential Analog Inputs

The XADC core within the Spartan-7 is a dual channel 12-bit analog-to-digital converter capable of
operating at 1 MSPS. Either channel can be driven by any of the analog inputs connected to the shield
pins. The XADC core is controlled and accessed from a user design via the Dynamic Reconfiguration
Port (DRP). The DRP also provides access to voltage monitors that are present on each of the FPGA’s
power rails, and a temperature sensor that is internal to the FPGA. For more information on using the
XADC core, refer to the Xilinx document titled 7 Series FPGAs and Zynq-7000 All Programmable SoC
XADC Dual 12-Bit 1 MSPS Analog-to-Digital Converter. A demo that uses the XADC core is available
on the Arty S7 resource center.