anatomy and radiography wrist, hand, and fingers · · 2010-04-04trapezium and 1st metacarpal...
TRANSCRIPT

SCS Continuing EducationSCS Continuing Education
and and
Three Phase CEUsThree Phase CEUs
presents:presents:
Anatomy and Radiography Anatomy and Radiography
of the of the
Wrist, Hand, and FingersWrist, Hand, and Fingers
by Shane Smith PTA, RT(R)by Shane Smith PTA, RT(R)
Copyright © 2006

Introduction:Hello and welcome to this program from SCS Continuing SCS Continuing EducationEducation! Knowledge is the key to success for ourselves and our patients. This easy-to-use point and click program allows you to navigate through text and visual aides designed to provide a comprehensive view of the material covered. Please feel free to contact Shane SmithShane Smith at [email protected]@yahoo.com if you have any questions.
All images and artwork used in this program were obtained or drawn by Shane Smith.
Course Abstract and Objectives:
The objective of this home study course is to provide the
learner with a computer based tutorial that will give them the
means to learn the anatomy and radiography of the wrist,
hand and fingers. A mastery test will be administered at the
end of this home study course in order to ensure that
competency of the material has been achieved.

Anatomy and Radiography of the Anatomy and Radiography of the
Wrist, Hand and FingersWrist, Hand and Fingers
by Shane Smith PTA, RT(R)by Shane Smith PTA, RT(R)
Copyright © 2006

CHAPTERS:CHAPTERS:
Fundamentals of the Wrist and Fundamentals of the Wrist and HandHand...…pg 5
Bony Bony AnatomyAnatomy…………………………. pg 8
PositioningPositioning………………………………pg 15
Technical Technical GuidelinesGuidelines…………………....pg 30
MRIMRI…………………………………….. pg 32
Common Clinical Common Clinical FindingsFindings…………….. pg 39
CConclusiononclusion………………………………pg 48
TestTest……………………………………...pg 49
ReferencesReferences……………………………… pg 50

Fundamentals of theFundamentals of the
Wrist and HandWrist and Hand

Fundamentals of the Wrist and Hand:Fundamentals of the Wrist and Hand:
wrist complex: 20° extension and 10° ulnar deviation
MCP joint: 45° flexion
PIP joint: 30° flexion
DIP joint: slight flexion
In a rested position, the palm of the hand is concave. The thumb is located
90° to the fingers and is of particular importance to the dexterity of the hand.
Functional position of the wrist and hand has been determined to be:
1. ellipsoid (ovoid) joint: oval surface of one bone fits into an elliptical cavity of
another; biaxial, typically flexion/extension and abduction/adduction.
2. gliding joint: side to side or front to back slipping between nearly flat bones.
3. hinge joint: monaxial; flexion/extension.
4. saddle joint: biaxial; both bones contain concave and convex portions.
5. synovial joint: diathrotic; allows one or more types of free movement; contain
articular cartilage, synovial fluid, synovial membrane and a
fibrous capsule.
Let’s review the type of joints involved in the wrist and hand:

Fundamentals of the Wrist and Hand:Fundamentals of the Wrist and Hand:
radiocarpal (wrist)
intercarpal
carpometacarpal
(digits 2-5)
carpometacarpal
(thumb)
metacarpophalangeal
interphalangeal
radius and carpals
adjacent carpals
carpals and metacarpals
trapezium and 1st metacarpal
metacarpal and proximal
phalanx
adjacent phalanges
synovial; ellipsoid
synovial; gliding
synovial; gliding
synovial; saddle
synovial; gliding
synovial; hinge
Joint Bones involved TypeJoint Bones involved Type
radiocarpal jointintercarpal joint
carpometacarpal joint
metacarpophalangeal joint
interphalangeal joint

Bony AnatomyBony Anatomy

Let’s begin by reviewing the bones of the right wrist in Let’s begin by reviewing the bones of the right wrist in
anatomicalanatomical position:position:
Distal Row:Distal Row:
Proximal Row:Proximal Row:
1 2 34
67 8
radiusulna
Note: the ulna is not considered part of the wrist complex
and is named for identification purposes only.
1. Hamate (unciform)
2. Capitate ( os magnum)
3. Trapezoid (lesser multangular)
4. Trapezium (greater multangular)
5. Pisiform
6. Triquetral (triquetrum)
7. Lunate (semilunar)
8. Scaphoid (navicular)
5
Bony Anatomy:Bony Anatomy:

Let’s identify the bones of this PA view of the right wristLet’s identify the bones of this PA view of the right wrist::
Distal Row:Distal Row:
Proximal Row:Proximal Row:
5
Note: The PA wrist is obtained when the patient’s hand is
in a palm down position. This is not anatomical position
1. Hamate (unciform)
2. Capitate ( os magnum)
3. Trapezoid (lesser multangular)
4. Trapezium (greater multangular)
5. Pisiform
6. Triquetral (triquetrum)
7. Lunate (semilunar)
8. Scaphoid (navicular)
8
7
2
UlnarRadius
43 1
6 5
Bony Anatomy:Bony Anatomy:

Now let’s review the bones of the Now let’s review the bones of the right hand in right hand in anatomicalanatomical position:position:
Metacarpals:Metacarpals:
There are There are 55 metacarpals in metacarpals in the hand.the hand.
Phalanges:Phalanges:
Digits Digits 22--55 have a proximal, have a proximal, middle and distal phalanx. middle and distal phalanx. The thumb (The thumb (pollicispollicis) does ) does not consist of a middle not consist of a middle phalanx, however, it does phalanx, however, it does have two have two sesamoidsesamoid bones.bones.
Both the Metacarpal and Both the Metacarpal and Phalanx have articulating Phalanx have articulating surfaces; the surfaces; the headhead distally distally and the and the base base proximally. proximally.
sesamoid
bones
metacarpals
1
2345
phalanges
distal
phalanx
middle
phalanx
proximal
phalanx
head
base
Bony Anatomy:Bony Anatomy:
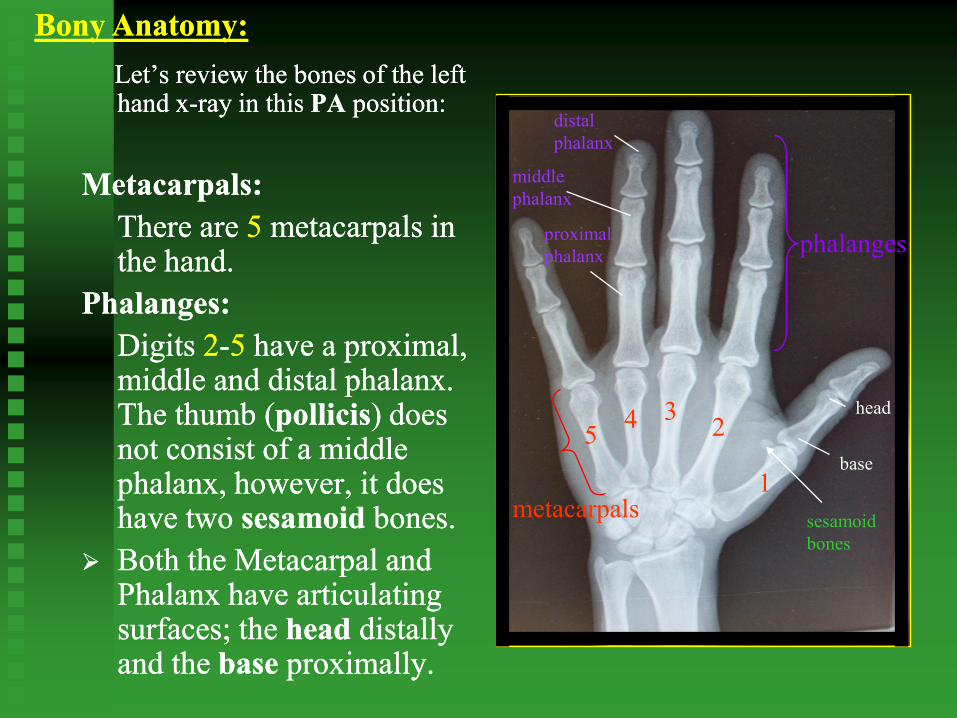
Let’s review the bones of the left Let’s review the bones of the left hand xhand x--ray in this ray in this PAPA position:position:
Metacarpals:Metacarpals:
There are There are 55 metacarpals in metacarpals in the hand.the hand.
Phalanges:Phalanges:
Digits Digits 22--55 have a proximal, have a proximal, middle and distal phalanx. middle and distal phalanx. The thumb (The thumb (pollicispollicis) does ) does not consist of a middle not consist of a middle phalanx, however, it does phalanx, however, it does have two have two sesamoidsesamoid bones.bones.
Both the Metacarpal and Both the Metacarpal and Phalanx have articulating Phalanx have articulating surfaces; the surfaces; the headhead distally distally and the and the base base proximally. proximally.
metacarpals
54 3
2
1
sesamoid
bones
distal
phalanx
middle
phalanx
proximal
phalanx
base
head
Bony Anatomy:Bony Anatomy:
phalanges
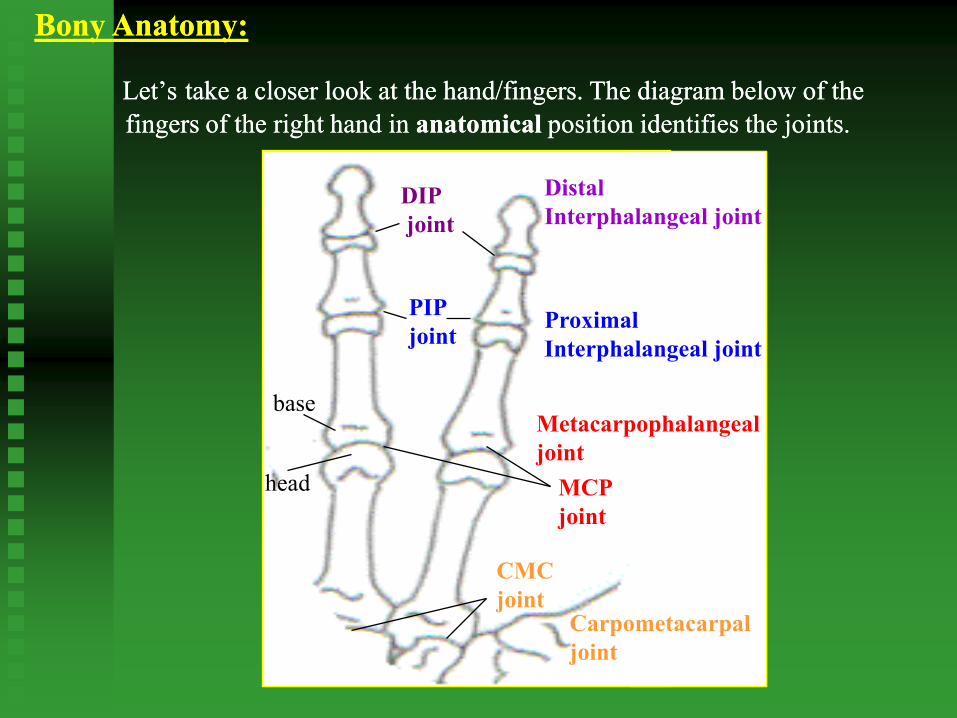
Let’sLet’s take a closer look at the hand/fingers. The diagram below of the take a closer look at the hand/fingers. The diagram below of the
fingers of the right hand in fingers of the right hand in anatomicalanatomical position identifies the joints. position identifies the joints.
DIP
joint
MCP
joint
PIP
joint
CMC
joint
head
base
Bony Anatomy:Bony Anatomy:
Distal
Interphalangeal joint
Proximal
Interphalangeal joint
Metacarpophalangeal
joint
Carpometacarpal
joint

The xThe x--ray below of the fingers of the left hand in a PA position identifies ray below of the fingers of the left hand in a PA position identifies
the jointsthe joints. .
DIP
joint
PIP
joint
MCP
joint
CMC
joint
head
base
Bony Anatomy:Bony Anatomy:

PositioningPositioning

Positioning:Positioning: General Guidelines:
always shield when possible; for the purpose of this program, shielding
should always be utilized for radiography of the wrist and hand.
use collimation; at minimum, collimation should not exceed the
cassette size.
make patient as comfortable as possible; some positions that the patient
must conform to and maintain in order for a diagnostic image to be
obtained can be difficult due to disease process, trauma, etc. It is important
to keep that in mind when positioning patients for an exam.
the body part should be parallel to the film; the central ray (centering)
should be perpendicular (90°) to the body part and the film.
remove any jewelry that will interfere with the anatomy being
radiographed.
Lead markers should be used to identify RIGHT or LEFT.

Positioning:Positioning: PA wrist:
• Place hand and wrist onto the cassette palm down.
• Center at the midcarpal area of the wrist.
• Include the distal radius and ulna, carpals and ½ of the
metacarpals.

Positioning:Positioning: PA Oblique wrist:
• Place hand and wrist onto the cassette at a 45° angle.
• Center at the midcarpal area of the wrist.
• Include the distal radius and ulna, carpals and ½ of the
metacarpals.

Positioning:Positioning: Lateral wrist:
• Place the wrist onto the cassette in a lateral (thumb
up) position.
• Center at the midcarpal area of the wrist.
• Include the distal radius and ulna, carpals and ½ of the
metacarpals.

Positioning:Positioning: PA Navicular:
• Place hand onto the cassette palm down with wrist in
ulnar deviation (flexion toward ulnar side).
• Angle tube 10° - 15° toward the elbow.
• Center at the navicular (scaphoid).
• Include the distal radius and ulna, carpals and proximal
metacarpals.

Positioning:Positioning: PA hand:
• Place pronated hand (palm down) onto the cassette.
• Center at the 3rd MP joint.
• Include the entire hand and distal radius and ulna.
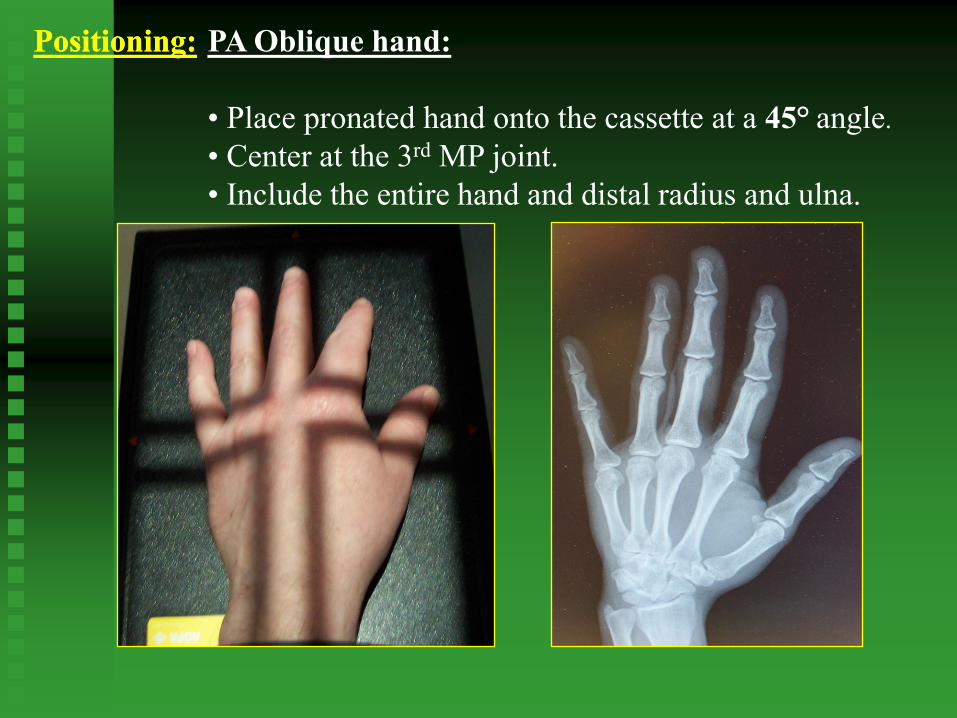
Positioning:Positioning: PA Oblique hand:
• Place pronated hand onto the cassette at a 45° angle.
• Center at the 3rd MP joint.
• Include the entire hand and distal radius and ulna.

Positioning:Positioning: Lateral hand:
• If possible, place hand in a “fan” lateral position
(recommended) onto the cassette.
• Center at the 2nd MP joint.
• Include the entire hand and distal radius and ulna.

Positioning:Positioning: PA finger:
• Place hand palm down onto the cassette.
• Center to the PIP joint.
• Include the entire finger and distal third of metacarpal.

Positioning:Positioning: PA Oblique finger:
• Place hand, palm facing down, onto the cassette at a
45° angle.
• Center at the PIP joint.
• Include the entire finger and distal third of metacarpal.

Positioning:Positioning: Lateral finger:
• A mediolateral projection is utilized for the 2nd finger.
• Place finger onto the cassette from a thumb-down lateral
position.
• A lateromedial projection is utilized for the 3rd, 4th and
5th fingers.
• Place finger parallel to the cassette from a thumb-up lateral
position.
• Center to the PIP joint.
• Include the entire finger and MCP joint.

Positioning:Positioning: AP thumb:
• Internally rotate hand until the back of the thumb can
be placed onto the cassette.
• Center at the 1st MP joint.
• Include the entire thumb, CMC joint and trapezium.

Positioning:Positioning: PA Oblique thumb:
• Place hand palm down onto the cassette.
• Center at the 1st MP joint.
• Include the entire thumb, CMC joint and trapezium.

Positioning:Positioning: Lateral thumb:
• Curl fingers and place hand onto the cassette.
• Center at the 1st MP joint.
• Include the entire thumb, CMC joint and trapezium.

Technical Technical
GuidelinesGuidelines

Technical Guidelines:Technical Guidelines:
Radiography of the hand and wrist is done at a 40 inch SID (source
image distance).
Radiographs of the wrist and hand are of better diagnostic quality
when an extremity cassette is utilized. CR (computerized radiography)
does not use conventional cassettes or film. Instead, a digitized plate is
utilized which can be programmed to act like an extremity cassette. The
difference is, however, that it is advised to only put one image per
cassette. Multiple images on one cassette do not always appear properly
and are difficult to “window” correctly.
Although x-ray machines vary, the general kVp ranges for radiography
of the wrist and hand is between 50-65 kVp.
Adjustments in kVp and MAs should be considered in cases involving
splints, casts, wraps, swelling, braces, etc.
Keep the body part as close to the cassette as possible in order to
reduce OID (object image distance).

MRIMRI

MRI:
A comprehensive explanation of MRI physics is outside the
scope of this program but in order to appreciate the
following slides and gain the most value from them, a
simplistic overview is provided.
Magnetic Resonance Imaging (MRI) is an imaging process
that utilizes a magnetic field to magnetize tissues of the body
in order to create a radio frequency signal (RF) that will, with
the assistance of coils and a computer, produce an image.
The magnetic field primarily affects tissues with an
adequate amount of hydrogen. A high concentration of
hydrogen will produce a strong signal and a bright area
on the image while a low concentration will produce
little or no signal. No signal will produce a black area
with the signals in between producing gray areas,
contrast.
Overview

MRI:
T1: on a T1 weighted image, fat is bright and water is dark.
PD: on a proton density image, water is bright and fat is
dark but the contrast between the two is less define.
T2: on a T2 weighted image, water is bright and fat is dark
but the contrast is greater.
T1 PD T2
dark
bright
fat
water
T1
PD
water
fat
Tissue Characteristics and Contrast:
One advantage to MRI is the ability to utilize the variety of
tissues in the body to produce contrast. The tissues of the body
are divided into three characteristics: T1, PD and T2. Images
produced in MRI are often described as being T1, PD or T2
“weighted.” Let’s use the diagram below to help define these
terms as they relate to the image that is produced.
T2

MRI: Coronal T2
ulna
lunate
triquetrum
hamatetrapezoid
capitate
navicular
radius
metacarpalThe coronal view of
the wrist in MRI is
comparable to the PA
view of the wrist in
x-ray. The image to
the right is one slice of
a coronal sequence.

MRI: Sagittal T1
radius
lunate
metacarpal
capitate
flexor
digitorum
profundus
tendon
extensor
digitorum
tendon
The sagittal view of
the wrist in MRI is
comparable to the
lateral view of the
wrist in x-ray. The
image to the right is
one slice of a sagittal
sequence.

MRI: Axial PD_T2
hamatehook of hamate
capitate
trapezoid
pisiform
trapezium metacarpal
median
nerve
The axial view of the
wrist in MRI has no
comparable view in x-
ray. The axial slice is
similar to slices in a
loaf of bread. The
image to the right is
one slice of an axial
sequence through the
distal carpal row.

MRI: Axial T2
lunate
navicular
triquetrum
extendor carpi
radialis brevis
tendon
extensor carpi
radialis longus
tendon
extendor carpi
ulnaris tendon
flexor carpi
radialis tendon
flexor pollicis
longus
tendon
flexor
digitorum
superficialis
tendons
flexor digitorum
profunus tendons
The axial view of the
wrist in MRI has no
comparable view in x-
ray. The axial slice is
similar to slices in a
loaf of bread. The
image to the right is
one slice of an axial
sequence through the
proximal carpal row.

Common Clinical Common Clinical
FindingsFindings

Common Clinical Findings:
Now that we’ve reviewed and understand the basic structure of the wrist
and hand, let’s review some of the common clinical findings.
1. Colles’ Fracture
- a fall on an outstretched hand produces a supinating force on the
wrist as the forearm pronates under the weight of the body; results
in a transverse fracture of the distal radius with a displacement of
the hand backward and outward; this combination produces a
dinner fork deformity
- Rx: ice (swelling), splint, cast (closed reduction) or pins (external
fixation)
2. Dupuytren’s Contracture
-a painless thickening and contracture of the palmar fascia due to fibrous
proliferation; results in flexion deformities of the finger(s) into the palm
with loss of function (extension) of the finger(s) involved; associated
with liver disease and long term use of phenytoin
-Rx: surgery

3. Carpal Tunnel Syndrome3. Carpal Tunnel Syndrome
--compression of the median nerve between the flexor tendons and the compression of the median nerve between the flexor tendons and the
transverse carpal ligament; primarily found in patients with history oftransverse carpal ligament; primarily found in patients with history of
prolonged (repetitive) manual work with hands (specifically wrist prolonged (repetitive) manual work with hands (specifically wrist
flexion) which puts pressure on the flexor retinaculum; results in pain flexion) which puts pressure on the flexor retinaculum; results in pain
and/or numbness which may radiate up armand/or numbness which may radiate up arm
--Phalen’s Test: hold wrist hyperflexion x 1 minute; positive test if Phalen’s Test: hold wrist hyperflexion x 1 minute; positive test if
sensation changes resultsensation changes result
--Tinel’s Sign: tap flexor retinaculum; results in tingling sensationTinel’s Sign: tap flexor retinaculum; results in tingling sensation
if median nerve is compressedif median nerve is compressed
--Rx: rest, temporary splinting, surgery, NSAIDs, iontophoresis, ice, heat Rx: rest, temporary splinting, surgery, NSAIDs, iontophoresis, ice, heat
Common Clinical Findings:

4. Swan Neck Deformity
-hyperextension of the PIP joint and flexion of the DIP joint as a result of
damage (frequently from rheumatoid arthritis) that causes hypermobility
of the PIP joints and a migration of the lateral bands dorsally; results in
a loss of the normal balance of forces around the PIP joint; may result in
interossei muscles to become taunt
5. Boutonniere Deformity (“button hole”)
-contracture of hand musculature which results in flexion of the PIP joint
and hyperextension of the the DIP joint; results in a decrease of extensor
power at the DIP joint
Common Clinical Findings:

6. Arthritic Changes
-Osteoarthritis: degeneration of articular cartilage so that the bony ends
touch; friction between the bones worsens the condition; slow,
symmetrical development of stiffness with minimal pain unless it is
associated with trauma; usually associated with varus deformity in the
IP joints distal to proximal
-Rheumatoid Arthritis: an autoimmune disease in which the immune
system attacks its own cartilage and joint linings; usually occurs bilat-
erally; painful decreases in motion with varying degrees of inflammation;
results in ulnar drift of fingers, crepitus and ankylosis (immobility of a
joint) in wrist flexion
Common Clinical Findings:
7. Boxer’s fracture
-fracture of the head of the 5th metacarpal.

Common Clinical Findings:
fracture base
of 5th
metacarpal

Common Clinical Findings:
fracture base
of 1st
metacarpal
Oblique hand with pins Lateral hand with pins and cast

Common Clinical Findings:
Boxer’s fractureBoxer’s fracture

Common Clinical Findings:
foreign body-
nail in soft tissue
of thumb
Conclusion:Conclusion:
Keep the body part as close to the cassette as possible in order to
reduce OID (object image distance).
Although x-ray machines vary, the general kVp ranges for radiography
of the wrist and hand is between 50-65 kVp.
The body part should be parallel to the film and the central ray
(centering) should be perpendicular (90°) to the body part and the film
unless otherwise indicated.
Always shield when possible; use collimation, identify LEFT or
RIGHT by utilizing lead markers, remove jewelry that may interfere
with anatomy and be conscious of patient comfort when positioning.
Radiography of the hand , fingers and wrist is done at a 40 inch SID
(source image distance).
Adjustments in kVp and MAs should be considered in cases involving
splints, casts, wraps, swelling, braces, etc.

Test:Test:
There are There are 6060 questions on this test. All answers can be questions on this test. All answers can be
found within the context of this program. The “hint” found within the context of this program. The “hint”
button located next to each question will provide you button located next to each question will provide you
the information needed to answer the question. At any the information needed to answer the question. At any
time during the test you may skip a question and return time during the test you may skip a question and return
to it later. You must successfully answer 70% of the to it later. You must successfully answer 70% of the
questions in order to receive credit for the course. To questions in order to receive credit for the course. To
access the test, please close out of this course by access the test, please close out of this course by
clicking the “x” in the top right corner.clicking the “x” in the top right corner.
Good luck!!!Good luck!!!

References:References:Norkin, Cynthia C. and Levangie, Pamela K.; Joint Structure & Function: A
Comprehensive Analysis, Second Edition, F.A. Davis Co. Philadelphia, PA. 1992
Hislop, Helen J. and Montgomery, Jacqueline; Daniels and Worthingham’s Muscle
Testing: Techniques of Manual Examination, Sixth Edition, W.B. Saunders Co.
Philadelphia, PA. 1995
Stalheim-Smith, Ann and Fitch, Greg K.; Understanding Human Anatomy and
Physiology, West Publishing Co. St. Paul, MN. 1993
Thomas, Clayton L.; Taber’s Cyclopedic Medical Dictionary, Seventeenth Edition,
F.A. Davis Co. Philadelphia, PA. 1993
Bontrager, Kenneth L.: Textbook of Radiographic Positioning and Related Anatomy,
Fourth Edition, Mosby Inc. St. Louis, MO. 1997
Tortora, Gerard J. and Grabowski, Sandra R.; Principles of Anatomy and Physiology,
Ninth Edition, John Wiley & Sons, Inc New York, NY. 2000
Stoller, David W.; Magnetic Resonance Imaging in Orthopaedics and Sports Medicine,
J.B. Lippincott Co. Philadelphia, PA. 1993
Sprawls, Perry; Magnetic Resonance Imaging Principles, Methods, and Techniques,
Medical Physics Publishing, Madison, WI. 2000