all hire manual - t s solutions ltd full manual.doc · web viewall hire. manual. t s solutions...
TRANSCRIPT

TSS
all Hire
Manual

all Hire
T S Solutions Limited 74 - 77 Station Road Workshops Station Road Kingswood Bristol BS15 4PJ Tel: 0844 800 1232 Email: [email protected] Website: www.tssweb.net
2

all Hire
CONTENTS
ACTIVE JOBS CHART 5
DIARY 7
CREATING A NEW JOB 9
CUSTOMER DETAILS 11
JOB DATES 15
CALENDAR 17
SITE ADDRESS/DELIVERY DETAILS 19
ENTERING ITEMS 21
SUB CONTRACTS 27
REPORTS 31
INVOICING 35
NOTE PAD 43
REFERENCES 44
3

all Hire
THINGS TO DO 47
IMAGE EDITOR 49
CREATING STOCK ITEMS & TRANSACTIONS 51
CONTACT MANAGER 59
EVENT MANAGER 69
VENUE MANAGER 74
STOCK AVAILABLE 78
STOCK SUMMARY SINGLE ITEM BY DAY 81
PLANNED RESOURCES 83
BUTTON BARS 89
CREATING A SIMPLE TOP CODE 93
Step By Step Guide to Creating a New Job 104
4

all Hire
Active Jobs Chart
The Active Jobs Chart gives an overall picture of what is happening in a particular period. By default it is set to appear on the screen every time you go into all-Hire. (This can be switched off in System Maintenance, User Preferences).
Blue Red Green
Blue In Build / Delivery
Blue / Red Line Finished Build but before Customer Use (Not used if Build dates are turned off.)
Red In Use By The Customer
Green / Red Line Customer finished with Equipment but before scheduled Return Use (Not used if Build dates are turned off.)
Green Breakdown/Collection
The names of the customers are shown down the left hand side with the dates you are currently looking at along the top.
You can change the date to look at any period either manually or by
clicking on the button. The buttons will move the period you are looking at backwards or forwards one week at a time respectively.
5

all HireBy default, only the Jobs which are Firm Bookings are shown on the Chart. You can also press the to show Enquiries (which will appear as a White bar) and the to show Cross Hires and Purchase Orders (which will appear in Dark Green below the Job which they were raised from.)
Clicking on the will expand the column with the Job Names in to include the Job Reference underneath.
Clicking on the will expand the column with the Job Names in to include the Job Reference underneath.
While you are in either of these views, an arrow pointing to the left or right indicates that the period of the job extends before/after the dates shown on the screen.
To open any of the jobs shown in the Chart, simply click the Mouse anywhere on the bar relating to that job and you will see the Job Summary screen.
If you leave the Active Jobs Chart open while you are working, or change
the dates, you can refresh the screen by clicking on the button on the left.
The button will allow you to limit what you can see on the Chart by the References. Click on the button, select the options you require and press OK. Your Chart will then show only the jobs that meet the criteria you have set.
6

all Hire
Diary
Each User that you have set up (see User Maintenance) shows in the diary on their own tab. This allows you to click on the person you want to see and only see their appointments, whereas the default All tab shows everything for everybody on one screen.
By default you will see the diary as a week to view. You can also change the view to show single day, 14 Days, 28 Days, or an entire year.
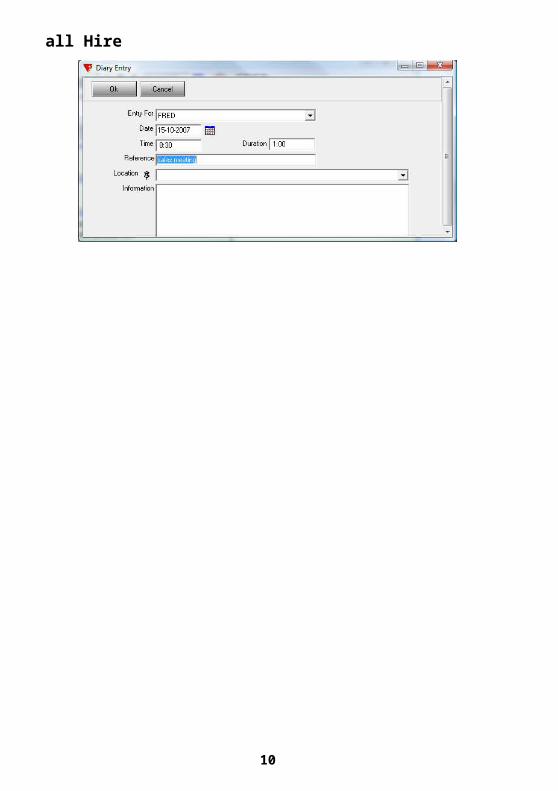
To add an entry for a specific user, click on their tab, then on the day the entry is for and then on the button at the top.
7

all HireBecause you had already selected the User and the date you required, these are set at the top. You can then enter the Time and Duration of the appointment. The Reference will appear next to the name of the User in the diary. Location and Information are fields that can be filled in for your information. They do not appear in the Diary as they would take up too much room.
When you entered all the relevant information press the OK button to return to the main Diary.
The new entry will now be in the User you created it for and also in the All Diary.
To view the information on one of the entries, double click it and it will bring up the screen used to enter the information. This can be amended by simply over-typing.
To Delete an entry, click on the relevant entry and then press the button. It will show you the Reference for the entry and give you the option to Cancel or Delete. Click the one you require.
Clicking the button will allow you to see To Do entries in the Diary.
Clicking the button will allow you to see Sub Contract deliveries / collections in the Diary.
8

all Hire
Creating A New Job
Clicking on this icon displays the Job screen. This is the master job screen and remains open as long as you are working on this job.
It shows the main details of the job to enable an instant review. In the
screen shown, the job is seen as an , (the default when creating a New Job), and it has a TMP number, (a temporary job number).
Closes the current Job and gives you the option to save it. If this is a New Job and you click No at this point, YOU WILL LOSE ALL THE INFORMATION YOU HAVE ENTERED.
This icon PERMANANTLY DELETES the job and CANNOT be undone.
The start and finish dates for the job.
Refreshes the screen to take into account any new changes.
Archives the current job instead of deleting it. If you didn’t get a particular job that you quoted for, or a job was cancelled, but you want to keep it in your records, this is the way to do it.
9
all HireAcross the top of the screen are the tabs relating to that job.
The order of entry for the relevant information for a job is NOT FIXED. You can enter it in the order, which suits you for each particular job.
10

all Hire
Customer Details
When creating a New Job, Job Reference will automatically show a temporary number (so that you can check availability without issuing a job number) and the Job Type will be set to Enquiry. To allocate a unique job number, click on the Job Reference button. This will issue the next available sequential number. If you prefer to use your own numbers, (which can be Alpha, Numeric or a combination of the two), you can simply over-type the TMP number.
The Job Type indicates the job status and a drop down box, which allows you to change this:
EnquiryFirm BookingCross HireOut Of Service
11

all HireEnquiry is used for the initial contact with the customer, right through the quotation stage and to the point that the job is booked.
A Firm Booking is used when the job is confirmed job, and you want to book the stock so that if anyone else tries to book it they will see any overbooking’s.
A Cross-Hire is created when you have sub-contracted stock in from a third party. Any items booked by this type will have their balance temporarily increased for the time period.
Out Of Service allows you to take stock, which cannot be used for a period of time (e.g. cleaning/repair) and temporarily book it as unavailable. You can create an Out Of Service Job for a particular item for a set period if you know how long it will be, or you can use a job with long date ranges to add damaged stock to and remove items once they have been repaired.
The Exp. date allows you to reserve the job for a period of time. Jobs that have a reserve date automatically appear in the Reserved Jobs screen. (This can be switched on in System Maintenance, User Preference).
The Name field should be used for the customer’s surname and Initials for their title and/or initials. (If using a Company Name, the Initials box should be left blank.)
If it is a regular customer, you may wish to use the Client button, which will retrieve all that customer’s information from your records.
12

all Hire
Type in the first letter or few letters of the name you want to trace and a list will be displayed. To activate a wider search, simply type in the information and press the Find button to activate the Find All searches.
Clicking on a name in the list displays the customer details in the bottom half of the screen. If these are the details you require click on the Select button you will return to the Job Details screen; their information will be inserted into the relevant fields.
To create a new Client see Contact Manager.
Address is the normal correspondence address. (Different Delivery and Invoice addresses are entered through the Site Address/Delivery Details and Invoicing screens respectively.)
Tel No, Fax No and Mobile No are simply entered in the appropriate fields.
Contact Name is usually the person you are liasing with and this would probably be the person to whom you would want to address any correspondence.
An E-Mail address can be added if you require
13

all HireFirst Contact Date is presumed to be the date on which the job is first entered onto the system but can be over-typed.
Next Contact Date can be entered or left blank. From this you can run a report of all those due to be contacted, and you may find it useful to know when to chase a quote or check on details before delivery. (It can be updated as the job progresses, although you may find it easier to use the To Do feature.)
The Order No. Is normally the customer’s Purchase Order Number and this field allows free input of alphanumeric characters.
The Event button allows you to link the Job to an event. When the button is selected the Event Find Screen is displayed.
The Event Information Box allows you to record more details about the event which can then be printed on customer paperwork - e.g. Wedding of Jane Smith and Andrew Brown to identify this specific Job.
To save the details you have entered click OK.
When the Job Type changes from an Enquiry to a Firm Booking, the program automatically checks the details have been registered in the Contact Manager. If you have not created a Contact for this customer you are taken automatically into the Client Locate screen. To enter the details, select the (Create New Contact) button. Enter the relevant information (see Contact Manager) and then press the OK button. Pressing the Select button then takes you back to the Job Details screen which you can now exit with the OK button as usual.
14

all Hire
Job Dates
On entering the dates for a New Job, they initially default to today's date. As you change the first date in a group, the others will be updated accordingly. The days are shown to the right to make planning easier.
You can enter the various dates by tabbing into the field and entering them manually or clicking their button and using the calendar to select the required date.
15

all Hire
The dates are used for the following:
Date of Delivery You have to option of selecting either Delivery (by you) or Collection (by the Customer) by using the drop-down box.
Earliest Delivery Time Enter any information that you require e.g. After 11am
Latest Enter any information that you require e.g. Before 4pm
End Of Build The date you expect to have all of the equipment on site and ready to use. (This field can be switched off if it is not relevant to you.)
First Date Of Use The first date that the customer wants to use the equipment.
Last Date Of Use The last date that the customer wants to use the equipment.
Start Of Removal The date you expect to begin removing equipment from site. (This field can be switched off if it is not relevant to you.)
End Of Removal The date you expect to have all of the equipment removed from site.
Earliest Collect Time Enter any information that you require e.g. After 11am
Latest Enter any information that you require e.g. Before 4pm
Date of Collection You have to option of selecting either Collection (by you) or Return (by the Customer) by using the drop-down box.
Clicking on OK saves the details and returns you to the Job screen.
16

all HireCalendar
Anywhere that you see the button, clicking on it will take you into the Calendar screen to make selecting a date easier.
If no date or today's date is in the box that you want to change, when you bring up the Calendar it will be today's date that is highlighted in Green.
To change the month click on the corresponding letter down the right-hand side of the screen or use the + and - buttons either side of the month at the top of the screen.
You can also change the year using the + and - buttons either side of the year at the top of the screen.
Now click on the day you require and it will fill in the box for you.
If you change your mind, use the X in the top right-hand corner to cancel the screen.
If a date is highlighted in Orange it means that it is a Bank Holiday or special day that you have defined. These should be set at the beginning of each year.
17

all HireTo do this, go into the calendar screen and click the button at the top of the list of months down the right-hand side (it is very small) and then click on the day that you want to set.
You will then see the Date Maintenance screen.
The date you are setting is shown at the top. In the Text box type in the text that you want to show at the bottom when you hover over this date.
The Charge Rate should be set to 1.00 unless you charge your customers a daily rate and do NOT want to charge them for the day you have selected, in which case it should be set to 0.00.
When you are happy click Close to save the change or the X in the top right to cancel.
You can then continue to set your Bank Holidays as long as the button is pressed down.
18

all Hire
Site Address/Delivery Details
The screen fields are initially blank. Selecting the Name button will display details already entered in the Contact Manager, as shown below:
This example shows some of the different addresses that may be available.
19

all HireThere is a free-type area at the bottom of the screen to enter any special Delivery Instructions.
20

all Hire
Entering Items
The first thing to check when entering this screen is that the dates at the top of the screen are the correct dates. (Out Date refers to when the stock would leave your premises and In Date is when you would expect it back.) If you are using this screen purely as an availability check, you will need to set the dates now.
To help you enter the items you require you have a choice of tabs in the bottom left hand corner, each with a different set of items on it which were set up when you entered your stock initially. The simplest way to select an item is to push the button which relates to it.
Alternatively, you can TAB down to the first code box, type the first part of the Code (if you know it) and press the TAB key.
This brings up the Stock Code – Find screen with the characters you typed and a list of all the items with codes that begin with them. When you have found the item you were looking for, press Select.
Once you have selected your item, Tab to fill in the Quantity at the bottom of the screen and change the Price if you want to or if no price is set for this item.
21

all Hire
The Discount box can be filled in as an amount or you can add a % sign to the end to give a percentage discount. This is an Item Discount and applies to the current item only. It should not be confused with an Overall Discount which is applied to all items that have the Discountable box ticked.
You can also change the settings for Charge Insurance and Dirty Wash for this item if you wish.
When you are happy with the quantity, price, etc. for this item, update it by either pressing the Return key on your keyboard or by clicking the small OK button towards the bottom right of the screen.
Should an Item be entered by mistake, click the right-hand mouse button on the item in the TOP half of the screen and choose Delete This Line from the menu.
To add an item between lines that are already there, highlight the item BELOW where you want to insert the new item, (again in the TOP half of the screen), click the right-hand mouse button and choose Insert Line Above. You must then click on the blank line so that it is highlighted BEFORE you select your new item.
To check to see if the stock you have selected is available without closing
the Job Items screen, click on the button. If the stock is available, you will see
22

all HireIf you are going to be short of some or all of the items you have selected, you will go to the Overbooked Stock screen.
Press Close to return to the Job Items screen.
NB
Pressing the Close button will close the screen, check the stock and SAVE your changes.
Pressing the Cancel button will NOT save your changes.
23

all HireMulti-Stock Select
If you want to select several items at once, e.g. all of your furniture, you
can click on the button at the bottom of the page to bring up the Stock Find - Multiple screen.
If you click the drop-down arrow in the Search Text box, you can select from you Groups, (e.g. Furniture) and will be shown a list of all of the items in this Group. Alternatively, you can type in a word you want to search for (e.g. Table), and it will bring up all of the items with the word Table in the Code, Description or Group.
24

all Hire
If you click on any of the items in the list, you can see how many of them are available for the period you have requested in the information at the top of the screen.
You can see that you have a balance of 299 Bistro Chairs. 272 of these are Available from 12-10-2007 to 18-10-2007 and although there are 15 more that are Returning between the 15th and 17th these can’t be utilized as the available balance drops again to 272 on 18th
25

all Hire
Enter the quantity you require for each item
The PRICE will be brought in automatically if you have set it up to do so; otherwise it will default to 0.00. You can over-type in either case. Enter the quantity you require in the Qty column and press OK.
This will take you back to the normal Job Items screen where you can add more stock if you require.
26

all HireSub Contracts
Whenever you see the Overbooked Stock screen, you have the option of dragging overbooked items into the Requires Attention column. By doing this, you are marking them to appear as a reminder in the Sub Contracts screen. To do this, simply click and hold the left-hand mouse button on the item that you want to mark and drag it from the Overbooked Stock column to the Requires Attention column. When you have moved all the items you require, press the button. (N.B. If you intend to sub contract a whole marquee, DO NOT move all of the parts - you can book it as a whole.)
Click on the button to go into the Purchase Order select screen.
In here you will see a list of any orders you have already raised. You will also see, at the bottom of the screen, the items you have dragged over earlier. The red on the left tells you that this item has not yet been ordered. (Once you order it, it will become a green .)
To amend / reprint an order raised previously, click on it in the list and press . To create a New Order press the button on the left-hand side.
27

all HireYou will now see
Click on the Order No button to issue the next Purchase Order Number.
If you require an additional reference, this should be entered in Order Reference.
The Order Date on a new order will default to today's date, but can be altered either by over-typing or clicking on the Calendar button.
Press the Supplier button to select an existing supplier or create a new one (Contact Manager)
On selecting the Supplier most of the information on the left-hand side will be filled in automatically. If you need to change any of the details for this order (e.g. Contact Name) simply overtype the details.
You MUST select the Style for this order to enable you to print out. (You may have several different styles.)
If you wish to keep a record of how the customer paid, enter it in Payment Method.
28

all Hire
The Delivery Date should be the date that you want your supplier to deliver or the date that you are collecting the equipment. The Times are optional.
The Event Date is filled in automatically from the Job Dates.
The Collect Date should be the date that you want your supplier to collect or the date that you are returning the equipment. The Times are optional.
IT IS VERY IMPORTANT THAT YOU ENTER DELIVERY & COLLECT DATES OR YOUR STOCK AVAILABILITY CHECKS COULD GIVE YOU INCORRECT RESULTS.
Authorised should be filled in by someone in your company who can authorise a Purchase Order.
When you receive confirmation from your supplier that they are able to fulfil your order, maybe at the same time that you are creating the order, fill in the Confirmed By and Confirmed Date fields. (If you do not, the icon by this order in the Purchase Order Select screen will remain a red instead of a green .)
The Information field can be used to pass on any other information the supplier may require about this order, or simply kept for internal information.
You can now choose the Order Type as General or Catering and also revise the Purchase Order by adding a new number so you can always see the new one or look back to an old one.
Once you have filled in as much of this info as you require, you can move to the Order Items tab.
29

all HireIn this screen you can:
Drag Items you selected in the Overbooked Stock screen to the top of the screen to order.Press the button to switch on your Button Bars Select items manuallyFree-type itemsAny combination of the above
You should enter the Quantity you require of each item, the Price you are paying for it, or full price and then any Discount you receive from your supplier, (in much the same way as entering Job Items). If you do not enter the price, it will not appear on your order and it will not be deducted from the nett value of the Job to give you a clearer picture of your profit on this job.
The Revenue box can be filled in with the total you are charging for the list of items to calculate the difference between what you are charging and what you are receiving for the item(s).
Once you have completed your list of order items you can change the Delivery Details if they are not the same as those for your customer or you can go straight to print your order using the View / Print button.
Once the order is on screen you can use the Print Setup button to change which printer you are using (this can be set to fax if you have that
option available) and the print using the button.
When you are happy with your order click the Close button
30

all Hire
Reports
Wherever you see the button you can run reports relevant to the screen you are in.
E.g. If you are in a Job and you click on the button it will bring up a list of all the reports that you may want to print for THIS JOB ONLY such as quote, order confirmation, load list etc.
The button on the main all Hire toolbar lets you access the General or System Wide Reports. These are not specific to any one job, order, resource etc. but are an overview. These would generally include things like Jobs commencing between selected dates, stock directory, overbooked stock and all purchase orders between selected dates.
31

all HireTo select a report simply click the box to the left of its' name to tick it. If you want to run more than one report then tick all of the ones you require. You can then:
Print to screen
Send direct to the printer
Send to a Word Processor so that you can edit the content.
Before you send the report to the printer, you can set the number of copies that you require using the box on the right-hand side.
To set the default printer for sending each of these reports DIRECTLY TO
THE PRINTER ONLY, click on the small button between the
button and the button. This will expand the screen to the right to show:
Put a tick in the box(es) of the report(s) you want to set then click on the printer in the list on the right and press the Set Default For Report button.
Press the button again to close the right-hand side of the screen.
32

all HireReports Maintenance - Authorised Users Only
If you have the rights to alter the reports in the list, clicking the right-hand mouse button on any reports screen will bring up the Reports Maintenance option. Click on this to go to the Reports Maintenance screen:
Whichever set of reports you have accessed this from (System, Active Job, Resource, etc.) will be highlighted in the left lower and the relevant reports listed in the left upper window.
The Name box (top right) shows you the name that appears in the list that you see to select the report. You can change this by simply clicking into the box and typing what you want to see.
Report, underneath this, shows the name of the Crystal Report that is used to produce the information. To change this / select a link for a new report click on the button, choose the one you want from the list and press Select.
33

all HireIf you have more than one Company under all Hire, you may want to make certain reports only Applicable To one of these companies. Use the drop down list to set each report.
When you set up your Users you have the option of setting a Report Security Level from 1 - 10 for each one. You can apply different Security Levels to each report so that only users with a high enough security level can access them.
Use the Copies box to set the default number of copies that will print of a particular report.
The Pre Process Type and Variable information is only used in advanced cases. If you need to use this we will direct you.
After each change be sure to press the Update button to show the changes at the top of the screen.
Click on Close when you have finished to return to the Reports screen.
34

all Hire
Invoicing
The Invoicing screen is used not only to set up the customer details for invoicing, but also Discount, Delivery / Collection charges, Insurance, and Settlement Discount.
These are all entered under the General Tab, together with the Invoice Address details. Discount and Insurance can both be entered as either a percentage or a fixed amount.
The normal setting for the Method box on the right-hand side of the screen is Default. This means that you will be raising the invoices for this job manually as they are required. If you have an on-going Job, you can set Method to Long Term and then fill in the information in the Long Term Set Up Tab. Likewise, if you agree to raise invoices for specific percentages on specific dates, set Method to Staged and fill in the information in the Staged Set Up Tab.
35

all Hire
Invoice Production
By default, the screen is set up to raise a Main Hire Invoice.
The Type is set to Main Hire Invoice and the Style will be whatever you have set to be used for a Main Hire Invoice. Any Discount, Insurance, Delivery / Collection, and Dirty Wash charges have been calculated and the total to be raised is calculated in the bottom right-hand corner of the screen. You can add Payment Terms in the box in the bottom left.
It is always advisable to PREVIEW an invoice before you print it in case you have forgotten something (e.g. extras that were ordered at the last minute, Insurance, Dirty Wash charges ).To do this simply click on the
button.
36

all Hire
This will bring the invoice to screen with an INVOICE NO. 0. This can be printed so that you can check it before raising it but it is NOT VALID AS AN INVOICE. The details will NOT be transferred to the customer account at this stage.If you are happy with the Preview, set the number of copies on the right-
hand side and then press the button to RAISE THE INVOICE.
NB EVERY TIME YOU PRESS THE BUTTON YOU WILL RAISE ANOTHER INVOICE AND ALLOCATE A NEW INVOICE NUMBER.
THIS SHOULD NOT BE USED TO OBTAIN A COPY OF AN INVOICE.
If you require a Copy of an invoice raised previously, double click the flashing red button on the far left of the screen, or click on the Previously Raised Invoices Tab. Select the invoice you require a copy of and press
the button. You can then print this using the button.
To raise a Deposit Invoice instead, change the Type to Deposit Invoice. This will automatically change the Style to the default you have set. (You can select a different Style by clicking the drop down and clicking the one you want in the list.)
A Deposit Invoice is not usually set up to show the items on the Job like a Main Hire Invoice, (although it can be if your report is changed to do so), but will only show the information that you type in at this point. Click in the Description box at the bottom of the screen, enter your text (e.g. 25% Deposit required to secure your booking), set the Qty to 1 and enter the Nett deposit you require in the Price box. (Vat will be added automatically.) Press the small OK button in the bottom right to update the information.
You can Preview this invoice in the same way as for a Main Hire Invoice, and Terms can again be added in the bottom left box.
37

all Hire
To raise any of the other types of invoice / credit note:DEPOSIT INVOICE:CREDIT NOTE:ADDITIONAL INVOICE:MAIN HIRE CREDIT:DEPOSIT INVOICE CREDIT:
You need to take a slightly different approach:
To raise a DEPOSIT INVOICE, for example.
Select DEPOSIT INVOICE from the drop down list in the top left-hand corner of the screen.
Free type whatever text you want to appear on the invoice, (e.g. Deposit required to secure booking), into the Description Section of the box in the bottom left hand corner of the screen.
Give it a QTY of 1, accept the default STD VAT rate or change it as required, and enter a NETT AMOUNT, e.g. 250.00.
38

all Hire
The SCREEN now looks like this:
The totals in the bottom right hand corner indicate the amount that the Deposit Invoice will be raised for. Raising this Invoice will affect the amount that the Main Hire Invoice will then be raised for.
If you leave the UPDATE STOCK box ticked (next to Terms Section), the stock levels will be reduced automatically.
The Settlement Disc. facility allows you to enter a % Discount that will be given if the invoice is paid within x days.
Again, this will not appear as standard on invoices, but can be made to do so if you wish to use it.
39

all HireLong Term Setup
If you have jobs which are out for long or indefinite periods and you invoice them weekly, monthly, quarterly, etc. you can set the job up to be invoiced automatically when it is due.
Click on the Long Term Set Up tab and you will see:
In the top left you can set whether you want Delivery, Collection, and Insurance to be split across all of the
40

all HireStaged Setup
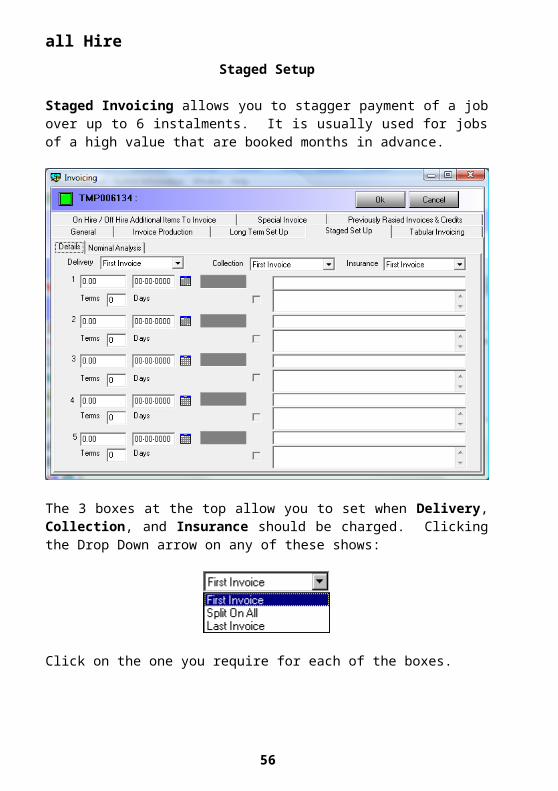
Staged Invoicing allows you to stagger payment of a job over up to 6 instalments. It is usually used for jobs of a high value that are booked months in advance.
The 3 boxes at the top allow you to set when Delivery, Collection, and Insurance should be charged. Clicking the Drop Down arrow on any of these shows:
Click on the one you require for each of the boxes.
41

all HireYou can then set the percentage of the total value that you want to raise each individual invoice for. These must add up to 100, but can be any combination, e.g.
Invoice % % %1 25 15 102 25 15 253 50 10 254 20 255 20 156 20
You can also set the Date that each of the invoices should be raised, and the text that you wish to appear on each of these invoices in the boxes on the right. The top of the 2 boxes for each invoice is for the text that will have the price against it, and the lower one is for you to add any additional text that you may require.
The first invoice raised is calculated as a percentage of the total value of the hire. The subsequent invoices compensate for any alterations to the value of the job automatically, so you do not need to alter the Staged Payment Schedule if the job value changes.
When you have finished setting up this information, you MUST REMEMBER to set the METHOD on the Invoice Production screen to Staged.
42

all HireNote Pad
On all jobs you have a Note Pad this can be used to store whatever information you want about the job. E.g. Keep a record of phone conversations with the customer, requests for changes, when you sent out a brochure, special instructions specific to this Job, etc.
It is like any text document you can edit it, add lines and delete etc
Type your text straight into the main white box and it will appear there every time you enter that job until you delete it.
One of the things that it can be used for is to make your Operations Staff aware that the customer has requested a specific delivery date and that this cannot be changed without consulting the customer first.
43

all Hire
References
Pressing the button gives you the option to add additional information about a job. This information can be used to give you more detailed reporting, (e.g look at all your jobs by Sales Manager), or to give you information about how many jobs you got from a particular advertising source.
The labels down the left-hand side and the information in the boxes can be altered to reflect the information that you would like to have.
You can either select the information from the drop-down list,
44

all Hire
or you can type it in manually if the option you require is not given.
To change the options which are listed, click the right-hand mouse button to get the following menu:
Click on Amend Reference Types and you will then see:
45

all Hire
To change the label you see on the left-hand side, click on it in the top box and then change it in the Name box
The Contents section will form the list that you see when you press the drop-down in the main References screen. After you have entered an item, press return to go to a new line.
You will not see the changes you have made until you press the
button.
46

all Hire
Things To Do
This button gives you the facility to attach things that need doing to a particular job. For instance, if you need to send out a new contract because the customer has altered their order but don’t have time to do it now, need to call them, order something for them, or anything else you need reminding about, you can add it to this screen to do later. You will be reminded about them in the Diary, the Job Planner and, when they are overdue, in the Overdue To Do List.
Pressing this button brings up the following screen:
To enter a new "To Do", click the button, enter a short Reference (e.g. “Send new contract”), the date you want to do this, (which can be left blank to appear in the diary and To Do List immediately), and any explanatory text.
Click the button
47

all HireThe screen has now been updated to:
When you have completed an item, or no longer need to be reminded about it, you can remove it from the list by highlighting it and clicking the
button .
You can also amend existing items by highlighting them in the top box, altering the relevant details in the Reference, Date and Information boxes
and pressing
You can enter as many items as you need to, with or without a specific date attached.
48

all HireImage Editor
You can store images against each Job for reference. e.g. You may take Digital Camera pictures of the site to show any particular problem areas or features you need to enhance / avoid.
You must first store the pictures on your hard drive somewhere. (These can be deleted once they are attached to the Job.) Open the Job you require and press the button.
To load a stored picture, press the button and find the picture you require. (This must be in BMP, TIF or JPG format.) If you load more than one, you will be able to select the one you want to look at from the drop down list on the right.
The other buttons allow you to do the following:
Go to the previous picture
Go to the next picture
Delete the CURRENT picture
Acquire image from scanner
Colour Adjust
Effects
Print the current picture
49

all Hire
50

all Hire
Creating Stock Items & Transactions
Click on the button and the New Stock Item screen is displayed:
Remember to “TAB” between the Boxed Fields
All the information relating to stock items are found in this screen. The descriptive tabs show the headings of each section.
51
Make sure that you have the correct COMPANY NAME showing in the header bar. If not click on the button: a drop-down box will give you the choice of all the other companies that you have created.
Because of the various implications in searching, pricing, etc, it is VERY IMPORTANT TO CONSIDER your use of stock codes CAREFULLY. (See Tutorials for more information.)

all HireGeneral Details
The Code can be any Alphanumeric arrangement of up to 50 Characters, excluding the use of { } EXCEPT in a Top Level Code. It will default to ST##### to prevent you entering a blank code, but this should be overwritten with the Code you require.
The Description field allows the use of as many lines of text as you require and these will be used on your customer & staff documentation. NB Only the first 5 lines (a new line is separated by a Return, not one which has wrapped around), can have pricing associated with them, so it is sensible to restrict your description to only 5 lines.
The Group field allows you to allocate your Stock Items to various groups both for reporting and searching purposes. Once you have entered a Group once, it is available in the drop down list to be selected again.
System is an analysis field and might be used to identify items in a particular modular structure system, china manufacturer, furniture style ...
Vat Code is a 3-character field. The default is STD (Standard Rate); other pre-set rates are ZER (Zero Rates) and 5%. These rates and definitions can be altered as necessary in System Maintenance..
Analysis Flag is an analysis field of up to 10 characters which can be used in a variety of ways. Ask about the best option for your company.
52

all HirePricing
All of the prices have a Per next to them. This allows you to set a Price Per quantity of an item. E.g. If you give the customer a price of 1.70 Per 10 you can set this here for use later.
The Cost figure is the purchase price of the item.
The Rental figure is the price charged to the customer. A price is not allocated to every item; e.g. ‘packs’ would use price bands whereas chairs would be charged per item.
The Trade figure is the price you would charge a customer for a damaged item and selling price to trade customers.
Retail Cost figure is the commercial selling price.
Hire Cost figure is the depreciation figure per booking
You have the option of entering information about 2 suppliers that you buy this particular item from. This is for Information purposes only and allows you to look up the potential cost if you are short of this item for an order and are considering buying it.
Pricing Formula and Price Code allow you to create one or more pricing structures for an Item, Pack or Top Code. (See Tutorials for more information.)
53

all HireStatus
Use on Loading List: If there is a tick in the box this item will appear on a Loading / Picking List. You would leave it blank if the Stock Item was simply a Pack Description, or included elsewhere in a Pack.
Include In Part Match: The default is a tick and should be left as it enables searches on partial stock names.
Stop here when hired: This is unimportant as it is no longer used.
Track Hired Stock: This MUST be ticked if you want to see that you are overbooked in this item. You would leave it blank for any item that you do not need to be warned that you are short of, (either because you have thousands and never run out, or because it is an item that you do not bring back, and simply replace when you get low).
Item Will Return To Stock: This should be only be left blank for items which you want to automatically reduce your stock of when the job has finished. E.g. Paper Napkins.
Discountable: Ticking this box will allow an overall discount given in all Hire to be calculated on this item.
Dirty Wash: If you charge for washing an item, (e.g. plates, cutlery etc.), put a tick in this box so that all Hire can calculate the charge for you.
Prevent Overbooking: Stops an individual user overbooking the item.
Charge Insurance: If an overall percentage is entered for insurance, it will only be calculated on items which have a tick in this box.
Bin Location: This is an analysis field of up to 16 characters, usually used to identify an item’s location.
Sort Order: This determines the order of priority the item will have on the Loading Lists - 0 has the highest priority and will appear at the top of the loading list. (Hint: Do not start at 1 and then go to 2, 3 , 4 etc.- leave a large gap, 100, 200, 300 and so on, so that you can easily insert any you have forgotten.)
54

all HireOut-Of-Service Days: This allows items that require maintaining or refurbishing, (e.g.: laundering), between hires to be automatically flagged as unavailable for hire for the necessary number of days at the hire end.
Min Stock Balance: Can be entered for Information purposes only and can be used in reports should you wish to create them.
Max Stock Balance: Can be entered for Information purposes only and can be used in reports should you wish to create them.
Re-Order Qty: Can be entered for Information purposes only and can be used in reports should you wish to create them.
Weight: If you enter the weight of an item into this box it can be used to calculate the weights of your loads.
Weight Per: If you only know the weight of a multiple of the item, enter that quantity in this box.
REMEMBER TO USE CONSISTENT UNITS OF WEIGHT - don’t try and mix Metric and Imperial!
Purchased New: This tick box is used for depreciation.
Sales Nominal Code: Fill in this if you are using Final Account and require a detailed Nominal Breakdown of your sales invoices.
Purchase Nominal Code: Fill in this if you are using Final Account and require a detailed Nominal Breakdown of your purchase invoices.
55
all HirePack Contents
Some items are themselves made up of more than one item. The items that they are made up of are entered into the Pack Contents.
If you know the Code, you can enter it straight into the grid at the bottom of the screen, together with how many of them you need in the Qty column.
If you don't know the Code, you can click on the button to go to the Stock Find screen.
From this screen you can select one or more items to put into the pack. (Multiple selections can be made by holding down the button on your keyboard and clicking the items you require.) Press Select to put the item(s) into your Pack Contents.
If you have already created a pack that is similar to this one, you can copy the contents by clicking on the button. This will again take you to the Stock Find screen where you can Select the pack that you want to copy the contents from.
56

all HireTransactions
This screen allows you to enter opening stock balance, and maintain additions and reductions of stock levels.
Always check that you have the Hire Transactions Tab selected (unless you specifically require Sales Transactions).
Choose the Transaction Type from the list.
Issue Stock that you have sold
Receipt New stock that you have received
Increase Adjustment General adjustment to increase your stock balance. (e.g. after a stock check, or if someone returns an item you previously thought was lost.)
Reduce Adjustment General adjustment to reduce your stock balance. (e.g. After a stock check or if something has been damaged in the warehouse and will not be invoiced but needs to be taken off your stock.)
57

all HireThe Quantity is the number that you are increasing / reducing your stock, BY not TO. As you enter the number and Tab out of the box, the New Balance box on the right will be filled in automatically.
If you want to enter the Price that you have paid for the items for information purposes only you can do so. You can also add a Reference (e.g. Opening Balance).
When you have entered all of the information you require, you MUST press the POST button to action it.
All of the information that you enter will be seen in the section at the bottom of the screen which shows you the history for this particular stock item. It will also show you any items that have been invoiced to a customer that damaged or did not return them.
58

all Hire
Contact Manager
The Contact manager can be accessed from both the main all Hire toolbar and from a Job. Whichever way you get to it, the first screen that you will see is the Client Locate screen.
From here, you can amend the details of an existing client, Create a New Client or Delete a Client by clicking on the appropriate button on the left-hand side of the screen. Alternatively, you can look further into the details of Jobs, Account Transactions or details of the Client by going to the Contact Summary screen.
To create a New Client, click the button on the left of the screen. You will then see the:
59

all HireGeneral Details Tab
Most of the fields are self-explanatory and should be filled in as required. However, here is a little more information about a few of them.
Account Ref can be any combination of numbers and letters that you require. If you are using Accounts Software, it should be the Account No of that Client in your Accounts Software, but otherwise it is simply a unique reference. (Hint: If you type in some letters, e.g. the first four characters of their company name / surname and then a question mark and press TAB, it will automatically allocate the next sequential number on the end.)
Important Info will be flashed up on the screen every time you go to select this Client (i.e. create a new job for them). It is therefore useful for information such as "SLOW PAYER" or "DOES NOT PAY A DEPOSIT" as you will then be aware of this and can adjust the way you do the Job accordingly.
This allows you to set this Contact as a Customer, a Supplier, or both. By default it is set to BOTH. (This is to ensure that you can find it again.)
This allows you to set this Contact as a Customer, a Supplier, or both. By default it is set to BOTH. (This is to ensure that you can find it again.)
To set a Contact as a Customer click the Green Supplier box to turn it OFF.
To set a Contact as a Supplier click the Man's Head to
60

all Hireturn it OFF.When creating a Contact, the New box will be ticked. This should be left as it is as it used for links to Accounting Software.
To allow you to search for Customers / Suppliers more easily you can attach Keywords to them. To create a new Keyword, simply type it into the white box below the Keywords Button. This will then be attached to the current Contact and available to be added to all other Contacts. TO find a Keyword that you have already created, click the Keywords button and you will get a list to choose from.
Put a tick in the box of the Keyword(s) you require and press the + button to add them to your list. Pressing the Empty Box will clear the ticks you have put in, and pressing the Box with the Tick will out ticks in ALL of the boxes.
Once you have completed your entries, either click on one of the other Tab Sheets to enter more information or press OK to close and save this Contact.
61

all HireWhen you are at the Contact Locate screen, if you type in the name you require, or part of it, you will get a list to choose from. Click on the Contact you require from the list and press Select to get into the Contact Summary screen, (or to Select this Contact and go back to your Job if you are accessing the screen form the Job screen).
The contact details are displayed on a ‘read only’ basis and you can see all of the details for this Client in the Tab Sheets at the bottom of the screen.
If you wish to update the details of this Client, click the button next to the Close button at the top of the screen. This will take you into the Details Tab Sheet, where you can modify and update the contact information.
62

all HireAccount Details Tab
To set a customer to automatically use a particular Price Band or Discount click on the Account Details tab.
On the right-hand side of the screen you can set the Default Price Band for this particular customer. Any order you then create for them will select prices from this band. You can change these manually for a particular order if required.
You can also set Default Discount for the customer in this screen. Enter the percentage discount followed by a % sign. (If you do not use the % sign, the customer will get a discount amount not a percentage deducted from their order.)
You can also set default prices for Delivery and Collection if you deliver to this customer on a regular basis.
63

all HireSales Ledger Transactions Tab
If you have raised an invoice to a customer, as well as seeing it in the Previous Invoices section it will show in the Sales Ledger Transactions tab.
This shows us all of the unpaid invoices raised for this customer. We can see the Job Ref as invoices could have been raised against a number of jobs for the same client. We can then also see the rest of the information about the individual invoices.
If you receive payment from this customer, this is the screen that is used to show the payment and reduce the customer's outstanding balance.
To make a payment, click on the Cash button at the top of the screen.
64

all Hire
If you did not receive the payment today, change the date accordingly. The Period will be filled in automatically. Set the Reference to something that will identify this later (e.g. their cheque number, BACS reference) and for the Paying In Ref you would normally use the number printed on your paying in slip, but you can use whatever you prefer.
NB You MUST fill in both the Reference and the Paying In Ref before you can make this payment.
You can use Additional Info for any relevant information.
Set the Cash amount to the amount of the payment you have received from this customer, even if it relates to more than one invoice.
If the amount they have paid matches the amount in the Current Balance
field (in the top right-hand corner) simply press the button.
If you make a mistake, you can Cancel, BUT YOU MUST DO IT BEFORE pressing the Post button.
65

all HireIf the customer has several invoices and is not paying the full balance, you may need to go to the Allocation Tab.
If the amount that they are paying exactly matches an invoice total, the allocation (on the right-hand side of the screen) will be done automatically
and you can simply press the button. If there are two or more invoices of the same value, the oldest one will be paid by default.
If the amount they are paying is a payment on account and does not match any particular invoices, the default allocation will start with the oldest invoice and, when it cannot pay off any more whole invoices, allocate the remainder as a part payment against the next invoice.
66

all Hire
If you want to change these allocations click on the CA button on the right-hand side of the screen. When asked if you are sure click Yes and the right-hand side of the screen will clear.
You now need to move the cash and required invoices to the right-hand side of the screen by double clicking them. YOU MUST DOUBLE CLICK THE CASH FIRST, followed by the invoices. When you move the cash, the Allocated box will show a negative of the amount you are paying onto the account.
As you then double click individual invoices, this amount will reduce.
If there is a balance remaining that does not match any of your invoices, you can decide whether or not to use it as part payment against another invoice. If you want to do this simply double click the relevant invoice and
then .
If you don't want the remainder to be allocated, you need to type over the amount of cash to reduce it to the amount you want to allocate.
67

all Hire
This now shows that the total received (the Unpaid column) was £ 20,000. We only want to allocate £ 19,317.71 of this so we overtype the amount in the Alloc column.
The Allocated at the top of the screen is reduced to 0.00
Now click on the button (it will change to ) before you and the extra amount will be left unallocated on their account.
This will take you back to the Sales Ledger Transactions Tab.
The invoices that have been paid off have now disappeared from the list and the Cash Received is showing an Unpaid (unallocated) amount of £ 682.29 which is the amount that we did not allocate.
If you want to see the previous invoices / payments on the account, click on the button and they will be included in the list with a symbol to show that they are paid.
68

all Hire
Event Manager
The Event Manager enables you to take several Jobs and link them by a common Event, e.g. The Showman's Show. From this, it is possible to plan your resources, combine your loads and get an overview of the Event as well as the individual Jobs.
The Event Find screen can be accessed from the main all Hire Toolbar or from an individual Job, and works in the same way as the Job and Contact Find screens.
If it is an existing Event, type in the first letter or few letters of the name of the Event you require and a list of possible matches will be displayed. If you cannot remember the exact name, but know where the Event is held, press the Find button to change the search type to Find All. This will look for any Event which has the text you have typed anywhere in its details.
69

all Hire
If you need to create a new Event, click on the button.
Each Event needs a unique Reference in the same way that a job does. If we were creating The Showman's Show for the year 2000, we could use the Reference SS2000.
Name Showman's ShowInitials TheAddress Newbury Showground
Nr NewburyBERKS
The other fields are mostly self-explanatory. The Special Instructions are relevant to the Event as whole.
Start Date The Start Date of the actual Event. This will be copied into the Start Date through to the First Date Of Use of any Job that is linked to this Event.
End Date The End Date of the actual Event. This will be copied into the Last Date Of Use through to the End Date of any Job that is linked to this Event.
Once you have filled in the General Details, you can add Photos of the site if you require. To do this, click on the Site Photos / Layout Tab.
70

all Hire
To load a stored picture, press the button and find the picture you require. (This must be in BMP, TIF or JPG format.) If you load more than one, you will be able to select the one you want to look at from the drop down list on the right.
The other buttons allow you to do the following:
Go to the previous picture
Go to the next picture
Delete the CURRENT picture
Acquire image from scanner
Colour adjust
Effects
Print the current picture
Once you are happy with the details you have entered, click on OK to go back to the Event Select screen.When you have found the Event you require, click on the Select button. If you have accessed this screen from the Customer Details section, you will return to this now with the Event filled in. Otherwise, you will go into the Event Manager for this Event.
71

all Hire
This screen gives you a list of all of the Jobs which are linked to the selected Event. Should you need to, you can create a new Job from this screen by clicking the button. You can go back and amend the details of the Event by pressing the button at the top of the screen.
You can also access the
Resource PlannerPlannerCosting
for this Event by pressing the appropriate button.
72

all Hire
The button gives a detailed list of the Jobs linked to the Event, i.e.
The button shows a list of all of the Jobs linked to the Event so that you can see all of them if there are a large number, i.e.
73

all Hire
Venue Manager
The Venue Manager enables you to store Venues that you often work at and link Jobs to them to save you having to type the same delivery address every time, and so that you can look back and see how much business you are doing at a particular Venue.
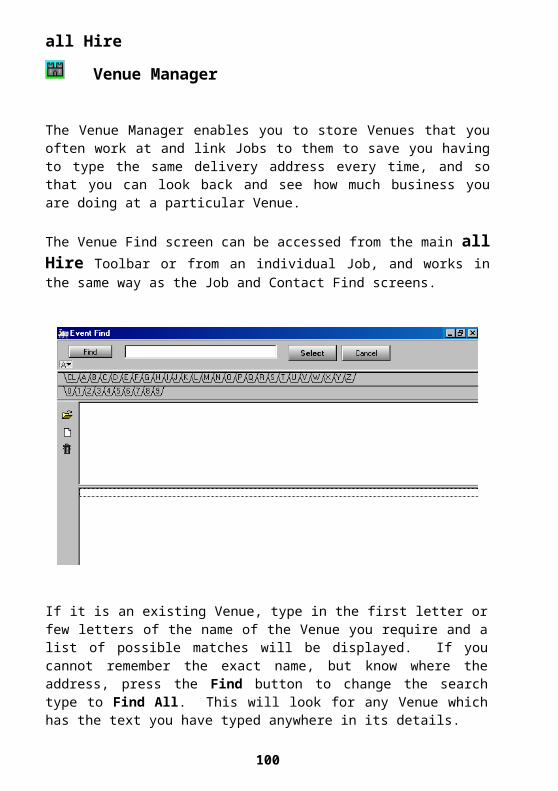
The Venue Find screen can be accessed from the main all Hire Toolbar or from an individual Job, and works in the same way as the Job and Contact Find screens.
If it is an existing Venue, type in the first letter or few letters of the name of the Venue you require and a list of possible matches will be displayed. If you cannot remember the exact name, but know where the address, press the Find button to change the search type to Find All. This will look for any Venue which has the text you have typed anywhere in its details.
74

all Hire
If you need to create a new Venue, click on the button.
Each Venue needs a unique Reference in the same way that a Job does. If you were creating The Royal Hotel in Bristol, you could use the Reference ROYALHOTEL, or ROYBRIS, or anything else you choose.
Most of the fields on this screen are self-explanatory. The Special Instructions are relevant to the Venue as a whole and will be added into the Delivery Instructions for the Job when you select the Venue Address.
Once you have filled in the General Details, you can add Photos of the site if you require. To do this, click on the Site Photos / Layout Tab.
75

all Hire
To load a stored picture, press the button and find the picture you require. (This must be in BMP, TIF or JPG format.) If you load more than one, you will be able to select the one you want to look at from the drop down list on the right.
The other buttons allow you to do the following:
Go to the previous picture
Go to the next picture
Delete the CURRENT picture
Acquire image from scanner
Colour adjust
Effects
Print the current pictureOnce you are happy with the details you have entered, click on OK to go back to the Venue Select screen.
When you have found the Venue you require, click on the Select button. If you have accessed this screen from the Customer Details section, you will return to this now with the Venue filled in. Otherwise, you will go into the Venue Manager for this Venue.
76

all HireThis screen gives you a list of all of the Jobs which are linked to the selected Venue. You can go back and amend the details of the Event by pressing the button at the top of the screen.
The button gives a detailed list of the Jobs linked to the Venue, i.e.
The button shows a list of all of the Jobs linked to the Venue so that you can see all of them if there are a large number, i.e.
77

all Hire
Stock Available
This gives an over-view of the available / booked stock situation for a particular group of items.
The search options are:
All Over Booked ItemsGroupUser Defined Group
Select a group from the drop-down menu. The search can be made more specific by entering the number of days starting from a particular date.
NB: If you search for a long period, it may take some time and the individual days will be very small when it comes up.
78

all Hire
The total Stock Quantity for each item is represented by the green bands and can be seen at the top of the screen if you click on a day..
Firm Booking commitments are shown as blue bands. The height of the blue bands relative to the height of the green bands shows approximately what percentage of stock is booked. i.e if a Blue band finishes approximately half way up the green band then about 50% of the stock is booked on that day.
A red band indicates that the items are Over Booked. The height to which the red block extends above the green block gives an indication of how many (as a percentage of the total hire balance) you are overbooked by.
(If this were either all or part pink, it would mean that some of the stock items are returning from one job on the same day that they are going out on another. This allows you to see quickly whether it really is a stock problem or just a matter of logistics.)
If you click on a coloured block you will see the exact quantities displayed
in the available box. If you select the icon and then click back on a day, the jobs associated with the stock item are displayed. By double clicking on a job it will open the Job screen.
79

all HireUser Defined Groups
If you find that you want to be able to look at a number of items from several groups at the same time, you can create your own group(s) to help you with this.
Click the right-hand mouse button on the screen before you select a group and click on User Defined Group from the menu that appears.
To create a New group click on the button next to the Close button. You will see <group> in the two white boxes at the top of the screen. Click into the Right-hand one and change the name to whatever you would like. (Hint: if you put a 1- in front of the name you type, it will appear near the top of the list of groups instead of getting lost in the middle.)
To add items to your group simply drag them from the list on the left into the box on the right. You can use the normal Stock Find and Find All button to help you.
If you would like to change the order once you have dragged your items over, click on the item you want to move and press one of the buttons to Move it up or down respectively. Similarly, to Delete an item, click on it and press the button next to the red arrows..
You can create as many additional groups as you need. To delete one that you have created press the button at the top of the screen. Press Close to exit the screen.
80

all Hire
Stock Summary Single Item By Day
The Stock Summary - Single Item By Day gives a picture of availability for a particular Stock Item in a particular period. The view is very similar to
the Active Jobs Chart. Select an item to look at by pressing the button and choosing from the Stock Find screen. The view that comes up
by default will show ALL jobs within the selected period. Press the button to switch off any jobs not relevant to this stock item.
The total hire Balance for this item is shown above the chart in a Blue Box.
The available stock for each day is running along the top row.
If it is a Blue box it means that you may still have stock available, the quantity of which is shown in the box.
If you have a Red box, it means that you are Overbooked, again the quantity you are overbooked by is shown in the box.
Below the Available row you have each of the jobs which require this stock item, whether they are being delivered, in use, or being collected, and how many they require.
If you want to look at a different item, simply click the button again and select a new item.
You can change the date to look at any period either manually or by
clicking on the button. The buttons will move the period you are looking at backwards or forwards one week at a time respectively.
81

all HireBy default, only the Jobs which are Firm Bookings are shown. You can also press the to show Enquiries (which will appear as a White bar) and the
to show Cross Hires and Purchase Orders (which will appear in Dark Green below the Job which they were raised from.)
Clicking on the will expand the column with the Job Names in to include the Job Reference underneath.
Clicking on the will expand the column with the Job Names in to include the Job Reference underneath.
While you are in either of these views, an arrow pointing to the left or right indicates that the period of the job extends before/after the dates shown on the screen.
If you leave this view open while you are working, you can refresh the
screen by clicking on the button on the left.
82

all Hire
Planned Resources
The first screen displayed is the Resource summary screen. This gives you an overview of your allocated resources. (The type of resource is selected from the drop down menu next to the date).
Selecting the icon takes you into the Global Resource Planner screen. This screen allows you to allocate and modify your resources.
83

all HireA resource is allocated by dragging it from the top right box onto the relevant coloured area against the client and date. If the resource is available, it has a green beside it. If the resource has been allocated for the day in question it displays a pink .
To view the resources allocated to a job on a particular day, simply click on the day and the details are displayed in the bottom right hand box. To Delete a resource, highlight it in the bottom right hand box and select the
icon.
To Delete ALL of the resources you have planned, click the right-hand mouse button and choose Delete All Resources from the menu.
To bring up the details of a Job, double click on one of the days and you will get the Job Summary screen.
This gives you the Customer Details, Delivery Information, Dates of the Job, Hire Items & Notepad Information to help you with your planning.
Once you have planned your resources, you can Print the planner exactly as it is on screen by clicking the right-hand mouse button and selecting Print Planner from the menu.
84

all HireCreating / Amending Resources
If you have not yet created your resources or would like to amend them, you can do this from the Global Resource Planner -
Click the right-hand mouse button and select Resource Maintenance from the menu
You need to begin by creating your types of Resources (e.g. Foremen, Vehicles, Crew, etc.). To do this click the button by the Close button.
Type a Name for this type of Resource into the white box and press OK.
85

all Hire
We now have a new Type next to All and a Resource of this type has been created automatically. To edit it, click into the Reference box at the bottom of the screen and enter what you want to appear when you select the resources. This may be a person's initials, a vehicle registration, a name or whatever suits that category. In the Description box you can add more information (e.g. Full name, job description, vehicle type ....).
When you are happy with this information press the button.
This information will then change in the list.
To add more resources OF THIS TYPE press the button ON THIS TAB - NOT the one at the top of the screen. Eventually you will build up a list.
86

all Hire
(You can add to or delete from this list at any time using the and buttons on this Tab.)
As you add new Types these will be added as new Tabs along the top.
87

all Hire
When you are happy with your Types and Resources, press to return to your planning screen.
You can now add your Resources to the relevant jobs by clicking on the in the top right-hand box and dragging them to the relevant Job and Day on the left-hand side.
If you want to select more than one resource at a time, click on the first one, then hold down the key on your keyboard as you select the others. These will then highlight and can be dragged as a group from any of the highlighted areas onto the relevant Day and Job. Each of the jobs will expand as you drop on more Resources.
88

all HireButton Bars
The Button Bars are used to make selecting the items of stock required for a job much quicker and easier, and remove any need to know the Stock Code.
When you go into the Job Items screen for the first time, you will see that the buttons are completely blank.
They will be made up of:
MAIN TOPICS: A category of equipment which may be made up of several more categories itself.
SUB TOPICS: A category of equipment which contains several items but no further categories.
BUTTONS: The individual / group of items you want to select.
For example:
FURNITURE(Main Topic)
CHAIRS TABLES(Sub Topic) (Sub Topic)
BISTRO GILT FOLDING 5' DIAM 3' DIAM 6' TRES(Button) (Button) (Button) (Button) (Button) (Button)
89

all HireTo create a new Main Topic, click the right-hand mouse button in the bottom dark grey area below the buttons and select New Main Topic from the menu.
You will be asked for a name for the topic. Enter this into the box and press OK. Your Button Bar will now look something like this:
Your first Sub Topic within the Main Topic will automatically have been given the same name as its' Main Topic. To change it, first click on it with the left-hand mouse button to highlight it in blue. Then click on it with the right-hand mouse button and select Amend Sub Topic from the menu. You will see the current name of this Sub Topic in the top box.
90

all HireClick into the box and change the text to the name you require. Below it you will see boxes in which to enter the text you require on each of the Buttons for this Sub Topic and the Code / Group of the items that
pressing this Button will select.
N.B. If there is no text in any of the Button Text boxes, the Sub Topic will not be saved and therefore not visible on the Tabs.
You can select the Stock Code / Group that each Button will select by:
Typing it in manually;
Pressing the button to the right of the Code box.
You can then alter the description in the Button Text box to whatever you choose. (12 characters is approximately the maximum that will fit on each button, less if you use all capital letters.)
You do not have to use a whole code for your selection. You can choose instead to use a Group (e.g. TABLES) or part of a Code (e.g. FUTA) so that you can select from a list of all of the items in that Group or that have Codes which begin with the characters you have entered. This can be particularly useful if you re running out of Buttons in a particular Topic and want to widen the selection.
91

all Hire
TUTORIALS
92

all HireCREATING A SIMPLE TOP CODE
For the purpose of this example, we will assume that you have Gilt Banquet Chairs with a choice of:
Blue RedGreenOr Gold Seat Pads.
It will therefore be necessary when picking a Gilt Banquet Chair to see the option:
Seat Pad Colour
Getting Started
The first thing that you need to do is to create the individual components:
Gilt Banquet ChairBlue Seat PadRed Seat PadGreen Seat PadGold Seat Pad
When you do this there are some important things to consider. In normal circumstances, the Code is unimportant and can be a part number, an abbreviated description, or even the whole thing.
e.g. a Blue Seat Pad could be coded as587426581892ORFUSPBLORBLUE SEAT PAD
There is no right or wrong way to do this - whatever codes you are comfortable with are fine.
However, in this case, because you need to be able to choose what colour seat pad you would like, you need to consider your codes a little more carefully. In order for you to be able to substitute Blue seat pads for Gold
93

all Hireor Green or Red, the codes for all of these similar items must be the same except for a few letters which represent the colour. In this example, we will be using the following codes:
FUCHGILT Gilt Banqueting ChairFUSPBL Blue Seat PadFUSPGO Gold Seat PadFUSPGR Green Seat PadFUSPRE Red Seat Pad
Each of them starts with FU for FURNITURE. This is not necessary but makes searching for a piece of stock easier as you know what the start of it is likely to be. The Seat Pads all have EXACTLY the same start to the code with the last 2 letters representing the colour.
IT IS VERY IMPORTANT THAT YOU ARE CONSISTENT IN THE WAY THAT YOU BUILD THESE CODES. The part which you choose to represent the colour MUST be the same number of characters and in the same position in the code.
Here are a few examples of sets of codes which would work and ones that wouldn't.
RIGHT WRONGFUSPBL FUSPBLUEFUSPGO FUSPGOLDFUSPGR FUSPGREENFUSPRE FUSPRED
FUBLSP FUBLUESPFUGOSP FUGOLDSPFUGRSP FUGREENSPFURESP FUREDSP
SEAT PAD BLUE SEAT PAD BLUESEAT PAD GOLD GOLD SEAT PAD SEAT PAD GREE SEAT PAD GREENSEAT PAD REDS SEAT PAD RED
94

all Hire
Creating Your Individual Codes
Here is a sample of how one of these codes should be set up.
Code FUCHGILTDescription Gilt Banqueting ChairGroup FURNITURE
The Status Tab settings should be set to look like this:
(There will be exceptions to this, but these will be down to individual requirements.)
Pricing does not need to be set unless you hire out your chairs and seat pads SEPERATELY.
You should enter your stock quantities in the Transactions Tab.
95

all Hire
Click on the Transaction Type box and choose Increase Adjustment.
Fill in the Quantity that you have in stock.
You can enter Opening Balance or something similar into the Reference box if you want to so that you can see at a later stage why you entered such a large quantity.
Once you are happy with what you have entered, press Post.CREATING THE TOP CODE
Once you have created you individual component codes, you need to create one more code to link them together.
This one should be totally different to the others. E.g.
TCGILT{**}
TC stands for Top CodeGILT tells us that it relates to a Gilt Banquet Chair{**} represents the number of characters in our variable (Seat Pad) code which change for the different colours.
If you look again at the codes we created earlier,
96

all HireFUCHGILT Gilt Banqueting ChairFUSPBL Blue Seat PadFUSPGO Gold Seat PadFUSPGR Green Seat PadFUSPRE Red Seat Pad
you can see that in each of the Seat Pad codes there are 2 characters on the end that change to represent each new colour. This time when you create your code, you need to set the following:Code TCGILT{**}Description Gilt Banqueting Chair {A}Group Top Code
(We will explain why the {A} is used in a moment.)
The StatusTab settings will be different this time.
Use On Loading List and Track Hired Stock are not ticked as this is not a real item, it is made up of 2 other items, (a seat pad and a gilt banquet chair).
97

all HirePricing should be filled in as this is the item that you will be hiring out.
You will not need to go to the Transactions Tab this time as you don't have any of this item - it is made up of a Gilt Chair and a Seat Pad and these have quantities.
ASSIST PROMPTS
There is, however, a new Tab to go to - Assist Prompts.
This is where you set up the option(s) for your Top Code, in this case, Seat Pad Colour.
You can see that we have Boxes A - J. This is where the {A} that we used in the Description comes from.
Each set of brackets in a Top Code represents an option.
These sets of brackets are lettered from left to right A, B, C, ...... J.
98

all Hire
So, in our code - TCGILT{**}, we have one option, so one set of brackets, and this is given letter A. (If our code was TCGILT{**}{*}, we would have brackets A and B, A being the left-hand set and B being the right-hand set.)
We now need to tell the system what the Box A option is. To do this, click the button at the top of the screen.
Reference SEATPAD - a short name which will identify this Assist Prompt so that you can use it for other tent Top Codes.
Description Seat Pad Colour - the question / option you will see in all Hire when you pick this stock item.
Code is the part of the Stock Code that is different from the others. (This should be the same number of characters as the number of stars in the relevant set of brackets.)
99
all Hire
User Prompt is the options that you will see in all Hire when you pick a Gilt Banquet Chair
Stock Description is the information that will be put into the Description instead of the {A} that is there at the moment. This will appear EXACTLY as you type it, so you should type in capitals or lowercase as required and include any "and ", "with ", similar words or spaces that you need to make the description read correctly.
Ours will look like this:
Code User Prompt Stock DescriptionBL Blue With Blue Seat PadGO Gold With Gold Seat PadGR Green With Green Seat PadRE Red With Red Seat Pad
Once you are happy with your descriptions, press OK.
You will then go back to your Assist Prompts screen. If you now press the down arrow to the right of Box A Prompt you will seat SEATPAD in your list. Click on it. This will then appear in the box.
Your Top Code will now work cosmetically and appear correctly on customer documentation, however, it will not yet book any stock or produce a loading list. To achieve this, you need to go to the Pack Contents Tab.
100

all Hire
A Gilt Banquet Chair with x colour Seat Pad is made up of 2 items:
1 x Gilt Banquet Chair1 x Seat Pad - Relevant Colour.
The Gilt Banquet Chair is easily entered by typing the code into the Code column and adding a Qty of 1.
For the Seat Pad, we use a similar idea to the description. First, type in the part of the code that is NOT VARIABLE, in this case FUSP. Then add {Box Letter from the relevant Assist Prompt} to the end of it, in this case {A}.
Your codes will then look like this:
Code QtyFUCHGILT 1.00FUSP{A} 1.00
The line with the {A} on it will highlight in BLUE. This is to show you that the code may or may not be correct, but it cannot be verified at this stage as it has an option on it.
101

all Hire
Any incorrect / invalid codes will be highlighted in RED.
Testing A Top Code
Once you have entered all of the above information, you can check that it is working without going out of the screen. Click on the Test Pack Tab.
If you then click the button, you will see your options.
102

all Hire
To change the colour seat pad you require, click the drop down arrow and choose a different one from the list. Then press OK.
You should now be able to see all the information you could possibly want about how your pack is made up.
Code being tested
Items found to go on loading list
Full description for customer documentation
Breakdown of where the load list items have come from.
If everything has been entered correctly, you should see a Gilt Banquet Chair and a Seat Pad of your choice of colour in the top, left-hand box and the description in the top right-hand box should match the seat colour you chose.
103

all HireStep By Step Guide to Creating a New Job
Introduction
The aim of this guide is to show you the steps to take to create a new job. It does not go into the more complex options that are available.
Create A New Job
1. When you enter all Hire you may need to Close the Chart box and the Diary box. The following screen is what you will see when you do that.
2. We are now going to create a new job. Clicking on this icon displays the Job screen you will find this on the above screen. The Job Screen is the master screen and remains open as long as you are working on this job.
104

all Hire3. This shows the main details of the job to enable an instant review.
You will see that the job is an Enquiry, (the default when creating a New Job), and it has a TMP number, (a temporary job number).
4. Because we haven’t yet entered any details, the dates are shown as today, and you can enter the following information in any order, but start with the Customer Details.
5. Click on the button, which is under the Close button. The following screen will appear.
Leave this set to Enquiry.
In the Name, Address etc type exactly what you see below:
Name SmithInitials Mr RAddress 25 Crompton Lane
BrentryBristol
Post Code BS9 3AHTelephone NO 0117 9372561Fax No 0117 9372562Mobile No 07932 867895Contact Name RichardE-mail [email protected] Information 50th Birthday Party
105

all HireDO NOT UNDERLINE THE E-MAIL ADDRESS
IF YOU TYPE THE JOB DETAILS IN CAPITALS THEN THAT IS HOW YOU WILL SEE IT ON YOUR DOCUMENTS. SO TYPE IN THE CASE YOU WANT TO SEE.
6. When you have entered the above information click on the
button.
7. Now click on the Job dates button and you will see the following screen.
8. In this screen you will put the dates the customer asked for (add the following dates as below). For example:
Date of Delivery 18.03.2008End of Build 18.03.2008First Date of Use 19.03.2008Last Date of Use 21.03.2008Start Date of Removal 22.03.2008Date of Collection 22.03.2008
Don’t worry if you can’t see the End of Build or Start of Removal, these are not always necessary and may be hidden.
106

all Hire
9. Once you have entered the above dates click on the button.
10. An alternative to typing the dates is to use the calendar button , which brings up the following screen.
11. Click on the date you want. If you want to change the month, click on the – to go back a month or the + to go forward a month. Also down the right hand side are the months and you can click on the on you want. Once you have entered the dates, click on
.
12. Now click on the Site/Delivery Dates button and you will see the following screen.
107

all Hire13. The screen fields are initially blank. Selecting the
button will display details already in the Customer Details below.
14. You can then click on the Customer Address then press
. It will then add the Customer’s Address you added in the Customer Details screen.
15. However, if the Delivery Address is different, as in this case type in the information. For this example we will use.
Name JonesInitials Mrs SAddress 35 Crow Lane
HenburyBristol
Postcode BS10 2DQ
THIS IS DEMO INFORMATION
Tel No. 0117 9859163Fax No. 0117 9859164Mobile N/AContact Name Sarah
108

all Hire
16. Click on the Site Info tab.
17. You may want to fill in further information. The information you use here can be used on delivery notes and load lists. This can be added later after a site visit.
18. Click on .
109

all Hire
19. Now click on the Job Items button and you will see the following screen.
20. This section is where you can add the items the customer would like.
Click on this tab to see the following items:
21. Click on the 10’ Plate. And we would like a Qty of 100 and then the price should come up. If not add a price.
Click on this tab and see the following items:
22. Click on the LgeFork and then the Lge Knife. And we would like a Qty of 100 for each of these.
110

all Hire
Click on this tab and see the following items:
Click on Lge Wine. Enter a Qty of 100, and so on.
23. Click on the Furniture tab and then click on and it will ask you what colour pads you would like on the chairs. See the following screen.
24. Click on Blue and .
25. Once you have selected your item, fill in the Quantity at the bottom of the screen as 10 and change the Price to 0.15. If you want to or if no price has been set for this item.
26. The Discount box can be filled in as an amount or you can add a % sign to the end to give a percentage discount. This is an Item Discount and applies to the current item only. It should not be confused with an Overall Discount, which is applied to all items that have the Discountable box ticked.
111

all Hire27. You can also change the settings for Item Insurance and Dirty
Wash (see main manual) for this item if you wish, then click
.
28. You decide you don’t want the plates, so to delete them, click on it in the top section (see picture below) and then right mouse click and it will come up insert line above or delete this line. Click on delete this line and the item will be removed from the list.
29. Now Add a line above Dinner Fork by clicking on the item Dinner Fork in the list (as above) and then right mouse click and it will say insert line above or delete this line. Click on insert line above and it will add an extra line for you.
30. Now click Close.
31. Now click on Reports. You will see the following screen.
112

all Hire
32. If the Job Not Processed box appears, click Yes.
33. The above screen shows you all the different reports you can produce for your customers. You can choose one of the reports by putting a tick in the box on the left hand side. Click in the box to the left of Quotation.
34. Then click on to look at the report. It will open it up and you will see the following screen.
113

all Hire
35. Click on the button at the top left of the page to close the Quotation.
114

all Hire
Note Pad
36. The text you enter into the Note Pad can be viewed by anyone who opens the job so that they can be made aware of anything they need to know before they make any alterations
37. Type a message into the blank section of the screen and you will see the text appear.
38. Now click on Invoicing and you’ll see the following screen.
115

all Hire
39. To change the address (If the invoice is going to different address),
you have to press the Invoice Name button and
then click the customer you want to use and press .
40. In the Invoice Production tab (shown below) you can view your
invoice by pressing the button and it will show you what your invoice will look like and you will see all of your details.(See main manual for more details)
41. The Things To Do screen is shown below.
116

all Hire42. These are your reminders that will be viewable in the Diary, Job
Planner and, when they are overdue, in the Overdue To Do List.
43. Click on the button and enter a short Reference (e.g. Send New Contract). Then enter the Date you want to do this and in the Information section, any explanatory text.
44. Click the button.
117