agilent ezchrom elite · 2 installation this document is designed to step you through the...
TRANSCRIPT

Agilent EZChrom Elite
Installation Guide

Notices
Copyright © Scientific Software, Inc 1997-2005 © Agilent Technologies, Inc. 2006-2007.
Adobe, Acrobat, and Reader are either registered trademarks or trademarks of Adobe Systems Incorporated in the United States and/or other countries.
Microsoft®, Active Directory®, ActiveX®, Outlook®PowerPoint®, Windows®, and Windows Internet Explorer 7® are registered trademarks of Microsoft Corporation in the United States and/or other countries.
No part of this manual may be reproduced in any form or by any means (including electronic storage and retrieval or translation into a foreign language) without prior agreement and written consent from Agilent Technologies, Inc. as governed by United States and international copyright laws.
Manual Part Number G4650-90012
Edition June, 2007
Document Revision 3.2a1
Printed in USA
Agilent Technologies, Inc. 6612 Owens Dr. Pleasanton, CA 94588-3334
Warranty The material contained in this document is provided �as is,� and is subject to being changed, without notice, in future editions. Further, to the maximum extent permitted by applicable law, Agilent disclaims all warranties, either express or implied, with regard to this manual and any information contained herein, including but not limited to the implied warranties of merchant-ability and fitness for a particular purpose. Agilent shall not be liable for errors or for incidental or consequential damages in connection with the furnishing, use, or performance of this doc-ument or of any information contained herein. Should Agilent and the user have a separate written agreement with warranty terms covering the material in this document that conflict with these terms, the warranty terms in the separate agreement shall control.
Technology Licenses The hardware and/or software described in this document are furnished under a license and may be used or copied only in accordance with such license.
Restricted Rights Legend If software is for use in the performance of a U.S. Government prime contract or subcontract, Software is delivered and licensed as "Commercial computer software" as defined in DFAR 252.227-7014 (June 1995), or as a "commercial item" as defined in FAR 2.101(a) or as "Restricted computer software" as defined in FAR 52.227-19 (June 1987) or any equivalent agency regulation or contract clause. Use, duplication or disclosure of Software is subject to Agilent Technologies� standard commercial license terms, and non-DOD Departments and Agencies of the U.S. Government will receive no greater than Restricted Rights as defined in FAR 52.227-19(c)(1-2) (June 1987). U.S. Government users will receive no greater than Limited Rights as defined in FAR 52.227-14 (June 1987) or DFAR 252.227-7015 (b)(2) (November 1995), as applicable in any technical data.

Contents
1 Using This Guide .................................................................... 7
Introduction........................................................................................ 7
Who Should Read This Guide?....................................................... 7
Documentation Conventions .......................................................... 7
2 Installation .............................................................................. 9
Definitions .......................................................................................... 9
Enterprise Path............................................................................... 9
Enterprise File Server.................................................................... 9
Enterprise Machine ....................................................................... 9
EZServers ........................................................................................ 9
Agilent Instrument Controller (AIC) ......................................... 10
Client PCs...................................................................................... 10
Enterprise Service Account ....................................................... 10
Enterprise Service Group............................................................ 10
Installation Notes............................................................................ 11
3 Before You Begin a New Installation................................ 13
4 Instrument Folders ............................................................... 16
5 Advanced File Security........................................................ 17
Common Folder ............................................................................ 18
AFS Requirements....................................................................... 19
AFS Notes ..................................................................................... 19
EZChrom Elite Installation Guide iii

6 Workstation Installation ......................................................21
Setup Worksheet ............................................................................ 21
Workstation Step 1: Setup the Enterprise Path ....................... 22
Workstation Step 2: Setup the Data System PC....................... 22
Workstation Step 3: Install the Software Licenses.................. 23
Installation of a Hardware License Key................................... 23
Workstation Step 4: Activating Advanced File Security .......... 23
Workstation Step 5: Configure the Enterprise........................... 26
Workstation Step 6: Configure Interfaces.................................. 27
Workstation Step 7: Configure Instruments .............................. 27
Workstation Step 8: What to Do Next ........................................ 29
7 Client/Server Installation....................................................31
Setup Worksheet ............................................................................ 31
Client/Server Step 1: Setup the Enterprise Path ...................... 32
Client/Server Step 2: Setup the Enterprise Machine............... 32
Client/Server Step 3: Setup the Instrument Controllers ......... 34
Client/Server Step 4: Setup the EZServers................................ 35
Client/Server Step 5: Setup the Client PCs ............................... 37
Client/Server Step 6: Install the Software Licenses................ 38
Installation of a Hardware License Key................................... 38
Client/Server Step 7: Activating Advanced File Security ........ 38
Client/Server Step 8: Configure the Enterprise......................... 42
Client/Server Step 9: Configure Interfaces................................ 43
Client/Server Step 10: Configure Instruments .......................... 43
Client/Server Step 11: What to Do Next.................................... 45
iv EZChrom Elite Installation Guide

8 Installation on a Citrix Server or Windows Terminal Server..................................................................................... 47
Notes for Running Elite as a Single Session on Citrix............. 49
9 Installation Qualification..................................................... 51
10 Software License Installation ............................................ 51
Installing a Software-Based License Key................................... 52
License Installation Wizard........................................................... 55
Select Template File.................................................................... 56
Request Code ............................................................................... 56
Uninstall License Wizard............................................................... 57
Output File..................................................................................... 58
Key Program..................................................................................... 60
Reinstalling a License Key ............................................................ 62
Repairing a Software License Key ............................................... 63
Creating a License Backup File .................................................... 64
11 Installation of an Evaluation License ................................ 67
12 Upgrade Software Installations ......................................... 69
Before You Begin an Upgrade ...................................................... 69
Upgrading EZChrom Elite Workstations ..................................... 70
Upgrading EZChrom Elite Client/Server Installations.............. 70
Upgrading an Existing Software License.................................... 71
13 Enterprise Setup � Activating AFS .................................... 75
Enterprise Service Account Password........................................ 77
EZChrom Elite Installation Guide v

DCOM Server Settings Options .................................................... 78
14 Hardware Installation ..........................................................81
SS420X A/D Interface Installation .............................................. 81
GPIB Board Installation ................................................................. 81
CIO/DIO ............................................................................................ 81
15 Network Printers ..................................................................83
16 Setting up E-mail Notification ............................................83
Step 1: Configuring Mail Services ............................................ 83
Step 2: Setting up E-Mail Notifications................................... 86
vi EZChrom Elite Installation Guide

1 Using This Guide Introduction This Installation Guide provides details on how to install the Agilent EZChrom Elite data system for Workstation and client/server environments.
Who Should Read This Guide? This document is designed for the system administrator who will install the Agilent EZChrom Elite data system.
Documentation Conventions The following conventions are used in this guide.
Convention Description
Bold Database names, table names, column names, menus, commands, dialog box options, and text that must be typed exactly as shown.
Italic Placeholders for information you must provide. For example, if you are instructed to type ServerName, then you must type the actual name of the server instead of the italicized term.
Monospace Programming code samples and display text.
ALL CAPITALS The keys you press on the keyboard. If combined with a plus sign (+), press and hold the first key while you press the remaining key(s). For example, press SHIFT+TAB.
Using This Guide 7

8 Using This Guide

2 Installation This document is designed to step you through the installation procedure as quickly as possible. After you install the hardware as described in this chapter, you will be ready to install the EZChrom Elite software. You must then configure the data acquisition hardware and the instruments installed (detectors, external events) in order to use the data system for data acquisition. Follow the steps provided to install the software in a Workstation environment or Client/Server environment.
Definitions
Enterprise Path The Enterprise Path is a shared folder that is used to store all of the files (methods, data, sequences, configurations, settings, etc.) used by the software.
The following definitions apply only to Client /Server installations of EZChrom Elite.
Enterprise File Server The Enterprise File Server is a PC on the network that is used to store all of the files (methods, data, sequences, configurations, settings, etc.) used by the software. These files are stored in a shared folder on this PC known as the Enterprise Path.
Enterprise Machine The Enterprise Machine is a PC on the network that is used to perform overall data system management tasks such as logins to the data system and file access.
EZServers An EZServer is a PC that is used to provide control and data acquisition to one or more LC or GC systems. In general, users do not interact directly with the software on
Installation 9

EZServers. Rather, Client PCs are used to connect to EZServers and provide user control.
Agilent Instrument Controller (AIC) The AIC is an instrument control and data acquisition network appliance. It performs all the functions of the older EZServer, without the limitations and validation issues inherent in using a standard PC.
Client PCs Client PCs provide the user interface and interactive environment for users of the data system. Client PCs are used to set up runs, monitor instrument activity, review data and perform other interactive tasks.
The following definitions apply only to installations using Advanced File Security.
Enterprise Service Account This special domain user account is used internally by the data system to access the Enterprise. This account should not be the account of a normal domain user. Because of the nature of its usage, if at all possible, this account should be given a secure password with no expiration date.
Enterprise Service Group When Advanced File Security is activated, members of this group will have complete access to the Enterprise Path. This group should contain the Enterprise Service Account, as well as any other accounts that will be permitted full access to the files in the Enterprise Path. This may include accounts such as domain administrators, accounts used by network back systems, and so on. It should not contain the accounts of normal data system users.
10 Installation

Installation Notes • Microsoft .NET version 2.0 must be installed prior to
installation of the EZChrom Elite software. To install .NET 2.0, run the executable program located on the Elite installation CD, in the Updates\Net 2.0 folder.
• Certain memory leaks are a known issue with Microsoft XP SP2. For an available patch and workaround, see the following Microsoft website article: http://support.microsoft.com/default.aspx?scid=kb;en-us;319740.
• Make sure the Enterprise Machine is rebooted either before or immediately after EnterpriseSetup.exe is run to enable the Advanced File Security. Otherwise, the postings to the Instrument Activity log will be interrupted.
• Do not install EZChrom Elite in the \Program Files folder. If it is installed there, only a system administrator will be able to start EZChrom Elite.
Installation 11

12 Installation

3 Before You Begin a New Installation To simplify installation of the data system software, it is helpful to decide on some configuration options before you begin the actual software installation.
Please review the points below and fill in your choices on the Setup Checklist included in the Workstation or Client/ Server Installation sections. If you need more information, please refer to the �Definitions� section of this manual.
Note: For installations NOT using AFS, because Windows XP assigns user rights differently than earlier operating systems, please ensure that all Elite users have been granted 'Full Control' Security Permissions in the Enterprise path.
! Review the Hardware and Software Requirements
For ANY new installation, you must make sure your computer meets ALL of the requirements for this version. Please see the EZChrom Elite Hardware and Software Requirements document for details.
• Decide if Advanced File Security Will be Used Advanced File Security (AFS) is a feature wherein the data system software modifies the Active Directory permissions on the Enterprise so that only members of a special domain users group can access the files. While Advanced File Security greatly increases the level of security for your data, it also imposes restrictions on access to the files within as well as outside of the data system. Once AFS has been implemented for an Enterprise, it cannot be turned off.
For more information about the requirements and issues related to AFS, please review the Advanced File Security topic in the EZChrom Elite Installation Guide or in the online help.
Before You Begin a New Installation 13

Note: Although it is easiest to activate Advanced File Security at the time of software installation, an Enterprise may be converted to Advanced File security at any time, by running the EnterpriseSetup Utility.
! Decide Where the Enterprise Path Will Be The Enterprise Path is the location used to store all files related to the data system software, including data, methods, sequences, configurations, and so on.
The Enterprise path must always be accessible to all PCs running the data system.
In a Client/Server environment, the Enterprise Path must be a shared folder on a Microsoft Network. Typically, it is located on a Windows Active Directory File Server.
For Workstation installations, the Enterprise Path may be a shared network folder or a folder on the local PC.
! Decide Which PC will be the Enterprise Machine In a client/server installation, the Enterprise Machine is used to perform tasks such as managing logins and user permissions.
The Enterprise Machine must always be accessible to all PCs running the data system.
The Enterprise Machine can be an EZServer, a separate PC or even the Enterprise File Server (though many organizations have limitations on the software that may be installed and run on File Servers).
For Workstation installations, there is no Enterprise Machine.
! Review the Requirements for the Enterprise File Server and the Enterprise Machine
Refer to the EZChrom Elite Hardware and Software Requirements document to confirm that the Enterprise File Server and the Enterprise Machine meet the system requirements.
14 Before You Begin a New Installation

! Decide How User Logins will be Managed The data system software can be configured to work in one of three ways:
• With user lists obtained from a Windows Active Directory domain.
• With user lists created internally with the data system software
• With logins disabled
For both simplicity and security, it is strongly recommended to use Windows Active Directory domain users.
! Create the Domain Groups and Users Used by the Data System If you will be using Windows Active Directory domain user lists, this task must be performed by your domain administrator.
If you will not be running with domain user lists, you may skip these steps.
Note: When defining domain groups for use with the data system, please be sure the groups are Domain Global groups and not Domain Local groups.
! Create a Data System Users Group This group should contain the accounts of all of the users of the data system.
! Create an Enterprise Service Account This account will be used internally by the data system to access the Enterprise. This account should not be the account of a normal domain user. If at all possible, this account should be given a secure password with no expiration date.
! Create an Enterprise Service Group This group should contain the Enterprise Service Account, as well as any other accounts that will be permitted full access to the files in the Enterprise Path. This may include accounts such as domain administrators, accounts used by
Before You Begin a New Installation 15

network back systems, and so on. It should not contain the accounts of normal data system users.
When Advanced File Security is activated, only members of this group will have complete access to the Enterprise Path.
! Install Required Hardware Make sure all hardware devices, including any A/D boards, cables, GPIB boards, etc. that may be required for your system are installed. You should also connect instrument detectors and communication cables that may be required for control of your instruments. See the Hardware Installation section for details on installation of supported acquisition hardware, or documentation provided with your instrument.
4 Instrument Folders When you install the software, instrument subfolders will be created. These folders are used to provide a temporary location for the data file during C/S connection. These subfolders will be named: instrument.10XYZ, where 10XYZ is the instrument ID.
In a new installation, these instrument folders will normally be created in C:\Documents and Settings\All Users\Application Data\ChromatographySystem\Recovery Data. The folders will be used to store temporary files.
16 Before You Begin a New Installation

5 Advanced File Security Advanced File Security (AFS) is an Enterprise security model that further protects files from unauthorized access. AFS replaces the security system used in versions prior to version 3.1 of EZChrom Elite with a model that is more tightly integrated with Windows Active Directory security.
AFS is activated by running the EnterpriseSetup.exe utility as part of the software installation. This utility modifies the NTFS permissions on the entire EZChrom Elite Enterprise so that only members of a special domain users group have access to the files, and once AFS has been activated, it cannot be turned off. See the �Enterprise Setup� section for details on running this utility.
The Network Administrator must create a domain users group and a domain user account to be used by AFS for this purpose. This special user account will be used internally by EZChrom Elite to access files in the protected Enterprise.
The following diagram shows the Enterprise folder structure under the EZChrom Elite security scheme.
Advanced File Security 17

Common Folder To facilitate legitimate transfers and sharing of files between projects, a Common folder is under the Enterprise path. All logged in users with proper credentials will have access to this folder. While running an instrument, a logged in user with the proper credentials will have equal access to the Common folder and the logged in project.
The ability to access the Common folder feature will be controlled by the EZChrom Elite System Administrator
18 Advanced File Security
through a permission, which can be granted on a user-by-user basis, to access the Common directory.
AFS Requirements
• All PCs used with EZChrom Elite AFS must be members of a Windows Active Directory domain.
AFS Notes
• The file security model used prior to EZChrom Elite 3.1 has been discontinued and replaced by AFS. The old security model is no longer available.
• If you are running with the old file security model, you must run the EnterpriseSetup utility to activate AFS. If you do not, project permissions assigned within EZChrom Elite (using the System Administration Wizard) will still apply to users logging into the data system. However, the Enterprise will not be secured to prevent access by users running programs outside of EZChrom Elite.
• Once AFS has been activated for an Enterprise, it cannot be turned off.
• Enterprise files may only be archived and managed by logging in to the domain as a member of the Enterprise Service Group.
• Once AFS has been activated for an Enterprise, any third party User Programs will only get access to a copy of the data file during analysis. The original file is kept securely in the Enterprise path and is not accessible to external programs.
Advanced File Security 19

20 Advanced File Security

6 Workstation Installation Setup Worksheet
This worksheet is designed to guide you through the steps required to perform a new installation for a Workstation installation of the data system software. For each step below, please refer to the corresponding section in this chapter for details on the process.
For easier reference, during the course of the installation, please fill in the following fields as they become available:
Enterprise Path: ___________________________
Enterprise Machine: ___________________________
Please perform the following steps in this order:
" Perform the preliminary tasks outlined in the section entitled Before You Begin
" Step 1: Setup the Enterprise Path
" Step 2: Setup the Data System PC
" Step 3: Install the Software Licenses
" Step 4: Activate Advanced File Security, if desired
" Step 5: Configure the Enterprise
" Step 6: Configure Interfaces
" Step 7: Configure Instruments
" Step 8: What to Do Next
Workstation Installation 21

Workstation Step 1: Setup the Enterprise Path The files used by the data system software (methods, data, sequences, configurations, settings, etc.) are stored in a folder on the PC known as the Enterprise Path.
1. Create a folder on the data system PC to be the Enterprise Path.
2. File permissions on this folder should be set to �Full Control� for the Data System Users Group
3. Enter the folder name in the space provided for the Enterprise Path in the Setup Worksheet.
Note: When Advanced File Security is activated, (see below), the permissions on the Enterprise folder will be modified to restrict access to its contents.
Workstation Step 2: Setup the Data System PC 1. Confirm that the EZServer PC is a member of your
Windows Active Directory domain and has TCP/IP installed.
2. Confirm that the Enterprise Service Group is a member of the Local Administrators group of the EZServer PC.
3. Confirm that the Enterprise Service Group and the Data System Users Group have been granted the Windows Active Directory permissions called �Log on Locally� and �Act as Part of the Operating System�.
4. Login into the PC using the name and password of with an account that has local administration rights.
5. Install the data system software by inserting the data system software CD and following the instructions displayed. The installation menu should start automatically. If the installation menu does not open, browse the CD and run CDInstaller.exe.
During installation, leave the name of the Enterprise Machine blank and enter the folder name of the
22 Workstation Installation

Enterprise Path from the Setup Worksheet. Reboot the computer when prompted.
6. Install any optional control software you might have purchased after you install the EZChrom Elite software. To install the optional software, insert the Options CD provided. The installation menu should start automatically. If the installation menu does not open, browse the CD and run CDInstaller.exe. Be sure to follow the installation instructions provided on the Options CD for the particular software you are installing.
7. Reboot the computer.
Workstation Step 3: Install the Software Licenses In order to control instruments and perform data acquisition, a hardware license key must be physically installed, or a software license key must be installed in the Enterprise Path.
Installation of a Hardware License Key If you have a USB license key, simply plug the key into the appropriate slot. It is not necessary to run any additional programs to install the key. For Client/Server installations, the license key must be installed on the Enterprise Machine.
Note: Do not connect the USB License Key until the EZChrom Elite software has been completely installed. Otherwise, incorrect USB drivers may be loaded and your license will not function.
If you are using a software-based license key, refer to the �Installing a Software-based License Key� section and follow the instructions for installing the license key.
Workstation Step 4: Activating Advanced File Security If you decide not to activate Advanced File Security, you may skip this step.
Workstation Installation 23

When Advanced File Security (AFS) is activated, the Windows Active Directory permissions on the entire Enterprise Path are modified so that only members of a special domain users group have access to the files.
Note: Once you have enabled the advanced file security by setting an Enterprise Service Account, the change will be permanent. All dialogs for file opening, saving, etc. will reflect this change and will limit access to Enterprise locations only. In addition, file permissions for the Enterprise will be modified so that no users other than members for the Enterprise Service Group will have access to the contents of the Enterprise outside of the data system software.
1. Reboot the PC and log in using the name and password of an account with administration rights.
2. Copy the program EnterpriseSetup.exe from the \Elite\Enterprise Setup folder of the Software Installation CD into the data system installation folder, and run it.
3. When the program starts, log in using the name and password of an account with administration rights.
4. The Enterprise Service Account Dialog will be displayed. Make the following entries:
• Enter the name and password of the Enterprise Service Account.
• Enter the domain to which the Enterprise Service Account belongs.
• Enter the name of the Enterprise Service Group.
24 Workstation Installation
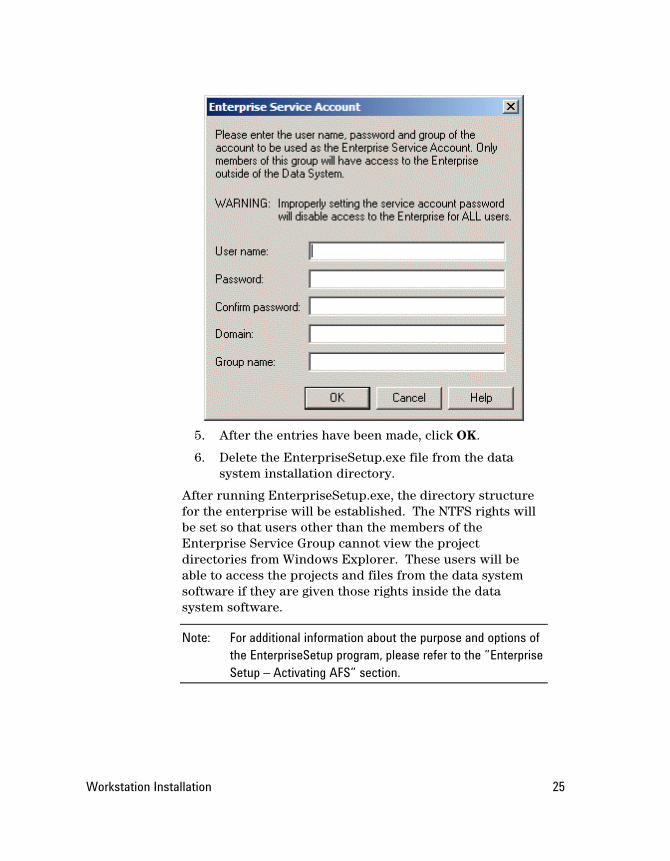
5. After the entries have been made, click OK.
6. Delete the EnterpriseSetup.exe file from the data system installation directory.
After running EnterpriseSetup.exe, the directory structure for the enterprise will be established. The NTFS rights will be set so that users other than the members of the Enterprise Service Group cannot view the project directories from Windows Explorer. These users will be able to access the projects and files from the data system software if they are given those rights inside the data system software.
Note: For additional information about the purpose and options of the EnterpriseSetup program, please refer to the �Enterprise Setup � Activating AFS� section.
Workstation Installation 25
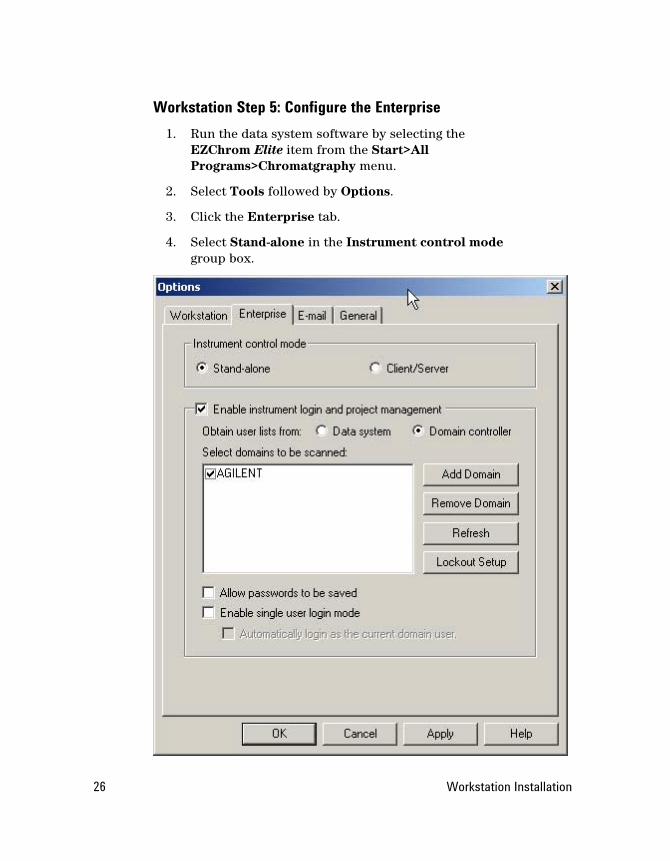
Workstation Step 5: Configure the Enterprise 1. Run the data system software by selecting the
EZChrom Elite item from the Start>All Programs>Chromatgraphy menu.
2. Select Tools followed by Options.
3. Click the Enterprise tab.
4. Select Stand-alone in the Instrument control mode group box.
26 Workstation Installation
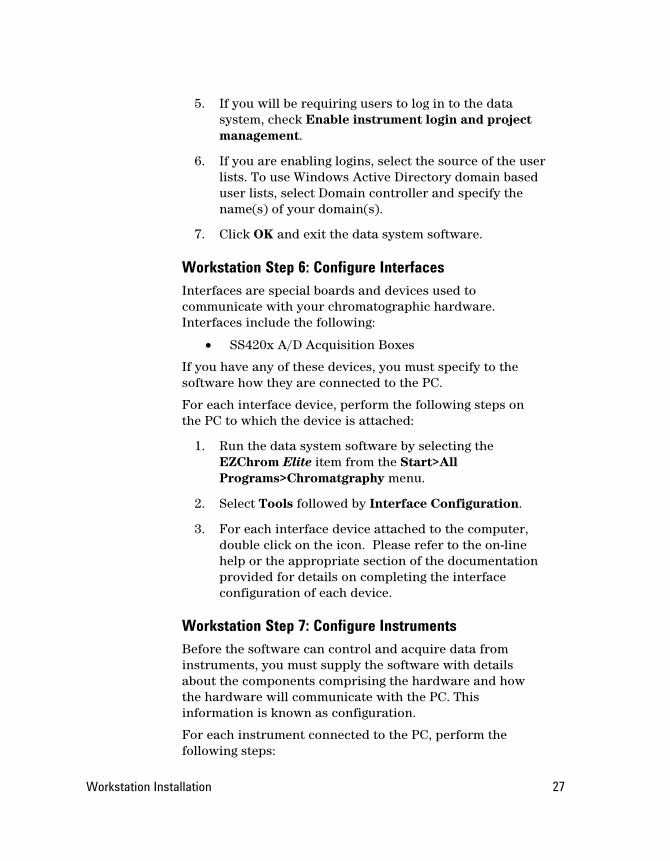
5. If you will be requiring users to log in to the data system, check Enable instrument login and project management.
6. If you are enabling logins, select the source of the user lists. To use Windows Active Directory domain based user lists, select Domain controller and specify the name(s) of your domain(s).
7. Click OK and exit the data system software.
Workstation Step 6: Configure Interfaces Interfaces are special boards and devices used to communicate with your chromatographic hardware. Interfaces include the following:
• SS420x A/D Acquisition Boxes
If you have any of these devices, you must specify to the software how they are connected to the PC.
For each interface device, perform the following steps on the PC to which the device is attached:
1. Run the data system software by selecting the EZChrom Elite item from the Start>All Programs>Chromatgraphy menu.
2. Select Tools followed by Interface Configuration.
3. For each interface device attached to the computer, double click on the icon. Please refer to the on-line help or the appropriate section of the documentation provided for details on completing the interface configuration of each device.
Workstation Step 7: Configure Instruments Before the software can control and acquire data from instruments, you must supply the software with details about the components comprising the hardware and how the hardware will communicate with the PC. This information is known as configuration.
For each instrument connected to the PC, perform the following steps:
Workstation Installation 27

1. Run the data system software by selecting the EZChrom Elite item from the Start>All Programs>Chromatgraphy menu.
2. From the File menu, click New followed by Instrument. A new icon will appear in the right pane of the main window with the title highlighted for editing. Type a descriptive name of the instrument.
3. Do a right mouse click on the instrument you want to configure, and then click Configure followed by Instrument.
4. Fill in the fields in the dialog box that appears:
Instrument Name
This is the descriptive name of the instrument. It appears next to the icon on the main Enterprise screen of the software.
Instrument Type
Select the type of instrument from the list
Server
This field is disabled for non client/server installations and should be left blank.
5. Click the Configure button. This will display a dialog box allowing you to perform model-specific
28 Workstation Installation

configuration of the instrument. Please refer to the on-line help or documentation provided for details on completing the configuration of the specific instrument.
Workstation Step 8: What to Do Next The basic installation of the data system software is complete.
At this point, you should proceed with the following tasks to prepare your data system for operation by your end users:
• Define Projects
• Setup User Permissions
Please refer to the appropriate sections of the online help or Reverence Guide for details on performing these tasks.
Note: In order for EZChrom Elite to function as a stand-alone Workstation, the user must be logged in as a local administrator.
Workstation Installation 29

30 Workstation Installation

7 Client/Server Installation Setup Worksheet
This worksheet is designed to guide you through the steps required to perform a new installation of the Client/Server version of the data system software. For each step below, please refer to the corresponding section in this chapter for details on the process.
For easier reference, during the course of the installation, please fill in the following fields as they become available:
Enterprise Path: ___________________________
Enterprise Machine: ___________________________
Please perform the following steps in this order:
" Perform the preliminary tasks outlined in the section entitled Before You Begin
" Step 1: Setup the Enterprise Path
" Step 2: Setup the Enterprise Machine
" Step 3: Setup the Agilent Instrument Controllers
" Step 4: Setup any Data Acquisition PCs (EZServers)
" Step 5: Setup the Client PCs
" Step 6: Install the Software Licenses
" Step 7: Activate Advanced File Security, if desired
" Step 8: Configure the Enterprise
" Step 9: Configure Interfaces
" Step 10: Configure Instruments
" Step 11: What to Do Next
Client/Server Installation 31
The following steps describe how to install EZChrom Elite in a Client/Server environment.
Client/Server Step 1: Setup the Enterprise Path The Enterprise File Server is a PC on the network that is used to store all of the files (methods, data, sequences, configurations, settings, etc.) used by the software. These files are stored in a shared folder on this computer known as the Enterprise Path.
In a client/server environment, the Enterprise Path typically resides on a file server in the Windows Active Directory domain.
1. Create a folder on the Enterprise File Server machine to be the Enterprise Path.
2. File permissions on this folder should be set to �Full Control� for the Data System Users Group
3. Share this folder, giving �Full Control� to Everyone for the Share.
4. Enter the share name in the space provided for the Enterprise Path in the Setup Worksheet. Note that the Enterprise Path must be in UNC format (i.e. \\ComputerName\ShareName )
5. Confirm that the Enterprise Service Group and the Data System Users Group have been granted the Windows Active Directory permission called Access this Computer from the Network.
Note: When Advanced File Security is activated, the permissions on the Enterprise folder will be modified to restrict access to its contents.
Client/Server Step 2: Setup the Enterprise Machine 1. Confirm that the Enterprise Service Group and the
Data System Users Group have been granted the Windows Active Directory permission called "Log on Locally". The Enterprise Service Account/Group needs the "Access this computer from the network"
32 Client/Server Installation

privilege on the machine containing the Enterprise Path.
2. Login into the Enterprise Machine using the name and password of any account that has local administration privileges. In a mixed NT and Active Directory network environment, the Enterprise Machine user must be an Active Directory user.
3. Install the data system software by inserting the data system software CD and following the directions presented. The installation menu should start automatically. If the installation menu does not open, browse the CD and run CDInstaller.exe. During installation, leave the field labeled Enterprise Machine blank, and specify the share name from the Setup Worksheet as the Enterprise Path. Reboot the computer when instructed.
4. Install any optional software you might have purchased after you install the EZChrom Elite software. To install the optional software, insert the Options CD provided. The installation menu should start automatically. If the installation menu does not open, browse the CD and run CDInstaller.exe. Be sure to follow the installation instructions provided on the Options CD for the particular software you are installing.
5. Reboot the computer after the installation of the data system software and login using the name and password of an account with local administration privileges.
6. Run the data system software by selecting the EZChrom Elite item from the Start>All Programs>Chromatgraphy menu. This will create the necessary folder structure in the Enterprise path, as required by the data system. (Running Key.exe will also do this.) When the main screen appears, select the File > Exit menu item.
7. Run the program DCOMServerSettings.exe, which is found in the main data system installation folder. Make the following entries:
Client/Server Installation 33

• Select Auto Logon for the Run As selection
• Enter the name and password of an account that has local Administrative privileges.
• After the entries have been made, click the Set button.
Note: For additional information about the purpose and options of the DCOMServerSettings program, please refer to the�DCOM Server Settings Options� section.
7. Reboot the computer.
Client/Server Step 3: Setup the Instrument Controllers The Agilent Instrument Controller (AIC) network appliances must be installed and configured according before you continue.
1. Please refer to the Agilent EZChrom Elite Instrument Controller Installation and Configuration Guide included with the device for details on setting up these devices. This manual is also provided as a PDF file in the
34 Client/Server Installation
\\Manual\Optional Software Manuals\ folder of the EZChrom Elite software distribution CD.
2. Confirm that the Enterprise Service Group has been granted the Windows Active Directory permissions called �Log on Locally� and �Act as Part of the Operating System�.
Client/Server Step 4: Setup the EZServers EZServers are PC�s that are used to provide control and data acquisition to one or more LC or GC systems. In general, users do not interact directly with the software on EZServers. Rather, Client PCs are used to connect to EZServers and provide user control.
Once configured, EZServers may be run without a monitor, keyboard or mouse attached. If you do not have any EZServers, skip this step.
For each EZServer PC perform the following steps:
1. Confirm that the EZServer PC is a member of your Windows Active Directory domain and has TCP/IP installed.
2. Confirm that the Enterprise Service Group has been granted the Windows Active Directory permissions called �Log on Locally� and �Act as Part of the Operating System�.
3. Login into the EZServer using the name and password of an account with local administration rights.
4. Install the data system software by inserting the software CD and following the instructions. During installation, enter the name of the Enterprise Machine and the share name of the Enterprise Path from the Setup Worksheet. Reboot the computer when prompted.
5. Install any optional software you might have purchased after you install the EZChrom Elite software. To install the optional software, insert the Options CD provided. The installation menu should
Client/Server Installation 35

start automatically. If the installation menu does not open, browse the CD and run CDInstaller.exe. Be sure to follow the installation instructions provided on the Options CD for the particular software you are installing.
6. Reboot the computer after the installation of the data system software and login using the name and password of a local administration account.
Note: Though it is not the preferred configuration, EZServers can be installed for use as both a server and a client workstation.
7. Run the program DCOMServerSettings.exe, which is found in the main data system installation folder.
If the EZServer will be dedicated to data acquisition, make the following entries:
• Select Auto Logon for the Run As selection
• Enter the name and password of an account that has local Administrative privileges
If the EZServer will function as both a data acquisition station and a client PC, make the following entries:
• Select Interactive User for the Run As selection
• After the entries have been made, click the Set button.
36 Client/Server Installation

Note: For additional information about the purpose and options of the DCOMServerSettings program, please refer to the �DCOM Server Settings Options� section.
8. Reboot the computer.
Client/Server Step 5: Setup the Client PCs For each PC that will serve as a client on the Enterprise, perform the following steps:
1. Confirm that the Enterprise Service Group and the Data System Users Group have been granted the Windows Active Directory permission called Log on Locally.
2. Confirm that the Data System Users Group has been granted the Windows Active Directory permission called Act as Part of the Operating System.
3. Login into the Client PC using the name and password of a user with local administrator rights.
Client/Server Installation 37

4. Install the data system software by inserting the software CD and following the instructions. During installation, enter the name of the Enterprise Machine and the share name of the Enterprise Path from the Setup Worksheet. Reboot the computer when prompted.
5. Install any optional software you might have purchased after you install the EZChrom Elite software. To install the optional software, insert the Options CD provided. The installation menu should start automatically. If the installation menu does not open, browse the CD and run CDInstaller.exe. Be sure to follow the installation instructions provided on the Options CD for the particular software you are installing.
6. Reboot the computer.
Client/Server Step 6: Install the Software Licenses In order to control instruments and perform data acquisition, a hardware license key must be physically installed, or a software-based license key must be installed in the Enterprise Path.
In Client/Server installations, the license key is a pool of software licenses that must be installed in the Enterprise Path. As clients connect to the Enterprise, the count of the remaining available licenses is maintained by the software.
Installation of a Hardware License Key If you have a USB license key simply plug the key into the appropriate slot. It is not necessary to run any additional programs to install the key. For Client/Server installations, the license key must be installed on the Enterprise Machine.
If you are using a software-based license key, refer to the Installing a Software-based License Key section.
Client/Server Step 7: Activating Advanced File Security If you decide not to activate Advanced File Security, you may skip this step.
38 Client/Server Installation

This version of the data system software introduces a new Enterprise security model called Advanced File Security (AFS) to further protect files from unauthorized access. AFS replaces the security system used in previous versions of the software with a model that is more tightly integrated with Windows Domain security. When AFS is activated, the Windows Active Directory permissions on the entire Enterprise Path are modified so that only members of a special domain users group have access to the files.
Note: Once you have enabled the advanced file security by setting an Enterprise Service Account, the change will be permanent. All dialogs for file opening, saving, etc. will reflect this change and will limit access to Enterprise locations only. In addition, file permissions for the Enterprise will be modified so that no users other than members for the Enterprise Service Group will have access to the contents of the Enterprise outside of the data system software.
Activation of Advanced File Security may be performed from the Enterprise Machine or any other PC with the data system software installed.
1. Reboot the PC and log in using the name and password of the Enterprise Service Account.
2. Copy the program EnterpriseSetup.exe from the \\Elite\Enterprise Setup\ folder of the software installation CD to the main data system installation folder, and run it.
3. When the program starts, log in using the name and password of an account that has the authority to change the folder/file rights on the enterprise file server.
Client/Server Installation 39

4. The Enterprise Service Account Dialog will be
displayed. Make the following entries:
• Enter the name and password of the Enterprise Service Account
• Enter the domain to which the Enterprise Service Account belongs
• Enter the name of the Enterprise Service Group
5. After the entries have been made, click OK.
40 Client/Server Installation

6. Delete the EnterpriseSetup.exe file from the data
system installation directory.
7. After running EnterpriseSetup.exe, the NTFS rights will be set so that users other than the Enterprise Administrator cannot view the project directories from Windows Explorer. These users will be able to access the projects and files from the data system software if they are given those rights inside the data system software.
Note: For additional information about the purpose and options of the EnterpriseSetup program, please refer to the �Enterprise Setup � Activating AFS� section.
Client/Server Installation 41
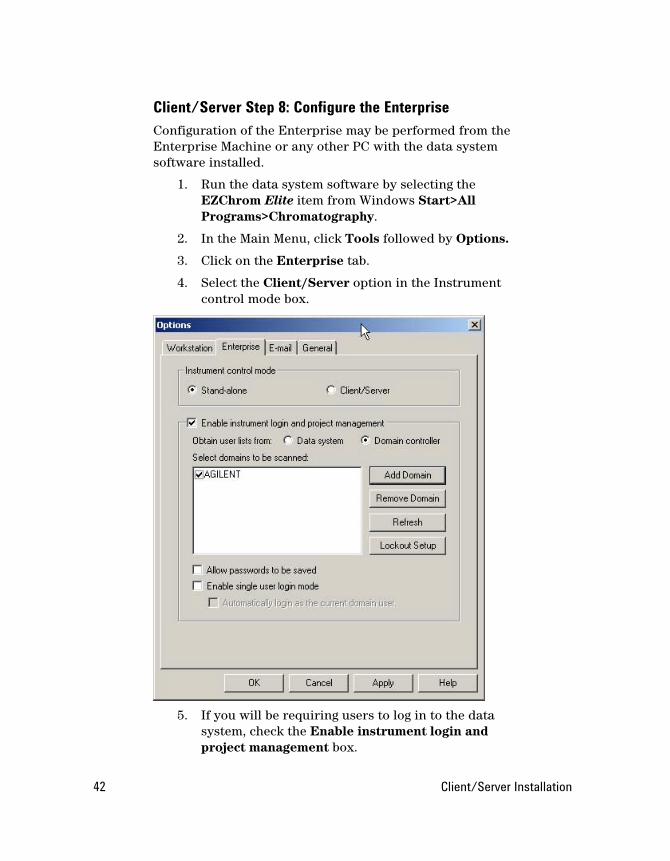
Client/Server Step 8: Configure the Enterprise Configuration of the Enterprise may be performed from the Enterprise Machine or any other PC with the data system software installed.
1. Run the data system software by selecting the EZChrom Elite item from Windows Start>All Programs>Chromatography.
2. In the Main Menu, click Tools followed by Options.
3. Click on the Enterprise tab.
4. Select the Client/Server option in the Instrument control mode box.
5. If you will be requiring users to log in to the data
system, check the Enable instrument login and project management box.
42 Client/Server Installation

6. If you are enabling logins, select the source of the user lists. To use Windows Active Directory domain based user lists, select Domain controller and specify the name(s) of your domain(s).
7. Click OK and exit the data system software.
Client/Server Step 9: Configure Interfaces Interfaces are special boards and devices used to communicate with your chromatographic hardware. Interfaces include the following:
• SS420x A/D Acquisition Boxes
• CIO/DIO Boards
If you have any of these devices, you must specify to the software how they are connected to the PC.
Interface configuration must be performed directly from the PC, server, or AIC to which the interface device is attached. They cannot be configured from a remote computer on the network.
For each interface device, perform the following steps on the PC to which the device is attached:
1. Run the data system software by clicking Windows Start>All Programs>Chromatography and then select EZChrom Elite.
2. From the Tools menu, click Interface Configuration.
3. For each interface device attached to the computer, double click on the icon. Please refer to the on-line help or the appropriate section of the hard copy instructions for details on completing the interface configuration of each device.
Client/Server Step 10: Configure Instruments Before the software can control and acquire data from instruments, you must supply the software with details about the components comprising the hardware and how the hardware will communicate with the PC. This information is known as configuration.
Client/Server Installation 43

Unlike interface configuration, instrument configuration may be performed from any PC in the Enterprise.
For each instrument, perform the following steps:
1. Run the data system software by clicking Windows Start>All Programs>Chromatography and then select EZChrom Elite.
2. From the File menu, click New followed by Instrument. A new icon will appear in the right pane of the main window with the title highlighted for editing. Type a descriptive name of the instrument.
Note: In a larger Enterprise, it may be convenient to organize your instruments by location. Locations may be created within the Enterprise hierarchy by selecting the File > New > Location/Group menu item from the main menu.
3. Do a right mouse click on the instrument icon and then select Configure followed by Instrument.
4. Fill in the fields in the dialog that appears:
Instrument Name
This is the descriptive name of the instrument. It appears next to the icon on the main Enterprise screen of the software.
Instrument Type
44 Client/Server Installation
Select the type of instrument from the drop down list
Server
This field must contain the UNC name of the PC or Agilent Instrument Controller to which the instrument is physically attached. Clicking the button to the right of the field will allow you to browse to the proper location.
5. Click the Configure button. This will display a dialog allowing you to perform model-specific configuration of the instrument. Please refer to the on-line help or printed documentation for details on completing the configuration of the instrument.
Client/Server Step 11: What to Do Next The basic installation of the data system software is complete.
At this point, you should proceed with the following tasks to prepare your data system for operation by your end users:
• Define Projects
• Setup User Permissions
Please refer to the appropriate sections of the instructions for details on performing these tasks.
Client/Server Installation 45

46 Client/Server Installation

8 Installation on a Citrix Server or Windows Terminal Server
In a client/server installation, data system clients may be served to end users using a Citrix MetaFrame XP Server or Windows Terminal Server. In this scenario, the client software is installed on the Citrix Server or Windows Terminal Server. To use the software with Citrix MetaFrame or Windows Terminal Server, perform the following steps:
1. Confirm the hardware requirements for running the data system software on a Citrix MetaFrame XP Server or Windows Terminal Server. (Refer to the EZChrom Elite Hardware and Software Requirements document for details.)
2. Confirm that Citrix MetaFrame XP or Windows Terminal Server has been properly installed and configured.
3. Confirm that the Enterprise Service Group is a member of the Local Administrators group of the Citrix Server or Windows Terminal Server PC.
4. Confirm that the Enterprise Service Group has been granted the Windows Active Directory permissions called "Log on Locally" and the Data System Users Group has been granted the "Act as Part of the Operating System" privilege.
5. From Explorer, check that the following DLLs in the System32 folder have Read (RX) privileges granted to Everyone:
oleaut32.dll
odbc32.dll
odbcint.dll
6. Login into the Citrix Server or Windows Terminal Server PC using the name and password of an account with local administration rights.
Installation on a Citrix Server 47

7. Use the Add/Remove programs functions to install the data system software on the Citrix server or Windows Terminal Server from the data system CD. Do NOT install by running the Install option of the CD auto-run menu. During installation, enter the name of the Enterprise Machine and the share name of the Enterprise Path from the Setup Worksheet.
8. Reboot the computer after the installation of the data system software and login using the name as password of an account with local administration rights.
9. Run the program DCOMServerSettings.exe, which is found in the main data system installation folder. Make the following entry:
• Select Citrix/Terminal Server for the Run As selection
10. Click the Set button.
48 Installation on a Citrix Server
Note: For additional information about the purpose and options of the DCOMServerSettings program, please refer to the �DCOM Server Settings� section.
11. Reboot the computer.
12. For Windows 2000 Citrix Servers with SP4,
Run regedit on the Citrix server and go to HKEY_LOCAL_MACHINE\SYSTEM\CurrentControlSet\Control\Session Manager and add a new DWORD value called ObjectSecurityMode. Set its value to 0. Reboot the Citrix server.
13. After the installation is complete, you must publish the application in the Citrix Neighborhood before Citrix ICA clients can access the software.
For additional information on the installation and use of the software in a Citrix MetaFrame or Windows Terminal Server environment, please review the software release notes and contact your local support representative.
Note: When using Citrix clients, printer name (including path) should be no longer than 50 characters long.
If you are running Elite as a single session on Citrix, see �Notes for Running Elite as a Single Session on Citrix�.
Notes for Running Elite as a Single Session on Citrix When you launch EZChrom Elite and close it, SSIPlatformNT.exe stays resident in memory. This means that when you launch EZChrom Elite as a published Citrix application, and then close CSMain, the Citrix client session remains open on the Citrix Server.
If your published app is configured to restrict it to a single session at a time, this may cause problems. If this is an issue, there is a Citrix Knowledge Base article that addresses this:
http://support.citrix.com/article/entry.jspa?entryID=2086
In summary, you need to add the following registry key:
Installation on a Citrix Server 49

HKEY_LOCAL_MACHINE\SYSTEM\CurrentControlSet\Control\Citrix\wfshell\TWI
Value Name: LogoffCheckSysModules
Type: REG_SZ
String: SSIPla~1.exe,SSIPlatformNT.exe (be sure there are no spaces after the comma)
Note: Wait about a minute after closing Elite for the session to end.
50 Installation on a Citrix Server

9 Installation Qualification To verify that all data system files were successfully installed, run the Installation Qualification program. This program verifies the integrity of the software by calculating a checksum on each of the program files and comparing them to the known proper values. To run the Installation Qualification program, from Windows Start select Programs followed by Chromatography and then select Installation Qualification (IQ).
The IQ program will generate an Installation Qualification Report that should have the result "PASSED". If it does not pass, you need to check that all the computer requirements and preparations were done properly and then re-install the data system. Do not proceed with using the system if IQ does not pass.
10 Software License Installation In order to run the data system software, you must install a "software key" or "hardware license key" that enables operation of the software on your computer. The key is your software license. It contains your data system serial number and determines the number of instruments and other options that may be used with your system.
Most systems ship with a hardware license key. If you have a USB license key, simply plug the key into the appropriate slot. It is not necessary to run any additional programs to install the key. If you are installing a software-based license key, see the Installation of a Software-Based License Key section.
If you have requested a software-based license, a license key disk containing a file with all the purchased options (for example, number of instruments, system suitability, PDA, and other options) was provided with your shipment. This disk has no copy protection and should be saved for uninstalling and reinstalling the software.
Installation Qualification 51
To install the license, or upgrade an existing license, you must run the key installation wizard from the Key.exe program. This program will be located in the program folder following software installation. The wizard will request user information and serial number, then will provide a Request Code. You must contact your vendor with this number to obtain a valid Enable Code for your system. Once this code is entered in the Key Installation Wizard, the key installation will be completed and your software will become fully functional.
If you require more instruments or other options than your license allows, contact your sales representative for upgrade information.
Note: You must uninstall the evaluation license before installation of your final software license.
Installing a Software-Based License Key The data system is normally shipped with a hardware-based license key that plugs into a USB port on the computer. If you have requested a software-based license, you should follow the instructions below to install it.
1. Run the Key program by clicking Windows Start>All Programs>Chromatography and then select Key.
2. From the Key program, seect Tools followed by Install License Options. Read the introductory screen of the Wizard and then click Next.
3. Insert the license floppy disk and click the Browse button to specify the path to the license. Your list of purchased options will be displayed. Click Next.
Note: The license diskette can only be used once to install the license key. Therefore, it is very important that you choose to create a License Repair Disk when prompted and store it in a secure place.
4. Enter your name and the software serial number in the spaces provided and then click Next. (The software
52 Software License Installation

serial number can be found on the CD envelope, or on the CD itself.)
5. If your PC has access to the Internet, click the Online Activation button to obtain the Enable Code for the software and click Finish.
If your PC does not have access to the Internet, click the Contact Info button to display other methods of obtaining the Enable Code for the software. When the code has been entered, click Finish.
Software License Installation 53

Note: If you are installing an evaluation license for the software, you may enter the evaluation code in the field labeled Enable Code and click the Finish button. See Installation of Evaluation License for details on using the Evaluation Code.
6. Click the Create License Backup button when prompted and specify the floppy drive letter or folder where you want to create the License Backup.
Note: It is very important to create a license backup. This backup will be required if you need to re-install the license for any reason.
Note: For additional information about the purpose and options of the Key program, please refer to the �Key Program� section.
54 Software License Installation
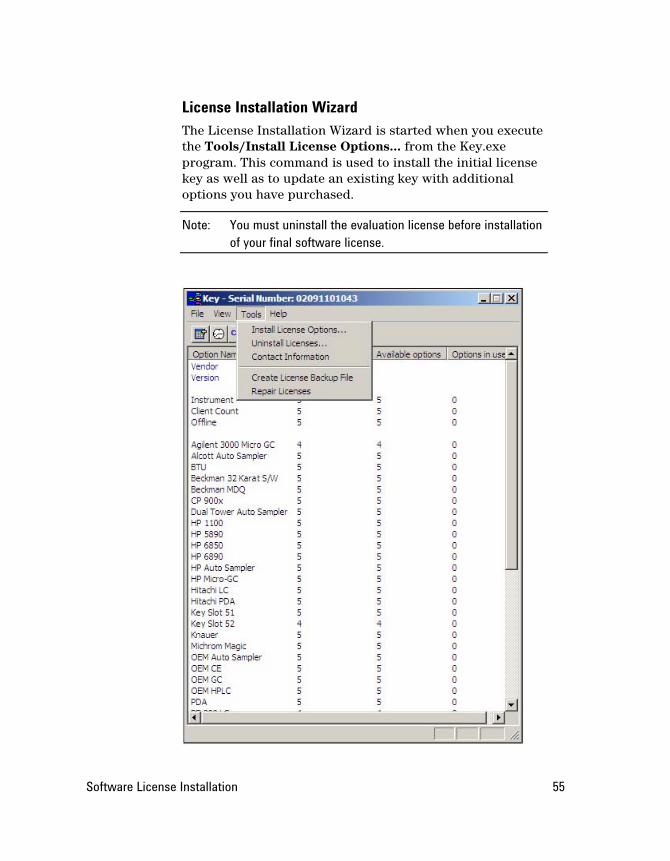
License Installation Wizard The License Installation Wizard is started when you execute the Tools/Install License Options� from the Key.exe program. This command is used to install the initial license key as well as to update an existing key with additional options you have purchased.
Note: You must uninstall the evaluation license before installation of your final software license.
Software License Installation 55
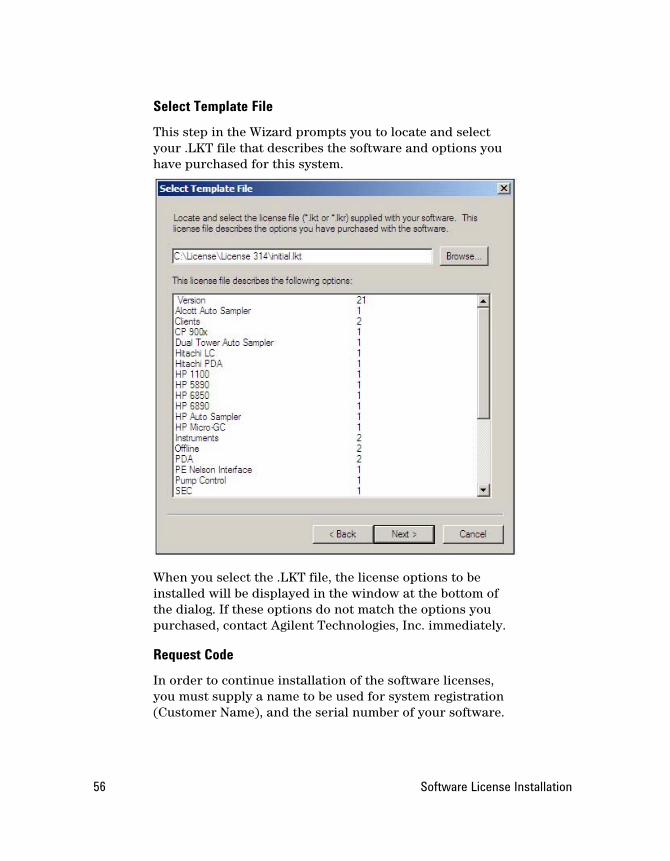
Select Template File This step in the Wizard prompts you to locate and select your .LKT file that describes the software and options you have purchased for this system.
When you select the .LKT file, the license options to be installed will be displayed in the window at the bottom of the dialog. If these options do not match the options you purchased, contact Agilent Technologies, Inc. immediately.
Request Code In order to continue installation of the software licenses, you must supply a name to be used for system registration (Customer Name), and the serial number of your software.
56 Software License Installation

The serial number should be located on the CD case, or on the CD itself.
Uninstall License Wizard To uninstall a software license, run the Key.exe program, and select the Tools/Uninstall Licenses� command. This will start the Uninstall License Wizard.
Software License Installation 57

When you complete this wizard, all licenses will be removed from your system, an .LKR file will be created for use in reinstalling the licenses, and you will be provided with an "Uninstall Code" which must be used to obtain a new Enable Code for reinstalling the licenses.
Note: You must have the disk with the .lkt file on it in order to re-install the license or move it to another location. Keep this disk in a safe place. You should uninstall the license if you are going to re-name your computer, then re-install after the computer has been re-named.
Output File In this screen, you should select the location where you want to have the .LKR file created. In most cases, this would be a floppy, but you can choose another location.
58 Software License Installation

Make sure the location for creation of the .LKR file is accessible from the computer where you intend to reinstall the licenses.
When you click the Finish button, the licenses will be removed from your computer, an .LKR file will be created in the designated location, and you will receive an Uninstall Code.
Save the information provided. It will be required to obtain an Enable Code for reinstallation of the software licenses on another computer.
Software License Installation 59

Key Program The Key program is used to display the status of the licenses available on a software license key. Once you have your software license key installed, you can view its options by running the Key.exe program located in the software program folder.
This program allows you to view your key status, and also provides a means for creating a License Backup file.
File Exit Exit the key program.
View Auto Refresh This automatically updates the status of the network key, and sets the number of seconds between refresh.
Refresh Use this to update the status of the network key.
Toolbar This toggles the display of toolbar icons.
Status Bar This will toggle the display of the Status line.
Key Status This displays information about the key, including current enterprise path and program directory.
60 Software License Installation

Tools Install License Options� Use this to install license or update current license with new options.
Uninstall Licenses Use this to uninstall current licenses from the current machine.
Contact Information Displays contact information for your software.
Create License Backup File This command creates a license repair file to be used to recover an existing license that has been damaged.
Repair Licenses This command uses the License Backup file for the current computer to restore the existing license to its original state.
Software License Installation 61
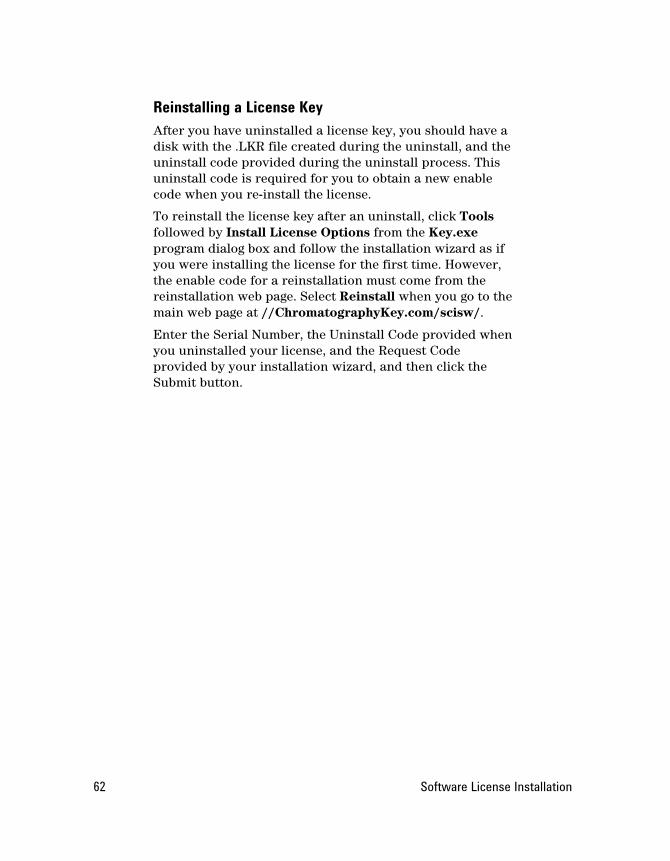
Reinstalling a License Key After you have uninstalled a license key, you should have a disk with the .LKR file created during the uninstall, and the uninstall code provided during the uninstall process. This uninstall code is required for you to obtain a new enable code when you re-install the license.
To reinstall the license key after an uninstall, click Tools followed by Install License Options from the Key.exe program dialog box and follow the installation wizard as if you were installing the license for the first time. However, the enable code for a reinstallation must come from the reinstallation web page. Select Reinstall when you go to the main web page at //ChromatographyKey.com/scisw/.
Enter the Serial Number, the Uninstall Code provided when you uninstalled your license, and the Request Code provided by your installation wizard, and then click the Submit button.
62 Software License Installation

Copy the Enable Code into the license installation wizard and step through the final wizard screens to complete the key installation.
Repairing a Software License Key
Should you for some reason lose access to your software license key, you can restore it to its original location using your License Backup file. (See �Creating a License Backup File�.) To repair your software license, insert the License Repair Disk in your floppy drive, and then run the Key program in your data system program folder.
Software License Installation 63

Select the Tools/Repair Licenses command. The program will restore your license to its original location. Note that the repair licenses command will not overwrite an existing license key.
Creating a License Backup File
Once you have installed your software license key, you should create a License Backup File. This is highly recommended. This will create a License Backup File on a formatted floppy disk, on another location on your hard drive or on the network, and contains your software license
64 Software License Installation

information. If you need to restore your software license because of an unexpected error in your system, this file will recover it for you.
Note: You can only use the License Backup File to re-install your software license to its original location. It cannot be used to install your license to another machine or location.
The License Backup File is created by running the Key.exe program, located in your data system program directory. Select the /Tools/Create License Backup File command. Enter the drive letter for the floppy drive or folder location, or click the Browse... button to browse to a location where you want to save the Backup File and click OK to continue.
Your software license information will be transferred to the License Backup File.
Save this disk in a secure location, or note the location of the Backup File should you need it to repair your software license. If you have more than one data system, be sure to note the correct computer name and enterprise path so you can identify the correct license backup file if needed.
Software License Installation 65

66 Software License Installation
11 Installation of an Evaluation License Evaluation licenses are available that enable full use of the software and options for a limited time. These licenses are designed to aid customers in evaluation of the software or for demonstration of the software.
Note: Be sure to UNINSTALL the evaluation license prior to installation of the final purchased software.
The process of installing an evaluation license is the same as that for installing a regular license. The evaluation license .LKT file is provided on a floppy disk. If the Evaluation Enable Code is entered during license installation, the software and options will be operational for a designated period of time.
1. Run he Key program by clicking Windows Start>All Programs>Chromatography and then select Key..
2. From the Key program, select Tools followed by Install License Options. Read the introductory screen of the Wizard and click Next.
3. Insert the license CD and click the Browse button to specify the path to the license. Your list of purchased options will be displayed. Click Next.
4. Enter your name and the software serial number in the spaces provided and then click Next. (The software serial number may be found on the CD envelope, or on the CD itself.)
5. For a 7-day evaluation only, enter the enable code when prompted. This code is good for the version you are installing only. The evaluation code can be found in the Release Notes.
When the code has been entered, click Finish.
Installation of an Evaluation License 67

Note: If you are installing an evaluation license for the software, you may enter the evaluation code in the field labeled Enable Code and click the Finish button. The evaluation license will grant you full access to the software for the evaluation period. The evaluation code can only be used once.
68 Installation of an Evaluation License

12 Upgrade Software Installations Please review the following prior to upgrading your existing data system installation to a new version:
• For Client / Server installations, the entire enterprise, including all clients, EZServers, AICs and the Enterprise Machine must be upgraded. Do not try to work with data or communicate with instruments until the entire Enterprise has been upgraded to the new version.
• The upgrade process will preserve your license and all of your instrument configurations, user and project permissions, and other system settings. Newer versions of are always able to read methods, data, sequences and other files generated by older versions of the software. Note however, that once a file has been modified (including recalibration or reanalysis) by a newer version, that file will no longer be readable in an older version of the software.
• For the above reasons, once you upgrade to a newer version of the software, you cannot revert back to the older version of the software and retain access to your existing Enterprise.
• The enterprise default template folder is created only once, when the enterprise is first set up, and not overwritten with new versions of software. This is to prevent over-writing templates that may have been changed by the user. If you want to re-install the default templates provided with a new build, the folder will have to be updated manually.
Before You Begin an Upgrade Before you start a software upgrade, please review the following:
Upgrade Software Installations 69

• Make sure your system meets the requirements for this version. Please see the EZChrom Elite Hardware and Software Requirements document for details.
• Review the entire Installation Instructions document provided to identify any specific issues that apply to you.
• Review the Release Notes for this version of the software to identify any specific issues that apply to you.
• If you are upgrading from a software version prior to 2.7, contact Agilent Technologies for additional information before performing the upgrade.
• Backup all the files in your enterprise folder. For Workstation systems, this is a folder inside the installation folder for the software (�C:\EZChrom Elite\Enterprise� by default). For client/server systems, this is the shared Enterprise Path folder on the Enterprise File Server.
Upgrading EZChrom Elite Workstations 1. First, uninstall your existing EZChrom Elite
software, using Add/Remove Programs in the Windows Control Panel.
2. Then, proceed to the �Workstation Step 2 �section and follow the procedures for a new installation of the data system. Make sure you specify the same Enterprise path that you used before.
Upgrading EZChrom Elite Client/Server Installations When upgrading a client/server enterprise, every Client PC, AIC, EZServer and The Enterprise Machine must be upgraded before attempting to work with data or communicate with instruments.
70 Upgrade Software Installations

Upgrade Procedure for Client PCs, EZServers and the Enterprise Machine
1. First, uninstall your existing EZChrom Elite software, using Add/Remove Programs in the Windows Control Panel.
2. Then, proceed to the �Client/Server Step 2� section and follow the procedures for a new installation of the data system. Make sure you select the same Enterprise path as you used before.
Upgrade Procedure for AICs
Refer to the Agilent EZChrom Elite Instrument Controller Installation and Configuration Guide provided for details on how to upgrade the Agilent Instrument Controllers.
Upgrading an Existing Software License If you are updating your software from a previous version, or if you are adding instruments or options to your existing software, you will have to update your software license key.
To install new software options after you have installed your software license key, you must run the license wizard again. This will upgrade your license for the options you have purchased. Run the Key.exe program from the data system program directory. Select the Tools>Install License Options� command.
Upgrade Software Installations 71

The license wizard will recognize your existing software key and start the upgrade wizard. The upgrade license key is provided on a CD.
72 Upgrade Software Installations
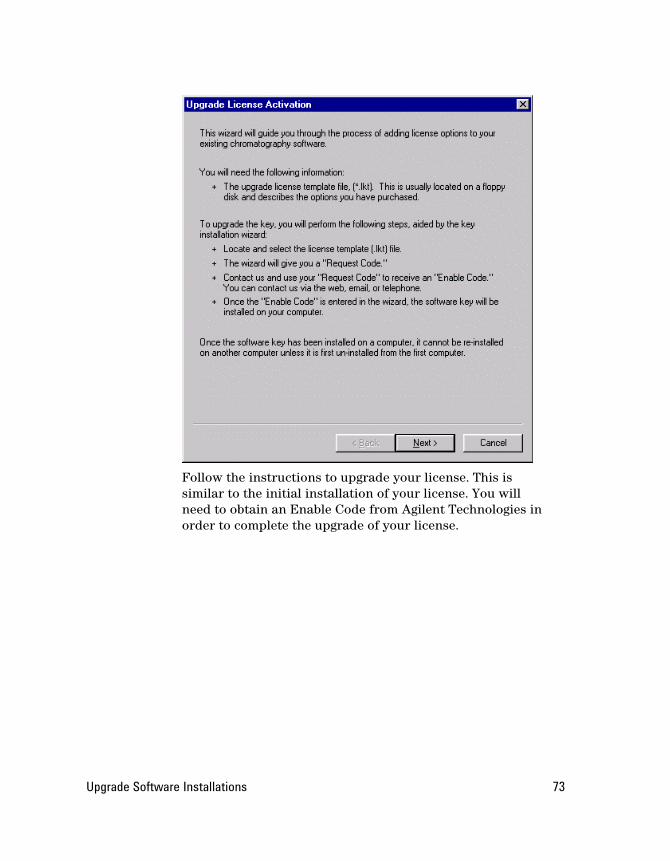
Follow the instructions to upgrade your license. This is similar to the initial installation of your license. You will need to obtain an Enable Code from Agilent Technologies in order to complete the upgrade of your license.
Upgrade Software Installations 73

74 Upgrade Software Installations
13 Enterprise Setup � Activating AFS When working in a multi-user environment, the enterprise can be set up so that only qualified users of the data system have access to data system files (methods, sequences, data files, etc.) This is accomplished by running the EnterpriseSetup.exe program. Once AFS has been activated, it cannot be turned off. To prepare to run the utility, copy the EnterpriseSetup.exe program from the \Elite\Enterprise Setup folder of the Software Distribution CD to your Elite installation folder.
Note: Make sure the Enterprise Machine is rebooted either before or immediately after EnterpriseSetup.exe is run to enable the Advanced File Security. Otherwise, the postings to the Instrument Activity log will be interrupted.
Preparing to Run Enterprise Setup
Prior to running this program, your network administrator should create a group that contains a special service account (called the Enterprise Service Account), and the account used for automated data backups on the network, if any. Your normal data system users should not be members of this group. Only members of this group will have access to the Enterprise when outside of the data system. The Enterprise Service Account will be used internally by the software to access the data system files in the protected Enterprise.
When you run this program for the first time, you will be asked to log in with the credentials of a user who has the rights to modify permissions on the Enterprise path.
Enterprise Setup � Activating AFS 75

Enter the name and password of the Enterprise Service Account. Next, you will be presented with an Enterprise Service Account dialog. In this dialog, re-enter Enterprise Service Account name and password, then confirm the password and enter the domain and group of this account.
76 Enterprise Setup � Activating AFS

Note: Once you have enabled the advanced file security by setting an Enterprise Service Account, the change will be permanent. All dialogs for file opening, saving, etc. will reflect this change and will limit access to Enterprise locations only. In addition, file permissions for the Enterprise will be modified so that no users other than members of the Enterprise Service Group will have access to the contents of the Enterprise outside of the data system.
Enterprise Service Account Maintenance
Once the Enterprise Service Account has been set up, running EnterpriseSetup.exe will take you to the Enterprise Service Account Maintenance screen. From here you can view and update the account password or group name.
Enterprise Service Account Password The Enterprise Service account should be managed by network administrators just like other service accounts on their network. This is not an account intended for user logons, but primarily for the data system to access the secure file storage area. Only the system administrator should have the password.
Use the following procedure to change enterprise service account password:
1. Stop all running instruments in the enterprise.
2. Change the enterprise service account password.
Enterprise Setup � Activating AFS 77

3. Run EnterpriseSetup to enter the new password.
4. Resume normal operations.
If any instruments were not stopped, the enterprise service account password used by the running instrument will not be updated and the enterprise service account may become locked out.
DCOM Server Settings Options The DCOMServerSettings program is a utility used to designate how machines in the Enterprise log in when rebooted. Using this program, the data system administrator can specify the name of a service account used internally by the software to gain access to the Enterprise files.
This utility must be run on each machine that performs unattended access to the Enterprise, including the Enterprise Machine, EZServers and Agilent Instrument Controllers. It should not be run on client PCs.
DCOMServerSettings is found in the main folder into which the data system software was installed. When this utility is run, the following dialog box is displayed:
78 Enterprise Setup � Activating AFS
The following options are available for this utility:
Specific User Select this option if you are going to use the EZServer without a keyboard and monitor as a dedicated data acquisition machine.
Note: When Specific User is selected, only 3 instruments can be opened at one time. This limit is imposed by the Windows Workstation software and its 10 simultaneous connections.
This option requires you to enter the username and password of a domain account that can access the Enterprise. Typically, this is the name and password of an account that has local Administrative privileges. The software uses the specified account �in the background" to run the application
The Enterprise Machine will use this account to authenticate users to the domain controller. EZServers and Agilent Instrument Controllers will use this account to access the Enterprise.
Interactive User Select this option if you are going to use the EZServer with a keyboard, mouse, and monitor to serve as both a data acquisition server and as a client workstation. A user will have to log-in to use the software.
Auto Logon This is the recommended option for Enterprise Machine, EZServers and Agilent Instrument Controllers (AICs).
Select this option if you want Windows to automatically log on when the machine is turned on.
Enterprise Setup � Activating AFS 79

Note: The Autologon user should not have a password with an expiration, as this may cause problems with automatic login. If the password expires, you will need to reset the password to re-enable the Agilent Instrument Controller.
Citrix/Terminal Server
Select this option if you are going to use the EZServer as a Citrix/Terminal Server. Click the Set button to apply the selections.
Note: Improper use of this utility can disable access to the Enterprise and/or prevent instrument data acquisition. Only data system and network administrators should use this program.
80 Enterprise Setup � Activating AFS

14 Hardware Installation Make sure all hardware devices, including any A/D boards, cables, GPIB boards, etc. that may be required for your system are installed. You should also connect instrument detectors and communication cables that may be required for control of your instruments. See the Hardware Installation section for details on installation of supported acquisition hardware, or documentation provided with your instrument.
Agilent Instrument Controllers should be installed when instructed in the �Client/Server Installation� section. For complete details on how to install the Agilent Instrument Controllers, see the �Agilent EZChrom Elite Instrument Controller Installation and Configuration Guide�
SS420X A/D Interface Installation For details on installing and using the SS420x A/D Interface, refer to the separate documentation and help provided with that product.
GPIB Board Installation If you are using a device that requires the use of a GPIB interface, install the GPIB card in an available slot. Follow the instructions supplied with the GPIB card for installation of required drivers.
CIO/DIO Install the CIO/DIO card according to the manufacturer's instructions. The card must be configured before it can be used. See the CIO/DIO Boards configuration section for details.
Hardware Installation 81

82 Hardware Installation

15 Network Printers A network printer is a printer that is set up on clients, EZServers, and AICs through a UNC path, not a through a local LPT port.
When the user logged into the computer is not a local administrator and the printer is shared with only Print permission, the software will require the user to select the printer every time they open an instrument. This is due to the logged user having insufficient rights to query for information about the printer.
To solve the problem, simply set the permissions for Everyone to Full Control rather than Print. This is done on the sharing computer as follows: log onto each computer as a local administrator, select the properties for the printer, on the Security tab click Permissions, and in the Permissions dialog change Everyone from Print rights to Full Control rights.
Note: When running as Specific User (see DCOM Server Settings), there is no default printer. To print during data collection, you must 1) first log into the EZServer as the user logged as Specific User and install the printer to be used according to the requirements for printer installation for client/server (see TCP/IP Printer Installation), and 2) select the printer in the Instrument window rather than letting the software try to use the default printer.
16 Setting up E-mail Notification The data system software includes the ability to automatically send e-mail notifications when system events occur.
Step 1: Configuring Mail Services Before any notifications can be sent, the data system administrator must specify the Mail Server name, protocol
Setting up E-mail Notification 83

and other information needed to send e-mail on your system.
Note: If you are unfamiliar with the e-mail configuration of your network, you will need to consult your network administrator to complete this setup.
1. Start the EZChrom Elite data system.
2. Login as a user with system administration privileges.
3. Select the Tools > Options menu item and click on the E-mail tab.
4. The data system supports two types of mail
interfaces. Select the one that your network implements and supply the necessary parameters.
84 Setting up E-mail Notification

SMTP
SMTP is a universal mail protocol supported by almost all mail servers. The following fields relate to SMTP Mailing:
Use this address in the �From� field
To deter spam, some e-mail systems will not send mail without a valid address in the �From� field. If necessary, supply the name of a valid e-mail account on your mail server.
Mail Server Name
Enter the URL computer name of the mail server (e.g. mail.earthlink.net). This name cannot be the UNC or PC name used internally by your LAN (\\MailServer).
SMTP Port
Enter the TCP port used for outgoing mail. In general, the default (port 25) is used.
Login Authentication
To deter spam, some main servers require a login to send mail. This is especially true if you use a mail server on a different network (e.g. Earthlink) than your internal LAN.
MAPI
MAPI is a popular mail system protocol used by many corporate LANs.
Profile
MAPI requires a valid sender name before sending an e-mail message. Enter the MAPI profile to be used when e-mail messages are sent.
5. When the E-Mail server setting have been entered, click the Test button. This will cause the system to attempt to connect to the e-mail server and test the port (for SMTP) or will check if the profile exists on the server (for MAPI). This function will display a
Setting up E-mail Notification 85

message box indicating the success or failure of the connection attempt.
Step 2: Setting up E-Mail Notifications
Automatic Notifications
Automatic Notifications are e-mail messages that are sent every time a specific event occurs. Automatic notifications are setup by a data system user with system administration privileges. They can be setup for an individual instrument, for location/groups or for the entire Enterprise.
To set up global e-mail events, from the main data system software window, right-click on the instrument, location/group or Enterprise icon and select Configure E-mail or Configure > E-mail menu item.
Fill in a row of the spreadsheet for each notification you want to occur. Please consult the on-line help if you need more details in setting up notifications.
Note that automatic notifications for an instrument are inherited from the group and Enterprise of which it is a member. For example, if you create an automatic notification for a hardware error for the Enterprise, that event will automatically appear in the spreadsheet for every instrument in the Enterprise.
Specific Notifications
Specific Notifications are one-time events that can be setup by any user of the data system. An example of this type of event is a notification that an individual sequence has completed.
A user activates a Specific Notification within the main instrument window by filling in the fields for that event in the dialog initiating that action (for example the Sequence Run dialog). Please consult the on-line help if you need more details in setting up these notifications
86 Setting up E-mail Notification


