advanced powerpoint: working with slide masters nan shastry
TRANSCRIPT
Advanced PowerPoint: Working with Slide Masters
Nan Shastry
Copyright www.brainybetty.com; Do not reproduce or broadcast without permission! 2
Introduction
PowerPoint is designed to help you achieve a consistent look in your slide presentations.
You want your audience to focus on the message and not be distracted by poor and inconsistent design from one slide to the next.
Copyright www.brainybetty.com; Do not reproduce or broadcast without permission! 3
About Templates
You achieve this consistency by using templates, or pre-designed slide presentations, that coordinate background colors and designs, font styles and placement, and other graphic design elements.
Copyright www.brainybetty.com; Do not reproduce or broadcast without permission! 4
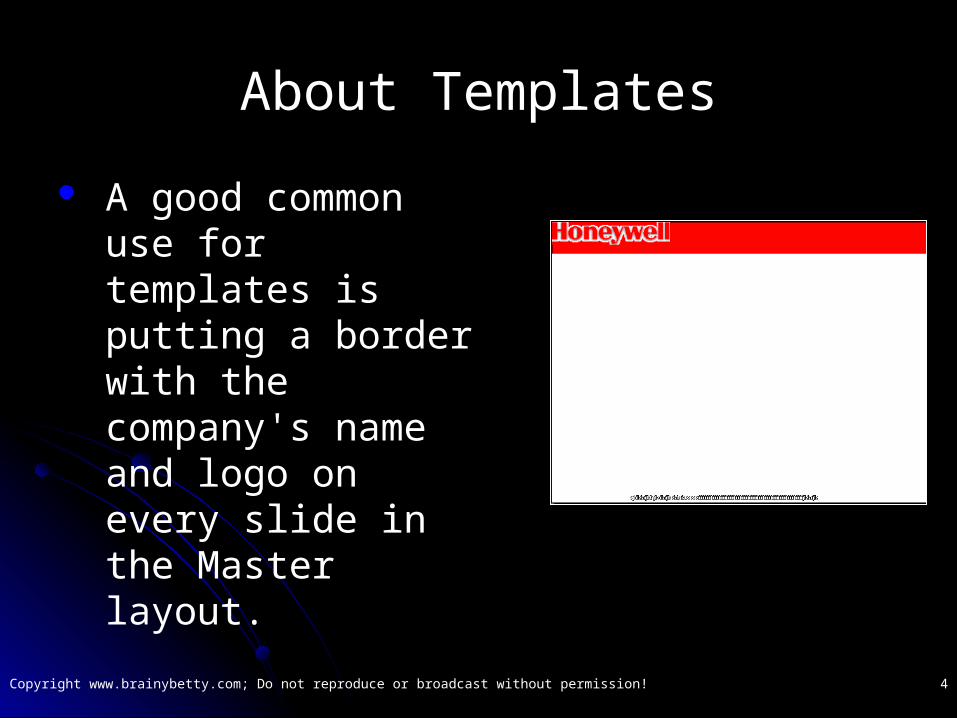
About Templates
A good common use for templates is putting a border with the company's name and logo on every slide in the Master layout.

Copyright www.brainybetty.com; Do not reproduce or broadcast without permission! 5
About Templates
When you first begin using PowerPoint, you should use the templates that come with the program.
Copyright www.brainybetty.com; Do not reproduce or broadcast without permission! 6
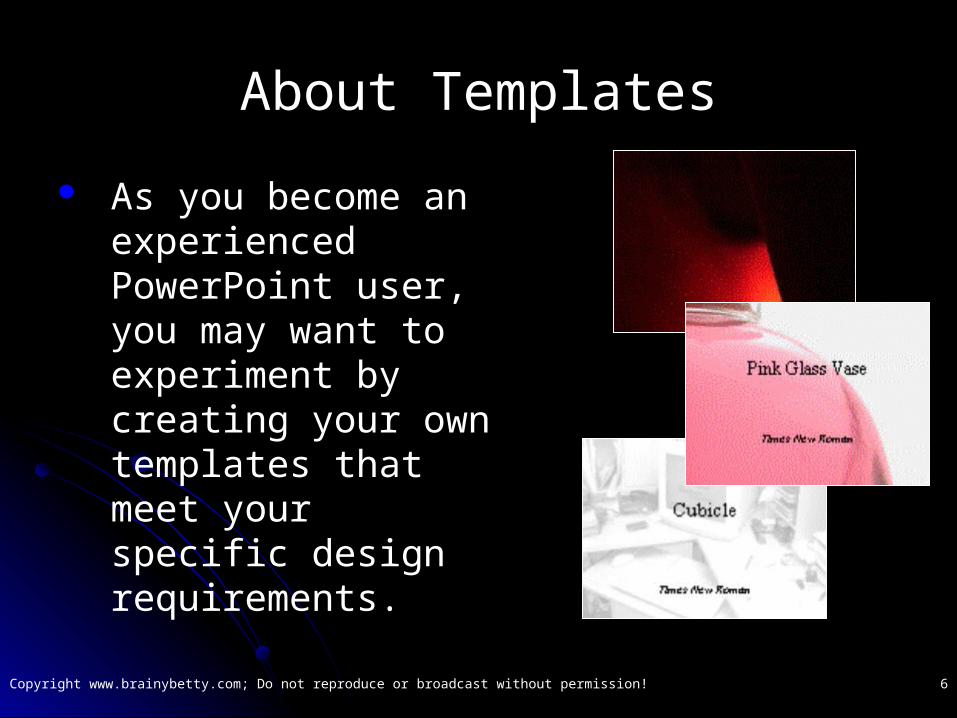
About Templates
As you become an experienced PowerPoint user, you may want to experiment by creating your own templates that meet your specific design requirements.

Copyright www.brainybetty.com; Do not reproduce or broadcast without permission! 7
Creating a Design Template
Copyright www.brainybetty.com; Do not reproduce or broadcast without permission! 8
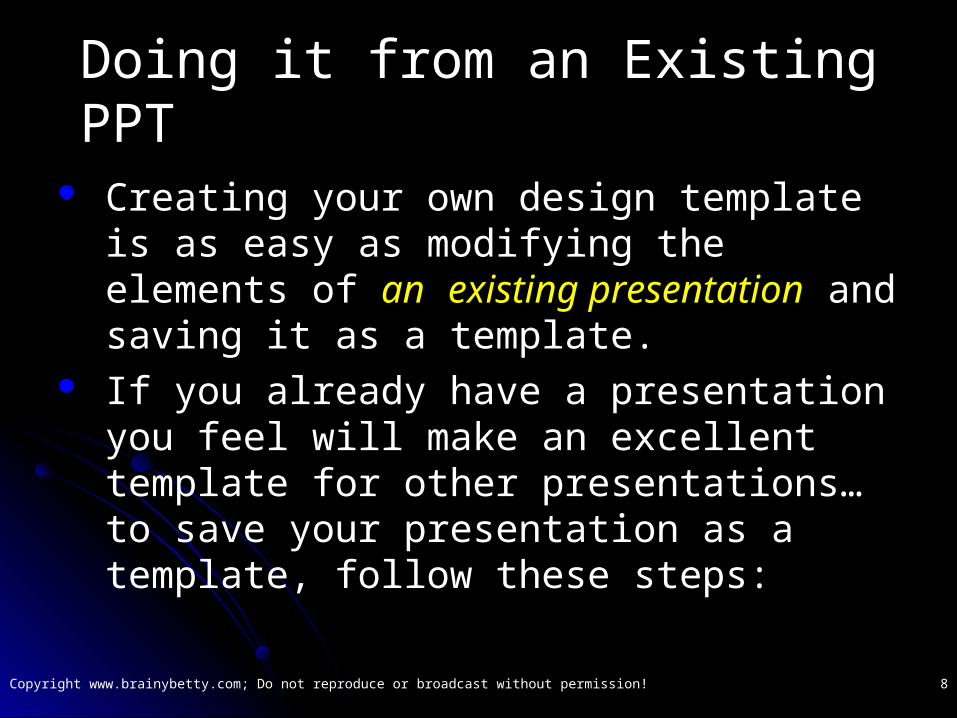
Doing it from an Existing PPT
Creating your own design template is as easy as modifying the elements of an existing presentation and saving it as a template.
If you already have a presentation you feel will make an excellent template for other presentations…to save your presentation as a template, follow these steps:
Copyright www.brainybetty.com; Do not reproduce or broadcast without permission! 9
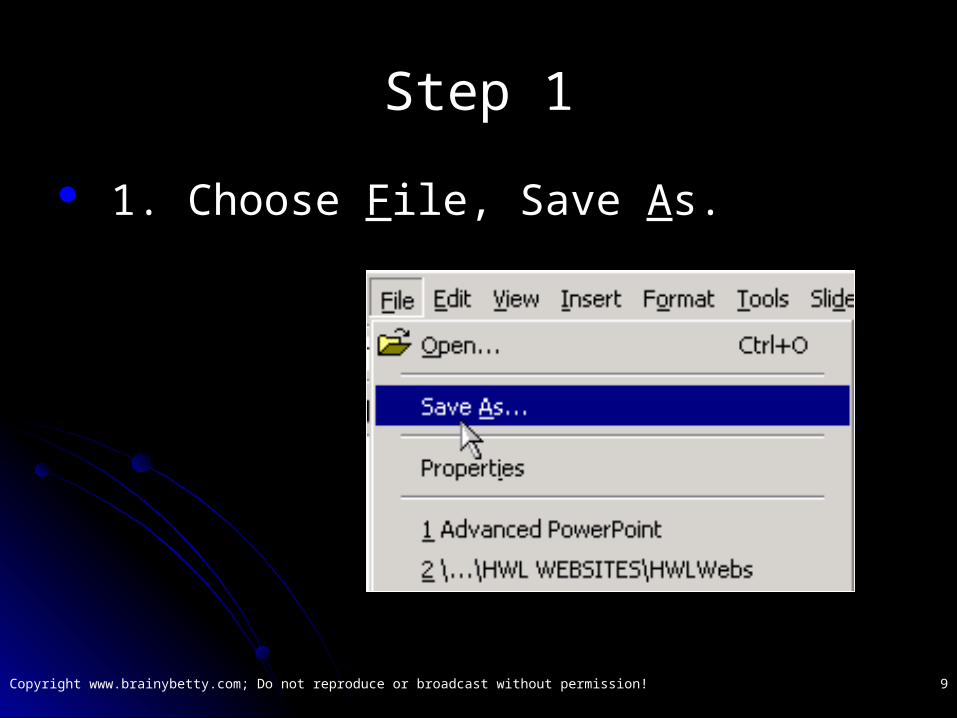
Step 1
1. Choose File, Save As.
Copyright www.brainybetty.com; Do not reproduce or broadcast without permission! 10
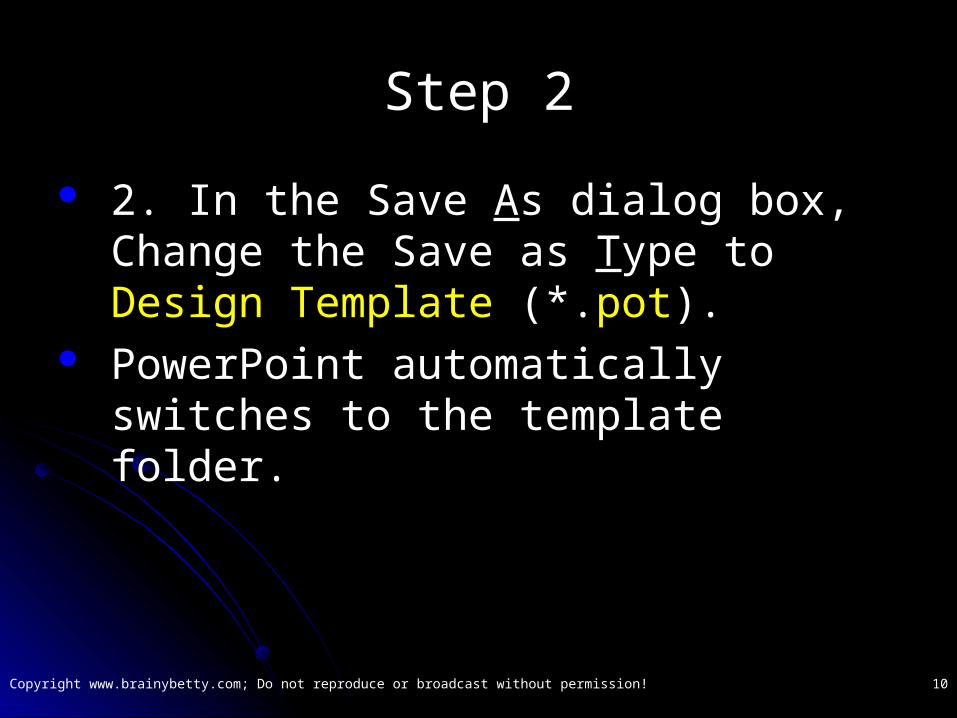
Step 2
2. In the Save As dialog box, Change the Save as Type to Design Template (*.pot).
PowerPoint automatically switches to the template folder.
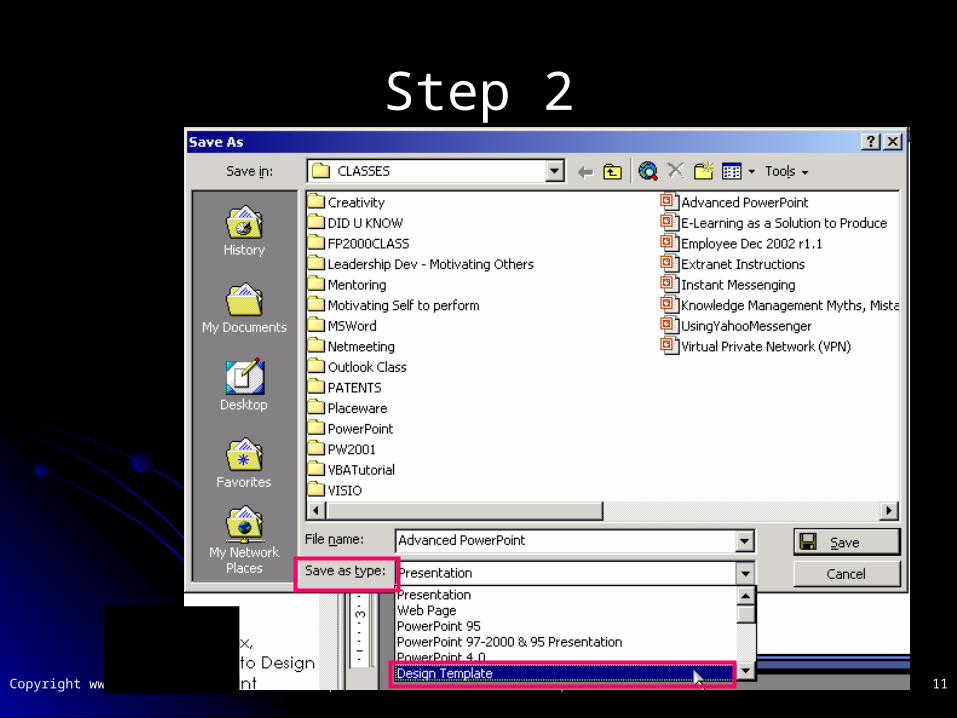
Copyright www.brainybetty.com; Do not reproduce or broadcast without permission! 11
Step 2

Copyright www.brainybetty.com; Do not reproduce or broadcast without permission! 12
Step 3 & 4
3. Supply a File Name; for example, MyTemplate (you do not need to add .pot).
4. Choose Save.
Copyright www.brainybetty.com; Do not reproduce or broadcast without permission! 13
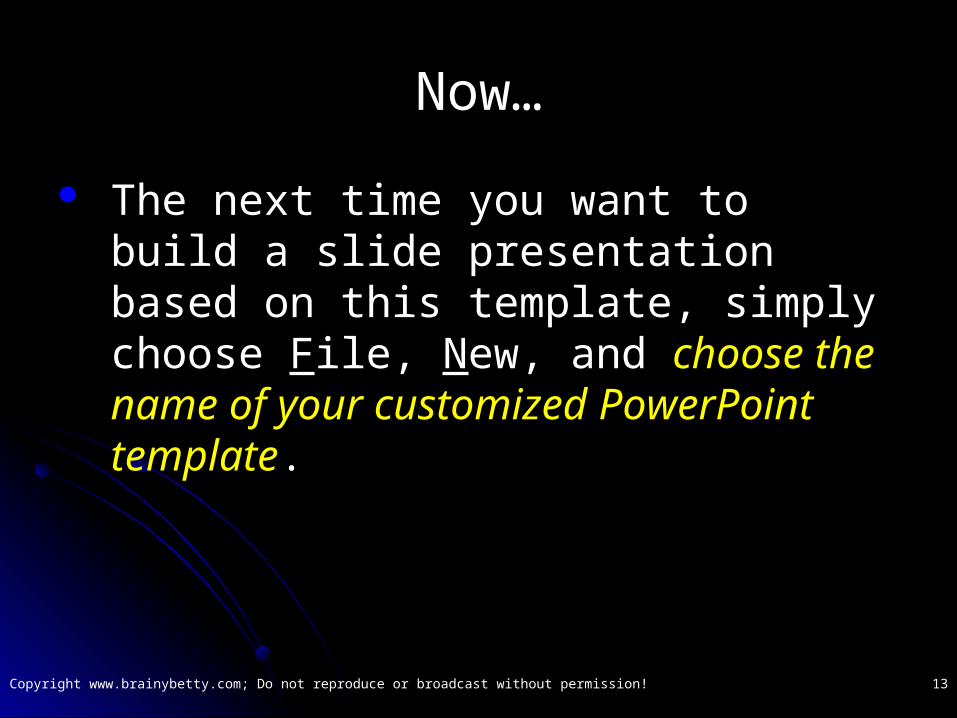
Now…
The next time you want to build a slide presentation based on this template, simply choose File, New, and choose the name of your customized PowerPoint template.
Copyright www.brainybetty.com; Do not reproduce or broadcast without permission! 14
Modifying the Slide Master

Copyright www.brainybetty.com; Do not reproduce or broadcast without permission! 15
What is the slide master?
Every slide presentation is based on a slide master of some sort.
The slide master determines, for example, which font appears on each slide and how it is to be formatted.

Copyright www.brainybetty.com; Do not reproduce or broadcast without permission! 16
To modify your slide master, follow these steps:
Choose View, Master, Slide Master. PowerPoint displays the Slide Master layout and editing screen
Copyright www.brainybetty.com; Do not reproduce or broadcast without permission! 17
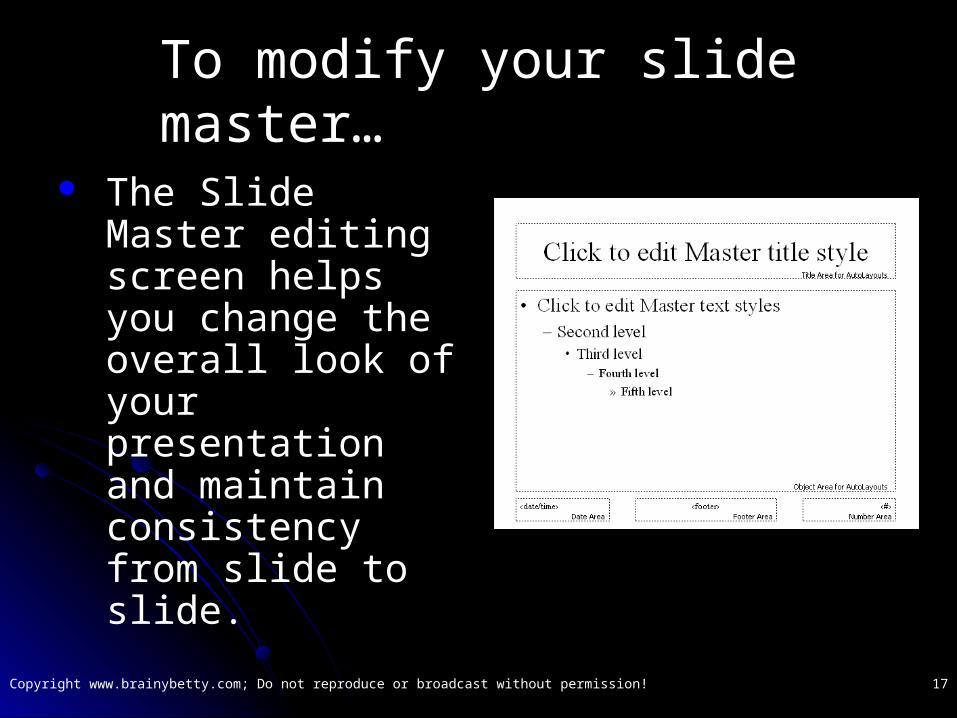
To modify your slide master…
The Slide Master editing screen helps you change the overall look of your presentation and maintain consistency from slide to slide.
Copyright www.brainybetty.com; Do not reproduce or broadcast without permission! 18
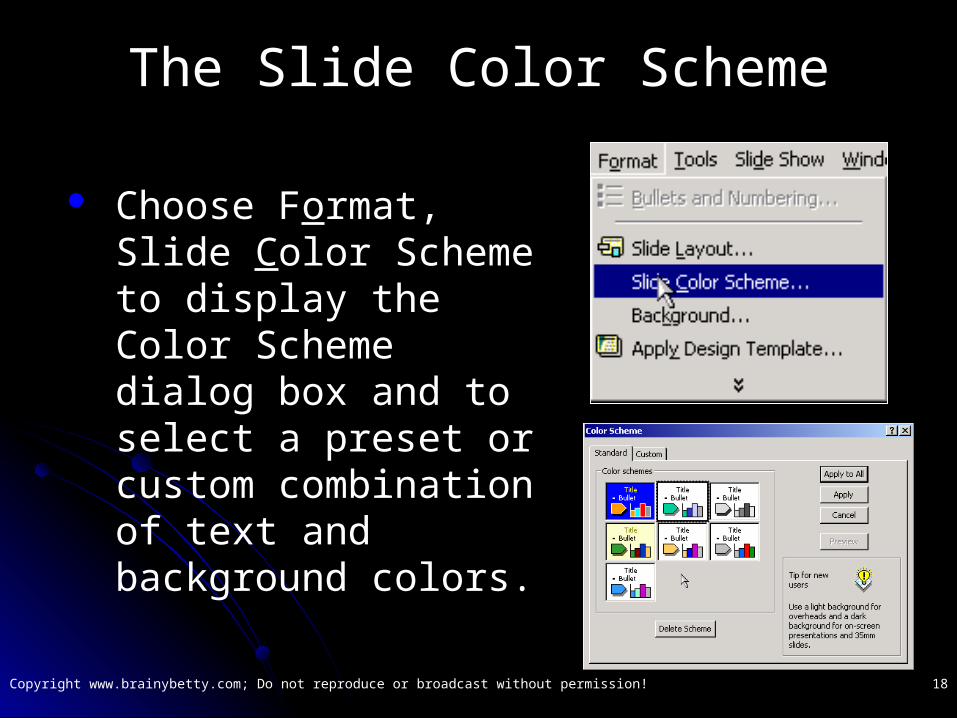
The Slide Color Scheme
Choose Format, Slide Color Scheme to display the Color Scheme dialog box and to select a preset or custom combination of text and background colors.

Copyright www.brainybetty.com; Do not reproduce or broadcast without permission! 19
Adding Clipart or Other Graphics
You can further customize your master template by adding clipart to the background using the MS Clip Art Gallery or other files from your computer.
Copyright www.brainybetty.com; Do not reproduce or broadcast without permission! 20
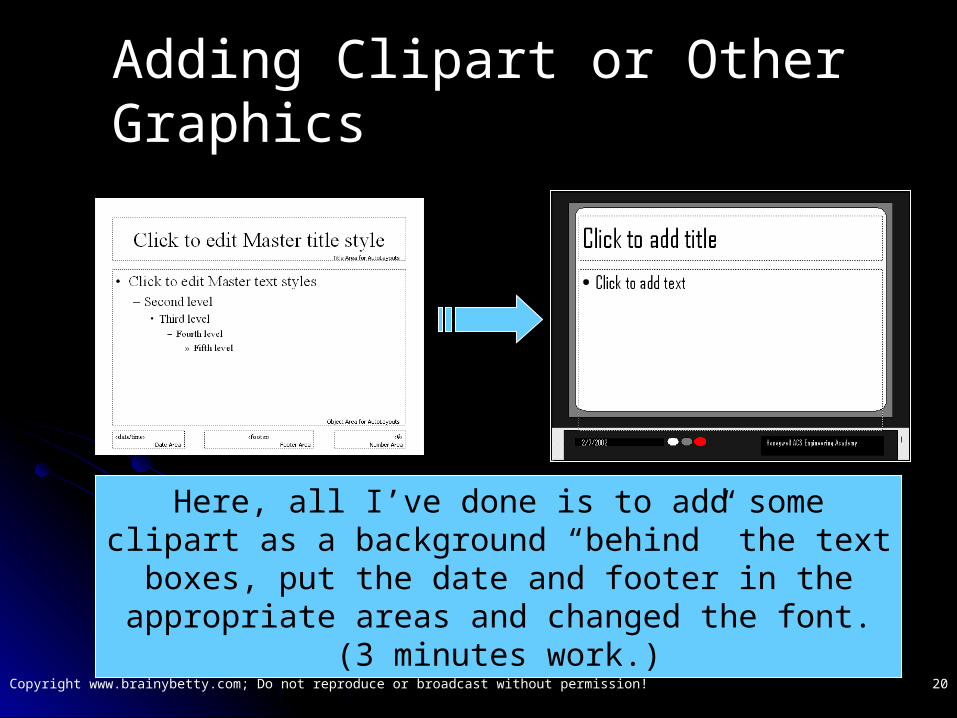
Adding Clipart or Other Graphics
Here, all I’ve done is to add some clipart as a background “behind” the text boxes, put the date and
footer in the appropriate areas and changed the font. (3 minutes work.)
Copyright www.brainybetty.com; Do not reproduce or broadcast without permission! 21
Step 7
When you are satisfied with your changes to the Slide Master, click the Close button on the Master toolbar, or choose View, Normal to return to the normal tri-pane view of your slide presentation.
Copyright www.brainybetty.com; Do not reproduce or broadcast without permission! 22
Modifying the Title Master

Copyright www.brainybetty.com; Do not reproduce or broadcast without permission! 23
Intro
The title slide often differs slightly from the other slides in a presentation in terms of font size, location of the title slide elements, and so on.
Unless you are modifying a presentation that uses one of PowerPoint's predesigned templates, you must first create a Title Master. The following steps show you how to create one…
Copyright www.brainybetty.com; Do not reproduce or broadcast without permission! 24
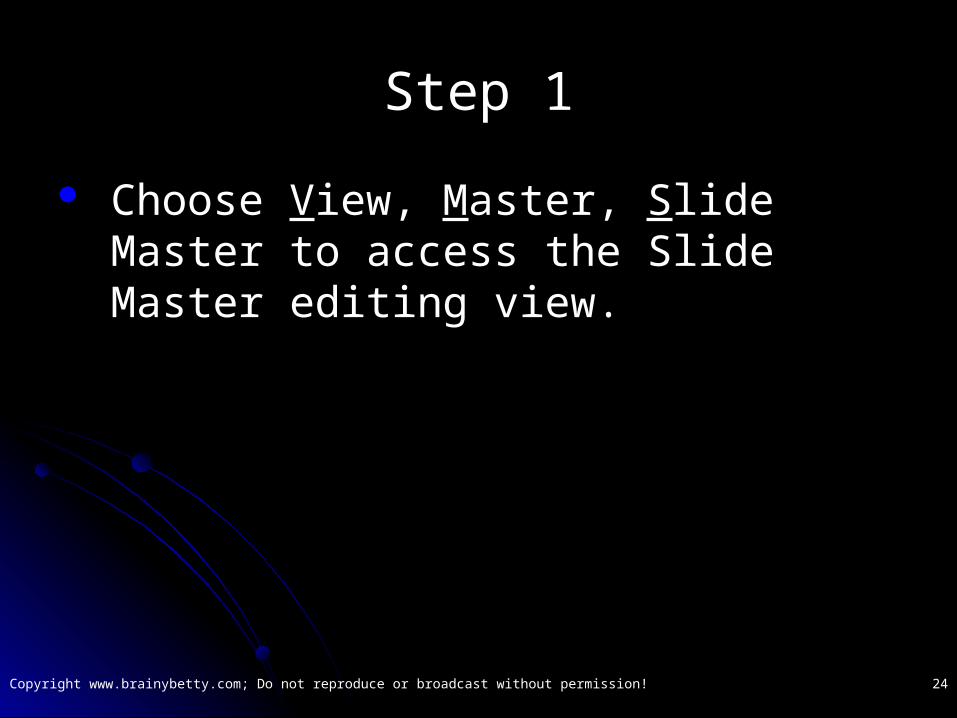
Step 1
Choose View, Master, Slide Master to access the Slide Master editing view.
Copyright www.brainybetty.com; Do not reproduce or broadcast without permission! 25
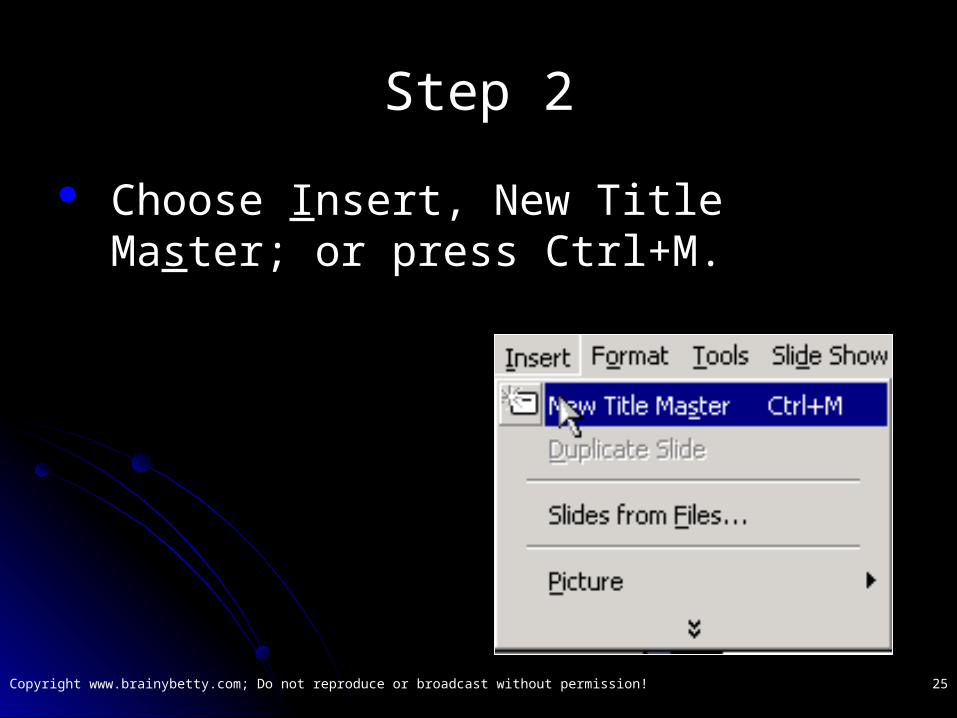
Step 2
Choose Insert, New Title Master; or press Ctrl+M.
Copyright www.brainybetty.com; Do not reproduce or broadcast without permission! 26
Using a predefined Title Master
If you already created a Title Master or if you are using a predefined PowerPoint template that already contains a Title Master, simply choose View, Master, Title Master.
PowerPoint displays the Title Master editing screen
Copyright www.brainybetty.com; Do not reproduce or broadcast without permission! 27
Note:
Make sure you have modified the Slide Master before changing the Title Master.
Initially the Title Master uses the same fonts and other attributes as the Slide Master.
Copyright www.brainybetty.com; Do not reproduce or broadcast without permission! 28
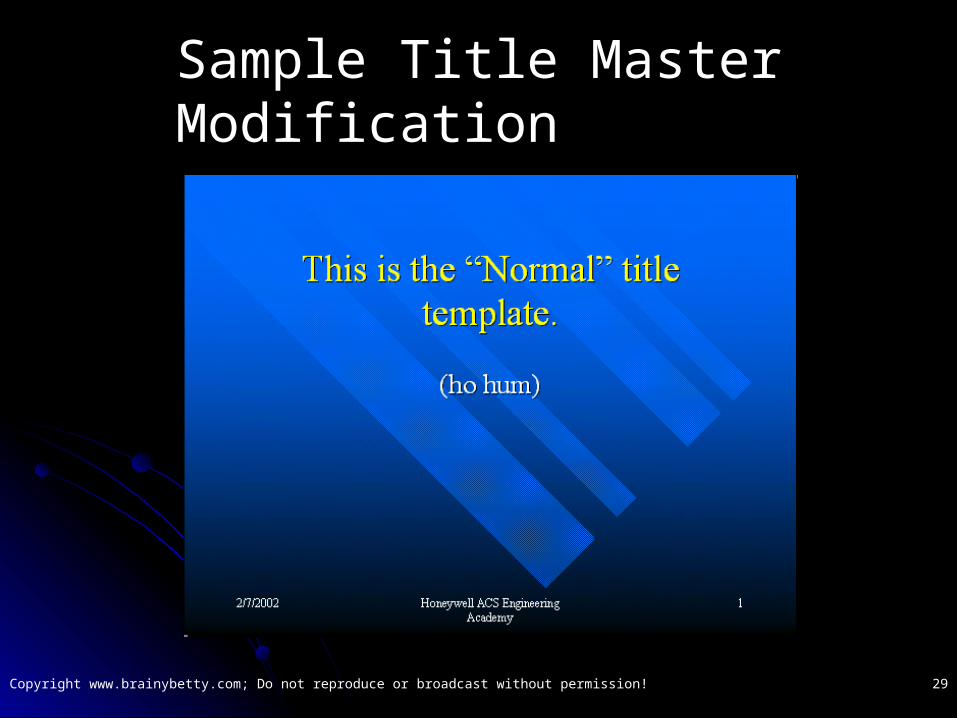
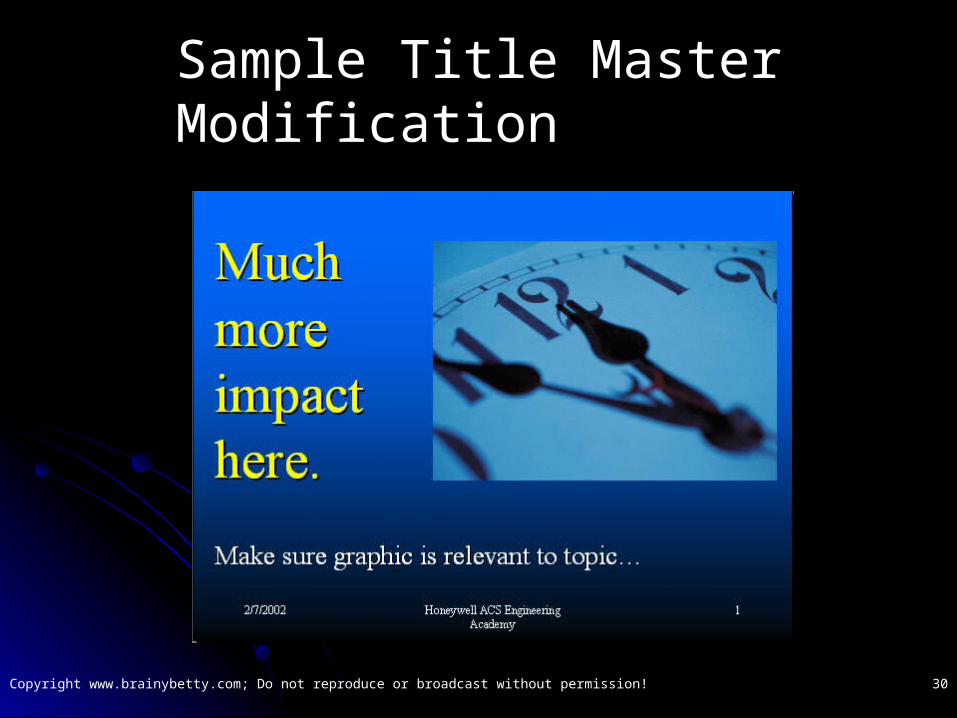
Finally
If you modified the Slide Master first, perhaps little needs to be changed for the title slide.
However, you might make the title font larger, position it differently, or add a graphic object to the screen. See what a difference font size and a graphic makes on the title screen…
Copyright www.brainybetty.com; Do not reproduce or broadcast without permission! 29
Sample Title Master Modification
Copyright www.brainybetty.com; Do not reproduce or broadcast without permission! 30
Sample Title Master Modification

Copyright www.brainybetty.com; Do not reproduce or broadcast without permission! 31
Modifying the Handout and Notes Masters
In addition to the presentation itself, PowerPoint enables you to modify the Handout and Notes Masters.
To modify the Handout Master, follow these steps…
Copyright www.brainybetty.com; Do not reproduce or broadcast without permission! 32
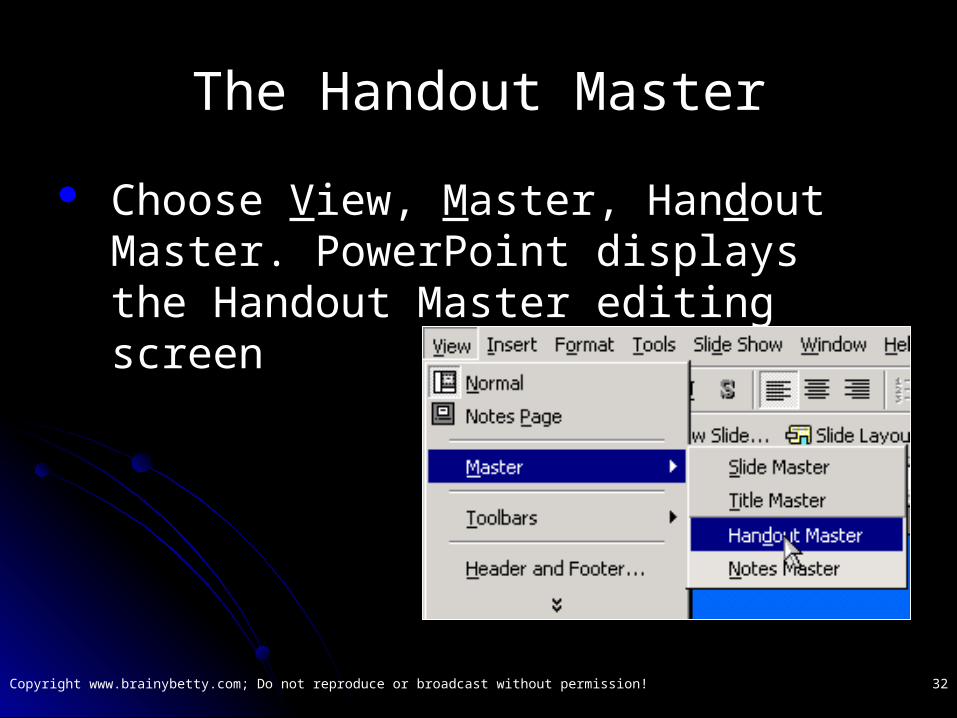
The Handout Master
Choose View, Master, Handout Master. PowerPoint displays the Handout Master editing screen
Copyright www.brainybetty.com; Do not reproduce or broadcast without permission! 33
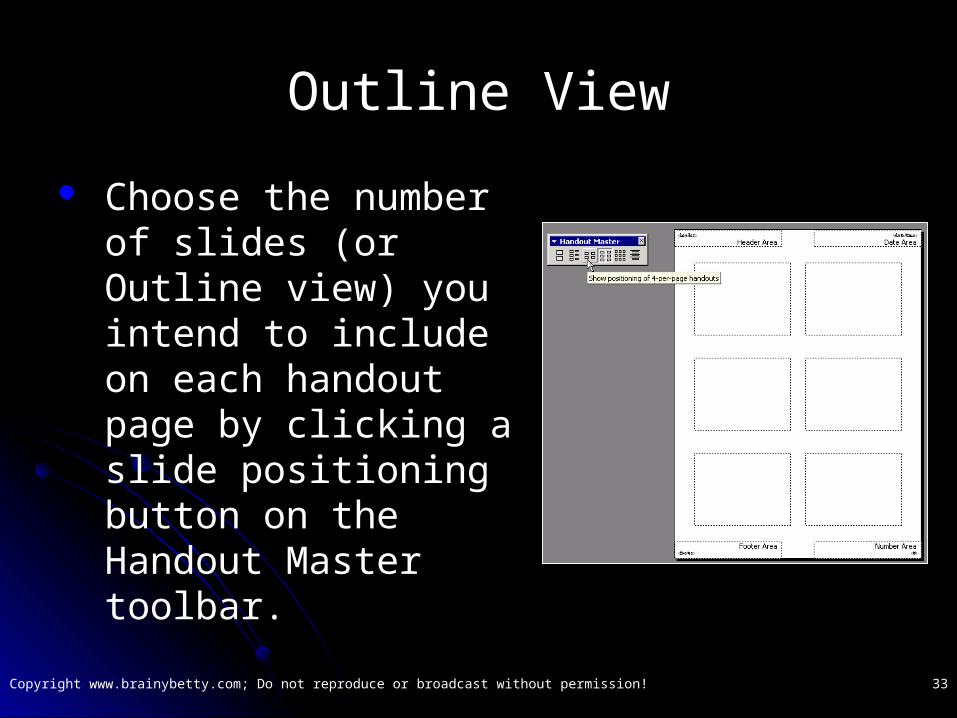
Outline View
Choose the number of slides (or Outline view) you intend to include on each handout page by clicking a slide positioning button on the Handout Master toolbar.
Copyright www.brainybetty.com; Do not reproduce or broadcast without permission! 34
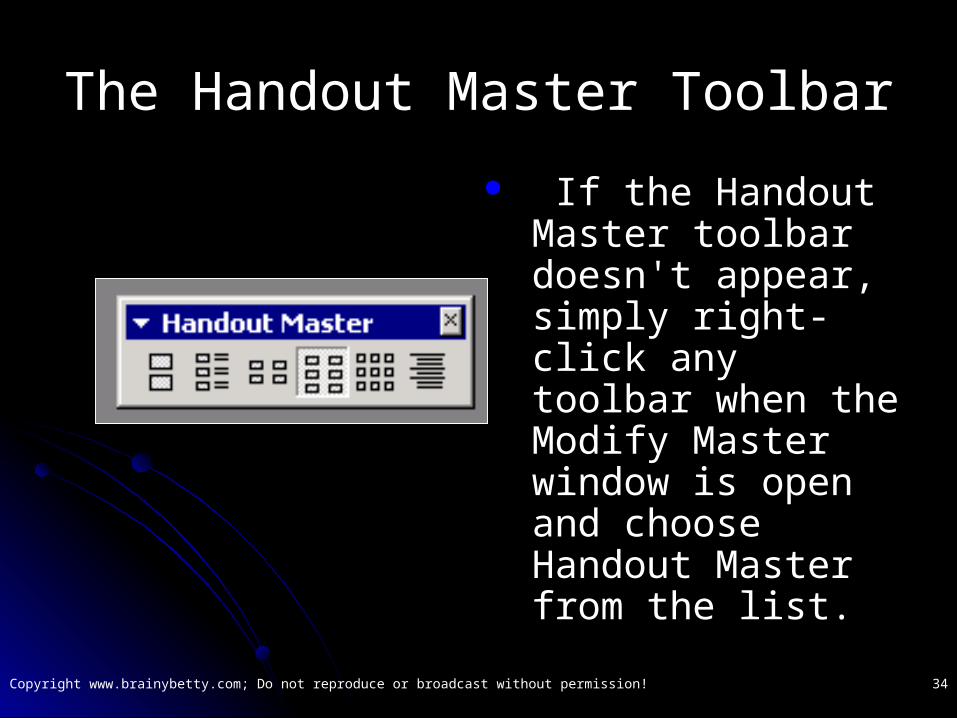
The Handout Master Toolbar
If the Handout Master toolbar doesn't appear, simply right-click any toolbar when the Modify Master window is open and choose Handout Master from the list.
Copyright www.brainybetty.com; Do not reproduce or broadcast without permission! 35
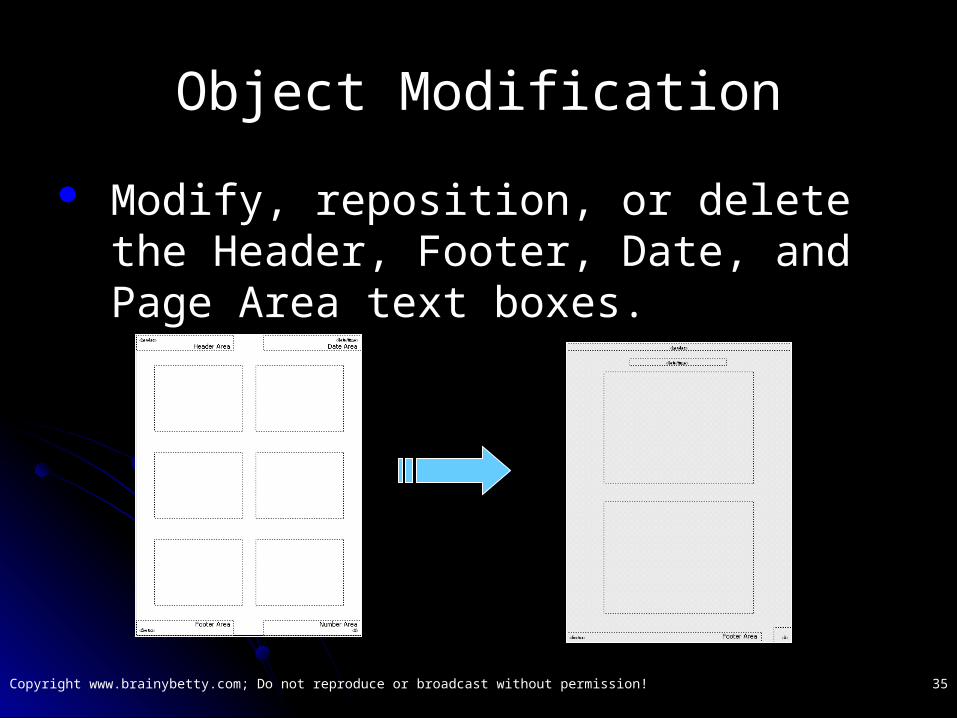
Object Modification
Modify, reposition, or delete the Header, Footer, Date, and Page Area text boxes.

Copyright www.brainybetty.com; Do not reproduce or broadcast without permission! 36
Print Dialog Box You can easily
change the number of slides to be included in the handouts in the Print dialog box when you actually print the handouts.

Copyright www.brainybetty.com; Do not reproduce or broadcast without permission! 37
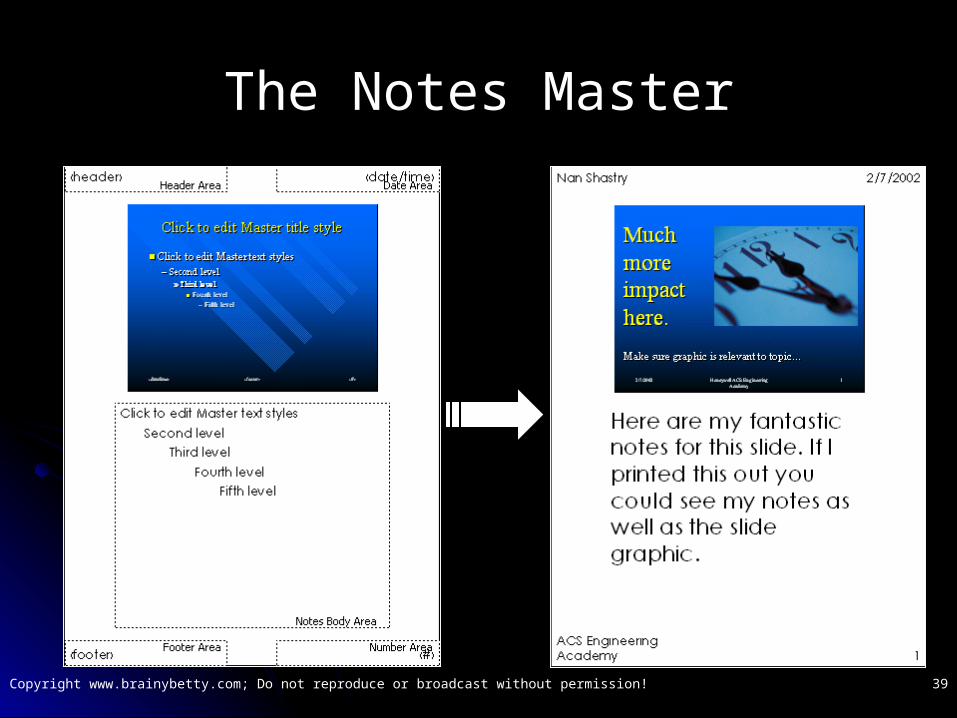
The Notes Master
The Notes Master can be changed by following these steps:
Choose View, Master, Notes Master. PowerPoint displays the Notes Master editing screen

Copyright www.brainybetty.com; Do not reproduce or broadcast without permission! 38
Reposition objects again
Reposition or resize the slide area, depending on how much area you want for the text (notes).
Modify, reposition, or delete the Header, Footer, Date, and Page Area text boxes.
Copyright www.brainybetty.com; Do not reproduce or broadcast without permission! 39
The Notes Master
Copyright www.brainybetty.com; Do not reproduce or broadcast without permission! 40
Backgrounds and Colors?
Although you can change the background colors and color schemes for the Handout and Notes Masters, you probably won't want do so. Handouts and Notes are usually printed, and background colors aren't necessary or desired.
You can, however, add a graphic element, such as a company logo, which then appears on each printed page.
Copyright www.brainybetty.com; Do not reproduce or broadcast without permission! 41
Graphic Manipulation – Part II
Copyright www.brainybetty.com; Do not reproduce or broadcast without permission! 42
Tools
Jasc Paint Shop Pro Microsoft (c) PhotoDraw Microsoft (c) Publisher (for print) Microsoft (c) PowerPoint Macromedia Freehand Snag-It Screen Capture
Freeware: Paraben’s Gif Animator Project Dogwaffle (Available at www.nonags.com)
Copyright www.brainybetty.com; Do not reproduce or broadcast without permission! 43
Raster Images
Raster images use a grid, or raster, of small squares known as pixels to represent graphics.
Each pixel in a bitmap image has a specific location and color value assigned to it.
When working with bitmap images, groups of pixels are edited rather than objects or shapes.

Copyright www.brainybetty.com; Do not reproduce or broadcast without permission! 44
Raster Images
Because they represent subtle gradiations of shades and color, bitmap images are the most common electronic medium for continuous-tone images, such as photographs, etc.
Bitmap images are resolution-dependent, in that they represent a fixed number of pixels.
As a result, they can appear jagged and lose detail if they are scaled on-screen, or if they are printed at a higher resolution than they were created for.
Copyright www.brainybetty.com; Do not reproduce or broadcast without permission! 45
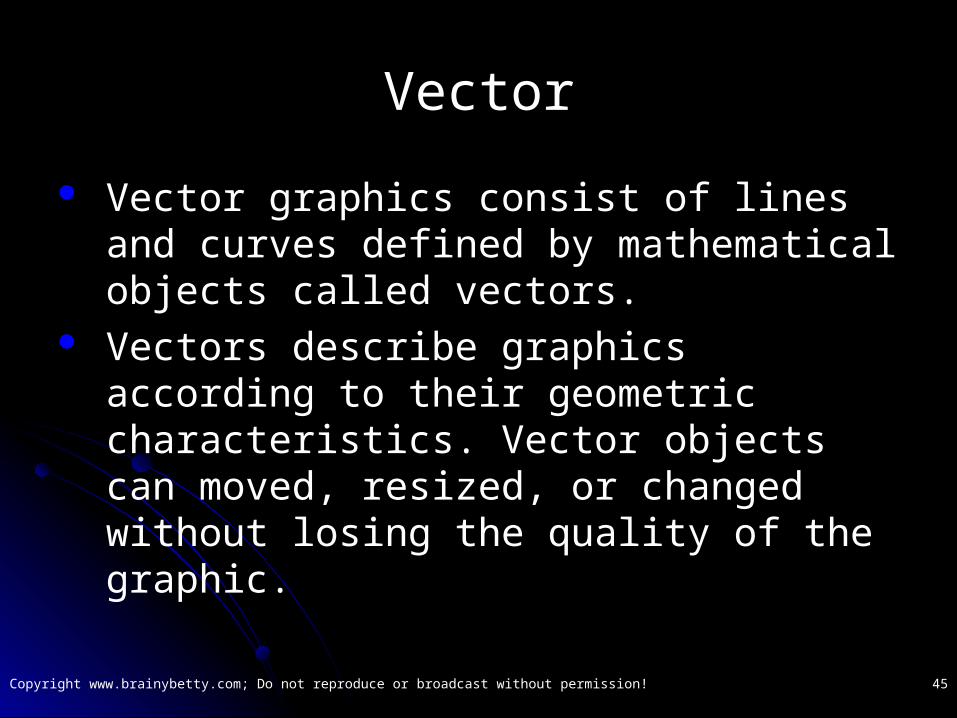
Vector
Vector graphics consist of lines and curves defined by mathematical objects called vectors.
Vectors describe graphics according to their geometric characteristics. Vector objects can moved, resized, or changed without losing the quality of the graphic.
Copyright www.brainybetty.com; Do not reproduce or broadcast without permission! 46
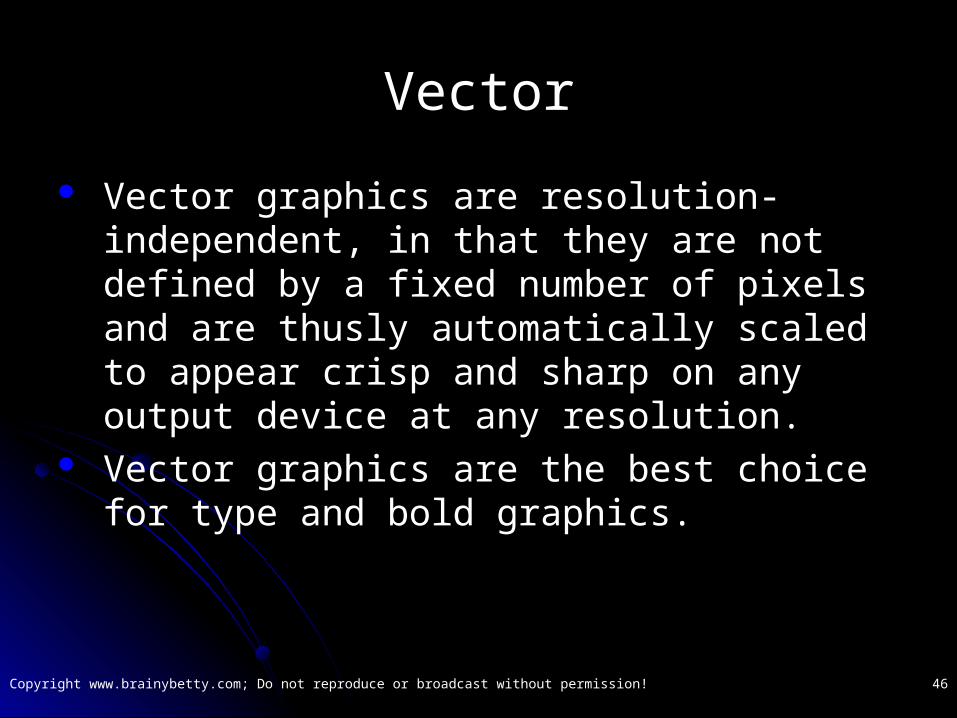
Vector
Vector graphics are resolution-independent, in that they are not defined by a fixed number of pixels and are thusly automatically scaled to appear crisp and sharp on any output device at any resolution.
Vector graphics are the best choice for type and bold graphics.

Copyright www.brainybetty.com; Do not reproduce or broadcast without permission! 47
Differences• The image to the left
represents the visual differences between raster and vector when we zoom in.
• The black circle in the background features super-imposed close-ups.
• In the upper area, you can see a "pixelated" raster close-up of the black circle as compared with a crisp, vector close-up directly
below it.

Copyright www.brainybetty.com; Do not reproduce or broadcast without permission! 48
Another Example: Raster (MS Paint)

Copyright www.brainybetty.com; Do not reproduce or broadcast without permission! 49
Another Example: Vector(Visio Professional)
Copyright www.brainybetty.com; Do not reproduce or broadcast without permission! 50
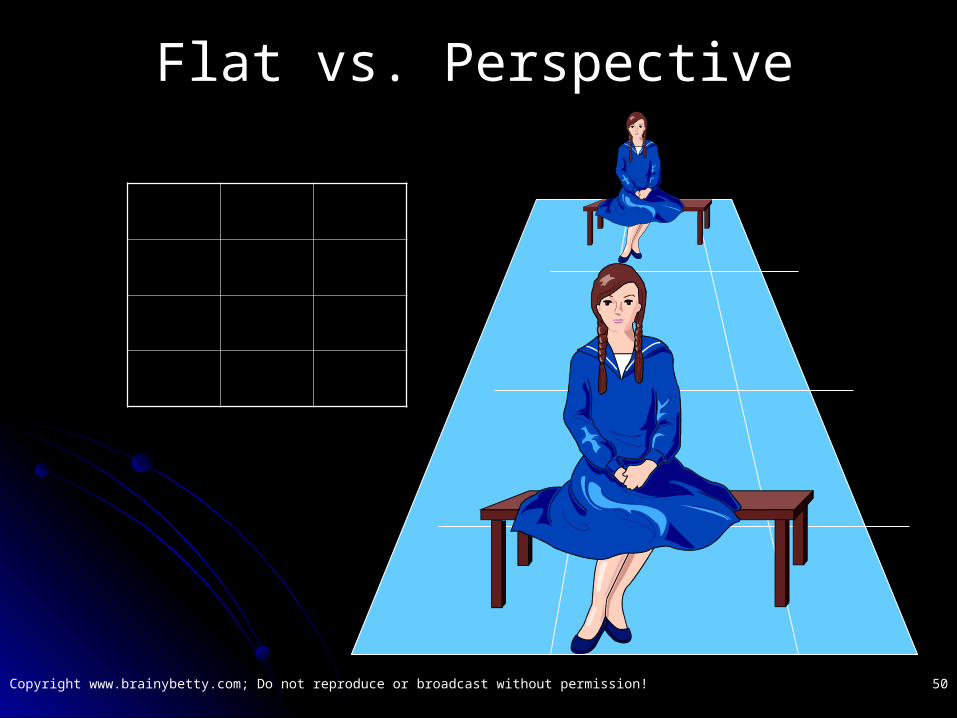
Flat vs. Perspective

Copyright www.brainybetty.com; Do not reproduce or broadcast without permission! 51
Shading for Illusion of Light and Dark Spaces
Light
Dark

Copyright www.brainybetty.com; Do not reproduce or broadcast without permission! 52
Adding a Horizon Line for Depth
Light
Dark Horizon Line
Copyright www.brainybetty.com; Do not reproduce or broadcast without permission! 53
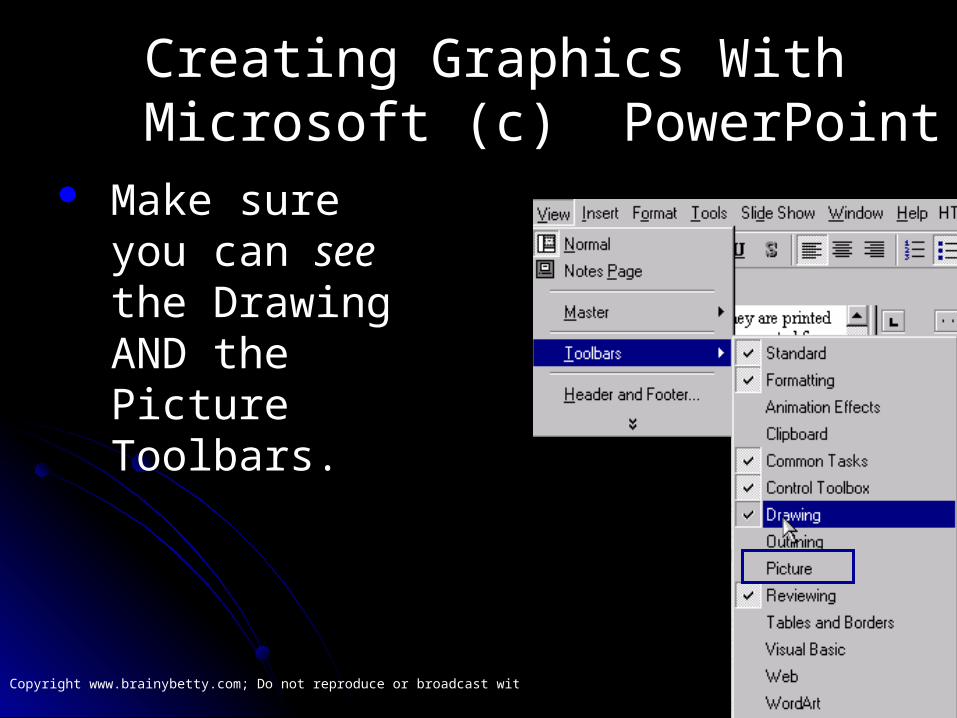
Creating Graphics With Microsoft (c) PowerPoint
Make sure you can see the Drawing AND the Picture Toolbars.

Copyright www.brainybetty.com; Do not reproduce or broadcast without permission! 54
The Toolbars and their Functions:

Copyright www.brainybetty.com; Do not reproduce or broadcast without permission! 55
The Toolbars and their Functions:
Copyright www.brainybetty.com; Do not reproduce or broadcast without permission! 56
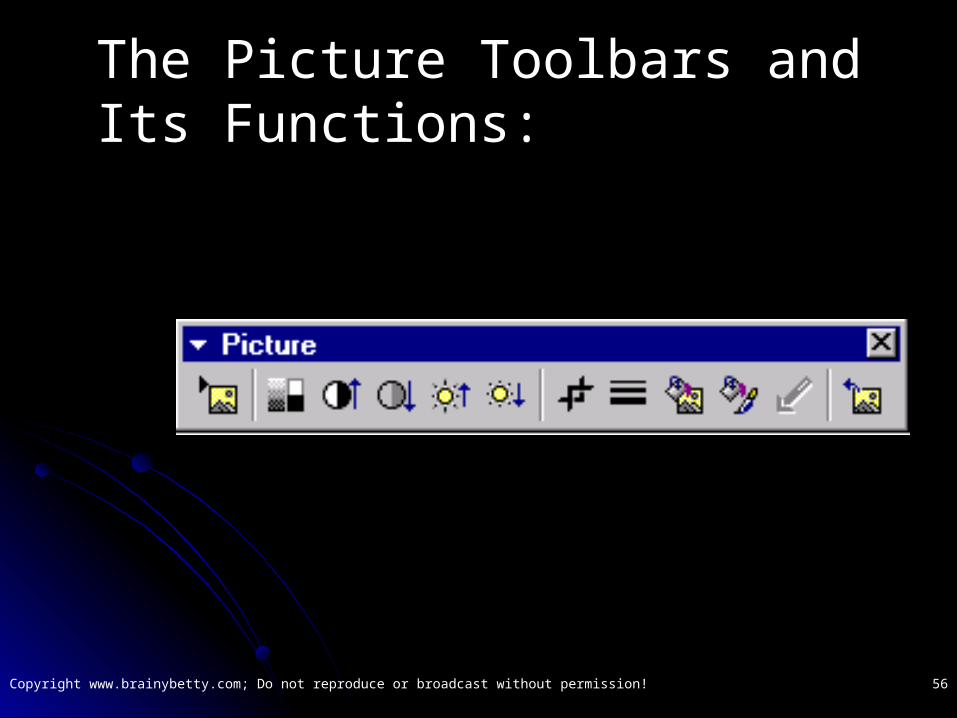
The Picture Toolbars and Its Functions:

Copyright www.brainybetty.com; Do not reproduce or broadcast without permission! 57
Cropping
Copyright www.brainybetty.com; Do not reproduce or broadcast without permission! 58
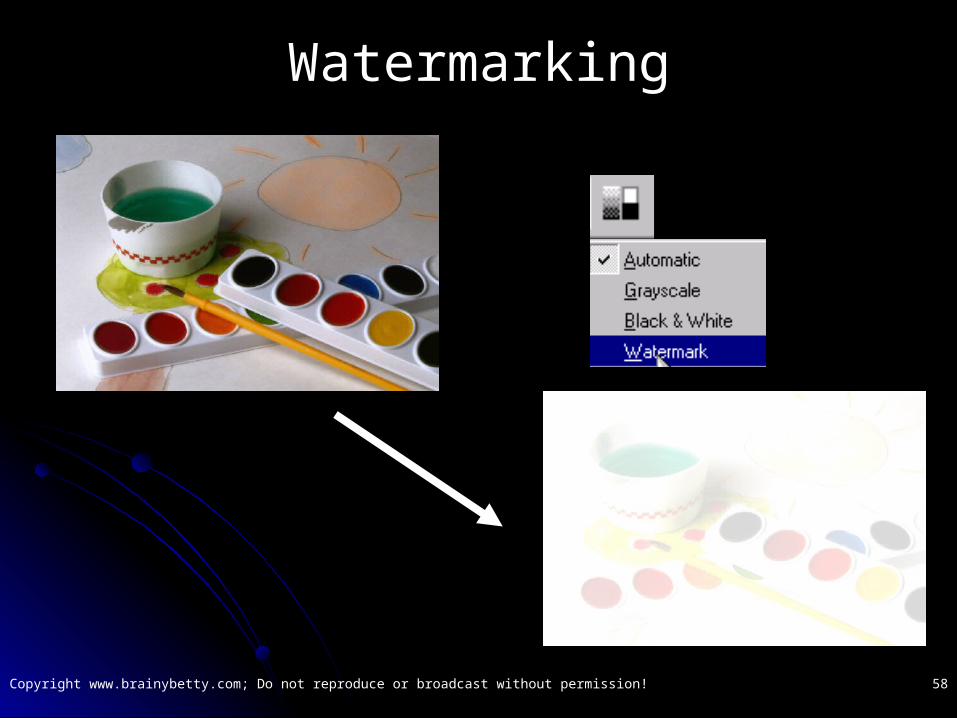
Watermarking
Copyright www.brainybetty.com; Do not reproduce or broadcast without permission! 59
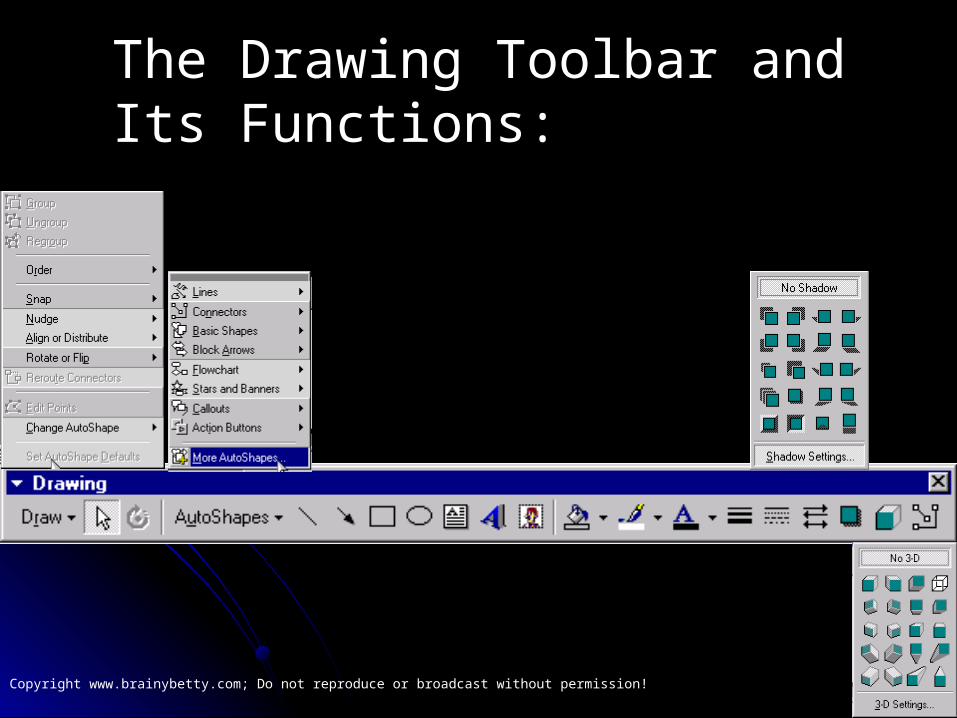
The Drawing Toolbar and Its Functions:
Copyright www.brainybetty.com; Do not reproduce or broadcast without permission! 60
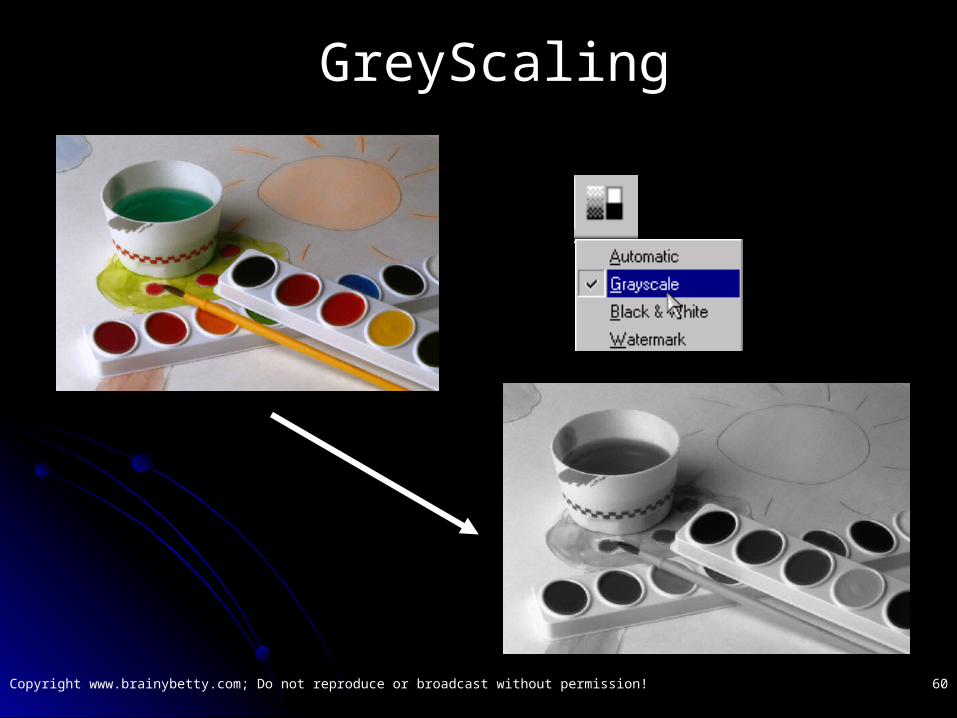
GreyScaling
Copyright www.brainybetty.com; Do not reproduce or broadcast without permission! 61
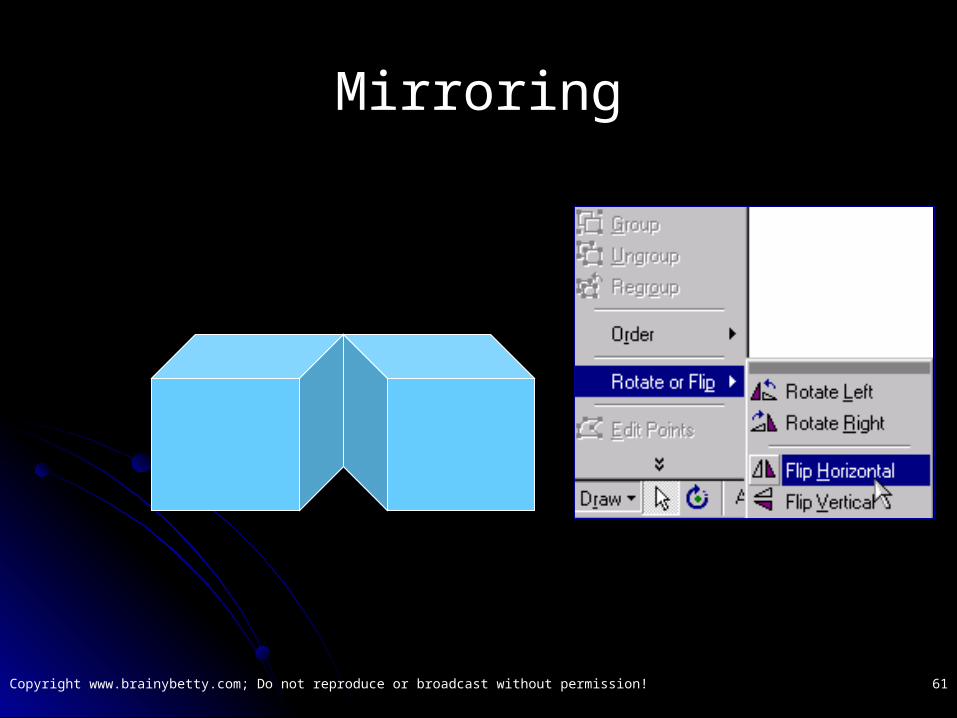
Mirroring

Copyright www.brainybetty.com; Do not reproduce or broadcast without permission! 62
3D Effects
Copyright www.brainybetty.com; Do not reproduce or broadcast without permission! 63
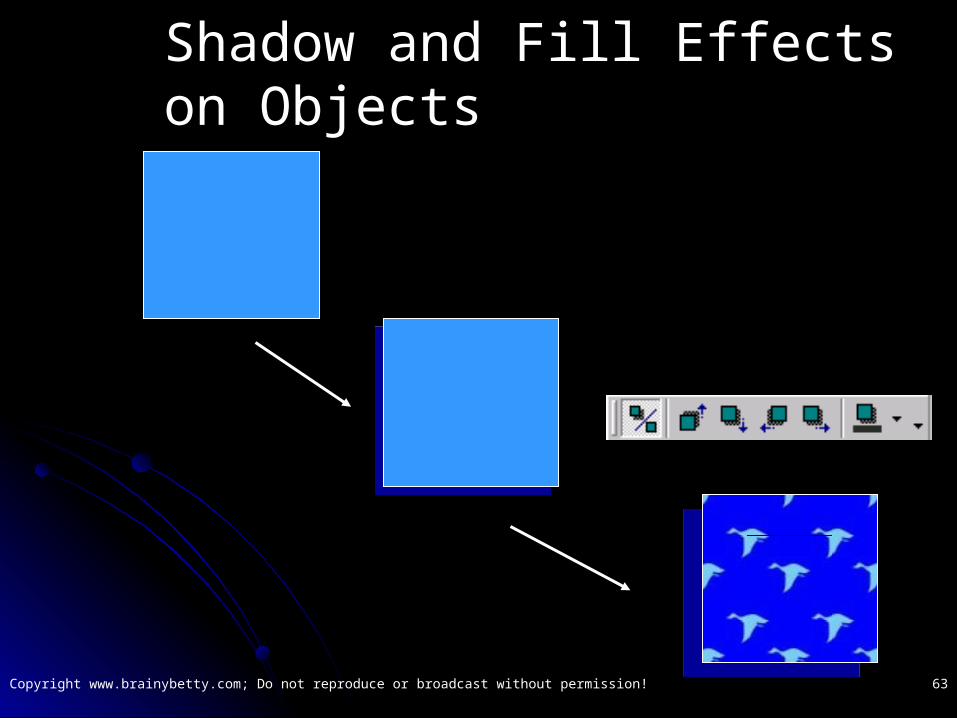
Shadow and Fill Effects on Objects

Copyright www.brainybetty.com; Do not reproduce or broadcast without permission! 64
Effects on Text
This is FLAT Text.
This is Shaded Text.This is Shaded Text.This is Shaded Text.This is Shaded Text.
This is This is shadowed Text.shadowed Text.This is This is shadowed Text.shadowed Text.
Th
is is
RO
TA
TED
Text.

Copyright www.brainybetty.com; Do not reproduce or broadcast without permission! 65
Font Use
Modern Fonts:Boxed InAgency FBCentury GothicCluffHMK BoldCornerstoneVT Corona
OLDER Fonts:Times New RomanArialVerdanaBritannic BoldComic Sans MS
Copyright www.brainybetty.com; Do not reproduce or broadcast without permission! 66
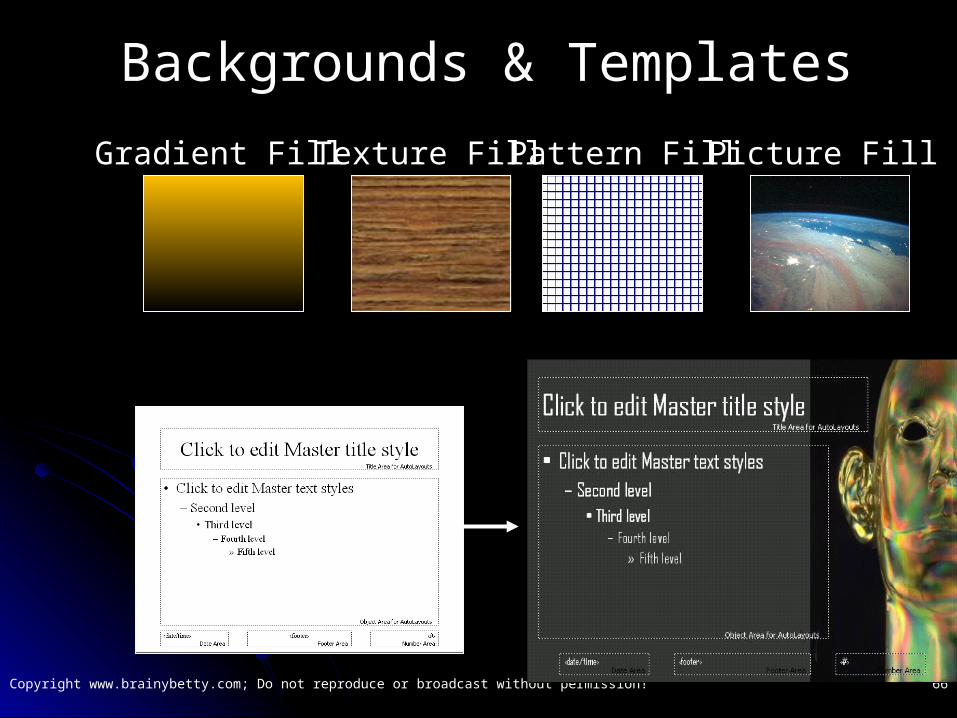
Backgrounds & Templates
Gradient Fill Texture Fill Pattern Fill Picture Fill
Copyright www.brainybetty.com; Do not reproduce or broadcast without permission! 67
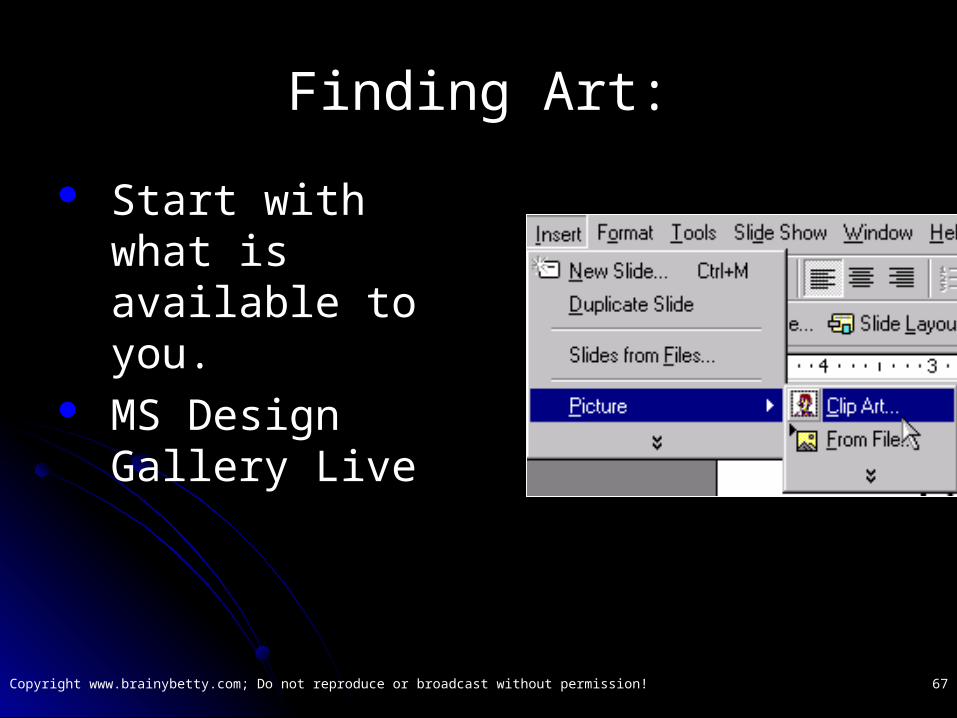
Finding Art:
Start with what is available to you.
MS Design Gallery Live
Copyright www.brainybetty.com; Do not reproduce or broadcast without permission! 68
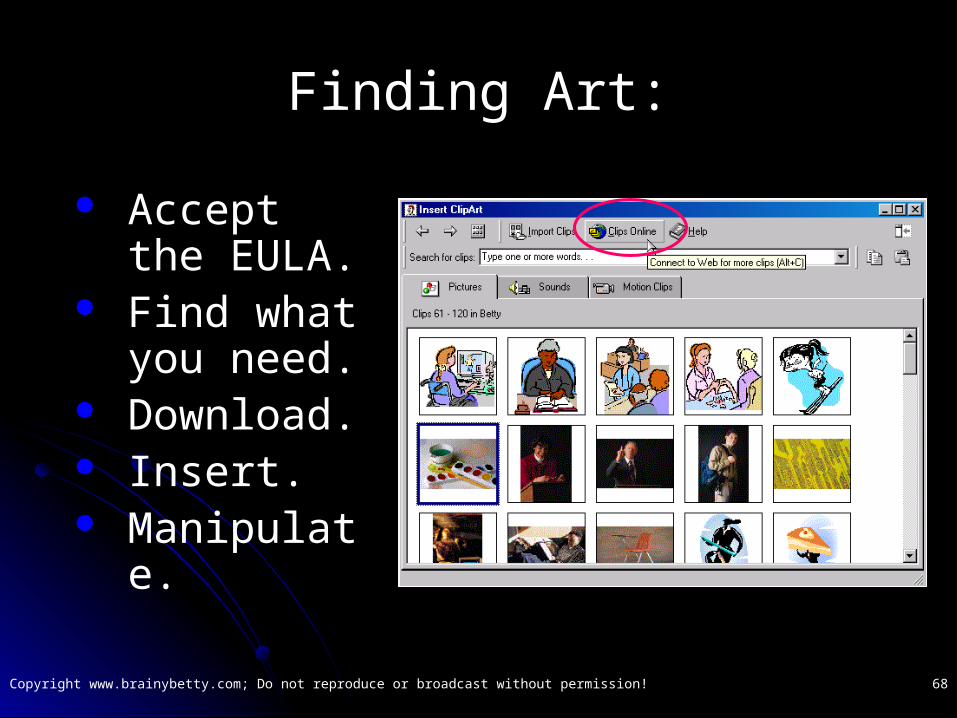
Finding Art:
Accept the EULA.
Find what you need.
Download. Insert. Manipulate.

Copyright www.brainybetty.com; Do not reproduce or broadcast without permission! 69
EULA: End User License Agreement
Copyright www.brainybetty.com; Do not reproduce or broadcast without permission! 70
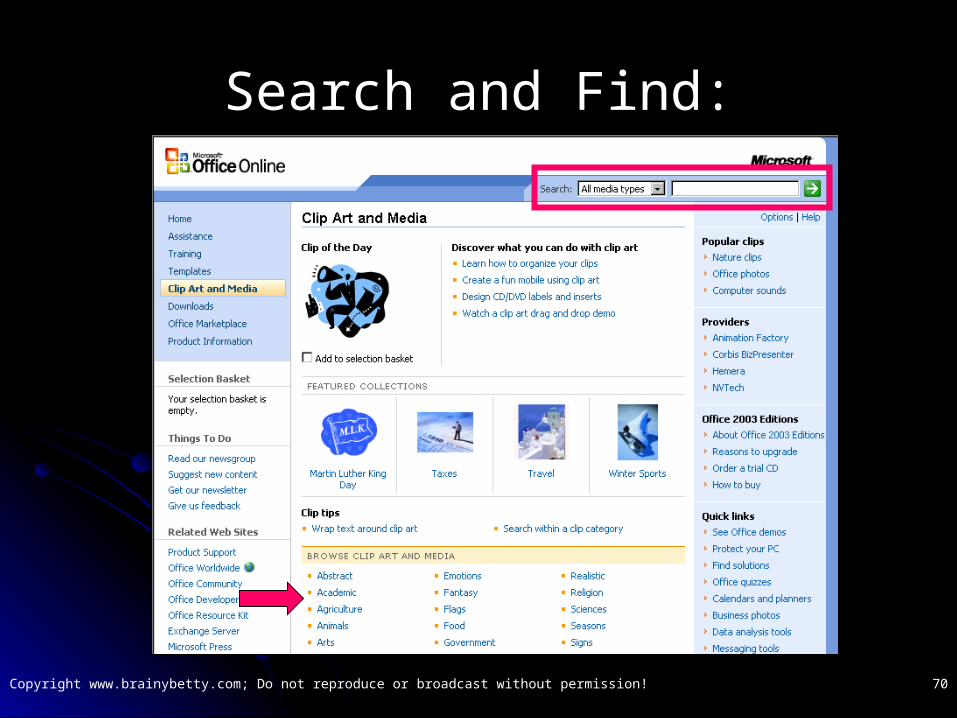
Search and Find:
Copyright www.brainybetty.com; Do not reproduce or broadcast without permission! 71
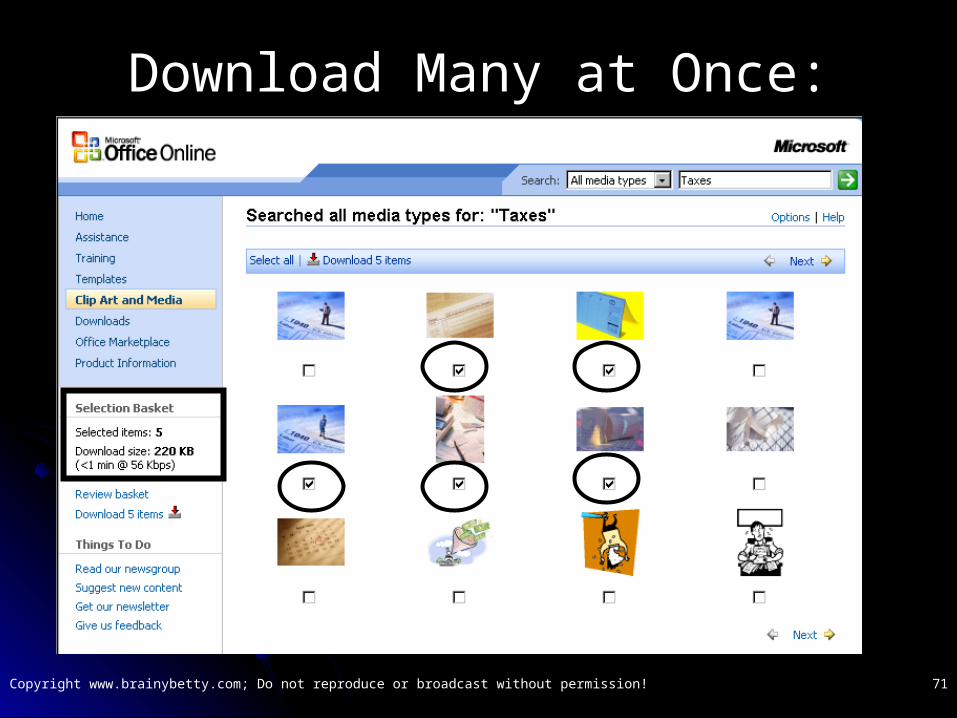
Download Many at Once:
