adsa web access county training - dshs - home page
TRANSCRIPT

ADSA Web Access –
County Training
Aging & Long-Term Services Administration
Training Services
Revised 2017
2
Table of Contents
Overview ............................................................................................................................ 2 Get Started ......................................................................................................................... 5
Web Browser – Get Around – Quick Review .............................................................................. 5
Login and login security ................................................................................................... 6 Work List – Get Started ................................................................................................. 10
Overview ..................................................................................................................................... 10 Referral – Pending County Review ............................................................................................ 11 Referral – Approved Pending Authorization .............................................................................. 17 Referral – Recently Withdrawn .................................................................................................. 17 Authorization – Recently Approved ........................................................................................... 18
Authorization – Recent RAC or Fund Source Change ............................................................... 19 Authorization – To Date in Next 30 Days .................................................................................. 20
Authorization – To Date in Past 30 Days ................................................................................... 21
Client ................................................................................................................................ 22 Search .......................................................................................................................................... 22 Demographics ............................................................................................................................. 23 Overview Screen ......................................................................................................................... 24
Client Contact ............................................................................................................................. 25 Residence History ....................................................................................................................... 26
Collateral Contact ....................................................................................................................... 27 County Service Referral .............................................................................................................. 28 County Service Authorization..................................................................................................... 29
County Service Authorization – Planned Rate ........................................................................... 30 Employment Outcome ................................................................................................................ 32
Billing ............................................................................................................................... 34 Overview ..................................................................................................................................... 34
Current Activities/Indirect Monthly Costs.................................................................................. 34 Indirect Monthly Costs - Edit/Delete .......................................................................................... 35 Billing Statements- Unbilled....................................................................................................... 36
Current Activities - Post.............................................................................................................. 37
Data Transfer .................................................................................................................. 38 Overview ..................................................................................................................................... 38 Employment Output .................................................................................................................... 39 Employment Input ...................................................................................................................... 41
Employment Input Errors ........................................................................................................... 42 Billing Output ............................................................................................................................. 43 Billing Input ................................................................................................................................ 44
Billing errors ............................................................................................................................... 46
Billing Correction Record ........................................................................................................... 47
Providers .......................................................................................................................... 48 Edit .............................................................................................................................................. 49 Formal Evaluation Dates............................................................................................................. 49
Reports ............................................................................................................................. 51 Overview ..................................................................................................................................... 51
Logout ............................................................................................................................................ 53
3
Appendix .......................................................................................................................... 54 County Billing Date Elements .................................................................................................... 53
County Billing Data Records Layouts ........................................................................................ 56
Employment Outcomes Data Records Layouts .......................................................................... 63 Job Type Code list: ..................................................................................................................... 63 County Billing Instructions Detail for Data Files ....................................................................... 64 County Billing Data Validation Rules ........................................................................................ 79 Employment Data Validation Rules ........................................................................................... 80
Billable Activities:Staff Hours Phases ........................................................................................ 81
County Procedure Codes............................................................................................................. 82 NOTES ........................................................................................................................................ 83
4
Overview
The ADSA (Aging & Disability Services Administration) Web Access is a system designed to
support County services for the Developmental Disabilities Administration (DDA) clients.
Please note that ADSA is now known as ALTSA (Aging and Long-Term Support).
ADSA Web Access (AWA):
Offers a consistent and reliable interaction for Counties statewide.
Provides a County connection to specific areas of CARE (Comprehensive Assessment
Reporting & Evaluation) application.
Collects more information from Providers to monitor quality.
Automates the billing and service authorization processes.
Connects to ProviderOne for payment. ProviderOne is a modern and efficient payment system
that provides timely payment, reduces payment errors and fraud, and maximizes federal
matching dollars.
About this Workbook:
This workbook provides exercises to get you up and running quickly on AWA. The exercises are
self-paced and designed to first tell you about a course of action, and then give you an opportunity
to try it, step-by-step.
Help: Please direct all questions about the AWA system to the ALTSA Help Desk at:
o In the Olympia Area: 360-725-2460
o Statewide: 1-800-818-4024
o E-mail: [email protected]
When you contact the ALTSA Help Desk you will receive a response within 24 hours and will be
given a tracking number. All contacts will be tracked in a database to ensure a resolution is
established.
Please see the Login – Security information in the Appendix of this workbook for additional
information about logging in for the first time.
Please turn to the next page to get started.
5
Get Started
Web Browser – Get Around – Quick Review
Launch the browser:
Launch your web browser as you normally do.
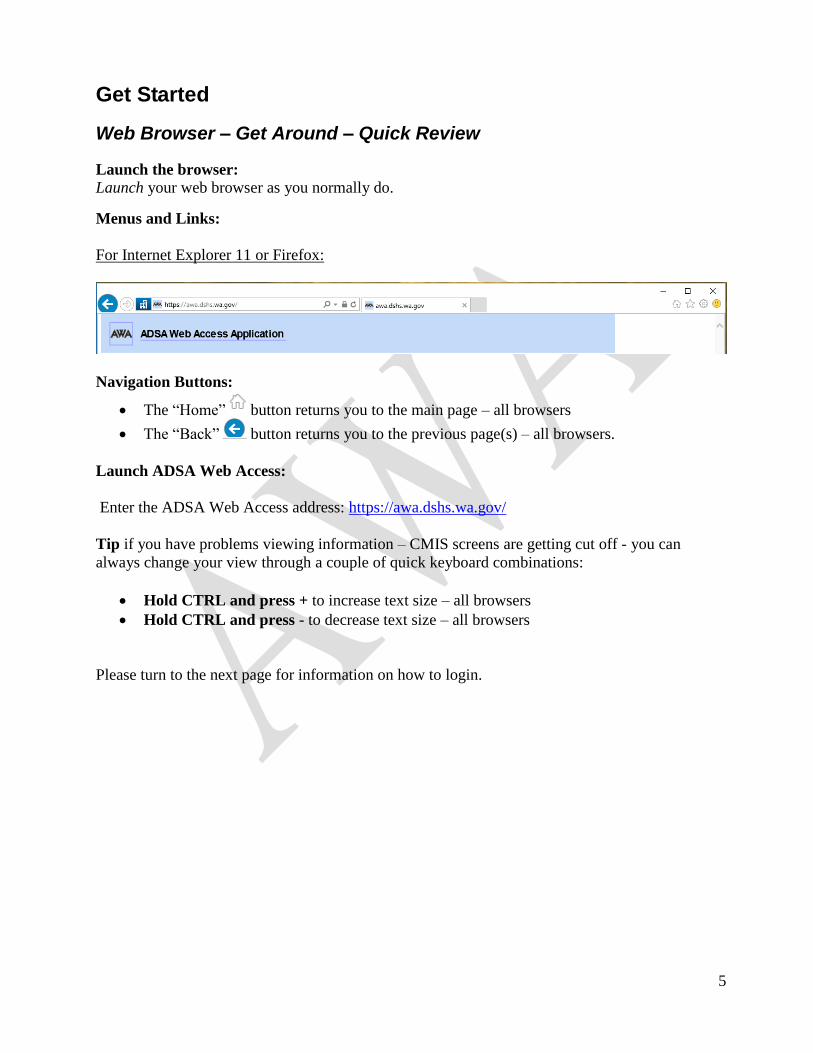
Menus and Links:
For Internet Explorer 11 or Firefox:
Navigation Buttons:
The “Home” button returns you to the main page – all browsers
The “Back” button returns you to the previous page(s) – all browsers.
Launch ADSA Web Access:
Enter the ADSA Web Access address: https://awa.dshs.wa.gov/
Tip if you have problems viewing information – CMIS screens are getting cut off - you can
always change your view through a couple of quick keyboard combinations:
Hold CTRL and press + to increase text size – all browsers
Hold CTRL and press - to decrease text size – all browsers
Please turn to the next page for information on how to login.
6
Login
The ADSA Web Access is a site on the web where many users can access data. There are several
other groups besides Counties who need limited access to client data. Some of these people will
use the same ADSA Web Access; however, their security group will only allow access to the
specific site they need.
Prior to Login you need to obtain you Username and Password thru the ALTSA Helpdesk (see
page 4 for contact information).
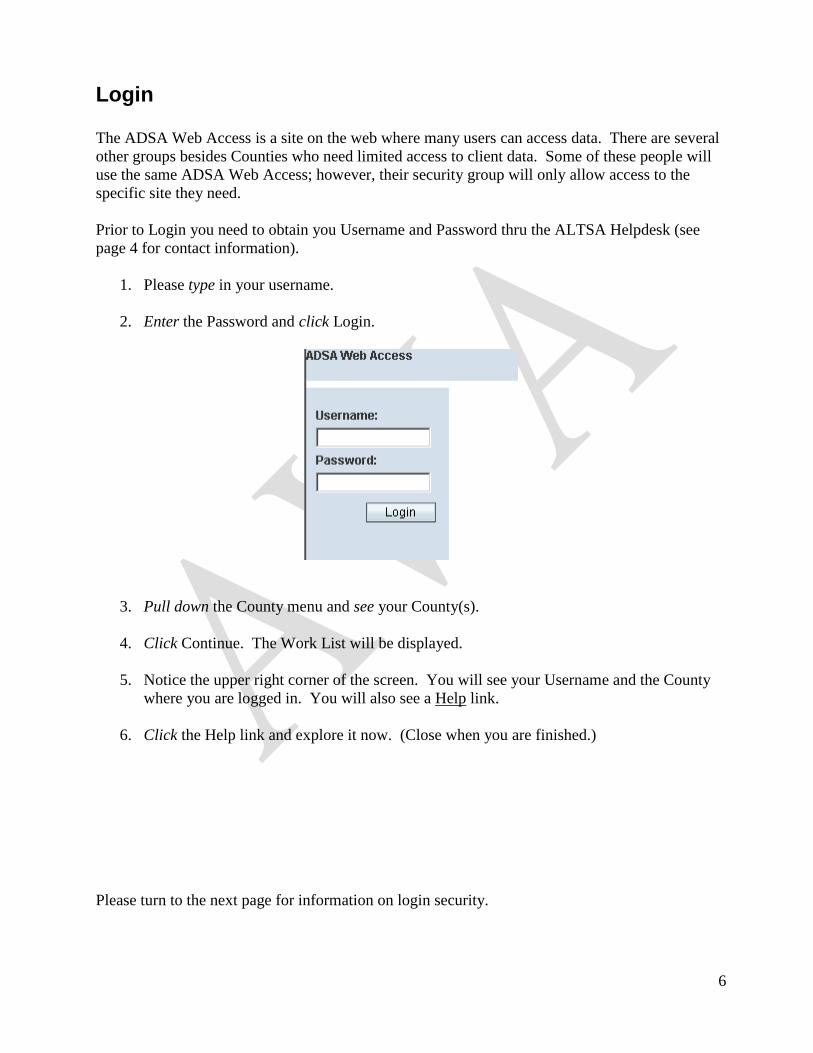
1. Please type in your username.
2. Enter the Password and click Login.
3. Pull down the County menu and see your County(s).
4. Click Continue. The Work List will be displayed.
5. Notice the upper right corner of the screen. You will see your Username and the County
where you are logged in. You will also see a Help link.
6. Click the Help link and explore it now. (Close when you are finished.)
Please turn to the next page for information on login security.
7
Login - Security
We’ve implemented SSL (Secure Sockets Layer) to the ADSA Web Access. This will make the
web site more secure by preventing others from gaining access to sensitive private information.
Internet Explorer needs to be configured for the ADSA Web Access so that the SSL will work
smoothly.
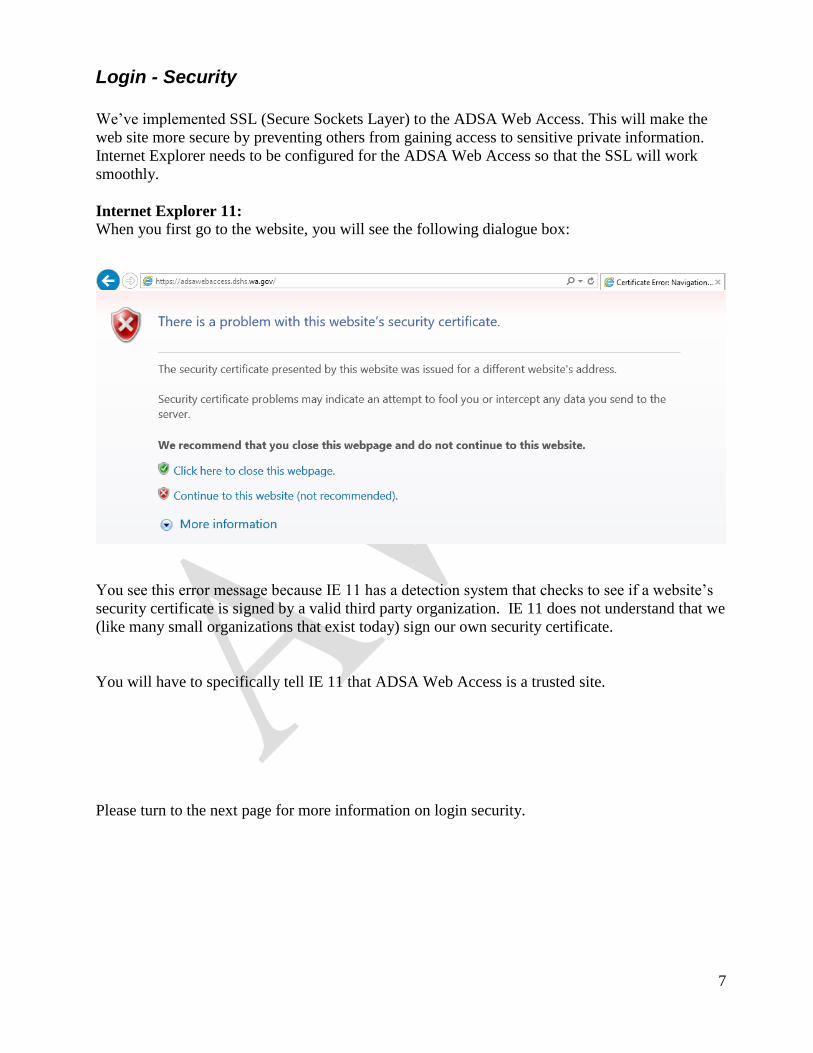
Internet Explorer 11:
When you first go to the website, you will see the following dialogue box:
You see this error message because IE 11 has a detection system that checks to see if a website’s
security certificate is signed by a valid third party organization. IE 11 does not understand that we
(like many small organizations that exist today) sign our own security certificate.
You will have to specifically tell IE 11 that ADSA Web Access is a trusted site.
Please turn to the next page for more information on login security.
8
Login – Security continued
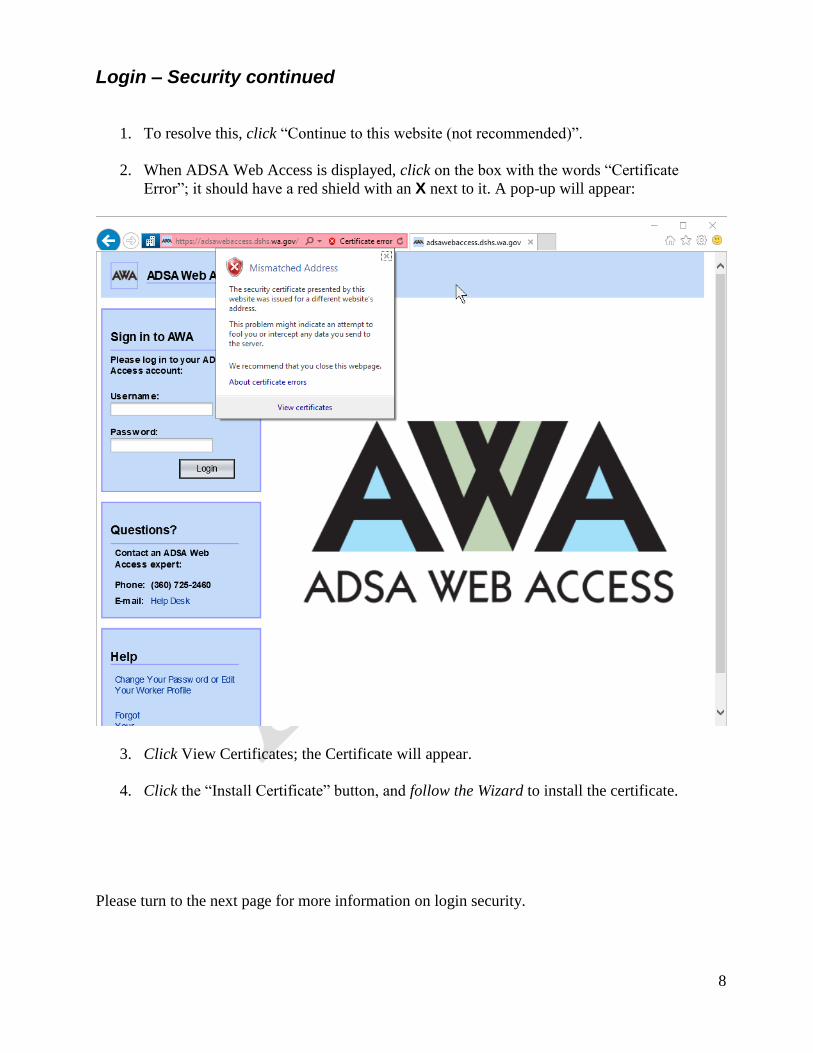
1. To resolve this, click “Continue to this website (not recommended)”.
2. When ADSA Web Access is displayed, click on the box with the words “Certificate
Error”; it should have a red shield with an X next to it. A pop-up will appear:
3. Click View Certificates; the Certificate will appear.
4. Click the “Install Certificate” button, and follow the Wizard to install the certificate.
Please turn to the next page for more information on login security.

9
Login – Security continued
Firefox: For Firefox, you will see the following warning when you first access the site:
1. Click the Advanced button.
2. Click the Add Exception… button that appears below.
3. Click the Confirm Security Exception button in the resulting dialog box to complete
importing the certificate.
If you are using a different browser and you have questions, please contact your IT support
person, or contact the ALTSA IT Helpdesk.
Please turn to the next page for an overview of the Work List.
10
Work List – Get Started
Overview
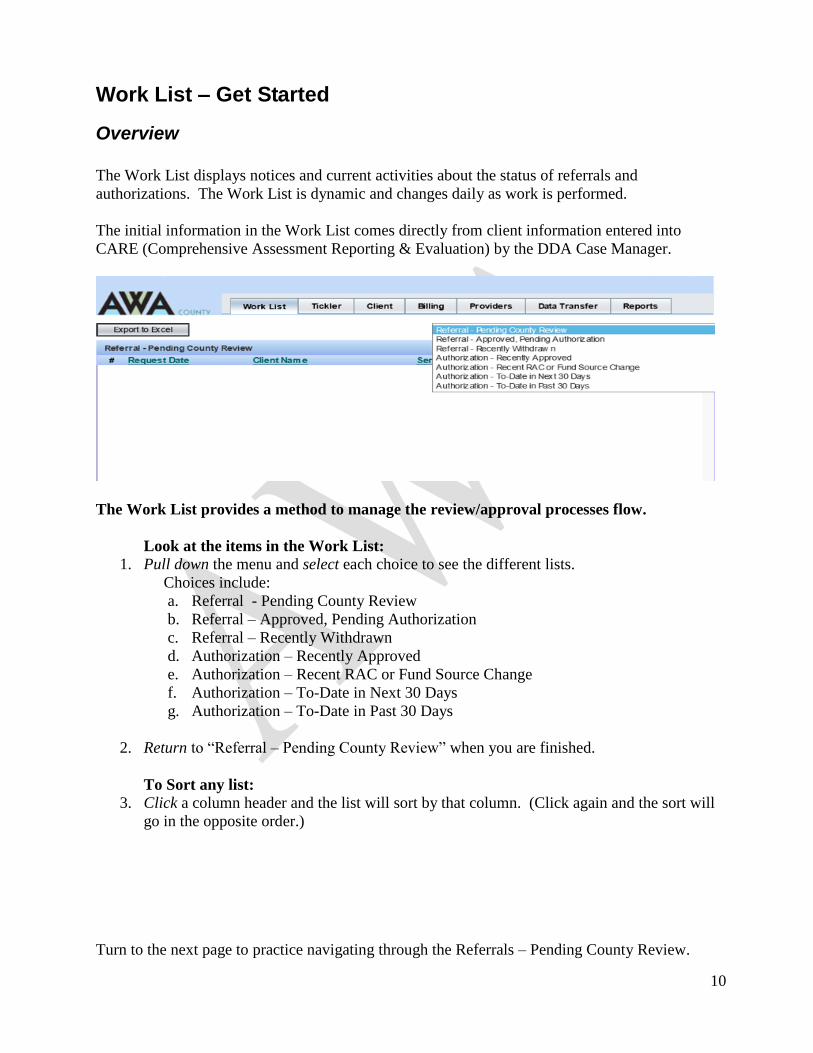
The Work List displays notices and current activities about the status of referrals and
authorizations. The Work List is dynamic and changes daily as work is performed.
The initial information in the Work List comes directly from client information entered into
CARE (Comprehensive Assessment Reporting & Evaluation) by the DDA Case Manager.
The Work List provides a method to manage the review/approval processes flow.
Look at the items in the Work List:
1. Pull down the menu and select each choice to see the different lists.
Choices include:
a. Referral - Pending County Review
b. Referral – Approved, Pending Authorization
c. Referral – Recently Withdrawn
d. Authorization – Recently Approved
e. Authorization – Recent RAC or Fund Source Change
f. Authorization – To-Date in Next 30 Days
g. Authorization – To-Date in Past 30 Days
2. Return to “Referral – Pending County Review” when you are finished.
To Sort any list:
3. Click a column header and the list will sort by that column. (Click again and the sort will
go in the opposite order.)
Turn to the next page to practice navigating through the Referrals – Pending County Review.
11
Work List
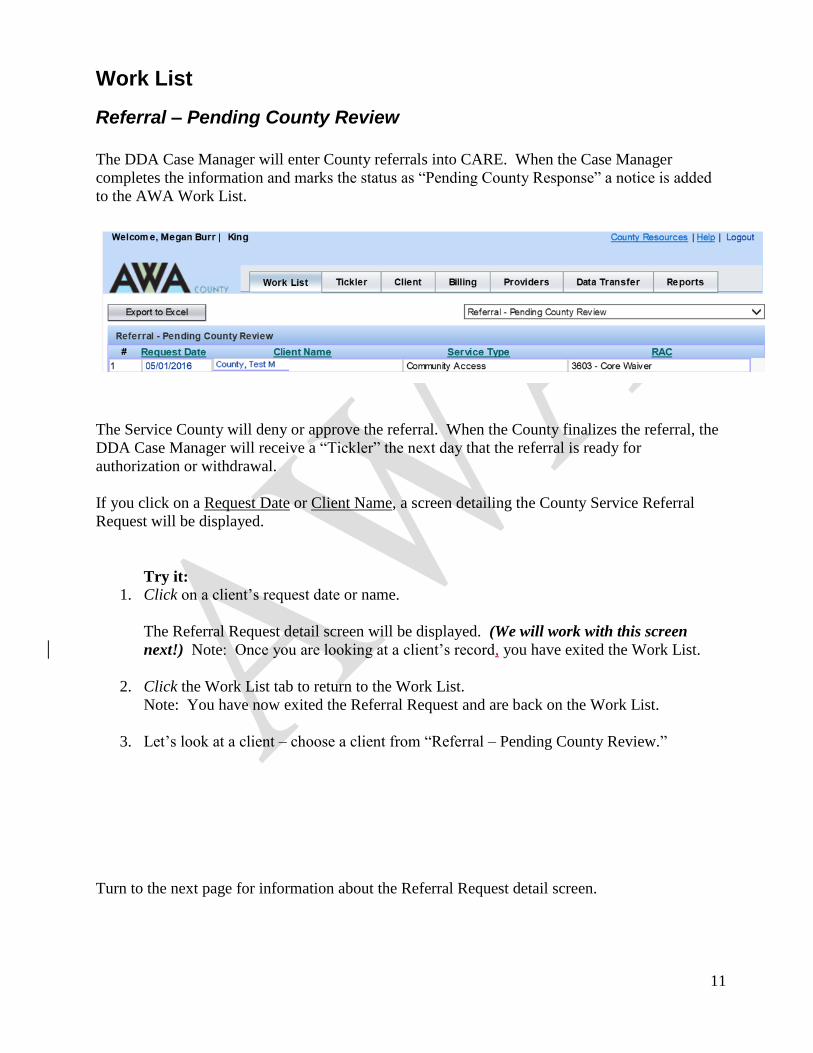
Referral – Pending County Review
The DDA Case Manager will enter County referrals into CARE. When the Case Manager
completes the information and marks the status as “Pending County Response” a notice is added
to the AWA Work List.
The Service County will deny or approve the referral. When the County finalizes the referral, the
DDA Case Manager will receive a “Tickler” the next day that the referral is ready for
authorization or withdrawal.
If you click on a Request Date or Client Name, a screen detailing the County Service Referral
Request will be displayed.
Try it:
1. Click on a client’s request date or name.
The Referral Request detail screen will be displayed. (We will work with this screen
next!) Note: Once you are looking at a client’s record, you have exited the Work List.
2. Click the Work List tab to return to the Work List.
Note: You have now exited the Referral Request and are back on the Work List.
3. Let’s look at a client – choose a client from “Referral – Pending County Review.”
Turn to the next page for information about the Referral Request detail screen.
12
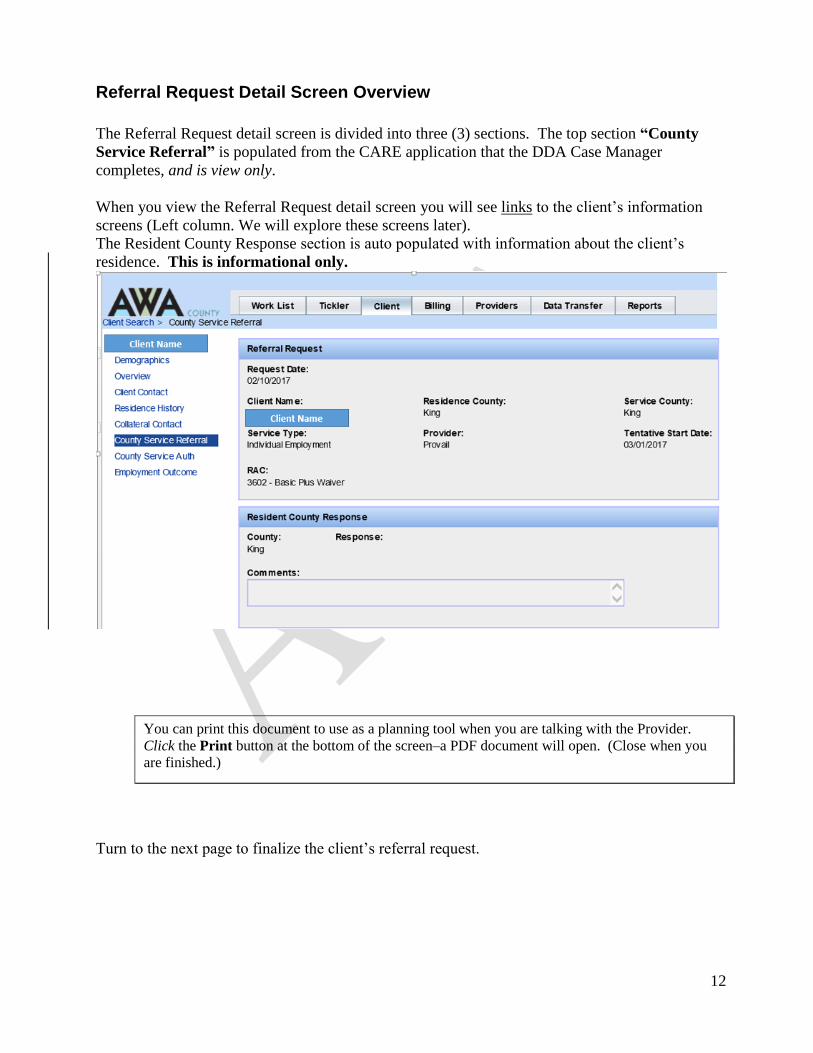
Referral Request Detail Screen Overview
The Referral Request detail screen is divided into three (3) sections. The top section “County
Service Referral” is populated from the CARE application that the DDA Case Manager
completes, and is view only.
When you view the Referral Request detail screen you will see links to the client’s information
screens (Left column. We will explore these screens later).
The Resident County Response section is auto populated with information about the client’s
residence. This is informational only.
You can print this document to use as a planning tool when you are talking with the Provider.
Click the Print button at the bottom of the screen–a PDF document will open. (Close when you
are finished.)
Turn to the next page to finalize the client’s referral request.
13
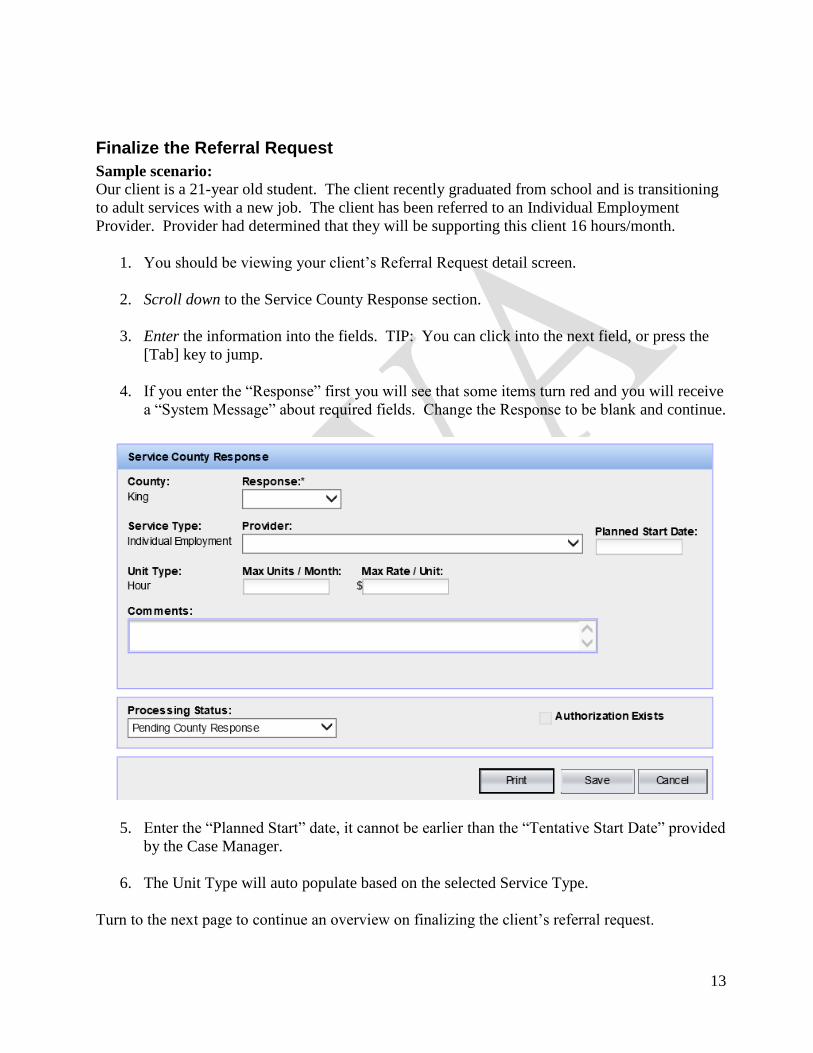
Finalize the Referral Request
Sample scenario:
Our client is a 21-year old student. The client recently graduated from school and is transitioning
to adult services with a new job. The client has been referred to an Individual Employment
Provider. Provider had determined that they will be supporting this client 16 hours/month.
1. You should be viewing your client’s Referral Request detail screen.
2. Scroll down to the Service County Response section.
3. Enter the information into the fields. TIP: You can click into the next field, or press the
[Tab] key to jump.
4. If you enter the “Response” first you will see that some items turn red and you will receive
a “System Message” about required fields. Change the Response to be blank and continue.
5. Enter the “Planned Start” date, it cannot be earlier than the “Tentative Start Date” provided
by the Case Manager.
6. The Unit Type will auto populate based on the selected Service Type.
Turn to the next page to continue an overview on finalizing the client’s referral request.
14
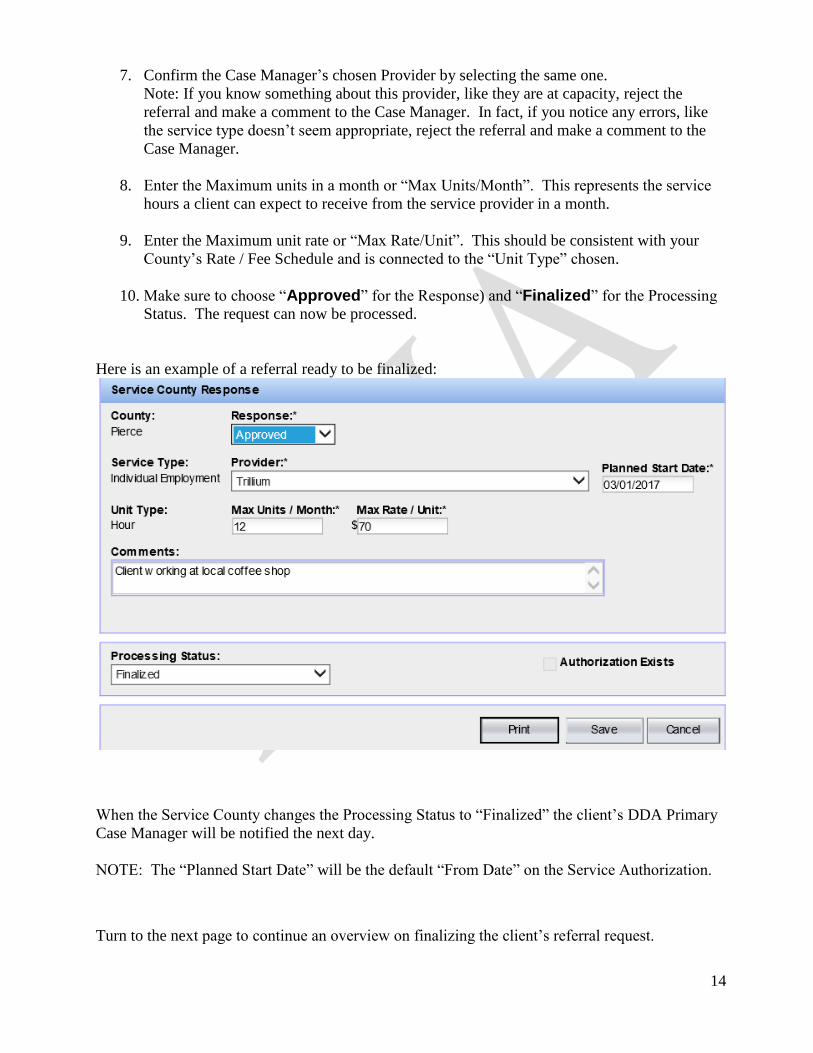
7. Confirm the Case Manager’s chosen Provider by selecting the same one.
Note: If you know something about this provider, like they are at capacity, reject the
referral and make a comment to the Case Manager. In fact, if you notice any errors, like
the service type doesn’t seem appropriate, reject the referral and make a comment to the
Case Manager.
8. Enter the Maximum units in a month or “Max Units/Month”. This represents the service
hours a client can expect to receive from the service provider in a month.
9. Enter the Maximum unit rate or “Max Rate/Unit”. This should be consistent with your
County’s Rate / Fee Schedule and is connected to the “Unit Type” chosen.
10. Make sure to choose “Approved” for the Response) and “Finalized” for the Processing
Status. The request can now be processed.
Here is an example of a referral ready to be finalized:
When the Service County changes the Processing Status to “Finalized” the client’s DDA Primary
Case Manager will be notified the next day.
NOTE: The “Planned Start Date” will be the default “From Date” on the Service Authorization.
Turn to the next page to continue an overview on finalizing the client’s referral request.
15
Save the Referral Request
The button is like an “undo” button. It will cancel all the entries.
If the screen is view only, the “Existing Authorization” box will be checked. This means
that the request was previously finalized and an authorization already created.
If DDA has withdrawn the request, the “Processing Status” field will display “Withdrawn”
and the screen will be view only.
Click the button.
You will be returned to the Work List.
Once you have finalized and saved the referral request, it will be dropped from the
“Referral – Pending County Review” Work List. (Look at this Work List to see.)
The DDA Primary Case Manager will then authorize or withdraw this approved request in
CARE.
The request is added to the “Referral – Approved, Pending Authorization”
Turn the page to see what a case manager views in the CARE for Referrals / Authorizations.
16
Work List
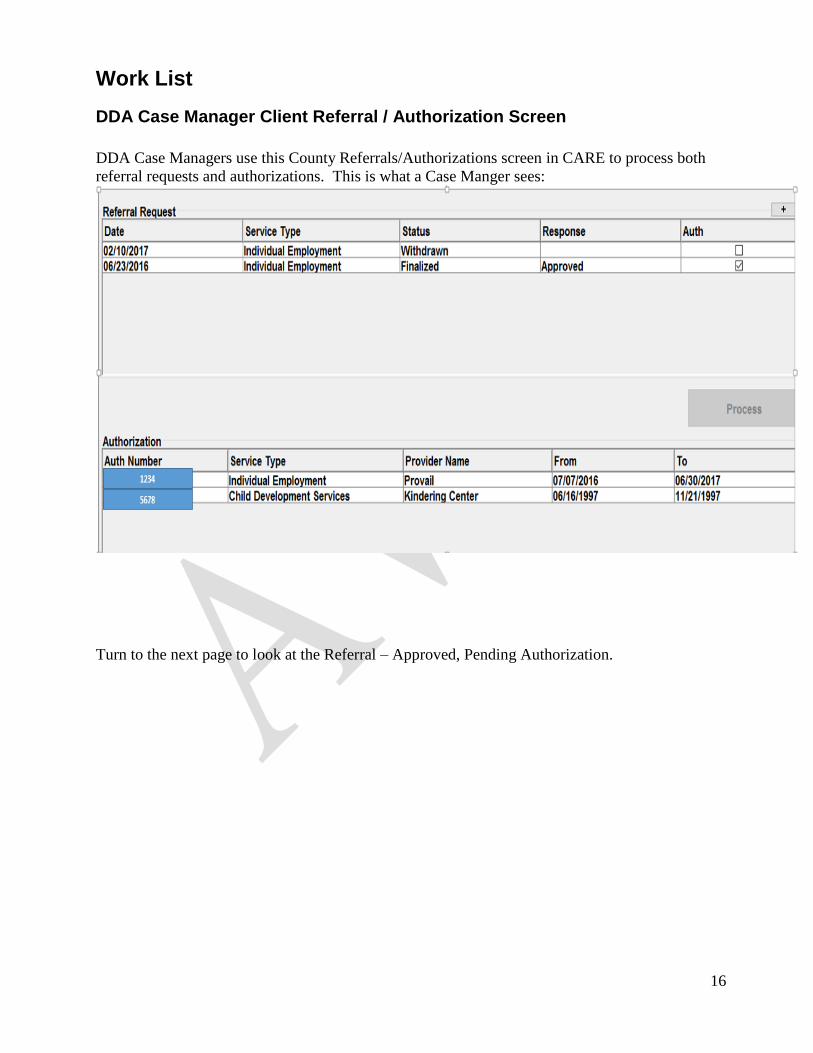
DDA Case Manager Client Referral / Authorization Screen
DDA Case Managers use this County Referrals/Authorizations screen in CARE to process both
referral requests and authorizations. This is what a Case Manger sees:
Turn to the next page to look at the Referral – Approved, Pending Authorization.
17
Work List
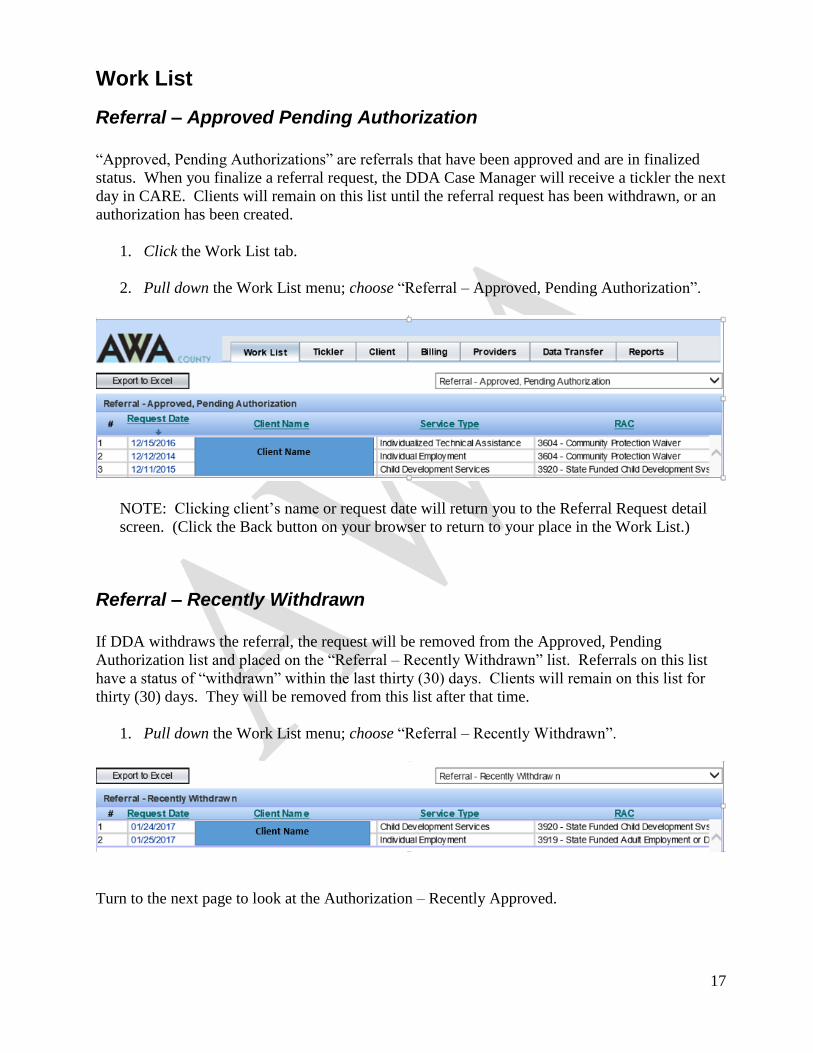
Referral – Approved Pending Authorization
“Approved, Pending Authorizations” are referrals that have been approved and are in finalized
status. When you finalize a referral request, the DDA Case Manager will receive a tickler the next
day in CARE. Clients will remain on this list until the referral request has been withdrawn, or an
authorization has been created.
1. Click the Work List tab.
2. Pull down the Work List menu; choose “Referral – Approved, Pending Authorization”.
NOTE: Clicking client’s name or request date will return you to the Referral Request detail
screen. (Click the Back button on your browser to return to your place in the Work List.)
Referral – Recently Withdrawn
If DDA withdraws the referral, the request will be removed from the Approved, Pending
Authorization list and placed on the “Referral – Recently Withdrawn” list. Referrals on this list
have a status of “withdrawn” within the last thirty (30) days. Clients will remain on this list for
thirty (30) days. They will be removed from this list after that time.
1. Pull down the Work List menu; choose “Referral – Recently Withdrawn”.
Turn to the next page to look at the Authorization – Recently Approved.
18
Work List
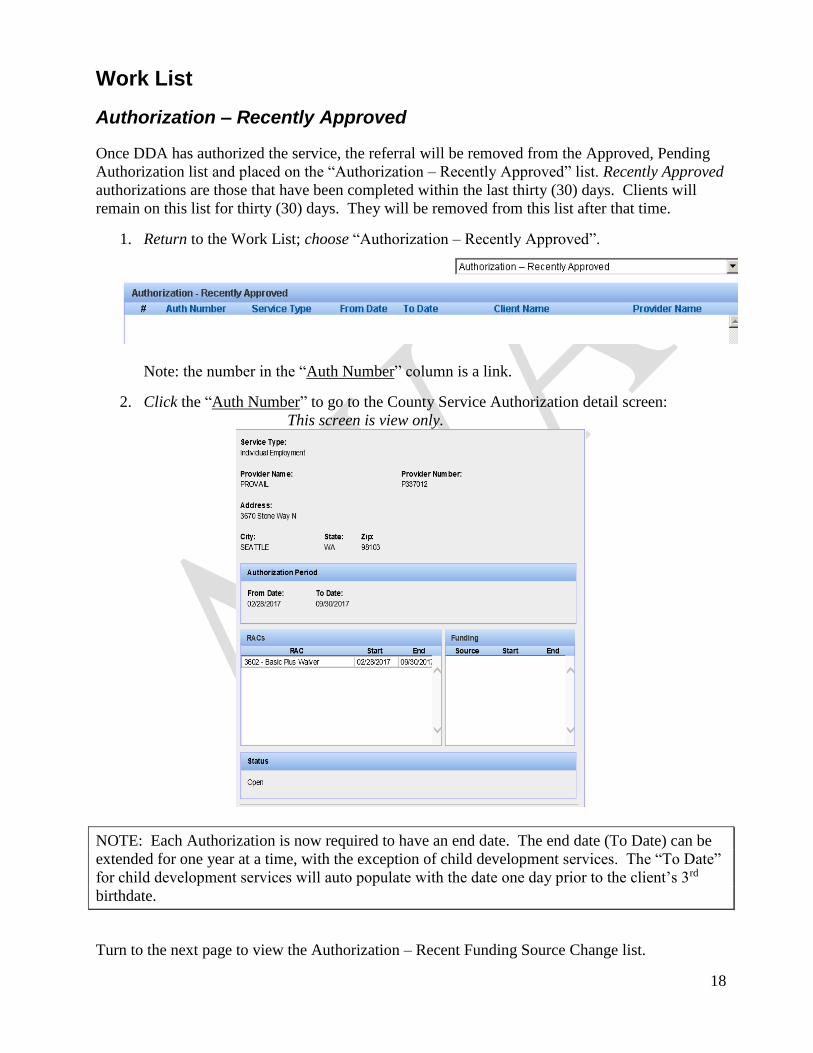
Authorization – Recently Approved
Once DDA has authorized the service, the referral will be removed from the Approved, Pending
Authorization list and placed on the “Authorization – Recently Approved” list. Recently Approved
authorizations are those that have been completed within the last thirty (30) days. Clients will
remain on this list for thirty (30) days. They will be removed from this list after that time.
1. Return to the Work List; choose “Authorization – Recently Approved”.
Note: the number in the “Auth Number” column is a link.
2. Click the “Auth Number” to go to the County Service Authorization detail screen:
This screen is view only.
NOTE: Each Authorization is now required to have an end date. The end date (To Date) can be
extended for one year at a time, with the exception of child development services. The “To Date”
for child development services will auto populate with the date one day prior to the client’s 3rd
birthdate.
Turn to the next page to view the Authorization – Recent Funding Source Change list.
19
Work List
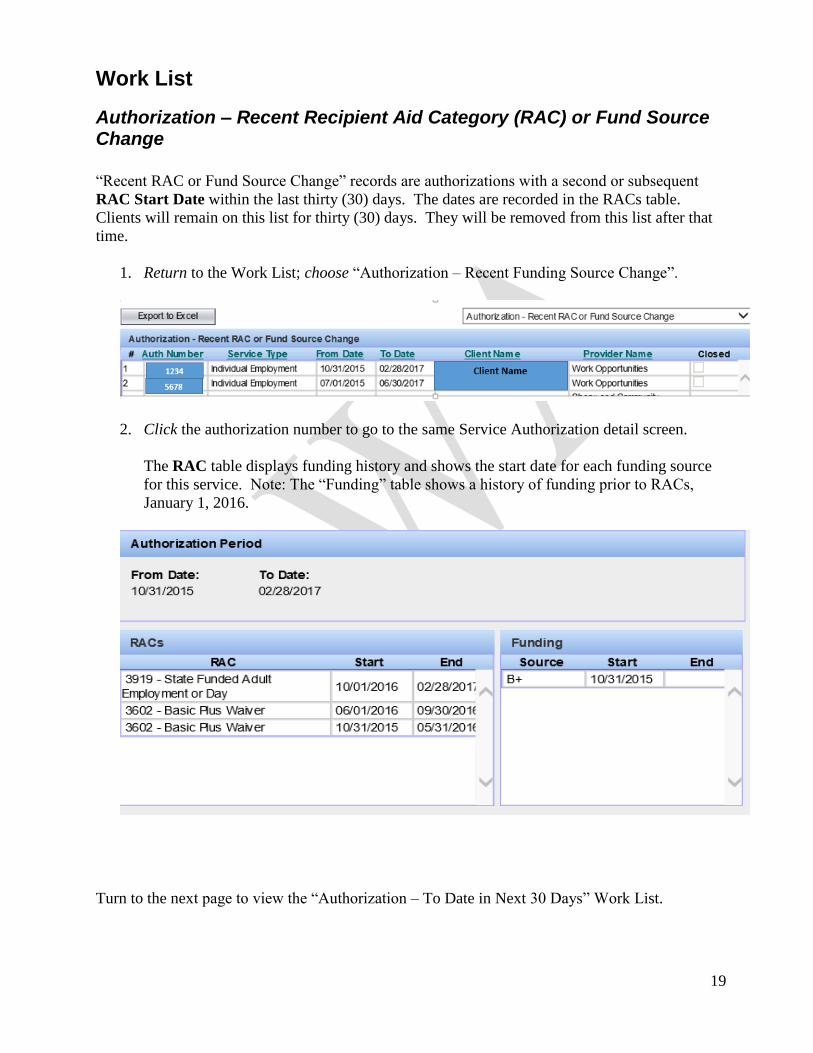
Authorization – Recent Recipient Aid Category (RAC) or Fund Source Change
“Recent RAC or Fund Source Change” records are authorizations with a second or subsequent
RAC Start Date within the last thirty (30) days. The dates are recorded in the RACs table.
Clients will remain on this list for thirty (30) days. They will be removed from this list after that
time.
1. Return to the Work List; choose “Authorization – Recent Funding Source Change”.
2. Click the authorization number to go to the same Service Authorization detail screen.
The RAC table displays funding history and shows the start date for each funding source
for this service. Note: The “Funding” table shows a history of funding prior to RACs,
January 1, 2016.
Turn to the next page to view the “Authorization – To Date in Next 30 Days” Work List.
20
Work List
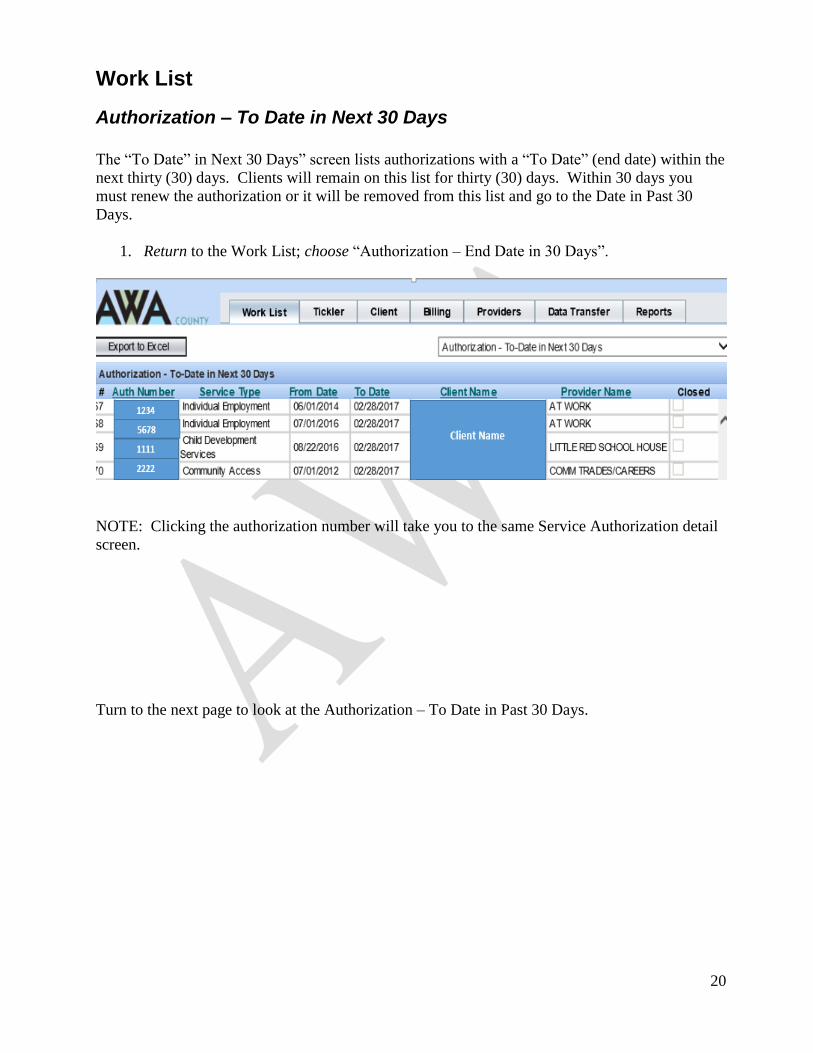
Authorization – To Date in Next 30 Days
The “To Date” in Next 30 Days” screen lists authorizations with a “To Date” (end date) within the
next thirty (30) days. Clients will remain on this list for thirty (30) days. Within 30 days you
must renew the authorization or it will be removed from this list and go to the Date in Past 30
Days.
1. Return to the Work List; choose “Authorization – End Date in 30 Days”.
NOTE: Clicking the authorization number will take you to the same Service Authorization detail
screen.
Turn to the next page to look at the Authorization – To Date in Past 30 Days.
21
Work List
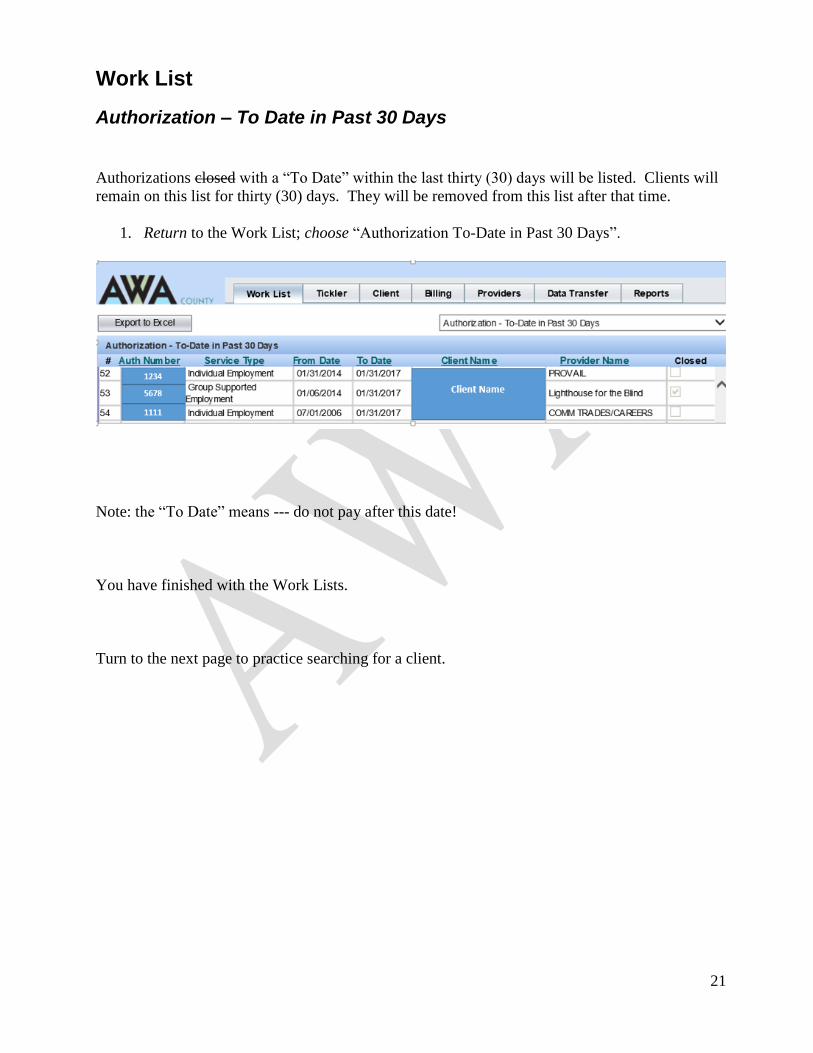
Authorization – To Date in Past 30 Days
Authorizations closed with a “To Date” within the last thirty (30) days will be listed. Clients will
remain on this list for thirty (30) days. They will be removed from this list after that time.
1. Return to the Work List; choose “Authorization To-Date in Past 30 Days”.
Note: the “To Date” means --- do not pay after this date!
You have finished with the Work Lists.
Turn to the next page to practice searching for a client.
22
Client
Search
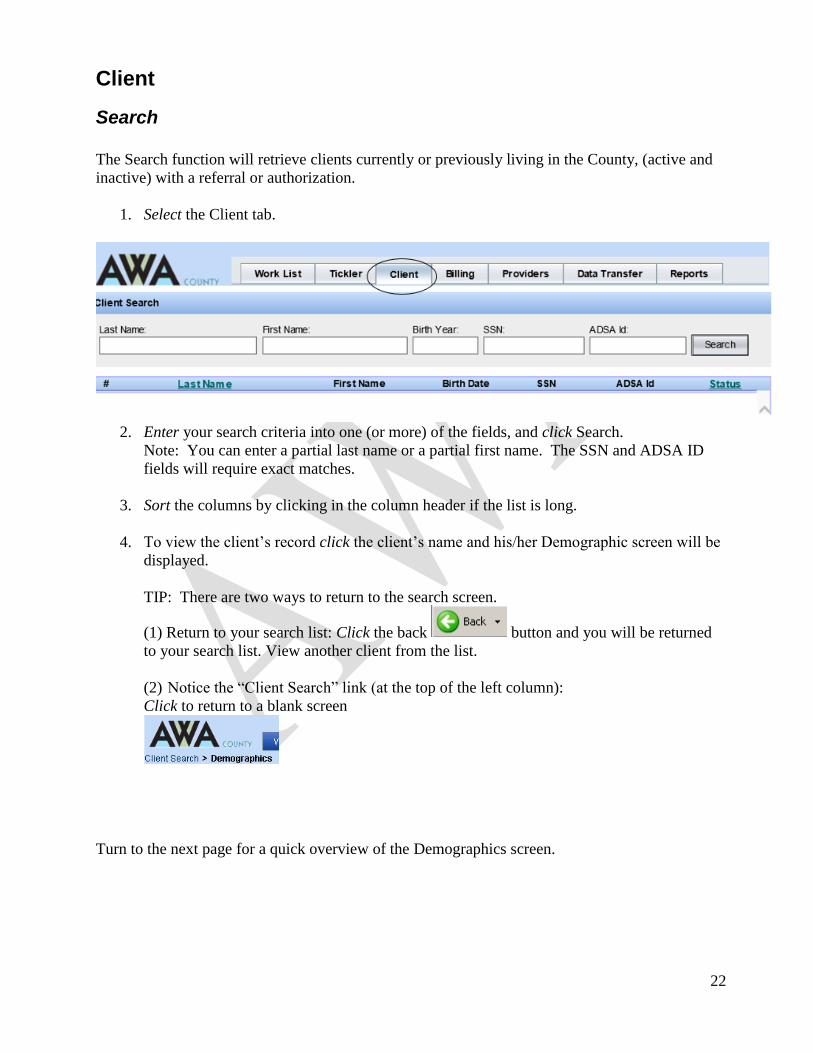
The Search function will retrieve clients currently or previously living in the County, (active and
inactive) with a referral or authorization.
1. Select the Client tab.
2. Enter your search criteria into one (or more) of the fields, and click Search.
Note: You can enter a partial last name or a partial first name. The SSN and ADSA ID
fields will require exact matches.
3. Sort the columns by clicking in the column header if the list is long.
4. To view the client’s record click the client’s name and his/her Demographic screen will be
displayed.
TIP: There are two ways to return to the search screen.
(1) Return to your search list: Click the back button and you will be returned
to your search list. View another client from the list.
(2) Notice the “Client Search” link (at the top of the left column):
Click to return to a blank screen
Turn to the next page for a quick overview of the Demographics screen.
23
Client
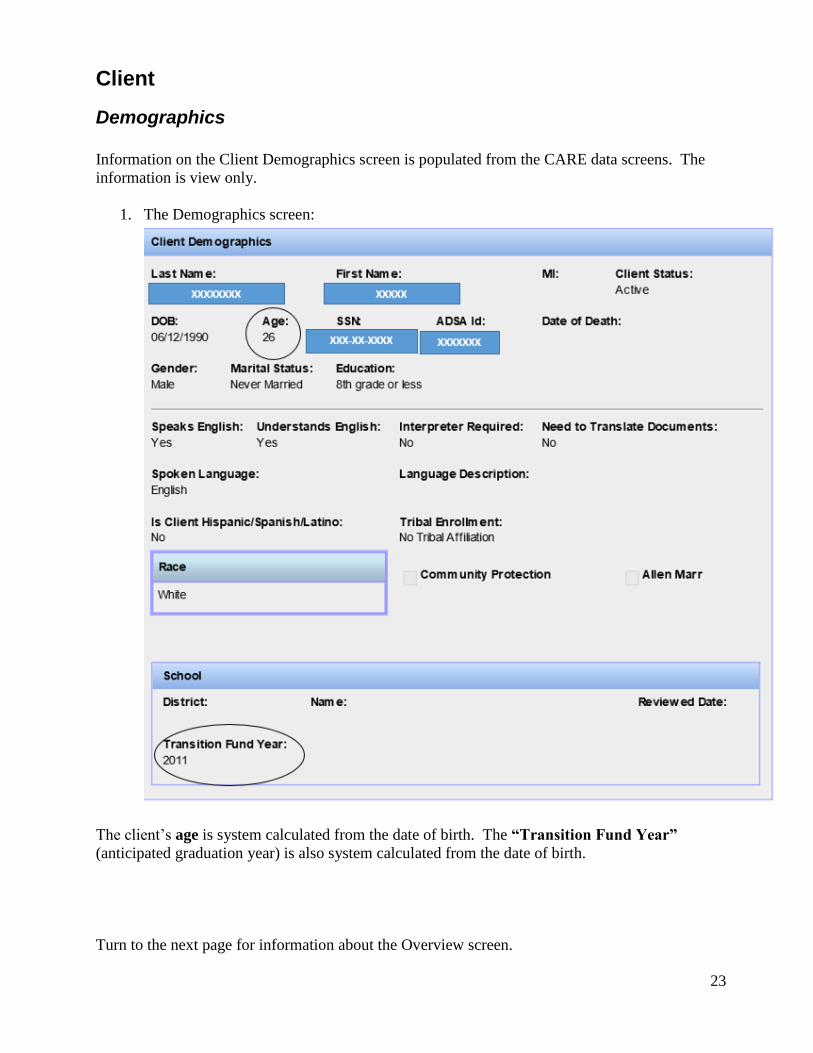
Demographics
Information on the Client Demographics screen is populated from the CARE data screens. The
information is view only.
1. The Demographics screen:
The client’s age is system calculated from the date of birth. The “Transition Fund Year”
(anticipated graduation year) is also system calculated from the date of birth.
Turn to the next page for information about the Overview screen.
24
Client
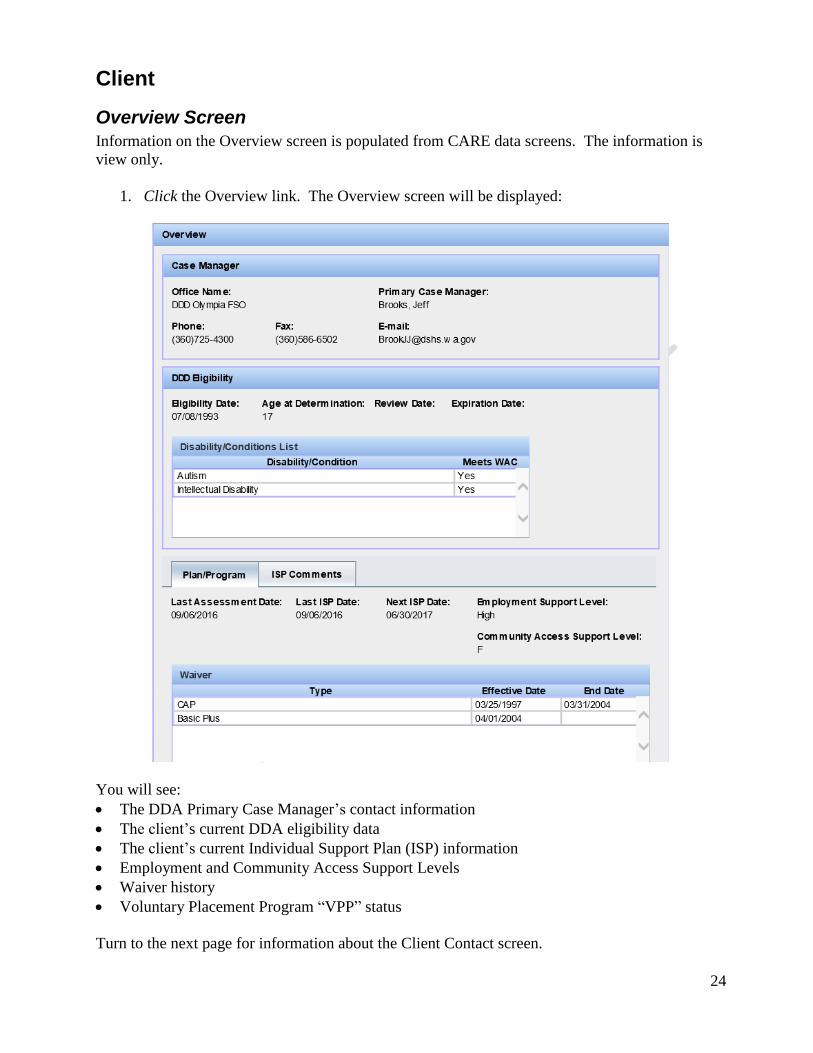
Overview Screen
Information on the Overview screen is populated from CARE data screens. The information is
view only.
1. Click the Overview link. The Overview screen will be displayed:
You will see:
The DDA Primary Case Manager’s contact information
The client’s current DDA eligibility data
The client’s current Individual Support Plan (ISP) information
Employment and Community Access Support Levels
Waiver history
Voluntary Placement Program “VPP” status
Turn to the next page for information about the Client Contact screen.
25
Client
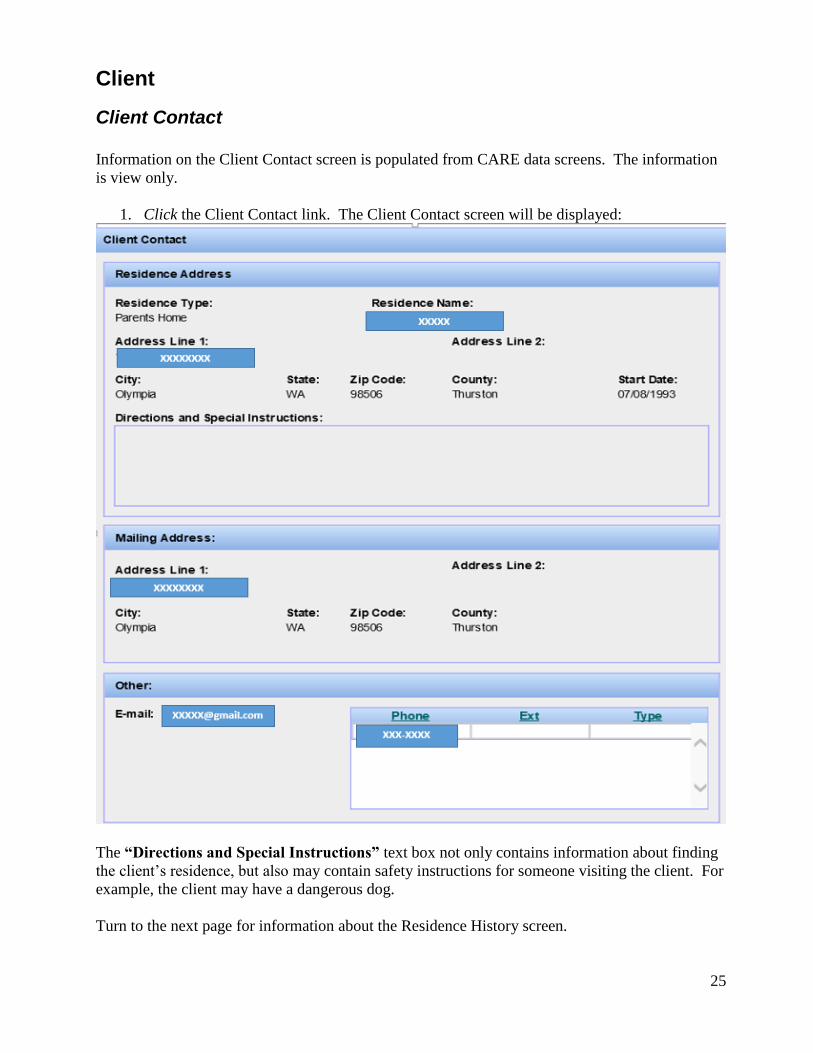
Client Contact
Information on the Client Contact screen is populated from CARE data screens. The information
is view only.
1. Click the Client Contact link. The Client Contact screen will be displayed:
The “Directions and Special Instructions” text box not only contains information about finding
the client’s residence, but also may contain safety instructions for someone visiting the client. For
example, the client may have a dangerous dog.
Turn to the next page for information about the Residence History screen.
26
Client
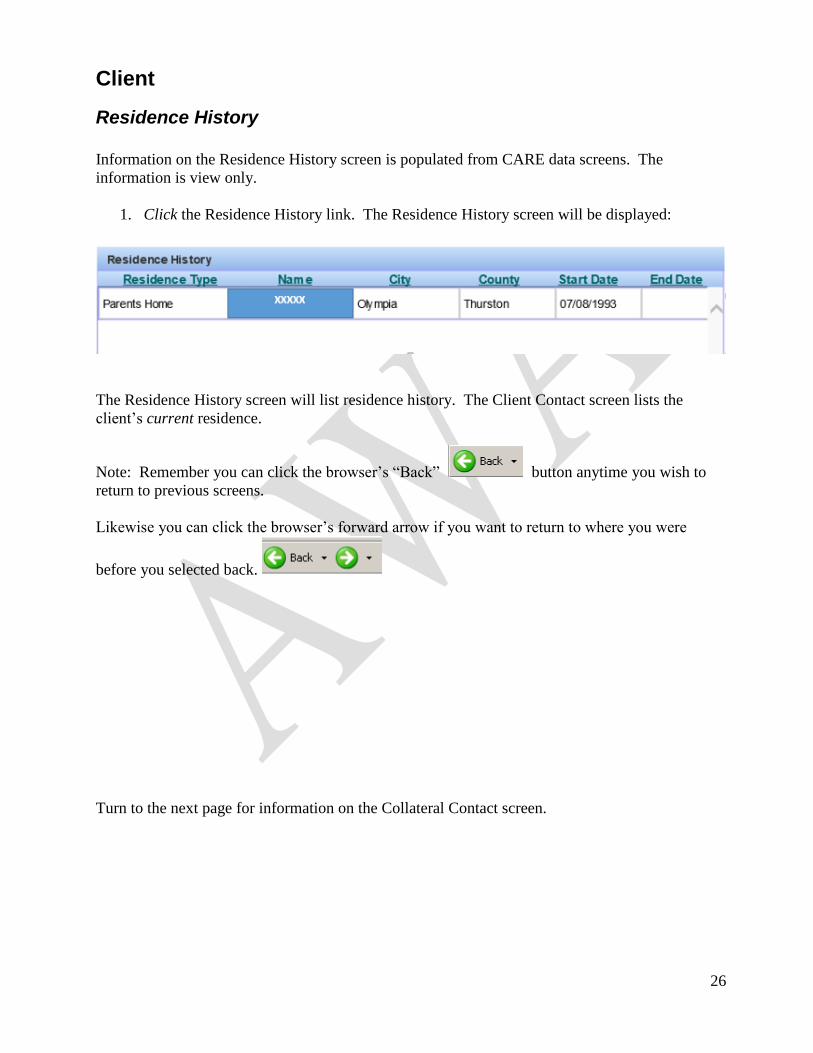
Residence History
Information on the Residence History screen is populated from CARE data screens. The
information is view only.
1. Click the Residence History link. The Residence History screen will be displayed:
The Residence History screen will list residence history. The Client Contact screen lists the
client’s current residence.
Note: Remember you can click the browser’s “Back” button anytime you wish to
return to previous screens.
Likewise you can click the browser’s forward arrow if you want to return to where you were
before you selected back.
Turn to the next page for information on the Collateral Contact screen.
27
Client
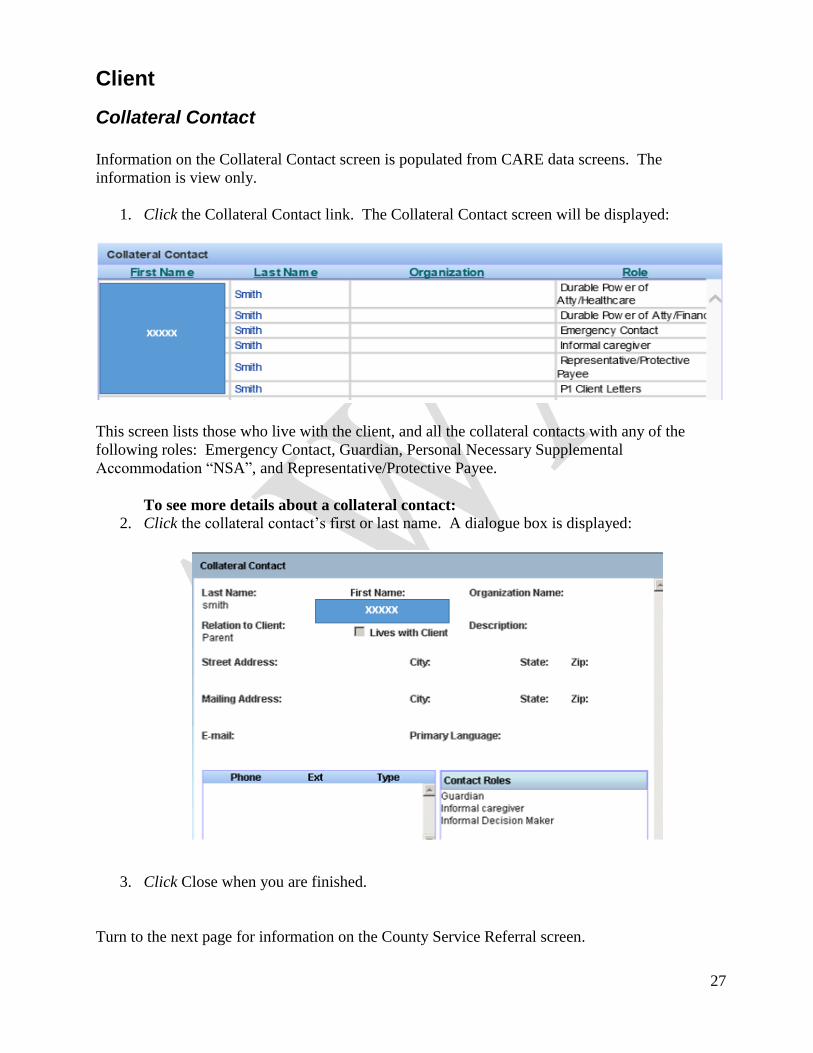
Collateral Contact
Information on the Collateral Contact screen is populated from CARE data screens. The
information is view only.
1. Click the Collateral Contact link. The Collateral Contact screen will be displayed:
This screen lists those who live with the client, and all the collateral contacts with any of the
following roles: Emergency Contact, Guardian, Personal Necessary Supplemental
Accommodation “NSA”, and Representative/Protective Payee.
To see more details about a collateral contact:
2. Click the collateral contact’s first or last name. A dialogue box is displayed:
3. Click Close when you are finished.
Turn to the next page for information on the County Service Referral screen.
28
Client
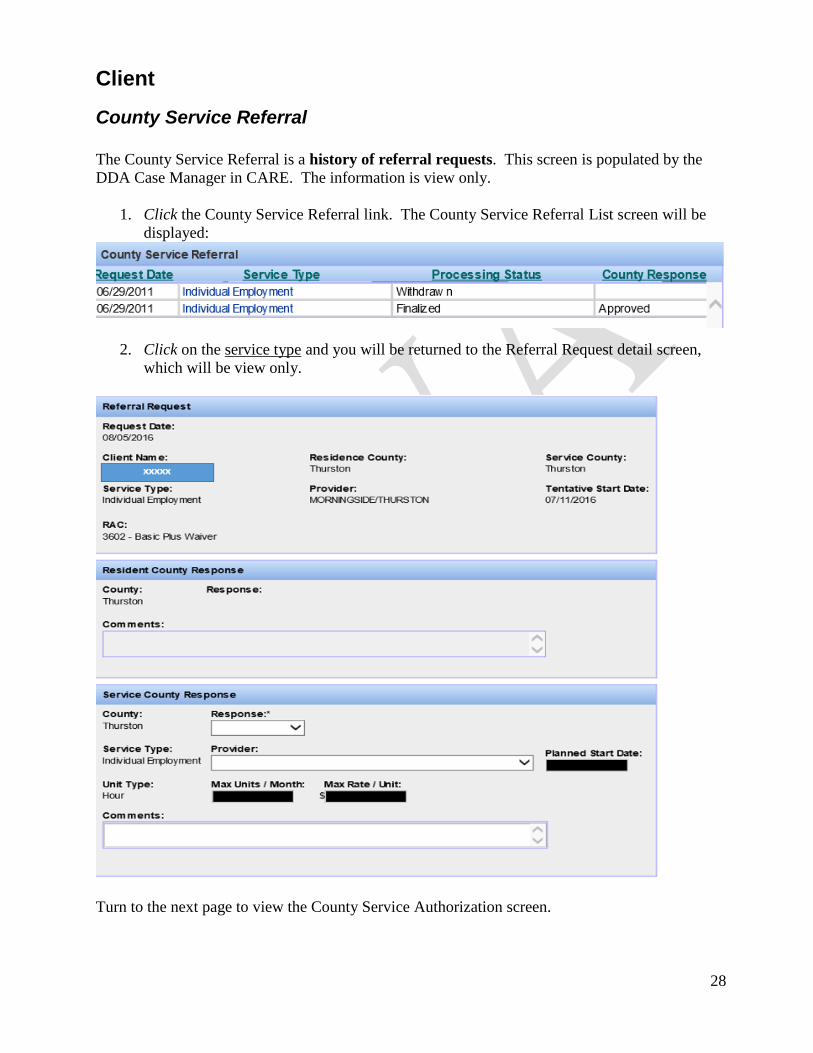
County Service Referral
The County Service Referral is a history of referral requests. This screen is populated by the
DDA Case Manager in CARE. The information is view only.
1. Click the County Service Referral link. The County Service Referral List screen will be
displayed:
2. Click on the service type and you will be returned to the Referral Request detail screen,
which will be view only.
Turn to the next page to view the County Service Authorization screen.
29
Client
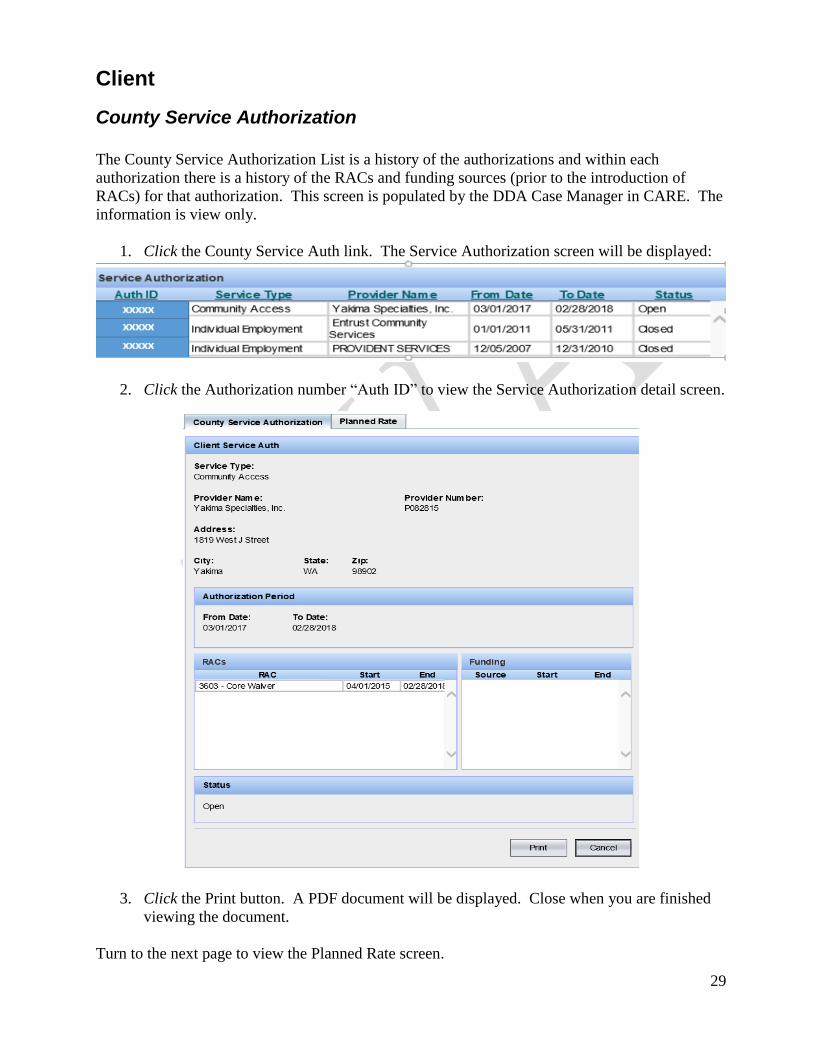
County Service Authorization
The County Service Authorization List is a history of the authorizations and within each
authorization there is a history of the RACs and funding sources (prior to the introduction of
RACs) for that authorization. This screen is populated by the DDA Case Manager in CARE. The
information is view only.
1. Click the County Service Auth link. The Service Authorization screen will be displayed:
2. Click the Authorization number “Auth ID” to view the Service Authorization detail screen.
3. Click the Print button. A PDF document will be displayed. Close when you are finished
viewing the document.
Turn to the next page to view the Planned Rate screen.
30
Client
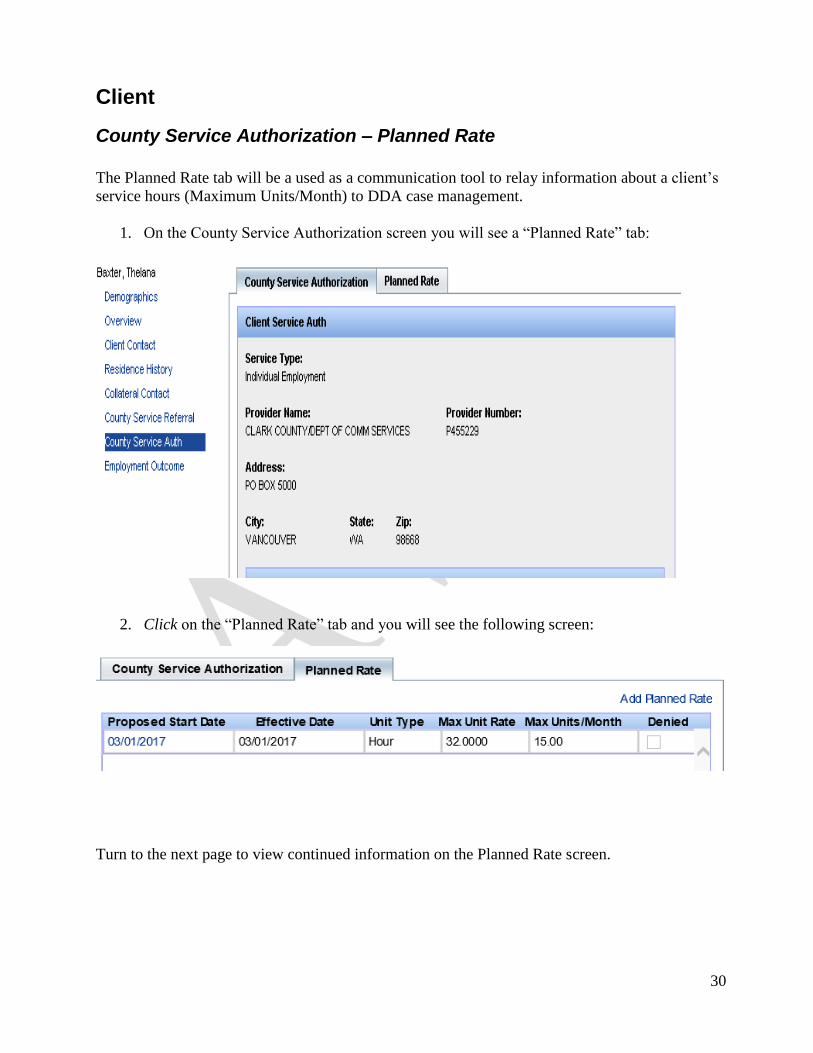
County Service Authorization – Planned Rate
The Planned Rate tab will be a used as a communication tool to relay information about a client’s
service hours (Maximum Units/Month) to DDA case management.
1. On the County Service Authorization screen you will see a “Planned Rate” tab:
2. Click on the “Planned Rate” tab and you will see the following screen:
Turn to the next page to view continued information on the Planned Rate screen.

31
Client
County Service Authorization – Planned Rate continued
3. To update the “Planned Rate” information for changes occurring, click on the “Add
Planned Rate”:
4. The following dialog box will appear:
5. Enter:
a. The date services will start in the “Proposed Start Date” box
b. The maximum units/month
c. The maximum rate/unit
d. Click on SAVE and the information will populate:
Note: Case Mangers will receive a tickler to notify them that the Planned Rate information has
changed.
Turn to the next page to view the Employment Outcomes screen.
32
Client
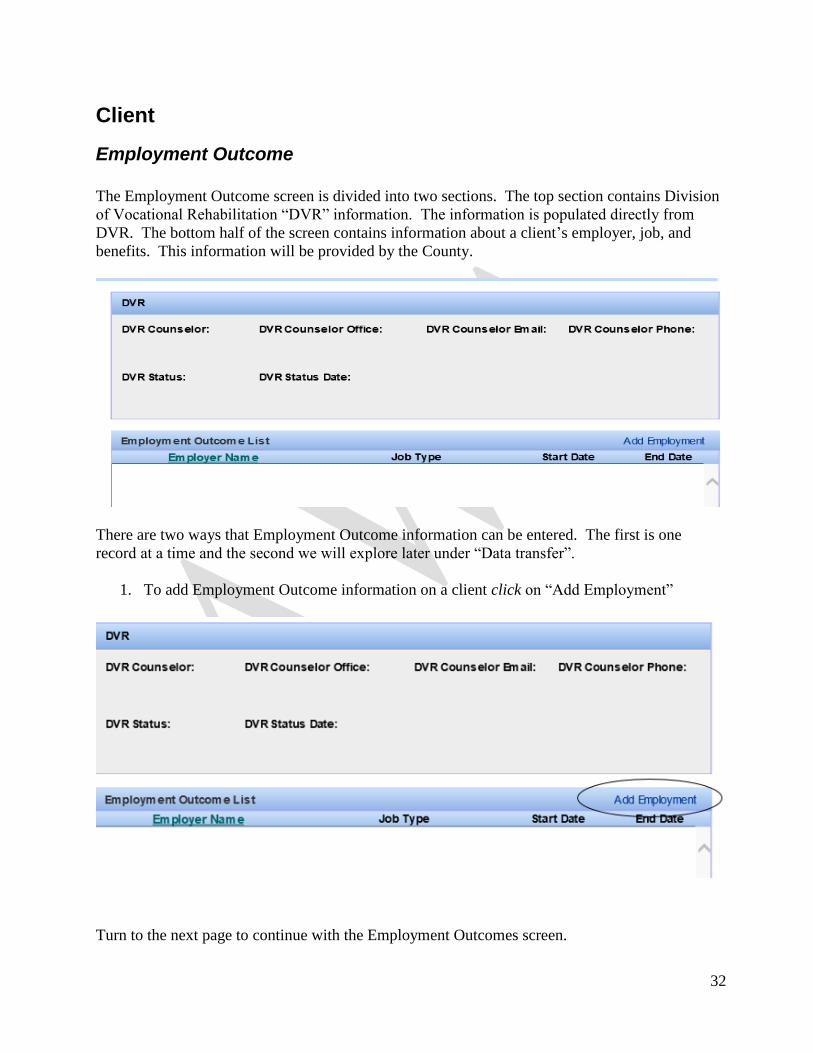
Employment Outcome
The Employment Outcome screen is divided into two sections. The top section contains Division
of Vocational Rehabilitation “DVR” information. The information is populated directly from
DVR. The bottom half of the screen contains information about a client’s employer, job, and
benefits. This information will be provided by the County.
There are two ways that Employment Outcome information can be entered. The first is one
record at a time and the second we will explore later under “Data transfer”.
1. To add Employment Outcome information on a client click on “Add Employment”
Turn to the next page to continue with the Employment Outcomes screen.

33
Client
Employment Outcome – continued
2. The following dialog box will appear.
3. Enter Employer’s name
4. Choose the appropriate job type from the drop down selection.
5. Enter the job “Start Date”.
6. Enter any benefits the client receives by clicking on the appropriate box.
7. “Save” the record
8. To change or update the information click on the Employer Name.
9. The dialog box will appear with the information previously saved. You can edit or add
new information anytime.
10. “Save” the record, the changes are instantly recorded.
You have finished viewing the Client information screens.
Turn to the next page for an overview of the billing.
34
Billing
Overview
This section is for entering and reviewing billing information. It is used to include the County
Indirect costs such as Administration “10” series, Training “30” series, Information & Education
“40” series, and the Other “90” series as well as review unbilled direct client billings prior to
posting.
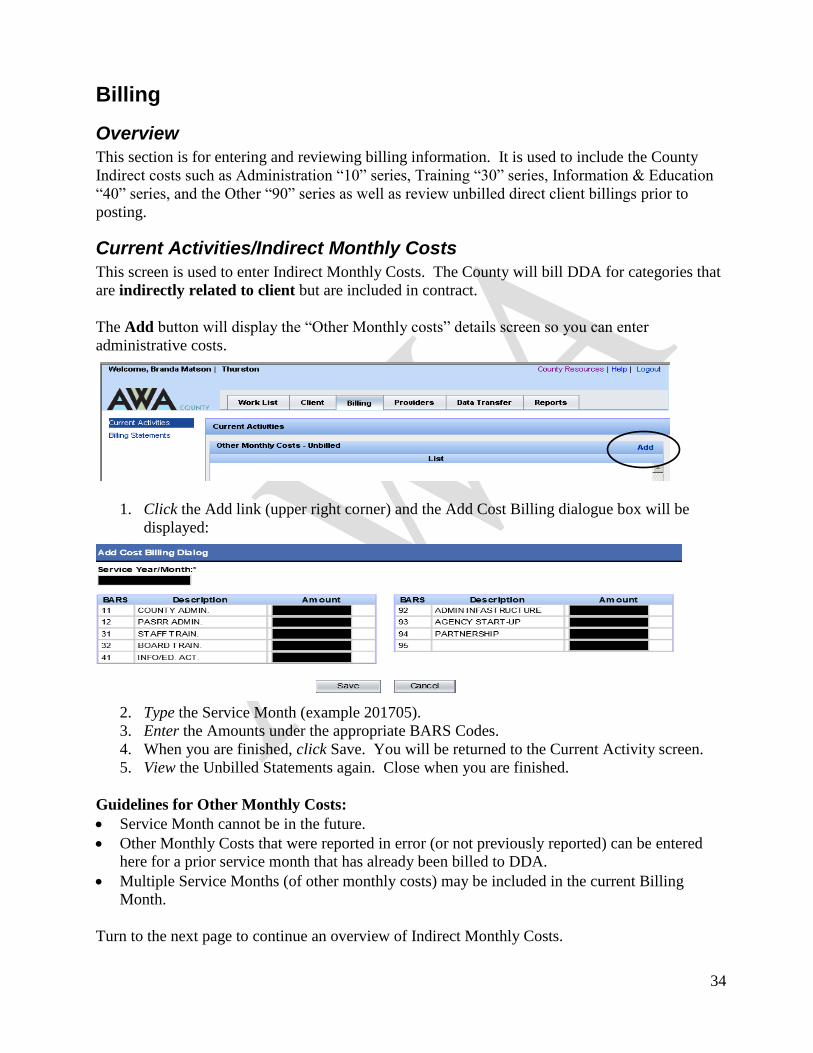
Current Activities/Indirect Monthly Costs
This screen is used to enter Indirect Monthly Costs. The County will bill DDA for categories that
are indirectly related to client but are included in contract.
The Add button will display the “Other Monthly costs” details screen so you can enter
administrative costs.
1. Click the Add link (upper right corner) and the Add Cost Billing dialogue box will be
displayed:
2. Type the Service Month (example 201705).
3. Enter the Amounts under the appropriate BARS Codes.
4. When you are finished, click Save. You will be returned to the Current Activity screen.
5. View the Unbilled Statements again. Close when you are finished.
Guidelines for Other Monthly Costs:
Service Month cannot be in the future.
Other Monthly Costs that were reported in error (or not previously reported) can be entered
here for a prior service month that has already been billed to DDA.
Multiple Service Months (of other monthly costs) may be included in the current Billing
Month.
Turn to the next page to continue an overview of Indirect Monthly Costs.
35
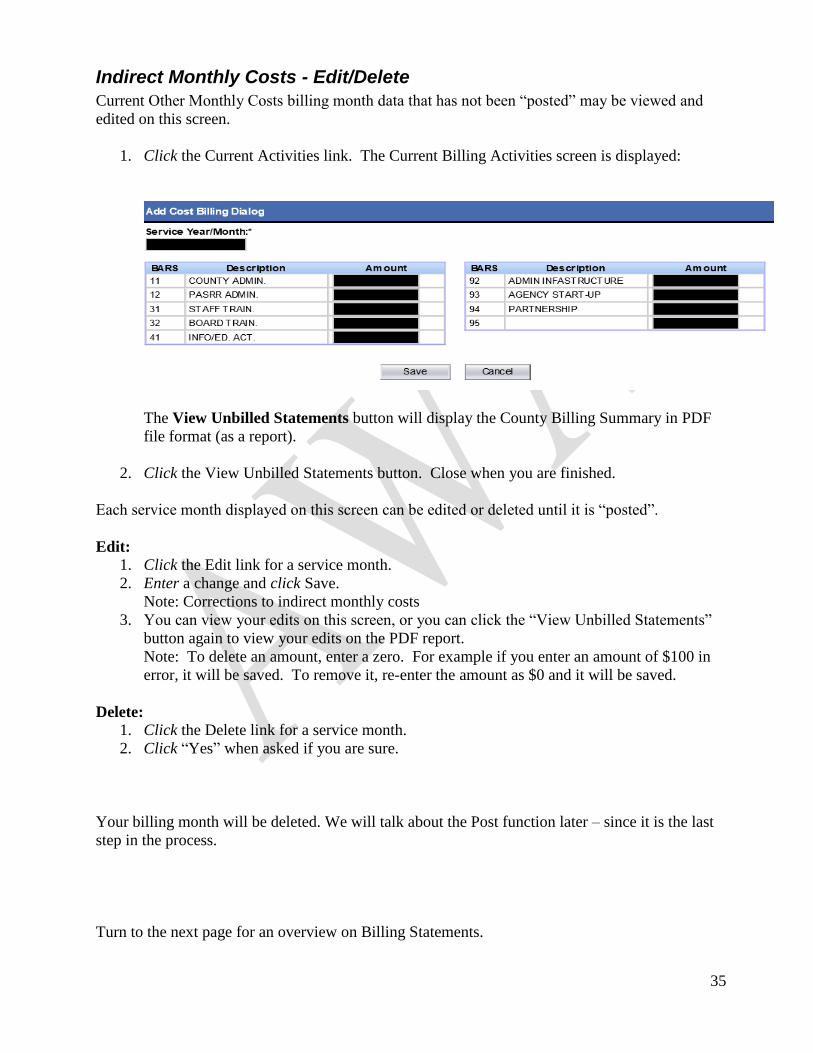
Indirect Monthly Costs - Edit/Delete
Current Other Monthly Costs billing month data that has not been “posted” may be viewed and
edited on this screen.
1. Click the Current Activities link. The Current Billing Activities screen is displayed:
The View Unbilled Statements button will display the County Billing Summary in PDF
file format (as a report).
2. Click the View Unbilled Statements button. Close when you are finished.
Each service month displayed on this screen can be edited or deleted until it is “posted”.
Edit:
1. Click the Edit link for a service month.
2. Enter a change and click Save.
Note: Corrections to indirect monthly costs
3. You can view your edits on this screen, or you can click the “View Unbilled Statements”
button again to view your edits on the PDF report.
Note: To delete an amount, enter a zero. For example if you enter an amount of $100 in
error, it will be saved. To remove it, re-enter the amount as $0 and it will be saved.
Delete: 1. Click the Delete link for a service month.
2. Click “Yes” when asked if you are sure.
Your billing month will be deleted. We will talk about the Post function later – since it is the last
step in the process.
Turn to the next page for an overview on Billing Statements.
36
Billing
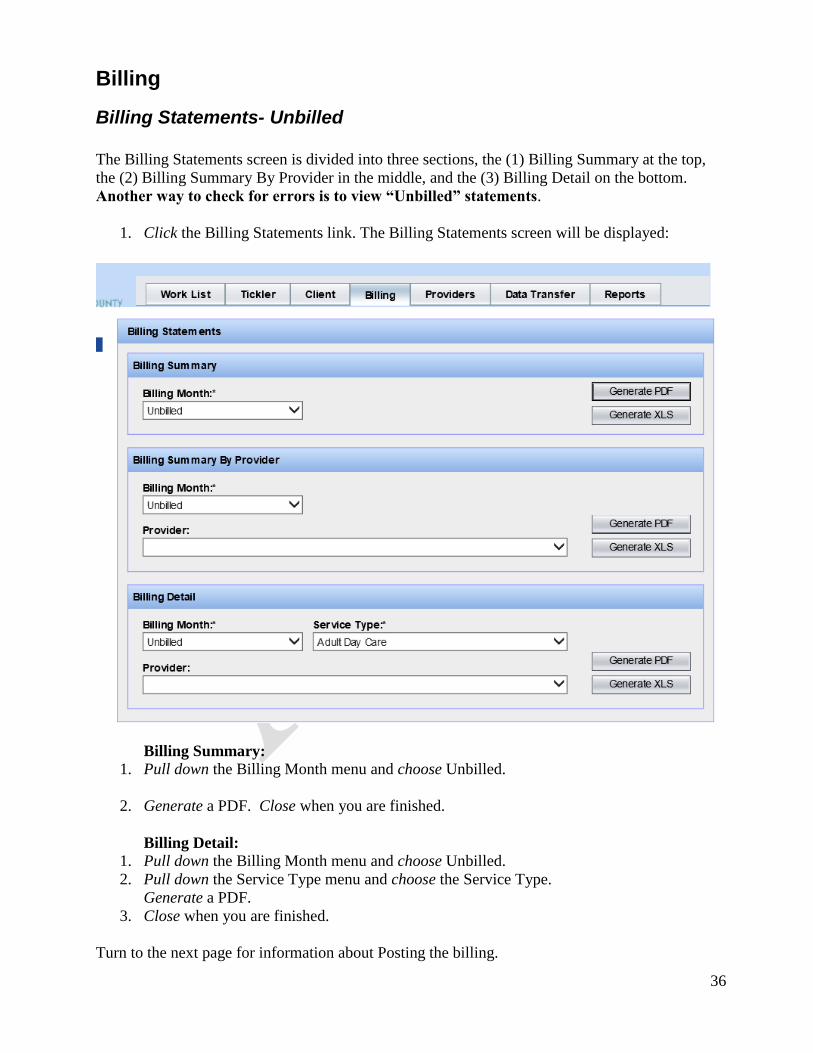
Billing Statements- Unbilled
The Billing Statements screen is divided into three sections, the (1) Billing Summary at the top,
the (2) Billing Summary By Provider in the middle, and the (3) Billing Detail on the bottom.
Another way to check for errors is to view “Unbilled” statements.
1. Click the Billing Statements link. The Billing Statements screen will be displayed:
Billing Summary:
1. Pull down the Billing Month menu and choose Unbilled.
2. Generate a PDF. Close when you are finished.
Billing Detail:
1. Pull down the Billing Month menu and choose Unbilled.
2. Pull down the Service Type menu and choose the Service Type.
Generate a PDF.
3. Close when you are finished.
Turn to the next page for information about Posting the billing.
37
Billing
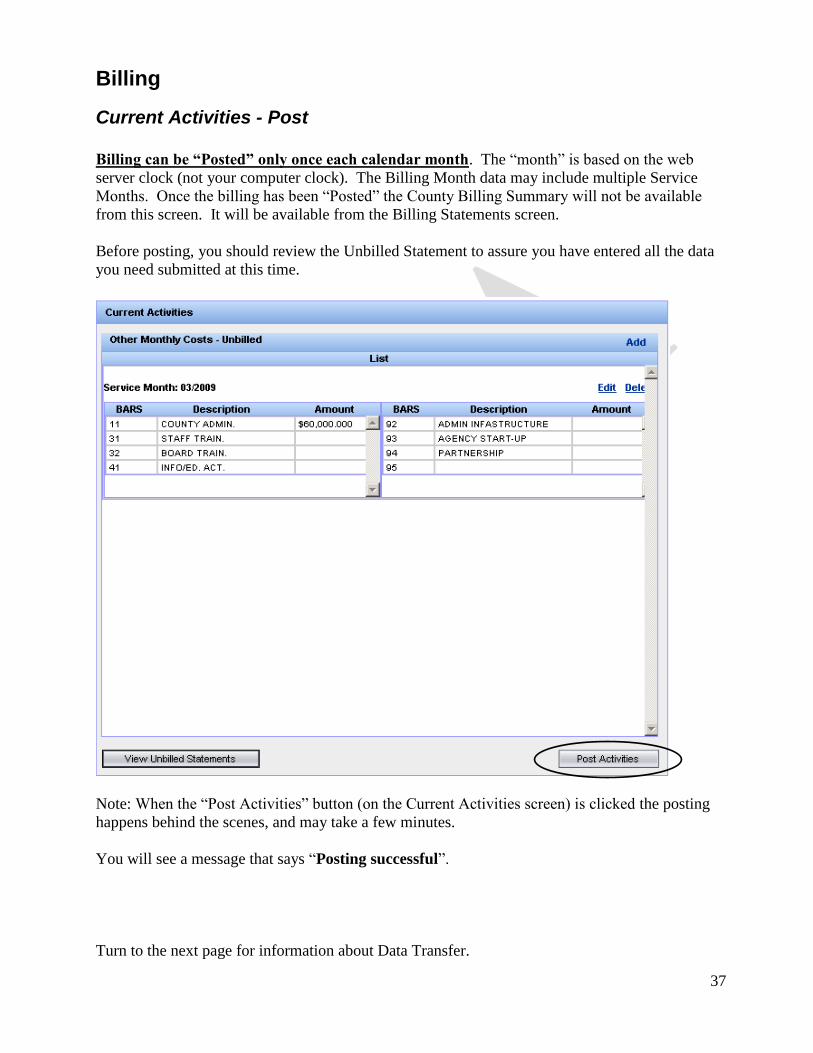
Current Activities - Post
Billing can be “Posted” only once each calendar month. The “month” is based on the web
server clock (not your computer clock). The Billing Month data may include multiple Service
Months. Once the billing has been “Posted” the County Billing Summary will not be available
from this screen. It will be available from the Billing Statements screen.
Before posting, you should review the Unbilled Statement to assure you have entered all the data
you need submitted at this time.
Note: When the “Post Activities” button (on the Current Activities screen) is clicked the posting
happens behind the scenes, and may take a few minutes.
You will see a message that says “Posting successful”.
Turn to the next page for information about Data Transfer.

38
Data Transfer
Overview
The County has two data transfer processes: One for Employment Outcome information and the
other for Billing.
Employment Outcome
During each month the County extracts data from DDA on clients authorized for services in their
County. The Employment extract (Output) contains clients authorized for service in their County
during the time period specified in the authorization range (Start Year/Month and End
Year/Month). The extract information will contain any previous information provided by the
County until an employment job end date is provided.
After the County receives client employment data from their providers, the data is validated and
uploaded (Input) in AWA. The County may upload employment outcome data as often as
wanted; however, this should occur on a regular basis to assure statewide information is up to
date. Corrections can be made individually thru the Client Employment Outcomes dialog box or
by uploading corrected information.
Billing
During the last week of the service month, or early the next month, the County extracts data on
clients authorized for service in their County. The Billing extract (Output) contains each service
authorized for each client for the month and year entered.
After the County incorporates service data from their providers, the data is validated and uploaded
(Input) in AWA. Uploaded billing information can be reviewed prior to posting (see previous
section – Current Activities – Post). Posting in AWA can only occur once a month.
Click the Data Transfer tab. The Data Transfer tab has several links located in the left column.
The Output screen will be displayed:
Turn to the next page to begin with Employment Output.
39
Data Transfer
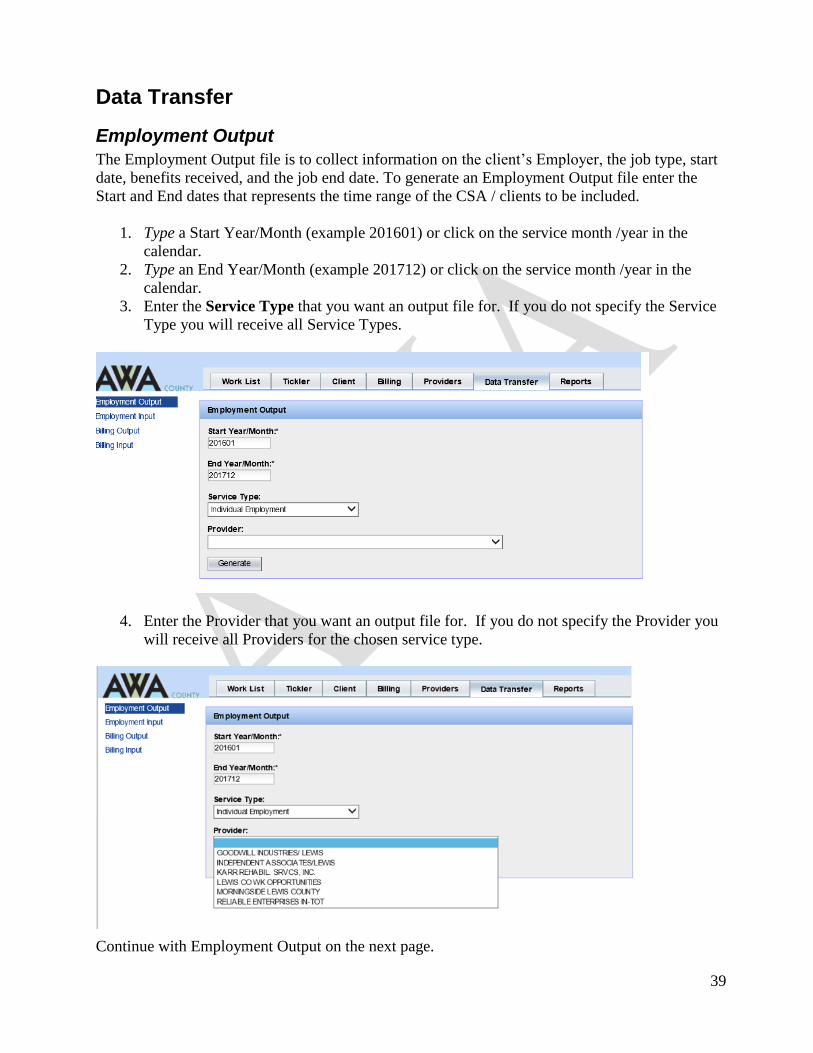
Employment Output
The Employment Output file is to collect information on the client’s Employer, the job type, start
date, benefits received, and the job end date. To generate an Employment Output file enter the
Start and End dates that represents the time range of the CSA / clients to be included.
1. Type a Start Year/Month (example 201601) or click on the service month /year in the
calendar.
2. Type an End Year/Month (example 201712) or click on the service month /year in the
calendar.
3. Enter the Service Type that you want an output file for. If you do not specify the Service
Type you will receive all Service Types.
4. Enter the Provider that you want an output file for. If you do not specify the Provider you
will receive all Providers for the chosen service type.
Continue with Employment Output on the next page.
40
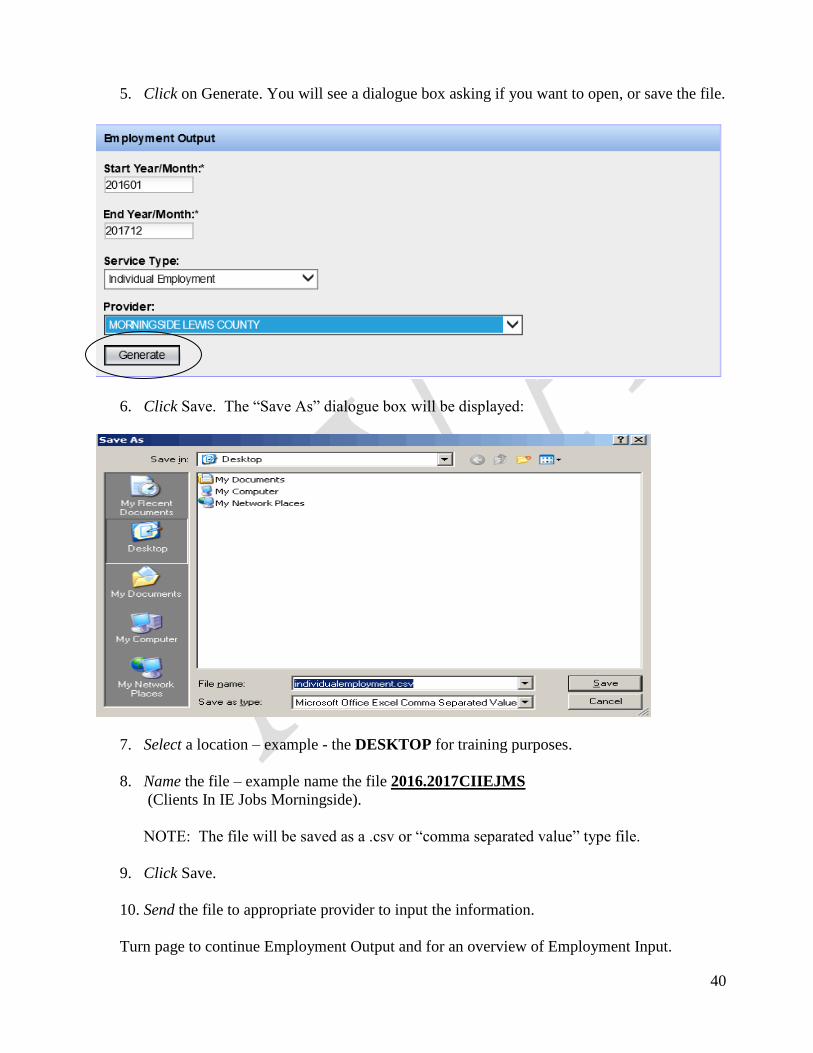
5. Click on Generate. You will see a dialogue box asking if you want to open, or save the file.
6. Click Save. The “Save As” dialogue box will be displayed:
7. Select a location – example - the DESKTOP for training purposes.
8. Name the file – example name the file 2016.2017CIIEJMS
(Clients In IE Jobs Morningside).
NOTE: The file will be saved as a .csv or “comma separated value” type file.
9. Click Save.
10. Send the file to appropriate provider to input the information.
Turn page to continue Employment Output and for an overview of Employment Input.
41
Note: It is important that your providers understand the data format to use as well as the
appropriate “Job Type” 4 digit code. This information it located Employment Data Records
Layouts description located in the back section of this workbook.
Data Transfer
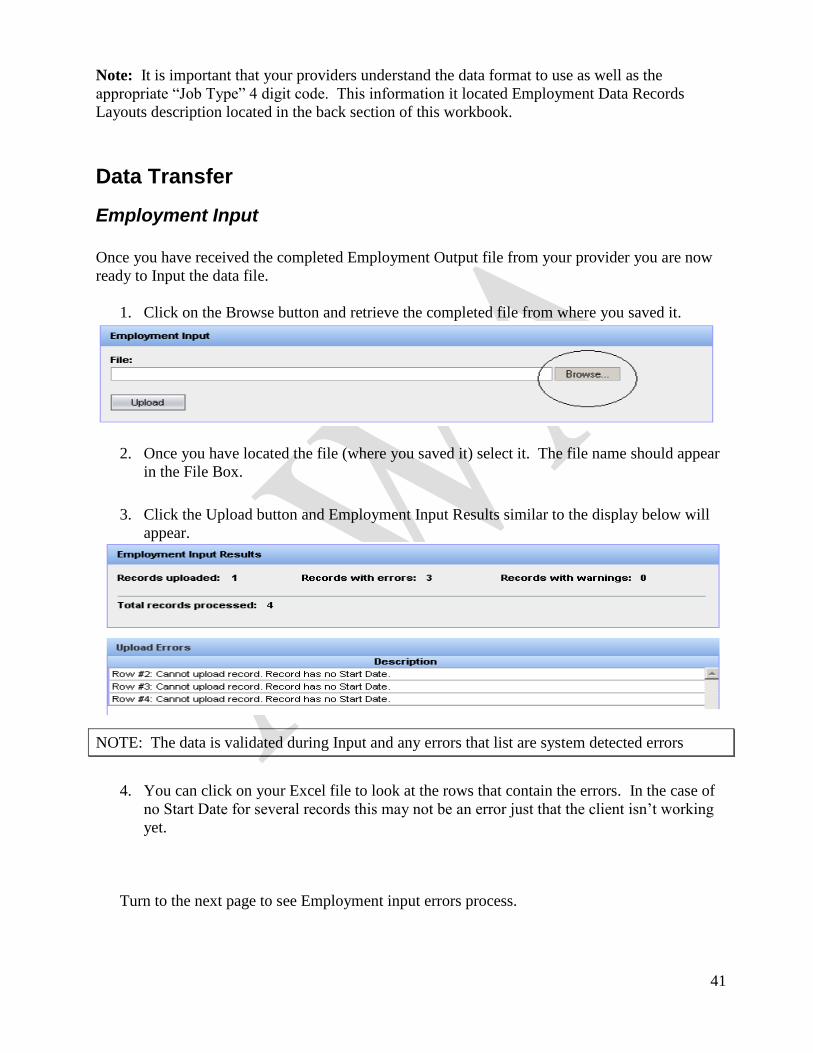
Employment Input
Once you have received the completed Employment Output file from your provider you are now
ready to Input the data file.
1. Click on the Browse button and retrieve the completed file from where you saved it.
2. Once you have located the file (where you saved it) select it. The file name should appear
in the File Box.
3. Click the Upload button and Employment Input Results similar to the display below will
appear.
NOTE: The data is validated during Input and any errors that list are system detected errors
4. You can click on your Excel file to look at the rows that contain the errors. In the case of
no Start Date for several records this may not be an error just that the client isn’t working
yet.
Turn to the next page to see Employment input errors process.
42
Employment Input Errors
Refer to the Employment Validation Rules in the Appendix of this workbook. Also, remember
you can click the Help link for additional information at any time.
1. Open the Excel file.
2. Go to the Desktop or wherever the file was saved and Double-click the file name.
3. Correct the errors.
Save your changes: 4. Choose File and Save As….
Upload with corrections: 5. Use the steps you already know to upload the Employment Input file again.
Note: The Upload process will update the original file with the corrected rows. So, the
last upload you do will always be the one that will be used for final Posting of the billing.
Turn to the next page to see Billing Output.
43
Data Transfer
Billing Output
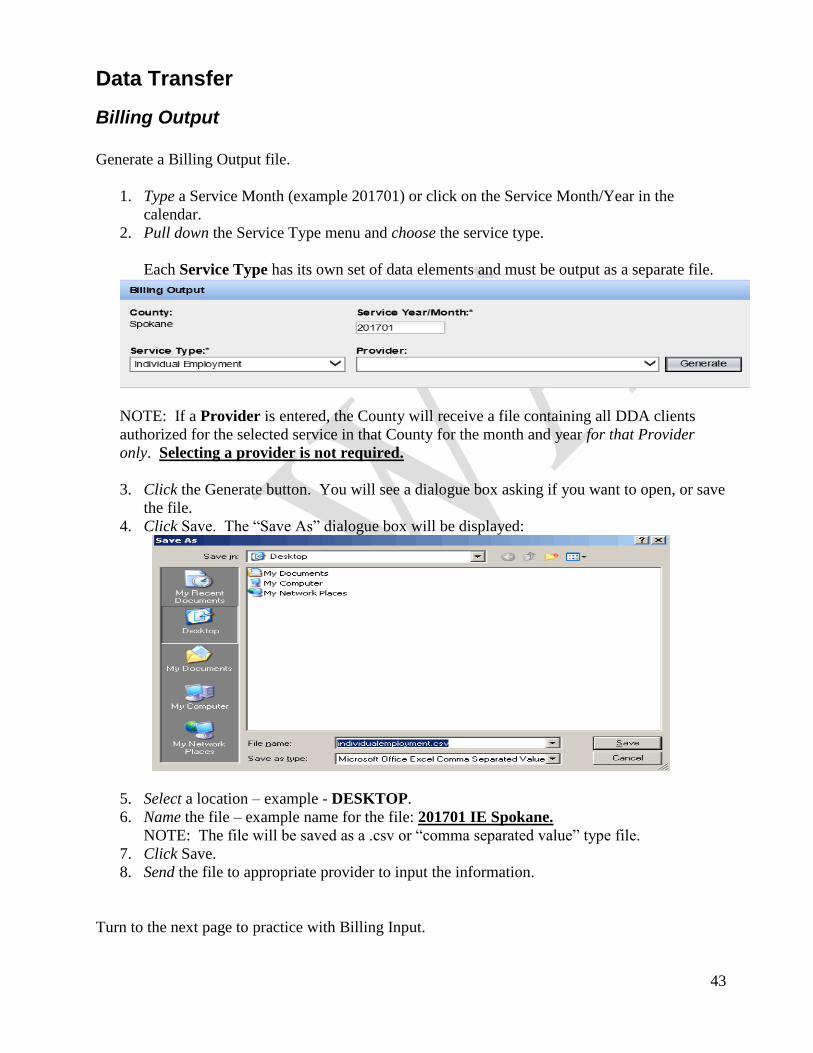
Generate a Billing Output file.
1. Type a Service Month (example 201701) or click on the Service Month/Year in the
calendar.
2. Pull down the Service Type menu and choose the service type.
Each Service Type has its own set of data elements and must be output as a separate file.
NOTE: If a Provider is entered, the County will receive a file containing all DDA clients
authorized for the selected service in that County for the month and year for that Provider
only. Selecting a provider is not required.
3. Click the Generate button. You will see a dialogue box asking if you want to open, or save
the file.
4. Click Save. The “Save As” dialogue box will be displayed:
5. Select a location – example - DESKTOP.
6. Name the file – example name for the file: 201701 IE Spokane.
NOTE: The file will be saved as a .csv or “comma separated value” type file.
7. Click Save.
8. Send the file to appropriate provider to input the information.
Turn to the next page to practice with Billing Input.
44
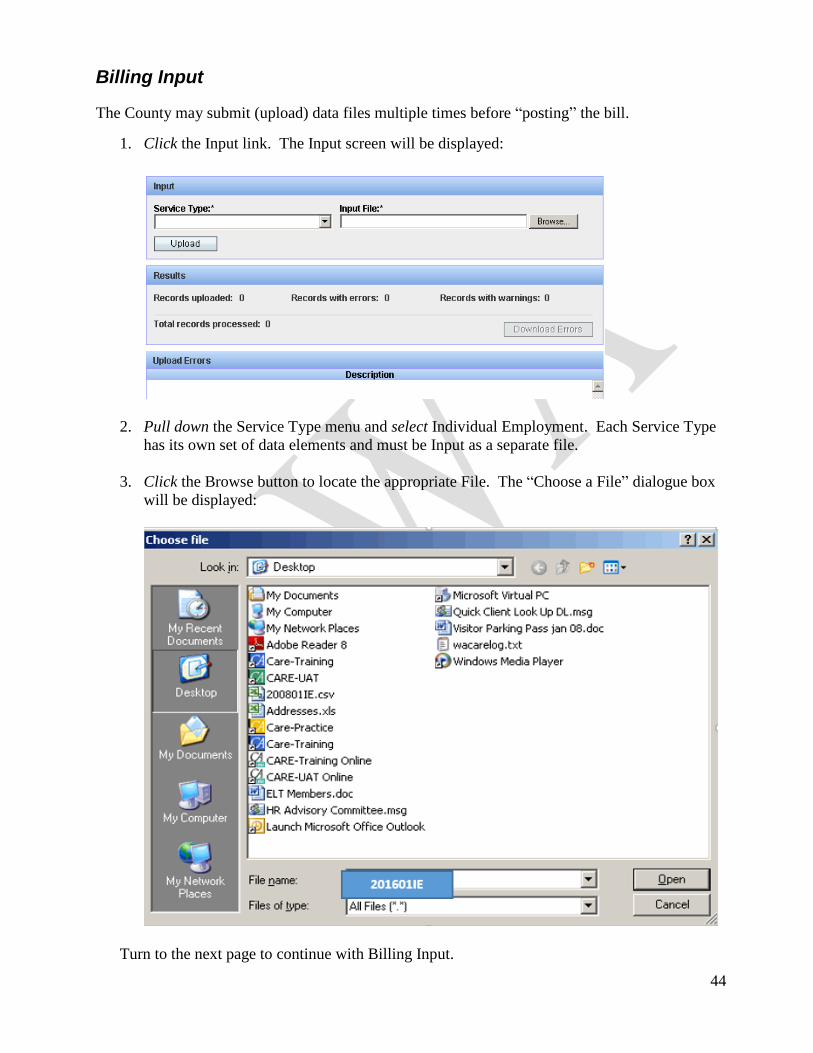
Billing Input
The County may submit (upload) data files multiple times before “posting” the bill.
1. Click the Input link. The Input screen will be displayed:
2. Pull down the Service Type menu and select Individual Employment. Each Service Type
has its own set of data elements and must be Input as a separate file.
3. Click the Browse button to locate the appropriate File. The “Choose a File” dialogue box
will be displayed:
Turn to the next page to continue with Billing Input.
45
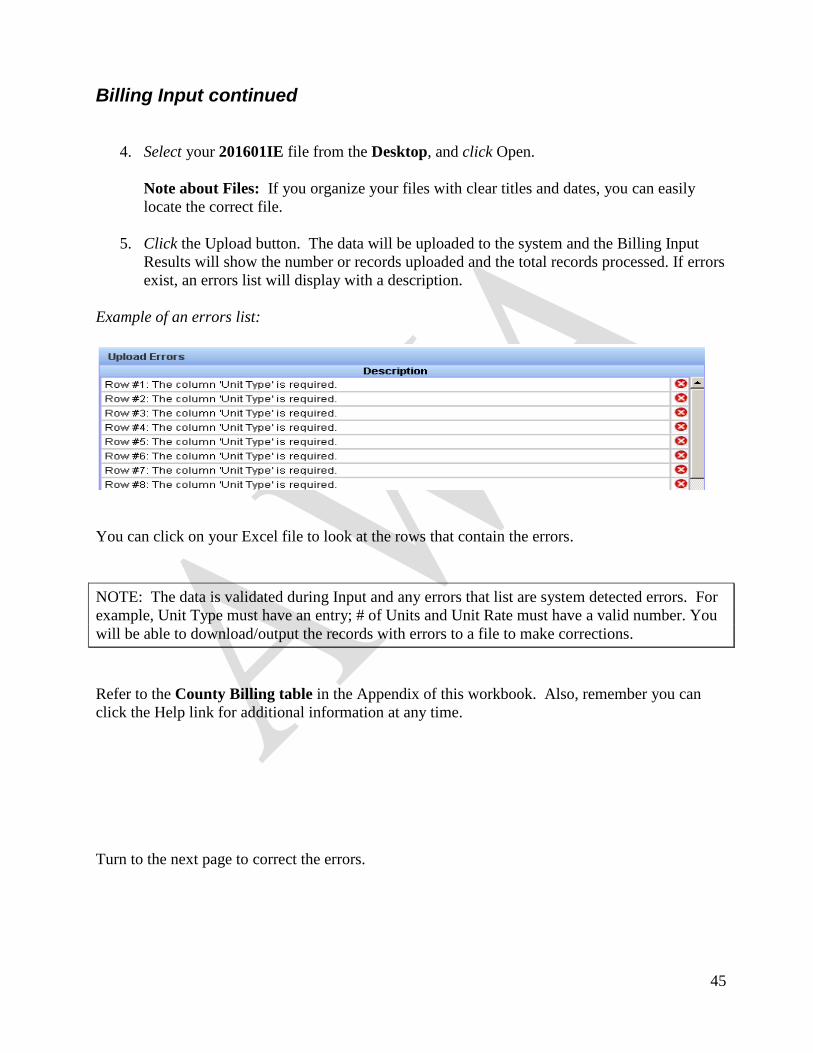
Billing Input continued
4. Select your 201601IE file from the Desktop, and click Open.
Note about Files: If you organize your files with clear titles and dates, you can easily
locate the correct file.
5. Click the Upload button. The data will be uploaded to the system and the Billing Input
Results will show the number or records uploaded and the total records processed. If errors
exist, an errors list will display with a description.
Example of an errors list:
You can click on your Excel file to look at the rows that contain the errors.
NOTE: The data is validated during Input and any errors that list are system detected errors. For
example, Unit Type must have an entry; # of Units and Unit Rate must have a valid number. You
will be able to download/output the records with errors to a file to make corrections.
Refer to the County Billing table in the Appendix of this workbook. Also, remember you can
click the Help link for additional information at any time.
Turn to the next page to correct the errors.
46
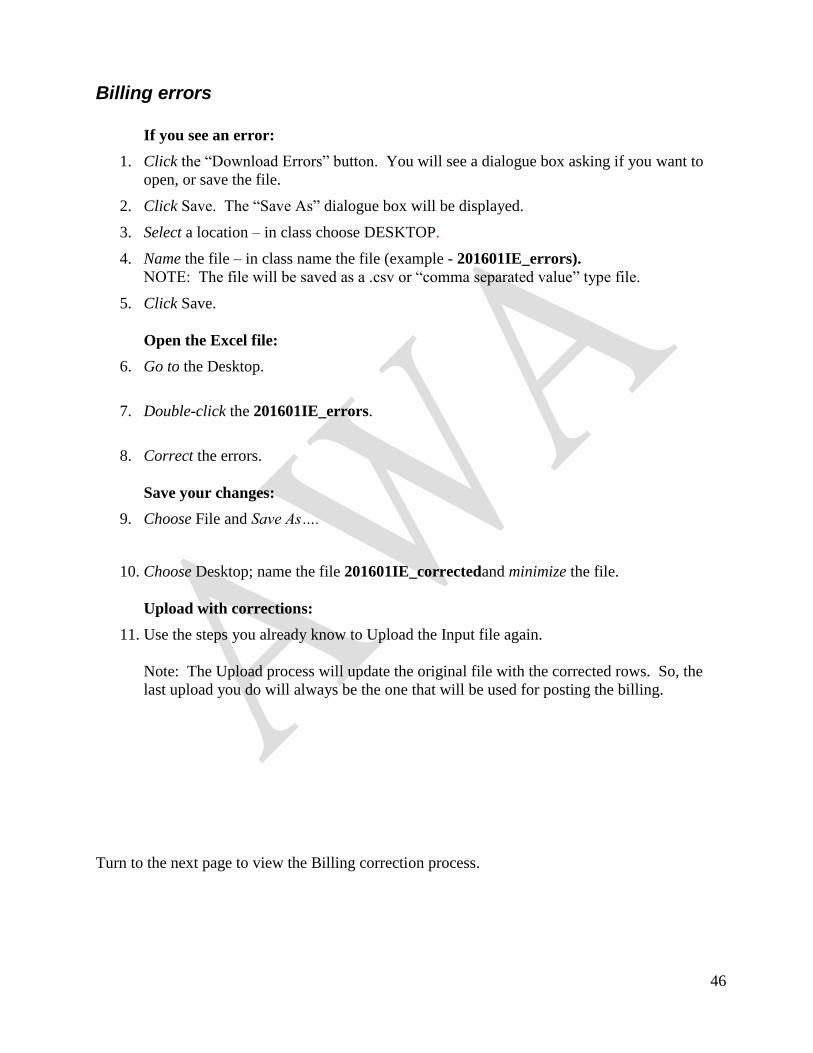
Billing errors
If you see an error:
1. Click the “Download Errors” button. You will see a dialogue box asking if you want to
open, or save the file.
2. Click Save. The “Save As” dialogue box will be displayed.
3. Select a location – in class choose DESKTOP.
4. Name the file – in class name the file (example - 201601IE_errors).
NOTE: The file will be saved as a .csv or “comma separated value” type file.
5. Click Save.
Open the Excel file:
6. Go to the Desktop.
7. Double-click the 201601IE_errors.
8. Correct the errors.
Save your changes:
9. Choose File and Save As….
10. Choose Desktop; name the file 201601IE_correctedand minimize the file.
Upload with corrections:
11. Use the steps you already know to Upload the Input file again.
Note: The Upload process will update the original file with the corrected rows. So, the
last upload you do will always be the one that will be used for posting the billing.
Turn to the next page to view the Billing correction process.
47
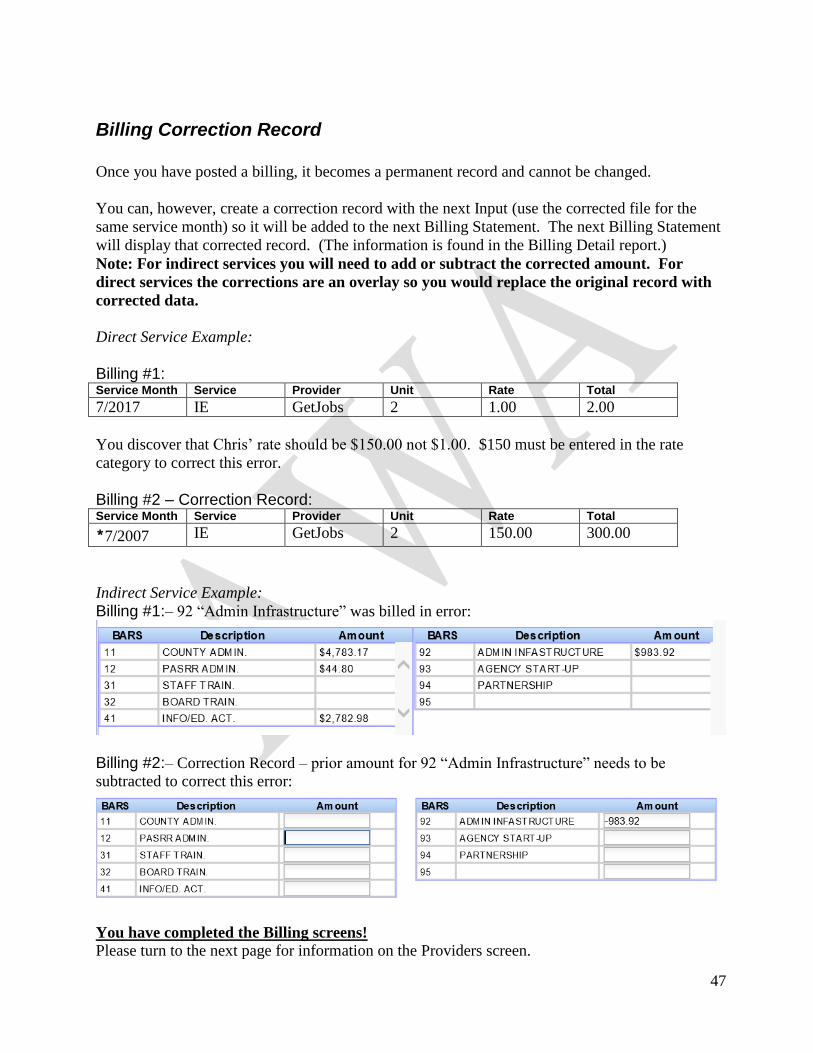
Billing Correction Record
Once you have posted a billing, it becomes a permanent record and cannot be changed.
You can, however, create a correction record with the next Input (use the corrected file for the
same service month) so it will be added to the next Billing Statement. The next Billing Statement
will display that corrected record. (The information is found in the Billing Detail report.)
Note: For indirect services you will need to add or subtract the corrected amount. For
direct services the corrections are an overlay so you would replace the original record with
corrected data.
Direct Service Example:
Billing #1: Service Month Service Provider Unit Rate Total
7/2017 IE GetJobs 2 1.00 2.00
You discover that Chris’ rate should be $150.00 not $1.00. $150 must be entered in the rate
category to correct this error.
Billing #2 – Correction Record: Service Month Service Provider Unit Rate Total
*7/2007 IE GetJobs 2 150.00 300.00
Indirect Service Example:
Billing #1:– 92 “Admin Infrastructure” was billed in error:
Billing #2:– Correction Record – prior amount for 92 “Admin Infrastructure” needs to be
subtracted to correct this error:
You have completed the Billing screens!
Please turn to the next page for information on the Providers screen.
48
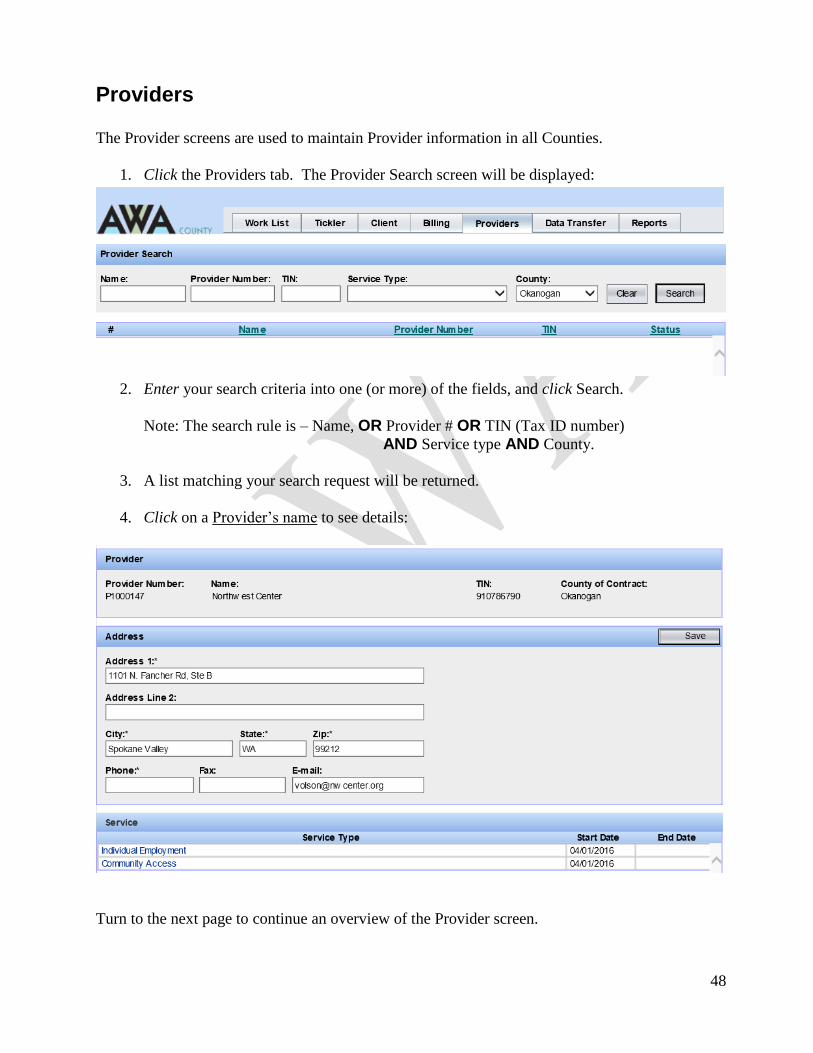
Providers
The Provider screens are used to maintain Provider information in all Counties.
1. Click the Providers tab. The Provider Search screen will be displayed:
2. Enter your search criteria into one (or more) of the fields, and click Search.
Note: The search rule is – Name, OR Provider # OR TIN (Tax ID number)
AND Service type AND County.
3. A list matching your search request will be returned.
4. Click on a Provider’s name to see details:
Turn to the next page to continue an overview of the Provider screen.

49
Providers
Edit
Only staff in the County of Contract can update the Provider data. Data will be view only for all
other Counties. County staff may update the Address, Telephone, FAX, and E-Mail. Any
other Provider information must be entered into the CARE by DDA Regional Operations
Managers.
Update a Provider’s information:
1. You should be viewing a Provider’s screen.
2. Click in one of the fields to edit. You can click, or use the [Tab] key to jump to the next
field.
3. Click Save when you are finished.
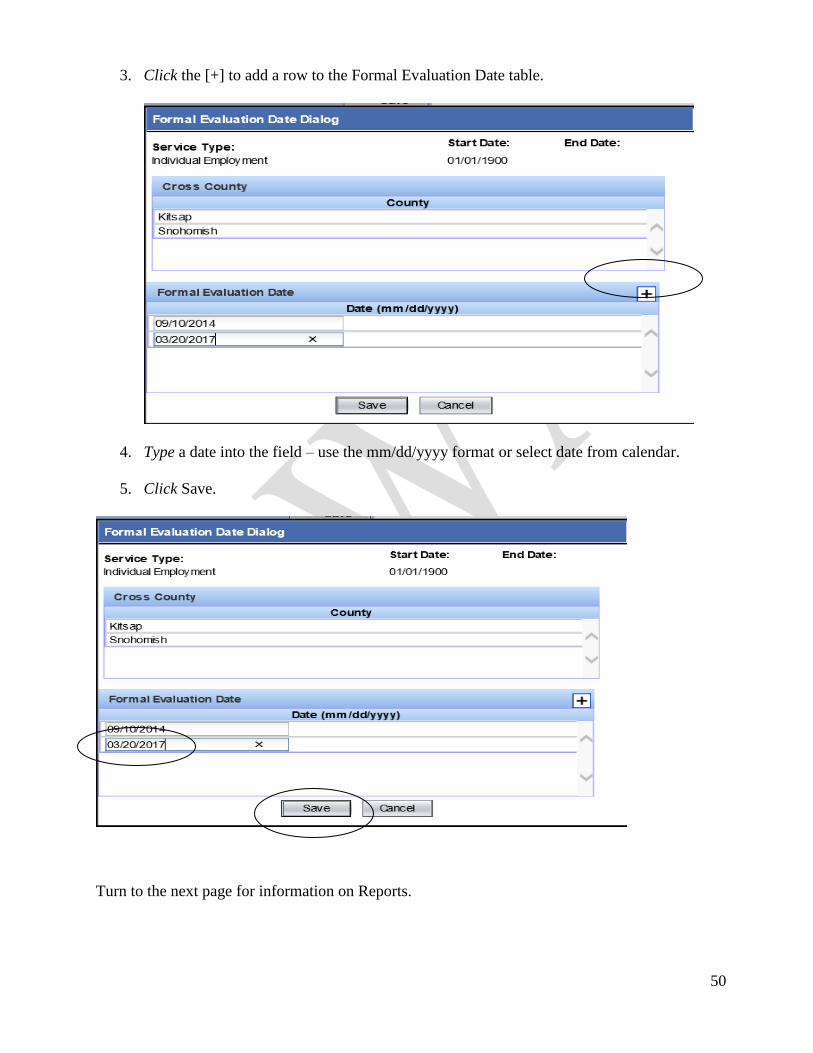
Formal Evaluation Dates
A history of formal evaluation (on-site monitoring review) dates for Providers can be recorded on
this screen.
1. View a Provider’s screen.
2. Click on a Service type in the Service table. The Formal Evaluation Date Dialogue box
will be displayed:
Turn to the next page to continue an overview of the Provider screen.
50
3. Click the [+] to add a row to the Formal Evaluation Date table.
4. Type a date into the field – use the mm/dd/yyyy format or select date from calendar.
5. Click Save.
Turn to the next page for information on Reports.
51
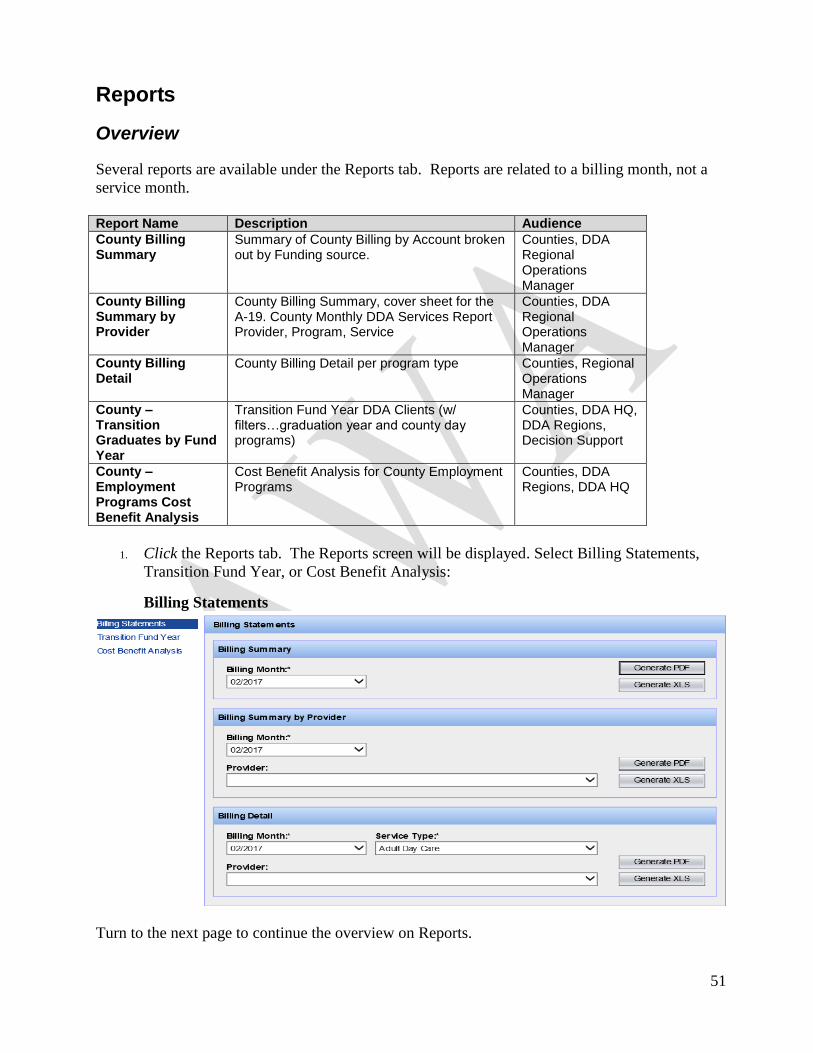
Reports
Overview
Several reports are available under the Reports tab. Reports are related to a billing month, not a
service month.
Report Name Description Audience
County Billing Summary
Summary of County Billing by Account broken out by Funding source.
Counties, DDA Regional Operations Manager
County Billing Summary by Provider
County Billing Summary, cover sheet for the A-19. County Monthly DDA Services Report Provider, Program, Service
Counties, DDA Regional Operations Manager
County Billing Detail
County Billing Detail per program type Counties, Regional Operations Manager
County – Transition Graduates by Fund Year
Transition Fund Year DDA Clients (w/ filters…graduation year and county day programs)
Counties, DDA HQ, DDA Regions, Decision Support
County – Employment Programs Cost Benefit Analysis
Cost Benefit Analysis for County Employment Programs
Counties, DDA Regions, DDA HQ
1. Click the Reports tab. The Reports screen will be displayed. Select Billing Statements,
Transition Fund Year, or Cost Benefit Analysis:
Billing Statements
Turn to the next page to continue the overview on Reports.
52
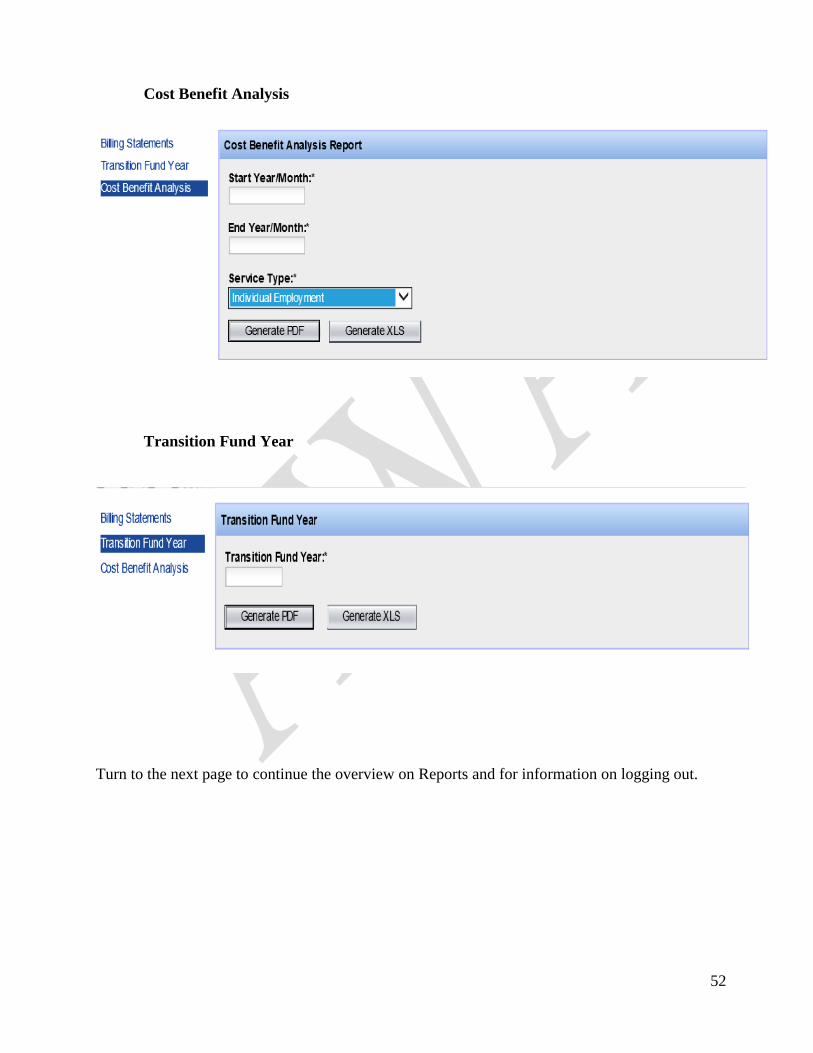
Cost Benefit Analysis
Transition Fund Year
Turn to the next page to continue the overview on Reports and for information on logging out.
53
Reports
Preview
These reports are the “canned” reports that the AWA will generate.
Try the different reports.
Billing Statements:
1. Select from one of the following reports:
Billing Summary by month
Billing Summary by Provider by month
Billing Detail by month
2. Choose a provider and service type (if applicable) and generate the report
3. Close when you are finished
Transition Fund Year report:
1. Click the Transition Fund Year link.
2. Choose a year and a fund source, and generate the report.
3. Close when you are finished.
Cost Benefit Analysis Report:
1. Click the Cost Benefit Analysis link.
2. Choose a service type.
3. Enter the start and end dates, for example: 201701 to 201801.
4. Generate the report; close when you are finished.
Logout
1. Click the Logout link (upper right corner).
2. You will be returned to the AWA opening screen.
Congratulations!!! You have completed the ADSA Web Access – County training!
Turn to the next page to find the AWA Appendix.
54
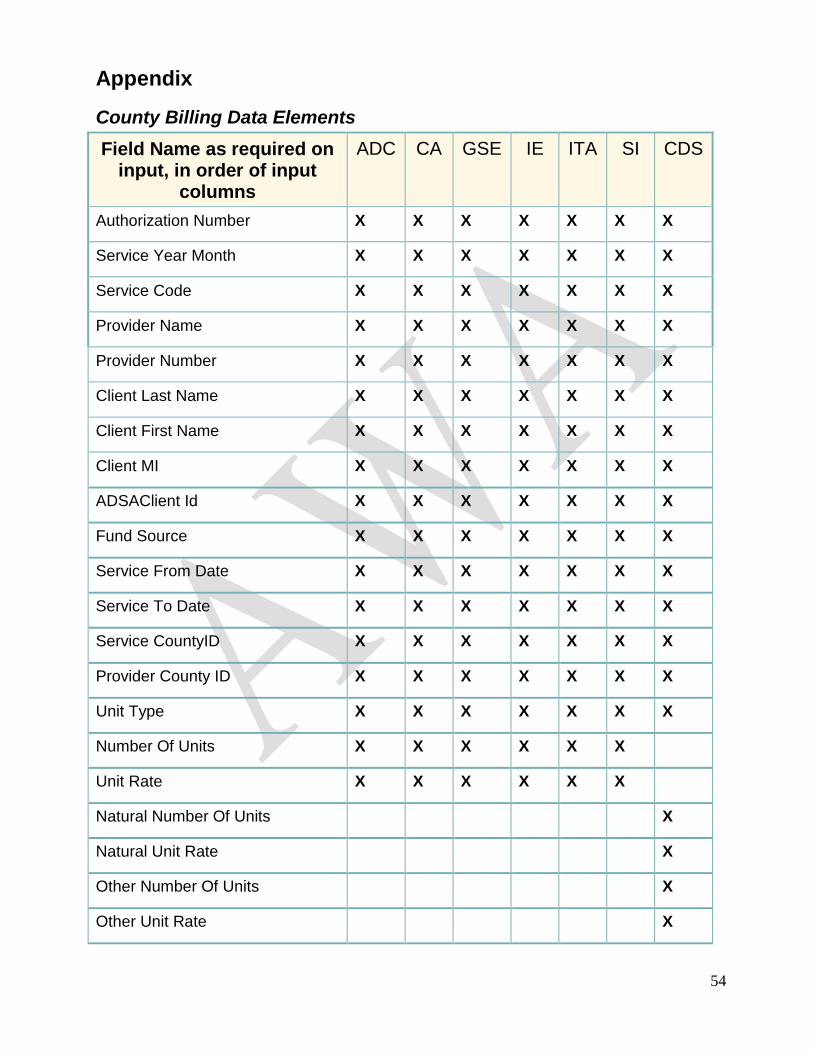
Appendix
County Billing Data Elements
Field Name as required on input, in order of input
columns
ADC CA GSE IE ITA SI CDS
Authorization Number X X X X X X X
Service Year Month X X X X X X X
Service Code X X X X X X X
Provider Name X X X X X X X
Provider Number X X X X X X X
Client Last Name X X X X X X X
Client First Name X X X X X X X
Client MI X X X X X X X
ADSAClient Id X X X X X X X
Fund Source X X X X X X X
Service From Date X X X X X X X
Service To Date X X X X X X X
Service CountyID X X X X X X X
Provider County ID X X X X X X X
Unit Type X X X X X X X
Number Of Units X X X X X X
Unit Rate X X X X X X
Natural Number Of Units X
Natural Unit Rate X
Other Number Of Units X
Other Unit Rate X

55
Field Name as required on input, in order of input
columns
ADC CA GSE IE ITA SI CDS
Additional Expense X
Site Hours X X
Client Hours Paid X X X X
Client Pathway Hours Volunteer X X X X
Client Pathway Hours Other X X X X
Gross Wages X X X X
Projected End Date X
Age In Months X
Provider Staff Hours X X X X X X
Job Prep X X X X
Job Development X X X X
Job Coaching X X X X
Record Keeping X X X X
Client Hours Volunteer X
Client Hours Other X
Personal Agent Hours X
Personal Agent Cost X
Input Error X X X X X X X
RAC X X X X X X X
56
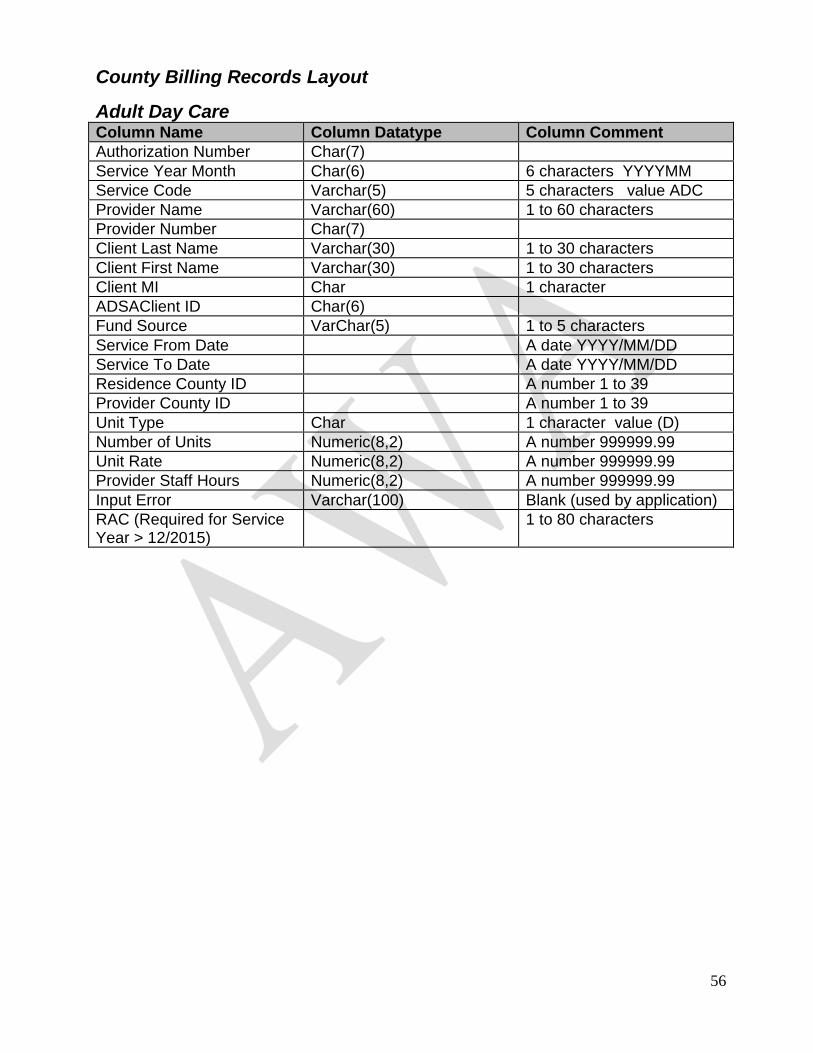
County Billing Records Layout
Adult Day Care Column Name Column Datatype Column Comment
Authorization Number Char(7)
Service Year Month Char(6) 6 characters YYYYMM
Service Code Varchar(5) 5 characters value ADC
Provider Name Varchar(60) 1 to 60 characters
Provider Number Char(7)
Client Last Name Varchar(30) 1 to 30 characters
Client First Name Varchar(30) 1 to 30 characters
Client MI Char 1 character
ADSAClient ID Char(6)
Fund Source VarChar(5) 1 to 5 characters
Service From Date A date YYYY/MM/DD
Service To Date A date YYYY/MM/DD
Residence County ID A number 1 to 39
Provider County ID A number 1 to 39
Unit Type Char 1 character value (D)
Number of Units Numeric(8,2) A number 999999.99
Unit Rate Numeric(8,2) A number 999999.99
Provider Staff Hours Numeric(8,2) A number 999999.99
Input Error Varchar(100) Blank (used by application)
RAC (Required for Service Year > 12/2015)
1 to 80 characters
57
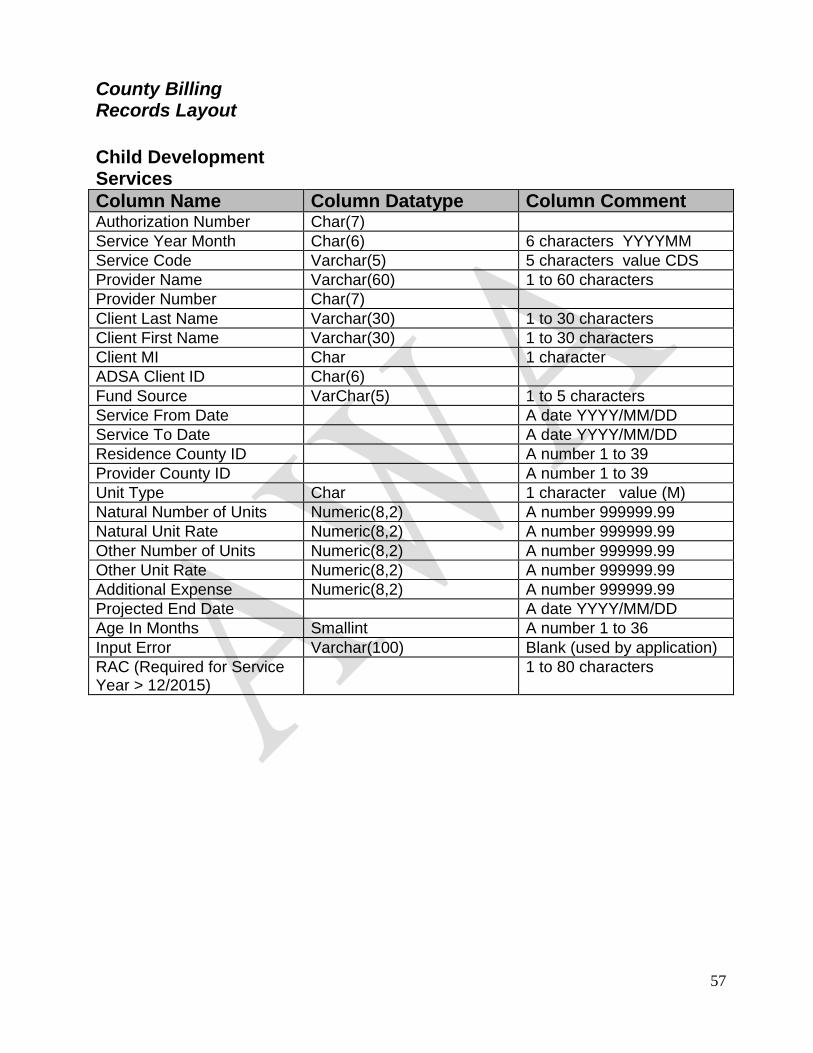
County Billing Records Layout
Child Development Services
Column Name Column Datatype Column Comment Authorization Number Char(7)
Service Year Month Char(6) 6 characters YYYYMM
Service Code Varchar(5) 5 characters value CDS
Provider Name Varchar(60) 1 to 60 characters
Provider Number Char(7)
Client Last Name Varchar(30) 1 to 30 characters
Client First Name Varchar(30) 1 to 30 characters
Client MI Char 1 character
ADSA Client ID Char(6)
Fund Source VarChar(5) 1 to 5 characters
Service From Date A date YYYY/MM/DD
Service To Date A date YYYY/MM/DD
Residence County ID A number 1 to 39
Provider County ID A number 1 to 39
Unit Type Char 1 character value (M)
Natural Number of Units Numeric(8,2) A number 999999.99
Natural Unit Rate Numeric(8,2) A number 999999.99
Other Number of Units Numeric(8,2) A number 999999.99
Other Unit Rate Numeric(8,2) A number 999999.99
Additional Expense Numeric(8,2) A number 999999.99
Projected End Date A date YYYY/MM/DD
Age In Months Smallint A number 1 to 36
Input Error Varchar(100) Blank (used by application)
RAC (Required for Service Year > 12/2015)
1 to 80 characters
58
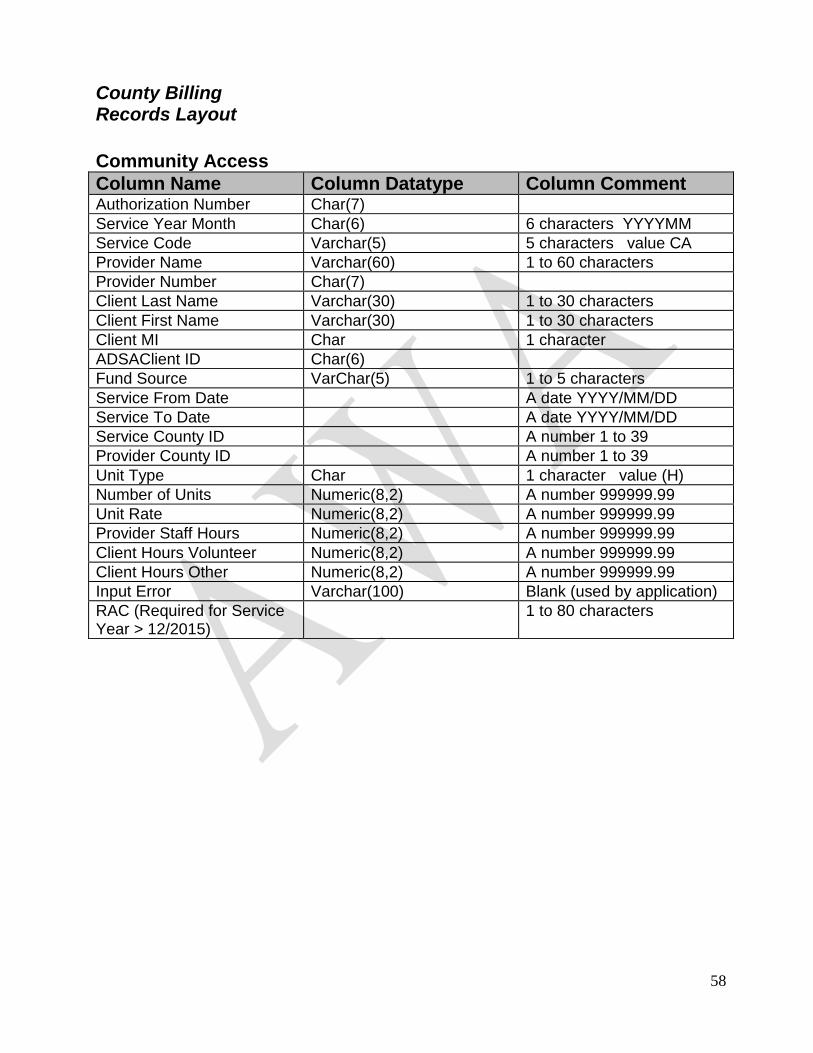
County Billing Records Layout
Community Access
Column Name Column Datatype Column Comment Authorization Number Char(7)
Service Year Month Char(6) 6 characters YYYYMM
Service Code Varchar(5) 5 characters value CA
Provider Name Varchar(60) 1 to 60 characters
Provider Number Char(7)
Client Last Name Varchar(30) 1 to 30 characters
Client First Name Varchar(30) 1 to 30 characters
Client MI Char 1 character
ADSAClient ID Char(6)
Fund Source VarChar(5) 1 to 5 characters
Service From Date A date YYYY/MM/DD
Service To Date A date YYYY/MM/DD
Service County ID A number 1 to 39
Provider County ID A number 1 to 39
Unit Type Char 1 character value (H)
Number of Units Numeric(8,2) A number 999999.99
Unit Rate Numeric(8,2) A number 999999.99
Provider Staff Hours Numeric(8,2) A number 999999.99
Client Hours Volunteer Numeric(8,2) A number 999999.99
Client Hours Other Numeric(8,2) A number 999999.99
Input Error Varchar(100) Blank (used by application)
RAC (Required for Service Year > 12/2015)
1 to 80 characters
59
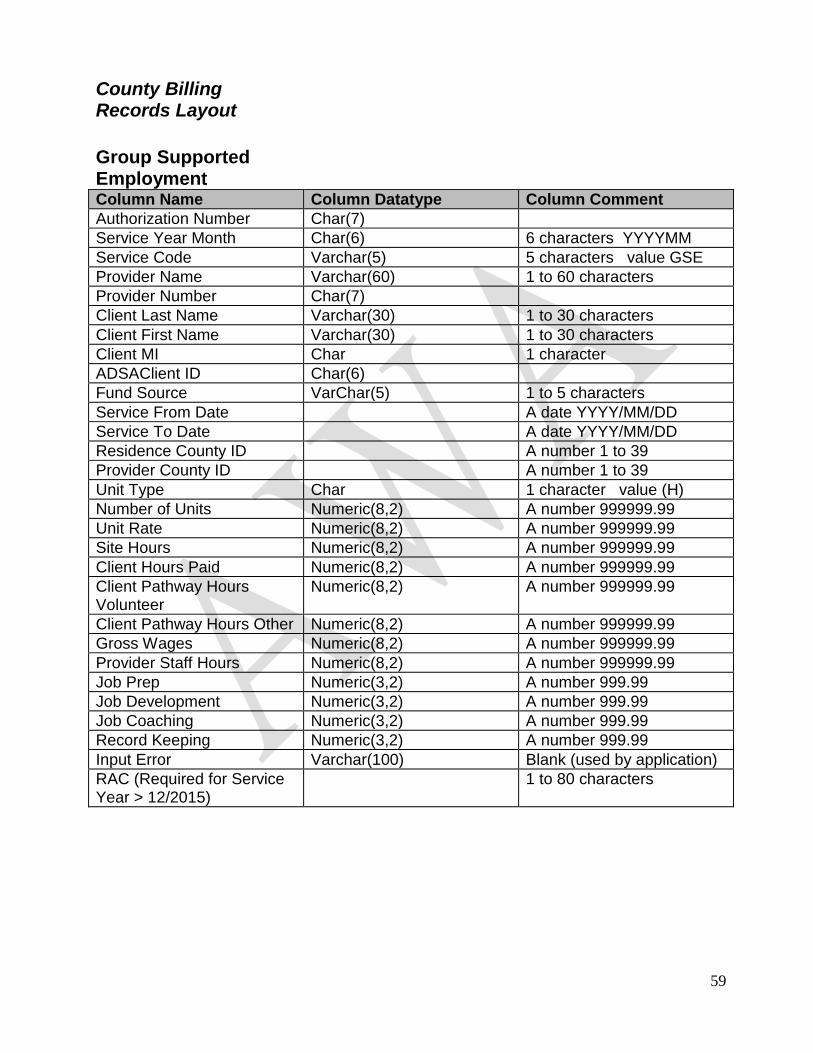
County Billing Records Layout
Group Supported Employment Column Name Column Datatype Column Comment
Authorization Number Char(7)
Service Year Month Char(6) 6 characters YYYYMM
Service Code Varchar(5) 5 characters value GSE
Provider Name Varchar(60) 1 to 60 characters
Provider Number Char(7)
Client Last Name Varchar(30) 1 to 30 characters
Client First Name Varchar(30) 1 to 30 characters
Client MI Char 1 character
ADSAClient ID Char(6)
Fund Source VarChar(5) 1 to 5 characters
Service From Date A date YYYY/MM/DD
Service To Date A date YYYY/MM/DD
Residence County ID A number 1 to 39
Provider County ID A number 1 to 39
Unit Type Char 1 character value (H)
Number of Units Numeric(8,2) A number 999999.99
Unit Rate Numeric(8,2) A number 999999.99
Site Hours Numeric(8,2) A number 999999.99
Client Hours Paid Numeric(8,2) A number 999999.99
Client Pathway Hours Volunteer
Numeric(8,2) A number 999999.99
Client Pathway Hours Other Numeric(8,2) A number 999999.99
Gross Wages Numeric(8,2) A number 999999.99
Provider Staff Hours Numeric(8,2) A number 999999.99
Job Prep Numeric(3,2) A number 999.99
Job Development Numeric(3,2) A number 999.99
Job Coaching Numeric(3,2) A number 999.99
Record Keeping Numeric(3,2) A number 999.99
Input Error Varchar(100) Blank (used by application)
RAC (Required for Service Year > 12/2015)
1 to 80 characters
60
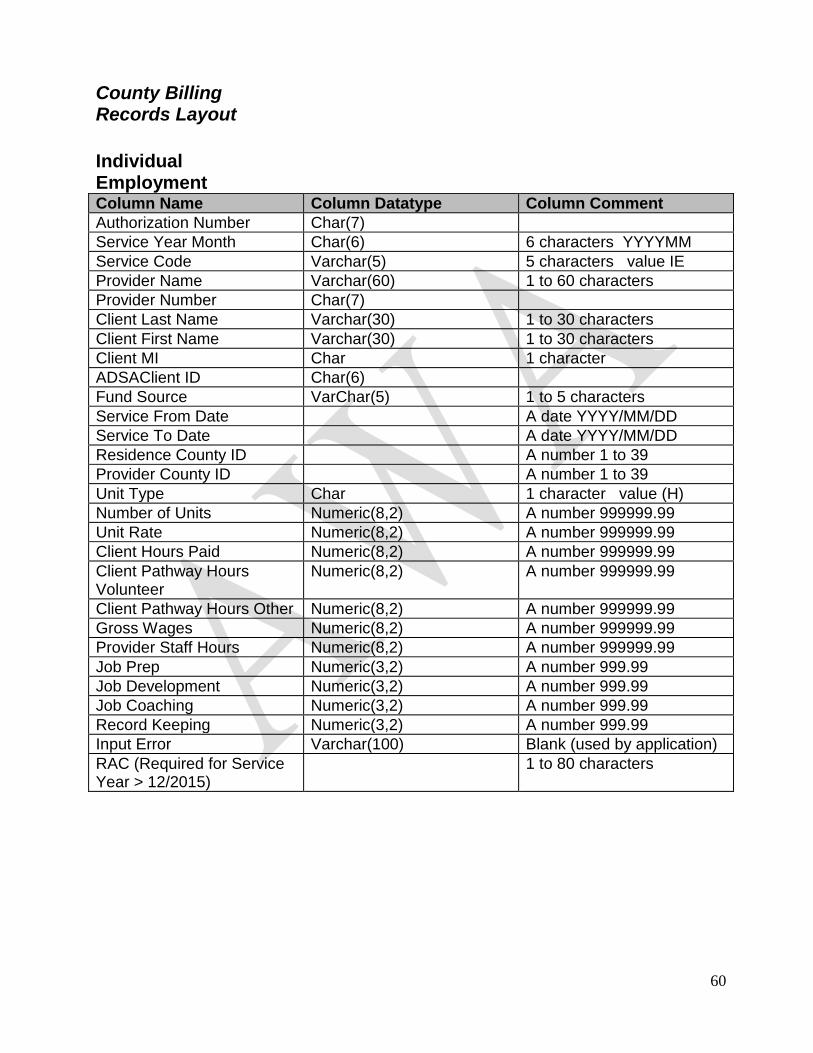
County Billing Records Layout
Individual Employment Column Name Column Datatype Column Comment
Authorization Number Char(7)
Service Year Month Char(6) 6 characters YYYYMM
Service Code Varchar(5) 5 characters value IE
Provider Name Varchar(60) 1 to 60 characters
Provider Number Char(7)
Client Last Name Varchar(30) 1 to 30 characters
Client First Name Varchar(30) 1 to 30 characters
Client MI Char 1 character
ADSAClient ID Char(6)
Fund Source VarChar(5) 1 to 5 characters
Service From Date A date YYYY/MM/DD
Service To Date A date YYYY/MM/DD
Residence County ID A number 1 to 39
Provider County ID A number 1 to 39
Unit Type Char 1 character value (H)
Number of Units Numeric(8,2) A number 999999.99
Unit Rate Numeric(8,2) A number 999999.99
Client Hours Paid Numeric(8,2) A number 999999.99
Client Pathway Hours Volunteer
Numeric(8,2) A number 999999.99
Client Pathway Hours Other Numeric(8,2) A number 999999.99
Gross Wages Numeric(8,2) A number 999999.99
Provider Staff Hours Numeric(8,2) A number 999999.99
Job Prep Numeric(3,2) A number 999.99
Job Development Numeric(3,2) A number 999.99
Job Coaching Numeric(3,2) A number 999.99
Record Keeping Numeric(3,2) A number 999.99
Input Error Varchar(100) Blank (used by application)
RAC (Required for Service Year > 12/2015)
1 to 80 characters
61
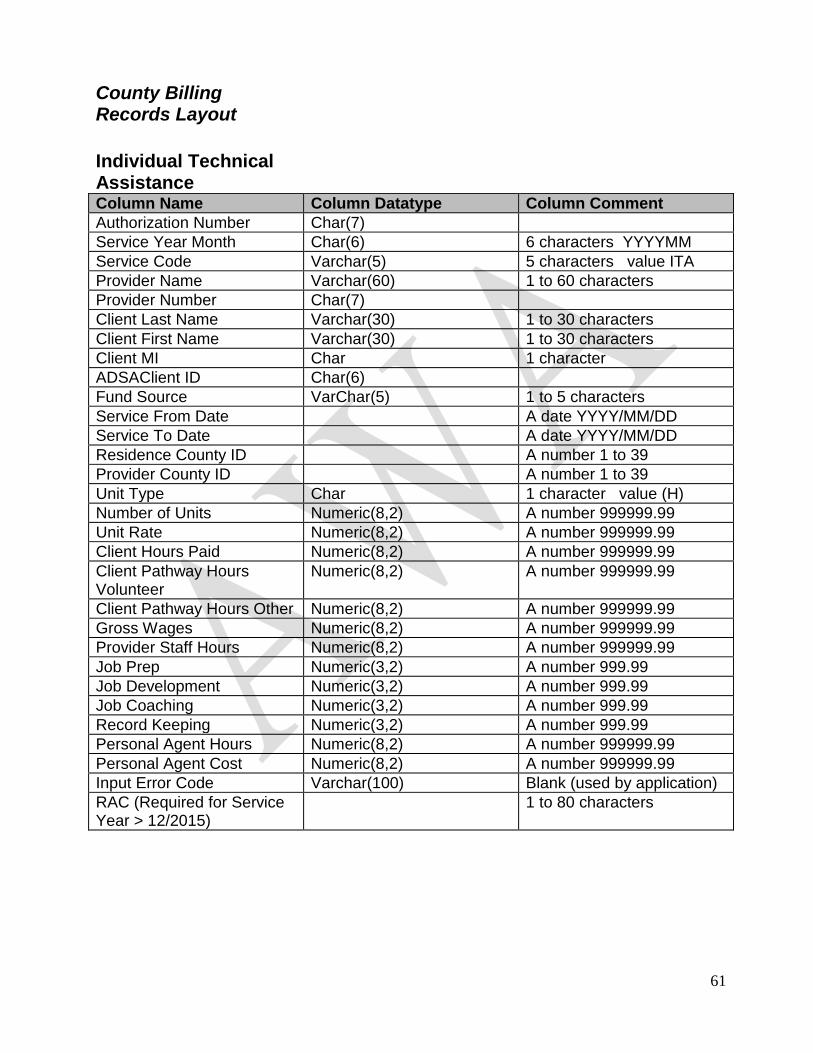
County Billing Records Layout
Individual Technical Assistance Column Name Column Datatype Column Comment
Authorization Number Char(7)
Service Year Month Char(6) 6 characters YYYYMM
Service Code Varchar(5) 5 characters value ITA
Provider Name Varchar(60) 1 to 60 characters
Provider Number Char(7)
Client Last Name Varchar(30) 1 to 30 characters
Client First Name Varchar(30) 1 to 30 characters
Client MI Char 1 character
ADSAClient ID Char(6)
Fund Source VarChar(5) 1 to 5 characters
Service From Date A date YYYY/MM/DD
Service To Date A date YYYY/MM/DD
Residence County ID A number 1 to 39
Provider County ID A number 1 to 39
Unit Type Char 1 character value (H)
Number of Units Numeric(8,2) A number 999999.99
Unit Rate Numeric(8,2) A number 999999.99
Client Hours Paid Numeric(8,2) A number 999999.99
Client Pathway Hours Volunteer
Numeric(8,2) A number 999999.99
Client Pathway Hours Other Numeric(8,2) A number 999999.99
Gross Wages Numeric(8,2) A number 999999.99
Provider Staff Hours Numeric(8,2) A number 999999.99
Job Prep Numeric(3,2) A number 999.99
Job Development Numeric(3,2) A number 999.99
Job Coaching Numeric(3,2) A number 999.99
Record Keeping Numeric(3,2) A number 999.99
Personal Agent Hours Numeric(8,2) A number 999999.99
Personal Agent Cost Numeric(8,2) A number 999999.99
Input Error Code Varchar(100) Blank (used by application)
RAC (Required for Service Year > 12/2015)
1 to 80 characters
62
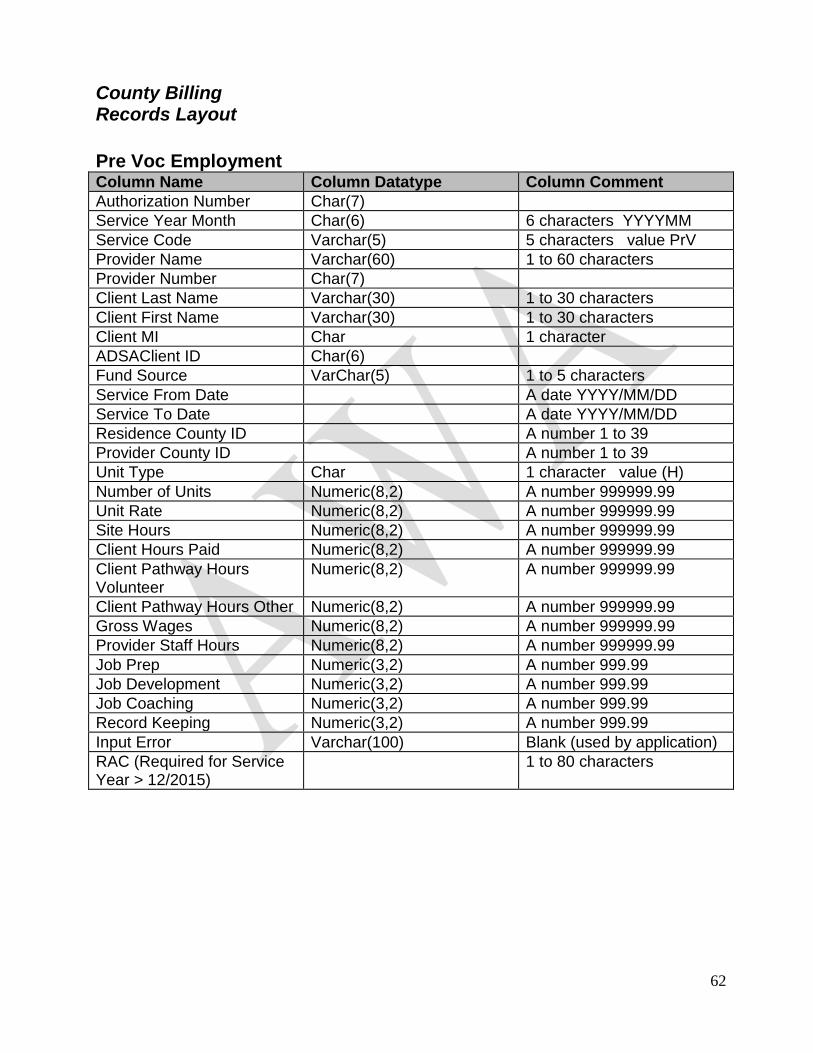
County Billing Records Layout
Pre Voc Employment Column Name Column Datatype Column Comment
Authorization Number Char(7)
Service Year Month Char(6) 6 characters YYYYMM
Service Code Varchar(5) 5 characters value PrV
Provider Name Varchar(60) 1 to 60 characters
Provider Number Char(7)
Client Last Name Varchar(30) 1 to 30 characters
Client First Name Varchar(30) 1 to 30 characters
Client MI Char 1 character
ADSAClient ID Char(6)
Fund Source VarChar(5) 1 to 5 characters
Service From Date A date YYYY/MM/DD
Service To Date A date YYYY/MM/DD
Residence County ID A number 1 to 39
Provider County ID A number 1 to 39
Unit Type Char 1 character value (H)
Number of Units Numeric(8,2) A number 999999.99
Unit Rate Numeric(8,2) A number 999999.99
Site Hours Numeric(8,2) A number 999999.99
Client Hours Paid Numeric(8,2) A number 999999.99
Client Pathway Hours Volunteer
Numeric(8,2) A number 999999.99
Client Pathway Hours Other Numeric(8,2) A number 999999.99
Gross Wages Numeric(8,2) A number 999999.99
Provider Staff Hours Numeric(8,2) A number 999999.99
Job Prep Numeric(3,2) A number 999.99
Job Development Numeric(3,2) A number 999.99
Job Coaching Numeric(3,2) A number 999.99
Record Keeping Numeric(3,2) A number 999.99
Input Error Varchar(100) Blank (used by application)
RAC (Required for Service Year > 12/2015)
1 to 80 characters
63
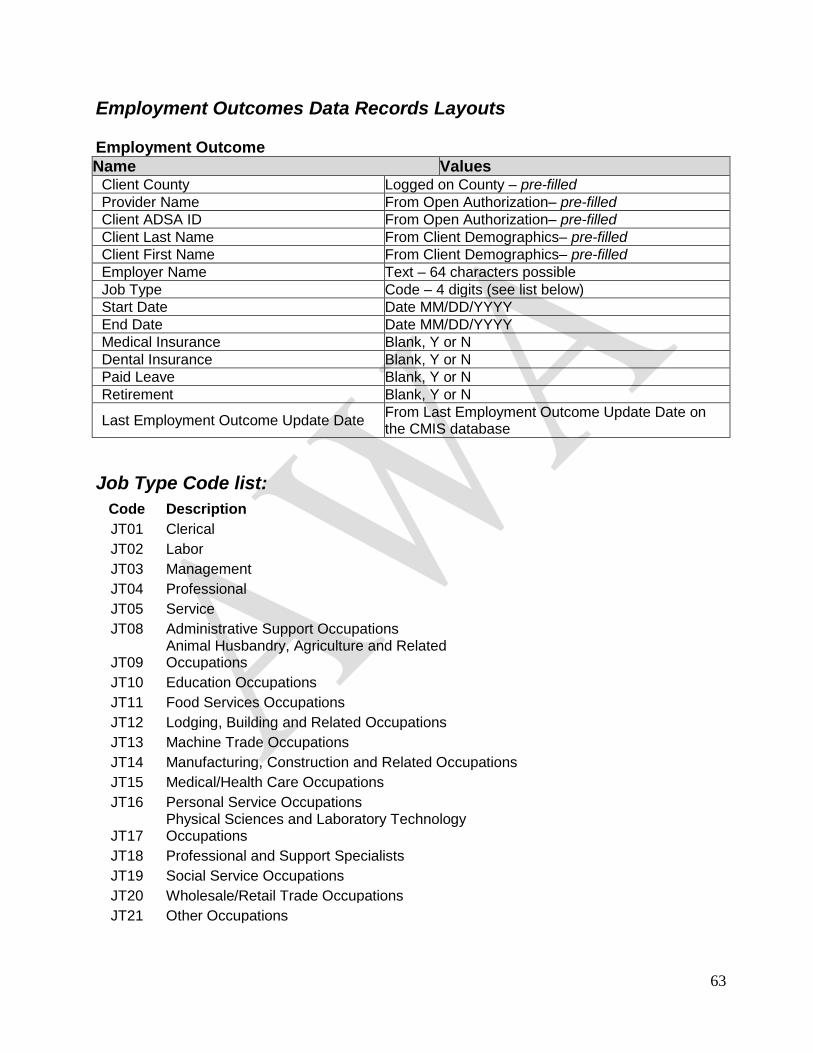
Employment Outcomes Data Records Layouts
Employment Outcome
Name Values Client County Logged on County – pre-filled
Provider Name From Open Authorization– pre-filled
Client ADSA ID From Open Authorization– pre-filled
Client Last Name From Client Demographics– pre-filled
Client First Name From Client Demographics– pre-filled
Employer Name Text – 64 characters possible
Job Type Code – 4 digits (see list below)
Start Date Date MM/DD/YYYY
End Date Date MM/DD/YYYY
Medical Insurance Blank, Y or N
Dental Insurance Blank, Y or N
Paid Leave Blank, Y or N
Retirement Blank, Y or N
Last Employment Outcome Update Date From Last Employment Outcome Update Date on the CMIS database
Job Type Code list:
Code Description
JT01 Clerical
JT02 Labor
JT03 Management
JT04 Professional
JT05 Service
JT08 Administrative Support Occupations
JT09 Animal Husbandry, Agriculture and Related Occupations
JT10 Education Occupations
JT11 Food Services Occupations
JT12 Lodging, Building and Related Occupations
JT13 Machine Trade Occupations
JT14 Manufacturing, Construction and Related Occupations
JT15 Medical/Health Care Occupations
JT16 Personal Service Occupations
JT17 Physical Sciences and Laboratory Technology Occupations
JT18 Professional and Support Specialists
JT19 Social Service Occupations
JT20 Wholesale/Retail Trade Occupations
JT21 Other Occupations
64
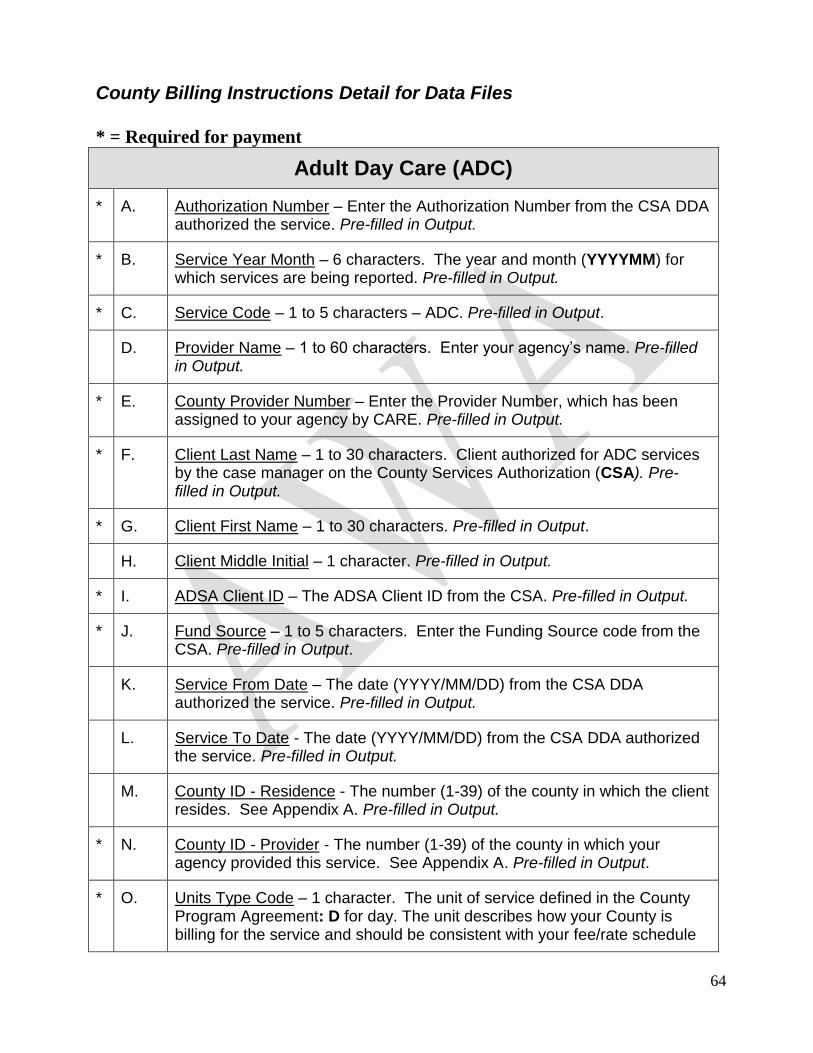
County Billing Instructions Detail for Data Files
* = Required for payment
Adult Day Care (ADC)
* A. Authorization Number – Enter the Authorization Number from the CSA DDA authorized the service. Pre-filled in Output.
* B. Service Year Month – 6 characters. The year and month (YYYYMM) for which services are being reported. Pre-filled in Output.
* C. Service Code – 1 to 5 characters – ADC. Pre-filled in Output.
D. Provider Name – 1 to 60 characters. Enter your agency’s name. Pre-filled in Output.
* E. County Provider Number – Enter the Provider Number, which has been assigned to your agency by CARE. Pre-filled in Output.
* F. Client Last Name – 1 to 30 characters. Client authorized for ADC services by the case manager on the County Services Authorization (CSA). Pre-filled in Output.
* G. Client First Name – 1 to 30 characters. Pre-filled in Output.
H. Client Middle Initial – 1 character. Pre-filled in Output.
* I. ADSA Client ID – The ADSA Client ID from the CSA. Pre-filled in Output.
* J. Fund Source – 1 to 5 characters. Enter the Funding Source code from the CSA. Pre-filled in Output.
K. Service From Date – The date (YYYY/MM/DD) from the CSA DDA authorized the service. Pre-filled in Output.
L. Service To Date - The date (YYYY/MM/DD) from the CSA DDA authorized the service. Pre-filled in Output.
M. County ID - Residence - The number (1-39) of the county in which the client resides. See Appendix A. Pre-filled in Output.
* N. County ID - Provider - The number (1-39) of the county in which your agency provided this service. See Appendix A. Pre-filled in Output.
* O. Units Type Code – 1 character. The unit of service defined in the County Program Agreement: D for day. The unit describes how your County is billing for the service and should be consistent with your fee/rate schedule

65
* P. Number of Units - Enter total number of service units received by the client. The “Units Number” should be consistent with the “Units Type Code” of daily and must be a whole number only.
* Q. Units Rate – Enter the rate paid for each service as authorized by the county. This should be consistent with your fee/rate schedule and must be divisible by four.
R. Provider Staff Hours Number - Enter the total hours of direct service the agency provided the client during the month.
S. Input Error Code – Used by the application. If blank, enter zero.
* T. RAC – 1 to 80 characters. Enter the Recipient Aid Category (RAC) from the CSA. Pre-filled in Output
* = Required for payment
Child Development Services (CDS)
* A. Authorization Number – Enter the Referral Number from the CSA DDA authorized the service. Pre-filled in Output.
* B. Service Year Month – 6 characters. The year and month (YYYYMM) for which services are being reported. Pre-filled in Output.
* C. Service Code – 1 to 5 characters – CDS. Pre-filled in Output.
D. Provider Name – 1 to 60 characters. Enter your agency’s name. Pre-filled in Output.
* E. County Provider Number – Enter the Provider Number, which has been assigned to your agency by CARE. Pre-filled in Output.
* F. Client Last Name – 1 to 30 characters. Client authorized for CDS by the case manager on the County Services Authorization (CSA). Pre-filled in Output.
* G. Client First Name – 1 to 30 characters. Pre-filled in Output.
H. Client Middle Initial – 1 character. Pre-filled in Output.
* I. ADSA Client ID – The ADSA Client ID from the CSA. Pre-filled in Output.
* J. Fund Source – 1 to 5 characters. Enter the Funding Source code from the CSA. Pre-filled in Output.

66
K. Service From Date – The date (YYYY/MM/DD) from the CSA DDA authorized the service. Pre-filled in Output.
L. Service To Date - The date (YYYY/MM/DD) from the CSA DDA authorized the service. Pre-filled in Output.
M. County ID - Residence - The number (1-39) of the county in which the client resides. See Appendix A. Pre-filled in Output.
* N. County ID - Provider - The number (1-39) of the county in which your agency provided this service. See Appendix A. Pre-filled in Output.
* O. Units Type Code – 1 character. The unit of service defined in the County Program Agreement: M for month. The unit describes how your County is billing for the service and should be consistent with your fee/rate schedule.
* P. Natural Number of Units – Enter the total number of direct service units received by the client and family in Natural Environment (as defined by IDEA – Part C) during the reporting month. If the client and family received direct service together, count only once. However, if the child and family receive direct services separately, include total units for each. The type of unit should be consistent with your county contract. Cannot be blank. Must contain a number or zero. Natural Units + Other Units must equal 1 or 0.
* Q. Natural Units Rate – Enter the rate paid for each Natural Based direct service unit per individual. Cannot be left blank. This should be consistent with your fee/rate schedule.
* R. Other Number of Units – Enter the total number of service units received by the client and family that occurred in other than a “Natural Environment”. If the client and family received service together, count only once. If the child and family receive service separately, include total units for each. The type of unit should be consistent with the county contract. Cannot be left blank. Other Units + Natural Units must equal 1 or 0.
* S. Other Units Rate – Enter the rate paid for all other county funded service units. Cannot be left blank. This should be consistent with your fee/rate schedule.
* T. Additional or Misc Expense – Enter the amount of any Additional or Misc. expense for this client for this service month. Enter zero if none. Cannot be left blank. Use this category is to capture tangible material items purchased for children 0-3.
U. Projected End Date – The date (MM/DD/YYYY) services from your agency is projected to end for this client. Pre-filled in Output.
V. Age in Months – The client’s age in months. Pre-filled in Output.
67
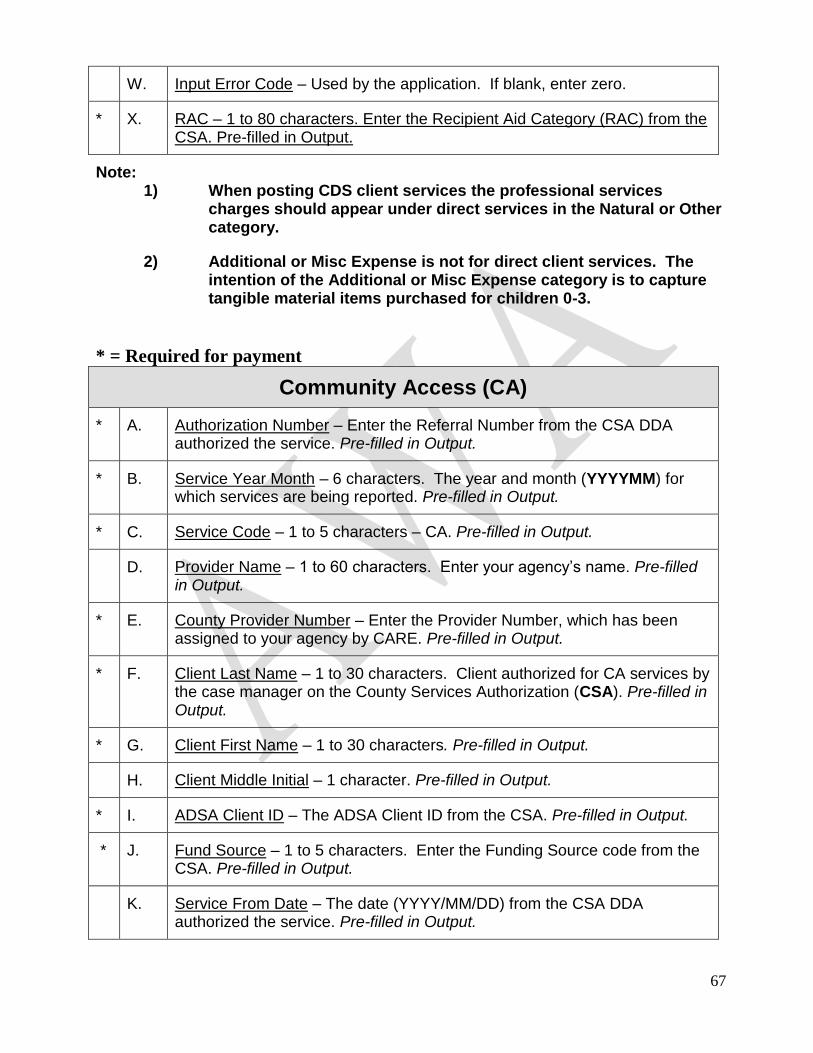
W. Input Error Code – Used by the application. If blank, enter zero.
* X. RAC – 1 to 80 characters. Enter the Recipient Aid Category (RAC) from the CSA. Pre-filled in Output.
Note: 1) When posting CDS client services the professional services
charges should appear under direct services in the Natural or Other category.
2) Additional or Misc Expense is not for direct client services. The intention of the Additional or Misc Expense category is to capture tangible material items purchased for children 0-3.
* = Required for payment
Community Access (CA)
* A. Authorization Number – Enter the Referral Number from the CSA DDA authorized the service. Pre-filled in Output.
* B. Service Year Month – 6 characters. The year and month (YYYYMM) for which services are being reported. Pre-filled in Output.
* C. Service Code – 1 to 5 characters – CA. Pre-filled in Output.
D. Provider Name – 1 to 60 characters. Enter your agency’s name. Pre-filled in Output.
* E. County Provider Number – Enter the Provider Number, which has been assigned to your agency by CARE. Pre-filled in Output.
* F. Client Last Name – 1 to 30 characters. Client authorized for CA services by the case manager on the County Services Authorization (CSA). Pre-filled in Output.
* G. Client First Name – 1 to 30 characters. Pre-filled in Output.
H. Client Middle Initial – 1 character. Pre-filled in Output.
* I. ADSA Client ID – The ADSA Client ID from the CSA. Pre-filled in Output.
* J. Fund Source – 1 to 5 characters. Enter the Funding Source code from the CSA. Pre-filled in Output.
K. Service From Date – The date (YYYY/MM/DD) from the CSA DDA authorized the service. Pre-filled in Output.

68
L. Service To Date - The date (YYYY/MM/DD) from the CSA DDA authorized the service. Pre-filled in Output.
M. County ID - Residence - The number (1-39) of the county in which the client resides. See Appendix A. Pre-filled in Output.
* N. County ID - Provider - The number (1-39) of the county in which your agency provided this service. See Appendix A. Pre-filled in Output.
* O. Units Type Code – 1 character. The unit of service defined in the County Program Agreement: H for hour. The unit describes how your County is billing for the service and should be consistent with your fee/rate schedule.
* P. Number of Units – Enter total number of service units received by the client. The “Number of Units” should be consistent with the “Units Type Code” of hourly. Whole numbers and quarter hours are acceptable, all else unacceptable.
* Q. Unit Rate – Enter the rate paid for each service as authorized by the county. This should be consistent with your fee/rate schedule and must be divisible by four.
R. Provider Staff Hours Number - Enter the total hours of direct service the agency provided the client during the month.
S. Number of Client Hours Volunteer - Enter the total number of hours the client spent in Volunteer activity during the service month. Do not include hours reported below under “Client Hours Other” item T.
T. Number of Client Hours Other - Enter the total number of hours the client spent in Other activities during the service month. Do not include hours reported under “Client Hours Volunteer” item S.
U. Input Error Code – Used by the application. If blank, enter zero.
* V. RAC – 1 to 80 characters. Enter the Recipient Aid Category (RAC) from the CSA. Pre-filled in Output
Note:
Provider Staff Hours Number - If staff is supporting two clients at one time – divide the paid staff hours among the clients being supported. Example: a staff member provides four paid hours of support to two clients at the same time – report two paid staff hour for each of the two clients for the reporting period. If staff has two clients and one needs one-to-one support and the others needs check-ins, then more time would be reported to the client requiring the one-to-one. Note all services are meant to be provided on an individual basis.
69
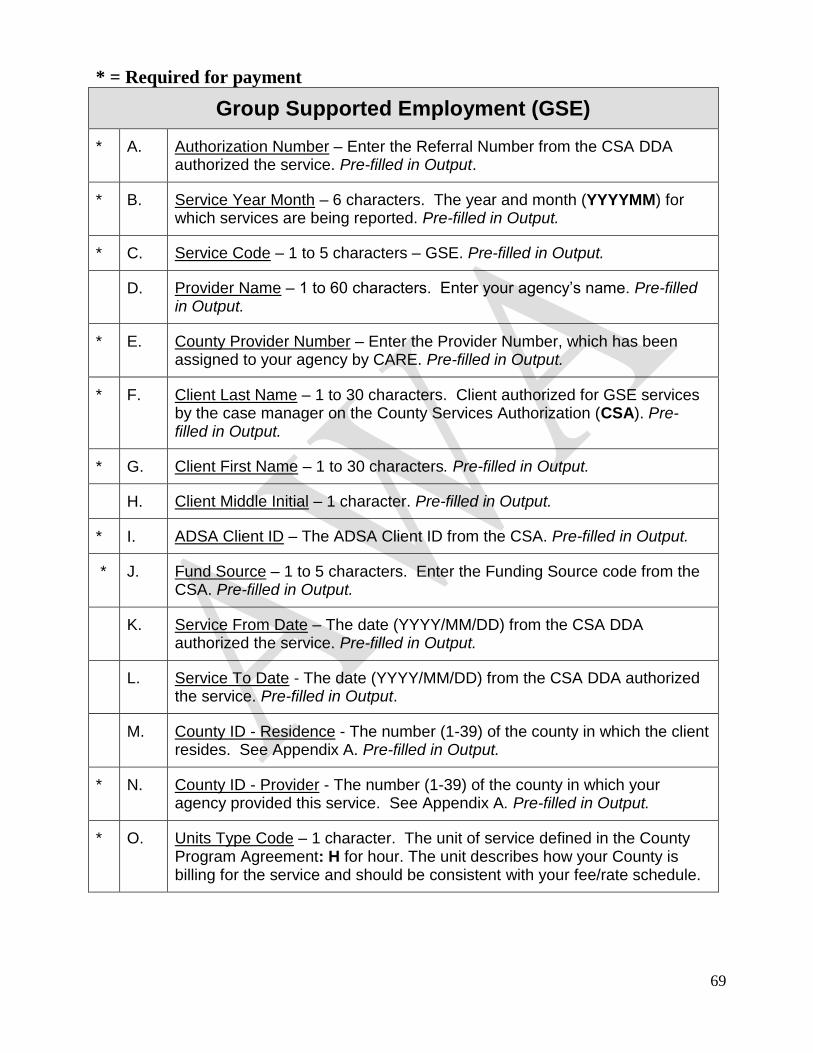
* = Required for payment
Group Supported Employment (GSE)
* A. Authorization Number – Enter the Referral Number from the CSA DDA authorized the service. Pre-filled in Output.
* B. Service Year Month – 6 characters. The year and month (YYYYMM) for which services are being reported. Pre-filled in Output.
* C. Service Code – 1 to 5 characters – GSE. Pre-filled in Output.
D. Provider Name – 1 to 60 characters. Enter your agency’s name. Pre-filled in Output.
* E. County Provider Number – Enter the Provider Number, which has been assigned to your agency by CARE. Pre-filled in Output.
* F. Client Last Name – 1 to 30 characters. Client authorized for GSE services by the case manager on the County Services Authorization (CSA). Pre-filled in Output.
* G. Client First Name – 1 to 30 characters. Pre-filled in Output.
H. Client Middle Initial – 1 character. Pre-filled in Output.
* I. ADSA Client ID – The ADSA Client ID from the CSA. Pre-filled in Output.
* J. Fund Source – 1 to 5 characters. Enter the Funding Source code from the CSA. Pre-filled in Output.
K. Service From Date – The date (YYYY/MM/DD) from the CSA DDA authorized the service. Pre-filled in Output.
L. Service To Date - The date (YYYY/MM/DD) from the CSA DDA authorized the service. Pre-filled in Output.
M. County ID - Residence - The number (1-39) of the county in which the client resides. See Appendix A. Pre-filled in Output.
* N. County ID - Provider - The number (1-39) of the county in which your agency provided this service. See Appendix A. Pre-filled in Output.
* O. Units Type Code – 1 character. The unit of service defined in the County Program Agreement: H for hour. The unit describes how your County is billing for the service and should be consistent with your fee/rate schedule.
70
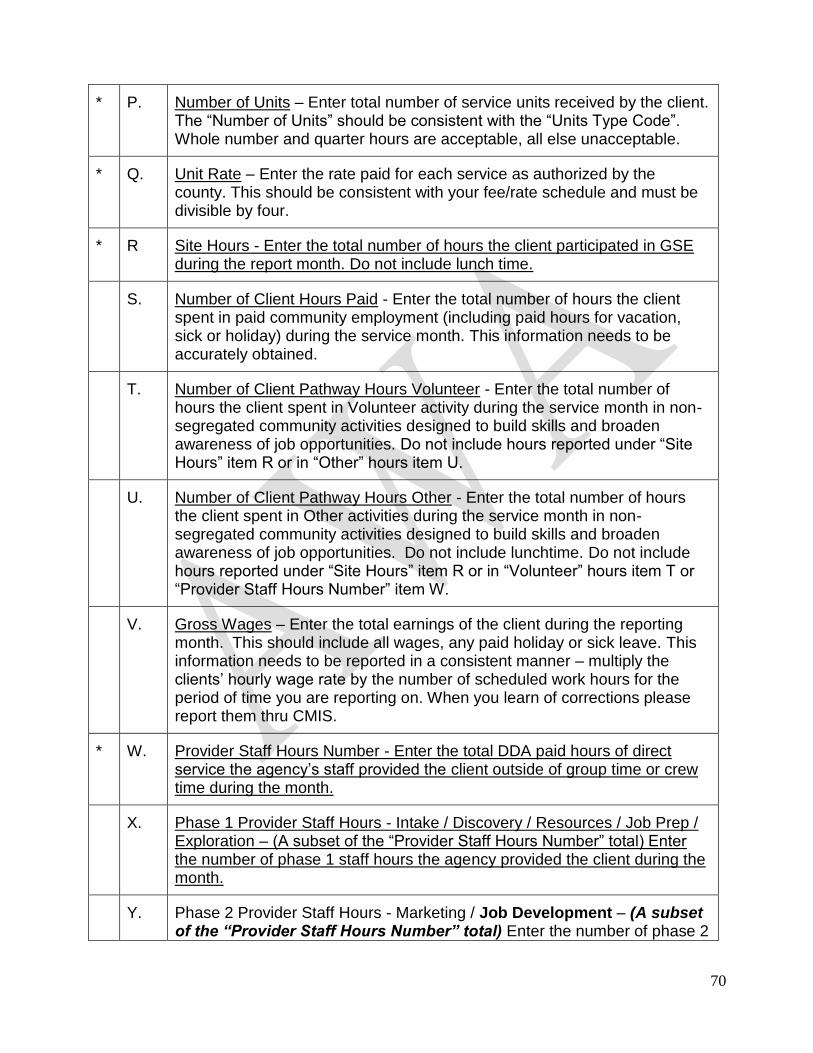
* P. Number of Units – Enter total number of service units received by the client. The “Number of Units” should be consistent with the “Units Type Code”. Whole number and quarter hours are acceptable, all else unacceptable.
* Q. Unit Rate – Enter the rate paid for each service as authorized by the county. This should be consistent with your fee/rate schedule and must be divisible by four.
* R Site Hours - Enter the total number of hours the client participated in GSE during the report month. Do not include lunch time.
S. Number of Client Hours Paid - Enter the total number of hours the client spent in paid community employment (including paid hours for vacation, sick or holiday) during the service month. This information needs to be accurately obtained.
T. Number of Client Pathway Hours Volunteer - Enter the total number of hours the client spent in Volunteer activity during the service month in non-segregated community activities designed to build skills and broaden awareness of job opportunities. Do not include hours reported under “Site Hours” item R or in “Other” hours item U.
U. Number of Client Pathway Hours Other - Enter the total number of hours the client spent in Other activities during the service month in non-segregated community activities designed to build skills and broaden awareness of job opportunities. Do not include lunchtime. Do not include hours reported under “Site Hours” item R or in “Volunteer” hours item T or “Provider Staff Hours Number” item W.
V. Gross Wages – Enter the total earnings of the client during the reporting month. This should include all wages, any paid holiday or sick leave. This information needs to be reported in a consistent manner – multiply the clients’ hourly wage rate by the number of scheduled work hours for the period of time you are reporting on. When you learn of corrections please report them thru CMIS.
* W. Provider Staff Hours Number - Enter the total DDA paid hours of direct service the agency’s staff provided the client outside of group time or crew time during the month.
X. Phase 1 Provider Staff Hours - Intake / Discovery / Resources / Job Prep / Exploration – (A subset of the “Provider Staff Hours Number” total) Enter the number of phase 1 staff hours the agency provided the client during the month.
Y. Phase 2 Provider Staff Hours - Marketing / Job Development – (A subset of the “Provider Staff Hours Number” total) Enter the number of phase 2
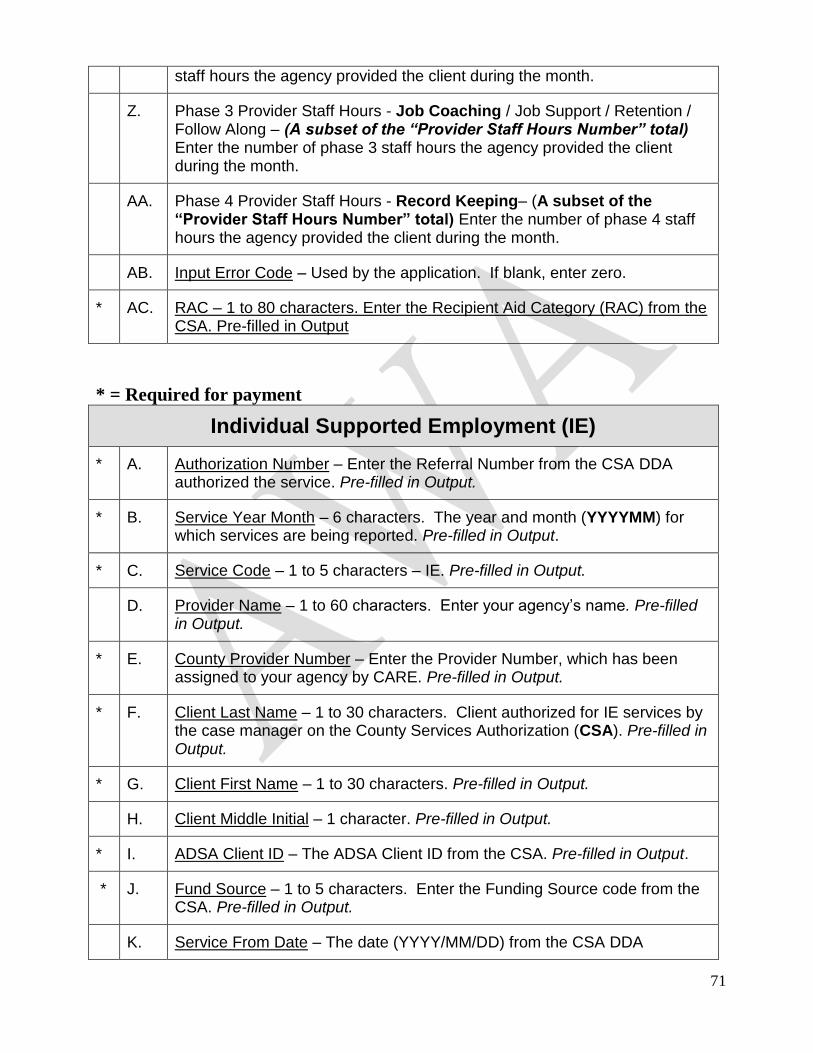
71
staff hours the agency provided the client during the month.
Z. Phase 3 Provider Staff Hours - Job Coaching / Job Support / Retention / Follow Along – (A subset of the “Provider Staff Hours Number” total) Enter the number of phase 3 staff hours the agency provided the client during the month.
AA. Phase 4 Provider Staff Hours - Record Keeping– (A subset of the “Provider Staff Hours Number” total) Enter the number of phase 4 staff hours the agency provided the client during the month.
AB. Input Error Code – Used by the application. If blank, enter zero.
* AC. RAC – 1 to 80 characters. Enter the Recipient Aid Category (RAC) from the CSA. Pre-filled in Output
* = Required for payment
Individual Supported Employment (IE)
* A. Authorization Number – Enter the Referral Number from the CSA DDA authorized the service. Pre-filled in Output.
* B. Service Year Month – 6 characters. The year and month (YYYYMM) for which services are being reported. Pre-filled in Output.
* C. Service Code – 1 to 5 characters – IE. Pre-filled in Output.
D. Provider Name – 1 to 60 characters. Enter your agency’s name. Pre-filled in Output.
* E. County Provider Number – Enter the Provider Number, which has been assigned to your agency by CARE. Pre-filled in Output.
* F. Client Last Name – 1 to 30 characters. Client authorized for IE services by the case manager on the County Services Authorization (CSA). Pre-filled in Output.
* G. Client First Name – 1 to 30 characters. Pre-filled in Output.
H. Client Middle Initial – 1 character. Pre-filled in Output.
* I. ADSA Client ID – The ADSA Client ID from the CSA. Pre-filled in Output.
* J. Fund Source – 1 to 5 characters. Enter the Funding Source code from the CSA. Pre-filled in Output.
K. Service From Date – The date (YYYY/MM/DD) from the CSA DDA
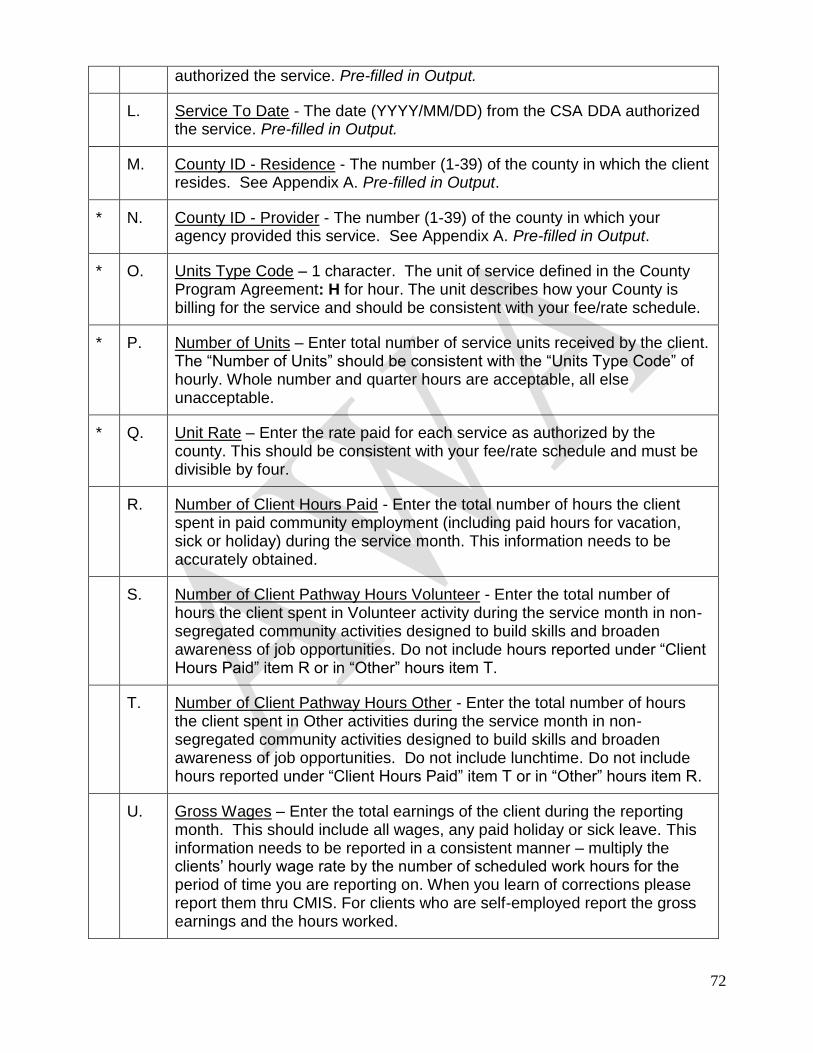
72
authorized the service. Pre-filled in Output.
L. Service To Date - The date (YYYY/MM/DD) from the CSA DDA authorized the service. Pre-filled in Output.
M. County ID - Residence - The number (1-39) of the county in which the client resides. See Appendix A. Pre-filled in Output.
* N. County ID - Provider - The number (1-39) of the county in which your agency provided this service. See Appendix A. Pre-filled in Output.
* O. Units Type Code – 1 character. The unit of service defined in the County Program Agreement: H for hour. The unit describes how your County is billing for the service and should be consistent with your fee/rate schedule.
* P. Number of Units – Enter total number of service units received by the client. The “Number of Units” should be consistent with the “Units Type Code” of hourly. Whole number and quarter hours are acceptable, all else unacceptable.
* Q. Unit Rate – Enter the rate paid for each service as authorized by the county. This should be consistent with your fee/rate schedule and must be divisible by four.
R. Number of Client Hours Paid - Enter the total number of hours the client spent in paid community employment (including paid hours for vacation, sick or holiday) during the service month. This information needs to be accurately obtained.
S. Number of Client Pathway Hours Volunteer - Enter the total number of hours the client spent in Volunteer activity during the service month in non-segregated community activities designed to build skills and broaden awareness of job opportunities. Do not include hours reported under “Client Hours Paid” item R or in “Other” hours item T.
T. Number of Client Pathway Hours Other - Enter the total number of hours the client spent in Other activities during the service month in non-segregated community activities designed to build skills and broaden awareness of job opportunities. Do not include lunchtime. Do not include hours reported under “Client Hours Paid” item T or in “Other” hours item R.
U. Gross Wages – Enter the total earnings of the client during the reporting month. This should include all wages, any paid holiday or sick leave. This information needs to be reported in a consistent manner – multiply the clients’ hourly wage rate by the number of scheduled work hours for the period of time you are reporting on. When you learn of corrections please report them thru CMIS. For clients who are self-employed report the gross earnings and the hours worked.
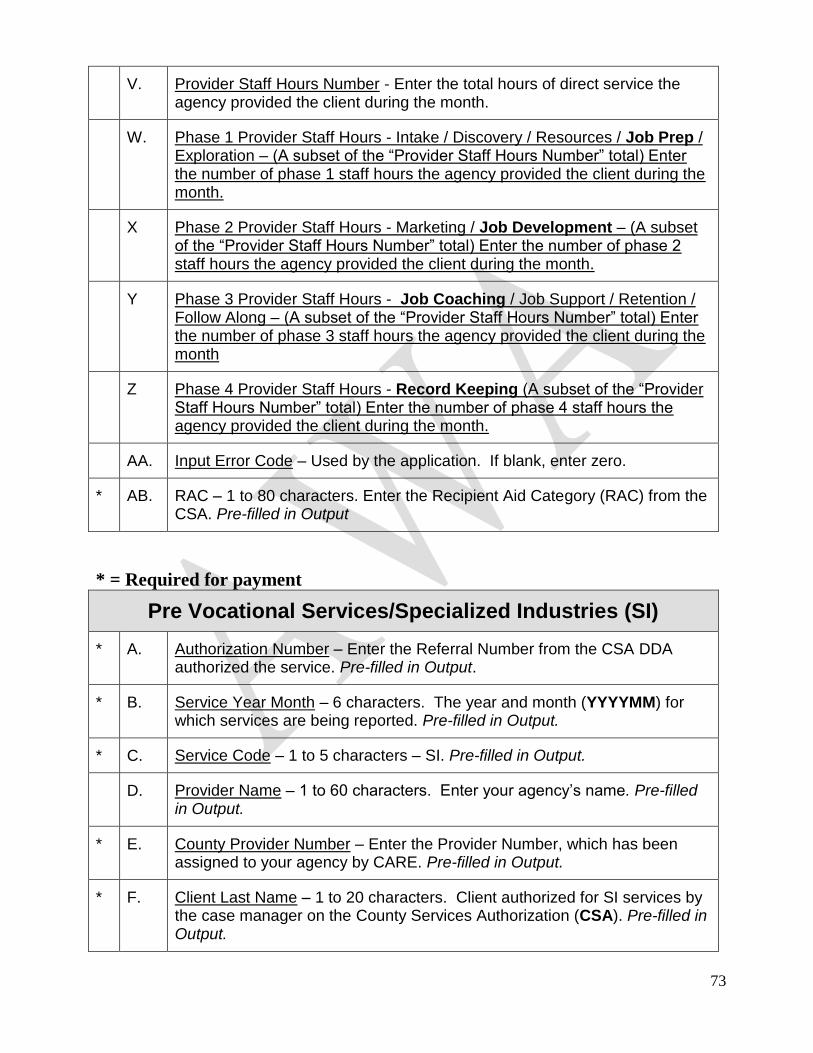
73
V. Provider Staff Hours Number - Enter the total hours of direct service the agency provided the client during the month.
W. Phase 1 Provider Staff Hours - Intake / Discovery / Resources / Job Prep / Exploration – (A subset of the “Provider Staff Hours Number” total) Enter the number of phase 1 staff hours the agency provided the client during the month.
X Phase 2 Provider Staff Hours - Marketing / Job Development – (A subset of the “Provider Staff Hours Number” total) Enter the number of phase 2 staff hours the agency provided the client during the month.
Y Phase 3 Provider Staff Hours - Job Coaching / Job Support / Retention / Follow Along – (A subset of the “Provider Staff Hours Number” total) Enter the number of phase 3 staff hours the agency provided the client during the month
Z Phase 4 Provider Staff Hours - Record Keeping (A subset of the “Provider Staff Hours Number” total) Enter the number of phase 4 staff hours the agency provided the client during the month.
AA. Input Error Code – Used by the application. If blank, enter zero.
* AB. RAC – 1 to 80 characters. Enter the Recipient Aid Category (RAC) from the CSA. Pre-filled in Output
* = Required for payment
Pre Vocational Services/Specialized Industries (SI)
* A. Authorization Number – Enter the Referral Number from the CSA DDA authorized the service. Pre-filled in Output.
* B. Service Year Month – 6 characters. The year and month (YYYYMM) for which services are being reported. Pre-filled in Output.
* C. Service Code – 1 to 5 characters – SI. Pre-filled in Output.
D. Provider Name – 1 to 60 characters. Enter your agency’s name. Pre-filled in Output.
* E. County Provider Number – Enter the Provider Number, which has been assigned to your agency by CARE. Pre-filled in Output.
* F. Client Last Name – 1 to 20 characters. Client authorized for SI services by the case manager on the County Services Authorization (CSA). Pre-filled in Output.
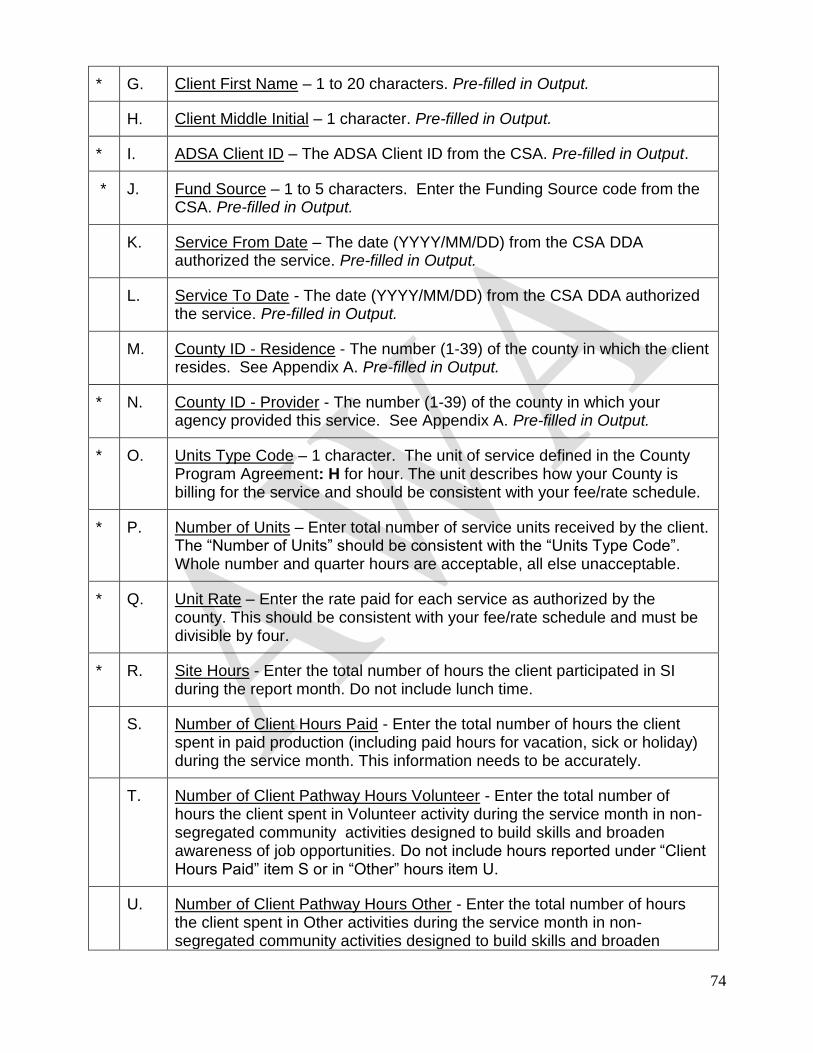
74
* G. Client First Name – 1 to 20 characters. Pre-filled in Output.
H. Client Middle Initial – 1 character. Pre-filled in Output.
* I. ADSA Client ID – The ADSA Client ID from the CSA. Pre-filled in Output.
* J. Fund Source – 1 to 5 characters. Enter the Funding Source code from the CSA. Pre-filled in Output.
K. Service From Date – The date (YYYY/MM/DD) from the CSA DDA authorized the service. Pre-filled in Output.
L. Service To Date - The date (YYYY/MM/DD) from the CSA DDA authorized the service. Pre-filled in Output.
M. County ID - Residence - The number (1-39) of the county in which the client resides. See Appendix A. Pre-filled in Output.
* N. County ID - Provider - The number (1-39) of the county in which your agency provided this service. See Appendix A. Pre-filled in Output.
* O. Units Type Code – 1 character. The unit of service defined in the County Program Agreement: H for hour. The unit describes how your County is billing for the service and should be consistent with your fee/rate schedule.
* P. Number of Units – Enter total number of service units received by the client. The “Number of Units” should be consistent with the “Units Type Code”. Whole number and quarter hours are acceptable, all else unacceptable.
* Q. Unit Rate – Enter the rate paid for each service as authorized by the county. This should be consistent with your fee/rate schedule and must be divisible by four.
* R. Site Hours - Enter the total number of hours the client participated in SI during the report month. Do not include lunch time.
S. Number of Client Hours Paid - Enter the total number of hours the client spent in paid production (including paid hours for vacation, sick or holiday) during the service month. This information needs to be accurately.
T. Number of Client Pathway Hours Volunteer - Enter the total number of hours the client spent in Volunteer activity during the service month in non-segregated community activities designed to build skills and broaden awareness of job opportunities. Do not include hours reported under “Client Hours Paid” item S or in “Other” hours item U.
U. Number of Client Pathway Hours Other - Enter the total number of hours the client spent in Other activities during the service month in non-segregated community activities designed to build skills and broaden

75
awareness of job opportunities. Do not include lunchtime. Do not include hours reported under “Client Hours Paid” item R or in “Volunteer” hours item T or “Provider Staff Hours Number” item W.
V. Gross Wages – Enter the total earnings of the client during the reporting month. This should include all wages, any paid holiday or sick leave. This information needs to be reported in a consistent manner – multiply the clients’ hourly wage rate by the number of scheduled work hours for the period of time you are reporting on. When you learn of corrections please report them.
* W. Provider Staff Hours Number - Enter the total DDA paid hours of direct service the agency’s staff provided the client outside of group time or crew time during the month.
X. Phase 1 Provider Staff Hours - Intake / Discovery / Resources / Job Prep / Exploration – (A subset of the “Provider Staff Hours Number” total) Enter the number of phase 1 staff hours the agency provided the client during the month.
Y. Phase 2 Provider Staff Hours - Marketing / Job Development – (A subset of the “Provider Staff Hours Number” total) Enter the number of phase 2 staff hours the agency provided the client during the month.
Z. Phase 3 Provider Staff Hours - Job Coaching / Job Support / Retention / Follow Along – (A subset of the “Provider Staff Hours Number” total) Enter the number of phase 3 staff hours the agency provided the client during the month
AA. Phase 4 Provider Staff Hours - Record Keeping– (A subset of the “Provider Staff Hours Number” total) Enter the number of phase 4 staff hours the agency provided the client during the month.
AB. Input Error Code – Used by the application. If blank, enter zero.
AC. RAC – 1 to 80 characters. Enter the Recipient Aid Category (RAC) from the CSA. Pre-filled in Output.
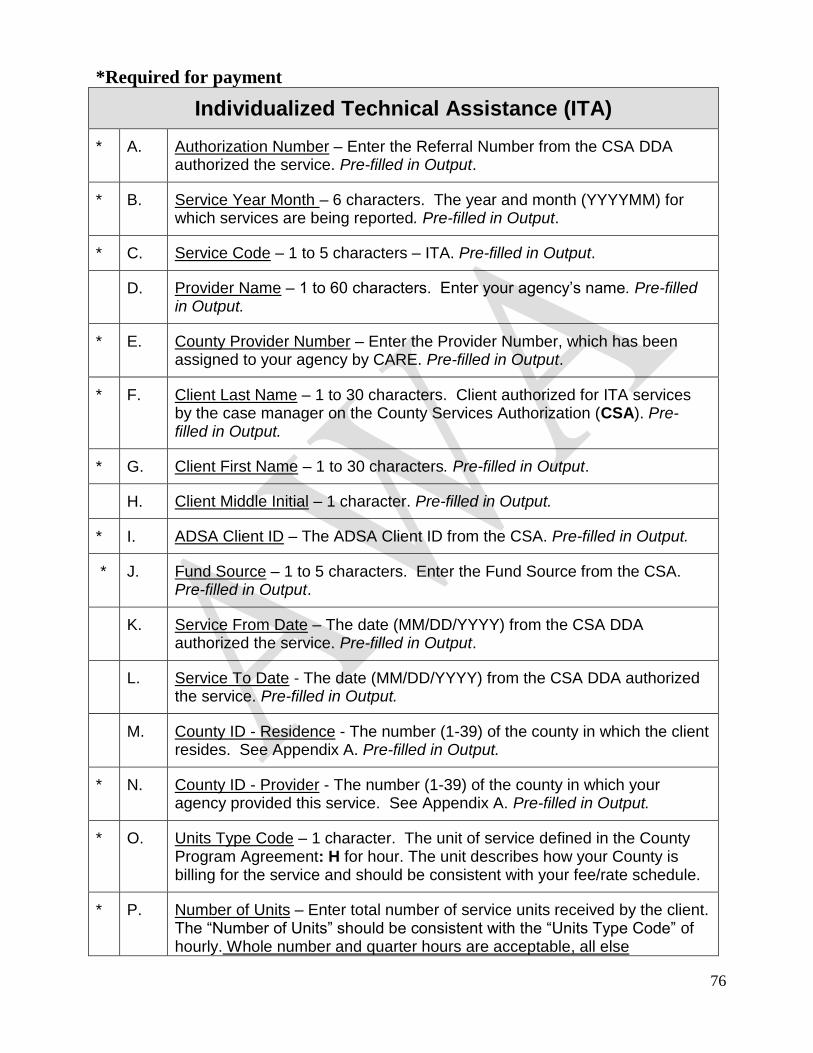
76
*Required for payment
Individualized Technical Assistance (ITA)
* A. Authorization Number – Enter the Referral Number from the CSA DDA authorized the service. Pre-filled in Output.
* B. Service Year Month – 6 characters. The year and month (YYYYMM) for which services are being reported. Pre-filled in Output.
* C. Service Code – 1 to 5 characters – ITA. Pre-filled in Output.
D. Provider Name – 1 to 60 characters. Enter your agency’s name. Pre-filled in Output.
* E. County Provider Number – Enter the Provider Number, which has been assigned to your agency by CARE. Pre-filled in Output.
* F. Client Last Name – 1 to 30 characters. Client authorized for ITA services by the case manager on the County Services Authorization (CSA). Pre-filled in Output.
* G. Client First Name – 1 to 30 characters. Pre-filled in Output.
H. Client Middle Initial – 1 character. Pre-filled in Output.
* I. ADSA Client ID – The ADSA Client ID from the CSA. Pre-filled in Output.
* J. Fund Source – 1 to 5 characters. Enter the Fund Source from the CSA. Pre-filled in Output.
K. Service From Date – The date (MM/DD/YYYY) from the CSA DDA authorized the service. Pre-filled in Output.
L. Service To Date - The date (MM/DD/YYYY) from the CSA DDA authorized the service. Pre-filled in Output.
M. County ID - Residence - The number (1-39) of the county in which the client resides. See Appendix A. Pre-filled in Output.
* N. County ID - Provider - The number (1-39) of the county in which your agency provided this service. See Appendix A. Pre-filled in Output.
* O. Units Type Code – 1 character. The unit of service defined in the County Program Agreement: H for hour. The unit describes how your County is billing for the service and should be consistent with your fee/rate schedule.
* P. Number of Units – Enter total number of service units received by the client. The “Number of Units” should be consistent with the “Units Type Code” of hourly. Whole number and quarter hours are acceptable, all else
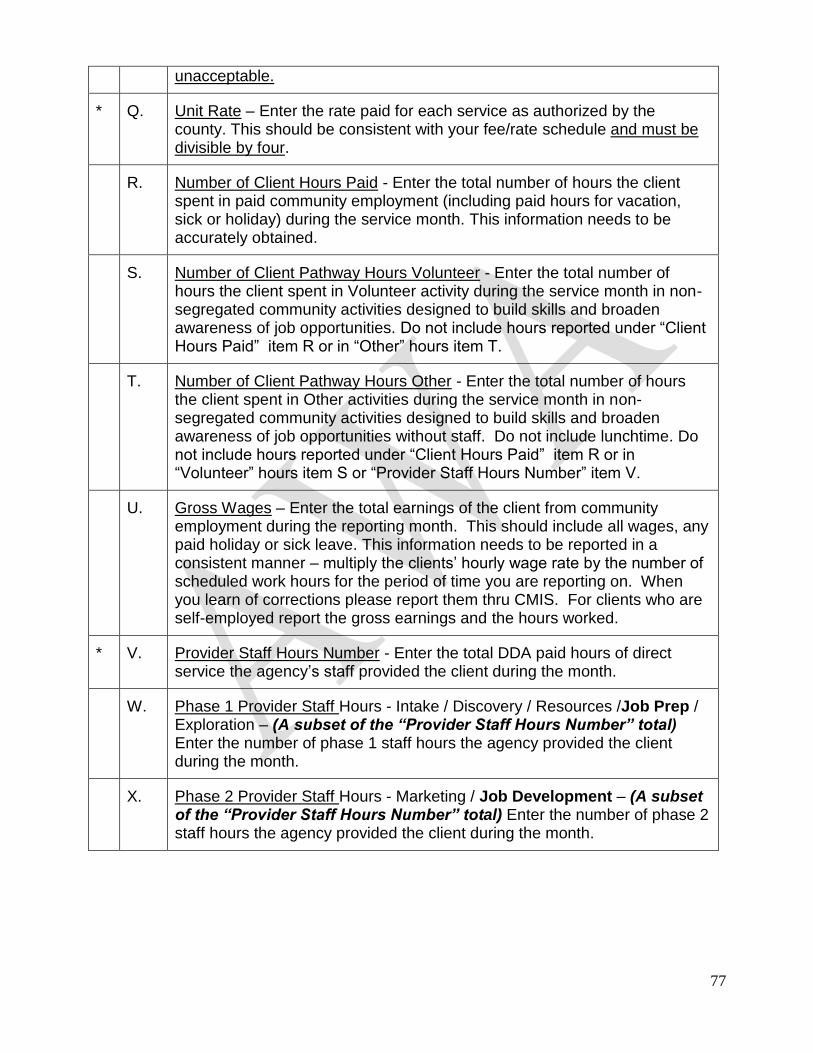
77
unacceptable.
* Q. Unit Rate – Enter the rate paid for each service as authorized by the county. This should be consistent with your fee/rate schedule and must be divisible by four.
R. Number of Client Hours Paid - Enter the total number of hours the client spent in paid community employment (including paid hours for vacation, sick or holiday) during the service month. This information needs to be accurately obtained.
S. Number of Client Pathway Hours Volunteer - Enter the total number of hours the client spent in Volunteer activity during the service month in non-segregated community activities designed to build skills and broaden awareness of job opportunities. Do not include hours reported under “Client Hours Paid” item R or in “Other” hours item T.
T. Number of Client Pathway Hours Other - Enter the total number of hours the client spent in Other activities during the service month in non-segregated community activities designed to build skills and broaden awareness of job opportunities without staff. Do not include lunchtime. Do not include hours reported under “Client Hours Paid” item R or in “Volunteer” hours item S or “Provider Staff Hours Number” item V.
U. Gross Wages – Enter the total earnings of the client from community employment during the reporting month. This should include all wages, any paid holiday or sick leave. This information needs to be reported in a consistent manner – multiply the clients’ hourly wage rate by the number of scheduled work hours for the period of time you are reporting on. When you learn of corrections please report them thru CMIS. For clients who are self-employed report the gross earnings and the hours worked.
* V. Provider Staff Hours Number - Enter the total DDA paid hours of direct service the agency’s staff provided the client during the month.
W. Phase 1 Provider Staff Hours - Intake / Discovery / Resources /Job Prep / Exploration – (A subset of the “Provider Staff Hours Number” total) Enter the number of phase 1 staff hours the agency provided the client during the month.
X. Phase 2 Provider Staff Hours - Marketing / Job Development – (A subset of the “Provider Staff Hours Number” total) Enter the number of phase 2 staff hours the agency provided the client during the month.
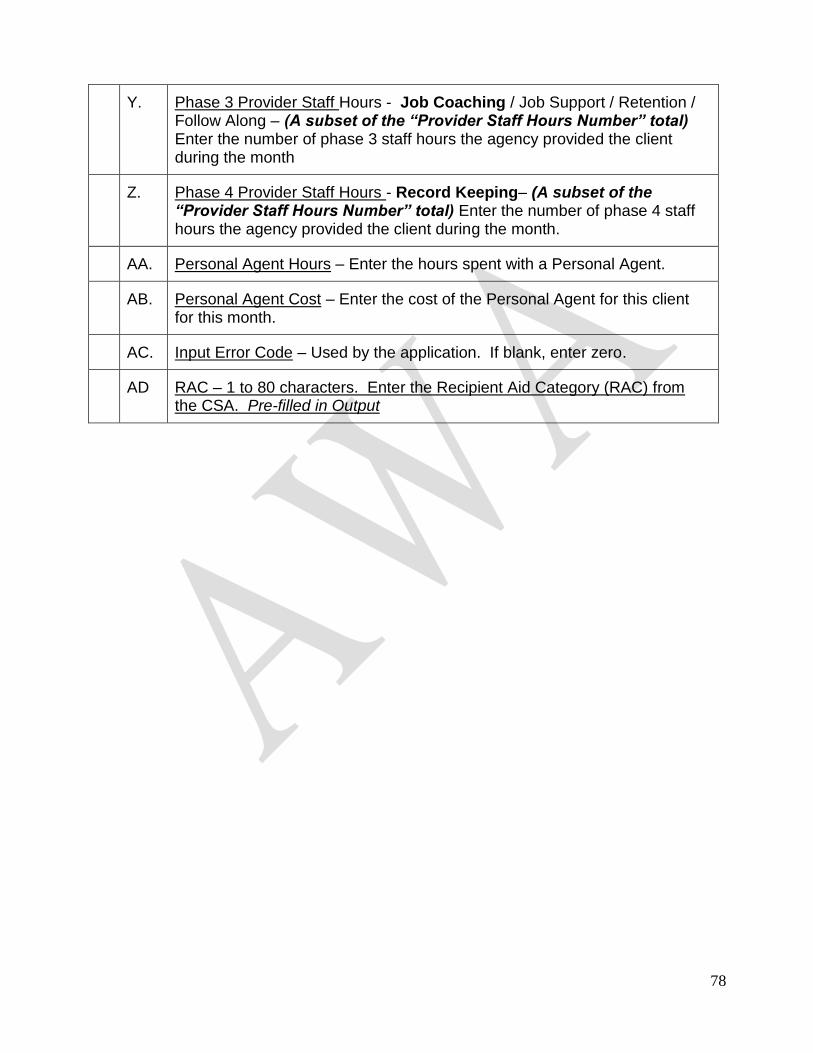
78
Y. Phase 3 Provider Staff Hours - Job Coaching / Job Support / Retention / Follow Along – (A subset of the “Provider Staff Hours Number” total) Enter the number of phase 3 staff hours the agency provided the client during the month
Z. Phase 4 Provider Staff Hours - Record Keeping– (A subset of the “Provider Staff Hours Number” total) Enter the number of phase 4 staff hours the agency provided the client during the month.
AA. Personal Agent Hours – Enter the hours spent with a Personal Agent.
AB. Personal Agent Cost – Enter the cost of the Personal Agent for this client for this month.
AC. Input Error Code – Used by the application. If blank, enter zero.
AD RAC – 1 to 80 characters. Enter the Recipient Aid Category (RAC) from the CSA. Pre-filled in Output
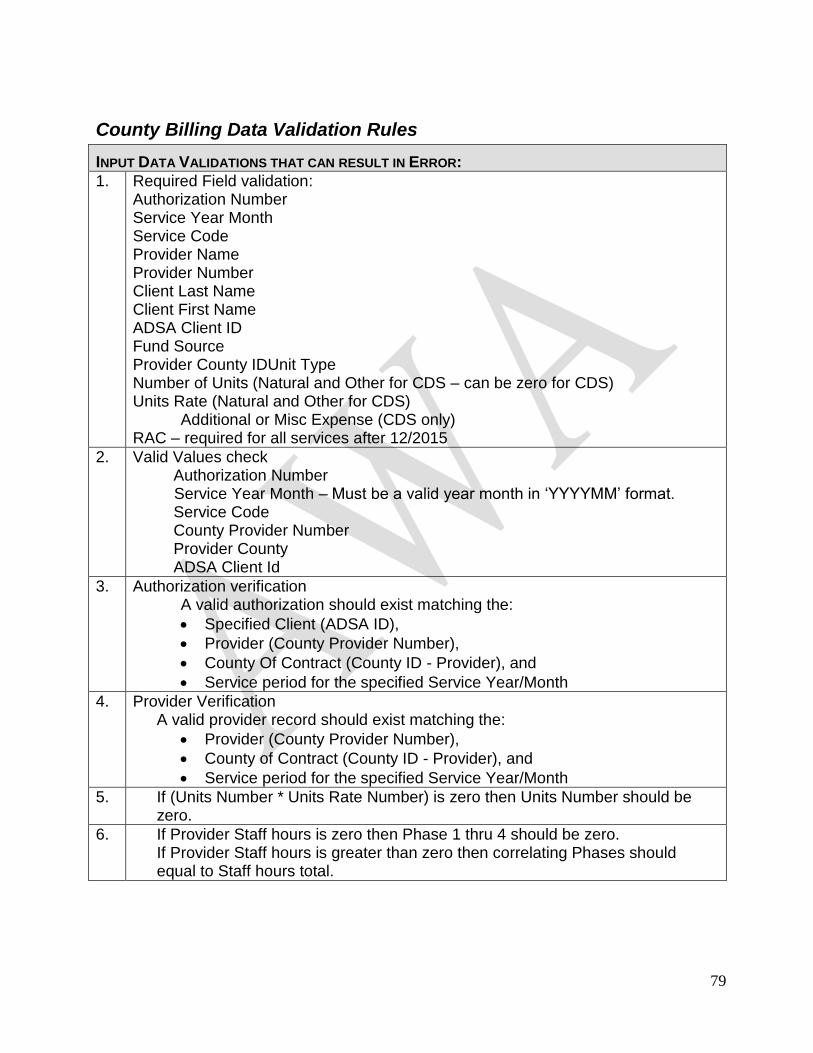
79
County Billing Data Validation Rules
INPUT DATA VALIDATIONS THAT CAN RESULT IN ERROR:
1. Required Field validation: Authorization Number Service Year Month Service Code Provider Name Provider Number Client Last Name Client First Name ADSA Client ID Fund Source Provider County IDUnit Type Number of Units (Natural and Other for CDS – can be zero for CDS) Units Rate (Natural and Other for CDS)
Additional or Misc Expense (CDS only) RAC – required for all services after 12/2015
2. Valid Values check Authorization Number Service Year Month – Must be a valid year month in ‘YYYYMM’ format. Service Code County Provider Number Provider County ADSA Client Id
3. Authorization verification A valid authorization should exist matching the:
Specified Client (ADSA ID),
Provider (County Provider Number),
County Of Contract (County ID - Provider), and
Service period for the specified Service Year/Month
4. Provider Verification A valid provider record should exist matching the:
Provider (County Provider Number),
County of Contract (County ID - Provider), and
Service period for the specified Service Year/Month
5. If (Units Number * Units Rate Number) is zero then Units Number should be zero.
6. If Provider Staff hours is zero then Phase 1 thru 4 should be zero. If Provider Staff hours is greater than zero then correlating Phases should equal to Staff hours total.
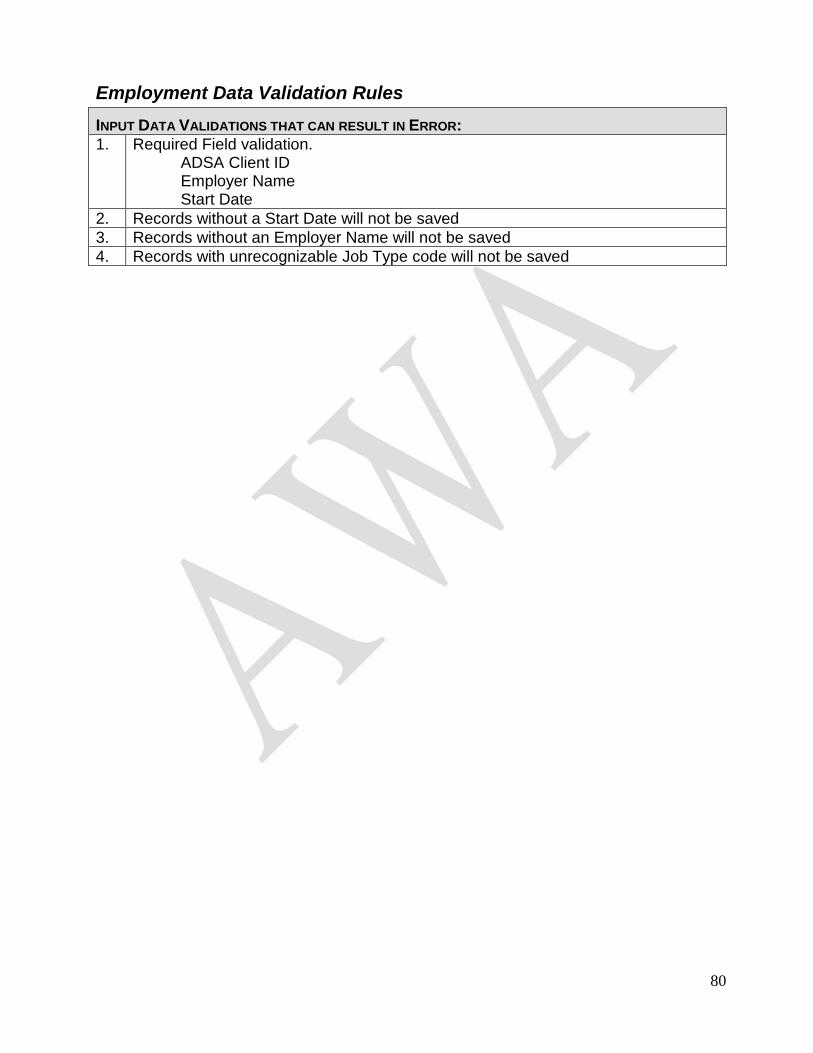
80
Employment Data Validation Rules
INPUT DATA VALIDATIONS THAT CAN RESULT IN ERROR:
1. Required Field validation. ADSA Client ID Employer Name Start Date
2. Records without a Start Date will not be saved
3. Records without an Employer Name will not be saved
4. Records with unrecognizable Job Type code will not be saved
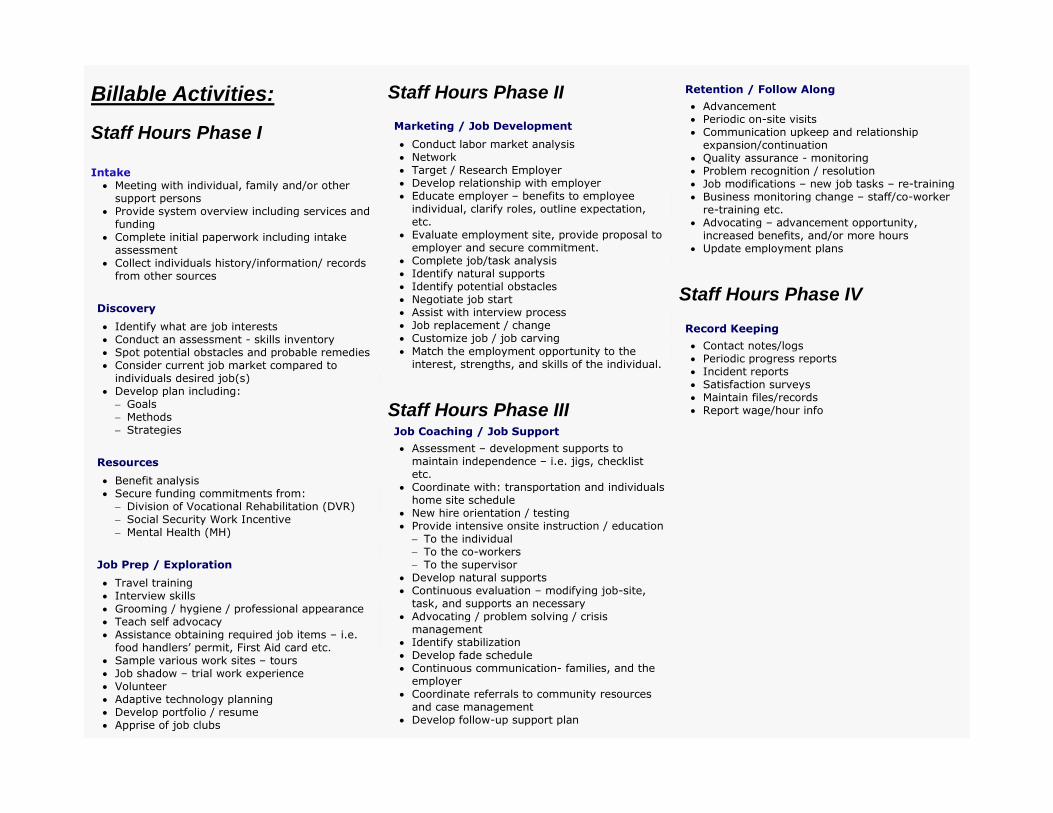
Billable Activities:
Staff Hours Phase I
Intake Meeting with individual, family and/or other
support persons Provide system overview including services and
funding Complete initial paperwork including intake
assessment Collect individuals history/information/ records
from other sources
Discovery
Identify what are job interests Conduct an assessment - skills inventory Spot potential obstacles and probable remedies Consider current job market compared to
individuals desired job(s) Develop plan including:
Goals Methods Strategies
Resources
Benefit analysis Secure funding commitments from:
Division of Vocational Rehabilitation (DVR) Social Security Work Incentive Mental Health (MH)
Job Prep / Exploration
Travel training Interview skills Grooming / hygiene / professional appearance Teach self advocacy Assistance obtaining required job items – i.e.
food handlers’ permit, First Aid card etc. Sample various work sites – tours Job shadow – trial work experience Volunteer Adaptive technology planning Develop portfolio / resume Apprise of job clubs
Staff Hours Phase II
Marketing / Job Development
Conduct labor market analysis Network Target / Research Employer Develop relationship with employer Educate employer – benefits to employee
individual, clarify roles, outline expectation, etc.
Evaluate employment site, provide proposal to employer and secure commitment.
Complete job/task analysis Identify natural supports Identify potential obstacles Negotiate job start Assist with interview process Job replacement / change Customize job / job carving
Match the employment opportunity to the interest, strengths, and skills of the individual.
Staff Hours Phase III Job Coaching / Job Support
Assessment – development supports to maintain independence – i.e. jigs, checklist etc.
Coordinate with: transportation and individuals home site schedule
New hire orientation / testing Provide intensive onsite instruction / education
To the individual To the co-workers To the supervisor
Develop natural supports Continuous evaluation – modifying job-site,
task, and supports an necessary Advocating / problem solving / crisis
management Identify stabilization Develop fade schedule Continuous communication- families, and the
employer Coordinate referrals to community resources
and case management Develop follow-up support plan
Retention / Follow Along
Advancement Periodic on-site visits Communication upkeep and relationship
expansion/continuation Quality assurance - monitoring Problem recognition / resolution Job modifications – new job tasks – re-training Business monitoring change – staff/co-worker
re-training etc. Advocating – advancement opportunity,
increased benefits, and/or more hours Update employment plans
Staff Hours Phase IV Record Keeping
Contact notes/logs Periodic progress reports Incident reports Satisfaction surveys Maintain files/records Report wage/hour info
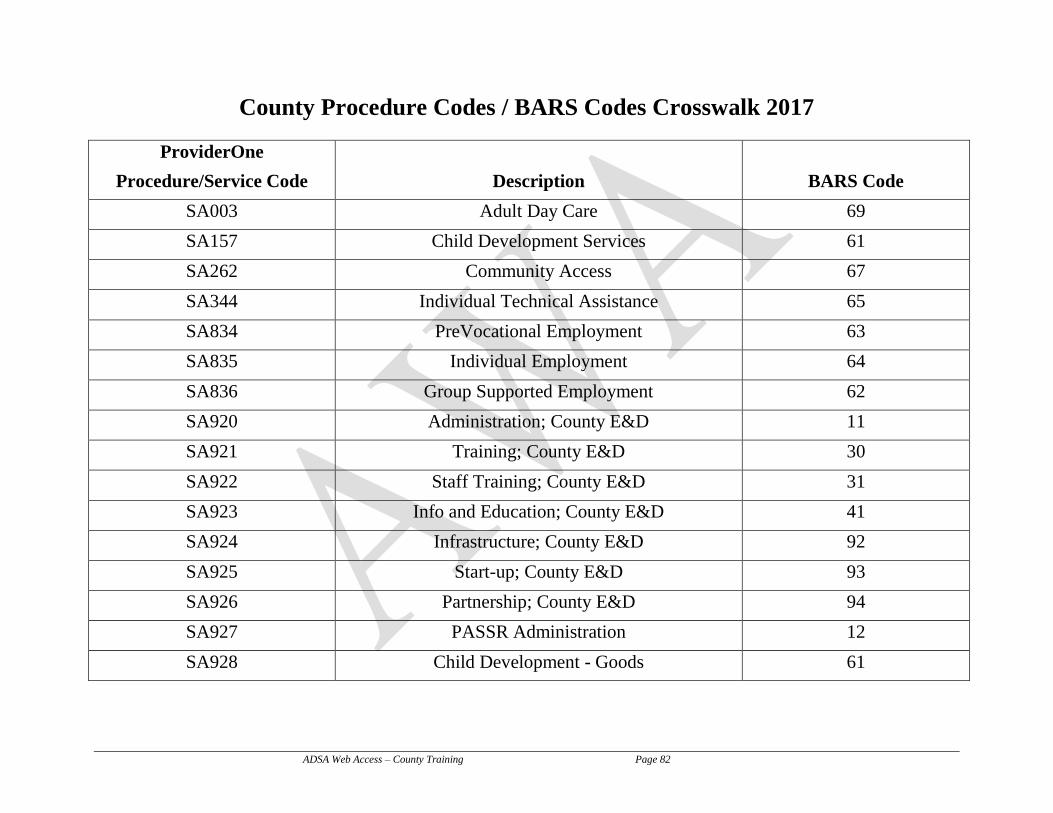
ADSA Web Access – County Training Page 82
County Procedure Codes / BARS Codes Crosswalk 2017
ProviderOne
Procedure/Service Code
Description
BARS Code
SA003 Adult Day Care 69
SA157 Child Development Services 61
SA262 Community Access 67
SA344 Individual Technical Assistance 65
SA834 PreVocational Employment 63
SA835 Individual Employment 64
SA836 Group Supported Employment 62
SA920 Administration; County E&D 11
SA921 Training; County E&D 30
SA922 Staff Training; County E&D 31
SA923 Info and Education; County E&D 41
SA924 Infrastructure; County E&D 92
SA925 Start-up; County E&D 93
SA926 Partnership; County E&D 94
SA927 PASSR Administration 12
SA928 Child Development - Goods 61

ADSA Web Access – County Training Page 83
NOTES