adobe indesign cc (2015 release) -...
TRANSCRIPT

Final Spine = 0.73475"
facebook.com/PeachpitCreativeLearning
@adobepress@peachpit
“� e Classroom in a Book series is by far the best training material on the market. Everything you need to master the so� ware is included: clear explanations of each lesson, step-by-step instructions, and the project � les for the students.”Barbara Binder, Adobe Certi� ed InstructorRocky Mountain Training
� e fastest, easiest, most comprehensive way to learn Adobe InDesign CC (2015 release)Classroom in a Book®, the best-selling series of hands-on so� ware training workbooks, o� ers what no other book or training program does—an o� cial training series from Adobe Systems Incorporated, developed with the support of Adobe product experts.
Adobe InDesign CC Classroom in a Book (2015 release) contains 16 lessons that cover the basics and beyond, providing countless tips and techniques to help you become more productive with the program. You can follow the book from start to � nish or choose only those lessons that interest you.
Purchasing this book includes valuable online extras. Follow the instructions in the book’s “Ge� ing Started” section to unlock access to: • downloadable lesson fi les you need to work through the projects in the book• Web Edition containing the complete text of the book, interactive quizzes,
videos that walk you through the lessons step by step, and updated material covering new feature releases from Adobe
What you need to use this book: Adobe InDesign CC (2015 release) so� ware, for either Windows or Mac OS. (So� ware not included.)
Note: Classroom in a Book does not replace the documentation, support, updates, or any other bene� ts of being a registered owner of Adobe InDesign so� ware.
CATEGORY:LAYOUT / DIGITAL AND GRAPHIC DESIGN / DESKTOP PUBLISHINGCOVER ILLUSTRATION: Riko Timian (Estonia), behance.net/RTNE Adobe Press books are published by Peachpit, San Francisco, CAPrinted and made in the USA
www.adobepress.com
US $59.99 CANADA $74.99
Create engaging page layouts and publish them for print or digital delivery. Learn to � ow and edit text, create and use styles, incorporate graphics and tables, and create PDF forms and ebooks. � is thorough, self-paced guide with real-world tips is ideal for beginning users wanting to get up to speed on the key features of Adobe InDesign, and for more experienced graphic designers who wish to improve their skills and learnthe newest tools in InDesign.
Adobe InDesign CC 2015 release
CLASSROOM IN A BOOK®
CLASSROO
M IN
A BO
OK
®Adobe InD
esign CC 2015 releaseA
NTO
N / CRU
ISE
InDesign CCAdobe
2015 release
CLASSROOM IN A BOOK® � e of� cial training workbook from AdobeKelly Kordes Anton and John Cruise
Riko Timian
9780134310008_AInDesignCC2015CIB_Cvr.indd 1 7/24/15 4:10 PM
CLASSROOM IN A BOOK® The official training workbook from AdobeKelly Kordes Anton and John Cruise
InDesign CCAdobe
2015 release
Riko Timian

Adobe InDesign CC Classroom in a Book® (2015 release)
© 2016 Adobe Systems Incorporated and its licensors. All rights reserved.
If this guide is distributed with software that includes an end user license agreement, this guide, as well as the software described in it, is furnished under license and may be used or copied only in accordance with the terms of such license. Except as permitted by any such license, no part of this guide may be reproduced, stored in a retrieval system, or transmitted, in any form or by any means, electronic, mechanical, recording, or otherwise, without the prior written permission of Adobe Systems Incorporated. Please note that the content in this guide is protected under copyright law even if it is not distributed with software that includes an end user license agreement.
The content of this guide is furnished for informational use only, is subject to change without notice, and should not be construed as a commitment by Adobe Systems Incorporated. Adobe Systems Incorporated assumes no responsibility or liability for any errors or inaccuracies that may appear in the informational content contained in this guide.
Please remember that existing artwork or images that you may want to include in your project may be protected under copyright law. The unauthorized incorporation of such material into your new work could be a violation of the rights of the copyright owner. Please be sure to obtain any permission required from the copyright owner.
Any references to company names in sample files are for demonstration purposes only and are not intended to refer to any actual organization.
Adobe, the Adobe logo, Acrobat, Acrobat Reader, the Adobe PDF logo, Classroom in a Book, Illustrator, InDesign, Photoshop, and PostScript are either registered trademarks or trademarks of Adobe Systems Incorporated in the United States and/or other countries.
Apple, Mac OS, Macintosh, and Safari are trademarks of Apple, registered in the U.S. and other countries. Microsoft, Windows, and Internet Explorer are either registered trademarks or trademarks of Microsoft Corporation in the U.S. and/or other countries. All other trademarks are the property of their respective owners.
Adobe Systems Incorporated, 345 Park Avenue, San Jose, California 95110-2704, USA
Notice to U.S. Government End Users. The Software and Documentation are “Commercial Items,” as that term is defined at 48 C.F.R. §2.101, consisting of “Commercial Computer Software” and “Commercial Computer Software Documentation,” as such terms are used in 48 C.F.R. §12.212 or 48 C.F.R. §227.7202, as applicable. Consistent with 48 C.F.R. §12.212 or 48 C.F.R. §§227.7202-1 through 227.7202-4, as applicable, the Commercial Computer Software and Commercial Computer Software Documentation are being licensed to U.S. Government end users (a) only as Commercial Items and (b) with only those rights as are granted to all other end users pursuant to the terms and condi-tions herein. Unpublished-rights reserved under the copyright laws of the United States. Adobe Systems Incorporated, 345 Park Avenue, San Jose, CA 95110-2704, USA. For U.S. Government End Users, Adobe agrees to comply with all applicable equal opportunity laws including, if appropriate, the provisions of Executive Order 11246, as amended, Section 402 of the Vietnam Era Veterans Readjustment Assistance Act of 1974 (38 USC 4212), and Section 503 of the Rehabilitation Act of 1973, as amended, and the regulations at 41 CFR Parts 60-1 through 60-60, 60-250, and 60-741. The affirmative action clause and regulations contained in the preceding sentence shall be incorporated by reference.
Adobe Press books are published by Peachpit, a division of Pearson Education located in San Francisco, California. For the latest on Adobe Press books, go to www.adobepress.com. To report errors, please send a note to [email protected]. For information on getting permission for reprints and excerpts, contact [email protected].
Project Editor: Connie Jeung-Mills Production Editor: Tracey Croom Technical Reviewer: Cari Jansen Copyeditor: Kim Wimpsett Indexer: Jack Lewis Proofreader: Liz Welch Cover Designer: Eddie Yuen Interior Designer: Mimi Heft Photos in Lessons 2, 8, and 11 are used with permission from Eric Shropshire Photography
Printed and bound in the United States of America
ISBN-13: 978-0-134-31000-8 ISBN-10: 0-134-31000-4
9 8 7 6 5 4 3 2 1

iv ABOUT THE AUTHORS
About the AuthorsKelly Kordes Anton has written and edited dozens of books and training resources on InDesign, including Adobe InDesign How-Tos: 100 Essential Techniques and four previous editions of the Adobe InDesign Classroom in a Book. She also writes about such diverse topics as youth hockey, service dog training, and financial education. Kelly lives in Littleton, Colorado.
John Cruise has been writing about and using page layout software for more than two decades. He’s coauthored numerous books, including the InDesign Bible, Adobe InDesign How-Tos: 100 Essential Techniques, and several editions of the Adobe InDesign Classroom in a Book. He’s written articles for numerous publica-tions, including Macworld, MacAddict, MacLife, and Layers magazines. John is also a page layout and design instructor at Metropolitan State University of Denver.

ADOBE INDESIGN CC CLASSROOM IN A BOOK (2015 RELEASE) v
GETTING STARTED 1
About Classroom in a Book . . . . . . . . . . . . . . . . . . . . . . . . . . . . . . . . . . 1
Prerequisites . . . . . . . . . . . . . . . . . . . . . . . . . . . . . . . . . . . . . . . . . . . . . . . 2
Installing the software . . . . . . . . . . . . . . . . . . . . . . . . . . . . . . . . . . . . . . 2
Saving and restoring the InDesign Defaults file . . . . . . . . . . . . . . 4
Additional resources . . . . . . . . . . . . . . . . . . . . . . . . . . . . . . . . . . . . . . . . 5
Adobe Authorized Training Centers . . . . . . . . . . . . . . . . . . . . . . . . . . 5
Checking for updates . . . . . . . . . . . . . . . . . . . . . . . . . . . . . . . . . . . . . . . 5
1 INTRODUCING THE WORKSPACE 6
Getting started . . . . . . . . . . . . . . . . . . . . . . . . . . . . . . . . . . . . . . . . . . . . . 8
Looking at the workspace . . . . . . . . . . . . . . . . . . . . . . . . . . . . . . . . . . . 9
Working with panels . . . . . . . . . . . . . . . . . . . . . . . . . . . . . . . . . . . . . . . 18
Customizing the workspace . . . . . . . . . . . . . . . . . . . . . . . . . . . . . . . . 24
Changing the magnification of a document . . . . . . . . . . . . . . . . 25
Navigating through a document . . . . . . . . . . . . . . . . . . . . . . . . . . . 27
Using context menus . . . . . . . . . . . . . . . . . . . . . . . . . . . . . . . . . . . . . . 30
Using panel menus . . . . . . . . . . . . . . . . . . . . . . . . . . . . . . . . . . . . . . . . 30
Modifying Interface preferences . . . . . . . . . . . . . . . . . . . . . . . . . . . . 31
Exploring on your own . . . . . . . . . . . . . . . . . . . . . . . . . . . . . . . . . . . . . 32
2 GETTING TO KNOW INDESIGN 34
Getting started . . . . . . . . . . . . . . . . . . . . . . . . . . . . . . . . . . . . . . . . . . . . 36
Viewing guides . . . . . . . . . . . . . . . . . . . . . . . . . . . . . . . . . . . . . . . . . . . . 37
Preflighting as you work . . . . . . . . . . . . . . . . . . . . . . . . . . . . . . . . . . . 38
Adding text . . . . . . . . . . . . . . . . . . . . . . . . . . . . . . . . . . . . . . . . . . . . . . . . 39
Working with styles . . . . . . . . . . . . . . . . . . . . . . . . . . . . . . . . . . . . . . . . 42
Working with graphics . . . . . . . . . . . . . . . . . . . . . . . . . . . . . . . . . . . . . 46
Working with objects . . . . . . . . . . . . . . . . . . . . . . . . . . . . . . . . . . . . . . 49
Working with object styles . . . . . . . . . . . . . . . . . . . . . . . . . . . . . . . . . 51
Front
GardenButterflyThe
Amuse-Bouche Bakery & BistroRelax in our elegant dining room and enjoy handcrafted artisan breads, irresistable appetizers, seasonal entrées, and homemade desserts. Our chef’s inspired amuse-bouches tantalize your tastebuds and are the talk of the town.
Starters & Small PlatesTry baked garlic, home-made tater tots, hummus, mussels and more for appetizers. Share small plates such as portobello sliders, seared scallops and jumbo lump crab cakes.
Entrées & DessertsIndulge in our chef’s daily creations, such as pesto cavatappi or grilled organic chicken, and be sure to leave room for scrumptious croissant bread pudding or lemon mousse.
CONTENTS

vi CONTENTS
Viewing the document in Presentation mode . . . . . . . . . . . . . . . 52
Exploring on your own . . . . . . . . . . . . . . . . . . . . . . . . . . . . . . . . . . . . . 54
3 SETTING UP A DOCUMENT AND WORKING WITH PAGES 56
Getting started . . . . . . . . . . . . . . . . . . . . . . . . . . . . . . . . . . . . . . . . . . . . 58
Creating and saving custom document settings . . . . . . . . . . . . 59
Creating a new document . . . . . . . . . . . . . . . . . . . . . . . . . . . . . . . . . . 60
Switching between open InDesign documents . . . . . . . . . . . . . 62
Working with master pages . . . . . . . . . . . . . . . . . . . . . . . . . . . . . . . . 62
Applying master pages to document pages . . . . . . . . . . . . . . . . . 72
Adding new document pages . . . . . . . . . . . . . . . . . . . . . . . . . . . . . . 74
Rearranging and deleting document pages . . . . . . . . . . . . . . . . . 74
Changing the size of pages . . . . . . . . . . . . . . . . . . . . . . . . . . . . . . . . . 75
Adding sections to change page numbering . . . . . . . . . . . . . . . . 76
Overriding master page items on document pages and placing text and graphics . . . . . . . . . . . . . . . . . . . . . . . . . . . . . . . . . . 78
Viewing the completed spread . . . . . . . . . . . . . . . . . . . . . . . . . . . . . 80
Exploring on your own . . . . . . . . . . . . . . . . . . . . . . . . . . . . . . . . . . . . . 82
4 WORKING WITH OBJECTS 84
Getting started . . . . . . . . . . . . . . . . . . . . . . . . . . . . . . . . . . . . . . . . . . . . 86
Working with layers . . . . . . . . . . . . . . . . . . . . . . . . . . . . . . . . . . . . . . . . 87
Creating and modifying text frames . . . . . . . . . . . . . . . . . . . . . . . . 92
Creating and modifying graphics frames . . . . . . . . . . . . . . . . . . . 98
Adding metadata captions to graphics frames . . . . . . . . . . . . .106
Placing and linking graphics frames . . . . . . . . . . . . . . . . . . . . . . . 107
Changing the shape of a frame . . . . . . . . . . . . . . . . . . . . . . . . . . . .110
Wrapping text around a graphic . . . . . . . . . . . . . . . . . . . . . . . . . . . 112
Modifying the shape of frames . . . . . . . . . . . . . . . . . . . . . . . . . . . .114
Transforming and aligning objects . . . . . . . . . . . . . . . . . . . . . . . .118
Selecting and modifying grouped objects . . . . . . . . . . . . . . . . . 122
Creating a QR code . . . . . . . . . . . . . . . . . . . . . . . . . . . . . . . . . . . . . . .124
Finishing up . . . . . . . . . . . . . . . . . . . . . . . . . . . . . . . . . . . . . . . . . . . . . . 125
Exploring on your own . . . . . . . . . . . . . . . . . . . . . . . . . . . . . . . . . . . . 125
2 Flora & Fauna of the Coastal Carolinas Flora & Fauna of the Coastal Carolinas 3F&F
Monarch ButterfliesEgrets and Herons
Amazing migrationA s a result of what researchers assert is a “catastrophic drop” in the number of monarchs migrating from the northern part of the United States and Canada to Mexico, a number of conservation efforts are underway. Mexican authorities have redoubled efforts to stop illegal logging in the mountain area where the butterflies spend the winter. In August 2014, scientists from a number of or-ganizations filed a petition with the U.S. Fish and Wildlife Service requesting that monarchs be listed as “threatened.”Perhaps the most significant efforts are being made with respect to the monarchs’ most important food source and larval host—milkweed plants. The world’s struggle against weeds may be succeeding, but in winning that war, the battle to save the mon-arch is being lost. Milkweed loss means monarch loss. Experts today are studying ways to restore milkweed growth in the areas frequented by migrating butterflies. Even citizen scientists and backyard gardeners can help by planting milkweed, but caution is also required because not every variety of milkweed is appropri-ate for monarch purposes.
Preserving habitatOf the more than 400 species of birds found in the Carolinas, perhaps the most majestic are the colonial wading birds. Char-acterized by long legs, long necks and long, pointed bills, these charismatic and graceful denizens of shores, lagoons, and wet-lands search for food—fish, frogs, and small invertebrates, such as shrimp, crabs, and crayfish.Herons and egrets both belong to the Ardeidae family, however, there is no clear distinction between the two. In general, spe-cies that are white or have ornate plumage are called egrets. You can identify herons and egrets in flight because of their retract-ed necks, unlike their cousin the ibis, which flies with an out-stretched neck. In the late 1800s, Great Egrets were hunted nearly to extinction for their feathers. This led to the first laws protect-ing endangered birds.
4 eVolve Newsletter eVolve Newsletter 1
IN THIS ISSUE:Investing in Training. Whether you're a small startup or a Fortune 500 company, providing training for your employees is one of the best investments you can make. Page3.
CSS Master Class. This educational seminar for experienced web designers will teach you how to get the most out of cascading style sheets to create state-of-the art web pages. Page 3.
Adobe Creative Cloud Master ClassAdobe Creative Cloud is officially hitting the road! Beginning in Seattle and
moving on to Portland, the Midwest and several cities on the East Coast, this
seminar will teach you how to get the most out of Creative Cloud.
Creative Cloud gives you the world’s best creative tools, always up to date. And
now, all the apps and assets—including new Adobe Stock images—are always
right where you need them. And everything is seamlessly connected through
Adobe CreativeSync technology, so you can easily turn your brightest ideas into
your best work across your desktop and mobile devices.
Given the rapidly evolving digital publishing scene, this seminar is a must for
anyone who is considering electronic distribution of content. It will explain how
you can use Adobe software to create virtually any kind of digital publication—
for tablets, eReaders, and smartphones. Unleash your creative power and stay
ahead of the curve by becoming a Creative Cloud power user.
w w w.evolveseattle.comT 555.555.5555F 555.555.5555
Have any ideas for us? We welcome your suggestions on new classes, seminars, and trends.
Send an email with the subject “My Recommendations” to [email protected]
the
Shauneen H. Senior AdministratorFaccummy nibh enibh ex et adig-na consed tat, commy nim ver il el dolortio conulputatum vendre modipsuscing etum vel ipit delit luptatu. Exercil iquipit iliquis.
Molly Y. In-house CounselAzzriure dolobore duisit lummy nos nulput iriusci llametuero do consequipit. Exercil iquipit iliquis adit utpatem zzriusto duisis at nibh el inci ex endiatem.
Sylvia B.Senior PhotographerFaccummy nibh enibh ex et adig-na consed tat, commy nim ver il el dolortio conulputatum vendre modipsuscing etum vel ipit delit luptatu. Exercil iquipit iliquis adit .
John C. Creative DirectorExercil iquipit iliquis adit utpatem zzriusto duisis at nibh el inci ex endiatem. Azzriure dolobore duisit lummy
Jeff G.SalesFaccummy nibh enibh ex et adig-na consed tat, commy nim ver il el dolortio conulputatum vendre modipsuscing etum vel ipit delit luptatu. Exercil iquipit iliquis adit utpatem zzriusto duisis at nibh el inci ex endiatem zzriure dolobore duisit lummy.
Hannah B. Creative DirectorExercil iquipit iliquis adit utpatem zzriusto duisis at nibh el inci ex endiatem. Azzriure dolobore duisit lummy
NEW Day & Evening Classes
» We’re forever eVolve-ing, and this year is no exception. At the start of the new year, we rolled out a whopping SEVEN new classes!
» Advanced Dreamweaver CC Techniques
» Creating HTML E-mail (eve.)
» InDesign CC Advanced (eve.)
» Illustrator CC Advanced (eve.)
» Photoshop CC Advanced (Sat.)
» Intro to mobile apps (eve.)
» Collaborating with CreativeSync (day)
Seattle Acrobat User Group
» Brian Wood, eVolve’s Director of Training, continues as Chapter Leader of the Acrobat Users Group. The next meeting is on Wednesday, June 21 at Adobe University in Fremont. The meeting topic will be posted at eVolve’s website a week before the event. The event is free and refreshments will be served. First arrivals get seats.
arrive smart. leave smarter.™ www.evolveseattle.com
Return Address:159 Western Ave W Suite A457Seattle, WA 98119
SCAN for the latest information from Adobe.
Customer Testimonials
BUZZ
Yield
Photo by Emily MillsPhoto by KY Studio
Photo by Bob Hickok Photo by John Sanders Photo by Focus Photos
Photo by Robin Cruise

ADOBE INDESIGN CC CLASSROOM IN A BOOK (2015 RELEASE) vii
5 FLOWING TEXT 128
Getting started . . . . . . . . . . . . . . . . . . . . . . . . . . . . . . . . . . . . . . . . . . .130
Flowing text into an existing frame . . . . . . . . . . . . . . . . . . . . . . . 131
Flowing text manually . . . . . . . . . . . . . . . . . . . . . . . . . . . . . . . . . . . .134
Creating text frames while flowing text . . . . . . . . . . . . . . . . . . . .136
Creating threaded frames automatically . . . . . . . . . . . . . . . . . . .138
Flowing text automatically . . . . . . . . . . . . . . . . . . . . . . . . . . . . . . . .140
Applying paragraph styles to text . . . . . . . . . . . . . . . . . . . . . . . . . 142
Adjusting columns . . . . . . . . . . . . . . . . . . . . . . . . . . . . . . . . . . . . . . . .144
Adding a jump line page number . . . . . . . . . . . . . . . . . . . . . . . . .146
Exploring on your own . . . . . . . . . . . . . . . . . . . . . . . . . . . . . . . . . . . . 147
6 EDITING TEXT 150
Getting started . . . . . . . . . . . . . . . . . . . . . . . . . . . . . . . . . . . . . . . . . . . 152
Finding and changing a missing font . . . . . . . . . . . . . . . . . . . . . . 153
Entering and importing text . . . . . . . . . . . . . . . . . . . . . . . . . . . . . . 155
Finding and changing text and formatting . . . . . . . . . . . . . . . . . 157
Checking spelling . . . . . . . . . . . . . . . . . . . . . . . . . . . . . . . . . . . . . . . . .160
Editing text by dragging and dropping . . . . . . . . . . . . . . . . . . . .164
Using the Story Editor . . . . . . . . . . . . . . . . . . . . . . . . . . . . . . . . . . . . . 165
Tracking changes . . . . . . . . . . . . . . . . . . . . . . . . . . . . . . . . . . . . . . . . . 167
Exploring on your own . . . . . . . . . . . . . . . . . . . . . . . . . . . . . . . . . . . .168
7 WORKING WITH TYPOGRAPHY 170
Getting started . . . . . . . . . . . . . . . . . . . . . . . . . . . . . . . . . . . . . . . . . . . 172
Adjusting vertical spacing . . . . . . . . . . . . . . . . . . . . . . . . . . . . . . . . . 173
Working with fonts, type styles, and glyphs . . . . . . . . . . . . . . . . 177
Fine-tuning columns . . . . . . . . . . . . . . . . . . . . . . . . . . . . . . . . . . . . . . 183
Changing paragraph alignment . . . . . . . . . . . . . . . . . . . . . . . . . . . 185
Creating a drop cap . . . . . . . . . . . . . . . . . . . . . . . . . . . . . . . . . . . . . . . 187
Adjusting letter and word spacing . . . . . . . . . . . . . . . . . . . . . . . . .189
Adjusting line breaks . . . . . . . . . . . . . . . . . . . . . . . . . . . . . . . . . . . . . . 191
Setting tabs . . . . . . . . . . . . . . . . . . . . . . . . . . . . . . . . . . . . . . . . . . . . . .194
Adding a rule above a paragraph . . . . . . . . . . . . . . . . . . . . . . . . . .198
Working with paragraph shading . . . . . . . . . . . . . . . . . . . . . . . . . .200
Exploring on your own . . . . . . . . . . . . . . . . . . . . . . . . . . . . . . . . . . . . 203
Pi LOCAL >> NOV/DEC 2015 LOCAL >> NOV/DEC 2015 P1
Name: Alexis K.
Age: 35
Occupation: Executive Director, Urban Museum
Favorite Neighborhood: “I can’t answer this question publicly if I’m expected to keep my job.”
Favorite Meridien memory: “New Year’s Eve. The city was celebrating its bicentennial and everyone was out in the streets, happy, and talking about how much they loved where they lived.”
I thought that the light drizzle on this crisp fall day might be a deterrent.
When I asked Alexis, director of Meridien’s Urban Museum,
to give me her personal tour of the city she’s resided in since her teenage years, she accepted, but only if we did it by bicycle.
I’m not a fitness freak and Meridien is known for its formidable hills, so when 6 a.m. rolled around, when I noted damp streets outside my apart-ment window and my cell phone
started buzzing, I was hoping it was Alexis calling to tell me that we were switching to Plan B.
“Sorry, Charlie. We’re not going to let a little misty air ruin our fun. Anyway, the forecast says it will clear up by late morning.”
So much for Plan B.We met at the Smith Street subway
station, a mid-century, mildly brutal-ist concrete cube designed by archi-
Bikes continued on 2
{local stats}
P48/ 2 WHEELS GOOD Alexes K., director of Meridien’s Urban Museum, takes us on a personal tour. Sometimes the best way to see the city is by bicycle. By Franklin M.
P60/ BIN THERE, DONE THAT The way we generate and dispose of refuse is not sustainable in the long run. That’s why Meridien’s Waste Disposal guru, Glen W., is developing new ways to get residents off their trashy ways. By Ella G.
P68/ FARM IN THE BACKYARD More and more Meridien residents are forgoing the flower garden and swing set for tomato plants and chicken coops. Local contributing editor Martin H. talks to some of these modern-day Old McDonalds.
P12/ LETTERS
P18/ THE LOCAL LIST
From art restorers to restaurants, your monthly mix of better urban living.
P22/ PRODUCT PROTECTION
The latest do-no-harm wares that Local editors have been using, abusing, and keeping around the office.
P30/ 3X3 Our three monthly prob-lems for another three of our favorite creative types: what to do with Meridien’s empty South Square.
P76/ BY THE NUMBERS
How does Meridien stack up to other favorite cities?
dept.
JUNE/JULY 2015>>DESTINATION>>MERIDIENLAT:47°36’0” LONG:14°31’0”
“Beauty and culture are vital to any city’s appeal, but they become pretty irrelevant if the air is so polluted you can’t go outside.”
—Nathan, Yours Partner
LOCAL >> JUNE/JULY 2015 P3
2 D I N E & D A S H D E C E M B E R 2015 D E C E M B E R 2015 D I N E & D A S H 3
RestaurantProfile
Sure, you can get Caesar salad prepared tableside for two at any of the higher-
end restaurants in town—for $25 plus another $40 (just for starters) for a single
slab of steak. Or, you can visit Assignments Restaurant, run by students of the
International Culinary School at The Art Institute of Colorado, where tableside prepara-
tions include Caesar salad for $4.50 and steak Diane for $19. No, this isn’t Elway’s, but
the chefs in training create a charming experience for patrons from start to finish.
Since 1992, the School of Culinary Arts has trained more than 4,300 chefs—all
of whom were required to work in the restaurant. Those chefs are now working in
the industry all over the country, says Chef Instructor Stephen Kleinman, CEC, AAC.
“Whether I go to a restaurant in Manhattan or San Francisco, people know me,”
Kleinman says, describing encounters with former students. Although he claims
to be a “hippie from the ’60s,” Kleinman apprenticed in Europe, attended a culinary
academy in San Francisco and had the opportunity to cook at the prestigious James
Beard House three times. He admits that his experience lends him credibility, but
it’s his warm, easygoing, approachable style that leads to his success as a teacher.
“Some of the best restaurants
in the world serve tableside; chefs
are more grounded this way,” claims
Kleinman, who would never be
mistaken for a snob. “By having
the students come to the front of
the house—serving as waitpeople
and preparing dishes tableside—
we break a lot of barriers.”
THE RESTAURANTAssignments Restaurant, tucked back by the Quest Diagnostics lab off South Broadway
near Alameda Avenue, seats 71 at its handful of booths and tables. The blissful quiet,
a welcome change from the typical hot spot, is interrupted only by solicitous servers
dressed in chef attire. Despite decor
that is on the edge of institutional with
its cream-colored walls, faux cherry
furniture and kitschy cafe artwork,
this is a spot that welcomes intimate
conversation with friends and family.
A perusal of the menu, while
munching fresh bread and savoring
a glass of wine, tempts you with its
carefully planned variety. “The menu is
all designed to teach cooking meth-
ods,” says Kleinman. “It covers 80 to 85
percent of what students have been
learning in class—saute, grill, braise,
make vinaigrettes, cook vegetables,
bake and make desserts.” In a twist on
“You have to know the rules to break
them,” Kleinman insists that students
need to first learn the basics before they
can go on to create their own dishes.
For our “test dinner,” an amuse
bouche, a crab-stuffed mushroom
cap, arrives followed by an appetizer
of chorizo-stuffed prawns wrapped in
applewood-smoked bacon. The table-
side Caesar preparation is a wonderful
ritual that tastes as good as it looks.
Entrees, all under $20, include grilled
trout, sweet and sour spareribs, spinach
lasagna, seared duck breast, flatiron
steak, steak Diane prepared tableside
and pesto-crusted lamb
chops. We opted for a
succulent trout and ten-
der spareribs, and notice
that a $10 macaroni and
cheese entree makes
Assignments kid-friendly
for special occasions.
THE GOALSThe purpose of this
unique restaurant is to
give students practical experience so
they can hit the ground running. “The
goal is to make the students comfort-
able, thinking on their feet, getting
ready for reality,” says Kleinman. He
wants students to be able to read tickets,
perform, and recover and
learn getting valuable
front-of-the-house and
business experience in
addition to cooking.
Five to seven students
work in the Assignments
kitchen at one time.
Students at the School
of Culinary Arts work
toward an associate of
applied science degree
in culinary arts or a bachelor of arts
degree in culinary management.
With degree in hand, the school
places 99 percent of its students. While
many students are placed at country
clubs and resorts that prefer formal train-
ing, chefs from all over town—Panzano,
Jax Fish House, Julia’s, St. Mark’s—have
trained at Assignments as well. Or try O’s
Restaurant, whose recent media darling
chef Ian Kleinman is not just a former
student but Stephen Kleinman’s son.
Make a reservation and maybe the next
celebrity chef to hit town will whip up a
tableside bananas Foster for you. j
Julia Pépin is a writer, editor and hockey mom who wishes that her assignments
involved lighting bananas on fire. For now, she celebrates any evening that doesn’t involve a hockey game and a sports bar.
DIN
ING
Assignments Restaurant
IF YOU GOName . . . . . . . . . . Assignments Restaurant
Address . . . . . . . . 675 S. Broadway, Denver
Reservations . . . call 303-778-6625 or visit
www.opentable.com
Hours . . . . . . . . . . Wednesday–Friday, 11:30
a.m.–1:30 p.m. and 6–8 p.m.
TRY IT @ HOMECAESAR SALAD2 cloves garlicTaste kosher salt2 anchovy fillets, chopped1 coddled egg½ lemon½ Tbsp Dijon mustard¼ cup red wine vinegar¾ cup virgin olive oil¼ tsp Worcestershire Romaine lettuce heart, washed and dried¼ cup croutons¼ cup Parmesan cheeseTaste cracked black pepper
Grind together the garlic and salt. Add the chopped
anchovies. Stir in the egg and lemon. Add the vinegar, olive oil and Worcestershire sauce, and whip briefly. Pour over lettuce and toss with croutons, Parmesan and black pepper.
CHORIZO-STUFFED PRAWNS 3 prawns, butterflied3 Tbsp chorizo sausage3 slices bacon, blanched1 bunch parsley, fried2 oz morita mayonnaise (recipe follows)½ oz olive oil
Heat oven to 350°. Stuff the butterflied prawns with chorizo. Wrap a piece of the blanched bacon around each prawn and place in the oven. Cook until the chorizo is done. Place the fried parsley on a plate and place the prawns on top. Drizzle with the morita mayonnaise.
MORITA MAYONNAISE1 pint mayonnaise1 tsp morita powder1 Tbsp lemon juiceSalt and pepper to taste
Mix ingredients and serve.
“Maybe the next
celebrity chef to hit
town will whip up
a tableside bananas
Foster for you.”

viii CONTENTS
8 WORKING WITH COLOR 206
Getting started . . . . . . . . . . . . . . . . . . . . . . . . . . . . . . . . . . . . . . . . . . .208
Managing color . . . . . . . . . . . . . . . . . . . . . . . . . . . . . . . . . . . . . . . . . . .209
Defining printing requirements . . . . . . . . . . . . . . . . . . . . . . . . . . . 213
Creating colors . . . . . . . . . . . . . . . . . . . . . . . . . . . . . . . . . . . . . . . . . . .216
Applying colors . . . . . . . . . . . . . . . . . . . . . . . . . . . . . . . . . . . . . . . . . . .224
Working with tint swatches . . . . . . . . . . . . . . . . . . . . . . . . . . . . . . . 231
Working with gradients . . . . . . . . . . . . . . . . . . . . . . . . . . . . . . . . . . . 232
Working with color groups . . . . . . . . . . . . . . . . . . . . . . . . . . . . . . . .236
Exploring on your own . . . . . . . . . . . . . . . . . . . . . . . . . . . . . . . . . . . .238
9 WORKING WITH STYLES 240
Getting started . . . . . . . . . . . . . . . . . . . . . . . . . . . . . . . . . . . . . . . . . . . 242
Creating and applying paragraph styles . . . . . . . . . . . . . . . . . . .244
Creating and applying character styles . . . . . . . . . . . . . . . . . . . . 247
Nesting character styles inside paragraph styles . . . . . . . . . . .250
Creating and applying object styles . . . . . . . . . . . . . . . . . . . . . . . 255
Creating and applying table and cell styles . . . . . . . . . . . . . . . .260
Globally updating styles . . . . . . . . . . . . . . . . . . . . . . . . . . . . . . . . . .266
Loading styles from another document . . . . . . . . . . . . . . . . . . . .268
Exploring on your own . . . . . . . . . . . . . . . . . . . . . . . . . . . . . . . . . . . .270
10 IMPORTING AND MODIFYING GRAPHICS 272
Getting started . . . . . . . . . . . . . . . . . . . . . . . . . . . . . . . . . . . . . . . . . . .274
Adding graphics from other programs . . . . . . . . . . . . . . . . . . . . . 275
Comparing vector and bitmap graphics . . . . . . . . . . . . . . . . . . . 275
Managing links to imported files . . . . . . . . . . . . . . . . . . . . . . . . . .276
Updating revised graphics . . . . . . . . . . . . . . . . . . . . . . . . . . . . . . . .278
Adjusting display quality . . . . . . . . . . . . . . . . . . . . . . . . . . . . . . . . . .280
Working with clipping paths . . . . . . . . . . . . . . . . . . . . . . . . . . . . . . 281
Working with alpha channels . . . . . . . . . . . . . . . . . . . . . . . . . . . . .284
Importing native Adobe graphic files . . . . . . . . . . . . . . . . . . . . . .288
Using an InDesign library to manage objects . . . . . . . . . . . . . . 295
Using Adobe Bridge to import graphics . . . . . . . . . . . . . . . . . . .299
Exploring on your own . . . . . . . . . . . . . . . . . . . . . . . . . . . . . . . . . . . . 302
Experience the Evolution of mosaic as an art form.
“…beautiful mosaics are made of broken pieces.” —Lori Jenessa Nelson
First Fridays, summer and fall, downtown arts district.
ART
2
Premium Loose Leaf Teas, Teapots & Gift CollectionsExpedition Tea Company™ carries an extensive array of teas from all the major tea growing regions and tea estates. Choose from our selection of teas, gift collections, teapots, or learn how to make your tea drinking
experience more enjoyable from our STI Certified Tea Specialist, T. Elizabeth Atteberry.
Loose Leaf Teas
We carry a wide selection of premium loose leaf
teas including black, green, oolong, white, rooibos and chai. Many of these are
from Ethical Tea Partnership monitored estates, ensuring
that the tea is produced in socially responsible ways.
ricky records
1 • Pathways
2 • Early Frost
3 • Whispers of Rain
4 • These Hands I Hold
5 • Night Vision
6 • Orchard of Kings
7 • Bread
8 • Mist & Light
9 • Endless and Then
10 • Corners
11 • I am, the Stepping Stone
12 • Just Knowing My Own1325 Hol lywood Blvd.Hol lywood, CA 90211
rickyrecords .com
addie mose

ADOBE INDESIGN CC CLASSROOM IN A BOOK (2015 RELEASE) ix
11 CREATING TABLES 304
Getting started . . . . . . . . . . . . . . . . . . . . . . . . . . . . . . . . . . . . . . . . . . .306
Creating a table . . . . . . . . . . . . . . . . . . . . . . . . . . . . . . . . . . . . . . . . . . . 307
Converting text to a table . . . . . . . . . . . . . . . . . . . . . . . . . . . . . . . . . 307
Changing rows and columns . . . . . . . . . . . . . . . . . . . . . . . . . . . . . .310
Formatting a table . . . . . . . . . . . . . . . . . . . . . . . . . . . . . . . . . . . . . . . . 315
Adding graphics to table cells . . . . . . . . . . . . . . . . . . . . . . . . . . . . .318
Creating a header row . . . . . . . . . . . . . . . . . . . . . . . . . . . . . . . . . . . . 322
Creating and applying table and cell styles . . . . . . . . . . . . . . . . 323
Exploring on your own . . . . . . . . . . . . . . . . . . . . . . . . . . . . . . . . . . . .326
12 WORKING WITH TRANSPARENCY 328
Getting started . . . . . . . . . . . . . . . . . . . . . . . . . . . . . . . . . . . . . . . . . . .330
Importing and colorizing a grayscale image . . . . . . . . . . . . . . . 331
Applying transparency settings . . . . . . . . . . . . . . . . . . . . . . . . . . . 333
Adding transparency effects to imported vector and bitmap graphics . . . . . . . . . . . . . . . . . . . . . . . . . . . . . . . . . . . . . . 337
Importing and adjusting Illustrator files that use transparency . . . . . . . . . . . . . . . . . . . . . . . . . . . . . . . . . . . . .340
Applying transparency settings to text . . . . . . . . . . . . . . . . . . . . 341
Working with effects . . . . . . . . . . . . . . . . . . . . . . . . . . . . . . . . . . . . . . 342
Exploring on your own . . . . . . . . . . . . . . . . . . . . . . . . . . . . . . . . . . . . 351
13 PRINTING AND EXPORTING 354
Getting started . . . . . . . . . . . . . . . . . . . . . . . . . . . . . . . . . . . . . . . . . . .356
Preflighting files . . . . . . . . . . . . . . . . . . . . . . . . . . . . . . . . . . . . . . . . . . 357
Packaging files . . . . . . . . . . . . . . . . . . . . . . . . . . . . . . . . . . . . . . . . . . .360
Creating an Adobe PDF proof . . . . . . . . . . . . . . . . . . . . . . . . . . . . . 361
Previewing separations . . . . . . . . . . . . . . . . . . . . . . . . . . . . . . . . . . .364
Previewing how transparency effects will be flattened . . . . . 365
Previewing the page . . . . . . . . . . . . . . . . . . . . . . . . . . . . . . . . . . . . . . 367
Printing a laser or inkjet proof . . . . . . . . . . . . . . . . . . . . . . . . . . . . . 367
Using the Ink Manager . . . . . . . . . . . . . . . . . . . . . . . . . . . . . . . . . . . . 372
Exploring on your own . . . . . . . . . . . . . . . . . . . . . . . . . . . . . . . . . . . .374
G R E E N TO W NC o m m u n i t yC O L L E G E Summer Schedule
Indicates off-site course. 1
ENRICHMENT COURSES
Department No. Course Name Credits
Art 102 Street Photography 3
Art 205 Fundraising for the Arts 2
Baking 101 Pies and Cakes 2
English 112 Creative Writing 3
Fashion 101 Design and Sewing 2
Math 125 Math for Liberal Arts 3
Recreation 101 Planning Summer Camp 3
I T H I N K , T H E R E F O R E I D I N E .
bistro
Boston | Chicago | Denver | Houston | Minneapolis
Flora&FaunaSPECIAL ISSUEFall 2015
Preservation effortsare helping to restore
threatened species

x CONTENTS
14 CREATING ADOBE PDF FILES WITH FORM FIELDS 376
Getting started . . . . . . . . . . . . . . . . . . . . . . . . . . . . . . . . . . . . . . . . . . .378
Adding form fields . . . . . . . . . . . . . . . . . . . . . . . . . . . . . . . . . . . . . . . .379
Exporting an interactive Adobe PDF file . . . . . . . . . . . . . . . . . . . 385
Exploring on your own . . . . . . . . . . . . . . . . . . . . . . . . . . . . . . . . . . . .386
15 CREATING A FIXED-LAYOUT EPUB 388
Getting started . . . . . . . . . . . . . . . . . . . . . . . . . . . . . . . . . . . . . . . . . . .390
Creating a new document for fixed-layout export . . . . . . . . . . 391
Adding animation . . . . . . . . . . . . . . . . . . . . . . . . . . . . . . . . . . . . . . . . 392
Adjusting the timing of animations . . . . . . . . . . . . . . . . . . . . . . .396
Adding multimedia and interactive elements . . . . . . . . . . . . . . 397
Exporting an EPUB file . . . . . . . . . . . . . . . . . . . . . . . . . . . . . . . . . . . . 403
Exploring on your own . . . . . . . . . . . . . . . . . . . . . . . . . . . . . . . . . . . . 405
INDEX 410
16 CREATING A REFLOWABLE EPUB A2
Getting started . . . . . . . . . . . . . . . . . . . . . . . . . . . . . . . . . . . . . . . . . . . .A4
Completing the booklet . . . . . . . . . . . . . . . . . . . . . . . . . . . . . . . . . . . . A5
Choosing the content of an ebook . . . . . . . . . . . . . . . . . . . . . . . . .A9
Adding metadata . . . . . . . . . . . . . . . . . . . . . . . . . . . . . . . . . . . . . . . . .A12
Exporting an EPUB file . . . . . . . . . . . . . . . . . . . . . . . . . . . . . . . . . . . .A12
Exploring on your own . . . . . . . . . . . . . . . . . . . . . . . . . . . . . . . . . . . .A15
INDESIGN CC 2015: PUBLISH ONLINE (PREVIEW) B2
Become part of the solution
Interested in volunteering?If you share our concern with preserving and restoring the flora and fauna of the region, we offer many opportunities throughout the year. Please fill out the form below to let us know how you’d like to help.
City:
E-mail Address:
State: ZIP:
First Name: Last Name:
Address:
Click to submit your information
In what way are you best able to help?
Financial donation
Volunteer time
Volunteer professional services
Please send me your newsletter in the following format:
Yes, I would like to receive your quarterly newsletter.
Submit
Semimonthly DIY Swap MeetEven though it occurs on a semi-regular basis, the DIY fair could pop up on any given weekend, any-where in Meridien.
Meridien’s Outdoor Film SeriesBring a blanket, grab some cheap eats, and join us on the closest green for our year-round Outdoor Film Series. (Weather permitting!)
Meridien Bicycle Commuter FestivalFrom its humble beginnings in the back of a biker bar, Meridien Bicycle Commuter Festival has now grown
into a yearly tradition showcasing independent films for and about bike culture. As it is never in the same place twice, be sure to check out the website for this year’s location and schedule.
ENJOYPlease enjoy our city. This is a sincere invita-tion we hope you will accept while you’re in town. Allow a few of these homegrown events to enrich your stay. Learn something new. Rub shoulders with the locals. But mostly, have fun. Maybe it will inspire you to tell others about what you’ve discovered — and to come back.
One Truly Amazing Meal
1
A FOUR-COURSE DINNER FIT FOR ROYALTYBY PAT SMITH
A C U L I N A R Y B E S T S E L L E R▶ ▶

ADOBE INDESIGN CC CLASSROOM IN A BOOK (2015 RELEASE) 1
Welcome to Adobe® InDesign® CC (2015 Release), a powerful page-design and production application that offers precision, control, and seamless integration with other Adobe professional graphics software. Using InDesign, you can produce professional-quality, full-color documents and print them using a variety of output devices, including desktop printers, high-resolution imaging devices, and high-volume color printing presses. You can also design publications for a broad range of electronic devices, such as tablets, smart phones, and e-readers, and export InDesign document in several formats, including PDF, HTML, and EPUB.
Writers, artists, designers, and publishers can communicate to a broader audience than ever before and through an unprecedented variety of media. InDesign supports this with its seamless integration with other Creative Cloud components.
About Classroom in a BookAdobe InDesign CC Classroom in a Book® is part of the official training series for Adobe graphics and publishing software with the support of Adobe product experts. The lessons are designed so that you can learn at your own pace. If you’re new to Adobe InDesign, you’ll master the fundamentals and learn to put the software to work for you. If you’ve already been using Adobe InDesign, you’ll find that this book teaches many advanced features, including tips and techniques for using the latest version of InDesign.
Each lesson provides step-by-step instructions for creating a specific project. You can follow the book from start to finish or do only the lessons that meet your interests and needs. Each lesson concludes with several optional tasks that let you further explore the features covered in the lesson, as well as a set of review questions and answers.
GETTING STARTED

2 GETTING STARTED
PrerequisitesBefore beginning to use Adobe InDesign CC Classroom in a Book, you should have a working knowledge of your computer and its operating system. Make sure that you know how to use the mouse and standard menus and commands and also how to open, save, and close files. If you need to review these techniques, see the printed or online documentation included with your operating system.
Installing the softwareBefore you begin using Adobe InDesign CC Classroom in a Book, make sure that your system is set up correctly and that you’ve installed the proper software and hardware.
The Adobe InDesign CC software is not included with this book; you must purchase the software separately. In addition to Adobe InDesign CC, some lessons in this book have steps that can be performed with Adobe Bridge and other Adobe applications. You must install these applications from Adobe Creative Cloud onto your computer. Follow the onscreen instructions.
Adobe Creative Cloud desktop appIn addition to Adobe InDesign CC, this training also requires the Adobe Creative Cloud desktop application, which provides a central location for managing the doz-ens of apps and services that are included in a Creative Cloud membership. You can use the Creative Cloud desktop application to sync and share files, manage fonts, access libraries of stock photography and design assets, and showcase and discover creative work in the design community.
The Creative Cloud desktop application is installed automatically when you down-load your first Creative Cloud product. If you have Adobe Application Manager installed, it auto-updates to the Creative Cloud desktop application.
If the Creative Cloud desktop application is not installed on your computer, you can download it from the Download Creative Cloud page on the Adobe website (creative.adobe.com/products/creative-cloud) or the Adobe Creative Cloud desktop apps page (adobe.com/creativecloud/catalog/desktop.html).
Classroom in a Book fontsSome of the fonts used in the Classroom in a Book lesson files are installed with Adobe InDesign. Some fonts are not installed with InDesign but are instead avail-able through Typekit, a font-subscription service from Adobe that offers access to a vast library of fonts for use in desktop applications and on websites. The Typekit service is integrated with InDesign's font selection features and the Creative Cloud Desktop application.
�Note: When instructions differ by platform, Windows commands appear first, and then the Mac OS commands, with the platform noted in parentheses . For example, “press the Alt (Windows) or Option (Mac OS) key and click away from the artwork .”

ADOBE INDESIGN CC CLASSROOM IN A BOOK (2015 RELEASE) 3
By default, font syncing with Typekit is turned on for Creative Cloud applications, so when you open a lesson file that uses Typekit fonts that aren’t installed on your computer, a Missing Fonts dialog box displays and offers the option to Sync Fonts. If Typekit font syncing is disabled, a Turn Typekit On button is displayed in the Missing Fonts dialog box. For more information about Typekit, go to the Typekit home page at typekit.com/help. For information from the Creative Cloud Help file about adding fonts from Typekit, go to helpx.adobe.com/creative-cloud/help/ add-fonts-typekit.html.
Accessing the Classroom in a Book files
To work through the projects in this book, you will need to download the lesson files from peachpit.com. You can download the files for individual lessons or down-load them all in a single file.
If you purchased an eBook from peachpit.com or adobepress.com, the files will automatically appear on your Account page, under the Lesson & Update Files tab.
If you purchased an eBook from a different vendor or a print book, use the unique code in this book to gain access to the lesson files.
1 Go to www.peachpit.com/redeem and enter the code found at the back of your book.
2 Click Redeem Code and sign in or create an account.
3 The downloadable files will be listed under the Lesson & Update Files tab on your Account page. Just log in to access your files anytime as many times as you need; the code needs to be redeemed only once.
4 Click the lesson file links to download them to your computer.
Web Edition
This book comes with a free Web Edition that provides many benefits. Your Web Edition can be accessed from any device with a connection to the Internet and it contains:
• The complete text of the book
• Hours of instructional video keyed to the text
• Interactive quizzes
In addition, the Web Edition will be updated when Adobe adds significant feature updates between major Creative Cloud releases. To accommodate the changes, sec-tions of the online book will be updated or new sections will be added.
Accessing the Free Web Edition
Your purchase of this Classroom in a Book in any format includes access to the cor-responding Web Edition. The Web Edition contains the complete text of the book augmented with hours of video and interactive quizzes.
�Note: Registering to access the Web Edition does not automatically provide access to your lesson files, and vice versa . You must follow the instructions for each to claim the full benefits of your purchase .

4 GETTING STARTED
If you purchased your book through any other channel, it must be registered:
1 Go to www.peachpit.com/register.
2 Sign in or create a new account.
3 Enter ISBN: 9780134310008.
4 Answer the questions as proof of purchase.
5 The Web Edition will appear under the Digital Purchases tab on your Account page. Click the Launch link to access the product.
Saving and restoring the InDesign Defaults fileThe InDesign Defaults file stores program preferences and default settings, such as tool settings and the default unit of measurement. To ensure that the preferences and default settings of your Adobe InDesign program match those used in this book, you should move the current InDesign Defaults file to a different location before you begin working on the lessons. When you have finished the book, you can return the saved InDesign Defaults file to its original folder, which restores the preferences and default settings used before you started working on the lessons.
To delete or save the current InDesign Defaults file, follow these steps:
1 Quit Adobe InDesign.
2 Locate the InDesign Defaults file.
• In Windows 7 [Service Pack 1] and Windows 8, the InDesign Defaults file is located in the folder [startup drive]\Users\[username]\AppData\Roaming\Adobe\InDesign\Version 11.0\en_US*\InDesign Defaults.
• In Mac OS, the InDesign Defaults file is located in the folder [startup drive]/Users/[username]/Library/Preferences/Adobe InDesign/Version 11.0/ en_US*/InDesign Defaults. (The folder name may be different depending on the language version you have installed.)
When you launch Adobe InDesign after moving the InDesign Defaults file to another folder, a new InDesign Defaults file is automatically created, and all prefer-ences and defaults are reset to their original factory settings.
If you can’t find the file, either you haven’t started Adobe InDesign CC yet or you have moved the preferences file. The preferences file is created after you quit the program the first time and is updated thereafter.
3 Copy the file and save it to another folder on your hard disk (if you want to restore those preferences) or delete it.
4 Start Adobe InDesign CC.
�Note: Each time you begin working on a new lesson, some panels may remain open even if you restore your InDesign Defaults file . If this occurs, you can close the panels manually if you want .
�Note: On Windows 7 and Windows 8, the AppData folder is hidden by default . To display it, click Appearance And Personalization in the Control Panel, and then click Folder Options . Click the View tab in the Folder Options dialog box, select Show Hidden Files, Folders, And Drives, and then click OK .
�Note: In Mac OS 10 .9 and later, the Library folder is hidden . To access this folder, choose Go > Go To Folder from the Finder menu . Type ~/Library in the Go To The Folder box, and then click OK .
� Note: If hidden files are visible and you still cannot locate the preferences file, use your operating system’s Find File feature and search for “InDesign Defaults .”

ADOBE INDESIGN CC CLASSROOM IN A BOOK (2015 RELEASE) 5
To restore the saved InDesign Defaults file after completing the lessons, follow these steps:1 Quit Adobe InDesign.
2 Locate your saved InDesign Defaults file, drag it back into its original folder, and replace the current InDesign Defaults file.
Additional resourcesAdobe InDesign CC Classroom in a Book is not meant to replace documentation that comes with the program or to be a comprehensive reference for every feature. Only the commands and options used in the lessons are explained in this book. For comprehen-sive information about program features and tutorials, refer to these resources:
Adobe InDesign Learn & Support: helpx.adobe.com/indesign.html is where you can find and browse Help and Support content on Adobe.com. Adobe InDesign Help and Adobe InDesign Support Center are accessible from the Help menu in InDesign.
Adobe Forums: forums.adobe.com lets you tap into peer-to-peer discussions, questions, and answers on Adobe products.
Adobe InDesign CC product home page: adobe.com/products/indesign provides information about new features and intuitive ways to create professional layouts for print, tablets, and eBooks.
Adobe Add-ons: creative.adobe.com/addons is a central resource for finding tools, services, extensions, code samples, and more to supplement and extend your Adobe products.
Resources for educators: adobe.com/education and edex.adobe.com offer a trea-sure trove of information for instructors who teach classes on Adobe software. Find solutions for education at all levels, including free curricula that use an integrated approach to teaching Adobe software and can be used to prepare for the Adobe Certified Associate exams.
Adobe Authorized Training CentersAdobe Authorized Training Centers offer instructor-led courses and training on Adobe products, employing only Adobe Certified Instructors. A directory of AATCs is available at training.adobe.com/trainingpartners.
Checking for updates Adobe periodically provides updates to software. You can easily obtain these updates through the Creative Cloud.
E Tip: To quickly locate the InDesign Defaults file so that you can move or delete it before you begin a new lesson, create a shortcut (Windows) or an alias (Mac OS) to the folder in which the InDesign Defaults file is stored.
Untitled-1 5 7/30/15 9:19 AM

84
WORKING WITH OBJECTS
Lesson OverviewIn this lesson, you’ll learn how to do the following:
• Work with layers.• Create and edit text frames and graphics frames.• Import graphics into graphics frames.• Import multiple graphics into a grid of frames.• Crop, move, and scale graphics.• Adjust the space between frames.• Add captions to graphics frames.• Place and link graphics frames. • Change the shape of frames. • Wrap text around an object.• Create complex frame shapes.• Convert frame shapes to other shapes.• Modify and align objects.• Select and modify multiple objects.• Create a QR code.
This lesson will take approximately 90 minutes.
Download the project files for this lesson from the Lesson & Update Files tab on your Account page at www.peachpit.com and store them on your computer in a convenient location, as described in the “Getting Started” section at the beginning of this book.
Your Account page is also where you’ll find any updates to the chapters or to the lesson files. Look on the Lesson & Update Files tab to access the most current content.
4

85
InDesign frames can contain text, graphics, or color. As you work with frames, you’ll discover that Adobe InDesign provides you with a great amount of flexibility and control over your design.
4 eVolve Newsletter eVolve Newsletter 1
IN THIS ISSUE:Investing in Training. Whether you're a small startup or a Fortune 500 company, providing training for your employees is one of the best investments you can make. Page3.
CSS Master Class. This educational seminar for experienced web designers will teach you how to get the most out of cascading style sheets to create state-of-the art web pages. Page 3.
Adobe Creative Cloud Master ClassAdobe Creative Cloud is officially hitting the road! Beginning in Seattle and
moving on to Portland, the Midwest and several cities on the East Coast, this
seminar will teach you how to get the most out of Creative Cloud.
Creative Cloud gives you the world’s best creative tools, always up to date. And
now, all the apps and assets—including new Adobe Stock images—are always
right where you need them. And everything is seamlessly connected through
Adobe CreativeSync technology, so you can easily turn your brightest ideas into
your best work across your desktop and mobile devices.
Given the rapidly evolving digital publishing scene, this seminar is a must for
anyone who is considering electronic distribution of content. It will explain how
you can use Adobe software to create virtually any kind of digital publication—
for tablets, eReaders, and smartphones. Unleash your creative power and stay
ahead of the curve by becoming a Creative Cloud power user.
w w w.evolveseattle.comT 555.555.5555F 555.555.5555
Have any ideas for us? We welcome your suggestions on new classes, seminars, and trends.
Send an email with the subject “My Recommendations” to [email protected]
the
Shauneen H. Senior AdministratorFaccummy nibh enibh ex et adig-na consed tat, commy nim ver il el dolortio conulputatum vendre modipsuscing etum vel ipit delit luptatu. Exercil iquipit iliquis.
Molly Y. In-house CounselAzzriure dolobore duisit lummy nos nulput iriusci llametuero do consequipit. Exercil iquipit iliquis adit utpatem zzriusto duisis at nibh el inci ex endiatem.
Sylvia B.Senior PhotographerFaccummy nibh enibh ex et adig-na consed tat, commy nim ver il el dolortio conulputatum vendre modipsuscing etum vel ipit delit luptatu. Exercil iquipit iliquis adit .
John C. Creative DirectorExercil iquipit iliquis adit utpatem zzriusto duisis at nibh el inci ex endiatem. Azzriure dolobore duisit lummy
Jeff G.SalesFaccummy nibh enibh ex et adig-na consed tat, commy nim ver il el dolortio conulputatum vendre modipsuscing etum vel ipit delit luptatu. Exercil iquipit iliquis adit utpatem zzriusto duisis at nibh el inci ex endiatem zzriure dolobore duisit lummy.
Hannah B. Creative DirectorExercil iquipit iliquis adit utpatem zzriusto duisis at nibh el inci ex endiatem. Azzriure dolobore duisit lummy
NEW Day & Evening Classes
» We’re forever eVolve-ing, and this year is no exception. At the start of the new year, we rolled out a whopping SEVEN new classes!
» Advanced Dreamweaver CC Techniques
» Creating HTML E-mail (eve.)
» InDesign CC Advanced (eve.)
» Illustrator CC Advanced (eve.)
» Photoshop CC Advanced (Sat.)
» Intro to mobile apps (eve.)
» Collaborating with CreativeSync (day)
Seattle Acrobat User Group
» Brian Wood, eVolve’s Director of Training, continues as Chapter Leader of the Acrobat Users Group. The next meeting is on Wednesday, June 21 at Adobe University in Fremont. The meeting topic will be posted at eVolve’s website a week before the event. The event is free and refreshments will be served. First arrivals get seats.
arrive smart. leave smarter.™ www.evolveseattle.com
Return Address:159 Western Ave W Suite A457Seattle, WA 98119
SCAN for the latest information from Adobe.
Customer Testimonials
BUZZ
Yield
Photo by Emily MillsPhoto by KY Studio
Photo by Bob Hickok Photo by John Sanders Photo by Focus Photos
Photo by Robin Cruise

86 LESSON 4 Working with Objects
Getting startedIn this lesson, you’ll work on a pair of spreads that make up a four-page newsletter. You’ll add text and images and make several modifications to the objects on the two spreads.
1 To ensure that the preference and default settings of your Adobe InDesign program match those used in this lesson, move the InDesign Defaults file to a different folder following the procedure in “Saving and restoring the InDesign Defaults file” on page 3.
2 Start Adobe InDesign. To ensure that the panels and menu commands match those used in this lesson, choose Window > Workspace > [Advanced], and then choose Window > Workspace > Reset Advanced. To begin working, you’ll open an InDesign document that is already partially completed.
3 Choose File > Open, and open the 04_Start.indd file in the Lesson04 folder, located inside the Lessons folder within the InDesignCIB folder on your hard drive. (If the Missing Fonts dialog box displays, click Sync Fonts, and then click Close after the fonts have successfully synced from Typekit.)
4 Choose File > Save As, rename the file 04_Objects.indd, and save it in the Lesson04 folder.
5 To see what the finished document looks like, open the 04_End.indd file in the same folder. You can leave this document open to act as a guide as you work. When you’re ready to resume working on the lesson document, choose Window > 04_Objects.indd or click its tab at the top of the document window.
4 eVolve Newsletter eVolve Newsletter 1
IN THIS ISSUE:Investing in Training. Whether you're a small startup or a Fortune 500 company, providing training for your employees is one of the best investments you can make. Page3.
CSS Master Class. This educational seminar for experienced web designers will teach you how to get the most out of cascading style sheets to create state-of-the art web pages. Page 3.
Adobe Creative Cloud Master ClassAdobe Creative Cloud is officially hitting the road! Beginning in Seattle and
moving on to Portland, the Midwest and several cities on the East Coast, this
seminar will teach you how to get the most out of Creative Cloud.
Creative Cloud gives you the world’s best creative tools, always up to date. And
now, all the apps and assets—including new Adobe Stock images—are always
right where you need them. And everything is seamlessly connected through
Adobe CreativeSync technology, so you can easily turn your brightest ideas into
your best work across your desktop and mobile devices.
Given the rapidly evolving digital publishing scene, this seminar is a must for
anyone who is considering electronic distribution of content. It will explain how
you can use Adobe software to create virtually any kind of digital publication—
for tablets, eReaders, and smartphones. Unleash your creative power and stay
ahead of the curve by becoming a Creative Cloud power user.
w w w.evolveseattle.comT 555.555.5555F 555.555.5555
Have any ideas for us? We welcome your suggestions on new classes, seminars, and trends.
Send an email with the subject “My Recommendations” to [email protected]
the
Shauneen H. Senior AdministratorFaccummy nibh enibh ex et adig-na consed tat, commy nim ver il el dolortio conulputatum vendre modipsuscing etum vel ipit delit luptatu. Exercil iquipit iliquis.
Molly Y. In-house CounselAzzriure dolobore duisit lummy nos nulput iriusci llametuero do consequipit. Exercil iquipit iliquis adit utpatem zzriusto duisis at nibh el inci ex endiatem.
Sylvia B.Senior PhotographerFaccummy nibh enibh ex et adig-na consed tat, commy nim ver il el dolortio conulputatum vendre modipsuscing etum vel ipit delit luptatu. Exercil iquipit iliquis adit .
John C. Creative DirectorExercil iquipit iliquis adit utpatem zzriusto duisis at nibh el inci ex endiatem. Azzriure dolobore duisit lummy
Jeff G.SalesFaccummy nibh enibh ex et adig-na consed tat, commy nim ver il el dolortio conulputatum vendre modipsuscing etum vel ipit delit luptatu. Exercil iquipit iliquis adit utpatem zzriusto duisis at nibh el inci ex endiatem zzriure dolobore duisit lummy.
Hannah B. Creative DirectorExercil iquipit iliquis adit utpatem zzriusto duisis at nibh el inci ex endiatem. Azzriure dolobore duisit lummy
NEW Day & Evening Classes
» We’re forever eVolve-ing, and this year is no exception. At the start of the new year, we rolled out a whopping SEVEN new classes!
» Advanced Dreamweaver CC Techniques
» Creating HTML E-mail (eve.)
» InDesign CC Advanced (eve.)
» Illustrator CC Advanced (eve.)
» Photoshop CC Advanced (Sat.)
» Intro to mobile apps (eve.)
» Collaborating with CreativeSync (day)
Seattle Acrobat User Group
» Brian Wood, eVolve’s Director of Training, continues as Chapter Leader of the Acrobat Users Group. The next meeting is on Wednesday, June 21 at Adobe University in Fremont. The meeting topic will be posted at eVolve’s website a week before the event. The event is free and refreshments will be served. First arrivals get seats.
arrive smart. leave smarter.™ www.evolveseattle.com
Return Address:159 Western Ave W Suite A457Seattle, WA 98119
SCAN for the latest information from Adobe.
Customer Testimonials
BUZZ
Yield
Photo by Emily MillsPhoto by KY Studio
Photo by Bob Hickok Photo by John Sanders Photo by Focus Photos
Photo by Robin Cruise
2 eVolve Newsletter eVolve Newsletter 3
Partial Class Calendar June—September 2015
In addition to scheduled classes, we pro-vide custom corporate training, on-site, off-site, and/or via the web.
Corporate training is a targeted ap-proach that allows your team to learn exactly what they need to know. The breadth and depth of eVolve trainers' experience translates into focused, effective training that yields an immediate and significant increase in your group's production efficiency.
Targeted SolutionBecause we customize the curricula and content of each corporate training program, you learn exactly what you need to know. We provide training at all levels, and design each curriculum according to your group's current skills and learning goals.
You'll return to work with newly honed skills, ready to work on your graphics
projects with greater ease. You'll also re-ceive comprehensive training materials and ongoing post-training support.
Whether you're a 3-person collaborative or a Fortune 500 department, you'll get the same top-notch training from our knowledgeable, talented instructors.
Our many happy clients can attest to that.
To see a partial list of the com-panies we work with, visit our
Clients page.
Location Options & Training Lab
Corporate training can take place at your location or in eVolve’s fully equipped Windows and Mac training lab, as a presentation-style seminar or as a hands-on class (each student in front of a computer).
CSS Master ClassFebruary 27th — Seattle, WAMarch 7th — Portland, OR CSS Master Class is officially hitting the road! Beginning in Seattle and moving on to
Portland, this educational seminar will teach you how to use CSS for your entire site
layout. If you've only used CSS to format text, join us for this information-packed day.
You'll walk away with great new skills that will help your site rank higher in search
engines. You'll also be able to use CSS for innovative design techniques, including multi-
column layout (best practices), iframes, pop-ups, rounded corner DIVs, and much, much
more.
Event information and registration is online at:
http://www.evolveseattle.com/events/cssmaster.html
Wasting Time: Invest in Corporate Training
Class Date Time (duration) Platform
Computer Graphics Intro
June 11 9:30-4:30 (1 day/6hrs) Mac/Windows
InDesign CC Immersion
July 28 & 29 9:30-4:30 (2 days/12hrs) Mac/Windows
Aug. 27 & 28 9:30-4:30 (2 days/12hrs) Mac/Windows
Sept. 22 & 23 9:30-4:30 (2 days/12hrs) Mac/Windows
Oct. 22 & 23 9:30-4:30 (2 days/12hrs) Mac/Windows
InDesign CC Intermediate
July 13 9:30-4:30 (1 day/6hrs) Mac/Windows
Aug. 7 9:30-4:30 (1 day/6hrs) Mac/Windows
Photoshop CC Immersion
July 2 & 3 9:30-4:30 (2 days/12hrs) Mac/Windows
Aug. 13 & 14 9:30-4:30 (2 days/12hrs) Mac/Windows
Sept. 8 & 9 9:30-4:30 (2 days/12hrs) Mac/Windows
Photoshop CC Intermediate
July 20 9:30-4:30 (1 day/6hrs) Mac/Windows
Aug. 17 9:30-4:30 (1 day/6hrs) Mac/Windows
Intro to Adobe Acrobat Pro DC & PDF
Aug. 1 9:30-4:30 (1 day/6hrs) Mac/Windows
Adobe Acrobat Pro DC eForms & Multimedia
Aug. 24 9:30-4:30 (1 day/6hrs) Mac/Windows
Illustrator CC Immersion
July 16 & 17 9:30-4:30 (2 days/12hrs) Mac/Windows
Aug. 17 & 18 9:30-4:30 (2 days/12hrs) Mac/Windows
Sept. 12 & 13 9:30-4:30 (2 days/12hrs) Mac/Windows
Yield
The newsletter that you will work on in this lesson contains two spreads: The spread on the left contains page 4 (the back page on the left) and page 1 (the cover on the right); the spread on the right contains pages 2 and 3 (the center spread). Keep this page arrangement in mind as you navigate from page to page. Here you see the finished newsletter.
�Note: If an alert is displayed when you open the sample document, click Update Links.
�Note: As you work through the lesson, move panels or change the zoom level to a magnification that works best for you.
� Note: If you have not already downloaded the project files for this lesson to your computer from your Account page, make sure to do so now. See “Getting Started” at the beginning of the book.

ADOBE INDESIGN CC CLASSROOM IN A BOOK (2015 RELEASE) 87
Working with layersBefore you begin creating and modifying objects, you should understand how layers work in InDesign. By default, every new InDesign document contains one layer (named Layer 1). You can rename this layer and add more layers at any time as you create a document. Placing objects on different layers lets you organize them for easy selection and editing. In the Layers panel, you can select, display, edit, and print different layers individually, in groups, or all together.
The 04_Objects.indd document has two layers. You’ll experiment with these layers to learn how the arrangement of the layers and the placement of objects on layers can affect the design of your document, and you’ll add a new layer.
About layersThink of layers as transparent sheets stacked on top of each other. When you create an object, you can place it on the layer of your choice, and you can move objects between layers. Each layer contains its own set of objects.
The Layers panel (Window > Layers) displays a list of a document’s layers and lets you create, manage, and delete layers. The Layers panel also lets you display the names of all objects on a layer and show, hide, or lock individual objects. Click the triangle to the left of a layer name to alternately display and hide the names of the objects on the layer.
By using multiple layers, you can create and edit specific areas or kinds of content in your document without affecting other areas or kinds of content. For example, if a document prints slowly because it contains many large graphics, you can use one layer for only the text in the document; then, when it’s time to proofread the text, you can hide all other layers and quickly print only the text layer. You can also use layers to display alternate design ideas for the same layout or different versions of an advertisement for different regions.

88 LESSON 4 Working with Objects
1 Click the Layers panel icon or choose Window > Layers to open the Layers panel.
2 If the Text layer is not selected in the Layers panel, click to select it. The layer is highlighted to indicate that it’s selected. Notice that a pen icon ( ) appears to the right of the layer name. The pen icon indicates that this layer is the target layer, and while it’s selected, anything you import or create is placed on this layer.
3 Click the small triangle to the left of the Text layer name. All of the groups and objects on this layer are now displayed below the layer name. Use the panel’s scroll bar to view the names in the list, and then click the triangle again to hide them.
4 Click the eye icon ( ) to the far left of the Graphics layer name. All the objects on the Graphics layer are hidden. The eye icon lets you hide or display individual layers. When you turn off the visibility of a layer, the eye disappears. Click the empty box again to display the layer contents.
Click to hide layer contents. The spread with the Graphics layer hidden.
5 Use the Zoom tool ( ) to zoom in on the dark blue frame on the front page (page 1).
6 Using the Selection tool ( ), move the pointer within the Yield sign graphic. Notice the blue frame edge on the graphics frame. This blue border indicates that the frame is on the Text layer, which has been assigned a blue color. A transparent doughnut shape, otherwise known as the content grabber, is displayed in the center of the frame. When you move the pointer within the content grabber, it changes to a hand.

ADOBE INDESIGN CC CLASSROOM IN A BOOK (2015 RELEASE) 89
Click and drag when the hand pointer is displayed to move only the graphic within the frame.
Click and drag when the arrow pointer is displayed to move the frame along with the graphic.
7 Now move the pointer within the circular graphics frame below the Yield sign. Notice that this frame’s edge is red, the color assigned to the Graphics layer.
8 Move the pointer back to the frame with the Yield sign, make sure the arrow pointer is displayed, and then click within the graphics frame to select it.
In the Layers panel, you’ll notice that the Text layer is selected, and a small blue square appears to the right of the layer name. This indicates that the selected object belongs to this layer. You can move objects from one layer to another by dragging this square between layers in the panel.
9 In the Layers panel, drag the small blue square from the Text layer up to the Graphics layer, and then release the mouse button. The image now belongs to the Graphics layer and is now the topmost object on the top layer.
Select the image and drag its icon in the Layers panel.
Result.
10 Click the empty layer lock box to the left of the Graphics layer to lock the layer.
E Tip: To see the position of the Yield sign in the Graphics layer relative to other objects in the layer, expand the Graphics layer by clicking the triangle to the left of the layer name.

90 LESSON 4 Working with Objects
11 Choose View > Fit Spread In Window.
Next, you will make a new layer and move existing content to it.
12 At the bottom of the Layers panel, click the Create New Layer button ( ). Because the Graphics layer was selected when you created the new layer, the new layer is positioned above the Graphics layer in the Layers panel.
13 Double-click the name of the new layer (Layer 3) to open the Layer Options dialog box. Change the name to Background, and click OK.
14 In the Layers panel, drag the Background layer to the bottom of the layer stack. A horizontal line appears when you move the pointer below the Text layer, indicating that the layer will be moved to the bottom when you release the mouse button.
15 Choose File > Save.
ETip: If you Alt-click (Windows) or Option-click (Mac OS) the Create New Layer button, the New Layer dialog box opens and lets you name the new layer as part of the layer-creation process.
If you Ctrl-click (Windows) or Command-click (Mac OS) the Create New Layer button, a new layer is added below the currently selected layer.
If you Ctrl+Alt-click (Windows) or Command+ Option-click (Mac OS) the Create New Layer button, the New Layer dialog box opens. A new layer is placed below the currently selected layer when you close the dialog box.
If you Ctrl-Shift-click (Windows) or Command-Shift-click (Mac OS) the Create New Layer button, a new layer is added as the topmost layer.
E Tip: You can also rename a layer by selecting the layer in the Layers panel and then clicking its name.

ADOBE INDESIGN CC CLASSROOM IN A BOOK (2015 RELEASE) 91
Using Smart GuidesThe Smart Guides feature gives you great flexibility in precisely creating and positioning objects. With Smart Guides, you can snap objects to the edges and centers of other objects, to the vertical and horizontal centers of pages, and to the midpoints of columns and gutters. Plus, Smart Guides appear dynamically as you work to provide instant visual feedback.
You can enable four Smart Guide options in the Guides & Pasteboard prefer-ences (Edit > Preferences > Guides & Pasteboard [Windows] or InDesign CC > Preferences > Guides & Pasteboard [Mac OS]):
• Align To Object Center. Causes object edges to snap to the center of other objects on a page or spread when you create or move an object.
• Align To Object Edges. Causes object edges to snap to the edge of other objects on a page or spread when you create or move an object.
• Smart Dimensions. Causes the width, height, or rotation of an object to snap to the dimensions of other objects on a page or spread when you create, resize, or rotate an object.
• Smart Spacing. Lets you quickly arrange objects so that the space between them is equal.
The Smart Guides command (View > Grids & Guides > Smart Guides) lets you turn Smart Guides on and off. You can also enable/disable Smart Guides from the View Options menu in the Application bar. Smart Guides are enabled by default.
To familiarize yourself with Smart Guides, create a new multicolumn one-page document. (In the New Document dialog box, specify a value greater than 1 in the Columns Number field.)
1 In the Tools panel, select the Rectangle Frame tool ( ). Click the left margin guide and drag to the right. As the pointer moves across the page, notice that a guide is displayed when the pointer reaches the middle of a column, the midpoint within a gutter, and the horizontal center of the page. Release the mouse button when a Smart Guide appears.
2 With the Rectangle Frame tool still selected, click the top margin guide and drag downward. Notice that when the pointer reaches the top edge, center, and bottom edge of the first object you created, as well as the vertical center of the page, a Smart Guide appears.
3 In an empty area of the page, create one more object with the Rectangle Frame tool. Drag the mouse slowly and watch carefully. Smart Guides appear when the pointer reaches the edge or center of any of the other objects. Also, when the height or width of the new object equals the height or width of either of the other two objects, a vertical or horizontal (or both) line with arrows at both ends appears next to the object you’re creating and the object with the matching height or width.
4 Close the document without saving changes.

92 LESSON 4 Working with Objects
Creating and modifying text framesIn most cases, text is placed inside a frame. (You can also use the Type On A Path tool [ ] to flow text along a path.) The size and location of a text frame determine where the text appears on a page. Text frames can be created with the Type tool and modified using a variety of tools—as you’ll do in this part of the lesson.
Creating and resizing text framesNow you’ll create your own text frame, adjust its size, and then resize another frame.
1 In the Pages panel, double-click the icon for page 4 to center it in the document window.
2 In the Layers panel, click the Text layer to select it. Any content created when the Text layer is selected will be placed on that layer.
3 Select the Type tool ( ) in the Tools panel. Position the pointer where the left edge of the first column meets the horizontal guide at 22p0 on the vertical ruler. Drag to create a frame that snaps to the right edge of the second column and has a height of about 8p.
4 Use the Zoom tool ( ) to magnify the text frame, and then select the Type tool.
5 In the new text frame, type Customer, press Shift+Enter (Windows) or Shift+Return (Mac OS) to create a forced line break (without creating a new paragraph), and then type Testimonials. Click anywhere within the text to select the paragraph.
Now you’ll apply a paragraph style to the text.

ADOBE INDESIGN CC CLASSROOM IN A BOOK (2015 RELEASE) 93
6 Click the Paragraph Styles panel icon or choose Type > Paragraph Styles to open the panel. Click the style named Testimonials to apply it to the selected paragraph.
Read more about styles in Lesson 9, “Working with Styles.”
7 Using the Selection tool ( ), double-click the center-bottom handle of the selected text frame to fit the frame to the text vertically.
Double-click to fit the frame to its content. Result.
8 Choose View > Fit Spread In Window, and then press Z to temporarily access the Zoom tool, or select the Zoom tool ( ) to magnify the rightmost column on the front page (page 1). Use the Selection tool ( ) to select the text frame below the “the BUZZ” text. The frame contains the text “NEW Day & Evening Classes.”
The red plus sign (+) at the lower-right corner of the text frame indicates that the frame contains overset text. Overset text is not visible because the frame is too small to display it. You’ll fix this by changing the size and shape of the text frame.
E Tip: It isn’t necessary to highlight an entire paragraph before applying a paragraph style to it. You can select a paragraph by clicking anywhere within it.

94 LESSON 4 Working with Objects
9 Drag the center-bottom handle of the selected text frame downward to resize the height of the frame until the bottom edge snaps to the ruler guide at 48p0 on the vertical ruler. When the pointer approaches the ruler guide, the arrows change in appearance from black to white, indicating that the frame edge is about to snap to the guide. The text remains overset. You’ll fix that later in this lesson.
Resize the frame by dragging the center point.
Result.
10 Choose Edit > Deselect All, and then choose File > Save.
Reshaping a text frameSo far, you’ve resized a text frame with the Selection tool by dragging a handle. Now you’ll reshape the frame using the Direct Selection tool to move one of the frame’s anchor points.
1 In the Tools panel, select the Direct Selection tool ( ), and then click within the text frame you just resized. Four very small anchor points now appear at the corners of the selected text frame. The anchor points are all hollow, indicating that none of them is selected.
Unselected anchor point.
Selected anchor point.

ADOBE INDESIGN CC CLASSROOM IN A BOOK (2015 RELEASE) 95
2 Select the anchor point at the lower-left corner of the text frame, and pause for a moment until the arrow pointer turns black. Drag straight down until the point touches the margin guide at the bottom of the page and release the mouse button. As you drag, the text is simultaneously reflowed to give you a real-time view. After you release the mouse button, notice that the overset text indicator (the red plus sign) is no longer displayed, and all of the story’s text is now visible.
Be sure to drag only the anchor point—if you drag just above or to the right of the anchor point, you’ll move other corners of the text frame, too. If you accidentally move the frame, choose Edit > Undo Move and try again.
3 Press the V key to switch to the Selection tool.
Path
Bounding box
4 Deselect all objects, and then choose File > Save.
ETip: To resize a text frame and the text characters inside it simultaneously, select the frame, and then double-click the Scale tool ( ), which is combined with the Free Transform, Rotate, and Shear tools in the Tools panel, and specify values in the Scale dialog box or hold down Ctrl (Windows) or Command (Mac OS) as you drag a text frame handle with the Selection tool. Add the Shift key as you drag to maintain the proportion of the text and frame.

96 LESSON 4 Working with Objects
Creating multi-column text framesNow you’ll take an existing text frame and convert it to a multiple-column text frame.
1 Choose View > Fit Spread In Window, and then use the Zoom tool ( ) to display the lower-right portion of the back page (page 4). Use the Selection tool ( ) to select the text frame that begins with “Shauneen H.”
2 Choose Object > Text Frame Options. In the Text Frame Options dialog box, type 3 in the Number box and p11 (11 points) in the Gutter box if necessary. The gutter controls the distance between the columns. Click OK.
3 To begin each column with a heading, select the Type tool ( ), place the insertion point in front of the name “Sylvia B.,” and then choose Type > Insert Break Character > Column Break. This forces “Sylvia B.” to the top of the second column. Insert a column break before the name “Jeff G.”
ETip: You can also display hidden characters by choosing Hidden Characters from the View Options menu in the Application bar.

ADOBE INDESIGN CC CLASSROOM IN A BOOK (2015 RELEASE) 97
4 Choose Type > Show Hidden Characters to see the break characters. (If Hide Hidden Characters is displayed—rather than Show Hidden Characters—at the bottom of the Type menu, hidden characters are already showing.)
The red circles indicate the Column Break characters.
5 Choose Type > Hide Hidden Characters.
Adjusting text inset and vertical alignmentYou’ll now finish the red title bar on the cover by fitting the text nicely into the frame. By adjusting the space between the edge of the frame and the text, you make the text easier to read.
1 Choose View > Fit Spread In Window, and then use the Zoom tool ( ) to magnify the red text frame near the top of the front page (page 1) with the text “arrive smart. leave smarter.” Select the Selection tool ( ), and then select the red text frame.
2 Choose Object > Text Frame Options. If necessary, drag the Text Frame Options dialog box aside so that you can still see the selected text frame as you set options.
3 In the Text Frame Options dialog box, make sure that the Preview option is selected. Then, in the Inset Spacing section, click the Make All Settings The Same icon ( ) to disable it so that you can change the Left setting independently. Change the Left value to 3p to move the left margin of the text frame 3 picas to the right and away from the left edge of the frame, and then change the Right value to 3p9.
Creating multi-column text framesNow you’ll take an existing text frame and convert it to a multiple-column text frame.
1 Choose View > Fit Spread In Window, and then use the Zoom tool ( ) to display the lower-right portion of the back page (page 4). Use the Selection tool ( ) to select the text frame that begins with “Shauneen H.”
2 Choose Object > Text Frame Options. In the Text Frame Options dialog box, type 3 in the Number box and p11 (11 points) in the Gutter box if necessary. The gutter controls the distance between the columns. Click OK.
3 To begin each column with a heading, select the Type tool ( ), place the insertion point in front of the name “Sylvia B.,” and then choose Type > Insert Break Character > Column Break. This forces “Sylvia B.” to the top of the second column. Insert a column break before the name “Jeff G.”
ETip: You can also display hidden characters by choosing Hidden Characters from the View Options menu in the Application bar.

98 LESSON 4 Working with Objects
4 In the Vertical Justification section of the Text Frame Options dialog box, choose Center from the Align menu. Click OK.
5 Select the Type tool ( ), and then click to the left of “www.evolveseattle.com” to establish an insertion point. To move the URL text so that it aligns with the right inset you specified earlier, choose Type > Insert Special Character > Other > Right Indent Tab.
6 Choose Edit > Deselect All, and then choose File > Save.
Creating and modifying graphics framesNow you’re ready to add the company logo and the employees’ images to the spread. In this section, you’ll focus on different techniques for creating and modifying graphics frames and their contents.
Because you’ll be working on graphics rather than text, your first step is to make sure that the graphics appear on the Graphics layer rather than on the Text layer. Isolating objects on different layers streamlines your workflow and makes it easier to find and edit elements of your design.

ADOBE INDESIGN CC CLASSROOM IN A BOOK (2015 RELEASE) 99
Drawing a new graphics frameTo begin, you’ll create a frame for the logo at the top of the cover page (the recto page in the first spread).
1 If the Layers panel is not visible, click the Layers panel icon or choose Window > Layers.
2 In the Layers panel, click the lock icon ( ) to unlock the Graphics layer. Lock the Text layer by clicking the box to the left of the layer name. Select the Graphics layer by clicking the name of the layer so that the new elements are assigned to this layer.
3 Choose View > Fit Spread In Window, and then use the Zoom tool ( ) to zoom in on the upper-left corner of the front page (page 1).
4 In the Tools panel, select the Rectangle Frame tool ( ). Move the pointer to the corner where the top and left margin guides intersect, drag down until the pointer reaches the horizontal guide, and then drag across to the right edge of the first column.
Drag to create a graphics frame.
5 Switch to the Selection tool ( ) and make sure that the graphics frame is still selected.

100 LESSON 4 Working with Objects
Placing a graphic within an existing frameNow, you’ll place the company logo within the selected frame.
1 Choose File > Place, and then double-click logo_paths.ai in the Links folder in the Lesson04 folder. The image appears in the graphics frame.
2 To ensure that the graphic is displayed at the highest possible resolution, choose Object > Display Performance > High Quality Display.
Resizing a graphics frame to crop a graphicThe graphics frame you created isn’t quite wide enough to show the entire logo, so you’ll widen it to reveal the hidden portion.
1 Using the Selection tool ( ), drag the center-right handle until the entire logo is visible. If you pause before you drag, you’ll be able to see the cropped portion of the image as you drag and easily determine when the frame edge is beyond the edge of the logo. Make sure you drag the small, white handle and not the larger, yellow one. The yellow handle lets you add corner options, and you’ll learn more about them later in this lesson.
2 Choose Edit > Deselect All, and then choose File > Save.
�Note: If a graphics frame isn’t selected when you place an image, the pointer changes to the loaded graphics icon ( ). In this case, you could click within the frame to place the image.
E Tip: You can also reveal the cropped portion of the graphic by choosing Object > Fitting > Fit Frame To Content.

ADOBE INDESIGN CC CLASSROOM IN A BOOK (2015 RELEASE) 101
Placing a graphic without an existing frameThe design of the newsletter uses two versions of the logo—one on the front cover and one on the back cover. You could simply use the logo you just placed and the Copy and Paste commands (Edit menu) to add the logo to the back cover, and you’ll do that later in this lesson, but instead you’ll import the logo graphic without first creating a graphics frame.
1 Choose View > Fit Spread In Window, and then use the Zoom tool ( ) to display the upper-right quarter of the back page (page 4).
2 Choose File > Place, and then double-click logo_paths.ai in the Links folder in the Lesson04 folder. The pointer changes to a loaded graphics icon ( ).
3 Position the loaded graphics icon ( ) at the left edge of the rightmost column slightly below the rotated text frame that contains the return address, drag until the pointer reaches the right edge of the column, and then release the mouse button. Notice that as you drag, a rectangle is displayed. This rectangle is proportional to the logo image.
You don’t need to resize the frame as you did earlier because the frame already shows the entire image. The graphic still needs to be rotated, but you’ll do that later in the lesson.
4 Choose Edit > Deselect All, and then choose File > Save.
Placing multiple graphics in a grid of framesThe back cover of the newsletter should contain six photos. You could place the photos one by one and then position each one individually, but because they will be arranged in a grid, you can place all the photos and arrange them in a grid at the same time.
1 Choose View > Fit Spread In Window.
2 Choose File > Place. Navigate to the Links folder in the Lesson04 folder, click the graphic file named 01ShauneenH.tif to select it, and then press Shift and click the file named 06HannahB.tif to select all six photos. Click Open.
E Tip: If you click—rather than click and drag—an empty area of the page when you place an image, the image is placed at 100 percent of its original size. The upper-left corner of the image is placed where you click.

102 LESSON 4 Working with Objects
3 Position the loaded graphics icon ( ) at the intersection of the horizontal ruler guide in the top half of the page and the left edge of the third column.
4 Drag down and toward the right margin. As you drag, press the Up Arrow key once and the Right Arrow key twice. As you press the arrows, the proxy image changes to a grid of rectangles to indicate the layout of the grid.
5 Continue dragging until the pointer snaps to the intersection of the right margin guide and the lower horizontal ruler guide, and then release the mouse. A grid of six graphics frames displays the six photos you placed.
6 Choose Edit > Deselect All, and then choose File > Save.
Resizing and moving images within framesNow that you’ve placed the six photos, you need to resize and reposition them so that they fill the graphics frames and are cropped correctly.
The image and the frame for any placed graphic are separate elements. Unlike text frames, a graphics frame and its content each have their own bounding box. Resizing the image (without resizing the frame) is exactly like resizing the frame and the image together, except that you first select the image’s bounding box before resizing it.
ETip: When using any of the frame creation tools (Rectangle, Polygon, Type, and so on), you can create multiple and equally spaced frames by using the same arrow key gestures as you drag with the tool.

ADOBE INDESIGN CC CLASSROOM IN A BOOK (2015 RELEASE) 103
1 Using the Selection tool ( ), position the pointer over the content grabber within the image of Shauneen H. (the top-left photo). When the pointer is within the content grabber, a hand icon ( ) is displayed. Click to select the frame’s contents (the image itself ).
Before clicking. Result.
2 While holding down the Shift key, drag the center- bottom handle to the bottom edge of the graphics frame. Do the same with the center-top handle and drag it to the top edge of the frame. The Shift key maintains the proportions of the graphic so that it is not distorted. If you pause briefly before you start dragging, you’ll see a ghosted image of the cropped areas of the graphic contents, a feature called Dynamic Preview. Make sure that the image entirely fills the graphics frame.
3 The image in the middle frame on the top row is too narrow to fill the frame. Click the content grabber with the Selection tool to select the image. While holding down the Shift key, drag the center-left handle to the left edge of the graphics frame. Do the same with the center-right handle and drag to the right edge of the frame. Make sure that the image entirely fills the graphics frame.
4 The image now fills the frame but is poorly cropped. To fix this, position the pointer over the content grabber within the image, and while holding down the Shift key, drag downward until the top of the photo aligns with the top of the frame.
ETip: When resizing an image with the Selection tool, press Shift+Alt (Windows) or Shift+Option (Mac OS) to size the image pro-portionately from the center outward.
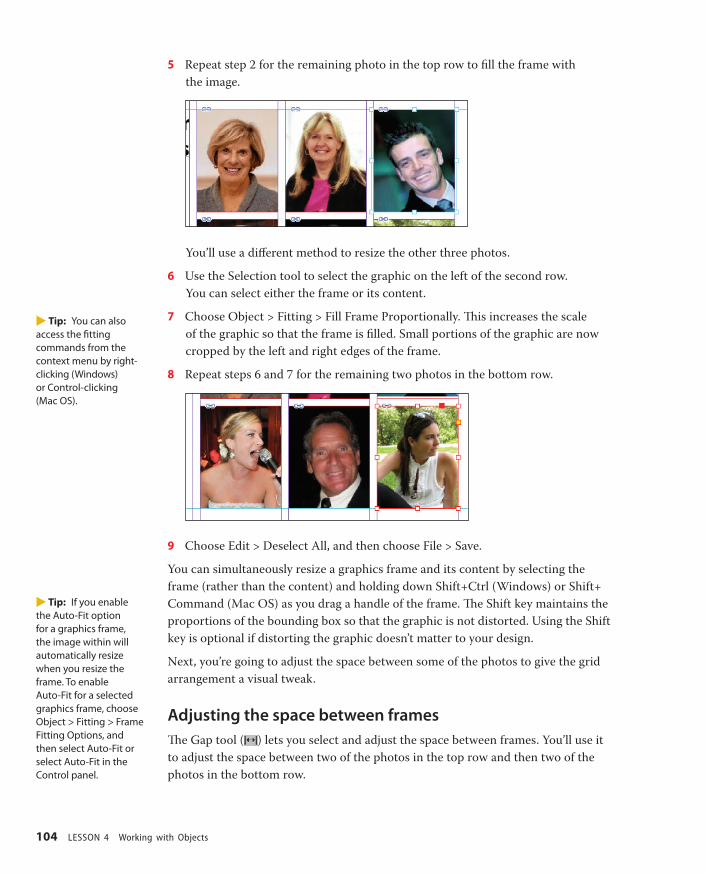
104 LESSON 4 Working with Objects
5 Repeat step 2 for the remaining photo in the top row to fill the frame with the image.
You’ll use a different method to resize the other three photos.
6 Use the Selection tool to select the graphic on the left of the second row. You can select either the frame or its content.
7 Choose Object > Fitting > Fill Frame Proportionally. This increases the scale of the graphic so that the frame is filled. Small portions of the graphic are now cropped by the left and right edges of the frame.
8 Repeat steps 6 and 7 for the remaining two photos in the bottom row.
9 Choose Edit > Deselect All, and then choose File > Save.
You can simultaneously resize a graphics frame and its content by selecting the frame (rather than the content) and holding down Shift+Ctrl (Windows) or Shift+ Command (Mac OS) as you drag a handle of the frame. The Shift key maintains the proportions of the bounding box so that the graphic is not distorted. Using the Shift key is optional if distorting the graphic doesn’t matter to your design.
Next, you’re going to adjust the space between some of the photos to give the grid arrangement a visual tweak.
Adjusting the space between framesThe Gap tool ( ) lets you select and adjust the space between frames. You’ll use it to adjust the space between two of the photos in the top row and then two of the photos in the bottom row.
ETip: You can also access the fitting commands from the context menu by right-clicking (Windows) or Control-clicking (Mac OS).
E Tip: If you enable the Auto-Fit option for a graphics frame, the image within will automatically resize when you resize the frame. To enable Auto-Fit for a selected graphics frame, choose Object > Fitting > Frame Fitting Options, and then select Auto-Fit or select Auto-Fit in the Control panel.

ADOBE INDESIGN CC CLASSROOM IN A BOOK (2015 RELEASE) 105
1 Choose View > Fit Page In Window. Hold down the Z key to temporarily access the Zoom tool ( ), zoom in on the two photos at the top left, and then release the Z key to return to the Selection tool.
2 Select the Gap tool ( ), and then move the pointer into the vertical gap between the two pictures. The gap is highlighted—all the way down to the bottom of the two photos below.
3 Hold down the Shift key and drag the gap one gutter width to the right, making the graphics frame on the left one gutter width wider and the one on the right one gutter width narrower. (If you don’t hold Shift while dragging, you’ll move the gap between the two photos below as well.)
4 Choose View > Fit Page In Window. Press Z to temporarily access the Zoom tool, and then zoom in on the two photos on the bottom left.
5 With the Gap tool, move the pointer to the vertical gap between the two pictures. Press Shift+Ctrl (Windows) or Shift+Command (Mac OS), and then drag to widen the gap from one gutter width to approximately three gutter widths. (You may have to drag left or right depending on which graphic you click closest to.) It’s important to release the mouse button before releasing the keys.
6 Choose View > Fit Page In Window, and then choose File > Save.
You’ve completed the grid of images on the back page (page 4).

106 LESSON 4 Working with Objects
Adding metadata captions to graphics framesYou can automatically generate captions for placed graphics based on metadata information stored in the original graphic files. Next, you’ll automatically add photographer credits to the pictures using metadata information.
1 With the Selection tool ( ), Shift-click to select the six graphics frames.
2 Click the Links panel icon to display the Links panel, and then choose Captions > Caption Setup from the panel menu.
3 In the Caption Setup dialog box, specify the following settings:
• In the Text Before box, type Photo by . (Make sure to enter a space character after by. Don’t add a period after the space character.)
• Choose Author from the Metadata menu; leave the Text After box blank.
• Choose Below Image from the Alignment menu.
• Choose Photo Credit from the Paragraph Style menu.
• In the Offset box, enter p2.
4 Click OK to save the settings and close the Caption Setup dialog box.
5 From the Links panel menu, choose Captions > Generate Static Captions.
ETip: If Adobe Bridge is installed on your computer, the Metadata panel lets you easily edit metadata for images and see metadata associated with images.
ETip: You can also open the Caption Setup dialog box by choosing Object > Captions > Caption Setup.
ETip: InDesign lets you create either static captions, which generate caption text from a graphic’s metadata and must be updated manually, or live captions, which are variables that retain links to a graphic’s metadata and can be automatically updated.

ADOBE INDESIGN CC CLASSROOM IN A BOOK (2015 RELEASE) 107
Each of the graphic files contains a metadata element named “Author,” which stores the name of the photographer. This metadata information is used when the photo credit caption is generated.
6 Choose Edit > Deselect All, and then choose File > Save.
Placing and linking graphics frames The two imported graphics on the cover page within the “IN THIS ISSUE” frame are used again on page 3 of the newsletter to accompany articles. Next, you’ll use the Place and Link feature to create copies of these two graphics and place them on page 3.
Unlike the Copy and Paste commands, which simply create a duplicate of the origi-nal object, the Place and Link feature creates a parent-child relationship between the original object and the copy. If you make changes to the parent object, you have the option to update the child object.
1 Choose View > Fit Spread In Window.
2 Select the Content Collector tool ( ). Notice that an empty Content Conveyor is now displayed at the bottom of the window.
3 Move the pointer over the Yield sign graphic on page 1. Notice that a heavy red border is displayed around the image, indicating that this graphics frame is on the Graphics layer. Click within the frame. The graphics frame is added to the Content Conveyor.
4 Click within the circular graphics frame below the Yield sign to add it to the Content Conveyor.
5 Open the Pages panel, and double-click page 3 to center it in the document window.
6 Select the Content Placer tool ( ). (It’s paired with the Content Collector tool in the Tools panel, and it’s also available in the lower-left corner of the Content Conveyor.) The pointer changes to a loaded graphics icon with the Yield sign graphic active. Both graphics are loaded.
ETip: In addition to placing and linking objects within a document, you can place and link objects between documents.
ETip: You can also add objects to the Content Conveyor by selecting them and then choosing Edit > Place And Link.
E Tip: You can also press the B key to alternate between the Content Collector and Content Placer tools, or you can click either of the tool buttons at the bottom of the Content Conveyor.

108 LESSON 4 Working with Objects
7 Select Create Link at the lower-left corner of the Content Conveyor. If you don’t select Create Link, you will simply create copies of the original objects without any parent-child relationships.
8 Click the pasteboard to the right of the top article to place a copy of the Yield sign graphic, and then click the pasteboard to the right of the bottom article to place a copy of the circular graphic.
9 Press Esc or click the close box in the Content Conveyor to close it or choose View > Extras > Hide Conveyor.
Modifying and updating parent-child graphics framesNow that you’ve placed and linked the two graphics frames, you’ll see how the parent-child relationships work between the original objects and the copies.
1 Open the Links panel and adjust the panel so that all of the filenames of the imported graphics are visible in the scroll list. The selected circular graphic (<ks88169.jpg>) is highlighted in the list. The other graphic you placed and linked (<yield.ai>) is the next filename in the list. The greater than and less than characters (<>) that bracket the filenames indicate that these graphics are linked to parent objects. Notice that these two graphic files—the parent objects—are also listed higher up in the scroll list.
�Note: Creating a link when placing content not only creates a link to the parent graphic, it also links the object’s appearance. Link Options can be set from the Links panel menu.
ETip: When you select the Content Placer tool, it is loaded with all objects in the Content Conveyor. Press the arrow keys to move between objects in the Content Conveyor. To remove an object from the Content Conveyor, press Esc.

ADOBE INDESIGN CC CLASSROOM IN A BOOK (2015 RELEASE) 109
2 Use the Selection tool ( ) to position the circular graphics frame to the left of the “CSS Master Class” article. Align the top of the graphics frame with the top of the article’s text frame; align the right edge of the graphics frame with the column guide to the left of the article’s text frame.
3 Navigate to page 1 (the front cover page), and then select the circular graphics frame.
4 Use the Control panel to apply a 5-point white [Paper] stroke to the frame.
5 In the Links panel, notice that the status of the <ks88169.jpg> graphic on page 3 has changed to Modified ( ). That’s because its parent object has been modified.
6 Navigate to page 3. Notice that the circular graphics frame no longer matches the version on the cover, and its link badge (the yellow triangle with the exclamation mark) also indicates it’s been modified. Select the circular graphics frame, and then click the Update Link button ( ) in the Links panel. The frame now matches its parent.
ETip: A Smart Guide appears when the top of the circular graphics frame is aligned with the top of the text frame.
ETip: You can also click the modified link badge on the circular graphics frame on page 3 to update the link or double-click the modified link icon to the right of <ks88169.jpg> in the Links panel.

110 LESSON 4 Working with Objects
Next, you’ll replace the Yield sign graphic with a newer version and then update its child frame.
1 Navigate to page 1, and then select the Yield sign graphic with the Selection tool.
2 Choose File > Place. Make sure Replace Selected Item is selected in the Place dialog box, and then double-click yield_new.ai in the Links folder in the Lesson04 folder.
In the Links panel, notice that the status of the file named <yield_new.ai> that’s on the pasteboard of page 3 is Modified. That’s because you replaced the parent graphic on page 1.
3 Select <yield_new.ai> in the scroll list, and then click the Update Link button ( ) in the Links panel. If you want, navigate to page 3 to see the updated graphic on the pasteboard, and then return to page 1.
4 Click the pasteboard to deselect all objects, choose View > Fit Spread In Window, and then choose File > Save.
Changing the shape of a frameWhen you resized a graphics frame using the Selection tool, the frame maintained its rectangular shape. Now you’ll use the Direct Selection tool and the Pen tool to reshape a frame on page 3 (the right page of the center spread).
1 Choose 3 from the page box at the bottom of the document window. Choose View > Fit Page In Window.

ADOBE INDESIGN CC CLASSROOM IN A BOOK (2015 RELEASE) 111
2 Click the Layers panel icon, or choose Window > Layers. In the Layers panel, click the lock icon for the Text layer to unlock it, and click the Text layer to select it if it’s not selected.
Next, you’ll change the shape of a rectangular frame and, by doing so, change the background of the page.
3 Press the A key to switch to the Direct Selection tool ( ). Move the tip of the pointer over the right edge of the green frame that covers the page, and click when the pointer appears with a small diagonal line ( ). This selects the path and reveals the four anchor points and the center point of the frame. Leave the path selected.
4 Press the P key to switch to the Pen tool ( ).
5 Carefully position the pointer over the top edge of the frame path where it intersects with the vertical ruler guide in the first column on page 3. When a plus sign is displayed at the lower right of the pointer, click. A new anchor point is added. The Pen tool automatically changes to the Add Anchor Point tool when it moves over an existing path.
6 Move the pointer to where the horizontal guide below the two-column text frame intersects with the bleed guide. Using the Pen tool, click again to add another new anchor point, and then choose Edit > Deselect All.
This point and the point you created in the previous step will form the corners of the irregular shape you’re creating. Repositioning the anchor point at the upper-right corner of the green frame will complete the reshaping of the frame.

112 LESSON 4 Working with Objects
7 Switch to the Direct Selection tool ( ). Click to select the upper-right corner point of the green frame. Drag the point down and to the left. (Pause before you drag so you can see the frame change as you drag.) When the anchor point snaps into place at the intersection of the right edge of the first column and the first horizontal guide from the top of the page (at 40p9 on the vertical ruler), release the mouse button.
The graphics frame is now properly shaped and sized for the design.
8 Choose File > Save.
Wrapping text around a graphicWith InDesign you can wrap text around the rectangular bounding box of any object, around objects of any shape, and around imported images. As you wrap text around the Yield sign in this exercise, you’ll see the difference between wrap-ping around its bounding box and around the shape of the graphic.
Your first task is to move the Yield sign graphic. For precise positioning, you can use the Smart Guides that are displayed dynamically when you create, move, or resize objects.
1 Using the Selection tool ( ), select the graphics frame with the image of a Yield sign on the pasteboard to the right of page 3. Make sure to click when the arrow pointer is displayed. If you click when the hand pointer is displayed, you’ll select the graphic instead of the graphics frame.

ADOBE INDESIGN CC CLASSROOM IN A BOOK (2015 RELEASE) 113
2 Being careful not to select one of the handles, drag the frame to the left so that the center point of the frame is aligned with the center point of the text frame that contains the article text. When the two center points align, you should see a purple vertical Smart Guide and a green horizontal Smart Guide appear. When these guidelines appear, release the mouse button.
Make sure that you have moved the frame onto the page without changing its size. Notice that the graphic overlaps the text. You’ll change this by applying a text wrap.
3 Choose Window > Text Wrap. In the Text Wrap panel, select Wrap Around Bounding Box to wrap the text around the bounding box, not around the Yield graphic’s shape. If necessary, choose Show Options from the panel menu to display all of the controls in the Text Wrap panel.
Wrap text around a bounding box. Result.
The option leaves too much white space for your desired design, so you’ll try another Text Wrap option.

114 LESSON 4 Working with Objects
4 Select Wrap Around Object Shape. In the Wrap Options section, choose Both Right & Left Sides from the Wrap To menu if it isn’t already selected. In the Contour Options section, choose Detect Edges from the Type menu. Enter 1p in the Top Offset box to add space between the edge of the graphic and the text, and press Enter or Return. Click a blank area to deselect all, or choose Edit > Deselect All.
Wrap text around an object shape. Result.
5 Close the Text Wrap panel, and choose File > Save.
Modifying the shape of framesIn this section, you’ll use various features that allow you to create nonrectangular frames. To begin, you’ll subtract the area of one shape from another. After that, you’ll create a polygon-shaped frame, and then you’ll add rounded corners to a frame.
Working with compound shapesYou can change the shape of an existing frame by adding other shapes to or sub-tracting other shapes from its area. The shape of a frame can also be changed, even if the frame already contains text or graphics. Now you’ll subtract a shape from the green background on page 3 to create a white background for the article at the bottom of the page.
1 Choose View > Fit Page In Window to fit and center page 3 in the document window.
�Note: The Wrap To menu in the Text Wrap panel is available only if you select Wrap Around Bounding Box or Wrap Around Object Shape at the top of the panel.
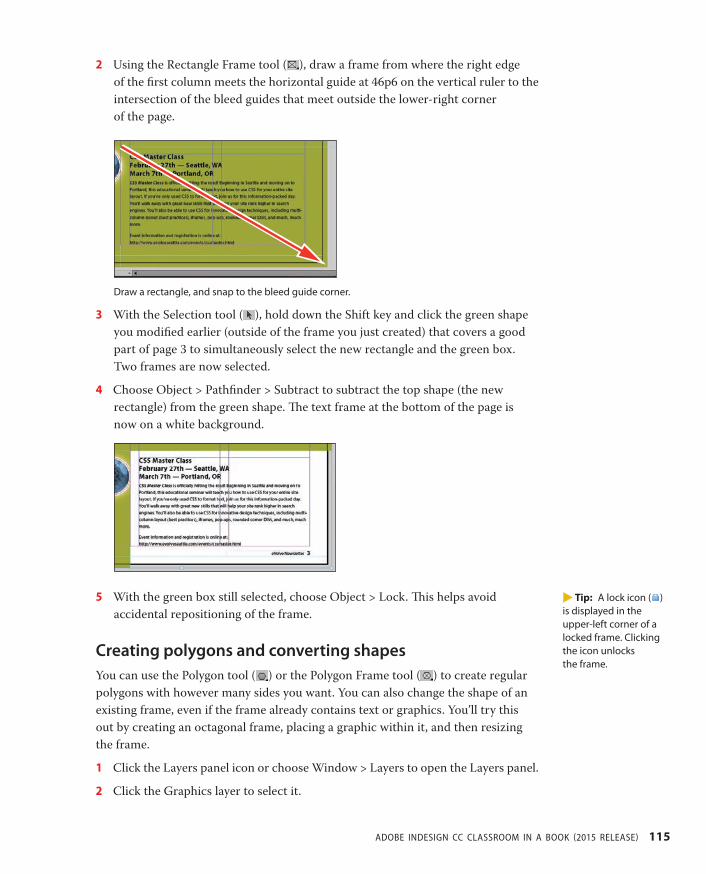
ADOBE INDESIGN CC CLASSROOM IN A BOOK (2015 RELEASE) 115
2 Using the Rectangle Frame tool ( ), draw a frame from where the right edge of the first column meets the horizontal guide at 46p6 on the vertical ruler to the intersection of the bleed guides that meet outside the lower-right corner of the page.
Draw a rectangle, and snap to the bleed guide corner.
3 With the Selection tool ( ), hold down the Shift key and click the green shape you modified earlier (outside of the frame you just created) that covers a good part of page 3 to simultaneously select the new rectangle and the green box. Two frames are now selected.
4 Choose Object > Pathfinder > Subtract to subtract the top shape (the new rectangle) from the green shape. The text frame at the bottom of the page is now on a white background.
5 With the green box still selected, choose Object > Lock. This helps avoid accidental repositioning of the frame.
Creating polygons and converting shapesYou can use the Polygon tool ( ) or the Polygon Frame tool ( ) to create regular polygons with however many sides you want. You can also change the shape of an existing frame, even if the frame already contains text or graphics. You’ll try this out by creating an octagonal frame, placing a graphic within it, and then resizing the frame.
1 Click the Layers panel icon or choose Window > Layers to open the Layers panel.
2 Click the Graphics layer to select it.
E Tip: A lock icon ( ) is displayed in the upper-left corner of a locked frame. Clicking the icon unlocks the frame.
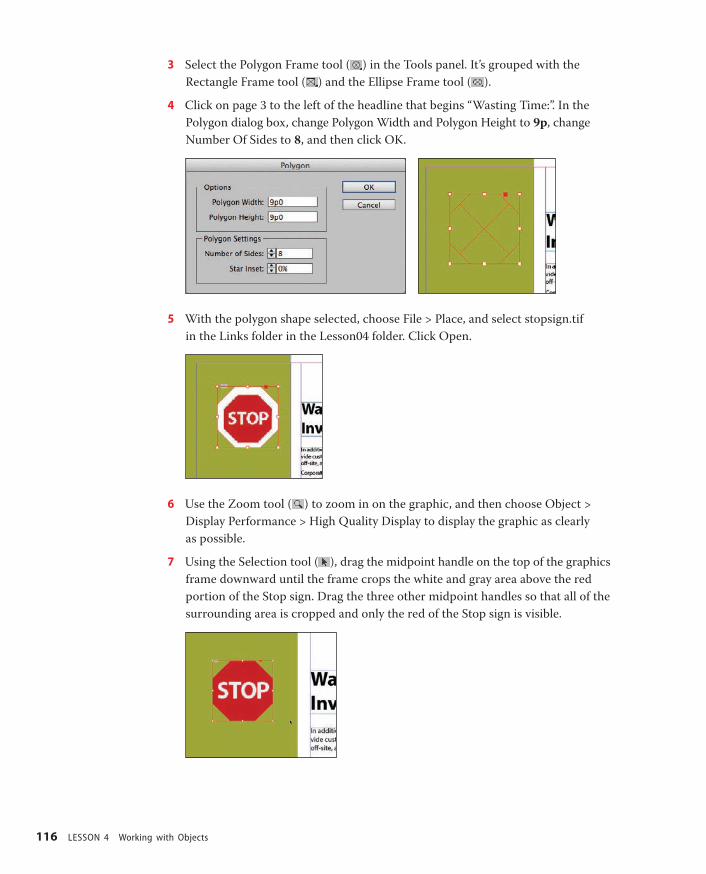
116 LESSON 4 Working with Objects
3 Select the Polygon Frame tool ( ) in the Tools panel. It’s grouped with the Rectangle Frame tool ( ) and the Ellipse Frame tool ( ).
4 Click on page 3 to the left of the headline that begins “Wasting Time:”. In the Polygon dialog box, change Polygon Width and Polygon Height to 9p, change Number Of Sides to 8, and then click OK.
5 With the polygon shape selected, choose File > Place, and select stopsign.tif in the Links folder in the Lesson04 folder. Click Open.
6 Use the Zoom tool ( ) to zoom in on the graphic, and then choose Object > Display Performance > High Quality Display to display the graphic as clearly as possible.
7 Using the Selection tool ( ), drag the midpoint handle on the top of the graphics frame downward until the frame crops the white and gray area above the red portion of the Stop sign. Drag the three other midpoint handles so that all of the surrounding area is cropped and only the red of the Stop sign is visible.

ADOBE INDESIGN CC CLASSROOM IN A BOOK (2015 RELEASE) 117
8 Choose View > Fit Page In Window, and then use the Selection tool ( ) to move the frame so that its vertical center edge aligns with the top edge of the text frame to the right that contains the headline (a green Smart Guide is displayed) and its right edge is approximately one gutter width to the left of the right edge of the green background frame. Pause briefly before dragging to display the graphic as you drag.
Adding rounded corners to framesNext, you’ll modify a text frame by rounding its corners.
1 Choose 1 from the page box at the bottom of the document window. Choose View > Fit Page In Window.
2 With the Selection tool ( ) still selected, hold down the Z key to temporarily access the Zoom tool ( ), zoom in on the dark blue text frame on page 1, and then release the Z key to return to the Selection tool.
3 Select the dark blue text frame, and then click the small yellow square that’s slightly below the resizing handle at the upper-right corner of the frame. Four small yellow diamonds replace the four resizing handles at the corners of the frame.
Click the yellow square. Result.
E Tip: If the yellow square is not visible when selecting the frame, choose View > Extras > Show Live Corners. Also ensure Screen Mode is set to Normal (View > Screen Mode > Normal).

118 LESSON 4 Working with Objects
4 Drag the diamond at the upper-right corner of the frame to the left and release the mouse button when the live radius (R:) value is approximately 2p0. As you drag, the other three corners change, too. (If you hold down the Shift key when dragging, only the corner you are working on changes.)
5 Choose Edit > Deselect All to exit live corner edit mode, and then choose File > Save.
Transforming and aligning objectsVarious tools and commands in InDesign let you modify an object’s size or shape and change its orientation on the page. All transformations—rotating, scaling, shearing, and flipping—are available in the Transform and Control panels, where you can precisely specify transformations. You can also align or distribute objects horizontally or vertically along the selection, margins, page, or spread.
You’ll experiment with some of these features now.
Rotating an objectInDesign offers several methods for rotating objects. In this part of the lesson, you’ll use the Control panel to rotate one of the logos you imported earlier in the lesson.
1 Use either the page box at the bottom of the document window or the Pages panel to display page 4 (the first page of the document; the back page of the newsletter). Choose View > Fit Page In Window.
2 Using the Selection tool ( ), select the “evolve” logo you imported earlier in the lesson. (Make sure you select the graphics frame and not the graphic within.)
E Tip: After you create rounded corners, you can Alt-click (Windows) or Option-click (Mac OS) any of the diamonds to cycle through several different corner effects.

ADOBE INDESIGN CC CLASSROOM IN A BOOK (2015 RELEASE) 119
3 At the left end of the Control panel, make sure that the center point is selected on the Reference Point locator ( ) so that the object rotates around its center. Choose 180° from the Rotation Angle menu in the Control panel.
Rotating an image within its frameYou can rotate the content of a graphics frame with the Selection tool.
1 Using the Selection tool ( ), select the image of Jeff G. (top right) by clicking within the content grabber. The arrow pointer changes to a hand when it’s within the doughnut shape.
Move the pointer within the doughnut.
Click to select the content of the frame.
2 In the Control panel, make sure that the center point in the reference point locator ( ) is selected.
3 Move the pointer slightly outside the resizing handle at the upper-right corner of the picture. The rotate pointer ( ) is displayed.
E Tip: You can also rotate a selected object by choosing Object > Transform > Rotate and entering a value in the Angle field of the Rotate dialog box.

120 LESSON 4 Working with Objects
4 Click and drag clockwise to rotate the image until the head is approximately vertical (about -25°), and then release the mouse button. As you drag, the angle of rotation is displayed along with the image.
5 After being rotated, the image no longer fills the frame. To fix this, first make sure that the Constrain Proportions For Scaling icon ( ) to the right of the Scale X Percentage and Scale Y Percentage boxes in the Control panel is selected, and then enter 55 in the Scale X Percentage box and press Enter or Return.
6 Choose Edit > Deselect All, and then choose File > Save.
Aligning multiple objectsPrecise alignment is made easy when you use the Align panel. Next, you’ll use the Align panel to horizontally center multiple objects on a page, and then you’ll align multiple images.
1 Choose View > Fit Page In Window, and then choose page 2 in the page box at the bottom of the document window.
2 Using the Selection tool ( ), click the text frame at the top of the page containing the “Partial Class Calendar” text and Shift-click the “evolve” logo above it. (Unlike the two logos you imported earlier, this logo was created within InDesign and is a group of objects. You’ll work with this group later in the lesson.)
3 Choose Window > Object & Layout > Align to open the Align panel.
E Tip: To fill the frame with the image after rotating it, you can also choose Object > Fitting > Fill Frame Proportionately.

ADOBE INDESIGN CC CLASSROOM IN A BOOK (2015 RELEASE) 121
4 In the Align panel, choose Align To Page from the Align To menu, and then click the Align Horizontal Centers button ( ). The objects are now aligned to the center of the page.
Top: Select the text frame and logo. Center: Align the objects. Bottom: Result.
5 Click a blank area or choose Edit > Deselect All.
6 Use the scroll bar at the bottom of the document window to show more of the pasteboard on the left of page 2. You’ll see seven program icons.
7 Using the Selection tool ( ), select the graphics frame at the upper-left corner of the calendar, and then Shift-click to select the seven graphics frames.
8 In the Align panel, choose Align To Key Object from the Align To menu. Notice that the first graphics frame you selected now has a thick blue border, indicating it’s the key object.
9 Click the Align Right Edges button ( ).
10 Choose Edit > Deselect All, and then choose File > Save.
�Note: When you specify a key object, the alignment of the other selected objects will be relative to the key object’s position.
E Tip: InDesign automatically assigns the object you selected first as the key object. To change the key object once you’ve selected all objects to be aligned, click the object that should be the key object. A thicker selection border will then appear around that object.

122 LESSON 4 Working with Objects
Scaling multiple objectsIn earlier versions of InDesign you could transform multiple objects only by using the transform tools or by first grouping the objects. You can now scale multiple selected objects without the need to select a transform tool first or group objects.
Next you’ll select two of the icons and resize both of them at once.
1 Use the Zoom tool ( ) to zoom in on the two Acrobat icons on the left side of the page.
2 Using the Selection tool ( ), click the first of the icons to select it, and then Shift-click the second icon to select both.
3 Press Shift+Ctrl (Windows) or Shift+Command (Mac OS), and then drag the handle at the upper-left corner down and to the right to make the two icons the same width as the Adobe Photoshop icon above the selected icons. A Smart Guide is displayed when the left edges of the selected frames align with the frame above.
Drag to resize the selected icons.
Result.
4 Choose Edit > Deselect All, and then choose File > Save.
Selecting and modifying grouped objectsEarlier you aligned the “evolve” logo at the top of page 2 to the center of the page. Now you’ll change the fill color of some of the logo’s shapes. Because they’re grouped, you can select and modify them as a unit. You’ll now change the fill color of just a few of the shapes without ungrouping or changing the other objects of the group.
The Direct Selection tool, or a set of commands in the Object menu (Object > Select), lets you select individual objects in a grouped object.
1 Choose View > Fit Spread In Window.

ADOBE INDESIGN CC CLASSROOM IN A BOOK (2015 RELEASE) 123
2 With the Selection tool ( ), click the “evolve” group at the top of page 2. If you want, use the Zoom tool ( ) to magnify the area you’re working on.
3 Click the Select Content button ( ) in the Control panel to select one object in the group without ungrouping.
Select the group with the Selection tool.
Choose Select Content. Result.
4 Click the Select Previous Object button ( ) in the Control panel six times to select the first “e” in the word “evolve.” Note that the Select Next Object button selects in the opposite direction.
Click Select Previous Object six times.
Result.
5 Using the Direct Selection tool ( ), hold down the Shift key and click the “v,” “l,” “v,” and “e” letters in the logo to simultaneously select them.
6 Click the Swatches panel icon or choose Window > Color > Swatches. Click the Fill box at the top of the Swatches panel and choose [Paper] to fill the letter shapes with a white color.
Result.Change the fill of the selected shapes to [Paper].
E Tip: You can also select an object in a group by double-clicking the object with the Selection tool, by selecting the group and choosing Object > Select > Content, or by right-clicking (Windows) or Control-clicking (Mac OS) the group and choosing Select > Content from the context menu.

124 LESSON 4 Working with Objects
Creating a QR codeInDesign lets you quickly generate and edit high-quality quick response (QR) code graphics. QR codes are machine-readable printed representations of data for various industry uses and have become common in consumer advertising. A consumer with a smartphone can install a QR-code scanner app that can read and decode the URL information and redirect the phone’s browser to a company website. After scanning QR codes, users may receive text, add a business card contact to their devices, open a web hyperlink, or compose an e-mail or text message.
The QR code generated in InDesign is a high-fidelity graphic object that behaves exactly like other InDesign objects. You can easily scale the object and fill it with color, apply transparency effects, or copy and paste the object as a vector graphic into a standard graphics editor tool such as Adobe Illustrator.
Next, you’ll add a QR code to the back page of the newsletter and configure it to open a web page.
1 Navigate to page 4 of the document (the back cover), and then choose View > Fit Page In Window to center the page.
2 Choose Object > Generate QR Code.
3 Choose each of the options in the Type menu to view the associated controls, and then choose Web Hyperlink.
4 In the URL field, enter http://www.adobe.com (or the complete URL for any website you want).
5 Click OK to close the dialog box.
E Tip: Click the Color tab in the Generate QR Code dialog box to apply a swatch color to the code.
E Tip: To edit a QR code, right-click the code with the Selection tool, and then choose Edit QR Code from the context menu or choose Object > Edit QR Code.

ADOBE INDESIGN CC CLASSROOM IN A BOOK (2015 RELEASE) 125
6 Click the intersection of the margin guides at the lower-left corner of the page, and then drag upward until the edge of the frame aligns with the first column guide.
Finishing upNow it’s time to admire your work.
1 Choose Edit > Deselect All.
2 Choose View > Fit Spread In Window.
3 At the bottom of the Tools panel, hold down the current screen mode button ( ) and choose Preview from the hidden menu that appears. Preview mode is an ideal way to see what a document will look like when printed. Preview mode displays artwork as if it were output, with all nonprinting elements suppressed (grids, guides, frame edges, nonprinting objects) and the pasteboard set to the preview color defined in Preferences.
4 Press the Tab key to close all the panels at the same time. Press the Tab key again when you are ready to show all the panels.
5 Choose File > Save.
Congratulations. You have finished the lesson.
Exploring on your ownOne of the best ways to learn about frames is to experiment on your own.
In this section, you’ll learn how to nest an object inside a frame. Follow these steps to learn more about selecting and manipulating frames:
1 Create a new (Print) document using the default settings in the New Document dialog box.
2 Use the Ellipse Frame tool ( ) to create a small circular text frame, approximately 12p0 x 12p0". (Press the Shift key as you drag to constrain the shape to a circle.)

126 LESSON 4 Working with Objects
3 Select the Type tool and then click within the frame to convert it to a text frame.
4 Choose Type > Fill With Placeholder Text to fill the frame with text.
5 Press the Esc key to switch to the Selection tool, and then use the Swatches panel to apply a fill color to the text frame.
6 Select Edit > Deselect All, and then select the Polygon tool ( ). Draw a shape on the page. (Before creating the polygon, you can double-click the Polygon tool to specify the number of sides and optionally a star inset value if you want to create a starburst shape.)
7 Select the Selection tool ( ), select the text frame you created earlier, and then choose Edit > Copy.
8 Select the polygon frame, and then choose Edit > Paste Into to nest the text frame inside the polygon frame. (If you choose Edit > Paste, the copied text frame is not pasted inside the selected frame.)
9 Use the Selection tool to move the text frame by positioning the pointer within the content grabber in the center of the polygon frame and then dragging.
10 Use the Selection tool to move the polygon frame and its content by positioning the pointer outside the content grabber and then dragging.
11 Choose Edit > Deselect All.
12 Select the Direct Selection tool ( ), use it to select the polygon frame, and then drag any of the handles to change the shape of the polygon.
13 When you have finished experimenting, close the document without saving.

ADOBE INDESIGN CC CLASSROOM IN A BOOK (2015 RELEASE) 127
Review questions1 When should you use the Selection tool to select an object, and when should you use
the Direct Selection tool to select an object?
2 How do you resize a graphics frame and its content simultaneously?
3 How do you rotate the graphic within a graphics frame without rotating the frame?
4 Without ungrouping objects, how do you select an object within a group?
Review answers1 Use the Selection tool for general layout tasks, such as positioning, rotating, and resizing
objects. Use the Direct Selection tool for tasks involving editing paths or frames, such as moving an anchor point on a path or selecting an object within a group and then changing the object’s fill or stroke color.
2 To resize a graphics frame and its content simultaneously, select the frame with the Selection tool, hold down Ctrl (Windows) or Command (Mac OS), and then drag a handle. Add the Shift key while dragging to maintain the object’s and content’s proportions. Alternatively, you can enable the Auto-Fit feature for a selected graphics frame and resize it without the need to hold down the Ctrl (Windows) or Command (Mac OS) key.
3 To rotate a graphic within a frame, use the Selection tool to select the graphic within the frame by clicking within the content grabber. Then position the pointer slightly outside any of the four corner handles and drag to rotate the graphic. Add the Shift key while dragging to constrain rotation to increments of 45°. You can also rotate a selected graphic by changing the Rotation Angle value in the Control panel.
4 To select an object within a group, use the Selection tool ( ) to select the group, and then click the Select Content button ( ) in the Control panel to select one object in the group. You can then click the Select Previous Object or Select Next Object button to select different objects in the group. You can also select an object in a group by clicking the object with the Direct Selection tool ( ) or double-clicking it with the Selection tool.

410 INDEX
INDEX
Angle, transparency settings, 349Animation
adjusting timing of, 396custom motion path for creating,
394–396motion presets for creating
animation, 392–393Animation panel, 393Application bar
accessing layout aids and Adobe resources from, 15
illustration of, 9managing windows, 17selecting Guides from View
Options menu, 37Zoom Level box, 25
Arabic numbers, page numbering styles, 76–77
Arrange Documents button, in managing windows, 17
Attributes, applying paragraph attributes, 175
Autocorrect, misspelled words, 163Auto-Fit option, enabling for graphics
frame, 104Automatically flowing text, 140–141Auto-Size feature, resizing text frames,
132–133
B
Background layer, 331Backgrounds
alpha channels and, 284creating clipping paths, 281–282examining Photoshop paths and
alpha channels, 285–287importing Photoshop file with
alpha channels, 284–285removing white background,
282–284using Photoshop paths and alpha
channels, 287–288Balance Ragged Lines
adjusting line breaks, 191Paragraph panel options, 194
importing files with alpha channels, 284–285
importing files with layers and layer comps, 288–289
use of bitmap graphics by, 275use of paths and alpha channels,
287–288working with clipping paths,
281–282Adobe Single-line Composer
adjusting text spacing, 189composition methods and,
192–193Adobe Typekit
adding fonts from, 176–177font library, 154
Alerts, indicating missing font, 153Align panel, 120–121Align Right option, Paragraph Styles
panel, 66Alignment
adjusting vertical alignment, 97–98aligning multiple objects, 120–121changing paragraph alignment,
185–186of drop caps, 188–189of multiple objects, 120–121of objects, 118smart guides for, 91of text using baseline grid, 173–174
All Caps style, 158Alpha channels
examining Photoshop paths and, 285–287
importing Photoshop file with, 284–285
using Photoshop paths and, 287–288
Altitude, transparency settings, 349Anchor points, reshaping text frames,
94–95Anchored graphics frames
adding wrapped text to, 291–293anchoring graphics in cells,
321–322creating, 290–291
A
Acrobat Pro. See Adobe Acrobat Pro DCAcrobat Reader. See Adobe Acrobat
Reader DCActions menu, 401Adobe
accessing Adobe resources from Application bar, 15
text composition options, 192–193Adobe Acrobat Pro DC
adding graphics to InDesign, 275opening exported PDF with, 385viewing layered PDF file, 363
Adobe Acrobat Reader DCopening exported PDF with, 385viewing layered PDF file, 363
Adobe Bridgeadding metadata captions to
graphics frames, 106importing graphics, 299–300, 302
Adobe Color CC app, 224Adobe Digital Editions, 404Adobe Illustrator CC
adding graphics to InDesign, 275color management with, 209importing and adjusting files that
use transparency, 340–341importing files with layers,
293–294use of vector graphics by, 275
Adobe Paragraph Composeradjusting line breaks, 191adjusting text spacing, 189composition methods and,
192–193Adobe PDF (Portable Document Format)
creating PDF proof, 361–363exporting interactive PDFs, 385form fields. See Form fields, PDFviewing layered PDF file, 363
Adobe Photoshop CCadding graphics to InDesign, 275color management with, 209colorizing grayscale images, 333examining paths and alpha
channels, 285–287

ADOBE INDESIGN CC CLASSROOM IN A BOOK (2015 RELEASE) 411
Baseline gridsaligning text using, 173–174viewing, 174–175
Basic Featherfeathering image edge, 343–344types of feathering effects, 343
Best practices, InDesign, 53Bevel, transparency effects, 343Bitmap graphics
applying transparency to, 339colorizing grayscale images, 333vs. vector graphics, 275–276
Bleeddefining document settings, 59–60Print dialog box options, 368–369
Bleed modepreviewing pages, 367Screen Mode options, 37
Blending modesapplying generally, 336–337applying transparency to bitmap
graphic, 339applying transparency to text, 342applying transparency to vector
graphic, 337–338Effect panel and, 334transparency settings, 349
BMP files, colorizing grayscale images, 333
Bold, font styles, 42, 154Borders, adding to tables, 317–318Bridge. See Adobe BridgeBulleted lists, indentation of, 198Buttons
adding radio buttons to PDF form, 380–381
animating, 395–396converting objects or groups
into, 384states of, 384for submitting PDF form, 384
Buttons and Forms paneladding button for submitting PDF
form, 384adding check boxes to PDF
form, 381adding combo boxes to PDF
form, 381–382adding descriptions to PFD form
fields, 383adding radio buttons to PDF form,
380–381adding text fields to PDF form,
379–380choosing button type, 399
C
Calibration, of monitors, 212Capitalization
adjusting drop cap alignment, 188–189
Drop Caps, 187–189, 269spell checking and, 162using Small Caps style for
abbreviations, 158Caption Setup dialog box, 106–107Captions
adding metadata captions to graphics frames, 106–107
creating static, 131CC (Creative Cloud) Libraries
adding color theme to, 222–223applying colors, 224–225creating color themes, 221creating colors, 216creating PANTONE color swatch,
216–217creating/using, 297managing color themes, 224placing graphics from, 298sharing assets via, 45
Cell stylesapplying, 325–326creating, 260–263, 323–325globally updating, 266–267
Cellsanchoring graphics in, 321–322converting to graphic cells,
318–319editing cell strokes, 316–317merging, 314placing images in graphic cells,
319–320resizing column widths and, 313
Change Format Settings dialog box, 157–158
Changes, tracking, 166–167Character Formatting Control icon,
Control panel, 44Character panel
adjusting vertical spacing, 173–174applying fonts, 178
Character stylesapplying, 248–249creating, 247–248creating nested, 250–255formatting text, 44–46globally updating, 266–267loading from another document,
268–269options for styling text, 40overview of, 42
Character Styles panel, 21–22, 187
Charactersadding special characters, 180–181displaying hidden, 97finding/changing formatting,
157–158inserting fraction characters,
182–183replacing with an alternate glyph,
179–180showing hidden, 194
Check boxes, adding to PDF form, 381Check Spelling dialog, 160Choke, transparency settings, 349Clear Effects button, 351Click state, buttons, 384Clicking, options for tool selection, 12Clipping paths
removing white background, 282–284
working with, 281–282CMYK (cyan, magenta, yellow, and
black)adding colors to group, 236–237color management and, 209Composite CMYK option in Print
dialog box, 369converting color mode of
swatches, 215converting spot color to, 373creating colors, 216creating preflight profile, 359defining printing requirements,
213–215Ink Manager and, 372–373previewing color separations,
364–365spot color vs. process color, 220swatches, 218–219
Color CC app, from Adobe, 224Color panel
creating CMYK color swatch, 218–219
creating colors, 216when to use for color, 217
Color Settings dialog box, 210Color settings file (CSF), 210Color Theme tool
adding themes to CC Library, 222–223
applying themes to Swatches panel, 222
viewing themes, 221Colors
adding to groups, 236–237adjusting direction of gradient
blend, 234–235applying color swatches, 224–225applying shading to paragraphs,
200–201

412 INDEX
Colors (continued)applying to objects, 225–227applying to strokes, 227–228applying to text, 44, 228–230calibrating monitors for, 212changing color of stroke, 188changing opacity of solid-color
objects, 335–336colorizing grayscale images,
331–333controlling in work environment, 211converting color mode of
swatches, 215creating and applying gradient
swatches, 233–234creating and applying tint
swatches, 231–232creating and using themes, 221–223creating CMYK color swatch,
218–219creating PANTONE color swatch,
216–217defining printing requirements, 213deleting unused, 236displaying images at full
resolution, 209experimenting with, 238getting started, 208illustration, 207lesson overview, 206loading and using preflight profile
for, 213–215modifying interface preferences, 31previewing color separations,
364–365previewing in final document, 237profiling onscreen, 211–212review Q&A, 239settings, 210spot color vs. process color, 220working with color groups, 236working with gradients, 232
Columnsadding rules above paragraphs,
198–199adjusting length of, 144–145adjusting width of, 312–314balancing, 184–185Column Break option, 131creating from text frames, 134creating headline that straddles
multiple, 183–184creating layout for additional
master page, 69–70creating multi-column text frames,
96–97entering text into, 155layout settings, 67setting for selected pages, 76
Combo boxes, adding to PDF form, 381–382
Command, for command-line options in Mac OSs, 11
Composition, Adobe text composition options, 192–193
Content Collector tool, 107–108Content Conveyor, 107–108Content grabber, 103Context menus
accessing commands from, 104displaying, 30
Contrast, Medium Light interface, 36Control panel
accessing editing options, 14–15applying colors, 224–225applying shading to paragraphs, 200applying strokes, 109Balance Columns option, 184–185baseline grid controls in, 175changing size of document pages,
75–76Character Formatting Control
icon, 44illustration of, 9moving, 23Paragraph Formatting controls, 244rotating objects, 118–120
Copy (written). See TextCopyright symbols, 180Creative Cloud (CC) Libraries. See CC
(Creative Cloud) LibrariesCrop Marks, Print dialog box, 368Cropping
images with selection tool, 48resizing graphic frames when, 100
CSF (color settings file), 210Ctrl, for command-line options in
Windows OSs, 11Customization
creating/saving custom settings, 59–60
of workspace, 24Cyan, magenta, yellow, and black.
See CMYK (cyan, magenta, yellow, and black)
D
Deselect All, 66–67Detect Edges option, 282–283Dictionary, adding words, 161Digital publishing document.
See EPUB (Fixed Layout)Dimensions, smart guides for, 91Direct Selection tool
reshaping text frames, 94–95selecting and modifying groups of
objects, 122–123
Directional Feathers, 343Display Performance menu, 209Display quality, adjusting quality of
graphics, 280–281Distance, transparency settings, 349Document pages. See PagesDocument Presets, 59Document setup
adding guides to master pages, 62–63
adding new document pages, 74adding placeholders for graphics,
68–69adding placeholders for text, 67–68applying master pages to document
pages, 72–73changing size of document pages,
75–76creating additional master page,
69–70creating document for EPUB fixed
layout, 391–392creating new document, 60–61creating sections to change page
numbering, 76–77creating text frame on master page,
65–67creating/saving custom settings,
59–60dragging guides from rulers, 63–65experimenting with, 82getting started, 58hiding guides and frames, 80–81illustration of, 57modifying parent master, 71–72overriding master items, 70–71overriding master items and
placing text and graphics, 78–80
rearranging/deleting document pages, 74–75
renaming master page, 67review Q&A, 83rotating spread, 81switching between open
documents, 62Document window
characteristics of, 15–16illustration of, 9working with multiple, 17–18
Dot Gain settings, profiling colors onscreen, 212
Drag and dropediting text, 164guides from rulers, 63–65placing objects, 50positioning graphics, 48
Drawing tools, use of vector graphics by, 275

ADOBE INDESIGN CC CLASSROOM IN A BOOK (2015 RELEASE) 413
Drop Capsadjusting alignment, 188–189creating, 187loading styles from another
document, 269Drop Shadows
adding to text, 346creating object styles and, 258transparency effects, 343
Dynamic Preview, 103Dynamic spell checking, 162
E
Editingcell strokes, 316–317Edit menu, 210effects, 350–351
Editing textadding words to dictionary, 161checking spelling, 160checking spelling dynamically, 162correcting misspelled words, 163by dragging and dropping, 164entering text, 155experimenting with, 168finding/changing formatting,
158–159finding/changing missing fonts,
153–154finding/changing text, 157–158getting started, 152–153illustration of, 151importing text, 155–156lesson overview, 150review Q&A, 169with Story Editor, 165–166tracking changes, 166–167
Effectsadding drop shadow to text, 346applying feathering to image edge,
343–344applying gradient feather, 344–345applying multiple effects to objects,
346–348Drop Shadow effect, 258editing and removing, 350–351working with, 342–343
Effects panelapplying blending modes, 336–337applying transparency to bitmap
graphic, 339applying transparency to text, 342applying transparency to vector
graphic, 337–338changing opacity of solid-color
objects, 335–336editing and removing effects, 350–351overview of, 334
Ellipse Frame tool, 12–14Em space, adding, 66Emboss
applying multiple effects to objects, 346–348
transparency effects, 343Environment, controlling color and
light, 211EPUB (Fixed Layout)
adding movies, 397–398adding sound, 398–399adjusting timing of animations, 396creating hyperlinks, 402creating new document for,
391–392creating slideshows, 400–402custom motion path for creating
animation, 394–396EPUB Interactivity Preview
panel, 394experimenting with, 405–408exporting EPUB files, 403–405getting started, 390–391illustration of, 389lesson overview, 388motion presets for creating
animation, 392–393review Q&A, 409
EPUB (Reflowable), 390EPUB Interactivity Preview panel
adding movies, 397–398adding sound to EPUB document,
398–399adjusting timing of animations, 396creating hyperlinks, 402creating hyperlinks and, 402creating slideshows, 400–402previewing animations, 393–396
Errors, preflighting and, 38Events
adding new action for selected event, 401
adjusting timing of animations, 396Excel. See Microsoft ExcelExplorer (Windows OS), showing
imported files in, 278Export dialog box, 403Exporting
EPUB files, 403–405interactive PDFs, 385
Exporting and printing. See Printing and exporting
Eyedropper toolapplying colors, 225applying fill color to objects,
225–227creating colors, 216when to use, 217
F
Featheringapplying gradient feather, 344–345applying to image edge, 343–344transparency effects, 343
Filesadjusting display quality of
imported file, 280–281colorizing grayscale images,
332–333exporting EPUB files, 403–405importing and adjusting Illustrator
files that use transparency, 340–341
importing native graphics files, 288importing Photoshop file with
alpha channels, 284–285importing Photoshop file with
layers and layer comps, 288–289
loading Type tool with multiple text files, 136
managing links to imported graphics files, 276
Open option, 79packaging, 360–361Place option, 78–79preflighting, 357–358Save As option, 78specifying export settings, 403using snippet files (.inds), 301vector graphics vs. bitmap
graphics, 275–276viewing imported, 278viewing information about linked
files, 277–278viewing layered, 363viewing linked graphics and text
files, 275Fill
adding fill color to tables, 316adding fill pattern to tables, 315applying fill color to objects, 49–51,
225–227applying fill color to text, 44colorizing grayscale images,
332–333Find Font dialog box, 153–154Find/Change dialog box
finding/changing formatting, 158–159
finding/changing text, 157–158Finder (Mac OS), 278Fine-tuning columns, 183Fit Frame To Content, 100Fit Page In Window, 16Fit Spread in Window, 25

414 INDEX
Flattening, previewing transparency effects, 365–366
Floating panels, expanding/collapsing, 20Flowing text
adding jump line page number, 146–147
adding pages and, 141adjusting columns, 144–145applying paragraph styles, 132,
142–144automatically, 140–141creating text frames and, 136–137creating threaded frames
automatically, 138–139experimenting with, 147getting started, 130illustration of, 129importing and, 40–42, 131–132lesson overview, 128manually, 134–135resizing text frames automatically,
132–133review Q&A, 148–149
Font menu, 179Font Style
applying, 178creating character styles, 247, 251finding/changing fonts, 154options, 40working with, 42
Fontsadding from Adobe Typekit,
176–177adding missing, 154applying, 178changing missing, 153–154creating drop caps, 187downloading PPD fonts, 371finding, 153–154, 179impact of different fonts on text
frames, 42OpenType fonts, 181options for downloading to
printers, 372Print dialog box and, 369syncing, 8
Form fields, PDFadding button for submitting
form, 384adding descriptions, 383check boxes, 381combo boxes, 381–382experimenting with, 386exporting interactive PDFs, 385getting started, 378illustration of, 377lesson overview, 376radio buttons, 380–381review Q&A, 387
setting tab order for fields, 383text fields, 379–380
Formatting. See also Stylesadding fill color to tables, 316adding fill pattern to tables, 315best practices, 53editing cell strokes, 316–317finding/changing, 158–159objects, 255–256overriding manual formatting with
styles, 243tables, 315
Fractions, inserting fraction characters, 182–183
Framesconverting into PDF form field, 379Frame Break option, 131graphics frames. See Graphics frameshiding, 80–81text frames. See Text frames
FX button, Effect panel, 334
G
Gap tool, adjusting space between graphics frames, 104–105
Global update, of styles, 266–267Glow effect
applying multiple effects, 346–348inner and outer glow, 343
Glyphsadding special characters, 180–181Glyphs panel, 179inserting fraction characters,
182–183replacing characters with an
alternate glyph, 179–180Gradient Feather
applying, 344–345editing and removing, 350–351types of feathering effects, 343
Gradient Swatch tool, 234–235Gradient tool, 232Gradients
adjusting direction of gradient blend, 234–235
creating and applying gradient swatches, 233–234
working with, 232Graphics
adding from other programs, 275adding placeholders for graphics
frames, 68–69adding to library, 296adding wrapped text to anchored
graphics frame, 291–293adjusting display quality, 280–281Adobe Bridge for importing,
299–300, 302
building blocks of layout, 35converting cells to graphic cells,
318–319creating anchored graphics frame,
290–291creating/using CC libraries, 297drawing new graphics frame, 99experimenting with, 302getting started, 274–275identifying imported images,
276–277illustration of import process, 273importing Illustrator file with
layers, 293–294importing Photoshop file with
alpha channels, 284–285importing Photoshop file with
layers and layer comps, 288–289
importing to InDesign library, 296, 299
lesson overview, 272managing links to imported files, 276managing objects using libraries,
295–296options for printing, 371placing graphics from CC
library, 298placing images in graphic cells,
319–320preflighting files and, 357–358removing white background,
282–284review Q&A, 303showing files in Windows Explorer
or Mac Finder, 278snippet use, 301updating revised graphics, 278–280vector graphics vs. bitmap
graphics, 275–276viewing information about linked
files, 277–278viewing linked graphics and text
files, 275working with, 46–48working with alpha channels,
284–288working with clipping paths,
281–282working with layers, 88–89
Graphics framesadding metadata captions to,
106–107adding placeholders for, 68–69adding wrapped text to anchored
frame, 291–293adjusting space between, 104–105building blocks of pages, 49changing shape of, 110–112

ADOBE INDESIGN CC CLASSROOM IN A BOOK (2015 RELEASE) 415
colorizing grayscale images, 332–333
creating anchored, 290–291drawing new, 99modifying and updating parent-
child frames, 108–110modifying frame shape, 114placing and linking, 107–108placing graphics in, 46, 100–102resizing and moving images in,
102–104resizing when cropping, 100rotating objects, 119–120wrapping text around a graphic,
112–114Graphics layer
drawing new graphics frame, 99working with layers, 88–89
Grayscale imagesComposite Gray option in Print
dialog box, 369importing/colorizing, 331–333profiling colors onscreen, 212
Grids. See also Tablesaligning text using baseline grid,
173–174entering text into, 155placing multiple graphics in,
101–102viewing baseline grid, 174–175
Groupsadding color to, 236–237animating, 392converting into buttons, 384selecting and modifying, 122–123working with color groups, 236working with style groups, 132
Guidesadding to master pages, 62–63dragging from rulers, 63–65entering text, 155hiding, 80–81placing objects, 35, 49–50sizing objects, 35viewing layout, 37
Guides & Pasteboard preferences, 91
H
Hand toolcentering page spread in document
window, 62navigating documents, 29selecting and using, 11–12
Hanging indents, 197–198Headers, creating header row, 322–323Headlines, that straddle multiple
columns, 183–184
Hidden Charactersdisplaying, 97selecting options from View
Options menu, 37showing when importing text, 131showing when working with
tabs, 194Horizontal alignment, changing
paragraph alignment, 185–186Horizontal rulers, dragging guides
from rulers, 63–65Hyperlinks, creating, 402Hyphenation
adjusting line breaks, 191settings, 193
I
Illustrator. See Adobe Illustrator CCImages. See also Graphics
cropping, 48displaying at full resolution, 209feathering edge of, 343–344grayscale images, 212, 331–333, 369identifying imported, 276–277placing in cells, 319–320raster images, 358resizing and moving in frames,
102–104Importing
Illustrator files that use transparency, 340–341
snippets, 71–72tables, 309text, 40–42, 155–156text into existing frame, 131–132
Importing graphicsadding from other programs, 275adding to library, 296adding wrapped text to anchored
graphics frame, 291–293adjusting display quality, 280–281Adobe Bridge for importing,
299–300, 302creating anchored graphics frame,
290–291creating/using CC libraries, 297experimenting with, 302getting started, 274–275grayscale images, 331–333identifying imported images,
276–277illustration of import process, 273importing Illustrator file with
layers, 293–294importing Photoshop file with
alpha channels, 284–285
importing Photoshop file with layers and layer comps, 288–289
importing to InDesign library, 296, 299
lesson overview, 272managing links to imported files, 276managing objects using libraries,
295–296placing graphics from CC
library, 298removing white background,
282–284review Q&A, 303showing files in Windows Explorer
or Mac Finder, 278snippet use, 301updating revised graphics, 278–280vector graphics vs. bitmap
graphics, 275–276viewing information about linked
files, 277–278viewing linked graphics and text
files, 275working with alpha channels,
284–288working with clipping paths,
281–282Indentation, creating hanging indents,
197–198InDesign, getting to know
applying paragraph styles, 43–44best practices, 53building blocks of layout, 35changing object stroke and fill,
50–51experimenting with, 54formatting text using character
styles, 44–46getting started, 36importing and flowing text, 40–42moving/rotating objects, 49preflighting as you work, 38–39review Q&A, 55typing and styling text, 39–40viewing document in Presentation
mode, 52–53viewing layout guides, 37working with graphics, 46–48working with object styles, 51–52working with styles, 42
Info panel, opening/closing, 18–19Ink Manager, managing printing with,
372–373Inkjet printers, 367–370Inner Glow, transparency effects, 343Inner Shadow, transparency effects, 343Insert Pages options, Pages panel, 74

416 INDEX
Interface. See WorkspaceInterface prefaces, 31–32Isolate blending, Effect panel, 334Italics
selecting italic option for text, 44–46
working with font styles, 42
J
JPEG files, 333Jump lines, 146–147
K
Keep Options, Paragraph Styles panel, 131
Kerning, adjusting space between letters or words, 189–191
Keyboard shortcutsadding to existing styles, 270applying styles, 243changing, 32for character styles, 244creating, 245–246, 248–249for Fit Frame To Content, 320formatting text, 243navigating documents, 27, 62for tool selection, 11–12for view magnification (zoom), 25
Keyboard Shortcuts dialog box, 32Knockout Group, Effect panel and, 334
L
LAB color. See RGB (red, green, and blue)
Language settings, spell checking and, 163
Laser printers, 367–370Layer comps, importing Photoshop file
with, 288–289Layers
about, 87best practices, 53importing Illustrator file with,
293–294importing Photoshop file with,
288–289viewing layered PDF file, 363working with, 87–90, 331
Layers panelabout layers, 87applying transparency to bitmap
graphic, 339applying transparency to text,
341–342
applying transparency to vector graphic, 337–338
changing opacity of solid-color objects, 335–336
changing shape of graphics frames, 111–112
creating polygons and converting shapes, 115–117
drawing new graphics frame, 99editing and removing effects,
350–351importing and adjusting Illustrator
files that use transparency, 340–341
working with layers, 87–90, 331Layout
accessing layout aids from Application bar, 15
building blocks of, 35consistency in, 57creating for additional master page,
69–70of EPUB document. See EPUB
(Fixed Layout)importing snippets to complete, 79margin and column settings, 67–68viewing Guides, 37
Layout menu, 28Leading
applying fonts, 178setting, 174
Leading menu, 173–174Levels, Effect panel and, 334Libraries
creating InDesign library, 296, 299creating/using CC Libraries, 297managing objects, 295–296placing graphics from CC
Libraries, 298sharing assets via CC Libraries, 45
Light, controlling in work environment, 211
Line tool, in workspace, 11–12Lines. See also Rules (lines)
adding jump lines to pages, 146–147
adjusting line breaks, 191adjusting ragged, 194
Linksto graphics frames, 107–108managing, 276preflighting files and, 357–358status icons, 280to tables, 309updating, 109–110viewing information about linked
files, 277–278viewing linked files, 275
Links paneladjusting display quality of
imported file, 280–281caption setup, 106–107identifying imported images,
276–277link status icons, 280managing links, 276modifying and updating parent-
child graphics frames, 108–110
placing and linking graphics frames, 107–108
preflighting files and, 358Update Link button, 109–110updating revised graphics, 278–280viewing information about linked
files, 277–278viewing linked graphics and text
files, 275List boxes
combo boxes compared with, 382creating PDF forms, 379
Lists, bulleted, 198Live Preflight feature, 38–39
M
Mac OSsCommand, 11Finder, 278
Magnification of documentsView options, 25Zoom tool, 26–27
Manually flowing text, 134–135Margins
adding guides to master pages, 62–63
creating layout for additional master page, 70
entering text and, 155hanging punctuation outside, 186layout settings, 67–68setting, 76, 173
Master pagesadding guides to, 62–63applying to document pages, 72–73creating additional, 69–70creating text frame on, 65–67modifying parent master, 71–72overriding master items, 70–71overriding master items and
placing text and graphics, 78–80
in Pages panel, 61renaming, 67

ADOBE INDESIGN CC CLASSROOM IN A BOOK (2015 RELEASE) 417
Media paneladding movies, 397–398adding movies to EPUB document,
397–398adding sound, 398–399
Medium Light interface, contrast and, 9
Menu bar, illustration of, 9Menus
context menus, 30, 104customizing workspace, 24Display Performance menu, 209Edit menu, 210Font menu, 179Layout menu, 28Leading menu, 173–174panel menus, 30–31popout menus, 12Screen Mode menu, 52–53Search menu, 157–158, 160Type Style menu, 44–46View menu, 16, 25, 37, 100, 212View Threshold menu, 174Window menu, 62
Metadata, adding captions to graphics frames, 106–107
Microsoft Excel, importing tables from, 309
Microsoft Wordimporting tables from, 309importing text from, 40–41
Misspelled words, automatically correcting, 163
Mixed ink color, 220Monitors (displays)
Calibration of, 212displaying images at full
resolution, 209profiling colors onscreen, 211–212work environment and, 211
Motion path, in creating animation, 394–396
Motion presetsin creating animation, 392–393defined, 392
Mouse, resizing objects and, 14Movies, adding to EPUB project,
397–398Multimedia, adding to EPUB
project, 397
N
Names, renaming master page, 67Navigating documents
Hand tool for, 29turning pages, 27–28
Nested stylescreating character styles, 250–255loading from another document, 269
New Document dialog boxcreating new digital document, 391creating new document, 60–61defining presets, 59
Noise, transparency settings, 349Notes panel, inserting notes and
tracking changes, 166
O
Object States panel, 400–401Object styles
applying, 259creating, 257–258formatting objects for, 255–256globally updating, 266–267overview of, 42working with, 51–52
Objectsadding metadata captions to
graphics frames, 106–107adding rounded corners to graphics
frames, 117–118adjusting space between graphics
frames, 104–105adjusting text inset and vertical
alignment, 97–98aligning multiple, 120–121animating, 392applying blending modes, 336–337applying fill colors, 225–227applying multiple effects, 346–348building blocks of layout, 35changing object stroke and fill, 50–51changing opacity of, 335–336changing shape of graphics frames,
110–112converting into buttons, 384creating multi-column text frames,
96–97creating polygons and converting
shapes, 115–117creating QR (quick response) code,
124–125creating/resizing text frames, 92–94drawing new graphics frame, 99experimenting with, 125–126formatting, 255–256getting started, 86illustration of, 85layers, 87–90lesson overview, 84managing using libraries, 295–296modifying and updating parent-
child graphics frames, 108–110
modifying frame shape, 114moving/rotating, 49placing and linking graphics
frames, 107–108placing graphics, 100–102reshaping text frames, 94–95resizing and moving images within
frames, 102–104resizing graphics frame when
cropping, 100review Q&A, 127rotating, 118–120scaling, 122selecting and modifying groups of,
122–123smart guides, 91transforming and aligning, 118working with compound shapes,
114–115wrapping text around a graphic,
112–114Opacity. See also Transparency
applying transparency to text, 341–342
changing opacity of solid-color objects, 335–336
editing and removing effects, 350–351
Effect panel and, 334transparency settings, 349
OpenType fonts, 179–181Optical Margin Alignment, 185–186Optimized Subsampling
options for printing graphics, 371Print dialog box, 369
Outer Glowapplying multiple effects to objects,
347–348transparency effects, 343
Output, preflighting as you work, 38–39Overset text
flowing, 135indicator for, 132, 137
P
Packaging files, 360–361Page Number character, 146–147Page tool, changing size of document
pages, 75–76Pages
adding guides to, 62–63adding jump lines to, 146–147adding new, 74adding while flowing text, 141adjusting column length, 144–145applying master pages to document
pages, 72–73

418 INDEX
Pages (continued)building blocks of, 49changing size of, 75–76creating, 61creating additional master page,
69–70creating sections to change
numbering, 76–77creating text frame on master page,
65–67Fit Page In Window, 16, 46formatting page elements, 35modifying parent master, 71–72overriding master items, 70–71overriding master items and
placing text and graphics, 78–80
previewing, 367rearranging/deleting, 74–75renaming master page, 67turning, 27–28view options, 78
Pages paneladding guides to master pages,
62–63adjusting column length, 144–145applying master pages to document
pages, 72–73changing size of document pages,
75–76creating additional master page,
69–70creating new document page, 61creating sections to change page
numbering, 76–77expanding/collapsing, 19Insert Pages options, 74rearranging/deleting document
pages, 74–75rotating spread, 81turning pages of a document, 27–28view options, 78
Panel dock, 20Panel menu, 30–31Panels. See also individual types
customizing workspace, 24expanding/collapsing, 19–20hiding/showing, 80illustration of, 9moving, 22–23opening/closing, 18–19rearranging/customizing, 20–22
Pantone coloradding colors to group, 236–237creating, 216Ink Manager and, 373previewing separations, 364–365swatches, 216–217
Paragraph Composer. See Adobe Paragraph Composer
Paragraph Formatting Controls, 244Paragraph panel
adding rules above paragraphs, 199adjusting drop cap alignment,
188–189Adobe Single-line Composer,
192–193applying shading to paragraphs,
200–201Balance Ragged Lines, 194changing spacing between
paragraphs, 175–176creating drop caps, 187
Paragraph stylesadding jump lines to pages, 146–147adjusting rules and updating,
201–202applying, 43–44, 246applying to sidebar text, 132applying to threaded text frames,
142–144changing spacing between
paragraphs, 175–176creating nested styles, 252–255creating styles, 244–246globally updating, 266–267importing text, 155–156loading from another document,
268–269options for styling text, 40overview of, 42
Paragraph Styles panelAlign Right, 66applying, 93Keep Options, 131rearranging/customizing panels,
20–22Paragraphs
adding rules above, 198–199adjusting drop cap alignment,
188–189adjusting line breaks, 191adjusting rules and updating
paragraph style, 201–202adjusting spacing of text in
paragraph, 189adjusting vertical spacing, 173–174aligning text using baseline grid,
174–175applying shading to, 200–201balancing ragged lines, 194changing alignment, 185–186changing spacing between,
175–176composition methods, 192–193
creating style based on formatting, 244
hyphenation settings, 193Parent-child relationships, modifying
and updating parent-child graphics frames, 108–110
Pasteboardcharacteristics of, 15–16illustration of, 9
PDF files. See Adobe PDF (Portable Document Format)
Photoshop. See Adobe Photoshop CCPlace dialog box
loading Type tool with multiple text files, 136
placing imported text, 41Place option, Files, 78–79Placeholders
for graphics, 68–69for text, 67–68
Polygon tool/Polygon Frame tool, creating polygons and converting shapes, 115–117
Popout menus, 12Portable Document Format. See Adobe
PDF (Portable Document Format)Poster pop-up menu, Media panel, 397PPD (printer description) software,
367, 371Precise, transparency settings, 349Preferences
baseline grids, 174drag and drop, 164Guides & Pasteboard preferences, 91modifying, 31–32spell checking, 162–163
Preflight panelcreating preflight profile, 359preflighting files, 357–358
Preflightingbest practices, 53creating profile for, 359files, 357–358loading and using color profile,
213–215Presentation mode
Screen Mode options, 37viewing document in, 52–53
PresetsAdobe PDF, 362color, 210motion presets for creating
animation, 392–393transparency flattener, 366
Preview modedisplaying documents in, 37indicator of missing font, 153selecting from Screen Mode menu,
52–53

ADOBE INDESIGN CC CLASSROOM IN A BOOK (2015 RELEASE) 419
Previewinganimations, 393–394colors in final document, 237how transparency effects are
flattened, 365–366pages, 367separations, 364–365
Print dialog box, 368Printer description (PPD) software,
367, 371Printing and exporting
creating Adobe PDF proof, 361–363
creating preflight profile, 359defining color requirements, 213experimenting with, 374getting started, 356illustration of, 355Ink Manager in, 372–373lesson overview, 354options for downloading fonts to
printers, 372options for printing graphics, 371packaging files, 360–361preflighting files, 357–358previewing how transparency
effects are flattened, 365–366previewing pages, 367previewing separations, 364–365printing laser or inkjet proof,
367–370review Q&A, 375viewing layered PDF file, 363
Process color vs. spot color, 220Profiles
of colors onscreen, 211–212creating, 359preflight color profile, 213–215
Proof Colors option, View menu, 212Proofs, creating PDF proof, 361–363Proxy, options for printing graphics, 371PSD files, colorizing grayscale
images, 333Punctuation, hanging outside
margins, 186
Q
QR (quick response) code, 124–125Quick Apply
applying colors, 225applying styles, 249
R
Radio buttons, adding to PDF form, 380–381
Raster images, 358Rectangle Frame tool
adding placeholders for graphics frames, 68–69
selecting and using, 12–14Recto, defining document settings, 60Red, green, and blue. See RGB
(red, green, and blue)Resizing. See SizeResolution
adjusting display quality, 280–281choosing for documents, 9displaying images at full
resolution, 209transparency flattener and, 366
RGB (red, green, and blue)color management and, 209creating colors, 216spot color vs. process color, 220
Rollover state, buttons, 384Roman numerals, page numbering
styles, 76–77Rotation
of objects, 49, 118–120of spread in document setup, 81
Rotation Angle field, 49Rows
adding, 310–311adjusting height of, 312–314,
319–320creating header row, 322–323deleting, 312
Rules (lines)adding above paragraphs, 198–199adjusting rules and updating
paragraph style, 201–202building blocks of pages, 49dragging guides from, 63–65entering text and, 155
S
Satin, transparency effects, 343Save As option, Files, 78Scaling multiple objects, 122Screen Mode
options, 37previewing pages, 367viewing document in Presentation
mode, 52–53Scrollable text fields, 379Search menu
finding/changing formatting, 157–158
finding/changing text, 157–158spell checking from, 160
Sections, creating sections to change page numbering, 76–77
Selection toolaccessing groups, 392accessing Hand tool from, 29accessing text frames, 41adding sound to EPUB document,
398–399adjusting frame height, 39cropping images, 48resizing images, 103resizing objects, 49selecting and using, 10–11
Send Data, options for printing graphics, 371
Separations, previewing color separations, 364–365
Settingscolors, 210transparency, 349
Shading, applying to paragraphs, 200–201
Shapeadding rounded corners to graphics
frames, 117–118changing shape of graphics frames,
110–112creating polygons and converting
shapes, 115–117modifying frame shape, 114working with compound shapes,
114–115Sharing styles, 243Signature fields, on PDF forms, 379Single-line Composer. See Adobe
Single-line ComposerSize
applying font sizes, 178resizing and moving images within
frames, 102–104resizing objects, 14resizing text frames, 92–94resizing text frames automatically,
132–133scaling multiple objects, 122transparency settings, 349
Slideshows, creating, 400–402Slug mode
defining document settings, 59previewing pages, 367Screen Mode options, 37
Small Caps style, 158Smart guides
creating and positioning objects, 91positioning circular graphic with, 109wrapping text around a graphic,
112–113

420 INDEX
Smart Text Reflow, 140–141Snapping objects, 49Snippets
adding, 301creating, 72, 301importing, 71–72importing to complete layout, 79
Softer, transparency settings, 349Sound (audio), adding to EPUB
project, 398–399Spacing
adjusting space between letters or words, 189–191
changing between paragraphs, 175–176
smart guides for, 91Span Columns dialog box, 183–184Special characters, 180–181Spell checking
adding words to user or document-specific dictionary, 161
automatically correcting misspelled words, 163
dynamically, 162overview of, 160
Spot coloradding to Swatches panel, 217converting to CMYK, 373creating PANTONE color swatch,
216–217vs. process color, 220
Spreadcentering in document window, 62Fit Spread In Window, 25, 28hiding guides and frames to view
complete, 80–81rotating, 81transparency settings, 349
States, button, 384Story
best practices, 53threaded text frames consisting
of, 43Story Editor, 165–166Stroke panel
applying colors to strokes, 227–228changing object stroke weight and
height, 50–51Strokes
adding table border, 317–318applying color to, 227–228applying to text, 188applying with Control panel, 109changing weight and height, 50–51editing cell strokes, 316–317working with objects, 49
Stylesapplying character styles, 248–249applying object styles, 259
applying paragraph styles, 246applying table styles, 265applying to page numbering, 76–77best practices, 53character styles, 44–46creating cell styles, 260–263creating character styles, 247–248creating nested character styles,
250–255creating new style, 45creating object styles, 257–258creating paragraph styles, 244–246creating table styles, 263–265experimenting with, 270font or type styles. See Type stylesformatting objects, 255–256formatting page elements, 35getting started, 242globally updating, 266–267illustration of, 241lesson overview, 240loading from another document,
268–270object styles, 51–52overview of, 243paragraph styles, 43–44Quick Apply option, 249review Q&A, 271Style groups, 132working with, 42
Swatchesapplying, 224–225converting color mode of, 215creating and applying gradient
swatches, 233–234creating and applying tint, 231–232creating CMYK color, 218–219creating PANTONE color, 216–217
Swatches paneladding colors to group, 236–237applying color themes, 222applying colors, 224–225applying colors to text, 228–230applying fill colors to objects,
225–227changing color of stroke, 188changing display of, 30–31colorizing grayscale images,
332–333converting spot color to CMYK, 373creating and applying gradient
swatches, 233–234creating and applying tint
swatches, 231–232creating CMYK color swatch,
218–219creating colors, 216creating PANTONE color swatch,
216–217
deleting unused colors, 236previewing color separations, 365working with object fill color, 50–51
T
Table stylesapplying, 265, 325–326creating, 263–265, 323–325creating cell styles, 260–263globally updating, 266–267
Tablesadding borders, 317–318adding fill color, 316adding fill pattern, 315adding rows, 310–311adjusting row height, 319–320anchoring graphics in cells,
321–322applying table and cell styles,
325–326building blocks of pages, 49converting cells to graphic cells,
318–319converting text to, 307–308creating, 307creating header row, 322–323creating table and cell styles,
323–325deleting rows, 312editing cell strokes, 316–317experimenting with, 326formatting, 315getting started, 306illustration of, 305importing, 309lesson overview, 304merging cells, 314placing images in graphic cells,
319–320rearranging rows and columns,
312–314review Q&A, 327
Tabsaligning text to tabs and adding
tab leaders, 194–195creating hanging indents, 197–198setting tab order for PDF form
fields, 383working with, 196
Tabs panelcreating hanging indents, 197–198setting tabs, 194–195
Technique, transparency settings, 349Text
adding drop shadows, 346adding placeholders for, 67–68adding rules above paragraphs,
198–199

ADOBE INDESIGN CC CLASSROOM IN A BOOK (2015 RELEASE) 421
adding text fields to PDF form, 379–380
adding to library, 296adding wrapped text to anchored
graphics frame, 291–293adjusting line breaks, 191adjusting text spacing in
paragraphs, 189aligning using baseline grid, 173–174applying character styles, 248–249applying colors to, 228–230applying paragraph styles, 43–44applying strokes to, 188applying transparency to, 341–342building blocks of layout, 35composition options, 192–193converting to tables, 307–308creating character styles, 247–248editing. See Editing textentering, 155finding/changing, 157–158flowing. See Flowing textformatting with character styles,
44–46handling overset text, 39importing, 40–42, 155–156keyboard shortcuts for
formatting, 243placing, 312–314selecting and using Type tool, 11Type context menu and, 30typing and styling text, 39–40viewing linked graphics and text
files, 275working with text styles, 42wrapping text around a graphic,
112–114Text fields, adding to PDF form,
379–380Text Frame Options dialog box,
96–98, 133Text frames
adding jump lines to pages, 146–147
adding placeholders for, 67–68adding rounded corners to,
117–118adding text and, 39adjusting text inset and vertical
alignment, 97–98applying paragraph styles to
threaded text frames, 142–144
best practices, 53building blocks of pages, 49changing paragraph alignment,
185–186creating hyperlink to website
using, 402
creating multi-column, 96–97creating on master pages, 65–67creating threaded frames
automatically, 138–139creating while flowing text, 136–137creating/resizing, 92–94editing with Story Editor, 165–166entering text, 155flowing text automatically, 140–141importing text, 155–156importing text into existing frame,
131–132options for styling text, 40–41overriding master items and
placing text and graphics, 80reshaping, 94–95resizing automatically, 132–133tables anchored in, 307
Text layers, working with, 88–89Text styles
applying character styles, 248–249applying paragraph styles, 43–44creating character styles, 247–248formatting with character styles,
44–46working with, 42
Text Wrap panel, 113–114Themes
adding color theme to CC Library, 222–223
applying color theme to Swatches panel, 222
managing color themes, 224selecting color themes, 216viewing color themes, 221
Threaded framesapplying paragraph styles to,
142–144creating automatically, 138–139in story, 43
Thresholds, removing white background, 283
Thumbnails, viewing with Adobe Bridge, 299
TIFF files, importing/colorizing grayscale images, 331–333
Timing, adjusting animations, 396Timing panel, 396Tint
colorizing grayscale images, 332–333
creating and applying tint swatches, 231–232
Tolerance, removing white background, 283
Tools panelDirect Selection tool, 94–95illustration of InDesign work area, 9moving, 22–23
navigating documents with Hand tool, 29
selecting and using Line and Hand tools, 11–12
selecting and using Rectangle Frame and Ellipse Frame tools, 12–14
selecting and using Selection tool, 10selecting and using Type tool, 11
Tracking, adjusting space between letters or words, 189–191
Tracking changes, editing text, 166–167Trademark symbols, 180Transform panel, 64–65Transforming objects, 118Transparency
adding drop shadow to text, 346applying blending modes, 336–337applying feathering to image edge,
343–344applying gradient feather, 344–345applying multiple effects to objects,
346–348applying to bitmap graphic, 339applying to text, 341–342applying to vector graphic, 337–338applying transparency settings, 333changing opacity of solid-color
objects, 335–336display performance options, 358editing and removing effects,
350–351Effect panel and, 334experimenting with, 351–352getting started, 330–331illustration of, 329importing and adjusting Illustrator
files that use, 340–341importing/colorizing grayscale
images, 331–333lesson overview, 328previewing how effects are
flattened, 365–366review Q&A, 353settings, 349settings and options, 349working with effects, 342–343
Type Style menu, 44–46Type styles
applying, 178working with, 177
Type toolapplying colors to text, 228–230context menu options, 30creating text frame on master page,
65–67editing and formatting tables, 307entering text, 155finding/changing text, 157–158

422 INDEX
Type tool (continued)loading with multiple text files, 136selecting and using, 11typing and styling text, 39–40
Typekit. See Adobe TypekitTypography
adding fonts from Adobe Typekit, 176–177
adding rules above paragraphs, 198–199
adding special characters, 180–181adjusting drop cap alignment,
188–189adjusting kerning and tracking,
189–191adjusting line breaks, 191adjusting rules and updating
paragraph style, 201–202adjusting vertical spacing, 173aligning text to tabs and adding tab
leaders, 194–195aligning text using baseline grid,
173–174applying fonts, 178applying shading to paragraphs,
200–201applying strokes to text, 188balancing columns, 184–185balancing ragged lines, 194changing paragraph alignment,
185–186changing spacing between
paragraphs, 175–176composition options, 192–193creating drop caps, 187creating hanging indents, 197–198creating headline that straddles
multiple columns, 183–184experimenting with, 203finding fonts, 179fine-tuning columns, 183getting started, 172–173hanging punctuation outside
margins, 186hyphenation settings, 193illustration of, 171inserting fraction characters,
182–183lesson overview, 170OpenType fonts, 181replacing characters with an
alternate glyph, 179–180
review Q&A, 204–205viewing baseline grid, 174–175working with tabs, 196
U
Update Link button, 109–110Updates
global update of styles, 266–267revised graphics, 278–280
URL, creating hyperlinks and, 402Use Global Light, transparency
settings, 349
V
Values, in placing objects, 49–50Vector graphics
applying transparency to, 337–338vs. bitmap graphics, 275–276display performance options, 358importing Illustrator file with
layers, 293–294Verso, defining document settings, 60Vertical alignment, adjusting, 97–98Vertical rulers, dragging guides from
rulers, 63–65Vertical spacing, adjusting, 173View menu
changing magnification of a document, 25
Fit Frame To Content, 100Fit Page In Window, 16, 46Fit Spread In Window, 25, 28Pages panel, 78Proof Colors option, 212selecting options from, 37
View Threshold menu, setting zoom levels, 174
W
White background, removing, 282–284White space, adding em space, 66Window menu, switching between
open documents, 62Windows Explorer, showing imported
files in, 278Word. See Microsoft WordWords, automatically correcting
misspelled, 163
Work environment, controlling color and light in, 211
WorkspaceApplication bar, 15changing magnification of a
document, 25Control panel options, 14–15customizing, 24document window and pasteboard
areas, 15–16expanding/collapsing panels, 19–20experimenting with, 32getting started, 8–9modifying preferences, 31–32moving panels, 22–23navigating documents, 27–29opening/closing panels, 18–19overview of, 9rearranging/customizing panels,
20–22review Q&A, 33using context menus, 30using Line and Hand tools, 11–12using panel menus, 30–31using Rectangle Frame and Ellipse
Frame tools, 12–14using Selection tool, 10–11using Type tool, 11using Zoom tool, 26–27view options, 25working with multiple document
windows, 17–18Wrapped text
adding to anchored graphics frame, 291–293
around a graphic, 112–114
X
X Offset, transparency settings, 349
Y
Y Offset, transparency settings, 349Yield sign, working with layers, 89
Z
Zoom Level box, Application bar, 25Zoom tool, changing magnification of
a document, 26–27