adobe® indesign® cc on demand -
TRANSCRIPT

InDesign® CConDemand
Adobe®
Que Publishing, 800 East 96th Street, Indianapolis, IN 46240 USA
1638_ttl_page.indd i 5/29/13 1:33 PM
Adobe® InDesign® CC on Demand
Copyright © 2013 by Perspection, Inc.
All rights reserved. No part of this book shall be reproduced, stored in aretrieval system, or transmitted by any means, electronic, mechanical, photo-copying, recording, or otherwise, without written permission from the publish-er. No patent liability is assumed with respect to the use of the informationcontained herein. Although every precaution has been taken in the prepara-tion of this book, the publisher and author assume no responsibility for errorsor omissions. Nor is any liability assumed for damages resulting from the useof the information contained herein.
Library of Congress Control Number: 2013941646
ISBN-13: 978-0-7897-5163-8
ISBN-10: 0-7897-5163-1
Printed and bound in the United States of AmericaFirst Printing: June 2013
16 15 14 13 4 3 2 1
Que Publishing offers excellent discounts on this book when ordered in quantity for bulk purchases or special sales.
For information, please contact: U.S. Corporate and Government Sales
1-800-382-3419 or [email protected]
For sales outside the U.S., please contact: International Sales
1-317-428-3341 or [email protected]
TrademarksAll terms mentioned in this book that are known to be trademarks or servicemarks have been appropriately capitalized. Que cannot attest to the accuracyof this information. Use of a term in this book should not be regarded asaffecting the validity of any trademark or service mark.
Adobe, the Adobe logo, Acrobat, Bridge, Dreamweaver, Extension Manager,ExtendScript Toolkit, Flash, InDesign, Illustrator, PageMaker, Photoshop, andPhotoshop Elements are registered trademarks of Adobe System Incorporated.Apple, Mac OS, and Macintosh are trademarks of Apple Computer, Inc.Microsoft and the Microsoft Office logo are registered trademarks of MicrosoftCorporation in the United States and/or other countries.
Warning and DisclaimerEvery effort has been made to make this book as complete and as accurate aspossible, but no warranty or fitness is implied. The authors and the publishersshall have neither liability nor responsibility to any person or entity withrespect to any loss or damage arising from the information contained in thisbook.
PublisherPaul Boger
Associate PublisherGreg Wiegand
Senior Acquisitions EditorLaura Norman
Managing EditorSteve Johnson
AuthorSteve Johnson
Page LayoutJames Teyler
Interior DesignersSteve JohnsonMarian Hartsough
PhotographsTracy Teyler
IndexerKatherine Stimson
ProofreaderBeth Teyler
Team CoordinatorCindy Teeters
iii
Acknowledgments
a
aPerspection, Inc.Adobe InDesign CC on Demand has been created by the professional trainers andwriters at Perspection, Inc. to the standards you’ve come to expect from Que pub-lishing. Together, we are pleased to present this training book.
Perspection, Inc. is a software training company committed to providing informationand training to help people use software more effectively in order to communicate,make decisions, and solve problems. Perspection writes and produces softwaretraining books, and develops multimedia and web-based training. Since 1991, wehave written more than 120 computer books, with several bestsellers to our credit,and sold over 5 million books.
This book incorporates Perspection’s training expertise to ensure that you’ll receivethe maximum return on your time. You’ll focus on the tasks and skills that increaseproductivity while working at your own pace and convenience.
We invite you to visit the Perspection web site at:
www.perspection.com
AcknowledgmentsThe task of creating any book requires the talents of many hard-working peoplepulling together to meet impossible deadlines and untold stresses. We’d like tothank the outstanding team responsible for making this book possible: writer, SteveJohnson; production editor, James Teyler; proofreader, Beth Teyler; and indexer,Katherine Stimson.
At Que publishing, we’d like to thank Greg Wiegand and Laura Norman for theopportunity to undertake this project, Cindy Teeters for administrative support, andSandra Schroeder for your production expertise and support.
Perspection

iv
aa
About the AuthorSteve Johnson has written more than 80 books on a variety of computer software,including Adobe Edge Animate, Adobe Photoshop CS6, Adobe Dreamweaver CS6,Adobe InDesign CS6, Adobe Illustrator CS6, Adobe Flash Professional CS5,Microsoft Windows 8, Microsoft Office 2013 and 2010, Microsoft Office 2008 for the Macintosh, and Apple OS X Mountain Lion. In 1991, after working for AppleComputer and Microsoft, Steve founded Perspection, Inc., which writes and pro-duces software training. When he is not staying up late writing, he enjoys coachingbaseball, playing golf, gardening, and spending time with his wife, Holly, and threechildren, JP, Brett, and Hannah. Steve and his family live in Northern California, butcan also be found visiting family all over the western United States.

v
a
We Want to Hear from You!As the reader of this book, you are our most important critic and commentator. Wevalue your opinion and want to know what we’re doing right, what we could do bet-ter, what areas you’d like to see us publish in, and any other words of wisdom you’re willing to pass our way.
As an associate publisher for Que, I welcome your comments. You can email orwrite me directly to let me know what you did or didn’t like about this book—as wellas what we can do to make our books better.
Please note that I cannot help you with technical problems related to the topic of this book. We do have a User Services group, however, where I will forward spe-cific technical questions related to the book.
When you write, please be sure to include this book’s title and author as well asyour name, email address, and phone number. I will carefully review your com-ments and share them with the author and editors who worked on the book.
Email: [email protected]
Mail: Greg WiegandQue Publishing800 East 96th StreetIndianapolis, IN 46240 USA
For more information about this book or another Que title, visit our Web site atwww.quepublishing.com. Type the ISBN (excluding hyphens) or the title of a book inthe Search field to find the page you’re looking for.

This page intentionally left blank
vii
Contents
c
cIntroduction xvii
Getting Started with InDesign CC 1
Installing InDesign 2 New!
Getting Started 4 New!
Viewing the InDesign Window 6 New!
Showing and Hiding Panels 7Working with Panels 8Using the Tools and Control Panel 10Opening a Document 12 New!
Opening a Document with Adobe Bridge 14Inserting Images or Text in a Document 16Using the Status Bar 17Working with Document Windows 18Checking for Updates Online 20 New!
Getting Help While You Work 22Saving a Document 24 New!
Finishing Up 26
Creating and Viewing a Document 27
Creating a New Document 28 New!
Creating a New Document from a Template 30Creating a New Document Using Presets 32 New!
Setting Up a Document 34 New!
Changing the Display View 36Changing the View with the Zoom Tool 38Viewing and Using Rulers 40Using Guides 42Changing Guides & Pasteboard Options 44 New!
Using Smart Guides 46Using the Grid 48Moving Around with the Hand Tool 50Working with the Info Panel 51
2
1
viii
c
Creating and Displaying Workspaces 52Using Undo and Redo 54
Managing Pages and Books 55
Using the Pages Panel 56Inserting Pages 58Navigating Pages 60Changing the Page Size 62Deleting Pages 65Moving Pages 66Working with Page Spreads 68Rotating Page Spreads 69Creating Master Pages 70Working with Master Pages 72Working with Page Numbers and Sections 74Working with Chapter Numbers 76Creating and Using Text Variables 78Creating a Book 80Managing Books 82Creating a Table of Contents 84Starting an Index 86Creating an Index Entry 88Creating an Index 90Managing an Index 92
Working with Text 95
Using Type Tools 96Creating Type in a Text Frame 97Creating Type Using Frame Tools 98Creating Path Type 100Importing Text 102Flowing Imported Text 104Working with Overflow Text 106Using Smart Text Reflow 108Typing and Selecting Text 110Editing Text with Autocorrect 112Copying and Moving Text 113Changing Fonts 114 New!
Changing Font Size 116Changing Text Leading 117Changing Text Kerning 118
4
3
Contents ix
c
Changing Text Tracking 119Scaling or Skewing Text 120Aligning Paragraphs 121Indenting and Spacing Paragraphs 122Creating a Drop Cap 123Applying a Paragraph Rule 124Adding Bullets and Numbering 126Setting Tabs 128Working with Glyphs 129Inserting Special Text Characters 130Working with Hidden Text 131Setting Text Frame Options 132Creating Columns 134Wrapping Text Around an Object 136Creating Type Outlines 138Adding Page Numbers to Continued Text 139Working with Different Languages 140
Placing and Working with Graphics 141
Placing Graphics 142Placing Graphics with Options 143Setting Place Import Options 144Placing Multiple Graphics 146Placing Graphics from Adobe Bridge 148Adding Captions to Graphics 150Copying or Moving Graphics 152Using the Links Panel 153Managing Linked Graphics 154Editing a Linked Graphic 156Displaying XMP Graphic Information 157Creating Specialty Frames for Graphics 158Selecting and Moving Frames and Graphics 160Fitting Graphics in Frames 162Nesting Graphics in Frames 164Formatting Graphics in Frames 165Controlling Graphics Display Performance 166Adding Alt Text to Graphics 168
Working with Objects and Layers 169
Creating Shapes 170Creating Lines 172
6
5
x
c
Creating Multiple Objects in a Grid 173Using the Selection Tool 174Using the Direct Selection Tool 176Resizing Objects 178Moving Objects 179Duplicating Objects 180Grouping and Combining Objects 182Aligning Objects 184Distributing Objects 186Arranging Object Stack Order 188Transforming Objects 189Repeating Object Transformations 190Using the Free Transform Tool 191Scaling Objects 192Shearing Objects 193Rotating Objects 194Locking and Unlocking Objects 196Creating Inline Objects 197Creating Anchored Objects 198Creating and Deleting Object Layers 200Setting Layer Options 202Showing and Hiding Layers and Objects 203Locking Layers and Objects 204Merging Layers and Groups 205Working with Objects on Layers 206Using the Measure Tool 207Using Live Screen Drawing 208
Applying and Managing Color 209
Changing Color Settings 210Changing Color Profiles 212Working with Color Modes 214Applying Colors 215Using the Eyedropper Tool 216Working with the Color Panel 218Working with the Swatches Panel 220Managing Color Swatches 222Working with Swatch Libraries 224Creating Tint Swatches 225Creating Gradient Swatches 226Creating Mixed Inks 228
7
Contents xi
c
Using Colors from the Kuler Panel 230Overprinting Colors 232Proofing Colors on the Screen 233Changing the Interface Color Theme 234 New!
Applying Fills, Strokes, and Effects 235
Applying Fill and Stroke Colors 236Changing Stroke Attributes 238Creating Stroke Styles 240Applying Gradients 242Using the Gradient Tool 244Using the Gradient Feather Tool 245Creating Blends and Effects 246Applying Shadow Effects 248Applying Glow Effects 249Applying Bevel and Emboss Effects 250Applying Feather Effects 251Applying Corner Object Effects 252Converting Shape Objects 254Setting Object Defaults 255
Working with Points and Paths 257
Drawing with the Pen Tool 258Selecting and Moving Points and Segments 260Converting Points 262Adding and Deleting Anchor Points 264Splitting Paths 266Joining Anchor Points 268Using the Smooth Tool 269Using the Pencil Tool 270Erasing to Reshape Paths 272Working with Pathfinder 273Creating a Compound Path 274Working with Clipping Paths 276
Working with Tables 279
Creating Tables 280Importing Text into Tables 282Entering and Editing Text in a Table 284Modifying a Table 286
10
9
8
xii
c
Adjusting Table Rows and Columns 288Adjusting Table Cells 290Aligning Content in Table Cells 291Creating Table Headers and Footers 292Adding Strokes and Fills 294Alternating Fills and Strokes 296Adding Diagonal Lines in Cells 298Adding a Border to a Table 299Adjusting Tables in the Text Frame 300
Working with Styles 301
Using the Paragraph Styles or Character Styles Panel 302Changing the Basic Paragraph Style 303Creating Paragraph Styles 304Creating Character Styles 306Creating GREP Styles 308Creating Style Groups 309Loading and Importing Styles 310Applying and Overriding Styles 312Creating Nested Styles 314Creating Object Styles 316 New!
Creating Table and Cell Styles 318Using Quick Apply 320Mapping Styles to Export Tags 322 New!
Finalizing a Document 323
Using Spell Check 324Using Custom Dictionaries 326Finding and Changing Fonts 327Using Find and Change 328Searching for Text 330Searching Using GREP 332Searching for Glyphs 333Searching for Objects 334Working with Hyphenation 335Keeping Lines Together 336Changing Justification Options 337Using the Story Editor 338Adding Footnotes 340Changing Case 342
12
11
Contents xiii
c
Creating an Interactive Document 343
Defining Hyperlink Destinations 344Creating Hyperlinks 346Converting and Stylizing Hyperlinks 348Using the Hyperlinks Panel 350Creating Cross-References 352Creating Bookmarks 354Adding Media 356Setting Media Options 358Adding Animation with Motion Presets 360Working with Animations 362Changing Animation Order 364Adding Page Transitions 365Using the Buttons and Forms Panel 366Creating Buttons 368Creating Forms 370Working with Events and Actions 372Working with Button States 374Setting Tab Order 375Creating Multi-State Objects 376Inserting HTML Content 378Creating QR Codes 379 New!
Using the SWF Preview Panel 380
Creating a Digital Publication 381
Creating Liquid Layouts 382Creating Alternate Layouts 384Working with Alternate Layouts 386Adjusting Layouts 387Getting Started with Digital Publishing Suite 388Creating a Folio Overlay 390Creating a Folio Publication 392Importing Articles into a Folio Publication 394Setting Folio and Article Properties 395Previewing a Folio Publication 396
Automating the Way You Work 397
Creating a Library 398Using and Updating a Library 400Changing Library Item Information 401
15
14
13
xiv
c
Searching and Sorting Libraries 402Creating and Using Snippets 404Creating Conditional Text 406Collecting and Placing Content 408Creating Linked Content 410Linking Content Across Documents 412Managing Linked Content 413Using and Running Scripts 414Using Data Merge 416Working with XML 418Exporting XML or IDML 420
Exporting a Document 421
Exporting a Document 422Understanding Export File Formats 423Exporting as a Print PDF 424Setting PDF General Options 426Setting PDF Compression Options 428Setting PDF Marks and Bleeds Options 429Setting PDF Output Options 430Setting PDF Advanced Options 431Setting PDF Security Options 432Exporting with PDF Presets 433Exporting PDF Files in the Background 434Setting PDF Media Options 435Exporting as an Interactive PDF 436Exporting as an EPS 438Exporting as a JPEG or PNG 440Exporting as a Flash Movie 442Exporting as a Flash File 444Ordering Content in the Articles Panel 446Exporting as an Accessible PDF 448Applying Tags to a PDF 450Exporting Tags for EPUB and HTML 451 New!
Exporting as an EPUB eBook 452 New!
Exporting as an HTML 454 New!
Setting EPUB and HTML Options 456 New!
Printing and Outputting a Document 457
Printing a Document 458Printing with Presets 459
17
16
Contents xv
c
Setting General and Setup Print Options 460Setting Marks and Bleed Options 462Setting Graphics Options 464Previewing Color Separations 465Setting Output Options 466Setting Trapping Options 468Setting Advanced Options 470Setting Color Management Options 472Creating a Print Summary 473Printing Spreads in a Booklet 474Using Live Preflight 476Inserting File Information 478Creating a Package 480Using Document Fonts 482
Customizing the Way You Work 483
Setting General Preferences 484Setting Interface Preferences 485 New!
Setting Type Preferences 486Setting Advanced Type Preferences 488 New!
Setting Composition Preferences 489Setting Units & Increments Preferences 490Setting Dictionary Preferences 492Setting Spelling Preferences 494Setting Notes Preferences 496Working with Appearance of Black Preferences 497Setting Story Editor Display Preferences 498Setting File Handling Preferences 500Setting Clipboard Handling Preferences 502Defining Shortcut Keys 503Customizing Menus 504Configuring Plug-In and Extensions 505 New!
Customizing the Control Panel 506
Collaborating with Others 507
Creating and Working with Notes 508Tracking Text Changes 510Sharing Content with Adobe InCopy 512Setting Up User Identification 513Exporting Content from InDesign 514Using the Assignments Panel 515
19
18
xvi
c
Creating an Assignment 516Checking Content Out and In 518Updating Content 519Working with InCopy 520
Working Together with Adobe Programs 521
Exploring Adobe Programs 522 New!
Exploring Adobe Bridge 523Getting Started with Adobe Bridge 524Getting Photos from a Digital Camera 525Working with Raw Images from a Digital Camera 526 New!
Modifying Images in Camera Raw 528 New!
Working with Images Using Adobe Bridge 530Setting Preferences in Adobe Bridge 532Applying Image Adjustments 534Automating Tasks in Adobe Bridge 535Using Mini-Bridge 536Scripting with Adobe ExtendScript Toolkit 537Working with Adobe Media Encoder 538Working with Adobe Extension Manager 540 New!
Using the Adobe Exchange Panel 541 New!
Accessing Adobe Creative Cloud 542 New!
New Features 543 New!
Adobe Certification 549Index 555
20
xvii
Introduction
Welcome to Adobe InDesign CC on Demand, a visual quickreference book that shows you how to work efficiently withInDesign. This book provides complete coverage of basic toadvanced InDesign skills.
How This Book WorksYou don’t have to read this book in any particular order.We’ve designed the book so that you can jump in, get theinformation you need, and jump out. However, the book doesfollow a logical progression from simple tasks to more com-plex ones. Each task is presented on no more than two facingpages, which lets you focus on a single task without havingto turn the page. To find the information that you need, justlook up the task in the table of contents or index, and turn tothe page listed. Read the task introduction, follow the step-by-step instructions in the left column along with screen illus-trations in the right column, and you’re done.
What’s NewIf you’re searching for what’s new in InDesign CC, just lookfor the icon: New!. The new icon appears in the table of con-tents and throughout this book so you can quickly and easilyidentify a new or improved feature in InDesign. A completedescription of each new feature appears in the New Featuresguide in the back of this book.
Keyboard ShortcutsMost menu commands have a keyboard equivalent, such asCtrl+P (Win) or A+P (Mac), as a quicker alternative to usingthe mouse. A complete list of keyboard shortcuts is availableon the web at www.perspection.com.
How You’ll Learn
How This Book Works
What’s New
Keyboard Shortcuts
Step-by-Step Instructions
Real World Examples
Workshops
Adobe Certification
Get More on the Web
xviii
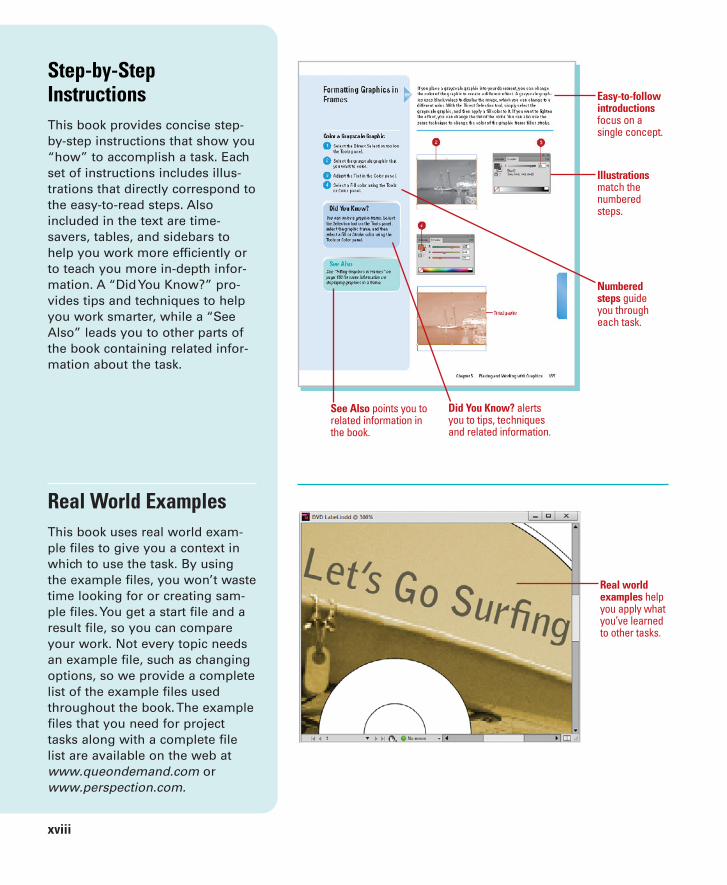
Step-by-StepInstructionsThis book provides concise step-by-step instructions that show you“how” to accomplish a task. Eachset of instructions includes illus-trations that directly correspond tothe easy-to-read steps. Alsoincluded in the text are time-savers, tables, and sidebars tohelp you work more efficiently orto teach you more in-depth infor-mation. A “Did You Know?” pro-vides tips and techniques to helpyou work smarter, while a “SeeAlso” leads you to other parts ofthe book containing related infor-mation about the task.
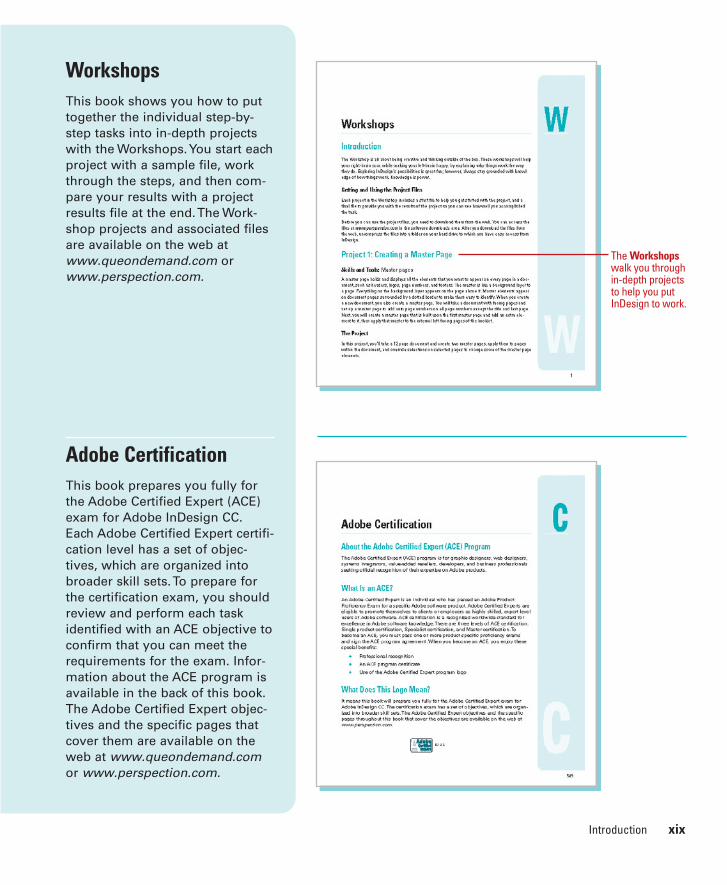
Real World ExamplesThis book uses real world exam-ple files to give you a context inwhich to use the task. By usingthe example files, you won’t wastetime looking for or creating sam-ple files. You get a start file and aresult file, so you can compareyour work. Not every topic needsan example file, such as changingoptions, so we provide a completelist of the example files usedthroughout the book. The examplefiles that you need for projecttasks along with a complete filelist are available on the web atwww.queondemand.com orwww.perspection.com.
Real worldexamples helpyou apply whatyou’ve learnedto other tasks.
Illustrationsmatch thenumberedsteps.
Numberedsteps guideyou througheach task.
Did You Know? alertsyou to tips, techniquesand related information.
See Also points you torelated information inthe book.
Easy-to-followintroductionsfocus on asingle concept.
The Workshopswalk you throughin-depth projectsto help you putInDesign to work.
Introduction xix
WorkshopsThis book shows you how to puttogether the individual step-by-step tasks into in-depth projectswith the Workshops. You start eachproject with a sample file, workthrough the steps, and then com-pare your results with a projectresults file at the end. The Work-shop projects and associated filesare available on the web atwww.queondemand.com orwww.perspection.com.
Adobe CertificationThis book prepares you fully forthe Adobe Certified Expert (ACE)exam for Adobe InDesign CC.Each Adobe Certified Expert certifi-cation level has a set of objec-tives, which are organized intobroader skill sets. To prepare forthe certification exam, you shouldreview and perform each taskidentified with an ACE objective toconfirm that you can meet therequirements for the exam. Infor-mation about the ACE program isavailable in the back of this book.The Adobe Certified Expert objec-tives and the specific pages thatcover them are available on theweb at www.queondemand.comor www.perspection.com.
xx
Get More on the WebIn addition to the information inthis book, you can also get moreinformation on the web to helpyou get up-to-speed faster withInDesign CC. Some of the infor-mation includes:
Transition Helpers◆ Only New Features.
Download and print the newfeature tasks as a quick andeasy guide.
Productivity Tools◆ Keyboard Shortcuts.
Download a list of keyboardshortcuts to learn faster waysto get the job done.
More Content◆ Photographs. Download
photographs and othergraphics to use in yourInDesign documents.
◆ More Content. Downloadnew content developed afterpublication.
You can access these additionalresources on the web atwww.perspection.com.
Additionalcontent is availableon the web.
3
3What You’ll Do
55
Managing Pages and Books
Introduction
Most documents are more than one page, so inserting newpages is a common practice in InDesign. You can quickly adda new blank page to a document using the Pages panel. ThePages panel allows you to visually display and navigatethrough all the pages in your document. When you work withmultiple page documents, moving pages around isinevitable. You can simply drag pages in the Pages panel torearrange them within a document or use the Move Pagecommand on the panel Options menu to move thembetween documents. When you no longer need a page, youcan quickly delete it from your document using the Pagespanel.
A master page is one of the most important parts of creat-ing an InDesign document. A master page holds and displaysall the elements that you want to appear on every page in adocument, such as headers, logos, page numbers, and foot-ers. The master is like a background layer to a page.Everything on the background layer appears on the page infront of it. When you make a change to a master page, thechange appears in all document pages unless you overridethe change.
Instead of creating long documents, you can break themup into smaller documents, like chapters, and then add themto a book. In InDesign, a book is not a single document. Itsimply keeps track of all the documents in the book and coor-dinates document page numbers, colors, and styles. Whenyou create a book, you can synchronize page numbers, col-ors, and styles for all the documents in the book. Each bookuses a file called the style source to control the style sheets,swatches, and master pages for all the documents in thebook. When you make changes to the style source file, all thedocuments in the book are synchronized to the file.
What You’ll Do
Use the Pages Panel
Insert Pages
Navigate Pages
Change the Page Size
Delete or Move Pages
Work with Page Spreads
Rotate Page Spreads
Create Master Pages
Work with Master Pages
Work with Page Numbers and Sections
Work with Chapter Numbers
Create and Use Text Variables
Create and Manage Books
Create a Table of Contents
Start an Index
Create an Index Entry
Create an Index
Manage an Index
56 Chapter 3
Using the Pages Panel
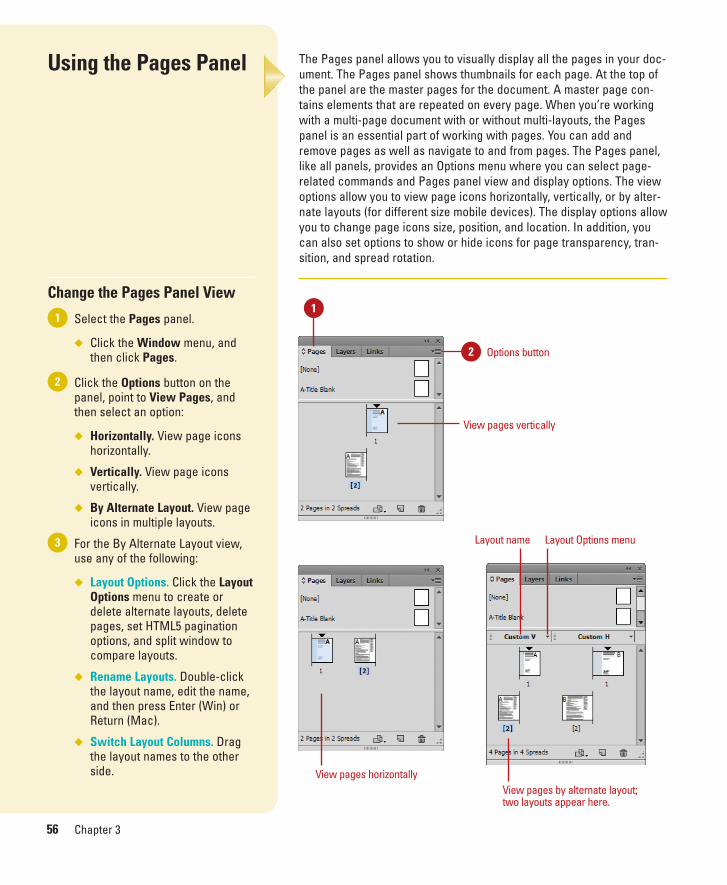
Change the Pages Panel View
Select the Pages panel.
◆ Click the Window menu, andthen click Pages.
Click the Options button on thepanel, point to View Pages, andthen select an option:
◆ Horizontally. View page iconshorizontally.
◆ Vertically. View page iconsvertically.
◆ By Alternate Layout. View pageicons in multiple layouts.
For the By Alternate Layout view,use any of the following:
◆ Layout Options. Click the LayoutOptions menu to create ordelete alternate layouts, deletepages, set HTML5 paginationoptions, and split window tocompare layouts.
◆ Rename Layouts. Double-clickthe layout name, edit the name,and then press Enter (Win) orReturn (Mac).
◆ Switch Layout Columns. Dragthe layout names to the otherside.
3
2
1
The Pages panel allows you to visually display all the pages in your doc-ument. The Pages panel shows thumbnails for each page. At the top ofthe panel are the master pages for the document. A master page con-tains elements that are repeated on every page. When you’re workingwith a multi-page document with or without multi-layouts, the Pagespanel is an essential part of working with pages. You can add andremove pages as well as navigate to and from pages. The Pages panel,like all panels, provides an Options menu where you can select page-related commands and Pages panel view and display options. The viewoptions allow you to view page icons horizontally, vertically, or by alter-nate layouts (for different size mobile devices). The display options allowyou to change page icons size, position, and location. In addition, youcan also set options to show or hide icons for page transparency, tran-sition, and spread rotation.
1
2
View pages vertically
View pages horizontallyView pages by alternate layout;two layouts appear here.
Layout Options menuLayout name
Options button

Chapter 3 Managing Pages and Books 57
Change the Pages Panel Display
Select the Pages panel.
◆ Click the Window menu, andthen click Pages.
Click the Options button on thepanel, and then click PanelOptions.
Select from the following Pagespanel options:
◆ Size. Specify an icon size forPages and Masters.
◆ Show Vertically. Select to showmaster page icons vertically.
◆ Show Thumbnails. Select toshow page or master pageicons as thumbnails.
Select from the following optionsfor icon display:
◆ Transparency. Select to displayicons when transparency isapplied to a page or spread.
◆ Spread Rotation. Select todisplay icons when the spreadview is rotated.
◆ Page Transitions. Select todisplay icons when pagetransitions are applied to a pageor spread.
Click the Pages on Top or Masterson Top option.
Click the Resize list arrow, andthen select an option when youresize the Pages panel.
Click OK. 7
6
5
4
3
2
11
2
7
3
5
4
6
58 Chapter 3
Inserting Pages
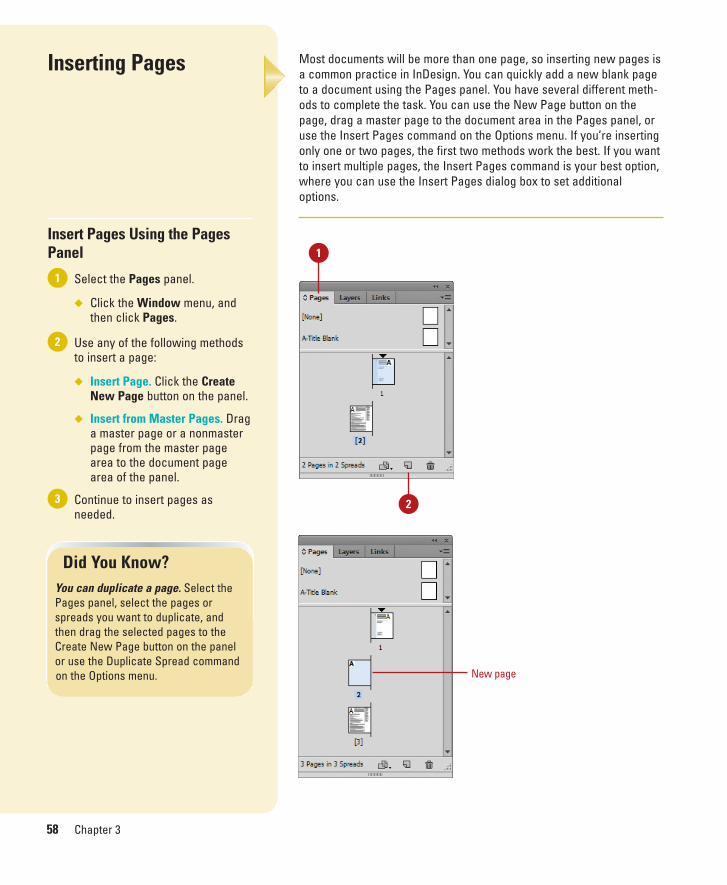
Insert Pages Using the PagesPanel
Select the Pages panel.
◆ Click the Window menu, andthen click Pages.
Use any of the following methodsto insert a page:
◆ Insert Page. Click the CreateNew Page button on the panel.
◆ Insert from Master Pages. Draga master page or a nonmasterpage from the master pagearea to the document pagearea of the panel.
Continue to insert pages asneeded.
3
2
1
Most documents will be more than one page, so inserting new pages isa common practice in InDesign. You can quickly add a new blank pageto a document using the Pages panel. You have several different meth-ods to complete the task. You can use the New Page button on thepage, drag a master page to the document area in the Pages panel, oruse the Insert Pages command on the Options menu. If you’re insertingonly one or two pages, the first two methods work the best. If you wantto insert multiple pages, the Insert Pages command is your best option,where you can use the Insert Pages dialog box to set additionaloptions.
Did You Know?You can duplicate a page. Select thePages panel, select the pages orspreads you want to duplicate, andthen drag the selected pages to theCreate New Page button on the panelor use the Duplicate Spread commandon the Options menu.
1
2
New page
Chapter 3 Managing Pages and Books 59
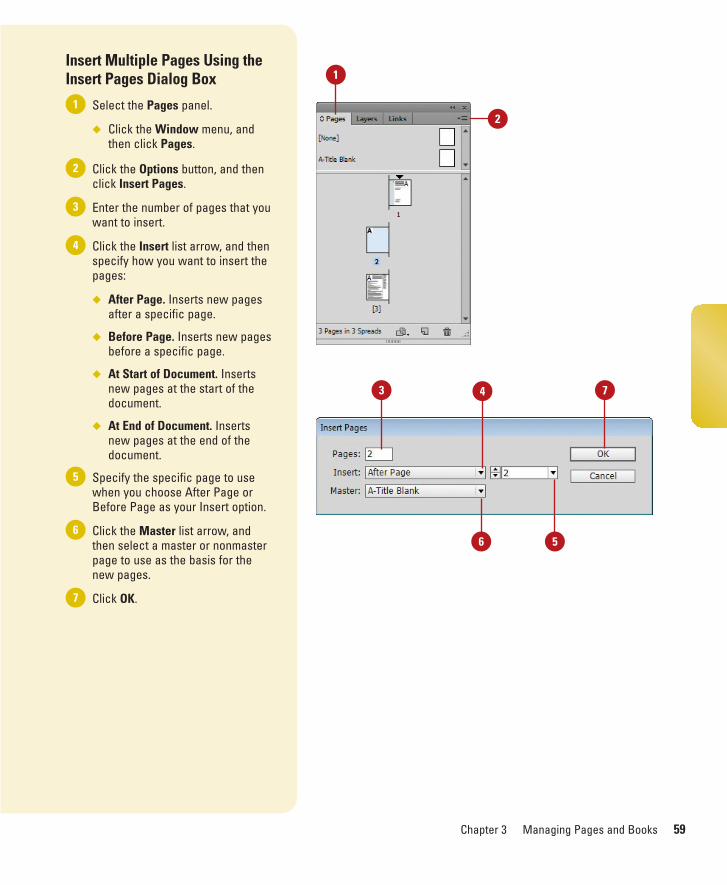
Insert Multiple Pages Using theInsert Pages Dialog Box
Select the Pages panel.
◆ Click the Window menu, andthen click Pages.
Click the Options button, and thenclick Insert Pages.
Enter the number of pages that youwant to insert.
Click the Insert list arrow, and thenspecify how you want to insert thepages:
◆ After Page. Inserts new pagesafter a specific page.
◆ Before Page. Inserts new pagesbefore a specific page.
◆ At Start of Document. Insertsnew pages at the start of thedocument.
◆ At End of Document. Insertsnew pages at the end of thedocument.
Specify the specific page to usewhen you choose After Page orBefore Page as your Insert option.
Click the Master list arrow, andthen select a master or nonmasterpage to use as the basis for thenew pages.
Click OK.7
6
5
4
3
2
1
1
2
3 74
6 5
60 Chapter 3
Navigating Pages
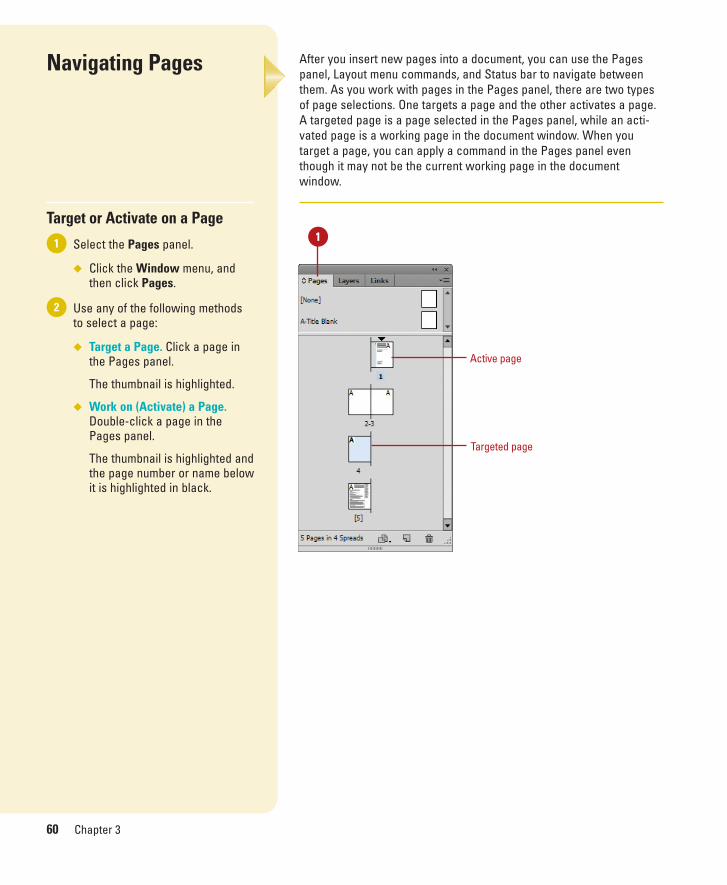
Target or Activate on a Page
Select the Pages panel.
◆ Click the Window menu, andthen click Pages.
Use any of the following methodsto select a page:
◆ Target a Page. Click a page inthe Pages panel.
The thumbnail is highlighted.
◆ Work on (Activate) a Page.Double-click a page in thePages panel.
The thumbnail is highlighted andthe page number or name belowit is highlighted in black.
2
1
After you insert new pages into a document, you can use the Pagespanel, Layout menu commands, and Status bar to navigate betweenthem. As you work with pages in the Pages panel, there are two typesof page selections. One targets a page and the other activates a page.A targeted page is a page selected in the Pages panel, while an acti-vated page is a working page in the document window. When you target a page, you can apply a command in the Pages panel eventhough it may not be the current working page in the documentwindow.
1
Active page
Targeted page
Chapter 3 Managing Pages and Books 61
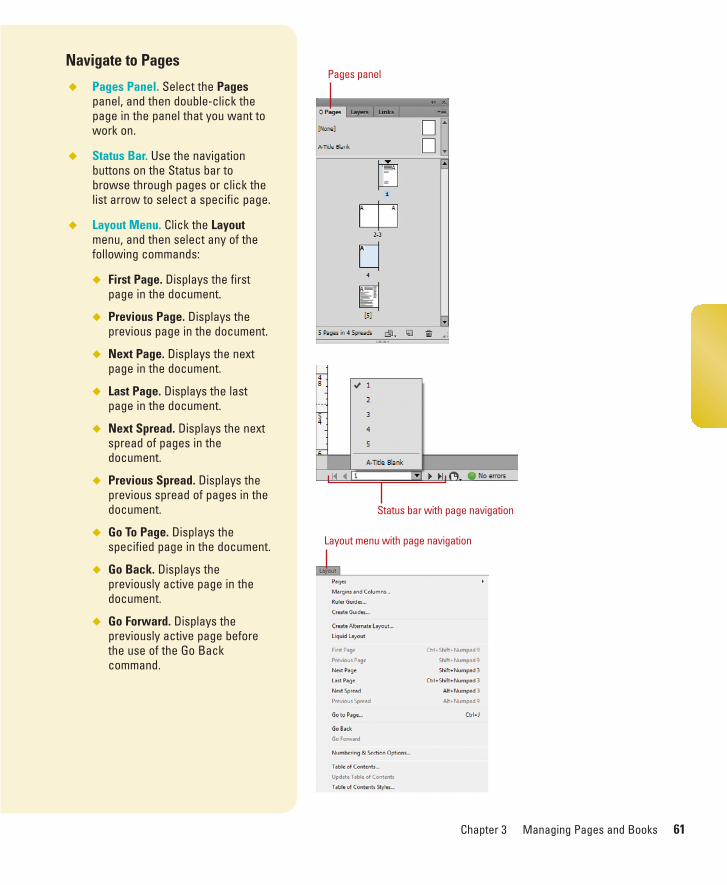
Navigate to Pages
◆ Pages Panel. Select the Pagespanel, and then double-click thepage in the panel that you want towork on.
◆ Status Bar. Use the navigationbuttons on the Status bar tobrowse through pages or click thelist arrow to select a specific page.
◆ Layout Menu. Click the Layoutmenu, and then select any of thefollowing commands:
◆ First Page. Displays the firstpage in the document.
◆ Previous Page. Displays theprevious page in the document.
◆ Next Page. Displays the nextpage in the document.
◆ Last Page. Displays the lastpage in the document.
◆ Next Spread. Displays the nextspread of pages in thedocument.
◆ Previous Spread. Displays theprevious spread of pages in thedocument.
◆ Go To Page. Displays thespecified page in the document.
◆ Go Back. Displays thepreviously active page in thedocument.
◆ Go Forward. Displays thepreviously active page beforethe use of the Go Backcommand.
Pages panel
Status bar with page navigation
Layout menu with page navigation
62 Chapter 3
Changing the PageSize
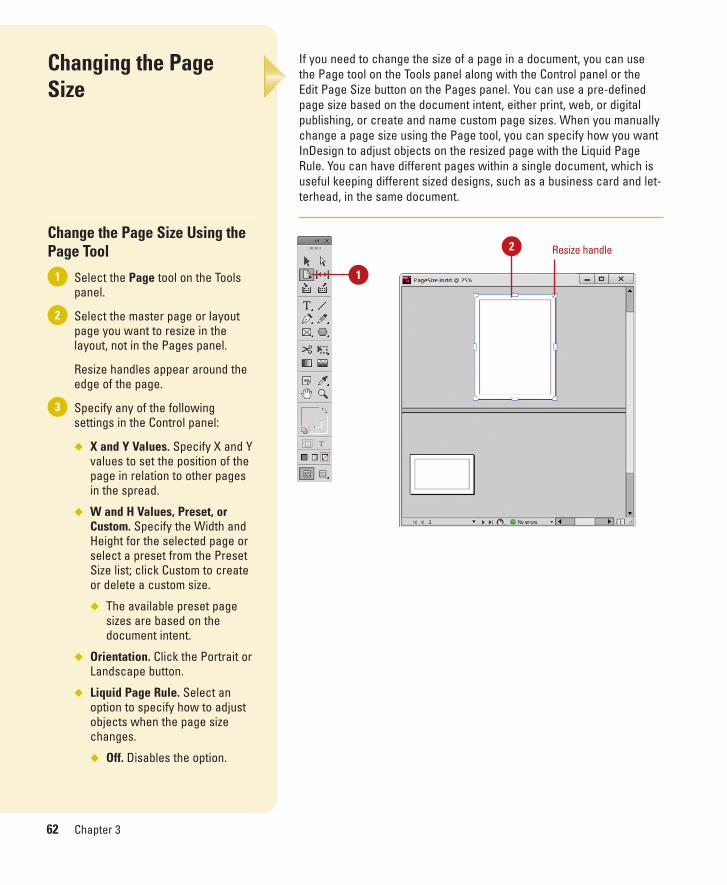
Change the Page Size Using thePage Tool
Select the Page tool on the Toolspanel.
Select the master page or layoutpage you want to resize in thelayout, not in the Pages panel.
Resize handles appear around theedge of the page.
Specify any of the followingsettings in the Control panel:
◆ X and Y Values. Specify X and Yvalues to set the position of thepage in relation to other pagesin the spread.
◆ W and H Values, Preset, orCustom. Specify the Width andHeight for the selected page orselect a preset from the PresetSize list; click Custom to createor delete a custom size.
◆ The available preset pagesizes are based on thedocument intent.
◆ Orientation. Click the Portrait orLandscape button.
◆ Liquid Page Rule. Select anoption to specify how to adjustobjects when the page sizechanges.
◆ Off. Disables the option.
3
2
1
If you need to change the size of a page in a document, you can usethe Page tool on the Tools panel along with the Control panel or the Edit Page Size button on the Pages panel. You can use a pre-definedpage size based on the document intent, either print, web, or digitalpublishing, or create and name custom page sizes. When you manuallychange a page size using the Page tool, you can specify how you wantInDesign to adjust objects on the resized page with the Liquid PageRule. You can have different pages within a single document, which isuseful keeping different sized designs, such as a business card and let-terhead, in the same document.
1
2 Resize handle

Chapter 3 Managing Pages and Books 63
◆ Scale. All objects work as agroup and scaleproportional. For differentaspect ratios, a black bandmay appear on top andbottom or left and right.
◆ Re-center. Objects arecentered no matter thewidth; not resized.
◆ Object-based. Object edgesare defined as fixed or fluidrelative to the correspondingpage edge. Select an objectand click pins to togglesettings. A filled circle pinsobjects as fixed; an unfilledcircle pins as fluid.
◆ Guide-based. Similar to theconcept of 3 & 9 slicescaling. Slice guides define astraight line across the pagewhere elements can resize.You add slide guides bydragging from the ruler.
◆ Controlled by Master. Let themaster determine it.
◆ Show Master Page Overlay.Select to show a shaded boxover the selected page. You canmove the master page overlayso items appear correctly.
◆ Objects Move with Page. Selectto move objects on the pagewhen the page size changes.
To manually change the page sizewith the liquid layout rules:
◆ Preview Manual Changes. Draga resize handle. When yourelease it, the page returns tothe original size.
◆ Manually Change Page Size.Press Alt (Win) or Option (Mac),and drag a resize handle toresize the page.
Continue Topic Next Page
4
3
Custom pagesize options
Click to select a presetor custom page size
Click to select howto adjust objects onpage size change
Object-based Liquid Page Rule
64 Chapter 3
Continued Topic from Previous Page
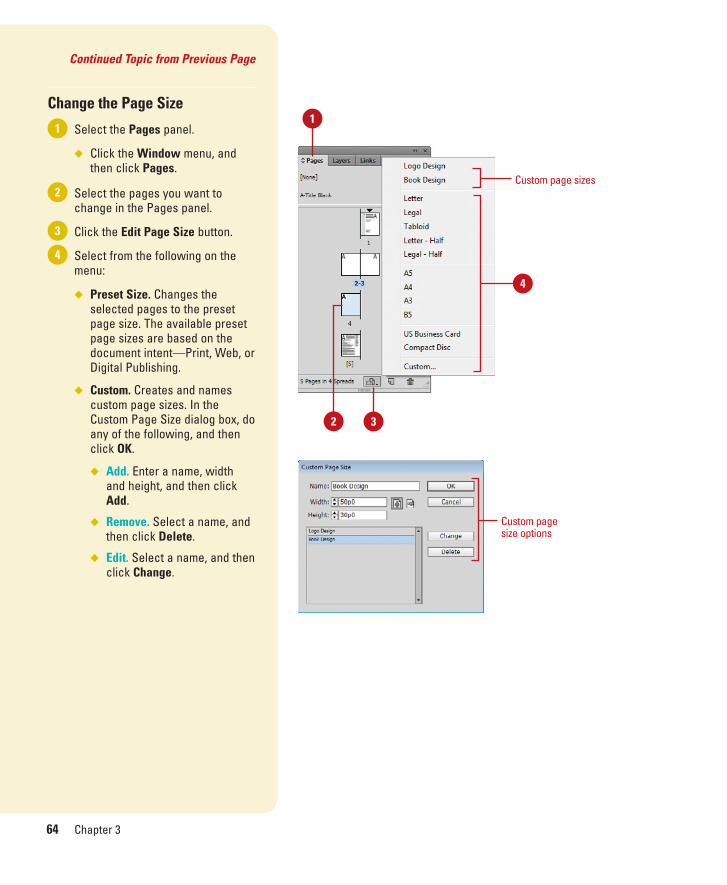
Change the Page Size
Select the Pages panel.
◆ Click the Window menu, andthen click Pages.
Select the pages you want tochange in the Pages panel.
Click the Edit Page Size button.
Select from the following on themenu:
◆ Preset Size. Changes theselected pages to the presetpage size. The available presetpage sizes are based on thedocument intent—Print, Web, orDigital Publishing.
◆ Custom. Creates and namescustom page sizes. In theCustom Page Size dialog box, doany of the following, and thenclick OK.
◆ Add. Enter a name, widthand height, and then clickAdd.
◆ Remove. Select a name, andthen click Delete.
◆ Edit. Select a name, and thenclick Change.
4
3
2
11
2
Custom page sizes
4
3
Custom pagesize options
Chapter 3 Managing Pages and Books 65
Deleting Pages
Delete Pages
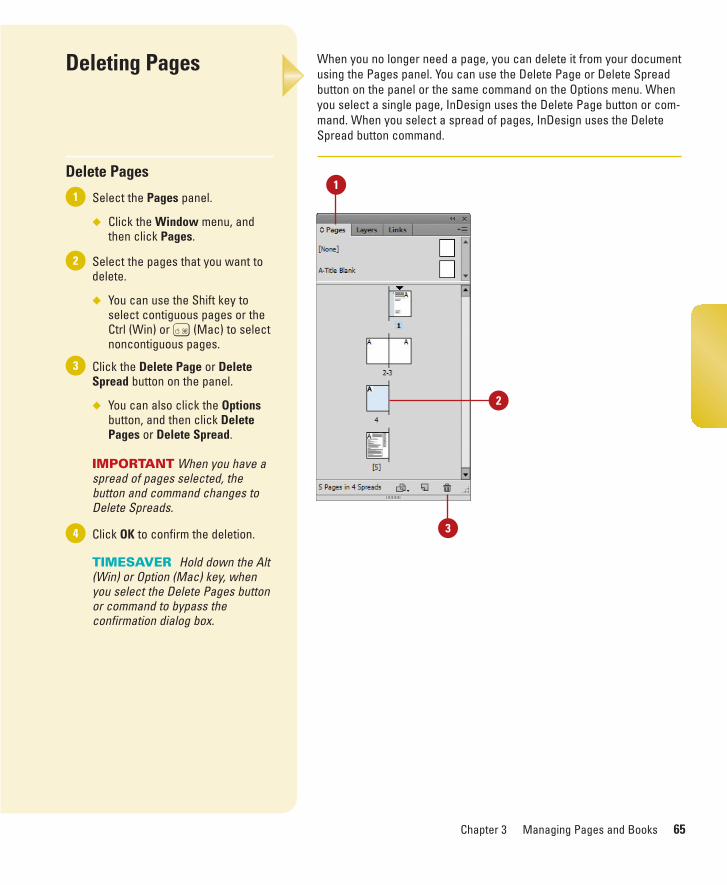
Select the Pages panel.
◆ Click the Window menu, andthen click Pages.
Select the pages that you want todelete.
◆ You can use the Shift key toselect contiguous pages or theCtrl (Win) or A (Mac) to selectnoncontiguous pages.
Click the Delete Page or DeleteSpread button on the panel.
◆ You can also click the Optionsbutton, and then click DeletePages or Delete Spread.
IMPORTANT When you have aspread of pages selected, thebutton and command changes toDelete Spreads.
Click OK to confirm the deletion.
TIMESAVER Hold down the Alt(Win) or Option (Mac) key, whenyou select the Delete Pages buttonor command to bypass theconfirmation dialog box.
4
3
2
1
When you no longer need a page, you can delete it from your documentusing the Pages panel. You can use the Delete Page or Delete Spreadbutton on the panel or the same command on the Options menu. Whenyou select a single page, InDesign uses the Delete Page button or com-mand. When you select a spread of pages, InDesign uses the DeleteSpread button command.
1
2
3
66 Chapter 3
Moving Pages
Move Pages by Dragging
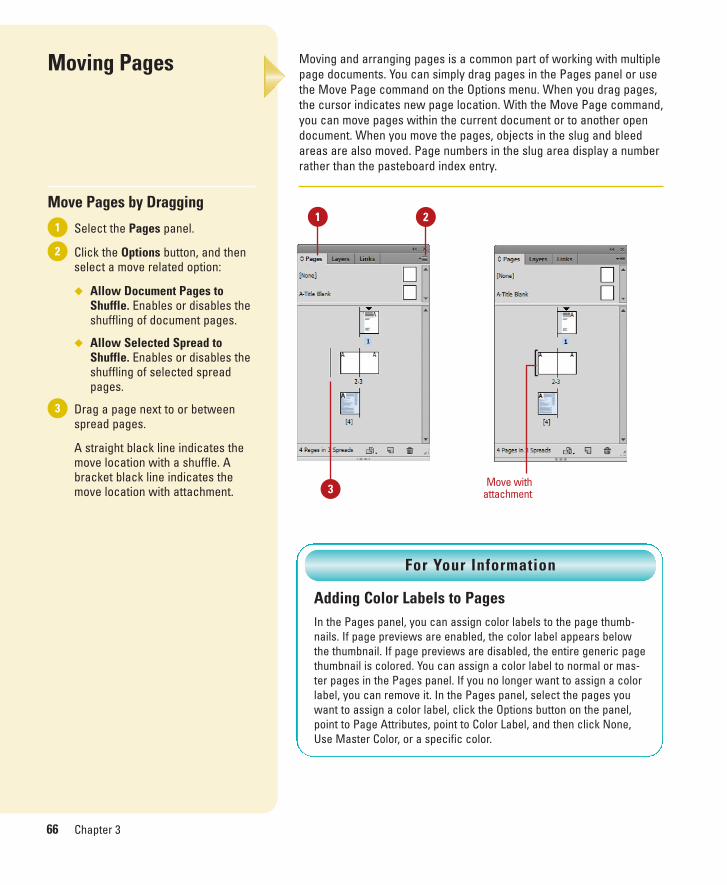
Select the Pages panel.
Click the Options button, and thenselect a move related option:
◆ Allow Document Pages toShuffle. Enables or disables theshuffling of document pages.
◆ Allow Selected Spread toShuffle. Enables or disables theshuffling of selected spreadpages.
Drag a page next to or betweenspread pages.
A straight black line indicates themove location with a shuffle. Abracket black line indicates themove location with attachment.
3
2
1
Moving and arranging pages is a common part of working with multiplepage documents. You can simply drag pages in the Pages panel or usethe Move Page command on the Options menu. When you drag pages,the cursor indicates new page location. With the Move Page command,you can move pages within the current document or to another opendocument. When you move the pages, objects in the slug and bleedareas are also moved. Page numbers in the slug area display a numberrather than the pasteboard index entry.
1 2
3 Move withattachment
Adding Color Labels to PagesIn the Pages panel, you can assign color labels to the page thumb-nails. If page previews are enabled, the color label appears belowthe thumbnail. If page previews are disabled, the entire generic pagethumbnail is colored. You can assign a color label to normal or mas-ter pages in the Pages panel. If you no longer want to assign a colorlabel, you can remove it. In the Pages panel, select the pages youwant to assign a color label, click the Options button on the panel,point to Page Attributes, point to Color Label, and then click None,Use Master Color, or a specific color.
For Your Information
Chapter 3 Managing Pages and Books 67
Move Pages
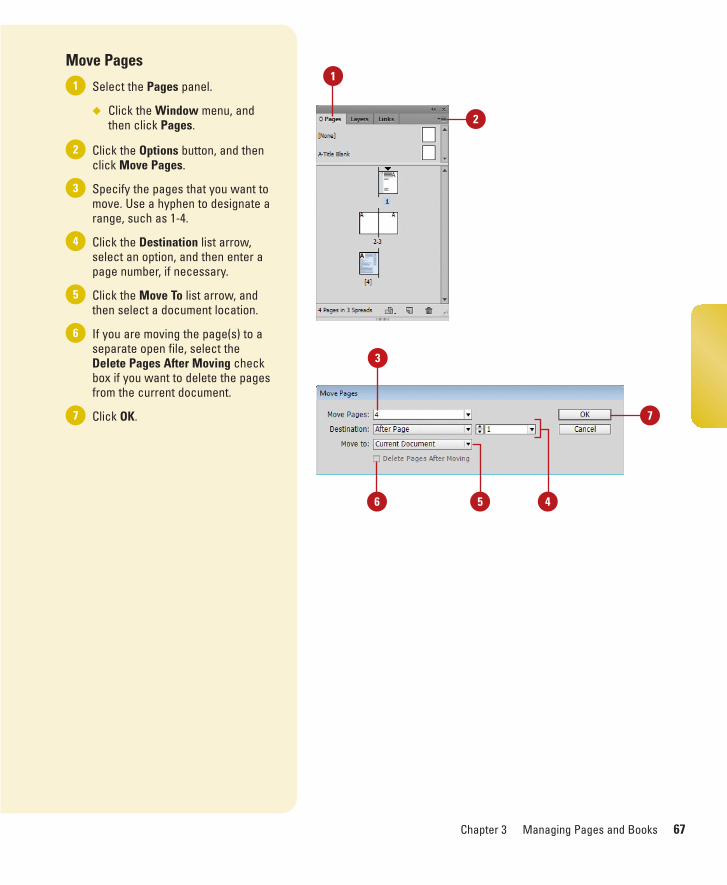
Select the Pages panel.
◆ Click the Window menu, andthen click Pages.
Click the Options button, and thenclick Move Pages.
Specify the pages that you want tomove. Use a hyphen to designate arange, such as 1-4.
Click the Destination list arrow,select an option, and then enter apage number, if necessary.
Click the Move To list arrow, andthen select a document location.
If you are moving the page(s) to aseparate open file, select theDelete Pages After Moving checkbox if you want to delete the pagesfrom the current document.
Click OK.7
6
5
4
3
2
11
6
2
4
7
3
5
68 Chapter 3
Working with PageSpreads
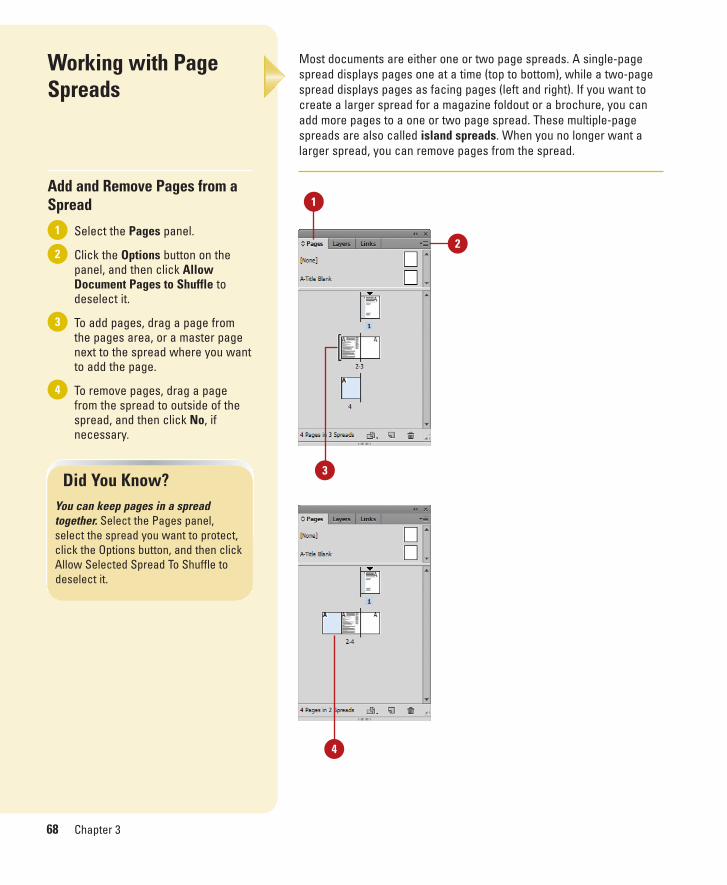
Add and Remove Pages from aSpread
Select the Pages panel.
Click the Options button on thepanel, and then click AllowDocument Pages to Shuffle todeselect it.
To add pages, drag a page fromthe pages area, or a master pagenext to the spread where you wantto add the page.
To remove pages, drag a pagefrom the spread to outside of thespread, and then click No, ifnecessary.
4
3
2
1
Most documents are either one or two page spreads. A single-pagespread displays pages one at a time (top to bottom), while a two-pagespread displays pages as facing pages (left and right). If you want tocreate a larger spread for a magazine foldout or a brochure, you canadd more pages to a one or two page spread. These multiple-pagespreads are also called island spreads. When you no longer want alarger spread, you can remove pages from the spread.
Did You Know?You can keep pages in a spreadtogether. Select the Pages panel,select the spread you want to protect,click the Options button, and then clickAllow Selected Spread To Shuffle todeselect it.
1
2
3
4
Chapter 3 Managing Pages and Books 69
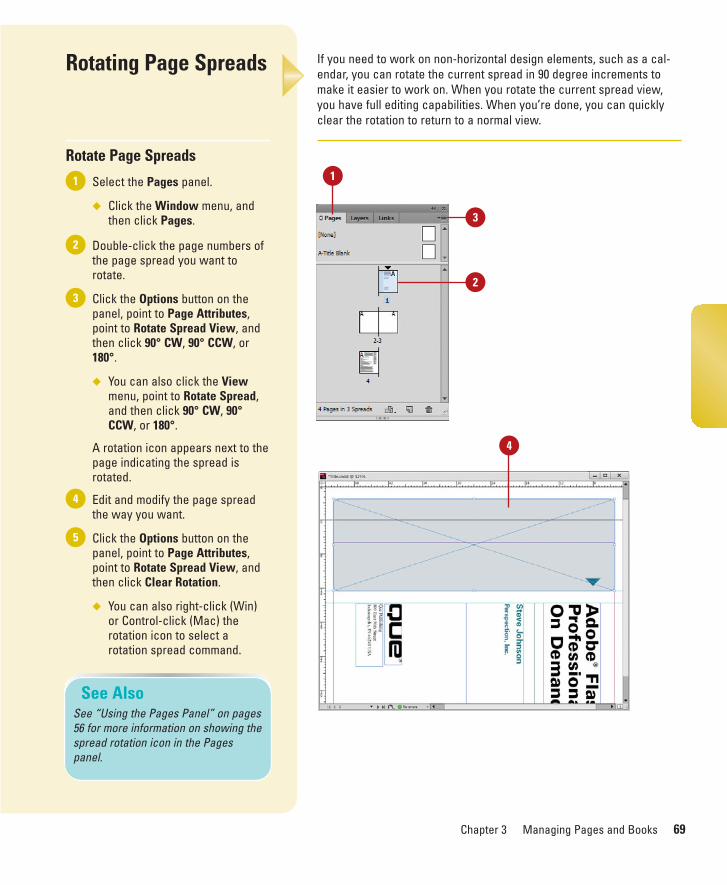
If you need to work on non-horizontal design elements, such as a cal-endar, you can rotate the current spread in 90 degree increments tomake it easier to work on. When you rotate the current spread view,you have full editing capabilities. When you’re done, you can quicklyclear the rotation to return to a normal view.
Rotating Page Spreads
Rotate Page Spreads
Select the Pages panel.
◆ Click the Window menu, andthen click Pages.
Double-click the page numbers ofthe page spread you want torotate.
Click the Options button on thepanel, point to Page Attributes,point to Rotate Spread View, andthen click 90° CW, 90° CCW, or180°.
◆ You can also click the Viewmenu, point to Rotate Spread,and then click 90° CW, 90°CCW, or 180°.
A rotation icon appears next to thepage indicating the spread isrotated.
Edit and modify the page spreadthe way you want.
Click the Options button on thepanel, point to Page Attributes,point to Rotate Spread View, andthen click Clear Rotation.
◆ You can also right-click (Win)or Control-click (Mac) therotation icon to select arotation spread command.
5
4
3
2
1
See AlsoSee “Using the Pages Panel” on pages56 for more information on showing thespread rotation icon in the Pagespanel.
1
4
3
2
70 Chapter 3
Creating Master Pages
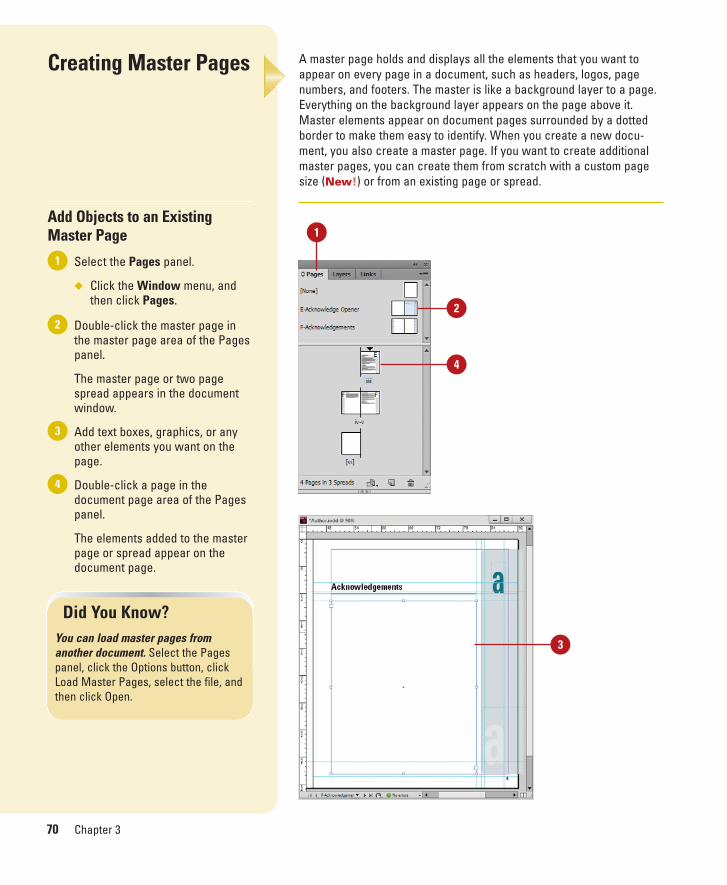
Add Objects to an ExistingMaster Page
Select the Pages panel.
◆ Click the Window menu, andthen click Pages.
Double-click the master page inthe master page area of the Pagespanel.
The master page or two pagespread appears in the documentwindow.
Add text boxes, graphics, or anyother elements you want on thepage.
Double-click a page in thedocument page area of the Pagespanel.
The elements added to the masterpage or spread appear on thedocument page.
4
3
2
1
A master page holds and displays all the elements that you want toappear on every page in a document, such as headers, logos, pagenumbers, and footers. The master is like a background layer to a page.Everything on the background layer appears on the page above it.Master elements appear on document pages surrounded by a dottedborder to make them easy to identify. When you create a new docu-ment, you also create a master page. If you want to create additionalmaster pages, you can create them from scratch with a custom pagesize (New!) or from an existing page or spread.
Did You Know?You can load master pages fromanother document. Select the Pagespanel, click the Options button, clickLoad Master Pages, select the file, andthen click Open.
1
2
4
3
Chapter 3 Managing Pages and Books 71
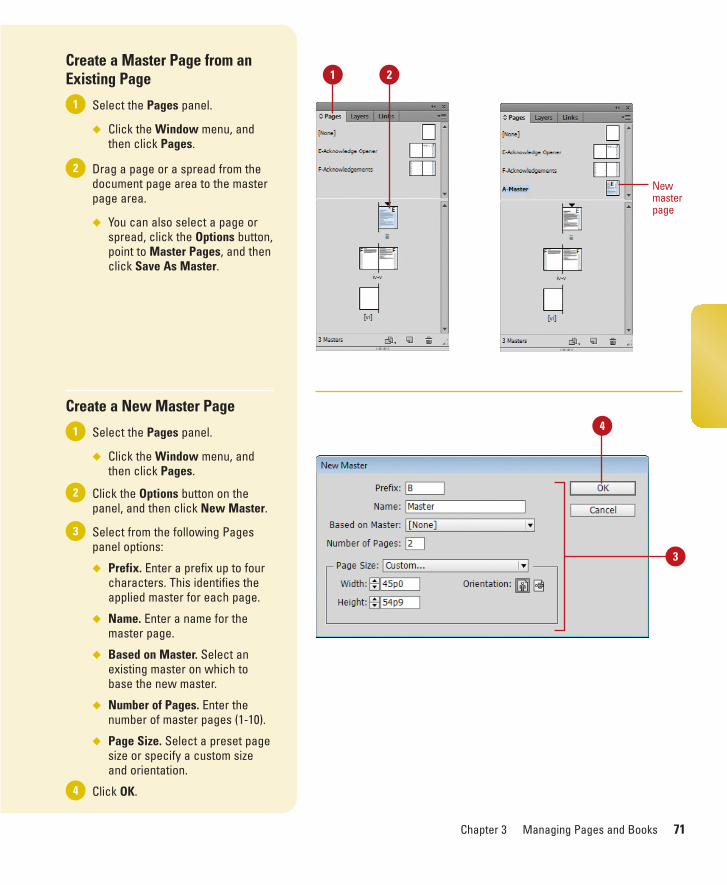
Create a Master Page from anExisting Page
Select the Pages panel.
◆ Click the Window menu, andthen click Pages.
Drag a page or a spread from thedocument page area to the masterpage area.
◆ You can also select a page orspread, click the Options button,point to Master Pages, and thenclick Save As Master.
Create a New Master Page
Select the Pages panel.
◆ Click the Window menu, andthen click Pages.
Click the Options button on thepanel, and then click New Master.
Select from the following Pagespanel options:
◆ Prefix. Enter a prefix up to fourcharacters. This identifies theapplied master for each page.
◆ Name. Enter a name for themaster page.
◆ Based on Master. Select anexisting master on which tobase the new master.
◆ Number of Pages. Enter thenumber of master pages (1-10).
◆ Page Size. Select a preset pagesize or specify a custom sizeand orientation.
Click OK. 4
3
2
1
2
1
1
Newmasterpage
2
4
3
72 Chapter 3
Working with MasterPages
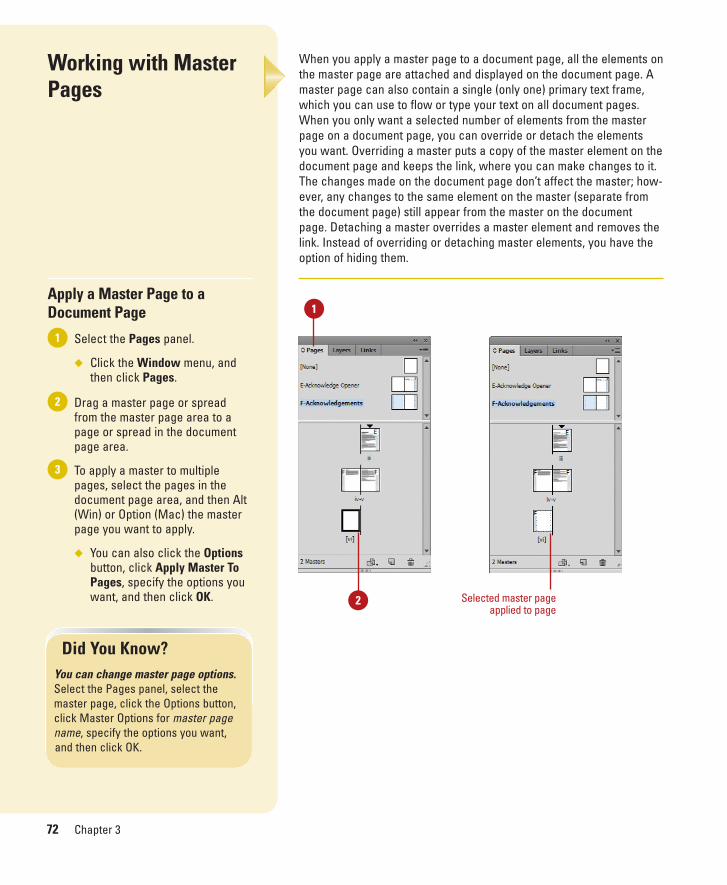
Apply a Master Page to aDocument Page
Select the Pages panel.
◆ Click the Window menu, andthen click Pages.
Drag a master page or spreadfrom the master page area to apage or spread in the documentpage area.
To apply a master to multiplepages, select the pages in thedocument page area, and then Alt(Win) or Option (Mac) the masterpage you want to apply.
◆ You can also click the Optionsbutton, click Apply Master ToPages, specify the options youwant, and then click OK.
3
2
1
When you apply a master page to a document page, all the elements onthe master page are attached and displayed on the document page. Amaster page can also contain a single (only one) primary text frame,which you can use to flow or type your text on all document pages.When you only want a selected number of elements from the masterpage on a document page, you can override or detach the elementsyou want. Overriding a master puts a copy of the master element on thedocument page and keeps the link, where you can make changes to it.The changes made on the document page don’t affect the master; how-ever, any changes to the same element on the master (separate fromthe document page) still appear from the master on the documentpage. Detaching a master overrides a master element and removes thelink. Instead of overriding or detaching master elements, you have theoption of hiding them.
Did You Know?You can change master page options.Select the Pages panel, select themaster page, click the Options button,click Master Options for master pagename, specify the options you want,and then click OK.
1
2 Selected master pageapplied to page
Chapter 3 Managing Pages and Books 73
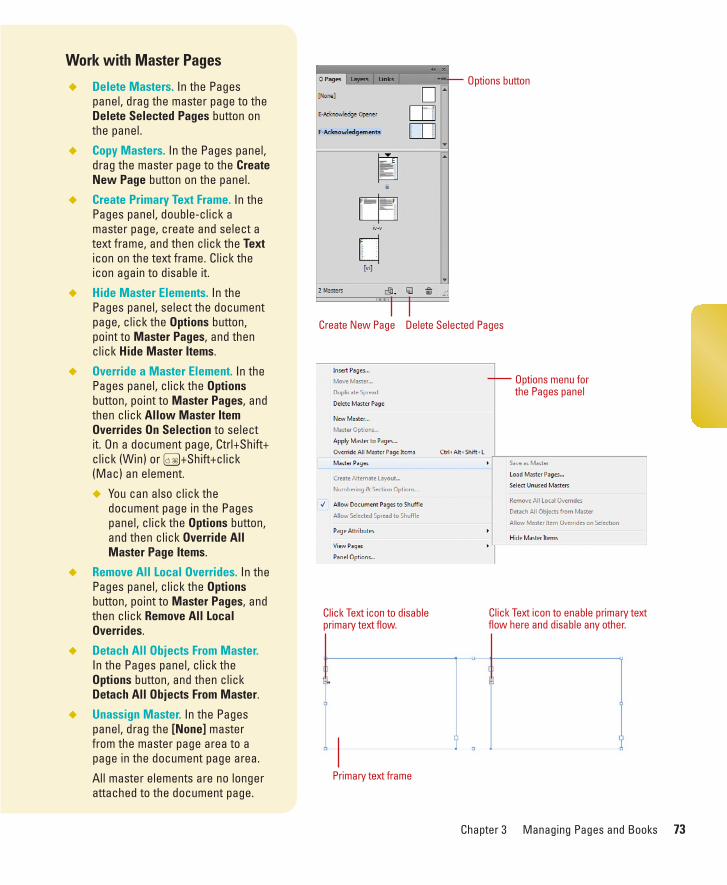
Work with Master Pages
◆ Delete Masters. In the Pagespanel, drag the master page to theDelete Selected Pages button onthe panel.
◆ Copy Masters. In the Pages panel,drag the master page to the CreateNew Page button on the panel.
◆ Create Primary Text Frame. In thePages panel, double-click amaster page, create and select atext frame, and then click the Texticon on the text frame. Click theicon again to disable it.
◆ Hide Master Elements. In thePages panel, select the documentpage, click the Options button,point to Master Pages, and thenclick Hide Master Items.
◆ Override a Master Element. In thePages panel, click the Optionsbutton, point to Master Pages, andthen click Allow Master ItemOverrides On Selection to selectit. On a document page, Ctrl+Shift+click (Win) or A+Shift+click(Mac) an element.
◆ You can also click thedocument page in the Pagespanel, click the Options button,and then click Override AllMaster Page Items.
◆ Remove All Local Overrides. In thePages panel, click the Optionsbutton, point to Master Pages, andthen click Remove All LocalOverrides.
◆ Detach All Objects From Master.In the Pages panel, click theOptions button, and then clickDetach All Objects From Master.
◆ Unassign Master. In the Pagespanel, drag the [None] masterfrom the master page area to apage in the document page area.
All master elements are no longerattached to the document page.
Create New Page
Options button
Click Text icon to disableprimary text flow.
Primary text frame
Click Text icon to enable primary textflow here and disable any other.
Delete Selected Pages
Options menu forthe Pages panel
74 Chapter 3
Working with PageNumbers and Sections
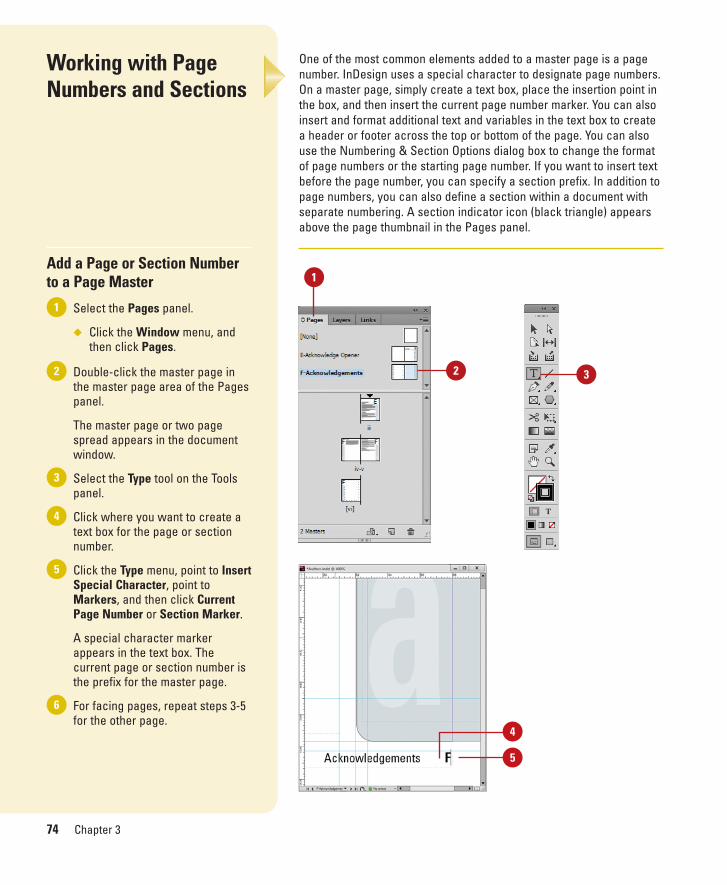
Add a Page or Section Numberto a Page Master
Select the Pages panel.
◆ Click the Window menu, andthen click Pages.
Double-click the master page inthe master page area of the Pagespanel.
The master page or two pagespread appears in the documentwindow.
Select the Type tool on the Toolspanel.
Click where you want to create atext box for the page or sectionnumber.
Click the Type menu, point to InsertSpecial Character, point toMarkers, and then click CurrentPage Number or Section Marker.
A special character markerappears in the text box. Thecurrent page or section number isthe prefix for the master page.
For facing pages, repeat steps 3-5for the other page.
6
5
4
3
2
1
One of the most common elements added to a master page is a pagenumber. InDesign uses a special character to designate page numbers.On a master page, simply create a text box, place the insertion point inthe box, and then insert the current page number marker. You can alsoinsert and format additional text and variables in the text box to createa header or footer across the top or bottom of the page. You can alsouse the Numbering & Section Options dialog box to change the formatof page numbers or the starting page number. If you want to insert textbefore the page number, you can specify a section prefix. In addition topage numbers, you can also define a section within a document withseparate numbering. A section indicator icon (black triangle) appearsabove the page thumbnail in the Pages panel.
1
2 3
4
5
Chapter 3 Managing Pages and Books 75
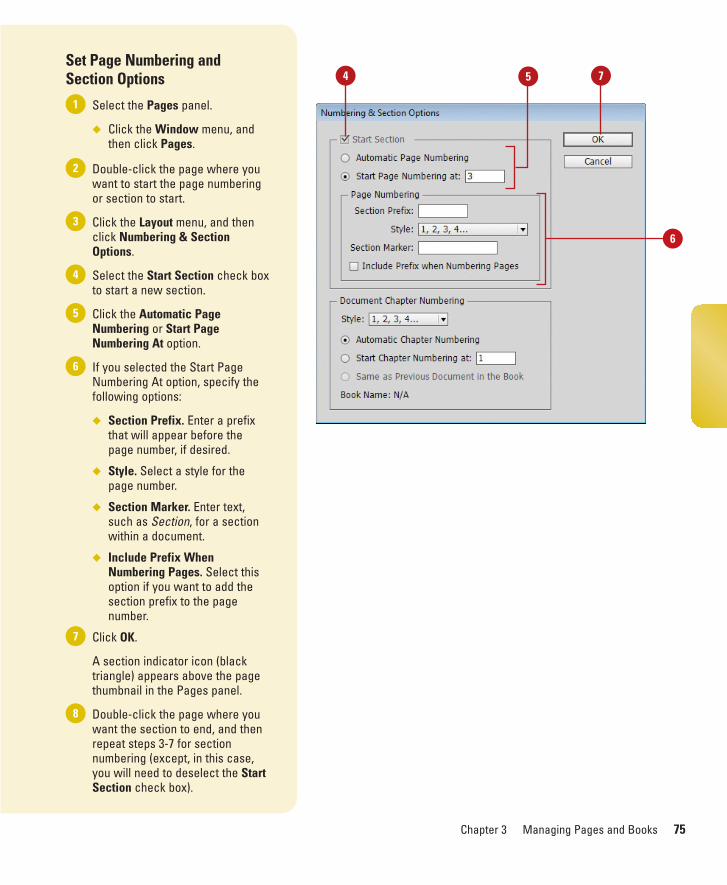
Set Page Numbering andSection Options
Select the Pages panel.
◆ Click the Window menu, andthen click Pages.
Double-click the page where youwant to start the page numberingor section to start.
Click the Layout menu, and thenclick Numbering & SectionOptions.
Select the Start Section check boxto start a new section.
Click the Automatic PageNumbering or Start PageNumbering At option.
If you selected the Start PageNumbering At option, specify thefollowing options:
◆ Section Prefix. Enter a prefixthat will appear before thepage number, if desired.
◆ Style. Select a style for thepage number.
◆ Section Marker. Enter text,such as Section, for a sectionwithin a document.
◆ Include Prefix WhenNumbering Pages. Select thisoption if you want to add thesection prefix to the pagenumber.
Click OK.
A section indicator icon (blacktriangle) appears above the pagethumbnail in the Pages panel.
Double-click the page where youwant the section to end, and thenrepeat steps 3-7 for sectionnumbering (except, in this case,you will need to deselect the StartSection check box).
8
7
6
5
4
3
2
1
74 5
6
76 Chapter 3
Working with ChapterNumbers
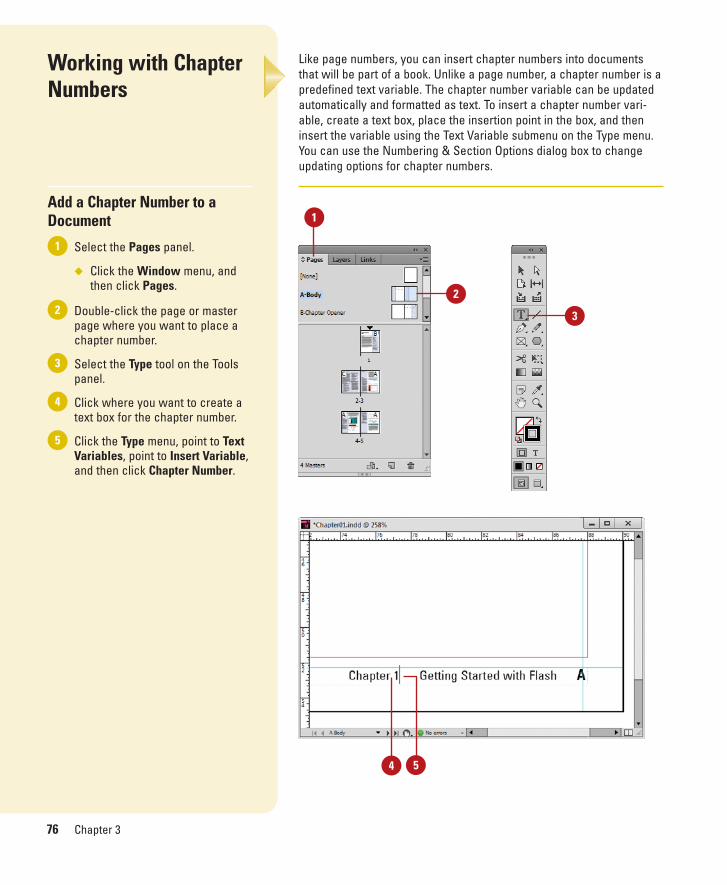
Add a Chapter Number to aDocument
Select the Pages panel.
◆ Click the Window menu, andthen click Pages.
Double-click the page or masterpage where you want to place achapter number.
Select the Type tool on the Toolspanel.
Click where you want to create atext box for the chapter number.
Click the Type menu, point to TextVariables, point to Insert Variable,and then click Chapter Number.
5
4
3
2
1
Like page numbers, you can insert chapter numbers into documentsthat will be part of a book. Unlike a page number, a chapter number is apredefined text variable. The chapter number variable can be updatedautomatically and formatted as text. To insert a chapter number vari-able, create a text box, place the insertion point in the box, and theninsert the variable using the Text Variable submenu on the Type menu.You can use the Numbering & Section Options dialog box to changeupdating options for chapter numbers.
1
2
3
4 5
Chapter 3 Managing Pages and Books 77
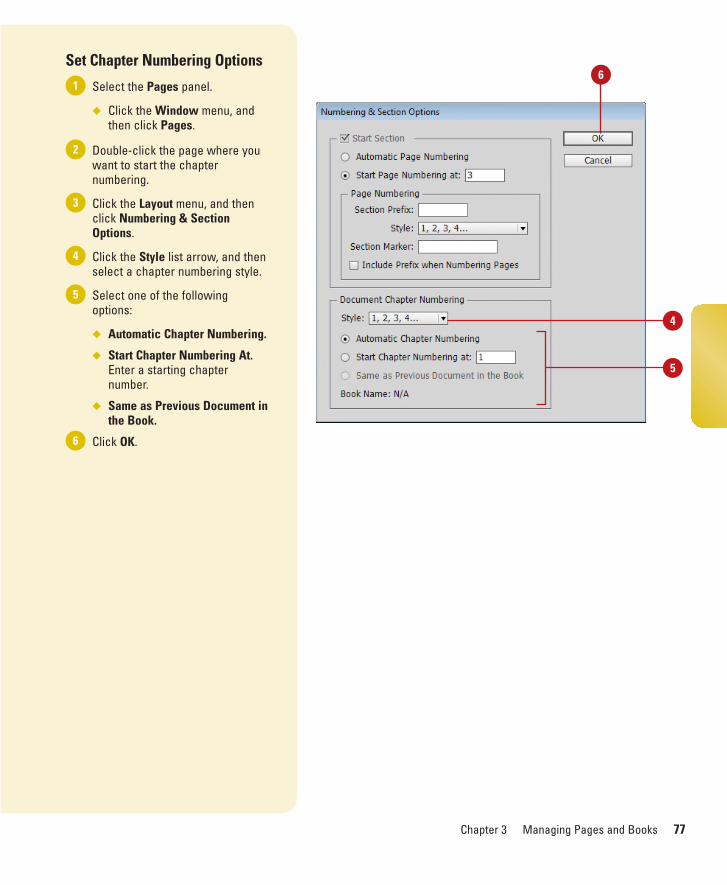
Set Chapter Numbering Options
Select the Pages panel.
◆ Click the Window menu, andthen click Pages.
Double-click the page where youwant to start the chapternumbering.
Click the Layout menu, and thenclick Numbering & SectionOptions.
Click the Style list arrow, and thenselect a chapter numbering style.
Select one of the followingoptions:
◆ Automatic Chapter Numbering.
◆ Start Chapter Numbering At.Enter a starting chapternumber.
◆ Same as Previous Document inthe Book.
Click OK.6
5
4
3
2
16
5
4
78 Chapter 3
Creating and UsingText Variables
Define a Text Variable
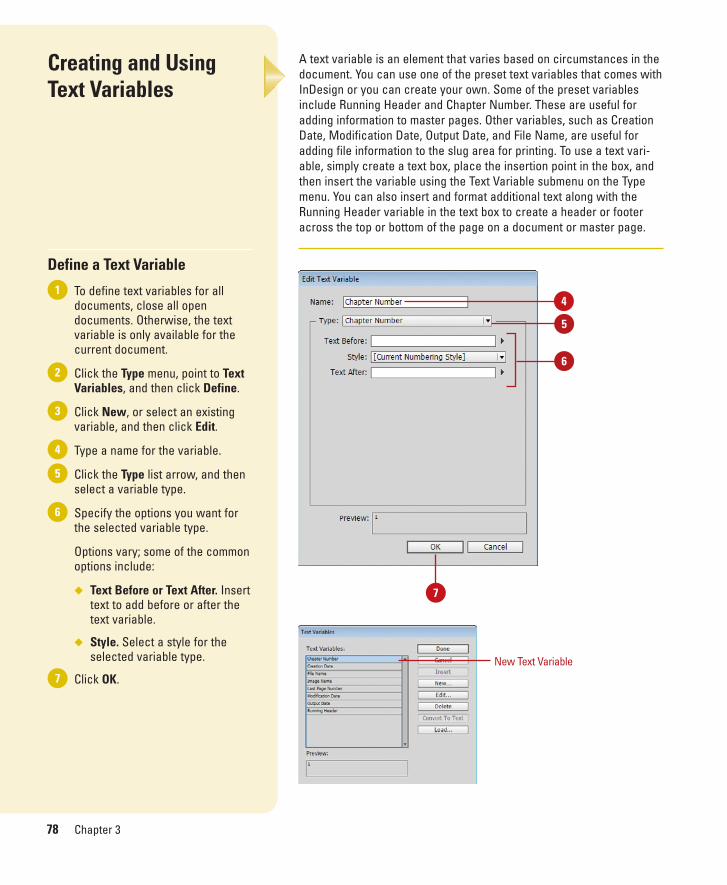
To define text variables for alldocuments, close all opendocuments. Otherwise, the textvariable is only available for thecurrent document.
Click the Type menu, point to TextVariables, and then click Define.
Click New, or select an existingvariable, and then click Edit.
Type a name for the variable.
Click the Type list arrow, and thenselect a variable type.
Specify the options you want forthe selected variable type.
Options vary; some of the commonoptions include:
◆ Text Before or Text After. Inserttext to add before or after thetext variable.
◆ Style. Select a style for theselected variable type.
Click OK.7
6
5
4
3
2
1
A text variable is an element that varies based on circumstances in thedocument. You can use one of the preset text variables that comes withInDesign or you can create your own. Some of the preset variablesinclude Running Header and Chapter Number. These are useful foradding information to master pages. Other variables, such as CreationDate, Modification Date, Output Date, and File Name, are useful foradding file information to the slug area for printing. To use a text vari-able, simply create a text box, place the insertion point in the box, andthen insert the variable using the Text Variable submenu on the Typemenu. You can also insert and format additional text along with theRunning Header variable in the text box to create a header or footeracross the top or bottom of the page on a document or master page.
New Text Variable
5
6
4
7
Chapter 3 Managing Pages and Books 79
Work with Text Variables
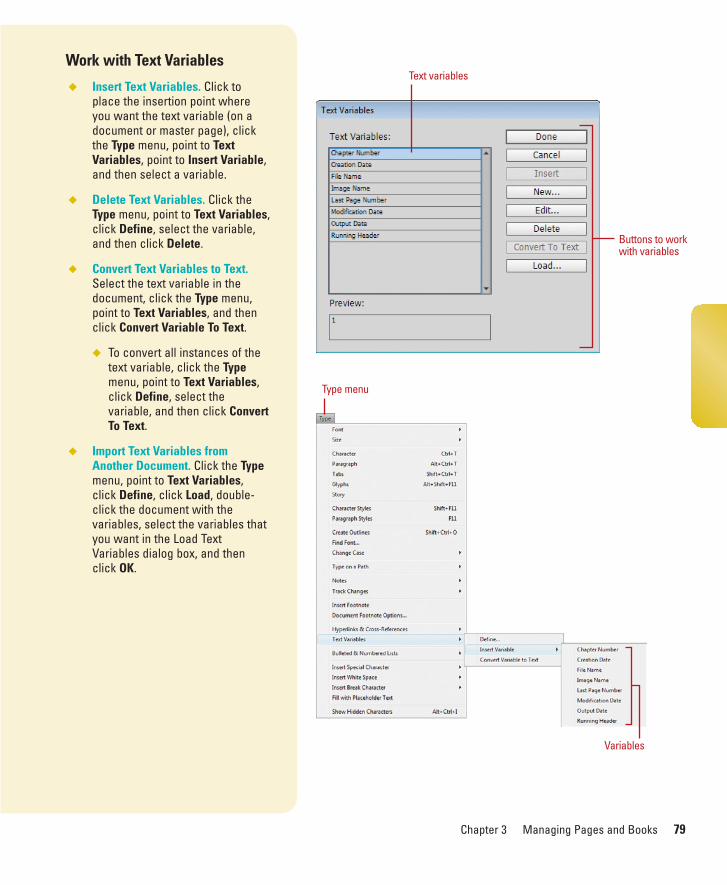
◆ Insert Text Variables. Click toplace the insertion point whereyou want the text variable (on adocument or master page), clickthe Type menu, point to TextVariables, point to Insert Variable,and then select a variable.
◆ Delete Text Variables. Click theType menu, point to Text Variables,click Define, select the variable,and then click Delete.
◆ Convert Text Variables to Text.Select the text variable in thedocument, click the Type menu,point to Text Variables, and thenclick Convert Variable To Text.
◆ To convert all instances of thetext variable, click the Typemenu, point to Text Variables,click Define, select thevariable, and then click ConvertTo Text.
◆ Import Text Variables fromAnother Document. Click the Typemenu, point to Text Variables,click Define, click Load, double-click the document with thevariables, select the variables thatyou want in the Load TextVariables dialog box, and thenclick OK.
Variables
Buttons to workwith variables
Text variables
Type menu
80 Chapter 3
Creating a Book
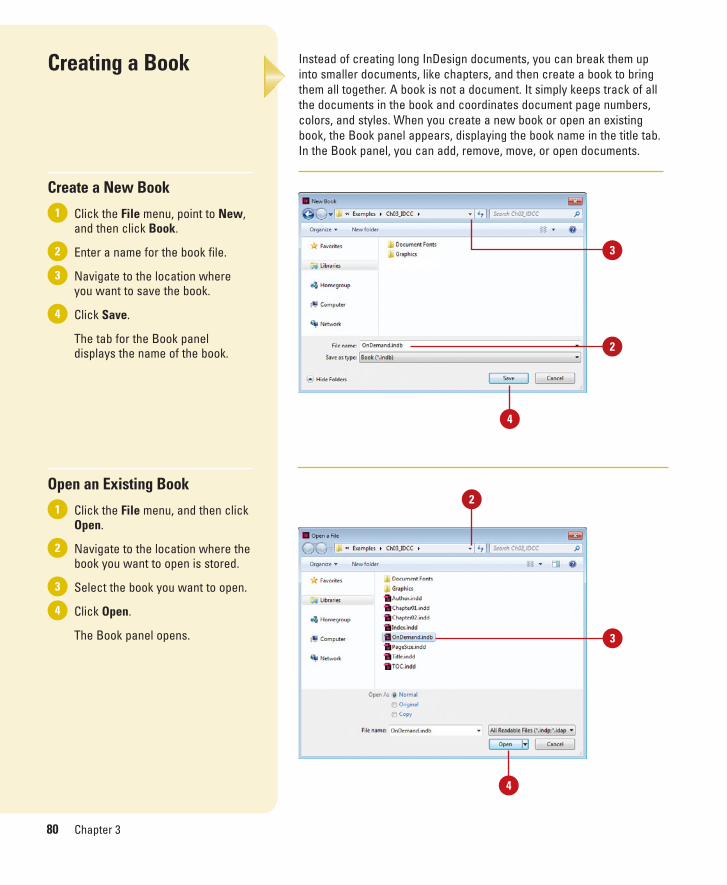
Create a New Book
Click the File menu, point to New,and then click Book.
Enter a name for the book file.
Navigate to the location whereyou want to save the book.
Click Save.
The tab for the Book paneldisplays the name of the book.
Open an Existing Book
Click the File menu, and then clickOpen.
Navigate to the location where thebook you want to open is stored.
Select the book you want to open.
Click Open.
The Book panel opens.
4
3
2
1
4
3
2
1
Instead of creating long InDesign documents, you can break them upinto smaller documents, like chapters, and then create a book to bringthem all together. A book is not a document. It simply keeps track of allthe documents in the book and coordinates document page numbers,colors, and styles. When you create a new book or open an existingbook, the Book panel appears, displaying the book name in the title tab.In the Book panel, you can add, remove, move, or open documents.
2
2
4
4
3
3

Chapter 3 Managing Pages and Books 81
Add, Remove, Move, or OpenDocuments in a Book
Open the book you want to edit.
Do any of the following:
◆ Add a Document. Click the AddDocument button on the panel,locate the document you wantto add, and then click Open.
◆ Remove a Document. Select adocument in the Book panel,and then click the RemoveDocument button at the bottomof the panel.
◆ Move a Document. Drag adocument to a new position inthe Book panel.
◆ Open a Document. Double-clicka document in the Book panel.An open book icon appears,indicating the book is open.
◆ View a Document in Exploreror Finder. Select a document inthe Book panel, click theOptions button, and then clickReveal in Explorer (Win) orFinder (Mac).
Click the Save Book button on thepanel.
Click the Close button to close thebook.
4
3
2
1
Did You Know?You can replace a document in a book.Open the book, select the documentthat you want to replace, click theOptions button, click ReplaceDocument, select the replacement file,and then click Open.
You can print an entire book. Open thebook, and then click the Print Bookbutton on the panel.
1
2
Move a document
3
4
Open a document
82 Chapter 3
Managing Books
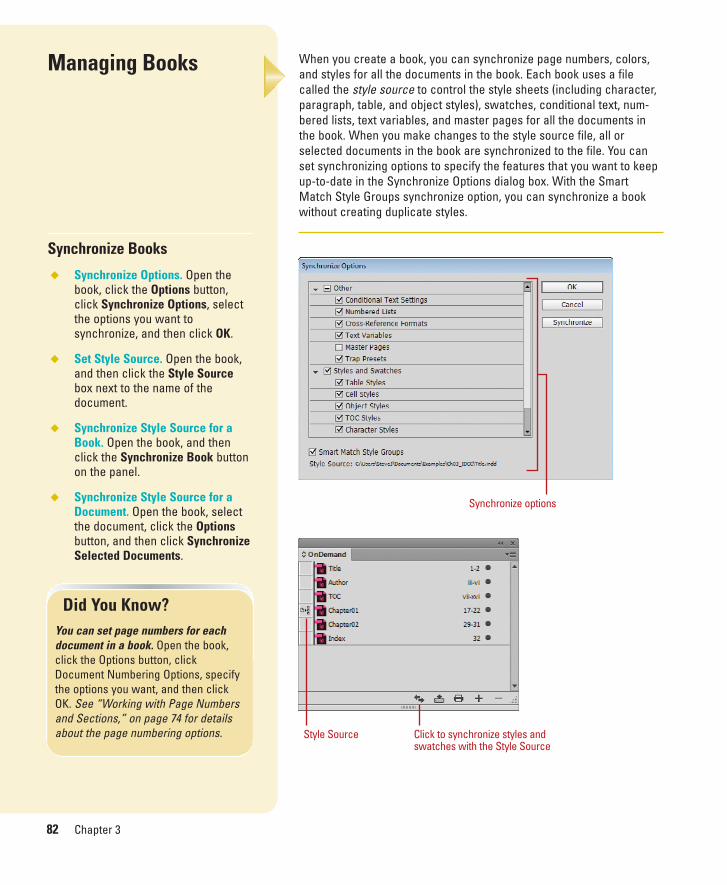
Synchronize Books
◆ Synchronize Options. Open thebook, click the Options button,click Synchronize Options, selectthe options you want tosynchronize, and then click OK.
◆ Set Style Source. Open the book,and then click the Style Sourcebox next to the name of thedocument.
◆ Synchronize Style Source for aBook. Open the book, and thenclick the Synchronize Book buttonon the panel.
◆ Synchronize Style Source for aDocument. Open the book, selectthe document, click the Optionsbutton, and then click SynchronizeSelected Documents.
When you create a book, you can synchronize page numbers, colors,and styles for all the documents in the book. Each book uses a filecalled the style source to control the style sheets (including character,paragraph, table, and object styles), swatches, conditional text, num-bered lists, text variables, and master pages for all the documents inthe book. When you make changes to the style source file, all orselected documents in the book are synchronized to the file. You canset synchronizing options to specify the features that you want to keepup-to-date in the Synchronize Options dialog box. With the SmartMatch Style Groups synchronize option, you can synchronize a bookwithout creating duplicate styles.
Did You Know?You can set page numbers for eachdocument in a book. Open the book,click the Options button, clickDocument Numbering Options, specifythe options you want, and then clickOK. See “Working with Page Numbersand Sections,” on page 74 for detailsabout the page numbering options.
Synchronize options
Style Source Click to synchronize styles andswatches with the Style Source
Chapter 3 Managing Pages and Books 83
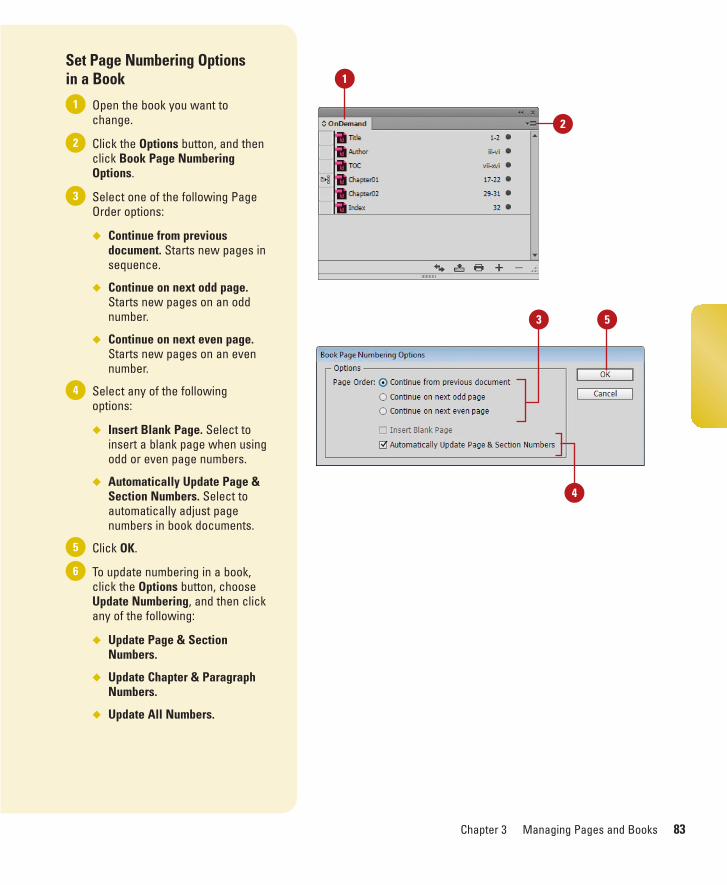
Set Page Numbering Options in a Book
Open the book you want tochange.
Click the Options button, and thenclick Book Page NumberingOptions.
Select one of the following PageOrder options:
◆ Continue from previousdocument. Starts new pages insequence.
◆ Continue on next odd page.Starts new pages on an oddnumber.
◆ Continue on next even page.Starts new pages on an evennumber.
Select any of the followingoptions:
◆ Insert Blank Page. Select toinsert a blank page when usingodd or even page numbers.
◆ Automatically Update Page &Section Numbers. Select toautomatically adjust pagenumbers in book documents.
Click OK.
To update numbering in a book,click the Options button, chooseUpdate Numbering, and then clickany of the following:
◆ Update Page & SectionNumbers.
◆ Update Chapter & ParagraphNumbers.
◆ Update All Numbers.
6
5
4
3
2
1
1
5
2
4
3
84 Chapter 3
Creating a Table ofContents
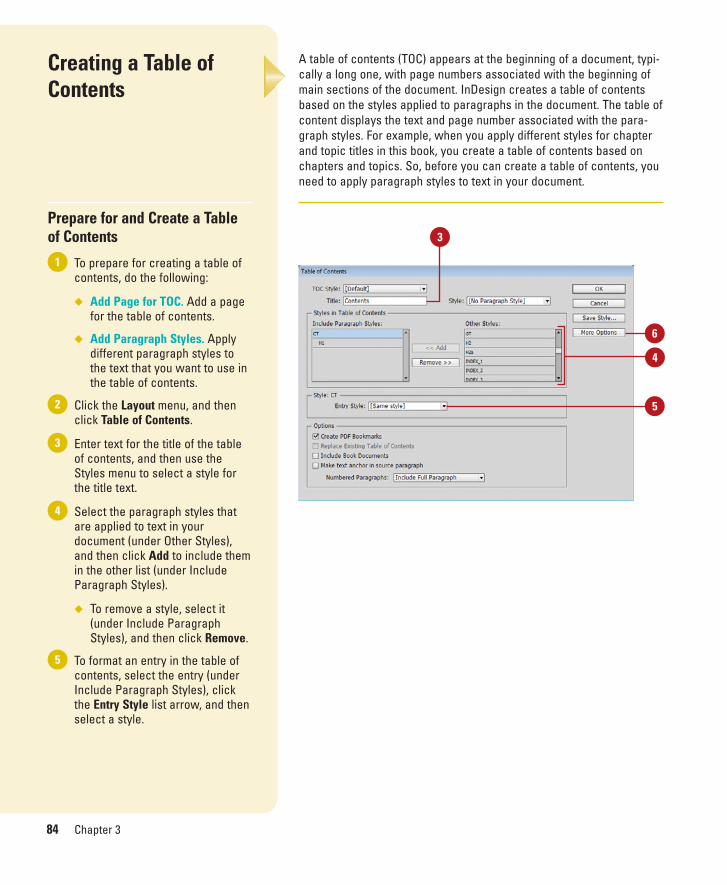
Prepare for and Create a Tableof Contents
To prepare for creating a table ofcontents, do the following:
◆ Add Page for TOC. Add a pagefor the table of contents.
◆ Add Paragraph Styles. Applydifferent paragraph styles tothe text that you want to use inthe table of contents.
Click the Layout menu, and thenclick Table of Contents.
Enter text for the title of the tableof contents, and then use theStyles menu to select a style forthe title text.
Select the paragraph styles thatare applied to text in yourdocument (under Other Styles),and then click Add to include themin the other list (under IncludeParagraph Styles).
◆ To remove a style, select it(under Include ParagraphStyles), and then click Remove.
To format an entry in the table ofcontents, select the entry (underInclude Paragraph Styles), clickthe Entry Style list arrow, and thenselect a style.
5
4
3
2
1
A table of contents (TOC) appears at the beginning of a document, typi-cally a long one, with page numbers associated with the beginning ofmain sections of the document. InDesign creates a table of contentsbased on the styles applied to paragraphs in the document. The table ofcontent displays the text and page number associated with the para-graph styles. For example, when you apply different styles for chapterand topic titles in this book, you create a table of contents based onchapters and topics. So, before you can create a table of contents, youneed to apply paragraph styles to text in your document.
3
4
5
6
Chapter 3 Managing Pages and Books 85
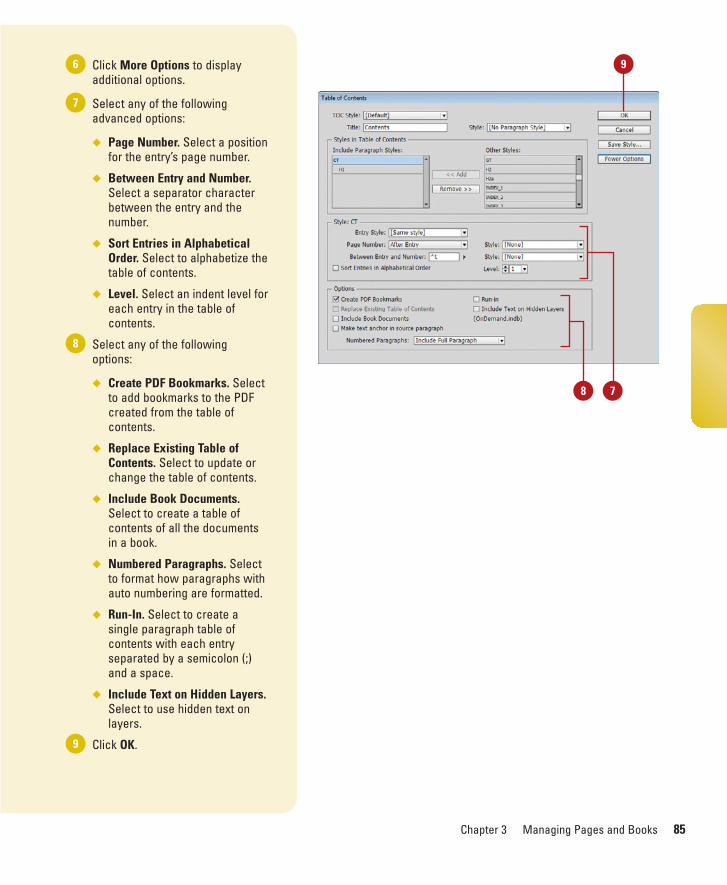
Click More Options to displayadditional options.
Select any of the followingadvanced options:
◆ Page Number. Select a positionfor the entry’s page number.
◆ Between Entry and Number.Select a separator characterbetween the entry and thenumber.
◆ Sort Entries in AlphabeticalOrder. Select to alphabetize thetable of contents.
◆ Level. Select an indent level foreach entry in the table ofcontents.
Select any of the followingoptions:
◆ Create PDF Bookmarks. Selectto add bookmarks to the PDFcreated from the table ofcontents.
◆ Replace Existing Table ofContents. Select to update orchange the table of contents.
◆ Include Book Documents.Select to create a table ofcontents of all the documentsin a book.
◆ Numbered Paragraphs. Selectto format how paragraphs withauto numbering are formatted.
◆ Run-In. Select to create asingle paragraph table ofcontents with each entryseparated by a semicolon (;)and a space.
◆ Include Text on Hidden Layers.Select to use hidden text onlayers.
Click OK.9
8
7
6
8 7
9
86 Chapter 3
Starting an Index
Create or Edit a List of IndexTopics
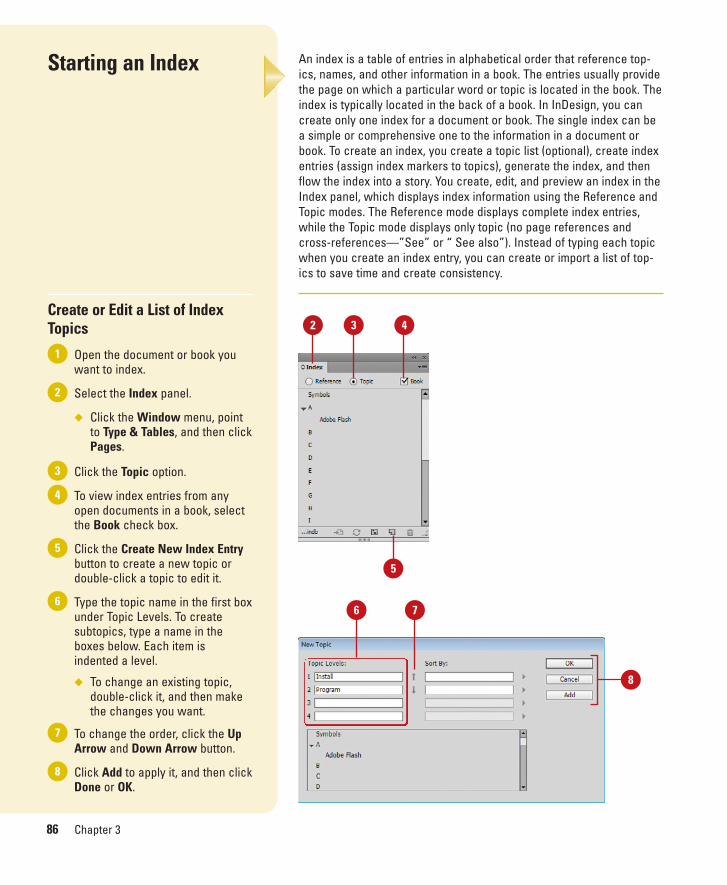
Open the document or book youwant to index.
Select the Index panel.
◆ Click the Window menu, pointto Type & Tables, and then clickPages.
Click the Topic option.
To view index entries from anyopen documents in a book, selectthe Book check box.
Click the Create New Index Entrybutton to create a new topic ordouble-click a topic to edit it.
Type the topic name in the first boxunder Topic Levels. To createsubtopics, type a name in theboxes below. Each item isindented a level.
◆ To change an existing topic,double-click it, and then makethe changes you want.
To change the order, click the UpArrow and Down Arrow button.
Click Add to apply it, and then clickDone or OK.
8
7
6
5
4
3
2
1
An index is a table of entries in alphabetical order that reference top-ics, names, and other information in a book. The entries usually providethe page on which a particular word or topic is located in the book. Theindex is typically located in the back of a book. In InDesign, you cancreate only one index for a document or book. The single index can bea simple or comprehensive one to the information in a document orbook. To create an index, you create a topic list (optional), create indexentries (assign index markers to topics), generate the index, and thenflow the index into a story. You create, edit, and preview an index in theIndex panel, which displays index information using the Reference andTopic modes. The Reference mode displays complete index entries,while the Topic mode displays only topic (no page references andcross-references—”See” or “ See also”). Instead of typing each topicwhen you create an index entry, you can create or import a list of top-ics to save time and create consistency.
2 3 4
5
6 7
8
Chapter 3 Managing Pages and Books 87
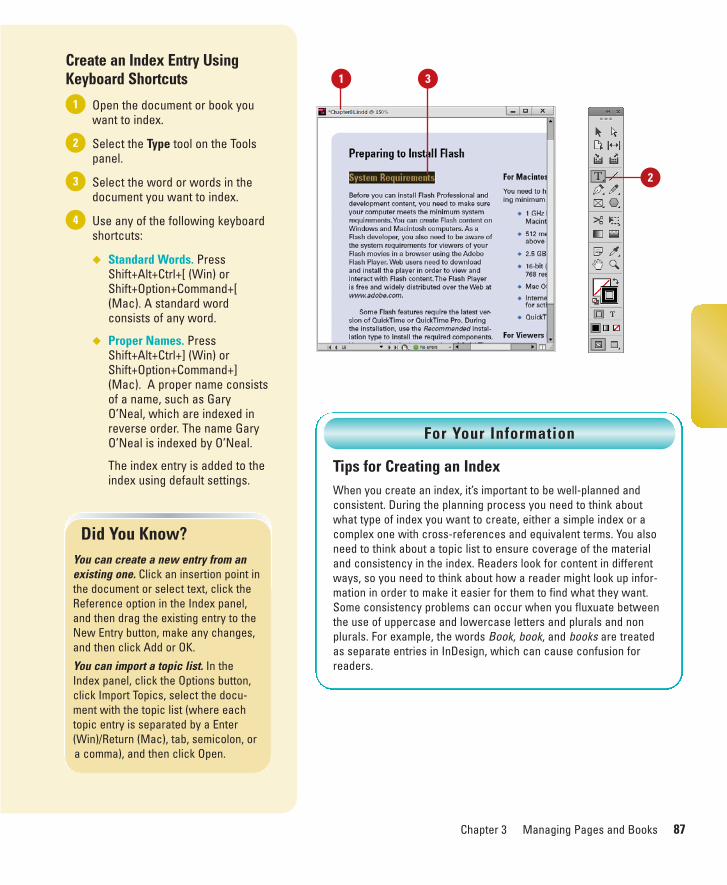
Create an Index Entry UsingKeyboard Shortcuts
Open the document or book youwant to index.
Select the Type tool on the Toolspanel.
Select the word or words in thedocument you want to index.
Use any of the following keyboardshortcuts:
◆ Standard Words. PressShift+Alt+Ctrl+[ (Win) orShift+Option+Command+[(Mac). A standard wordconsists of any word.
◆ Proper Names. PressShift+Alt+Ctrl+] (Win) orShift+Option+Command+](Mac). A proper name consistsof a name, such as GaryO’Neal, which are indexed inreverse order. The name GaryO’Neal is indexed by O’Neal.
The index entry is added to theindex using default settings.
4
3
2
1
Tips for Creating an IndexWhen you create an index, it’s important to be well-planned andconsistent. During the planning process you need to think aboutwhat type of index you want to create, either a simple index or acomplex one with cross-references and equivalent terms. You alsoneed to think about a topic list to ensure coverage of the materialand consistency in the index. Readers look for content in differentways, so you need to think about how a reader might look up infor-mation in order to make it easier for them to find what they want.Some consistency problems can occur when you fluxuate betweenthe use of uppercase and lowercase letters and plurals and nonplurals. For example, the words Book, book, and books are treatedas separate entries in InDesign, which can cause confusion forreaders.
For Your Information
Did You Know?You can create a new entry from anexisting one. Click an insertion point inthe document or select text, click theReference option in the Index panel,and then drag the existing entry to theNew Entry button, make any changes,and then click Add or OK.
You can import a topic list. In theIndex panel, click the Options button,click Import Topics, select the docu-ment with the topic list (where eachtopic entry is separated by a Enter(Win)/Return (Mac), tab, semicolon, ora comma), and then click Open.
2
1 3
88 Chapter 3
Creating an IndexEntry
Create an Index Entry
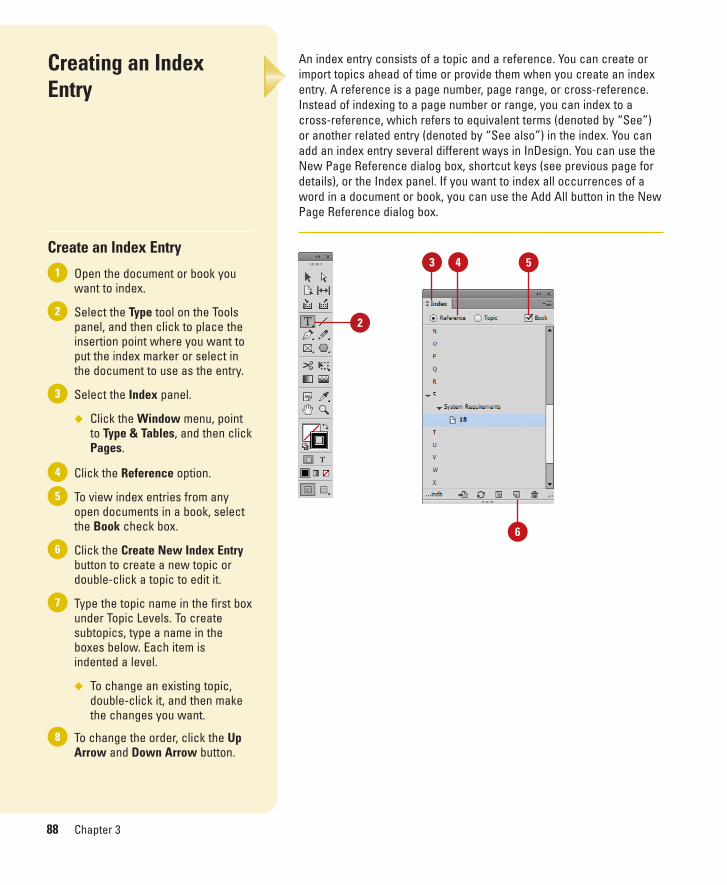
Open the document or book youwant to index.
Select the Type tool on the Toolspanel, and then click to place theinsertion point where you want toput the index marker or select inthe document to use as the entry.
Select the Index panel.
◆ Click the Window menu, pointto Type & Tables, and then clickPages.
Click the Reference option.
To view index entries from anyopen documents in a book, selectthe Book check box.
Click the Create New Index Entrybutton to create a new topic ordouble-click a topic to edit it.
Type the topic name in the first boxunder Topic Levels. To createsubtopics, type a name in theboxes below. Each item isindented a level.
◆ To change an existing topic,double-click it, and then makethe changes you want.
To change the order, click the UpArrow and Down Arrow button.
8
7
6
5
4
3
2
1
An index entry consists of a topic and a reference. You can create orimport topics ahead of time or provide them when you create an indexentry. A reference is a page number, page range, or cross-reference.Instead of indexing to a page number or range, you can index to across-reference, which refers to equivalent terms (denoted by “See”)or another related entry (denoted by “See also”) in the index. You canadd an index entry several different ways in InDesign. You can use theNew Page Reference dialog box, shortcut keys (see previous page fordetails), or the Index panel. If you want to index all occurrences of aword in a document or book, you can use the Add All button in the NewPage Reference dialog box.
2
3 4 5
6
Chapter 3 Managing Pages and Books 89
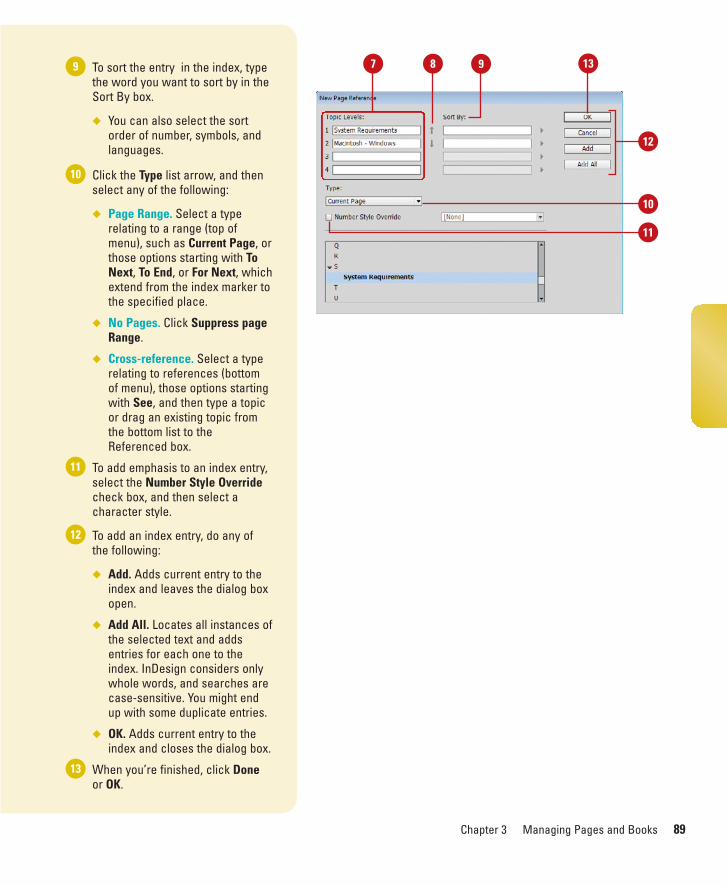
To sort the entry in the index, typethe word you want to sort by in theSort By box.
◆ You can also select the sortorder of number, symbols, andlanguages.
Click the Type list arrow, and thenselect any of the following:
◆ Page Range. Select a typerelating to a range (top ofmenu), such as Current Page, orthose options starting with ToNext, To End, or For Next, whichextend from the index marker tothe specified place.
◆ No Pages. Click Suppress pageRange.
◆ Cross-reference. Select a typerelating to references (bottomof menu), those options startingwith See, and then type a topicor drag an existing topic fromthe bottom list to theReferenced box.
To add emphasis to an index entry,select the Number Style Overridecheck box, and then select acharacter style.
To add an index entry, do any ofthe following:
◆ Add. Adds current entry to theindex and leaves the dialog boxopen.
◆ Add All. Locates all instances ofthe selected text and addsentries for each one to theindex. InDesign considers onlywhole words, and searches arecase-sensitive. You might endup with some duplicate entries.
◆ OK. Adds current entry to theindex and closes the dialog box.
When you’re finished, click Doneor OK.
13
12
11
10
9 7 8
12
9
10
13
11
90 Chapter 3
Creating an Index
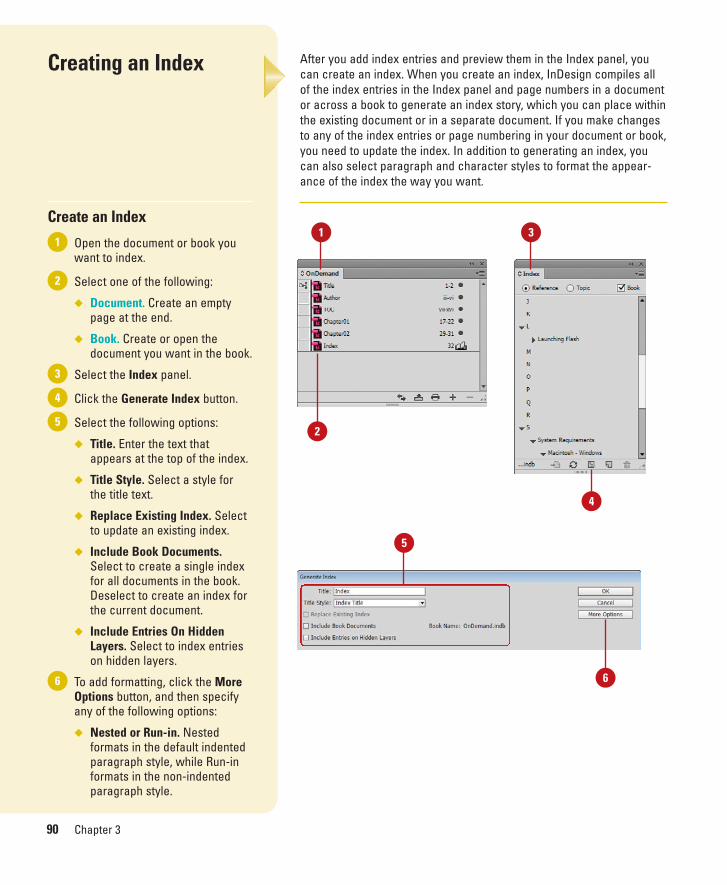
Create an Index
Open the document or book youwant to index.
Select one of the following:
◆ Document. Create an emptypage at the end.
◆ Book. Create or open thedocument you want in the book.
Select the Index panel.
Click the Generate Index button.
Select the following options:
◆ Title. Enter the text thatappears at the top of the index.
◆ Title Style. Select a style forthe title text.
◆ Replace Existing Index. Selectto update an existing index.
◆ Include Book Documents.Select to create a single indexfor all documents in the book.Deselect to create an index forthe current document.
◆ Include Entries On HiddenLayers. Select to index entrieson hidden layers.
To add formatting, click the MoreOptions button, and then specifyany of the following options:
◆ Nested or Run-in. Nestedformats in the default indentedparagraph style, while Run-informats in the non-indentedparagraph style.
6
5
4
3
2
1
After you add index entries and preview them in the Index panel, youcan create an index. When you create an index, InDesign compiles allof the index entries in the Index panel and page numbers in a documentor across a book to generate an index story, which you can place withinthe existing document or in a separate document. If you make changesto any of the index entries or page numbering in your document or book,you need to update the index. In addition to generating an index, youcan also select paragraph and character styles to format the appear-ance of the index the way you want.
3
4
1
2
5
6
Chapter 3 Managing Pages and Books 91
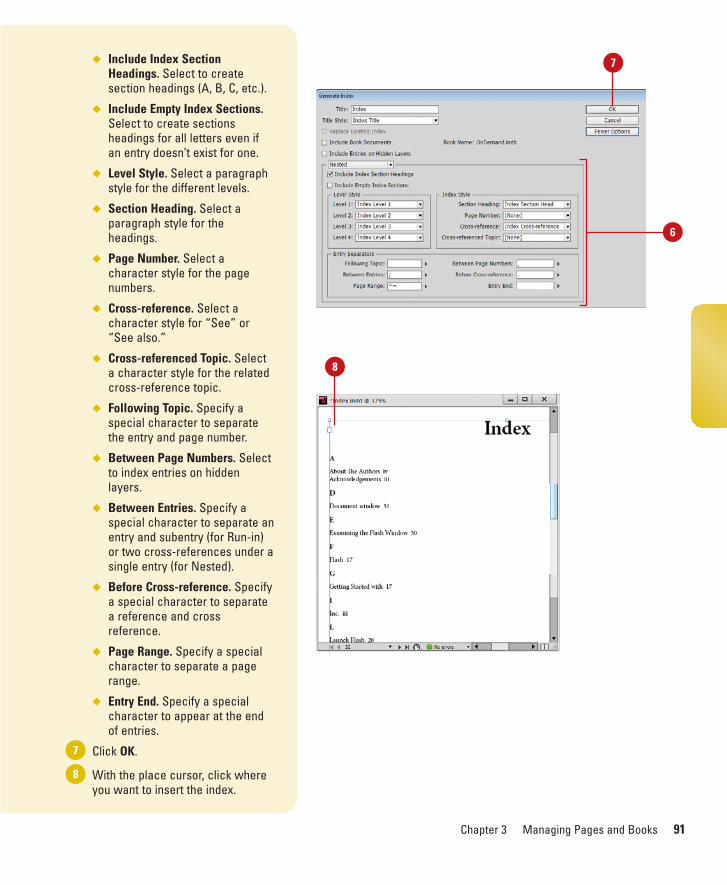
◆ Include Index SectionHeadings. Select to createsection headings (A, B, C, etc.).
◆ Include Empty Index Sections.Select to create sectionsheadings for all letters even ifan entry doesn’t exist for one.
◆ Level Style. Select a paragraphstyle for the different levels.
◆ Section Heading. Select aparagraph style for theheadings.
◆ Page Number. Select acharacter style for the pagenumbers.
◆ Cross-reference. Select acharacter style for “See” or“See also.”
◆ Cross-referenced Topic. Selecta character style for the relatedcross-reference topic.
◆ Following Topic. Specify aspecial character to separatethe entry and page number.
◆ Between Page Numbers. Selectto index entries on hiddenlayers.
◆ Between Entries. Specify aspecial character to separate anentry and subentry (for Run-in)or two cross-references under asingle entry (for Nested).
◆ Before Cross-reference. Specifya special character to separatea reference and crossreference.
◆ Page Range. Specify a specialcharacter to separate a pagerange.
◆ Entry End. Specify a specialcharacter to appear at the endof entries.
Click OK.
With the place cursor, click whereyou want to insert the index.
8
7
6
7
8
92 Chapter 3
Managing an Index
Manage an Index
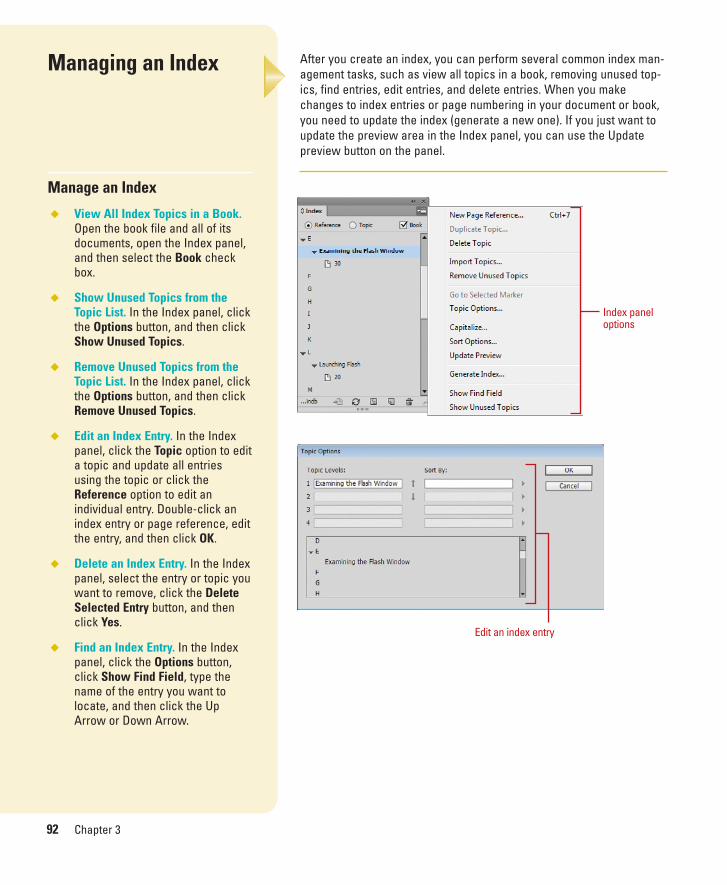
◆ View All Index Topics in a Book.Open the book file and all of itsdocuments, open the Index panel,and then select the Book checkbox.
◆ Show Unused Topics from theTopic List. In the Index panel, clickthe Options button, and then clickShow Unused Topics.
◆ Remove Unused Topics from theTopic List. In the Index panel, clickthe Options button, and then clickRemove Unused Topics.
◆ Edit an Index Entry. In the Indexpanel, click the Topic option to edita topic and update all entriesusing the topic or click theReference option to edit anindividual entry. Double-click anindex entry or page reference, editthe entry, and then click OK.
◆ Delete an Index Entry. In the Indexpanel, select the entry or topic youwant to remove, click the DeleteSelected Entry button, and thenclick Yes.
◆ Find an Index Entry. In the Indexpanel, click the Options button,click Show Find Field, type thename of the entry you want tolocate, and then click the UpArrow or Down Arrow.
After you create an index, you can perform several common index man-agement tasks, such as view all topics in a book, removing unused top-ics, find entries, edit entries, and delete entries. When you makechanges to index entries or page numbering in your document or book,you need to update the index (generate a new one). If you just want toupdate the preview area in the Index panel, you can use the Updatepreview button on the panel.
Index paneloptions
Edit an index entry
Chapter 3 Managing Pages and Books 93
◆ Locate Index Markers in aDocument. Click the Type menu,click Show Hidden Characters,open the Index panel, click theReference option, select the entryyou want to locate, and then clickthe Go To Selected Marker buttonon the Index panel.
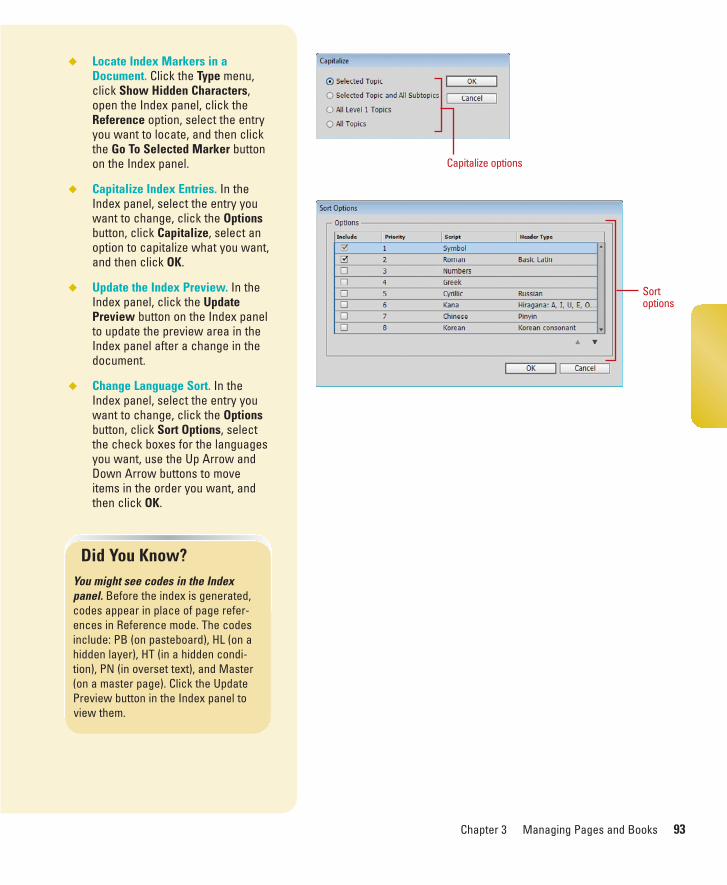
◆ Capitalize Index Entries. In theIndex panel, select the entry youwant to change, click the Optionsbutton, click Capitalize, select anoption to capitalize what you want,and then click OK.
◆ Update the Index Preview. In theIndex panel, click the UpdatePreview button on the Index panelto update the preview area in theIndex panel after a change in thedocument.
◆ Change Language Sort. In theIndex panel, select the entry youwant to change, click the Optionsbutton, click Sort Options, selectthe check boxes for the languagesyou want, use the Up Arrow andDown Arrow buttons to moveitems in the order you want, andthen click OK.
Did You Know?You might see codes in the Indexpanel. Before the index is generated,codes appear in place of page refer-ences in Reference mode. The codesinclude: PB (on pasteboard), HL (on ahidden layer), HT (in a hidden condi-tion), PN (in overset text), and Master(on a master page). Click the UpdatePreview button in the Index panel toview them.
Sortoptions
Capitalize options

This page intentionally left blank

555
Index
Aabsolute colorimetric, specifying, 213accessible PDF,
Articles panel, ordering content, 446-447creating PDF, 448finishing in Acrobat Pro, 449tags, applying to, 450
Acrobat.com, Adobe.comDPS, folio publications, 388-396sign in and out, DPS, 388-389
Acrobat layers, Adobe PDF option for creating, 427
Acrobat Pro, 448-449actions for buttons, editing or adding,
372–373activation of program, 2Actual Size, viewing document in, 38Add button, Pathfinder, 273additive RGB. See RGB (Red, Green, Blue)Adobe
Acrobat, 427Creative Cloud, 1-5, 521-522, 542
sign in and out, 2-5, 21, 542Dreamweaver, HTML format, exporting
documents for, 454–455Exchange panel, 3, 522, 541exploring programs, 522Product Improvement Program, 23programs working with, 521–541web site
plug-ins, availability of, 505updates and patches, checking for, 20Welcome screen links to, 4
Adobe Application Manager, 20Adobe Application Manager Preferences
dialog box, 20–21Adobe Bridge, 1, 522
automating tasks in, 535
Batch command in, 534browsing
documents, 14graphics, 148
camera raw plug-in, 1, 522working with, 510-511
color settings synchronizing, 211copying and pasting settings in, 534digital cameras preferences for Camera
RAW, 526-527DNG format, converting RAW files to,
525documents, inserting file information in,
478–479getting started with, 524Home web site, 4Image Processor command in, 534images, working with, 532–533JPEG files, opening, 530-531labels to images, adding, 533libraries, using, 399linked graphics, locating, 148Mini Bridge, 210, 536modifying images in, 534naming/renaming, 14
automatically renaming files, 535opening
documents in, 12, 14–15graphics, 148
preferencescamera raw files, 526-527
presets, applying, 534previewing, 532–533raw images
importing, 527-529modifying, 527-529working with, 526–529
renaming files automatically in, 535
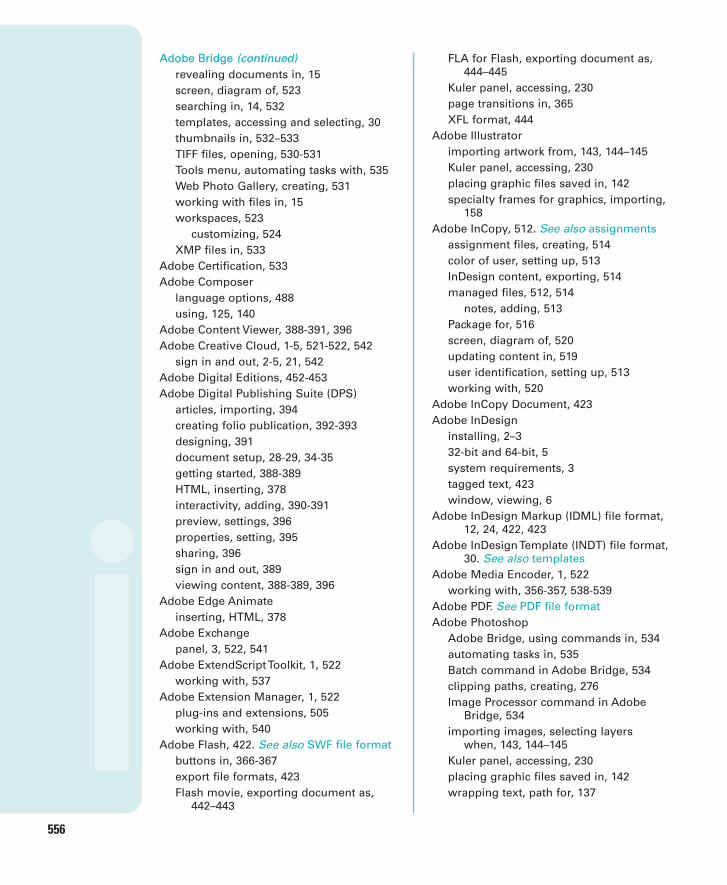
556
Adobe Bridge (continued)revealing documents in, 15screen, diagram of, 523searching in, 14, 532templates, accessing and selecting, 30thumbnails in, 532–533TIFF files, opening, 530-531Tools menu, automating tasks with, 535Web Photo Gallery, creating, 531working with files in, 15workspaces, 523
customizing, 524XMP files in, 533
Adobe Certification, 533Adobe Composer
language options, 488using, 125, 140
Adobe Content Viewer, 388-391, 396 Adobe Creative Cloud, 1-5, 521-522, 542
sign in and out, 2-5, 21, 542Adobe Digital Editions, 452-453 Adobe Digital Publishing Suite (DPS)
articles, importing, 394creating folio publication, 392-393designing, 391document setup, 28-29, 34-35getting started, 388-389HTML, inserting, 378interactivity, adding, 390-391preview, settings, 396properties, setting, 395sharing, 396sign in and out, 389viewing content, 388-389, 396
Adobe Edge Animateinserting, HTML, 378
Adobe Exchange panel, 3, 522, 541
Adobe ExtendScript Toolkit, 1, 522working with, 537
Adobe Extension Manager, 1, 522plug-ins and extensions, 505working with, 540
Adobe Flash, 422. See also SWF file formatbuttons in, 366-367export file formats, 423Flash movie, exporting document as,
442–443
FLA for Flash, exporting document as,444–445
Kuler panel, accessing, 230page transitions in, 365XFL format, 444
Adobe Illustratorimporting artwork from, 143, 144–145Kuler panel, accessing, 230placing graphic files saved in, 142specialty frames for graphics, importing,
158Adobe InCopy, 512. See also assignments
assignment files, creating, 514color of user, setting up, 513InDesign content, exporting, 514managed files, 512, 514
notes, adding, 513Package for, 516screen, diagram of, 520updating content in, 519user identification, setting up, 513working with, 520
Adobe InCopy Document, 423Adobe InDesign
installing, 2–332-bit and 64-bit, 5system requirements, 3tagged text, 423window, viewing, 6
Adobe InDesign Markup (IDML) file format,12, 24, 422, 423
Adobe InDesign Template (INDT) file format,30. See also templates
Adobe Media Encoder, 1, 522working with, 356-357, 538-539
Adobe PDF. See PDF file formatAdobe Photoshop
Adobe Bridge, using commands in, 534automating tasks in, 535Batch command in Adobe Bridge, 534clipping paths, creating, 276Image Processor command in Adobe
Bridge, 534importing images, selecting layers
when, 143, 144–145Kuler panel, accessing, 230placing graphic files saved in, 142wrapping text, path for, 137
Index 557
After-Blending Intent option, 212AICB (Adobe Illustrator Clipboard), 158Align and Distribute, 11aligning. See also grids; Smart Guides
bullets and numbering, 127Gap tool, 184-185objects, 184-185paragraphs, 121stroke on path, changing alignment of,
238table cells, content of, 291tabs, 128text frame options, setting, 132text on a path, 101Type tool option, 11
All Caps, styling text as, 114–115alpha channels
clipping path, selecting as, 277importing images with, 143, 144–145for wrapping text, 137
alt text for graphics, 168for exporting to PDF, 448for object styles, 316-317
alternate layouts, creating, 384-385HTML5 Pagination Options, 386split window to compare, 386viewing by, 56working with, 386
Amazon Kindle, creating for, 452-453 animation
Animation panel, 360-363with Motion Presets, 360-363
applying, 360-361editing, 360-361
order changing, 364anchor points
adding, 264–265deleting, 265Direct Selection tool, selecting with, 177joining, 268moving, 260-261open path, adding to, 265with Pen tool, 258–259reshaping, 260-261selecting, 260-261Smooth tool, using, 269
splitting paths at, 266anchors
hyperlinks creating text anchors, 346for objects, 197-199
Android 10”creating for, 452-453 document setup, 28-29, 34-35
ANPA color library, 224anti-aliasing in Story Editor display, 498,
499appearance
Adobe InCopy, Appearance panel in, 520Black, preferences for appearance of, 497of conditional text, 406of graphic frames, 170hyperlinks, changing appearance of, 349ruler guides, changing appearance of,
44–45Apple iPad, creating for, 452-453 AppleScripts, 414Application bar, 6
in Adobe InCopy, 520Apply Effect, 11Apply Photoshop Clipping Path Option,
276Arabic typefaces, 140, 488Arial font, 114Arrange Documents menu, 18–19artboards, importing, 143, 144–145articles, for folio, DPS
articles, importing, 394properties, setting, 395
Articles panelordering content, 446-447
artwork. See graphicsassignments
checking content out and in, 518creating, 516–517existing assignment, adding to, 517locked files, overriding, 519out-of-date content, checking for, 519packages, creating, 516same time, creating assignment and
adding content at, 516–517updating content, 519
Assignments panel, 515. See also assign-ments
Assign Profile dialog box, 212–213

558
audio/sound Media panel, inserting, 356-357
Autocorrect for text, 112Auto-Fit, 160-161autoflowing imported text, 105
Bbackgrounds
guides in, 44Smart Guides in back, showing, 47Story Editor display, setting, 498
Background Tasks panelin background, exporting PDF in, 434
Barnes & Noble Nook, creating for, 452-453barcode, 379base color, 225baseline
characters, shifting, 117for footnotes, 341paragraph rule, setting for, 125paragraphs to baseline, aligning, 121printing options, 460table sells, specifying option for, 291for text frames, 133
baseline grids, 48preferences, setting, 49
Basic Feather effect, 251Batch command in Adobe Bridge, 14, 534bevel effect, 250
with corner options, 252rectangles, beveled, 254strokes, bevel join on, 239
bibliographies, hanging indents for, 122bicubic downsampling with Adobe PDF, 428bitmaps
BMP file format, placing graphic filessaved in, 142
color profiles for, 212–213fonts, creating, 116print as bitmap option, 470
black. See also CMYK (Cyan, Magenta,Yellow, Black)
tones, preferences for, 497blank pages, printing, 460bleed. See marks and bleedBleed view, 36blend effect, creating, 246–247
blending modecolor space, selecting, 247feather effects, 251glow effects, 249with shadow effects, 248
BMP file format, placing graphic files savedin, 142
boldfacing, changing, 114bookmarks
Adobe PDF option, 427creating, 354–355
Bookmarks panel, 354-355books
adding or deleting, 81blank page, inserting, 83eBook, EPUB, exporting document for,
452-453existing book, opening, 80new book, creating, 80opening documents in, 81Page Order options, 83printing, 81saving, 81synchronizing, 82updating page and section numbers in,
83Books template, 30Book workspace, 52–53borders to tables, adding, 299Bounding Box option, 136–137Bridge. See Adobe BridgeBring Forward in object stack, 188Bring to Front in object stack, 188Brochures template, 30browsing. See also Adobe Bridge
Kuler panel themes, 230bullets and numbering
adding, 126Adobe Dreamweaver, exporting HTML,
document for, 454-455digital editions, EPUB, specifying
options for, 452-453formatting, 127paragraph styles, setting, 305
butt caps on strokes, 239buttons
actions, adding or editing, 372–373Buttons panel, working with, 366-367
Index 559
button states, working with, 374deleting, 366-367events for button, setting, 372objects to buttons, converting, 368-369sample, creating from, 368tab order, setting, 375
Buttons and Forms panel, 368-369
Ccamera raw images. See Adobe Bridge;
DNG file formatCanon CR2 format, 529cap colors for paragraph rule, width of, 124capitalization. See also case-sensitivity;
drop caps; small capsAutocorrect fixing, 112changing case, 342hyphenating capitalized words, 335spell-checking preferences, 494
caps on strokes, changing, 238–239captions
adding to graphics, 16, 158-159static, 158with variables, 159
case-sensitivityAdobe PDF passwords, 432changing case, 342with Find/Change command, 331of style names, 310
Catalogs template, 30CD/DVD
contents of, 2sets template, 30
Cell Options dialog box, Diagonal Lines tab,298
cell phones and RGB color, 214cells. See tablescentering
paragraphs, 121with Smart Guides, 47text on path, 101
Certificates template, 30chapter numbers
adding to document, 76text variable, 78
Character panel, InCopy, 520characters. See also letters
advanced type settings for, 488for bullets, 126–127End Nested Style Here special character,
314–315Find/Change command for, 330Info panel, information in, 50for leading text, 117outlines, creating, 138for page numbers, 74spacing options, 337special characters
Find/Change command for, 330inserting, 130
character stylesattributes for, 307creating, 306–307deleting, 306mapping styles to export tags, 307, 322,
451nested styles, creating, 314–315
Character Styles panel, 302check boxes, 126–127Chinese typefaces, 140, 488Chisel Hard option with bevel effect, 250Choke effect
with feather effects, 251with glow, 249with shadows, 248
Classic System theme, 498Clear Transformation command, 189Clipboard
handling preferences, setting, 502objects, copying, 180
Clip Content to Cell option, 291clipping path
alpha path as clipping path, selecting,277
editing on importing, 145graphic, modifying from, 145, 276importing images with, 143, 144–145for wrapping text, 137
Close button, 18, 26for panels, 8
closed path, opening, 266–267closing documents, 26CMYK (Cyan, Magenta, Yellow, Black), 214
Adobe PDF options, setting, 430black tones, preferences for, 497
560
CMYK (continued)Color panel, selecting with, 218EPS file format options, 438preserving colors, 233Working Space controls, 210–211
codeHTML, 378QR Code, 379
Collapse to Icons option for panels, 8collapsing/expanding. See panelsColor blend mode, 246Color guide panel, 236Color Labels, 66Color Management, 210–211
printing options, 472color modes, 214
Color panel, selecting with, 218Color panel, 174
fill or stroke color, changing, 236selecting color modes with, 218working with, 219
Color Picker, 236, 237color profiles
for bitmap images, 212–213changing, 212–213deleting, 212–213document colors to other profile, con-
verting, 212–213importing images with, 143, 144–145Info panel, information in, 50rendering intent, specifying, 213
colors. See also CMYK (Cyan, Magenta,Yellow, Black); color profiles; fills; gapcolor/tint; gradients; Lab color; marksand bleed; objects; paragraphs; print-ing; RGB (Red, Green, Blue); strokes;Swatches panel; tables
Adobe InCopy, setting colors for, 513Adobe PDF output options, 430applying colors, 215assignments, association with, 516for baseline grids, 49blend effect, creating, 246–247for buttons, 374of camera raw images, 528-529changing settings, 210–211character styles, setting, 307color theme, interface, 6, 234, 485
for commands, 504for conditional text, 406for cross-references, 352-353dashed/dotted lines, gap color for, 239for Document grids, 49EPS file format options, 438Eyedropper tool, using, 216–217frame for graphic, coloring, 165gradient swatches, creating, 226–227for guides, 44hidden text, changing colors of, 131for hyperlinks, 351Kuler panel, using colors from, 230–231layer colors, specifying, 202note colors, identifying, 509overprinting colors, 232for package files, 480proofing colors on screen, 233separations, previewing, 465soft proofing colors on screen, 233swatch libraries, adding colors from, 224synchronizing color settings, 211for text in Story Editor display, 498tint swatches, creating, 225for Web Photo Gallery, 531
Color Sampler tool with camera raw files,528-529
Color Settings dialog box, 210–211color space
for blending transparent objects, 247Info panel, information in, 50
color stopsediting, 243with gradients, 226–227
color theme, interface, 6, 234, 485Match to Theme Color option, 44
columns and rows. See also guides; tableschanging options, 34–35creating, multiple, 134-135for Data Merge, 416hyphenating across, 335for new documents, 29text frame options, setting, 132
Command Bar for InCopy, 520commands, 6
Adobe InCopy commands, 520Batch command in Adobe Bridge, 14,
534
Index 561
Community Help site, 22Community resources, Welcome screen
links to, 4compatibility
Adobe PDF options, setting, 426of assignments, 516
Composer, Adobe, 125, 140, 488composition preferences, setting, 489compound path, creating, 274–275compression
Adobe PDF options, 425, 428Flash movie, document exported as, 443
condensed style, changing, 114conditional text, working with, 406–407Conditional Text panel, 407Configure Plug-ins dialog box, 505configuring plug-ins, 505consolidating all documents, 19contact sheet, creating, 146–147Content Collector tool, 408-409Content Placer tool, 408-409Content Grabber, 160-161Content Viewer, 388-391, 396 continued text, adding page numbers to,
139Control of Transform panel, 189, 191Control panel, 6, 174
Adobe Bridge, 523Customizing, 506resizing objects in, 178using, 11
Convert Direction Point Tool, 262-263converting URLs to hyperlinks, 348-349Conveyor, 408-409copies
printing option, 460saving copy of document, 25
Copyfit Info panel, Adobe InCopy, 520copying. See also objects
Adobe Bridge, settings in, 534Clipboard handling preferences, setting,
502master pages, 73paths, 159text, 113
corner object effects, 252Live corners, 253
Corner Options dialog box, 252
rectangle shapes using radius value in,254
Create Outlines command, 138, 158–159Creative Cloud. See Adobe Creative Cloudcreep for booklet pages, 475cropping. See also positioning
Adobe PDF setting options, 428camera raw files, 528-529fitting graphics in frames and, 163
Cross-Reference dialog box, 352-353cross-references, creating, 352-353CSS options
Emit CSS option, 322, 451EPUB exporting, 452-453HTML exporting, 454-454
CSS stylesAdobe Dreamweaver, exporting HTML
document for, 454-455for eBook, EPUB, 452-453
CSV (comma-delimited) data fields, 416cursors
graphic preview cursor, 146Story Editor cursor options, setting, 499
curves, Pen tool for drawing, 258–259custom-dashed stroke, applying, 240custom page size, 29cutting
spacing, automatic adjustment of, 486text, 113
DDarken blend mode, 246dashes. See also strokes
inserting, 130Data Merge, 416–417
template, 30DCS file format, WMFgraphic files saved in,
142Default Image Intent option, 212–213Delete Workspace dialog box, 53deleting. See also tables
with Adobe Bridge, 14Adobe PDF preset, creating, 433anchor points, 265bookmarks, 354-355books, documents in, 81buttons, 366-367
562
deleting (continued)button states, 374character styles, 306color profiles, 212–213color swatch, 221, 222combined object, 183cross-references, 352-353empty pages, 108, 487guides, 43hyperlinks, 345, 350layers, 201library items, 398–399master pages, 72–73moving, deleting pages after, 66-67notes, 509objects, 174-175in Open dialog box, 13pages in Pages panel, 65paragraph styles, 304plug-ins, 505presets, 32–33, 459in Save As dialog box, 13script files, 414segments, 265styles, 319tabs, 128text on path, 100text variables, 79trap presets, 468workspaces, 53XML tags, 418
destination filesAdobe PDF options, setting, 430for cross-references, 352-353for hyperlinks, 344for linked graphics, 153
detect edges and wrapping text, 137diagonal lines in table cells, adding, 298Diagonal Lines tab, Cell Options dialog box,
298DIC color library, 224dictionaries
Autocorrect dictionary, 112custom dictionaries, using, 326preferences, setting, 492–493
digital cameras. See also Adobe Bridgedocuments, inserting file information in,
478–479
digital editions, EPUB, exporting docu-ments for, 452–453
Digital Imaging and Communications inMedicine options, inserting, 479
digital publishingdocument setup, 28-29, 34-35
Digital Publishing Suite. DPS. See AdobeDigital Publication Suite
Directional Feather effect, 251Direct Selection tool. See also overflow text
anchor points, selecting, 177frames and graphics, selecting and mov-
ing, 160graphics, selecting, 160, 176grayscale graphic, applying color to, 165with grouped objects, 182–183objects, selecting, 174-175, 177
displaybleed mode, 36changing, 36library display, changing, 402–403normal mode, 36output views, 36–37preview mode, 36presentation mode, 36slug mode, 36Story Editor display preferences, setting,
325, 498–499Distribute Columns Evenly command, 288Distribute Rows Evenly command, 288distributing
columns, 288objects, 186–187
DNG file formatconverting raw images to, 525description of, 529saving raw images in, 527-529
docking/undockingdocument windows, 19panels, 8
Document grids, 48, 49Document Presets dialog box, 32documents. See also assignments; books;
exporting documents; graphics;Microsoft Word; multiple documents;new documents; opening
Adobe Bridge, working with, 14changing document options, 34closing, 26
Index 563
color profiles, converting, 212–213display performance, setting, 167file information, inserting, 478–479fonts, 482images, inserting, 16object defaults, setting, 255preview images with document, saving,
24–25printing, 458saving, 24–25spell-checking, 324–325swatches from other documents, import-
ing, 224tabs, open as, 485text, inserting, 16XML tags, placing, 418–419zooming in/out view of, 38–39
Document Setup dialog box, 34-35document windows, 6
for Adobe InCopy, 520docking/undocking, 19working with, 18
double quotation marks, inserting, 130downloading
extensions with Adobe ExtensionManager, 505, 540
print option for downloading fonts, 464downsampling with Adobe PDF, 428DPS. See Adobe Digital Publication Suitedrag-and-drop
graphics, 152pages, moving, 66–67paths, 159snippets, creating, 404–405text, 113text editing options, selecting, 487with Zoom tool, 38
drawingLive Screen Drawing, 208
drop capscreating, 123paragraph styles, setting, 305
Drop Shadow, 11, 248DTBook format for eBooks, EPUB, selecting,
452-453duplicating
color stops, 243color swatch, 220
layers, 200–201objects, 180–181pages, 58plug-ins, 505
DVD. See CD/DVDdynamic spelling, 324, 325, 495
EeBook, EPUB, exporting document for,
452–453Edit Custom Dictionary dialog box, 326editing. See also hyperlinks; Story Editor;
textAdobe PDF editing preset, creating, 433button actions, 372clipping path on importing, 145color swatch, 221cross-reference formats, 352-353gradients, 242–243Kuler panel theme, 231linked graphics, 155, 156mixed ink groups, 229presets, 459QR Code, 379Quick Apply, styles with, 321scripts, 414Spread view content, 37styles with Quick Apply, 321tables, text in, 284–285
Edit With submenu, 156effects. See also specific effects
for text on a path, 101elements in XML file format, 418Ellipse Frame tool, 170ellipses
converting, 254creating elliptical shape, 170
Ellipse tool, 170text, adding, 96, 98
e-mail, hyperlinks to, 346embedding
Adobe PDF options, 427general preferences, setting, 484graphics, 152, 153preflight profiles, 476–477
emboss effect, 250em dashes, inserting, 130
564
Emit CSS option, 316, 322, 451empty pages, deleting, 108, 487empty sounds or movie clip frames, 356enabling/disabling
JavaScript, 484Live Preflight, 476–477
en dashes, inserting, 130End Nested Style Here special character,
314–315endnotes. See footnotesEnglish typefaces, 488envelopes with Data Merge, 416–417EPS file format, 423
exporting document in, 438–439inserting files in, 16metadata to files, adding, 479placing graphic files saved in, 142
EPUB formatArticles panel, 446-447for eBooks, selecting, 452-453mapping styles to export tags, 305, 307,
322, 451object export options, setting, 456
erasing parts of paths, 272errors. See also spell-checking
Preflight panel, options in, 477Essentials workspace, 52–53events for buttons, setting, 372Excel. See also XLS file format
tables, importing, 282–283Exclude Overlap button, Pathfinder, 273EXIF file format for metadata, 533existing document, opening, 12Exit command, 26exiting InDesign, 26Expand Panels button, 8exporting. See exporting documents;
importing/exportingexporting documents, 422. See also PDF file
formatin background, exporting PDF, 434for accessible PDF, 448-449for Adobe Dreamweaver, HTML, 454–455description of file formats, 423for digital editions, EPUB, 452–453as EPUB, 452-453in EPS file format, 438–439
FLA for Flash, exporting document as,444–445
in InDesign CS4 or CS5 with IDML, 24, 422, 423
as HTML, 454–455for interactive PDF, 436-337as JPEG files, 440-441with object styles, 316-317, 451as PNG files, 440-441for print, 424-432for tags (mapping) to EPUB/HTML or
PDF, 316, 322, 451with text styles, 322, 451
exporting objects, settingalt text, 168, 316EPUB and HTML, 316, 456tagged PDF, 450
exporting tags, mapping styles, 305, 307,316, 322, 451
Export PDF dialog boxinteractive, 436-437print, 424-432
ExtendScript Toolkit, 1, 522working with, 537
Extension Manager. See Adobe ExtensionManager
Extensions submenu for accessing Kulerpanel, 230
Eyedropper toolcolors, using for, 216–217fill or stroke color, changing, 236options, changing, 217
FF4V format, 356-358facing pages
changing, 34new documents, selecting for, 28spreads, preserving, 487
Fancy corner options, 252favorite fonts, 114Favorites panel, Adobe Bridge, 523feather effects, 251fields for Data Merge, 416file formats. See also exporting documents;
specific typesopening document files in, 12placing graphic files saved in, 142
Index 565
File path, Adobe Bridge, 523files. See also Adobe InCopy; assignments
documents, inserting file information in,478–479
handling preferences, setting, 500–501hyperlinks to, 346package files, creating, 480–481sidecar files, 533
fills. See also tablesadding, 294–295applying fill colors, 215, 236–237compound path, object's fill in, 275default and switch for fill colors, 236–237defaults, setting, 255Eyedropper tool, using, 216–217
Filter panel, Adobe Bridge, 523filters
with Adobe Bridge, 14, 523Graduated Filter with camera raw files,
528-529Find/Change command, 328–329
for glyphs, 328–329, 332for GREPs, 328–329, 332with objects, 328–329, 334special characters, finding, 330
Find Font dialog box, 327Fire/Nook
document setup, 28-29, 34-35first-line indent
for bullets and numbering, 127creating, 122
first page, navigating to, 63Fit Page In Window option, 38Fit Spread in Window option, 38fitting
booklet pages, marks and bleed in, 475Flash movie, document exported as, 442FLA for Flash, document exported as,
444graphics in frames, 163
FLA format, 356-358, 423, 444-445Flash. See Adobe Flashflattened artwork, printing, 471Flattener Preview mode, 36–37flatten transparency. See transparencyflipping, 11. See also objects
print orientation, 467text on a path, 101
floating all windows, 19floating tools panel options, 485Focoltone color library, 224Folders panel, Adobe Bridge, 523folders with Adobe Bridge, 14Folio Builder panel,
creating, folios, 392-393getting, downloading, 388-389 importing, folios, 393properties, setting, 395
Folio Overlays panel, 388-391HTML, inserting, 378
folio publicationarticles, importing, 394creating, 392-393designing, 391getting started with DPS, 388-389HTML, inserting, 378interactivity, adding, 390-391preview, settings, 396properties, setting, 395sharing, 396sign in and out to DPS, 389viewing content, 388-391, 396
Folio Producer tools, 388-389Font Family option, Type tool, 11fonts. See also glyphs; OpenType
Adobe PDF options, setting, 431changing, 327
font family and style, 114size of font, 116
digital editions, EPUB, specifyingoptions for, 452-453
document, using, 482favorite fonts, 114Find/Change command, using, 328–329finding fonts, 327general preferences, setting, 484graphics, options for, 464package files including, 480–481preferences, setting, 486–487preview size, selecting, 487printing options, 470search for fonts, 114size of font, changing, 116Story Editor display, setting, 498styles, changing, 114–115

566
Font Size option, Type tool, 11Font Type option, Type tool, 11Footnote Options dialog box, 340footnotes
adding, 340changing options, 341Find/Change command for searching,
329importing, 340
foreign characters, printing, 463formatting. See also styles
bullets and numbering, 127dragged text, inherited formatting for,
113footnotes, 341frames, graphics in, 165graphics in frames, 165JPEG files, documents exported as,
440-441PNG files, documents exported as,
440-441table of contents, 84–85
formadding controls, 371creating, PDF, 370-371
form letters with Data Merge, 416–417Forms template, 3045-degrees
lines, drawing, 172objects, constraining movement of, 179
fractions. See glyphsFrame Fitting Options dialog box, 162–163frames. See graphic frames; text frames;
unassigned framesFrame tools for adding text, 96, 98Free Transform tool, 191French typefaces, 488Fuji RAF format, 529
GGallery & Story panel, InCopy, 520gamut colors. See also out of gamut
identifying, 219gap color/tint. See also tables
for dashed/dotted lines, 239paragraph rule, width of, 124
Gap tool, 184-185
general preferences, setting, 484Get Photos from Camera command, Adobe
Bridge, 525Getting Started, Welcome screen links to, 4GIF file format
EPUB and HTML, export, 451-456metadata to files, adding, 479placing graphic files saved in, 142WMFgraphic files saved in, 142
Global Light effect, 248with bevel effect, 248with emboss effect, 248setting, 250with shadows, 248
glow effects, 249glyphs
Find/Change command, using, 328–329,333
highlighting text with, 489inserting or replacing, 129spacing options, 337
Go Back option, 63Go Forward option, 63Google Maps
inserting, HTML, 378Go to Page option, 63GPS (global positioning system) file format
for metadata, 533Gradient Feather tool, 245, 251Gradient panel, 227. See also gradientsgradients. See also color stops
applying gradient fill to object, 242editing, 242–243Gradient Feather tool, 245, 251Gradient tool, working with, 244swatches, creating, 226–227
Gradient tool, 244Graduated Filter with camera raw files,
528-529graphic frames. See also assignments
appearance of, 170for bookmarks, 354-355captions
adding to graphics, 158-159static, 158with variables, 159
clipping path to frame, converting, 145,276
Index 567
coloring graphic frame, 165compound path as frame, creating and
releasing, 158fitting graphics in, 162–163formatting graphics in, 165Frame Fitting Options dialog box, fitting
graphics in frames with, 162–163grayscale graphic, coloring, 165moving frames and graphics, 160–161nesting graphics in, 164resizing, 161
for fitting graphics in frames, 162graphics and frames, 161
searching for, 334selecting frames and graphics, 160–161specialty frames for graphics, creating,
158–159type outlines as frames, creating, 159
graphic preview cursor, 146graphics, 142. See also Adobe Photoshop;
graphic frames; tablesAdobe Bridge, placing graphics from,
148–149clipping path, modifying, 276contact sheet, creating, 146–147copying, 152default display options, setting, 167Direct Selection tool, selecting with, 160,
176display
changing display performance, 166default display options, setting, 167
documentsfile information, inserting, 478–479images, inserting, 16
drag-and-drop, 152editing linked graphics, 155, 156embedding, 152, 153
changing graphic from linked toembedded, 155
existing frame with graphic, placinggraphic in, 142
grayscale graphic, coloring, 165high quality display, 166InCopy, exporting content to, 514Info panel, information in, 50Info panel, viewing in, 51inline graphic in object, placing, 197
linked graphicsAdobe bridge, locating in, 148Conveyor, using, 408-409displaying information on, 153editing, 155, 156relinking, 153, 154, 155replacing, 154working with, 155XMP metadata, displaying, 157
locating graphicsAdobe bridge, locating linked graphic
in, 148Links panel, 154, 410-413
moving, 152multiple graphics, placing, 146–147nesting graphics in frames, 164options, placing graphics with, 143package files including, 480–481pasting, 152preview cursor, 146print options, setting, 464relinking, 154
missing graphic, 153, 155replacing linked graphic, 154, 410-411resizing, 161
allowing for, 387with Direct Selection tool, 176for fitting graphics in frames, 162
setting place import options, 144–145sorting graphics in Links panel, 153typical display setting, 166updating links, 155, 410-411XMP metadata, displaying, 157zooming in/out view of, 38–39
grayscalewith camera raw images, 528-529EPS file format options, 438graphics in grayscale, adding color to,
165greeked text, 487GREPs
applying, 312–313creating, 308Find/Change command, using, 328–329,
332paragraph styles, setting, 305searching for, 332
GREP Styles dialog box, 332
568
grids. See also baseline gridsAdobe PDF option, 427create multiple objects in, 173colors, specifying, 49preferences, changing, 48–49printing options, 460showing/hiding, 48Step and Repeat command, creating grid
with, 181tiling documents in, 19working with, 48, 49
groups. See also objectsmixed ink group, creating, 229style groups, creating, 309
guides. See also rulers; Smart GuidesAdobe PDF option, 427changing guides, 44columns
color, specifying, 44locking/unlocking, 43
creating, 42deleting, 43moving, 42printing options, 460Smart Guides, 46–47working with, 43
gutterschanging size of, 35new documents, selecting for, 29text frame options, setting, 132
HH.290-encoded format, 356-357Hand tool, moving with, 50hanging indents, creating, 122Hard Light blend mode, 246harmony rule for colors, 231headers and footers. See also tables
for panels, 8Hebrew typefaces, 140, 488height, weight, width, 11. See also tables
changing, 34for cross-references, 352-353Flash movie, document exported as, 442FLA for Flash, document exported as,
444for hyperlinks, 349
for new documents, 28paragraph rule, width of, 124–125printing setup options, 461stroke, selecting weight of, 172, 174, 238text frame options, setting, 132
help information, 22–23searching for, 22–23
Help menuhelp information on, 22–23updates, checking for, 21
hidden lock files (IDLK), 518hidden text
in table of contents, 85working with, 131
hiding. See showing/hidingHighlight Object under Selection Tool, 485highlights
composition preferences, setting, 489for conditional text, 421for cross-references, 352-353for hyperlinks, 349
HKS color library, 224horizontal lines, converting, 254horizontally tiling all documents, 19horizontal text, leading applied to, 117HTML document
Articles panel, 446-447as Flash movie, exporting, 443exporting, 454-455HTML5, 454-455inserting HTML code, 378object export options, setting, 456mapping styles to export tags, 305,
307, 316, 322, 451hyperlinks
Adobe PDF option, 427appearance, changing, 349creating, 346–347converting URLs and stylizing, 348-349cross-references, creating, 352–353defining destinations, 344deleting, 345, 350editing, 345
from Hyperlinks panel, 351Flash movie, document exported as,
443resetting, 350updating, 350

Index 569
URLscreating hyperlink from, 346–347destination, setting URL as, 344
Hyperlinks panel, 350–351cross-references, creating, 352-353
hyphenationdictionary preferences, setting, 492inserting hyphens, 130options, changing, 335in package files, 481paragraph styles, setting, 305
Hyphenation dialog box, 335
IICMA files, 516ICML files, 516icons
for linked graphics, 153Pages panel icons, 56–57showing/hiding, 504
IDML file format, 12, 24, 422, 423opening InDesign CS4 or CS5, 12exporting as, 420, 422-423
IDMS files. See snippetsIllustrator. See Adobe IllustratorImage Processor command in Adobe
Bridge, 52images. See graphicsImages format, inserting files in, 16importing/exporting, 512. See also export-
ing documents; graphics; textAdobe PDF preset, creating, 433footnotes, 340plug-ins, 505presets, 459specialty frames for graphics, 158swatches from other documents, 224text variables, importing, 79XML tagged data, 418–419, 420
InCopy. See Adobe InCopyINDD file format
inserting files in, 16opening, 12saving as, 24
indenting. See also first-line indent; paragraphs
bullets and numbering, 127
InDesign CS4 or CS5 with IDML, exporting,24, 422, 423
indexentry
creating, 88-89with keyboard shortcuts, 87
creating, 90-91managing, 92-93starting, 86tips, 87topics, list of, 86
Indian typefaces, 140, 488INDL file format. See librariesINDT file format, 30
saving as, 12Info panel, 50–51Ink Manager, 467Ink on Paper theme, 498inks
Adobe PDF options, 430color separations, previewing, 465EPS file options, 439for printing, 467
inline object, creating, 197Inner Glow effect, 249Inner Shadow effect, 248Insert Anchored Object dialog box, 198-199inserting. See also pages
Adobe Edge Animate, HTML, 378bookmarks, insertion point for, 354-355dashes, 130Google Maps, 378HTML code, 378QR Code, 379tabs, 128text variables, 79YouTube, 378
Insert Pages dialog box, 58–59multiple pages, inserting, 59
Inset corner options, 252inside and outside margins. See marginsInspector panel, Adobe Bridge, 523installing
extensions with Adobe ExtensionManager, 505, 540
Macintosh computers, InDesign in, 3Windows, InDesign in, 2
570
interactive documents. See also buttons;hyperlinks
Adobe PDF options, 427Flash movie, interactivity options for,
443interactive PDF, exporting, 436-437
media options, 435Interactivity workspace, 52–53interface, color theme, 6, 234, 485
Match to Theme Color option, 44interface preferences, setting, 485Internet
North America Web/Internet color settings, 210
updates, checking for, 20Web color library, 224
Intersect button, Pathfinder, 273Inverse Rounded corner options, 252inverted rounded rectangles, converting,
254iOS, Apple
creating for, 452-453 document setup, 28-29, 34-35
iPad. See iOS, AppleiPhone. See iOS, AppleIPTC file format for metadata, 533iRiver, creating for, 452-453island spreads, 68isolate blending, 246italicizing, changing, 114
JJapanese typefaces, 140, 488JavaScriptAdobe Dreamweaver, exporting HTML
document for, 454-455enabling or disabling, 484JDF File Using Acrobat checkbox with
Adobe PDF, 431Join or Close Path button, 268joins on strokes, changing, 238–239JPEG file format, 422, 423
Adobe Bridge, opening with, 530-531EPUB and HTML, export, 452-456exporting documents in, 440-441importing images, options for, 143, 145metadata to files, adding, 479placing graphic files saved in, 142
raw images, saving, 527-529as recommended compression method,
428Jump Object option, 136–137Jump to Next Column option, 136–137justification
creating, multiple, 134-135options, changing, 337of paragraphs, 121paragraph styles, setting, 305table cells, content of, 291text frame options, setting, 132
KKeep options for paragraphs, 336kerning, 118
highlighting text with, 489increments preferences, setting, 490–491
keyboard preferences, setting, 490–491keyboard shortcuts
defining, 503icons for starting InDesign, 4starting InDesign with, 5for tools, 10zooming in/out with, 39
Keywords panel, Adobe Bridge, 523Kindle Fire, Amazon
creating for, 452-453 document setup, 28-29, 34-35
knockout group blending, 246Kobo, creating for, 452-453Korean typefaces, 140, 488Kuler panel, using colors from, 230–231
Llab color, 214
Color panel, selecting with, 218Labels and Stickers template, 30labels for Adobe Bridge images, 533landscape orientation
changing, 34for new documents, 28
languagesAdobe Composer options, 125, 140, 488advanced type settings for, 488for Autocorrect, 112changing, 140
Index 571
last-line indent, creating, 122last page, navigating to, 63last saved version, reverting to, 24Latin typefaces, 488Layer Options dialog box, 202layers
Adobe InCopy, exporting to, 514Adobe PDF, creating Acrobat layers with,
427colors for layers, specifying, 202copying objects between, 206deleting, 201duplicating, 200–201Find/Change command, searching locked
layers with, 329guides, options for, 202importing, 143, 144locking/unlocking, 202, 204merging layers, 205moving objects between, 206
naming/renaming, 202new layer, renaming, 200new layer, creating, 200options, setting, 202pasting, creating new layer while, 200printing, 202printing options, 460reordering, 205, 206selecting layers, 206showing/hiding, 202, 203
searching hidden layers, 329wrapping text, preventing, 202
Layers panel, showing/hiding objects andlayers in, 203
Layout Adjustment options, 387Layout menu
pages, navigating between, 60–61table of contents, creating, 84–85
Layout view, drag-and-drop editing in, 113LCD Optimized display for Story Editor, 499leading
Auto Leading option, 337entire paragraph, applying to, 486tabs, leaders with, 128text, 117
left-aligning paragraphs, 121left indents
for bullets and numbering, 127
creating, 122left side, dragging text to, 101lens corrections with camera raw images,
528-529letters
half page size, 29page size, 29Quick Apply commands, 321spacing options, 337
librariesadding items in, 398–399Adobe Bridge libraries, using, 399changing item information, 401deleting items in, 398–399display, changing, 402–403existing library, opening, 398new library, creating, 398object types for items, changing, 401opening existing library, 398placing items on page, 400Samples button library, 368-369Samples form library, 370-371searching in, 402sorting items in, 402–403swatch libraries, adding colors from, 224updating items in, 400
ligatures. See glyphsLighten blend mode, 246Linear gradients, 226line breaks
balancing, 336forcing, 110–111
lines. See strokesLine tool, 172. See also strokeslinks. See also graphics; hyperlinks
Adobe Bridge, locating linked graphicswith, 148
Adobe PDF options, 427documents, across, 412Conveyer, using, 408-409missing link preferences, setting, 501in package files, 480objects, 410-411options, setting, 413preferences, setting, 501stories, 410-411styles, breaking links to, 312
572
Links panel. See also graphicssorting items in, 153
Liquid layoutalternate layouts, 56, 384-386creating, 382-383Liquid Page Rules, 382-382panel, 382-383
List view, displaying library items in, 403Live Corners, 253Live Preflight, 476–477Live Screen Drawing, 208locating graphics. See graphicslocking/unlocking
assignment files, overriding locked, 519guides, 43layers, 202, 204prevent selection, 484moving locked objects, 387object position, 196
Lock Position command, 196lowercase text, creating, 342
MMacintosh computers. See also PICT file
formatAppleScripts, 414installing InDesign in, 3starting InDesign in, 5System color library, 224
magnification. See zooming in/outMake Compound Path command, 274–275managing files. See also Adobe InCopy
with Adobe Bridge, 14mapping styles to export tags, 305, 307,
316, 322, 451margins. See also gutters
changing options, 34–35guide color, specifying, 44new documents, options for, 29objects to margins, aligning, 186optical margin adjustment, setting, 337
markers, inserting, 130marks and bleed
with Adobe PDF, 429for booklet pages, 474changing bleed values, 34guide color, specifying, 44
for new documents, 28–29print options, setting, 462–463
master pagesadding objects to, 70copying, 73creating, 70-71deleting, 72–73detaching, 72–73document page, applying to, 72existing page, creating master page
from, 70–71Find/Change command for searching,
329hiding master items, 73multiple pages, applying master to, 72overriding master element, 72–73page numbers, adding, 74–75page size, custom, 71printing options, 460scratch, creating master page from,
70–71section numbers, adding, 74–75Start Page and Numbering At option, 75text variables, creating and using, 78–79unassigning masters, 72–73
master text frameschanging, 34with imported text, 104new documents, selecting for, 28Smart Text Reflow for, 487
Match Pasteborad to Theme Color, 44, 234Measure tool, 207Media Encoder, 1, 522
working with, 356-357, 538-539Media Files format, inserting files in, 16Media panel, 356-359
adding a file, 356converting legacy files, 357setting media option, 356-359
menus, 6. See also specific menuscolors for commands, 504customizing, 504InCopy menus, 520shortcuts for menus, creating, 503
Menus template, 30Merge Layers command, 205merging. See also Data Merge
color swatches, 223

Index 573
layers, 205table cells, 286, 290user dictionary into document, 493
metacharacters, 330metadata. See also Adobe Bridge
description of, 533documents, inserting file information
in, 478–479Metadata panel, Adobe Bridge, 523Microsoft Excel. See also XLS file format
tables, importing, 282–283Microsoft Tablet PC. See Windows Tablet PCMicrosoft Word
importing text from, 102inserting files in documents, 16styles from Word document, importing,
310–311tables, importing text into, 282–283
Mini Bridge, 210, 536Minus Back button, Pathfinder, 273missing link preferences, setting, 501miter join on strokes, 239mixed inks, 228–229MOBI file format
Amazon Kindle, creating for, 452-453monitors
colors, setting, 210page size, setting, 29
More options for new documents, 29Motion Presets, animation
applying, 260-261converting objects to, 363deleting, 362duplicating, 362editing, 363importing, 362options, settings, 260-261saving, 362
Move Page command, 66–67movies/videos
adding, 356–357Media panel, 356-359options, setting, 358–359
moving. See also objectswith Adobe Bridge, 14anchor points, 260-261books, documents in, 81
color swatches, 223frames and graphics, 160–161graphics, 152guides, 42with Hand tool, 50help topics, moving between, 23pages, 66–67segments, 260-261tabs, 128text, 113
MP3 format, 356-359MP4 format, 356-359multiple documents
arranging, 19working with, 18
multiple pages, inserting, 59multi-state objects, creating, 376-377Multi-State panel, 376-377
Nnaming/renaming. See also Adobe Bridge;
layersassignments, 516bookmarks, 354–355master page, 71plug-ins, 505styles, 310
navigating pages, 60–61nesting
creating nested styles, 314–315graphics in frames, 164paragraph styles, setting, 305tables, creating nested, 280
New Character Styles dialog box, 306New Document dialog box, 32new documents
presets, creating with, 32template, creating from, 30
New Features, Welcome screen links to, 4New Hyperlink From URL command,
346–347New Paragraph Styles dialog box, 304Newsletters template, 30New Workspace dialog box, 52next page, navigating to, 63next spread, navigating to, 63Nikon NEF format, 529
574
90-degree angles, drawing lines at, 172Noise effect
with feather effects, 251with glow, 249with shadows, 248
nonbreaking space, inserting, 130non-Latin text, setting preferences for, 488non-printing content
Adobe PDF option, 427in package files, 481printing options for objects, 460
Nook, Barnes & Noblecreating for, 452-453 document setup, 28-29, 34-35
Normal view, 36North American,
Prepress 2 color settings, 210Purpose 2 color settings, 210Web/Internet color settings, 210
notes. See also footnotesto Adobe InCopy managed files, 513creating, 508Notes panel, working in, 509preferences, setting, 496tables, adding to, 508text to notes, converting, 508, 509
Notes panel, 509No Wrap option, 136Numbering and Section Options dialog box
chapter numbers, adding, 76–77master pages, page and section num-
bers for, 74–75number of pages
changing, 34master spread, specifying for, 71new documents, selecting for, 28
numbers. See also bullets and numbering;chapter numbers; number of pages;page numbers
footnotes, numbering, 341
Oobjects. See also anchor points; gradients;
graphics; layersaligning, 184-185anchored objects, creating, 198-199blend effect, creating, 246–247buttons, converting object to, 368–369
create multiple, in a grid, 173colors
applying, 215, 236Eyedropper tool, using, 216–217overprinting colors, 232
copying, 180–181layers, copying objects between, 206scaling and copying objects, 192
defaults, setting, 255deleting, 174-175deleting combined object, 183Direct Selection tool
grouped objects, working with,182–183
inline object, creating, 197selecting with, 174-175, 177
distances and angles, measuring, 207duplicating, 180–181export options
Alt-text, 168EPUB and HTML, 451, 456tagged PDF, 450
Find/Change command, using, 328–329,334
flipping objects, 194-195Free Transform tool, transforming
objects with, 191Gap tool, 184-185grouped objects, 182–183
creating groups, 182selecting objects in group, 183ungrouping objects, 182
individual transformation, repeating, 190inline object, creating, 197library items, object types for, 401locking/unlocking object position, 196measuring distances and angles
between, 207moving, 179
layers, moving objects between, 206multiple objects, duplicating, 181multi-state objects, creating, 376-377overlapping objects, creating compound
shapes from, 273repeating transformations, 190resizing, 178rotating, 189, 194–195
free rotating objects, 194-195
Index 575
scaling, 178, 189–191, 192searching for, 328–329, 334Selection tool, 174-175
inline object, moving, 197resizing objects with, 178
sequence of transformations, repeating,190
shearing, 193shortcuts for object editing, creating, 503showing/hiding, 203slipping objects, 192Smart Guides for moving, 179spacing, distributing objects with,
186–187stack of objects, arranging, 188styles
creating, 316–317default object styles, modifying, 316
transformations, 189repeating transformations, 190
Object Shape option, 136–137Object styles
creating, 316-317exporting options, 316-317
OEBPS folder, 452-453older versions, updating from, 2On Blur event for buttons, 372On Click event for buttons, 372On Focus event for buttons, 372online activation of program, 2On release event for buttons, 372On Roll Over event for buttons, 372opacity, 11
for Gradient Feather effect, 251Open dialog box, 12
deleting files in, 13opening. See also Adobe Bridge
books, documents in, 80closed paths, 266–267existing document, opening, 12IDML file format, InDesign CS4 or CS5,
12libraries, 398panels, 7recently opening document, 13
Open Package command, 516Open Path button for splitting paths, 266
OpenType, 116character styles, setting, 307glyphs, inserting, 129highlighting text with, 489paragraph styles, setting, 305
Open With command with Adobe Bridge,148
OPI optionswith Adobe PDF, 431print options, 470
optical margin adjustment, setting, 337optical size of fonts, setting, 486Options menu
for panels, 8, 9for tools, 11
ordinals. See glyphsordering content, Articles panel, 446-447orientation
changing, 34flipping print orientation, 467for new documents, 28printing setup options, 461
Outer Glow effect, 249outlines, creating, 138out of gamut, 214
converting out of gamut colors, 219overflow text
changing thread between frames, 107reshaping, 97text on a path, correcting, 101threading/unthreading, 106–107
overlapping objects, creating compoundshapes from, 273
Overlay blend mode, 246overprinting
colors, 232paragraph rule, width of, 124simulating, 467
Overprint Preview mode, 36–37overrides. See also styles
Adobe PDF options, setting, 431assignment files, locked, 519print options, 470
PPackage for InCopy, 516packages, creating, 480–481
576
PageMakerfile format, 12Shortcuts for, 503
page numbers. See also number of pagesbooks, options for, 82–83continued text, adding to, 139general preferences, setting, 484master pages, adding to, 74–75for table of contents, 85
pages. See also facing pages; masterpages; Pages panel; spreads
Adobe PDF options, setting, 426for bookmarks, 354-355Color Labels, adding, 66EPS file format options, 438Flash movie, exported as, 442FLA for Flash, exported as, 444hyperlinks to, 344inserting pages
multiple pages, inserting, 59with Pages panel, 58–59
JPEG files, documents exported as, 440-441
objects to page, aligning, 184-185PNG files, documents exported as,
440-441Preflight panel options, 477size, changing, 28-29, 34-35, 62-64transitions, applying, 365trap preset, assigning, 468–469
page size optionschanging, 28-29, 34-35, 62-64list of, 29for new documents, 28printing, setup for, 461
Pages/Links panel, 8Pages panel. See also master pages;
spreadsdeleting pages, 65display, changing, 56duplicating pages, 58inserting pages with, 58–59multiple pages, inserting, 59navigating pages, 60–61showing/hiding icons, 57size, changing, 28-29, 34-35, 64target a page, navigating with, 60work on a page, navigating with, 60
Page toolchanging the page size, 62-63, 382Liquid Page Rule, setting, 62
page transitionsFlash movie, document exported as, 443for Pages panel icons, 57
Page Transitions dialog box, 365panel groups, 6
in Adobe InCopy, 520panels, 6. See also Control panel; Pages
panel; Tools panelin Adobe InCopy, 520collapsing/expanding, 7
panel set between icons and panels, 9hidden panels, auto-showing, 485icons, auto-collapsing, 485Info panel, sizing object with, 51opening/closing, 7Options menu, using, 8, 9panels, 8shortcuts for panels, creating, 503showing/hiding, 7-8, 36, 52
Pantone color library, 224Paragraph panel, InCopy, 520paragraphs. See also bullets and number-
ingAdobe Composer, 125, 140aligning, 121columns, creating multiple, 134-135colors
rule, width of, 124styles, setting, 305
creating, 110–111cross-references, creating, 352-353drop caps, creating, 123indenting, 122
styles, setting, 305Info panel, information in, 50keeping lines together in, 336languages, work with, 140rules, applying, 124–125spacing, 122in table cells, 291table of contents, formatting for, 85
paragraph stylesattributes, setting, 305basic paragraph style, changing, 303creating, 305
Index 577
deleting, 304existing text, creating from, 304mapping styles to export tags, 305, 322,
451for table of contents, 84
Paragraph Styles panel, 302password options in Adobe PDF, 432pasteboard. See also guides
match to theme color, 44, 234Show Entire Pasteboard option, 38
Paste In command, 182–183pasting
Adobe Bridge, settings in, 534Clipboard handling preferences, 502graphics, 152layers while pasting, creating, 200spacing, automatic adjustment of, 486text, 113
patches, checking for, 20–21Pathfinder command, 273Pathfinder panel
Convert Shape buttons in, 254Join or Close Path button, 268Reverse button, 267
paths. See also clipping path; points;reshaping; strokes
closed path, opening, 266–267closing open path, 268compound path, creating, 274–275erasing parts of, 272frames, importing paths as, 159Pencil tool, drawing with, 270–271Pen tool, drawing with, 258–259reversing direction of, 267selecting path as clipping path, 277Smooth tool, using, 269splitting paths, 266
PDAs, RGB colors for, 214PDF file format, 423
accessible PDFArticles panel, ordering content,
446-447creating PDF, 448finishing in Acrobat Pro, 449tags, applying to, 450
advanced options setting, 431and bookmarks, 354-355in background, exporting, 434
for buttons, 372–373buttons in, 366-367Clipboard handling preferences, 502compression options, setting, 428for data merged files, 416exporting documents, 424general options, setting, 426–427graphic files saved in, 142inserting files in, 16for interactive, 435, 436-437mapping styles to export tags, 305, 307,
322, 451Marks and Bleeds option, setting, 429media options, 435metadata to files, adding, 479output options, setting, 430for page transitions, 365placing, 144–145Preflight panel, creating PDF report in,
477presets, 425
exporting with, 433for print, 424-432security options, setting, 432table of contents, PDF bookmarks for, 85tagged PDF, 426, 450
PDF/X options with Adobe PDF, 424-427, 430Pencil tool, 270–271Pen tool, 258–259perceptual colors, specifying, 213Photoshop. See Adobe PhotoshopPICT file format
EPS file preview option, 439WMFgraphic files saved in, 142
pirated versions, preventing, 2Place and Link command, 410-412Place command. See also graphics
with Adobe Bridge, 148importing text with, 102–103inserting artwork with, 16multiple graphics, placing, 146–147
placing graphics. See graphicsplug-ins, configuring, 505PNG file format, 423
EPUB and HTML, export, 452-456exporting documents in, 440-441metadata to files, adding, 479placing graphic files saved in, 142
578
points. See also anchor pointsConvert Direction Point Tool, using,
262-263defined, 41Direct Selection tool
converting points on path with, 262-263
moving, 266–267and fonts, 116
ruler units preferences, setting, 490Polygon Frame tool, 170polygons
converting, 254creating, 170–171Pen tool, drawing with, 258
Polygon tool, 170text, adding, 96, 98–99
portrait orientationchanging, 34for new documents, 28
positioningprinting setup options, 461
poster images for sounds and movies, 358-359
PostScriptEPS file format options, 438points preferences, setting, 490
preferences. See also type preferencescamera raw preferences, setting, 526-527Clipboard handling preferences, setting,
502composition preferences, setting, 489dictionary preferences, setting, 492–493file handling preferences, setting,
500–501general preferences, setting, 484grid preferences, changing, 48–49interface preferences, setting, 485links preferences, setting, 501notes preferences, setting, 496restoring, 501ruler units preferences, setting, 490spell-checking preferences, setting,
494–495Story Editor preferences, setting,
498–499Track Changes, 510Units & Increments preferences, 490–491
prefixes for master pages, 71Preflight panel, 476–477
Status bar, accessing from, 17preflight profile
Status bar, accessing from, 17using, 476–477
presentation mode, 36presets. See also PDF file format
in Adobe Bridge, 534deleting, 32–33, 459printing with, 459saving, 32text variables, 78transparency flattener preset, creating,
471trapping preset, creating, 468working with, 33
previewing. See also Adobe Bridgecolor separations, 465data merge data, 417EPS file format options, 439folio publication, 396guide color for backgrounds, specifying,
44images, saving, 24–25overprinted colors, 232page transitions, 365save preferences, setting, 500text frame options, 132
Preview view, 36previous page, navigating to, 63previous spread, navigating to, 63Print command, 458printers' marks options with Adobe PDF,
429printing. See also overprinting; spreads;
trappingAdobe PDF print options, 425advanced options, setting, 470–471auto options, 461booklet, spreads in, 474–475books, 81color handling options, 472Color Management options, setting, 472color separations, previewing, 465data format options, 464documents, 458flattened artwork, 471
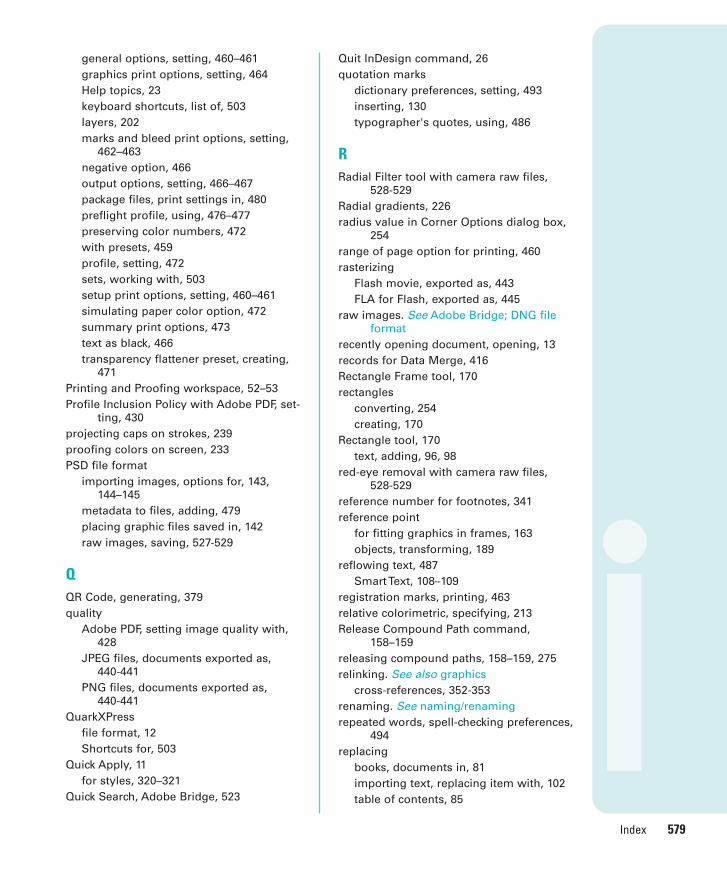
Index 579
general options, setting, 460–461graphics print options, setting, 464Help topics, 23keyboard shortcuts, list of, 503layers, 202marks and bleed print options, setting,
462–463negative option, 466output options, setting, 466–467package files, print settings in, 480preflight profile, using, 476–477preserving color numbers, 472with presets, 459profile, setting, 472sets, working with, 503setup print options, setting, 460–461simulating paper color option, 472summary print options, 473text as black, 466transparency flattener preset, creating,
471Printing and Proofing workspace, 52–53Profile Inclusion Policy with Adobe PDF, set-
ting, 430projecting caps on strokes, 239proofing colors on screen, 233PSD file format
importing images, options for, 143,144–145
metadata to files, adding, 479placing graphic files saved in, 142raw images, saving, 527-529
QQR Code, generating, 379quality
Adobe PDF, setting image quality with,428
JPEG files, documents exported as, 440-441
PNG files, documents exported as, 440-441
QuarkXPressfile format, 12Shortcuts for, 503
Quick Apply, 11for styles, 320–321
Quick Search, Adobe Bridge, 523
Quit InDesign command, 26quotation marks
dictionary preferences, setting, 493inserting, 130typographer's quotes, using, 486
RRadial Filter tool with camera raw files,
528-529Radial gradients, 226radius value in Corner Options dialog box,
254range of page option for printing, 460rasterizing
Flash movie, exported as, 443FLA for Flash, exported as, 445
raw images. See Adobe Bridge; DNG fileformat
recently opening document, opening, 13records for Data Merge, 416Rectangle Frame tool, 170rectangles
converting, 254creating, 170
Rectangle tool, 170text, adding, 96, 98
red-eye removal with camera raw files, 528-529
reference number for footnotes, 341reference point
for fitting graphics in frames, 163objects, transforming, 189
reflowing text, 487Smart Text, 108–109
registration marks, printing, 463relative colorimetric, specifying, 213Release Compound Path command,
158–159releasing compound paths, 158–159, 275relinking. See also graphics
cross-references, 352-353renaming. See naming/renamingrepeated words, spell-checking preferences,
494replacing
books, documents in, 81importing text, replacing item with, 102table of contents, 85
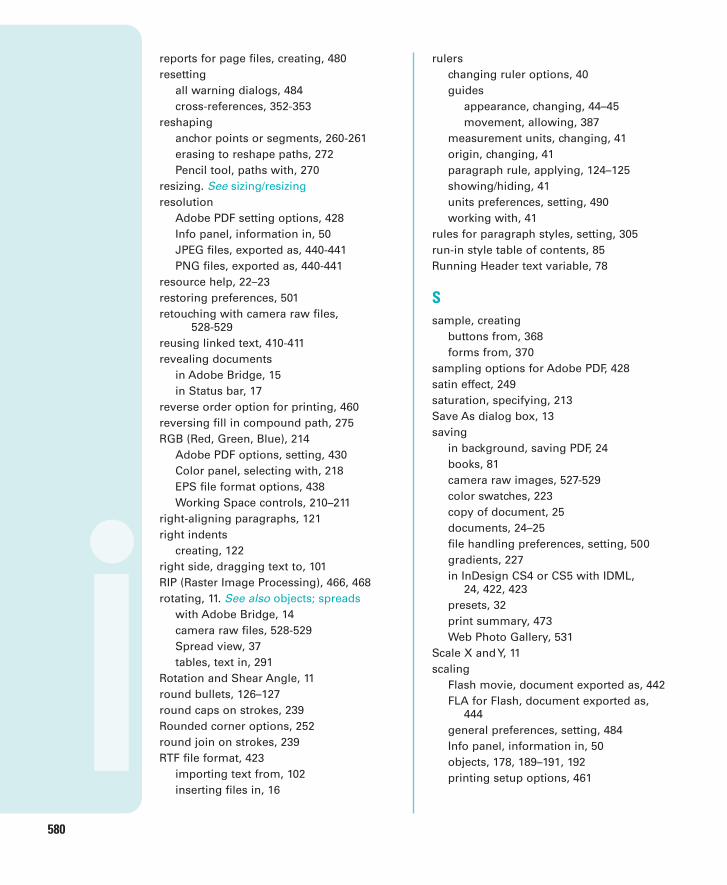
580
reports for page files, creating, 480resetting
all warning dialogs, 484cross-references, 352-353
reshapinganchor points or segments, 260-261erasing to reshape paths, 272Pencil tool, paths with, 270
resizing. See sizing/resizingresolution
Adobe PDF setting options, 428Info panel, information in, 50JPEG files, exported as, 440-441PNG files, exported as, 440-441
resource help, 22–23restoring preferences, 501retouching with camera raw files,
528-529reusing linked text, 410-411revealing documents
in Adobe Bridge, 15in Status bar, 17
reverse order option for printing, 460reversing fill in compound path, 275RGB (Red, Green, Blue), 214
Adobe PDF options, setting, 430Color panel, selecting with, 218EPS file format options, 438Working Space controls, 210–211
right-aligning paragraphs, 121right indents
creating, 122right side, dragging text to, 101RIP (Raster Image Processing), 466, 468rotating, 11. See also objects; spreads
with Adobe Bridge, 14camera raw files, 528-529Spread view, 37tables, text in, 291
Rotation and Shear Angle, 11round bullets, 126–127round caps on strokes, 239Rounded corner options, 252round join on strokes, 239RTF file format, 423
importing text from, 102inserting files in, 16
rulerschanging ruler options, 40guides
appearance, changing, 44–45movement, allowing, 387
measurement units, changing, 41origin, changing, 41paragraph rule, applying, 124–125showing/hiding, 41units preferences, setting, 490working with, 41
rules for paragraph styles, setting, 305run-in style table of contents, 85Running Header text variable, 78
Ssample, creating
buttons from, 368forms from, 370
sampling options for Adobe PDF, 428satin effect, 249saturation, specifying, 213Save As dialog box, 13saving
in background, saving PDF, 24books, 81camera raw images, 527-529color swatches, 223copy of document, 25documents, 24–25file handling preferences, setting, 500gradients, 227in InDesign CS4 or CS5 with IDML,
24, 422, 423presets, 32print summary, 473Web Photo Gallery, 531
Scale X and Y, 11scaling
Flash movie, document exported as, 442FLA for Flash, document exported as,
444general preferences, setting, 484Info panel, information in, 50objects, 178, 189–191, 192printing setup options, 461
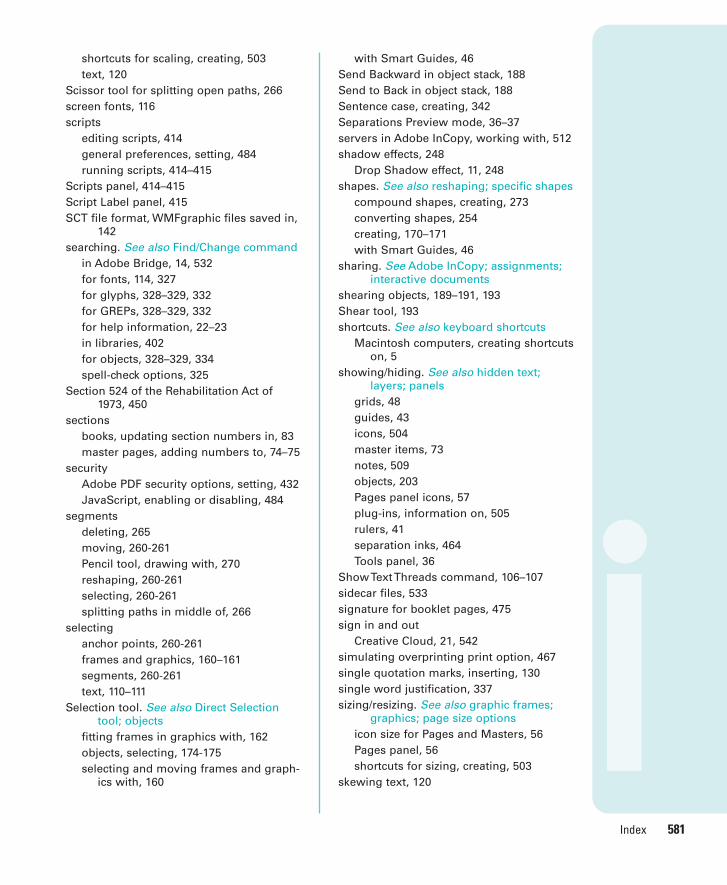
Index 581
shortcuts for scaling, creating, 503text, 120
Scissor tool for splitting open paths, 266screen fonts, 116scripts
editing scripts, 414general preferences, setting, 484running scripts, 414–415
Scripts panel, 414–415Script Label panel, 415SCT file format, WMFgraphic files saved in,
142searching. See also Find/Change command
in Adobe Bridge, 14, 532for fonts, 114, 327for glyphs, 328–329, 332for GREPs, 328–329, 332for help information, 22–23in libraries, 402for objects, 328–329, 334spell-check options, 325
Section 524 of the Rehabilitation Act of1973, 450
sectionsbooks, updating section numbers in, 83master pages, adding numbers to, 74–75
securityAdobe PDF security options, setting, 432JavaScript, enabling or disabling, 484
segmentsdeleting, 265moving, 260-261Pencil tool, drawing with, 270reshaping, 260-261selecting, 260-261splitting paths in middle of, 266
selectinganchor points, 260-261frames and graphics, 160–161segments, 260-261text, 110–111
Selection tool. See also Direct Selectiontool; objects
fitting frames in graphics with, 162objects, selecting, 174-175selecting and moving frames and graph-
ics with, 160
with Smart Guides, 46Send Backward in object stack, 188Send to Back in object stack, 188Sentence case, creating, 342Separations Preview mode, 36–37servers in Adobe InCopy, working with, 512shadow effects, 248
Drop Shadow effect, 11, 248shapes. See also reshaping; specific shapes
compound shapes, creating, 273converting shapes, 254creating, 170–171with Smart Guides, 46
sharing. See Adobe InCopy; assignments;interactive documents
shearing objects, 189–191, 193Shear tool, 193shortcuts. See also keyboard shortcuts
Macintosh computers, creating shortcutson, 5
showing/hiding. See also hidden text; layers; panels
grids, 48guides, 43icons, 504master items, 73notes, 509objects, 203Pages panel icons, 57plug-ins, information on, 505rulers, 41separation inks, 464Tools panel, 36
Show Text Threads command, 106–107sidecar files, 533signature for booklet pages, 475sign in and out
Creative Cloud, 21, 542simulating overprinting print option, 467single quotation marks, inserting, 130single word justification, 337sizing/resizing. See also graphic frames;
graphics; page size optionsicon size for Pages and Masters, 56Pages panel, 56shortcuts for sizing, creating, 503
skewing text, 120
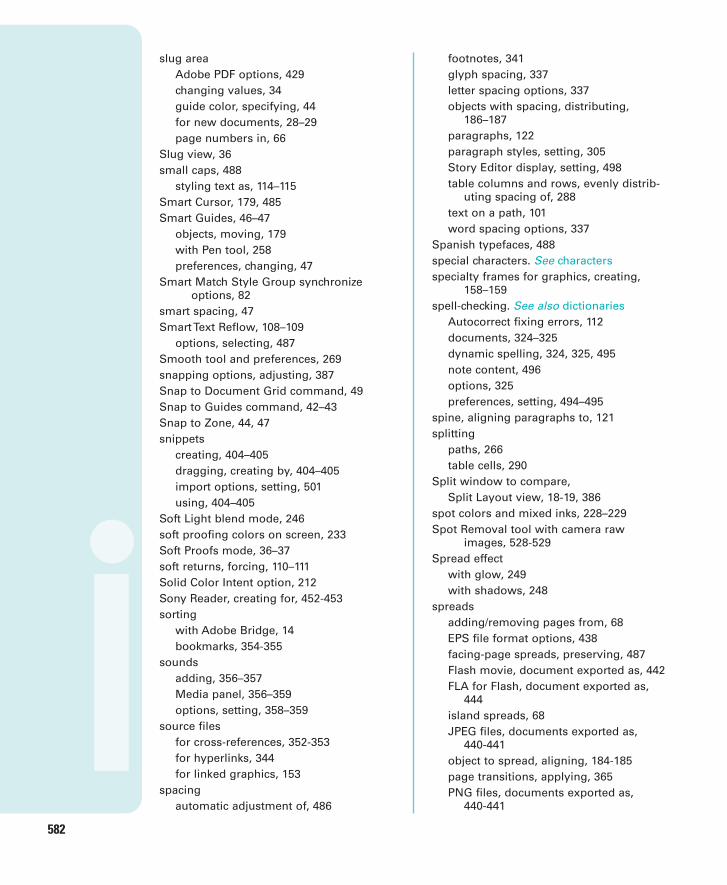
582
slug areaAdobe PDF options, 429changing values, 34guide color, specifying, 44for new documents, 28–29page numbers in, 66
Slug view, 36small caps, 488
styling text as, 114–115Smart Cursor, 179, 485Smart Guides, 46–47
objects, moving, 179with Pen tool, 258preferences, changing, 47
Smart Match Style Group synchronizeoptions, 82
smart spacing, 47Smart Text Reflow, 108–109
options, selecting, 487Smooth tool and preferences, 269snapping options, adjusting, 387Snap to Document Grid command, 49Snap to Guides command, 42–43Snap to Zone, 44, 47snippets
creating, 404–405dragging, creating by, 404–405import options, setting, 501using, 404–405
Soft Light blend mode, 246soft proofing colors on screen, 233Soft Proofs mode, 36–37soft returns, forcing, 110–111Solid Color Intent option, 212Sony Reader, creating for, 452-453sorting
with Adobe Bridge, 14bookmarks, 354-355
soundsadding, 356–357Media panel, 356–359options, setting, 358–359
source filesfor cross-references, 352-353for hyperlinks, 344for linked graphics, 153
spacingautomatic adjustment of, 486
footnotes, 341glyph spacing, 337letter spacing options, 337objects with spacing, distributing,
186–187paragraphs, 122paragraph styles, setting, 305Story Editor display, setting, 498table columns and rows, evenly distrib-
uting spacing of, 288text on a path, 101word spacing options, 337
Spanish typefaces, 488special characters. See charactersspecialty frames for graphics, creating,
158–159spell-checking. See also dictionaries
Autocorrect fixing errors, 112documents, 324–325dynamic spelling, 324, 325, 495note content, 496options, 325preferences, setting, 494–495
spine, aligning paragraphs to, 121splitting
paths, 266table cells, 290
Split window to compare, Split Layout view, 18-19, 386
spot colors and mixed inks, 228–229Spot Removal tool with camera raw
images, 528-529Spread effect
with glow, 249with shadows, 248
spreadsadding/removing pages from, 68EPS file format options, 438facing-page spreads, preserving, 487Flash movie, document exported as, 442FLA for Flash, document exported as,
444island spreads, 68JPEG files, documents exported as,
440-441object to spread, aligning, 184-185page transitions, applying, 365PNG files, documents exported as,
440-441
Index 583
printing, 460booklet spreads, 474–475
rotating, 37, 69Pages panel icons, 57
spreadsheets, links preferences when placing, 501
stackingAdobe Bridge, images in, 14, 533object stack order, arranging, 188
StandardSoundPoster.jpg, 356StandardMoviePoster.jpg, 358-359star shape
creating, 170–171frame for text, creating, 99
starting InDesign, 4–5Start menu or screen, 4-5, 13Start Page and Numbering At option, 75Status bar
pages, navigating between, 60–61working with, 17
Step and Repeat commandgrid, creating, 181objects, copying, 180
storiesAdobe InCopy, exporting content to, 514Find/Change command, searching story
layers with, 329Story Editor
background color for notes in, 496display preferences, setting, 325,
498–499drag-and-drop editing in, 113show or hide elements, 339tables, editing text in, 284–285working with, 338-339
straightening camera raw files, 528-529strikethrough options
character styles, setting, 307paragraph styles, setting, 305
Strikethrough text, 114–115Stroke panel, 8, 174strokes. See also gap color/tint; tables
alignment of stroke on path, 238applying strokes, 215, 236-237attributes, changing, 238–239caps, changing, 238–239converting, 254custom-dashed stroke, applying, 240
custom styles, creating, 240–241dashed/dotted strokes
applying, 240creating, 240–241gap color for, 239
defaultsfor colors, 236–237setting, 255
drawing, 174Eyedropper tool, using, 216–217Info panel, information in, 50joins, changing, 238–239styles, 239–241
custom styles, creating, 240–241dashed stroke style, applying, 240
Structure pane for placing XML tags,418–420
styles. See also character styles; GREPs;objects; paragraph styles; strokes;tables
applying, 312–313for bullets, 126–127case-sensitivity of names, 310cell styles, creating, 318Character Styles panel, 302clearing style overrides, 312–313for cross-references, 352-353deleting table and cell styles, 319editing with Quick Apply, 321End Nested Style Here special character,
314–315font style, changing, 114–115groups, creating, 309for hyperlinks, 349importing styles, 310–311InDesign document, loading styles from,
310letter commands with Quick Apply, 321links to style, breaking, 312loading styles, 310mapping to export tags, 316, 322, 451Microsoft Word document, importing
styles from, 310–311nested styles, creating, 314–315overriding
formatting, 312–313object style overrides, clearing, 317
paragraph rule, width of, 124

584
styles (continued)with Paragraph Styles panel, 302Quick Apply, using, 320–321renaming styles, 310table styles, 318–319
Style Source setting for books, 82subsampling with Adobe PDF, 428subscript, 114–115
advanced type settings for, 488Subtract button, Pathfinder, 273summary
for booklet pages, 475print options, viewing summary of, 473
superscript, 114–115advanced type settings for, 488
swapping text on path, 101swashes. See glyphsSwatches panel. See also gradients
adding color swatch, 221all unnamed colors, adding, 223for button colors, 374Color Picker, adding colors from, 237deleting color swatch, 221, 222display, changing, 220editing color swatch, 221fill or stroke color, changing, 236gradient swatches, creating, 226–227Kuler panel, adding, 230loading swatches, 223merging color swatches, 223mixed inks with, 228–229moving swatches, 223name of swatch, entering, 221saving swatches, 223selecting swatches, 223tint swatches, creating, 225working with swatches, 222–223
swatch libraries, adding colors from, 224SWF file format, 356-359, 422, 423
exporting document in, 442–443SWF Preview panel, 378, 380
Adobe Bridge, 523switching between pages in Status bar, 17symbols
@ before field name, adding, 416Autocorrect, inserting with, 112inserting, 130
synchronizingbooks, 82camera raw images, 528-529
System color library, 224system requirements, 3
32-bit and 64-bit, 5
Ttable of contents
creating, 84–85for digital editions, EPUB, 452-453
Table Options dialog box, 299tables
adjusting options, 282aligning content in cells, 291alternating fills and strokes in, 296–297borders, adding, 299clipping for graphics, setting, 291colors
for borders, 299for diagonal lines in cells, 298strokes and fills, setting for, 296–297
columns and rows, inserting, 287Control panel, modifying tables with,
286converting
tables to text, 281text to tables, 281
defined, 279deleting
cell contents, 284columns and rows, 287table and cell styles, 319
diagonal lines in cells, adding, 298dimensions, specifying, 280editing text in tables, 284–285elements, selecting, 284fills
adding, 294–295alternating fills, 296–297
gap color/tintfor borders, 299for diagonal lines in cells, 298tables, strokes in, 297
graphicsclipping for graphics, setting, 291importing graphics, 282
Index 585
headers and footers, 292–293converting cells and, 293
height, weight, widthadjustment options, 289for borders, 299elements, specifying, 286
importinggraphics into tables, 282text into tables, 282–283
merging/unmerging cells, 286, 290Microsoft Excel tables, importing,
282–283Microsoft Word text, importing, 282–283modifying, 286–287navigating in tables, 284nested tables, creating, 280new table, creating, 280notes, adding, 508spacing of columns and rows, evenly
distributing, 288splitting cells, 290Story Editor, using, 284–285strokes
adding, 294–295alternating strokes, 296–297cells, adding to, 294–295diagonal lines in table cells, adding,
298drawing order, setting, 294lines, 172style and weight, specifying, 286
styles, 318–319Table panel, modifying tables with, 286text
converting tables and text, 281editing text in tables, 284–285entering text in tables, 284importing text, 282–283rotating, 291Story Editor, editing text with,
284–285text frames, adjusting tables in, 300
tabletscreating for, 452-453 document setup, 28-29, 34-35
tabloid page size, 29Tab Order dialog box, 375
tabsfor bullets and numbering, 127button tab order, setting, 375paragraph styles, setting, 305setting, 128stops, defined, 128
tagged PDF options, 450target a page, navigating with, 60templates
creating template document, 31new document, creating, 30saving document as, 25for Web Photo Gallery, 531
Terminal theme, 498text. See also character styles; fonts; hidden
text; kerning; overflow text; para-graphs; paragraph styles; Smart TextReflow; Story Editor; tables; textframes; tracking; type preferences;wrapping text
Autocorrect options, 112autoflowing imported text, 105baseline, shifting characters from, 117black, printing text as, 466for bookmarks, 354-355with bullets, 126–127for buttons, 374colors in Story Editor display, 498conditional text, working with, 406–407copying, 113cutting, 113documents, inserting text in, 16dragging text, 113Find/Change command, using, 328–329,
330Frame tools, adding with, 96, 98greeked text, 487importing text, 102–103
autoflowing imported text, 105continued text, adding page numbers
to, 139flowing imported text, 104–105with options, 102–103
Info panel, viewing in, 51inherited formatting for text, 113leading text, 117linked text, reusing, 410-411links preferences when placing, 501

586
text (continued)notes, converting text to, 508, 509overflowing text, reshaping, 97pasting, 113reflowing, 108–109scaling text, 120searching, 328, 329–330selecting, 110–111skewing text, 120special text characters, inserting, 130track text changes, 510-511Type of a Path tool, using, 96typing text, 110
text breaks, inserting, 130text frames. See also assignments; over-
flow textbaseline options, 133creating text in, 97elliptical frame, creating, 98ignoring text wrapping in, 133options, setting, 132–133outlines, creating, 138overflowing text, reshaping, 97polygon frame, creating, 99rectangle frame, creating, 98searching for, 334star frame, creating, 99tables, adjusting, 300wrapping text, 97, 137
ignoring text wrap, 133Text Only file format, 423text variables
defining, 78working with, 79
themescolor theme, interface, 6, 44, 234, 485Kuler panel, using colors from, 230–231Story Editor display, setting, 498
threading/unthreading overflow text,106–107
3-D bevel effect, 250threshold
for grids, 49for guides, 45
thumbnailsAdobe PDF options, setting, 426library items, displaying, 403options for showing, 485
in Pages panel, 56printing setup options, 461
Timing panel, 364TIFF file format
Adobe Bridge, opening with, 530-531EPS file preview option, 439importing images, options for, 143, 145for metadata, 479, 533placing graphic files saved in, 142raw images, saving, 527-529
tiling documents, 19Times New Roman font, 114tints. See also gap color/tint
dashed/dotted lines, tint color for, 239paragraph rule, width of, 124swatches, creating, 225
Title Case, creating, 342tone curve for camera raw images, 528-529tools. See also specific tools
keyboard shortcuts for, 10shortcuts for tools, creating, 503
Tools panel, 6for InCopy, 520keyboard shortcuts, 10showing/hiding, 36using, 10–11
Tools Hints panel, 10-11tooltips
note tooltips, showing, 496options for showing, 485
top and bottom margins. See marginsToyo color library, 224track changes, 510-511tracking, 119
highlighting text with, 489increments preferences, setting, 490–491
Tracking and Indentation option, Type tool,11
Transform Again submenu, 189transformation. See also objects
values, showing, 485transitions. See page transitionstransitions for pages, displaying, 365transparency
Adobe PDF options, setting, 431blend, create effect with, 247color space for blending transparent
objects, 247
Index 587
FLA for Flash, document exported as,445
importing, 143, 144for Pages panel icons, 57print options, 470–471
trapping, 466assigning trap presets to pages, 468–469preset, creating, 468
Trap Presets panel, 468triangles, converting, 254triple-click, changing action of, 111TrueType fonts, 116Trumatch color library, 224turning on/off
Smart Guides, 462-up perfect bound for booklet, printing,
4742-up saddle stitch for booklet, printing, 474TXT file format
data fields, 416importing text from, 102inserting files in, 16
Type on a Path tool, 96creating text on path, 100deleting text on path, 100modifying text on path, 101
type outlines as frames, creating, 159type preferences
advanced preference, setting, 488general preferences, setting, 486–487
Type toolsoptions with, 11text frame, creating text in, 97using, 96
typing text, 110typographer's quotes, using, 486Typography workspace, 52–53
Uunassigned frames, 169, 170
searching for, 334underlining, 114–115
character styles, setting, 307conditional text, 406-407paragraph styles, setting, 305
undoing/redoing, 53updates and updating``
assignments, 519data merge sources, 417Help menu, checking on, 21hyperlinks, 350Internet, checking for updates on, 20library items, 400package files, 480
uploading Web Photo Gallery, 531uppercase text, creating, 342Upright tool with camera raw images,
528-529URLs. See hyperlinksuser dictionary preferences, 492
Vvector-based images, inserting, 16vertical lines, converting, 254vertically tiling all documents, 19vertical spacing in text, changing, 117videos. See moviesviews and viewing. See also display; rulers
InCopy views, 512InDesign window, 6object styles, 316page transitions, 365print summary, 473Zoom tool, changing view with, 38–39
Visibility icon, 504visibility settings
for cross-references, 352-353for hyperlinks, 348-349
Visual Basic scripts, 414visually impaired persons, PDF options for,
432
Wwarning dialogs, resetting, 484Web color library, 224Web Photo Gallery, creating, 531Web sites
hyperlinks to, 344weight. See height, weight, widthWelcome screen
Open dialog box, 12opening document from, 13starting InDesign from, 4
What's New, finding, 23
588
White Balance with camera raw files, 528-529
white space, inserting, 130width. See height, weight, widthWindows menu, 18–19
System color library, 224Windows Tablet PC
creating for, 452-453 document setup, 28-29, 34-35
WMF file format, graphic files saved in, 142Word. See Microsoft Wordwords
Info panel, information in, 50spacing options, 337
Working Space color controls, 210–211work on a page, navigating with, 60workspaces. See also Adobe Bridge
built-in workspaces, 52creating, 52deleting, 53displaying, 53
wrapping text. See also text framescomposition preferences, setting, 489contour options, 137inside edges, including, 137layers, preventing wrapping in, 202objects, wrapping and unwrapping
around, 136setting shape wrap options, 137
WYSIWYG font menu, 486–487
XXFL file format, 444XHTML format for eBooks, EPUB, selecting,
452-453XLS file format
importing text from, 102inserting files in, 16
XML file format, 423creating XML tags, 418document, placing XML tags in, 418–419elements in, 418exporting XML, 420importing XML tagged data, 418–419for motion presets, 360-361
XMP file format, 533alt text, adding to graphic, 168
documents, inserting file information in,478–479
linked graphic, displaying informationfor, 157
XMP Software Development Kit, 479Xoom
document setup, 28-29, 34-35
YYouTube, inserting, HTML, 378
Zzooming in/out
in camera raw files, 528-529image view, 38–39shortcut keys for, 39