admin guide -...
TRANSCRIPT

Admin Guide

Admin Guide
Publication date $Date: 2014-12-11 15:48:19 +0000 (Thu, 11 Dec 2014) $Copyright © 2014 Octopus Newsroom

iii
Table of Contents1. Introduction .............................................................................................................. 12. Definition of terms and Octopus objects ........................................................................ 23. Admin interface ......................................................................................................... 44. Definition of workflow ............................................................................................... 7
4.1. Story elements ................................................................................................ 74.2. Story templates ............................................................................................... 84.3. Story status .................................................................................................... 84.4. Story descriptions .......................................................................................... 104.5. Jingles and CGs ............................................................................................ 11
4.5.1. Jingles ............................................................................................... 114.5.2. Character generator templates (CGs) ....................................................... 12
4.6. Show types ................................................................................................... 144.7. Rundown templates ........................................................................................ 154.8. Show schedules ............................................................................................. 164.9. Story folders ................................................................................................. 184.10. System forms, filters and fields ...................................................................... 21
4.10.1. System forms .................................................................................... 214.10.2. Filters for media or rundown list .......................................................... 214.10.3. System fields .................................................................................... 23
4.11. Contacts/Guest bid status ............................................................................... 235. Custom tags ............................................................................................................ 256. Story locks management ............................................................................................ 277. Spell-check dictionaries ............................................................................................. 288. Users and user groups ............................................................................................... 29
8.1. Authentication ............................................................................................... 298.2. User list ....................................................................................................... 29
9. Wires, E-mails, RSS, SMS, Fax and other information sources ......................................... 369.1. Working with OCTOPUS Agent ....................................................................... 379.2. Wire Agent Configuration ............................................................................... 399.3. Inject Agent configuration ............................................................................... 419.4. RSS Agent Configuration ................................................................................ 429.5. SMS Agent Configuration ............................................................................... 439.6. Fax Agent Configuration ................................................................................. 449.7. Wire, RSS, FAX, SMS and Email folders .......................................................... 459.8. Wire Filter Rules ........................................................................................... 46
10. Notification rules .................................................................................................... 4811. Stories export ......................................................................................................... 5012. Custom print forms ................................................................................................. 51
12.1. User case .................................................................................................... 5112.2. Tool bar ..................................................................................................... 5212.3. Designing print form .................................................................................... 5512.4. New print form ............................................................................................ 58
13. Commercial agent ................................................................................................... 6113.1. Commercial agent installation ........................................................................ 61
14. CG control configuration ......................................................................................... 6214.1. CG devices ................................................................................................. 6214.2. CG connection ............................................................................................. 6214.3. CG encoding ............................................................................................... 63
15. Advanced setup ...................................................................................................... 6416. Defining main menu ............................................................................................... 6617. Server monitoring ................................................................................................... 7118. Server maintenance ................................................................................................. 72
18.1. Single server solution ................................................................................... 7218.2. Streaming replication .................................................................................... 7218.3. Cluster solution ............................................................................................ 72

iv
List of Tables8.1. Wire rights options ................................................................................................ 338.2. Story folder rights options ....................................................................................... 338.3. Channel and Rundown rights options ........................................................................ 348.4. Group roles ........................................................................................................... 359.1. Characters examples ............................................................................................... 409.2. RSS configuration fields ......................................................................................... 429.3. SMS configuration fields ......................................................................................... 439.4. FAX configuration fields ......................................................................................... 4415.1. General Tab ........................................................................................................ 6415.2. Story Tab ........................................................................................................... 6415.3. Wires Tab ........................................................................................................... 6515.4. CG Tab .............................................................................................................. 6515.5. System Tab ......................................................................................................... 6516.1. Main Menu Items ................................................................................................. 68

1
Chapter 1. IntroductionThis is the essential guide to OCTOPUS administration, covering all the major tasks that you as anadministrator need to complete. It defines the main OCTOPUS objects, illustrates the main workflowsetup options and explains step-by step how to handle everyday administration tasks.
To understand administration of OCTOPUS, first study the OCTOPUS user manual as well as theworkflow used in your newsroom.

2
Chapter 2. Definition of terms andOctopus objects
OCTOPUS uses the object model described below.
Story The story is a basic format of OCTOPUS. It is a story or item that onereporter is working on and can be assigned to that reporter. The storyscript contains all the text for the anchor, for VOs, or even packages. Italso describes all the technical commands like video clips, CGs or graphicpieces used with the story.
Element Each story contains one or more elements. These are separate parts of astory that your journalists use for composing the stories like anchor intros,packages, VOs, SOTs etc. Each company can have a different namingconvention for these and OCTOPUS allows you to define it.
Story script containing “st” and “video” elements
Rundown When you combine several stories in the list to make a program, it is calleda RUNDOWN in OCTOPUS. Each story line in the rundown is calleda SLUG. Unlike the story folders the rundown displays the story in theorder that they will be broadcast and calculates show times. This is howthe on-air program is built.

Definition of termsand Octopus objects
3
Rundown Preview
Show “News at 6” or “Sport at ‘15” are SHOWs. Each show has its ownrundown, where the stories are put in. Different user rights can be definedfor each show type.
Channel Each show should be assigned to a channel. There is one CHANNELdefined in OCTOPUS for each on-air stream your TV station is producing.
Story Folder When you organise the stories in groups, it is called a folder in OCTOPUS.Each folder contains stories related to each other, for example all businessstories or all sports stories. It is up to you how you define your folderstructure.
Forms and Columns Each rundown, container and some other objects have the visualrepresentation described by FORMs and COLUMNs. Columns and theirlabels and formats are definable. There are columns with fixed meaninglike “story duration” and there are also columns where meaning of themcan be defined. The form itself is composed from both of these types ofcolumns.
Folder Folders are the menu options on the left hand side of the screen. Thestructure of the menu is defined in the OCTOPUS admin GUI and userrights can be defined to allow each user to see different folders in theirmain menu.
User OCTOPUS is only accessible to a list of users defined in the system.
User group Rights in OCTOPUS are definable for user groups. Users sharing commonrights are contained within a same group.
MOS Media Object Server protocol is a standardised protocol forcommunication between a newsroom computer system and a third partydevices. These may be Teleprompters, Character Generators, Mediaservers, Playout Servers, NLEs and many more.

4
Chapter 3. Admin interfaceOCTOPUS Admin GUI is available immediately after installation. Accessing OCTOPUS using theadministrator account will display all the administrative folders.
The Admin menu will appear on the left side, a typical admin menu will look like the below screenshot.

Admin interface
5

Admin interface
6
Admin menu
Later you will be able to reorganise your admin menu as required.

7
Chapter 4. Definition of workflowRegardless of whether you are 24/7 news channel, a multi-channel entertainment company or aregional channel with one news show per day and regardless of the workflow you are using in yournewsroom, you have to define the following areas before OCTOPUS can be used by journalists. Thisstep-by-step guide will help you through this process. The original configuration can be changed infuture. It is not essential to follow this sequence exactly, but it's a good idea to ensure that you don'tforget anything. Before you start, you should be familiar with your newsroom workflow processes.
4.1. Story elementsSelect Admin/Story/Elements from main menu and use New button to create new story elements.OCTOPUS defines 7 basic story element types (out of which 2 are mostly for backwards compatibility)and 3 special elements types:
STUDIO This is a live event broadcast studio set. It can be anchor intro or tag, chat withguest. Duration of this element is always counted from text. There is actually noclip assign to it. The text of the STUDIO element is sent to the prompter screen.
VIDEO Any piece of video or audio material played from any kind of device. Examples arepackage (PKG), SOT (sound on tape, soundbite). Duration of this element basedon either a ready video clip that has been added or, if there is no clip or attachedclip is not ready yet, then duration is based on the estimated slug duration. Thiselement is usually not sent to the prompter. (this can be configured)
VO This is a video element where the audio comes from another source (usually live).This can be VO (voiceover – anchor speaking over rolling tape) or a graphic(realtime graphic with anchor comment) but also a phone call (photo of personspeaking and sound from phone hybrid). The duration of this element is alwaysbased on the text, not from the duration of the clip. This element is usually sentto the prompter.
LIVE This element is defined by external live source. Duration is based on the estimatedduration of the slug. The LIVE element is sent to the prompter.
LIVEVIDEO Duration is always based on estimated duration of the story. It is possible to adda clip to this element.
TAPE This element is for adding a tape from the OCTOPUS tape library to the story.Duration is based on the IN and OUT points entered for the tape. This element isbackwards compatible with OCTOPUS5 behaviour and it is normally not used (asmost customers are using MOS nowadays)
LEGACYVIDEO Any piece of video or audio material played from any kind of device. Examples arepackage (PKG), SOT (sound on tape, soundbite). Duration of this element basedon either a (any, event not-ready) video clip that has been added. If there is no clipor a not ready clip, duration is based on the estimated slug duration. This elementis backward compatible with OCTOPUS5 behaviour.
JINGLE This special element is placed in special stories called JINGLES. These are all thebumpers, opening and closing graphics or fillers. Usually the JINGLE story typeis added to show templates. The duration of a JINGLE is based on the duration ofthe clip assigned. JINGLES are not sent to the prompter.
INSERT Special element that allows import of content from external systems via specialOCTOPUS service. This is used usually for commercial scheduling from third-party traffic systems. Again, this element is used in stories in show templates.INSERT is never sent to prompter.

Definition of workflow
8
BREAK A gap in broadcast of defined Rundown, typically handing over to different controlroom to broadcast advertisements. A special element that has only a duration andno other content.
Here are some of the custom elements definition based on basic element types:
PKG based on Video
VO based on VO
Intro based on Studio
Tag based on Studio
4.2. Story templatesWhen a story is created in OCTOPUS one of the story templates has to be used. Story templatescontain a sequence of elements in an order that they would commonly be used, for example ST/VOor ST/PKG. Story templates can be edited in the same way as a script allowing entry of predefinedtext, formatting or other parts of the script.
For example you can create a template for the show opening with a basic welcome sentence and alower third for the anchor, which speeds up the script writing for journalists. To create a new storytemplate go to Admin/Story/Templates from main menu and hit the NEW button on the toolbar. Enterthe name of the story template (this would typically be in the format ST/PKG for example) and tickthe box if this should be the default template for all newly create scripts. Next select the new storytemplate and click on the SCRIPT button on the toolbar, this opens the template and allows editing inthe same was as creating a script. (See the OCTOPUS User Guide for details on script writing).
Story Templates Section and New Story Template Dialogue
4.3. Story statusThe story status identifies how far along the production process the story currently is. There are 16states with definable colours and rules; these should be configured to indicate the different stages ofyour story production process.
Here is one example of how story status might be configured:

Definition of workflow
9
RED story is assigned, but nothing done
BLUE script is done, reporter has ticked the “script” tick box
ORANGE visuals are done for this script, reporter ticked “visuals”
GREEN story is ready to air, producer has checked the visuals and other content and ticked “readyto air”. The story is now automatically locked and only users with Masteredit user rightscan modify it.
To define a new “workflow checkpoint” or status, go to Admin/Story/Status and then choose the statestab. Choose one of the unused rows and click the EDIT button on the toolbar. Type the name of thenew story state and tick the active tickbox.
States Tab of Status Section and Edit Story State Dialogue
Next choose the colours tab to choose a colour to be displayed when the rules matching your new storystate are met. Click NEW on the toolbar and then click on the coloured square to display a paletteof available colours, click the required colour on the palette. You can also choose some text to bedisplayed within the coloured status indicator, such as S for script, V for visuals etc. There is also anoption MASTEREDIT, this should generally only be ticked for your READY TO AIR status.
Story Status Colours Tab and Edit Story Colour Dialogue
To create the story state rule, click the Rules tab. To create a new rule click on the NEW button on thetoolbar. The New Story Status Rule dialogue contains three drop down lists, the first is for choosing IF/

Definition of workflow
10
IF NOT, the second for the name of the story state and the third is the colour that should be displayedif this criteria is met. Rules can be dependant on other rules, this can be achieved by leaving the toplevel rule without a colour defined and then dragging and dropping other rules on top of that – as inthe below example.
Story Status Rules Tab and Edit Story Status Rules Dialogue
4.4. Story descriptionsAn unlimited number of plain-text description fields for stories can be defined. In most newsrooms,just one story description is sufficient and nothing extra needs to be added. However it is possible tocreate multiple story description tabs. This is particularly useful for planning/newsgathering folderswhich allow editing only of the description tabs and not the actual script body. Please see the StoryFolders chapter of the user manual to become familiar with these types of stories.
To create extra story description tabs, go to Admin-Story-Description and click the NEW button. Allthat is required in the new story description dialogue is to enter a name and tick the enabled box.
Story descriptions list
Story description templates allow you to have text and formatting automatically added to thedescription tab. If you would like to create a story description template for use with this new storydescription tab, go to Admin-Story-Description Templates. Choose the newly created story descriptionfrom the drop down list below the toolbar and then click on the NEW button on the toolbar. Give thetemplate a name and then enter in the text field below any text that you would like to have added bydefault to the story description when this template is applied, click OK.

Definition of workflow
11
Story description edit
The new story description will now be available when a new script is created or later when editing thescript properties in a normal scripting story folder. In the newsgathering/planning folders these storydescriptions will be displayed when double clicking the story from the list or by selecting the storyand clicking EDIT on the toolbar.
4.5. Jingles and CGsYou need to predefine your Jingles and Character Generator templates in order to be able to use themin stories/rundowns later.
4.5.1. Jingles
Jingles are usually short clips used at the start or end of a show and/or before or after breaks. WithMOS integrated media, you can obtain exact jingles from your Media Server and use them in yourrundowns. But first you have to create “links” to them in OCTOPUS. To define your jingles, go toAdmin/Story/Jingles section, and hit NEW toolbar button.

Definition of workflow
12
New Jingle – Dialogue Window
Fill in name of the jingle, and click the default tickbox if you would like this to be the default Jingleand then click OK. Now click on the SCRIPT toolbar button, and then click EDIT on the script toolbar.Right click in the script editing area and choose NEW – JINGLE. To add clip to this jingle element,either start typing in the name of the clip into the Name field and choose from the drop-down list ofmatching media, or right click on the dark grey part of the media form and choose MOS – BROWSEand then choose the clip from the Browse Media dialogue – see screenshot on the following page. (Formore detailed advise on adding media to scripts, see the Scripts chapter of the OCTOPUS User Guide).
Selecting Browse for Media in Script part of Jingle
4.5.2. Character generator templates (CGs)
Character generators are used for on-screen graphics, displayed while a show is being broadcast orrecorded. Character Generators use graphics templates of many types (e.g. on-screen persons’ names& titles, sports tables, etc.) These templates consist of graphics, and predefined spaces for text lines.Texts can be either input manually (by extra staff), or automatically using OCTOPUS CG SenderApplication. In this second case, journalists write all the CGs’ texts. A third option is to use a thirdparty active-x to create the CG, including the text, and then add this as a MOS object in the scripts –

Definition of workflow
13
this option is dependant on the 3rd party Active-X software and therefore cannot be covered in moredetail in this guide.
If you plan to use OCTOPUS CG Sender to send the CG text, you have to define the available CGtemplates in OCTOPUS. You will need some help from the graphics department for this as they willneed to provide you with all the graphics templates used by the station. You will need all the CGtemplates numbers, and ideally JPEG image previews, these can be any size, but generally shouldbe in the same proportions as the actual template to give users an idea of what the actual templatelooks like. These images are not mandatory, but it is a useful way of providing a preview of the actualtemplate to users.
Create a new folder on the OCTOPUS server within the $OCTOPUSDIR called CG-templates (anylocation on the server will work, this is just a suggestion) and copy the JPEG files to the new folder. Itis a good idea to name these JPEG files as $TEMPLATENUMBER.jpg where $TEMPLATENUMBERis a template number of the particular CG template. (e.g. 5000.jpg; 5001.jpg; etc.)
After you have list of templates and images ready, go to Admin/CG/Templates section of the mainmenu and click the New button.
New CG Template – Dialogue Window
Fill in the Template Name (this should be something easily understood by users like Lower Third, 2Lines etc.) the template ID as provided by the graphics department, the Blank ID - if any (ID of the“blank” Graphics Template) and optionally the IN and OUT times which would be entered by defaultwhen users select this template.
To choose the background image click on the background button on the toolbar and browse for theJPEG file that you saved to the server earlier and then click on the Open button.
To add a new text line, which will be seen on a CG, click the down arrow on the New button and chooseEdit. You can then Drag-and-Drop it to its real position. There’s an important thing to notice abouteach of these edit lines, they each have a line number determining the position within the template.The number of lines and their positions must correspond to the numbers and positions of the templateon the CG device. Accidental switching two lines, may lead to the text being displayed in the wrongorder on the CG machine. If the edit lines are in the wrong order, rather than rearranging by drag &drop, you can click the Renumber button on the toolbar which will consecutively number the linesstarting from the top-left and ending at the bottom right of the template.
In addition to edit lines, you can also insert labels. Labels are only used to describe an edit lines content.You should use them particularly if you have not provided the preview images as users may have no

Definition of workflow
14
idea what type of information should be entered in the edit line. To position the labels and edit linesof the CG neatly select the labels or edit lines that you would like to align with Ctrl + click, then clickthe the down arrow on the ALIGN button and choose the way you would like to align these fields –LEFT, RIGHT, TOP, HORIZONTAL or VERTICAL.
CG Template with Background Image, 2 Labels and 2 Edit Lines
When the template is ready, click the Save button, which will take you back to templates list.
4.6. Show typesThe types of shows in your schedule are defined here. Rundown duration does not matter for showtypes, at this stage you only need to define the type of program. For example you might have a programNews at 6, with 20 minute duration and another News at 10 with 30 minute duration. Just one showtype 'News' can be created. A different show type would be created for a Sport bulletin however.
As journalists may work on one particular show type, but should not have access to others, differentuser rights can be set up for each show type and channel combination. For example you might havetwo show types, News and Sports; and a journalist that should have the rights to work on the News , butnot the Sports programs – defining these show types allows you to define the user rights accordingly.
Enter the Administrator/Show/Types option and add all the show types you need for your schedule.Once entered, the show type can only be edited or archived, not deleted; so be careful to only addnecessary show types. The default rundown template can also be assigned here (these will be createdthe next chapter Step 7). It is possible to set up automatic actions for the show types, includingarchiving, deletion, or deep archiving (additional configuration is required for this – ask OCTOPUSsupport). For each automatic action you can define a period of time in either hours, days weeks ormonths after the show has ended that the action should take place. It is important to either archive ordelete old rundowns particularly in 24/7 news channels as keeping numerous rundowns active in thedatabase will take up space necessarily and may eventually slow the system down.

Definition of workflow
15
Show Types Preview
4.7. Rundown templatesFor each show type at least one rundown template should be created. You may also have severaltemplates for each show type, for example for a “News” show type, there might be a different templatefor “News at 6” and “News at 10.”
To create a new rundown template go to Administration/Show/Rundown Templates and click the Newbutton; you will be presented with a dialogue for entry of the template name and planned duration –enter these details and click OK.
New Show Template Dialogue
For each template, content can be defined. Click the Content button on the toolbar to get to templateeditor. The template can consist of any of the usual rundown content; jingles, predefined stories (suchas news opening and closing studios), breaks, commercials, segments, text notes and an off-air line.Stories may be marked as skipped if required in the template as well. Any of these items can be createdby clicking on the down arrow next to the New button on the toolbar and selecting the relevant typeof slug. Reordering can be achieved with drag and drop. Creating rundown templates is the same as

Definition of workflow
16
creating an actual rundown, so for more details on how to create this template, please see the Rundownsand Broadcasting section of the OCTOPUS User Guide. When you have finished editing the content,just close the tab.
Rundown Template Content
If you have the same program repeated at different times of the day, with the same duration –generally the same template can be used for all of these rundowns, this will make the workflow morestraightforward.
4.8. Show schedulesOCTOPUS rundowns are created in advance, automatically, according to the defined show schedule.This means that producers will have the basic outline of the rundowns ready each day, includingcontent like headlines, bumpers etc.
To create the show schedule, go to Administration/Show/Scheduler and click the New button on thetoolbar. In the new Show Schedule dialogue you need to name the plan and choose how many daysin advance the rundowns should be created from the drop-down list. When the Recreate Rundownscheckbox is checked, OCTOPUS will automatically recreate any shows that have been deleted beforetheir scheduled start time as long as this is after the Create Rundowns From time. You can also add adescription for the plan, if this is the holiday schedule then describe its intended use here, then clickOK to save it. More than one show schedule can be created for each channel, but only one at a timecan be assigned.

Definition of workflow
17
New Schedule Dialogue
To add rundowns to the schedule, select your newly created schedule and then click Content on thetoolbar. The schedule is defined on a weekly basis, to add a new rundown to the schedule click Newon the toolbar. Choose the required Show Type and Rundown Template, enter the scheduled starttime, and check the days that this show will be aired, set MOS redirection (if using MOS) and definethe desired Automatic action (Archive, Delete, Deep Archive) and the time frame after the schedulestart time that this action should take place. Rundowns can be also scheduled as Connected, whichmeans that the connected rundowns start time will be equal to the end time of the previous rundown,regardless previous rundown’s duration.
To edit the properties of shows that have been added previously to the schedule, select the rundownor rundowns (using Ctrl + click or Shift + click) and then click the Edit toolbar button.
To delete rundowns from the schedule select the rundown or rundowns and hit Delete toolbar button.
Schedule Content and New Scheduled Rundown Dialogue
When all rundowns have been added to the schedule, go back to the list of show schedules and assignthe plan to a channel by clicking Plan assignment on the toolbar. The plan assignment dialogue allowsyou to assign a schedule for each channel and to specify how long the plan should be applied for in thedate and time fields Create Rundowns From: and Create Rundowns To:; if you are going to specify adate range, don't forget that you will need to assign a new plan to the channel at the end of this period.By specifying a date range you can prevent having rundowns created for more than one plan when theswitch to a new plan takes place. If no dates are entered the plan will be assigned indefinitely, but notethat it will never create rundowns for a time already past or beyond the configured number of hoursin advance. The schedule will be applied when the OK button is pressed; the procedure which createsthe rundowns automatically runs periodically throughout the day – if you want the rundowns createdimmediately, click Schedule now on the toolbar.

Definition of workflow
18
Schedule Assignment to Channels Dialogue
4.9. Story foldersStories in OCTOPUS are organised in folders. The folder structure is very flexible and can beconfigured according to your newsroom workflow; consultation with management staff should helpyou with defining this structure. There are two types of story folders, scripting folders and newsdeskfolders (which allow access only to story properties and the background information tabs. If yourorganisation plans to use Assignment desk folders, possibly you might have separate assignmentfolders for each day of the week (Mon-Sun). Scripting story folders are generally either based onsubject e.g. sport, business, economics; or these folders could be based on shifts Morning, Afternoon,Late etc. The folders structure is dependent on your newsroom workflow; therefore management staffcould help you with its definition.
To create story folders, locate to Administrator/Story/Folders section in the main menu. Click New onthe toolbar and enter the name for the folder and enter any required automatic actions (Archive, Delete,Deep Archive), it is a good idea to apply automatic actions to avoid keeping unnecessary material inthe database.

Definition of workflow
19
New Story Folder Dialogue
Create all the story folders that you need, note that it is possible to add subfolders by dragging anddropping the story folder onto another story folder. Next go to Administrator/Menu Structure. To keepthe main menu tidy, it is a good practise to put the story folders in a folder; click the New button on thetoolbar, choose Folder from the drop-down list in the Main Menu Item dialogue and name the foldere.g. Assignment Desk or Story Pools. Next start adding the story folders by again clicking the Newbutton, but this time choose Story Folder from the Type list. Name the story folder, then select thestory folder you created earlier from the list below.

Definition of workflow
20
Adding Story Folders to Main Menu
If this should be an Assignment Desk type of folder, choose Story Only from the Available Edit StoryMode list; if this will be a standard scripting folder, choose Both, Script Default.
Calendar mode enables a calendar filter for the folder, this might be particularly useful for AssignmentDesk folders so that reporters can easily filter assignments according to date.
Note
See the Story Folder chapter of the user manual to understand how the calendar works
If you would like to add a tree (top level folder and sub-folders) to the menu, choose the top-level folderfrom the list of story folders and then choose Selected and Subtree from the Subfolder Tree Mode list.

Definition of workflow
21
Note
Currently the subfolders will be available only via a drop-down list displayed under the storyfolder toolbar; in future versions it will be possible to display the subfolders directly in themain menu in a tree.
4.10. System forms, filters and fieldsIn addition to OCTOPUS automatically saving user forms for viewing lists and users being able tocreate user their own forms, you can define system wide forms which will be the default for all userswhen they first open each section of OCTOPUS. For the Media and Rundown list sections customfilters can also be created to allow sorting of the items. It is also possible to change the labels displayedas column headers for all users to localise this part of the interface.
4.10.1. System formsTo modify the system forms that will be the default for all users, go to the Administrator/Forms/Forms section in the client. Choose the form that you would like to modify from the list and thenclick the Edit button on the toolbar. Do not change the name of a system form, you will be warnedif you try to do this. If you want to create an alternative system-wide form for users, first select theoriginal form and click the Copy button on the toolbar, the new form will be added at the bottomof the list with (1) appended to the name.
The list of available columns is on the right, these can be dragged and dropped into the form editorarea on the left. The columns displayed in the form editor can be reordered by left clicking on thecolumn header and dragging and dropping to a new position. To resize the columns, hover over thejoin between the column headers until you see the icon with an arrow at each end, then left click anddrag left or right to resize. To delete a column right click on the column header and choose Delete.When you have finished modifying the form, click the Save button.
Form Editor showing the Rundown system form
4.10.2. Filters for media or rundown listIt is possible to create filters for the Media section or for the Rundown list to make it easier for usersto find the items that they need. Creating filters is very similar to creating system forms, open theAdministrator/Forms/Forms section of the client and then choose the form that will be used to createthe filter – if you are creating a Media filter choose MEDIASIMPLE, if you want to create a filter forthe Rundown list choose the form called SHOW. The first thing you need to do is create a copy ofthe form, so select your form and click the Copy button on the toolbar, this will create a copy of theform with (1) appended to the title. Choose the new copy of your form and click Edit on the toolbar.
Once you have the form open in the form editor, enter a name for the filter into the Name field,then select Filter from the Purpose drop-down list. Now you can start adding the required fields tothe form, these can be added by dragging and dropping the fields from the list on the right of the

Definition of workflow
22
form editor. Delete those that are not wanted by right clicking on the column header and choosingDelete. You can add Labels to empty columns, to add an empty column to the form, right click in avacant area of the form and choose Add New Column from the context menu. Then double click inthe new column and type in the text label. Some columns are not allowed to be used for the purposeof a Filter, the following are examples of commonly used Media and Rundown List filters:
Editing Media Filter
Editing a Show/Rundown List Filter
To test your new filters, open the Media or Rundown List section as required, then choose yournew filter from the Filter on the toolbar. You should see the labels and fields that you added to thefilter displayed above the list as in the example below. Choose the required options/dates availablein your filter and then click Apply, you should see the list of items narrowed down accordingly.
Applying a Filter to the Media Section
Media filters can be added to the main menu to allow users to easily view media items from aparticular integrated device. To do this, choose the Media device only and do not filter accordingto date, then Apply the desired filter to the list. Once the filter is applied, choose Save as NewPublic Filter from the Filter menu on the toolbar and name your filter according to the name of theintegrated media device. Once you have saved the new public filter, there will be a new option onthe Filter menu – Add Filter to menu. After choosing to add the media filter to the menu, a newoption will be available in the main menu as a sub-folder of media, this will contain the filteredlist of media.
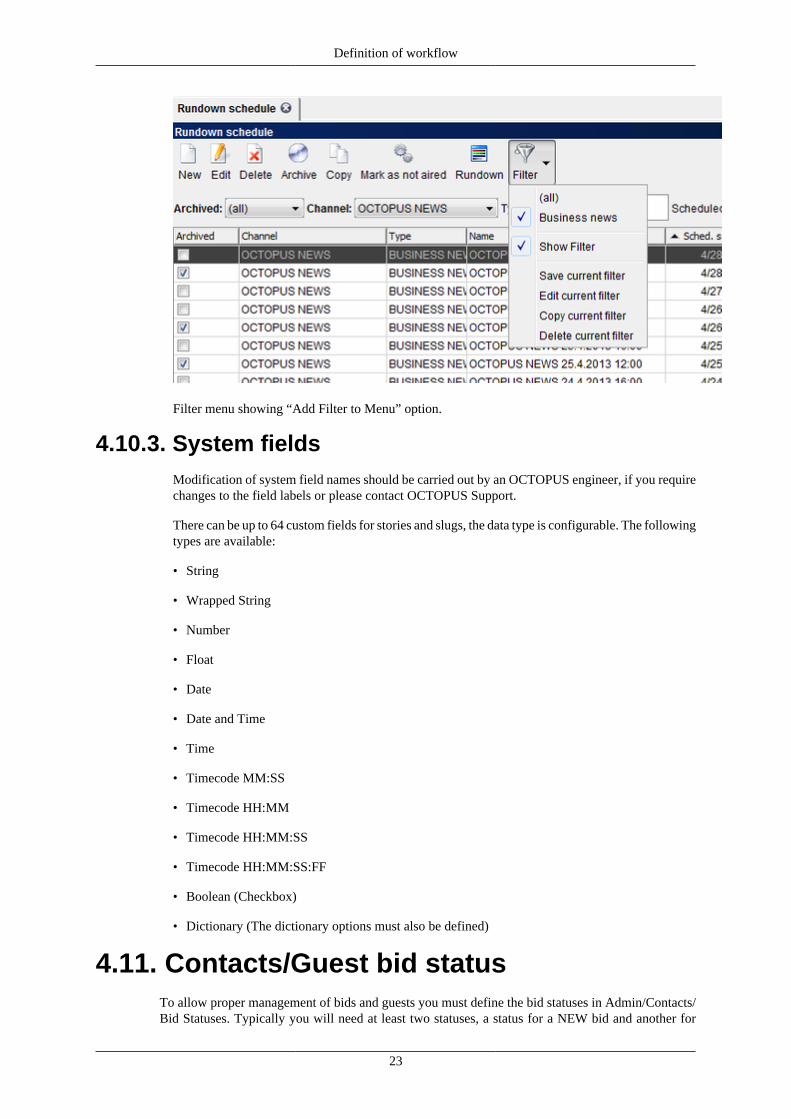
Definition of workflow
23
Filter menu showing “Add Filter to Menu” option.
4.10.3. System fieldsModification of system field names should be carried out by an OCTOPUS engineer, if you requirechanges to the field labels or please contact OCTOPUS Support.
There can be up to 64 custom fields for stories and slugs, the data type is configurable. The followingtypes are available:
• String
• Wrapped String
• Number
• Float
• Date
• Date and Time
• Time
• Timecode MM:SS
• Timecode HH:MM
• Timecode HH:MM:SS
• Timecode HH:MM:SS:FF
• Boolean (Checkbox)
• Dictionary (The dictionary options must also be defined)
4.11. Contacts/Guest bid statusTo allow proper management of bids and guests you must define the bid statuses in Admin/Contacts/Bid Statuses. Typically you will need at least two statuses, a status for a NEW bid and another for

Definition of workflow
24
CONFIRMED bids. To create a new status, click the New button on the toolbar enter the name of thestatus and click OK. For the confirmed status, you should tick MOVE TO GUEST LIST, so that allconfirmed bids will automatically be added to the guest list.
Bid Status Tab and New Bid Status Dialogue

25
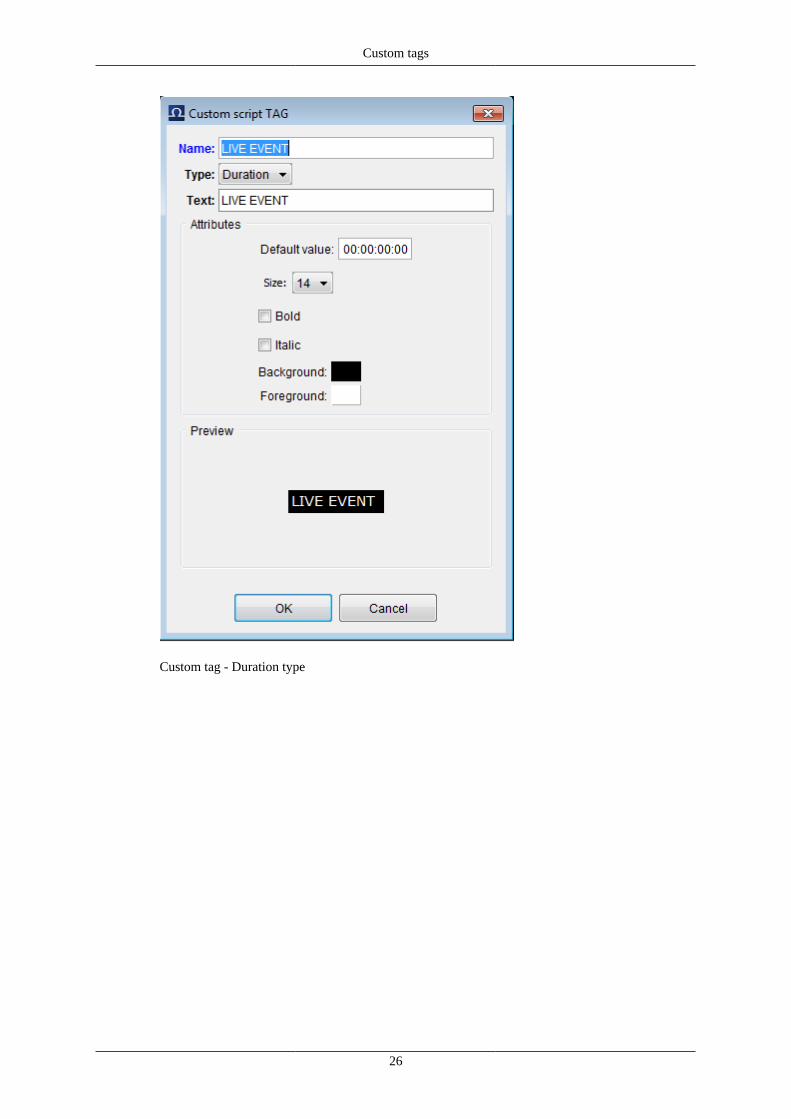
Chapter 5. Custom tagsCustom tags can be created for either marking the script or adding duration. Once created these tagswill be available when right clicking in the text editing area of a script and choosing New, the customtags will be at the bottom of this list. To create a new custom tag, go to the Admin/Story/Tags sectionof the Octopus Client. Name the tag, choose whether you want it to be a simple mark or a durationtag and enter the text that should appear in the tag. For a simple mark there are formatting attributesavailable including font size, bold, and foreground and background colours. The duration tag has anadditional option for entering a default duration. See the below examples of Mark and Duration tags.
Custom tag - Mark type
Custom tags
26
Custom tag - Duration type

27
Chapter 6. Story locks managementWhenever a script is open for editing, a lock is automatically applied to the story to prevent other usersfrom modifying the story’s content. But, if a user starts editing a story and then forgets to save andclose the script, the lock will remain. If other users try to edit this story, they get a message warningthem about the story being already locked by someone else. Some users can be assigned the lock pickerright to allow them to take over a story lock, see the user rights section of this guide on how to assignthese rights. Users could also send a message to the user who has locked the story.
As a last resort, there is the lock manager available in Admin/Story/Locks which will display all currentstory locks with the name of the story, the name of the user that locked it and the time that the storywas locked. There are two options available from the toolbar, SEND MESSAGE and DELETE. Selectthe lock you would like to manage and click SEND MESSAGE to send a message via OCTOPUSmessaging to the user that has locked the story. Otherwise, you can choose to delete the lock – if youdo this the user will lose any unsaved work.
Story Lock Manager

28
Chapter 7. Spell-check dictionariesSpell-check dictionaries compatible with Open Office 3.0 (.oxt file extension) can generally beused with Octopus. These files can be downloaded from http://extensions.services.openoffice.org/dictionary These .oxt files needs to be signed by certificate of the Octopus Newsrom and needs tobe saved to the octopus\server\extensions\dictionary directory; the OctopusServer service needs to berestarted when a new dictionary file has been added to this directory.
Once the dictionary has been added it should be available for selection via the Config button on theStory Editing toolbar. If you want to apply a spell-check dictionary to all users, click the Admin button,check the Spellchecker option and then choose the Spellchecker Language from the drop-down listand then click OK.
Story Editing Config Dialogue

29
Chapter 8. Users and user groups
8.1. AuthenticationThere are two possible types of user authentication in OCTOPUS, basic and LDAP. Under basicauthentication the username and password are stored in the OCTOPUS database; all users must beadded manually. If LDAP is being used users can be imported from and authentication will be handledby the domain controller. OCTOPUS client stations and the OCTOPUS server should be included inone domain. The username is unique identifier and should not be changed during the system’s lifetime.Regardless of the authentication type, adding users is done via the Admin/Users/List section of themain menu.
8.2. User listTo create new users manually click NEW on the toolbar and then enter the mandatory details: Username, Long name, Short name, Password, Department and Title. The department and title lists dependon your local environment and dictionaries of these need to be created in the Admin/Dictionary/Department and Admin/Dictionary/Title sections.
To import from LDAP, click on the USER IMPORT button, this will show all users in the OU specifiedduring the system configuration. The multi-select list displayed can be filtered. You will still need toedit the imported users to add the mandatory details that are not automatically completed.
The non mandatory fields are accessible to the users by right clicking on the green server status dot inthe center at the bottom of the screen and choosing USER PROFILE.

Users and user groups
30
Add User – Dialogue Window
After creating users, they should be assigned a channel. Click the CHANNELS toolbar button to assignusers a channel.
User rights set up can be accessed under Admin/Users/Group List. To create a new User Group, clickon the NEW button. Under the basic Tab, Enter a Name for the group and then add members to thegroup either by clicking the '…' icon and choosing users from the multiselect list or by starting to typeusernames into the text field next to this.

Users and user groups
31
New Group Dialogue
User groups can be configured as a hierarchy, just drag and drop one group onto another and it willbecome the child group - see the screenshot on the next page. User rights are inherited from the parentgroup to the child, so the least powerful users should be in the parent group and the basic rights likeRead Own should be applied at this level. More senior users should be added to the child groupswhere additional rights can be applied. User rights that have been applied in a parent folder will appeargreyed out in the child folder if a rule applying to the same section is added. For a complicated userrights configuration, you can have many separate top level groups/hierarchies - the Show Rights buttonavailable from Admin/User/List toolbar will be useful to determine effective rights in this situation.There are no 'No Access' rights, this removes a layer of complication.

Users and user groups
32
User Rights Hierarchy
The rights tab in the New/Edit group dialogue is where user rights can be assigned for the followingsections: Main Menu, Wires, Story Folders, Channel & Rundown, Story Fields, Story Archives, StoryTrash, Story State and Roles. Throughout the rights section rules can be added in a the same way,select the area on the left that you would like to configure rights for and then right click in the grey areaon the right and choose ADD RULE. After adding a new rule in Menu, Wires, Story Folders, Channel& Rundown and Story Fields you will receive one or more drop-down lists. Leaving the drop-downselection as blank is a wildcard which means that the rules will apply to all of the options in the list.Some of the lists also include groups of items, such as the Main Menu list which will allow you toapply rules to Main Menu items that you have grouped together in folders.
Main Menu User Rights - List of Folders
The first requirement is to assign rights to the main menu, this determines which folders will bedisplayed and accessible to users in this group. Anything that you select from rule lists will grant theusers in that group access to that menu item, there are no tick boxes for these types of rules. Access tothe main menu item does not necessarily grant access to the contents of the section, this will dependon subsequent rules.

Users and user groups
33
Wires - Select the wire folder that you would like to apply rules for or select the blank option to applya wildcard. The options available include:
User Rights rule for Wires folder
Table 8.1. Wire rights options
Right Description
Create Create a new wire in this folder.
Colour Highlight the wire in the list.
Comment Comment on any wire in this folder.
Modify Modify any wire in the folder.
Modify Own Only wires that this user has created in the folder.
Delete Delete any wire in the folder.
Delete Own Delete only wires that this user has created in thefolder.
Read Read any wire in this folder.
Read Own Read only wires that this user has created in thefolder.
Story folder: user rights can be assigned to story folders or story folder groups, the available rightsinclude:
Table 8.2. Story folder rights options
Right Description
Create Create a new story in this folder.
Delete Delete any story in the folder.
Delete Own Delete only stories that this user has created in thefolder.
Purge Purge any story in the folder. (This removes thestory from all assigned locations and is dependenton the user having sufficient rights in eachlocation)
Purge Own Purge only stories that this user has created in thefolder. (This removes the story from all assignedlocations and is dependent on the user havingsufficient rights in each location)
Archive Move to Archive any stories in this folder.
Archive Own Move to Archive only stories that this user hascreated in the folder.
Read Read any stories in this folder.
Read Own Read only stories that this user has created in thefolder.

Users and user groups
34
Right Description
Masteredit Allows user to modify stories that have beenapproved as Ready to Air.
Lock Picker Allows user to take over another users story lock.
Mos Operator Allows user to make stories in this folder MOSactive.
Channel and Rundown - rights can be applied to any Channel and Rundown Type combination orwildcards of either type:
Table 8.3. Channel and Rundown rights options
Right Description
Create Create a new rundown.
Delete Delete the whole rundown.
Modify Modify rundown properties, also allows deletionof Off-Air lines and Segment lines from therundown.
Read Read access to the rundown.
Archive Move the rundown to the Archive.
Copy to Archive User is able to Archive a copy of the rundown.
MOS Operator User can make the rundown MOS Active or MOSReady to Air
Lock Allows user to lock the entire rundown.
Archive Slug Move to Archive any slug in this rundown type.
Archive Own Slug Move to Archive only slugs that this user hascreated in the rundown.
Create Slug Create a new slug.
Read Slug Read any slug in the rundown.
Skip Skip and/or Clear slugs from the rundown.
Move User can change the order of slugs in the rundown.
Manual Start Allows user to Set the Manual Start time for thisslug and start the timer.
Delete Delete any slug in the rundown.
Delete Own Delete only slugs that this user has created in therundown.
Purge Purge any story in the rundown. (This removesthe story from all assigned locations and isdependent on the user having sufficient rights ineach location)
Purge Own Purge only stories that this user has created inthe rundown. (This removes the story from allassigned locations and is dependent on the userhaving sufficient rights in each location)
Masteredit Allows user to modify slugs that have beenapproved as Ready to Air, they also have the rightto delete Commercial slugs.
Lock Picker Allows user to take over another users slug lock.

Users and user groups
35
Story Fields - this section allows user rights to be assigned at the level of story and slug fields. In mostsituations it may not be necessary to define user rights at such a detailed level, in this case adding fullrights to the wildcards is all that is required. If you want to give users access to only certain fieldsyou will need to specify the columns from the list and assign the appropriate rights, which include:Modify, Modify Own, Read, Read Own.
Story Archive and Story Trash – These rights are all self explanatory. You can define whether userscan Read or Read Own and Purge or Purge Own in the Trash and Archives. Rights can also be assignedto allow users to Empty Trash or Empty trash Own.
Story State – For Each defined story state you can specify whether the group has Read or Modifyaccess to the state. If the story state is Ready for Air (including Masteredit) for example, modify rightsshould be restricted to an Editor group.
Role – The following roles can be granted to users:
Table 8.4. Group roles
Name Description
Administrator Has full rights to every part of the system and canchange system wide configuration settings.
Power user
Reporter Stories can be assigned to all users with theReported Role.
Presenter Users with the presenter role can be assigned asthe Presenter for a block of text in a script.
Mobile user Users with the mobile role can set the Mobile userpassword and use the mobile/tablet clients.

36
Chapter 9. Wires, E-mails, RSS, SMS,Fax and other information sources
Wires are a source of information from the various news agencies for journalists to work with. Thejournalists read incoming wires and then use them as background information for writing scripts.Additional information sources covered in this chapter are RSS feeds, SMS, E-mail, and Fax. Thischapter focuses on the administration of all data sources coming in to OCTOPUS.
The diagram on the previous page describes how wires, E-mail and RSS feeds are added to theOCTOPUS database.
The WiresAgent receives raw data and converts it to text files. These files (or other files received bydifferent program) are added to the database using InjectAgent. RSS, E-mail and fax are received withspecial agents and the data is inserted directly into database without Inject Agent. When any of thesesources are added to the OCTOPUS DB, Wire Filter Rules must be applied to sort the messages intodifferent folders.
Before it is possible to start configuration, you should know the answers to the following questions:
1) How are the wires received? Are they coming through a satellite or another receiver or modem? Inthat case it will be necessary to install WiresAgent first to be able to receive data and save it as a textfile. The text file will then be processed by Inject Agent and added to database.
2) Are the wires already being received by a third-party program? If so, are the files plain text orXML? When the data is already received in a suitable plain text or XML format, only InjectAgent isrequired to add the files to OCTOPUS.
3) Is the data being received via E-mail? In this case the MailAgent needs to be installed to receivethe mail directly and add it to OCTOPUS.

Wires, E-mails, RSS, SMS, Faxand other information sources
37
4) Is it an RSS feed? For RSS feeds we need to install RSS Agent which receives the feed and addsit to the OCTOPUS Database.
5) Are files being received via Fax? The Fax Agent is used to receive fax and add the to the database.
9.1. Working with OCTOPUS AgentAll agent share some properties. All of them can run as Windows services and they can run in thebackground on linux. Each of the agents can also be run from the command line, in that case it isnecessary to execute 'java -jar Name_of_Agent.jar' Agents will typically be installed by the OCTOPUSengineer as part of the initial installation. The most important feature for the administrator is accessingthe configuration interface, generally this can be started by running setup.cmd or config.cmd inthe directory where the agent is installed (typically C:\OCTOPUS\services\name_of_agent). If thesetup.cmd/config.cmd files are not available the config interface can also be run by executing thecommand: java -jar Name_of_Agent.jar -s (please note the last parameter -s).
Some of the configuration parameters are common to all of the agents – these parameters are foundin the tabs called: Log, Warning and Server (tab Server is not present in Wires Agent as it does notneed to connect to the database).
Log tab Here it is possible to set up the path for log files. It is recommended to put all logfiles into the directory: $OCTOPUS_installation_folder$/services/Name_of_the-agent/log.
E-mails can be sent automatically from OCTOPUS agents when errors are found,you will need to set up the log forwarding details for this to work. The Networklistener field can be kept as suggested by the agent, typically the netbios name. Onthe next line enter the smtp/mail server details, OCTOPUS requires anonymousaccess to the SMTP server. The check box on left side of this line must be checkedto enable the email notification. Enter the email addresses that logs should beforwarded to into the fields Immediately and Daily accordingly (use a comma toseparate them).
Agent Configuration Interface - Log Tab

Wires, E-mails, RSS, SMS, Faxand other information sources
38
Warning tab The warning tab allows you to specify a number of minutes of inactivity after whichthe agent will send a warning message to the email addresses added during the logforwarding setup.
Agent Configuration Tab – Warning Tab
Server tab The server tab is for configuration of the connection to the OCTOPUS Server.Enter the cluster name to the field Server. The username and password needs tobe created in the OCTOPUS client admin/user/list section, choose the agent typefrom the drop-down list below the toolbar and then create a user for each agentthat needs to connect. Then enter this username and password to the server taband click Test Server Connection – you should see a green highlighted messageindicating a successful connection. If the details are incorrect or the OCTOPUSserver is unavailable then you will see a red highlighted message 'Can't connect tothe server, see the logs for more information.'

Wires, E-mails, RSS, SMS, Faxand other information sources
39
Agent Configuration Interface – Server Tab
9.2. Wire Agent ConfigurationThe WiresAgent should be used when receiver (satellite, modem or any other device) is connected tothe computer through a serial (RS-232) communication port. Configuration details vary from deviceto device. Please ask your service provider for connection parameters. To add a new wire connection,click the ADD button on the PORTS tab. The following screenshot is an example of how it can lookafter completing the required details.

Wires, E-mails, RSS, SMS, Faxand other information sources
40
WiresAgent Configuration Interface – Add New Wire
In the Wire Agent, the Name field is just used to distinguish the sources.
The connection parameters required from the service provider include:
COM port settings: COM port (which port is device connected to), Baud rate, Data bits, Parity, Stop bit.
Information about the raw data: Charset, Start and End characters (Characters used to indicate the startand end of each wire message)
The received messages will be saved as text files in directory specified in the Location field, thereforea connection to the OCTOPUS server is not required.
Sometimes it is necessary to use a translation table, this allows you to convert characters to somethingmore suitable when the charset of the raw data differs from the charset on the computer running theWiresAgent. The characters which we don't want to display can be replaced by other characters.
The translation table needs to have the extension .trt. Each line should contain an entry like: A = B. Ais unwanted character, B is the replacement. B is always a string value. A can be in one of followingformats:
Table 9.1. Characters examples
Example Description
u99 Character 99 in Unicode
x99 Character 99 as hexadecimal value
99 Character 99 as decimal value
"x" String value
Example formulas: x4F = "c" | u0A = "r" | 125 = "z" | "\u" = "u"
When you have completed all the required fields in the ADD new wire dialogue, click OK to savethe changes. To modify these settings use select the wire from the list in the ports tab and click theEDIT button, or to delete it click DELETE.

Wires, E-mails, RSS, SMS, Faxand other information sources
41
9.3. Inject Agent configurationThe purpose of InjectAgent is to read any text file (whether received by WiresAgent or not) and insertit into the OCTOPUS database. Open the InjectAgent configuration interface and select the Wires tab,click the ADD button to open the new wire dialogue.
Inject Agent Configuration Interface – Wires Tab
The Name field is very important in the InjectAgent wire tab. Most of the wire filter rules will bebased on on this field, in the OCTOPUS admin/wire/rules section it as referred to as 'source'.
In example above, the Inject Agent is watching the folder /OCTOPUS/wiredata/APTN (Location)every 10 seconds (Interval) if new files (Watch events) are created. Also all files in the specifiedlocation would be processed on startup of Inject Agent.
After processing, the files are moved to folder /OCTOPUS/wiredata/APTN-done (After and To fields).The option force means that file with same name would be overwritten. Files that cannot be parsedwould be moved to /OCTOPUS/wiredata/APTN-failed any problems (Move Failed To:). It is notessential to move or copy the files after processing, the field 'To:' can be left blank.
Translation table field has same functionality as the Wires Agent translation table. Please see theprevious section for details.
In our example, the parser called IPTC7 (Title switch) is being used for the APTN wire. Inject agentcontains some other built-in parsers like NewsML or NewsML2 for XMLs. For wire formats that donot follow the industry standards, a custom script can be created. To start writing a new script choose'Custom script' or 'Custom JavaScript' in the combo called Parser and then click the button Edit (on theright of the Script field). Writing a custom script is quite simple, the required syntax and instructionsare available via the Help tab – see screenshot below.

Wires, E-mails, RSS, SMS, Faxand other information sources
42
InjectAgent Custom Script Editor
For advanced scripts (necessary in cases where not all wires in the feed are in the same format) it mightbe necessary to write a Custom JavaScript instead. On-screen help is available in the same in a tab aswith the Custom script. If you need assistance with writing these scripts, contact OCTOPUS Support.
9.4. RSS Agent ConfigurationThe general tab of the RSS agent configuration includes a few basic settings; most of the configurationfor RSS feeds can be done in the Admin section of the Octopus client. The settings available are:
Table 9.2. RSS configuration fields
Name Description
Interval How often the agent connects to OctopusServer inseconds.
Temp Path The path for storing temporary files.
Proxy Host If a proxy server is used, enter the hostname or IPhere.
Proxy Port If a proxy server is used, enter the port numberused.
Timeout Timeout in seconds, default is 30.
Description Count Number of characters to be included asdescription.
To add a new RSS feed, go to the Admin/Wires/RSS feeds section of the Octopus client and clickthe new button on the toolbar. You will see a dialogue box like the one below. Enter a name for thisRSS feed in the Title field. The URL of the RSS feed should be entered as it would be accessed in a

Wires, E-mails, RSS, SMS, Faxand other information sources
43
web browser into the URL field. Should credentials be required, just put them into URL like http://user:pass@server/location. Source is used for setting up wire filtering rules, so whatever you enter heremust match your entries in wire rules. You can also set up wire rules within this dialogue by choosingfrom the available wire folders in the Store To field and ticking the Change Filter Rule tickbox. Therefresh interval will determine how often the RSSAgent will check the RSS source for new items.Additional options include Save Offline and Extract Text from Page, choosing extract text from pagewill allow the body text for each RSS item to be viewed in Octopus.
New/Edit RSS source dialogue
9.5. SMS Agent ConfigurationOctopus SMS integration requires a GSM module to be connected via a serial connection to a machinewith the Octopus SMS agent installed. The general tab of the SMSAgent has a few basic options,much of the configuration can be done in the Admin/SMS section of the Octopus client. The Namefield on the SMSAgent general tab should match the name given to the SMS agent in the Admin/SMSAgent section of the client. The Port field is for entering the COM port that you have attachedthe SMS module to; and speed allows you to choose the appropriate baud rate.
The configuration options within the Admin/SMS section of the Octopus client are shown in the tableand screenshot below.
Table 9.3. SMS configuration fields
Name Description
Name This should match the name entered in theSMSAgent general tab.
PIN The PIN number for SIM card in the GSMmodule.
Sending Messages Enables Sending SMS messages using Octopuschat/instant messaging.
Receiving Messages Enables receiving SMS messages into a wiresfolder.

Wires, E-mails, RSS, SMS, Faxand other information sources
44
Name Description
Message Life How many SMS be stored on the GSM module.
Message Validity How long days the GSM module will try to deliverthe SMS to the number.
Message Encoding TEXT or UCS2.
Provider SMS center The phone number for the SMS providersmessage service center.
Enabled Tick to enable this SMS agent.
SMS agent configuration dialogue
To enable sending of SMS messages via Octopus Instant messaging or chat, GSM providers mustbe configured and users mobile numbers must be entered in their profile. To add GSM providers, goto Admin/Dictionary/GSM and click the NEW button on the toolbar. Enter the name of the serviceprovider, the dialling code eg +420, the SMS format e.g. TEXT, and lastly the SMS character limitsfor the subject and body of the message. Users must edit their profile, choose a GSM provider fromthe drop-down list in the contacts section and enter their mobile number in the field next to this.
9.6. Fax Agent ConfigurationOctopus FAX agent needs to be installed on a machine that has the fax modem connected. Installationand configuration of the standard agent tabs (Log, Warning and Server) is as described in the abovesection Working with Octopus Agents. The general tab of the FaxAgent has the following options:
Table 9.4. FAX configuration fields
Name Description
Name The name of this source as used for theconfiguration of wire sorting rules. Typically'FAX' would be used.

Wires, E-mails, RSS, SMS, Faxand other information sources
45
Name Description
Temp Path Path to store temporary image files, for examplec:\octopus\services\FAXagent\temp
Image width Scale Factor An option for resizing the image width by a scalefactor – the default is 1.0 which maintains theoriginal width.
Image Height Scale Factor An option for resizing the image height by a scalefactor – the default is 1.0 which maintains theoriginal height.
Port The serial port that the fax modem is connected to.
Baud Rate The baud rate used by the modem.
Fax Class Class of the fax modem, available options are 1or 2.
Timeout (seconds) Default value is 30
You will need to configure wire folders and wire sorting rules in the Administrationsection of theOctopus client to display the received faxes in Octopus, this procedure is described in the followingtwo pages.
9.7. Wire, RSS, FAX, SMS and Email foldersTo receive Wires, RSS feeds, E-mails, SMS and Faxes into OCTOPUS you must have already createdthe wire folders and wire filter rules. To create a new Wire folder, go to Administration/Wires/Wire &Email Folders and click the NEWbutton on the toolbar. Name the wire folder according to its intendedcontents, for example all wires from a source agency might be stored there, for example AP or Reuters,or all wires according to category such as Sport or Economics. There are two settings related to purgingof wire messages to avoid storing thousands of old wire messages in the database, Number of days –messages older than the set number of days will be purged, and Number of messages – once this limitis reached the oldest messages beyond this limit will be deleted. If you want to allow wires to be editedby OCTOPUS users or to have locally created wires, you can tick the boxes to 'Apply rules to manuallyupdated messages' or 'Apply rules to manually created messages' to ensure that local content is sortedin the same way. The drop-down list 'After Wire Update:' includes options to have manually updatedmessages to be moved to the top of the list or to have a copy made with a version number assigned to it.
Wire Folder List and Create New Wire Folder dialogue
Wires, E-mails, RSS, SMS, Faxand other information sources
46
9.8. Wire Filter RulesWire filter rules are always applied when a new message is inserted into the database by one of theOCTOPUS Agents. OCTOPUS will apply all rules starting at the top of the list matching the newmessage.
Every rule has two parts: a condition (what we are looking for: source, keywords, category etc.) andan action (what will happen to the message: it will be moved to a folder, it will be marked with acolour etc.).
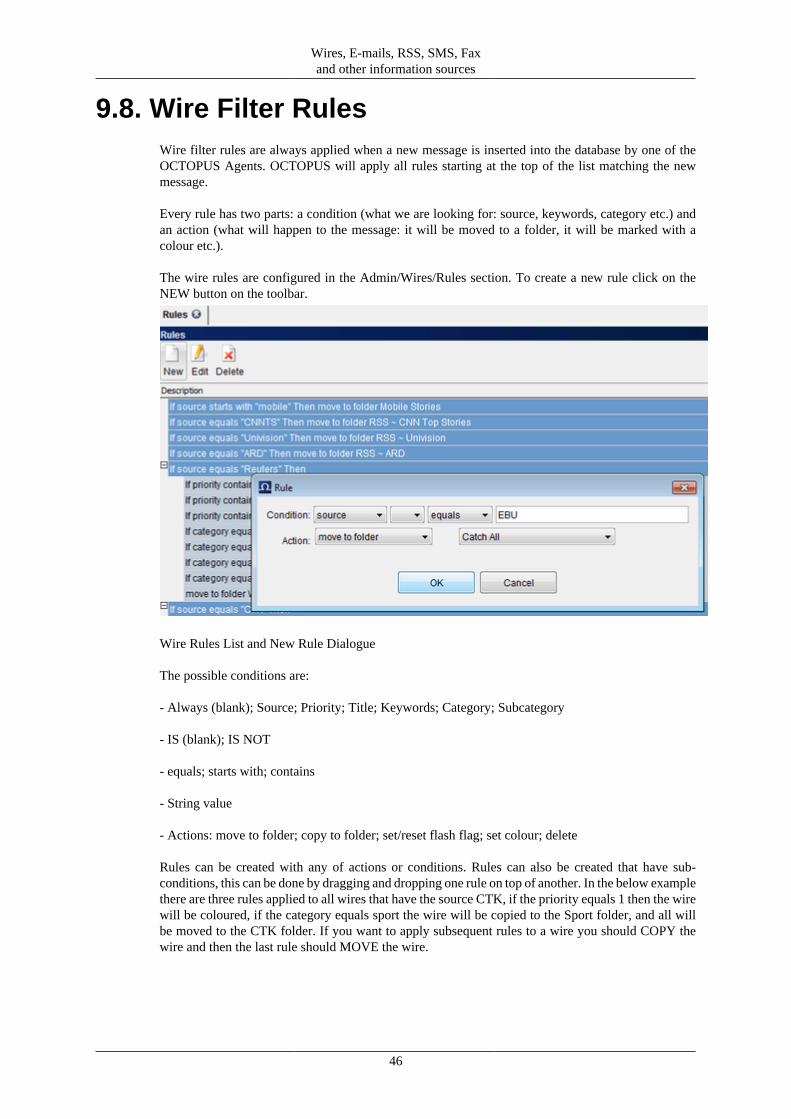
The wire rules are configured in the Admin/Wires/Rules section. To create a new rule click on theNEW button on the toolbar.
Wire Rules List and New Rule Dialogue
The possible conditions are:
- Always (blank); Source; Priority; Title; Keywords; Category; Subcategory
- IS (blank); IS NOT
- equals; starts with; contains
- String value
- Actions: move to folder; copy to folder; set/reset flash flag; set colour; delete
Rules can be created with any of actions or conditions. Rules can also be created that have sub-conditions, this can be done by dragging and dropping one rule on top of another. In the below examplethere are three rules applied to all wires that have the source CTK, if the priority equals 1 then the wirewill be coloured, if the category equals sport the wire will be copied to the Sport folder, and all willbe moved to the CTK folder. If you want to apply subsequent rules to a wire you should COPY thewire and then the last rule should MOVE the wire.

Wires, E-mails, RSS, SMS, Faxand other information sources
47
Wire Rules
When creating the rules you can use also the keywords like {TITLE}, {PRIORITY}, {CATEGORY},{SOURCE}, {SUBCATEGORY} and {KEYWORDS}, for example set subcategory to {TITLE}.

48
Chapter 10. Notification rulesThe administrator has the option to force flash wires to appear in all users system widgets and can alsoapply notification rules to all users system widgets (see the next page).
To force all flash wires to appear in all users system widget, there is an option in Admin/System Setup/Wires tab which must be ticked – Force Flash to Everyone. Wires rules must also be configured tomake wires flash, typically it would be a rule that makes all priority 1 or urgent wires flash.
The Notification rules drop-down list in the dialogue below allows enabling/disabling of notificationrules and allowing only private notification rules.
System Setup – Wires Tab
To apply a public notification rule to all users system widgets, while logged in as an administratorright click on the system widget (the one on the left) and choose configure widget. This will open thebelow dialogue which will allow you to choose the rules to apply from the list on the right, then clickthe Admin button followed by OK.

Notification rules
49
Admin Configure Widget Dialogue

50
Chapter 11. Stories exportIt is possible to export rundowns, slugs, stories, wires and media from OCTOPUS into a structuredfile or files. There are many situations where this could be useful ranging from export for a website,for a separate subtitling system, an archiving system or even a prompter that doesn't support MOS.
The export framework is highly configurable, so if you need a proprietary export format then pleasecontact OCTOPUS Support to discuss this. We will need to create a custom export script to meet therequirements.

51
Chapter 12. Custom print formsCustom print forms can be created to match criteria desired by the customer when printing therundown, script or prompter. The current print forms can be found under Administration/Print/Forms.If this menu item is missing you have to add it into your menu - see the admin guide.
All printouts are rendered at the server upon request issued by client. As the clients can specify differentfonts for printouts (of script) these fonts must be present at the server and available to JVM.
Rundown list (that is the rundown slugs view) printing is done dynamically in the server code so thatthe user gets printed same columns as on screen
If you want to override default print forms you have to name the print form as follows:
• Script.jrxml - to override the default script form
• PrompterScript.jrxml - to override the default prompter form
• Wires.jrxml - to override the default wires form
• Contact.jrxml - to override the default contact form
• Script.jrxml - to override the default script form
The priority of form used to print specialized output:
1. $SERVER_ROOT/print directory on server
2. Print forms stored in octopus.server.system.print package in Server.jar
This means that the server will first look into the print directory on the server and if the print formwith specified name is not found it will use the print form in the Server.jar
12.1. User case• If you are missing some specific columns in the default print forms.

Custom print forms
52
12.2. Tool bar
Print toolbar
• New - to add new print form
• Edit - to edit selected print form
• Download - to download selected print form templates.
• Rundown - the template for the rundown print form without predefined fields
• Story Folder - the template for story folder print form without predefined fields

Custom print forms
53
• Script - the template used when printing the Script or Prompter. The difference between printingthe Script and Prompter is that there is a field $F{TECH_CONTENT} which is used only whenprinting the script
• Wires - the template used when printing the wire message with predefined fields.
• Contact - the template used when printing the contact

Custom print forms
54
• Rundown (+fields) - the template for the rundown print form with all available fields
• Story Folders (+fields) - the template for the story folder print form with all available fields

Custom print forms
55
• Styles - styles used when printing. Slugs have special print style based on its type to differentiatebetween regular slug and segment for example.
• Upload - to upload the .jrxml or .jrtx files to the server
12.3. Designing print formThis is done using report forms (Jasper Reports). Forms are created in visual designer iReport. NewestiReport is not compatible so bear in mind that you need version 4.5.0.
You can find particular version in iReport Archive [http://sourceforge.net/projects/ireport/files/iReport/]
You can find following sections in the right pane called Report Inspector
• Styles - the default styles are for all print form templates but you can override the setting by thesestyles
• Parameters - list of all parameters available in this form
• Fields - list of all fields available in this form
• Variables - list of all variables available in this form
• Scriptlets - list of all scripts
• Page Header - here you can define how the page header will look like.
• Column Header - here you can define how the column header will look like. This is the place wherethe labels of the columns are used - $P{LBL_%name_of_the_column%}. P means Parameter, LBLmeans label. So this will take the name of the column defined in octopus AS Fields.

Custom print forms
56
Edit expression - Parameter
• Detail 1 - this is additional band - you can add your own band if you want. This is the place whereyou actually defining the look of the content - $F{SLG_%name_of_the_column%} - $F meansField, SLG means slug, SRY means story. This expression takes the content of the particular slug/story field.
Edit expression - Field
• Detail 2 - you can define the band just to separate the content
• Page Footer - here you can define how the page footer will look like.
List of all fields is available in the print form template with all fields. You can easily change the sizeof the boxes, also the position. You can also delete the fields if you want.
Every field has own properties available in the left pane. There is a plenty options see just few ofthem: position and size of the filed, colours of the field, style, stretch options, print options, text fieldproperties and text properties like font and alignment, spacing etc.
Right click on the file will give you another options

Custom print forms
57
Customized print form
You have to always search for desired option for example Bands have height, every box has height,and then you have a font size. So you have to be aware what exactly do you want to change if thesize of the box or just the text or both.
If you select the name of some band, for example "Column Header" you can define the height.
You can find another objects in "Palette" pane which you can use during the designing of the printform.
You can check whether the print form is fine by compiling - it is the Compile Report button next tothe zoom out button in the toolbar. It will give you the results and descriptions of the problems.
If the print form is without errors you can switch from the Design mode into the Preview mode. TheiReport will ask you about the content of the fields in the form and will generate preview of the formaccording to your inputs.
Once you are done in iReport with the print form template save it under different name for example"rundown-test".

Custom print forms
58
Customized print form
Now you can go into the octopus client Administration/Print/Form and click on New select the type"Rundown" and write the name of the form which you want to see in Print/Custom.... Click on the ...right next to the Open and select your modified print form and press OK
12.4. New print formYou can add new print form. Click on the New and you will get new window:
Add new print form
• Type - you have to select the type according to your needs.
• RUNDOWN - when adding a print form for rundown - it will appear in rundown under Print/Custom...

Custom print forms
59
• STORY_FOLDER - when adding a print form for
• STORY - when adding a print form for
• WIRE - when adding a print form for wire messages
• CONTACT - when adding a print form for contact
• STYLES - when modifying printing styles
• Name - this name will be shown in the Print/Custom...
• Filename - this can be used when the file was already located under /octopus/server/print/ whenoctopus server service started.
• Local File - this can be used when uploading the file to the server from the local computer.
Add new print form
You have to get the message "Print forms were successfully reloaded" in the left down part of thestatus bar. If there is some problem with the form you will get the message here too.

Custom print forms
60
New print form rundown-test in the menu
Then you can open any rundown and click on the Print select Custom...and you will find that templatein rolldown box called "Form".
Print/Custom...

61
Chapter 13. Commercial agentThe CommercialAgent is the program responsible for sending and receiving data to a 3rd partycommercial/traffic system. Specifically it will send a list of all the commercial breaks in active Octopusrundowns and receive commercial inserts from the traffic system which are then added to the breaksin Octopus rundowns.
Note
Users with Masteredit user rights can delete commercial slugs from the rundown, to limit thepossibility of an inexperienced user deleting a commercial from the rundown, the Masteredituser right should be granted sparingly.
13.1. Commercial agent installation1) Create a user of CommercialAgent type in the Octopus client Admin/Users section.
2) Install CommercialAgent, copy CommercialAgent files to folder \OCTOPUS$\services\CommercialAgent.
3) Edit the file CommercialAgent.xml file, as in the following example:
4) Install agent as a service by executing 'CommercialAgent.exe install' in command line. It will useCommercialAgent.xml to set parameters. You can check the new key HKEY_LOCAL_MACHINE\SYSTEM\CurrentControlSet\Services\Octopus Commercial Agent to see if everything is as required.
To uninstall is straightforward – run CommercialAgent.exe -uninstall from a command line.
There are some configuration options available in the Octopus client Admin/System Setup/Commercial tab. You can change the TCP/IP port, by default it is 35000. There are also two checkboxes available here, Commercial Agent Inserts Stories and Commercial Agent Sends Descriptionof Errors.
To test if the Octopus Commercial Agent is working correctly, first make sure you have an activerundown with at least one commercial slug, then you can connect from a command line by typing'telnet localhost 35000' and enter BL. CommercialAgent should then return a break list.
62
Chapter 14. CG control configurationTo use OCTOPUS CG Control, there are several other administrative tasks that must be completed(in addition to CG templates already covered in the section Step 5 Jingles and CG Templates). CGcontrol supports Chyron or Aston drivers via a serial connection. Therefore, amongst other settings,it is necessary to choose the appropriate driver, COM port settings and charset.
14.1. CG devicesThis section can be found in the menu under Administration/CGControl/CG Devices. This is a simplelist of the different CG devices that will be used with OCTOPUS CG Control. The only options on thetoolbar are NEW, EDIT or DELETE. The NEW and EDIT dialogue just allows entry or modificationof a single field, the NAME of the device. Devices in this list can later be chosen by journalists whenadding CG's to rundowns and can be used to filter CG's according to device in the CG Control section.
14.2. CG connectionCG Connection is a more detailed dialogue containing most of the required settings, this can be foundin the menu under Administration/CGControl/CG Connections. Again the toolbar has only NEW,EDIT and DELETE buttons. A screenshot of the NEW/EDIT dialogue window is displayed on thenext page. Enter the name of the connection and choose the CG device (as created in CG DEVICESsection) that this will be used with in the Basics section.
The CG settings section needs to be filled with details relevant to the CG device: you can choosebetween Chyron or Aston drivers, enter the path to the Font directory, enter the Target page numberand choose the charset that needs to be used with this device. Supported charsets include ASCII,Unicode, UTF8 and custom (described in the next section CG encoding).
COM settings contains all the necessary configuration options for the serial communication. Choosethe Port that the device will be connected to on the OCTOPUS client used for CG control. Baud rate,data bits, stop bits and parity can be chosen from the drop-down lists according to the settings usedby your device.

CG control configuration
63
New CG Device Connection dialogue
14.3. CG encodingTo make a customised translation table or character map to be used for CG device encoding, accessAdmin/CGControl/CG encoding in the menu. This can be used for translation of Unicode charactersto Ascii characters. To create a new table click the NEW button on the toolbar. Enter a name for thenew translation table. The dialogue has a button FILL WITH ASCII, this might be a good startingpoint for the new table. You can then use the ADD button to add a new row to the table. In each rowyou will have to add a valid unicode hexadecimal entry in the first column and in the third columna decimal in the range 0-255 (you can also enter two decimal entries separated by a semicolon forexample 48;48 for 00). Other options in this dialogue include EXPORT XML TO CLIPBOARD andIMPORT XML FROM CLIPBOARD.

64
Chapter 15. Advanced setupAdvanced system configuration options can be found under Admin/System Setup. These settings aresystem-wide, all users will be affected by anything that you change here. Some of these settings, suchas those under the System tab, should not be modified by the administrator unless advised to do soby OCTOPUS support. The below tables list and describe the available settings in the System Setupsection tabs.
Table 15.1. General Tab
Name Description
Timing Standard Number of frames per second, available standardsare PAL, NTSC and NTSCD.
Default Reading Speed The read-rate that will be used to calculate theduration of script text when a presenter is notassigned or the assigned presenter has not set theirread-rate.
Default Reading Speed Text You can change the text used in the reading speedcalculation dialogue to the local language, theexact length of the text does not matter.
First Day of Week Select the day of the week that will be the first dayin the Scheduler.
Drag and Drop Threshold Pixels This sets the range of pixels for the minimummovement required for a drag and drop and therange around the pointer that will start scrollingwithin a tab.
Table 15.2. Story Tab
Name Description
Add Version Number to copied stories When ticked a version number in brackets will beadded to the title of copied stories.
Delete History when Archiving When checked, the history versions of storieswill be removed from archived stories. This isrecommended to prevent wasting DB space.
Total History Versions The number of previously saved versions that areavailable in script history.
Trash Story Days limit The number of days that stories will remain beforebeing automatically purged.
Status Field Content Option to display story approval status text,initials of modifier or both in the status field.
Rundown deep archive export path The path where rundowns set to be deep archivedwill be exported to.
Story folder deep archive export path The path where stories in folders set to be deeparchived will be exported to.
Rundown Lock Picker Group A user group that has the right to edit a lockedrundown. This is different to a user rights group- ifnecessary add the User Groups section to the mainmenu, the group must be Public-Read Only. Usersin the group specified here are able to modifylocked rundowns no matter how lock extents are

Advanced setup
65
Name Description
configured, the user that locked the rundown andadministrators are similarly unaffected.
Rundown Lock Extent Definition of parts of the rundown will be lockedby locking the rundown. -OTHER - create newslug, story archive, skip, move, story delete,edit (existing) show, archive show, delete show-SCRIPT - save script, save folder story editdialog, story commit (production requirement),inline editing -SLUG - renumber, save rundownslug edit dialog, setManualStart, inline editing
Table 15.3. Wires Tab
Name Description
Read Text Colour The colour of read wire title text.
Flash Text Colour The colour of flash wire title text.
Flash Highlight Colour The colour of flash wire highlighting.
Read Flash Text Colour The colour of read flash wire title text.
Read Flash Highlight Colour The colour of read flash wire highlighting.
Force Flash to Everyone All users will receive flash notification.
Default Source Field Value The option to display the source of manuallycreated wires as either Username/Fully Qualifiedfolder name/Short folder name.
Table 15.4. CG Tab
Name Description
Width Default width of a CG template in pixels
Height Default Height of a CG template in pixels
CG duration mode Whether to include IN and OUT or IN andDURATION time fields for CG's.
Under System tab are advanced system settings and should not be modified unless advised byOCTOPUS support.
Table 15.5. System Tab
Name Description

66
Chapter 16. Defining main menuThe main menu allows users to access the different OCTOPUS sections. The menu is highlyconfigurable, it is possible to add/remove all sections to match station's workflow. Once the main menuhas been defined, access to some sections can be restricted to particular user groups via user rights.
Menu Structure Configuration Tab
In order to modify the menu, go to Administration/Menu/Menu Structure. There are three buttonsNEW, EDIT and DELETE allowing users to create a new menu item, to edit an existing item or todelete an existing menu item.
To create a new menu item, click the NEW and then choose the required menu item type and typeits display name as you would like it to appear in the menu (see image below). There are two generaltypes of menu item: folder and others. Folders are designed to contain other items, thus it is possible to
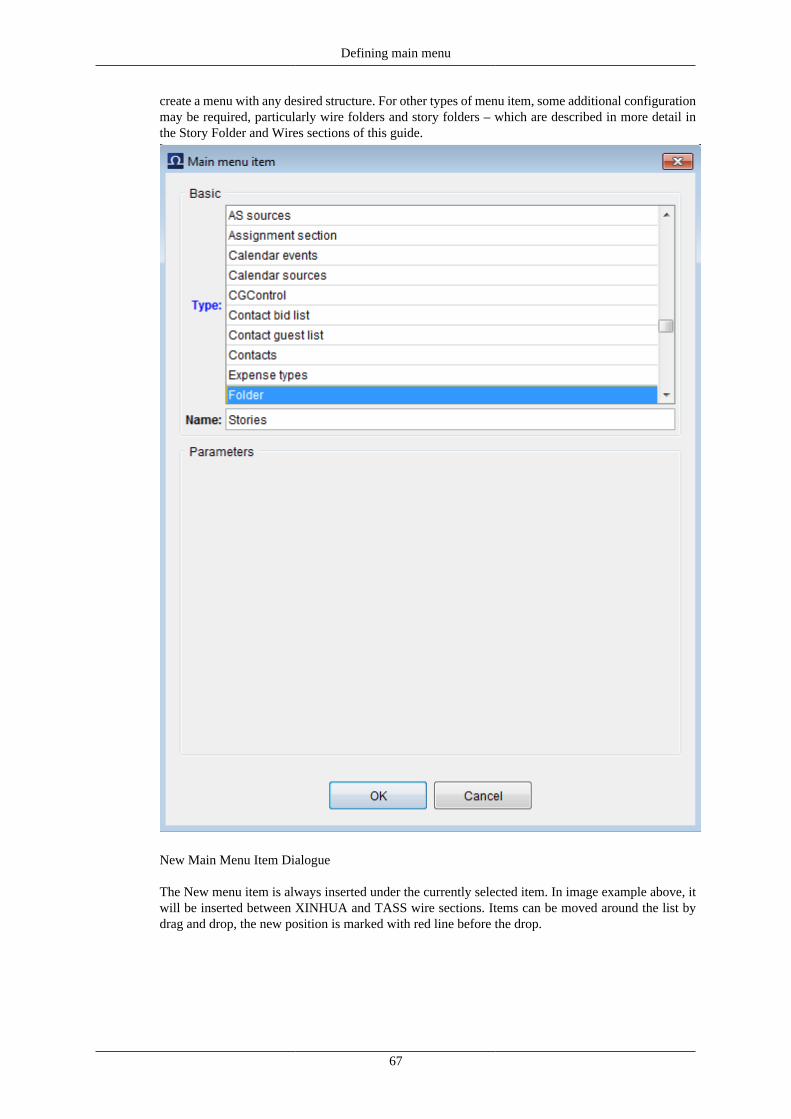
Defining main menu
67
create a menu with any desired structure. For other types of menu item, some additional configurationmay be required, particularly wire folders and story folders – which are described in more detail inthe Story Folder and Wires sections of this guide.
New Main Menu Item Dialogue
The New menu item is always inserted under the currently selected item. In image example above, itwill be inserted between XINHUA and TASS wire sections. Items can be moved around the list bydrag and drop, the new position is marked with red line before the drop.

Defining main menu
68
Red line indicating the destination for Drag and Drop
There is no limit to the number of items in menu or the number of subfolders.
The following table lists the available Main Menu items:
Table 16.1. Main Menu Items
Type Description Options
About OCTOPUS splash screen Name
ActiveX Inline 3rd party ActiveX visualcomponents
Name | Plugin
Admin Banned WordDictionary
List of banned words Name
Admin CG Device Connections Connections parameters of CGdevice
Name
Admin CG Device Encodings Encoding translation table forCG device
Name
Admin CG Devices List of CG devices Name
Admin CG Templates List of CG templates Name
Admin contact bid statuses List of contact bid statuses Name
Admin dictionary breaks Breaks Name
Admin dictionary country Countries Name
Admin dictionary department Departments Name
Admin dictionary GSM GSM providers Name
Admin dictionary channel Channels for shows/rundowns Name
Admin dictionary rundown Show types Name
Admin dictionary title Titles Name
Admin export formats Export scripts with editor Name
Admin field dictionary Dictionaries for custom fields Name
Admin folder structure Menu structure - items Name

Defining main menu
69
Type Description Options
Admin folder type Menu items types Name
Admin forms Forms Name
Admin fulltext Fulltext Name
Admin online users List of online users Name
Admin RSS feeds List of RSS feeds Name
Admin rundown templates Show/Rundown templates Name
Admin search web List of webs used for searchingthe Internet
Name
Admin story description Story descriptions Name
Admin story descriptiontemplate
Templates for story descriptions Name
Admin story element set Sets of story elements Name
Admin story elements Story elements Name
Admin story folders Story folders Name
Admin story lock manager List of all currently lockedstories
Name
Admin story state Story statuses Name
Admin story tags Story script tags Name
Admin story templates Story templates Name
Admin system setup OCTOPUS system setup Name
Admin user group list User groups and rights Name
Admin user list List of users Name
Admin wire and email folder Wire, Mail, RSS folders Name
Admin wire rule Wire, Mail, RSS string rules tofolders
Name
Advanced fulltext search Advanced search options Name
CGControl Control application for CGdevice – sends the text
Name
Contact bid list List of bids based on contacts Name
Contact guest list List of confirmed bids Name
Contacts List of contacts Name
Folder Special menu type used forbetter structures in menu
Name
Jingles List of Jingles Name
Media Media Name
MOS activations List of active rundowns for eachMOS device
Name
MOS devices MOS devices Name
My stories Stories created by currentlylogged user
Name
Notification Rules Notification rules used bywidgets
Name
Remote Octopus Connection to different Octopusserver (not part of cluster)
Name | Remote server name |Remote folders

Defining main menu
70
Type Description Options
Rundown List of rundown(s) displayed inmenu
Name | Quick rundowns | None |Range | On-Air | Current| Timed|Named
Rundown playlist Graphical view of current shows Name
Rundown schedule List of scheduled shows Name
Rundown scheduler List of plans for scheduling Name
Stories archive Story archive Name
Stories trash can Story trash can Name
Story folder Story folder Name | Story folder name| Displaying modes (Calendarmode, Edit story mode, Subtreemode)
URL Link to Internet site Name | URL | Start in newwindow
User groups User groups for messaging Name
Wires and Email Link to wire or email folder Name

71
Chapter 17. Server monitoringYou can check the status of the servers under Administration/Admin server in the menu. If this menuitem is missing you can add it into the menu, see the defining-main-menu chapter.
Print toolbar
Here you can see:
• Mode - server role, typically MASTER for MAIN and SLAVE for BACKUP and DEGRADED ifthe server was launched in the wrong order and DEAD if the server is not running
• Name - MAIN, BACKUP
• Addresses - IP address of the servers
• SSL - status of the encrypted communication - enabled / disabled
• Last time alive - when was the server available
• # of clients - count of currently connected clients
• Database mode - MASTER and READ_ONLY
• Database lag - this number is the difference between the last transactions on the server. In the idealenvironment it should be zero, or at least some small number (smaller the 1 000 000) - this dependson the frequency of the transaction exchange between the servers. You can notice that if the numberincrease it is also decrease from time to time. This is how you can monitor the replication state. Ifthe number grows too much it means that the replication is not running properly.
• Current xlog - current transaction log

72
Chapter 18. Server maintenanceOctopus services are set to start automatically so if you need to restart the Octopus server there are noextra steps needed. PostgreSQL and Octopus Server and Octopus services will start automatically.
18.1. Single server solution1. All services on the server are set to automatic start so administrator does not have to do anything
after server restart.
18.2. Streaming replicationMAIN server - all octopus and postgres services are set to automatic start.
BACKUP server - all octopus services are set to manual start. PostgreSQL service is set to automaticstart. Just the PostgreSQL is running.
1. You can restart the server in any order you want as the feature of the streaming replication is thatit can connect from backup to main even after few hours of being disconnected.
18.3. Cluster solutionMAIN server - all octopus and postgres services are set to automatic start.
BACKUP server - all octopus services are set to manual start. PostgreSQL service is set to automaticstart. OctopusServer service and PostgreSQL service are running.
Important
Do not restart OctopusServer service on the MAIN server if the OctopusServer service isrunning on the BACKUP server - it will break the replication and it will cause automaticfailover.
1. BACKUP server - stop the OctopusServer service, then you can restart the server.
2. MAIN server - you can restart the server if the OctopusServer service on MAIN server is stopped.After server starts check that PostgreSQL and OctopusServer service started automatically.
3. BACKUP server - check if PostgreSQL service started automatically (it should), then you can startOctopusServer service manually - if the OctopusServer service is running on MAIN.