aztec learning system administration guidepascua.azteclearning.com/aztec/admin/documents/5.3.2...
TRANSCRIPT
Aztec Learning System Administration Guide
The contents of this guide and the associated learning materials are the property of Aztec Software Associates, Inc. and are copyrighted. Reproduction in whole or in part is authorized only for use with the Aztec Learning System.
For additional information or assistance, please contact Aztec Software at:
Website: www.aztecsoftware.com
E-mail: [email protected]
Phone: 973-258-0011
Fax: 973-258-0010
©2009 Aztec Software Associates, Inc.


WELCOME
Thank you for choosing the Aztec family of learning products. You have purchased quality workforce and educational software to meet your students’ or clients’ needs. You have also become a valued customer of a company that prides itself on premier service and support.
We know you will be satisfied with our products. Our courseware has been checked before implementation and we do not foresee any problems. However, should you encounter any difficulties or find yourself in need of technical assistance, contact us immediately at (800) 273-0033. Our skilled technical staff will be pleased to help you.
We welcome you as a customer and look forward to helping you with your future needs.


TABLE OF CONTENTS AZTEC LEARNING SYSTEM INSTALLATION .................................................................................... 5 ADMINISTRATION SYSTEM LOG IN ................................................................................................... 5 MAIN MENU ........................................................................................................................................... 7 STUDENTS ............................................................................................................................................ 7 EDIT STUDENTS ................................................................................................................................... 8 Creating Students ................................................................................................................................... 8 Student Names ....................................................................................................................................... 8 Passwords .............................................................................................................................................. 9 Search for Existing Students .................................................................................................................. 9 Delete Students .................................................................................................................................... 10 Edit Student Class Enrollment .............................................................................................................. 10 Edit Student Customized Assignments ................................................................................................ 10 Edit Student Mode of Operation ........................................................................................................... 12 Edit Student Demographics .................................................................................................................. 12 EDIT INSTRUCTORS/CLASSES ........................................................................................................ 14 New Instructor....................................................................................................................................... 14 Edit Instructor Rights ............................................................................................................................ 14 New Class............................................................................................................................................. 18 Edit Class Content ................................................................................................................................ 18 Creating a Class Assignment using the Modules, Group Modules, Curricula Option .......................... 19 Class Assessment Test ........................................................................................................................ 21 Class Properties (Within Class Content Window) ................................................................................ 22 Add Students to Class .......................................................................................................................... 23 Edit Student Customized Assignments ................................................................................................ 24 Rename Class ...................................................................................................................................... 25 Class Properties (Main Instructors/Class Menu) .................................................................................. 26 Classes Containing Lessons ................................................................................................................ 26 Testing Properties ................................................................................................................................ 27 Configuration ........................................................................................................................................ 27 Advanced Settings, Class Properties ................................................................................................... 28 Move Class ........................................................................................................................................... 29 Copy Class ........................................................................................................................................... 30 EDIT MODULES................................................................................................................................... 30 Edit Module Categories ........................................................................................................................ 31 CREATING MODULES ........................................................................................................................ 31 New Module.......................................................................................................................................... 31 Module Problem Set ............................................................................................................................. 33 Module Properties ................................................................................................................................ 34 Module Properties – Advanced Settings .............................................................................................. 35 Module Configuration ........................................................................................................................... 36 Add Category Wizard ........................................................................................................................... 37 CURRICULA ........................................................................................................................................ 40 PROBLEM SETS ................................................................................................................................. 41 Creating Test and Practice Questions.................................................................................................. 42 VIEW REPORTING .............................................................................................................................. 44 Student Course Detail Report............................................................................................................... 45 Student Curriculum Report ................................................................................................................... 47 Course Activity Report .......................................................................................................................... 48 Class Report ......................................................................................................................................... 49 Student Lock Out Report ...................................................................................................................... 49 Individual Education Plan Report (CDL Report) ................................................................................... 50 Print Certificate ..................................................................................................................................... 51 Custom Certificate ................................................................................................................................ 52
Student Usage Report .......................................................................................................................... 53 Student Attendance Report…………………………………………………………………………………… 55 MAINTENANCE ................................................................................................................................... 58 Logoff Facilities..................................................................................................................................... 58 Student Lockout Facility ....................................................................................................................... 58 System Status....................................................................................................................................... 59 OPTIONS FUNCTIONS ....................................................................................................................... 60 Set Password Options .......................................................................................................................... 60 Options Advanced Settings .................................................................................................................. 61 Set Student Defaults............................................................................................................................. 61 Student Timeout…………………………………………………………………………………………….......62 Set Student Demographic Options ....................................................................................................... 63 Certificate Options ................................................................................................................................ 64 GROUP MODULES ............................................................................................................................. 64 Group Module Properties ..................................................................................................................... 65 COMPUTER DIRECTED LEARNING.................................................................................................. 68 Library.................................................................................................................................................. 69 THE DATABASE UTILITY PROGRAM ............................................................................................... 70 Backup Database ................................................................................................................................. 71 Restore Database................................................................................................................................. 71 Optimize Database ............................................................................................................................... 71 Schedule Backup LAN version only ................................................................................................... 71 LEARNING SYSTEM LOG IN.............................................................................................................. 73 Passwords ............................................................................................................................................ 73 Learning System Navigation ............................................................................................................. 74
AZTEC LEARNING SYSTEM INSTALLATION Please refer to the installation instructions for Version 5.2 located in the Aztec product binder. If you cannot locate the instructions, please call (800) 273-0033 or e-mail [email protected] and we will provide you with instructions.
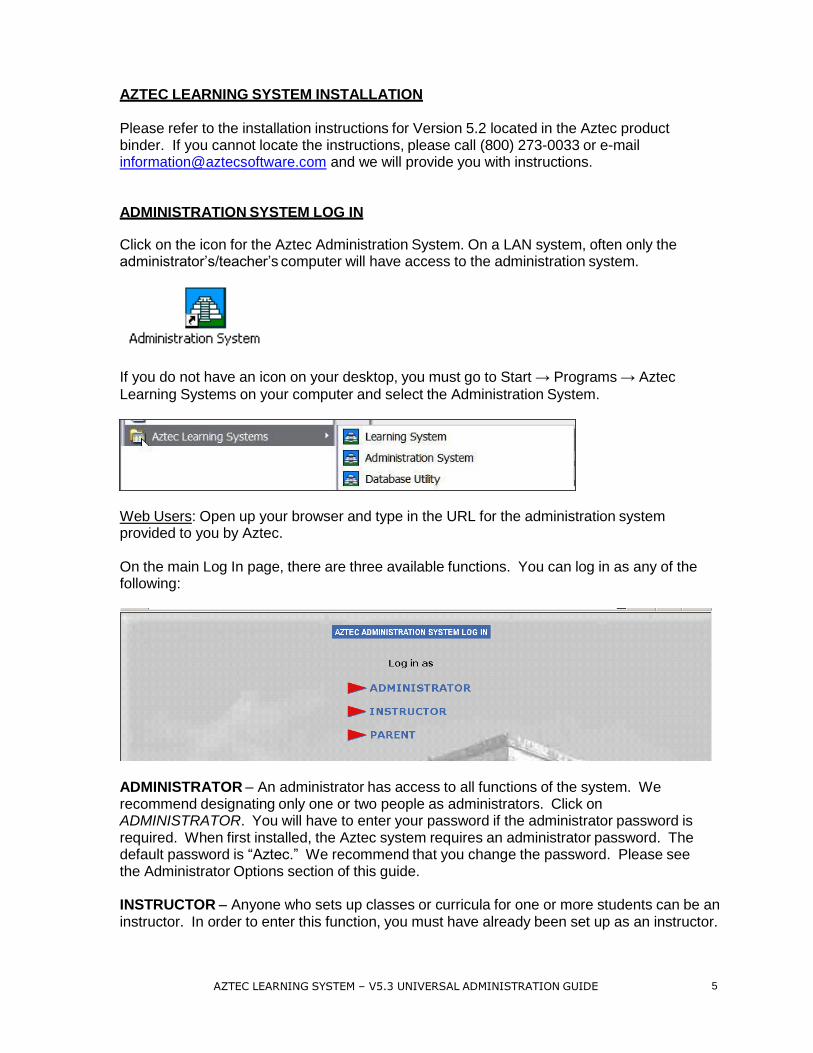
ADMINISTRATION SYSTEM LOG IN Click on the icon for the Aztec Administration System. On a LAN system, often only the administrator’s/teacher’s computer will have access to the administration system.
If you do not have an icon on your desktop, you must go to Start → Programs → Aztec
Learning Systems on your computer and select the Administration System.
Web Users: Open up your browser and type in the URL for the administration system provided to you by Aztec.
On the main Log In page, there are three available functions. You can log in as any of the following:
ADMINISTRATOR – An administrator has access to all functions of the system. We recommend designating only one or two people as administrators. Click on ADMINISTRATOR. You will have to enter your password if the administrator password is required. When first installed, the Aztec system requires an administrator password. The default password is “Aztec.” We recommend that you change the password. Please see the Administrator Options section of this guide.
INSTRUCTOR – Anyone who sets up classes or curricula for one or more students can be an instructor. In order to enter this function, you must have already been set up as an instructor.
AZTEC LEARNING SYSTEM – V5.3 UNIVERSAL ADMINISTRATION GUIDE 5
6 AZTEC LEARNING SYSTEM – V.5.3 UNIVERSAL ADMINISTRATION GUIDE
By clicking on INSTRUCTOR, a list of all registered instructors will appear on the screen. Click on the appropriate instructor name. You will have to enter your password if the instructor password is required. This will bring up the Instructor Main Menu in the Administration System. The administrator, at his or her discretion, may expand individual instructor rights to allow more access to the administration system.
PARENT – Function is available for parents to see their children’s records. This is done by clicking on PARENT, then highlighting the student’s name in the box. A student ID will have to be entered if a student password is required. This function brings up a menu that will provide access to individual student records.
7 AZTEC LEARNING SYSTEM – V.5.3 UNIVERSAL ADMINISTRATION GUIDE
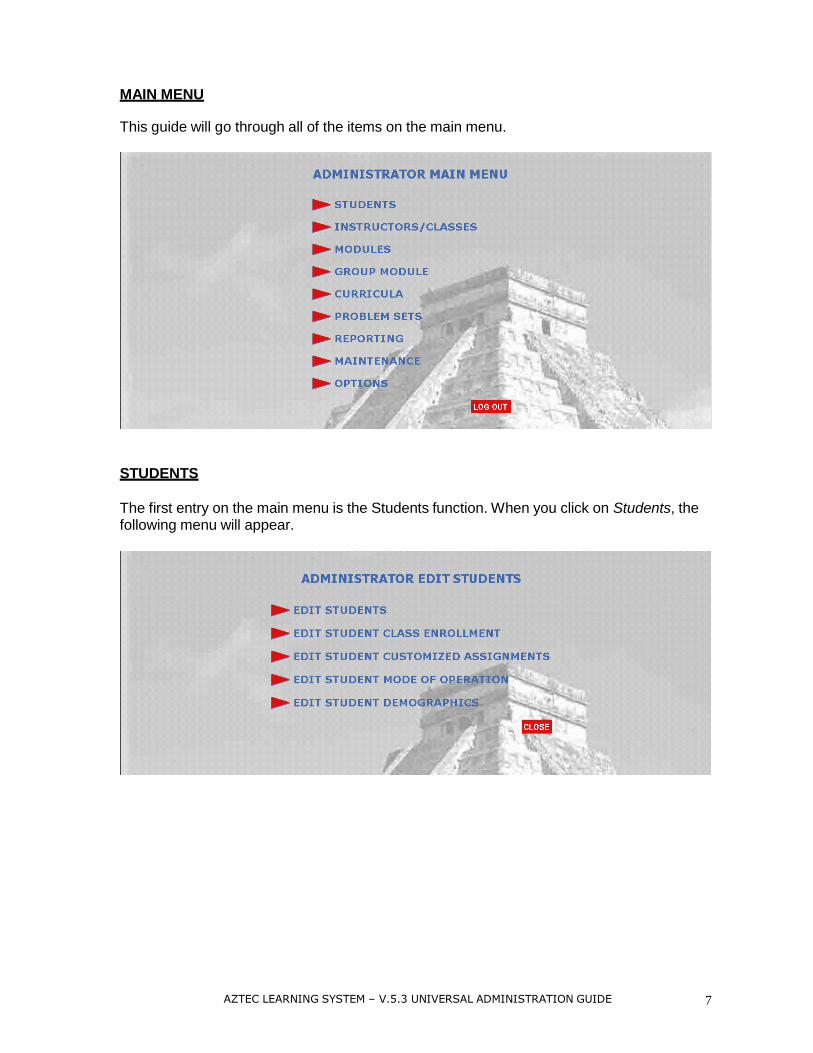
MAIN MENU This guide will go through all of the items on the main menu.
STUDENTS
The first entry on the main menu is the Students function. When you click on Students, the following menu will appear.
8 AZTEC LEARNING SYSTEM – V.5.3 UNIVERSAL ADMINISTRATION GUIDE
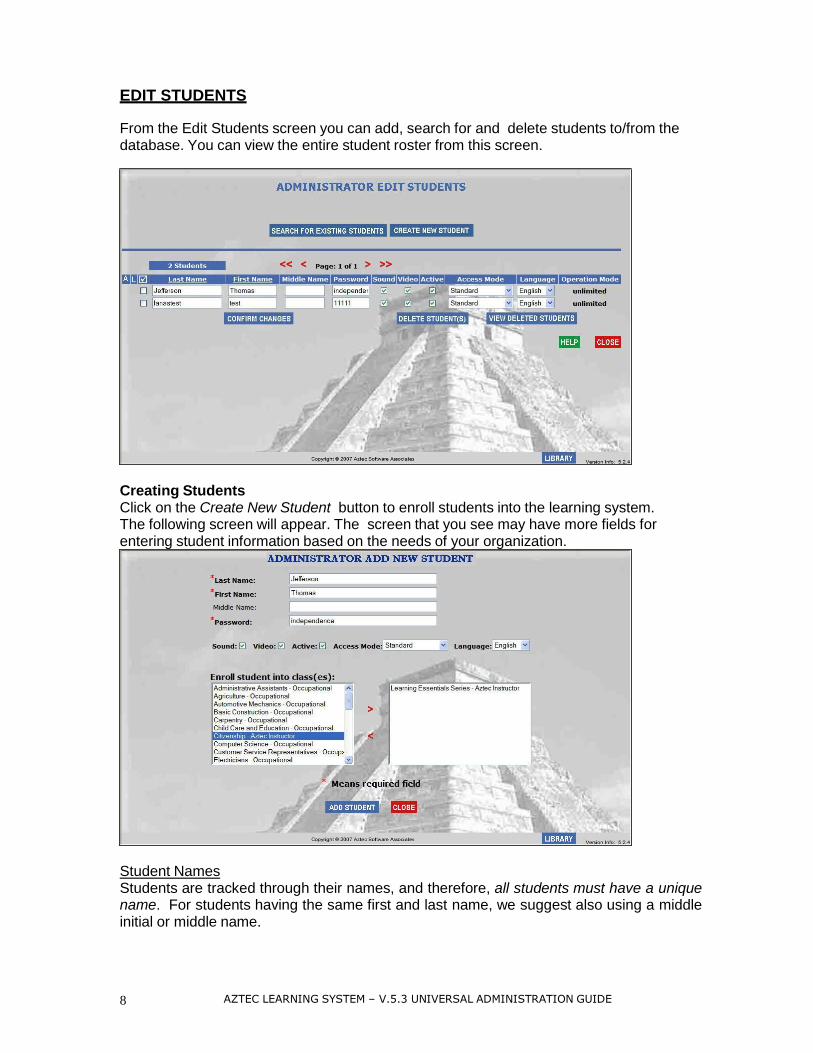
EDIT STUDENTS From the Edit Students screen you can add, search for and delete students to/from the database. You can view the entire student roster from this screen.
Creating Students Click on the Create New Student button to enroll students into the learning system. The following screen will appear. The screen that you see may have more fields for entering student information based on the needs of your organization.
Student Names Students are tracked through their names, and therefore, all students must have a unique name. For students having the same first and last name, we suggest also using a middle initial or middle name.

9 AZTEC LEARNING SYSTEM – V.5.3 UNIVERSAL ADMINISTRATION GUIDE
Passwords All students must have a password. Passwords are case sensitive. They must contain a minimum of five and a maximum of twelve letters or numbers. Passwords do not have to be unique; students may have the same password.
Entering Student Information
1. Enter the student’s last name, first name, password and any other required information identified with a red asterisk.
2. Tab over or move the curser to different fields. 3. Enabling Sound and Video in the learning system default to ON (check marked) but
can be changed. Video is still in development. 4. Student status defaults to ACTIVE. If ACTIVE is unchecked, the student’s records
remain in the database, but the student is unable to access the learning system. 5. Access Mode will alter the system to accommodate hearing or visually impaired
students. This feature is still in development. 6. Language selects the default language for the audio in the learning system.
You may enroll the student into an existing class(es) from this screen. There is a box labeled Enroll student into class(es) in the lower half of the screen. Scroll down the student’s class assignment and highlight it. You may select more than one title at a time by holding down your Ctrl key. Click on the “>” button to assign the student to the class. The class title will appear in the box on the right. You can do this as many times as you wish. To remove a class, click on the title and use the “<” button.
Once you have finished entering the student’s information and assignments, click the ADD STUDENT button. When you have finished entering all new students click CLOSE.
You will be brought back to the Edit Students screen. Search for Existing Students To search for a student in the database, click on the Search for Existing Students button at the top of the Edit Students screen. Type in the known information about the student into the fields at the top of the screen. The information can be as detailed as a last name or password, or as limited as a first initial. Click on the green Search button. The search results will appear.
To return to the main Edit Students screen, click on the Search for Existing Students button and then click on the green Search button. Make sure that all of the search fields are empty.
Student Roster The lower half of the Edit Students menu contains the entire student roster. You may edit the information of currently enrolled students such as passwords by checking the box to the left of the student’s name and then changing the student information. The additional settings presented on this screen can also be changed here. When you have finished making your changes, click on the CONFIRM CHANGES button.
The “A” and “L” columns next to the student’s name identify a student or parent, in some cases, as currently logged on to the administration system (“A”) or the learning system (“L”).

10 AZTEC LEARNING SYSTEM – V.5.3 UNIVERSAL ADMINISTRATION GUIDE
Delete Students To delete a student, click on the box to the left of the student’s name and then click the DELETE button. To see a list of deleted students, click on the View Deleted Students button. * Note: Once a student’s records are deleted, you can NEVER retrieve them!
Edit Student Class Enrollment
This section enables an administrator or instructor to assign a student to multiple classes from one menu.
1. Use the drop-down box to select one student name at a time. 2. Under All Classes, click on the class or classes you want to assign to the student. 3. Click the arrow pointing to the right to assign the class to the students. 4. To remove a class, click on the name of the class under Student Class List. 5. Click on the arrow pointing to the left.
In order to access the learning system, students must be assigned to at least one class at all times.
Edit Student Customized Assignments
11 AZTEC LEARNING SYSTEM – V.5.3 UNIVERSAL ADMINISTRATION GUIDE
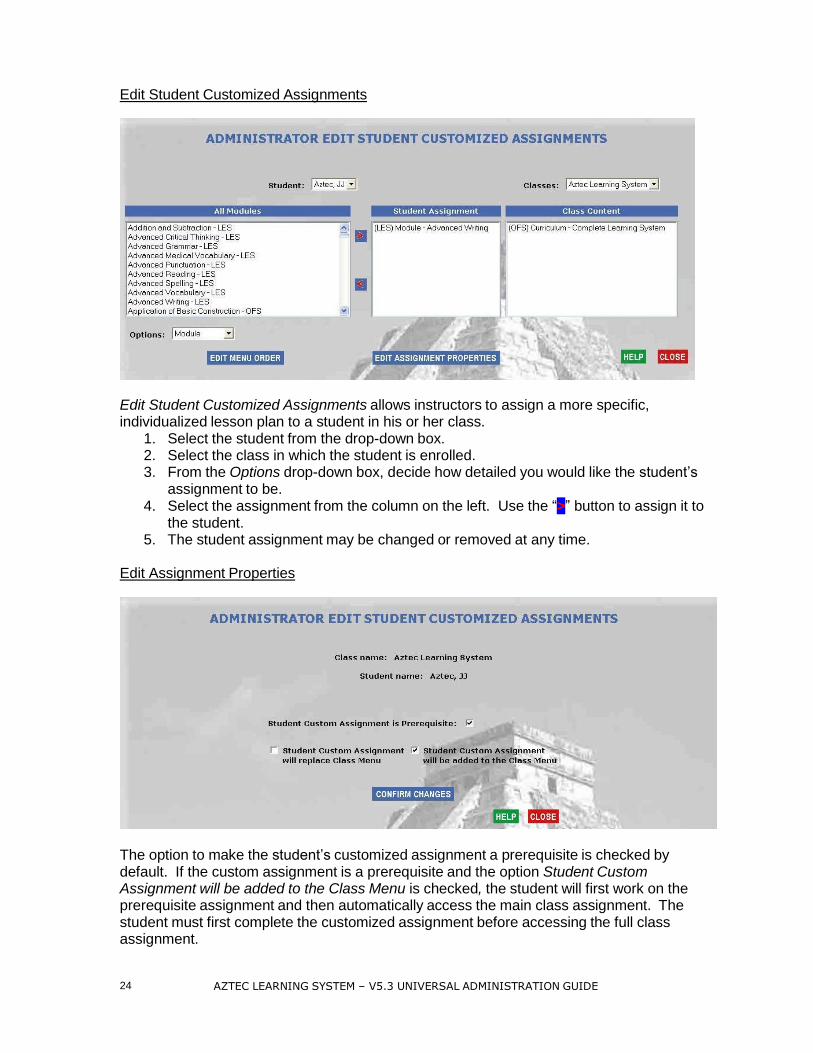
Edit Student Customized Assignments allows instructors to assign a more specific, individualized lesson plan to a student in his or her class. Select the student from the drop- down box.
1. Select the class in which the student is enrolled. 2. From the Options drop-down box, decide how detailed you would like the student’s
assignment to be. 3. Select the assignment from the column on the left. Use the “>” button to assign it to
the student. 4. The student assignment may be changed or removed at any time.
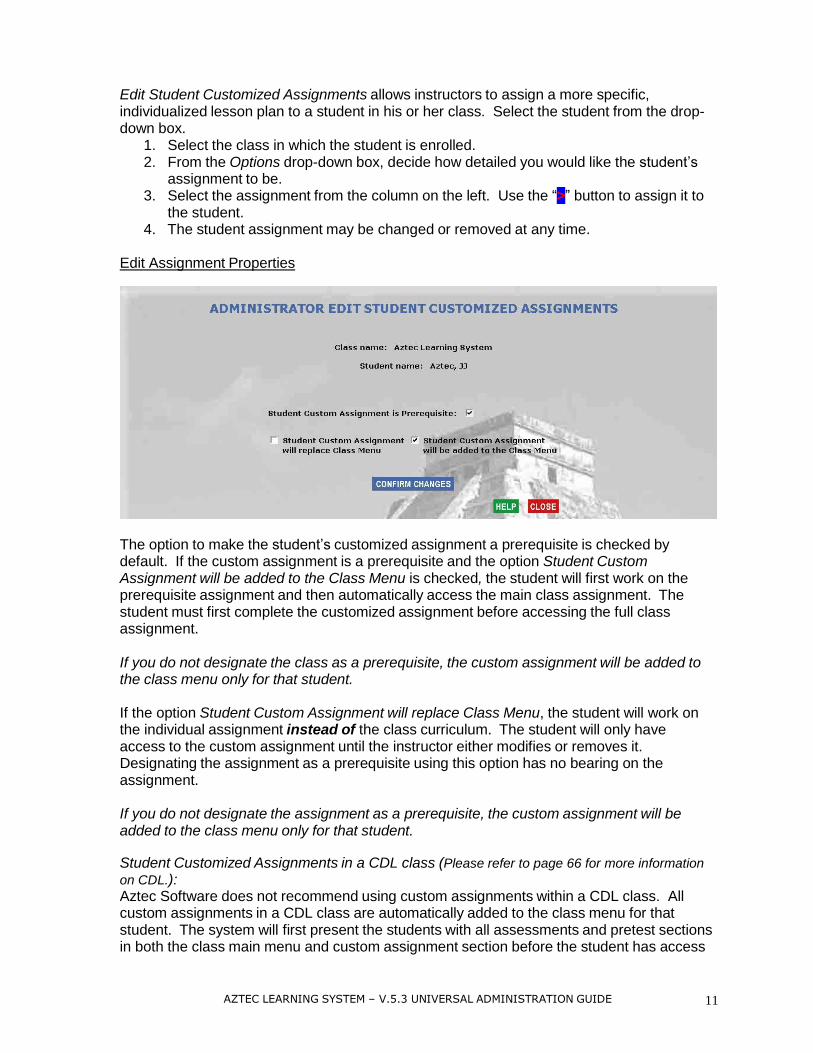
Edit Assignment Properties
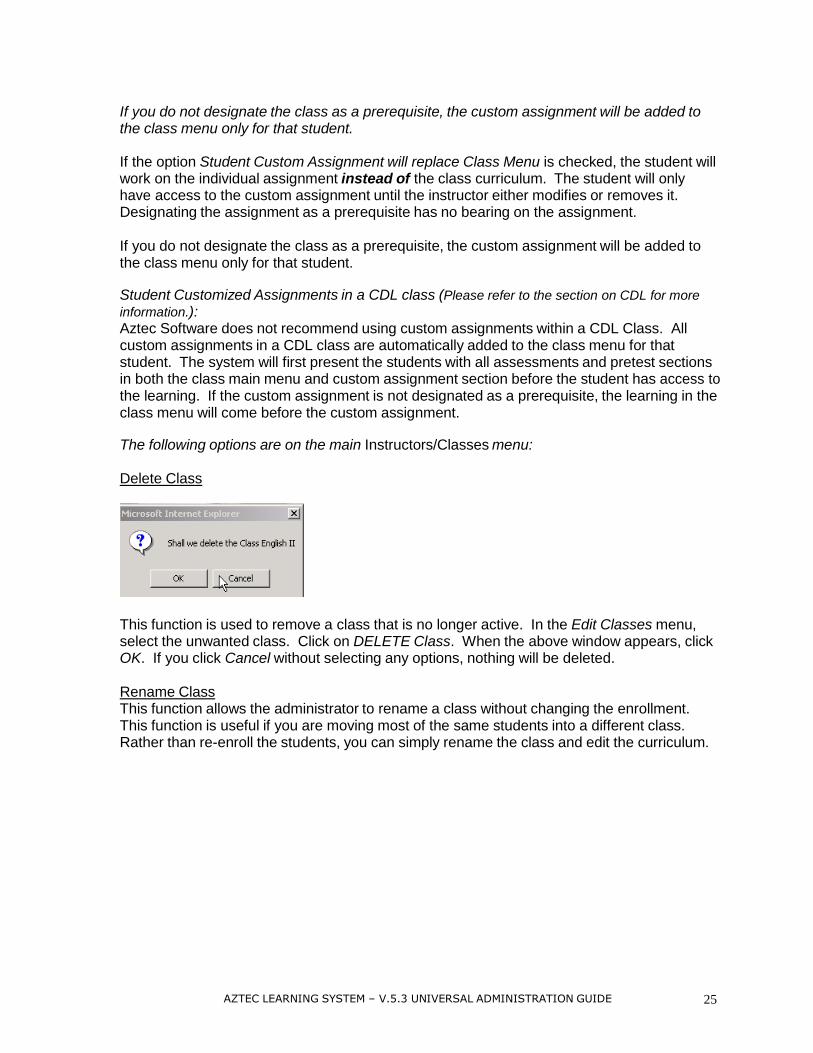
The option to make the student’s customized assignment a prerequisite is checked by default. If the custom assignment is a prerequisite and the option Student Custom Assignment will be added to the Class Menu is checked, the student will first work on the prerequisite assignment and then automatically access the main class assignment. The student must first complete the customized assignment before accessing the full class assignment.
If you do not designate the class as a prerequisite, the custom assignment will be added to the class menu only for that student.
If the option Student Custom Assignment will replace Class Menu, the student will work on the individual assignment instead of the class curriculum. The student will only have access to the custom assignment until the instructor either modifies or removes it. Designating the assignment as a prerequisite using this option has no bearing on the assignment.
If you do not designate the assignment as a prerequisite, the custom assignment will be added to the class menu only for that student.
Student Customized Assignments in a CDL class (Please refer to page 66 for more information
on CDL.): Aztec Software does not recommend using custom assignments within a CDL class. All custom assignments in a CDL class are automatically added to the class menu for that student. The system will first present the students with all assessments and pretest sections in both the class main menu and custom assignment section before the student has access
12 AZTEC LEARNING SYSTEM – V.5.3 UNIVERSAL ADMINISTRATION GUIDE
to the learning. If the custom assignment is not designated as a prerequisite, the learning in the class menu will come before the custom assignment.
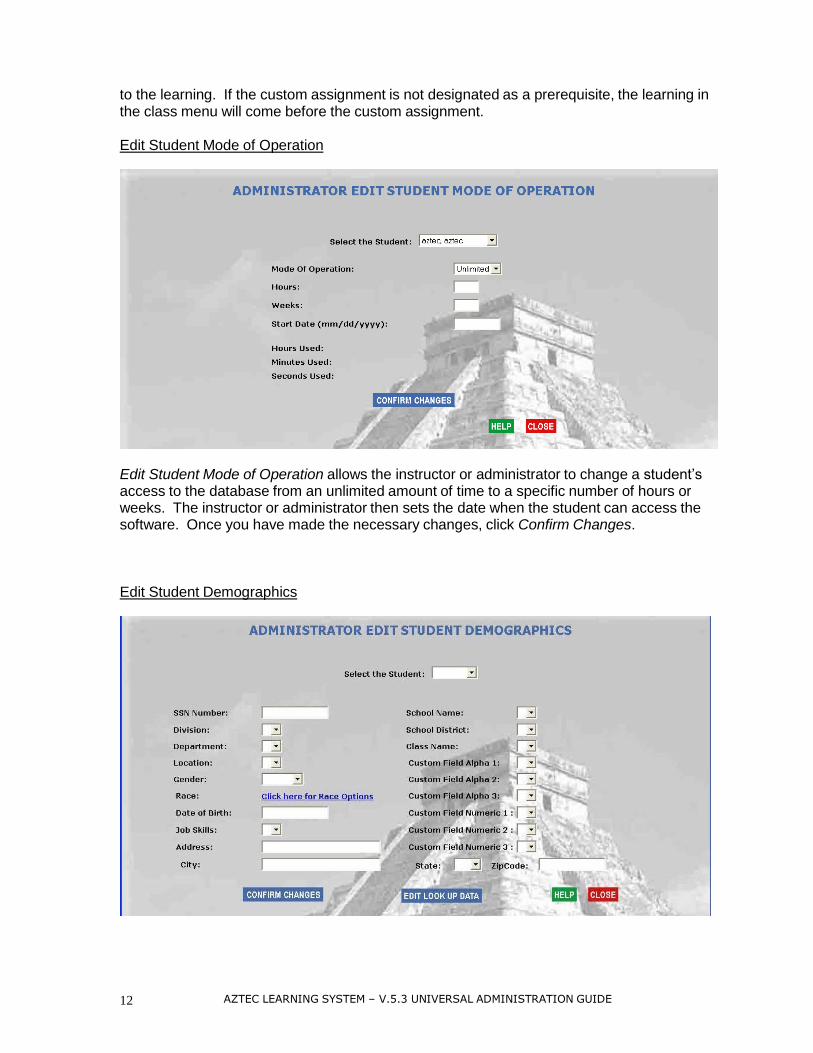
Edit Student Mode of Operation
Edit Student Mode of Operation allows the instructor or administrator to change a student’s access to the database from an unlimited amount of time to a specific number of hours or weeks. The instructor or administrator then sets the date when the student can access the software. Once you have made the necessary changes, click Confirm Changes.
Edit Student Demographics
13 AZTEC LEARNING SYSTEM – V.5.3 UNIVERSAL ADMINISTRATION GUIDE
The administration system allows student demographic information to be input for reporting purposes. Use the drop-down menus to input or make changes to the student’s demographic data. You must click Confirm Changes for the new information to be saved.
Administrators have the ability to customize which options appear in the drop-down boxes of the demographic fields.
In order to change or update the drop-down boxes, click on Edit Look Up Data.
1. Use the arrow in the drop-down box to choose the data category you would like to edit.
2. Click on Edit. A window will appear where you can change the existing values or add a new value.
3. When you are done making changes, click on Confirm Modify. If you do not want to make changes, click on Close Window.
4. You will need to exit and reenter the Edit Student Demographics menu for the new information to appear in the drop-down menus.
The administrator can designate required fields in the Options section of the administration system. You will see a red “O” or “R” next to the values on the screen. “O” stands for optional fields to be filled in. “R” stands for required fields.
EDIT INSTRUCTORS/CLASSES
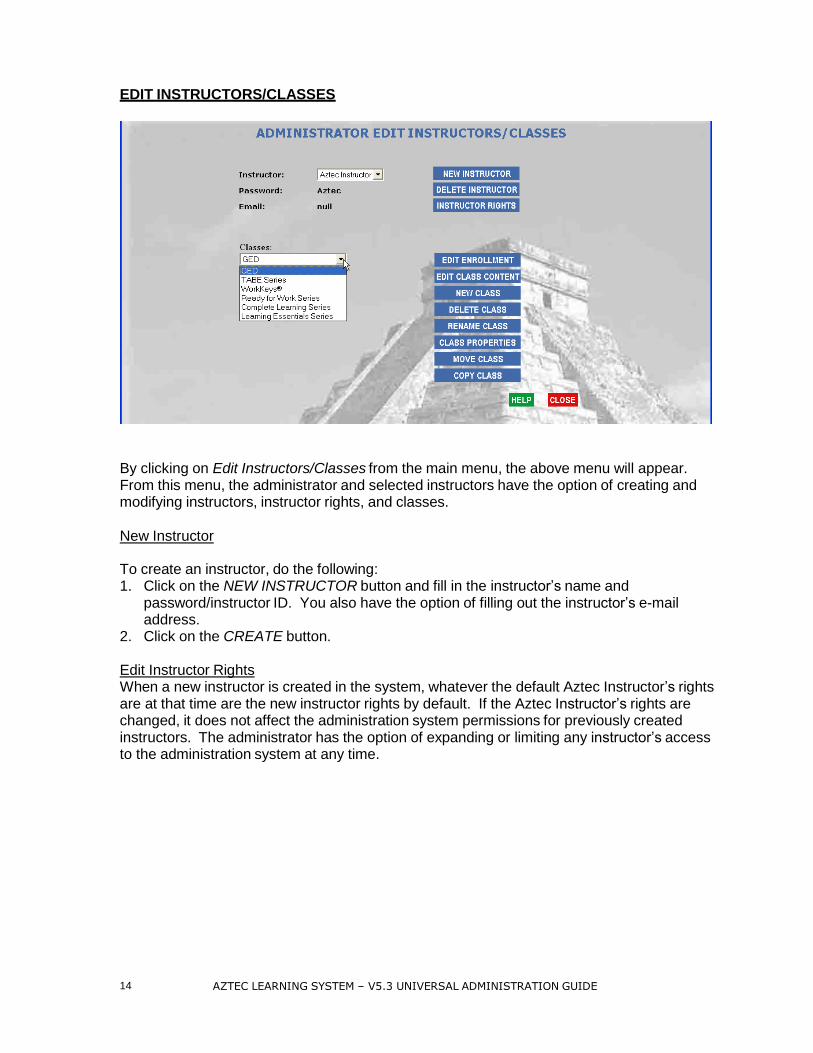
By clicking on Edit Instructors/Classes from the main menu, the above menu will appear. From this menu, the administrator and selected instructors have the option of creating and modifying instructors, instructor rights, and classes.
New Instructor
To create an instructor, do the following: 1. Click on the NEW INSTRUCTOR button and fill in the instructor’s name and
password/instructor ID. You also have the option of filling out the instructor’s e-mail address.
2. Click on the CREATE button. Edit Instructor Rights When a new instructor is created in the system, whatever the default Aztec Instructor’s rights are at that time are the new instructor rights by default. If the Aztec Instructor’s rights are changed, it does not affect the administration system permissions for previously created instructors. The administrator has the option of expanding or limiting any instructor’s access to the administration system at any time.
14 AZTEC LEARNING SYSTEM – V5.3 UNIVERSAL ADMINISTRATION GUIDE
15 AZTEC LEARNING SYSTEM – V.5.3 UNIVERSAL ADMINISTRATION GUIDE
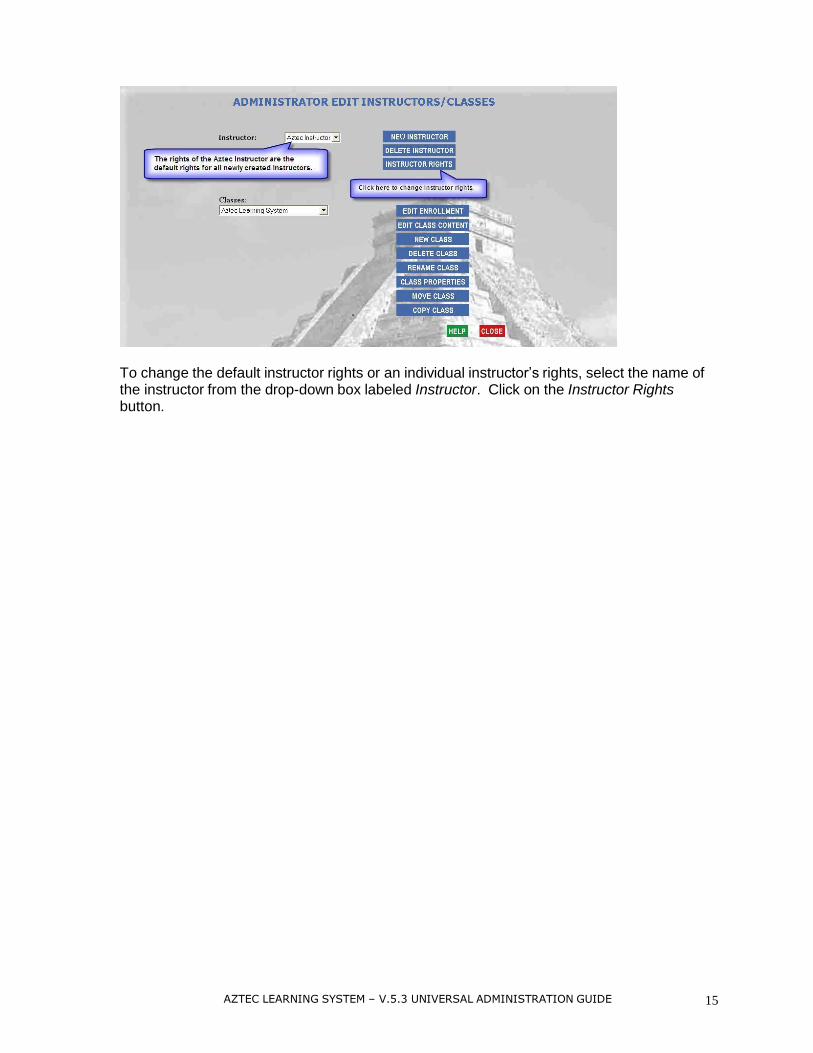
To change the default instructor rights or an individual instructor’s rights, select the name of the instructor from the drop-down box labeled Instructor. Click on the Instructor Rights button.
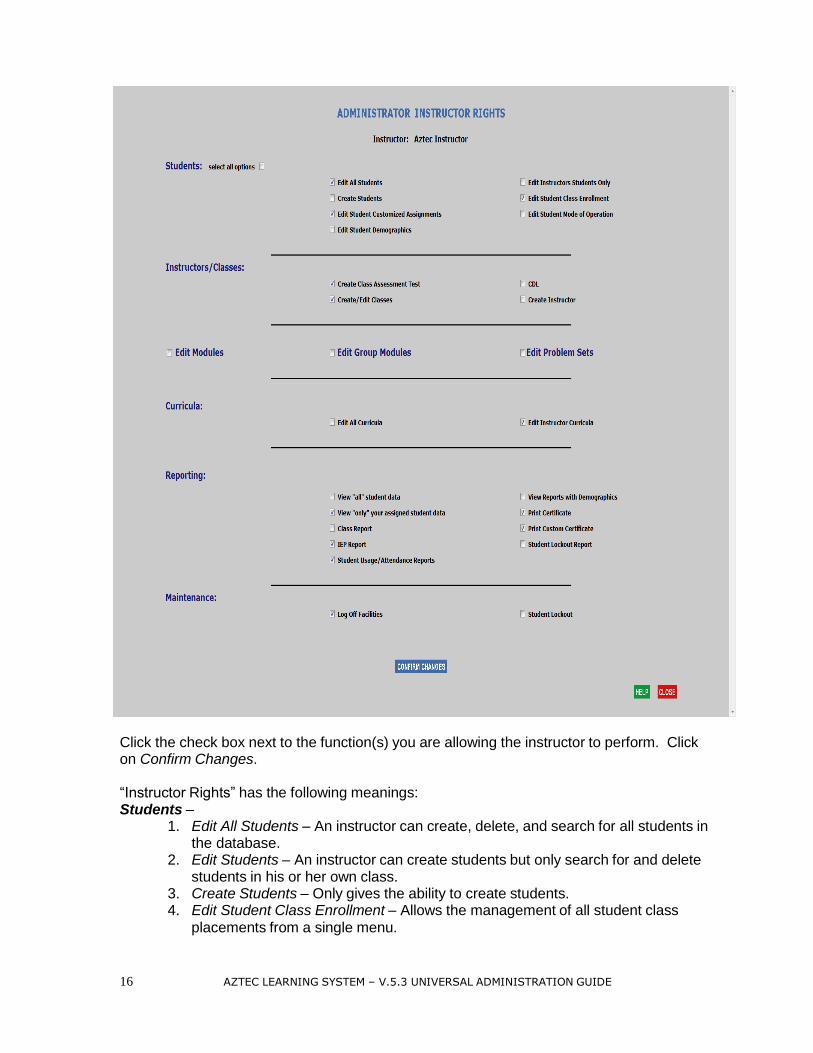
Click the check box next to the function(s) you are allowing the instructor to perform. Click on Confirm Changes.
“Instructor Rights” has the following meanings: Students –
1. Edit All Students – An instructor can create, delete, and search for all students in the database.
2. Edit Students – An instructor can create students but only search for and delete students in his or her own class. 3. Create Students – Only gives the ability to create students. 4. Edit Student Class Enrollment – Allows the management of all student class
placements from a single menu.
16 AZTEC LEARNING SYSTEM – V.5.3 UNIVERSAL ADMINISTRATION GUIDE
17 AZTEC LEARNING SYSTEM – V.5.3 UNIVERSAL ADMINISTRATION GUIDE
5. Edit Student Customized Assignments – Alternative menu location to manage
student customized assignments. Only gives access to students already in the
instructor’s classes.
6. Edit Student Demographics – Allows access to and editing of student demographic information.
Edit Classes – The instructor may create a class and assign students to the class. CDL – Allows the instructor to create a Computer Directed Learning class Create Instructor – Create new instructors. Edit Modules, Groups Modules – Ability to create and edit modules and/or group modules. Edit Problem Sets – Create new test questions, copy existing problem sets. Edit All Curricula – Ability to edit curricula created by other instructors. Edit Instructor Curricula – The instructor may create curricula that can be used by all instructors and assigned to multiple classes. View “all” students data – View reports for all students. View “only” your assigned students – Pull reports for the instructor’s classes and students. Class Report – The simplest reporting option available. A single summary report that pulls all student activity for an entire class. It is automatically included in the above reporting options. IEP Report – The IEP Report documents a student’s Individual Educational Plan within a CDL class and charts the student’s progress in that class. View Reports with Demographics – Allows the instructor to pull reports containing sensitive demographic information. Print Certificate – Allows the instructor to print a completion certificate for students Print Custom Certificate – Allows the instructor to create and print a customized certificate for students. Student Lock Out Report – The Student Lock Out Report logs all of the students who failed the same post-test three times and were locked out of the system. Logoff Facilities – Allows the instructor to manually log students out of the learning system. Unlock Students – Allows a student to reenter the learning system after he or she has failed the same post-test three times.
Please note there are certain options in Instructor Rights that will not be activated unless other complimentary and logical options are also activated.
Select an Existing Instructor Click on the drop-down arrow in the instructor box and select the instructor’s name you would like to work with.
Delete an Instructor In order to delete an instructor, all of his or her classes must have been previously deleted.
1. Select the instructor so that his or her name appears in the window. 2. Click on the DELETE INSTRUCTOR button. 3. Click OK.
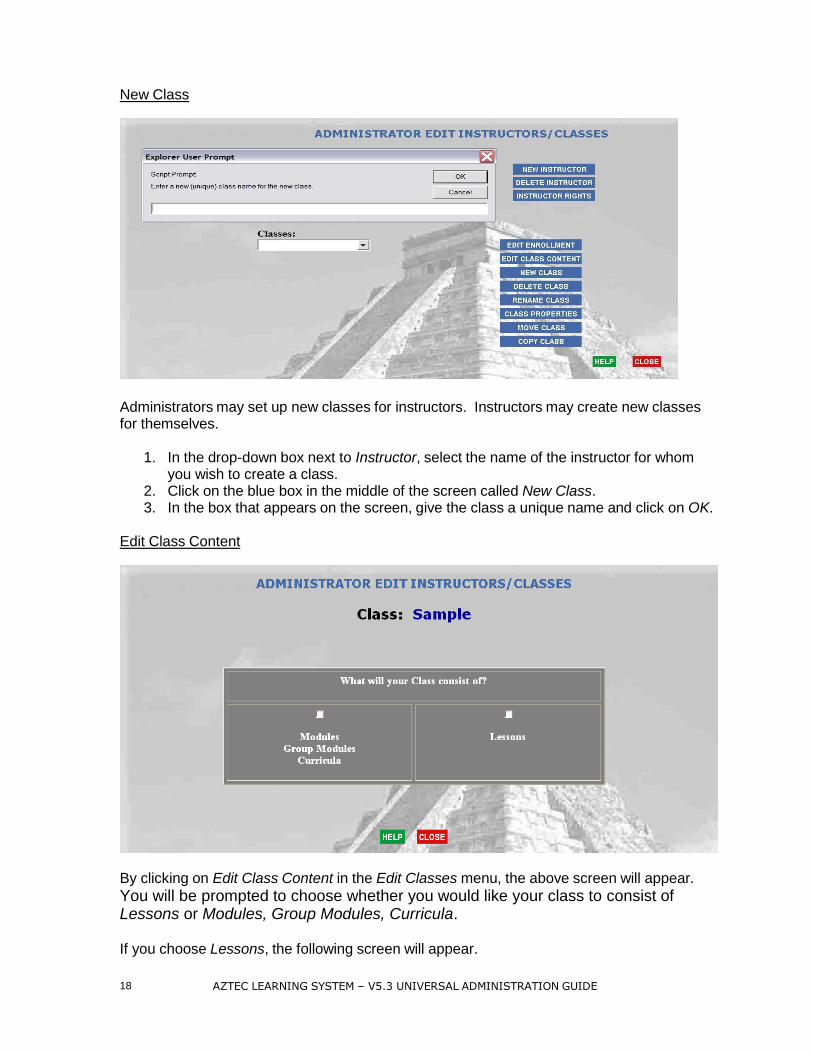
New Class
Administrators may set up new classes for instructors. Instructors may create new classes for themselves.
1. In the drop-down box next to Instructor, select the name of the instructor for whom
you wish to create a class. 2. Click on the blue box in the middle of the screen called New Class. 3. In the box that appears on the screen, give the class a unique name and click on OK.
Edit Class Content
By clicking on Edit Class Content in the Edit Classes menu, the above screen will appear.
You will be prompted to choose whether you would like your class to consist of Lessons or Modules, Group Modules, Curricula.
If you choose Lessons, the following screen will appear.
18 AZTEC LEARNING SYSTEM – V5.3 UNIVERSAL ADMINISTRATION GUIDE
19 AZTEC LEARNING SYSTEM – V.5.3 UNIVERSAL ADMINISTRATION GUIDE
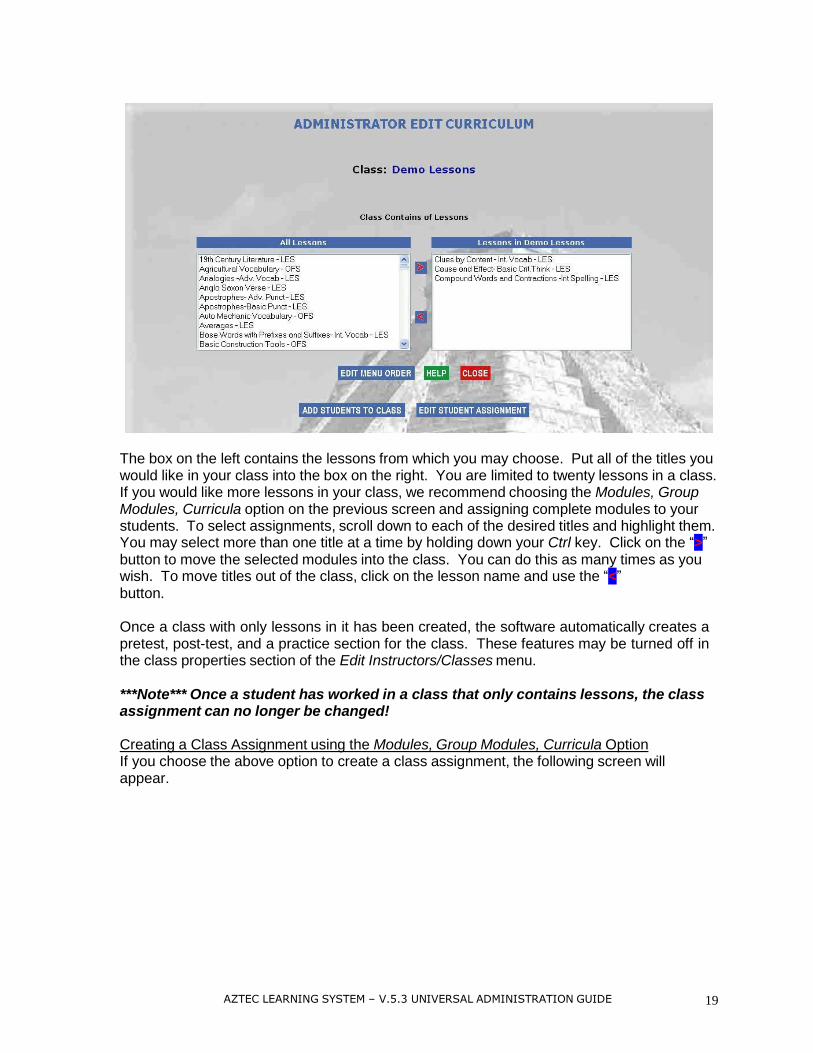
The box on the left contains the lessons from which you may choose. Put all of the titles you would like in your class into the box on the right. You are limited to twenty lessons in a class. If you would like more lessons in your class, we recommend choosing the Modules, Group Modules, Curricula option on the previous screen and assigning complete modules to your students. To select assignments, scroll down to each of the desired titles and highlight them. You may select more than one title at a time by holding down your Ctrl key. Click on the “>” button to move the selected modules into the class. You can do this as many times as you wish. To move titles out of the class, click on the lesson name and use the “<” button.
Once a class with only lessons in it has been created, the software automatically creates a pretest, post-test, and a practice section for the class. These features may be turned off in the class properties section of the Edit Instructors/Classes menu.
***Note*** Once a student has worked in a class that only contains lessons, the class assignment can no longer be changed!
Creating a Class Assignment using the Modules, Group Modules, Curricula Option If you choose the above option to create a class assignment, the following screen will appear.

The drop-down box labeled Options allows you to choose from Modules, Group Modules, or Curricula. The box on the left contains the Modules or Curricula from which you may choose. Put all of the titles you want in your class into the box on the right. This is done in the same manner that students are enrolled. Scroll down to each of the desired titles and highlight them. You may select more than one title at a time by holding down your Ctrl key. Click on the “>” button to move the selected modules into the class. You can do this as many times as you wish. To move titles out of the class curriculum, use the “<” button.
Options:
Using the drop-down menu next to the word Options, you may make assignment selections based on some or all of the following designations: Module – Assigns all of the lessons in one level of a subject. Example: Intermediate Reading. Group Module – Assigns all levels and lessons of a complete subject such as Reading into a class. Curriculum – Assigns a previously constructed group of lessons, modules, or group modules such as the GED Curriculum.
20 AZTEC LEARNING SYSTEM – V.5.3 UNIVERSAL ADMINISTRATION GUIDE
AZTEC LEARNING SYSTEM – V5.3 UNIVERSAL ADMINISTRATION GUIDE 21
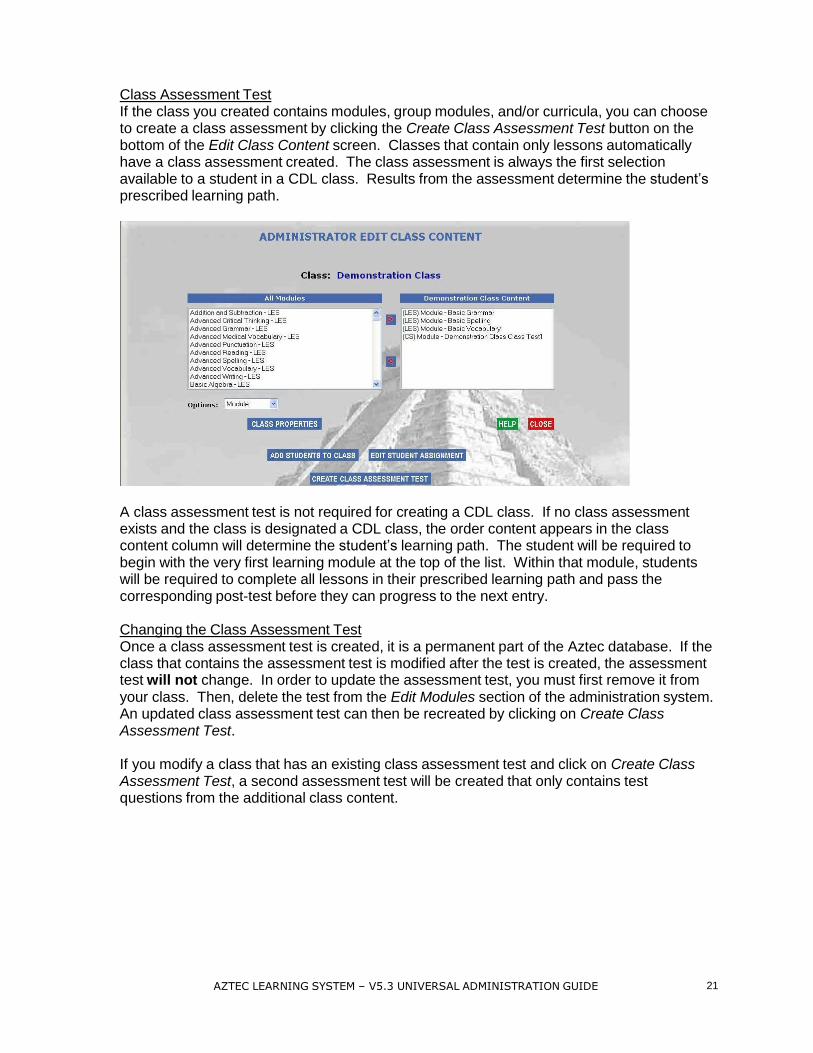
Class Assessment Test If the class you created contains modules, group modules, and/or curricula, you can choose to create a class assessment by clicking the Create Class Assessment Test button on the bottom of the Edit Class Content screen. Classes that contain only lessons automatically have a class assessment created. The class assessment is always the first selection available to a student in a CDL class. Results from the assessment determine the student’s prescribed learning path.
A class assessment test is not required for creating a CDL class. If no class assessment exists and the class is designated a CDL class, the order content appears in the class content column will determine the student’s learning path. The student will be required to begin with the very first learning module at the top of the list. Within that module, students will be required to complete all lessons in their prescribed learning path and pass the corresponding post-test before they can progress to the next entry.
Changing the Class Assessment Test Once a class assessment test is created, it is a permanent part of the Aztec database. If the class that contains the assessment test is modified after the test is created, the assessment test will not change. In order to update the assessment test, you must first remove it from your class. Then, delete the test from the Edit Modules section of the administration system. An updated class assessment test can then be recreated by clicking on Create Class Assessment Test.
If you modify a class that has an existing class assessment test and click on Create Class Assessment Test, a second assessment test will be created that only contains test questions from the additional class content.

22 AZTEC LEARNING SYSTEM – V5.3 UNIVERSAL ADMINISTRATION GUIDE
Class Properties (Within Class Content Window) Administrators may require specific lessons or modules in a class to be class prerequisites regardless of a student’s score on a pretest or class assessment test. Within the Edit Class Content menu, click on the title of one selection in the Class Content column. Next, select Class Properties.
You will have the option of changing the order in which the selection appears in the students’ learning menu and designate the selection as a prerequisite. Click on the check box to make the selection a prerequisite and click on Confirm Changes.
There is no limit to the number of prerequisites within a class.

AZTEC LEARNING SYSTEM – V5.3 UNIVERSAL ADMINISTRATION GUIDE 23
Add Students to Class When you are finished creating your curriculum, you may add students to your class directly from this screen. Click on the Add Students to Class button.
You must select one of the buttons at the top of the screen. Show All Students, lets you choose students from the entire database,
Eligible students are in the left column. The students can be moved into the class, one by one, by highlighting each of their names and clicking on the “>” button. If you would like to move several students, hold down the Ctrl key on your keyboard and select a group of students to move. If you would like to move a block of students into the class, hold down the Shift key and select the first and last student in the block. Click the “>” arrow to move the students into your class. To move students out of a class, highlight the student’s name and use the “<” button. When you are finished, click Close. You will be taken back to the previous screen.
If you choose the Show Students by Class option, you must choose a class in the Available Classes drop down box that appears on the screen. You then follow the above directions for selecting students.
If you choose Show Students by Demographic Options, select the demographic options for the class and then click Done with Criteria. You then follow the above directions for selecting students.
When you are finished click the Close button.
24 AZTEC LEARNING SYSTEM – V5.3 UNIVERSAL ADMINISTRATION GUIDE
Edit Student Customized Assignments
Edit Student Customized Assignments allows instructors to assign a more specific, individualized lesson plan to a student in his or her class.
1. Select the student from the drop-down box. 2. Select the class in which the student is enrolled. 3. From the Options drop-down box, decide how detailed you would like the student’s
assignment to be. 4. Select the assignment from the column on the left. Use the “>” button to assign it to
the student. 5. The student assignment may be changed or removed at any time.
Edit Assignment Properties
The option to make the student’s customized assignment a prerequisite is checked by default. If the custom assignment is a prerequisite and the option Student Custom Assignment will be added to the Class Menu is checked, the student will first work on the prerequisite assignment and then automatically access the main class assignment. The student must first complete the customized assignment before accessing the full class assignment.
If you do not designate the class as a prerequisite, the custom assignment will be added to the class menu only for that student.
If the option Student Custom Assignment will replace Class Menu is checked, the student will work on the individual assignment instead of the class curriculum. The student will only have access to the custom assignment until the instructor either modifies or removes it. Designating the assignment as a prerequisite has no bearing on the assignment.
If you do not designate the class as a prerequisite, the custom assignment will be added to the class menu only for that student.
Student Customized Assignments in a CDL class (Please refer to the section on CDL for more
information.): Aztec Software does not recommend using custom assignments within a CDL Class. All custom assignments in a CDL class are automatically added to the class menu for that student. The system will first present the students with all assessments and pretest sections in both the class main menu and custom assignment section before the student has access to the learning. If the custom assignment is not designated as a prerequisite, the learning in the class menu will come before the custom assignment.
The following options are on the main Instructors/Classes menu:
Delete Class
This function is used to remove a class that is no longer active. In the Edit Classes menu, select the unwanted class. Click on DELETE Class. When the above window appears, click OK. If you click Cancel without selecting any options, nothing will be deleted.
Rename Class This function allows the administrator to rename a class without changing the enrollment. This function is useful if you are moving most of the same students into a different class. Rather than re-enroll the students, you can simply rename the class and edit the curriculum.
AZTEC LEARNING SYSTEM – V.5.3 UNIVERSAL ADMINISTRATION GUIDE 25
26 AZTEC LEARNING SYSTEM – V5.3 UNIVERSAL ADMINISTRATION GUIDE
Class Properties (Main Instructors/Class Menu)
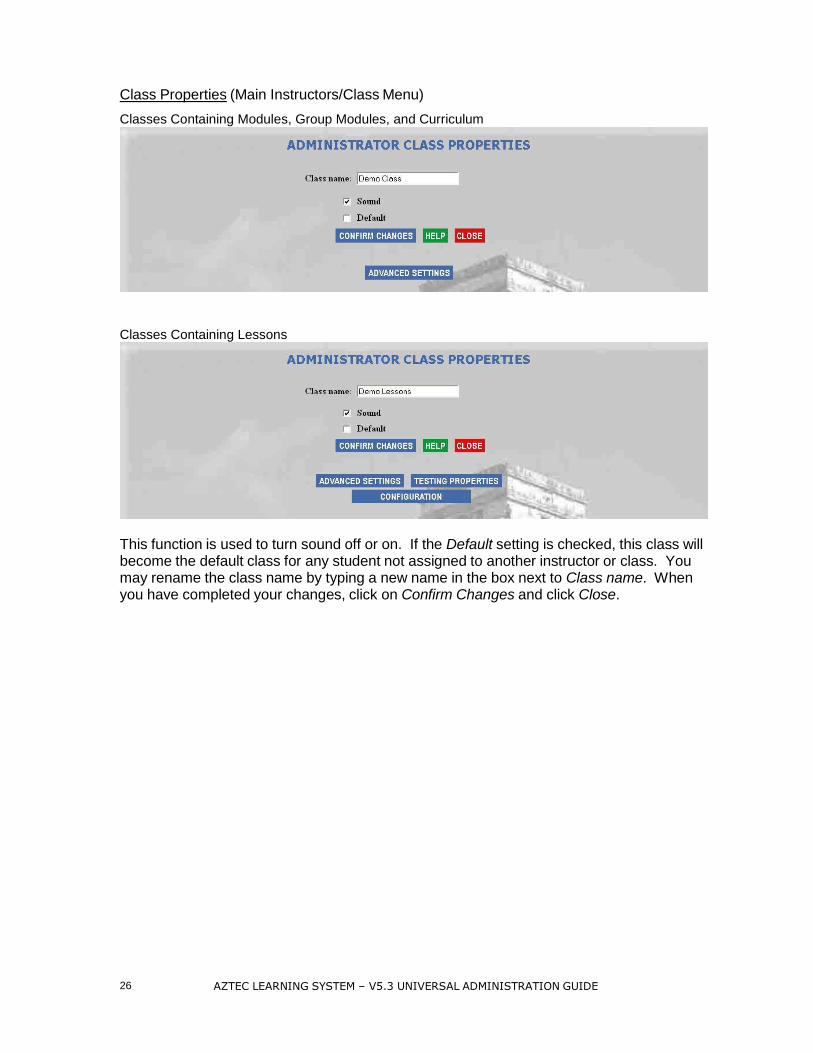
Classes Containing Modules, Group Modules, and Curriculum
Classes Containing Lessons
This function is used to turn sound off or on. If the Default setting is checked, this class will become the default class for any student not assigned to another instructor or class. You may rename the class name by typing a new name in the box next to Class name. When you have completed your changes, click on Confirm Changes and click Close.

Testing Properties
Testing Properties appears for classes that only contain lessons. It allows the instructor to customize the pretest and post-test for the class. Instructors may increase or decrease the number of questions in a test and the passing percentages.
Configuration
Configuration allows the instructor to turn off various features that are automatically created for classes made up of individual lessons. Instructors may turn off the Introduction, which is a tutorial on how to use Aztec, the Pretest, Post-test, Practice, and student View Scores. By default, these settings are turned on.
AZTEC LEARNING SYSTEM – V5.3 UNIVERSAL ADMINISTRATION GUIDE 27
28 AZTEC LEARNING SYSTEM – V5.3 UNIVERSAL ADMINISTRATION GUIDE
Advanced Settings, Class Properties
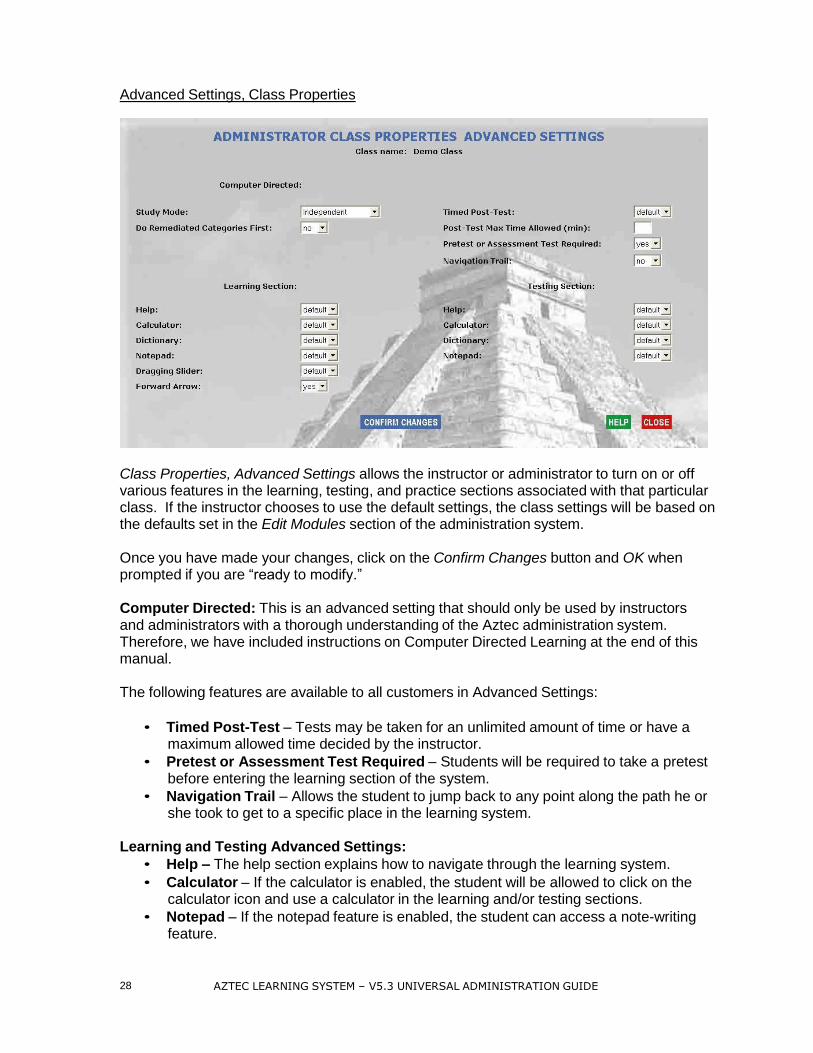
Class Properties, Advanced Settings allows the instructor or administrator to turn on or off various features in the learning, testing, and practice sections associated with that particular class. If the instructor chooses to use the default settings, the class settings will be based on the defaults set in the Edit Modules section of the administration system.
Once you have made your changes, click on the Confirm Changes button and OK when prompted if you are “ready to modify.”
Computer Directed: This is an advanced setting that should only be used by instructors and administrators with a thorough understanding of the Aztec administration system. Therefore, we have included instructions on Computer Directed Learning at the end of this manual.
The following features are available to all customers in Advanced Settings:
• Timed Post-Test – Tests may be taken for an unlimited amount of time or have a
maximum allowed time decided by the instructor.
• Pretest or Assessment Test Required – Students will be required to take a pretest before entering the learning section of the system.
• Navigation Trail – Allows the student to jump back to any point along the path he or she took to get to a specific place in the learning system.
Learning and Testing Advanced Settings:
• Help – The help section explains how to navigate through the learning system.
• Calculator – If the calculator is enabled, the student will be allowed to click on the calculator icon and use a calculator in the learning and/or testing sections.
• Notepad – If the notepad feature is enabled, the student can access a note-writing feature.

• Dragging Slider (Learning Only) – The dragging slider allows the user to move through various sections of the learning system without completing every screen. This feature is useful for instructors to experience the learning system without actually completing an entire lesson.
• Forward Arrow – The forward arrow allows the student to move forward to the next screen in the lesson. It automatically appears on every screen in the software. If the instructor wants the arrow to appear only when the screen has presented all information and audio files, change this function to “no.”
Move Class
This function is used to move a class to a different instructor. The enrollment, curriculum, and properties of the class are unaffected by this move. This function is useful if you are changing a class instructor.
In the Edit Instructors/Classes menu, using the drop-down menu, click on the name of the class you would like to move. Click on the MOVE CLASS button.
A new MOVE CLASS window will appear containing the name of the class to be moved and a list of the names of all the other instructors. Click on the instructor taking over the class and then click on the Confirm Changes button. The next window will be the Instructor/Classes window with the name of the new instructor in the instructor box and the name of the moved class in the class box.
AZTEC LEARNING SYSTEM – V.5.3 UNIVERSAL ADMINISTRATION GUIDE 29
30 AZTEC LEARNING SYSTEM – V5.3 UNIVERSAL ADMINISTRATION GUIDE
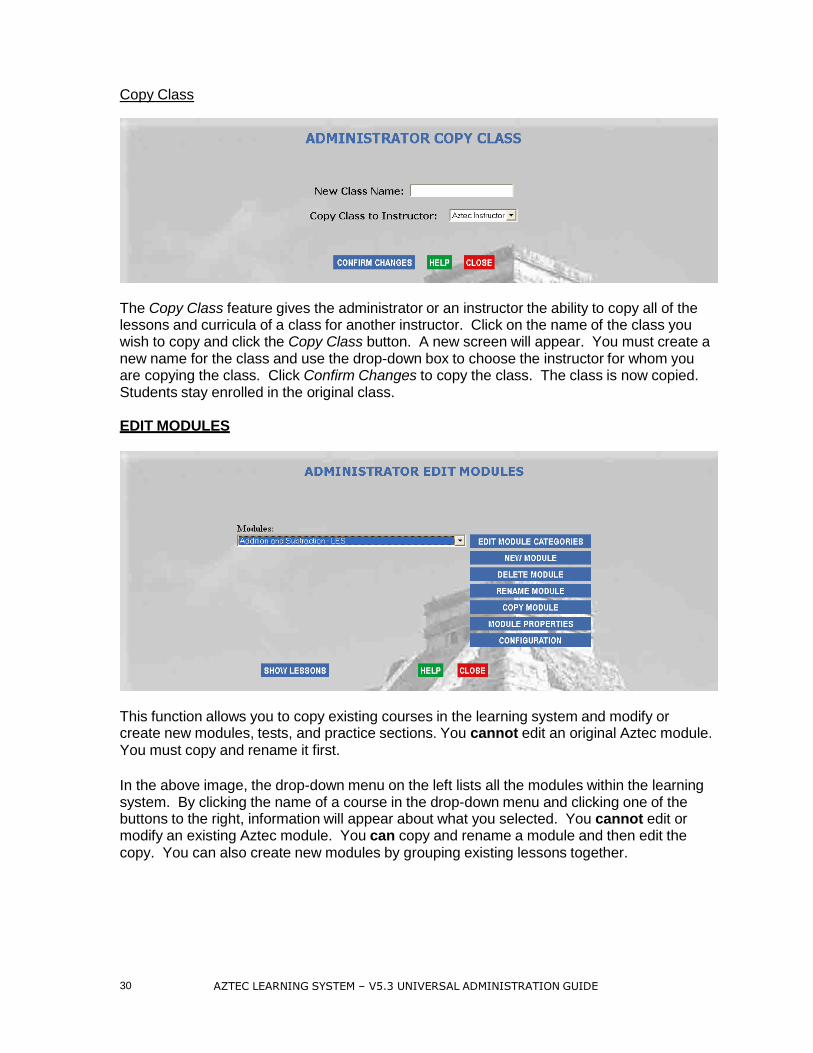
Copy Class
The Copy Class feature gives the administrator or an instructor the ability to copy all of the lessons and curricula of a class for another instructor. Click on the name of the class you wish to copy and click the Copy Class button. A new screen will appear. You must create a new name for the class and use the drop-down box to choose the instructor for whom you are copying the class. Click Confirm Changes to copy the class. The class is now copied. Students stay enrolled in the original class.
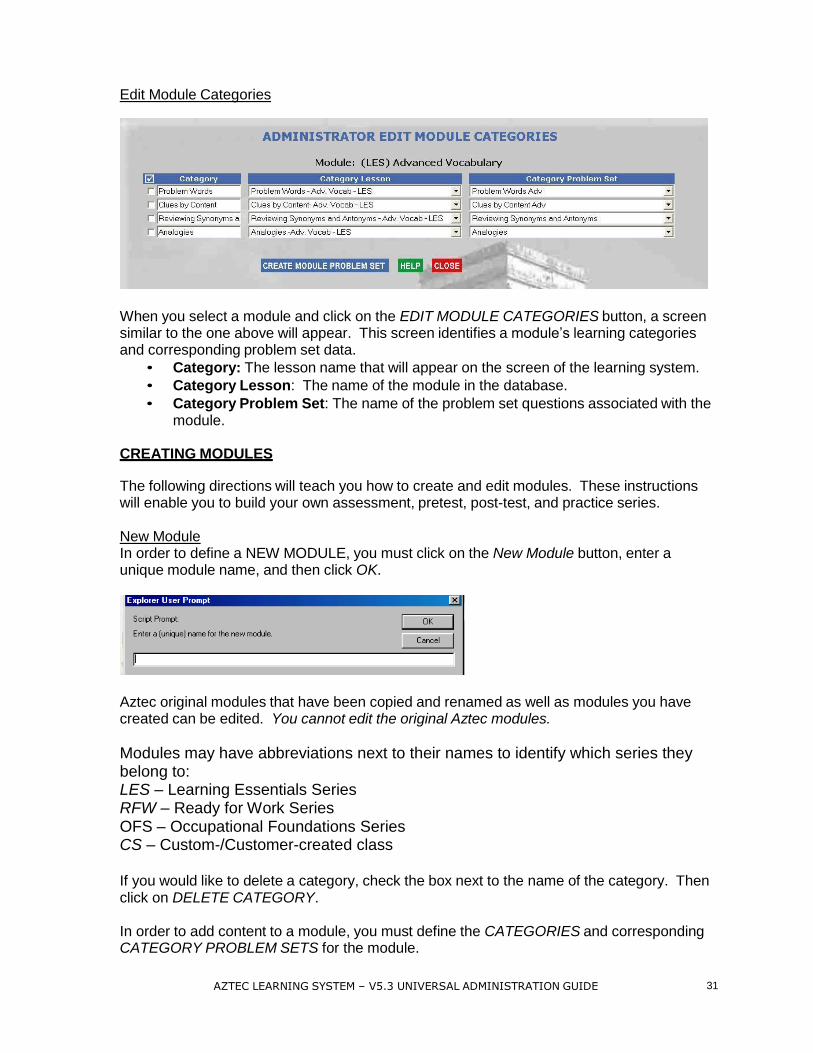
EDIT MODULES
This function allows you to copy existing courses in the learning system and modify or create new modules, tests, and practice sections. You cannot edit an original Aztec module. You must copy and rename it first.
In the above image, the drop-down menu on the left lists all the modules within the learning system. By clicking the name of a course in the drop-down menu and clicking one of the buttons to the right, information will appear about what you selected. You cannot edit or modify an existing Aztec module. You can copy and rename a module and then edit the copy. You can also create new modules by grouping existing lessons together.
AZTEC LEARNING SYSTEM – V5.3 UNIVERSAL ADMINISTRATION GUIDE 31
Edit Module Categories
When you select a module and click on the EDIT MODULE CATEGORIES button, a screen similar to the one above will appear. This screen identifies a module’s learning categories and corresponding problem set data.
• Category: The lesson name that will appear on the screen of the learning system.
• Category Lesson: The name of the module in the database.
• Category Problem Set: The name of the problem set questions associated with the module.
CREATING MODULES
The following directions will teach you how to create and edit modules. These instructions will enable you to build your own assessment, pretest, post-test, and practice series.
New Module In order to define a NEW MODULE, you must click on the New Module button, enter a unique module name, and then click OK.
Aztec original modules that have been copied and renamed as well as modules you have created can be edited. You cannot edit the original Aztec modules.
Modules may have abbreviations next to their names to identify which series they belong to: LES – Learning Essentials Series RFW – Ready for Work Series OFS – Occupational Foundations Series CS – Custom-/Customer-created class
If you would like to delete a category, check the box next to the name of the category. Then click on DELETE CATEGORY.
In order to add content to a module, you must define the CATEGORIES and corresponding CATEGORY PROBLEM SETS for the module.

32 AZTEC LEARNING SYSTEM – V.5.3 UNIVERSAL ADMINISTRATION GUIDE
The CATEGORY names shown in the far left column match the corresponding names in the learning system.
1. Click on the check box to the left of the series of white boxes.
2. In the Category column, type in the name of the new category.
3. The drop-down box under Category Lesson contains the name of the learning lesson in the database. If you are creating a test or assessment, you should leave this blank.
4. If you are using an existing Aztec category lesson, the computer will automatically fill in the appropriate category problem set. If the computer does not do this, select the name of the problem set in the Category Problem Set column that will be attached to the lesson. NOTE: You may choose up to ten categories. Repeat these steps until you have all the categories you want.
5. Click Close. In order for all features in the learning system to work properly, all categories must have problem sets attached to them.
AZTEC LEARNING SYSTEM – V5.3 UNIVERSAL ADMINISTRATION GUIDE 33
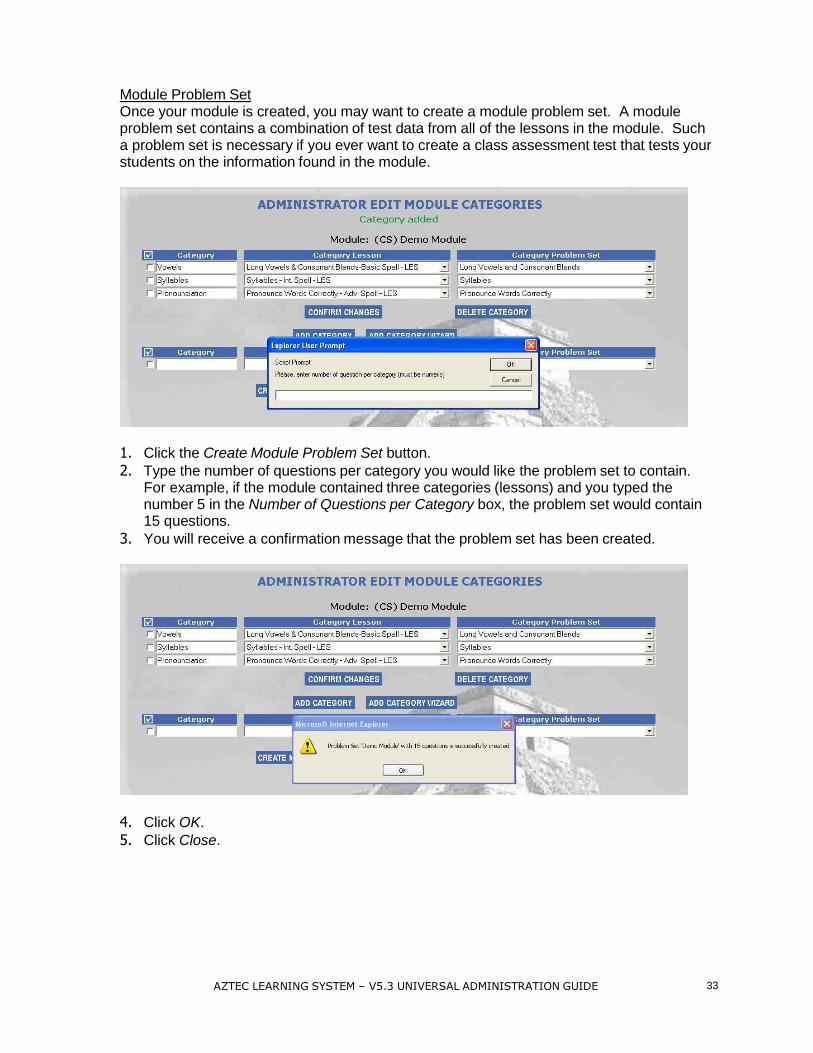
Module Problem Set Once your module is created, you may want to create a module problem set. A module problem set contains a combination of test data from all of the lessons in the module. Such a problem set is necessary if you ever want to create a class assessment test that tests your students on the information found in the module.
1. Click the Create Module Problem Set button.
2. Type the number of questions per category you would like the problem set to contain.
For example, if the module contained three categories (lessons) and you typed the number 5 in the Number of Questions per Category box, the problem set would contain 15 questions.
3. You will receive a confirmation message that the problem set has been created.
4. Click OK.
5. Click Close.
34 AZTEC LEARNING SYSTEM – V.5.3 UNIVERSAL ADMINISTRATION GUIDE
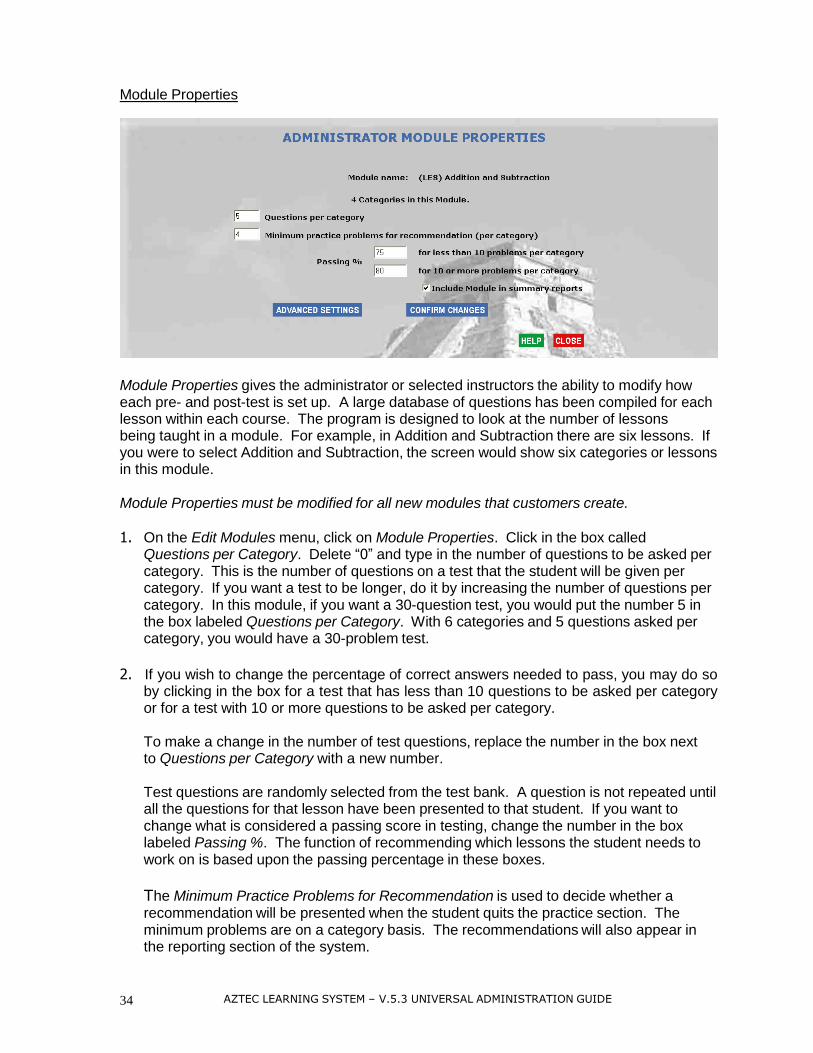
Module Properties
Module Properties gives the administrator or selected instructors the ability to modify how each pre- and post-test is set up. A large database of questions has been compiled for each lesson within each course. The program is designed to look at the number of lessons being taught in a module. For example, in Addition and Subtraction there are six lessons. If you were to select Addition and Subtraction, the screen would show six categories or lessons in this module.
Module Properties must be modified for all new modules that customers create.
1. On the Edit Modules menu, click on Module Properties. Click in the box called
Questions per Category. Delete “0” and type in the number of questions to be asked per category. This is the number of questions on a test that the student will be given per category. If you want a test to be longer, do it by increasing the number of questions per category. In this module, if you want a 30-question test, you would put the number 5 in the box labeled Questions per Category. With 6 categories and 5 questions asked per category, you would have a 30-problem test.
2. If you wish to change the percentage of correct answers needed to pass, you may do so
by clicking in the box for a test that has less than 10 questions to be asked per category or for a test with 10 or more questions to be asked per category.
To make a change in the number of test questions, replace the number in the box next to Questions per Category with a new number.
Test questions are randomly selected from the test bank. A question is not repeated until all the questions for that lesson have been presented to that student. If you want to change what is considered a passing score in testing, change the number in the box labeled Passing %. The function of recommending which lessons the student needs to work on is based upon the passing percentage in these boxes.
The Minimum Practice Problems for Recommendation is used to decide whether a recommendation will be presented when the student quits the practice section. The minimum problems are on a category basis. The recommendations will also appear in the reporting section of the system.
35 AZTEC LEARNING SYSTEM – V.5.3 UNIVERSAL ADMINISTRATION GUIDE
3. Confirm your changes and then click Close.
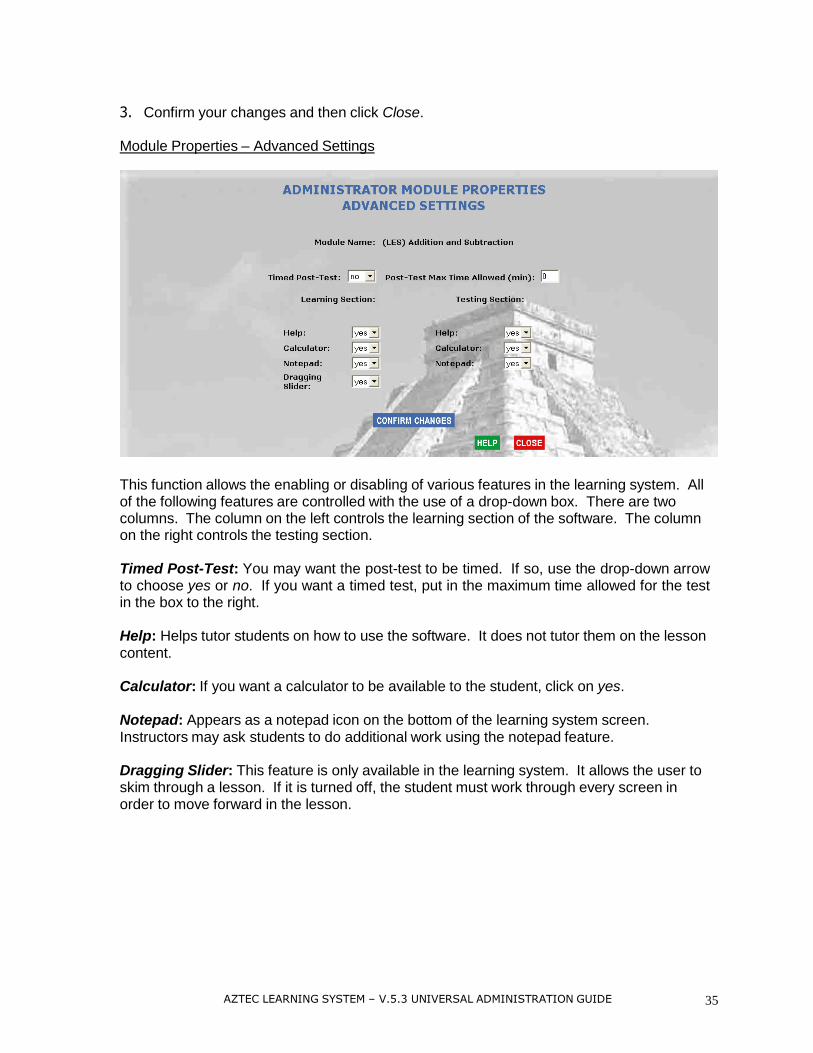
Module Properties – Advanced Settings
This function allows the enabling or disabling of various features in the learning system. All of the following features are controlled with the use of a drop-down box. There are two columns. The column on the left controls the learning section of the software. The column on the right controls the testing section.
Timed Post-Test: You may want the post-test to be timed. If so, use the drop-down arrow to choose yes or no. If you want a timed test, put in the maximum time allowed for the test in the box to the right.
Help: Helps tutor students on how to use the software. It does not tutor them on the lesson content.
Calculator: If you want a calculator to be available to the student, click on yes.
Notepad: Appears as a notepad icon on the bottom of the learning system screen. Instructors may ask students to do additional work using the notepad feature.
Dragging Slider: This feature is only available in the learning system. It allows the user to skim through a lesson. If it is turned off, the student must work through every screen in order to move forward in the lesson.
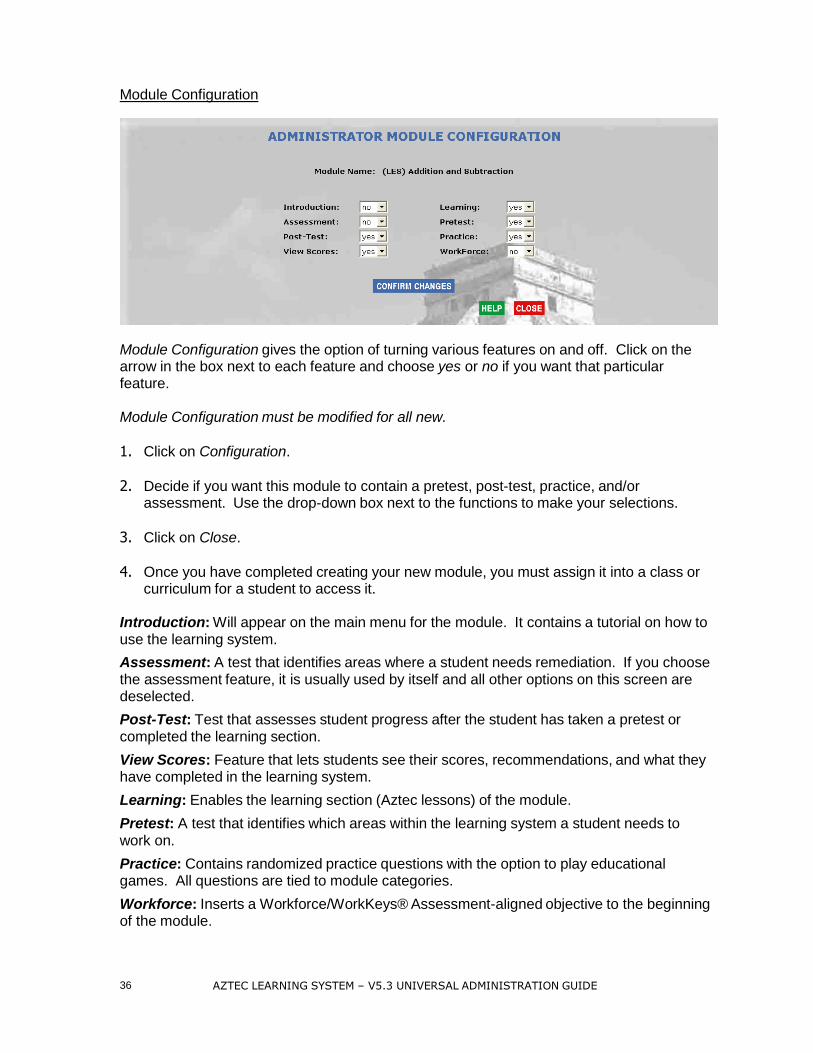
Module Configuration
Module Configuration gives the option of turning various features on and off. Click on the arrow in the box next to each feature and choose yes or no if you want that particular feature.
Module Configuration must be modified for all new.
1. Click on Configuration.
2. Decide if you want this module to contain a pretest, post-test, practice, and/or
assessment. Use the drop-down box next to the functions to make your selections. 3. Click on Close.
4. Once you have completed creating your new module, you must assign it into a class or
curriculum for a student to access it. Introduction: Will appear on the main menu for the module. It contains a tutorial on how to use the learning system.
Assessment: A test that identifies areas where a student needs remediation. If you choose the assessment feature, it is usually used by itself and all other options on this screen are deselected.
Post-Test: Test that assesses student progress after the student has taken a pretest or completed the learning section.
View Scores: Feature that lets students see their scores, recommendations, and what they have completed in the learning system.
Learning: Enables the learning section (Aztec lessons) of the module.
Pretest: A test that identifies which areas within the learning system a student needs to work on.
Practice: Contains randomized practice questions with the option to play educational games. All questions are tied to module categories.
Workforce: Inserts a Workforce/WorkKeys® Assessment-aligned objective to the beginning of the module.
36 AZTEC LEARNING SYSTEM – V5.3 UNIVERSAL ADMINISTRATION GUIDE

37 AZTEC LEARNING SYSTEM – V.5.3 UNIVERSAL ADMINISTRATION GUIDE
Add Category Wizard Aztec gives you the ability to reconfigure learning modules to create new modules containing lessons using the Add Category Wizard.
Once you have selected an existing editable module or created a new module, do the following:
1. Click on Add Category Wizard in the Edit Modules section. You will be prompted to
create a category name for this module. You may change it at a later time. The category name is the lesson name the student will see in the learning system.
2. Click on Next and select the skill levels you are looking for.
Click on Next and select the lesson subjects from which you would like to choose.

3. Click on Next and narrow down your choices by choosing key words that apply to your new category.
4. You will now be given a list of categories that fit your criteria. You can pick only one
category. The computer will attach the appropriate problem set for you.
38 AZTEC LEARNING SYSTEM – V.5.3 UNIVERSAL ADMINISTRATION GUIDE
39 AZTEC LEARNING SYSTEM – V.5.3 UNIVERSAL ADMINISTRATION GUIDE
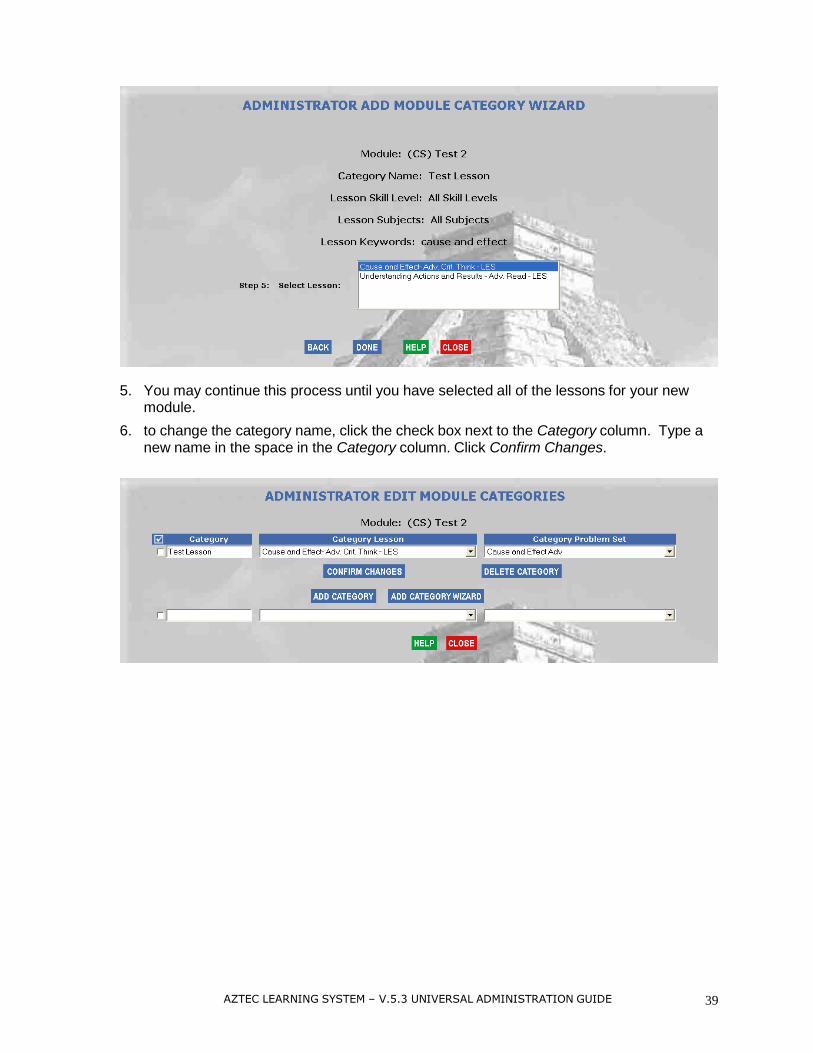
5. You may continue this process until you have selected all of the lessons for your new module.
6. to change the category name, click the check box next to the Category column. Type a new name in the space in the Category column. Click Confirm Changes.
CURRICULA
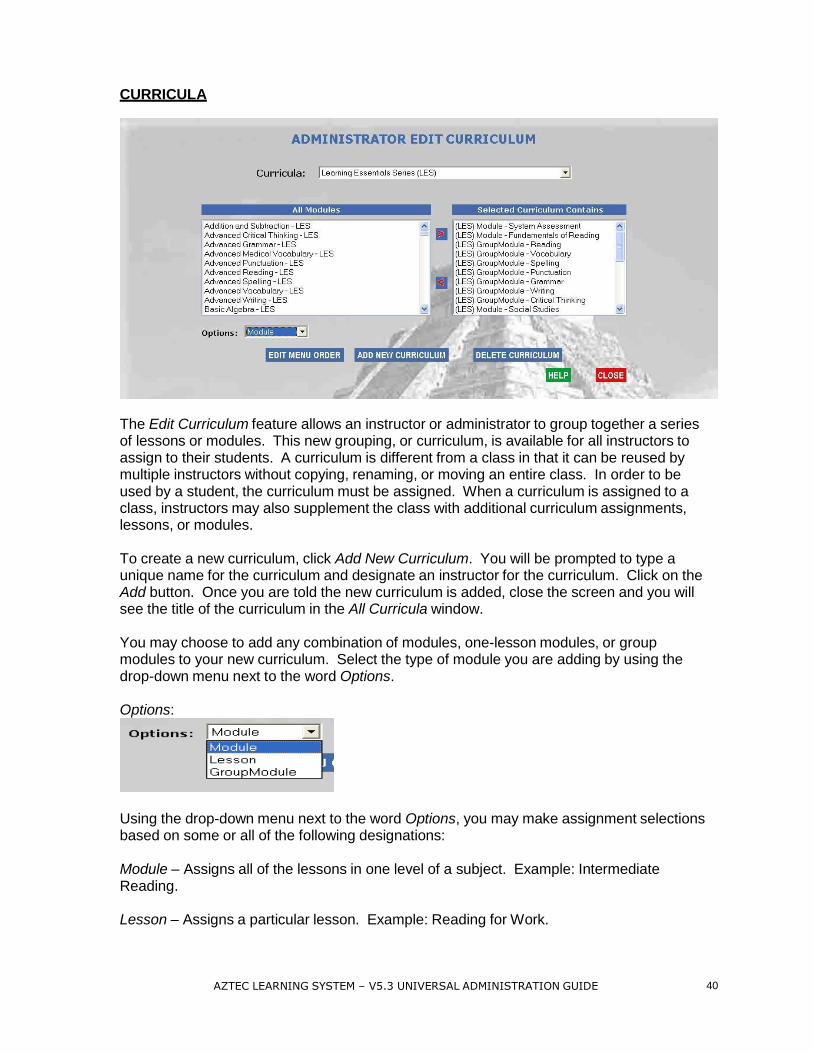
The Edit Curriculum feature allows an instructor or administrator to group together a series of lessons or modules. This new grouping, or curriculum, is available for all instructors to assign to their students. A curriculum is different from a class in that it can be reused by multiple instructors without copying, renaming, or moving an entire class. In order to be used by a student, the curriculum must be assigned. When a curriculum is assigned to a class, instructors may also supplement the class with additional curriculum assignments, lessons, or modules.
To create a new curriculum, click Add New Curriculum. You will be prompted to type a unique name for the curriculum and designate an instructor for the curriculum. Click on the Add button. Once you are told the new curriculum is added, close the screen and you will see the title of the curriculum in the All Curricula window.
You may choose to add any combination of modules, one-lesson modules, or group modules to your new curriculum. Select the type of module you are adding by using the drop-down menu next to the word Options.
Options:
Using the drop-down menu next to the word Options, you may make assignment selections based on some or all of the following designations:
Module – Assigns all of the lessons in one level of a subject. Example: Intermediate Reading.
Lesson – Assigns a particular lesson. Example: Reading for Work.
AZTEC LEARNING SYSTEM – V5.3 UNIVERSAL ADMINISTRATION GUIDE 40
AZTEC LEARNING SYSTEM – V5.3 UNIVERSAL ADMINISTRATION GUIDE 41
Group Module – Assigns all levels and lessons of a complete subject such as Reading into a class.
Select the module by clicking on its name in the column on the left side of the screen. Click on the arrow pointing to the right to add your selection to the curriculum. When you are finished, click Close.
Delete Curriculum – If you wish to delete a curriculum, select the name of the curriculum from the drop-down list at the top of the screen. Click on Delete Curriculum. Click Close.
***NOTE*** You cannot edit or delete any of the original Aztec curricula.
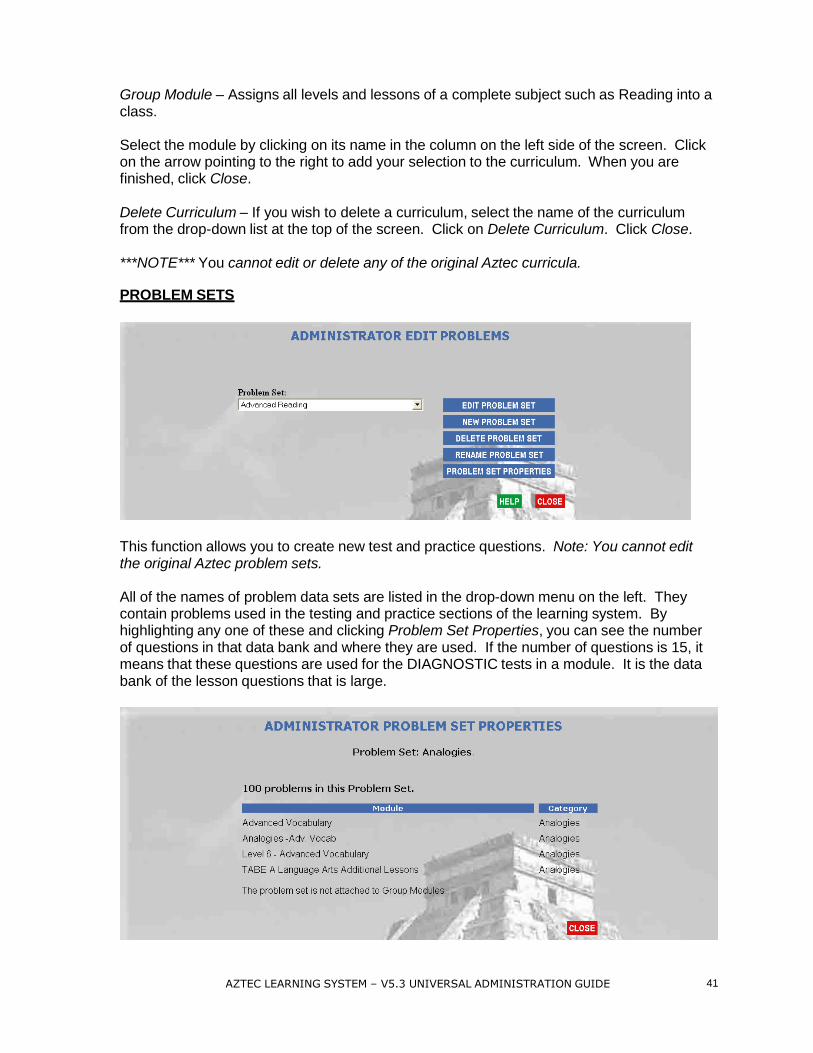
PROBLEM SETS
This function allows you to create new test and practice questions. Note: You cannot edit the original Aztec problem sets.
All of the names of problem data sets are listed in the drop-down menu on the left. They contain problems used in the testing and practice sections of the learning system. By highlighting any one of these and clicking Problem Set Properties, you can see the number of questions in that data bank and where they are used. If the number of questions is 15, it means that these questions are used for the DIAGNOSTIC tests in a module. It is the data bank of the lesson questions that is large.
For example, if you highlight Analogies and click Problem Set Properties, you will see the following information: There are 100 problems in this set. The problem set is used by the following module categories: Advanced Vocabulary Analogies. Each lesson in the system has its own individual set of problems. There are thousands of test questions being used in the learning system.
The Edit Problem Sets menu is where the administrator can also click on NEW and create a new set of questions to be placed in NEW Modules.
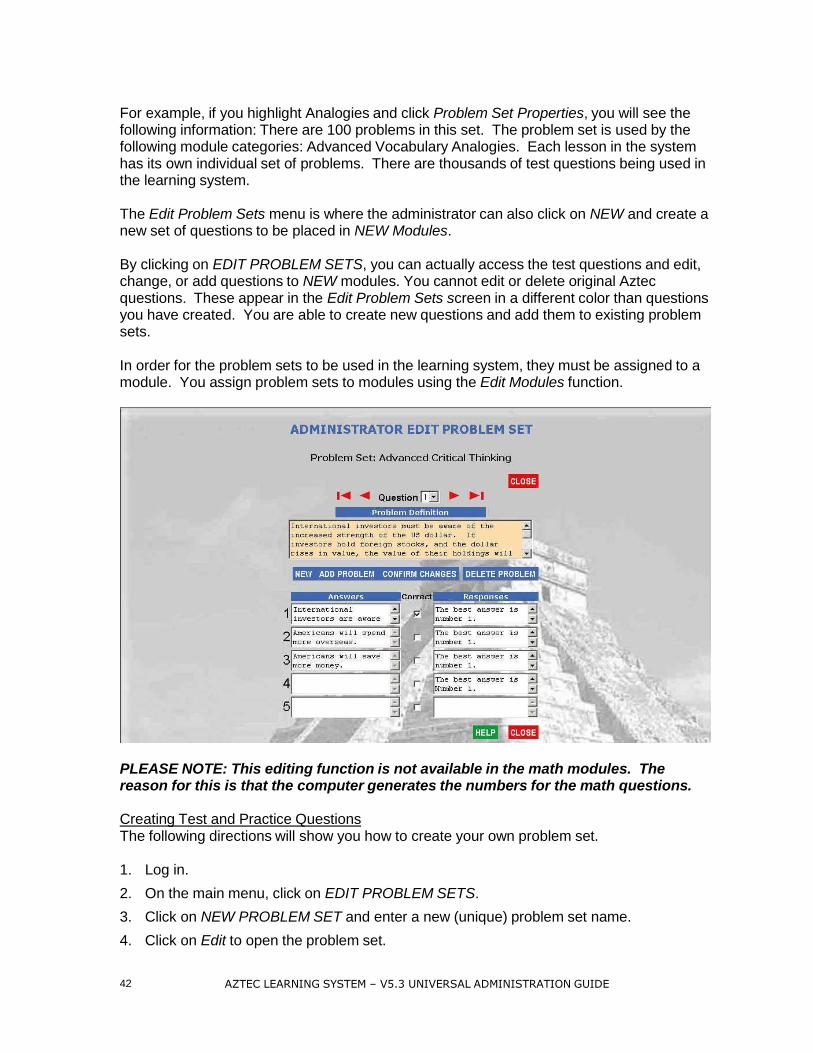
By clicking on EDIT PROBLEM SETS, you can actually access the test questions and edit, change, or add questions to NEW modules. You cannot edit or delete original Aztec questions. These appear in the Edit Problem Sets screen in a different color than questions you have created. You are able to create new questions and add them to existing problem sets.
In order for the problem sets to be used in the learning system, they must be assigned to a module. You assign problem sets to modules using the Edit Modules function.
PLEASE NOTE: This editing function is not available in the math modules. The reason for this is that the computer generates the numbers for the math questions.
Creating Test and Practice Questions The following directions will show you how to create your own problem set.
1. Log in.
2. On the main menu, click on EDIT PROBLEM SETS.
3. Click on NEW PROBLEM SET and enter a new (unique) problem set name.
4. Click on Edit to open the problem set.
42 AZTEC LEARNING SYSTEM – V5.3 UNIVERSAL ADMINISTRATION GUIDE

AZTEC LEARNING SYSTEM – V5.3 UNIVERSAL ADMINISTRATION GUIDE 43
5. In the box at the top labeled Problem Definition, type in the question. You can use up to six lines of text and/or blank lines in this field.
6. Below the question on the left side are the answer boxes. These are the answers from which the student will get to choose. You may include up to five choices, but only one that is correct.
7. On the right side of the answers are the response boxes. These responses are displayed when the student clicks on an answer. Each answer has its own response. For example, if the student clicks on choice 3, he or she will see the response text for choice 3.
8. In between the answer and response boxes is the Correct box. You must identify the correct answer and response by checking this box.
9. When all of the above information is filled in, click ADD PROBLEM. You are ready to move on to the next question. Above the Problem Definition box, you will find a set of
buttons and a number. They are as follows: |◄ ◄ will take you to the first or previous
problem in the problem set. ► will display the next problem in the set with respect to the
problem appearing on the screen. ►|will take you to the last problem in the problem set. The number between the symbols is the current problem displayed on the screen. NEW will display an empty problem screen for creating a new problem. DELETE will delete the problem appearing on the screen, and CLOSE will end the problem set editing function.
10. Repeat the above steps until you have added all the questions you need into the system.
11. When you have all your questions entered, click CLOSE. This will bring up the Problem Set Properties screen. You don’t need to do anything to the properties of your problem set. The management system already knows the number of questions and will fill in which modules use the set when you associate them in the modules section.
12. To place this problem set in a module for a test or assessment, follow the directions for building a test or an assessment.

VIEW REPORTING
An ADMINISTRATOR can view all of the reports from all classes, whereas INSTRUCTOR reporting functions may be limited by the administrator.
Click on VIEW REPORTING. The Aztec system provides seven types of reports and two print certificate options. You will have to select one of the following nine options.
1. Student Course Detail Report – Displays the details of an individual student’s
progress within the software. 2. Student(s) Curriculum Report – Displays an overview of student progress. You may
select multiple students at one time. 3. Course(s) Activity Report – Displays a cumulative record of how a group of students
has done in the course(s) in which they are enrolled. 4. Class Report – Generic report that displays information for all students in a particular
class. 5. Student Lock Out Report – Displays a list of students who have failed a post-test
three times. It shows who has been unlocked and who is still locked out. 6. Individual Education Plan Report (CDL Report) – This is a report for individual
students enrolled in a CDL class. The report displays the student’s prescribed learning path and progress in the CDL class.
7. Student Usage Report- Provides a detailed account of the time and dates a student has spent in each area of the learning system.
When pulling reports, you can narrow the list of available students by choosing All Students in a Class or All Students under an Instructor. You will then be able to pull student reports based on class assignment or instructor.
AZTEC LEARNING SYSTEM – V5.3 UNIVERSAL ADMINISTRATION GUIDE 44
AZTEC LEARNING SYSTEM – V5.3 UNIVERSAL ADMINISTRATION GUIDE 45
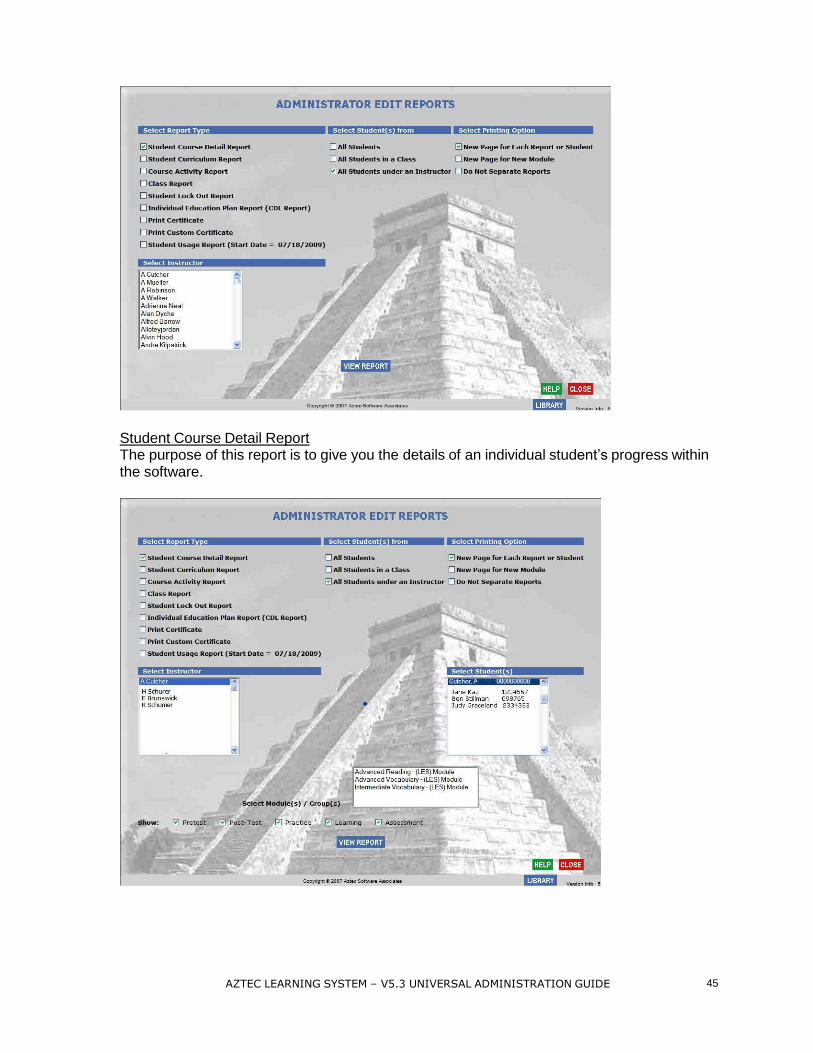
Student Course Detail Report The purpose of this report is to give you the details of an individual student’s progress within the software.
46 AZTEC LEARNING SYSTEM – V5.3 UNIVERSAL ADMINISTRATION GUIDE
To obtain this report, you must do the following: 1. If applicable, make sure you have selected the instructor and/or class for whom you wish
to pull reports.
2. Check the box next to STUDENT COURSE DETAIL REPORT.
3. Select one student from the list of students that appears on your screen.
4. A drop-down menu will appear that contains all of the lessons the student has accessed. You may choose as many of these lessons as you like.
5. This report will produce details of individual student progress in the assessment, pretest, post-test, practice, and subjects you specified. You may uncheck the check boxes next to these categories if you do not wish to see the results.
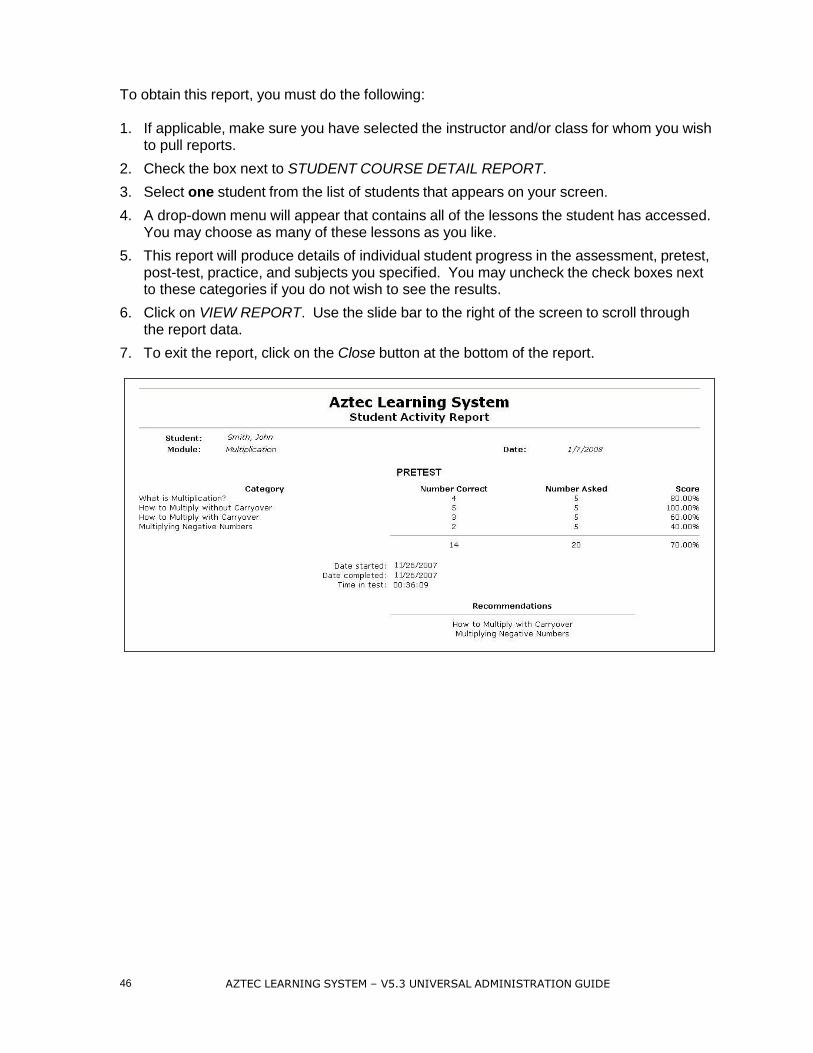
6. Click on VIEW REPORT. Use the slide bar to the right of the screen to scroll through the report data.
7. To exit the report, click on the Close button at the bottom of the report.
AZTEC LEARNING SYSTEM – V5.3 UNIVERSAL ADMINISTRATION GUIDE 47
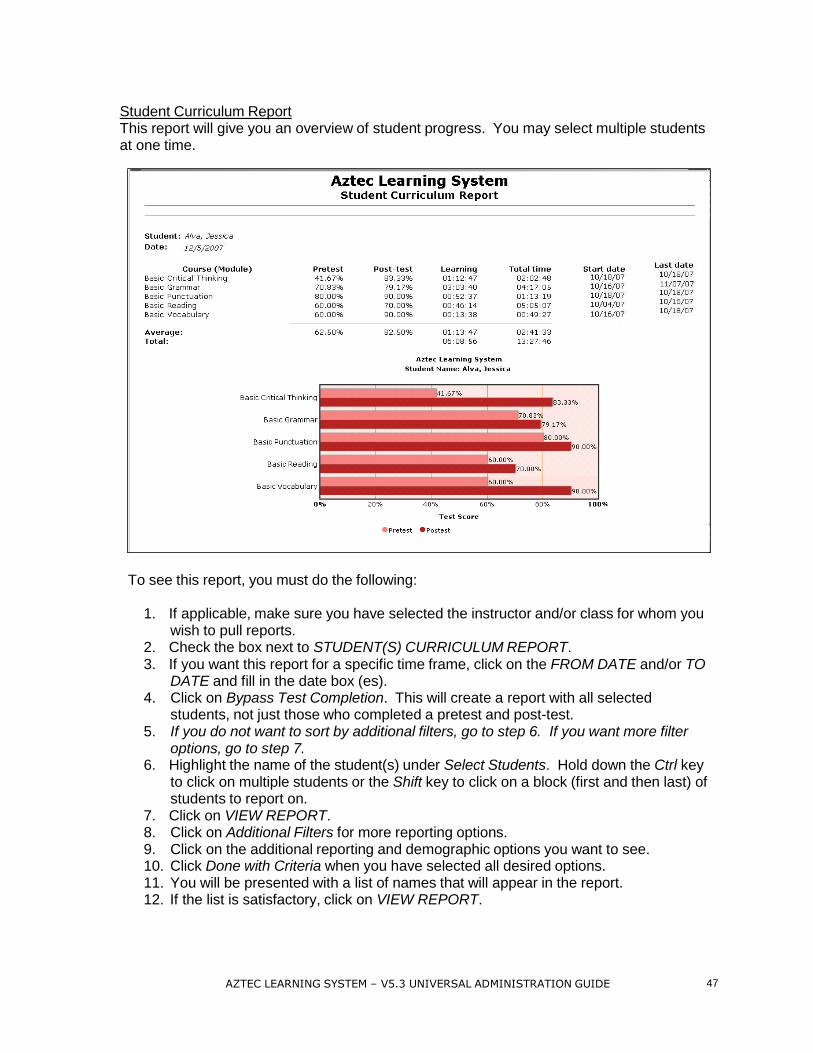
Student Curriculum Report This report will give you an overview of student progress. You may select multiple students at one time.
To see this report, you must do the following:
1. If applicable, make sure you have selected the instructor and/or class for whom you wish to pull reports.
2. Check the box next to STUDENT(S) CURRICULUM REPORT. 3. If you want this report for a specific time frame, click on the FROM DATE and/or TO
DATE and fill in the date box (es). 4. Click on Bypass Test Completion. This will create a report with all selected
students, not just those who completed a pretest and post-test. 5. If you do not want to sort by additional filters, go to step 6. If you want more filter
options, go to step 7. 6. Highlight the name of the student(s) under Select Students. Hold down the Ctrl key
to click on multiple students or the Shift key to click on a block (first and then last) of students to report on.
7. Click on VIEW REPORT. 8. Click on Additional Filters for more reporting options. 9. Click on the additional reporting and demographic options you want to see. 10. Click Done with Criteria when you have selected all desired options. 11. You will be presented with a list of names that will appear in the report. 12. If the list is satisfactory, click on VIEW REPORT.
48 AZTEC LEARNING SYSTEM – V5.3 UNIVERSAL ADMINISTRATION GUIDE
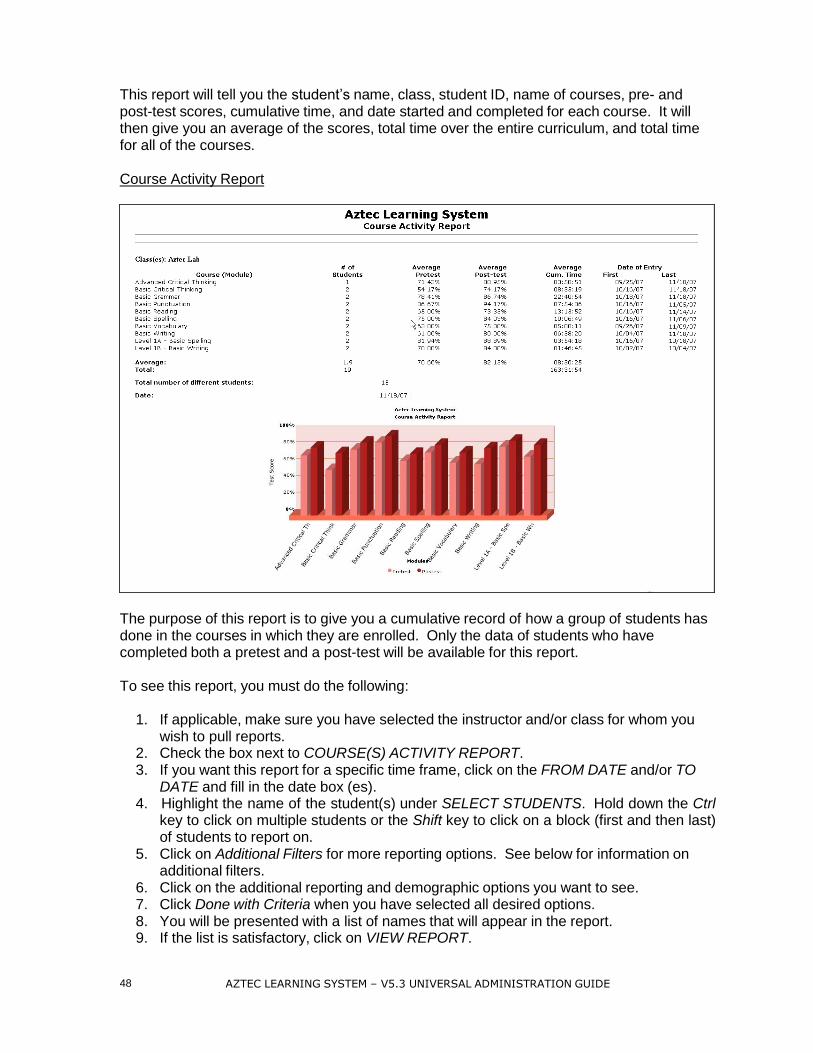
This report will tell you the student’s name, class, student ID, name of courses, pre- and post-test scores, cumulative time, and date started and completed for each course. It will then give you an average of the scores, total time over the entire curriculum, and total time for all of the courses.
Course Activity Report
The purpose of this report is to give you a cumulative record of how a group of students has done in the courses in which they are enrolled. Only the data of students who have completed both a pretest and a post-test will be available for this report.
To see this report, you must do the following:
1. If applicable, make sure you have selected the instructor and/or class for whom you
wish to pull reports. 2. Check the box next to COURSE(S) ACTIVITY REPORT. 3. If you want this report for a specific time frame, click on the FROM DATE and/or TO
DATE and fill in the date box (es). 4. Highlight the name of the student(s) under SELECT STUDENTS. Hold down the Ctrl
key to click on multiple students or the Shift key to click on a block (first and then last) of students to report on.
5. Click on Additional Filters for more reporting options. See below for information on additional filters.
6. Click on the additional reporting and demographic options you want to see. 7. Click Done with Criteria when you have selected all desired options. 8. You will be presented with a list of names that will appear in the report. 9. If the list is satisfactory, click on VIEW REPORT.

AZTEC LEARNING SYSTEM – V5.3 UNIVERSAL ADMINISTRATION GUIDE 49
This report will tell you the names of the courses, number of students enrolled in the courses, their average pre- and post-test scores, and the average cumulative time spent in each course.
All reports can be viewed and/or printed. Use the printer icon on your browser to print reports.
Additional Filter Reporting Options The Student Curriculum Report and Course Activity Report both offer the option of selecting additional filters when running these reports. These filters are customizable and allow selections based on demographics and usage.
After you have selected the report type, you can choose additional filter options. Select the options you would like to filter and click Done with Criteria. You will get a list of the students that fit your additional criteria and you may then click View Report. Most of the filter options are based on student demographic fields. One of the options is Bypass Test Completion. This will create a report with all selected students, not just those who completed a pretest and post-test.
Class Report The Class Report gives a summary of all student activity in an instructor’s class(es). Only students who have completed a pretest or post-test will appear in this report. 1. Check the box next to Class Report. 2. If you are logged in as an administrator, select an instructor. 3. Select a class. 4. The report will then generate.
Student Lock Out Report
The Student Lock Out Report logs all of the students who failed the same post-test three times and were locked out of the system.
1. Check the box next to Student Lock Out Report.
2. Select the pool of students for the report.
3. If you are selecting students in a class or students under an instructor, select the appropriate instructor and/or class.
4. Select the students who you would like to be in the report.
50 AZTEC LEARNING SYSTEM – V5.3 UNIVERSAL ADMINISTRATION GUIDE
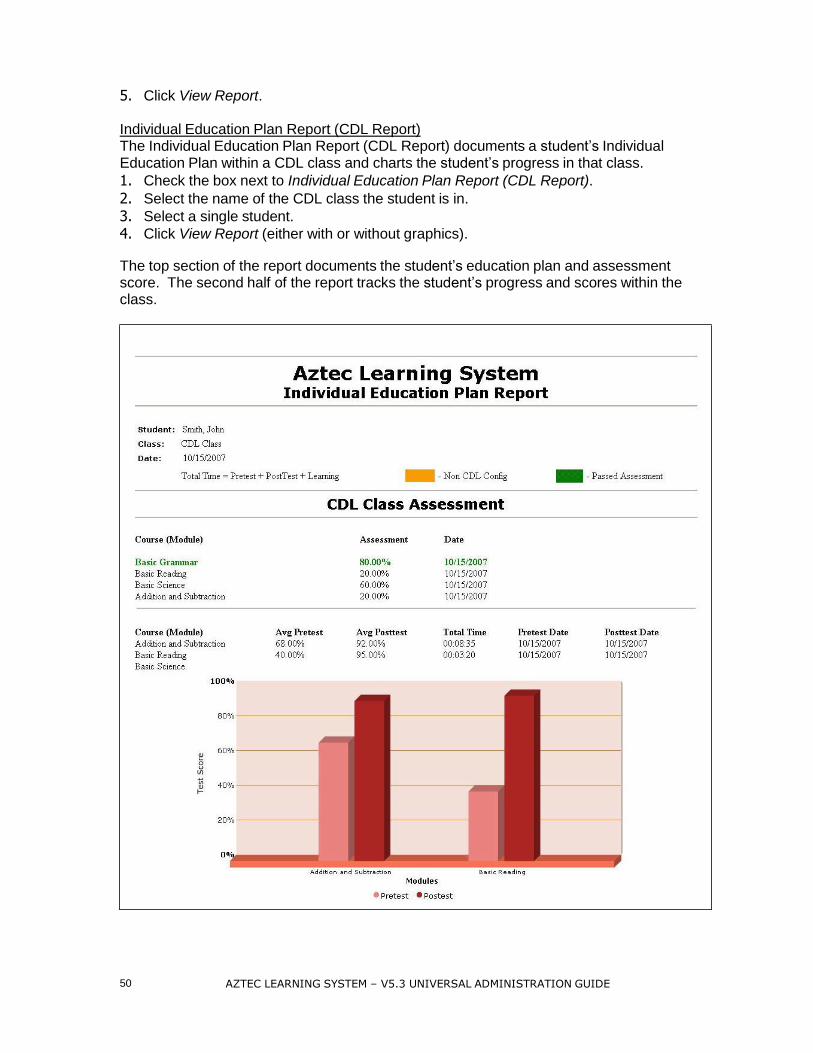
5. Click View Report. Individual Education Plan Report (CDL Report) The Individual Education Plan Report (CDL Report) documents a student’s Individual Education Plan within a CDL class and charts the student’s progress in that class.
1. Check the box next to Individual Education Plan Report (CDL Report).
2. Select the name of the CDL class the student is in.
3. Select a single student.
4. Click View Report (either with or without graphics). The top section of the report documents the student’s education plan and assessment score. The second half of the report tracks the student’s progress and scores within the class.
AZTEC LEARNING SYSTEM – V5.3 UNIVERSAL ADMINISTRATION GUIDE 51
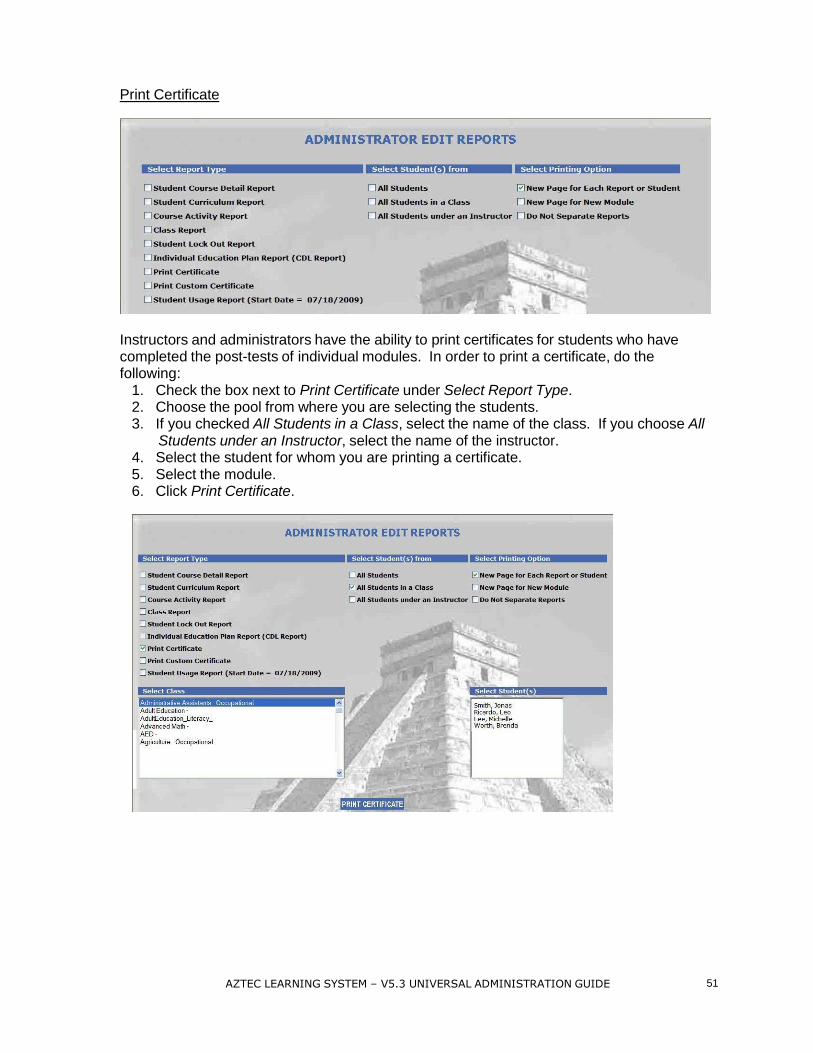
Print Certificate
Instructors and administrators have the ability to print certificates for students who have completed the post-tests of individual modules. In order to print a certificate, do the following:
1. Check the box next to Print Certificate under Select Report Type. 2. Choose the pool from where you are selecting the students. 3. If you checked All Students in a Class, select the name of the class. If you choose All
Students under an Instructor, select the name of the instructor. 4. Select the student for whom you are printing a certificate. 5. Select the module. 6. Click Print Certificate.
52 AZTEC LEARNING SYSTEM – V5.3 UNIVERSAL ADMINISTRATION GUIDE
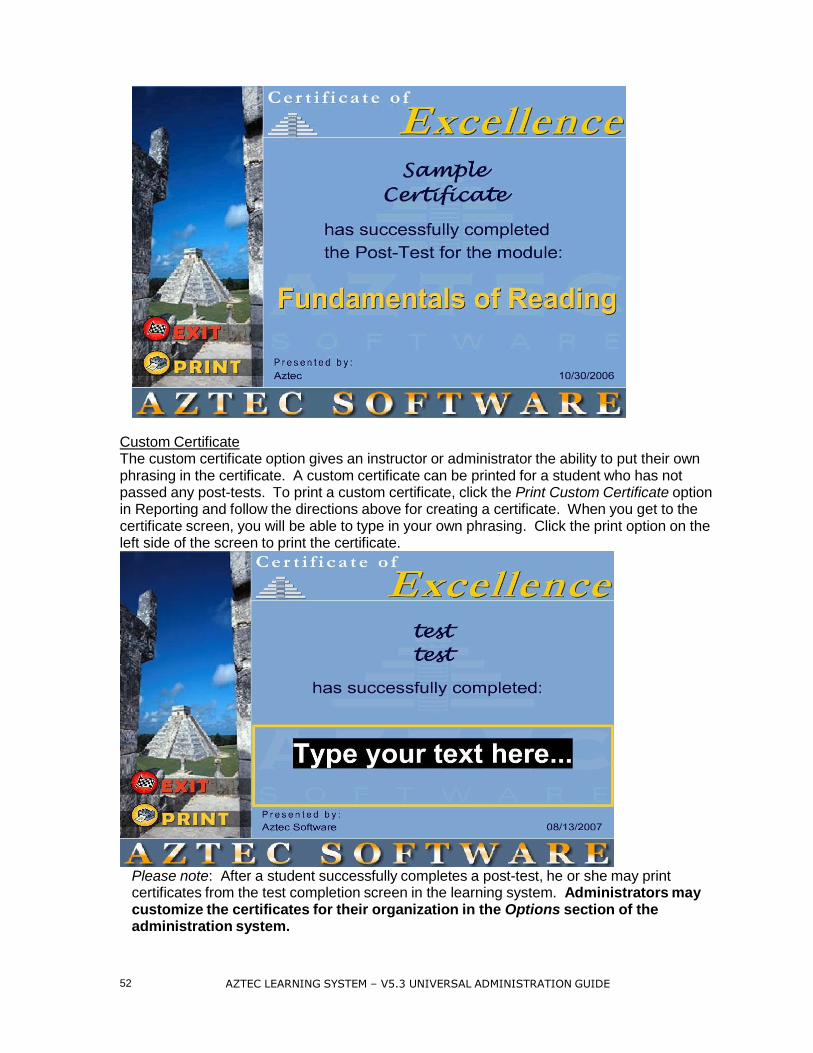
Custom Certificate The custom certificate option gives an instructor or administrator the ability to put their own phrasing in the certificate. A custom certificate can be printed for a student who has not passed any post-tests. To print a custom certificate, click the Print Custom Certificate option in Reporting and follow the directions above for creating a certificate. When you get to the certificate screen, you will be able to type in your own phrasing. Click the print option on the left side of the screen to print the certificate.
Please note: After a student successfully completes a post-test, he or she may print certificates from the test completion screen in the learning system. Administrators may customize the certificates for their organization in the Options section of the administration system.

AZTEC LEARNING SYSTEM – V5.3 UNIVERSAL ADMINISTRATION GUIDE 53
Student Usage Report The Student Usage Report provides a detailed account of the time a student has spent in each individual area of the learning system for a specific date range.
To obtain this report, you must do the following:
1. Click Student Usage report from the main Edit Reports screen
2. A From: (mm/dd/yyyy) and To: (mm/dd/yyyy) date field will appear. You must enter a date range. You cannot pull a usage report with a date earlier than the start date listed on your screen.
3. If applicable, select the instructor or class you wish to pull reports for.
4. Highlight the name of the student(s) under SELECT STUDENTS. Hold down the Ctrl key to click on multiple students or the Shift key to click on a block (first and then last) of students for the report
5. Click on VIEW REPORT. Use the slide bar to the right of the screen to scroll through the report data.
6. To exit the report, click on the Close button at the bottom of the report
54 AZTEC LEARNING SYSTEM – V5.3 UNIVERSAL ADMINISTRATION GUIDE
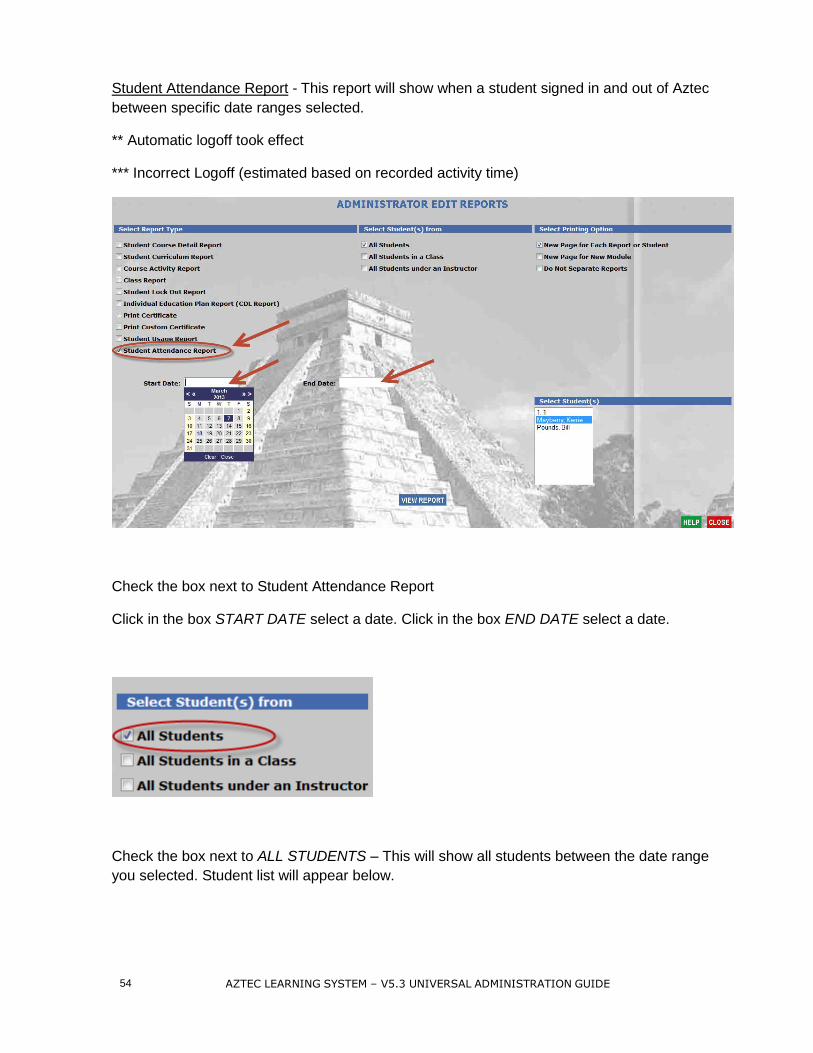
Student Attendance Report - This report will show when a student signed in and out of Aztec
between specific date ranges selected.
** Automatic logoff took effect
*** Incorrect Logoff (estimated based on recorded activity time)
Check the box next to Student Attendance Report
Click in the box START DATE select a date. Click in the box END DATE select a date.
Check the box next to ALL STUDENTS – This will show all students between the date range
you selected. Student list will appear below.
AZTEC LEARNING SYSTEM – V5.3 UNIVERSAL ADMINISTRATION GUIDE 55
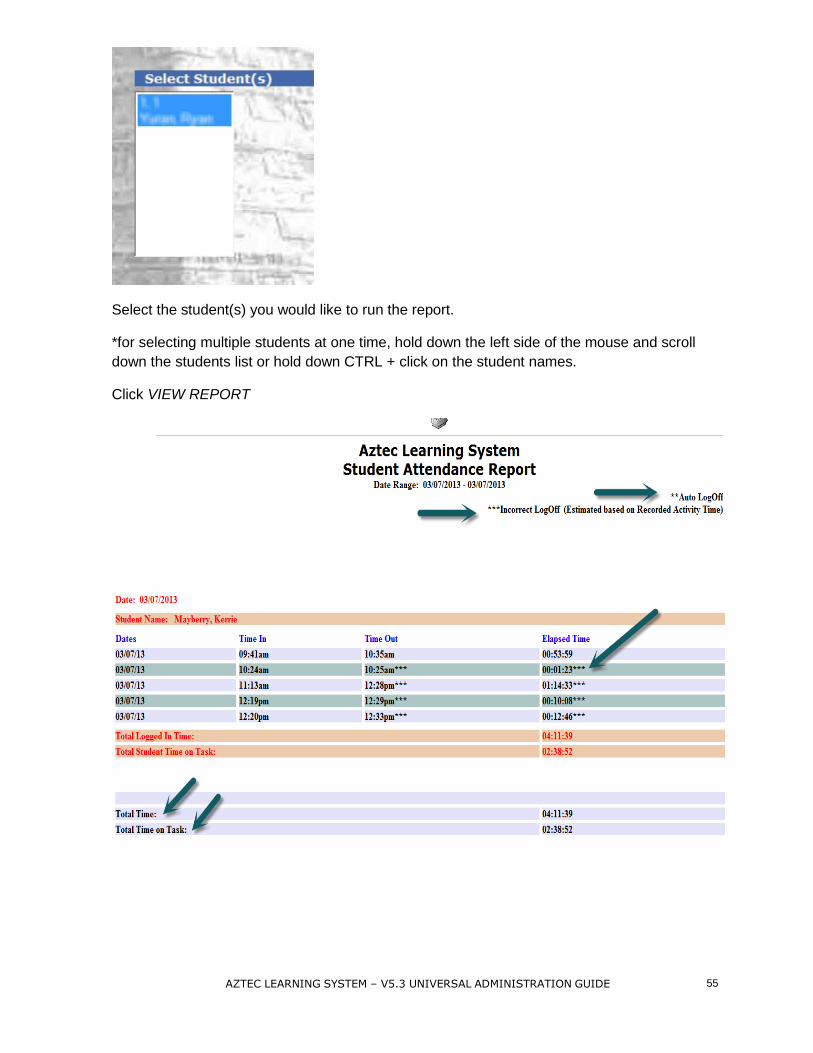
Select the student(s) you would like to run the report.
*for selecting multiple students at one time, hold down the left side of the mouse and scroll
down the students list or hold down CTRL + click on the student names.
Click VIEW REPORT
56 AZTEC LEARNING SYSTEM – V5.3 UNIVERSAL ADMINISTRATION GUIDE
MAINTENANCE
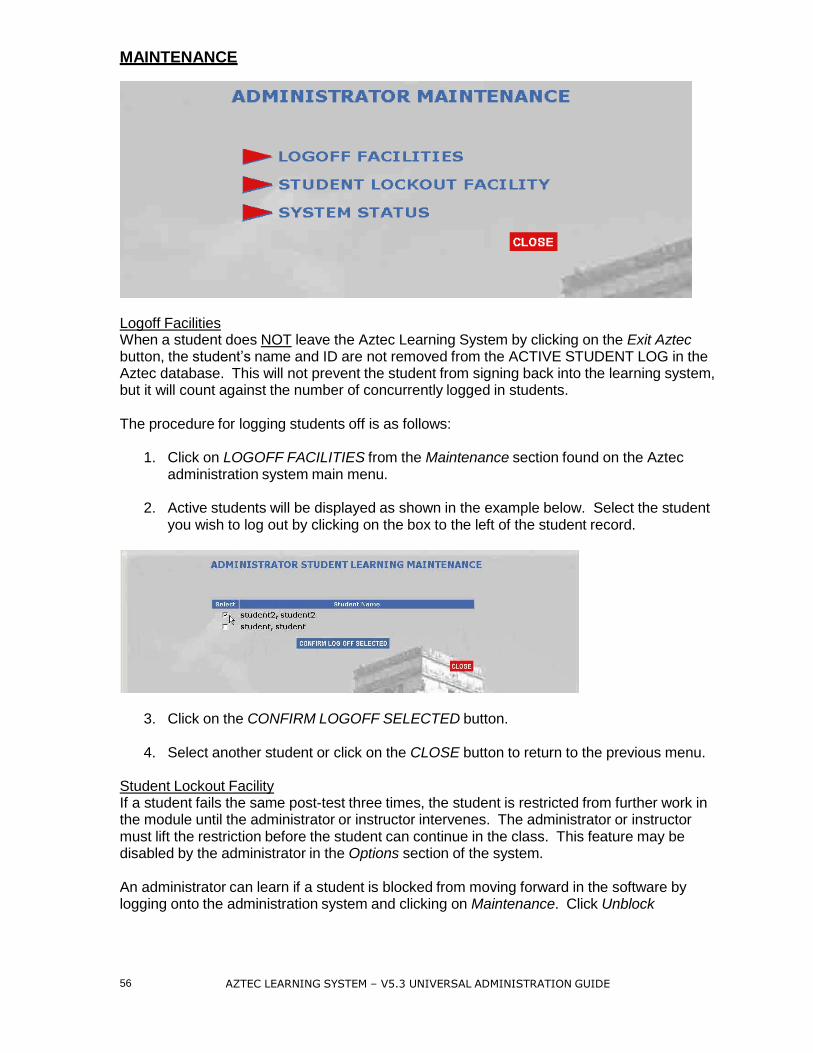
Logoff Facilities When a student does NOT leave the Aztec Learning System by clicking on the Exit Aztec button, the student’s name and ID are not removed from the ACTIVE STUDENT LOG in the Aztec database. This will not prevent the student from signing back into the learning system, but it will count against the number of concurrently logged in students.
The procedure for logging students off is as follows:
1. Click on LOGOFF FACILITIES from the Maintenance section found on the Aztec
administration system main menu.
2. Active students will be displayed as shown in the example below. Select the student you wish to log out by clicking on the box to the left of the student record.
3. Click on the CONFIRM LOGOFF SELECTED button.
4. Select another student or click on the CLOSE button to return to the previous menu.
Student Lockout Facility If a student fails the same post-test three times, the student is restricted from further work in the module until the administrator or instructor intervenes. The administrator or instructor must lift the restriction before the student can continue in the class. This feature may be disabled by the administrator in the Options section of the system.
An administrator can learn if a student is blocked from moving forward in the software by logging onto the administration system and clicking on Maintenance. Click Unblock
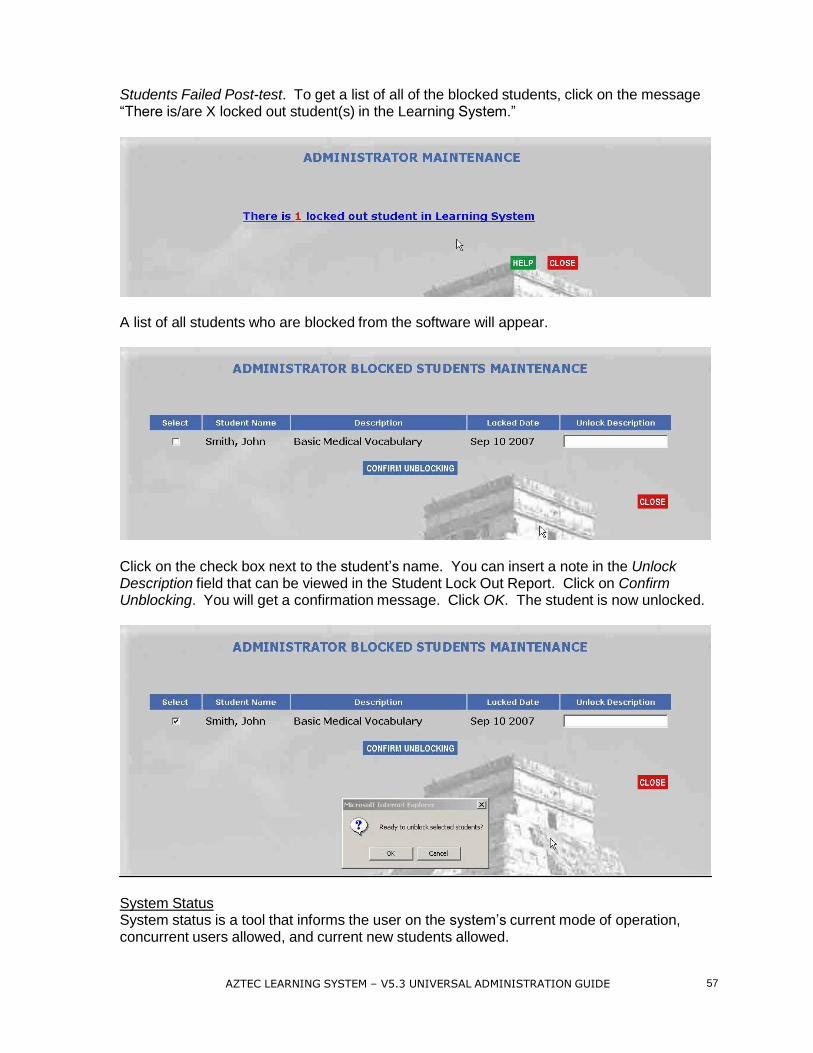
AZTEC LEARNING SYSTEM – V5.3 UNIVERSAL ADMINISTRATION GUIDE 57
Students Failed Post-test. To get a list of all of the blocked students, click on the message “There is/are X locked out student(s) in the Learning System.”
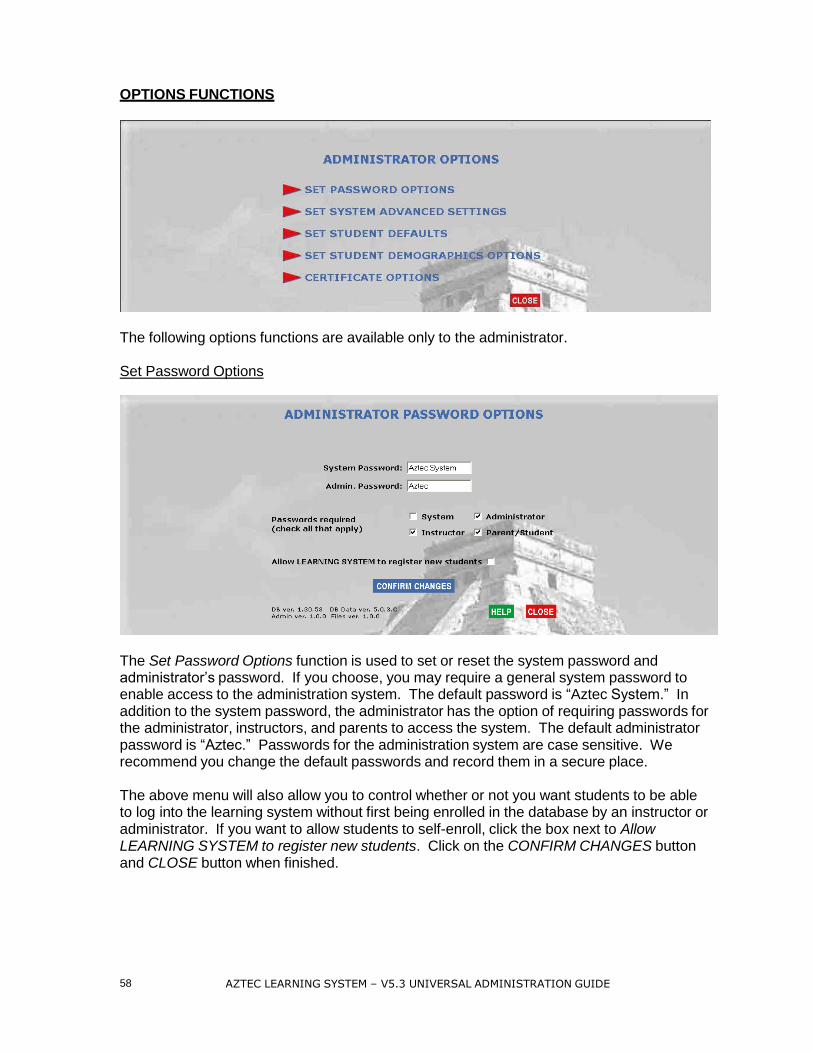
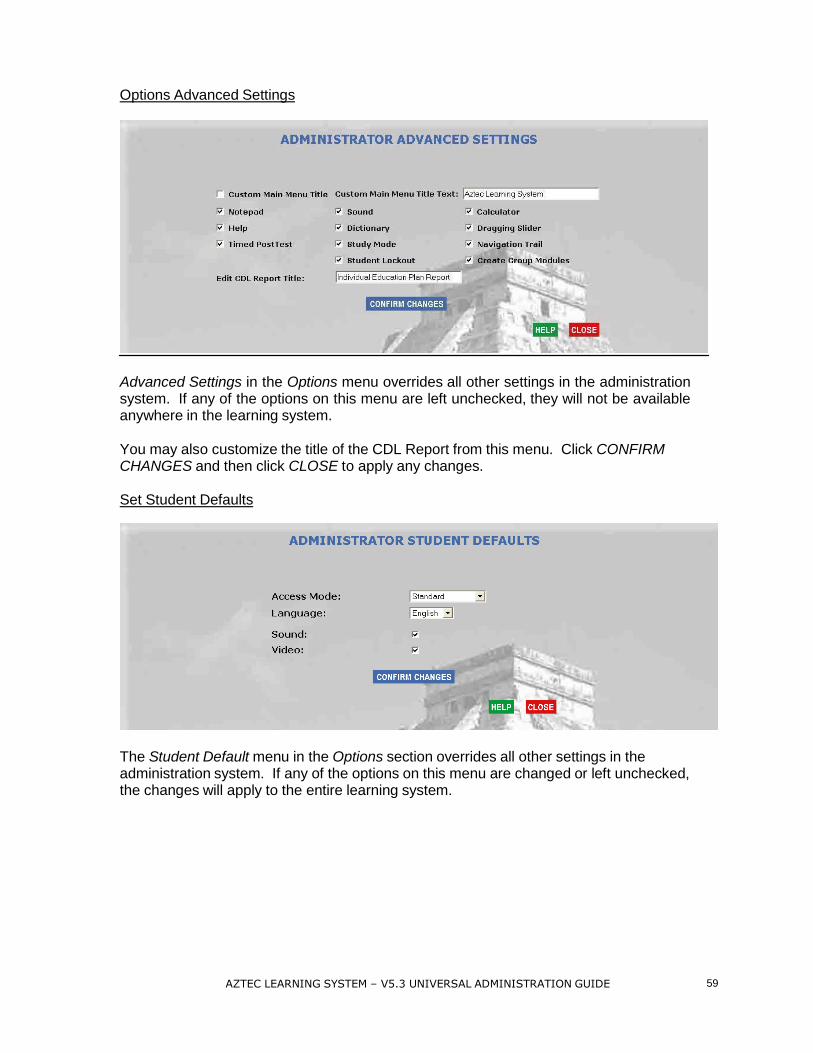
A list of all students who are blocked from the software will appear.
Click on the check box next to the student’s name. You can insert a note in the Unlock Description field that can be viewed in the Student Lock Out Report. Click on Confirm Unblocking. You will get a confirmation message. Click OK. The student is now unlocked.
System Status System status is a tool that informs the user on the system’s current mode of operation, concurrent users allowed, and current new students allowed.
58 AZTEC LEARNING SYSTEM – V5.3 UNIVERSAL ADMINISTRATION GUIDE
OPTIONS FUNCTIONS
The following options functions are available only to the administrator.
Set Password Options
The Set Password Options function is used to set or reset the system password and administrator’s password. If you choose, you may require a general system password to enable access to the administration system. The default password is “Aztec System.” In addition to the system password, the administrator has the option of requiring passwords for the administrator, instructors, and parents to access the system. The default administrator password is “Aztec.” Passwords for the administration system are case sensitive. We recommend you change the default passwords and record them in a secure place.
The above menu will also allow you to control whether or not you want students to be able to log into the learning system without first being enrolled in the database by an instructor or administrator. If you want to allow students to self-enroll, click the box next to Allow LEARNING SYSTEM to register new students. Click on the CONFIRM CHANGES button and CLOSE button when finished.
AZTEC LEARNING SYSTEM – V5.3 UNIVERSAL ADMINISTRATION GUIDE 59
Options Advanced Settings
Advanced Settings in the Options menu overrides all other settings in the administration system. If any of the options on this menu are left unchecked, they will not be available anywhere in the learning system.
You may also customize the title of the CDL Report from this menu. Click CONFIRM CHANGES and then click CLOSE to apply any changes.
Set Student Defaults
The Student Default menu in the Options section overrides all other settings in the administration system. If any of the options on this menu are changed or left unchecked, the changes will apply to the entire learning system.
60 AZTEC LEARNING SYSTEM – V5.3 UNIVERSAL ADMINISTRATION GUIDE
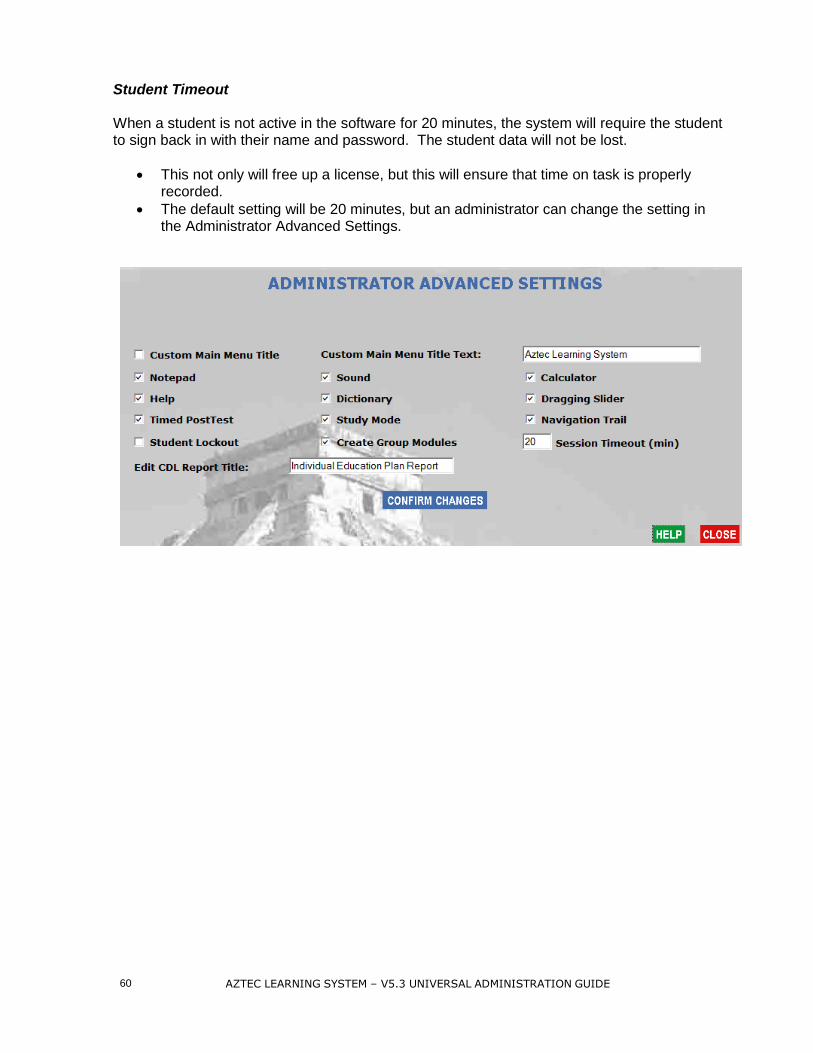
Student Timeout When a student is not active in the software for 20 minutes, the system will require the student to sign back in with their name and password. The student data will not be lost.
This not only will free up a license, but this will ensure that time on task is properly recorded.
The default setting will be 20 minutes, but an administrator can change the setting in the Administrator Advanced Settings.
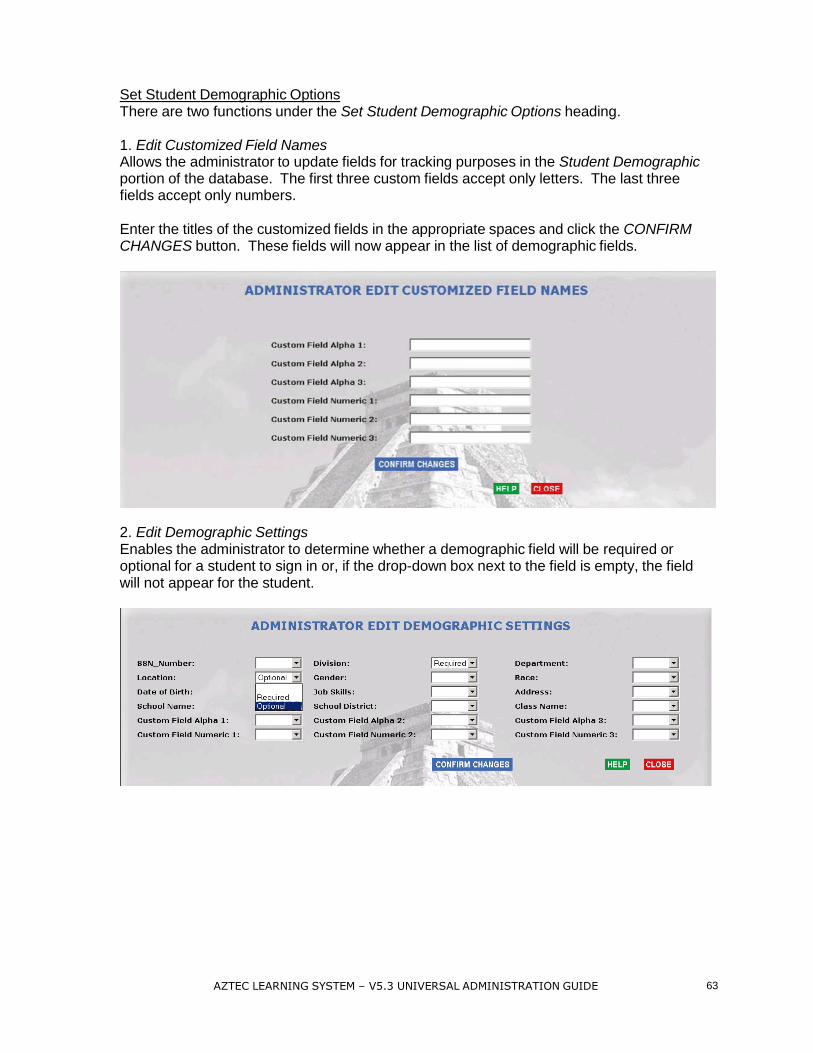
Set Student Demographic Options There are two functions under the Set Student Demographic Options heading.
1. Edit Customized Field Names Allows the administrator to update fields for tracking purposes in the Student Demographic portion of the database. The first three custom fields accept only letters. The last three fields accept only numbers.
Enter the titles of the customized fields in the appropriate spaces and click the CONFIRM CHANGES button. These fields will now appear in the list of demographic fields.
2. Edit Demographic Settings Enables the administrator to determine whether a demographic field will be required or optional for a student to sign in or, if the drop-down box next to the field is empty, the field will not appear for the student.
AZTEC LEARNING SYSTEM – V5.3 UNIVERSAL ADMINISTRATION GUIDE 63

AZTEC LEARNING SYSTEM – V5.3 UNIVERSAL ADMINISTRATION GUIDE 64
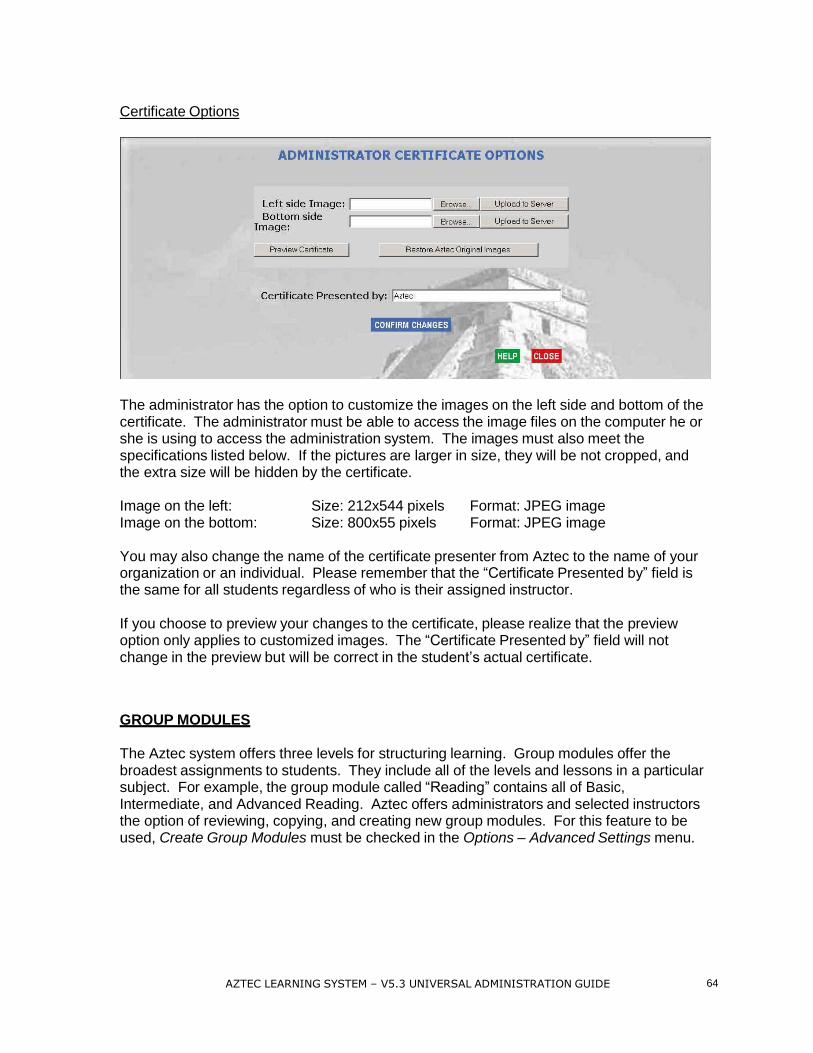
Certificate Options
The administrator has the option to customize the images on the left side and bottom of the certificate. The administrator must be able to access the image files on the computer he or she is using to access the administration system. The images must also meet the specifications listed below. If the pictures are larger in size, they will be not cropped, and the extra size will be hidden by the certificate.
Image on the left: Size: 212x544 pixels Format: JPEG image Image on the bottom: Size: 800x55 pixels Format: JPEG image
You may also change the name of the certificate presenter from Aztec to the name of your organization or an individual. Please remember that the “Certificate Presented by” field is the same for all students regardless of who is their assigned instructor.
If you choose to preview your changes to the certificate, please realize that the preview option only applies to customized images. The “Certificate Presented by” field will not change in the preview but will be correct in the student’s actual certificate.
GROUP MODULES
The Aztec system offers three levels for structuring learning. Group modules offer the broadest assignments to students. They include all of the levels and lessons in a particular subject. For example, the group module called “Reading” contains all of Basic, Intermediate, and Advanced Reading. Aztec offers administrators and selected instructors the option of reviewing, copying, and creating new group modules. For this feature to be used, Create Group Modules must be checked in the Options – Advanced Settings menu.

Group Module Properties
The Group Module Properties setting lets you customize the criteria for the group module diagnostic test. A diagnostic test is offered to a student to determine the level where the student should begin. Questions are pulled from all modules contained in the group module. You have the ability to determine how many questions should be asked from each module, the passing percentage of the module to move the student to the next level, and whether or not you want the results of the diagnostic test to appear in the reporting section of the administration system.
New Group Modules To create a new group module, click on the New Group Module button. When prompted, type in the name for the new group module in the box that appears on the screen. When you are finished typing the name, click OK. A message will appear on the screen indicating the new group module was added. Click on Modules in Group Module to assign modules to the new group module.
65 AZTEC LEARNING SYSTEM – V5.3 UNIVERSAL ADMINISTRATION GUIDE

AZTEC LEARNING SYSTEM – V5.3 UNIVERSAL ADMINISTRATION GUIDE 66
Modules in Group Module
The Modules in Group Module section allows you to view the modules contained in a group module and assign modules to group modules that you have created. You cannot modify Aztec original group modules. In order to assign modules to a new group module, click on the name of the module in the left-hand column. Then, click on the arrow pointing to the right-hand column. The module is now part of the new group module. If you made a mistake or change your mind, click on the module name in the right-hand column and click on the arrow pointing left to remove the module from the group module.
Delete Group Modules To delete a group module that is not an Aztec original group module, select the group module you wish to delete in the drop-down window in the Group Module main menu. Click Delete Group Modules. Confirm that you want to delete that group module and click OK. If you do not want to delete the group module, click Cancel.
Rename Group Module Group modules that are not Aztec original group modules may be renamed. Select the group module you wish to rename in the drop-down window in the Group Module main menu. Click on Rename Group Module. Enter the new name for the group module. Click OK.
Copy Group Module The Copy Group Module function can be used to copy any group module including Aztec original group modules. After a group module is copied, you will be prompted to give the module a unique new name. The copied group module is now considered a new group module and may be edited.

Group Module Configuration
Group Module Configuration enables the administrator or select instructors to change available options for the selected group module.
Introduction: Will appear on the main menu for the group module. It contains a tutorial on how to use the learning system.
Assessment: A test that identifies areas where a student needs remediation. If you choose the assessment feature, it is usually used by itself, and all other options on this screen are deselected.
Diagnostic: A test that identifies at which level a student should begin.
WorkForce: If WorkForce is chosen, a different WorkForce-oriented introduction screen will appear in the learning.
View Scores: Allows students to view their progress in the group module from the learning system.
Edit Problem Sets
In order to have the diagnostic or assessment work in the group modules, problem sets must be attached. These problem sets only apply to the group module assessment or diagnostic. Click on the check box next to the name of the module. Use the drop-down menu to select the problem set you want to use in the test. Repeat this for all of the modules in the group module. When you are finished, click Close.
AZTEC LEARNING SYSTEM – V5.3 UNIVERSAL ADMINISTRATION GUIDE 67
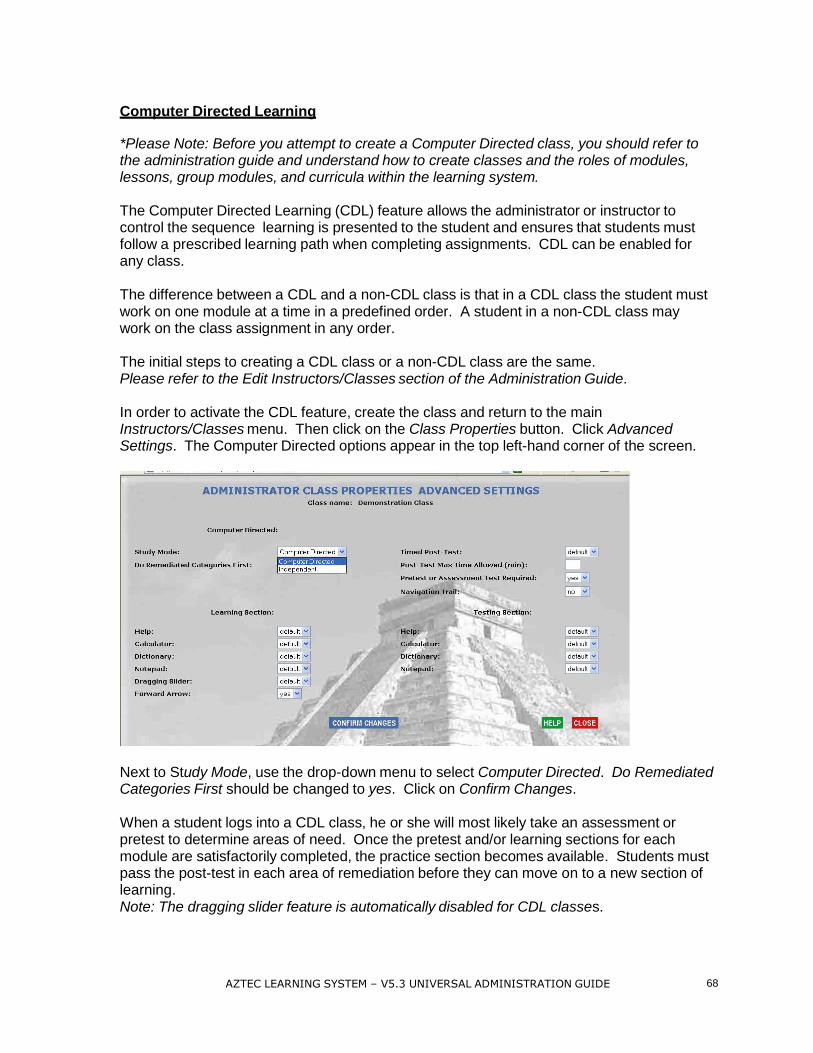
AZTEC LEARNING SYSTEM – V5.3 UNIVERSAL ADMINISTRATION GUIDE 68
Computer Directed Learning *Please Note: Before you attempt to create a Computer Directed class, you should refer to the administration guide and understand how to create classes and the roles of modules, lessons, group modules, and curricula within the learning system.
The Computer Directed Learning (CDL) feature allows the administrator or instructor to control the sequence learning is presented to the student and ensures that students must follow a prescribed learning path when completing assignments. CDL can be enabled for any class.
The difference between a CDL and a non-CDL class is that in a CDL class the student must work on one module at a time in a predefined order. A student in a non-CDL class may work on the class assignment in any order.
The initial steps to creating a CDL class or a non-CDL class are the same. Please refer to the Edit Instructors/Classes section of the Administration Guide.
In order to activate the CDL feature, create the class and return to the main Instructors/Classes menu. Then click on the Class Properties button. Click Advanced Settings. The Computer Directed options appear in the top left-hand corner of the screen.
Next to Study Mode, use the drop-down menu to select Computer Directed. Do Remediated Categories First should be changed to yes. Click on Confirm Changes.
When a student logs into a CDL class, he or she will most likely take an assessment or pretest to determine areas of need. Once the pretest and/or learning sections for each module are satisfactorily completed, the practice section becomes available. Students must pass the post-test in each area of remediation before they can move on to a new section of learning. Note: The dragging slider feature is automatically disabled for CDL classes.
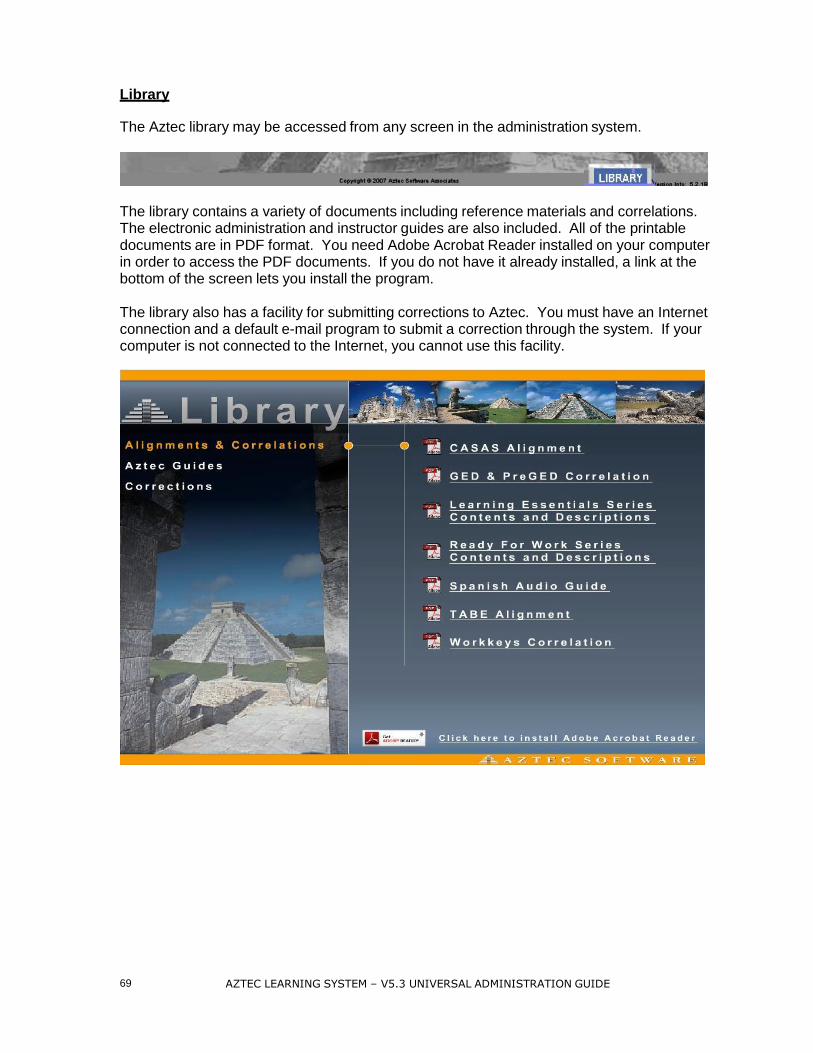
69 AZTEC LEARNING SYSTEM – V5.3 UNIVERSAL ADMINISTRATION GUIDE
Library The Aztec library may be accessed from any screen in the administration system.
The library contains a variety of documents including reference materials and correlations. The electronic administration and instructor guides are also included. All of the printable documents are in PDF format. You need Adobe Acrobat Reader installed on your computer in order to access the PDF documents. If you do not have it already installed, a link at the bottom of the screen lets you install the program.
The library also has a facility for submitting corrections to Aztec. You must have an Internet connection and a default e-mail program to submit a correction through the system. If your computer is not connected to the Internet, you cannot use this facility.
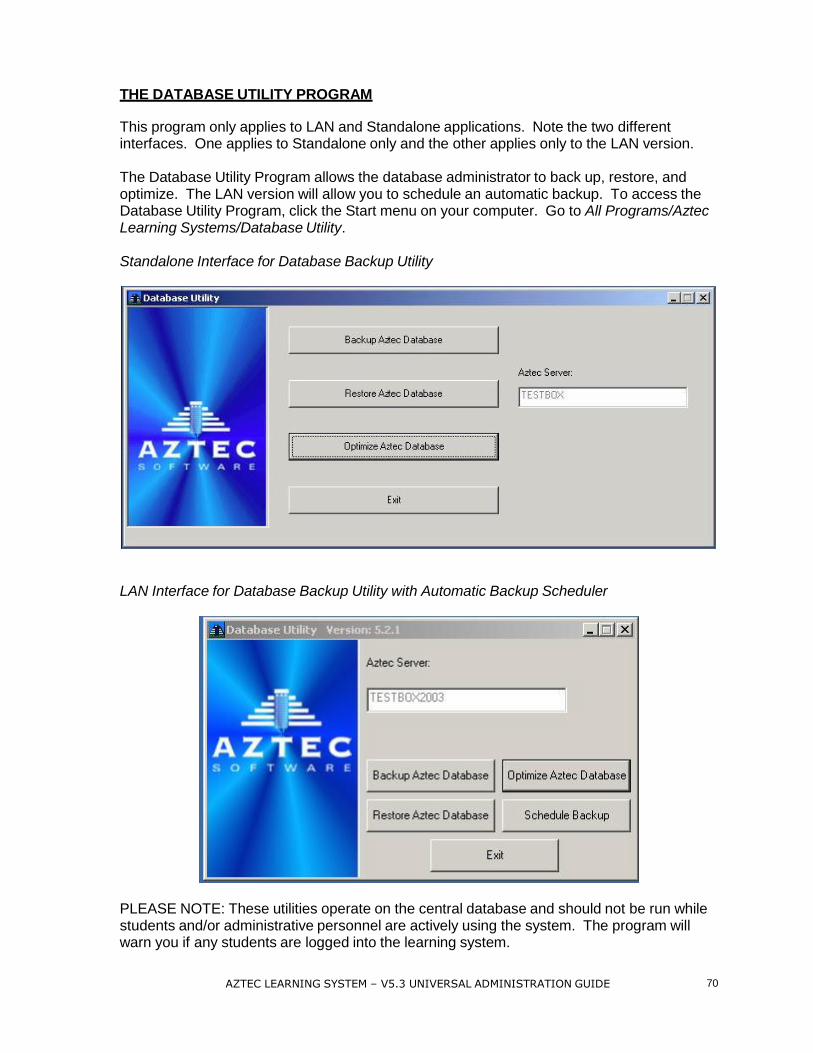
AZTEC LEARNING SYSTEM – V5.3 UNIVERSAL ADMINISTRATION GUIDE 70
THE DATABASE UTILITY PROGRAM This program only applies to LAN and Standalone applications. Note the two different interfaces. One applies to Standalone only and the other applies only to the LAN version.
The Database Utility Program allows the database administrator to back up, restore, and optimize. The LAN version will allow you to schedule an automatic backup. To access the Database Utility Program, click the Start menu on your computer. Go to All Programs/Aztec Learning Systems/Database Utility.
Standalone Interface for Database Backup Utility
LAN Interface for Database Backup Utility with Automatic Backup Scheduler
PLEASE NOTE: These utilities operate on the central database and should not be run while students and/or administrative personnel are actively using the system. The program will warn you if any students are logged into the learning system.

71 AZTEC LEARNING SYSTEM – V5.3 UNIVERSAL ADMINISTRATION GUIDE
Backup Database This will make a copy of the Aztec database. Click on Backup Database and you will be presented with a SAVE AS dialog box. Provide a name for the backup file and click Next to save a copy of the database.
Restore Database This will restore a copy of an Aztec database backed up with the Backup Database procedure above. Click on Restore Database. In the Data File Name dialog box, select the backup file that you wish to restore, then click on the OPEN button. The backup database will be restored to the proper location and renamed accordingly.
Optimize Database This function will organize the database and increase the performance of the Aztec Learning System. Upon completion, you will be notified that the Aztec database has been optimized successfully.
Schedule Backup LAN version only
From the main user interface, select the Schedule Backup button. You will see the following screen.
This screen will allow you to select the frequency of your scheduled backup job. You may choose to schedule your job daily, weekly, or monthly. You will always select the time for your backup regardless of the frequency selected. Daily Backup Your daily backup will take place everyday Sunday through Saturday at the scheduled time. Weekly Backup Select the day of the week and the time for your backup. Monthly Backup For the monthly backup, you have two options. You may select either the date or the day of the month for your backup.
Once you have selected your schedule, you will click the Create Job and Schedule button to finalize the setup.
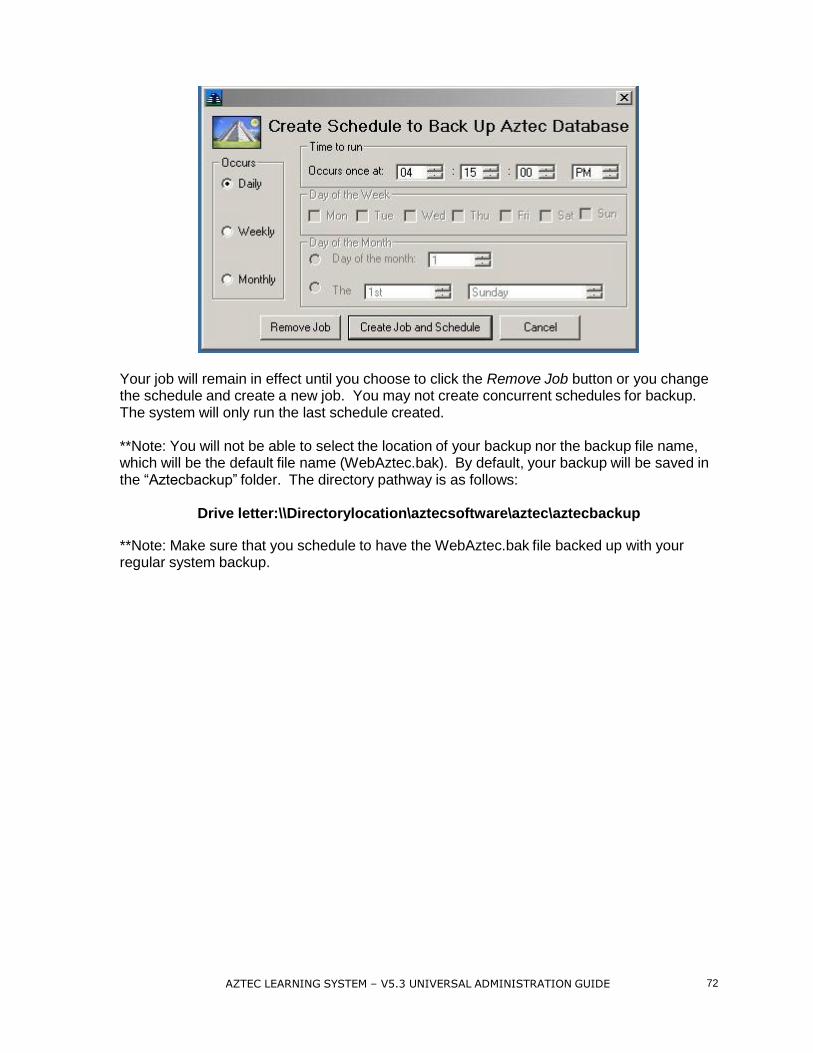
AZTEC LEARNING SYSTEM – V5.3 UNIVERSAL ADMINISTRATION GUIDE 72
Your job will remain in effect until you choose to click the Remove Job button or you change the schedule and create a new job. You may not create concurrent schedules for backup. The system will only run the last schedule created.
**Note: You will not be able to select the location of your backup nor the backup file name, which will be the default file name (WebAztec.bak). By default, your backup will be saved in the “Aztecbackup” folder. The directory pathway is as follows:
Drive letter:\\Directorylocation\aztecsoftware\aztec\aztecbackup
**Note: Make sure that you schedule to have the WebAztec.bak file backed up with your regular system backup.

LEARNING SYSTEM LOG IN Click on the icon for the Aztec Learning System on your desktop. You will be brought to the log in screen of the learning system.
If there is no Aztec icon on your desktop, you must go through the Start → Programs function on your computer and select the Aztec Learning System.
Web Users: Open up your browser and type in the URL for the learning system provided to you by Aztec.
When a student accesses the Aztec Learning System, he or she will be prompted to sign into the system. All students will be required to provide their first name, last name, and password.
Students are tracked through their names and, therefore, all students must have a unique name. For students having the same first and last name, we suggest using a middle initial or middle name.
Passwords All students must have a password that contains a minimum of five and a maximum of twelve letters or numbers. Passwords do not have to be unique.
Self-Enrollment
AZTEC LEARNING SYSTEM – V5.3 UNIVERSAL ADMINISTRATION GUIDE 73

AZTEC LEARNING SYSTEM – V5.3 UNIVERSAL ADMINISTRATION GUIDE 74
If a student has never accessed the software before and his or her information has not been entered into the system, a student registration option is available. The Student Self- Enrollment option is activated by the administrator in the Options portion of the administration system. If allowed, students would have to fill out a registration form with required information in order to access the software. The required fields are decided by the administrator.
Once in the learning system, the student will be prompted to select an instructor. The curriculum from that instructor will then appear on the screen. Depending on the assignments from that instructor, the student may have one or several options to choose from.
Learning System Navigation Navigation in the software remains consistent throughout. Every screen has a navigation bar on the bottom that lets the student move forward, backward, repeat the current screen, or return to the main menu. Students may click on the question mark for questions on using the software. A calculator may be made available for math problems.
For all additional questions on how to use any of the functions outlined in this manual, please call (800) 273-0033.