6th science and social studies: a thematic...
TRANSCRIPT

Science & Social Studies Interconnections: A Thematic Approach 1
INTERCONNECTIONS
6th
Science and Social Studies: A Thematic
Approach
Department of Teaching and Learning
Salt Lake City, UT

Science & Social Studies Interconnections: A Thematic Approach 2
Notes: Foldable: Graphic organizer where students fold the paper and then write/draw information in each section. Do an internet search for some examples. eMedia: Online media content provider that can be accessed through UEN.org. Video files can be shown directly from the website or can be downloaded and saved (recommended). Document Camera: Overhead camera that connects to the computer and LCD projector so that the entire class can see a single document or book. HUE brand can be purchased from Amazon.com for around $50 or less. LCD Projector: The electronic copy of the manual can be used on the LCD instead of making copies, or to take advantage of the color graphics in the electronic version. Nystrom Atlas: Recommended to have a class set for each grade level. Contact Kim Sorensen at Nystrom for a current catalog. 801-969-5737. Book/Video list: A spreadsheet of all suggested materials is available on the Interconnections website (or Intranet for GSD employees). The teacher may always substitute another book if they do not have the suggested title. Books go out of print, or may not be as appropriate for every student. Teachers can use their judgment on replacing a book or video. Supplies: The science supplies are listed in a spreadsheet on the Interconnections website (or Intranet for GSD employees). Suggestions for where to purchase items can be found in the spreadsheet. Website: http://www.graniteschools.org/departments/teachinglearning/Curriculum/interconnectins/Pages/default.aspx

Science & Social Studies Interconnections: A Thematic Approach 3
6th Grade Table of Contents 5-Welcome 6-Imagine It! Correlations 7-Unit 1 Microorganisms 9-Essential Question 1 How does the structure of microorganisms relate to their function or environment?
11-Microorganisms 17-Essential Question 2 In what negative ways do humans and microorganism interact? 19-Disease Microorganisms
23-Essential Question 3 What changes occur in foods due to the action of microorganisms? 25-Microbe Investigation 31-Grocery Store Microbes
37-Essential Question 4 How has science developed positive uses of microorganisms? 39-Decay and Composition 43-Scientists and Microbiology
47-Unit 2 Cause & Effect: Ancient Civilizations 49-Essential Question 1 How did geography affect the development f early civilizations?
51-Where in the World Does History Happen? 57-Emerging Civilizations 61-The Fertile Crescent 65-Mesopotamia
71-Essential Question 2 How has religion played a role in history from ancient times through today? 73-Ancient Beliefs 75-The Gods Must be Crazy, Part 1 81-The Gods Must be Crazy, Part 2
85-Essential Question 3 How can modern governments trace some of their ideas to those in ancient civilizations?
87-Government of the People 95-Essential Question 4 How did the earliest civilizations create technologies and systems to meet their needs?
97-Show me the Evidence 101-The Most Excellent Civilization
105-Unit 3 Transformations: The Middle Ages & the Renaissance 107-Essential Question 1 How does physical geography affect economic and cultural expansion?
109-The Wonder of the World 115-The Spice World
119-Essential Question 2 Why was religion so important in the Middle Ages and Renaissance and how do relation from those times continue to impact us today?
121-Two Worlds Collide 123-Relevant Today: Religion in the Middle Ages and Renaissance 129-History Makers
133-Essential Question 3 How did governments take steps toward self-rule during the Middle Ages and Renaissance?
135-From Feudalism to Self-Rule 145-Rise of the City States
151-Essential Question 4 Why is the Renaissance considered a rebirth of cultural and intellectual pursuits?
153-A Renaissance of Ideas

Science & Social Studies Interconnections: A Thematic Approach 4
157-Unit 4 Transformations: Energy of Heat, Light & Sound 159-Essential Question 1 How can energy be transferred from one material to another?
161-Conduction 165-Convection 169-Radiation
175-Essential Question 2 In why ways can visible light be changed? 177-Reflecting Light 181-Refraction: The Bending of Light 185-Light: Sources and Colors
193-Essential Question 3 How can changes in vibrations create sound? 195-Conduction of Sound 199-Good Vibrations
205-Unit 5 Change: The Universe in Motion 207-Essential Question 1 In what ways do the Earth, sun and moon affect each other?
209-Moon Phases 215-More Moon Phases
219-Essential Question 2 How does the position of the Earth in the solar system affect the condition of life on our planet?
221-Orbit, Revolution, Rotation 223-Seaons
229-Essential Question 3 How does the force of gravity affect all matter in the universe? 231-Gravity
235-Essential Question 4 How are the planets and other objects in the solar system similar to and different from Earth?
237-Tour of the Solar System 245-Distance in the Solar System 249-Like Earth?
253-Essential Question 5 What can learn from the night sky? 255-Constellation Myths 257Constellation Tubes 259-The Stars in Motion 263-Tools of the Astronomer
267-Unit 6 Change: Revolution and the Modern World 269-Essential Question 1 Why do people revolt?
271-Revolutionary Reasons 275-Essential Question 2 How is revolution a catalyst for change?
277-Winds of Change 281-Essential Question 3 How did major conflicts of the 20th century affect the world today?
283-World at War, Part 1 287-World at War, Part 2 289-World at War, Part 3
295-Essential Question 4 What are possible solutions to the global issues we face today? 297-Into the Future: Global Solutions
301-Essential Question 5 What rights and responsibilities do we have in today’s world? 303-Rights, Respect and Responsibility in a Global World

Science & Social Studies Interconnections: A Thematic Approach 5
Welcome to Interconnections! Interconnections is a thematic approach to teaching the Utah elementary science and social studies core curricula. Introduced over a decade ago, Interconnections was and continues to be a collaborative effort of classroom teachers, media coordinators, curriculum specialists, and district administrators. The 2011 revised program honors the past, yet embraces current research, resources, and technology. Built on the Backward Design* model, each grade level in the 2011 program includes four to six units sequenced to build on skills and knowledge outlined in the curricula and assessed through state criterion-referenced tests (CRTs). Each unit includes an enduring understanding and three to five essential questions designed to teach both science and social studies comprehensively and efficiently. Time is a precious instructional resource. Interconnections recognizes this and consolidates resources, ancillary materials, and lesson plans into one user-friendly notebook per grade level. Theme-related graphics associate individual lessons and support materials with specific units of instruction. In addition to the notebook, electronic versions of the program replace the need for overheads and excessive photocopying. Program updates and support services are available through the Granite School District Interconnections website. The look may be new, but the philosophy remains the same. Students need to recognize authentic connections among content areas and use them to enhance their skills and understanding of a given subject. Students must be engaged in learning tasks that promote life skills and higher-level thinking. Students need opportunities to apply their reading and writing abilities during science and social studies instruction. While Interconnections adheres to this philosophy, it honors the expertise of individual classroom teachers and encourages them to make program adjustments as necessary to meet the needs of individual students and classrooms. 6th Grade Pacing Map
Unit 1 Unit 2 Unit 3 Unit 4 Unit 5 Unit 6 4 weeks 4 weeks 4 weeks 5 weeks 10 weeks
(complete before science
CRTs)
5 weeks
*Understanding by Design, Grant P. Wiggins & Jay McTighe

Science & Social Studies Interconnections: A Thematic Approach 6
Imagine It! Correlations with Interconnections 6th Grade
6th Grade Taking a Stand
Ancient Civilizations Ecology
Great Expectations
Earth in Action
Art and Impact
Interconnections None Unit II, EQ 2 None Unit I, EQ 4 None Unit III, EQ 4

Science & Social Studies Interconnections: A Thematic Approach
7
Sixth Grade Interconnections Unit I
Investigations: Microorganisms Enduring Understanding: Microorganisms are living things that are too small to see without magnification. They range from simple to complex, are found almost everywhere and are both helpful and harmful. Essential Questions • How does the structure of microorganisms relate to their function or
environment? • In what negative ways do humans and microorganisms interact? • What changes occur in foods due to the action of microorganisms? • How has science developed positive uses of microorganisms? Core Curriculum Concepts/Skills: investigation, scale, relationship, communication, demonstration, observation, complexity, summarize
Core Standards Science Standard V: Students will understand that microorganisms range from simple to complex, are found almost everywhere, and are both helpful and harmful. Objective 1: Observe and summarize information about microorganisms.
Objective 2: Demonstrate the skills needed to plan and conduct an experiment to determine a microorganism’s requirements in a specific environment. Objective 3: Identify positive and negative effects of microorganisms and how science has developed positive uses for some microorganisms and overcome the negative effects of others.
Science language students should know and use: algae, fungi, microorganism, decomposer, single-celled, organism, bacteria, protozoan, producer, hypothesis, experiment, investigation, variable, control, culture

Science & Social Studies Interconnections: A Thematic Approach
8

6th Grade Unit 1: Investigations: Microorganisms
Science & Social Studies Interconnections: A Thematic Approach 9
Essential Question #1: How does the structure of microorganisms relate
to their function or environment?
Lessons: • Microorganisms
Core Standards Social Studies Science
Standard V o 1a examine and illustrate size, shape and structure of organisms found in an
environment such as pond water o 1b compare characteristics common in observed organisms and infer their
function o 1c research and report on a microorganisms requirements including food,
water, air, waste disposal, temperature of environment, reproduction o 2a formulate a question about microorganisms that can e answered with a
student experiment o 2b develop a hypothesis for a question about microorganisms based on
observations and prior knowledge o 2c plan and carry out an investigation on microorganisms (NOTE: see
teacher/student safety information) o 2d display results in an appropriate format o 2e prepare a written summary or conclusion to describe the results in terms of
the hypothesis for the investigation on microorganisms

6th Grade Unit 1: Investigations: Microorganisms
Science & Social Studies Interconnections: A Thematic Approach 10

Unit 1, Essential Question #1 11 Interconnections © 2011
6th Grade Unit 1: Investigations: Microorganisms
Essential Question #1: How does structure of a microorganism relate
to their function or environment? Lesson Title: Microorganisms SC Standard 5, Objective 1 Implementation Time: 60 minutes Media Resources Needed: Optional: Micro Monsters by Maynard (1/2 class set) Optional: Life Under the Microscope by Christopher Maynard www.microscope-microscope.org/applications/pond-critters/pond-critters.htm Materials Needed: (per station) Activity 1 Activity 2 Activity 3 Jar of pond water Yeast Bacteria Invasion Sheet Eye dropper Flour Calculator Microscope and slide Sugar 3 balloons 3 empty water bottles water Procedure: Teacher Prep: 1. Collect protists from local pond water by scooping up the scum and algae on top of the water. Even in midwinter, protists may be scooped up in debris or vegetation on top or on the bottom of the pond. 2. Fill the jars 2/3 full with the pond water. 3. Keep the jars in a well-lit area, preferably one that is reached by moderate sunlight. Don’t let the water to get too hot or the protists could die. Be careful about direct sunlight. Within 24-48 hours, some protists that were scattered through the jar will become concentrated at the top where they may be found more easily and in greater numbers (others may become concentrated near the bottom of the jar).

Unit 1, Essential Question #1 12 Interconnections © 2011
4. Divide students into groups and rotate them to each station for about 15 minutes. Activity 1: Pond Water Investigation Students will look for different kinds of protists in pond water. Sources of pond water could be provided by a student or collected at a local park or lake. Activity 2: Yeast Blow Up Students will try and discover what kind of food and water yeast likes best. This station could be adapted to more inquiry by allowing students to change the amounts of sugar or flour or water. Activity 3: Bacteria Invasion Have students do a math activity that shows how quickly a single bacteria can multiply into thousands. Assessment: Activity Answer Keys 1. Pond water: Check student notebooks to see if they sketched and identified protists. 2. Yeast Blow Up: Check student observations. Should find that warm, not hot or cold temperature creates the most response (balloon fills the fullest with gas. A fuller balloon indicates better activity by the yeast). 3. Bacteria Invasion: 16,777,216 bacteria in just 8 hours (explanation below) 224 Start 1 1 20 1x2 2 40 2x2 4 60 (1 hr) 4x2 8 80 8x2 16 100 16x2 32 120 (2 hr) 32x2 64 140 64x2 128 160 128x2 256 180 (3 hr) 256x2 512 200 512x2 1024 220 1024x2 2048 240 (4 hr) 2048x2 4096 260 4096x2 8192 280 8192x2 16384 300 (5 hr) 16384x2 32768 320 32768x2 65536 340 65536x2 131072 360 (6 hr) 131072x2 262144 380 262144x2 524288 400 524288x2 1048576 420 ( 7 hr) 1048576x2 2097152 440 2097152x2 4194304 460 4194304x2 8388608 480 (8 hr) 8388608x2 16777216
Extension: 1. Have students create a foldable pyramid showing 3 different kinds of protists or other microorganisms. 2. Add a research station with the Microbe Monster book and have students record interesting facts in their science notebooks.

Unit 1, Essential Question #1 13 Interconnections © 2011
Pond Water Investigation 1. Using an eyedropper, suck-up some pond water from the murky part of the water (squeeze the dropper before putting it in the water), place a drop or two on a slide and then cover the drop with coverslip. 2. Be patient while looking for protists, but make additional slides if necessary. 3. Once a protist has been identified, draw what you saw. 4. Finally, see if you can identify what you saw using the descriptions below. 5. The jars could be kept for several days. The species that are most numerous one day may be absent the next day, replaced by other species. Protists: Protists are single celled organisms. In a drop of pond water you may see a variety of protists as well as other small organisms. While doing your lab with pond water, keep an eye out for some of these organisms. Use the suggested link at the beginning of the lesson or do an internet search for “pond water protists.” Euglena - These protozoa move using a flagellum, a long tail-like structure. Amoebas - These protozoa move and capture food by changing their body shape, reaching out pseudopods (meaning false feet). Paramecium - These protozoa are covered with tiny hair-like structures call cilia, they move by "rowing" with the cilia. Algae - Algae are plant-like single celled organisms that sometimes live in groups. They produce their food using photosynthesis just like plants (in fact many forms of algae are sometimes classified as plants). Diatoms - Diatoms are a very interesting class of single celled algae. They form hard, rigid, cell wall out of silica (the same stuff a lot of sand and glass is made from). Animals: Worms - The name worm is used for many unrelated animals that evolved a slender elongated body shape. Insect larva - Many insects lay their eggs in water, when they hatch these larva usually look nothing like the adult insects. Rotifers - Rotifers are microscopic multicellular animals, and among the most ancient and primitive of all animals. Plants You are likely to see many tiny aquatic plants in your pond water, along with broken bits of larger plants such as leaves and roots, depending on the time of year you many also see tiny seeds or pollen.

Unit 1, Essential Question #1 14 Interconnections © 2011
Bacteria Invasion Bacteria reproduce by dividing in half. The E.Coli bacteria can divide every 20 minutes under ideal conditions. If you start with just one bacteria, how many would you have in 8 hours? Start 1 After 20 minutes ________ After 40 minutes ________ After 1 hour ________ After 2 hours _________ After 4 hours _________ After 5 hours _________ After 6 hours _________ After 7 hours _________ After 8 hours _________

Unit 1, Essential Question #1 15 Interconnections © 2011
Yeast Blow Up
You will get to see how yeast is a living microbe. As yeast, a living microbe, digests its food, it creates gas! The better it digests, the more gas it creates. 1. In three empty water bottles place 1/2 teaspoon of flour, 1/2 teaspoon sugar, 1/2 teaspoon yeast. 2. In the one bottle add 100 ml of cold tap water. In the second bottle add 100 ml of warm water. In the third bottle add 100 ml of hot water. Swirl the flasks. 3. Quickly place a balloon over each flask (three different colors help for identification). Keep an eye on all three flasks for about 15 minutes. Record your observations in your science notebook. What water temperature had the biggest effect on the yeast? How do you know?

Unit 1, Essential Question #1 16 Interconnections © 2011

6th Grade Unit 1: Investigations: Microorganisms
Science & Social Studies Interconnections: A Thematic Approach 17
Essential Question #2:
In what negative ways do humans and microorganisms interact?
Lessons: • Disease Microorganisms
Core Standards Social Studies Science
Standard V o 3d relate several diseases caused by microorganism to the organism causing
the disease (example may include: athlete’s foot – fungi; streptococcus throat – bacteria; giardia – protozoa)

6th Grade Unit 1: Investigations: Microorganisms
Science & Social Studies Interconnections: A Thematic Approach 18

Unit 1, Essential Question # 2 19 Interconnections © 2011
6th Grade Unit 1: Investigations: Microorganisms
Essential Question #2: In what negative ways do humans and
microorganisms interact? Lesson Title: Disease Microorganisms Standard, V Objective 3 Implementation Time: 45 minutes Media Resources Needed: Simple Organisms and Viruses Macmillan/McGraw-Hill Kids Discover: Germs (1/2 class set) Any books on microorganisms for reference Materials Needed: Disease Microorganisms Sheet Procedure: 1. Explain to the students that they are to complete the “Disease Microorganisms” chart in their science notebook.
2. Pass out the Kids Discover: Germs magazines and have students read with a partner. They should read pages 1-5, 8-11, and 16-19 and then use it along with Kids Discover: Germs as a reference. 3. Pass out the “Disease Microorganisms” hand out. Have the Simple Organisms and Viruses book for reference. 4. Explain that you want the students to skim the books and use the index to identify which microorganism category to sort the list of diseases into.
5. Tell students that after they have finished sorting the diseases into the categories they are to answer the two questions at the bottom of the “Disease Microorganisms” hand out page. Assessment: Check to see if the diseases are placed in the correct categories. Ask the students question one and two to see if they came to a correct conclusion of microbes according to the chart.

Unit 1, Essential Question # 2 20 Interconnections © 2011
DISEASE MICROORGANISMS Each of the diseases in the list below is caused by one of the microorganism listed on the chart. Use Simple Organisms and Viruses and find out what kind of microorganism causes each disease in humans and list it on the chart. Strep Throat Whooping Cough Thrush Ringworm Polio Mumps Dysentery Rabies Athlete’s Food Colds/Flu Malaria Diphtheria Chicken Pox Hepatitis AIDS Tuberculosis Bubonic Plague St. Anthony’s Fire Small Pox Botulism Sleeping Sickness Measles Meningitis Bacteria Protozoa Virus Fungi
Questions: Reading a chart. 1.Which two groups of microbes have the most diseases listed?
2. What conclusion can you draw about these two groups of microbes?

Unit 1, Essential Question # 2 21 Interconnections © 2011
Answer Key: DISEASE MICROORGANISMS
Bacteria Protozoa Virus Fungi Strep Throat Dysentery Polio Thrush Whooping Cough Malaria Mumps Ringworm Diphtheria Sleeping Sickness Colds/Flu Athlete’s Foot Tuberculosis Chicken Pox St. Anthony’s Fire Botulism Hepatitis Meningitis AIDS Bubonic Plague Measles Small Pox Questions: 1.Bacteria and Viruses 2.Most diseases in humans are caused by bacteria and viruses.

Unit 1, Essential Question # 2 22 Interconnections © 2011

6th Grade Unit 1: Investigations: Microorganisms
Unit 1, Essential Question # 3 23 Interconnections © 2011
Essential Question #3: What changes occur in foods due to the action
of microorganisms?
Lessons: • Microbe Investigation • Grocery Store Microbes
Core Standards Social Studies Science
Standard V o 3a describe in writing how microorganisms serve as decomposers in the
environment o 3b identify how microorganisms are used as food or in the production of food o 3e observe and report on microorganisms’ harmful effects on food

6th Grade Unit 1: Investigations: Microorganisms
Unit 1, Essential Question # 3 24 Interconnections © 2011

Unit 1, Essential Question # 3 25 Interconnections © 2011
6th Grade
Unit 1: Investigations: Microorganisms
Essential Question #1: How does the structure of a microorganism relate to their function and environment?
Lesson Title: Microbe Investigation (adapted from USU Ag in the Classroom)
SC Standard V, Objective 2 Implementation Time: 45 minutes (plus observation time) Materials Needed: (per group) Test-tube racks (teams can share) Refrigerator with freezer compartment, if possible 30 ml of pasteurized, whole milk (10 ml per test tube) 30 ml of ultra high temperature milk (shelf stable, UHT) or reconstituted powered milk 6 sterile test tubes Aluminum foil to cover the test tubes 20 Sterile plastic pipettes for the milk Methylene blue 1% in dropper bottles Permanent marker to label test tubes Note: You can order test tubes, racks, and droppers from the district warehouse. Methylene blue can be ordered from Hi Valley Chem in Centerville 1-888-253-4294 or Genesis Scientific in Provo 1-801-367-3695 (or call your feeder Jr or Sr high to see if you can borrow some) Procedure: Teacher Background: Pasteurization is a heat treatment and is performed at milk processing plants. Pasteurization destroys harmful bacteria without affecting the quality of the milk. Milk may be pasteurized using a low heat method (63°C/145°F for 30 minutes) or a high heat method (72°C/162° F for 15 seconds). Pasteurization does not kill all bacteria contained in raw milk, but it does kill those that may cause disease. Bacteria that remain after pasteurization eventually cause milk to sour (spoil). Pasteurization also inactivates enzymes in the milk and destroys yeasts and molds.
Bacteria populations in milk are a direct indication of milk quality. Processing plants check the milk before they load it into a truck, again before the truck is unloaded at the processing plant, in the storage tank at the processing plant, before it is pasteurized, and after it is pasteurized. Milk lots are also tested daily

Unit 1, Essential Question # 3 26 Interconnections © 2011
for 10 days after they are bottled.
Milk sours in stages as one type of bacteria is replaced by another. Bacteria convert protein into ammonia products, and the pH rises. The odor of spoiled milk becomes apparent once this has happened.
UHT or “ultra high temperature” treated milk is milk that is “ultra” pasteurized, making the milk sterile. Extreme high temperature and pressure are applied to the milk resulting in a sterile product that can be stored without refrigeration. UHT milk is specially packaged in airtight containers. Look for UHT milk on the canned milk aisle (sometimes in “juice box” style containers). Powdered milk that has been reconstituted can be substituted. Powdered milk is not a “sterile” product, but when prepared with clean water it is nearly “sterile”. 1.Engage: Ask students if they have ever poured a glass of milk and taken a big sip only to discover it tasted awful. Have they have ever wondered why their parents are always asking them to put the milk back in the refrigerator? What might happen to that milk if it’s left out at room temperature over-night? What might be present in milk that if left out, causes the milk to spoil? Explain that this activity will help them understand the reasons behind milk spoilage.
Activity: 2. Teacher Preparation: Start by sterilizing the test tubes, pipettes by boiling. Purchase pasteurized whole milk and ultra high temperature (shelf stable) whole milk or powdered milk. (Shelf stable UHT milk can usually be found in the juice box or canned milk aisle. Ask your store manager to order it if it isn’t available in your supermarket.) 3. Pour a small amount of methylene blue into dropper bottles. Place all the equipment on a lab table. Provide each student with Microbe Investigation Sheet. Discuss pasteurization and UHT (shelf stable) or powered milk with students.
Design and Conduct Experiment: 4. Introduce the materials that teams may use for their experiments: regular pasteurized milk, ultra high temperature (shelf stable) milk or powdered milk, and methylene blue. 5. Tell them they can use any of the other materials on the lab table. Also mention there is a refrigerator and freezer they can use. 6. Explain that one container of milk came from the refrigerated dairy case of the supermarket and the other from an unrefrigerated shelf. Let students examine each container. 7. Explain to students that methylene blue is an indicator dye used to determine the presence of bacteria in milk. It will turn the milk blue at first and as bacteria alter the milk it will turn white again. Students should add enough drops of

Unit 1, Essential Question # 3 27 Interconnections © 2011
methylene blue to turn the milk blue (2-3 drops). (the dye is not poisonous, but should not be eaten) 8. Form teams of 3 or 4 and encourage each team to develop a hypothesis on how temperature affects bacterial growth. Then ask them to design an experiment to test their hypothesis. Give students the Microbe Activity lab planning sheet. 9. Let teams discuss their hypotheses and experimental designs for 10 to 15 minutes. Then, begin posing the following questions to help students design well-thought-out experiments: What are some variables you could test? (storage temperature, milk
type)
How many variables can you test in one experiment? (ONE)
What will be the control? (a part of the experiment left unchanged, for example, if temperature is being tested, the control would be in the refrigerator, the test sample should be left out at room temperature and the type of milk is the same in both tubes.)
How can you tell if bacteria are growing in the test samples? (Add methylene blue to each sample. If bacteria are growing, the methylene blue will become colorless and the milk will change from blue to white. This is not immediate, but happens over a few days.)
10. Have each group present their hypothesis and experimental design to the class. Encourage students to discuss the merits of each suggested test. (Students will often want to test temperature and milk type together in the same experiment. This should be discouraged because the results will not be clear.) 11. After the group discussions, give the teams time to revise their hypotheses and experimental de-signs. Have teams fill out the design sheet and when the teacher has approved it, collect the necessary materials. 12. Let teams conduct experiments according to their designs. Note: The test tubes must be checked each day after the experiment has begun. Since the color change happens over time, you could miss important findings if you don’t check every day. Students should design data collection charts and tables to record information. Observe and Record: 13.Students should make daily observations and record their results in journals or lab sheets. They can make drawings or written observations.

Unit 1, Essential Question # 3 28 Interconnections © 2011
14. Have teams present their findings to the class. They should report their results and discuss ways they would improve their experimental design. Assessment:
1. Check student science notebooks for evidence of observations and conclusions.
2. Have students do a 5-minute write on the relationship of what they learned during this lab to food safety.
Results you can expect from this experiment: Room temperature samples The pasteurized milk will turn white on the second day indicating that
there are some spoilage bacteria in milk. Bacteria thrive in warmer temperatures, so they multiply.
The UHT milk will still be blue by the second day. This is because the UHT milk has fewer spoil-age bacteria than regular pasteurized milk. Thus, it takes longer to see any bacterial growth. Bacteria do not quickly multiply in the UHT milk.
After leaving the UHT milk at room temperature for another day or two, the color will turn white, indicating that spoilage bacteria will ultimately grow in the UHT milk.
Chilled and frozen samples Both the pasteurized and UHT chilled and frozen milk samples will still
be blue by the second day, indicating that cold temperatures retard bacterial growth. A refrigerated sample will eventually turn from blue to white, but a frozen sample will not.
Note: After leaving the chilled and frozen samples at room temperature for another day or two, the color will change to white. This indicates that when the temperature rises to room temperature bacteria can grow. It may take longer for the UHT milk to change to white because there are fewer spoilage bacteria in UHT milk than in regular pasteurized milk.

Unit 1, Essential Question # 3 29 Interconnections © 2011
Extensions: Compare the spoilage rate and bacterial growth in milk samples of varying fat content, such as powdered, skim, 1%, 2%, whipping cream, evaporated milk, and half-and-half. Study and discuss the numerous contributions of Louis Pasteur. Test UHT milk that has an expiration date that has passed and UHT milk that has an expiration date in the future. See if the “expired” milk changes more quickly than the fresher milk.

Unit 1, Essential Question # 3 30 Interconnections © 2011
Name:____________________________
Microbe Activity
Title: Introduction: What one thing will you be testing today? Hypothesis: Materials: Procedures:
1. 2. 3. 4. Data: Conclusion:

Unit 1, Essential Question #3 31 Interconnections © 2011
6th Grade Unit 1: Investigations: Microorganisms
Essential Question #3: What changes occur in foods due to the action
of microorganisms? Lesson Title: Grocery Store Microbes (adapted from USOE TRB6) Standard V, Objective 3 Implementation Time: 45 Minutes Materials Needed: Loaf of bread Magnifying glass Science notebooks Grocery store advertisements per every two students Shopping for Microbes hand out Microbe Reading Sheet Procedure: 1. Bring in a loaf of bread, display it for the students. Ask them to close their eyes and think about a memory that they have had about their favorite bread. 2. Next, as a class, make a list of the ingredients they know are in bread. Write this list in their science notebooks. Have the students come up with as many ingredients as they can on their own. Then together look at a simple bread or roll recipe to add the rest of the ingredients. 3. As you look at the list of ingredients, ask if any of the ingredients in bread are alive? Take several student answers. 4. Tell students that before the bread dough was baked, the yeast found in the ingredients was alive. It is a microorganism often used in baking. 5. Pass out a piece of bread and a magnifying glass per student. Tell the students that even if we can’t see the yeast organism, we can see its effects on the bread. Have the students use the magnifying glass to look over the bread. What are kinds of details do they see? Take all sorts of descriptions. As a teacher make sure to point out the holes, where bubbles may have been. Tell the students that the holes were made by the yeast microbes digesting sugar and

Unit 1, Essential Question #3 32 Interconnections © 2011
giving off carbon dioxide gas. Yeast is used to make the bread dough fluffy or airy in texture. 6. Have students sketch their piece of bread in their science notebook right underneath their five-minute write. 7. Next, tell students that we often use microorganisms in our food preparation and eaten them a million times over. Hand students the Microbe Reading Sheet and let students read it (in pairs or as a read-aloud or jig-saw). Next hand out the Shopping for Microbes sheet along with a grocery store advertisement. Tell students that they are going to take a minute to go “shopping”. The students will use the information given in the hand out to find microorganisms in the food that they buy. Students will fill out the chart provided and answer the three questions on the back. 8. When the students are finished, ask them if anything surprised them about their shopping experience? Assessment: The Shopping for microbe sheet Extension: 1. Have the students help cook dinner at home. Look over all the ingredients are going to be used. Are their any microbes in the food that you will be eating? 2. Have the students write a paragraph about the cooking and eating of their dinner. How did they feel about the microbes they ate?

Unit 1, Essential Question #3 33 Interconnections © 2011
Name:__________________
Shopping for Microbes Directions: Look through the ad; your goal is to find as many foods that contain microorganisms or were produced with the help of microorganisms. Hint: You can find vinegar in salad dressings; also salad dressings can include a thickener made from algae. Are their any foods that need proper handling? For example does it need to be refrigerated to keep from spoiling? Common microbes in foods: Bacteria: cheddar cheese, Swiss cheese, feta cheese, sour cream, buttermilk, yogurt, vinegar Fungi: blue cheese, mushrooms Algae (Protista): Ice Cream, salad dressings Yeast: bread, and other dough products
Food Item Microbe Responsible
Does this food product need
special handling?

Unit 1, Essential Question #3 34 Interconnections © 2011
1. What would happen if you ignored the special directions for handling some of the foods?
2. What is your favorite item to eat from the shopping list?
3. Were you shocked to find microbes in that type of food? Why?

Unit 1, Essential Question #3 35 Interconnections © 2011
Microbe Reading Sheet
Some microorganisms are harmful and cause disease while others are benevolent, neutral, or even helpful. Some help us to produce certain foods, break down toxins in our environment, while others can kill us. For example: Protozoa cause amebic dysentery, fungi cause athlete’s foot and ring-worm, bacteria cause pneumonia, legionnaire’s disease, strep throat, tetanus and other diseases. Contaminants in food like E. coli or Salmonella (sam-mo-nel-a) can also make us very sick. The second activity in this lesson will focus on helpful and harmful microorganisms.
Molds: Molds are probably the best known of the microorganisms (see bread mold activity in previous les-son). They are widely distributed in nature and grow under a variety of conditions in which air and moisture are present. They are members of the kingdom fungi. Nearly everyone has seen mold growth on damp clothing and old shoes. The mold we see with the naked eye is actually a colony of millions of mold cells growing together. Molds vary in appearance. Some are fluffy and filament-like; others are moist and glossy; still others are slimy.
Molds are made up of more than one cell. They appear flat, fuzzy, and shapeless. Mold cells form a “fruiting body.” The fruiting body produces the spores, which detach and are carried by air cur-rents and deposited to start new mold colonies whenever conditions are favorable. Mold spores are quite abundant in the air. So any food allowed to stand in the open soon becomes contaminated with mold if adequate moisture is present. Some types of molds are also psychrophiles (Sigh-cro-files, grow in cool temperatures) and can cause spoilage of refrigerated foods.
Molds (and other microorganisms) are important to the food industry. Among their many contributions are the flavor and color they add to cheeses and the making of soy sauce. They also play a role in making chemicals such as citric and lactic acid and many enzymes. Sour cream, butter-milk, yogurt, and hard cheeses (cheddar, Swiss, jack, feta, etc.) are all cultured with a bacteria. Other cheeses such as blue and Roquefort are cultured by fungi. Processed cheeses, like American cheese, are not cultured with microorganisms.
Some ice cream contains a thickener made from seaweed. Seaweed, or algae, is everywhere in our food today. Chunks of it float around in Korean soups, paper-thin sheets of it are wrapped around Japanese rice balls, and it lies hidden in the alginates and carrageenans (Car-ran-gee-nans) in hamburgers, yogurt and ice cream. Seaweed-based food additives are now so commonly used in prepared and fast food that virtually everybody in Europe and North America eats some processed seaweed every day.
Sometimes microorganisms spoil food. Most students will have seen rotten, spoiled, or moldy food in their refrigerators. Food that is spoiled by bacteria may not be seen with the naked eye, but the food will taste bad and can make you sick. Molds are more visible. The best known use of molds is in the drug industry,

Unit 1, Essential Question #3 36 Interconnections © 2011
where they help produce such antibiotics as penicillin.
The best advice, “When in doubt...throw it out!

6th Grade Unit 1: Investigations: Microorganisms
Science & Social Studies Interconnections: A Thematic Approach 37
Essential Question #4:
How has science developed positive uses of microorganisms?
Lessons: • Decay and Composition • Scientists in Microbiology
Core Standards Social Studies Science
Standard V o 3c identify helpful uses of microorganisms and the role of science in the
development of understanding that led to positive uses including: Pasteur established the existence, growth, and control of bacteria; Fleming isolated and developed penicillin

6th Grade Unit 1: Investigations: Microorganisms
Science & Social Studies Interconnections: A Thematic Approach 38

Unit 1, Essential Question #4 39 Interconnections © 2011
6th Grade Unit 1: Investigations: Microorganisms
Essential Question #4: How has science developed positive uses of
microorganisms? Lesson Title: Decay and Decomposition Standard V, Objective 3 Implementation Time: 35 minutes plus observation time Media Resources Needed: Decomposer Reading Sheet Materials Needed: Quart zipper bag for each team of two Tape Markers Decay buffet (including grass, vegetable peelings, straw, dry leaves, etc.) Water spray/mist bottle Plastic gloves Magnifying glass Procedure: Invitation to Learn: 1. Ask students to describe the most disgusting thing they have ever pulled out of their refrigerators. Ask them why foods decay (hopefully molds or bacteria are mentioned). Instructional Procedures: 2. Divide the class into pairs. 3. Provide each pair of students with a zipper quart bag and ask them to write their names on some tape and then stick the tape on the bag. 4. Set up a “Decay Buffet” of items noted in the list of materials to be placed in the bags. The ingredient ratio of 2-parts dry (brown or the carbon containing ingredients) to 1-part wet (green or nitrogen containing ingredients) is VERY IMPORTANT. 5. Students should place one small piece of each item at the “Decay Buffet” into

Unit 1, Essential Question #4 40 Interconnections © 2011
their bags. Have them cut up items if necessary. Stress that they not add any meat or dairy product to their bags because potentially harmful bacteria could grow. 6. One student can place the items in the bag and the other student can record the exact contents in the science notebook. 7. Students should make predictions about what will happen to the materials. Will the item rot? Smell yucky? Remain the same? 8. Students should add about 1/2 cup of soil to their bags and lightly mist the contents with a spray bottle. 9. Have the students blow into the bags (to inflate slightly) and carefully seal the bags. 10. Once the bags are sealed, leave them for 2-8 weeks. You may decide to keep the bags together, or place them in various locations with differing conditions. (If you let the students choose their compost bag’s location, be sure to have everyone register their locations on a class master list or you may be unpleasantly surprised when a missing bag finally makes its presence known.) 11. Have students create a compost bag journal page in their science notebook. Ask them to observe their bags periodically and record what they see happening inside. Do they see fuzzy masses? Remind students that they are not to open the bags until the designated date. 12. On the designated date, have the students take their bags outside. Distribute plastic gloves to the students to wear while sorting through the contents of their bags with their partners. They may need magnifying glasses to “see” the original items. Caution: students with known allergies to mold or fungus should not participate! Bags do not need to be opened to observe mold growths and decay. 13. Record any items still identifiable and in their present state. Provide misters or water bowls so items can be cleaned off for closer observation and identification. 14. Are any items missing? Check the list and note the items missing. How did the results compare with the predictions? 15. Define and discuss the process of decomposition or decay. You may want to ask your students some questions: What are some things you have thrown away over the past couple of days? What happens to these things? Do they disappear? Decompose? Remain in the same form forever?

Unit 1, Essential Question #4 41 Interconnections © 2011
Will placing the bags in various conditions have an effect on what occurs in the bags? Can you think of any other types of compost containers that would get the decomposition job done? Assessment: 1. Check student notebooks to look for observations during the lab. 2. Have a class discussion about the role of microorganisms in nature. 3. Have students write a story that describes what would happen if tomorrow the microorganisms went on strike and decided not to decay and decompose anymore (how would it impact home/school/yard etc…)

Unit 1, Essential Question #4 42 Interconnections © 2011
Decomposer Reading Page Yes, it’s true; decomposition is a fundamental process on which all life depends.
We’d all be knee deep in garbage without it. Bacteria, fungi, and other
microscopic organisms that live in the soil, air, and water are responsible for
turning once living plants, animals and other organisms into nutrients that can be
used again and again. Think of them as nature’s recyclers. These tiny creatures
have the ability to produce special enzymes that allow them to break down dead
plant and animals and use them as food. No job is too big because they enlist the
help of friends and family. As they eat, they grow and multiply at an amazing
rate. In just 4 hours, one bacterial cell can grow to a colony of 5,096. At day’s
end there are millions and billions of them working together. Why, in one
teaspoon of soil, there are more bacteria and fungi than all the people on Earth!

Unit 1, Essential Question #4 43 Interconnections © 2011
6th Grade Unit 1: Investigations: Microorganisms
Essential Question #4: How has science developed positive uses of
Microorganisms Lesson Title: Scientists in Microbiology Standard V, Objective 3 Implementation Time: 45 minutes Media Resources Needed: http://pioneer.uen.org/k12/ Search for articles found under SIRS Discover Materials Needed: Internet with Pioneer Library Science notebook Pencil Procedure: Teacher Prep: If you desire, find articles about the scientists listed below and print out the information—or students can do their own research. Leeuwenhoek Louis Pasture Alexander Fleming Jonas Salk 1. Have students turn to the next available page in their notebook and title it “How I know that microorganisms exist.” 2. Give students 2 minutes to write as many reasons or observations that they can think of that proves that there are microbes in the world. They can be reasons like they find mold growing on the cheese in the fridge; they catch a common cold; they hear about a virus on TV or the internet etc…After the two minutes are up ask students to share their observations or reasons. 3. Next, tell students that some of our ideas are based on what we observe and some of our ideas are based on what we have learned from scientists who made discoveries before. Tell the students that today they will learn about a scientist who have influenced our understanding of microbes.

Unit 1, Essential Question #4 44 Interconnections © 2011
4. Have students break into groups of three and assign them to study one of three people: Anton Leeuwenhoek, Alexander Fleming, Louis Pasture or Marie Curie (There are several articles provided that give a short summary of these individuals found in the media resources). 5. Once the groups have been assigned, pass out the Microbe Scientist hand out. Tell the groups that this sheet is meant to organize their research. 6. Students can use the information they research to make a presentation. The presentation could be a rap, song, poem, picture, brochure, newspaper article, foldable, paragraph, poster, webpage, art project, diorama etc… 7. When the projects are finished, have each present to the whole class. Assessment: Evaluate the information provided in the students’ research projects.

Unit 1, Essential Question #4 45 Interconnections © 2011
Name:_______________ Microbe Scientist 1. Who are you researching? 2. When were they born? 3. How many years ago was that? 4. What kind of education did they have? 5. What discovery are they most famous for? 6. How did they make their discovery? 7. How has their discovery influenced the world we live in today? 8. Is there anything about the person that surprised you? 9. Is there anything else you would like to know about this person?

Unit 1, Essential Question #4 46 Interconnections © 2011

6th Grade
Science & Social Studies Interconnections: A Thematic Approach
47
Sixth Grade Interconnections Unit II
Cause & Effect: Ancient Civilizations Enduring Understanding: Students will understand how ancient civilizations developed and how they contributed to the current state of the world. Essential Questions • How did geography affect the development of early civilizations? • How has religion played a role in history from ancient times through today? • How can modern governments trace some of their ideas to those in ancient
civilizations? • How did the earliest civilizations create technologies and systems to meet their
needs? Core Curriculum Concepts/Skills: investigation, systems, relationship, change over time, cause and effect, comparison, systems of power, systems of governance, systems of authority, explanation, analysis, evaluation
Core Standards Social Studies Standard I: Students will understand how ancient civilizations developed and how they contributed to the current state of the world. Objective 1: Explain why physical geography affected the development of early civilizations.
Objective 2: Evaluate how religion has played a central role in human history from ancient times to today. Objective 3: Explain how modern governments can trace some of their attributes to the systems of power, authority, and governance established in ancient civilizations. Objective 4: Analyze how the earliest civilizations created technologies and systems to meet community and personal needs.
Social Studies language students should know and use: ancient, decline, customs, mosque, synagogue, temple, sacred, architecture, empire, innovations, technologies, irrigation, philosophy, drama, literature, social class, vocation, gender role

6th Grade
Science & Social Studies Interconnections: A Thematic Approach
48

6th Grade Unit 2: Cause & Effect: Ancient Civilizations
Science & Social Studies Interconnections: A Thematic Approach 49
Essential Question #1:
How did geography affect the development of early civilizations?
Lessons: • Where in the World Does History Happen? • Emerging Civilizations • The Fertile Crescent • Mesopotamia
Core Standards Social Studies Science Standard I
o 1a identify the major physical features of the regions where ancient civilizations flourished
o 1b describe how these features influenced the success or decline of the civilizations
o 1c compare maps of these ancient civilizations to current political maps and make inferences about the continuing affects of physical geography on cultural development

6th Grade Unit 2: Cause & Effect: Ancient Civilizations
Science & Social Studies Interconnections: A Thematic Approach 50
Unit 2, Essential Question #1 51 Interconnections © 2011
6th Grade Unit 2: Cause & Effect: Ancient Civilizations
Essential Question #1:
How did geography affect the development of early civilizations?
Lesson Title: Where in the World Does History Happen?
Standard I, Objective 1
Implementation Time: 60 minutes
Media Resources Needed: Nystrom Atlas of World History Materials Needed: one copy of “Making a Timeline Folder” handout (per student); set of timeline templates per student (set includes: two pages with pre-typed dates, six pages w/o dates); scissors, rulers, 9”x12”colored paper (1 sheet per student), tape/stapler, glue
Procedure: Note: The Nystrom Atlas of World History includes timelines and dates. In this lesson, students will make their own Timeline Folder to use throughout this year’s social studies lessons. In it, they’ll record dates/events/ideas they think are important in each unit. 1. Before you begin constructing the timeline, ask students to look at pages 4-5 in Atlas of World History and make observations about the organization of the atlas.
2. Place students in groups and have each group discuss what they learn about how to use/read the atlas. Have each group share one insight with the whole class.
3. Hand out materials for the Timeline Folder and have students follow the instructions on the activity sheet to make a timeline folder.
4. Explicitly teach/model the steps for the students.
5. Once students complete their timelines, collect them and keep them in a safe place with easy access for the next lesson. Assessment:Assign each group a continent that was illustrated on the timeline and ask them to draw an outline on the whiteboard or a classroom bulletin board and name one event that happened in that region in the time period between 100,000 B.C. and 1,000 B.C.

Unit 2, Essential Question #1 52 Interconnections © 2011
Name___________________________________________
Making a Timeline Folder

Unit 2, Essential Question #1 53 Interconnections © 2011
Activity Sheet 3b

Unit 2, Essential Question #1 54 Interconnections © 2011
Activity Sheet 3c

Unit 2, Essential Question #1 55 Interconnections © 2011
Activity Sheet 3d

Unit 2, Essential Question #1 56 Interconnections © 2011

Unit 2, Essential Question #1 57 Interconnections © 2011
6th Grade Unit 2: Cause & Effect: Ancient Civilizations
Essential Question #1:
How did geography affect the development of early civilizations?
Lesson Title: Emerging Civilizations
SS Standard I, Objective 1
Implementation Time: 45 minutes
Media Resources Needed: Nystrom Atlas of World History Resources Needed: Timeline Folder from lesson #1; “Map Analysis” handout
Procedure: Students will use the atlas to gain information about physical features that impacted civilizations. 1. Hand out the world atlas and have students look for the unit on Early Settlements and Civilizations.
2. Ask students to study all maps and information in Unit 1 of the atlas, noting the oceans, continents and migration routes. Have them count the number of continents and oceans they see on the map and share the names and number in a small cooperative group.
3. Explicitly demonstrate how to use the key in the map and ask some oral, whole group questions to check for understanding.
4. Distribute the “Map Analysis” handout to each student and have them work in partners to complete the assignment.
5. Place two pairs together to form a small group and allow them to exchange papers and read what the other pair wrote.
6. Give each pair two minutes to ask any questions of the other pair about what they wrote. 7. Instruct each small group to write unanswered questions they still have about the emergence of civilizations.
8. Have students add any information they find about the ancient civilizations of Babylon, Assyria, Mesopotamia and Phoenicia on their timeline.

Unit 2, Essential Question #1 58 Interconnections © 2011
Assessment: Using the strategy of a group write, have each group compose and share a sentence using details from their atlas activity. Assign the class to write an paragraph/essay addressing the essential question: How did geography affect the development of early civilizations? The first group will write an opening sentence/paragraph and the last group will write a concluding sentence/paragraph. Remaining groups will use the information from the atlas activity to write supporting paragraphs. The class will edit and revise together with the teacher as facilitator.

Unit 2, Essential Question #1 59 Interconnections © 2011
Map Analysis
Study/Analyze the assigned page(s) from the atlas and complete the following questions. A. List three things in this atlas that you think are important and explain why?
1.
2.
3. B. What inferences can you make about the emergence of early civilizations in relationship to geography? C. List the physical features from this unit that you believe have an impact on historical events and give one piece of evidence from the information found in the atlas for Unit One. D. Rank the three most important physical features that you think have the most impact and place them in order. Meet with one other pair of students and share your information. As a group, write three questions that you still have about the emergence of civilization and geography.

Unit 2, Essential Question #1 60 Interconnections © 2011

Unit 2, Essential Question #1 61 Interconnections © 2011
6th Grade Unit 2: Cause & Effect: Ancient Civilizations
Essential Question #1:
How did geography affect the development of early civilizations?
Lesson Title: The Fertile Crescent
SS Standard I, Objective 1
Implementation Time: 45 Minutes
Media Resources Needed: eMedia video clip The Middle East and Central Asia: The People-segment 04: Mesopotamia (1 min., 54 sec.); Nystrom Atlas of World History; computer and LCD projector Resources Needed: Various photos/paintings showing the land in the Middle East where the Fertile Crescent is located (make sure you include photos of the river system) numbered and placed at eye-level on walls around the room; “Photo Analysis Chart” (1 per student)
Materials Needed: a pitcher of water with paper cups for each student; a bowl of sand and a bowl of grass clippings or grain Procedure: The purpose of this lesson is to elicit the importance of water in the area known as the Fertile Crescent through exploration and analysis. 1. Distribute atlases and “Photo Analysis” sheets to students.
2. Show them the first square and instruct them to watch the emedia segment, observing the land and what is being explained about the land and the area. 3. After the eMedia segment, ask students to write their observations in the first square. In the second square, instruct them to write what this tells them about the area. In the fourth square, they need to write a conclusion about why this area may be called the Fertile Crescent.
4. Instruct students to look in their atlas and find the page titled Ancient Mesopotamia and have them complete the same procedure as they did with the video segment. 5. Give students a number that will correspond with a number that you have placed on each picture around the room and ask them to stand at that picture with other students with that number. Explicitly teach them how to complete the chart following the same procedure as the previous two items.

Unit 2, Essential Question #1 62 Interconnections © 2011
6. Give each group 2 minutes at each picture, rotating until they have analyzed each picture.
7. Have students return to their seats. Instruct the class to look at the pitcher of water, bowl of sand, and grass or grain. As a group, assign them to discuss what the three items have to do with the Fertile Crescent based on what they observed in the pictures.
8. Each group will write a summary statement on why this area became known as the Fertile Crescent and was the center of the beginning of ancient civilizations (allow students to use information in the atlas and the “Photo Analysis Chart”).
Assessment: Each student will write an acrostic poem using the letters of the FERTILE CRESCENT or MESOPOTAMIA. The poem must include details about the area, land and civilization. Students must show they understand the importance of geography in the development of ancient civilizations. See sample below.
Acrostic Poem
C hildren have culture regardless of place
U nited States of America, Africa, Mexico or Greece
L anguage, stories, customs
T raditions and music are key to
U nderstanding the similiarities and differences between you and me.
R eligion and art are part of culture, too.
E veryone has culture, from here to Timbuktu!
-Dawn Hauser
Directions: Use each of the letters in your word as the first letter of a sentence or word in your acrostic poem.

Unit 2, Essential Question #1 63 Interconnections © 2011
Photo/Picture Analysis Chart Picture or
Item Observation
(What do you see/hear?)
Inference (What is happening?)
Analysis (Why the Fertile
Crescent?)
Video Segment
Historical Atlas
#1
#2
#3
#4
#5
#6
#7
#8

Unit 2, Essential Question #1 64 Interconnections © 2011

Unit 2, Essential Question # 1 65 Interconnections © 2011
6th Grade Unit 2: Cause & Effect: Ancient Civilizations
Essential Question # 1: How did geography affect the
development of early civilizations? Lesson Title: Mesopotamia Standard I, Objective 1 Implementation Time: 45 minutes Media Resources Needed: KIDS Discover Mesopotamia ½ class set, dictionaries, Optional: eMedia video Ancient Mesopotamia Resources Needed: “Mesopotamia Study Sheet” Materials Needed: paper, pencils Procedure: 1. Tell students they will be working in collaborative groups to uncover some mysteries of Mesopotamia. Groups will participate in a jigsaw activity. Each group will be assigned to read together and discuss two pages of KIDS Discover Mesopotamia. After reading and discussing, the group will write five main ideas from their pages to share with the class. As the groups share, students will fill in the study sheet on Mesopotamia.
2. Divided the class into seven groups. Assign pages as follows:
Group 1: pages 2-3 Group 2: pages 4-5 Group 3: pages 6-7 Group 4: pages 8-9 Group 5: pages 12-13 Group 6: pages 14-15 Group 7: pages 16-17 Everyone reads pages 10-11
3. Pass out KIDS Discover Mesopotamia and have students work in groups. Give them approximately 15 minutes to read and write down their five main ideas.

Unit 2, Essential Question # 1 66 Interconnections © 2011
4. Pass out the “Mesopotamia Study Sheet.” Have groups share their five main ideas while the rest of the class fills in the study sheets as groups share information. If the question is not answered from their main ideas, have students check the magazine for the answer.
5. Leave KIDS Discover Mesopotamia out for students to read and explore during free time. 6. Optional: Use the eMedia clip Ancient Mesopotamia to reinforce concepts presented in the KIDS Discover magazine.
Assessment: Check to see if students have completed the study sheet accurately.

Unit 2, Essential Question # 1 67 Interconnections © 2011
MESOPOTAMIA STUDY SHEET
Name ___________________________ 1. How did life in the Fertile Crescent change over time?
a. First_____________________________ b. Next _____________________________ c. Then ____________________________
2. What kinds of building materials were used?
3. How were crops watered?
4. When did the first cities develop in the south?
5. What was Hammurabi’s code?
6. Where did the cities get their slave labor?
7. What did sons of wealthy families do?
8. What did girls do?
9. What were some religious beliefs? 10. What were temples called?

Unit 2, Essential Question # 1 68 Interconnections © 2011
11.What were some of the accomplishments of the Mesopotamians? 12. Who is possibly the most famous Mesopotamian?
13. What is history?
14. What is prehistory?
15. Who invented writing?
16. What is the current name of the country that was once Mesopotamia?
17. What is archeology?
18. What does an archeologist do?
19. What is anthropology?
20. What are some of the ways Mesopotamian accomplishments affect your life today?

Unit 2, Essential Question # 1 69 Interconnections © 2011
MESOPOTAMIA STUDY SHEET Key
1. a. First there were hunters and gatherers
b. Next there were farming villages. c. Then there were cities.
2.Mud (Clay) bricks]
3.By irrigation
4.Around 3500 B.C.
5.It was a code of law. He wanted justice in the land. The law demanded, “an eye for an eye, a tooth for a tooth.”
6.They got them from the people they conquered. Also from military captives or citizens who had fallen into debt.
7.They went to school from age six, mainly to learn to read and write cuneiform. They also learned about animals, plants, math, and literature.
8.They learned cooking, spinning, and household management from their mothers and family slaves. Some were taught cuneiform in the home.
9.They believed that human beings were created to serve the gods. Gods looked and acted like people but had supernatural powers. Spirits (good and bad) and demons also affected the lives of humans.
10.Ziggurats 11.They were the first people to study the heavens, use the arch and the wheel, compile law, and keep written records. They were the first chemists; they made soap, herbal remedies, dyes, and glass. Our modern number system is based on the number 10 which they used. They invented stringed musical instruments.
12.Gilgamesh

Unit 2, Essential Question # 1 70 Interconnections © 2011
13. History is the written record of events.
14. Before the written record of events.
15. The Sumerians
16. Iraq
17. The study of past human life by finding of digging up items used by ancient peoples.
18. She/he studies ancient cultures through digs or uncovering items the people used, dwellings they lived in, and pictures or writings they left.
19. The scientific study of the origins and physical, social, and cultural development and behavior of human beings.
20. They were the first to use the wheel and I love biking. They invented writing and I love reading and writing. They invented soaps and dyes. I use soaps and I like color in my clothes and surroundings. They used the base 10 number system. I use math all the time. They invented stringed musical instruments and I love music.

6th Grade Unit 2: Cause & Effect: Ancient Civilizations
Science & Social Studies Interconnections: A Thematic Approach 71
Essential Question #2:
How has religion played a role in history from ancient times through today?
Lessons: • Ancient Beliefs • The Gods Must be Crazy • The Gods Must be Crazy, II
Core Standards Social Studies Science Standard I
o 2a explore the importance of religion in the cultural expression of ancient civilizations (examples may include: customs, artistic expression, creation stories, architecture of sacred places)
o 2b identify key tenets of the major world religions including Buddhism, Christianity, Hinduism, Islam, Judaism
o 2c analyze how religious ideas influence current issues

6th Grade Unit 2: Cause & Effect: Ancient Civilizations
Science & Social Studies Interconnections: A Thematic Approach 72

Unit 2, Essential Question #2 73 Interconnections © 2011
6th Grade Unit 2: Cause & Effect: Ancient Civilizations
Essential Question #2: How has religion played a role in
history from ancient times through today?
Lesson Title: Ancient Beliefs
SS Standard I, Objective 2
Implementation Time: 60 minutes
Media Resources Needed: I Am the Mummy Heb-Nefert by Eve Bunting (or other picture book about Egyptian mummification); computer and LCD projector Resources Needed: “Ancient Civilizations Inquiry Chart” (one per student) to be used throughout this unit; large class chart hung in the room or a projection of the chart to show on the screen for modeling and student contributions Materials Needed: markers, crayons or colored pencils
Procedure: Students will visualize and make modern day connections to the process of mummification and Egyptian religious beliefs. 1. Ask students to tell you what they know already about mummies and list the ideas on the board.
2. Have students close their eyes as you read the book I Am the Mummy Heb-Nefert (or another account of this process). Ask students to put themselves in the place of Heb-Nefert (or mummy). 3. After reading, ask students to add or delete from the list from #1 as a whole group. 4. On a sheet of plain white art paper ask students to draw a scene from the book and list on the back three modern- day connections made while listening to the story. 5. Have students share their drawing and connections with a cooperative group. Assessment: Have each student add information to their inquiry chart (in the column under Egypt next to the row that asks the question about religion). Give each group a marker and have them write one thing they learned about Egyptian beliefs on the class chart.

Unit 2, Essential Question #2 74 Interconnections © 2011
Ancient Civilizations Inquiry Chart
Essential Questions
Egypt Greece Rome
How did geography impact the culture?
How did religion impact the culture?
How were the countries
governed?
Science and Technology
Interesting Facts
New Questions

Unit 2, Essential Question #2 75 Interconnections © 2011
6th Grade Unit 2: Cause & Effect: Ancient Civilizations
Essential Question #2: How has religion played a role in
history from ancient times through today? Lesson Title: The Gods Must Be Crazy! SS Standard I, Objective 2 Implementation Time: 60 Minutes Media Resources Needed: Nystrom Atlas of World History; Greek News, Roman News and Egyptian News by Candlewick Press (or other picture books about these ancient civilizations); World Religions by Teacher Created Resources Resources Needed: “Quilt Match Chart” (one per group); chart with Greek, Egyptian, Roman and world religions symbols Materials Needed: 6-10 Envelopes with quilt squares; small word strips on card stock with the following: Ancient Rome, Ancient Egypt, Ancient Greece, and Major World Religions Procedure: This is cooperative lesson is designed to be a pre-assessment of what students already know about ancient and world religions. 1. Cut the sheet with symbols of faith into squares and place them in an envelope for each group.
2. Copy one chart for each group on card stock paper (use different colored paper to distinguish each group chart). 3. Give each group a quilt match chart with names and explanations. 4. Instruct students to find the symbol that matches the word on the chart and place the symbol on the appropriate square.
5. When all groups are finished, have one group member remain at the table while the rest will move to the next table to view another chart. Allow 2 minutes at each table and allow them to ask questions or make comments about the choices made on the chart.

Unit 2, Essential Question #2 76 Interconnections © 2011
6. After students see all charts, have them return to their original group and allow them to make changes to their chart.
7. Hand out the answer key and allow students to check and glue the papers to the squares.
8. Give each group a yellow, orange, light blue and light green colored pencil and have them color each square according to the following code:
• Green=Greek gods and goddesses • Orange=Roman gods and goddesses • Blue=Egyptian gods and goddesses • Yellow=Contemporary world religions
9. Check/discuss as a whole class.
10. Instruct the groups to study the chart and allow them to look at books and other resources that have information about these belief systems.
11. If members of each group know something about any of the symbols and what they represent; instruct them to circle that symbol.
Assessment: Have each student write a short paragraph explaining what they learn about ancient and modern religious beliefs based on what they see on the chart.

Unit 2, Essential Question #2 77 Interconnections © 2011
Group Quilt Match Chart
Buddhism
Anubis The god of embalming who watches over the
dead
Pluto
god of the dead
Horus
god who wards off evil spirits
Taoism
Hinduism
Mercury
Messenger of the gods.
Athena
The goddess of cities, war and
wisdom
Thoth The god of learning
Saturn The god of
growth/farming
Islam
Aphrodite
Goddess of love, beauty and nature
Christianity
Bacchus
The god of wine/life-giving force
Zeus Chief of
gods/punishes the wicked
Mars The god of war
Poseidon The god of the sea
Apollo God of light
Bast The goddess of cats, dancers & musicians
Venus Goddess of love and
beauty
Judaism
Amon Ra The king of the gods
Juno
Chief goddess of women and children
Artemis
The huntress/goddess of wild animals, purity and
birth
Sikhism

Unit 2, Essential Question #2 78 Interconnections © 2011
Cut the above squares and place in envelopes.

Unit 2, Essential Question #2 79 Interconnections © 2011
Key
Amon Ra
Bast
Anubis
Horus
Thoth

Unit 2, Essential Question #2 80 Interconnections © 2011
Judaism
Hinduism
Christianity
Buddhism
Sikhism
Islam
Aphrodite
Dionysus Apollo
Zeus
Hera Athena
Artemis Poseidon Juno
Mars
Neptune
Apollo
Diana
Venus
Pluto Mercury
Bacchus Taoism Saturn

Unit 2, Essential Question #2 81 Interconnections © 2011

Unit 2, Essential Question #2 82 Interconnections © 2011
6th Grade Unit 2: Cause & Effect: Ancient Civilizations
Essential Question #2: How has religion played a role in history
from ancient times to today?
Lesson Title: The Gods Must be Crazy, Part II
SS Standard 1, Objective 2 Art Standard 4, Objective 2,3 Implementation Time: 60 minutes
Media Resources Needed: Nystrom Atlas of World History; Greek News, Roman News and Egyptian News by Candlewick Press (or other picture books about these ancient civilizations); World Religions by Teacher Created Resources; Joyful Noise or I am Phoenix by Paul Fleischman. Optional: eMedia video: Ancient History: Greek Accomplishments (27 min. 51 sec.) Resources Needed: “Quilt Match” from previous lesson; “Inquiry Chart” from previous lesson; instructions for Poem for Two Voices; “5 W’s Chart”
Procedure: This lesson will conclude the study of world and ancient religions and their modern influence. 1. Assign each group one of the following belief systems to research (try to assign the groups a religion on which they already have some schema - use the circled symbols on their chart as a basis of determination). 1) Ancient Egypt; 2) Ancient Rome; 3) Ancient Greek; 4) Christianity; 5) Islam; 6) Hinduism; 7) Buddhism; 8) Judaism. 2. Give each group the resource that will help them gain the information on the “5 W’s Chart”: Who? What? Why? When? How? and Where?
3. Instruct students to look in their world atlas to find where this faith began and study the information from the map. Place the information in the “Where” box. 4. Using the Egyptian, Roman or Greek News or World Religions books, complete the information. Place the name of the belief system in the oval and complete the other boxes. For example: Why did the belief system begin? What is this system based on (tenants of faith)? Who is the founder or leader (gods/goddesses)? How do believers practice/worship? When did the belief system begin?

Unit 2, Essential Question #2 83 Interconnections © 2011
5. After each group completes their chart, instruct them to find a partner from another group and take their graphic with them to share/exchange information.
6. Explicitly demonstrate how to write a poem for two voices and have students create a Venn diagram showing the differences and similarities between two belief systems. Use examples from Paul Fleischman’s books Joyful Noise or I am Phoenix. See instructions below.
7. After presentations of the two voice poems, have students complete the inquiry chart row answering the question How did religion impact culture?
Assessment: Assign each pair of students to create a poem for two voices showing the similarities and differences of two belief systems. It is best if you pair one ancient belief system with one major world religion.
How to Write a Two-Voice Poem A Two-voice poem is written for two people to perform and has lines for each of the readers to read. When the two different voices talk alone, they are each talking about how their own topics are different. When the two different voices talk together, they are talking about how their topics are the same. 1st: Think about general ideas that apply to the belief system you are writing about. Examples: tenants of faith, worship, gods/goddesses, leaders, meaning of life, ceremonies 2nd: List examples or words (from your graphic/research and reading) that fit your general ideas and are important about your belief system. 3rd: Group your ideas into stanzas or “poem paragraphs” to highlight the differences among the two belief systems. Two lines should talk about the differences while the third line (read by both poets) talks about the similarities among the belief systems. 4th: Have fun! Performing your poem for two voices is a fun way to show all you know about ancient and major world belief systems/religions. Extension: Have students write a three-paragraph essay answering the essential question. Watch the eMedia clip Ancient History: Greek Accomplishments (27 min. 51 sec.)

Unit 2, Essential Question #2 84 Interconnections © 2011
5 W’s and H Chart
Why Who
How
Where When
What
Belief System

Unit 2, Essential Question #2 85 Interconnections © 2011

6th Grade Unit 2: Cause & Effect: Ancient Civilizations
Science & Social Studies Interconnections: A Thematic Approach 86
Essential Question #3:
How can modern governments trace some of their ideas to those in ancient civilizations?
Lessons: • Government of the People
Core Standards Social Studies Science Standard I
o 3a identify forms of government within ancient civilizations o 3b compare those forms to existing systems of governance in today’s
world

6th Grade Unit 2: Cause & Effect: Ancient Civilizations
Science & Social Studies Interconnections: A Thematic Approach 87

Unit 2, Essential Question #3 88 Interconnections © 2011
6th Grade Unit 2: Cause & Effect: Ancient Civilizations
Essential Question #3: How can modern governments trace
some of their ideas to those in ancient civilizations?
Lesson Title: Government of the People
SS Standard 1, Objective 3
Implementation Time: Two 45 minute lessons
Media Resources Needed: Nystrom Atlas of World History; Greek News, Roman News and Egyptian News by Candlewick Press (or other picture books about these ancient civilizations); We the People: The Citizen and Constitution by The Center for Civic Education; Cleopatra by Diane Stanley and Peter Vennema; KIDS Discover Ancient Greece Resources Needed: “Sequencing Pyramid”, “Give One/Get One Chart”; Anticipation Guide for Cleopatra; Inquiry Chart (from previous lessons); “Influences of Ancient Civilizations and Cultures on America” Procedure: 1. Have students complete a “Give One/ Get One” chart by brainstorming all the information they know about our government today in the “Give One” column (allow 2-3 minutes).
2. Instruct students to get up and go to another person and share one thing from their “Give One” column and place what they “get” from the other person in the “Get One” column. They will go around the room until they share or get something from everyone in the room. (They may not just sit with a group and copy all their information, they must move and may only get one piece of information from each person). 3. After the students return to their seats, ask the class Where do you think these ideas came from? List ideas on the board.
4. Divide the class into four groups and assign them the following books and assignments to complete:
• Group #1: Read pages 4 and 5 of the KIDS Discover Greece books and complete the “Sequencing Pyramid” showing the events that led to democracy.

Unit 2, Essential Question #3 89 Interconnections © 2011
• Group #2: Read Lesson 3 (pages 21-28) in We the People: The Citizen and the Constitution and complete the questions on page 28 under Review the Lesson.
• Group #3: Read Cleopatra and complete the “Anticipation Guide” before and after the reading.
• Group #4: Read the pages in the World Atlas (the unit on ancient Greece and Rome) and illustrate (draw) a representation of what they learn about the government of ancient Greece and Rome.
• All groups may have access to the Egyptian, Roman and Greek News.
5. After each group completes their assignments, jigsaw the groups by placing one member of each group in a group of four. Allow them to share their graphic, picture, answers and anticipation guide. As they share, have students highlight any similarities that they see on their “Give One/Get One” chart, (make sure each group has a We the People : The Citizen and the Constitution text to access for information about our government).
6. When the assessment is over have students take out their inquiry sheet and complete the third row. Assessment: Complete the “Influences of Ancient Civilizations and Cultures on America” assignment (individually or as a group). Discuss as a class. Extension: Have each group of four plan and present a short skit (3-6 minutes long) during the next class session. Skits should show how ancient civilizations influenced our government. As a whole class, create a rubric that will address the desired outcome and expectations. Have students complete the post assessment during and after the skits.
Unit 2, Essential Question #3 90 Interconnections © 2011
What You Already Know?
Give One (What you know and give to others)
Get One (What you get from others)
Unit 2, Essential Question #3 91 Interconnections © 2011
Sequencing Pyramid:
Democracy

Unit 2, Essential Question #3 92 Interconnections © 2011
Anticipation Guide for Cleopatra
Before reading the book Cleopatra, follow the directions. 1. Read each statement. 2. Place an X in the YOU column next to each statement YOU agree with. 3. Discuss your answers with a partner, explaining WHY you agree or disagree with each statement. 4. While you read the book, look for information that tells you what the AUTHOR thinks about each statement. 5. When you discover some information place an X in the Author column next to each statement the Author agrees with. 6. Be ready to discuss why you think the author agrees or disagrees with each statement. You Author 1. _____ _____ The ruler of a country always has the power to make decisions for
that country.
2. _____ _____ Cleopatra was a descendant of the great Pharaohs of Egypt.
3. _____ _____ Cleopatra’s younger brother ruled Egypt with her.
4. _____ _____ Cleopatra had to fight for her kingdom.
5. _____ _____ Julius Caesar declared Cleopatra a goddess in Egypt and Rome; an action that lead to his death.
6. _____ _____ Antony, Octavian, and Lepidus ruled Rome together in what became known as a triumvirate.
7. _____ _____ Rulers of countries usually marry only because they love each other.
8. _____ _____ Rome and Egypt had the same type of government during Cleopatra’s reign.
9. _____ _____ Cleopatra was a descendant of Alexander the Great.
10. _____ _____ Julius Caesar was murdered to save the Roman Republic.

Unit 2, Essential Question #3 93 Interconnections © 2011
Anticipation Guide for Cleopatra -KEY
Before reading the book Cleopatra, follow the directions. 1. Read each statement. 2. Place an X in the YOU column next to each statement YOU agree with. 3. Discuss your answers with a partner, explaining WHY you agree or
disagree with each statement. 4. While you read the book, look for information that tells you what the
AUTHOR thinks about each statement. 5. When you discover some information place an X in the Author column
next to each statement the Author agrees with. 6. Be ready to discuss why you think the author agrees or disagrees with
each statement.
You Author 1. _____ _____ The ruler of a country always has the power to make decisions for
that country.
2. _____ _____ Cleopatra was a descendant of the great Pharaohs of Egypt.
3. _____ _____ Cleopatra’s younger brother ruled Egypt with her.
4. _____ __X__ Cleopatra had to fight for her kingdom.
5. _____ __X__ Julius Caesar declared Cleopatra a goddess in Egypt and Rome; an action that lead to his death.
6. _____ __X__ Antony, Octavian, and Lepidus ruled Rome together in what became known as a triumvirate.
7. _____ _____ Rulers of countries usually marry only because they love each other.
8. _____ _____ Rome and Egypt had the same type of government during Cleopatra’s reign.
9. _____ __X__ Cleopatra was a descendant of Alexander the Great.
10. ____ __X__ Julius Caesar was murdered to save the Roman Republic.

Unit 2, Essential Question #3 94 Interconnections © 2011
Name _____________________ Date_______________________
INFLUENCES OF ANCIENT CIVILIZATIONS AND CULTURES ON AMERICA
1. Define the following words:
a. Ancient ___________________________________________ __________________________________________________
b. Civilization _________________________________________ ___________________________________________________
c. Culture ____________________________________________ ___________________________________________________
d. Influence ___________________________________________ ____________________________________________________
2. How did the ancient civilizations listed below influence America? Where do you see these influences today?
Civilization Influence on America Example of Influence Egypt
Greece
Rome
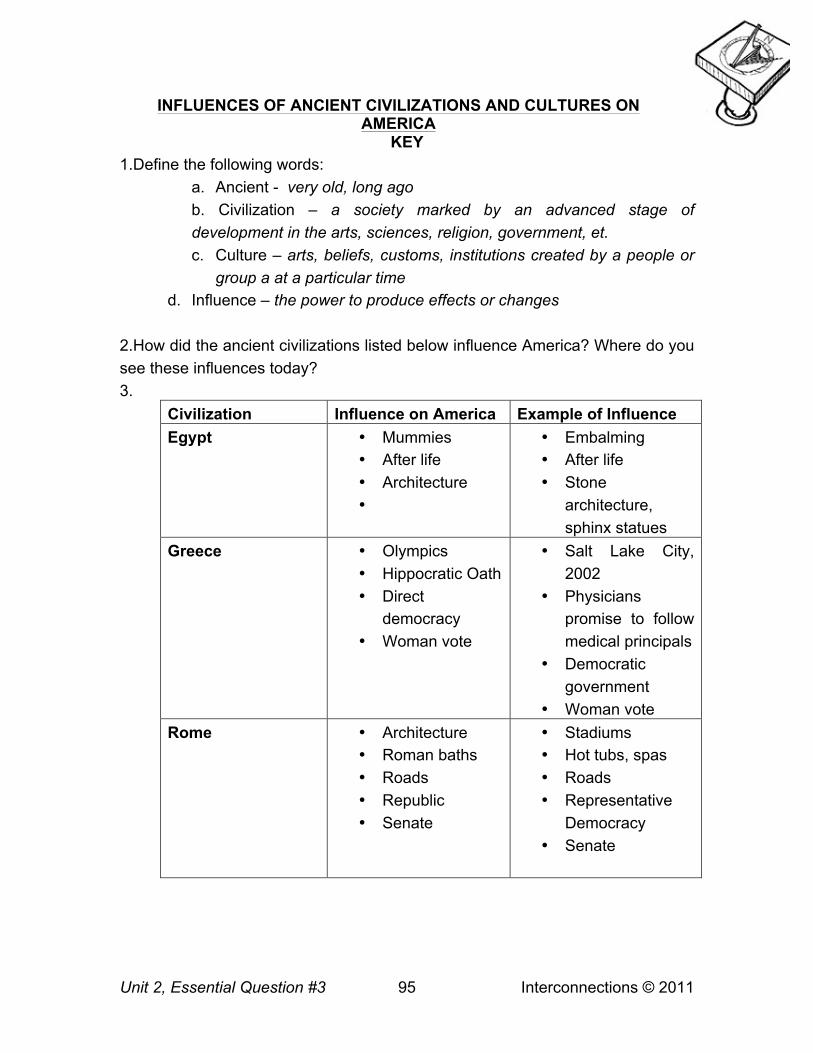
Unit 2, Essential Question #3 95 Interconnections © 2011
INFLUENCES OF ANCIENT CIVILIZATIONS AND CULTURES ON AMERICA
KEY 1.Define the following words:
a. Ancient - very old, long ago b. Civilization – a society marked by an advanced stage of development in the arts, sciences, religion, government, et. c. Culture – arts, beliefs, customs, institutions created by a people or
group a at a particular time d. Influence – the power to produce effects or changes
2.How did the ancient civilizations listed below influence America? Where do you see these influences today? 3.
Civilization Influence on America Example of Influence Egypt • Mummies
• After life • Architecture •
• Embalming • After life • Stone
architecture, sphinx statues
Greece • Olympics • Hippocratic Oath • Direct
democracy • Woman vote
• Salt Lake City, 2002
• Physicians promise to follow medical principals
• Democratic government
• Woman vote Rome • Architecture
• Roman baths • Roads • Republic • Senate
• Stadiums • Hot tubs, spas • Roads • Representative
Democracy • Senate

6th Grade Unit 2: Cause & Effect: Ancient Civilizations
Science & Social Studies Interconnections: A Thematic Approach 96
Essential Question #4:
How did the earliest civilizations create technologies and systems to meet their needs?
Lessons: • Show Me the Evidence • The Most Excellent Civilization
Core Standards Social Studies Science Standard I
o 4a identify innovations in manmade structures over time (examples may include: irrigation, roads, building materials) and their influence on meeting needs
o 4b examine the evolution and importance of writing o 4c identify cultural expressions that reflect these systems (examples may
include: architecture, artistic expression, medicine, philosophy, drama, literature)
o 4d compare social classes, vocations, and gender roles within ancient civilizations

6th Grade Unit 2: Cause & Effect: Ancient Civilizations
Science & Social Studies Interconnections: A Thematic Approach 97

Unit 2, Essential Question #4 98 Interconnections © 2011
6th Grade Unit 2: Cause & Effect: Ancient Civilizations
Essential Question #4: How did the earliest civilizations create technologies and systems to meet their needs?
Lesson Title: Show Me the Evidence
SS Standard 1, Objective 4 Art Standard IV, Objective 1, 2
Implementation Time: 45 minutes
Media Resources Needed: Nystrom Atlas of World History; Greek News, Roman News and Egyptian News by Candlewick Press (or other picture books about these ancient civilizations); KIDS Discover Pyramids. Resources Needed: Inquiry Chart from previous lessons; Post Assessment from the last lesson; “Finding Evidence Chart”; Timeline Folder from the first lesson Materials Needed: file folders with a strip of paper/sticker label across the front that reads “History Detective”
Procedure: Students will become “history detectives” to uncover the technology systems of ancient times. 1. Hand each group of students a file folder that contains a “Finding Evidence Chart” for each student. Explain that they are on the lookout for evidence of technology systems originating in ancient civilizations and influencing our world today.
2. Give each group the resources listed above and tell them they must uncover the information in the resources that will give proof of the statement on the chart. 3. Assign the following in each group: 1) Illustrator-job is to look at pictures, maps, graphics and other illustrations to find proof of the statement (this could be a low-level reader or ELL student) 2) Headliner-job is to look at all headlines, bold print titles to gain proof of statement 3) Editor-job is to read information within the text to gain proof of the statement 4) Scribe-job is to write the information as each group member finds it on the chart (other group members will copy the information after nine pieces of evidence are found).
Example: One student might have the book on Egypt and see a photo of hieroglyphics. That student tells the scribe a form of writing (first column) came from Egypt (third column) shows writing began in ancient times as

Unit 2, Essential Question #4 99 Interconnections © 2011
pictures/symbols (column two, proof), reference (column 4) page 11, Egyptian News.
4. Explain that groups must have four different references listed on the chart.
5. After each group finds nine pieces of evidence, ask them to determine which system they believe to have the greatest impact on our lives today and write a statement using evidence to support their thesis: Example: We think writing from the Egyptians had the most impact because it increased communication and allowed for trade to flourish.
Assessment: Have individual students complete their evidence chart and allow them to add any information they believe is missing. They will add to the last rows in their inquiry chart and post assessment. They will also add additional dates to their timeline folder.
Extension: Using the black outline of cartouches and the Hieroglyphic Alphabet, have students write their name in hieroglyphics using the method of writing down rather than across.

Unit 2, Essential Question #4 100 Interconnections © 2011
Finding Evidence Chart Statement: Technology was evidenced in ancient civilizations that influence our culture today. (Find proof of this statement). Technology includes systems of writing, language, architecture, science, math, medicine, preservation techniques, roads, transportation, weapon and other systems. Directions: As you explore the resources provided, look for evidence of technologies that begin in ancient times that benefit us today and complete the evidence chart below. Technology Type Proof Origin Reference

Unit 2, Essential Question #4 101 Interconnections © 2011

Unit 2, Essential Question #4 102 Interconnections © 2011

Unit 2, Essential Question #4 103 Interconnections © 2011
6th Grade Unit 2: Cause & Effect: Ancient Civilizations
Essential Question #4: How did the earliest civilizations create technologies and systems to meet their needs?
Lesson Title: The Most Excellent Civilization
SS Standard 1, Objective 4 Implementation Time: 45 minutes Media Resources Needed: Resources Needed: Inquiry chart from previous lessons; Post Assessment Chart; Finding Evidence Chart; “Discussion Web”; large class inquiry chart; four corners signs written on a regular size plain sheet of paper, one for each of the following: 1) Ancient Egypt was the most excellent civilization due to their contributions. 2) Ancient Greece was the most excellent civilization due to their contributions. 3) Ancient Rome was the most excellent civilization because of their contributions. 4) Ancient Rome, Egypt and Greece were equally the most excellent due to their contributions.
Procedure: The purpose of this activity is for students to engage in historical inquiry and decision-making based on evidence gathered. 1. Have students choose their own group of four students and allow them time to discuss and study the charts, timeline, graphics and inquiry chart they have completed.
2. Hand out the “Discussion Web” and instruct students to come up with five arguments in agreement with the statement and five arguments in disagreement with the statement. 3. Based on their arguments, have students write a concluding statement, coming to consensus with all group members as to whether they agree or disagree and why. If they cannot come to a consensus, have students vote and go with the majority. 4. Have a spokesperson for each group share the group’s concluding statement with the class.
5. Have each student return to their individual desk and ask them to complete this statement: I think ________ (have them choose between Greece, Rome and Egypt) was the most excellent civilization because they made the following

Unit 2, Essential Question #4 104 Interconnections © 2011
contributions to our world ______________and they were important because_____________.
6. Place the four signs in four corners of the room and have students move to the corner that best reflects their personal opinion (they will take their paper with them). 7. Either have the students in each corner choose a person to voice their opinion (based on the best evidence written) or you can give each student 15 seconds to voice their opinion as you alternate among corners. Tell students their job is to persuade others to join their corner. After each corner/ student has voiced their opinion, give anyone an opportunity to change corners and ask them to explain why they changed. If there is a corner that no one moves to, go to that corner and give an opinion in favor of that choice.
Assessment: Give markers to each group and ask them to contribute one item in each row and column of the large class inquiry chart. Have them go one at a time and make sure there is something in each square. Monitor for misconceptions or misunderstandings.
Extension: Any unanswered questions in the last row of the Inquiry chart can be given to students or groups of students to conduct research and students can complete a technology piece of their choice to express their understanding of the material.

Unit 2, Essential Question #4 105 Interconnections © 2011
Discussion Web
Agree Disagree
Discussion Web
Topic Without the contributions of ancient civilizations, our world would not be
as advanced today.
Conclusion

Unit 2, Essential Question #4 106 Interconnections © 2011

6th Grade
Science & Social Studies Interconnections: A Thematic Approach
107
Sixth Grade Interconnections Unit III
Transformations: The Middle Ages & Renaissance Enduring Understanding: Students will understand the transformation of cultures during the Middle Ages and Renaissance and the impact of this transformation on modern times. Essential Questions • How does physical geography affect economic and cultural expansion? • Why was religion so important in the Middle Ages and Renaissance and how do
relations from those times continue to impact us today? • How did governments take steps toward self-rule during the Middle Ages and
Renaissance? • Why is the Renaissance considered a rebirth of cultural and intellectual
pursuits? Core Curriculum Concepts/Skills: investigation, systems, relationship, change over time, cause and effect, comparison, expansion, cultural exchange, systems of governance, self-rule, transformation
Core Standards Social Studies Standard II: Students will understand the transformation of cultures during the Middle Ages and the Renaissance and the impact of this transformation on modern times. Objective 1: Explain how physical geography affects economic and cultural expansion.
Objective 2: Explore the importance of religion in the Middle Ages and the Renaissance and its relevance to modern times. Objective 3: Examine how systems of governance began steps toward self-rule during the Middle Ages and the Renaissance. Objective 4: Explain the importance of the Renaissance as a rebirth of cultural and intellectual pursuits.
Social Studies language students should know and use: international trade, cultural exchange, renaissance, middle ages, merchant, feudalism, manor, city-state, Magna Carta, moveable type, literacy

6th Grade
Science & Social Studies Interconnections: A Thematic Approach
108

6th Grade Unit 3: Transformation: The Middles Ages & Renaissance
Science & Social Studies Interconnections: A Thematic Approach 109
Essential Question #1: How does physical geography affect economic
and cultural expansion?
Lessons: • The Wonder of the World • The Spice World
Core Standards Social Studies Science Standard II
o 1a identify natural resources and physical features that affected expansion o 1b describe the development of international trade via the desert, sea, and
land and the resultant cultural exchanges between Asia, the Middle East, and Europe (example may include: the Silk Road)

6th Grade Unit 3: Transformation: The Middles Ages & Renaissance
Science & Social Studies Interconnections: A Thematic Approach 110

Unit 3, Essential Question #1 111 Interconnections © 2011
6th Grade Unit 3: Transformation: The Middle Ages & the Renaissance Essential Question #1: How does physical geography affect
economic and cultural expansion? Lesson Title: The Wonder of the World SS Standard 2, Objective 1 Art Standard 1, Objective 1 Implementation Time: Two 45-minute lessons Media Resources Needed: P is for Passport: a World Alphabet by Devin Scillian; Nystrom Atlas of World History Materials Needed: large outline map of the world, you might enlarge the one included in this lesson; large classroom physical map of the world (optional), 10” by 12” foil covered cardboard; materials to create a physical map of the world out of salt dough: scissors, salt dough made the day before, toothpicks, food coloring or water colors, glue, tape, cup of water, pencils; construction paper in blue, green and brown
Procedure: 1. To activate students’ schema of world geographic features, read the book P is for Passport. You might just show/project the photos and ask students what they think the letter stands for (it may be too long to read), choose pieces that will bring out the ideas of how the geography of a place impacts the culture.
2. Give students a copy of the world atlas and have them find the pages in the back that show the different world maps over time, the political map of today, and then the physical map of the world. Ask them to observe the changes over time and ask them to share what they notice about the maps as they look at their progression. Direct them to compare the world today with the physical map of the world and ask them what is different. 3. Pose questions about how the physical map shows mountains and different physical features. Discuss the purpose of a physical map and why it is important to connect geography with history.

Unit 3, Essential Question #1 112 Interconnections © 2011
4. Hand out the materials listed above for the salt dough map. Have students work in cooperative groups of 4-5 to complete a map.
5. Instruct students to tape the black outline map of the world onto the foil covered board. Have them cut small rectangles out of the colored paper and write the physical features on the papers (these will be taped to the toothpicks). The names of mountains will be written on the brown, rivers and oceans on the blue, and land on the green.
6. Give each group of students a handful of salt dough and have them thinly cover the continents of the world. They only need a thin layer so that the toothpicks will stand up. They will use the map in the atlas to obtain the important names and determine where to place the mountains by building the salt dough higher in those areas. Instruct them to label the major mountain ranges, oceans, continents and rivers. You may want to give them a list of the important places that will be needed for the next lesson. 7. Have students place the toothpicks in the proper places and then let the maps dry. 8. For the next session, students will paint the mountains brown, the rivers, oceans and seas blue and the continents and major places green.
9. Allow a place for the maps to dry and note that you will use these throughout this unit. Assessment: Instruct students to write a List Poem (see directions below) about the geography/physical features of the world as they observe it on the map. This can be done individually or in a group. Extension: You may have students conduct additional research on what different parts of the world are like according to climate, physical features, and natural resources. After they have a grasp of the characteristics of the different regions, assign students to determine where they would choose to live if they could live anywhere in the world. Tell them government is not a consideration, selections should be made based on geography alone. Synthesize knowledge by completing the following statement: “Based on the geography of the world, I would choose to live in the area of______________ because_______________________(list a minimum of three different reasons).” Allow students time to try and convince others of their choice. This can be done in a debate format. Divide students into eastern and western hemispheres and argue their case, citing evidence/information from the atlas.

Unit 3, Essential Question #1 113 Interconnections © 2011
List Poem Instructions: 1. Process content information or generate a list of topics to write about. 2. Read sample poem and discuss the form. Reading poems aloud is more enjoyable. 3. Make a list of items, activities, or events that fit the topic then add details or more information. 4. Revise. 5. Edit. 6. Publish. Sharing aloud brings the poems to life. 7. Use this kind of poem again so students become more comfortable with it. 8. Be sure you write with the students or write your own poem first. This form is harder than it looks. Content: For this assignment, students will use the information found on the physical map of the world to write their poem, they must show information from all regions of the world. Example: Spartan Life… Age seven men went to military, (naked) The men couldn’t leave military till age 30, Sparta maintained a strong army, War-kept going even when wounded, Wore red to show no would, Spartan army was the best in Greece, Spartans controlled city-states They hated new comers, Life in Sparta never changed. -Seth, Brook, and Carter

Unit 3, Essential Question #1 114 Interconnections © 2011
Salt Dough Recipe
For Physical Map of the World
1cup Salt ½ cup cornstarch
2/3 or ¾ cup water Stir over heat until thick and smooth. Let cool on piece of aluminum foil. Knead like bread dough. Knead food coloring in as it cools, brown for the mountains, blue for the bodies of water, and green for the land/continents. Or it can be left white and painted later. Wrap in Saran Wrap or plastic wrap, or place in covered jar to keep moist until used. This clay dries hard in two to three days. *This recipe will make about 2-3 maps. *This is a great project to have a room mother or volunteer mix up for you. Or use the following recipe: 2 cups flour 2 cups water 2 cups salt 2 T. cream of tarter 2 T. oil (baby) Mix together, knead, wrap in plastic wrap or store in covered jar.

Unit 3, Essential Question #1 115 Interconnections © 2011

Unit 3, Essential Question #1 116 Interconnections © 2011

Unit 3, Essential Question #1 117 Interconnections © 2011
6th Grade Unit 3: Transformation: The Middle Ages & the Renaissance Essential Question #1: How does physical geography affect
economic and cultural expansion? Lesson Title: The Spice World SS Standard II, Objective 1 Implementation Time: 60 minutes Media Resources Needed: eMedia, World Heritage Palmyra; Nystrom Atlas of World History Materials Needed: three column “Spice Chart”; salt dough map from previous lesson or world map in this lesson, nine clear jars with the following spices (one in each jar): rosemary, fennel seed, nutmeg, sage, cloves, oregano, ginger, black pepper and cinnamon. Number each jar from 1-9. Procedure: 1. To activate prior knowledge of the east/west trade and the Silk Road, show the eMedia video clip. Have students write what they learn about the Silk Road and the importance of the centers of trade on its route.
2. After the clip, ask students: Why would people risk such a dangerous journey? 3. Place students in eight groups and give each group an unmarked, clear jar with one of the spices (the jars should have a number from 1-9). You will give students the “Spice Chart” list and ask them to look, smell and touch the spice to determine which one it is on the chart and place the number from the jar next to the name of the spice. Give students 30 seconds with each jar and have them pass it to the next designated group, choose the passing order ahead of time.
4. When all groups finish with all the spices, collect the jars and hold the spice up and ask where they place that jar number on the chart. You might have photos of foods that contain each of the spices. Ask students what they think that food would taste like without that spice. Example: pumpkin pie without nutmeg, cinnamon rolls without cinnamon.

Unit 3, Essential Question #1 118 Interconnections © 2011
5. When you have the charts correct, ask students to find out how much a pound of each spice would cost. You will want to make sure the current cost is in the cost column. Instruct them to answer the questions on the bottom of the chart.
6. Have students locate the country(ies) of origin for each spice by looking through the atlas at the Silk Road maps and the world maps. Have them add a toothpick with the name of the spice in the correct place on their salt dough maps (previous lesson) and have them draw with a marker the route of the Silk Road.
7. If you do not want to use the salt dough map, use the map in this lesson and have students make a key to show where the spices are on the map. They may label the continents and the Silk Road. Assessment: Assign one of the spices and other items from the Columbian Exchange to each student and ask them to research the item to determine what the impact of that item has been on the world. Next, have students use personification to write a first-person account of the item’s impact on world history. Example: “I am cinnamon and came from Ceylon. People journeyed long to find me and bring me back to their home country in Europe. These people wanted me because I added……I impacted society in a positive way because……. Extension: Assign students to create a flyer to enlist people to come on an expedition to the east for spices. The flyer must include information from the lesson about the importance and benefits of bringing back spices and the adventures along the Silk Road.

Unit 3, Essential Question #1 119 Interconnections © 2011
Legend: Rosemary Fennel Seed Nutmeg Sage Cloves Oregano Ginger Silk Road Black Pepper Cinnamon

Unit 3, Essential Question #1 120 Interconnections © 2011
Cost of Spices Chart
Number Spice/Country Cost Per Jar
Cost Per 1 oz.
Cost per Lb.
Nutmeg/Moluccas (Indonesia)
1.9 oz.$2.39
$ ÷ ounces Cost per 1
oz x 16 oz.
Cinnamon/Ceylon (Indian Island)
1.9 oz. $1.99
Cloves/Moluccas (Indonesia)
1.9 oz. $3.99
Ginger/Southern China
1.9 oz. $2.39
Black Pepper/India, East Indies
1.9 oz. $2.09
Fennel Seed/Southern Europe, Asia Minor
1.9 oz. $1.84
Sage/Albania, Greece
1.9 oz. $2.24
Oregano/Greece, Italy, Spain
1.9 oz. $2.24
Rosemary/European Mediterranean Countries
1.9 oz. $1.69
Calculate how much one pound of each spice will cost. Why do you think Cloves are the most expensive spice? What does this have to do with the age of exploration?

6th Grade Unit 3: Transformation: The Middles Ages & Renaissance
Science & Social Studies Interconnections: A Thematic Approach 121
Essential Question #2:
Why was religion so important in the Middle Ages and Renaissance and how do relations
from those times continue to impact us today?
Lessons: • Two Worlds Collide • Relevant Today: Religion in the Middle Ages &
Renaissance • History Makers
Core Standards Social Studies Science Standard II
o 2a explain the influence of religion on cultural expression (examples may include: the arts, architecture, government, education, family structure)
o 2b compare relations between the Muslim, Christian, and Jewish faiths curing the Middle Ages, Renaissance and the modern world (examples may include: Crusades, period of peaceful coexistence, periods of conflict)

6th Grade Unit 3: Transformation: The Middles Ages & Renaissance
Science & Social Studies Interconnections: A Thematic Approach 122

Unit 3, Essential Question #2 123 Interconnections © 2011
6th Grade Unit 3: Transformation: The Middle Ages & the Renaissance
Essential Question #2: Why was religion so important in The Middle Ages and Renaissance and how do relations from
those times continue to impact us today? Lesson Title: Two Worlds Collide SS Standard II, Objective 2 Implementation Time: 45 minutes Media Resources Needed: The Middle Ages (Spotlights) by Sarah McNeill; Nystrom Atlas of World History Materials Needed: various pictures of life during the Middle Age (find these in books or on line); Timeline Folder from Unit II, large sentence strips or large post-it paper; different colored markers (one for each group) Procedure: 1. Activate students’ background by placing them in cooperative groups and giving each group one of the pictures of life during the Middle Ages (teacher choice).
2. Instruct students to make observations and inferences about what they can learn from the pictures. 3. Have each group use their marker to write a statement about life in the Middle Ages (on a large sentence strip/post-it paper), based on what they learned from the picture. You may want to have them take turns writing the statement on the large post-it note or chart. 4. Hand out the Atlas of World History to each student and a copy of The Middle Ages (Spotlights) or other trade/picture book on Medieval Europe to each group. 5. Instruct them to locate the unit in the atlas on the Middle Ages and look at maps, charts, pictures and timelines to find evidence that will prove or disprove the statements made by each group. They may also look at other resources you provide.

Unit 3, Essential Question #2 124 Interconnections © 2011
6. As students find evidence, have them go to the statement that is posted and place a plus if they found proof (+) and a minus (-) if they disproved the statement. They may also add statements about the Middle Ages as they find new information. Allow 20 minutes for this part of the lesson.
7. Process student learning by discussing each statement and having students give their reasoning for the plus and minus. 8. Have students take out their Timeline Folder and add three to five events from the atlas. Assessment: Each student will choose one of the statements and write three questions that come from the statement: Example: Church leaders were powerful. + 1. How important was religion during the Middle Ages? 2. Why were religious leaders so important? 3. What did religious leaders do during this time? Extension: Assign students to exchange their questions and research the answers. Have them write a newspaper article or other performance task of their choice to explain the information.

Unit 3, Essential Question #2 125 Interconnections © 2011
6th Grade Unit 3: Transformation: The Middle Ages & the Renaissance Essential Question #2: Why was religion so important in the
Middle Ages and Renaissance and how do relations from those times continue to impact us today?
Lesson Title: Relevant Today: Religion in the Middle Ages & Renaissance SS Standard II, Objective 2 Implementation Time: two 45-minutes lessons Media Resources Needed: Nystrom Atlas of World History; The Middle Ages by Rebecca Stark; The Middle Ages (Spotlights) by Sarah McNeill; other resources you may have with information about the Crusades and role of the Christian Church during the Middle Ages Materials Needed: “RAT” Strategy handout (1 per student); “Bridge Over Troubled Waters” Chart (1 per student); current newspapers/news magazines (see assessment), Paper blocks: eight blank rectangles that will be placed on the board as part of a bridge. One paper block with the words Middle Ages and one with the word Renaissance (see example below); markers (one per group); lined sheet of paper for each student; masking tape
Procedure: Your students will read about the events, issues and impact of the Middle Ages and Renaissance, including the Crusades.
1. Make sure all students have a copy of the Atlas of World History. 2. Distribute the “RAT” strategy handout to each student. 3. Explain the “RAT” strategy (Read Around the Text). To explicitly teach the strategy, instruct your students to turn to the atlas page on the Decline of the Roman Empire. This will also give students some background into why Europe fell into the Dark Age. Project the handout and have students follow along and respond as you take them through the procedure step-by-step. Do not have them write on their papers; write their responses on the projected version for all to see. You may want to have the class come up with the written paragraph together. 4. Place students in cooperative groups or pairs and assign them one of the following eight titles from the Atlas of World History: 1) Feudalism and the Holy

Unit 3, Essential Question #2 126 Interconnections © 2011
Roman Empire, 2)Crusades to the Holy Land, 3)Moorish Spain, 4)The Hundred Years’ War, 5)Trade Routes and the Plague, 6)Europe During the Renaissance, 7) Reformation and Counter Reformation, 8) Rise of the Ottoman Empire.
5. Give students copies of pages from the Middle Ages by Rebecca Stark that apply to their atlas topic or the book (if you have enough for each group). You may also give them the book The Middle Ages (Spotlights) by Sarah McNeill as supplemental material. The Feudal System (The Middle Ages page 13), The Crusades (The Middle Ages pages 52-53), The Renaissance (The Middle Ages Page 81). 6. Remind students of the essential question and the focused ideas of this lesson to direct them to the facts that help answer that question.
7. When students have completed their “RAT”, give each group a building block for the bridge. 8. Place the block that reads “Middle Ages” on one end of the board or large poster and the one that reads “Renaissance” on the other side (space them so they will meet with the number of blocks that are placed between them -see the example in this lesson). Explain to students the idea of Europe being in troubled waters and the many events that led them from the Dark Age of Medieval Europe to the enlightened Renaissance. They have read about those events. Tell each group to place an event or concept they read about on the block, something that would have helped to “bridge” troubled waters to a more enlightened age. This will come from the last box on their “RAT” sheet.
9. Have students come up and tape their event/concept on the board. Instruct them to place blocks that were closer to the Middle ages on that side, and as they get closer to the other side events that relate closer to the Renaissance.
10. You may also print and copy the bridge and distribute one to each student so they have a copy. 11. When all blocks are on, ask the class if they would rearrange any of them and get class consensus regarding the order of the blocks. Students may want to copy the concepts on their own bridge. 12. Hand students a lined sheet of paper and ask them to fold it (landscape) into three equal parts. On the first column instruct them to write a large P -this stands for positive. On the second column instruct them to write the letter I -this represents interesting. On the third column instruct them to write an N- this represents negative. On their own and using the information from their “RAT” and from the Bridge, ask students to write under the correct column what they find positive, interesting and negative about the importance of religion during the Middle Ages and the Renaissance.

Unit 3, Essential Question #2 127 Interconnections © 2011
Assessment: For the second lesson, bring (or assign students to find on their own) current newspapers and have groups of students look for news stories that they think might have a connection to the importance of religion during the Middle Ages and Renaissance. They will tape the headline of the story under the Bridge on the board and give a brief statement on how it connects. After everyone has presented their headline, have each student answer the last part of the essential question: How do relations from those times impact us today? This should be developed as an argument, with evidence specifically cited from various texts/sources. Extension: Have student research religion during the Middle Ages and Renaissance to find evidence of the impact on our world today. In their papers, have them explain the event or decision from those times that may have led to conflict today and how they would solve the problem or change the decision/ event. This must show good research and build an argument with citations.

Unit 3, Essential Question #2 128 Interconnections © 2011
R. A.T. Topic _________________
Instructions: Complete the read-around to quick-read the text. Write the title______________________________________________ List what you think the pictures, graphics and maps tell you about the title.
1 Turn all the headings and sub-headings into a Question and answer the questions to help explain the pictures and graphics.
2 Read any text that will help you synthesize and summarize the information from the first two boxes. Write your findings in one paragraph that is comprised of 8-10 complete sentences.
3 Write one event or concept that you think is the most important for others to understand about your topic. How does this concept or event influence the coming of the Renaissance?
4

Unit 3, Essential Question #2 129 Interconnections © 2011
The Bridge over Troubled Water
Middle Ages
Renaissance

Unit 3, Essential Question #2 130 Interconnections © 2011

Unit 3, Essential Question #2 131 Interconnections © 2011
6th Grade Unit 3: Transformation: The Middle Ages & the Renaissance Essential Question #2: Why was religion so important in the Middle Ages and Renaissance and how do relations from those times continue to impact us today? Lesson Title: History Makers SS Standard II, Objective 2 Implementation Time: 60 minutes Media Resources Needed: Nystrom Atlas of World History; short biographies of people involved with the Reformation and Renaissance: Martin Luther, King Henry VIII, John Calvin, Desiderius Erasmus, Leonardo daVinci, Michelangelo, Raphael, Christine de Pizan, Petrarch, Dante, Chaucer Lorenzo de’ Medici, Joan of Arc, Queen Isabella, King Ferdinand, Niccolo Machiavelli, Pope Gregory VII, Saint Thomas Aquinas, John Hus, Queen Elizabeth I, etc. (You may use excerpts from books, text or find appropriate leveled texts from the internet. If you have computers in your room, you may have students find the information on their assigned person through research.); books and other resource materials that discuss the Renaissance, Reformation and Middle Ages. Materials Needed: copy of the “Reporter” instructions included in this lesson.
Procedure: Have students think critically think about the question: Does history make the person or does the person make history? In the process, students will gain information and insights into how religion played a role during this time period. Students will also understand how the Reformation changed the religious climate in Europe and impacted the move toward individual freedom. 1. To activate students’ background knowledge, ask them to think of a person who caused a change to take place. Use a Think, Pair, Share strategy to process their response. Ask someone to share with the class. Discuss how this was accomplished and ask if they believe the person to be the cause of change or if the “events of the time” became the catalyst for change?
2. Write the word “Reformation” on the board. Ask the class how they think this relates to change? What does it mean to “reform” something?

Unit 3, Essential Question #2 132 Interconnections © 2011
3. Hand out the Atlas of World History to each student and have them locate the page that discusses the Reformation and Counter-Reformation. Ask them to read the information until they find a definition of the Reformation. 4. Have students look the word up in the dictionary and write their own definition of the word (in their own words). Ask students what they think it might mean? What leads reformers to become leaders/agent of change? How do leaders/agents of change often interact with systems of power and governance? 5. Explain that the Reformation took place during the Renaissance, but many of the causes of the Reformation occurred during the Middle Ages. 6. Hand out a biography to each student and ask them to complete a KWL chart before they begin reading (first column, what do you already know) and the second column (what do you want to learn). They will complete the last column while they read (what they learned). 7. After they complete their last column, instruct students to pass their papers around the room (you will designate an order so each person passes to the same one each time). 8. Have them pass their paper to the next person and allow them 30 seconds to read the last column before passing the paper on. Repeat until all students have a chance to read about each person. (You might have a group of four read the same bio and share before they pass, have them pass as a group. This will save time.) 9. After everyone gets their own paper back, have students answer the following on the back: I think Martin Luther made history because… or I think History made Martin Luther because… 10. Play the game “The Reporter” follow the instructions listed in this lesson below.
Assessment: Make a class list of the people studied and ask students to rank them in order of their impact on history. Have students write a two-three paragraph argument (citing specific evidence and examples) with details of what, why and how the number one person on their list accomplished what they did.
Extension: Create a continuum on one end place the statement History Makes the Person. On the other end place the statement The Person Makes History. Ask students to take their place on the continuum according to their belief about history makers. Give each person beginning on one end of the continuum 15

Unit 3, Essential Question #2 133 Interconnections © 2011
seconds to try and convince others they are right. Go to the other end and continue back and forth until you get to the middle person. Ask if anyone would change their position based on what others said. If any change ask them to explain what convinced them.
The Reporter Procedures and set up: 1. Have student s study/research a group of people who were involved in the same time period. You might give short biographies (one page) on each person and have them study their significant contribution for that time period in history. 2. After students have required background on the people, choose students to represent the people and three students to become reporters. You may change the reporters for each person. 3. Send the person out of the room and tell the reporters and class who that person will be. For example, the person might be Marie Antoinette. You do not tell the person who is playing that roll, and the point is for that person to figure out who he/she is based on the clues given/questions asked. 4. Invite the person in and have the reporters take turns asking questions that range from vague to more obvious. Ex. What country are you from? The person has to just guess at this point. The next question might be: What was your first impression of France when you arrived? Next question could be: How do you like your cake? (More obvious). Then you might ask: What was your role during the revolution? 5. The purpose is to see if students understand the significance of this person in history. 6. Make copies of the role descriptions below and give them to the class so they know what each person is responsible for. Reporter: 1. Each reporter will write 2-3 questions each. 2. Questions cannot contain any names. 3. Try to come up with questions that give clues without making it obvious who the person is. The object of the game is to make him/her work to figure out who he/she is. 4. Reporters take turns asking one question at a time. 5. If the famous person can’t guess who he/she is after 6 questions, the press corp. (rest of the class) may help.

Unit 3, Essential Question #2 134 Interconnections © 2011
Famous Person: 1. Answer each question that comes along, even though you may not know who you are yet. Be confident and watch for the reaction of the reporters and press corp. when you answer to determine if you are on the right track. 2. Look for clues in the questions that help you know who you are. When you finally guess who you are, tell us what clues helped you figure it out. 3. Do not answer with “I don’t know”, be creative and give an answer that might match, think about the people that you have studied. Press Corp.: 1. Remain quiet and listen, take notes on the questions asked and how they are answered. 2. Be prepared to help if the reporters get stumped or when it’s your turn to play reporter. Have questions ready to go.

6th Grade Unit 3: Transformation: The Middles Ages & Renaissance
Science & Social Studies Interconnections: A Thematic Approach 135
Essential Question #3:
How did governments take steps toward self-rule during the Middle Ages and Renaissance?
Lessons: • From Feudalism to Self-Rule • Rise of the City-States
Core Standards Social Studies Science Standard II
o 3a examine relationships between significant events and ideas and their influence on systems of government (examples may include: the rise of the merchant class, the Magna Carta, the impact of the Black Death, Germanic tribes, feudalism, manors, city-states)
o 3b compare individual rights of people in the United States today with the rights of selected groups in the Middle Ages and the Renaissance (examples may include: serfs, nobility, merchant class)

6th Grade Unit 3: Transformation: The Middles Ages & Renaissance
Science & Social Studies Interconnections: A Thematic Approach 136

Unit 3, Essential Question # 3 137 Interconnections © 2011
6th Grade Unit 3: Transformation: The Middle Ages & the Renaissance
Essential Question #3: How did governments take steps toward self-rule during the Middle Ages and Renaissance?
Lesson Title: From Feudalism to Self-Rule SS Standard II, Objective 3 Implementation Time: 90 minutes Media Resources Needed: Nystrom Atlas of World History; Middle Ages by Rebecca Stark (or teacher’s choice of other resource); The Middle Ages (Spotlights) by Sarah McNeill (or teacher’s choice) Materials Needed: information pages included in this lesson: “The Feudal System”, “The Middle Ages”, “A Serf’s Life”, “A Noble’s Life”, and “Germanic Tribes”; assignments from the previous lesson, large sheets of paper (one per group) Procedure:
1. Distribute the Nystrom Atlas of World History and have students review the section titled Europe in the Middle Ages. Students should already be familiar with this unit from the previous lesson. 2. Instruct students to search for information about how Europe was governed during the Middle Ages. They may also look at the assignments and notes from the previous lesson for information. 3. Explain that this time, students will be looking for evidence of how Europe was ruled during the Middle Ages. Have students make a list of statements about government during this time period. Example: People were born into nobility and had more freedom than those who were not.
4. After they have 4-5 statements written, place students in cooperative groups. You will assign each group one of the following roles: serf, noble/lord, baron/bishop, peasant, craftsman, servant, or king. Instruct students to search their resources to find what their role would be as part of the feudal system.

Unit 3, Essential Question # 3 138 Interconnections © 2011
5. Each group will draw a representation of their assigned role. Then instruct them to draw lines out from the person with descriptions of their role (see example).
6. Each group will discuss how satisfied they are with their role in a feudal system and what they would change about the system based on their satisfaction level. Give students 15-20 minutes to complete the activity.
7. Allow each group time to present their role poster to the class and explain why they are satisfied or dissatisfied with their role.
8. Write the words “satisfied” and “dissatisfied” on the board and list reasons under the correct word as each group presents the information.
9. After each group presents, take a look at the board and ask the class, based on our presentations and list of satisfied and dissatisfied items: Do you think the majority of the people liked the feudal system?
10. Have students help you list the hierarchy of the feudal system on the board with the king at the top and the serf at the bottom.
11. Instruct students to return to their groups and make a list of 10 suggestions to the king on how they might change the way they are ruled in Europe. Give this to the king (group). Assessment: Have students write a RAFTS with their group as follows: R ole=you are to be the role they were assigned during this lesson.
A udience=you will be addressing all of Europe.
F ormate=Speech
T opic=How the Feudal System needs to change. Trait=Voice, Ideas and Content S trong Verb=Persuasive. *If you are the King, you will be writing to the people in response to what they are saying in their speeches. Incorporate the list of suggestions in your response.

Unit 3, Essential Question # 3 139 Interconnections © 2011
Example of Role Poster for the Knight Students write responsibilities on the arrow lines such as: protects the King and
Nobility, risks his life, wears heavy equipment, etc.

Unit 3, Essential Question # 3 140 Interconnections © 2011
GERMANIC TRIBES
Raids by Germanic tribes (The Goths, the Vandals, and the Lombards) shook the power of the Roman Empire and brought about a new way of life in Western Europe. The Vandals invaded the empire along with other barbarians and helped bring about its decline. The Vandals were no more destructive than other barbarians, but the word “vandal” has come to mean someone who destroys or damages valuable things. War was a normal part of the Germanic tribes’ lives. They lived as bands of warriors with chieftains as leaders. The aim of each warrior was to win glory in battle. Their daring raids put the Roman Empire under pressure and disrupted the Roman way of living. Society had to be reorganized and new ways of maintaining law and order had to be found. One very important change was the custom of strong men offering protection to a band of followers. Powerful individuals, like the Germanic war-chiefs, gave armed protection to their people. In return they expected service, particularly in battle. In the unsettled conditions brought about by the raids of the Germanic tribes and the fall of the Roman Empire, this was very necessary. People were desperate for protection. A new sort of society was growing up, in which loyalty to an all-powerful local warrior chieftain or “lord” was an important part of life.

Unit 3, Essential Question # 3 141 Interconnections © 2011
RELIGION IN THE MIDDLE AGES Religious belief was a part of everyday life in the Middle Ages, which also contributed to the power of the church. People looked to the church and its leaders to explain events in the world around them. Disasters like storms, disease, or famine were often explained as punishments sent by God. People hoped that prayer and religious devotions would keep away events of this kind. Life during the Middle Ages was dangerous. There were few laws that everyone obeyed. Besides feudalism and manor life, the third force to bring order to Europe was the Roman Catholic Church. Since all of Europe was once part of the Roman Empire, Europeans believed in the religion coming from Rome, which was the Roman Catholic Church. The church had rules, known as cannon laws, which taught that the people who lived a good life would earn a place in heaven after they died. Everyone, including the king was expected to obey these laws. If a person broke a church law and was found guilty in a church court, that person was punished. One of the most severe punishments was excommunication, which meant a person could no longer be a member in the church. Since Roman Catholics believed that through baptism in their faith they were saved, excommunication was a terrible thing. The power and wealth of the church were obvious to many people in their everyday lives. The buildings of the church made everyone aware of these things. Few villages were without a church, a stone building which towered above the little huts and cottages of the peasants. In many places, there were also large monasteries and cathedrals in the most up-to-date architectural styles. Because of the church, education was carried on and learning was saved during the Middle Ages. Education was mainly a privilege for men destined to follow a career in the church. Schools were found in many monasteries and cathedrals. Warfare was also controlled by the church, which stated that there could be no fighting on weekends, and holy days. The church declared so many holy dates that by the end of the Middle Ages only eight days of the year remained on which fighting was allowed. In the Middle Ages, artistic work was carried out for the church.

Unit 3, Essential Question # 3 142 Interconnections © 2011
THE MIDDLE AGES
From 41 B.C. until 407 A.D., The Roman Empire was the most powerful force in all of Europe. In 58 B.C., Julius Caesar conquered the part of Europe that was then known as Gaul. This region included all of what is now France, as well as the northern part of Italy. Three years later, Caesar invaded Britain. Rome came to control all of the countries around the Mediterranean Sea and extended its influence as far west as Britain. Rome exerted great influenced on the cultural development of its neighbors. From Rome they took their alphabet, their architecture, their language, and their systems of government and law. As time went on, Rome grew weak and less able to defend itself against attack. The Vandals, a savage Germanic tribe from northern Europe, grew strong. During the fourth and fifth centuries A.D., they overran Gaul, Spain, and northern Africa. One by one, they captured Roman cities and moved close to Rome itself. In 455 A.D., as many as eighty thousand Vandals sacked Rome and left the city in ruins. Under the pressure of repeated attacks by barbarians, the Roman Empire collapsed. For four to six centuries, people had no art, no music, and no education. They lived in fear they would be attacked by roaming bands of barbarians or would die of the plague or some other dread disease. This bleak period is known as the Dark Ages. About 800 A.D., people began to join together for protection. The strongest warriors among them became kings. Each kind took the land he had conquered and divided it among his loyal followers. In return, they would fight in his army and pay taxes to him. These followers helped the kind build a castle in which he and his family could live safely. If an enemy attacked, the kind’s followers also sought safety within the castle walls. From these sad and savage beginnings came the feudal system and the period known as the Middle Ages.

Unit 3, Essential Question # 3 143 Interconnections © 2011
THE FEUDAL SYSTEM
By the twelfth century, the feudal form of lordship was found through most of We stern Europe. It was characterized by the holding of land from a superior in return for certain services. At the top was the king of a very powerful lord. They system was based on mutual obligations between lord and vassal (lower lord). The king or lord claimed ownership of all land and his first obligation to the vassal was the granting of the fief or land which ranged from a few to several thousand acres. It often included houses, barns, tools, animals and serfs (peasants bound to the land and owned by the lord). The land was granted in different parts of the country, so no vassal or baron could become too powerful. The lord or baron was given the right to collect tolls and taxes from those living on or crossing over his land. The king also kept large areas as royal forests and owned the chief towns and the royal manor. Forests were regarded as an important source of sport for the knights and nobles. There were elaborate laws to preserve the beasts in both royal and ordinary forests. The services owed by a vassal to his lord varied but most important was military service. A vassal was bound to supply his overlord with a fixed number of knights for 40 to 60 days per year. The vassal also had to appear in the lord’s court, either to serve on the jury or to give advice. He was also expected to help ransom the lord or his family if necessary. In addition, a portion of the vassal’s income from the fief was to be given to the lord. On certain occasions, such as the knighting of the lord’s eldest son or the marriage of his eldest daughter, the lord would expect a money payment or aid. (Later, military obligations could be met with money payments as well.)

Unit 3, Essential Question # 3 144 Interconnections © 2011
A NOBLE’S LIFE
The kings and queens depended on the nobles to provide fighting men if their power was threatened. Noblemen fought as knights. Much of their time was spent in activities like hunting or fighting in tournaments which was good practice for war. They also spent time watching over their land and tenants. Many nobles were wealthy and their lives luxurious by medieval standards. They lived in castles which were always full of people. Many people wanted to enter the service of especially powerful families. The lord’s wife, or lady, was trained to oversee the household servants. She could also spin, sew, and weave. She was expected to care for the sick and wounded. She was respected, but she usually could not read and had few rights. If she did not have at least one male child, the lord could choose to end the marriage. The nobles were among the few people who slept on a wooden bed with a mattress, silk, or linen sheets, fur coverings, and curtains to give privacy. From the thirteenth century the wealthiest nobles sometimes had glass in the windows of their castles. Elaborate wall-hangings provided decoration and kept out drafts. Castles often had paintings on the walls. Boys of the nobility started their military training at age six when they were sent to a neighboring castle to become a page. Early in life, girls were taught handicrafts and dancing. When a girl was old enough to marry, her father would offer her hand in marriage and a dowry to any knight who would agree to marry her. No child could be married without the lord’s consent. When a girl married, all lands she inherited from her family became the property of her husband.

Unit 3, Essential Question # 3 145 Interconnections © 2011
A SERF’S LIFE
Serfs (or villeins) were not free. They had to obey their lord completely. They had to work on his land and were not allowed to move away. They could become free by buying their freedom or by becoming a priest. They might become free if they ran away to a town or they might be caught and severely punished. Life on manor was constant work for a serf and his family. The entire family would rise at dawn, eat a few crust of bread, and go to work on their lord’s lands. They raised crops and looked after livestock. They raised crops and looked after livestock. They had small strips of land to grow their own food. Children performed simple tasks and were given more responsibility as they grew older. Serfs worked until sunset, then walked back to their huts and ate a simple meal of bread and vegetables or meat. All members of a serf family slept in the same room at night. They went to bed early so they could do the same back-breaking work the next day. The only days off from work were the sacred or holy days celebrated by the Catholic Church. The word “holiday” 9Holy day) comes from the Middle Ages and even today it means a day off from work. In the Middle Ages, the clothes a person wore were a clear sign of his or her position in society. Serfs or peasant dressed very simply. They made their own clothes by spinning or weaving cloth at home Serf children did not attend school. Most serfs never learned how to read. They learned about the world by listening to stories or legends. If a lord sold his lands, the serfs were guaranteed the right to keep working the land for the new lord.

Unit 3, Essential Question # 3 146 Interconnections © 2011

Unit 3, Essential Question # 3 147 Interconnections © 2011
6th Grade Unit 3: Transformation: The Middle Ages & the Renaissance
Essential Question #3: How did government take steps
toward self-rule during the Middle Ages and Renaissance? Lesson Title: Rise of the City-States SS Standard II, Objective 3 Implementation Time: 45 minutes Media Resources Needed: eMedia World Heritage Video: Florence; Nystrom Atlas of World History, The Renaissance by Linda Larsen (or other source books on the Renaissance) Materials Needed: strips of paper two inches wide and twelve inches long in two different colors to make a chain; glue, staples or clear tape; markers, lined paper, Instructions for Diamante Poetry Procedure: Students will learn how to recognize cause and effect and will learn how events during the Middle Ages and Renaissance led to change in Europe; the focus is on governmental changes.
1. Distribute the Atlas of World History to each student. 2. Explicitly teach students how to recognize cause and effect by using some statements from the atlas unit on The Middle Ages. Place them on the screen and ask students to pick out the word that identifies the sentence as showing cause/effect relationship. Example: Increased trade spread new goods across Europe. However, it also spread the worst disease in European history-the bubonic plague. Ask students what the cause was (increased trade) and its effect? (Spread of the bubonic plague). Continue with other examples until you know that your students understand the concept of cause/effect. You can have them turn to that unit and look for their own examples and share with the class.
3. Assign one half of the class (group 1) the atlas unit titled Europe in the Middle Ages and the other half of the class (group 2), the unit titled From Renaissance to Industrial Revolution.
4. Give each student three paper strips of each color (total of six). Write the name of each color on the board and next to one color write “cause” and the other color “effect”.

Unit 3, Essential Question # 3 148 Interconnections © 2011
5. Instruct students to read through their assigned section of the atlas and when they discover a cause or effect have them write it in a brief statement on the designated color strip. 6. You might assign students one page of their unit for time management, with more than one student assigned to each page, depending on the number of students that you have. 7. After each student has finished reading and writing on their strips of paper, show the eMedia video and instruct them to write any cause and effect relationships they see in the video on a separate sheet of paper. 8. Discuss the video and what they observed; have them share their cause and effect notes from the movie clip. This will help you to assess their understanding of cause and effect relationships. 9. Place the students in cooperative groups of two from the Middle Ages group and two from the Renaissance group. Have them determine how they might link one cause strip with one effect. They might find that they can link two effects to one cause or just make a continuous chain showing cause/effect/cause/effect, explain to them that often one effect becomes the cause of something else. 10. Students will share their chain through an “around the world” or “walk about.” One group member will remain seated with the group chain to explain it to others, the rest of the group will move around the room from table to table to learn about the other cause and effect chains. 11. You will want to spot check the chains to see if they are on the right track and if you see a link with no relationship, ask them to support their reasoning for the link. 12. After each table has been visited, give the group time to readjust their chains based on what they might have learned from others. 13. Have the groups hang their chains in the room.
14. Chart the essential question by asking students how they would answer it based on the past two lessons. Example: The Reformation took government power out of the hands of the clergy. The printing press allowed the peasantry access to learning, leading to a greater desire for personal freedom. Assessment: Have students write an adaptation of a Diamante Poem to show their

Unit 3, Essential Question # 3 149 Interconnections © 2011
understanding of the progression from the Middle Ages to the Renaissance and understanding of the essential question. Extension: Expose students to excerpts from Sir Thomas Moore’s Utopia and Machiavelli’s The Prince with their contrasting philosophies of government. Have students make a T-Chart with “The Prince” on one side and “Utopia” on the other and list the differing ideas as they listen to/read the passages. Have students write a letter to one of the authors expressing their agreement or disagreement with their philosophy of government and an explanation (complete with cited evidence) of their opinion. Discuss how this relates to government of the two time periods.

Unit 3, Essential Question # 3 150 Interconnections © 2011
Diamante
Diamante is poetry form that takes the shape of a diamond. You will write about two opposite words or concepts or to show how one event lead to another. Steps:
1. Use fluency to list 25 pairs of opposites such as day/night.
2. Use originality to choose an unusual pair of opposites about which you would like to write.
3. Follow this pattern (look at the examples to help): Line1: The first word in your pair of opposites. Line 2: Two adjectives describing the first word. Line 3: Three verbs ending in “ing” which tell what the first word does.
Line 4: Two nouns which go with the first word, then two nouns which go with the second word in the pair of opposites.
Line 5: Three verbs ending in “ ing” which tell what the second word does. Line 6: Two adjectives describing the second word. Line 7: The second word in the pair of opposites.
1. Noun 2. Adj. Adj.
3. Verb(ing) Verb(ing) Verb (ing) 4. Noun Noun Noun Noun
5. Verb(ing) Verb (ing) Verb (ing) 6. Adj. Adj.
7. Noun

Unit 3, Essential Question # 3 151 Interconnections © 2011
You will use this format to show the differences between the Middle Ages and the Renaissance, keeping cause and effect in mind. Your
assignment is to demonstrate the concept of change.
Middle Ages
________ ________
________ ________ _________
________ _________ _________ _________
_______ ________ ________
________ ________
Renaissance

Unit 3, Essential Question # 3 152 Interconnections © 2011
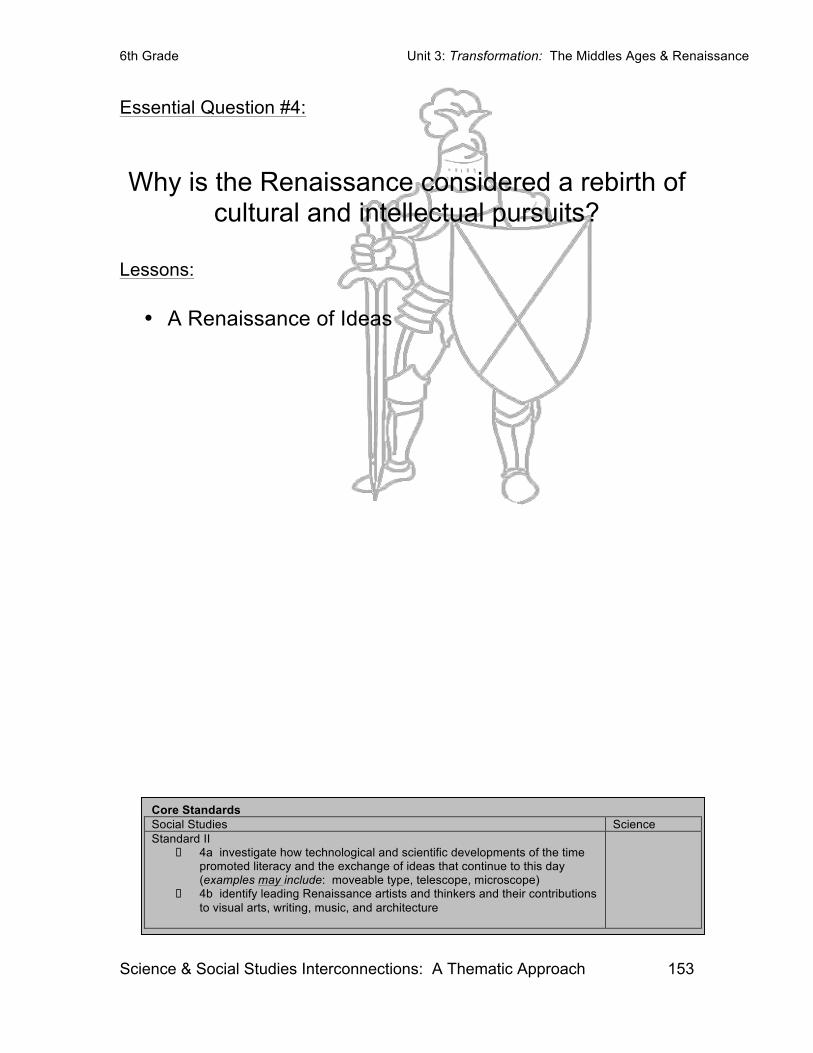
6th Grade Unit 3: Transformation: The Middles Ages & Renaissance
Science & Social Studies Interconnections: A Thematic Approach 153
Essential Question #4: Why is the Renaissance considered a rebirth of
cultural and intellectual pursuits?
Lessons: • A Renaissance of Ideas
Core Standards Social Studies Science Standard II
o 4a investigate how technological and scientific developments of the time promoted literacy and the exchange of ideas that continue to this day (examples may include: moveable type, telescope, microscope)
o 4b identify leading Renaissance artists and thinkers and their contributions to visual arts, writing, music, and architecture

6th Grade Unit 3: Transformation: The Middles Ages & Renaissance
Science & Social Studies Interconnections: A Thematic Approach 154

Unit 3, Essential Question #4 155 Interconnections © 2011
6th Grade Unit 3: Transformation: The Middle Ages & the Renaissance Essential Question #4: Why is the Renaissance considered a
rebirth of cultural and intellectual pursuits? Lesson Title: A Renaissance of Ideas SS Standard II, Objective 3 Implementation Time: two 45-minute sessions Media Resources Needed: eMedia video - World Heritage: Vatican City Materials Needed: pencils, water colors, markers, construction or art paper, various prints/pictures of Renaissance paintings, sculptures, architecture, inventions and excerpts from written works of the age (teacher choice); instructions for “Renaissance Learning Stations”; “Questioning the Renaissance Man/Woman” handout (1 per student) Procedure: 1. Activate students’ background knowledge by showing a short segment of the Vatica City video to give students a view of Renaissance architecture.
2. Ask students to talk with a partner and list five characteristics of Renaissance art. Share with the class.
3. Before class, gather pictures, prints, artifacts and excerpts from some of the most famous Renaissance art, architecture, inventions, personalities and writings (teacher choice)
4. Create stations for students to visit. The format for the stations is included in this lesson.
5. Explain that students will take a walk through the “Rebirth of Learning” to discover what makes this time period so enlightened.
6. Students will visit at least three stations and analyze all the materials at those stations. Instruct them to choose one piece at each station and write three questions for the artist or author of the piece they choose. Make sure the name of the author/inventor/artist/architect is written on the back of the item.

Unit 3, Essential Question #4 156 Interconnections © 2011
7. Give students 10 minutes at each station before rotating. Decide on how many stations they will be able to complete in the allotted time.
8. Direct students to exchange their questions/papers with someone in the class. Each student will read through the questions and choose one of the three questions sets to respond to. Instruct students to take on the voice of the artist/architect/inventor/author and answer each of the three questions. They will use the information they have learned during this unit to formulate their responses. (It is best that students sit at the table where the question originated so they can look at the item and make inferences about the mind of the creator.)
9. After students finish answering the questions, have them stand in a circle around the perimeter of the room and pass their paper to the person on their right. Give them one minute to read the three questions and answers, pass to the next person. Continue for 5-10 passes.
10. Process the lesson by asking students which of the stations they enjoyed the most and why they think the Renaissance is called a “Rebirth of Learning”.
Assessment:
Assign students to write a three paragraph essay focusing on the traits of ideas and content and organization to answer the essential question (Six Traits of Writing).
Extension: Have students research a Renaissance personality: artist, architect, writer, or inventor. Conduct a “meeting of the minds” in which students take on the persona and interact with other personalities in character as their Renaissance figure. Interaction should focus on how different personalities impacted change during the Renaissance.

Unit 3, Essential Question #4 157 Interconnections © 2011
Renaissance Learning Stations 1. The Painters: Place 4-5 famous art prints from Renaissance period at this station. Choose artists that students may be familiar with. You can get most of these from a library, art books, or the internet.
2. The Sculptors: Place photos of famous sculptures of the time period (if you have any miniatures or replicas that would be best).
3. The Inventors: Place the blueprints of some of the inventions of the time, such as the printing press and navigation tools for sailing. DaVinci’s blueprints for flying machines, war craft, and other inventions are fascinating for students to examine.
4. The Writers: Place excerpts from authors of the time such as Shakespeare and the enlightened philosophers, including Galileo.
5. The Architects: Place photos of Romanesque and Gothic structures including the inside and outside of Renaissance cathedrals.
6. Renaissance Creation Station: This is the overflow station for students who finish early at other stations. Place the art supplies and allow students an opportunity to become a Renaissance man/woman by creating something of their own for that time period. If they lived during the Renaissance how would they contribute? They might paint a picture, draw plans for an invention, draw blueprints for a building, or write a philosophical paper about the meaning of life and government.
Unit 3, Essential Question #4 158 Interconnections © 2011
Questioning the Renaissance Man/Woman As you travel trough the Renaissance, choose one item from each station and write three questions that you would like to ask about the item or the creator of the item. It is best to stick with open-ended questions such as Why, What and How.
The Artist:
1.
2.
3.
The Inventor
1.
2.
3.
The Architect
1.
2.
3.
The Author/Thinker
1.
2.
3.
The Sculptor
1.
2.
3.

6th Grade
Science & Social Studies Interconnections: A Thematic Approach
159
Sixth Grade Interconnections Unit IV
Transformation: Energy of Heat, Light & Sound Enduring Understanding: Heat, light and sound are all forms of energy that can be transformed from one form to another. Essential Questions • How can energy be transferred from one material to another? • In what ways can visible light be changed? • How can changes in vibrations create sound?
Core Curriculum Concepts/Skills: investigation, scale, relationship, movement, communication, demonstration, observation, complexity, summarize
Core Standards Science Standard VI: Students will understand properties and behavior of heat, light, and sound. Objective 1: Investigate the movement of heat between objects by conduction, convection, and radiation.
Objective 2: Describe how light can be produced, reflected, refracted, and separated into visible light of various colors. Objective 3: Describe the production of sound in terms of vibration of objects that create vibrations in other materials.
Science language students should know and use: angle of incidence, angle of reflection, absorption, conduction, conductor, convection, medium, pitch, prism, radiation, reflection, refraction, spectrum, vibration

6th Grade
Science & Social Studies Interconnections: A Thematic Approach
160

6th Grade Unit 4: Transformation: Energy of Heat, Light, and Sound
Science & Social Studies Interconnections: A Thematic Approach 161
Essential Question #1:
How can energy be transferred from one material to another?
Lessons: • Conduction • Convection • Radiation
Core Standards Social Studies Science Standard VI
o 1a compare materials that conduct heat to materials that insulate the transfer of heat energy
o 1b describe the movement of heat from warmer objects to cooler objects by conduction and convection
o 1c describe the movement of heat across space from the sun to Earth by radiation
o 1d observe and describe, with the use of models, heat energy being transferred through a fluid medium (liquid and/or gas) by convection currents
o 1e design and conduct an investigation on the movement of heat energy

6th Grade Unit 4: Transformation: Energy of Heat, Light, and Sound
Science & Social Studies Interconnections: A Thematic Approach 162

Unit 4, Essential Question #1 163 Interconnections © 2011
6th Grade Unit 4: Transformation: Energy of Heat, Light & Sound
Essential Question #1: How can Energy be transferred from one
material to another? Lesson Title: Conduction SC Standard VI, Objective 1 Implementation Time: 45 minutes Materials Needed: (per group) 1 cup ice cubes Ice Activity Sheet 1 zipper bag Conduction Assessment Sheet 2 ice cubes 1 cup room temperature water (per class) Thermometer Clock or timer (per class) Procedure: 1. Teacher Demonstration: Show the students the thermometer, the cup of ice and the cup of room temperature water. Measure the temperature of the water, then pass the room temperature cup around to students to make a few other observations. What does the cup feel like? Is there water on the outside of the cup? Etc.. Write these observations down in the science notebook
2. Ask: When ice is added to the warm water, does the warm water melt the ice, or does the ice make the water colder? Have several students give their guesses along with their reasons why and write them on the board. Note: The heat from the warm water is transferred to the ice. 3. A few minutes after adding the ice cubes, take the temperature of the cup and compare the temperature to the original room temperature reading. Have a few volunteers feel the cup. Is the cup sweating or collecting condensation on the outside? Is the cup cold or hot? How does the feeling of the cup compare to the temperature readings? Have students write observations and explanations down. 4. Pair students up. Tell them that as a class we are going to have a contest. The student team to be the fastest to melt the ice in the zipper bag will win. 5. Model the use of the Ice Activity sheet by doing a teacher demonstration: Project a copy of the Ice Activity on the LCD. Tell the students that your lab plan is to put the ice in a zipper bag in your pocket for 3 minutes. At the end of the 3 minutes you believe all the ice will melt. Next, you need to fill out your plan on the

Unit 4, Essential Question #1 164 Interconnections © 2011
Ice Activity sheet. Have the students help you come up with a title, show them how to write a hypothesis (for example, you could write the sentence; Hypothesis: Putting ice in your pocket is the fastest way to melt ice.) Finally, have them help you list the materials you are using, and write down the list of procedures used in melting the ice.
6. Next, do the teacher demonstration. Have a student watch the clock/timer and as a teacher checks their ice at the beginning and each minute for 5 minutes. After the five minutes. Go back to the data section on the Ice Activity page and document observations by drawing pictures. 7. Now tell the students that you have just set what is called the control. Tell the students that they have the opportunity in their teams to come up with a strategy to beat the teacher. Tell the students they will choose one thing that they want to change in their experiment. This will be located on their Ice Activity paper in the hypothesis section. Items to test might include seeing if the ice will make something else freeze, if something is better at melting the ice or keeping ice frozen. 8. Check to make sure students have filled out their sheet, identified only one change and are ready to begin. Once students have their activity planned and procedures written, pass out the bags of ice and have student teams write their name on the bag. 9. Next tell the students that they can get ready to test out their strategy. Set a timer in the classroom for five minutes and say to your students “On your mark, Get set, Go!” 10. After the race, collect the bags and make observations. Which bags had the most water in them? What methods created the most liquid? Be sure to record the winners’ methods on the board. Talk about things these plans have in common. (Students should find that the ice melted through some sort of direct contact with a warmer object.) 11. Next tell the students that as a class we are going to further observe this phenomenon. Have a student to hold a bag of ice in their hand for 1 minute. At the end of the one minute ask: Does the ice make hands cold, or did the heat from the hands cause the ice to melt? Note: The hands transfer heat to the ice, which results in the melting ice. 12. Tell the students that they were observing a type of heat transference called conduction (the transfer of heat by direct contact between particles. The transfer of heat is a result of the collision of particles between the two mediums). In other words the heat from the warmer object (hands) is shared or transferred to a cooler object (the ice), eventually balancing the two temperatures. So in essence, the transfer of heat made the students hands cold.

Unit 4, Essential Question #1 165 Interconnections © 2011
Assessment: Give your students Conduction assessment page. There they will see a list of statements tell about heat. Suggested answers: (although if a student has a logical explanation, take any answer) 1.N 2.Y 3. N 4.Y 5.Y Name:____________________________
Ice Activity
Title: Introduction: Have you ever wondered why ice feels cold? Today I would like to conduct investigations to see if one heat source conducts to another material. Hypothesis: Materials: Procedures: 1. 2. 3. 4. Data: Conclusion:

Unit 4, Essential Question #1 166 Interconnections © 2011
Name:______________
Conduction Assessment
The question of the day: Is conduction happening in the kitchen? Read the statements below, if you can see conduction happening in the kitchen circle yes and write a sentence explaining why. If there is no conduction, circle no and write a sentence of why not.
1. Setting plates on a table Conduction? Yes No Why or why not?
2. A metal fork in boiling water Conduction? Yes No Why or why not?
3. Stirring juice in a container
Conduction? Yes No Why or why not?
4. A thermos with hot soup inside
Conduction? Yes No Why or why not?
5. Scrambled eggs cooking on a frying pan
Conduction? Yes No Why or why no

Unit 4, Essential Question # 1 167 Interconnections © 2011
6th Grade Unit 4: Transformation: Energy of Heat, Light & Sound
Essential Question #1: How can energy be transferred from one
material to another? Lesson Title: Convection SC Standard VI, Objective 1 Implementation Time: 60 minutes Media Needed: Document camera/LCD projector Optional: Youtube.com clip on “convection currents” Materials Needed: Hotplate Per Group: Clear Pyrex Beaker (250mL or larger) Clear plastic container Water small foam cups Pencil Shavings or Dry Parsley Flakes hot water food coloring/eye dropper Procedure: Teacher Demonstration: 1. Teacher Prep: The day before the activity, fill a clear Pyrex jar ¾ full with water. Put about 1 small spoonful of the pencil shavings (or parsley) in the water and let them settle to the bottom. You must use the Pyrex brand glass beaker since it can withstand being heated on a hotplate without shattering. 2. Have the students make and record observations of the container on the hot plate as you turn on the heat in their journals. 3. During the demonstration, have the students answer these questions in their notebooks. • What happens to molecules as you add energy to them in the form of heat? • When you open the refrigerator, does the cold air that comes out rise to the top
of the room or fall to the floor?

Unit 4, Essential Question # 1 168 Interconnections © 2011
• In winter, what happens to the hot air produced in your heater; does it rise to the ceiling or fall to the floor of the room? • In the summertime, is it cooler to sleep in an upstairs room or in a basement?
4. As the water becomes warm, have the students make observations of the moving material. Can they see a pattern of movement? (They should see the pencil shavings moving in a circular pattern, which forms a convection current.) 5. Direct the students to draw the convection currents that result. 6. Have students use arrows to record the movement of warm and cold water by color-coding the arrows red for warm and blue for cold water. 7. In a whole group discussion, have your students relate these convection currents to those in the air. 8. In this discussion, remind students that by adding heat, you are adding energy. Molecules with a lot of energy tend to move quickly and take up more space (so they become less dense). • How is this fact related to the currents they saw in the water? • What kind of air (water) rises? • What kind of air (water) falls? • What makes the hot air (water) fall when it moves away from the heat source? 9. Student Investigation. Students will have the opportunity to observe convection currents in small groups. Give each group a clear container with room temperature water. Use 3-4 foam cups, turned upside down, to hold the container up off of the table. Fill the eyedropper with food coloring and then put the eyedropper in the water at the bottom of the container and then squeeze out the contents into “pile” at the bottom of the container. Fill another foam cup with boiling/very hot water and slide it under the clear container. Students will observe the heat from the hot water start a convection current in the clear container, causing the food coloring to start to swirl in a circular patter. Try searching youtube.com for additional convection current experiments for students to observe. 10. After completing this activity, divide the class into three smaller groups. Assign each group a question to be answered with the concepts they learned in the convection activity. • Why are the heating vents (the ducts that bring in hot air) in the floors in
houses? Would your heating system work better if you placed these grates in the ceiling? Why or why not?

Unit 4, Essential Question # 1 169 Interconnections © 2011
• It’s a summer night and you are too hot to sleep. Would you be more comfortable (temperature wise) if you moved off your bed and slept on the floor? Why or why not? • Janet owned an older home that she decided to remodel. She remodeled the
low ceiling in the living room and exposed the older ceiling which was very high. The next winter, Janet noticed that her heating bills increased significantly from the previous year. What accounts for this increased heating cost?
10. After the small group discussions, have the students present and justify their answers to the class. Assessment: 1. Review student science journals to check for accurate drawings of convection currents. 2. Review answers to the questions posed in #9 to assess for correct understanding of heat transfer.

Unit 4, Essential Question # 1 170 Interconnections © 2011

Unit 4, Essential Question #1 171 Interconnections © 2011
6th Grade Unit 4: Transformation: Energy of Heat, Light & Sound
Essential Question #1: How can energy be transferred from one
material to another? Lesson Title: Radiation SC Standard VI, Objective 1 Implementation Time: Two-45 minute class periods, plus observation time Media Resources: Optional: Do a Youtube.com search for “pizza box into a solar oven” Materials Needed: (per group) Solar oven materials (could make 1 for the whole class or get enough for all groups to make their own oven) Black construction paper Chocolate bars Pencil Aluminum foil Large marshmallows S’mores Sheet Clear plastic wrap Box cutter (for teacher) Duct tape Thermometer Masking tape Pizza box Graham crackers Wooden dowel Procedure: Advance prep: Start collecting pizza boxes well in advance (students can bring from home or you could try getting them donated from a store). Note—if you don’t have time, you can just do through step 9 as a demonstration and let students do the rest as homework or an optional extension. Day 1 1. On a sunny day, take students outside. Tell the students to turn to the next available page in their science notebook and title the page “Sunshine Observations”. 2. Have students make 5 observations and then write down what they notice about the effects of sunshine. Are they hot or are they cold. How are they seeing? (Note: Remind students to never look directly at the sun)

Unit 4, Essential Question #1 172 Interconnections © 2011
3. Have student volunteers share the observations that they made. 4. Next, tell students that as a class they will use the observations in an art form called an I Am poem 5. Show the students the I Am Poetry sheet as an example of an I Am poem. 6. Take a minute, use the chart paper and markers to have an interactive write. As a class compose one stanza of an I Am poem as a class. Divide class into groups of 3 and assign each group to write a stanza. Day 2 7. Tell students that in science we want to focus on solar energy (refer back to poems from lesson Radiation Sun Observations. Ask them to focus on one particular effect from the sun. Tell them you want to look at a particular type of heat transference. Ask the students to make a few statements of how they think the heat will be transferred? Take several student explanations. Tell the students that you are going to set up an experiment to test the student explanations. 8. Show the students a finished solar oven. Cover top and bottom of the inside with aluminum foil. Glue or take a smaller piece of black construction paper on the inside the bottom of the box where the s’more can sit. On the top lid of the pizza box, make a window to see the s’more by cutting 1 ½ inches in on three sides of the box. Cover the bottom side of the window with aluminum foil and use a wooden dowel to prop the window open to be to make the s’more visible to the sun. Lastly use clear plastic wrap to cover the window that you have just created in effort to keep the heat that is created in.
9. Place an open-faced s’more inside the box and then tape a thermometer down beside the s’more, close the box and take the class and the box outside to make

Unit 4, Essential Question #1 173 Interconnections © 2011
observations. Tell the students that they need to use the next page of their science notebooks to record the things about heat they are observing. What is happening to the s’more? Is the temperature in the box changing? Ask the students if they are warm currents of air move toward the box? Is the outside of the box warmer than normal could it be conducting heat into the box? 10. While you are waiting for the s’more to cook, tell the students that you brought them out to observe the heat transfer of radiation. Talk about how when radiation warms things up you don’t have to be touching anything, or having currents of heat traveling to it. Take the students inside and give them a definition of the heat transference of Radiation: The transfer of energy by electromagnetic waves. Note that unlike conduction or convection, radiation des not need a medium to move. The waves carry the energy through space. 11. Ask the students if they remember a time that they received sunburn? Sunburn is a sign that heat transference has occurred from the sun to your skin. Usually with sunburn you can’t feel anything happening until it is too late. The burn doesn’t come from heat currents; it comes because your skin has been over-exposed to radiation or some times we say being cooked by the sun. Bring box, s’more and students back inside to finish the observations. Optional: 12. Next, tell the students that they are going to have the chance to make their own solar oven to harness the sun to a s’more. Students can make a replica of the teacher’s oven design their own improved version. 13. Once teams of students have a plan that they have sketched out in their notebooks, they may take the items listed in the materials above and begin to construct their oven. If students need a hole cut in an opening in their box, the teacher should use the box cutter. 14. On a sunny day students can take the ovens outside and use the thermometers to measure the temperature and cook their s’mores. Assessment: Have groups share their stanzas and create a group poem. Have students write a short paragraph evaluating their solar oven design. Is there anything that they would change about their design that would increase the boxes ability to collect heat by radiation?

Unit 4, Essential Question #1 174 Interconnections © 2011
I Am Poetry
An I Am poem can be used to describe any character, setting idea or concept found in literature from language arts, social studies, science, math and art. It actually can have as many or as few stanzas as you would like.
The I Am Poem Organization
I am Two special characteristics the person or thing has I Wonder Something the person or thing could actually be curious about I hear An imaginary or actual sound I see An imaginary or actual sight I want A desire I am The first line of the poem repeated I pretend Something the person or thing could actually pretend to do I feel A feeling about the imaginary I touch An imaginary touch I worry Something that could really bother the person or thing I cry Something that could make the person or thing sad I am The first line of the poem repeated I understand Something the person or thing knows to be true I say Something the person believes in I dream Something the person or thing could actually dream about I try Something the person or thing could make an effort to do I am The first line of the poem repeated Example Poem: I am cold and unpredictable I wonder how the people will clear the highways I hear the tinkle of sleigh bells in the distance I see the tops of trees bend with heavy laden snow I want to blanket the Earth I am cold and unpredictable

Unit 4, Essential Question #1 175 Interconnections © 2011
Name:____________________________
Solar S’mores Activity
Title: Introduction: Have you ever wondered why you get into a car and it is hot after sitting outside in the sun all day? Today you will explore radiation, an energy transfer that occurs with out touching something or current flow. Hypothesis: Materials: Procedures: 1. 2. 3. 4. Data: Conclusion:

Unit 4, Essential Question #1 176 Interconnections © 2011

6th Grade Unit 4: Transformation: Energy of Heat, Light, and Sound
Science & Social Studies Interconnections: A Thematic Approach 177
Essential Question #2:
In what ways can visible light be changed?
Lessons: • Reflecting Light • Refraction: The Bending of Light • Light: Sources and Colors
Core Standards Social Studies Science Standard VI
o 2a compare light from various sources o 2b compare the reflection of light from various surfaces o 2c investigate and describe the refraction of light passing through various
materials o 2d predict and test the behavior of light interacting with various fluids o 2e predict and test the appearance of various materials when light of
different colors is hone on the material

6th Grade Unit 4: Transformation: Energy of Heat, Light, and Sound
Science & Social Studies Interconnections: A Thematic Approach 178

Unit 4, Essential Question #2 179 Interconnections © 2011
6th Grade Unit 4: Transformation: Energy of Heat, Light & Sound
Essential Question #2: In what ways can visible light be changed?
Lesson Title: Reflecting Light SC Standard VI, Objective 2 Implementation Time: 45 minutes Media Resources: Optional: Sci-ber Text website, Light Information Sheet Materials Needed: (per group) Reflection Investigation sheet Laser pen (mini flashlights work “ok”, but not great) Small mirror Procedure: 1. Engage: Tell the students that you are going to have a reflector hunt. Instruct students to get out their science notebook, look around the room and find objects that give a clear reflection, i.e., mirrors, metal objects (usually things that students can see themselves in) and list these objects that they find.
2. Explain: Tell the student that scientists define reflection as the bouncing back of light waves from a surface.
4. Explore: Next tell students they are going to investigate how reflection occurs. Put students in groups of 3. Tell students that one person will be the light holder, one person will be the mirror holder, and one person will be the light observer. Take a few minutes to allow students to explore and shine the light on the mirror and find where the light is reflected. Warning: Never shine a laser pen or flashlight directly in someone’s eyes. 5. After the exploration, have groups take a few minutes to sketch the light shinning outcomes in their science journal. As a class discuss the outcomes. Did the light always shine back the same direction that it was pointed from? Why not?

Unit 4, Essential Question #2 180 Interconnections © 2011
6. Elaborate: After the discussion, project the Light Information reading sheet on the LCD (or photocopy) and have students read it. Have students refer back to the questions they wrote in their science notebooks and answer the ones that they now understand. 7. Explain to the students that light travels in straight lines so when it leaves the light source it will continually travel in a straight line unless a reflective surface alters the direction the path. The Angle of Incidence is the angle formed by a ray of light, striking a surface and a line perpendicular to the surface it hit. The Angle of Reflection is the angle formed when light bounces off a surface at the same angle it hit the surface. 8. Evaluate: Have students do the Reflection Investigation. Hand out the Light Information reading sheet and the Investigation instruction sheet. Assessment: Check the students’ plan in their science notebooks. Reflection Investigation Sheet: The angle of reflection is identical to the angle of incidence. (20=20, 40=40 for example) Extension: 1. Students can write and draw a plan to hit a particular object in the classroom based off of the Angle of Incidence and the Angle of Reflection of where they will have the light hit. 2. Have students read the Sci-Ber text online and try some of the home activities http://www.schools.utah.gov/curr/science/core/6th/SCIBER6/heat_etc/html/intro.htm

Unit 4, Essential Question #2 181 Interconnections © 2011
Light Information Source: Utah Core Academy Handbook, 2004 Light travels so fast that it seems we see things the instant they happen. Light travels at 300,000 km per second, or 186,000 miles per second. Light travels in straight lines. When light hits an object, it can be absorbed, reflected, or pass through (transmitted). If light passes through a transparent object at an angle, it can also be refracted, or bent, because the speed of light slows as it passes from one transparent object to another. With a transparent object (air, water, clear glass) almost all light passes through. Translucent materials (wax paper, bathroom windows) allow some light to pass through while some light is reflected. Opaque materials (wood, metal) do not allow light to pass through, instead they either reflect or absorb the light. All objects reflect some light, because we can see them, but objects that are smooth and hard are better at reflecting light than others. Mirrors are excellent reflectors because the surface is smooth, and light is able to bounce back. When light hits a surface, it is always reflected at the same angle it strikes the surface. The law of reflection states that the angle of incidence equals the angle of reflection. This is best demonstrated by throwing a ball at a smooth surface. The angle at which it hits will equal the angle at which it bounces back (45˚ going in equals 45˚ going out). Light travels in a straight line. As light passes from one transparent material to another at an angle (from air to water, or air to glass), the light will slow down and appear bent. This is called refraction. A good example of this is placing a pencil in a clear glass of water. The part of the pencil above the water appears to be broken off from the part below the water. Light shining through a glass cup filled with water demonstrates refraction.

Unit 4, Essential Question #2 182 Interconnections © 2011
Reflection Investigation Angle of incidence is the angle at which light hits an object. Place a mirror at the edge of the protractor (reflective edge of mirror must be on the 0 line). Use a laser pointer to shine a light from one angle of the protractor and determine at which angle it is being reflected. Angle of Incidence
20 60 80 40 70 10 50 30
Angle of Reflection
What can you conclude about this experiment? Use protractor picture for this activity. Hold the mirror vertically on the “0” line.
Unit 4, Essential Question #2 183 Interconnections © 2011
6th Grade Unit 4: Transformation: Energy of Heat, Light & Sound
Essential Question #2: In what ways can visible light be changed?
Lesson Title: Refraction: The Bending of Light SC Standard VI, Objective 2 Implementation Time: 35 minutes Materials Needed: (per group) 2 Clear plastic cups Mysterious Penny Sheet Foam bowl Refraction Sheet Penny Line Sheet Pencil Procedure: 1. Divide students into pairs to conduct the next experiments. Pass out one Styrofoam bowl, one penny, and two clear plastic cups (one with water, the other empty) to each pair. Have them turn in their science notebooks and label the pages “Refraction” and “A Magic Penny.” Have them follow the directions for these two experiments and write their observations in their science notebook.
2. Explain to students that when they have finished these two experiments they are to predict in their science notebooks what they think will happen with “The Line Experiment.” Assessment: Assess the students’ notes and predictions in their science notebooks.

Unit 4, Essential Question #2 184 Interconnections © 2011
REFRACTION WHAT HAPPENED TO THE PENCIL? Look for relationship between the following experiments, so you can predict what will happen on the last experiment. Materials Needed: Clear plastic cup Water Pencil Procedure:
1. Fill the plastic cup about 2/3 full of water.
2. Put the pencil into the water.
3. Look at the pencil from the top and from the side.
4. Observations – Take a few moments to turn to your next available page in your science notebook and record drawings and observations of what occurred in the penny experiment.
Concept: Light travels at different speeds through different substances, creating a bending effect on any light rays that enter a substance at an angle. This is called refraction. Light travels faster through air than it does through water. The bending of the light rays as they pass from air to water or from water to air results in an optical illusion as the object in the water appears to bend at the surface of the water. This effect is also seen with a boar oar or canoe paddle. It looks broken when placed into the water. Vocabulary: -Refraction- Bending of light

Unit 4, Essential Question #2 185 Interconnections © 2011
MYSTERIOUS PENNY Materials: Foam bowl Water Science notebook Procedure:
1. Place the penny in the bottom of the foam bowl. Be sure you are able to see the penny.
2. Keep your head steady and move back until the penny disappears.
3. Tell your partner to pour water in very slowly. When the penny becomes visible, have your partner stop pouring the water.
4. Answer the following questions in your science notebook:
a. Why did the light do what it did? b. List any other experiences you’ve had that are similar

Unit 4, Essential Question #2 186 Interconnections © 2011
LINE
Materials Needed: Clear plastic cup Water Science notebook Procedure:
1. Place the empty cup over the line below.
2. Observation One: Look at the line from the top of the glass. Record your observation. Write this information on the next available page in your science notebook.
3. Predict what you think will happen to the line if you fill the glass with water. Record your prediction just below the initial observation in your science notebook.
4. Hold your head in the same position as you did in step two as you slowly fill the glass with water.
5. Observation Two: Look at the line as the glass is filled with water. Write this information just below your prediction in your science notebook.

Unit 4, Essential Question # 2 187 Interconnections © 2009
6th Grade Unit 4: Transformation: Energy of Heat, Light & Sound
Essential Question #2: In what ways can visible light be changed?
Lesson Title: Light: Sources and Colors SC Standard VI, Objective 2 Implementation Time: Two 30-minute sessions Materials Needed: Crayons/ colored pencils Optional: Rainbow (diffraction) glasses* Powdered milk A string of white holiday lights (1 per class) flashlight Red and green filters (cellophane or mylar) clear cup Prism, per group (warehouse # 212340-21) Make a Sunset Sheet Prism Investigation sheet The Colors of Light sheet *Purchase through Genesis Scientific, contact on supply list on District Website Procedure: Hint: Stock up on red & green cellophane in December when it is available and on sale. Part 1 1. Before the students enter turn on all light sources. For example; TV, computer screen, lights in the room, overhead projector, LCD screen, flash light etc.
2. Divide students into teams and have them do a game. Tell the students that the game is called Light and Seek. Student groups will have three minutes to explore and find all the light sources they can in the room and list them in their science notebooks. The team with the most correct sources “wins” 3. After the game, as a class create a list of all the light sources that were found in the classroom. 4. Next, have your students answer the following questions describing the light sources that the class has found. Do all the light sources have the same brightness? What makes one light source more or less bright than another source? How do visible colors differ based on the light source?

Unit 4, Essential Question # 2 188 Interconnections © 2009
Part 2 1. Arrange a strand of white holiday lights on the wall of your classroom in the shape of your choice. Ask the students what colors they see (white). Hand each student a pair of “rainbow glasses”, but tell them not to put them on yet. Darken the room except for the holiday lights and shut the blinds. Then signal for students to put their glasses on. Students will “ooh” and “aah”. The diffraction grating glasses (rainbow glasses) produce a rainbow of colors. Explain that they are wearing diffraction grating glasses that separate the colors in white light. Explain that all of these colors were hidden in the white light. Explain that when you mix all the paint colors together, you get a dark color but when you mix all the colors of light you get white! 2. Give each group a prism. Have them look at the prism and discuss. Explain that the prism refracts light so it breaks up into rainbow colors. Conduct the Prism Investigation using the student instruction sheet.
Part 3 3. Have students read the information sheet Colors and Light (project on the LCD or photocopy). In their science notebooks, have students describe what color of light is being reflected if a student sees: (answers are in parentheses)
A red t-shirt (red) A blue car (blue) A green lawn (green) A black road (no light reflected, all absorbed) A white flag (all light reflected, none absorbed)
4. Remind students that light is made up of all the colors in the rainbow and that the color of objects depends on what wavelengths of light are REFLECTED back to our eyes (the rest of the colors are absorbed by the object). 5. Students will have a chance to make “mystery messages” using different color crayons and colored cellophane filters. Model how this will work by doing an example. On white paper, write the phrase “p l e a s e l o o k ” in red, leaving enough space for an additional letter between each letter. Use the green crayon to write “thank you” in the spaces (the paper should look like: ptlheaanske lyooouk!) Next, draw a picture of a flower basket in greens, blues and violets. Draw the flowers in reds, yellows and oranges. Lay a piece of the red cellophane on top of the page—you should be able to see the basket and the words “thank you”. Remove the red cellophane and lay a piece of the green cellophane down. Students should be able to see the flowers and the words “please look.” Give students the opportunity to make their own secret messages and exchange them with a partner. Assessment: 1. Check student answers in their science notebooks. 2. Have students make a foldable that shows the colors in the white light spectrum

Unit 4, Essential Question # 2 189 Interconnections © 2009
3. Have students quiz each other on what light is being reflected off of each other’s clothing. Extension: 1. Have students take their science notebooks home and choose a room in their home. Write down all the light sources that they see in that particular room and then answer the same questions that they did in their class observations.
a. Do all the light sources have the same brightness? b. What make one light source more or less bright than another source? c. How do visible colors differ based on the light source? d. How are the light sources different in this room compared to the light
sources in the schoolroom? 2. For home or classroom, try the Make a Sunset experiment where light is reflected through the milk particles to make new “sunset colors”. As an assessment, have the students draw a picture of the experiment or research the wavelengths of what colors showed on the wall.

Unit 4, Essential Question # 2 190 Interconnections © 2009
Color and Light Reading Sheet Source: USOE Core Academy 2004 Visible light is made up of different wavelengths, with each color having its own unique
wavelength. The seven colors of the visible light spectrum are red, orange, yellow,
green, blue, indigo, and violet (ROYG. BIV). (There is ongoing debate as to whether
indigo is really a color or not. This would make a good student research project.) As
light hits an object, some light is absorbed and some is reflected back. The color of an
object is the color of the light it reflects. Grass looks green because when light hits, it
the blades absorb all the colors of light except green, which it reflects back to our eyes.
Objects that appear white reflect back all colors of light waves; black objects absorb all
colors of light waves and don’t reflect any colors back to our eyes.
White light contains all the colors of light. The colors can be separated when a bright
white light is shone through a prism at an angle. Short wavelengths, such as blue and
violet, are bent more than longer wavelengths, like red, so the colors always separate
into the same pattern. In nature, people have noticed the color separation during or after
a rainstorm or from a sprinkler. The primary colors of light are red, green and blue (Roy
G Biv’s initials), which are different than the primary colors of pigment (yellow, magenta,
cyan). Light of all colors can be made from these primary light colors, and when all
colors of light are added together, white light is produced. When colored filters are used,
only certain wavelengths pass through; others are absorbed. When a red filter is used
over a light, only red light passes through, and objects appear either in shades of red or
black.

Unit 4, Essential Question # 2 191 Interconnections © 2009
Prism Investigation
Taking Light Apart: White light has all the colors of the rainbow in it. When you shine white light on a lemon, it looks yellow because that is the color that bounces off of it. The other colors are absorbed. The color of an object is the color that it reflects back for us to see. When white light goes though a prism, the light is bent. All of the colors in the white light have different wavelengths. They are bent at different angles so the colors separate. Red as the longest wavelength and violet has the shortest. You use a prism in several different ways to break light apart. Try it to see what works best. Changing the angle of the light source or prism just a little bit can make a big difference. 1. Darken the room and use a single light source such as an overhead projector or a flashlight. Leave on small slit in the curtains to use as a light source. 2. Hold the prism in the light beam and turn it until you get the best spectrum on the ceiling or wall. 3. Rainbows in the sky are produced in the same way that you are making rainbows on your classroom walls. When sunlight shins through rain, each raindrop acts as a tiny prism

Unit 4, Essential Question #2 192 Interconnections © 2011
Name:
What I have learned about light:

Unit 4, Essential Question #2 193 Interconnections © 2011
MAKE A SUNSET (optional lab)
Materials Needed: Clear glasses filled with water Powdered milk Flashlights (strong light source such as a Maglite Flashlight or Overhead projector) Teaspoons Procedure: 1. Divide the class into teams of three or four. Give each team a glass filled with water. Have them add about a teaspoon of powdered milk into the water. Do not stir. Let the powder sink to the bottom of the water. 2. Give the powder time to sink. Have students shine a flashlight from above the glass straight down onto the surface of the water. Have students observe the color. It should be a bluish shade. This is because the light is scattered only a little bit. The blue waves are scattered across the surface of the glass. This is like when the sun is high in the sky. 3. Instruct the teams to stir the water and milk solution. When the water settles down, tell the students to shine the light through the glass and onto a wall behind it. Have students observe what color is cast onto the wall. It should be a reddish-orange color, like a sunset. This is because the light waves are scattered again, and only the longer red and orange waves pass through the cloudy water successfully. This is what happens in the evening. When the sun is low in the sky and its light is scattered by dust and other particles in the atmosphere.

Unit 4, Essential Question #2 194 Interconnections © 2011

6th Grade Unit 4: Transformation: Energy of Heat, Light, and Sound
Science & Social Studies Interconnections: A Thematic Approach 195
Essential Question #3:
How can changes in vibrations create sound?
Lessons: • Conduction of Sound • Good Vibrations
Core Standards Social Studies Science Standard VI
o 3a describe how sound is made from vibration and moves in all directions from the source in waves
o 3b explain the relationship of the size and shape of a vibrating object to the pitch of the sound produced
o 3c relate the volume of a sound to the amount of energy used to create the vibration of the object producing the sound
o 3d make a musical instrument and report on how it produces sound

6th Grade Unit 4: Transformation: Energy of Heat, Light, and Sound
Science & Social Studies Interconnections: A Thematic Approach 196

Unit 4, Essential Question #3 197 Interconnections © 2011
6th Grade Unit 4: Transformation: Energy of Heat, Light & Sound
Essential Question #3: How can changes in vibrations create sound?
Lesson Title: Conduction of Sound SC Standard VI, Objective 3 Implementation Time: 30 minutes Materials Needed: (per pair) Wire hanger String (two 18- inch lengths) Pencil (standard wood type, not mechanical) Sound Investigation page Sound Reading Sheet Procedure: 1. Pass out the Sound Investigations activity. Ask the students to make a decision. Ask them to talk to their partner and tell them what they think. “Is sound conducted better through solids or through air?” After they have told their neighbor, tell the students that they are going to spend science class investigating that question. Instruct students to write down the hypotheses they just shared with their neighbor down on their paper on the investigation paper.
2. Pass out a hanger with 18 inches of string or yarn attached to both corners of the hanger to each student. Explain to the students that you want them to observe if the sound travels better through the air or through a solid. (The solid being the string). Have the students hold each string with their fingers and bang the hanger against their desk and listen. Now have the students wind the string around their pointer finger and place their pointer fingers + string in their ears and bang the hanger against their desk. Have them write their observations on the Sound Investigation page (Answer: The sound is louder when the students place their fingers in their ears, the solid is the string.)
3. Next, direct the students to take a pencil and scratch their finger across the bare wood near the point and listen. Now have the students take their pencil and place the eraser end between their teeth and scratch it in the same place. Have them write their observations on the Sound Investigations page. (Answer: The sound is louder in the mouth because the sound travels through their skull, the solid, to their ears.)
Unit 4, Essential Question #3 198 Interconnections © 2011
4. Finally, instruct students to knock on their desks and listen. Now have them place their ear on their desk and knock on their desk. Have them write their observations on the sound investigations page. (Answer: The sound is louder when it travels through their desk directly to their ear on the desk.)
5. Ask the class what conclusion they can make about the question, “Is sound conducted better through solids or through the air. (Answer: Sound is conducted better through solids.)
6. Pass out the “Sound Reading Sheet”. Have student pairs read through the examples. Then have several pairs of students share their thoughts about each category. These are examples of how sound travels better through a solid than through the air.
Assessment: Assess the students sound investigation page.

Unit 4, Essential Question #3 199 Interconnections © 2011
Name:____________
Sound Investigations
Problem Statement: Is sound conducted better through a solid or through the air? Hypothesis: Experiments: 1.Coat Hanger: (a) Air: Wind the string around your pointer finger and bang the hanger against your desk. (b) Solid: Place your pointer finger with the string in your ear and bang the hanger against your desk.
2.Pencil (a) Air: Take your pencil and scratch your finger across the bare wood near the point. (b) Solid: Place your pencil in your teeth and scratch the bare wood near the point.
3.Desk: (a) Air: knock on your desk. (b) Solid: Place your ear down on your desk and knock on your desk.
Record/Analyze Date: Hanger (a) What happened? (b) What happened?
Pencil (a) What happened? (b) What happened?
Desk (a) What happened? (b) What happened?
Conclusion:

Unit 4, Essential Question #3 200 Interconnections © 2011
Sound Reading Sheet: BEETHOVEN USED HIS TEETH TO COMPOSE MUSIC
Beethoven was a famous composer of music in the late 1700s and early 1800s. However, did you know that he continued to compose great music even after he became deaf? To help him hear the music he was writing, he would hold one end of a long wooden stick between his teeth and put the other end against the piano strings. When he played a note, the sound traveled through the stick and through his teeth and skull bones directly to his inner ears.
HEARING-EAR DOGS
You can hear your clock radio, your telephone ringing, and your doorbell, but what if you were deaf? How could you recognize these things? A hearing-ear dog could help you. They are trained to nudge their owner whenever it hears one of these sounds. The dog then leads the owner to the source of the sounds.
SNAKES HEAR WITHOUT EARS
Snakes use the fact that sound travels better through solids than through air to “hear” an approaching meal or an enemy. Snakes do not have ears, but if it lays its head on the ground, a bone inside its head picks up the sound vibrations coming from an approaching animal’s movements. The vibrations travel to the snake’s brain via a cochlea similar to the one inside the human ear, signaling to the brain the “sound” of the approaching animal.
Unit 4, Essential Question #3 201 Interconnections © 2011
6th Grade Unit 4: Transformation: Energy of Heat, Light & Sound
Essential Question #3: How can changes in vibration create sound?
Lesson Title: Good Vibrations SC Standard VI, Objective 3 Implementation Time: 45 minutes Materials Needed: Per group: Table salt Plastic spoons Empty can (such as soup, vegetable)-wrap sharp edges with tape Plastic wrap (or piece of latex balloon or glove-caution for those with allergies) Per student: Several types of rubber bands all thicknesses Ruler Two pencils Design a Musical Instrument hand out (optional) Per Teacher: Three glass goblets filled with different amounts of water A spoon Procedure: 1. Organize students into groups of 4. Give each group a small, empty can, a length of plastic wrap to fit over the open end of the can, and a rubber band to tighten the plastic wrap over the tin can. Note: Make the plastic wrap fit very tightly for best results.
2. Take a small spoon-full of salt and sprinkle a few grains on the plastic wrap on the top of the can. 3. Next, have the students get out their science notebooks and turn to the next available page and title the page, Can and Salt Observations. Students should put face near the can and, in turn, yell “Science is Fun!” at the can. After all the students have tried yelling at the can, tell them to take a moment to write down their observations.

Unit 4, Essential Question #3 202 Interconnections © 2011
4. Ask the students to describe what they see happening to the salt? What happens to the salt when the yells are loud? What happens to the salt when the yells are soft? Have students turn to their neighbor and share their idea. Then choose a few student groups to share the most important thing that they said. (Student answers should note that the salt was moving along with the voice sounds. Students should also indicate that the louder the sound was the more the salt moved). 5. Tell the students that we have had the opportunity to observe two things. The moving salt moved because the air and the substances around the salt vibrated this is a physical way we can see sound waves travel. The louder the sound got the more intense the waves became and the more the salt moved. The sound waves were so strong that the small salt crystals moved.
6. Draw a picture of waves on the board. Show the students that for soft sounds there is not a lot of difference between the top of the center line for wave A, this means the volume of this wave would be quite soft. However, loud sounds have a greater difference between top and bottom of the wave. Waves also determine pitch of a sound.; waves that are close together have a higher pitch, waves that are further apart have a lower pitch.
Instrument 1 7. Next, tell the students that we are going to be looking at the vibration in an instrument that they will make. Pass out the rulers. Have students place their ruler on their desk. Press one end of the ruler on the desk and pluck the ruler on the other end. Slide the ruler in to make the portion hanging off the desk shorter, and pluck it, and then make the portion of the ruler hanging of the desk longer and then pluck it. Have the student make note about the movement of the ruler. What stays the same when they pluck? What seems to be different? ANSWER: When more of the ruler hangs off the edge, a lower sound is heard. 8. Ask the students to turn to your partner and talk about what they see happening now. Ask a couple of student teams to share with the class some of their observations. (Some student answers could be like: First of all, we could see and feel that the ruler was vibrating. Second, depending on where we moved the ruler, the vibrations sounded higher or lower (in pitch)) Instrument 2 9. Now pass out rubber bands to your students. Have them loop them the long way around the ruler. Then have the students take their pencil and place it between the
Low Pitch, low volume High Pitch, high volume

Unit 4, Essential Question #3 203 Interconnections © 2011
rubber band and the ruler. This should make a bridge, like you see in a stringed instrument. Have the student pluck the string. Ask the students to explain to their neighbor what they are seeing and hearing when they pluck the string. Take a few group explanations. 10. Next, have student’s trade rubber band instruments. Ask them to take a minute and compare with their neighbor. Is the rubber band that they have on the ruler larger or smaller than the instrument that they originally built? If the band is different how does it change in the sound they are seeing, feeling and hearing? Take a few minutes have students talk to each other, then as a class share a few student observations. Optional Teacher Demonstration
11. As a teacher demonstration have the teacher take three glasses filled with different levels of water Fill the cups ¼ full, ½ full and ¾ full. Tap the side of the cups with the back of a spoon. Have the students monitor the differences in sound that they are hearing. Ask them to describe their experience. (The students should comment on the fact that the cup with the most water sounds higher than the other two cups.) The teacher then has the opportunity to talk about pitch, how high or low a musical note sounds. Have the teacher tap the cups of water again ask the students to talk about why they think the pitch sounds different according to each cup. Take several student responses.
12. Next have students take their ruler/rubber band instrument out again. Have the students use the sound apparatus to look at pitch and vibration together. What can you see in the vibrations when the pitch is high? Is it easy or hard to pluck the rubber band? What happens if the pitch is low? What can you see in the rubber band vibrations now? Is it easy or hard to pluck the rubber band? 13. Explain to the students that the pitches high and low pitches that the student sees with the cups and the rubber bands are similar in the respect that the more room that an object has to vibrate, the slower the vibration and the lower the sound. When the student has a lot of rubber band length they get a low sound because there is a lot room for movement. Also the glass that is ¼ full has a low pitch because there is more room for the mostly empty cup to vibrate.

Unit 4, Essential Question #3 204 Interconnections © 2011
14. Have your students take out their science journal and participate in a Five Minute Write. They are to write about their observations from the three different investigations. What did they see with the salt? Did the salt stay in one place or did it go all over? What did vibrations feel like, where they different? What happened to the vibrations as the sound got louder? What happened if the sound was soft? 15. The rules of the Five Minute Write: The students set their pencil on their journal paper; the teacher sets a class timer for five minutes. On the count of “On your mark, get set, go!” the students then write about the selected topic for five minutes, it doesn’t matter what. Sometimes they write the same thing over and over again. This game is a process of expression so their pencil must be writing the whole time Also the game is designed for students to have free expression so the are not marked down for spelling or grammatical errors. A five minute write is designed to get a rough draft from a student.
16. When the five minutes are up, have a few students share their journals entries. Assessment: Check the students paragraph from the five minute write for understanding of how sound travels, how pitch varies etc…. Extension: A symphony of sound 1. As a home extension tell the students that they now are going to be a musical instrument designer. 2. If possible, arrange with the band/ orchestra teacher demonstrate the different types of instruments like: strings, percussion, and wind. Demonstrate to the students how the sound is made in each. You can even invite some of the band/orchestra students in your class to play their instrument for you. 3. Next hand out the Design a Musical Instrument sheet. Have students fill this page out to document the construction of their instrument. 4. Have students bring in their instruments for a demonstration. Collect the Design sheet as an assessment.

Unit 4, Essential Question #3 205 Interconnections © 2011
Name:________________
Design a Musical Instrument
You are about to become a musical instrument designer. At home, you can look through your recycle bin to find items that will make a unique instrument. Bringing in a box or a can is not enough. Your assignment will be to find objects that you feel like could provide you sound vibrations. Use these objects together and create a musical instrument. You can do this by striking, plucking or bowing on the pieces that you have selected. Draw a picture of your instrument: Write directions for making your instrument: Write directions on how you play your instrument:

Unit 4, Essential Question #3 206 Interconnections © 2011

6th Grade
Science & Social Studies Interconnections: A Thematic Approach
207
Sixth Grade Interconnections Unit V
Change: The Universe in Motion Enduring Understanding: Organization of the universe can be used to understand the motion of the stars, sun, moon and planets in the sky. There is an interrelationship among the scale, distance and movement of objects in our universe. Essential Questions • In what ways do the Earth, sun and moon affect each other? • How does the position of the Earth in the solar system affect the conditions of life on
our planet? • How does the force of gravity affect all matter in the universe? • How are the planets and other objects in the solar system similar to and different from
Earth? • What can we learn from the night sky? Core Curriculum Concepts/Skills: investigation, scale, relationship, movement, organization, communication, demonstration, observation, complexity, summarize, describe, compare
Core Standards Science Standard I: Students will understand that the appearance of the moon changes in a predictable cycle as it orbits Earth and as Earth rotates on its axis. Objective 1: Explain patterns of changes in the appearance of the moon as it orbits Earth.
Objective 2: Demonstrate how the relative positions of Earth, the moon, and the sun create the appearance of the moon’s phases.
Standard II: Students will understand how Earth’s tilt on its axis changes the length of daylight and creates the seasons. Objective 1: Describe the relationship between the tilt of Earth’s axis and its yearly orbit around the sun. Objective 2: Explain how the relationship between the tilt of Earth’s axis and its yearly orbit around the sun produces the seasons. Standard III: Students will understand the relationship and attributes of objects in the solar system. Objective 1: Describe and compare the components of the solar system. Objective 2: Describe the use of technology to observe objects in the solar system and relate this to science’s Understanding of the solar system. Objective 3: Describe the forces that keep objects in orbit in the solar system. Standard IV: Students will understand the scale of size, distance between objects, movement, and apparent motion (due to Earth’s rotation) of objects in the universe and how cultures have understood, related to and used these objects in the night sky. Objective 1: Compare the size and distance of objects within systems in the universe. Objective 2: Describe the appearance and apparent motion of groups of stars in the night sky relative to Earth and how various cultures have understood and used them. Science language students should know and use: Earth’s tilt, seasons, axis of rotation, orbits, phases of the moon, revolution, reflection, asteroids, celestial object, comets, galaxy, planets, satellites, star, distance, force, gravity, gravitational force, mass, scale, solar system, constellation, Milky Way galaxy, speed of light, telescope, universe, sun, light years

6th Grade
Science & Social Studies Interconnections: A Thematic Approach
208

6th Grade Unit 5: Change: The Universe in Motion
Science & Social Studies Interconnections: A Thematic Approach
209
Essential Question #1:
In what ways do the Earth, sun and moon affect each other?
Lessons: • Moon Phases • More Moon Phases
Core Standards Social Studies Science Standard I
o 1a describe changes in the appearance of the moon during a month o 1b identify the pattern of change in the moon’s appearance o 1c use observable evidence to explain the movement of the moon
around Earth in relationship to Earth turning on its axis and the position of the mono changing in the sky
o 1d design an investigation, construct a chart, and collect data depicting the phases of the moon
o 2a identify the difference between the motion of an object rotating on its axis and an object revolving in orbit
o 2b compare how objects in the sky (the moon, planets, stars) change in relative position over the course of the day or night
o 2c model the movement and relative positions of Earth, the moon, and the sun
6th Grade Unit 5: Change: The Universe in Motion
Science & Social Studies Interconnections: A Thematic Approach
210

Unit 5, Essential Question #1 211 Interconnections © 2011
6th Grade Unit 5: Change: The Universe in Motion
Essential Question # 1: In what ways do the Earth, Sun and Moon affect
each other? Lesson Title: Moon Phases SC Standard I, Objectives 1, 2 Implementation Time: 45 minutes Media Resources Needed: Book: The Moon, by Karen Edwards Moon phase images (possible source: http://tycho.usno.navy.mil/vphase.html) Optional Videos: A Spin Around the Solar System. The Moon Dance. or Space Science. A Closer Look at the Moon (online, eMedia) Materials Needed: Overhead projector or lamp Per student: Optional: Basketball 1” styrofoam ball Oreos Tennis ball Craft (popsicle) sticks Lunar Chart Drawing Moon Phases sheet Procedure: 1. Have students get out their science notebooks and turn to the next available page. Tell the students that they need to title this page Moon Phases.
2. Next, have the students move the desks so that the room is clear and stand in a half circle around a small lamp without a shade (set lamp on a desk). 3. Take the basketball and tennis ball out. Designate the larger ball as Earth and the smaller ball the Moon. Show students that the smaller ball is about ¼ the size of the Earth. Tell the students that lamp will represent the sun. (Remind them that the size and distance of the sun is not accurate).
4. Choose students to take the two balls and the lamp and place the moon and earth in its “orbit” and move in a circle around the lamp. Make sure you describe the differences that you see in the monthly orbit and have he students sketch what they are seeing. Tell the students that the moon orbits around the Earth approximately every 28 days.

Unit 5, Essential Question #1 212 Interconnections © 2011
5. Next, have several different student volunteers explain what they are seeing in the shadow changes in the moon. The teacher and the other student volunteers can sketch on the board various examples of what they are seeing in the shadow changes, while the rest of the students are sketching the class board sketches in their science notebooks. 6. Tell the students that people have made moon observations since time began; they have charted the differences in light and shadow through out the moon revolution cycle. Project the lunar calendar page on the LCD (any month will work, but you could find the current month by searching online). 7. Have students make some comparisons to the sketches they made during the activity. Which of their sketches are most accurate? As a class talk about why you think that is. (In general, the sketches that work will be because the students will have drawn the sketches of the Moon with respect that they are visualizing that they are looking up from Earth. 8. Next give every student in the room a styrofoam ball that is attached to a craft stick, which will be their moon, have them form a circle around the lamp (they are facing the light source). Darken the room except for the lamp. 9. Tell students to imagine that their head is the Earth. Have the students hold the moon right in front of them, a little higher than their heads. Ask the students to explain the shadow that they see. (The students should explain that the whole side that they see is darkened. This is called New Moon. 10. Next, tell students to turn a quarter turn to the left. Have the students look at the moon. They should explain that they see half of the moon lighted. It should look like the letter D. Talk about the lighted side of the moon. The moon is not its own light source; it is reflecting the light that it is receiving from the sun. In this particular light/shadow pattern the students are looking at the First Quarter of the moon. As the students are looking, draw pictures and label of the phase on the board. Make sure you draw and label pictures of the new phase each time you make another left turn. 11. Now have the students turn another quarter turn, where their backs are facing the light source. The moon appears fully lighted. Tell the students that we are looking at the Full Moon Phase. 12. Next, have the students take another quarter turn to the left. As they look at the moon the lighted side should look like a backwards capital D. This is the Third or Last Quarter. 13. Then have students take their last quarter turn to the left. They should arrive back at the New Moon phase.

Unit 5, Essential Question #1 213 Interconnections © 2011
14. Now have the students slowly rotate around the left, looking for the movement of the light across the moon. Ask the students to go slowly this time and describe the phases that they see that are between the New Moons and the Quarters, these are the waxing and or waning crescents. Then have the students move slowly from the Quarters to the and from the Full Moon these are the waxing and waning Gibbous. When your students have had enough time to look at the lunar cycle. Have the students go back to their desks. Pass out the Drawing Moon Phases page. Draw the appropriate phase according to the explanation. Read The Moon by Karen Edwards to the class to re-emphasize the phases of the moon. Assessment: Check the finished Drawing Moon Phases page. Extension: Have the students watch A Spin around the Solar System. The Moon Dance At the end of the video, have students answer the questions posed in the video. Have a Moon Phase celebration! Pass out Oreo cookies and a plastic table knife. Have groups of students twist the cookies apart. Have the students use the frosting to display the different phases of the Moon during the month. When they have all the phases in the correct order, let the groups eat the cookies. Used with permission from Vicki Ahlstrom

Unit 5, Essential Question #1 214 Interconnections © 2011
Lunar Chart for Optional Oreo Extension You can print off the month that you are in for this activity.
June 2009
Sun Mon Tue Wed Thu Fri Sat
1
2
3
4
5
6
7
8
9
10
11
12
13
14
15
16
17
18
19
20
21
22
23
24
25
26
27
28
29
30
Phases of the Moon Calendar taken from: http://stardate.org/nightsky/moon/

Unit 5, Essential Question #1 215 Interconnections © 2011
________________
Name__________________________________
Drawing Moon Phases Using the description and matching words, complete worksheet by adding the drawing of that phase of the moon.
Description: Drawing:
1. New Moon Moon is almost directly between the sun and Earth. (start of cycle)
2. Waxing Crescent Moon
A bit of the sunlit side of the moon shows on the right side. 3. First Quarter Moon
The moon is a quarter of its way around Earth. It is in its first quarter phase.
4. Waxing Gibbous Moon
The moon is increasing in light between a first quarter moon and a full moon.
5. Full Moon
Two weeks have passed since the new moon. We see the entire face of the moon shining.
6. Waning Gibbous Moon
The moon is decreasing in light between a full moon and a last quarter moon.
7. Last Quarter Moon
The moon is three-quarters of its way around Earth. It is in its last quarter phase.
8. Waning Crescent Moon
A bit of the waning sunlit side of the moon shows on the left side.
9. New Moon
Moon is almost directly between the sun and Earth. (cycle starts again)
__________________
__________________
__________________
__________________
__________________
__________________
__________________
__________________

Unit 5, Essential Question #1 216 Interconnections © 2011
Unit 5, Essential Question #1 217 Interconnections © 2011
6th Grade Unit 5: Change: The Universe in Motion
Essential Question #1: In what ways do the Earth, Sun and Moon affect
each other? Lesson Title: More Moon Phases SC Standard I, Objective 2 Implementation Time: 45 minutes Media Resources Needed: Moon: Kids Discover (15 copies) Materials Needed: Moon Phase Information Sheet Moon Worksheet Procedure: 1. Show the animation of the moon orbiting earth (source: McDougall Littell publishing) http://www.classzone.com/books/earth_science/terc/content/visualizations/es2503/es2503page01.cfm Pause frequently to stop and show students the different phases of the moon. Switch from the overhead view to an oblique view and run through the moon phases again. 2. Have students read the Moon Phase Information Sheet and then try the practice worksheet. 3. Pass out copies of Moon Kids Discover magazine and let students write down any facts or questions that interest them. Have class share their questions and discuss possible answers. Assessment: Worksheet Key: 1. A (it is a new moon and “A” shows the near side of the moon in complete shadow 2. A 3. D (the earth rotates counter-clockwise, so the diagram shows the earth going from night to day…as day comes, the moon sets) 4. D Extension: 1. Have students do some practice CRTs online (or print out as homework assignments) http://www.myutips.org/~science/

Unit 5, Essential Question #1 218 Interconnections © 2011
Moon Phase Information Sheet The moon rotates on its axis at the same pace as it revolves around Earth. As a result,the moon always keeps the same side pointed toward us throughout its orbit. Astronomers call the side we see from Earth the “nearside of the moon,” and the side we never see from Earth the “far side of the moon.” During the moon's cycle, the actual shape of the moon never changes. It is always a sphere. We only see the moon because sunlight reflects back to us from its surface; it has no light source of its own. What changes is the portion of the moon that can be seen from Earth. Half of the moon is always illuminated by the sun. The half of the moon facing the sun is always lighted; but the lighted side does NOT always face Earth. As the moon circles Earth, the amount of its disk facing us that is lighted by the sun changes, altering how much of the lunar surface appears bright and how much is in darkness. The changes are known as phases, and repeat in a specific cycle. These are the main phases: New Moon, First Quarter, Full Moon, Last Quarter. (It takes 27-30 days to go from one New Moon to the next.) During the time it takes to move from one phase to another, the amount of the moon's surface lighted by the sun changes gradually; it's not an abrupt change from one phase to the next. There are times during the cycle when the moon can be seen during the day. These times are predictable. The following chart gives the times when each phase rises and sets. PHASE RISES HIGHEST IN SKY SETS New Moon Sunrise Noon Sunset First Quarter Noon Sunset Midnight Full Moon Sunset Midnight Sunrise Last Quarter Midnight Sunrise Noon Eclipses Earth's shadow plays no role in the moon's phases, but the shadow of Earth does darken the moon during a lunar eclipse. Earth revolves around the sun once every year. The moon circles Earth about once per month. The plane of the moon's orbit is tilted a little (5 °) from the plane of Earth's orbit. When the moon is on the side of Earth away from the sun (Full Moon), it passes very close to Earth's shadow; however, because its orbit is tilted, the moon usually passes just above or below Earth's shadow. About once every six months the moon goes right through the shadow of Earth, creating a lunar eclipse.

Unit 5, Essential Question #1 219 Interconnections © 2011
Moon Worksheet 1. Study the diagram below. From Earth, which position below would show the pictured phase of the moon? What phase is this moon?______________________ To help solve this problem, first draw a vertical line through each of the moon choices and color the half that is in the dark black. (See example on letter H) Now imagine you are looking down on the earth and moon. At which letter would you see the moon model that looks like this?
2. If you watched the night sky for several hours, how would the stars appear to be moving? They would move around A. The North Star B. The Big Dipper C. The Moon D. You

Unit 5, Essential Question #1 220 Interconnections © 2011
3. You are looking down directly on the North Pole. Remember, the earth rotates counter-clockwise. Which of the statements given below best explains your observations? Hint for solving: First, find the person on globe A. Is he where he standing day or night time? (day time is closest to the sun). Now, find the person on the globe in Diagram B—is it day or night? How much time has passed? (Remember it take 24 hours to complete 1 rotation)
A. The moon has revolved in its orbit; one whole day has passed, changing the moon’s phase. B. The earth has revolved in its orbit; the poles now tilt differently, so it is a new season. C. The moon has rotated on its axis, causing the back of the moon to face towards the earth. D. The earth has rotated on its axis; 6 hours have passed and the moon is setting in the western sky. 4. Which of the following correctly describes the movement of Earth, moon and sun? A. Sun revolves around moon, moon revolves around Earth B. Sun and moon revolve around earth C. Moon revolves around sun, Earth revolves around moon D. Moon revolves around Earth, Earth revolves around sun

6th Grade Unit 5: Change: The Universe in Motion
Science & Social Studies Interconnections: A Thematic Approach
221
Essential Question #2: How does the postion of the Earth in the solar system affect the conditions of life on our planet?
Lessons: • Orbit, Revolution & Rotation • Seasons
Core Standards Social Studies Science Standard II
o 1a describe the yearly revolution (orbit) of Earth around the sun o 1b explain that Earth’s axis is tilted relative to its yearly orbit around the sun o 1c investigate the relationship between the amount of heat absorbed and
the angle to the light source o 2a compare Earth’s position in relationship to the sun during each season o 2b compare the hours of daylight and illustrate the angle that the sun’s rays
strikes the surface of Earth during summer, fall, winter, and spring in the Northern Hemisphere
o 2c use collected data to compare patterns relating to seasonal daylight changes
o 2d use a drawing and/or model to explain that changes in the angle at which light from the sun strikes Earth, and the length of daylight, determine seasonal differences in the amount of energy received
o 2e use a model to explain why the seasons are reversed in the Northern and Southern Hemispheres

6th Grade Unit 5: Change: The Universe in Motion
Science & Social Studies Interconnections: A Thematic Approach
222

Unit 5, Essential Question #2 223 Interconnections © 2011
6th Grade Unit 5: Change: The Universe in Motion
Essential Question #2: How does the position of the Earth in the Solar
System affect the conditions of life on our planet? Lesson Title: Orbit, Revolution & Rotation SC Standard II, Objective 1 Implementation Time: 45 minutes Media Resources Needed: Earth: Our Planet in Space by Seymour Simon Materials Needed: Science Notebooks Pencil P.E. cones to mark the track race (optional) Procedure: 1. Tell students that they will be participating in a race outside today. If your school has an oval track, use it, if not, mark your own with PE cones (you could also use the perimeter of the gym).
2. Take the students to the track and tell them that they are going to race counter-clockwise. Have the students line up at the starting point facing counter clockwise. They are going to do one lap around the marked off track. Start the “race.” Let the students complete the course and come back and sit down.
3. As the students are finishing their lap ask them individually to explain how they have finished the race? When the entire group has finished have them talk to their neighbor explaining how they know that they are done. Answer: They arrived back at the same starting point. 4. Next, ask for student volunteers to run one more counterclockwise lap. Stager the student racers. Place one several feet inside the track; one on the designated track itself and one way on the outside of the track. Line them up on the starting line and let them run. Tell them that in addition to going around the track, they must also turn in circles.

Unit 5, Essential Question #2 224 Interconnections © 2011
5. While they are running have the class monitor the competing students, and have them decide if the race is fair or not. Student comments that you could receive would be. “No it is not because the innermost student doesn’t have far to run.” Or, “No the student on the outside has to run a lot more distance.” 6. Take the students inside and tell them that we ran a race to examine something that happens in our Solar System all the time. Tell them that today in the first race we were examining the revolution of planets. Tell the students that the planets in our Solar System are continually running a track race around our sun and like in our race today, scientists have given a designated starting and ending point of the revolution race. For Earth it takes 365 ¼ days to finish its race or make one revolution around the Sun. In other terms one Earth revolution is equal to one year. The turning the students had to do during the second race is like a planet’s rotation around its axis. For earth, it takes 24 hours to complete one rotation (so the earth rotates 365 times during its revolution). 7. Have the students take out their science notebooks and turn to the next available page. Have them label the page Space Vocabulary. Have the students write down the words revolution and rotation and define it.
Revolution: the circling of an object in space around another object in space Rotation: the turning of an object around an axis
8. Next, have the students think back to the second race that was run. Ask the students if the race was fair? Take several student answers. Tell the students that in this unfair race you were trying to represent how all the planets revolve around the sun. The planets do not share the same orbit, and they are different distances away from the Sun. So, each planet has a different time frame that it will complete one revolution. Mercury will complete a revolution in 88 days and Neptune will complete a revolution in 248 Earth years.
9. In their notebooks, have students define the word orbit.
Orbit: the path a planet or moon takes during its revolution 10. In the science notebooks, have students participate in a Five Minute Write. They are to write about the most important thing that they observed during the races and how it applies to revolution, rotation and planet orbit. On the count of “On your mark, get set, go!” the students then write about the selected topic for five minutes. Have a few students share their notebooks.
11. Read the section of the book Earth: Our Planet in Space that deals with its orbit to reinforce the concept of orbit, rotation and revolution. Assessment: Check the finished vocabulary words and the Five Minute Write.

Unit 5, Essential Question #2 225 Interconnections © 2011
6th Grade Unit 5: Change: The Universe in Motion
Essential Question #2: How does the position of the Earth in the Solar
System affect the conditions of life on our planet? Lesson Title: Seasons SC Standard II, Objective 1 Implementation Time: 45 minutes Media Resources Needed: Earth: Our Planet in Space by Seymour Simon Materials Needed: Lamp 2 meter sticks Mounted globe Nail with large head Scotch tape Sign labeled North Star (Polaris) Yarn/string Procedure: 1. Invitation to Learn: Ask students to predict why we have four seasons. Have the class discuss the predictions and talk about why the predictions may or may not be accurate. Lead a class discussion on what may cause seasonal changes. Do not give any answers to the class, just enough information to start them thinking and wondering. For example:
• Think about how the sun feels on your face in the middle of June. Now think how it feels in December. Why do you think there is a difference?
• If the sun is shining during the winter, why isn't it as warm as when the sun is shining in the summer?
• Does the length of daylight affect the temperature? When are the shortest days of the year? Is it colder then or when the sun shines for more hours? Why?
• In the spring and in the fall, the length of daylight is about the same. However, it seems to be warmer in the fall. Can you predict why this is the case?
Activity 1 2. Have the students gather around the area where you will be working. Place the lamp (shade removed) on the floor and turn it on. Make a circle around the

Unit 5, Essential Question #2 226 Interconnections © 2011
lamp with yarn or string to represent the Earth’s orbit (it should be a nearly perfect circle, only a very slightly elliptical—teacher note: books often depict earth’s orbit as very oval in shape, which leads people to believe that there is a significant difference in the distance between the sun and earth during its revolution—according to the Clark Planetarium, that is NOT the case. The oval-ness of the orbit is so slight (statistically speaking) that it is nearly a circle). 3. Divide the orbit into 4 sections that will represent each of the 4 seasons. The lamp represents the sun. 4. Put the “North” sign up in the correct direction. 5. Place the globe on the ground on the south side of the “sun”. The North Pole of the globe should be tilted toward the North sign you posted. This is the summer position for the Northern Hemisphere. Ask the students what they notice about the sun's rays. 6. Find where we live on a mounted globe. 7. Rotate the globe counter clockwise. One rotation represents one day or 24 hours. When light is shining on our location, it is day. When it is dark, it is night. 8. Repeat your observations for each of the other seasons. Move the globe counter-clockwise from summer (South) to fall (East) to winter (North) and spring (West). Make sure that the North Pole of the globe is always pointed toward the North Star sign posted. Have students pay attention to the amount of sunshine we get during each season. Also, have them observe if the sunlight hits the Earth's Northern Hemisphere at a large or small angle. Students can sketch what they see in their science notebooks (or make a foldable). 9. Remind students that when Earth makes one revolution (summer, fall, winter, and spring) one year has passed. It takes one year or 365 1/4 days for Earth to make one complete revolution around the sun. Activity 2 10. Have a student model the Earth’s tilt and rotation. Tape a North Star sign to the end of a meter-stick and have a student hold it up in the air. On a second meter-stick tape North Pole on one end and South Pole on the other. Have a student hold the North/South Pole meter stick at an approximately 23.5 degree angle. Tell the student that his body will represent the location of Utah on the Earth. Have the student start at the summer position with the North Pole pointing toward the North Star. Have the students notice that during the summer, that Utah is facing the sun. Have the “earth” student walk counter-clockwise (he can rotate as he walks to model day/night) to the Fall position. Have class notice that “Utah” isn’t facing the sun as directly. Have student move to the Winter position—notice that “Utah” is facing away from the sun. Move to spring and notice that again “Utah” is getting more direct rays from the sun.
Unit 5, Essential Question #2 227 Interconnections © 2011
Activity 3 11. Next, tape a small nail, head down, on top of the location where we live on the globe. 12. Have students predict what the nail's shadow will look like in the summer position. 13. Discuss predictions as a class. Next, have students record their predictions in their notebooks for what the nail's shadow will look like for the other seasons. 14. Place the globe in the summer position (south of the sun). 15. Measure the length of the shadow produced by the nail. How does the shadow look? Were their predictions correct? 16. Move the globe to the other seasons, measuring the nail's shadow for each season and discuss the student’s predictions. 17. As a class, discuss the following questions:
• During which season is the nail's shadow shortest? • During which season is it the longest?
Answers: A short shadow indicates direct sunlight. A long shadow indicates weaker sunlight coming at an angle.
• During which season do you get the most daylight? • During which season do you get about the same amount of daylight and
darkness? Answers: In general, the stronger the sunlight during the day, the warmer the day. 18. Put the globe in the summer position one more time, this time have the students pay attention to the Southern Hemisphere. Ask students what season the Southern Hemisphere is having while we are having summer. Do the same demonstration for each of the seasons. Have students predict what season the Southern Hemisphere is experiencing. Point out that seasons in the Southern Hemisphere are reversed from the Northern Hemisphere. Have students explain why this is the case. 19. Lead another class discussion with the same questions asked at the beginning of the activity. Students should realize that the angle of the sun's rays is a factor determining the seasons. They should also realize that when days are longer, the sun has a longer time to heat Earth. Read from Earth: Our Planet in Space to describe why we have seasons. 20. Project the Season Diagram on the LCD. Have students identify the earth, the moon and the sun. Quiz students on what season is represented at A, B, C and D (the Earth’s axis is always pointed north, so when it is pointed toward the sun, it is summer and when it is pointed away from the sun it is winter. A=Fall B=Winter C=Spring D=Summer

Unit 5, Essential Question #2 228 Interconnections © 2011
Season Diagram
D A
B
C

Unit 5, Essential Question #2 229 Interconnections © 2011
Assessment: 1. Have students write a paragraph explaining why the tilt of Earth's axis and its yearly orbit around the sun produces the seasons. (the seasons occur because of the earth’s tilt. As the earth revolves around the sun, the Northern Hemisphere is either pointed toward or away from the sun, which changes the angle at which light hits the earth) 2. In their science notebooks, have students explain how the tilt of Earth affects our lives. 3. Have students draw a diagram depicting the four seasons and the relationship of Earth's tilt and the sun. Extension: 1. Remind students that seasons are reversed in the Southern Hemisphere. Have them write how their lives would be different if midsummer came in January, and midwinter came in July. Students might mention the change in how holidays are celebrated, when school is in session, or when vacations are taken. 2. Have students work in small groups to form explanations for why the hottest day of the year is usually not the longest day. Possible answer: The hottest day usually occurs in mid to late summer when Earth's surface has had a chance to retain enough solar energy to produce high temperatures.

Unit 5, Essential Question #2 230 Interconnections © 2011
Student Reading Sheet: Seasons Earth orbits the sun. Earth is slightly tilted (23.5 degrees) and spins on its axis. The
north end of the axis always points toward the North Star as Earth circles the sun.
Because it is tilted and travels around the sun, we have seasons. The time it takes to
complete an orbit is 365 1/4 days. Seasonal changes give us a change in temperature
and a change in the length of daylight.
We live in the Northern Hemisphere. It is summer when the North Pole is tilted toward
the sun. At this time, the sun is high overhead and we receive strong sun rays. The sun
shines for many hours each day. Its strong rays have a lot of time to heat Earth. In the
far North, the sun shines for 24 hours a day. This gradually changes. Days get shorter
and cooler, and the sun appears low in the sky at noon as the North Pole moves slowly
away from the sun. Summer turns to fall, and then to winter. In winter, the North Pole is
tilted away from the sun. We do not receive the strong rays and the sun is low in the
sky. The sun shines for fewer hours each day. These weak rays do not have time to
heat Earth. This explains the colder winters even though the sun is shining. Winter turns
to spring and then back to summer as Earth completes one journey around the sun.

6th Grade Unit 5: Change: The Universe in Motion
Science & Social Studies Interconnections: A Thematic Approach
231
Essential Question #3: How does the force of gravity affect all matter in the
universe?
Lessons: • Gravity
Core Standards Social Studies Science Standard III
o 3a describe the forces holding Earth in orbit around the sun, and the moon in orbit around Earth
o 3b relate a celestial object’s mass to its gravitational force on other objects o 3c identify the role gravity plays in the structure of the solar system

6th Grade Unit 5: Change: The Universe in Motion
Science & Social Studies Interconnections: A Thematic Approach
232

6th Grade Unit 5: Change: The Universe in Motion
Science & Social Studies Interconnections: A Thematic Approach
233
6th Grade Unit 5: Change: The Universe in Motion
Essential Question #3: How does the force of gravity affect all mater in the
universe? Lesson Title: Gravity SC Standard III, Objective 3 Implementation Time: 45 minutes Media Resources Needed: Clark Planetarium Fact Sheet http://www.clarkplanetarium.org/guides--handouts.html Materials Needed: Small bucket 45” square of lycra fabric Water bowling ball Rope Small balls (golf, bouncy ball, etc…) Bathroom scale Planet Gravity hand out Procedure: 1. Demonstration: Have students sketch the planets in their orbits (this is not an elaborate drawing, just a quick sketch). Ask students if they have any ideas why the planets travel in orbits and stay in orbit? Before responding, take a bucket and fill it about ¼ full of water (so that you can lift it). Tie a rope around the handle and spin the bucket around. Point out that the water isn’t spilling out of the bucket because the force of the spinning keeps the water inside. Caution: Make sure the rope doesn’t come off. You could do this outside or in a gym where students can stand back. 2. Explain to the students that gravitational force acts like the bucket tied to the string. The earth’s rotation helps keep things on earth. We stand on earth’s surface instead of floating above it because earth’s gravity pulls us to the center of the Earth. If we didn’t have such a force we would float off into space. 3. Explain that gravity is also dependent on mass. The greater the mass, the more gravity it has. Ask students to name the object in the solar system with the greatest mass (answer is the Sun). The Sun has so much mass that it can keep all the planets revolving in orbit around it.

6th Grade Unit 5: Change: The Universe in Motion
Science & Social Studies Interconnections: A Thematic Approach
234
4. Demonstration: Have students hold the edges of a 45” square of lycra fabric and pull tightly, place a bowling ball in the middle of the fabric. While the students hold the fabric and ball above the ground (hold it still), take a small ball that represents a planet and set it on the fabric and start it rolling around the ball. With some practice the small ball should orbit the bowling ball a few times before running out of momentum. Note: Try it again with a smaller mass ball and the experiment won’t work as well. Less mass=less gravity. 5. Students could list on the board or in their notebooks a list of all the planets in order from greatest mass to least mass. Use the Clark Planetarium Fact Sheet to help with this task. 6. Next, explain to the students that different objects in space have different gravitational pulls. On earth, we measure our weight based on how much gravity is pulling on an object (use a bathroom scale and have volunteers find out their weight). Tell the students that we are going to figure out what different objects would weigh on different planets due to the differences in their gravitational pull. For example, on earth a man may weigh 100kg. The moon has less mass than the earth, so it has less gravity. That 100kg man would only weigh about 60 kg! 7. Pass out the Planet Gravity hand out. Also give the students a copy of the Clark Planetarium Solar System Fact Sheet. Have the students highlight the surface gravity section from the Clark Planetarium Fact sheet. Have the students choose the surface gravity of their favorite planets to compute the new weight of the objects. (or you could assign partners a particular planet to ensure that all planets get done). Have students share their results with the class. Assessment: 1. The finished Planet Gravity hand out. Answers will depend based on the planet the student chooses.

6th Grade Unit 5: Change: The Universe in Motion
Science & Social Studies Interconnections: A Thematic Approach
235
Name:_____________________
Planet Gravity
Using the Clark Planetarium Solar System Fact sheet, multiply the object’s weight by the planet surface gravity measurement to find out how much the object will weigh on that planet. Example:
Jar of Jelly Beans 3 lbs
Mars 0.379
3 x 0.379 = 1.137 pounds
Your Planet_________________________
Objects and Weight on Earth
Planet and Surface Gravity
New weight on the other planet
Grape Nuts Cereal box 2 pounds
Hand weights 5 pounds
Bag of flour 20 pounds
Your teacher 150 pounds
Gallon of Milk 8 pounds
You! ________ pounds
Elephant 10,000 pounds
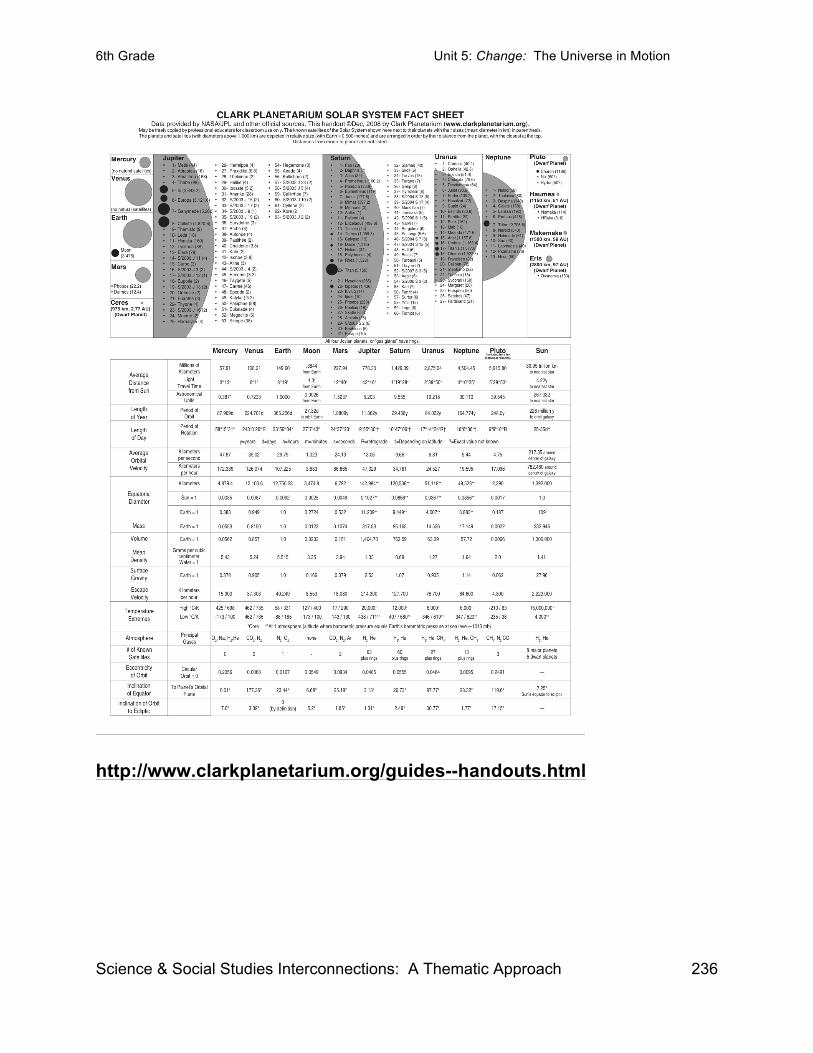
6th Grade Unit 5: Change: The Universe in Motion
Science & Social Studies Interconnections: A Thematic Approach
236
http://www.clarkplanetarium.org/guides--handouts.html

6th Grade Unit 5: Change: The Universe in Motion
Science & Social Studies Interconnections: A Thematic Approach
237
Essential Question #4:
How are the planets and other objects in the solar system similar to and different from Earth?
Lessons: • Tour of the Solar System • Distance in the Solar System • Like Earth?
Core Standards Social Studies Science Standard III
o 1a identify the planets in the solar system by name and relative location from the sun
o 1b using references, compare the physical properties of the planets o 1c use models and graphs that accurately depict scale to compare the size
and distance between objects in the solar system o 1d describe the characteristics of comets, asteroids, and meteors o 1e research and report on the use of manmade satellites orbiting Earth and
various planets o 2a describe the use of instruments to observe and explore the moon and
planets o 2b describe the role of computers in understanding the solar system o 2c relate science’s understanding of the solar system to the technology
used to investigate it o 2d find and report on ways technology has been and is being used to
investigate the solar system

6th Grade Unit 5: Change: The Universe in Motion
Science & Social Studies Interconnections: A Thematic Approach
238

Unit 5, Essential Question #4 239 Interconnections © 2011
6th Grade Unit 5: Change: The Universe in Motion
Essential Question #4: How are planets and other objects in the Solar
System similar to and different from Earth? Lesson Title: Tour of the Solar System SC Standard III, Objective 1 Implementation Time: 45 minutes Media Resources Needed: A Book about Planets and Stars by Betty Reigot Our Solar System by Seymour Simon Solar System: Kids Discover Possible websites for research: USOE Sci-Ber Text http://www.schools.utah.gov/curr/science/core/6th/SCIBER6/solarsys/html/planets.htm NASA Solar System Booklet http://stargazers.gsfc.nasa.gov/resources/products.htm
(scroll to the Resource Guide section and look for Solar System Puzzle Kit. Click download.)
NASA Planet sites: http://Solarsystem.nasa.gov/planets/index.cfm Materials Needed: (per student) Our Solar System Reader’s Theater-could just project on LCD Touring the Solar System hand out Procedure: 1. Hand out a copy of the Our Solar System reader’s theater. Assign 9 narrator parts. Read through the document as a whole class. 2. Display on the LCD “Touring the Solar System Sheet” (also give each student a copy). Have students find the place in the reader’s theater where the narrator describes the Earth (on the 2nd page of the document). Once you have found the section, re-read those short stanzas and write those facts on the Touring the Solar System hand out to model for students.

Unit 5, Essential Question #4 240 Interconnections © 2011
3. Once you have modeled finding the facts for the Earth, place students in groups and assign the groups to one object in the Solar System on the Touring the Solar System hand out. The groups are to find facts about these objects in the Solar System add them to their hand out and have a representative to the teacher copy. They can find additional information on one of the websites or books in the Media Resources section of this lesson.
4. Have students add facts about the object/planet or clarify a fact that you have written down from the Reader’s Theater that they find online or in other resources you have in class.
5. When groups have collected their facts, have a representative from their group add their group’s facts to the teacher’s copy. Students are then to add all the facts from the teacher’s copy that is projected by the LCD screen.
6. Once the teacher’s copy is completed, have a short class conversation. Each group can share their findings, things that surprised them or questions.
Assessment: 1. The finished Touring the Solar System hand out.
Extension: 1. Students create a travel brochure for their favorite object in the solar system. This information is taken from the Touring the Solar System hand out. 2. Once the brochure is finished have the student be the “tour guide” and present the ideas detailed within their travel brochure. 3. Have students do the Solar System Puzzle Box in the NASA booklet. Need paper, glue, tape and coloring materials. http://stargazers.gsfc.nasa.gov/resources/products.htm

Unit 5, Essential Question #4 241 Interconnections © 2011
Our Solar System-Reader’s Theater
Narrator #1
As you look at the sky, as you stare into space, you might wonder where we fit into this place.
Narrator #2
The universe is so large, our planet is so small. Where do we fit? Just where do we fall?
Narrator #3
We’re part of a galaxy called the Milky Way. It’s made of billions of stars, or so they say.
Narrator #4
It’s a cloud of stars you can see in the sky. If the night is clear and you have a sharp eye.
Narrator #5
Nine different planets and one bright star, makes up our solar system which extends so far.
Narrator #6
Some planets have moons, and some have rings, around our bright Sun they all do swing.
Narrator #7
In orbits of varying sizes they race. Eight planets and Sun go whirling through space.
Narrator #8
Five planets of rock and four made of gas—this is our Solar System and it’s enormously vast.
Narrator #9
Way up in our sky is a large yellow ball. Its gravity holds us so we don’t fall.
Narrator #2
It’s really a star, but we call it the Sun. It brings heat and light to everyone.
Narrator #4
It’s made up of gases that gravity holds. It’s over four and a half billion years old.
Narrator #6
Mercury, the first planet, is nearest the Sun. It has little atmosphere. Moons? It has none!
Narrator #8
With craters all over, it’s a bare, rocky ball. It’s larger than Pluto, but still very small.
Narrator #1
It’s named after Mercury, a god from old Rome. This planet’s so hot It could not be our home.
Narrator #3
Venus is named for a goddess of love. It comes after Mercury in the heavens above.

Unit 5, Essential Question #4 242 Interconnections © 2011
Narrator #5
Its size is like Earth’s, but with no moon in its sky. While a day passes on Venus, an Earth year goes by.
Narrator #7
Windstorms rage on Venus, and lighting flashes. Its atmosphere is full of poisonous gases.
Narrator #9
Earth, the watery planet, is third from the Sun. It has a moon, but only just one!
Narrator #8
It’s surrounded by air for all living things. The Earth is so special for the life that it brings.
Narrator # 7
It’s the fifth largest planet, and it isn’t quite round. The poles are a bit flattened we’ve found.
Narrator #6
Mars is fourth from the Sun. A rust-colored ball. With lots of volcanoes, Mars has the biggest volcano of all!
Narrator #5
The volcano Olympus Mons is three times as high as Earth’s Mount Everest, which is five miles high!
Narrator #4
Two moons orbit Mars, which is half the Earth’s size. Are there Martians on Mars? No, those are just lies.
Narrator #3
Jupiter is the biggest planet we know. It’s fifth from the Sun, with 17 moons that show.
Narrator #2
Galileo, the astronomer, found the first four. Since his time we’ve spotted 13 moons more.
Narrator #1
Jupiter’s covered with clouds, and has a great red spot, which we think is a storm on that planet so hot.
Narrator #9
With seven rings ‘round it, Saturn’s sixth in the line. With rings made of ice and rock, glimmer and shine.
Narrator #4
Ten times larger than Earth, Saturn’s second in size. At least 30 moons orbiting ‘round in its skies.
Narrator #7
Made mostly of gas, Saturn’s considered quite light. It could float in an ocean, wouldn’t that be a sight?
Narrator #8
Uranus is seventh, and it’s tilted—that’s true. It’s covered with gases; its color is blue.
Narrator #2
Its moons circle ‘round it—there are 20 we’ve found. Its rings spin, made of dust, dirt and ground.
Narrator Did it crash with a planet a long time ago? Is that why it’s

Unit 5, Essential Question #4 243 Interconnections © 2011
#3 tilted? Scientists think so.
Narrator #9
Neptune is named for the god of the sea. It’s eighth in the lineup, with rings—one, two, three.
Narrator #6
Neptune has eight moons; its color is blue. It’s made of gas, rock, and iron, and that’s really true.
Narrator #4
One hundred and sixty-four Earth years it takes, for the very long trip ‘round the Sun that it makes.
Narrator #1
Pluto is the dwarf planet all the way out at the end. A celestial snowball they call it my friend.
Narrator #2
It is far from the Sun and smallest of all. It is one-fifth Earth’s size, and that’s really small!
Narrator #3
Charon’s the name of its moon, there’s just one. Pluto’s four billion miles away from the Sun.
Narrator #4
Asteroids, meteorites, and comets, too, circle our Sun and pass by our view.
Narrator #3
Crashing and bumping, asteroids break into bits. They become meteoroids and they make quite a hit!
Narrator #2
Some crash into planets, some fly through the sky. They’re called shooting stars, have you seen them go by?
Narrator #1
Eight different planets, one dwarf and one star,
Narrators 2&3
Make up our Solar System, which extends out so far.
Narrators 4&5
Some planets have moons, and some have rings.
Narrators 6 &7
Around our bright Sun, they all do swing,
Narrators 8&9
In orbits of varying sizes they race.
All: All planets and Sun go whirling through space. Name:__________________

Unit 5, Essential Question #4 244 Interconnections © 2011
Touring the Solar System
Object in our Solar System
Facts about the object:
Sun
Mercury
Venus
Earth
Mars
Asteroids/Asteroid
belt/ Meteor
Jupiter

Unit 5, Essential Question #4 245 Interconnections © 2011
Saturn
Neptune
Dwarf Planet-Pluto
Comets

Unit 5, Essential Question #4 246 Interconnections © 2011

Unit 5, Essential Question #4 247 Interconnections © 2011
6th Grade Unit 5: Change: The Universe in Motion
Essential Question #4: How are the planets and other objects in the solar
system similar and different from Earth? Lesson Title: Distance in the Solar System SC Standard IV, Objective 1 Implementation Time: 45 minutes Media Resources Needed: Optional: Solar System: Kids Discover Optional: Bill Nye The Science Guy, The Planets (online, eMedia) Optional website: http://www.pbs.org/teachers/mathline/concepts/space2/activity1.shtm Materials Needed: Student Handout on Solar System Distances Roll of Toilet Paper (per group) Rulers or Yard Sticks Planet Models to scale: Sun-bowling ball, diameter 8.00 inches Mercury-a pinhead, diameter 0.03 inch Venus-a peppercorn, diameter 0.09 inch Earth- another peppercorn, diameter 0.09 Mars- another pinhead, if you can find one slightly larger that would be best 0.04 inches Jupiter-a chestnut or a pecan, diameter 0.90 inch Saturn- a hazelnut or an acorn, diameter 0.70 inch Uranus –an unshelled peanut or coffee bean, diameter 0.30 inch Neptune- another peanut or coffee bean Pluto- a fleck of pepper glued to a card, diameter 0.001 inch Procedure: Teacher Prep: Get the items that will represent the planet models ready by attaching them to index cards if necessary. It isn’t important that some of the items aren’t round or exactly in ratio, it’s the visual that will really help kids. 1. Have students to do a 1-minute quick-write about all the kinds of things found in our

Unit 5, Essential Question #4 248 Interconnections © 2011
universe. Students should come up with a list that includes things like: Galaxies, stars, solar systems, individual planets (and their moons), comets, and asteroids. 2. Now have students list the items from their quick write in order from largest to smallest (galaxy, star, planet, asteroids/comets). 3. Help students understand that the sun is really big, using a scale model (1”=1,000 miles). Set out as a center, or at your desk. 4. Put all the planet models out on a table (bowling ball, peppercorns, pin, peanuts etc…). Let the students just marvel at how enormous the sun is compared to the planets. Tell the students that the Earth in real life is 8,000 miles in diameter. The sun is 108 times bigger (864,000 miles around). Tell students that the models you have brought are in proportion to their real sizes. (these models were suggested at http://www.noao.edu/education/peppercorn/pcmain.html ) 5. Next, ask the students to place the planet models in order with the distance between each planet that they think is correct. Most students are going to try and put all the “planets” on the same table. In real life, the Earth is 93 million miles away from the Sun. Using the scale we have 1”=1,000 miles, then our Earth model should be placed 26 yards away from the Sun model! Try it-you will probably have to leave your classroom. Optional: If you want to have the students see the distances between planets based on this scale it takes about 1,000 yards! (1/2 a mile)—you could do it out on a playground if you “folded” the distance back and forth across the field. (Note: the Solar System Distance Activity later in this lesson shrinks up the scale and uses toilet paper and can easily be done in a classroom, gym or hallway. You probably only want to do one distance model or the other). Don’t want to measure each yard precisely? Have students practice taking giant steps that are about 1 yard long. Assign a model planet to a student and have them move into position. Mercury 10 yards Venus 9 yards from Mercury Earth 7 yards from Venus Mars 14 yards from Earth Jupiter 95 yards from Mars! Wow, this is a huge gap! Saturn 112 yards from Jupiter Uranus 249 yards from Saturn Neptune 281 yards from Uranus Pluto (dwarf planet) 242 yards from Neptune =1,109 total yards from your “Sun”. 6. Hand out the Solar System Distance Sheet and a roll of toilet paper to each group. Let students again model just how far apart the planets in our solar system are. You
Unit 5, Essential Question #4 249 Interconnections © 2011
may need to review how to estimate a partial square a toilet paper. You could use sticky notes to mark the locations of the planets if that is easier than writing on the toilet paper. Students can copy the chart from the LCD screen into their science notebooks or each student can be given a photocopy. 7. If you have time, let students look through the Kids Discover magazines to look for interesting facts or to help develop questions they want to answer. Assessment: 1. Toilet Paper activity: 1) Mercury & Venus 2) Uranus & Neptune 3) Inner 4) Inner planets (closer to sun) 5) Outer planets (farther from sun) Extension: 1. Have students do the How Long is a Light Year activity on the PBS Mathline website. http://www.pbs.org/teachers/mathline/concepts/space2/activity1.shtm 2. Watch Bill Nye the Science Guy, The Planets video.

Unit 5, Essential Question #4 250 Interconnections © 2011
Solar System Distance Student Sheet Have you ever noticed that posters of the entire solar system make it look like the planets are exactly the same distance from each other? In fact, some planets are relatively close together, and some planets are very far apart. Since things are so vast in the solar system scientists need a very big measurement (it isn’t practical to measure giant distances in meters, because you would end up with LOTS of zeros on the ends of numbers). Scientists use a unit of measurement called an Astronomical Unit. 1 A.U. = 149.6 million km or 93 million miles (the distance from the Sun to the Earth) Directions 1. In a long hallway or outside, unroll the toilet paper and mark each planet according to the chart. 2. One A.U. is equal to one square of toilet paper. 3. When all the planets are marked, observe your model. Answer the questions below.
Chart of Planet Distances PLANET Astronomical Units
Mercury 0.4 Venus 0.7 Earth 1 Mars 1.5 Jupiter 5.2 Saturn 9.5 Uranus 19.2 Neptune 30 Pluto 39.5 1. Which two neighboring planets are closest together? 2. Which two neighboring planets are farthest apart? 3. Which planets are closest together–the inner or outer planets? 4. Which planets are the warmest? Why? 5. Which are the coldest? Why? Activity from: http://www.schools.utah.gov/curr/science/core/6th/SCIBER6/size_etc/html/intro.htm

Unit 5, Essential Question #4 251 Interconnections © 2011
6th Grade Unit 5: Change: The Universe in Motion
Essential Question #4: How are planets and other objects in the Solar
System similar to and different from Earth? Lesson Title: Like Earth? SC Standard III, Objective 1 Implementation Time: 35 minutes Media Resources Needed: Comets http://solarsystem.nasa.gov/planets/profile.cfm?Object=Comets Materials Needed: Like Earth Sheet Safety goggles Comet Ingredients: 4 lbs dry ice 2 large garbage bags or plastic tablecloths ½ gallon of water Large plastic mixing bowl 1 tsp. ammonia (window cleaner) Wooden spoon ½ c. dirt (fine grained dirt or sand) Ski gloves 1 Tbs. dark corn syrup Paper towels 3 zipper gallon bags Measuring cups/spoons Procedure: 1.Tell the students that they are going to be able to make and touch an object that they find in our Solar system frequently.
2. Show the students a few pictures of comets. (Use the NASA website, click on the “gallery” tab or use Google images to search for comets). 3. In their science notebook, label the next page: Comets. Give students one minute to do a quick-write; list as many facts or questions that they have about comets and how they work. 4. After the quick-write, do partner share of the information.

Unit 5, Essential Question #4 252 Interconnections © 2011
5. Teacher Demonstration w/ student assistant: To build a comet start by placing the zipper gallon bags inside of each other. This will make a three-ply bag. Use a hammer to break the dry ice if needed and then take the smaller chunks of the ice and place them in the innermost portion of the bags. Seal each of the bags ¾ of the way – DO NOT SEAL COMPLETELY (otherwise the bags could expand and explode). Note: Teacher and student should wear safety goggles.
6. With all three bags partially open, have a student crush the dry ice with a hammer. The finer the “powder” from crushing the dry will be easier to use in comet making.
7. Prepare the mixing bowl. Lay one garbage bag underneath the mixing bowl to catch spills and another draped inside of it (without opening it). This will line the entire mixing bowl. Pour in 3 cups of water. Mix in the dirt, ammonia and dark corn syrup.
8. Ask a few students to help stir the ingredients. Make sure that they all are wearing protective ski gloves and goggles. Once the students are protected, pour in the crushed dry ice into the bowl. Have the student continuously stir. There will be lots of vapor and you may want to stop and stare at it… but don’t, just keep stirring! The ingredients in the bowl should be thickening and starting to form slush. Keep stirring as it thickens; try to mix all ingredients until the mixture is almost completely frozen.
9. Teacher: Put on ski gloves and wrap the garbage bag lining the bowl around the frozen slush and shape and pack it as you would a big snowball. If the frozen slush pieces are not staying together, open up the garbage bag and add a little more water and pack it again. Continue adding water like this until it solidifies as a big lump. Unwrap the big lump and you have a miniature nucleus of a comet.
10. Explore. Set the nucleus of the comet out on a covered table and let your students make investigations. The mixture should be safe enough to touch with hands. However, have the students lead most of their investigations with a skewer or a spoon. If you find a spot that feels sticky, pour a little water on it and listen to hiss and pop as the carbon dioxide sublimates as the carbon dioxide forces its way through weak spots in the ice crust. Watch for these small jets coming from the nucleus—this happens on real comet nuclei and results in slight jetting forces that can make the nucleus spin, split apart, or even cause minimal changes in the comet’s orbit.
11. Explanation: The ingredients used in this comet are similar to what is in an actual comet. The dry ice is frozen carbon dioxide. Corn syrup is not really in comets, but it represents the carbon based molecules. Real comet nuclei contain frozen water and carbon dioxide, ammonia, organic carbon based molecules or silicates. Water ice comprises 80-90% of a comet. Carbon dioxide comprises 7-15% of the comet.

Unit 5, Essential Question #4 253 Interconnections © 2011
12. Next have students open their science notebook to the questions and wonderings about comets that they created during the quick write. Ask students to go over their questions with their neighbor. After students share with one another, have group volunteers state their questions and name their findings.
13. Now ask the students if we have answered all their questions? If not, tell the students that they can look for the information from what other scientists have collected. Pass out the information from the NASA Comets website. Have students in pairs read the information given from the NASA scientists. Have them use the information to answer their outstanding questions.
14. Evaluate. Have students fill out the Like Earth Sheet. Tell students that they need to write down the things that they see that are the same as our planet Earth, and the things that they see are different from our planet.
Assessment:
1. The completed Like Earth Sheet. Earth: has carbon dioxide, water, organic material, is spherical in shape, travels in an orbit Comet: smaller than a planet, spherical in shape, has carbon dioxide, water, organic material.

Unit 5, Essential Question #4 254 Interconnections © 2011
Name: ______________
Like Earth?
Things that are the same as a comet:
Things that are different than a comet:
Planet Earth

6th Grade Unit 5: Change: The Universe in Motion
Science & Social Studies Interconnections: A Thematic Approach
255
Essential Question #5:
What can we learn from the night sky?
Lessons: • Constellation Myths • Constellation Tubes • The Stars in Motion • Tools of the Astronomer
Core Standards Social Studies Science Standard IV
o 1a use the speed of light as a measuring standard to describe the relative distances to objects in the universe
o 1b compare distances between objects in the solar system o 1c compare the size of the solar system to the size of the Milky Way galaxy o 1d compare the size of the Milky Way galaxy to the size of the known
universe o 2a locate and identify stars that are grouped in patterns in the night sky o 2b identify ways people have historically grouped stars in the night sky o 2c recognize that stars in a constellation are not all the same distance from
Earth o 2d relate the seasonal change in the appearance of the night sky to Earth’s
position o 2e describe ways that familiar groups of stars may be used for navigation
and calendars

6th Grade Unit 5: Change: The Universe in Motion
Science & Social Studies Interconnections: A Thematic Approach
256

Unit 5, Essential Question #5 257 Interconnections © 2011
6th Grade Unit 5: Change: The Universe in Motion
Essential Question # 5: What can we learn from the night sky?
Lesson Title: Constellation Myths SC Standard IV, Objective 2 Implementation Time: 35 minutes Media Resources Needed: D’Aulaires Book of Greek Myths by Cynthia Ross Sci-Ber Text: http://www.schools.utah.gov/curr/science/core/6th/SCIBER6/solarsys/html/intro.htm Pictures of constellations (possible site) http://www.slivoski.com/astronomy Sky Wheel http://www.lhs.berkeley.edu/starclock/skywheel.html Optional: Dot To Dot Stories In The Sky, Stories In The Stars by Joan Hinz Materials Needed: Black construction paper Hole punched circles of paper Science notebooks Procedure: 1. Read the story of the Big Dipper or Big Bear constellation: The Greek god Zeus hid the beautiful Callisto from his wife Hera by changing Callisto into a bear. Callisto’s son, Actas, did not know his mother was now a bear and while hunting one day came across Callisto. To keep Actas from accidentally killing his mother, Zeus placed both Callisto and her son together into the sky as the Big and Little Bear (we know them better by the names Big and Little Dipper). 2. Next, tell the students that we have just replicated what ancient civilizations did with the night sky. They looked for patterns and changes in stars. When Ancient people looked at the night sky they would find a pattern that they would recognize in the night sky and create a story explaining why the pattern existed there. 3. Give students a piece of black paper and 5-6 pieces of paper from a hole punch. Have students put their paper on the floor and drop/scatter the hole punches on the paper. Use a glue stick or tape to attach the hole punches to the spot they landed. This will represent the student’s constellation. Connect the dots with white crayon. Let students decide what they think it looks like and write their own story about the constellation. Give students 10 minutes to write their quick story.

Unit 5, Essential Question #5 258 Interconnections © 2011
4. Show students three or four of the most popular constellations and along with a myth that goes along with the picture (myth could be from Greek, Roman, Indian or other culture). 5. Talk about how the ancient civilizations used the patterns of the rising and setting constellations to determine the time of night and the season of the year. Because of the Earth’s orbit and tilt and rotation, not all the constellations can be seen at the same time. 6. Hand out the papers to build a star chart (One is available from “Uncle Al’s Sky Wheel site). Have students inspect the wheel find their favorite constellation and give them time to research why the constellation got its name. Have students draw a picture and write a short paragraph about the constellation in their science notebook. Keep the Sky Wheel for the next lesson. 7. As homework, have students finish the rough draft of their own constellation stories. Assessment: Have volunteers share their constellation stories. Students could make a foldable about constellations. Extension: Read from a book of constellation stories such as Dot To Dot Stories In The Sky, Stories In The Stars By Joan Hinz or D’Aulaire’s Myths.

Unit 5, Essential Question #5 259 Interconnections © 2011
6th Grade Unit 5: Change: The Universe in Motion
Essential Question #5: What can we learn from the night sky?
Lesson Title: Constellation Tubes SC Standard IV, Objective 1 Implementation Time: 35 minutes Media Resources Needed: Uncle Al’s Sky Wheel http://www.lhs.berkeley.edu/starclock/skywheel.html Constellation pictures-possible sources: http://www.schools.utah.gov/curr/science/core/6th/SCIBER6/size_etc/html/starpics.htm http://austinkids.files.wordpress.com/2009/02/constellations-for-blog.pdf Materials Needed: Aluminum foil (heavy duty works best) Toilet paper tubes Rubber bands or masking tape Straight pins or unfolded paper clips Science notebook Uncle Al’s Sky Wheel (already built from previous Constellation Myth lesson) Constellation pictures (print from Sci-Ber text or Google images) Procedure: 1. Teacher prep: Have students bring in toilet paper tubes in advance of the lesson. Kids may want to do more than one constellation tube. 2. Pass out a toilet paper tube, a 4”x 4” piece of foil, a rubber band or tape, and a straight pin or paper clip to each student. Have the student cover one end of the toilet paper roll with foil. Then have the students secure the foil with a rubber band or tape. 3. Once the rubber band is in place, place an image of a constellation on top of the foil as a pattern for poking the holes (or they could design their own or use the one they made during the Constellation Myth lesson). Students should notice that some of the stars are larger than others. Have students use the straight pin to poke holes and make their constellation in the foil. 4. When their tubes are finished have students trade their tube with a partner and let them try it. Look through the open end of the tube up toward a light (or turn off the

Unit 5, Essential Question #5 260 Interconnections © 2011
classroom lights and let student shine a flashlight through the tube and have the class guess what constellation is being projected). Assessment: Place a sign on each wall for each of the seasons. Have the students use their star finders to determine what season their constellation that they made is visible in the night sky. Then have students stand with their constellation tubes in the season that it belongs in.

Unit 5, Essential Question #5 261 Interconnections © 2011
6th Grade Unit 5: Change: The Universe in Motion
Essential Question #5: What can we learn from the night sky?
Lesson Title: The Stars in Motion SC Standard IV, Objective 2 Implementation Time: 45 Minutes Media Resources Needed: Uncle Al’s Sky Wheel http://www.lhs.berkeley.edu/starclock/skywheel.html Seasonal Constellations: http://www.onr.navy.mil/Focus/spacesciences/observingsky/constellations5.htm Video: A Spin Around the Solar System. Look to the Stars. (online eMedia) Materials Needed: 4 Signs labeled with each season Sign labeled Polaris (North Star) String What is the Date sheet Sky Wheel (from previous lessons) Procedure: 1. Place a season sign on each wall of the classroom. 2. Hang/stick the Polaris sign from the ceiling in the center of the room. 3. Stick the constellations signs in each season
Winter Constellations: Orion, Canis Minor, Canis Major, Taurus Spring Constellations: Bootes, Virgo, Gemini, Leo Summer Constellations: Cygnus, Lyra, Aquila, Sagittarius Fall Constellations: Perseus, Andromeda, Pegasus
4. Have students stand in a circle with their faces toward the wall, arms extended out to the side. Students should have their notebook and pencil with them, place on floor in front of them. 5. The out-stretched arms represent the horizon. You can see only what is within your horizon-no turning your head or moving arms to look around!

Unit 5, Essential Question #5 262 Interconnections © 2011
6. Have students observe which constellations can be seen at this point. Each student should step counter-clockwise (this simulates the earth’s revolution) 1/8 of the way around the room and observe which constellations you can see now. 7. Repeat Step 6 until you are back to their original position. Students should record in their notebooks which constellations can be seen in each season (and note that some constellations transition from one season to the next). Students should notice that the North Star (Polaris) can be seen in every season. 8. Give students the “What is the Date” reading sheet (or project on the LCD). In their science notebooks, have students write a story how they could have used the North Star to guide them to their favorite vacation spot, a city they have lived in, a friend’s house etc… 9. Have students pull out their Sky Wheel and use them to determine what stars will be visible that night. To do this, have the students turn the dial to the Month and time. All the constellations in the oval window should be visible that night (weather permitting). Assessment: Read the student stories. Check to see that students understand how to use the Sky Wheel. Extension:
1. Allow the students to take their sky wheels home and use them with their family to have a “Sky Party” and find as many constellations as they can.
2. Watch A spin around the Solar System. Look to the Stars. (online, eMedia)
3. Make a calendar. Which do you think was more accurate, a calendar made from the moon’s cycle or a calendar made from the cycle of the stars? Create your own calendar based on either of these cycles. You can name your own months and have whatever number of days in each month you choose. Would your calendar work? It might be helpful to do some research on how the ancient Egyptians, Aztecs, and Chinese developed their calendars. Use this Web site for your research http://www.units.muohio.edu/dragonfly/time (note: this webpage is no longer maintained, but you can print out the information to keep).

Unit 5, Essential Question #5 263 Interconnections © 2011
What is the Date?
From the Sci-Ber Text Before GPS units and the art of mapmaking, travelers used the stars to help them find
their way from place to place. Sailors used the stars to help them guide their ships at
night since Polaris is always visible in the Northern Hemisphere. African-American
slaves used the Big Dipper (which led to the North Star) to help them find their way to
freedom in the northern states during the time of the Civil War. The pioneers of the
1800’s also used the constellations to help them find their way West.
People in ancient cultures noticed that certain constellations appeared in the sky only in
certain times of the year. For example, the Egyptians counted the number of days
between the appearances of Sirius. They found that there was 365 days in each year.
By dividing the year into 365, the Egyptians created a calendar. They noticed that Sirius
always came back a few days before the annual flooding of the Nile River, so this
helped the Egyptians know when it was time to plant crops.
Unit 5, Essential Question #5 264 Interconnections © 2011

Unit 5, Essential Question #5 265 Interconnections © 2011
6th Grade Unit 5: Change: The Universe in Motion
Essential Question #5: What can we learn from the night sky?
Lesson Title: Tools of the Astronomer SC Standard III, Objective 2 Implementation Time: 45 minutes Media Resources Needed: Making your own simple telescope (print out at: http://www.exploratorium.edu/exploring/space/activity.html) Instruments that scientists use to learn about space http://amazing-space.stsci.edu/resources/explorations/galileo Materials Needed: Paper bowls Reading glasses (from Dollar Store) 6 misc objects Magnifying glass Tape Flash light Wax paper Meter stick Procedure: 1. Teacher Prep: Get six paper bowls and choose six different small objects to tape inside the bowl. The objects can be pieces of candy, small figurines, small toys etc. Cover bowls with wax paper and secure with tape. 2. Teacher Prep: Visit the website Making your own simple telescope compile and construct the materials to make a simple telescope. You may need more than one if you have a very large class.
3. Explain that you have placed an object in each of the bowls that students must try to identify. This object represents something found far out in space. Students should record as many observations about each object that they can. No peeking, lifting the bowl, or touching! Observe with eyes only….. 4. Students should record observations in their science notebooks, title the page “Looking Up from Here.” 5. Project the “Properties I can See” table on the LCD so students can copy it into their notebooks.

Unit 5, Essential Question #5 266 Interconnections © 2011
Properties I Can See… I think the object is a…. Object 1 Object 2 Object 3 Object 4 Object 5 Object 6
5. Divide students into groups and pass out covered bowls and let the students rotate through the six bowl stations to make their observations.
6. After students have seen all the bowls, have them think-pair-share their then gather students back to the whole group. Discuss:
§ Who thinks they identified an object correctly? § How did you figure out what the object it? (discuss term inferring) § What difficulties did you encounter as you were trying to record observations and identify the objects? Was this activity frustrating? Why or why not?
7. Next, have students set up another table on the same page in their science notebooks that is similar to the first. Remove the wax paper and have the students make a second set of observations on their paper.
Properties I Can See… I know the object is a… Object 1 Object 2 Object 3 Object 4 Object 5 Object 6
8. Have student groups quickly share their information, and then gather the class together as a whole group. Discuss:
How did removing the wax paper help in your ability to see the object?
How were your observations of the properties different?

Unit 5, Essential Question #5 267 Interconnections © 2011
9. Next, tell the students that will make similar observations using a simple telescope that they will build.
10. Split students into three groups, and have pairs in those groups be in charge of the different components of the telescope.
11. Students can take turns exploring the parts of the homemade telescope. The eyepiece of the telescope is the magnifying glass. The objective of the telescope is a lens from the reading glasses. Make sure that each group of students has a chance to make observations with the magnifying lens with and without the wax paper.
12. When all students have had a chance to use the parts of the telescope, have them return to their desks. Ask the student groups to share what they learned from their observations? Also ask them to decide which way the observations were easiest to make, with the wax paper or without the wax paper?
13. Tell the students that the wax paper represented things in space that make it more difficult to observe. Examples of challenges to identifying objects in space include; the great distance from earth, pollution or weather in earth’s atmosphere or the discovery of something new that scientists aren’t sure of what it is.
14. Because of these difficulties scientists encounter when looking at things in space, ask the students to brainstorm different ideas about what scientists have done to improve observations that they make. Possible answers:
Use satellites to retrieve information.
The Hubble Space Telescope can take pictures outside of the Earth’s atmosphere.
Astronauts go into space to make observations themselves.
Space probes with computers can be sent to places that are too far or too dangerous for humans.
15. Next, assign each group to do research on one of the following technology categories that provide for better observations of objects in space. Present results as a powerpoint, move, poster, oral report, brochure or foldable. Categories:
telescopes, space probes, rockets, space shuttle, space station
One possible research site: http://www.childrensmuseum.org/games/grades_6-8.htm (Once on the Children’s Museum page, click on Cosmic Quest. Next click on Field Guide to the Universe and then click on space craft. This site will give information about different probes and space telescopes).

Unit 5, Essential Question #5 268 Interconnections © 2011
Assessment: Student notebook observations. Space technology presentation Extension: 1. Have students build a paper model of a satellite or probe or rocket http://chandra.harvard.edu/graphics/edu/formal/build/chandra_kit.pdf 2. Instruments that scientists use to learn about space http://amazing-space.stsci.edu/resources/explorations/galileo

6th Grade
Science & Social Studies Interconnections: A Thematic Approach 269
Sixth Grade Interconnections Unit VI
Change: Revolution and the Modern World Enduring Understanding: Global forces of revolution and conflict created changes and challenges that impact us today. We must understand current global issues and our rights and responsibilities in an interconnected world. Essential Questions • Why do people revolt? • How is revolution a catalyst for change? • How did major conflicts of the 20th century affect the world today? • What are possible solutions to the global issues we face today? • What rights and responsibilities do we have in today’s world? Core Curriculum Concepts/Skills: revolution, conflict, challenge, global interconnectedness, relationship, responsibility, investigation
Core Standards Social Studies Standard III: Students will understand how revolutions have had an impact on the modern world. Objective 1: Understand the processes of revolution.
Objective 2: Analyze the impact of selected revolutions. Standard IV: Students will understand current global issues and their rights and responsibilities in the interconnected world. Objective 1: Analyze how major world events of the 20th century affect the world today. Objective 2: Explore current global issues facing the modern world and identify potential solutions. Objective 3: Determine human rights and responsibilities in the world. Social Studies language students should know and use: revolution, conflict, environment, political turmoil, poverty, famine, child labor,conservation

6th Grade
Science & Social Studies Interconnections: A Thematic Approach 270

6th Grade
Science & Social Studies Interconnections: A Thematic Approach 271
Essential Question #1:
Why do people revolt?
Lessons: • Revolutionary Reasons
Core Standards Social Studies Science Standard III
o 1a examine social, religious, and economic issues that may lead to revolution
o 2a identify representative people from selected revolutions (examples may include: napoleon, Martin Luther, James Watt, Isaac Newton, Madame Curie, Anton Van Leeuwenhoek)

6th Grade
Science & Social Studies Interconnections: A Thematic Approach 272

Unit 6, Essential Question #1 273 Interconnections © 2011
6th Grade Unit 6: Change: Revolution and the Modern World
Essential Question #1: Why do People Revolt? Lesson Title: Revolutionary Reasons SS Standard III, Objective 1, 2 Implementation Time: 60 minutes Media Resources Needed: eMedia video Empires: Martin Luther Episode 02-The Reluctant Revolutionary; Empires: Napoleon Episode 01-To Destiny; Revolutionary News (if your school already has copies); Nystrom Atlas of World History; other books and readings on Revolutionary movements; timeline folder from Unit 1; comparison matrix Materials Needed: lined paper (1 sheet per student); squares of white cardstock (1 per student), half sheets of white paper with the following prompt for each student: Think of a time when you were dissatisfied with something. How did you deal with your dissatisfaction? Procedure: 1. Entrance slip: hand each student a half sheet of paper with the following prompt (they will need to respond directly on the sheet): Think of a time when you were dissatisfied with something. How did you deal with your dissatisfaction? Tell students to leave their names off the papers.
2. Instruct students to wad their paper up and explain the procedures for a “snowball fight”. Students will stand and begin throwing their waded paper at each other and pick up another and continue to throw until you say” stop.” They will pick up the paper closest to them and read the response.
3. Have students share a few of the anonymous responses. Write the reasons for dissatisfaction on the board and introduce the essential question-Why do people revolt? Assign students to copy the list onto their lined paper.
4. Instruct students to listen for reasons people revolt as you show the introduction to the Martin Luther clip. After the clip, ask students to share the reasons they heard during the clip and write them on the board under the class responses.
5. Show the Napoleon clip. First show the introduction and ask if they saw any reasons for revolt. Cue the video to the 19 minute marker (this section is about the beginning of the French Revolution) and show five more minutes.

Unit 6, Essential Question #1 274 Interconnections © 2011
6. Ask students to give you reasons from the movie clip that address why people revolt. Add these to the list on the board and have students add them to their list.
7. Hand out an Atlas of World History to each student. Ask students to add at least three more events from the previous lessons to their timeline.
8. Assign each student a page of the Atlas under the following headings: in the Unit From Renaissance to Industrial Revolution 1) Europe During the Renaissance; 2)Reformation and Counter Revolution; 3) Industrial Revolution Changes Europe. In the unit Revolutions and Imperialism 4)Independence in the Americas; 5) French Revolution; 6) Empire of Napoleon; 7)New Boundaries in Europe; in the Unit Twentieth Century and Beyond 8) Rise of Communism; 9) Independence Sweeps the World. If you have other books you might also assign or allow students to utilize them for additional information.
9. Tell students to look at the pictures and read the first paragraph at the beginning of the page to find other reasons why people revolt; add ideas to the list they have already started.
10. Place students in cooperative groups with three others who each read a different page. Students will complete the first part of the comparison matrix with this group.
11. Instruct students to write the names of five revolutions they read about. Example: Reformation, French, Industrial, American, scientific, cultural, communist (this will depend on their assigned readings).
12. For each revolution, have students complete the first column with reasons why people revolt. Students may want to add some of the reasons from the class-generated list if any apply to their revolutions.
Assessment:
Instruct each group to choose the most common reason why people revolt and create a quilt square on the square of white card stock given to them. This can be a symbol, word, or decoration that shows their understanding of the essential question. Example: They might choose the desire for freedom of choice so they might draw a picture of a liberty bell or if they choose the cause of a new government, they might draw a crown with a big “no” sign across it. These will be placed on the wall or board together to resemble a quilt.

Unit 6, Essential Question #1 275 Interconnections © 2011
Comparison Matrix
ITEMS TO BE COMPARED (Revolution
Names)
CHARACTERISTICS
Reasons for Revolt
Types of
Revolutions
How
Result/What changed?
SYTHESIS: What did you learn?
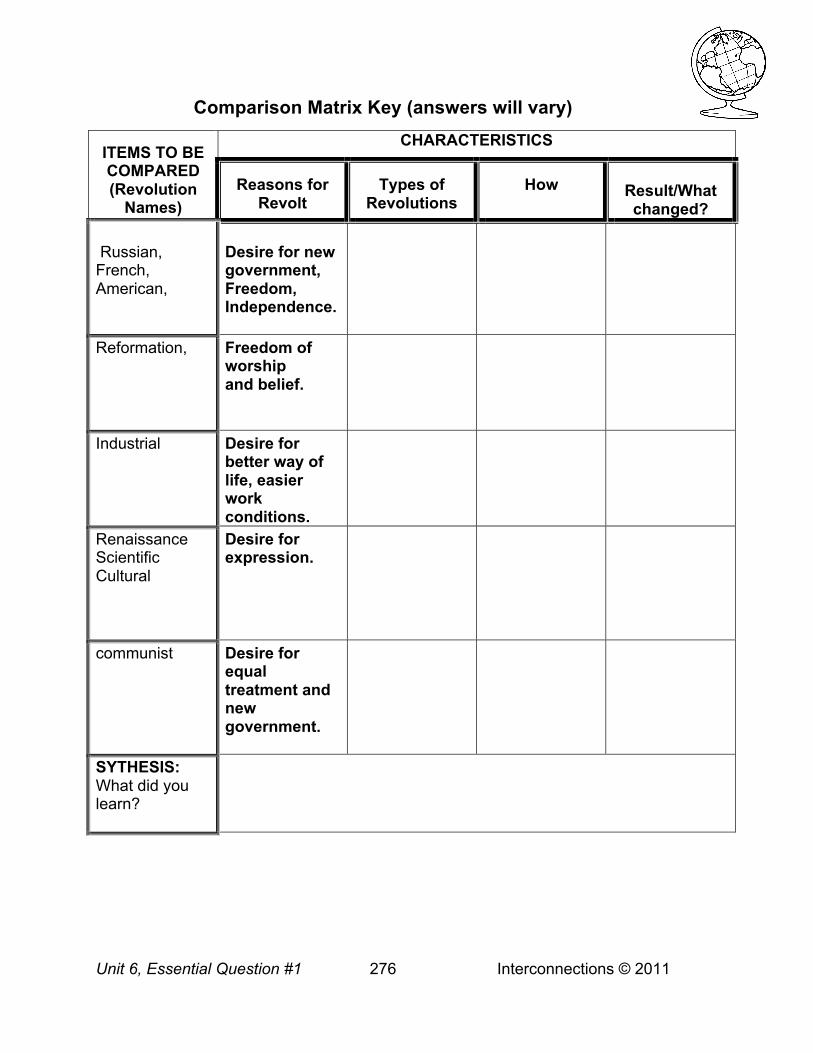
Unit 6, Essential Question #1 276 Interconnections © 2011
Comparison Matrix Key (answers will vary) ITEMS TO BE COMPARED (Revolution
Names)
CHARACTERISTICS
Reasons for Revolt
Types of
Revolutions
How
Result/What changed?
Russian, French, American,
Desire for new government, Freedom, Independence.
Reformation,
Freedom of worship and belief.
Industrial Desire for better way of life, easier work conditions.
Renaissance Scientific Cultural
Desire for expression.
communist Desire for equal treatment and new government.
SYTHESIS: What did you learn?

6th Grade Unit 6: Change: Revolution and the Modern World
Science & Social Studies Interconnections: A Thematic Approach 277
Essential Question #2:
How is revolution a catalyst for change?
Lessons: • Winds of Change
Core Standards Social Studies Science Standard III
o 1b identify and compare how revolutions develop in multiple areas of human life (examples may include: scientific, agricultural, industrial, political, medical)
o 2b examine the outcomes of selected revolutions (examples may include: the Scientific and Industrial Revolutions, the Reformation, the French Revolution)

6th Grade Unit 6: Change: Revolution and the Modern World
Science & Social Studies Interconnections: A Thematic Approach 278

Unit 6, Essential Question #2 279 Interconnections © 2011
6th Grade Unit 6: Change: Revolution and the Modern World
Essential Question #2: How is revolution a catalyst for change?
Lesson Title: Winds of Change SS Standard III, Objective 1, 2 Implementation Time: two 45-minute sessions. Media Resources Needed: Nystrom Atlas of World History; other books and resources on various revolutions that you used in the previous lesson; Comparison Matrix from previous lesson Materials Needed: markers; tape; construction paper; a large sheet of butcher paper (red, white or blue) long enough to hang above the board and extend six inches below the board or to hang on the wall vertically; eight envelopes for a sort, the following words cut into small rectangles on red cardstock: ECONOMIC, SOCIAL, and POLITICAL (these words should be larger than the next list); the following words on blue or white paper: French Revolution, Russian Revolution, Chinese Revolution, American Revolution, Industrial Revolution, Cultural Revolution, Reformation, Renaissance, Women’s movement, Scientific Revolution. Place a set of the entire list of words each of the envelopes. Procedure: 1. Ask students to take out their comparison matrix and look at the second column. What do you think that column is about? Get their responses and place on the butcher paper the words Economic, Social, Political and ask if anyone understands the meaning of these words. If you need to look these up as a class, do so. Make sure all students have a basic understanding of this vocabulary.
2. Place students back in their cooperative groups from the previous lesson and give each group a sort envelope that you have prepared ahead of time. Instruct them to find the three words on red paper and place them as the three headings. Tell them to look at each of the other concepts and categorize them according to type of revolution.
3. Give three groups a chance to share one of their columns and ask if the class agrees, if not ask them to give reasons. This activity should take no more than 10 minutes.
4. Instruct students to complete the second column of their matrix, according to the revolutions they have listed. Explain that some can be more than one type.

Unit 6, Essential Question #2 280 Interconnections © 2011
5. Make sure all students have an atlas and ask them to look through the same pages and resources to find what change came about as a result of each of the revolutions they read about.
6. Instruct students to look for how this was done. How did their revolution accomplish the change- through war, inventions etc.? See the examples in the key but do not share these with the students. Allow them to come to their own conclusions.
7. Have each group make a word using construction paper and markers that they would like to add to the word wall and have them cut it out and tape it on. This will be used for the entire unit.
Assessment: Assign each group to choose one of the revolutions from their matrix (make sure each group chooses a different one). If two groups want to do the same one and all revolutions are taken, combine the two groups. Allow students to use computers in the classroom or other resources to gain more in-depth information about their revolution. Encourage the American Revolution group to focus on South America instead of the U.S. Give the groups 10-15 minutes to plan a 4-minute skit on their revolution that answers the essential question. The focus is on how the revolution was a catalyst for change. You should review expectations and presentation skills prior to student presentations. *After the skits, have students complete the synthesis part of the matrix and hand it in. Extension: Gather various songs of revolution such as Revolution #1 by the Beatles and songs from Newsies and Les Miserables. Have students analyze the songs using a sound recording analysis sheet from the National Archive website at http://www.archives.gov . Have students read historical fiction novels with the theme of revolution to gain empathy and insight into how revolution leads to change in society and in people. You can choose approved novels or have students find one on their own to read. This can be done as a literature circle with students reading novels you choose from the approved district list.

Unit 6, Essential Question #2 281 Interconnections © 2011
Comparison Matrix Key (answers will vary)
ITEMS TO BE COMPARED (Revolution
Names)
CHARACTERISTICS
Reasons for Revolt
Types of
Revolutions
Result/What changed?
How
Russian, French, American,
Desire for new govern. Freedom Independence
Political Democratic form of government, independence and recognition of human rights.
Overthrew the monarchy, through violent protest/war.
Reformation,
Freedom of worship And belief
Social The power of one religion over all. Separation of church and state.
Broke off from major religion and started a new one.
Industrial Desire for better way of life, easier work conditions.
Economic From human work to machines. Growth of cities.
Through inventions.
Renaissance Scientific Cultural
Desire for expression
Social and Economic
Art, architecture, learning opened up. More expression.
Thinking and creating.
Communist Desire for equal treatment and new government.
Political Less democratic government.
Overthrew the monarchy, through violent protest/war.
SYTHESIS: What did you learn?
Answers will vary but must show their understanding of the Enduring Understanding and essential questions #1 and #2.

Unit 6, Essential Question #2 282 Interconnections © 2011

6th Grade Unit 6: Change: Revolution and the Modern World
Science & Social Studies Interconnections: A Thematic Approach 283
Essential Question #3: How did major conflicts of the 20th century affect the
world today?
Lessons: • World at War, Part I • World at War, Part II • World at War, Part III
Core Standards Social Studies Science Standard IV
o 1a identify key events, ideas, and leaders of the 20th century (examples may include: World War I, World War II, the Holocaust)
o 1b describe the impact of these events on the world today

6th Grade Unit 6: Change: Revolution and the Modern World
Science & Social Studies Interconnections: A Thematic Approach 284

Unit 6, Essential Question #3 285 Interconnections © 2011
6th Grade Unit 6: Change: Revolution and the Modern World
Essential Question #3: How did major conflicts of the 20th century affect the world today? Lesson Title: World at War, Part I SS Standard IV, Objective 1 Implementation Time: 60 minutes Media Resources Needed: eMedia video Unfinished Nation, Episode 9: Road to War, In Flanders Fields by Norman Jorgensen and Brian Harrison-Lever (from 5th grade Interconnections kit); Where Poppies Grow by Linda Granfield; Nystrom Atlas of World History Materials Needed: three full sheets of paper with the following words on each one: Militarism, Nationalism, Imperialism -have the definitions on three other papers, one on each; copies of the poem handout “In Flanders Fields” (1 per student), computer; document camera (if available) Procedure: 1. Place the words and definitions on the board and ask for volunteers to match the word with the correct definition. See if the class agrees and allow students to change a match if there are any that are not correct. Explain that these three concepts are the main underlying causes of both world wars and still cause conflict today. Tell them to think of themselves as detectives with the task of finding evidence that these are the causes of conflicts in the 20th century.
2. Make sure all students have a sheet of lined paper and instruct them to make a three column vertical fold. At the top of each column write one of the three words.
3. Instruct students to watch the video segment Road to War and list any sign of these three concepts under the correct column. These can be seen or heard in the video.
4. Show the first 15 minutes of the segment - you just want students to get the background of the cause of WWI.
5. Model what you want students to do by stopping at the first sign of evidence to point out to students what they may be looking for.

Unit 6, Essential Question #3 286 Interconnections © 2011
6. After the video segment, ask students to share with another student what they wrote. Ask for volunteers to share evidence from each of the columns. Examples: Germany built up their military might as an evidence of militarism. Alliances made would be evidence of imperialism as they were made for the purpose of allowing countries to take control of others.
7. Now have students turn to the atlas and look for more evidence from pictures, maps and charts in the units titled Revolutions and Imperialism, and Twentieth Century and Beyond.
8. Show the book Flanders’ Field from the 5th grade Interconnections unit and ask students what they remember about this book. Turn to the last page and read the verse from the poem. Ask them what new insights they have now that they have studied WWI.
9. Show them the book Where Poppies Grow and turn to page 32 (for best results, project this on the screen through the use of a document camera). Read the entire page to the students. Print copies of the poem and distribute them to students.
10. Ask students to analyze the meaning of the poem. What is the significance of the Poppy (it appears in the poem and in both books)? They will work in cooperative groups to write a statement of meaning.
11. Have each group share this with the class. You might want to show some of the artifacts in the book and discuss what this scrapbook tells us about WWI and the impact it had on the world.
Assessment:
Instruct each student to choose one of the causes of WWI: Militarism, Nationalism or Imperialism. They will take an event or decisions made prior to WWI, under the chosen cause, and write an editorial opinion on how to prevent WWI by stopping that event or changing the decision. You can use the RAFTS writing strategy or you might have students read various editorials to gain information on how to write a logical opinion with cited evidence. Assign students to focus on voice and persuasive verbs.
Extension: Copy some of the artifacts from the book Where Poppies Grow and have students analyze and write a WWI story based on the artifact. This could be a creative writing project. For your visual and artistic students, consider assigning them to tell the story in a comic strip format with at least three frames.

Unit 6, Essential Question #3 287 Interconnections © 2011
In Flanders Fields
In Flanders fields the poppies blow Between the crossed, vow on vow,
That mark our place; and in the sky The larks, still bravely singing, fly Scarce heard amid the guns below.
We are the Dead. Short days ago
We lived, felt dawn, saw sunset glow, Loved, and were loved, and now we lie
In Flanders fields.
Take up our quarrel with the foe: To you from failing hands we throw The torch; be yours to hold it high. If ye break faith with us who die
We shall not sleep, through poppies grow In Flanders fields.
John McCrae

Unit 6, Essential Question #3 288 Interconnections © 2011

Unit 6, Essential Question #3 289 Interconnections © 2011
6th Grade Unit 6: Change: Revolution and the Modern World
Essential Question #3: How did major conflicts of the 20th
century affect the world today? Lesson Title: World at War, Part II SS Standard IV, Objective 1 Implementation Time: 45 Minutes Media Resources Needed: eMedia Video; America in the 20th Century WWII-Road to War; Nystrom Atlas of World History, other books and resources about WWI, WWII, Cold War; History Frame from http://www.readingquest.org (print and copy one for each student); collection of books on the World Wars from your school library (teacher’s choice) Materials Needed: three column note paper from the previous lesson; vocabulary words and definitions from the previous lesson; 3”x5” index cards (1 per student) Procedure: 1. Remind students of the definitions of the three causes of WWI and explain that they emerged again prior to WWII.
2. Instruct students to take out their three column note paper and have them draw a line under the last line with writing on it. If students need to make a new sheet allow them to do so.
3. Explain to students that they will be watching another movie clip, this time the focus will be on the causes of WWII. Tell them to pay close attention to the impact of the decisions made after WWI and how those decisions unleashed the three causes on Europe once again.
4. Instruct students to add evidence to their list under the correct concept/cause as they watch the video clip.
5. Show the first 26 minutes of the emedia video - stop when they begin to focus on the United States.
6. After watching the movie, have students meet with their cooperative groups from the previous lesson and share their column notes.

Unit 6, Essential Question #3 290 Interconnections © 2011
7. Assign two cooperative groups to look at and analyze the maps on WWI in the atlas, paying careful attention to the changes made after WWI. Assign two groups the maps on WWII and two groups the maps on The Cold War.
8. Each group will complete a history frame on their assigned topic based on what they have learned about WWI, WWII and the Cold War from the movie clips, reading summaries and the atlas information.
9. Assign students to present their information to the class. They will determine as a group how to rank the three causes based on their impact on causing their assigned war and then will record their ranking on the back with a brief reason for the ranking.
Place the three words on the word wall.
Assessment: Folded Line- Ask students to individually respond to the following question: Do you think the three underlying causes of the World Wars still exist today? Assign students to write their answer and explanation on a 3”X5” index card. Instruct students to get up and make a human line facing you. If you do not have enough room, you might go out in the hall. Divide the line in half and ask one half to fold the line until they are facing another person. Ask each student facing each other to read their card and then have students facing one direction take three steps to the side and read to the person they are now facing. The people on the ends will move to the other side of the line so the line moves like a bicycle chain. Repeat for five moves (if time allows, give each student the opportunity to talk to each classmate). Instruct students to take their seats and ask if they would change their answer based on what they heard from others. If any change their mind, instruct them to write their revised statement on the back of their card with an explanation of why they changed their mind. Extension: In cooperative groups, assign students to research the major world conflicts during the 20th century and have the entire 6th grade present a “War Fair” using display boards and characters from the various wars to talk about the causes, effects and strategies of the war. It might be good to do this around VE Day or Memorial Day in May. Invite some veterans and make it an opportunity to honor their sacrifices. Students from other classes could visit and rotate between the displays to hear about the various wars. Make sure all students show how their event(s) continues to impact us today.

Unit 6, Essential Question #3 291 Interconnections © 2011
6th Grade Unit 6: Change: Revolution and the Modern World
Essential Question #3: How did major conflicts of the 20th century
affect the world today? Lesson Title: World at War, Part III SS Standard IV, Objective 1 Implementation Time: two 45-minute sessions Media Resources Needed: Nystrom Atlas of World History; Vietnam War (DK Eyewitness Books) by DK Publishing; The Korean War (Chronicles of America's Wars) by Ruth Tenzer Feldman; The Cold War by Wendy Conklin (Primary Source Reader); or other resources on the Vietnam, Korean war and the Cuban Missile Crisis Materials Needed: different colored markers; paper for Venn diagram, “Future Wheel”; “Cause Chart”; “Triple Venn diagram” Procedure: Students will be comparing three major conflicts of the Cold War to see the similarities and differences and determine their impact on the world. 1. Draw a circle on the board and place the words “Cold War” in the center. Then draw three lines from the circle and write Korean War, Vietnam War, and Cuban Missile Crisis at the top of each of the other three circles (see example in this lesson).
2. Give each row or table a different color marker and tell them to come up when you say “go” and write any facts they know about any of the three events and write them under that event in the circle (allow 5-7 minutes for this).
3. When students finish, use the marker colors and number of facts to determine how to assign each of the three events.
4. Assign 1/3 of the class to gain information on the Vietnam War, 1/3 the Korean War, and 1/3 the Cuban Missile Crisis.
5. Give each group one of the resources to gain some basic information about the assigned conflict. Have students look in the atlas to gain a context of where these conflicts took place. This will be found on pages referencing the Cold War.
6. Assign students to complete the chart provided in this lesson.
Unit 6, Essential Question #3 292 Interconnections © 2011
7. Place three students together who studied a different topic so all three conflicts are covered.
8. Instruct students to complete a triple Venn diagram that they draw themselves. Instruct them to write in the outer part of the circle information from each event and then show how they relate in the intersecting part of the circles.
Assessment: Assign students to answer the essential question in a three paragraph essay using the information from their completed graphic organizers as supporting evidence. Extension: Have students complete a “Future Wheel” by placing one of the conflicts in the center and listing one positive and one negative result of the conflict, and then a positive and negative one for each of those, and so forth until they have completed the wheel. After looking at their overall answers, instruct students to determine whether the negative effects outweighed the positive effects and write a letter to the President of the United States at the time prior to the outbreak of the conflict, persuading him to go forth or stop the conflict from happening, citing evidence from the future wheel.

Unit 6, Essential Question #3 293 Interconnections © 2011
Cause Chart
Effect
Causes
Conflict
Effect
Effect

Unit 6, Essential Question #3 294 Interconnections © 2011
Triple Venn Diagram

Unit 6, Essential Question #3 295 Interconnections © 2011
Future Wheel
+
Conflict
+
+
__ __
+ __
__
+ +
__
__ +
+
__
+ __
__
+ +
__ __
+
+
__ __
__
+

Unit 6, Essential Question #3 296 Interconnections © 2011

6th Grade Unit 6: Change: Revolution and the Modern World
Science & Social Studies Interconnections: A Thematic Approach 297
Essential Question #4: What are the possible solutions to the global issues
we face today?
Lessons: • Into the Future: Global Solutions
Core Standards Social Studies Science Standard IV
o 2a investigate pressing issues facing the world today (examples may include: environmental, pollution, political turmoil, hunger, poverty, genocide, famine, natural, disasters, child labor)
o 2b identify potential solutions to pressing issues o 2c identify individuals and groups making positive changes in the world
today and support these choices with evidence

6th Grade Unit 6: Change: Revolution and the Modern World
Science & Social Studies Interconnections: A Thematic Approach 298

Unit 6, Essential Question #4 299 Interconnections © 2011
6th Grade Unit 6: Change: Revolution and the Modern World
Essential Question #4:What are the possible solutions to the
global issues we face today? Lesson Title: Into the Future: Global Solutions SS Standard IV, Objective 2 Implementation Time: 45 minutes Media Resources Needed: eMedia video Clear and Present Danger, Terrorism; Kids Guide to Social Action by Barbara Lewis, Mercedes and the Chocolate Pilot by Margot Raven, problem/solution chart, Nystrom Atlas of World History Materials Needed: chocolate kisses, ABC Brainstorm on a large post-it, “Problem-Solution Chart”; “Paired Comparison Chart”, newspapers, news magazines. Procedure: Students will brainstorm problems that face our world today and will come up with solutions. 1. Place a dish of chocolate kisses on each table and tell students you will be reading a true story that took place after WWII. One man found a solution to a very difficult problem.
2. Tell students to listen for the problems and solutions in the story as you read it aloud (students should refrain from eating the chocolate until instructed to do so).
3. Read Mercedes and the Chocolate Pilot to the class and ask them to identify the problem. How did one man contribute to the solution? Discuss the effectiveness of his solution and allow students to eat the kisses as you read the historical context from the book.
4. Ask students how this problem was solved. Explain how the Berlin Wall came in down in 1989 and the Cold War ended.
5. Have students turn to the page titled International Challenges Today in their atlas to gain insight into the problems facing today’s world.
6. Make a large “ABC Brainstorm” chart or just make it on the board with whiteboard markers by writing the letters of the alphabet and leaving space around each letter for students to write. Tell students to think of problems they see in their community, city, state, nation and the world (tell them to think about the news). When students think of

Unit 6, Essential Question #4 300 Interconnections © 2011
a problem that begins with one of the letters of the alphabet, instruct them to come up and write it on the board next to that letter. Example: They may think of pollution and will write it next to the P on the chart. Encourage students to brainstorm an authentic problem for as many letters as possible. Some letters may have multiple problems.
7. Discuss students’ responses on the chart and ask the class if they have any comments or questions about what was written.
8. Ask students to decide which of the problems are the most global and need the most attention; circle them as the students respond.
9. Place students in pairs and assign one of the problems to each pair; if you allow them to choose, make sure each pair has a different problem.
10. Hand out the “Problem-Solution Chart” and instruct students on how to complete the graphic organizer. Model this for the students with one of the unassigned problems. Have newspapers and various current news magazines available for students to look through for further information.
11. When students complete their part, have them get up and meet with another pair to share their row, continue to allow them to move from pair to pair until they have all rows complete. Students will have to find other pairs that have rows in the three areas.
12. Have students look at the Kids Guide to Social Action and review the steps to how they can make a difference.
13. Have each student choose one of the problems and work on the solution in more detail on their own. Instruct them on how to identify and write a letter to the appropriate government representative. Have students write the letter, edit and mail it to the correct address.
Assessment: Distribute the “Paired Comparison Chart” and have students list the problems in the same order on top as on the side. Students must decide which of the problems are the most serious and have the most impact on our world. This is done by comparing one on top with the one on the side and placing the number of the one they choose in the square. This is done all the way across for each until they have compared every one. Add up the numbers to see which one they chose most often. Have them write a paragraph on why this problem is the most serious and has the most impact today. Extension: Show students the emedia video on terrorism and have students take different sides on the issue of how to solve this problem. Hold a debate.

Unit 6, Essential Question #4 301 Interconnections © 2011
Problem-Solution Chart *As you gather information, write down the problems (first column) and a description of how the problem impacts our world today (second column). In the third column, write the things that get in the way of solving this problem or what the catalyst is for this problem. In the fourth column, write your idea for how to solve this problem. Finally, in the last column write how this problem impacts you personally.
Type of Problem
Problem Description
Barriers or Constraints
Solution
Personal Impact
Social
Political
Economic

Unit 6, Essential Question #4 302 Interconnections © 2011
Paired Comparison Chart Determine which of the global problems from your chart have the most impact on society today.
1.
2. 3. 4. 5. 6. 7. 8. 9. 10.
1.
2.
3.
4.
5.
6.
7.
8.
9.
10.
1. ____, 2.____, 3.____, 4.____, 5.____, 6. ____, 7.____, 8.____, 9._____, 10._____

6th Grade Unit 6: Change: Revolution and the Modern World
Science & Social Studies Interconnections: A Thematic Approach 303
Essential Question #5:
What rights and responsibilities do we have in today’s world?
Lessons: • Rights, Respect and Responsibility in a Global World
Core Standards Social Studies Science Standard IV
o 3a identify rights considered essential for all humans (examples may include: health care, education, safety, freedom from fear, freedom of expression)
o 3b propose steps individual students can take to protect these rights (examples may include: support for sister schools, energy and resource conservation, letter writing, career choices, fundraising efforts)

6th Grade Unit 6: Change: Revolution and the Modern World
Science & Social Studies Interconnections: A Thematic Approach 304

Unit 6, Essential Question #5 305 Interconnections © 2011
6th Grade Unit 6: Change: Revolution and the Modern World
Essential Question #5: What rights and responsibilities do we
have in today’s world? Lesson Title: Rights, Respect and Responsibility in a Global World SS Standard IV, Objective 3 Implementation Time: two 60-minute sessions Media Resources Needed: computers and Internet; LCD projector; Terrible Things by Eve Bunting; Project Citizen booklets from the Center for Civic Education Materials Needed: “Document #4” from this lesson copied and cut into the four pictures and paper-clipped together (1 set per group), current newspapers, news magazines, and other resource books related to current world issues; quotes by Rev. Martin Niemoller, and Margaret Mead (to be projected); Big Six research materials; copy of the four documents included in this lesson; list of projects in various formats; templates for citing sources in a bibliography; Timeline Folder Procedure: Against the backdrop of the modern world, students will formulate their opinions regarding the civic responsibilities humans have to one another. They will use all information and materials from this unit to conduct research on current world issues in order to formulate and present their opinion. 1. Activate students’ background knowledge of the 20th century conflicts that have been previously discussed in class; ask them to think about the violations of human rights in these world conflicts. Ask for ideas on what they have learned. Informally assess whether or not students come up with the Holocaust during WWII. If not, you may need to briefly discuss/review. Add appropriate events and dates to Timeline Folder (which should now be complete).
2. Instruct students to listen to the story Terrible Things by Eve Bunting. As they listen to you read the story, have students list examples of the animals’ rights that are being violated. Tell them to think about what rights are lost as the “terrible things” come to take each animal. Read the story out loud.
3. Stop after each animal is taken and ask: Why was that animal was taken?
4. After you finish the story, have student share their list as you write the violations on the board. You may have to prod students to think beyond the obvious: capture, will

Unit 6, Essential Question #5 306 Interconnections © 2011
they be fed, given their proper, habitat, etc. Ask students to infer what they think the terrible things did to them once they were captured.
5. Project the quote from Rev. Martin Niemoller and read it to the students, explaining that Terrible Things is an allegory about the Holocaust in Germany during WWII. Give students just a brief overview of what took place. Ask: Why do you think this was allowed to go on in Germany prior to the outbreak of World War II? What responsibility did the citizens of the world have to those being persecuted? What would you have done if you lived during that time period and found out about the violation of human rights? Where have you seen such things happen in the news recently?
6. Make copies of the documents included in this lesson and distribute “Document #1” to half your students (this might go to your lower level readers). Distribute “Document #2” to the other half of the room. Ask students to analyze the picture or read the document and make a list of the human rights they see in each of the documents. Have them stand and choose someone from the other side of the room with a different document and meet with that person to share their lists.
7. Give each pair a copy of “Document #3” and read this together as a class. Ask them what the Four Freedoms are and have them highlight or circle them if they are on their list. Ask the class if they believe every human in the world should have the right to these four freedoms? Why or why not? Discuss.
8. Have students choose one other pair to work with so that you have cooperative groups of 4 students each. Give each group the four paintings that you prepared prior to class (“Document #4” cut into four pictures, paper clipped together). Ask them to place the paintings in sequence as a group showing a ranking of the four freedoms according to what they think are the most important to the least important.
9. Instruct students to write an explanation of why they ranked the pictures the way they did. They must choose a spokesperson to share the ranking and statement.
10. After each group presents their statement, ask students if there is a freedom left out that should be added today. Example: Freedom to breathe (environmental).
11. Place the Margaret Mead quote on the board and ask student to discuss the meaning of the quote and how it addresses the essential question.
12. Explain the process of the Big Six Research strategy - you may want ask your media center coordinator to conduct training for your students prior to this lesson.

Unit 6, Essential Question #5 307 Interconnections © 2011
Assessment: Instruct students to choose one of the human rights from the list created by the class during the four freedoms learning activity. Go through the Big Six steps and tell students their task is to formulate an opinion regarding the civic responsibilities they have to one another to help secure the human right they chose to research and present. They will need to search for where this right is being violated and look at what has been done and what still needs to be done. They will present their research and opinion in a format of their choice. Allow them some time to brainstorm ways to present this to the class. They will need some time in class to research. Students may interview adults about the issue and watch the news and read newspapers while they are working on this assessment. You might give two weeks to work at home after they get started with the research in the classroom. Assign a due date and plan a 45 minute time period for presentations. You may choose to assign this as a group or individual assessment. Extension: Extend this lesson into a service learning activity by connecting it to students’ immediate community. Have them choose one of the presentations that seem realistic and have them brainstorm ideas and use the Kids Guide from the previous lesson to plan the steps for completing a project. Motivated/accelerated students might participate in Project Citizen and enter their project in the state competition.

Unit 6, Essential Question #5 308 Interconnections © 2011
Document #1 The Atlantic Charter
The President of the United States of America and the Prime Minister,
Mr. Churchill,
Representing His Majesty's Government in the United Kingdom, being met together, deem it right to make known certain common principles in the national policies of their respective countries on which they base their hopes for a better future for the world. First, their countries seek no aggrandizement, territorial or other; Second, they desire to see no territorial changes that do not accord with the freely expressed wishes of the peoples concerned; Third, they respect the right of all peoples to choose the form of government under which they will live; and they wish to see sovereign rights and self government restored to those who have been forcibly deprived of them; Fourth, they will endeavor, with due respect for their existing obligations, to further the enjoyment by all States, great or small, victor or vanquished, of access, on equal terms, to the trade and to the raw materials of the world which are needed for their economic prosperity; Fifth, they desire to bring about the fullest collaboration between all nations in the economic field with the object of securing, for all, improved labor standards, economic advancement and social security; Sixth, after the final destruction of the Nazi tyranny, they hope to see established a peace which will afford to all nations the means of dwelling in safety within their own boundaries, and which will afford assurance that all the men in all the lands may live out their lives in freedom from fear and want; Seventh, such a peace should enable all men to traverse the high seas and oceans without hindrance; Eighth, they believe that all of the nations of the world, for realistic as well as spiritual reasons must come to the abandonment of the use of force. Since no future peace can be maintained if land, sea or air armaments continue to be employed by nations which threaten, or may threaten, aggression outside of their frontiers, they believe, pending the establishment of a wider and permanent system of general security, that the disarmament of such nations is essential. They will likewise aid and encourage all other practicable measures which will lighten for peace-loving peoples the crushing burden of armaments. Signed by: Franklin D. Roosevelt & Winston S. Churchill

Unit 6, Essential Question #5 309 Interconnections © 2011
“In Germany they came first for
the Communists and I didn’t speak up because
I wasn’t a Communist. Then they came for the Jews and
I didn’t speak up because I wasn’t a Jew.
Then they came for the trade unionists and
I didn’t speak up because I wasn’t a trade unionist.
Then they came for the Catholics and I didn’t speak up because
I was a Protestant. Then they came for me-and by that time no one was left to speak up.”
-Rev. Martin Niemoller
(1945)

Unit 6, Essential Question #5 310 Interconnections © 2011
Never doubt that a small group of
thoughtful, committed citizens
can change the world: indeed, it is the only thing that
ever does.
Margaret Mead

Unit 6, Essential Question #5 311 Interconnections © 2011
Document #2

Unit 6, Essential Question #5 312 Interconnections © 2011
Document #3 Franklin D. Roosevelt’s Four Freedoms
In the future days, which we seek to make secure, we look forward to a world founded upon four essential human freedoms.
The first is freedom of speech and expression -- everywhere in the world.
The second is freedom of every person to worship God in his own way -- everywhere in the world.
The third is freedom from want -- which, translated into world terms, means economic understandings which will secure to every nation a healthy peacetime life for its inhabitants -- everywhere in the world.
The fourth is freedom from fear -- which, translated into world terms, means a world-wide reduction of armaments to such a point and in such a thorough fashion that no nation will be in a position to commit an act of physical aggression against any neighbor-- anywhere in the world.
That is no vision of a distant millennium. It is a definite basis for a kind of world attainable in our own time and generation. That kind of world is the very antithesis of the so-called new order of tyranny which the dictators seek to create with the crash of a bomb.
To that new order we oppose the greater conception -- the moral order. A good society is able to face schemes of world domination and foreign revolutions alike without fear.
Since the beginning of our American history, we have been engaged in change -- in a perpetual peaceful revolution -- a revolution which goes on steadily, quietly adjusting itself to changing conditions -- without the concentration camp or the quick-lime in the ditch. The world order which we seek is the cooperation of free countries, working together in a friendly, civilized society.
This nation has placed its destiny in the hands and heads and hearts of its millions of free men and women; and its faith in freedom under the guidance of God. Freedom means the supremacy of human rights everywhere. Our support goes to those who struggle to gain those rights or keep them. Our strength is our unity of purpose.
To that high concept there can be no end save victory.

Unit 6, Essential Question #5 313 Interconnections © 2011
Document #4
http://www.archives.gov

Unit 6, Essential Question #5 314 Interconnections © 2011
The Big Six Research Steps
1. Task Definition: a. Choose a human right from the list. b. Formulate an opinion regarding the civic responsibilities we have to one
another in order for this human right to be secured around the world. 2. Information Seeking Strategies:
a. Fill out Research Source Worksheet. b. Evaluate these sources to determine their accuracy.
3. Location and Access a. Locate your source. Sate where you found it. b. Find information in the source by using the table of contents, index and
web searches. 4. Use of Information
a. Read, hear and/or view the information in a source. b. Use a graphic organizer, Cornell Notes or index cards to record and
synthesis your information. 5. Synthesis:
a. Organize information from your graphic organizers/index cards or note sheets into your project choice.
b. Present the information. 6. Evaluation:
a. Judge the quality of your synthesis. b. Judge your final project using a rubric that your teacher provides.

Unit 6, Essential Question #5 315 Interconnections © 2011
Research Skills Source Worksheet Directions: Using the reference sources indicated, find your topic and copy the entry completely. If there is no entry for your topic, write NA.
Source Title (Edition)
Location (Page, volume,
Author/publisher, web address)
Synthesis Component
Dictionary
Encyclopedia Index Entry
Library Books
Children’s Magazine Guide Entry
Almanac
Atlas
CD Rom
Internet
Video/Movie
Newspaper
Interview

Unit 6, Essential Question #5 316 Interconnections © 2011