4493853 roomba 800series manual 2015 en - qvc®roomba 800 series owner’s guide 3 en roomba is...
TRANSCRIPT
Roomba® 800b ® 800
Owner’s Guide

Roomba® 800 Series Owner’s Guide 1
EN
Table of ContentsGetting Started ................................................................................................................................................................2
Robot Anatomy .................................................................................................................................................................4
Using Your Roomba .......................................................................................................................................................6
Scheduling ...........................................................................................................................................................................7
Accessories .........................................................................................................................................................................8
Robot Care ....................................................................................................................................................................... 11
Troubleshooting ............................................................................................................................................................ 15
Important Safety and Compliance Information ................................................................................... 18
EN
2 For Customer Care go to irobot.com/support
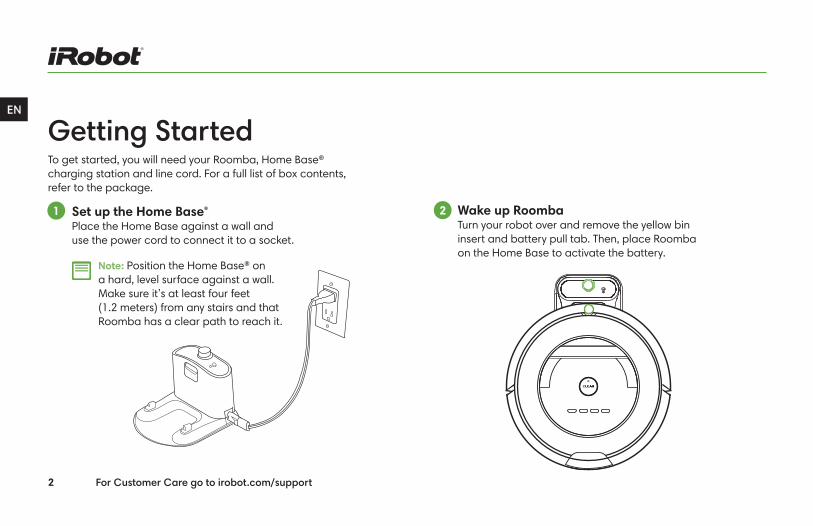
To get started, you will need your Roomba, Home Base® charging station and line cord. For a full list of box contents, refer to the package.
Getting Started
Set up the Home Base® Place the Home Base against a wall and use the power cord to connect it to a socket.
1 Wake up Roomba Turn your robot over and remove the yellow bin insert and battery pull tab. Then, place Roomba on the Home Base to activate the battery.
2
Note: Position the Home Base® on a hard, level surface against a wall. Make sure it’s at least four feet (1.2 meters) from any stairs and that Roomba has a clear path to reach it.
Roomba® 800 Series Owner’s Guide 3
EN
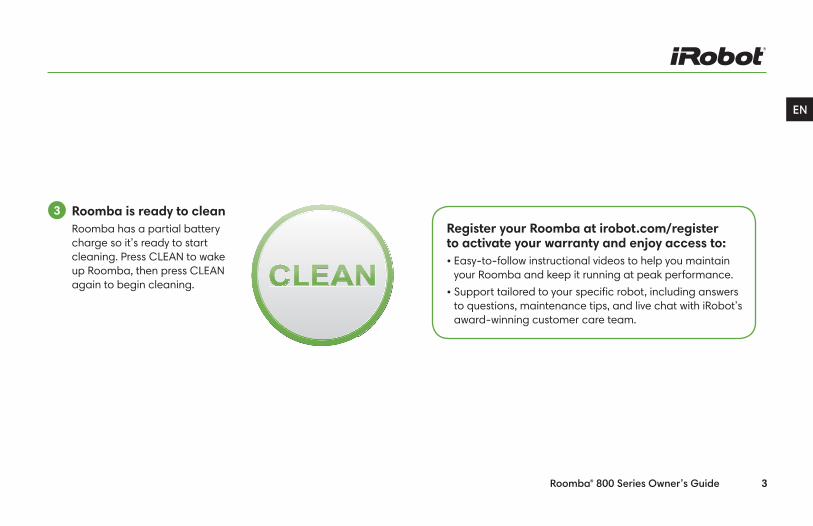
Roomba is ready to cleanRoomba has a partial battery charge so it’s ready to start cleaning. Press CLEAN to wake up Roomba, then press CLEAN again to begin cleaning.
3Register your Roomba at irobot.com/register to activate your warranty and enjoy access to:• Easy-to-follow instructional videos to help you maintain
your Roomba and keep it running at peak performance.• Support tailored to your specific robot, including answers
to questions, maintenance tips, and live chat with iRobot’s award-winning customer care team.
EN
4 For Customer Care go to irobot.com/support
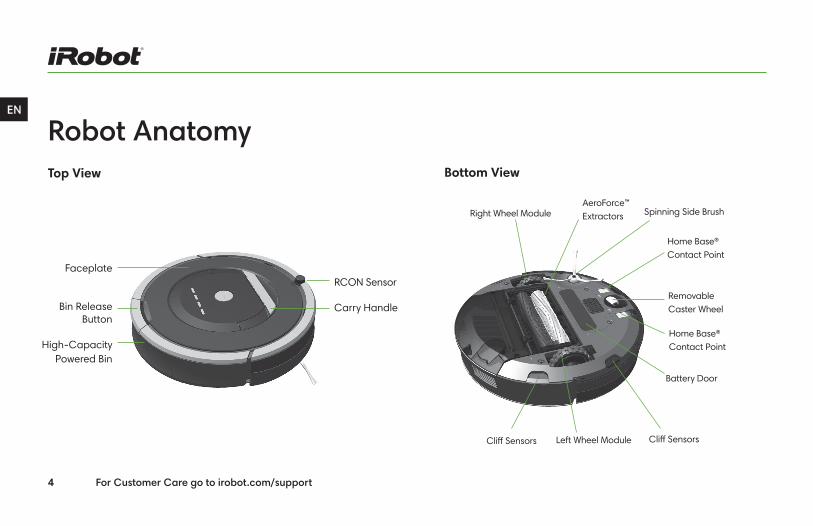
Faceplate
Bin Release Button
High-Capacity Powered Bin
RCON Sensor
Carry Handle
Right Wheel Module
Cliff Sensors
Home Base®Contact Point
Removable Caster Wheel
Battery Door
Home Base® Contact Point
AeroForce™ Extractors Spinning Side Brush
Robot AnatomyBottom ViewTop View
Left Wheel Module Cliff Sensors
Roomba® 800 Series Owner’s Guide 5
EN
Buttons & Lights
Battery Light
Dirt Detect™
Full Bin Light
Anti-Tangle Light
Troubleshooting LightCLEAN/Power Button
HOURCLOCK
MINUTESCHEDULE
OK SPOT
DAYBACK
CLEAN
EN
6 For Customer Care go to irobot.com/support
To wake Roomba, press CLEAN. Press CLEAN again to begin a cleaning cycle.• To pause Roomba during a cycle, press CLEAN.
» To resume the cleaning cycle, press CLEAN again. » To send Roomba back to the Home Base, press DOCK.
• To use spot cleaning, place Roomba on top of the localised debris and press SPOT on the robot.
Note: Your Roomba can be set to 16 different languages. For more information visit global.irobot.com.
Note: Indicator lights will turn off after 60 seconds to conserve energy while Roomba is charging. Check status of the battery by pressing the CLEAN button.
Using Your Roomba
Tips for Optimising Performance• Store Roomba on the Home Base so it’s always charged
and ready to clean when you need it.• Remove excess clutter from the floors before cleaning (e.g.
clothing, toys, etc.), and use a Virtual Wall® device (optional accessory) to keep Roomba cleaning where you want it and out of the areas you don’t.
• Empty the bin, clean the filter, and charge the battery after each use.
• Use Roomba daily to maintain well-conditioned floors.
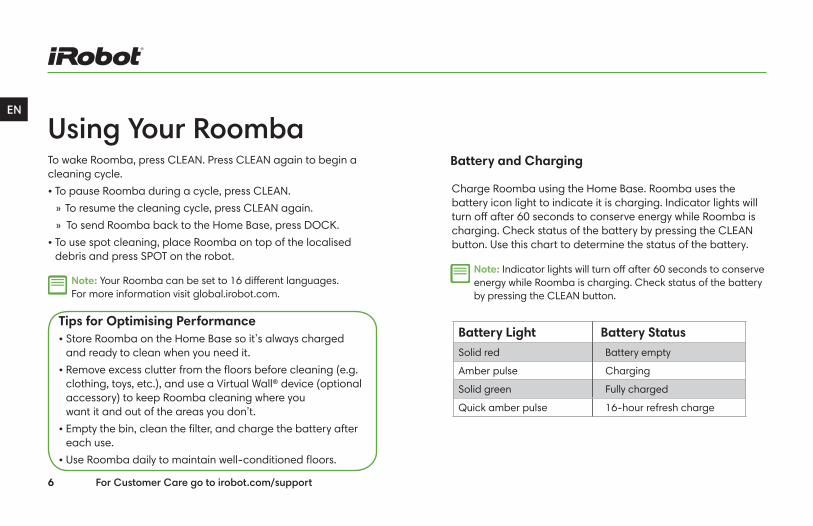
Charge Roomba using the Home Base. Roomba uses the battery icon light to indicate it is charging. Indicator lights will turn off after 60 seconds to conserve energy while Roomba is charging. Check status of the battery by pressing the CLEAN button. Use this chart to determine the status of the battery.
Battery and Charging
Battery Light Battery StatusSolid red Battery empty
Amber pulse Charging
Solid green Fully charged
Quick amber pulse 16-hour refresh charge
Roomba® 800 Series Owner’s Guide 7
EN
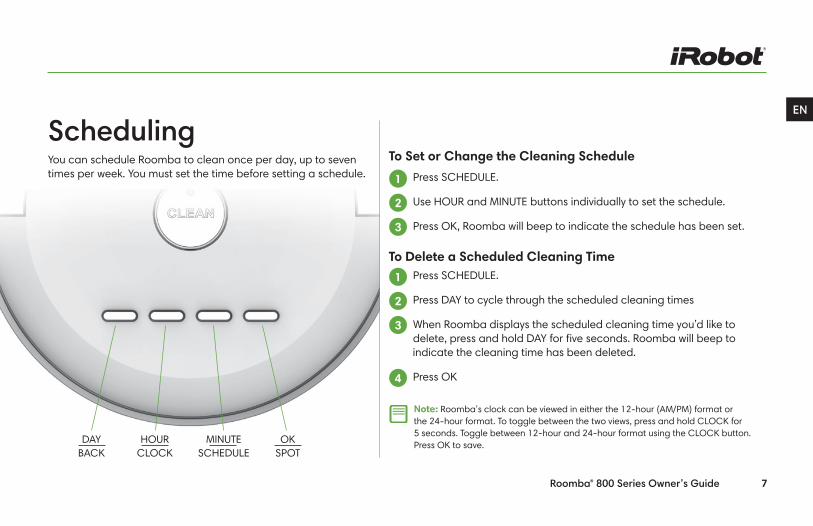
You can schedule Roomba to clean once per day, up to seven times per week. You must set the time before setting a schedule.
SchedulingTo Set or Change the Cleaning Schedule
To Delete a Scheduled Cleaning TimePress SCHEDULE.
Press DAY to cycle through the scheduled cleaning times
When Roomba displays the scheduled cleaning time you’d like to delete, press and hold DAY for five seconds. Roomba will beep to indicate the cleaning time has been deleted.
Press OK
DAYBACK
HOURCLOCK
OKSPOT
MINUTESCHEDULE
Note: Roomba’s clock can be viewed in either the 12-hour (AM/PM) format or the 24-hour format. To toggle between the two views, press and hold CLOCK for 5 seconds. Toggle between 12-hour and 24-hour format using the CLOCK button. Press OK to save.
1
1
2
2
3
3
4
Press SCHEDULE.
Use HOUR and MINUTE buttons individually to set the schedule.
Press OK, Roomba will beep to indicate the schedule has been set.
EN
8 For Customer Care go to irobot.com/support
Accessories
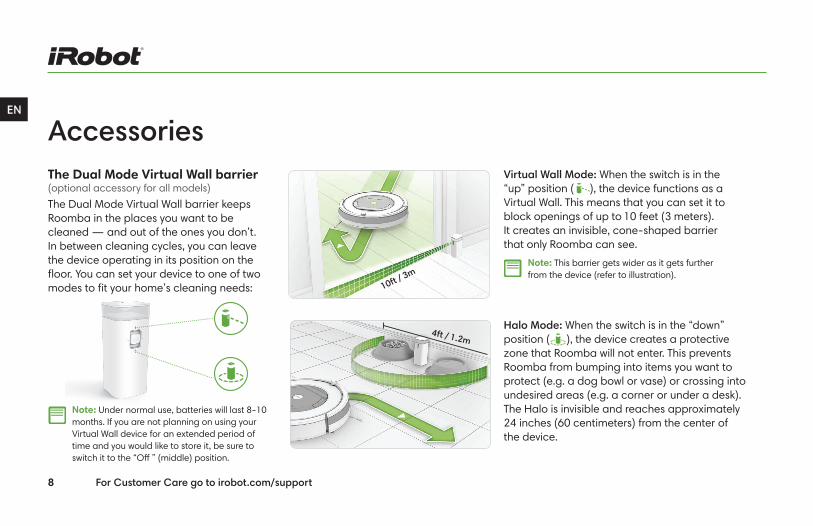
The Dual Mode Virtual Wall barrier keeps Roomba in the places you want to be cleaned — and out of the ones you don’t.In between cleaning cycles, you can leave the device operating in its position on the fl oor. You can set your device to one of two modes to fi t your home’s cleaning needs:
Virtual Wall Mode: When the switch is in the “up” position ( ), the device functions as a Virtual Wall. This means that you can set it to block openings of up to 10 feet (3 meters). It creates an invisible, cone-shaped barrier that only Roomba can see.
Note: This barrier gets wider as it gets further from the device (refer to illustration).
Note: Under normal use, batteries will last 8-10 months. If you are not planning on using your Virtual Wall device for an extended period of time and you would like to store it, be sure to switch it to the “Off ” (middle) position.
Halo Mode: When the switch is in the “down” position ( ), the device creates a protective zone that Roomba will not enter. This prevents Roomba from bumping into items you want to protect (e.g. a dog bowl or vase) or crossing into undesired areas (e.g. a corner or under a desk). The Halo is invisible and reaches approximately 24 inches (60 centimeters) from the center of the device.
The Dual Mode Virtual Wall barrier (optional accessory for all models)
10ft / 3m
4ft / 1.2m

Roomba® 800 Series Owner’s Guide 9
EN
The Virtual Wall Lighthouse can act as both a Lighthouse and a Virtual Wall. Simply use the Mode Selector to make your choice. The device turns on and off automatically as you turn Roomba on and off. When on, the light on top is lit. A flashing power light means the batteries need replacing soon.
Virtual Wall Mode: When the switch is in the “Virtual Wall” position, the device functions as a Virtual Wall. This means that you can set it to block openings of up to 8 feet (2.4 meters). It creates an invisible, cone-shaped barrier that only Roomba can see.
Note: This barrier gets wider as it gets further from the device (refer to illustration).
Lighthouse Mode: When switch is in “Lighthouse” mode, the device allows Roomba to efficiently clean multiple rooms before returning to Home Base. Place a Lighthouse in the doorway with logo facing forward, when Roomba has completed the first room, the Lighthouse will help it navigate to the next. You can use Lighthouse devices and Virtual Wall barriers at the same time. However, please avoid placing them too close to each other, to the Home Base, or to furniture that could block the invisible beams.
The Virtual Wall Lighthouse (optional accessory for select models)
8ft / 2.4m

EN
10 For Customer Care go to irobot.com/support
The Remote Control lets you conveniently control Roomba’s functions. You can use it to turn Roomba on and off and steer it around your room without bending down. It also gives you remote access to these commands:
Directional Buttons
SPOT Button
CLEAN / Power Button
DOCK Button
Important: The remote control, Virtual Wall®, Lighthouse™ and Home Base® operate using an invisible infrared beam. If they are all used in the same area, Roomba may see multiple infrared signals and will not operate. The remote WILL NOT work when Roomba is near a Virtual Wall.
Note: Make sure there is a direct line of sight from the remote control to Roomba and that the remote is pointed at Roomba.
Remote Control (optional accessory for all models)
Roomba® 800 Series Owner’s Guide 11
EN
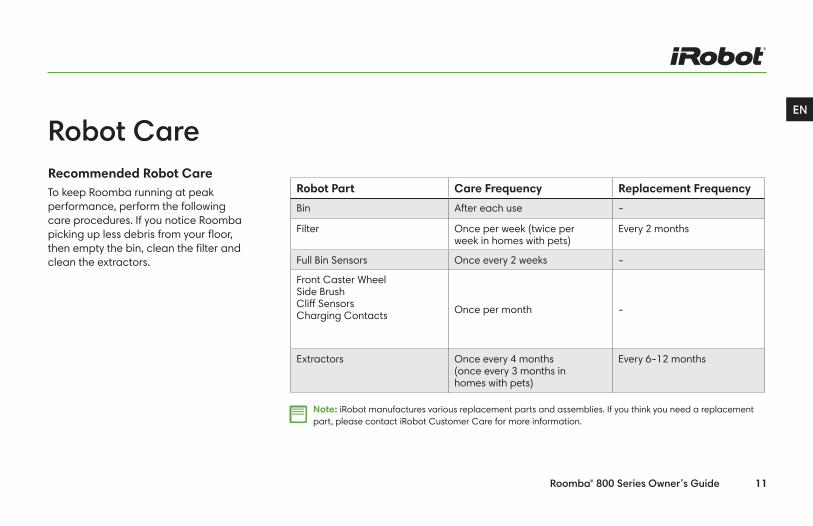
To keep Roomba running at peak performance, perform the following care procedures. If you notice Roomba picking up less debris from your floor, then empty the bin, clean the filter and clean the extractors.
Robot Part Care Frequency Replacement Frequency
Bin After each use -
Filter Once per week (twice per week in homes with pets)
Every 2 months
Full Bin Sensors Once every 2 weeks -
Front Caster Wheel Side Brush Cliff Sensors Charging Contacts Once per month -
Extractors Once every 4 months (once every 3 months in homes with pets)
Every 6-12 months
Note: iRobot manufactures various replacement parts and assemblies. If you think you need a replacement part, please contact iRobot Customer Care for more information.
Recommended Robot Care
Robot Care
EN
12 For Customer Care go to irobot.com/support
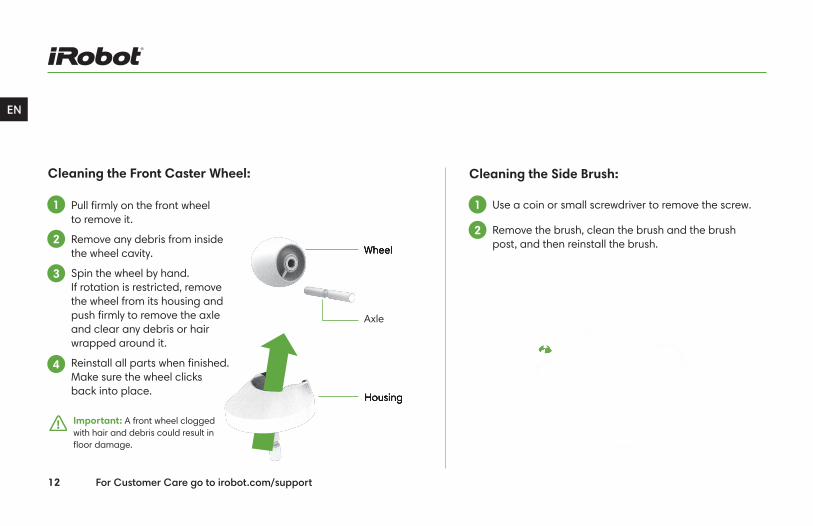
Cleaning the Front Caster Wheel:
Wheel
Axle
Housing
Wheel
Housing
Pull fi rmly on the front wheel to remove it.
Remove any debris from inside the wheel cavity.
Spin the wheel by hand. If rotation is restricted, remove the wheel from its housing and push fi rmly to remove the axle and clear any debris or hair wrapped around it.
Reinstall all parts when fi nished. Make sure the wheel clicks back into place.
1
2
4
3
Use a coin or small screwdriver to remove the screw.
Remove the brush, clean the brush and the brush post, and then reinstall the brush.
1
2
Cleaning the Side Brush:
Important: A front wheel clogged with hair and debris could result in fl oor damage.
Roomba® 800 Series Owner’s Guide 13
EN
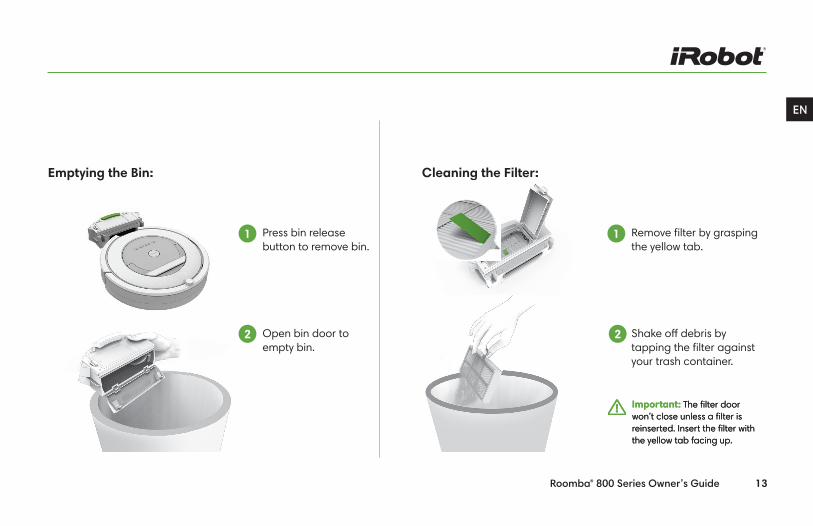
Emptying the Bin: Cleaning the Filter:
Shake off debris by tapping the fi lter against your trash container.
2Open bin door to empty bin.
2
Important: The fi lter door won’t close unless a fi lter is reinserted. Insert the fi lter with the yellow tab facing up.
Remove fi lter by grasping the yellow tab.
1Press bin release button to remove bin.
1
Important: The fi lter door won’t close unless a fi lter is reinserted. Insert the fi lter with the yellow tab facing up.
EN
14 For Customer Care go to irobot.com/support
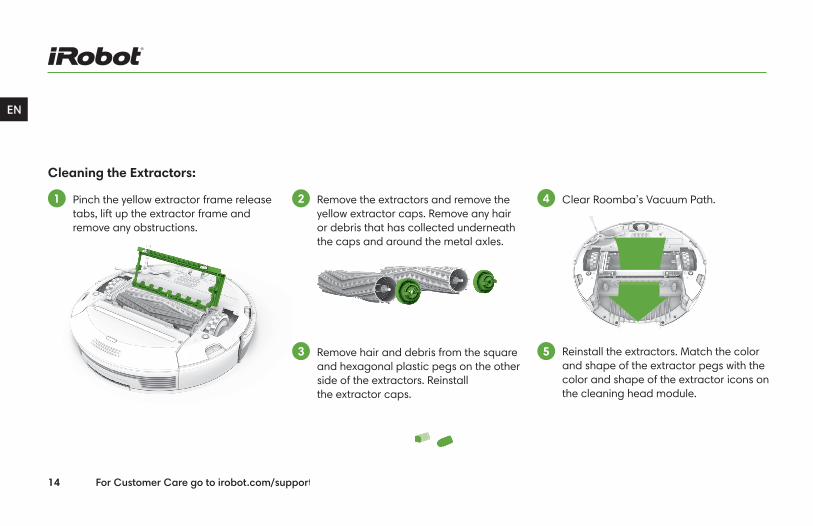
Cleaning the Extractors:
Pinch the yellow extractor frame release tabs, lift up the extractor frame and remove any obstructions.
1 Remove the extractors and remove the yellow extractor caps. Remove any hair or debris that has collected underneath the caps and around the metal axles.
2 Clear Roomba’s Vacuum Path.4
Reinstall the extractors. Match the color and shape of the extractor pegs with the color and shape of the extractor icons on the cleaning head module.
5
For Customer Care go to irobot.com/supportFor Customer Care go to irobot.com/support
Remove hair and debris from the square and hexagonal plastic pegs on the other side of the extractors. Reinstall the extractor caps.
3
Roomba® 800 Series Owner’s Guide 15
EN
Roomba will tell you something is wrong with a two-tone distress sound followed by a spoken message. The troubleshooting indicator ( ) will also blink. Follow the audible instructions. Additional troubleshooting information, along with more detailed support and videos, are available online. If the problem is not resolved, visit www.irobot.com/support.
Repeating Runtime Error MessagesTo repeat Roomba’s error message, press CLEAN. If Roomba is on, press the bumper to repeat the message.
If you have questions or comments about this product, please contact iRobot before contacting a retailer.
iRobot Customer Care Team877.855.8593.
Visit the iRobot home support site at www.irobot.com/support for support tips, frequently asked questions, and information about accessories and other iRobot products.
For best results, only use the iRobot Lithium Ion Battery that comes with Roomba. While Roomba will operate with older-model batteries, its performance will be limited.
Lithium Ion BatteryImportant: Lithium ion batteries and products that contain lithium ion batteries are subject to stringent transportation regulations. If you need to ship this product (with the battery included) for service, travel or any other reason, you MUST comply with the following shipping instructions:
Troubleshooting
Important: To reset Roomba’s software, hold down the CLEAN button for 10 seconds. This will clear all scheduled cleaning times, reset the clock and resolve some software issues.
» Remove the lithium ion battery from the product » Place a piece of tape over the battery’s metal charging contacts » Reinstall the battery (with the tape on it) in the product and secure
the battery door » Package the product in its original packaging or in your own
packaging that prevents any movement during transportation » Ship via ground transportation only (no air shipping)

EN
16 For Customer Care go to irobot.com/support
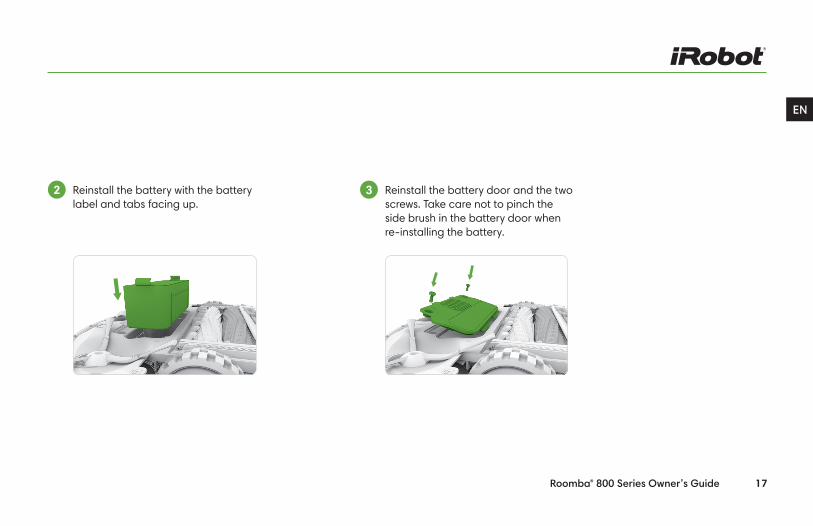
Battery RemovalFollow these instructions to remove and reinstall Roomba’s battery:
Unscrew the two screws on the battery door, then remove the door and battery. 1
Roomba® 800 Series Owner’s Guide 17
EN
Reinstall the battery door and the two screws. Take care not to pinch the side brush in the battery door when re-installing the battery.
3 Reinstall the battery with the battery label and tabs facing up.
2
EN
18 For Customer Care go to irobot.com/support
Important Safety and Compliance Information
THIS APPLIANCE CAN BE USED BY CHILDREN AGED FROM 8 YEARS AND ABOVE AND PEOPLE WITH REDUCED PHYSICAL, SENSORY OR MENTAL CAPABILITIES OR LACK OF EXPERIENCE AND KNOWLEDGE IF THEY HAVE BEEN GIVEN SUPERVISION OR INSTRUCTION CONCERNING THE USE OF THE APPLIANCE IN A SAFE WAY AND UNDERSTAND THE HAZARDS INVOLVED. CHILDREN MUST NOT PLAY WITH THE APPLIANCE. CLEANING AND USER MAINTENANCE MUST NOT BE CARRIED OUT BY CHILDREN WITHOUT SUPERVISION.
CAUTION: DO NOT EXPOSE THE ELECTRONICS OF YOUR ROBOT, ITS BATTERY OR THE INTEGRATED DOCK CHARGER KNOWN AS THE HOME BASE. THERE ARE NO USER-SERVICEABLE PARTS INSIDE. REFER SERVICING TO QUALIFIED SERVICE PERSONNEL. PLEASE ENSURE THAT THE VOLTAGE RATING FOR THE ENCLOSED HOME BASE MATCHES THE STANDARD SOCKET VOLTAGE.

Roomba® 800 Series Owner’s Guide 19
EN
For EU Declaration of Conformity information, visit www.irobot.com/compliance To reduce the risk of injury or damage, keep these safety precautions in mind when setting up, using, and maintaining your robot.
General Safety Instructions• Read all safety and operating instructions before operating your robot.• Retain the safety and operating instructions for future reference.• Heed all warnings on your robot, battery, Home Base®, and in the
owner’s manual.• Follow all operating and use instructions.• Refer all non-routine servicing to iRobot.
The symbol on the product or its packaging indicates: Do not dispose of electrical appliances as unsorted municipal waste, use separate collection facilities. Contact your local authority for information regarding the collection systems available. If electrical appliances are disposed of in landfills or dumps, hazardous substances can leak into the groundwater and get into the food chain, damaging your health and well-being. Please contact your local or regional waste authority for more information on collection, reuse and recycling programs.
EN
20 For Customer Care go to irobot.com/support
Heed all warnings on your robot, battery, Home Base®, and in the owner’s guide.• Your robot is for indoor use only.• Your robot is not a toy. Do not sit or stand on this device.
Small children and pets should be supervised when your robot is in operation.
• Store and operate your robot in room temperature environments only.
• Clean with a cloth dampened with water only. Do not spray or pour liquids on Roomba.
• Do not use this device to pick up anything that is burning or smoking• Do not use this device to pick up spills of bleach, paint, other
chemicals or anything wet.• Before using this device, pick up objects like clothing, loose papers,
pull cords for blinds or curtains, power cords and any fragile objects. If the device passes over a power cord and drags it, there is a chance that an object could be pulled off a table or shelf.
• If the room to be cleaned contains a balcony, a physical barrier should be used to prevent access to the balcony and ensure safe operation.
• This appliance is not intended for use by people (including children) with reduced physical, sensory or mental capabilities, or lack of experience and knowledge, unless they have been given supervision or instruction concerning the use of the appliance by a person responsible for their safety.
• Do not place anything on top of your robot.• Be aware that the robot moves on its own. Take care when walking
in the area that the robot is operating in to avoid stepping on it.• Do not operate the robot in areas with exposed electrical outlets
in the floor.• Your iRobot Roomba comes with a region approved power supply
cord. Do not use any other power supply cord. For replacement cords, please call Customer Care at 1-877-855-8593 to ensure proper selection of country specific power supply cord.
Roomba® 800 Series Owner’s Guide 21
EN
Battery and Charging• Charge using a standard socket only. The product may not be used
with any type of power converter. The use of other power converters will immediately void the warranty.
• Use only the Home Base® supplied by the manufacture to charge this device.• Do not use a Home Base with a damaged cord or plug. If the cord
or plug is damaged, it must be serviced by the manufacturer or similarly qualified people.
• Use only rechargeable battery packs approved by iRobot.• Always charge and remove the battery from your robot and
accessories before long-term storage or transportation.• Charge indoors only.• Your robot’s Home Base may be protected with a surge protector.• Never handle the Home Base with wet hands.• Always disconnect your robot from the Home Base before cleaning
or maintaining it.• Please ensure that the voltage rating for the enclosed Home Base
matches the standard socket voltage.
• Used battery packs should be placed in a sealed plastic bag and disposed of safely in accordance with local environmental regulations.
• In the event that a battery is leaking, do not allow the liquid to come in contact with the skin or eyes. If contact has been made, wash the affected area with copious amounts of water and seek medical advice.The battery pack must be removed from the robot before disposal.
• When disposing the battery pack, contact your local or regional waste authority for more information on collection, reuse and recycling programs.• Do not crush or dismantle battery packs. Do not heat or place the
battery pack near any heat source.• Do not incinerate the battery pack. Do not short-circuit the battery
pack.• Do not immerse the battery pack in any liquid.
Roomba Use Restrictions and Safety Information• Use Roomba only in dry environments.• Do not spray or pour liquids on Roomba.
EN
22 For Customer Care go to irobot.com/support

© 2015 iRobot Corporation, 8 Crosby Drive, Bedford, MA 01730. All rights reserved. iRobot, Roomba, iAdapt, Home Base and Virtual Wall are registered trademarks of iRobot Corporation. Dirt Detect is a trademark of iRobot Corporation.
US Patent Numbers www.irobot.com/patents | Other Patents Pending. WC: 4493853