roomba 800 series owner's manual - irobot - wellbots€¦ · roomba 800 series owner’s...
TRANSCRIPT
Roomba 800 Series Owner’s Manual 1
EN
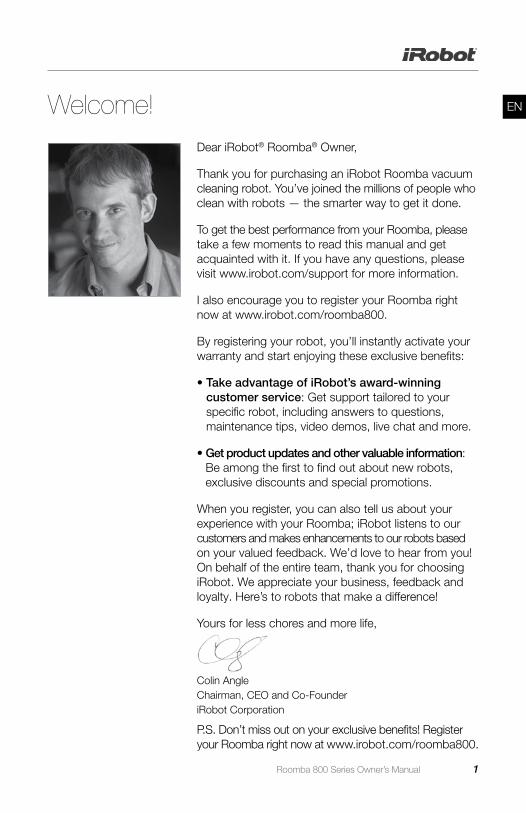
Dear iRobot® Roomba® Owner,
Thank you for purchasing an iRobot Roomba vacuum cleaning robot. You’ve joined the millions of people who clean with robots — the smarter way to get it done.
To get the best performance from your Roomba, please take a few moments to read this manual and get acquainted with it. If you have any questions, please visit www.irobot.com/support for more information.
I also encourage you to register your Roomba right now at www.irobot.com/roomba800.
By registering your robot, you’ll instantly activate your warranty and start enjoying these exclusive benefits:
• Take advantage of iRobot’s award-winning customer service: Get support tailored to your specific robot, including answers to questions, maintenance tips, video demos, live chat and more.
• Get product updates and other valuable information: Be among the first to find out about new robots, exclusive discounts and special promotions.
When you register, you can also tell us about your experience with your Roomba; iRobot listens to our customers and makes enhancements to our robots based on your valued feedback. We’d love to hear from you! On behalf of the entire team, thank you for choosing iRobot. We appreciate your business, feedback and loyalty. Here’s to robots that make a difference!
Yours for less chores and more life,
P.S. Don’t miss out on your exclusive benefits! Register your Roomba right now at www.irobot.com/roomba800.
Colin Angle Chairman, CEO and Co-Founder iRobot Corporation
Welcome!

Roomba 800 Series Owner’s Manual 3
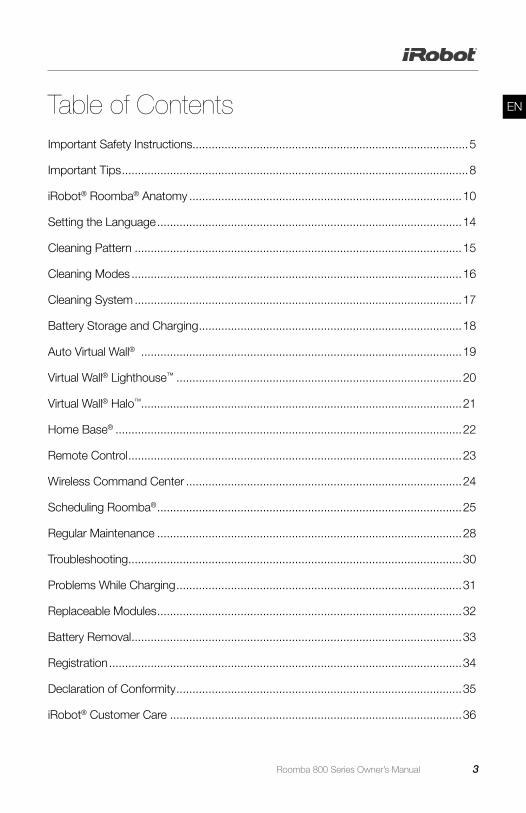
ENTable of ContentsImportant Safety Instructions......................................................................................5
Important Tips ............................................................................................................8
iRobot® Roomba® Anatomy .....................................................................................10
Setting the Language ...............................................................................................14
Cleaning Pattern ......................................................................................................15
Cleaning Modes .......................................................................................................16
Cleaning System ......................................................................................................17
Battery Storage and Charging ..................................................................................18
Auto Virtual Wall® ....................................................................................................19
Virtual Wall® Lighthouse™ .........................................................................................20
Virtual Wall® Halo™....................................................................................................21
Home Base® ............................................................................................................22
Remote Control ........................................................................................................23
Wireless Command Center ......................................................................................24
Scheduling Roomba® ...............................................................................................25
Regular Maintenance ...............................................................................................28
Troubleshooting ........................................................................................................30
Problems While Charging .........................................................................................31
Replaceable Modules ...............................................................................................32
Battery Removal .......................................................................................................33
Registration ..............................................................................................................34
Declaration of Conformity .........................................................................................35
iRobot® Customer Care ...........................................................................................36

Roomba 800 Series Owner’s Manual 5
EN
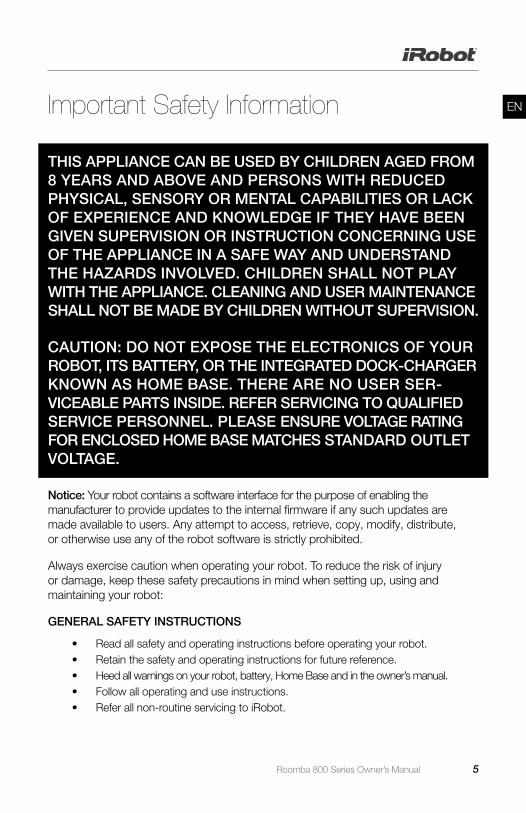
THIS APPLIANCE CAN BE USED BY CHILDREN AGED FROM 8 YEARS AND ABOVE AND PERSONS WITH REDUCED PHYSICAL, SENSORY OR MENTAL CAPABILITIES OR LACK OF EXPERIENCE AND KNOWLEDGE IF THEY HAVE BEEN GIVEN SUPERVISION OR INSTRUCTION CONCERNING USE OF THE APPLIANCE IN A SAFE WAY AND UNDERSTAND THE HAZARDS INVOLVED. CHILDREN SHALL NOT PLAY WITH THE APPLIANCE. CLEANING AND USER MAINTENANCE SHALL NOT BE MADE BY CHILDREN WITHOUT SUPERVISION.
CAUTION: DO NOT EXPOSE THE ELECTRONICS OF YOUR ROBOT, ITS BATTERY, OR THE INTEGRATED DOCK-CHARGER KNOWN AS HOME BASE. THERE ARE NO USER SER-VICEABLE PARTS INSIDE. REFER SERVICING TO QUALIFIED SERVICE PERSONNEL. PLEASE ENSURE VOLTAGE RATING FOR ENCLOSED HOME BASE MATCHES STANDARD OUTLET VOLTAGE.
Important Safety Information
Notice: Your robot contains a software interface for the purpose of enabling the manufacturer to provide updates to the internal firmware if any such updates are made available to users. Any attempt to access, retrieve, copy, modify, distribute, or otherwise use any of the robot software is strictly prohibited.
Always exercise caution when operating your robot. To reduce the risk of injury or damage, keep these safety precautions in mind when setting up, using and maintaining your robot:
GENERAL SAFETY INSTRUCTIONS
• Read all safety and operating instructions before operating your robot. • Retain the safety and operating instructions for future reference. • Heed all warnings on your robot, battery, Home Base and in the owner’s manual.• Follow all operating and use instructions. • Refer all non-routine servicing to iRobot.
6 Roomba 800 Series Owner’s Manual
EN Important Safety InformationThe symbol on the product or its packaging indicates: Do not dispose of electrical appliances as unsorted municipal waste, use separate collection facilities. Contact your local authority for informationregarding the collection systems available. If electrical appliances are disposed of in landfills or dumps, hazardous substances can leak into the groundwater and get into the food chain, damaging your health and well-being. When replacing old appliances with new ones, the retailer is legally obliged to take back your old appliance for disposal at least free of charge.
USE RESTRICTIONS
• Your robot is for indoor use only. • Your robot is not a toy. Do not sit or stand on this device. Small children and
pets should be supervised when your robot is operating.• Store and operate your robot in room temperature environments only. • Clean with a cloth dampened with water only. • Do not use this device to pick up anything that is burning or smoking. • Do not use this device to pick up spills of bleach, paint, or other chemicals,
or anything wet.• Before using this device, pick up objects like clothing, loose papers, pull
cords for blinds or curtains, power cords, and any fragile objects. If the device passes over a power cord and drags it, there is a chance an object could be pulled off a table or shelf.
• If the room to be cleaned contains a balcony, a physical barrier should be used to prevent access to the balcony and ensure safe operation.
• This appliance is not intended for use by persons (including children) with reduced physical, sensory or mental capabilities, or lack of experience and knowledge, unless they have been given supervision or instruction concerning use of the appliance by a person responsible for their safety.
• Children should be supervised to ensure they do not play with the robot. Cleaning and maintenance shall not be performed by children without supervision.
• Do not place anything on top of your robot. • Be aware that the robot moves on its own. Take care when walking in the
area that the robot is operating in to avoid stepping on it.• Do not operate the robot in areas with exposed electrical outlets in the floor.
Roomba 800 Series Owner’s Manual 7
ENImportant Safety InformationBATTERY AND CHARGING
• Charge using a standard outlet only. Product may not be used with any type of power converter. Use of other power converters will immediately void the warranty.
• Use only the Home Base supplied by the manufacturer to charge this device. • Do not use a Home Base with a damaged cord or plug. If the cord
or plug is damaged, it must be serviced by the manufacturer or similarly qualified persons.
• Use only rechargeable battery packs approved by iRobot. • Always charge and remove the battery from your robot and accessories
before long-term storage or transportation.• Charge indoors only. • Your robot’s Home Base may be protected with a surge protector in the
event of severe electrical storms.• Never handle the Home Base with wet hands.• Always disconnect your robot from the Home Base before cleaning
or maintaining it.• Please ensure voltage rating for enclosed Home Base matches standard
outlet voltage.• Used battery packs should be placed in a sealed plastic bag and disposed
of safely according to local environmental regulations.• Before every use, check the battery pack for any sign of damage or leakage.
Do not charge damaged or leaking battery packs. • If the battery pack is leaking, return it to your local authorized iRobot Service
Center for disposal.• The battery pack must be removed from the robot before disposal.• Only use original battery packs with the correct specification and supplied
by iRobot.• Do not crush or dismantle battery packs. Do not heat or place the battery
pack near any heat source.• Do not incinerate the battery pack. Do not short-circuit the battery pack.
Do not immerse the battery pack in any liquid. ROOMBA® USE RESTRICTIONS AND SAFETY INFORMATION
• Use Roomba only in dry environments. • Do not spray or pour liquids on Roomba.
8 Roomba 800 Series Owner’s Manual
EN Important Tips
Turning Roomba on and off
• To turn Roomba on, press CLEAN once. You will hear a beep, and the CLEAN button will light up.
• To start a cleaning cycle, press CLEAN again. Roomba will start a cleaning cycle.• To pause Roomba, press CLEAN while Roomba is cleaning.• To resume the cleaning cycle, press CLEAN again.• To turn Roomba off, press and hold CLEAN until Roomba’s lights turn off.
For Best Performance
• Empty Roomba’s bin and clean its filter after every use.• Use an Auto Virtual Wall® or Virtual Wall Lighthouse™ (optional accessories) to
keep Roomba cleaning where you want it.• Wipe all sensors with a clean, dry, soft cloth every week. • Use Roomba frequently.
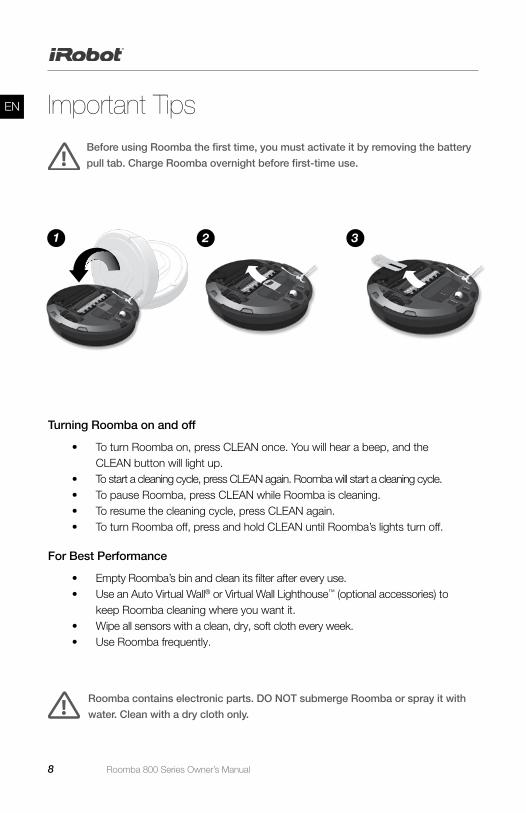
Before using Roomba the first time, you must activate it by removing the battery
pull tab. Charge Roomba overnight before first-time use.
Roomba contains electronic parts. DO NOT submerge Roomba or spray it with
water. Clean with a dry cloth only.
31 2
Roomba 800 Series Owner’s Manual 9
EN
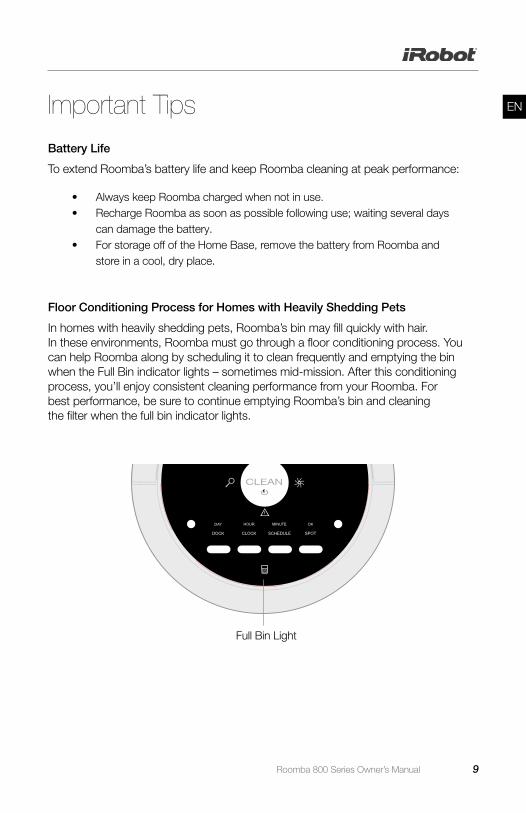
Full Bin Light
CLEAN
Important Tips
Battery Life
To extend Roomba’s battery life and keep Roomba cleaning at peak performance:
• Always keep Roomba charged when not in use.• Recharge Roomba as soon as possible following use; waiting several days
can damage the battery.• For storage off of the Home Base, remove the battery from Roomba and
store in a cool, dry place.
Floor Conditioning Process for Homes with Heavily Shedding Pets
In homes with heavily shedding pets, Roomba’s bin may fill quickly with hair. In these environments, Roomba must go through a floor conditioning process. You can help Roomba along by scheduling it to clean frequently and emptying the bin when the Full Bin indicator lights – sometimes mid-mission. After this conditioning process, you’ll enjoy consistent cleaning performance from your Roomba. For best performance, be sure to continue emptying Roomba’s bin and cleaning the filter when the full bin indicator lights.
10 Roomba 800 Series Owner’s Manual
EN
Battery Light
Dirt Detect™
CLEAN/ Power Button
Top View
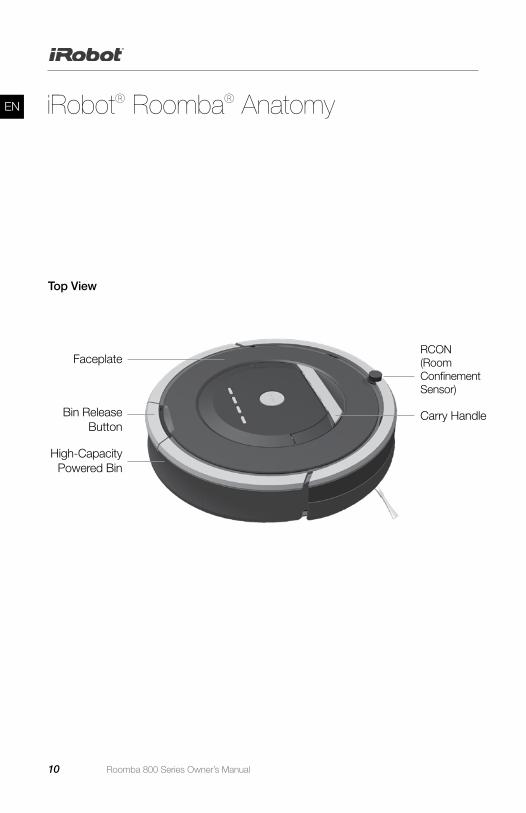
iRobot® Roomba® Anatomy
Faceplate
Bin Release Button
High-Capacity Powered Bin
RCON (Room Confinement Sensor)
Carry Handle
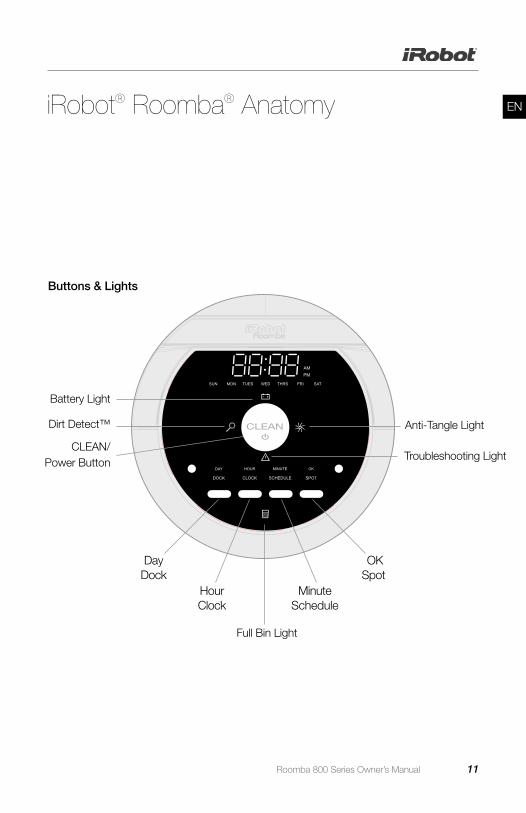
Roomba 800 Series Owner’s Manual 11
ENiRobot® Roomba® Anatomy
Buttons & Lights
Battery Light
Dirt Detect™
CLEAN/ Power Button
Hour Clock
Full Bin Light
Anti-Tangle Light
Troubleshooting Light
Day Dock
Minute Schedule
OK Spot
RCON (Room Confinement Sensor)
Carry HandleCLEAN
12 Roomba 800 Series Owner’s Manual
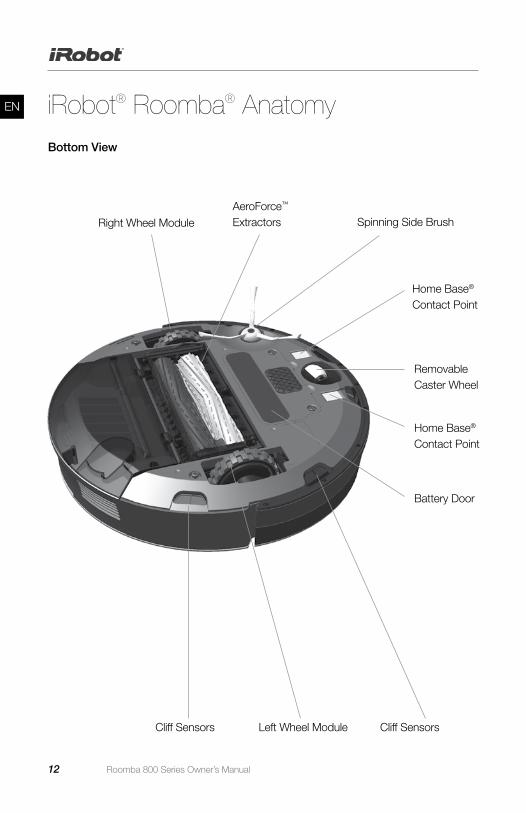
EN iRobot® Roomba® AnatomyBottom View
Right Wheel Module
Cliff Sensors Left Wheel Module Cliff Sensors
Home Base® Contact Point
Removable Caster Wheel
Battery Door
Home Base® Contact Point
AeroForce™ Extractors Spinning Side Brush
Roomba 800 Series Owner’s Manual 13
EN
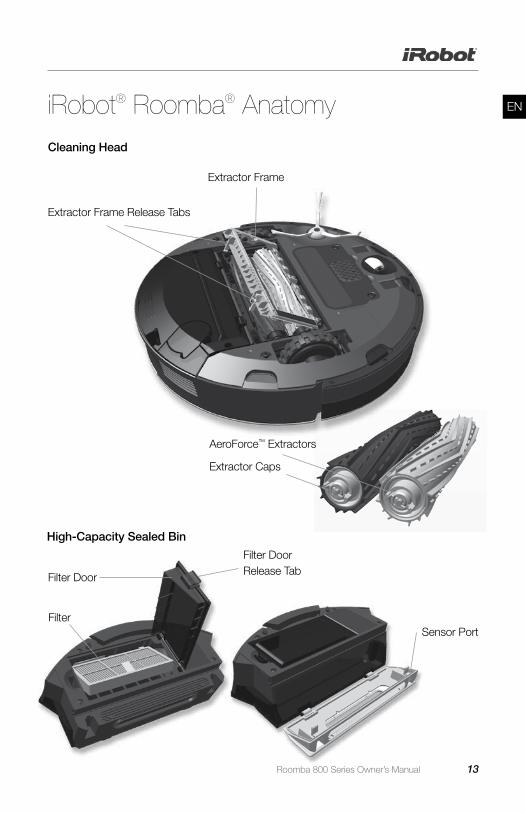
AeroForce™ Extractors
Extractor Caps
iRobot® Roomba® AnatomyCleaning Head
High-Capacity Sealed Bin
Extractor Frame
Extractor Frame Release Tabs
Sensor Port
Home Base® Contact Point
Removable Caster Wheel
Home Base® Contact Point
Filter Door Release TabFilter Door
Filter
14 Roomba 800 Series Owner’s Manual
EN
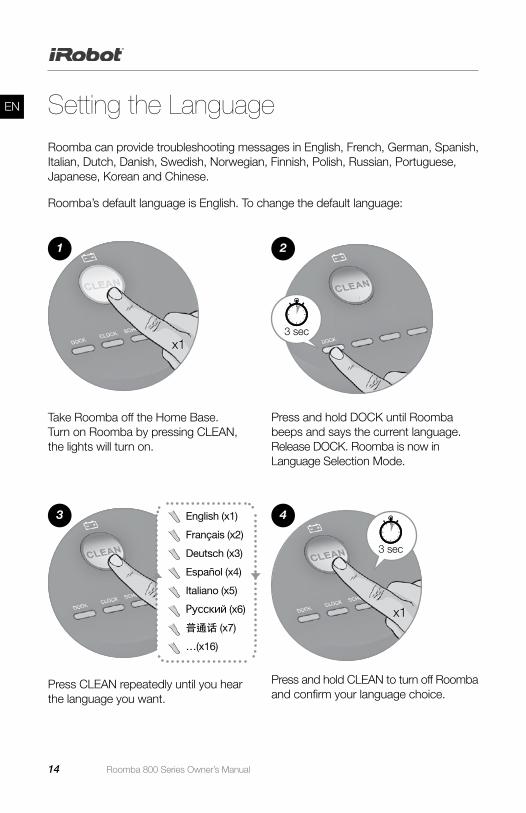
Roomba can provide troubleshooting messages in English, French, German, Spanish, Italian, Dutch, Danish, Swedish, Norwegian, Finnish, Polish, Russian, Portuguese, Japanese, Korean and Chinese.
Roomba’s default language is English. To change the default language:
Setting the Language
1
x1
4
3 sec
x1
Take Roomba off the Home Base. Turn on Roomba by pressing CLEAN, the lights will turn on.
2
3 sec
Press and hold DOCK until Roomba beeps and says the current language.Release DOCK. Roomba is now in Language Selection Mode.
3 English (x1)
Français (x2)
Deutsch (x3)
Español (x4)
Italiano (x5)
Pусский (x6)
普通话 (x7)
…(x16)
Press CLEAN repeatedly until you hear the language you want.
Press and hold CLEAN to turn off Roomba and confirm your language choice.
Roomba 800 Series Owner’s Manual 15
EN
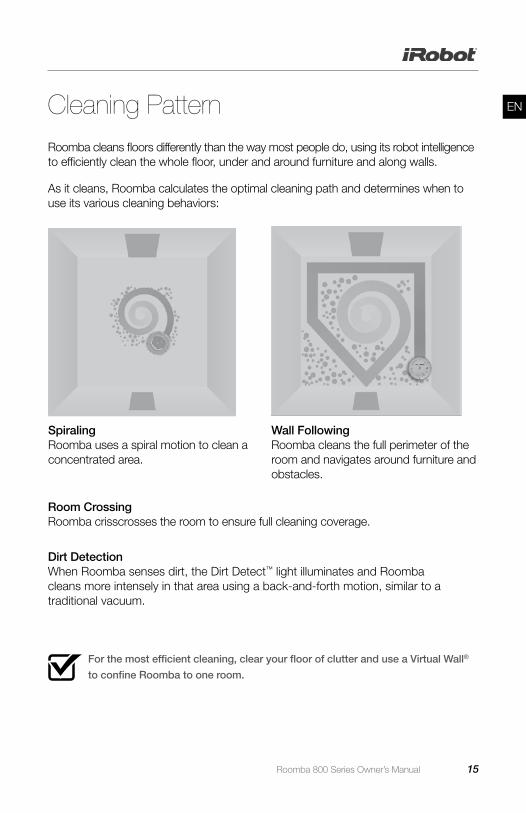
Roomba cleans floors differently than the way most people do, using its robot intelligence to efficiently clean the whole floor, under and around furniture and along walls.
As it cleans, Roomba calculates the optimal cleaning path and determines when to use its various cleaning behaviors:
Room Crossing Roomba crisscrosses the room to ensure full cleaning coverage.
Dirt Detection When Roomba senses dirt, the Dirt Detect™ light illuminates and Roomba cleans more intensely in that area using a back-and-forth motion, similar to a traditional vacuum.
Cleaning Pattern
For the most efficient cleaning, clear your floor of clutter and use a Virtual Wall®
to confine Roomba to one room.
Spiraling Roomba uses a spiral motion to clean a concentrated area.
Wall Following Roomba cleans the full perimeter of the room and navigates around furniture and obstacles.
16 Roomba 800 Series Owner’s Manual
EN
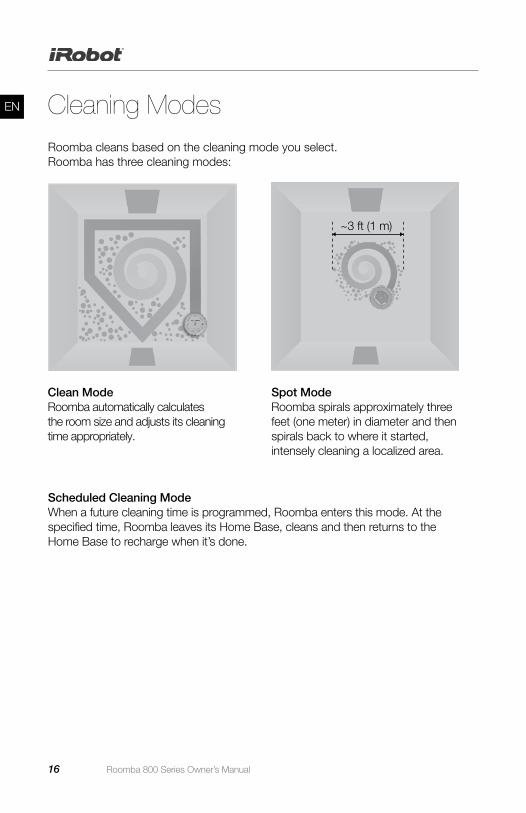
Roomba cleans based on the cleaning mode you select. Roomba has three cleaning modes:
Scheduled Cleaning Mode When a future cleaning time is programmed, Roomba enters this mode. At the specified time, Roomba leaves its Home Base, cleans and then returns to the Home Base to recharge when it’s done.
Cleaning Modes
~3 ft (1 m)
Clean Mode Roomba automatically calculates the room size and adjusts its cleaning time appropriately.
Spot Mode Roomba spirals approximately three feet (one meter) in diameter and then spirals back to where it started, intensely cleaning a localized area.
Roomba 800 Series Owner’s Manual 17
ENCleaning SystemAeroForce™ Performance Cleaning System The AeroForce System uses a combination of two breakthrough technologies, tan-gle-free AeroForce™ extractors and a high-powered vacuum channel, to deliver more cleaning power and less maintenance hassle.
Tangle-Free AeroForce™ Extractors Dual counter-rotating extractors incorporate durable rubber treads that grab dirt and debris from any floor type, while ensuring that you never hassle with hair-tangled brushes. High-Powered Vacuum Channel Accelerated airflow through a sealed channel dramatically increases suction at the floor to transfer dirt, debris and allergens through the extractors and into the HEPA-filtered, high-capacity bin.
Spinning Side Brush Cleans along wall edges and corners.
Floor Surfaces Roomba works on wood, carpet, tile, vinyl and laminate, and adjusts automatically to different floor types. Roomba automatically senses stairs and other cliffs.
Anti-Tangle System Roomba won’t get stuck on cords, carpet fringe or tassels. When Roomba senses it has picked up a cord or tassel, it will automatically stop its main brushes or side brush and try to escape. Roomba may make a clicking noise when the anti-tangle system is activated.
Roomba might stall when confronting rounded edges and might slide over
particularly slippery surfaces. Extremely dark-colored floors may contribute
to Roomba’s cliff sensors working less effectively.
18 Roomba 800 Series Owner’s Manual
EN Battery Storage and Charging
Roomba is powered by a rechargeable battery. Roomba’s battery can last for hundreds of cleaning cycles if cared for properly.
Battery Life
To extend the battery life, iRobot recommends always keeping Roomba charged. For more details on how to maintain Roomba’s battery life, visit www.irobot.com/support.
Cleaning Time
You should fully charge Roomba’s battery before each cleaning cycle. When fully charged, the Battery light will be green and Roomba’s battery will last for at least one full clean cycle.
16-Hour Refresh Charge
If Roomba has been left off the Home Base for an extended period, it will initiate a special 16-hour charge cycle. This extensive charge refreshes Roomba’s battery and extends battery life. While charging, Roomba’s CLEAN button pulses quickly. Note: For best results, do not interrupt the refresh charge.
Charging Roomba
To charge Roomba, connect the line cord to the Home Base and then dock your robot.
Charging Lights
Roomba uses the battery icon light to indicate it is charging. Use this chart to determine the status of the battery.
Recharge Roomba as soon as possible following use; waiting several days can
damage the battery.
For storage off of the Home Base, remove the charged battery from Roomba
and store in a cool, dry place.
When Roomba is on the Home Base, always make sure that the Home Base power light is on.
BATTERY ICON BATTERY STATUS
Solid red Battery empty
Amber pulse Charging
Solid green Fully charged
Quick amber pulse 16-hour refresh charge
For best performance, charge Roomba’s battery overnight before using Roomba
for the first time.
Roomba 800 Series Owner’s Manual 19
EN
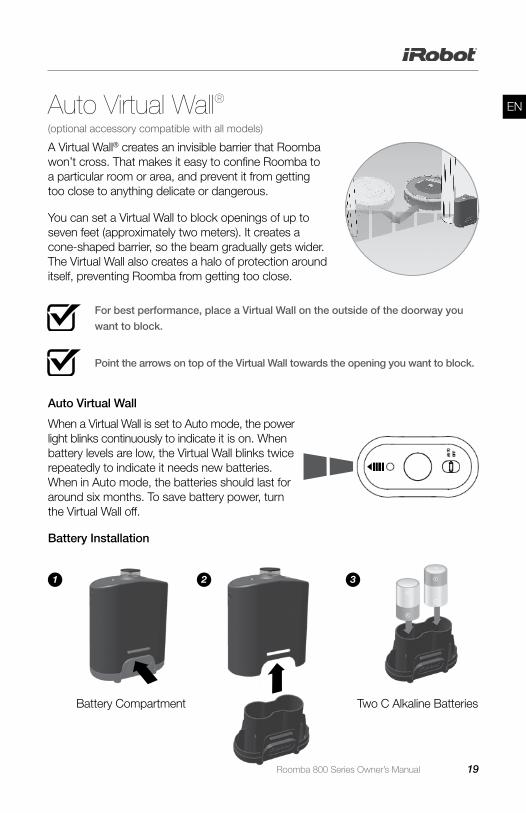
A Virtual Wall® creates an invisible barrier that Roomba won’t cross. That makes it easy to confine Roomba to a particular room or area, and prevent it from getting too close to anything delicate or dangerous.
You can set a Virtual Wall to block openings of up to seven feet (approximately two meters). It creates a cone-shaped barrier, so the beam gradually gets wider. The Virtual Wall also creates a halo of protection around itself, preventing Roomba from getting too close.
Auto Virtual Wall
When a Virtual Wall is set to Auto mode, the power light blinks continuously to indicate it is on. When battery levels are low, the Virtual Wall blinks twice repeatedly to indicate it needs new batteries. When in Auto mode, the batteries should last for around six months. To save battery power, turn the Virtual Wall off.
Battery Installation
Auto Virtual Wall®
For best performance, place a Virtual Wall on the outside of the doorway you
want to block.
Point the arrows on top of the Virtual Wall towards the opening you want to block.
(optional accessory compatible with all models)
2 31
Battery Compartment Two C Alkaline Batteries
20 Roomba 800 Series Owner’s Manual
EN
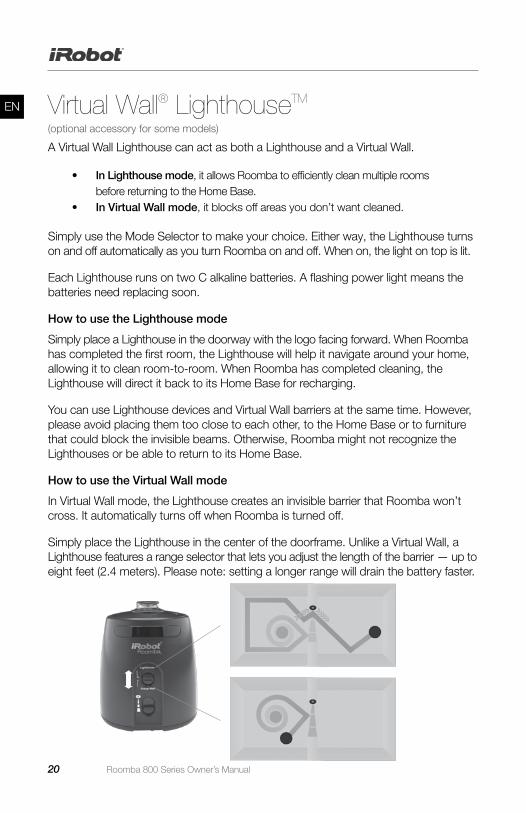
A Virtual Wall Lighthouse can act as both a Lighthouse and a Virtual Wall.
• In Lighthouse mode, it allows Roomba to efficiently clean multiple rooms before returning to the Home Base.
• In Virtual Wall mode, it blocks off areas you don’t want cleaned. Simply use the Mode Selector to make your choice. Either way, the Lighthouse turns on and off automatically as you turn Roomba on and off. When on, the light on top is lit.
Each Lighthouse runs on two C alkaline batteries. A flashing power light means the batteries need replacing soon.
How to use the Lighthouse mode
Simply place a Lighthouse in the doorway with the logo facing forward. When Roomba has completed the first room, the Lighthouse will help it navigate around your home, allowing it to clean room-to-room. When Roomba has completed cleaning, the Lighthouse will direct it back to its Home Base for recharging.
You can use Lighthouse devices and Virtual Wall barriers at the same time. However, please avoid placing them too close to each other, to the Home Base or to furniture that could block the invisible beams. Otherwise, Roomba might not recognize the Lighthouses or be able to return to its Home Base.
How to use the Virtual Wall mode
In Virtual Wall mode, the Lighthouse creates an invisible barrier that Roomba won’t cross. It automatically turns off when Roomba is turned off.
Simply place the Lighthouse in the center of the doorframe. Unlike a Virtual Wall, a Lighthouse features a range selector that lets you adjust the length of the barrier — up to eight feet (2.4 meters). Please note: setting a longer range will drain the battery faster.
Virtual Wall® LighthouseTM
(optional accessory for some models)
Roomba 800 Series Owner’s Manual 21
ENVirtual Wall® LighthouseTM
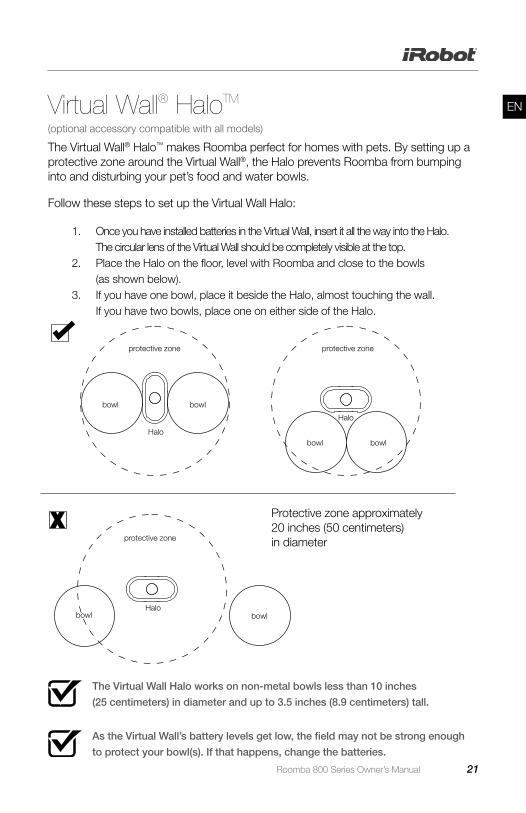
The Virtual Wall® Halo™ makes Roomba perfect for homes with pets. By setting up a protective zone around the Virtual Wall®, the Halo prevents Roomba from bumping into and disturbing your pet’s food and water bowls.
Follow these steps to set up the Virtual Wall Halo:
1. Once you have installed batteries in the Virtual Wall, insert it all the way into the Halo. The circular lens of the Virtual Wall should be completely visible at the top.
2. Place the Halo on the floor, level with Roomba and close to the bowls (as shown below).
3. If you have one bowl, place it beside the Halo, almost touching the wall. If you have two bowls, place one on either side of the Halo.
Virtual Wall® HaloTM
x
protective zone
bowlbowl
bowl bowlHalo
Halo
protective zone
bowlbowlHalo
protective zone
The Virtual Wall Halo works on non-metal bowls less than 10 inches
(25 centimeters) in diameter and up to 3.5 inches (8.9 centimeters) tall.
As the Virtual Wall’s battery levels get low, the field may not be strong enough
to protect your bowl(s). If that happens, change the batteries.
(optional accessory compatible with all models)
Protective zone approximately 20 inches (50 centimeters) in diameter
22 Roomba 800 Series Owner’s Manual
EN
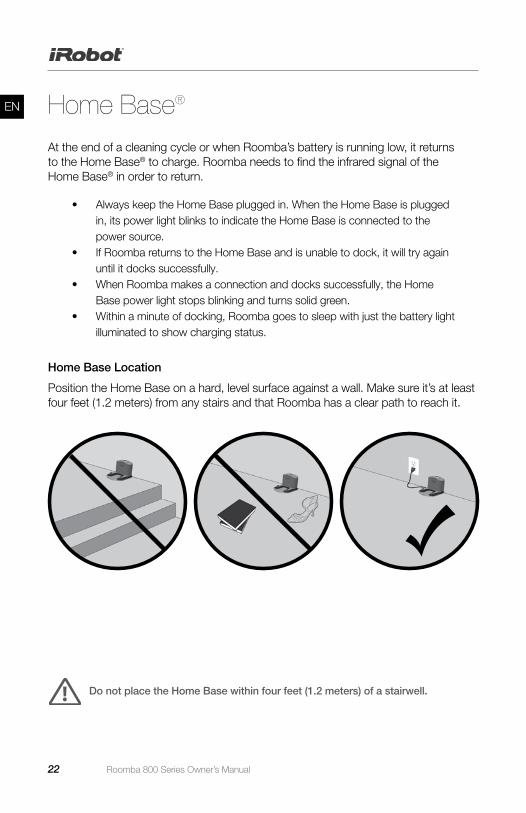
At the end of a cleaning cycle or when Roomba’s battery is running low, it returns to the Home Base® to charge. Roomba needs to find the infrared signal of the Home Base® in order to return.
• Always keep the Home Base plugged in. When the Home Base is plugged in, its power light blinks to indicate the Home Base is connected to the power source.
• If Roomba returns to the Home Base and is unable to dock, it will try again until it docks successfully.
• When Roomba makes a connection and docks successfully, the Home Base power light stops blinking and turns solid green.
• Within a minute of docking, Roomba goes to sleep with just the battery light illuminated to show charging status.
Home Base Location
Position the Home Base on a hard, level surface against a wall. Make sure it’s at least four feet (1.2 meters) from any stairs and that Roomba has a clear path to reach it.
Home Base®
Do not place the Home Base within four feet (1.2 meters) of a stairwell.
Roomba 800 Series Owner’s Manual 23
EN
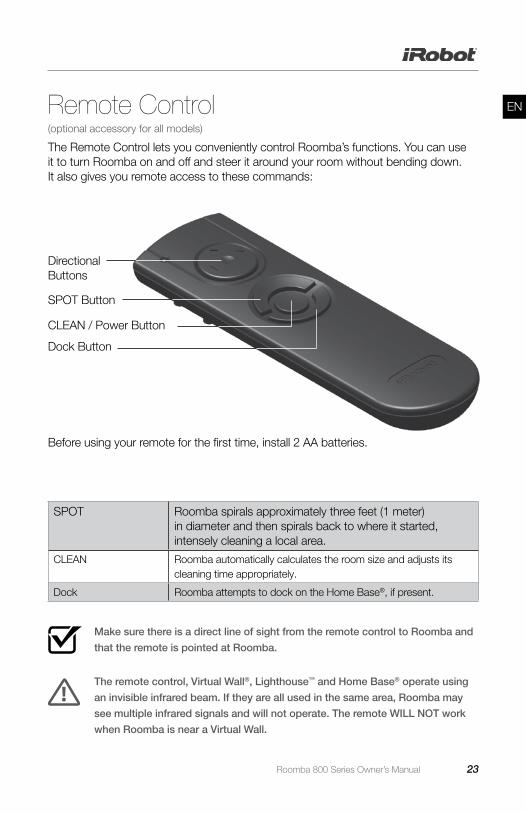
The Remote Control lets you conveniently control Roomba’s functions. You can use it to turn Roomba on and off and steer it around your room without bending down. It also gives you remote access to these commands:
Before using your remote for the first time, install 2 AA batteries.
Remote Control
SPOT Roomba spirals approximately three feet (1 meter) in diameter and then spirals back to where it started, intensely cleaning a local area.
CLEAN Roomba automatically calculates the room size and adjusts its cleaning time appropriately.
Dock Roomba attempts to dock on the Home Base®, if present.
Make sure there is a direct line of sight from the remote control to Roomba and
that the remote is pointed at Roomba.
The remote control, Virtual Wall®, Lighthouse™ and Home Base® operate using
an invisible infrared beam. If they are all used in the same area, Roomba may
see multiple infrared signals and will not operate. The remote WILL NOT work
when Roomba is near a Virtual Wall.
Directional Buttons
SPOT Button
CLEAN / Power Button Dock Button
(optional accessory for all models)
24 Roomba 800 Series Owner’s Manual
EN
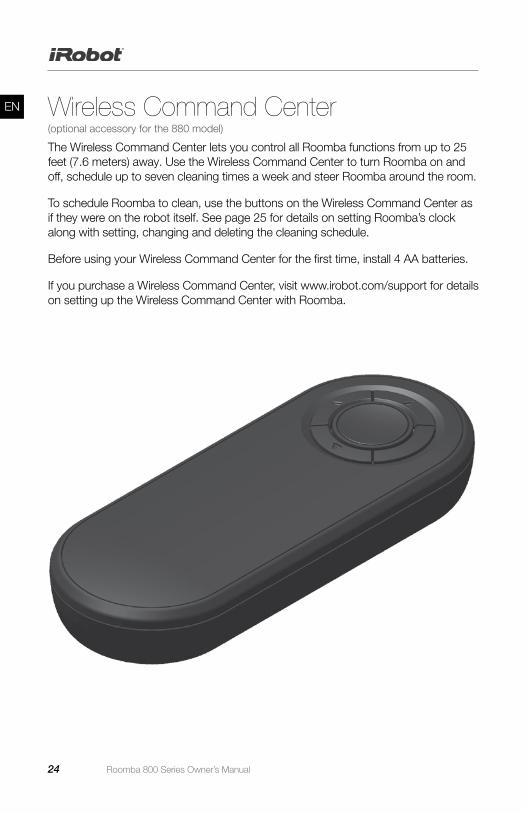
The Wireless Command Center lets you control all Roomba functions from up to 25 feet (7.6 meters) away. Use the Wireless Command Center to turn Roomba on and off, schedule up to seven cleaning times a week and steer Roomba around the room.
To schedule Roomba to clean, use the buttons on the Wireless Command Center as if they were on the robot itself. See page 25 for details on setting Roomba’s clock along with setting, changing and deleting the cleaning schedule.
Before using your Wireless Command Center for the first time, install 4 AA batteries.
If you purchase a Wireless Command Center, visit www.irobot.com/support for details on setting up the Wireless Command Center with Roomba.
Wireless Command Center (optional accessory for the 880 model)
Roomba 800 Series Owner’s Manual 25
EN
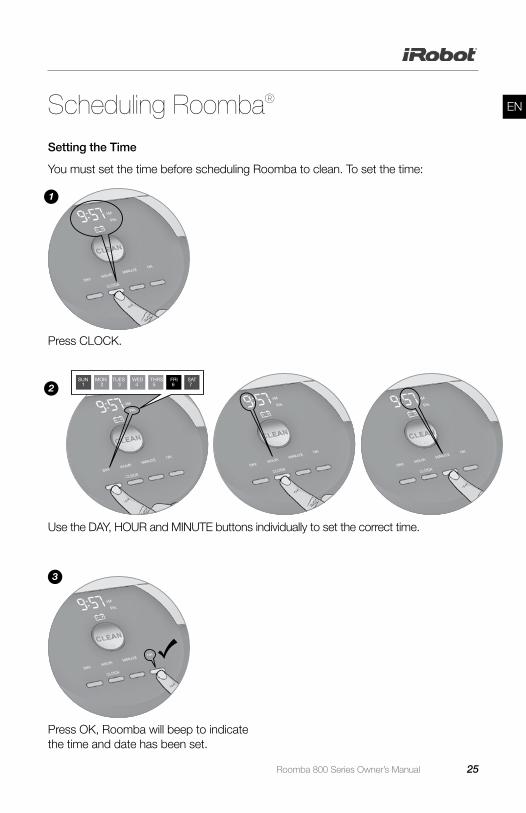
Setting the Time
You must set the time before scheduling Roomba to clean. To set the time:
Scheduling Roomba®
SUN MON TUES WED THRS FRI SAT 1 2 3 4 5 6 7
Press CLOCK.
Press OK, Roomba will beep to indicate the time and date has been set.
Use the DAY, HOUR and MINUTE buttons individually to set the correct time.
2
3
1
26 Roomba 800 Series Owner’s Manual
EN
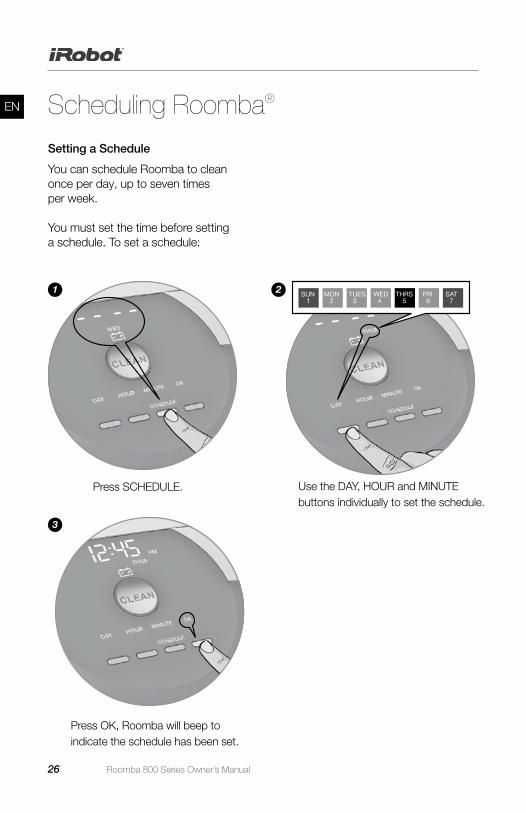
Setting a Schedule
You can schedule Roomba to clean once per day, up to seven times per week. You must set the time before setting a schedule. To set a schedule:
Scheduling Roomba®
Press SCHEDULE.
1 SUN MON TUES WED THRS FRI SAT 1 2 3 4 5 6 7
2
Use the DAY, HOUR and MINUTE buttons individually to set the schedule.
3
Press OK, Roomba will beep to indicate the schedule has been set.
Roomba 800 Series Owner’s Manual 27
EN
Roomba’s clock can be viewed in either the 12-hour (AM/PM) format or the
24-hour format. To toggle between the two views, press and hold CLOCK for 5
seconds. Toggle between 12-hour and 24-hour format using the CLOCK button.
Press OK to save. Roomba beeps and the clock briefly illuminates to indicate
the clock format has been switched.
Roomba’s clock will switch back to the default 12-hour (AM/PM) format when
the battery is disconnected or very low on power.
Viewing Schedules
To view Roomba’s scheduled cleaning times:
1. Press SCHEDULE.2. Press DAY to cycle through the scheduled cleaning times. 3. Press OK.
Deleting a Schedule
To delete a scheduled cleaning time:
1. Press SCHEDULE. 2. Press DAY to cycle through the scheduled cleaning times. 3. When Roomba displays the scheduled cleaning time you’d like to delete, press
and hold DAY for five seconds. Roomba will beep to indicate the cleaning time has been deleted.
4. Press OK.
Changing the Schedule
To change the cleaning schedule:
1. Press SCHEDULE.2. Press DAY to cycle through the scheduled cleaning times. 3. When Roomba displays the scheduled cleaning time you’d like to change,
press HOUR and/or MINUTE to make the change. 4. Press OK, Roomba will beep to indicate the schedule has been set.
28 Roomba 800 Series Owner’s Manual
EN
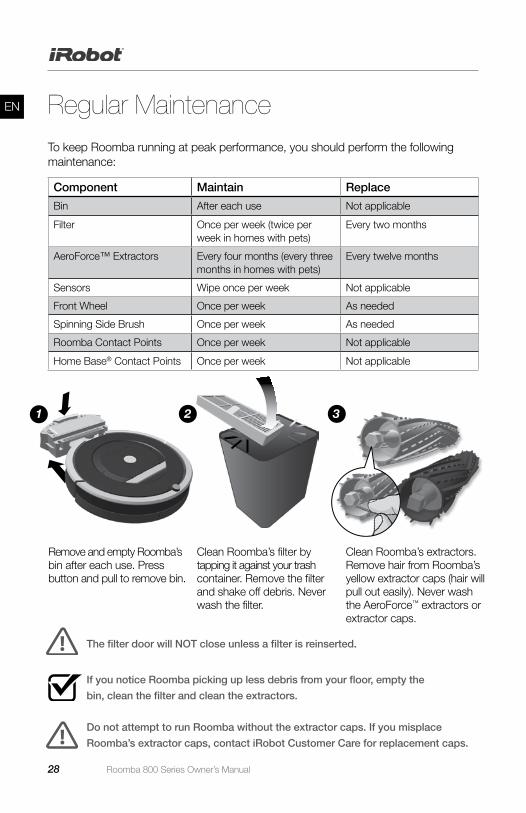
To keep Roomba running at peak performance, you should perform the following maintenance:
Regular Maintenance
Component Maintain Replace
Bin After each use Not applicable
Filter Once per week (twice per week in homes with pets)
Every two months
AeroForce™ Extractors Every four months (every three months in homes with pets)
Every twelve months
Sensors Wipe once per week Not applicable
Front Wheel Once per week As needed
Spinning Side Brush Once per week As needed
Roomba Contact Points Once per week Not applicable
Home Base® Contact Points Once per week Not applicable
If you notice Roomba picking up less debris from your floor, empty the
bin, clean the filter and clean the extractors.
Do not attempt to run Roomba without the extractor caps. If you misplace
Roomba’s extractor caps, contact iRobot Customer Care for replacement caps.
The filter door will NOT close unless a filter is reinserted.
Remove and empty Roomba’s bin after each use. Press button and pull to remove bin.
Clean Roomba’s filter by tapping it against your trash container. Remove the filter and shake off debris. Never wash the filter.
Clean Roomba’s extractors. Remove hair from Roomba’s yellow extractor caps (hair will pull out easily). Never wash the AeroForce™ extractors or extractor caps.
31 2
Roomba 800 Series Owner’s Manual 29
EN
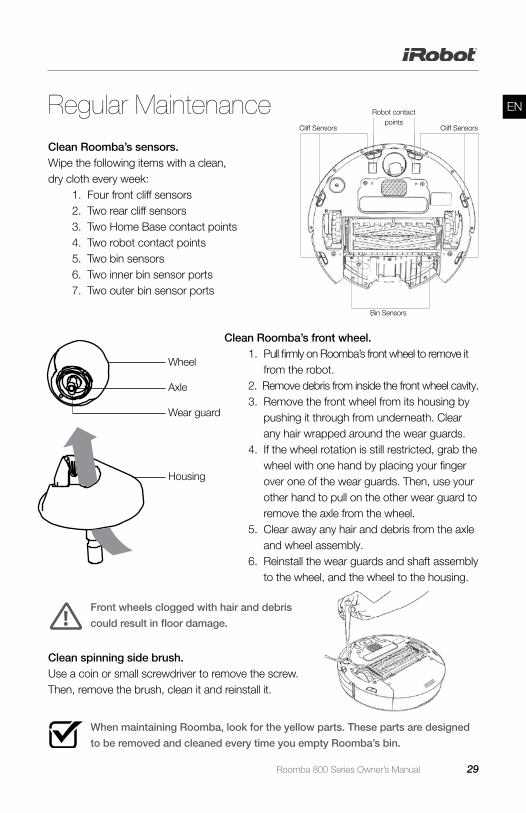
Clean Roomba’s sensors. Wipe the following items with a clean, dry cloth every week: 1. Four front cliff sensors 2. Two rear cliff sensors 3. Two Home Base contact points 4. Two robot contact points 5. Two bin sensors 6. Two inner bin sensor ports 7. Two outer bin sensor ports
Clean spinning side brush. Use a coin or small screwdriver to remove the screw. Then, remove the brush, clean it and reinstall it.
Regular Maintenance
When maintaining Roomba, look for the yellow parts. These parts are designed
to be removed and cleaned every time you empty Roomba’s bin.
Wheel
Axle
Wear guard
Housing
SCALE 0.400
Cliff Sensors
Bin Sensors
Clean Roomba’s front wheel. 1. Pull firmly on Roomba’s front wheel to remove it
from the robot. 2. Remove debris from inside the front wheel cavity. 3. Remove the front wheel from its housing by
pushing it through from underneath. Clear any hair wrapped around the wear guards.
4. If the wheel rotation is still restricted, grab the wheel with one hand by placing your finger over one of the wear guards. Then, use your other hand to pull on the other wear guard to remove the axle from the wheel.
5. Clear away any hair and debris from the axle and wheel assembly.
6. Reinstall the wear guards and shaft assembly to the wheel, and the wheel to the housing.
Front wheels clogged with hair and debris
could result in floor damage.
Cliff Sensors
Robot contact points
30 Roomba 800 Series Owner’s Manual
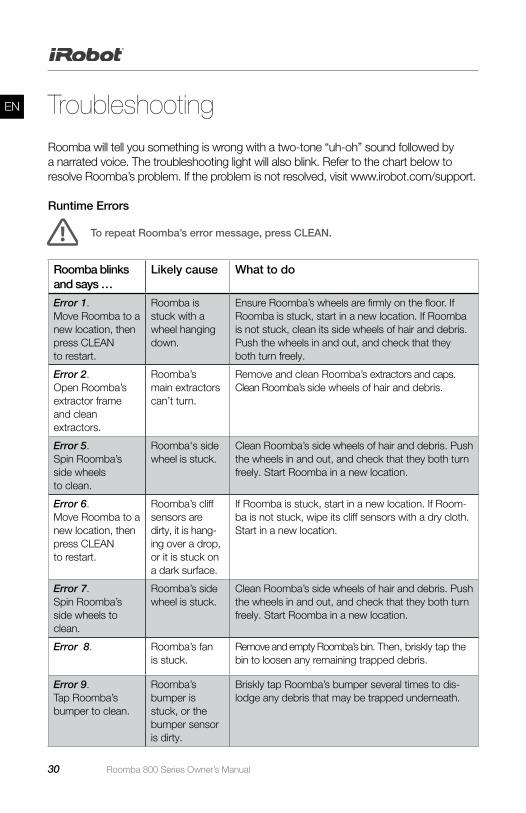
EN Troubleshooting Roomba will tell you something is wrong with a two-tone “uh-oh” sound followed by a narrated voice. The troubleshooting light will also blink. Refer to the chart below to resolve Roomba’s problem. If the problem is not resolved, visit www.irobot.com/support. Runtime Errors
Roomba blinks and says …
Likely cause What to do
Error 1. Move Roomba to a new location, then press CLEAN to restart.
Roomba is stuck with a wheel hanging down.
Ensure Roomba’s wheels are firmly on the floor. If Roomba is stuck, start in a new location. If Roomba is not stuck, clean its side wheels of hair and debris. Push the wheels in and out, and check that they both turn freely.
Error 2. Open Roomba’s extractor frame and clean extractors.
Roomba’s main extractors can’t turn.
Remove and clean Roomba’s extractors and caps. Clean Roomba’s side wheels of hair and debris.
Error 5. Spin Roomba’s side wheels to clean.
Roomba's side wheel is stuck.
Clean Roomba’s side wheels of hair and debris. Push the wheels in and out, and check that they both turn freely. Start Roomba in a new location.
Error 6. Move Roomba to a new location, then press CLEAN to restart.
Roomba’s cliff sensors are dirty, it is hang-ing over a drop, or it is stuck on a dark surface.
If Roomba is stuck, start in a new location. If Room-ba is not stuck, wipe its cliff sensors with a dry cloth. Start in a new location.
Error 7. Spin Roomba’s side wheels to clean.
Roomba’s side wheel is stuck.
Clean Roomba’s side wheels of hair and debris. Push the wheels in and out, and check that they both turn freely. Start Roomba in a new location.
Error 8. Roomba’s fan is stuck.
Remove and empty Roomba’s bin. Then, briskly tap the bin to loosen any remaining trapped debris.
Error 9. Tap Roomba’s bumper to clean.
Roomba’s bumper is stuck, or the bumper sensor is dirty.
Briskly tap Roomba’s bumper several times to dis-lodge any debris that may be trapped underneath.
To repeat Roomba’s error message, press CLEAN.
Roomba 800 Series Owner’s Manual 31
EN
Problems While Charging
Roomba blinks…
Roomba displays…
Roomba says…
Likely cause What to do
1 time Err 1 Charging error 1
Roomba’s battery isn’t connected.
Confirm Roomba’s battery pull tab is removed. Remove Roomba’s battery cover, then remove and reinstall battery (see page 33).
2 times Err 2 Charging error 2
Roomba has a charging error.
Let Roomba cool down for at least an hour and try charging again.
3 times Err 3 Charging error 3
Roomba has a charging error.
Contact customer support.
5 times Err 5 Charging error 5
Roomba has a charging error.
Confirm Roomba’s Home Base is installed properly (see page 22). Please wipe contact points clean on Roomba and Home Base.
6 times Err 6 Charging error 6
Roomba’s battery is too warm.
Let Roomba cool down for at least an hour and try charging again.
7 times Err 7 Charging error 7
Roomba’s battery isn’t cooling.
Let Roomba cool down for at least an hour and try charging again.
To reset Roomba’s software, hold down the CLEAN button for 10 seconds.
This will clear all scheduled cleaning times, reset the clock and resolve some
software issues.
Error 10. Spin Roomba’s side wheels to clean.
Roomba’s side wheel is stuck, or its bumper isn’t detecting obstacles.
If Roomba is circling, clean its side wheels of hair and debris. Push the wheels in and out, and check that they both turn freely. If it's not circling, Roomba may be in a very large room. Use a Virtual Wall to create a smaller cleaning area.
Error 11. Roomba has an internal error.
Call iRobot Customer Service.
32 Roomba 800 Series Owner’s Manual
EN
Roomba has a number of modules that can be replaced, including its drive wheels, spinning side brush, main cleaning head, vacuum bin, caster wheel and battery. To access Roomba’s replaceable modules, remove the following items in this order:
1. The screw holding the side brush2. The two screws holding down the battery door3. The battery4. The two screws holding down the bottom cover
Replaceable Modules
To order replacement
modules, go to global.irobot.com
Visit global.irobot.com to order replacement parts
Side brush with screw
Caster housing
Battery
Right side wheel module
Side brush module
Chassis
Replaceable faceplate
Wear guard Front caster wheel
Battery cover
Bottom cover
Cleaning head module
Left side wheel module
High-capacity bin
Roomba 800 Series Owner’s Manual 33
EN
Follow these instructions to remove and reinstall Roomba’s battery.
Battery Removal
Battery door screws
1. Unscrew the two screws shown below and remove Roomba’s battery door and battery.
2. Reinstall Roomba’s battery with the iRobot logo facing up.3. Replace Roomba’s battery door and the two screws.
34 Roomba 800 Series Owner’s Manual
EN RegistrationRegister your Roomba now to activate your warranty and enjoy exclusive access to:
• iRobot’s award-winning customer service: Get support tailored to your specific robot, including answers to questions, maintenance tips, video demos and live chat.
• Product updates and other valuable information: Be among the first to learn about new robots, exclusive discounts and special promotions.
When you register, you can also tell us about your experience with your Roomba. iRobot listens to our customers and makes enhancements to our robots based on your valued feedback. We’d love to hear from you!
To register your Roomba, visit the 800 Series Owner’s Center at global.irobot.com/register. There, you’ll also find a quick start guide, instructional videos, information on accessories, frequently asked questions and more.
Roomba 800 Series Owner’s Manual 35
EN
iRobot Roomba® Vacuum Cleaning Robot and Accessories
Manufacturer: iRobot Corporation, 8 Crosby Drive, Bedford, MA 01730, USA Declares that Roomba along with Model 17062 and 17063 Battery Chargers and the Home Base, conform to the requirements of:
Low Voltage Directive 73/23/EEC as amended by 93/68/EEC and EMC Directive 89/336/EEC as amended by 92/31/EEC.
It is further declared that the Roomba and Roomba SE Robotic Vacuum Cleaner and Accessories conform to the following harmonised European standards:
Year of CE Marking: 2004
EN 60335-1:2002 + A11:2004 Household and Similar Electrical Appliances - Safety Part 1 - General Requirements
EN 60335-2-2:2003 Household and Similar Electrical Appliances - Safety Part 2 - Particular
Requirements for Vacuum Cleaners and Water-Suction Cleaning Appliances EN 60335-2-29:2002 Household and Similar Electrical Appliances - Part 2-29 - Particular Requirements for Battery Chargers
EN 55014-1:2000 + A1:2001 + A2:2002 Electromagnetic compatibility - Requirements for household appliances, electric tools and similar apparatus – Part 1: Emission
EN 55014-1:1997 + A2:2002 Electromagnetic compatibility - Requirements for household appliances, electric tools and similar apparatus – Part 2: Immunity - Product family standard
Low Voltage tests and EMC tests have been conducted by: TUV Rheinland of North America
This equipment has been tested and found to comply with the limits for a Class B digital device, pursuant to part 15 of the FCC Rules. These limits are designed to provide reasonable protection against harmful interference when the equipment is operated in a commercial environment. This equipment generates, uses, and can radiate radio frequency energy and, if not installed and used in accordance with the instruction manual, may cause harmful interference to radio communications. Operation of this equipment in a residential area is likely to cause harmful interference in which case the user will be required to correct the interference at his own expense.
Declaration of Conformity
36 Roomba 800 Series Owner’s Manual
EN
If you have questions or comments about this product, please contact iRobot before contacting a retailer.
Please visit the iRobot home support site at www.irobot.com/support for support tips, frequently asked questions and information about accessories and other iRobot products.
Should you still need assistance: Call our Customer Care team at 877.855.8593.
iRobot Customer Care hours:
• Monday – Friday, 9AM – 7PM Eastern Time • Saturday, 9AM – 6PM Eastern Time
iRobot Customer Care USA & Canada