293 wright street • delavan, wi 53115 submersible sump/effluent … · 2010-02-09 · this...
TRANSCRIPT

Individual *Switch SettingModel Motor Full Branch Circuit Cord in inches (mm)
Number HP Load Amps Required (Amps) Length On OffDC233110T 1/3 9.8 15 10' 13" (330) 4" (102)DC233110V 1/3 9.8 15 10' 7" (178) 2" (51)DC233110M 1/3 9.8 15 10' – –DC233120T 1/3 9.8 15 20' 13" (330) 4" (102)DC233120V 1/3 9.8 15 20' 7" (178) 2" (51)DC233120M 1/3 9.8 15 20' – –DC233130T 1/3 9.8 15 30' 13" (330) 4" (102)EC240110M 4/10 12.5 15 10' – –EC240110T 4/10 12.5 15 10' 14" (356) 5" (127)EC240120M 4/10 12.5 15 20' – –EC240120T 4/10 12.5 15 20' 14" (356) 5" (127)DC250110T 1/2 12.5 15 10' 13" (330) 4" (102)DC250110V 1/2 12.5 15 10' 7" (178) 2" (51)DC250110M 1/2 12.5 15 10' – –DC250120T 1/2 12.5 15 20' 13" (330) 4" (102)DC250120V 1/2 12.5 15 20' 7" (178) 2" (51)DC250120M 1/2 12.5 15 20' – –
EC2 and DC2 Series
Submersible Sump/Effluent PumpsINSTALLATION, OPERATION, & PARTS MANUAL
SAFETY INFORMATIONCarefully read and follow all safety instructions in thismanual or on pump.
This is the safety alert symbol. When you see thissymbol on your pump or in this manual, look for one of thefollowing signal words and be alert to the potential for personal injury!
warns about hazards that will cause seriouspersonal injury, death or major property damage if ignored.
warns about hazards that can cause seriouspersonal injury, death or major property damage if ignored.
warns about hazards that will or can causeminor personal injury or property damage if ignored.The word NOTICE indicates special instructions which areimportant but not related to hazards.
DESCRIPTIONThese Submersible Sump Pumps are designed for homesumps. The unit is equipped with a 3-prong grounding-typepower cord. The shaded-pole motor is oil filled and sealedfor cooler running. Upper sleeve/lower ballbearing on themotor shaft never need lubrication. Automatic reset thermalprotection.
SPECIFICATIONSPower supply required........................................115V, 60 HZ.Motor Duty ............................................................ContinuousLiquid Temp. Range ..........................32°F to 130°F (0°-54°C)Individual Branch DC233 Series...........................15 AmpsCircuit Required: EC240 Series...........................15 Amps
DC250 Series...........................20 AmpsDischarge Adapter (DC and EC Series)................1-1/2" NPT
PERFORMANCE
© 2007 S506 (Rev. 8/8/07)
293 Wright Street • Delavan, WI 53115
GPM (LPM) AT TOTAL FEET (m)5 10 15 20
Model (1.5m) (3m) (4.6m) (6.1m)CAPACITY GALLONS(L)/MINUTE
DC233 48 40 29 15 24 Ft.Series (182) (151) (110) (57) (7.3m)EC240 62 53 46 38 32 Ft.Series (235) (201) (174) (144) (9.8m)DC250 62 53 46 38 32 Ft.Series (235) (201) (174) (144) (9.8m)
No flow at heightshownbelow
MOTOR, SWITCH, & CORD SPECIFICATIONS

GENERAL SAFETY INFORMATIONElectrically powered sump pumps normally give many yearsof trouble-free service when correctly installed, maintained,and used. However, unusual circumstances (interruption ofpower to the pump, dirt/debris in the sump, flooding thatexceeds the pump’s capacity, electrical or mechanical failurein the pump, etc.) may prevent your pump from functioningnormally. To prevent possible water damage due to flooding,consult your dealer about installing a secondary sump pump,a DC backup sump pump, and/or a high water alarm. See the“Troubleshooting Chart” in this manual for information aboutcommon sump pump problems and remedies. For more information, see your dealer or call customer service at 1-888-782-7483.1. Know the pump application, limitations, and potential
hazards.2. Disconnect the power before servicing.3. Release all pressure within the system before servicing
any component.4. Drain all water from the system before servicing.5. Secure the discharge line before starting the pump. An
unsecured discharge line will whip, possibly causing per-sonal injury and/or property damage.
6. Check the hoses for a weak or worn condition beforeeach use. Make certain all connections are secure.
7. Periodically inspect the sump, pump and system compo-nents. Keep free of debris and foreign objects. Performroutine maintenance as required.
8. Provide a means of pressure relief for pumps whose dis-charge line can be shut-off or obstructed.
9. Personal Safety:a. Wear safety glasses at all times when working with
pumps.b. Keep the work area clean, uncluttered and properly
lighted – replace all unused tools and equipment.c. Keep visitors at a safe distance from work area.d. Make the workshop child-proof – with padlocks, mas-
ter switches, and by removing starter keys.10. When wiring an electrically driven pump, follow all electri-
cal and safety codes that apply.11. This equipment is only for use on 115 volt (single
phase) and is equipped with an approved 3-conduc-tor cord and 3-prong, grounding-type plug.
Electrical shock hazard. Can burn orkill. To reduce risk of electric shock, pull plug before ser-vicing. Pump is supplied with a grounding conductor andgrounding-type attachment plug. Be sure it is connectedonly to a properly grounded grounding-type receptacle.Where a 2-prong wall receptacle is encountered, it mustbe replaced with a properly grounded 3-prong receptacleinstalled in accordance with codes and ordinances thatapply.This pump has not been investigated for use in swim-ming pool areas.
12. All wiring should be performed by a qualified electrician.13. Make certain the power source conforms to the require-
ments of your equipment.14. Protect the electrical cord from sharp objects, hot sur-
faces, oil, and chemicals. Avoid kinking the cord. Replaceor repair damaged or worn cords immediately.
15. Do not touch an operating motor. Modern motors aredesigned to operate at high temperatures.
16. Do not handle the pump or pump motor with wet handsor when standing on wet or damp surface, or in water.
Electrical shock hazard. Can burn or kill. Ifyour basement has water or moisture on floor, do not walk onwet area until all power has been turned off. If shut-off box isin basement, call electric company or hydro authority to shut-
off service to house, or call your local fire department forinstructions. Remove pump and repair or replace. Failure tofollow this warning can result in fatal electrical shock.17. Vent the sewage or septic tank according to the local codes.18. Do not install the pump in any location classified as
hazardous by the National Electric Code, ANSI/NFPA 70-1984 or the Canadian Electrical Code.
INSTALLATION1. Install the pump in a sump pit with a minimum diameter
of 10" (254mm) for models equipped with vertical switch-es and 14" (356mm) for tethered float switch models. Thesump depth should be 15" minimum (381mm). Constructthe sump pit of tile, concrete, steel or plastic. Check thelocal codes for approved materials.
2. NOTE: When installing the vertical switch, the rod stop(Key No. 1F, page 4) must not be pushed up farther thanthe bottom nib on the float rod. Pushing it any farther upthe rod will cause the switch to hang up on the pump discharge and will damage the pump.
3. The pump should not be installed on clay, earth or sand sur-faces. Clean the sump pit of small stones and gravel whichcould clog the pump. Keep the pump inlet screen clear.
4. Install the pump in the pit so that the switch operatingmechanism has maximum possible clearance.
5. Install the discharge plumbing. When using rigid pipe,use plastic pipe. Wrap the threads with Teflon tapeTM.Screw the pipe into the pump hand tight +1 – 1-1/2 turns.NOTICE: Do not use ordinary pipe joint compound onplastic pipe. Pipe joint compound can attack plastics anddamage the pump.
Risk of flooding. If a flexible dischargehose is used, make sure the pump is secure in the sumpto prevent movement. Failure to secure the pump mayallow pump movement, switch interference and preventthe pump from starting or stopping.
6. To reduce motor noise and vibrations, a short length ofrubber hose (e.g. radiator hose) can be connected intothe discharge line near the pump using suitable clamps.
7. Install an in-line check valve to prevent backward flowthrough the pump when the pump shuts off.
8. Power Supply: The pump is designed for 115 V., 60 Hz.,operation and requires a minimum 15 amp individualbranch circuit (refer to Motor, Switch and CordSpecifications chart, Page 1). Both the pump and switchare supplied with 3-wire cord sets with grounding-typeplugs. The switch plug is inserted directly into the outletand the pump plug inserts into the opposite end of theswitch plug.
TM E.I. DuPont de Nemours and Company Corporation.
2
Figure 15669 0707

Hazardous voltage. Can shock, burn orkill. The pump should always be electrically grounded toa suitable electrical ground such as a grounded waterpipe or a properly grounded metallic raceway, or groundwire system. Do not modify the cord or plug or cut off theround ground pin.
9. If the pump discharge line is exposed to an outside sub-freezing atmosphere, the portion of the line exposedmust be installed so any water remaining in the pipe willdrain to the outfall by gravity. Failure to do this can causethe water trapped in the discharge to freeze which couldresult in damage to the pump.
10. After the piping and check valve have been installed, theunit is ready for operation.
11. Check the operation by filling the sump with water andobserving pump operation through one complete cycle.
Risk of Flooding. Failure to make thisoperational check may lead to improper operation, pre-mature failure, and flooding.
OPERATION / MAINTENANCERisk of electrical shock. Can burn or cause
death. Do not handle a pump or pump motor with wet handsor when standing on a wet or damp surface, or in water.Before attempting to check why unit has stopped operating,disconnect power from unit.
Risk of fire and explosion. Can causesevere injury, property damage or death. Do not use inexplosive atmospheres. Pump water only with this pump.1. The shaft seal depends on water for lubrication and cool-
ing. Do not operate the pump unless it is submerged inwater as the seal may be damaged if allowed to run dry.
2. The motor is equipped with an automatic reset thermalprotector. If the temperature in the motor should riseunduly, the switch will cut off all power before damage
can be done to the motor. When the motor has cooledsufficiently, the switch will reset automatically and restartthe motor. If the protector trips repeatedly, the pumpshould be removed and checked as to cause of difficulty.Low voltage, long extension cords, clogged impeller, verylow head or lift, etc., could cause cycling.
3. The pump will not remove all water. If a manually operatedpump is operating and suddenly no water comes out of thedischarge hose, shut the unit off immediately. The waterlevel is probably very low and the unit has broken prime.
NOTICE: Do not change the tether length of the float switch.The float must be able to swing through its complete arcwithout interference.
AIRLOCKSWhen a pump airlocks, it runs but does not move any water.An airlock will cause the pump to overheat and fail. Thispump has a built in anti-airlock hole. See the exploded viewon the repair parts page for the location of the hole. Leakagefrom the anti-airlock hole is normal.If you suspect an airlock, unplug the pump, clean out theanti-airlock hole with a paper clip or a piece of wire, andrestart the pump.
3
3-1/2"(89 mm)3649 0200
SYMPTOM PROBABLE CAUSE(S) CORRECTIVE ACTION
Pump won’t start Blown fuse. If blown, replace with a fuse of proper size.or run. Low line voltage. If the voltage is under the recommended minimum, check the size
of the wiring from the main switch on the property. If OK, contact power company or hydro authority.
Defective motor. Replace the pump.Defective float switch. Replace the float switch.Impeller. If the impeller won’t turn, remove the lower pump body and locate
the source of the binding.Float is obstructed. Remove the obstruction.
Pump starts and stops Backflow of water from Install or replace the check-valve.too often. piping.
Faulty float switch. Replace the float switch.
Pump won’t shut off. Defective float switch. Replace the float switch.Restricted discharge Remove the pump and clean the pump and piping.(obstacle in piping).Float obstructed. Remove the obstruction.
Pump operates but Low line voltage. If the voltage is under the recommended minimum, check the size delivers little or no of the wiring from the main switch on the property. If OK, contact water. power company or hydro authority.
Something is caught in Clean out the impeller.impeller.Anti-airlock hole is plugged. Turn off the pump, clean out the anti-airlock hole, and restart pump.
TROUBLESHOOTING CHART
Figure 2 – Float Switch Tether Length, Models DC233110T,DC233120T, DC233130T, EC240110T, EC240120T,DC250110T and DC250120T.

4
2
45
7A
6
12A
12B
14
16
3
1C
17
18
19
1D
1E
1F
1A
1B
13
6A
7B
11
10
9
8
15
20
21
anti-airlock hole
DC233110T, DC233120T,DC233130T, DC233110V,DC233120V, DC233110M,DC233120M, EC240110T,EC240110M, EC240120T,EC240120M, DC250110T,DC250120T, DC250110V,DC250120V, DC250110M,DC250120M

5
REPLACEMENT PARTS LIST
* If the Motor fails replace the entire pump.** The DC233 Series pumps use Impeller number PS5-26P. All remaining Model numbers use Impeller number PS5-29P.
*** DC Series pumps only.(†) For use with Model Numbers ending in “T”.(††) Model DC233130T uses Part No. PS217-164.
EC240110T EC240120T EC240110M EC240120MDC233110T DC233120T DC233110V DC233120V DC233110M DC233120M
Key DC233130TNo. Description Qty. DC250110T DC250120T DC250110V DC250120V DC250110M DC250120M
1 Vertical Switch (Incl. 1A thru 1F) 1 – – PKG 208 PKG 209 – –1A Switch 11B Mounting Bracket 11C Screw 21D Float 11E Retainer Strap 11F Stop 12 Screw, #8-1/2” self-tapping (†) 1 U30-539SS U30-539SS U30-539SS U30-539SS – –3 Switch Cord Clamp (†) 1 CC0030-13 CC0030-13 – – – –4 Oil Fill Plug 1 U78-941ZPV U78-941ZPV U78-941ZPV U78-941ZPV U78-941ZPV U78-941ZPV5 Ring Handle 1 U97-128 U97-128 U97-128 U97-128 U97-128 U97-1286 Cord Connector 1 PS17-46P PS17-46P PS17-46P PS17-46P PS17-46P PS17-46P
6A O-Ring 1 U9-370 U9-370 U9-370 U9-370 U9-370 U9-3707A Motor Cover - DC Series 1 PS18-144B PS18-144B PS18-144B PS18-144B PS18-144B PS18-144B7B Motor Cover - EC Series PS18-149B PS18-149B – – PS18-149B PS18-149B8 #10-32 x3/4”, Capscrew 3 U30-482SS U30-482SS U30-482SS U30-482SS U30-482SS U30-482SS9 O-Ring 1 U9-339 U9-339 U9-339 U9-339 U9-339 U9-33910 Insulating Disk 1 PS18-82 PS18-82 PS18-82 PS18-82 PS18-82 PS18-8211 Motor / Upper Volute 1 * * * * * *
12A Shaft Seal Stationary Head Assembly 1 U9-379A U9-379A U9-379A U9-379A U9-379A U9-379A12B Shaft Seal Rotating Mating Ring 1 U9-321A U9-321A U9-321A U9-321A U9-321A U9-321A13 Impeller 1 ** ** ** ** ** **14 Gasket 1 PS20-21 PS20-21 PS20-21 PS20-21 PS20-21 PS20-2115 Lower Volute 1 PS1-34P PS1-34P PS1-34P PS1-34P PS1-34P PS1-34P16 Lower Pump Body Screw #10-32x1”
Hex Washer, self-tapping 7 U30-966SS U30-966SS U30-966SS U30-966SS U30-966SS U30-966SS17 Suction Plate*** 1 U43-142SS U43-142SS U43-142SS U43-142SS U43-142SS U43-142SS18 Screw, #6-1/4” pan head*** 1 U30-972SS U30-972SS U30-972SS U30-972SS U30-972SS U30-972SS19 Lower Pump Body Screw #10-32x1-1/8”
Hex Washer, self-tapping 1 U30-967SS U30-967SS U30-967SS U30-967SS U30-967SS U30-967SS20 Powercord Assembly 1 See Chart See Chart See Chart See Chart See Chart See Chart21 Tethered Float Switch (†) (††) 1 PS217-62 PS217-64 – – – –
Dielectric Oil All Models use .61 qts. 1 U197-8A U197-8A U197-8A U197-8A U197-8A U197-8A
POWER CORD ASSEMBLYPump Part Pump Part
Model Number Number Model Number NumberDC233110M PW117-281-TSU DC250110V PW117-237-TSUDC233110T PW117-281-TSU DC250120M PW117-122-TSUDC233110V PW117-281-TSU DC250120T PW117-122-TSUDC233120M PW117-122-TSU DC250120V PW117-122-TSUDC233120T PW117-122-TSU EC240110M PW117-237-TSEDC233120V PW117-122-TSU EC240110T PW117-237-TSEDC233130T PW117-293-TSU EC240120M PW117-122-TSEDC250110M PW117-237-TSU EC240120T PW117-122-TSEDC250110T PW117-237-TSU

6
LIMITED WARRANTYSta-Rite Industries warrants to the original consumer of the products listed below, that they will be free from defects in material and work-manship for the Warranty Period from the date of original installation or manufacture as noted.
Product Warranty Period
Water Systems Products – jet pumps, whichever occurs first:small centrifugal pumps, submersible pumps 1 year from date of original installation, orand related accessories 2 years from date of manufacture
Hydro-Flow Filters 1 year from date of purchase
Signature 2000® Fibrewound Tanks 5 years from date of original installation
Pro-SourceTM Steel Pressure Tanks 5 years from date of original installation
Pro-SourceTM Epoxy-Lined Tanks 3 years from date of original installation
Sump/Sewage/Effluent Products 1 year from date of original installation, or2 years from date of manufacture
Our warranty will not apply to any product that has been subject to negligence, misapplication, improper installation or maintenance. In theevent a three phase submersible motor is operated with single phase power through a phase converter, or if three-leg ambient compen-sated, extra-quick trip overload relays of recommended size are not used, our warranty is void.
Buyer’s only remedy and Sta-Rite Industries’ only duty is to repair or replace defective products (at Sta-Rite Industries’ choice). Buyer agreesto pay all labor and shipping charges associated with this warranty and to request warranty service through the installing dealer as soon as aproblem is discovered. If warranty service is requested more than 30 days after the Warranty Period has ended, it will not be honored.
STA-RITE INDUSTRIES SHALL NOT BE LIABLE FOR ANY CONSEQUENTIAL, INCIDENTAL, OR CONTINGENT DAMAGES WHATSOEVER.
THE FOREGOING WARRANTIES ARE EXCLUSIVE AND IN LIEU OF ALL OTHER EXPRESS WARRANTIES. IMPLIED WARRANTIES,INCLUDING BUT NOT LIMITED TO THE IMPLIED WARRANTIES OF MERCHANTABILITY AND FITNESS FOR A PARTICULAR PUR-POSE, SHALL NOT EXTEND BEYOND THE WARRANTY PERIOD PROVIDED HEREIN.
Certain states do not permit the exclusion or limitation of incidental or consequential damages or the placing of limitations on the durationof an implied warranty, therefore, the limitations or exclusions herein may not apply. This warranty sets forth specific legal rights and oblig-ations, however, additional rights may exist, which may vary from state to state.
Supersedes all previous publications.
Sta-Rite Industries, 293 Wright St., Delavan, WI 53115

Serie EC2 y DC2
Bombas sumergiblede sumidero/efluenteMANUAL DE INSTALACIÓN, OPERACIÓN Y REPUESTOS
INFORMACIÓN SOBRE LA SEGURIDADEs importante que lea y observe todas las instrucciones deseguridad que aparezcan en este manual o en la bomba.
Este es un símbolo de alerta sobre la seguridad. Cuandovea este símbolo en su bomba o en este manual, busque
para ver si hay alguna de las siguientes palabras de señal y estéalerta a la posibilidad de lesiones personales.
Advierte sobre peligros que ocasionarán lesionespersonales graves, muerte o daños considerables
a la propiedad si se les ignora.
Advierte sobre peligros que pueden oca-sionar lesiones personales graves, muerte o daños considerables ala propiedad si se ignoran.
Advierte sobre peligros que ocasionarán opueden ocasionar lesiones personales o daños a la propiedadmenores si se ignoran.La palabra AVISO indica instrucciones especiales que son importantes pero que no están relacionadas con los peligros.
DESCRIPCIÓNEstas Bombas Sumergible de Sumidero ha sido diseñada parasumideros domésticos. La unidad viene equipada con un cordón decorriente de 3 puntas, de tipo conexión a tierra. El motor de polosprotegidos está lleno de aceite y sellado para funcionamiento másfrío. Los cojinetes de bolas de la camisa superior/inferior en el ejedel motor nunca necesitan lubricación. Con protección térmica dereposición automática.
ESPECIFICACIONESSuministro de corriente requerido ...................................115V, 60 HzServicio del motor .................................................................ContinuoGama de temp. del líquido .......................32° F a 130° F (0° - 54° C)Requiere un ramal individual Serie DC233: ...........15 amperios
Serie EC240: ...........15 amperiosSerie DC250: ...........20 amperios
Accesorios de descarga (Serie DC y EC): ...................NPT de 1-1/2"
RENDIMIENTO
PRECAUCIÓN
ADVERTENCIA
PELIGRO
© 2007 S506 (Rev. 8/8/07)
293 Wright Street • Delavan, WI 53115
GPM (LPM) A ALTURA TOTAL EN PIES (m)5 10 15 20
Modelo (1,5m) (3m) (4,6m) (6,1m)Capacidad en galones (litros)/minuto
Serie 48 40 29 15 24 ft.DC233 (182) (151) (110) (57) (7,3m)Serie 62 53 46 38 32 ft.
EC240 (235) (201) (174) (144) (9,8m)Serie 62 53 46 38 32 ft.
DC250 (235) (201) (174) (144) (9,8m)
No hayflujo a las
alturassiguientes:
Número Carga total del Requiere un ramal Largo *Graduación del conmutador en pulgadas (mm)del modelo Motor – CV motor – amps individual (amperios) del cordón Encendido ApagadoDC233110T 1/3 9,8 15 10' 13" (330) 4" (102)DC233110V 1/3 9,8 15 10' 7" (178) 2" (51)DC233110M 1/3 9,8 15 10' – –DC233120T 1/3 9,8 15 20' 13" (330) 4" (102)DC233120V 1/3 9,8 15 20' 7" (178) 2" (51)DC233120M 1/3 9,8 15 20' – –DC233130T 1/3 9,8 15 30' 13" (330) 4" (102)EC240110M 4/10 12,5 15 10' – –EC240110T 4/10 12,5 15 10' 14" (356) 5" (127)EC240120M 4/10 12,5 15 20' – –EC240120T 4/10 12,5 15 20' 14" (356) 5" (127)DC250110T 1/2 12,5 15 10' 13" (330) 4" (102)DC250110V 1/2 12,5 15 10' 7" (178) 2" (51)DC250110M 1/2 12,5 15 10' – –DC250120T 1/2 12,5 15 20' 13" (330) 4" (102)DC250120V 1/2 12,5 15 20' 7" (178) 2" (51)DC250120M 1/2 12,5 15 20' – –
ESPECIFICACIONES DEL MOTOR, CONMUTADOR Y CORDÓN
2
INFORMACIÓN GENERALSOBRE LA SEGURIDADLas bombas de sumidero con accionamiento eléctrico, generalmente brindanmuchos años de servicio sin problemas cuando se las instala, mantiene yemplea correctamente. Sin embargo, circunstancies inusuales (como la inter-rupción de la corriente hacia la bomba, suciedad/escombros en el sumidero,inundación que supera la capacidad de la bomba, fallas eléctricas o mecáni-cas en la bomba, etc.) pueden evitar que la bomba funcione normalmente.Para evitar posibles daños causados por el agua y debidos a inundaciones,consulte con su representante de ventas sobre la posibilidad de instalar unbomba secundaria de sumidero, una bomba de reserva de CA para sum-idero, y/o una alarma de nivel alto de agua. Consulte la "Tabla de local-ización de fallas" en este manual para obtener información sobre los proble-mas comunes con bombas de sumidero y sus soluciones. Para mayor infor-mación, consulte con su representante de ventas o llame al departamentode servicio al cliente, marcando 1-888-782-7483.1. Infórmese sobre la aplicación, limitaciones y posibles riesgos de la
bomba.2. Desconecte la energía eléctrica antes de efectuar reparaciones.3. Alivie toda la presión dentro del sistema antes de reparar cualquier
componente.4. Drene toda el agua del sistema antes de efectuar reparaciones.5. Asegure bien la tubería de descarga antes de poner en marcha la
bomba. Una tubería de descarga que no esté bien segura puedemoverse y causar lesiones personales y/o daños materiales.
6. Antes de cada uso, verifique si las mangueras están débiles o gas-tadas, asegurándose de que todas las conexiones estén firmes.
7. Inspeccione periódicamente el sumidero, la bomba y los compo-nentes del sistema. Manténgalos limpios de basuras y objetos forá-neos. Realice el mantenimiento de rutina según sea necesario.
8. Provea un medio de alivio de la presión para aquellas bombas cuyatubería de descarga pueda bloquearse u obstruirse.
9. Seguridad Personal :a. Use lentes protectores en todo momento cuando trabaje con la
bomba.b. Mantenga la zona de trabajo limpia, despejada y debidamente
iluminada - guarde todas herramientas y el equipo que no se use.c. Mantenga a los visitantes a una distancia segura de la zona de
trabajo.d. Asegúrese de que su taller sea a prueba de niños - con candados,
conmutadores maestros y sacando las llaves del arrancador.10. Cuando instale el cableado de una bomba accionada eléctrica-
mente, observe todos los códigos eléctricos y de seguridad que correspondan.
11. Esta bomba se puede usar solamente con corriente de 115voltios (monofásica) y está equipada con un cordón aprobadode 3 conductores y 3 clavijas, de tipo con conexión a tierra.
Riesgo de choque eléctrico. Puedecausar quemaduras o muerte. Para reducir el riesgo de choqueeléctrico, desenchufe la bomba antes de repararla. La bomba essuministrada con un conductor de puesta a tierra y un enchufe detipo con conexión a tierra. Asegúrese de que se conecte solamentea un tomacorriente puesto a tierra, de tipo con conexión a tierra.Si el tomacorriente mural es del tipo para 2 clavijas, éste debe serreemplazado por un tomacorriente de 3 clavijas e instalado deacuerdo con los códigos y reglamentos que correspondan.No se ha comprobado aún si esta bomba pueda ser usada en albercas.
12. Todo el cableado debe ser efectuado por un electricista certificado.
13. Asegúrese de que la fuente de alimentación cumpla con los requisitos de su equipo.
14. Proteja el cordón eléctrico contra objetos afilados, superficiescalientes, aceite y sustancias químicas. Evite que se enrede.Reemplace o repare inmediatamente un cordón que esté dañado o gastado.
15. No toque un motor cuando esté funcionando. Los motores modernos están diseñados para funcionar a temperaturas altas.
16. No manipule la bomba ni el motor de la bomba con las manosmojadas o cuando esté parado en suelo húmedo o mojado, o en el agua.
Riesgo de choque eléctrico. Puede causarquemaduras o muerte. Si su sótano tiene agua o humedad en el piso,no camine en el lugar mojado hasta que no haya desactivado toda fuentede corriente eléctrica. Si la llave de paso está en el sótano, llame a lacompañía de electricidad o de energía para cortar el servicio a su casa,
o llame al departamento de bomberos de su localidad para solicitarinstrucciones. Saque la bomba y repárela o reemplácela. El incumplim-iento de esta advertencia puede resultar en un choque eléctrico mortal.17. Ventile el tanque cloacal o séptico según los códigos locales.
18. No instale la bomba en ningún lugar clasificado como peligroso porel Código Eléctrico Nacional, ANSI/NFPA 70-1984 o el CódigoEléctrico Canadiense.
INSTALACIÓN1. Instale la bomba en el foso del sumidero con un diámetro mínimo
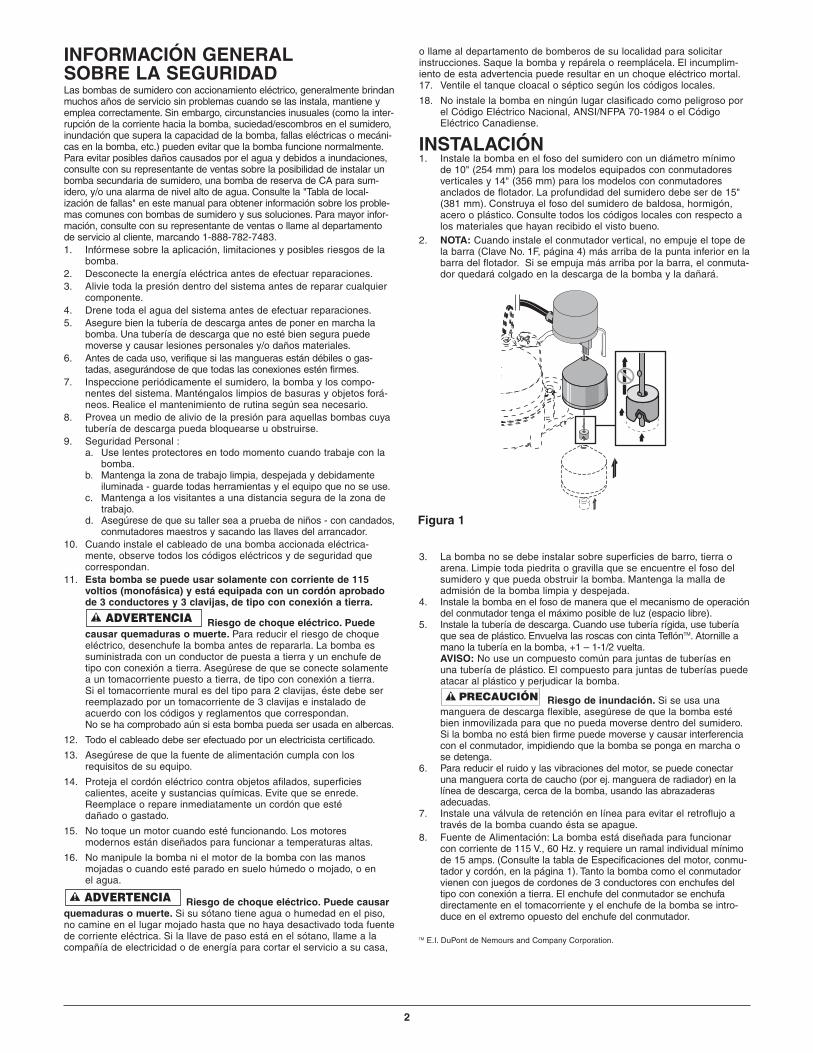
de 10" (254 mm) para los modelos equipados con conmutadoresverticales y 14" (356 mm) para los modelos con conmutadoresanclados de flotador. La profundidad del sumidero debe ser de 15"(381 mm). Construya el foso del sumidero de baldosa, hormigón,acero o plástico. Consulte todos los códigos locales con respecto alos materiales que hayan recibido el visto bueno.
2. NOTA: Cuando instale el conmutador vertical, no empuje el tope dela barra (Clave No. 1F, página 4) más arriba de la punta inferior en labarra del flotador. Si se empuja más arriba por la barra, el conmuta-dor quedará colgado en la descarga de la bomba y la dañará.
3. La bomba no se debe instalar sobre superficies de barro, tierra oarena. Limpie toda piedrita o gravilla que se encuentre el foso delsumidero y que pueda obstruir la bomba. Mantenga la malla deadmisión de la bomba limpia y despejada.
4. Instale la bomba en el foso de manera que el mecanismo de operacióndel conmutador tenga el máximo posible de luz (espacio libre).
5. Instale la tubería de descarga. Cuando use tubería rígida, use tuberíaque sea de plástico. Envuelva las roscas con cinta TeflónTM. Atornille amano la tubería en la bomba, +1 – 1-1/2 vuelta.AVISO: No use un compuesto común para juntas de tuberías enuna tubería de plástico. El compuesto para juntas de tuberías puedeatacar al plástico y perjudicar la bomba.
Riesgo de inundación. Si se usa unamanguera de descarga flexible, asegúrese de que la bomba estébien inmovilizada para que no pueda moverse dentro del sumidero.Si la bomba no está bien firme puede moverse y causar interferenciacon el conmutador, impidiendo que la bomba se ponga en marcha ose detenga.
6. Para reducir el ruido y las vibraciones del motor, se puede conectaruna manguera corta de caucho (por ej. manguera de radiador) en lalínea de descarga, cerca de la bomba, usando las abrazaderas adecuadas.
7. Instale una válvula de retención en línea para evitar el retroflujo através de la bomba cuando ésta se apague.
8. Fuente de Alimentación: La bomba está diseñada para funcionarcon corriente de 115 V., 60 Hz. y requiere un ramal individual mínimode 15 amps. (Consulte la tabla de Especificaciones del motor, conmu-tador y cordón, en la página 1). Tanto la bomba como el conmutadorvienen con juegos de cordones de 3 conductores con enchufes deltipo con conexión a tierra. El enchufe del conmutador se enchufadirectamente en el tomacorriente y el enchufe de la bomba se intro-duce en el extremo opuesto del enchufe del conmutador.
PRECAUCIÓN
ADVERTENCIA
ADVERTENCIA
Figura 15669 0707
TM E.I. DuPont de Nemours and Company Corporation.
3
Tension pelogrosa. Puede causarchoque, quemaduras o muerte. La bomba siempre debe estar puestaa tierra por medio de una conexión eléctrica a tierra adecuada como unatubería de agua puesta a tierra, una canalización metálica debidamentepuesta a tierra, o un sistema de cableado a tierra. No modifique elcordón ni el enchufe, ni corte la clavija redonda de conexión a tierra.
9. Si la línea de descarga de la bomba está expuesta a la intemperie contemperaturas debajo del punto de congelamiento, la porción de la líneaque quede expuesta, deberá ser instalada de manera que el agua quepermanezca en la tubería se desagüe hacia la salida por gravedad. Sise ignora esta precaución, existe el riesgo de que el agua que quedeatrapada en la descarga se congele y dañe la bomba.
10. Después de que se haya instalado la tubería y la válvula de reten-ción, la bomba estará lista para su funcionamiento.
11. Verifique el funcionamiento de la bomba, llenando el sumidero conagua y haciendo funcionar la bomba a través de un ciclo completo.
Riesgo de inundación. El incumplimientode esta verificación del funcionamiento puede resultar en una fun-cionamiento inadecuado, en una falla prematura y en inundaciones.
OPERACIÓN/MANTENIMIENTORiesgo de choque eléctrico. Puede causar
quemaduras o muerte. No manipulee la bomba ni el motor de la bombacon manos mojadas o cuando esté parado sobre una superficie mojada ohúmeda, o en agua.Antes de tratar de verificar la razón por la cual la unidad ha dejado defuncionar, desconecte la corriente.
Riesgo de incendio o de explosión. Puedecausar lesions graves, daños materiales o muerte. No se debe usar enatmósferas explosivas. Esta bomba se debe utilizar solamente parabombear agua.1. El sello del eje depende del agua para su lubricación y refrigeración.
No opere la bomba a menos que se encuentre en agua, ya que elsello se perjudicará si marcha en seco.
2. El motor viene equipado con un protector térmico de reposiciónautomática. Si la temperatura en el motor se eleva indebidamente, elconmutador cortará la corriente antes de que el motor se pueda
perjudicar. Cuando el motor se haya enfriado lo suficiente, el conmu-tador se reposicionará automáticamente y volverá a arrancar elmotor. Si el protector se dispara repetidamente, será necesariosacar la bomba y verificar la causa de este problema. Una tensiónbaja, cordones largos de extensión, un impulsor tapado, muy pocaaltura o elevación, etc. pueden ocasionar estos ciclos.
3. La bomba no extrae toda el agua. Si una bomba operada manual-mente está funcionando y de repente no sale agua de la manguerade descarga, apague la unidad inmediatamente. El nivel del agua esprobablemente muy bajo y la unidad no está cebando.
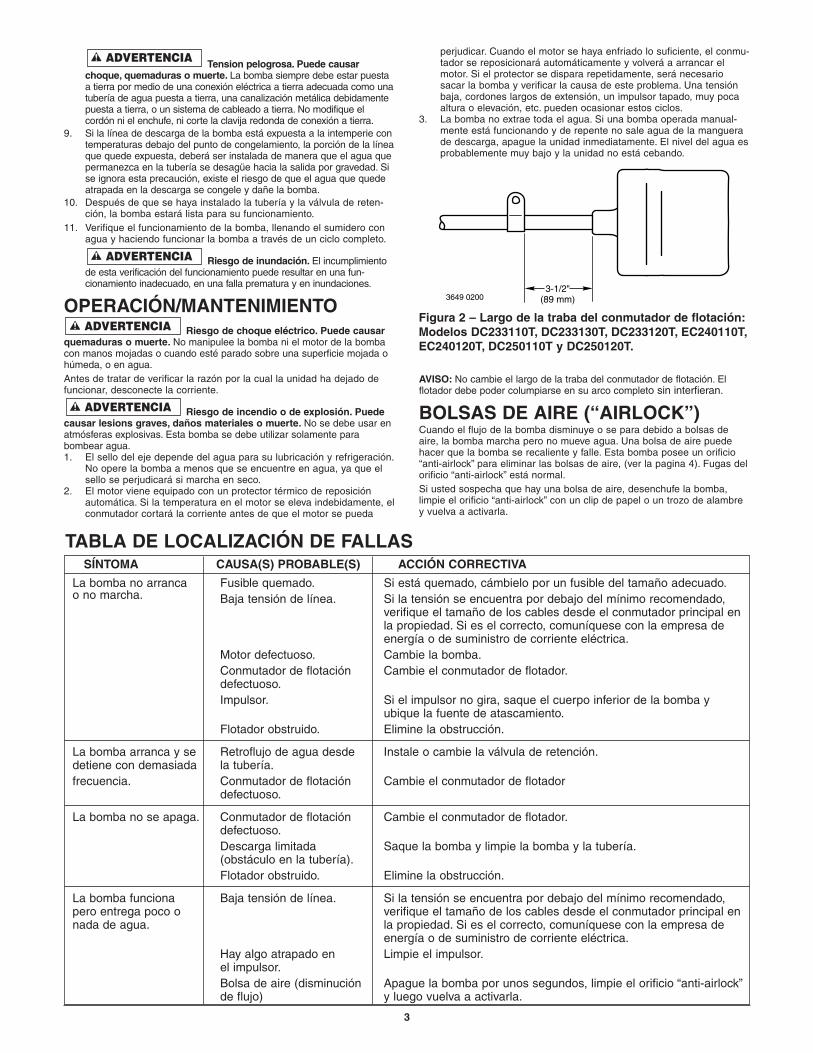
AVISO: No cambie el largo de la traba del conmutador de flotación. Elflotador debe poder columpiarse en su arco completo sin interfieran.
BOLSAS DE AIRE (“AIRLOCK”)Cuando el flujo de la bomba disminuye o se para debido a bolsas deaire, la bomba marcha pero no mueve agua. Una bolsa de aire puedehacer que la bomba se recaliente y falle. Esta bomba posee un orificio“anti-airlock” para eliminar las bolsas de aire, (ver la pagina 4). Fugas delorificio “anti-airlock” está normal.Si usted sospecha que hay una bolsa de aire, desenchufe la bomba,limpie el orificio “anti-airlock” con un clip de papel o un trozo de alambrey vuelva a activarla.
ADVERTENCIA
ADVERTENCIA
ADVERTENCIA
ADVERTENCIA
3-1/2"(89 mm)3649 0200
SÍNTOMA CAUSA(S) PROBABLE(S) ACCIÓN CORRECTIVA
La bomba no arranca Fusible quemado. Si está quemado, cámbielo por un fusible del tamaño adecuado.o no marcha. Baja tensión de línea. Si la tensión se encuentra por debajo del mínimo recomendado,
verifique el tamaño de los cables desde el conmutador principal en la propiedad. Si es el correcto, comuníquese con la empresa de energía o de suministro de corriente eléctrica.
Motor defectuoso. Cambie la bomba.Conmutador de flotación Cambie el conmutador de flotador.defectuoso.Impulsor. Si el impulsor no gira, saque el cuerpo inferior de la bomba y
ubique la fuente de atascamiento.Flotador obstruido. Elimine la obstrucción.
La bomba arranca y se Retroflujo de agua desde Instale o cambie la válvula de retención.detiene con demasiada la tubería.frecuencia. Conmutador de flotación Cambie el conmutador de flotador
defectuoso.
La bomba no se apaga. Conmutador de flotación Cambie el conmutador de flotador.defectuoso.Descarga limitada Saque la bomba y limpie la bomba y la tubería.(obstáculo en la tubería).Flotador obstruido. Elimine la obstrucción.
La bomba funciona Baja tensión de línea. Si la tensión se encuentra por debajo del mínimo recomendado, pero entrega poco o verifique el tamaño de los cables desde el conmutador principal en nada de agua. la propiedad. Si es el correcto, comuníquese con la empresa de
energía o de suministro de corriente eléctrica.Hay algo atrapado en Limpie el impulsor.el impulsor.Bolsa de aire (disminución Apague la bomba por unos segundos, limpie el orificio “anti-airlock”de flujo) y luego vuelva a activarla.
TABLA DE LOCALIZACIÓN DE FALLAS
Figura 2 – Largo de la traba del conmutador de flotación:Modelos DC233110T, DC233130T, DC233120T, EC240110T,EC240120T, DC250110T y DC250120T.

4
2
45
7A
6
12A
12B
14
16
3
1C
17
18
19
1D
1E
1F
1A
1B
13
6A
7B
11
10
9
8
15
20
21
anti-airlock hole
DC233110T, DC233120T,DC233130T, DC233110V,DC233120V, DC233110M,DC233120M, EC240110T,EC240110M, EC240120T,EC240120M, DC240110T,DC240120T, DC240110V,DC240120V, DC240110M,DC240120M
Orificio “anti-airlock”

5
LISTA DE PIEZAS DE REPUESTO
* Si el motor falla, cambie toda la bomba. La Serie EC2 usa el Motor/la Voluta Superior 8A.** Use el impulsor PS5-26P para los modelos DC233 (1/3 CV) y PS5-29 para ambos modelos DC250 (1/2 CV) y EC240 (4/10 CV).
*** Bomba de serie DC solamente.(†) Para ser utilizado en los números de modelo que terminan en “T”.(††) Model DC233130T uses Part No. PS217-164.
EC240120TEC240110T DC233120T EC240110M EC240120MDC233110T DC233130T DC233110V DC233120V DC233110M DC233120M
Clave Descripción Cant. DC250110T DC250120T DC250110V DC250120V DC250110M DC250120M
1 Conmutador vertical (incl. 1A al 1F) 1 – – PKG 208 PKG 209 – –1A Conmutador 11B Soporte de montaje 11C Tornillo 21D Flotador 11E Correa de retención 11F Tope 12 Tornillo, #8-1/2" autorroscante (†) 1 U30-539SS U30-539SS U30-539SS U30-539SS – –3 Abrazadera del cable del interruptor (†) 1 CC0030-13 CC0030-13 – – – –4 Tapón de aceite 1 U78-941ZPV U78-941ZPV U78-941ZPV U78-941ZPV U78-941ZPV U78-941ZPV5 Mango anular 1 U97-128 U97-128 U97-128 U97-128 U97-128 U97-1286 Conector del cordón 1 PS17-46P PS17-46P PS17-46P PS17-46P PS17-46P PS17-46P
6A Aro tórico 1 U9-370 U9-370 U9-370 U9-370 U9-370 U9-3707A Tapa del motor - DC Series 1 PS18-144B PS18-144B PS18-144B PS18-144B PS18-144B PS18-144B7B Tapa del motor - EC Series PS18-149B PS18-149B – – PS18-149B PS18-149B8 Tornillo de cabeza # 10-32 x 3/4” 3 U30-482SS U30-482SS U30-482SS U30-482SS U30-482SS U30-482SS9 Aro tórico 1 U9-339 U9-339 U9-339 U9-339 U9-339 U9-33910 Disco aislador 1 PS18-82 PS18-82 PS18-82 PS18-82 PS18-82 PS18-8211 Motor/Voluta superior 1 * * * * * *
12A Ensamblaje del cabezal fijo del eje sellado 1 U9-379A U9-379A U9-379A U9-379A U9-379A U9-379A12B Aro giratorio del eje sellado 1 U9-321A U9-321A U9-321A U9-321A U9-321A U9-321A13 Impulsor 1 ** ** ** ** ** **14 Junta 1 PS20-21 PS20-21 PS20-21 PS20-21 PS20-21 PS20-2115 Voluta inferior 1 PS1-34P PS1-34P PS1-34P PS1-34P PS1-34P PS1-34P16 Tornillo del cuerpo inferior de la
bomba #10-32x1” Arandela hexagonal, autorroscante 7 U30-966SS U30-966SS U30-966SS U30-966SS U30-966SS U30-966SS
17 Tubería de placa*** 1 U43-142SS U43-142SS U43-142SS U43-142SS U43-142SS U43-142SS18 Tornillo de cabeza platillo #6-1/4"*** 1 U30-972SS U30-972SS U30-972SS U30-972SS U30-972SS U30-972SS19 Tornillo del cuerpo inferior de la
bomba #10-32x1-1/8” Arandela hexagonal, autorroscante 1 U30-967SS U30-967SS U30-967SS U30-967SS U30-967SS U30-967SS
20 Ensamblaje del cordón eléctrico 1 Ver Tabla Ver Tabla Ver Tabla Ver Tabla Ver Tabla Ver Tabla21 Conmutador de flotador anclado (†) (††) 1 PS217-62 PS217-64 – – – –
Aceite dieléctrico. Todos los modelos usan .61 qts. 1 U197-8A U197-8A U197-8A U197-8A U197-8A U197-8A
ENSAMBLAJE DEL CORDÓN ELÉCTRICOModelo número Número Modelo número Número
de bomba de parte de bomba de parteDC233110M PW117-281-TSU DC250110V PW117-237-TSUDC233110T PW117-281-TSU DC250120M PW117-122-TSUDC233110V PW117-281-TSU DC250120T PW117-122-TSUDC233120M PW117-122-TSU DC250120V PW117-122-TSUDC233120T PW117-122-TSU EC240110M PW117-237-TSEDC233120V PW117-122-TSU EC240110T PW117-237-TSEDC233130T PW117-293-TSU EC240120M PW117-122-TSEDC250110M PW117-237-TSU EC240120T PW117-122-TSEDC250110T PW117-237-TSU

6
GARANTÍA LIMITADASta-Rite Industries garantiza al consumidor original de los productos indicados a continuación, que se encontrarán libres de defectosen material y mano de obra durante el Período de Garantía, desde la fecha de la instalación o fabricación inicial, según se indique.
Producto Período de Garantía
Productos de los sistemas de agua - lo que ocurra primero:bombas de chorro, pequeñas bombas 1 año desde la fecha de la instalacióncentrífugas, bombas sumergibles y inicial, o 2 años desde la fecha deaccesorios relacionados. fabricación
Filtros hydro-flow 1 año desde la fecha de compra
Tanques de enrollado de fibra 5 años desde la fecha de la instalación Signature 2000 inicial
Tanques a presión de acero 5 años desde la fecha de la instalación inoxidable Pro-Source inicial
Tanques Pro-Source Epoxy-Line 3 años desde la fecha de la instalación inicial
Productos para sumideros/aguas 1 año desde la fecha de la instalación inicial, residuales/vertidos o 2 años desde la fecha de fabricación
Nuestra garantía no corresponde a ningún producto que haya estado sujeto a negligencia, mala aplicación, instalación o mantenimien-to inadecuados. En el caso en que se opere un motor trifásico sumergible con una potencia monofásica, a través de un convertidor defase, o si no se usan relés de sobrecarga de tres patas, con compensación ambiental, y disparo extra-rápido, del tamaño recomenda-do, nuestra garantía quedará anulada.
El único recurso del comprador, y la única obligación de Sta-Rite Industries serán el de reparar o reemplazar los productos defectuosos(a opción de Sta-Rite Industries ). El comprador acuerda pagar por toda la mano de obra y los cargos de envío asociados con estagarantía y solicitar un servicio de garantía a través del representante que haya realizado la instalación, tan pronto como se descubra elproblema. No se aceptará ninguna solicitud de servicio bajo garantía si ésta se presenta pasados los 30 días después del vencimientodel Período de Garantía.
STA-RITE INDUSTRIES NO SE HARÁ RESPONSABLE DE NINGÚN DAÑO CONSECUENTE, INCIDENTAL O CONTINGENTE QUESEA.
LAS GARANTÍAS QUE PRECEDEN SON EXCLUSIVAS Y EN LUGAR DE TODA OTRA GARANTÍA EXPLÍCITA. LAS GARANTÍASIMPLÍCITAS, INCLUYENDO, PERO SIN LIMITARSE A LAS GARANTÍAS IMPLÍCITAS DE COMERCIABILIDAD E IDONEIDAD PARAUN FIN EN PARTICULAR, NO SE EXTENDERÁN MÁS ALLÁ DEL PERÍODO DE GARANTÍA PROPORCIONADO EN LA PRESENTE.
Ciertos estados no permiten la exclusión o limitación de daños incidentales o consecuentes, o la introducción de limitaciones a laduración de una garantía implícita, por lo tanto, es posible que las limitaciones o exclusiones indicadas en la presente no correspon-dan. Esta garantía determina derechos y obligaciones legales específicos, sin embargo, es posible que existan derechos adicionalesque pueden variar de un estado al otro.
Reemplaza toda publicación anterior.
Sta-Rite Industries, 293 Wright St., Delavan, WI 53115