1955-57 9” ford rear end installation - … classics 10 by randy irwin 1955-57 9” ford rear end...
TRANSCRIPT
CHEVY CLASSICS
10
by Randy Irwin
1955-57 9” FORD REAR END INSTALLATION
Parts Needed:21-238 9” Ford With 11” Drum Brakes21-238PC Powder Coated 9” Ford With 11” Drum Brakes
21-242 9” Ford With 11” Drum Brakes & Stainless Brake Lines
21-242PC Powder Coated 9” Ford With 11” Drum Brakes & Stainless Brake Lines
21-239 9” Ford With 11-7/8” Disc Brakes
21-239PC Powder Coated 9” Ford With 11-7/8” Disc Brakes
21-243 9” Ford With 11-7/8 Disc Brakes & Stainless Brake Lines
21-243PC Powder Coated 9” Ford With 11-7/8 Disc Brakes & Stainless Brake Lines
20-223 55-57 9” Ford Drum Brake Rear Emergency Brake Cable
34-110 55-57 Brake Hose Clip Set (4) 34-114 55-57 Emergency Brake Cable Clips
To order parts call 1-800-456-1957 or visit ClassicChevy.com
Tools Needed: Floor JackJack stands3/4” Socket & Ratchet3/8” Extension
1/2” Wrench3/8” Line WrenchPliers
The weakest part of the driveline on a Tri-Five has got to be the rear end.However, it is usually the last thing to be changed - if it works don’t fix itsyndrome. A new engine you can show off to your friends, an overdrivetransmission can save you gas money; but the rear end is under the car,out of sight out of mind. A 9” Ford is the way to go as far as durability,ease of finding parts and least expense in the long run. Finding a 9” withgood bearings, the ratio you want, with a posi and the right width can betough. The Ford rears Eckler’s carries manufactured by The 9” Factory is acompletely new rear end (housing and all internals are new, nothing used!)for the Tri-Fives with either drum or disc brakes that is a truly a bolt-in unit.The leaf spring perches will be set correctly, the width is exact to yourspecs, the axles have the Chevy bolt pattern and with the supplied U-jointthe stock driveshaft can be used without any modifications. These rearends are now available in semi-gloss black powder coat so you don’t evenhave to take it apart and paint it if you choose one of the “PC” rears. WithThe 9” Factory rear end, the hardest job you’ll have is unpacking it fromthe shipping pallet!
Time Frame: 4-5 Hours
Randy Irwin - Technical WriterRandy has been involved in the Chevy
parts business for over 30 years. He is a wiz-ard at creating, making and modifying customparts for Chevys.
21-242PC
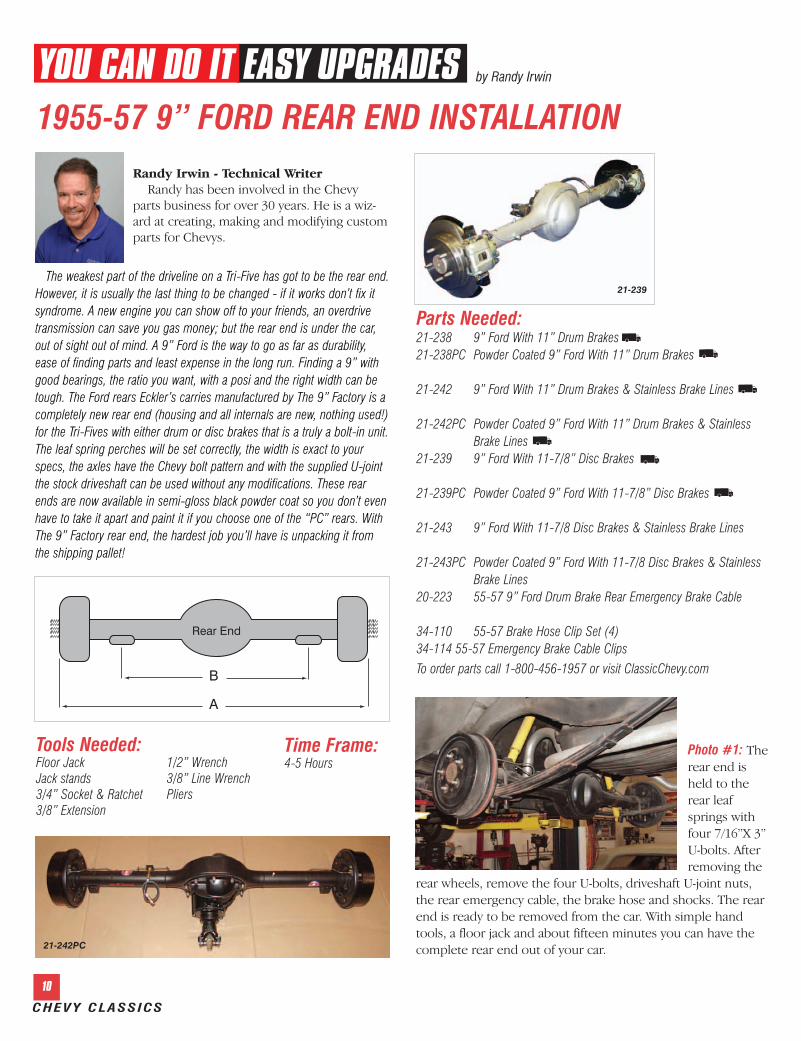
Photo #1: Therear end isheld to therear leafsprings withfour 7/16”X 3”U-bolts. Afterremoving the
rear wheels, remove the four U-bolts, driveshaft U-joint nuts,the rear emergency cable, the brake hose and shocks. The rearend is ready to be removed from the car. With simple handtools, a floor jack and about fifteen minutes you can have thecomplete rear end out of your car.
21-239
SEPTEMBER 2009
11
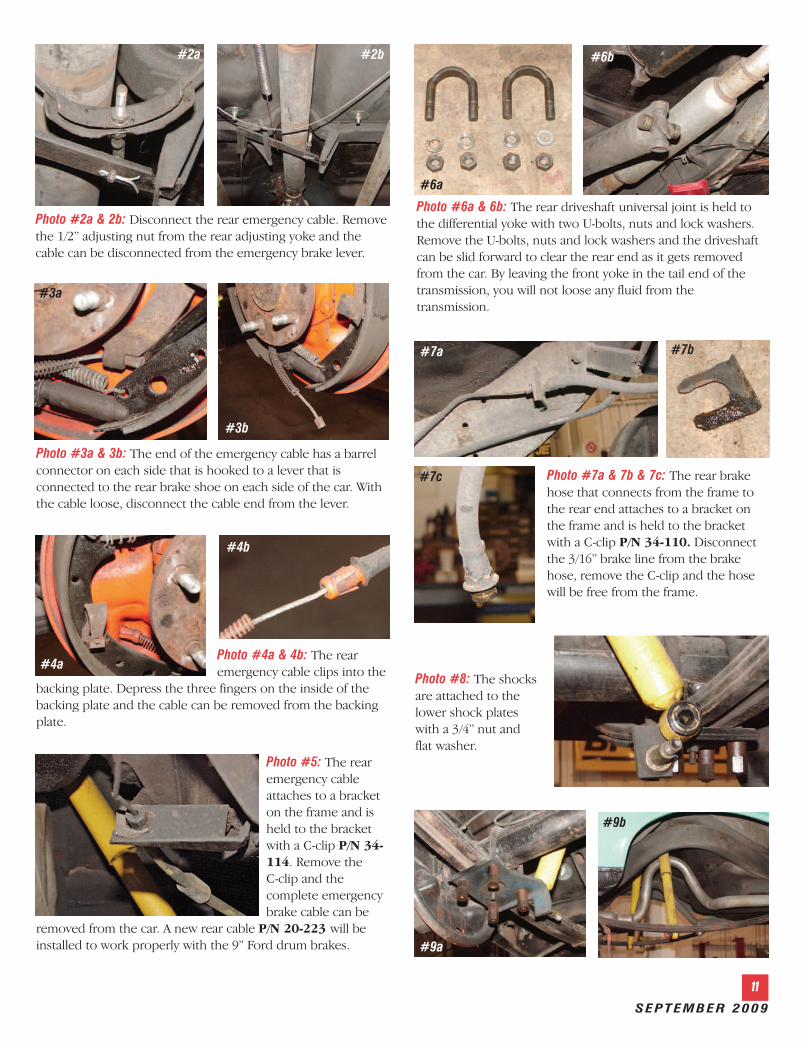
Photo #2a & 2b: Disconnect the rear emergency cable. Removethe 1/2” adjusting nut from the rear adjusting yoke and thecable can be disconnected from the emergency brake lever.
Photo #5: The rearemergency cableattaches to a bracketon the frame and isheld to the bracketwith a C-clip P/N 34-114. Remove theC-clip and thecomplete emergencybrake cable can be
removed from the car. A new rear cable P/N 20-223 will beinstalled to work properly with the 9” Ford drum brakes.
#2a #2b
Photo #3a & 3b: The end of the emergency cable has a barrelconnector on each side that is hooked to a lever that isconnected to the rear brake shoe on each side of the car. Withthe cable loose, disconnect the cable end from the lever.
Photo #6a & 6b: The rear driveshaft universal joint is held tothe differential yoke with two U-bolts, nuts and lock washers.Remove the U-bolts, nuts and lock washers and the driveshaftcan be slid forward to clear the rear end as it gets removedfrom the car. By leaving the front yoke in the tail end of thetransmission, you will not loose any fluid from thetransmission.
#6a
#6b
#9a
#9b
Photo #4a & 4b: The rearemergency cable clips into the
backing plate. Depress the three fingers on the inside of thebacking plate and the cable can be removed from the backingplate.
#4a
#4b
Photo #8: The shocksare attached to thelower shock plateswith a 3/4” nut andflat washer.
#3a
#3b
Photo #7a & 7b & 7c: The rear brakehose that connects from the frame tothe rear end attaches to a bracket onthe frame and is held to the bracketwith a C-clip P/N 34-110. Disconnectthe 3/16” brake line from the brakehose, remove the C-clip and the hosewill be free from the frame.
#7a #7b
#7c
CHEVY CLASSICS
12
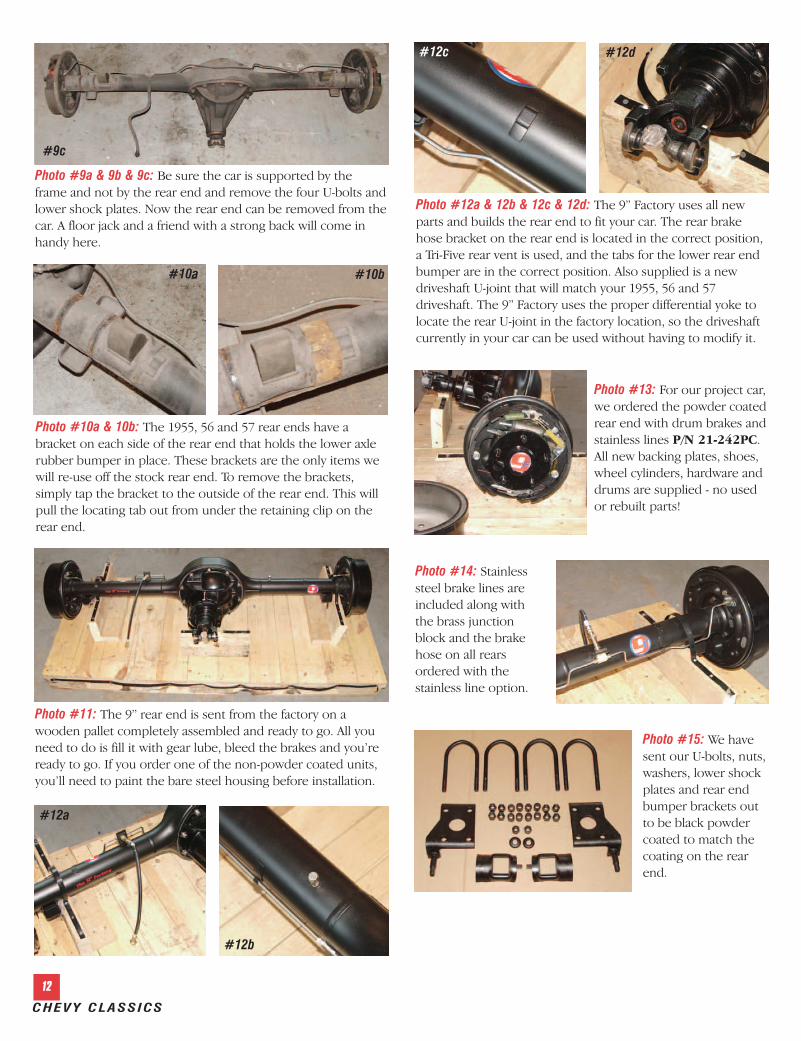
Photo #9a & 9b & 9c: Be sure the car is supported by theframe and not by the rear end and remove the four U-bolts andlower shock plates. Now the rear end can be removed from thecar. A floor jack and a friend with a strong back will come inhandy here.
Photo #10a & 10b: The 1955, 56 and 57 rear ends have abracket on each side of the rear end that holds the lower axlerubber bumper in place. These brackets are the only items wewill re-use off the stock rear end. To remove the brackets,simply tap the bracket to the outside of the rear end. This willpull the locating tab out from under the retaining clip on therear end.
#10a #10b
Photo #12a & 12b & 12c & 12d: The 9” Factory uses all newparts and builds the rear end to fit your car. The rear brakehose bracket on the rear end is located in the correct position,a Tri-Five rear vent is used, and the tabs for the lower rear endbumper are in the correct position. Also supplied is a newdriveshaft U-joint that will match your 1955, 56 and 57driveshaft. The 9” Factory uses the proper differential yoke tolocate the rear U-joint in the factory location, so the driveshaftcurrently in your car can be used without having to modify it.
#12c
#9c
#12d
#12a
#12b
Photo #14: Stainlesssteel brake lines areincluded along withthe brass junctionblock and the brakehose on all rearsordered with thestainless line option.
Photo #13: For our project car,we ordered the powder coatedrear end with drum brakes andstainless lines P/N 21-242PC.All new backing plates, shoes,wheel cylinders, hardware anddrums are supplied - no usedor rebuilt parts!
Photo #11: The 9” rear end is sent from the factory on awooden pallet completely assembled and ready to go. All youneed to do is fill it with gear lube, bleed the brakes and you’reready to go. If you order one of the non-powder coated units,you’ll need to paint the bare steel housing before installation.
Photo #15: We havesent our U-bolts, nuts,washers, lower shockplates and rear endbumper brackets outto be black powdercoated to match thecoating on the rearend.
SEPTEMBER 2009
13
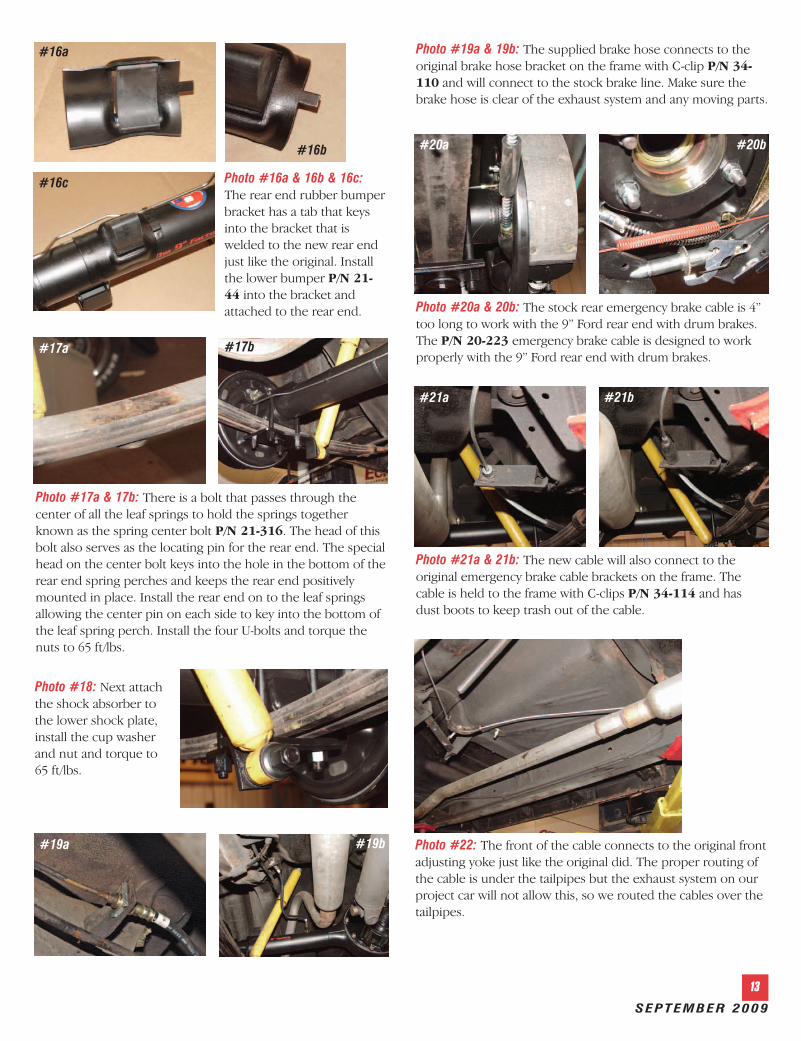
Photo #17a & 17b: There is a bolt that passes through thecenter of all the leaf springs to hold the springs togetherknown as the spring center bolt P/N 21-316. The head of thisbolt also serves as the locating pin for the rear end. The specialhead on the center bolt keys into the hole in the bottom of therear end spring perches and keeps the rear end positivelymounted in place. Install the rear end on to the leaf springsallowing the center pin on each side to key into the bottom ofthe leaf spring perch. Install the four U-bolts and torque thenuts to 65 ft/lbs.
#17a #17b
Photo #20a & 20b: The stock rear emergency brake cable is 4”too long to work with the 9” Ford rear end with drum brakes.The P/N 20-223 emergency brake cable is designed to workproperly with the 9” Ford rear end with drum brakes.
#20a #20b
Photo #21a & 21b: The new cable will also connect to theoriginal emergency brake cable brackets on the frame. Thecable is held to the frame with C-clips P/N 34-114 and hasdust boots to keep trash out of the cable.
#21a #21b
Photo #19a & 19b: The supplied brake hose connects to theoriginal brake hose bracket on the frame with C-clip P/N 34-110 and will connect to the stock brake line. Make sure thebrake hose is clear of the exhaust system and any moving parts.
#19a #19b
Photo #16a & 16b & 16c:The rear end rubber bumperbracket has a tab that keysinto the bracket that iswelded to the new rear endjust like the original. Installthe lower bumper P/N 21-44 into the bracket andattached to the rear end.
#16a
#16c
#16b
Photo #18: Next attachthe shock absorber tothe lower shock plate,install the cup washerand nut and torque to65 ft/lbs.
Photo #22: The front of the cable connects to the original frontadjusting yoke just like the original did. The proper routing ofthe cable is under the tailpipes but the exhaust system on ourproject car will not allow this, so we routed the cables over thetailpipes.
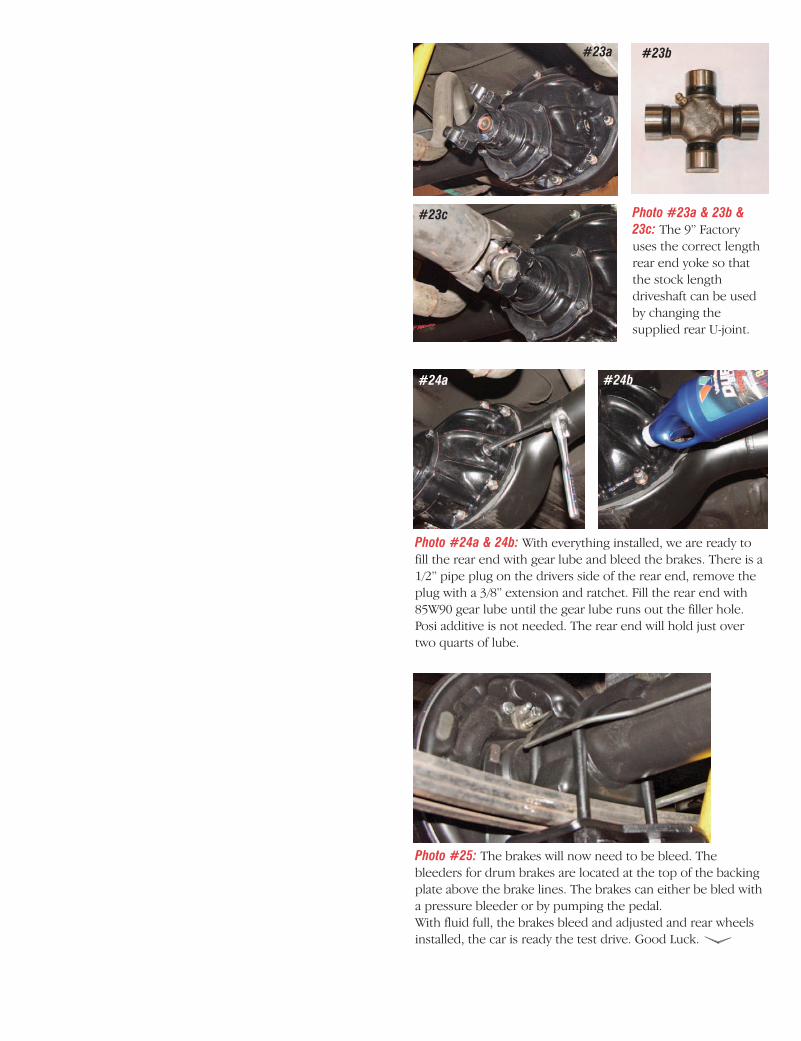
Photo #24a & 24b: With everything installed, we are ready tofill the rear end with gear lube and bleed the brakes. There is a1/2” pipe plug on the drivers side of the rear end, remove theplug with a 3/8” extension and ratchet. Fill the rear end with85W90 gear lube until the gear lube runs out the filler hole.Posi additive is not needed. The rear end will hold just overtwo quarts of lube.
#24a #24b
Photo #23a & 23b &23c: The 9” Factoryuses the correct lengthrear end yoke so thatthe stock lengthdriveshaft can be usedby changing thesupplied rear U-joint.
#23a
#23c
#23b
Photo #25: The brakes will now need to be bleed. Thebleeders for drum brakes are located at the top of the backingplate above the brake lines. The brakes can either be bled witha pressure bleeder or by pumping the pedal. With fluid full, the brakes bleed and adjusted and rear wheelsinstalled, the car is ready the test drive. Good Luck.