15. list registry hives - powertheshell – powershell …. list registry hives use the provider...
TRANSCRIPT

1. Accessing Registry
2. Reading Registry Hives
3. Using Native Registry Paths
4. Reading Registry Values
5. Reading Default Values
6. Creating New Registry Keys
7. Creating or Changing Registry Values
8. Creating Registry Values with Type
9. Remove Registry Keys and Values
10. Listing Installed Software
11. Test Whether Registry Key Exists
12. Test Whether Registry Value Exists
13. Exclude Unwanted Registry Values
14. Accessing Registry Remotely
15. List Registry Hives
16. Load Registry User Hive
17. Copy Registry Hives
18. Scanning Registry for ClassIDs
19. Enumerating Registry Keys with Style
20. Getting Windows Product Key
21. Investigating USB Drive Usage
Table of Contents
1. Accessing Registry
PowerShell treats the Windows Registry just like another drive, pretty much like a disk drive. This is why you can use all the file system cmdlets to read, write, and change the Registry (as you will see in the examples below).
Before you try and play with the examples, be aware that the Registry and its content is important and crucial for Windows to function properly. By changing or deleting the Registry content, you may damage your Windows installation. So do not change or delete Registry content unless you really know what you are doing.
Note also that you may need to run PowerShell elevated to activate your full privileges to make changes in HKEY_LOCAL_MACHINE. Finally, note that changes to the Registry may or may not have immediate effect. Some changes will require a logoff or even reboot. The Registry is simply a database, and it is up to Windows and its components to look up values.
Reading Registry content is always safe.
2. Reading Registry Hives
Since PowerShell treats the Registry like a drive, you can use Get-ChildItem to list Registry key subkeys, and even search the Registry recursively.
This will list all subkeys below HKEY_LOCAL_MACHINE\Software\Microsoft\Windows:
Get-ChildItem -Path HKLM:\software\microsoft\Windows
And this would find all keys in HKEY_LOCAL_MACHINE and HKEY_CURRENT_USER that contain the keyword “PowerShell”:
Get-ChildItem -Path HKLM:\, HKCU:\ -Include *PowerShell* -Recurse -ErrorAction SilentlyContinue
As you see, the parameter -Recurse works perfectly well in the Registry. Whenever you use -Recurse, make sure you suppress error messages with -ErrorAction because recursively traversing the Registry will very likely touch keys that you may not have access permission for.
Note that the Registry provider does not support -Filter, so in order to filter Registry keys, you need to use -Include instead. This parameter is slower than -Filter.
3. Using Native Registry Paths
In PowerShell, you access Registry keys through virtual drives like HKCU: (for HKEY_CURRENT_USER) and HKLM: (representing HKEY_LOCAL_MACHINE).
You do not need these drives, though. Use the native Registry key name and prepend “Registry::”. This way, you can simply copy and paste Registry paths from the Registry editor, and you can access hives in the Registry that are not covered by the Power-Shell Registry drives.
This will list all registered file types from HKEY_CLASSES_ROOT:
Get-ChildItem -Path Registry::HKEY_CLASSES_ROOT | Where-Object { $_.PSChildName -like ‘.*’ }
Note that the property “Name” will contain the complete path name of a key whereas “PSChildName” contains the key name only. So if you wanted to check the key name (like in the example above), make sure you use “PSChildName” instead of “Name”.
Another approach is this:
Get-ChildItem -Path Registry::HKEY_CLASSES_ROOT\.* -Name
It, too, returns registered file types. Because of the -Name parameter, only the key names are returned (remove this parameter to discover the difference).
So it is completely up to you whether you want to use the PowerShell Registry drive names, or rather stick to the native Registry paths and use the “Registry::” provider name as a prefix.
4. Reading Registry Values
Registry values in PowerShell are called “ItemProperties”. The easiest way to read particular Registry values is to use Get-ItemProperty and not specify the -Name parameter. This way, you get back all Registry values in a particular key.
This will dump all Registry values in HKEY_LOCAL_MACHINE\Software\Microsoft\Windows NT\CurrentVersion:
Get-ItemProperty -Path ‘HKLM:\SOFTWARE\Microsoft\Windows NT\CurrentVersion’
In addition to the Registry key values, there are a number of additional entries that PowerShell added. These start with “PS” and provide information about the origin of information.

To read one particular Registry value, simply store the result in a variable and access the value as a property:
$allvalues = Get-ItemProperty -Path ‘HKLM:\SOFTWARE\Microsoft\Windows NT\CurrentVersion’$allvalues.RegisteredOwner$allvalues.CSDVersion$allvalues.CurrentVersion
‘Current User {0} is running Windows {1} with {2}’ -f $allvalues.RegisteredOwner, $allvalues.CurrentVersion, $allvalues.CSDVersion
This will produce output similar to this:
TobiasService Pack 16.1Current User Tobias is running Windows 6.1 with Service Pack 1
You can also use Select-Object to pick more than one Registry value, and produce a nice table:
$allvalues | Select-Object -Property RegisteredOwner, CurrentVersion, CurrentBuild, CSDVersion
The result will now look like this:
RegisteredOwner CurrentVersion CurrentBuild CSDVersion --------------- -------------- ------------ ---------- Tobias 6.1 7601 Service Pack 1
5. Reading Default Values
Each Registry key has a default value. It is called (default) when you look into regedit. Reading default values is no different than reading any other Registry value. Just use “(default)” as a name.
This will read the file type description for any registed file type:
$extension = ‘.doc’
$allValues = Get-ItemProperty -Path Registry::HKEY_CLASSES_ROOT\$extension $allValues.’(Default)’
Since file type descriptions are located in HKEY_CLASSES_ROOT the Registry hive, and since there is no default PowerShell drive pointing to this hive, use the native Registry path and prepend it with “Registry::” instead. This way, you can access any location inside the registry.
Author Bio
Tobias Weltner is a long-term Microsoft PowerShell MVP, located in Germany. Weltner offers entry-level and advanced PowerShell classes throughout Europe, targeting mid- to large-sized enterprises. He just organized the first German PowerShell Community conference which was a great success and will be repeated next year (more on www.pscommunity.de).. His latest 950-page “PowerShell 3.0 Workshop” was recently released by Microsoft Press.
To find out more about public and in-house training, get in touch with him at [email protected].
6. Creating New Registry Keys
PowerShell treats the Registry like a drive, and anything on a drive is called “Item”. So New-Item can easily create new Registry keys. This will create a new Registry key called “Testkey” in HKEY_CURRENT_USER\Software:
New-Item -Path HKCU:\Software\Testkey
You can also set the default value for the Registry key by submitting the -Value parameter:
New-Item -Path HKCU:\Software\Testkey -Value ‘My default value’
By default, New-Item cannot create multiple Registry keys. It requires the immediate parent key to exist. If you want to create all keys in your path that may not yet exist, use the -Force parameter. This line will create all Registry keys that may be missing:
New-Item -Path HKCU:\Software\Testkey\more\anotherone\finalkey -Force
7. Creating or Changing Registry Values
Registry values in PowerShell are called “ItemProperties”, so to create a new Registry value, you can either use New-ItemProperty or Set-ItemProperty.
Note that the Registry key needs to already exist. This will first create a new Registry key with a default value, and then add some Registry values:
$RegKey = ‘HKCU:\Software\Testkey1’
$key = New-Item -Path $RegKey -Value ‘I am testing here’$value1 = New-ItemProperty -Path $RegKey -Name ‘MyFirstValue’ -Value 123$value2 = New-ItemProperty -Path $RegKey -Name ‘MySecondValue’ -Value ‘Hello World’
Beginning in PowerShell 3.0, PowerShell will choose the Registry value data type depending on your value. Numeric values are using the Registry data type “DWORD”, and string values are using “REG_SZ”.
New-ItemProperty will throw an exception if the Registry value already exists. To overwrite existing values, use Set-ItemProperty. This cmdlet will overwrite existing values, and it will also create values if they do not exist yet:
$RegKey = ‘HKCU:\Software\Testkey2’
$key = New-Item -Path $RegKey -Value ‘I am testing here’Set-ItemProperty -Path $RegKey -Name ‘MyFirstValue’ -Value 123Set-ItemProperty -Path $RegKey -Name ‘MySecondValue’ -Value ‘Hello World’
8. Creating Registry Values with Type
To write a Registry value in a specific Registry data type, use New-ItemProperty, and specify the value type with the parameter -Type. This will create a testkey and then add a Registry value of type “Binary”:
$null = New-Item -Path HKCU:\Software\Testkey3Set-ItemProperty -Path HKCU:\Software\Testkey3 -Name Testvalue -Value 1,2,3,4 -Type Binary
Powershell Plus FREE TooL To LEARN AND mASTER PoWERSHELL FAST
• Learn PowerShell fast with the interactive learning center
• Execute PowerShell quickly and accurately with a Windows UI console
• Access, organize and share pre-loaded scripts from the QuickClick™ library
• Code & Debug PowerShell 10X faster with the advanced script editor

Technical Editor Bio
Aleksandar Nikolic, Microsoft MVP for Windows PowerShell, a frequent speaker at the conferences (Microsoft Sinergija, PowerShell Deep Dive, NYC Techstravaganza, KulenDayz, PowerShell Summit) and the co-founder and editor of the PowerShell Magazine(http://powershellmagazine.com). He is also available for one-on-one online PowerShell trainings. You can find him on Twitter: https://twitter.com/alexandair
Note that PowerShell IntelliSense will show the -Type parameter only if the specified path is not quoted and uses the PowerShell Registry drive names.
When you submit an unrecognized data type for -Type, for example “dunno”, then the exception error message will list the supported data types in its message.
9. Remove Registry Keys and Values
Use Remove-Item to actually delete a Registry key. If the key contains subkeys, you need to submit -Force:
Remove-Item -Path HKCU:\Software\Testkey3 -Force
Use Remove-ItemProperty to delete a Registry value, but keep the key and all other values.
10. Listing Installed Software
Get-ItemProperty can read Registry values, but also supports wildcards. So it can even read multiple Registry keys and values in one step.
This example will read all subkeys below the Uninstall key and dump the values specified for each key. The result is a lightweight software inventory:
Get-ItemProperty HKLM:\Software\Microsoft\Windows\CurrentVersion\Uninstall\* | Select-Object DisplayName, DisplayVersion, Publisher, UninstallString Just add a Where-Object to remove empty keys, and pipe it to Out-GridView to get a great reporting tool:
Get-ItemProperty HKLM:\Software\Microsoft\Windows\CurrentVersion\Uninstall\* | Where-Object { $_.DisplayName } | Select-Object DisplayName, DisplayVersion, Publisher, UninstallString | Out-GridView This would list only 64-bit software on 64-bit systems. To also include 32-bit software, take advantage of the fact that Get-ItemProperty supports multiple paths:
$path1 = ‘HKLM:\Software\Microsoft\Windows\CurrentVersion\Uninstall\*’$path2 = ‘HKCU:\Software\Microsoft\Windows\CurrentVersion\Uninstall\*’$path3 = ‘HKLM:\Software\Wow6432Node\Microsoft\Windows\CurrentVersion\Uninstall\*’$path4 = ‘HKCU:\Software\Wow6432Node\Microsoft\Windows\CurrentVersion\Uninstall\*’
Get-ItemProperty -Path $path1, $path2, $path3, $path4 | Where-Object { $_.DisplayName } | Select-Object DisplayName, DisplayVersion, Publisher, UninstallString | Out-GridView

And if you want to keep a reference in your report where the software is installed, you can call Get-ItemProperty multiple times for each Registry location, and use Add-Member to “tag” your results:
$path1 = ‘HKLM:\Software\Microsoft\Windows\CurrentVersion\Uninstall\*’$path2 = ‘HKCU:\Software\Microsoft\Windows\CurrentVersion\Uninstall\*’$path3 = ‘HKLM:\Software\Wow6432Node\Microsoft\Windows\CurrentVersion\Uninstall\*’$path4 = ‘HKCU:\Software\Wow6432Node\Microsoft\Windows\CurrentVersion\Uninstall\*’
$result = Get-ItemProperty -Path $path1 | Add-Member -MemberType NoteProperty -Name Type -Value AllUsers64bit -PassThru$result += Get-ItemProperty -Path $path2 | Add-Member -MemberType NoteProperty -Name Type -Value CurrentUser64bit -PassThru$result += Get-ItemProperty -Path $path3 | Add-Member -MemberType NoteProperty -Name Type -Value AllUsers32bit -PassThru$result += Get-ItemProperty -Path $path4 | Add-Member -MemberType NoteProperty -Name Type -Value CurrentUser32bit -PassThru
$result | Where-Object { $_.DisplayName } | Select-Object Type, DisplayName, DisplayVersion, Publisher, UninstallString | Out-GridView This way, there is now a new property called “Type” that reports the type of software installed.
11. Test Whether Registry Key Exists
If you would like to test whether a certain Registry key exists, you should remember that all Registry keys are treated like folders on a drive, so they have a path. Test-Path can check whether they exist:
Test-Path -Path HKCU:\Software\Testkey Based on this, you could decide to delete Registry keys:
$RegPath = ‘HKCU:\Software\Testkey’
$exists = Test-Path -Path $RegPath
if ($exists -eq $false){ Write-Warning “Creating key $RegPath” $null = New-Item -Path $RegPath -Force}else{ Write-Warning “Deleting key $RegPath” # Deleting is permanent! Remove -WhatIf to actually delete! # Make sure you delete the key you want, and not accidentally # something else. Make especially sure there is no typo # in your path variable, and the variable contains what you # intend to remove. If $RegPath was empty, then PowerShell # takes YOUR CURRENT PATH and depending on where you are, # could delete files, folders, or whatever. SO BE CAREFUL! Remove-Item -Path $RegPath -Force -Recurse -WhatIf}
You can also use the native Registry syntax. This line would check whether there is a handler installed for PDF files:
$isPDFViewerInstalled = Test-Path -Path Registry::HKEY_CLASSES_ROOT\.pdf
12. Test Whether Registry Value Exists
Registry values are treated like properties to a Registry key so they have no specific path and you cannot use Test-Path to check whether a given Registry value exists.
You can however use Get-Item to access the Registry key, then use its GetValueNames() method to get the names of all values present.
This would check whether the specified Registry value exists:
$RegPath = ‘HKLM:\SOFTWARE\Microsoft\Windows NT\CurrentVersion’$ValueName = ‘RegisteredOwner’
$key = Get-Item -Path $RegPath$exists = $key.GetValueNames() -contains $ValueName
“The value $valuename exists? $exists”
13. Exclude Unwanted Registry Values
When you query the values of a Registry key, PowerShell will add a bunch of artifacts to the results. You’ll get some new properties that all start with “PS”:
$regkey = ‘HKLM:\SOFTWARE\Microsoft\Windows NT\CurrentVersion’Get-ItemProperty $regkey | Select-Object -Property * You can use -ExcludeProperty like this to get rid of them:
Get-ItemProperty $regkey | Select-Object -Property * -ExcludeProperty PS*
This will exclude any property starting with “PS.” A more precise approach would first get the names of the real Registry values and display only these. This way, if there was a Registry key that coincidentally started with “PS” as well, it would no longer be suppressed:
$RegPath = ‘HKLM:\SOFTWARE\Microsoft\Windows NT\CurrentVersion’$key = Get-Item -Path $RegPath$values = $key.GetValueNames() | Sort-ObjectGet-ItemProperty -Path $RegPath | Select-Object -Property $values
As a nice extra effect, by sorting your list of Registry values, you get a sorted output, so the Registry value names are dumped in alphanumeric order.
14. Accessing Registry Remotely
If you need to access Registry keys and values on another machine, you can either use PowerShell remoting (requires PowerShell 2.0 on a remote machine), or you can use good old DCOM. Here is how--simply replace the target computer name in $ComputerName:
$ComputerName = ‘storage1’
# NOTE: RemoteRegistry Service needs to run on a target system!$reg = [Microsoft.Win32.RegistryKey]::OpenRemoteBaseKey(‘LocalMachine’, $ComputerName)$key = $reg.OpenSubKey(‘SOFTWARE\Microsoft\Windows\CurrentVersion\Uninstall’)
$key.GetSubKeyNames() | ForEach-Object {$subkey = $key.OpenSubKey($_)$i = @{}$i.Name = $subkey.GetValue(‘DisplayName’)$i.Version = $subkey.GetValue(‘DisplayVersion’)New-Object PSObject -Property $i$subkey.Close()}
$key.Close()$reg.Close()
Note: this approach may fail if you do not have local administrator privileges on the target machine.
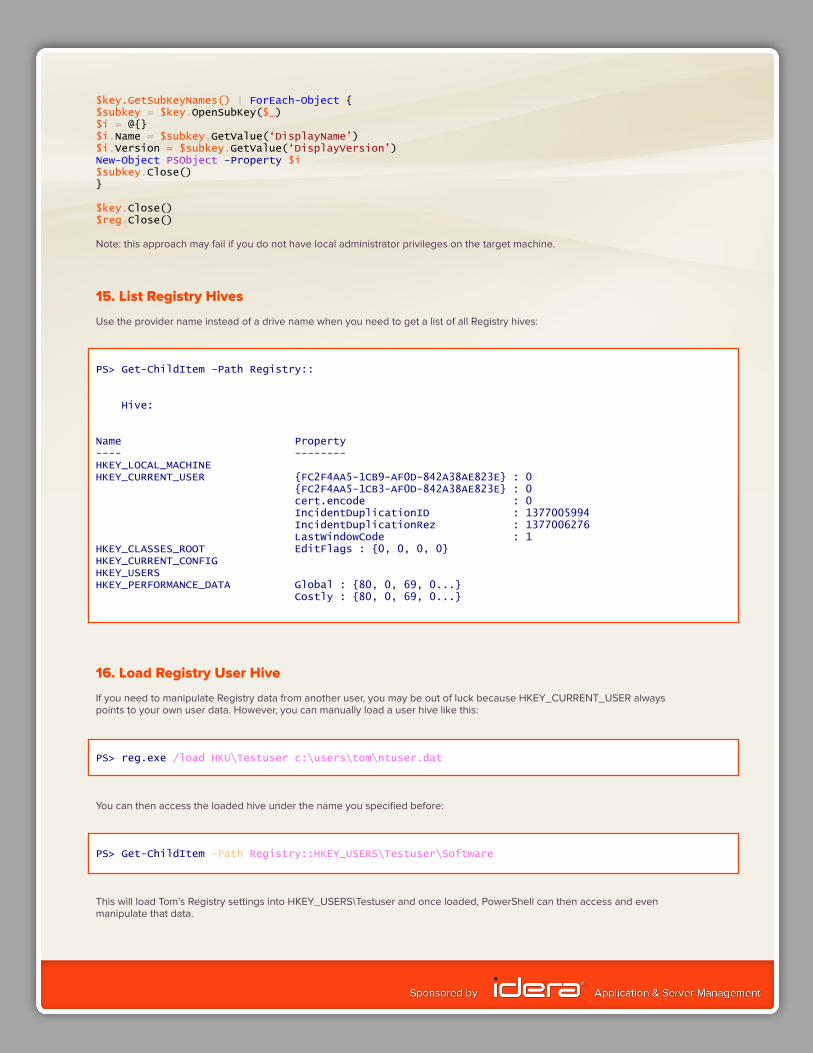
15. List Registry Hives
Use the provider name instead of a drive name when you need to get a list of all Registry hives:
PS> Get-ChildItem -Path Registry::
Hive:
Name Property ---- -------- HKEY_LOCAL_MACHINE HKEY_CURRENT_USER {FC2F4AA5-1CB9-AF0D-842A38AE823E} : 0 {FC2F4AA5-1CB3-AF0D-842A38AE823E} : 0 cert.encode : 0 IncidentDuplicationID : 1377005994 IncidentDuplicationRez : 1377006276 LastWindowCode : 1 HKEY_CLASSES_ROOT EditFlags : {0, 0, 0, 0} HKEY_CURRENT_CONFIG HKEY_USERS HKEY_PERFORMANCE_DATA Global : {80, 0, 69, 0...} Costly : {80, 0, 69, 0...}
16. Load Registry User Hive
If you need to manipulate Registry data from another user, you may be out of luck because HKEY_CURRENT_USER always points to your own user data. However, you can manually load a user hive like this:
PS> reg.exe /load HKU\Testuser c:\users\tom\ntuser.dat
You can then access the loaded hive under the name you specified before:
PS> Get-ChildItem -Path Registry::HKEY_USERS\Testuser\Software
This will load Tom’s Registry settings into HKEY_USERS\Testuser and once loaded, PowerShell can then access and even manipulate that data.
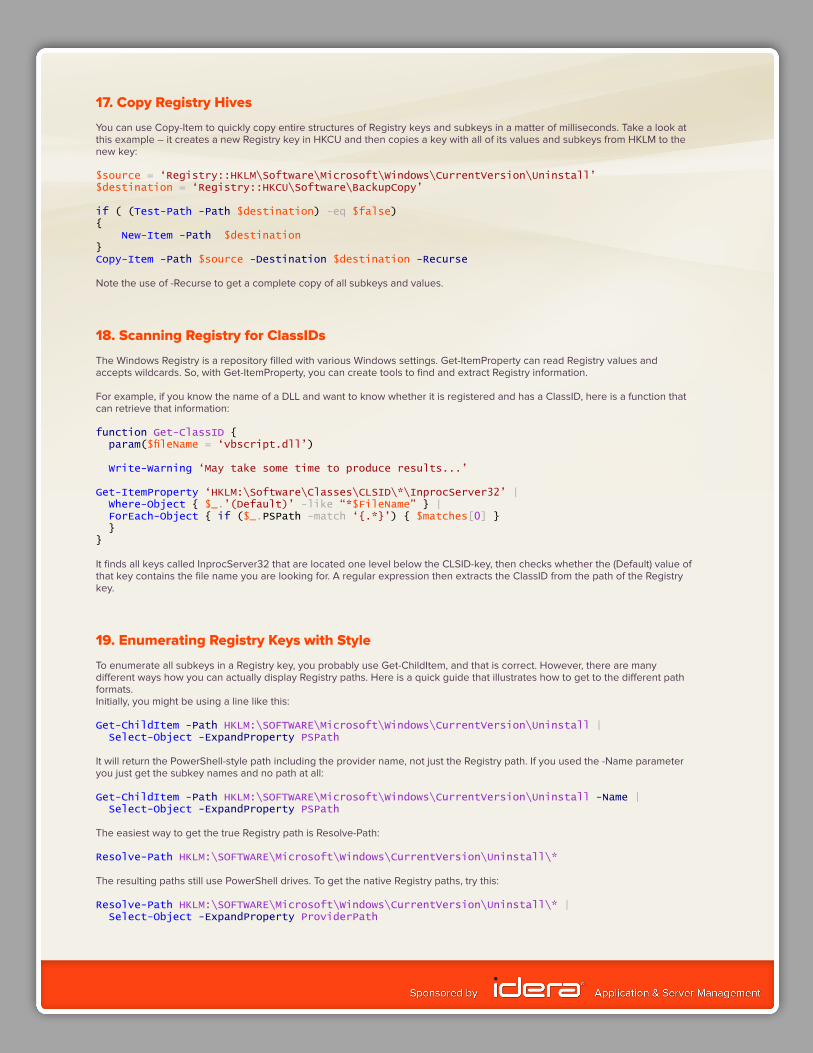
17. Copy Registry Hives
You can use Copy-Item to quickly copy entire structures of Registry keys and subkeys in a matter of milliseconds. Take a look at this example – it creates a new Registry key in HKCU and then copies a key with all of its values and subkeys from HKLM to the new key:
$source = ‘Registry::HKLM\Software\Microsoft\Windows\CurrentVersion\Uninstall’$destination = ‘Registry::HKCU\Software\BackupCopy’
if ( (Test-Path -Path $destination) -eq $false){ New-Item -Path $destination}Copy-Item -Path $source -Destination $destination -Recurse
Note the use of -Recurse to get a complete copy of all subkeys and values.
18. Scanning Registry for ClassIDs
The Windows Registry is a repository filled with various Windows settings. Get-ItemProperty can read Registry values and accepts wildcards. So, with Get-ItemProperty, you can create tools to find and extract Registry information.
For example, if you know the name of a DLL and want to know whether it is registered and has a ClassID, here is a function that can retrieve that information:
function Get-ClassID { param($fileName = ‘vbscript.dll’)
Write-Warning ‘May take some time to produce results...’ Get-ItemProperty ‘HKLM:\Software\Classes\CLSID\*\InprocServer32’ | Where-Object { $_.’(Default)’ -like “*$FileName” } | ForEach-Object { if ($_.PSPath -match ‘{.*}’) { $matches[0] } }}
It finds all keys called InprocServer32 that are located one level below the CLSID-key, then checks whether the (Default) value of that key contains the file name you are looking for. A regular expression then extracts the ClassID from the path of the Registry key.
19. Enumerating Registry Keys with Style
To enumerate all subkeys in a Registry key, you probably use Get-ChildItem, and that is correct. However, there are many different ways how you can actually display Registry paths. Here is a quick guide that illustrates how to get to the different path formats.Initially, you might be using a line like this:
Get-ChildItem -Path HKLM:\SOFTWARE\Microsoft\Windows\CurrentVersion\Uninstall | Select-Object -ExpandProperty PSPath
It will return the PowerShell-style path including the provider name, not just the Registry path. If you used the -Name parameter you just get the subkey names and no path at all:
Get-ChildItem -Path HKLM:\SOFTWARE\Microsoft\Windows\CurrentVersion\Uninstall -Name | Select-Object -ExpandProperty PSPath
The easiest way to get the true Registry path is Resolve-Path:
Resolve-Path HKLM:\SOFTWARE\Microsoft\Windows\CurrentVersion\Uninstall\*
The resulting paths still use PowerShell drives. To get the native Registry paths, try this:
Resolve-Path HKLM:\SOFTWARE\Microsoft\Windows\CurrentVersion\Uninstall\* | Select-Object -ExpandProperty ProviderPath
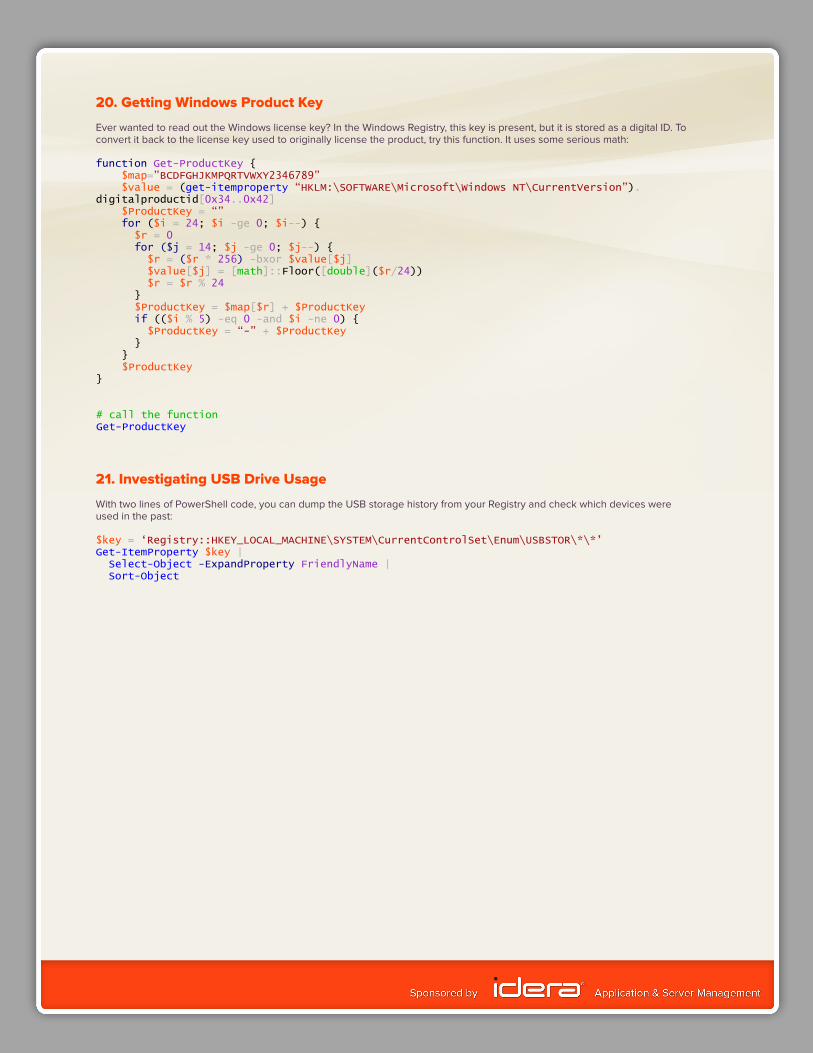
20. Getting Windows Product Key
Ever wanted to read out the Windows license key? In the Windows Registry, this key is present, but it is stored as a digital ID. To convert it back to the license key used to originally license the product, try this function. It uses some serious math:
function Get-ProductKey { $map=”BCDFGHJKMPQRTVWXY2346789” $value = (get-itemproperty “HKLM:\SOFTWARE\Microsoft\Windows NT\CurrentVersion”).digitalproductid[0x34..0x42] $ProductKey = “” for ($i = 24; $i -ge 0; $i--) { $r = 0 for ($j = 14; $j -ge 0; $j--) { $r = ($r * 256) -bxor $value[$j] $value[$j] = [math]::Floor([double]($r/24)) $r = $r % 24 } $ProductKey = $map[$r] + $ProductKey if (($i % 5) -eq 0 -and $i -ne 0) { $ProductKey = “-” + $ProductKey } } $ProductKey}
# call the functionGet-ProductKey
21. Investigating USB Drive Usage
With two lines of PowerShell code, you can dump the USB storage history from your Registry and check which devices were used in the past:
$key = ‘Registry::HKEY_LOCAL_MACHINE\SYSTEM\CurrentControlSet\Enum\USBSTOR\*\*’Get-ItemProperty $key | Select-Object -ExpandProperty FriendlyName | Sort-Object