10 paving troubleshooting - · pdf file10-1 chapter ten: paving troubleshooting long-term...
TRANSCRIPT

10 Paving Troubleshooting
Problems Observed Before The Concrete Has Set
Mixture and Placement Issues
Edge and Surface Issues
Problems Observed In The First Days After Placement
Strength
Cracking
Joint Issues
Preventing Problems That Are Observed Some Time After
Construction
Edge and Surface Issues
Cracking

10-1
CHAPTER TEN:
PAVING TROUBLESHOOTING
Long-term pavement performance is the result of the smoothness and mat
quality of the PCCP mixture. Smoothness affects the transportation costs
of the road user to include vehicle maintenance coasts, fuel consumption,
speed, passenger comfort, safety, and vehicle noise. Poor mat quality also
affects the pavement performance and may be caused by cracks, poor
joints, and other defects.
This chapter will discuss the problems that affect the smoothness and
quality of the pavement mat and the possible solutions for correcting these
deficiencies. Problems may be observed before the concrete has set,
observed in the first days after placement, or sometime after placement.
____________________________________________________________
PROBLEMS OBSERVED BEFORE THE CONCRETE HAS SET
MIXTURE AND PLACEMENT ISSUES
Slump is out of Specification
Potential Cause – Possible Solution
1. Change in water content or aggregate grading
a. Check aggregate moisture contents and absorptions
b. Check for segregation in the stockpile
c. Make sure the batch water is adjusted for aggregate moisture content
d. Conduct batch plant uniformity tests Check whether water was added
at the site
2. Mix Proportions
a. Check batch equipment for calibration
3. Admixture dosage
a. Check delivery ticket for correct admixture dosage
4. Concrete temperature too high or too low
5. Haul time
a. Check the batch time on the concrete delivery ticket. Haul times
should not be excessive.
Loss of Workability/Slump Loss/Early Stiffening
Potential Cause – Possible Solution
1. Dry coarse aggregates
a. Make sure the aggregate stockpile is kept consistently at saturated
surface-dry (SSD) (use soaker hoses if necessary)

10-2
2. Ambient temperature increases
a. Do not add water
b. Chill the mix water or add ice
c. Sprinkle the aggregate stockpiles
d. Use a water reducer or retarder
e. Do not increase the water/cement ratio to a value greater than the
maximum approved mix design
f. Use a mix design that includes slag or fly ash
3. Transport time too long
a. Reject the load if greater than specified
b. Use retarder in the mixture
c. Use an agitator rather than dump trucks
4. Mix proportions have changes
a. Check/monitor the moisture contents of the aggregate stockpiles
b. Check the batch weigh scales
c. Verify that aggregate gradations are correct
5. False setting (temporary)
a. Check for changes in cementitious materials
b. Reduce Class C fly ash replacement
c. Change the type of water reducer
d. Try restoring plasticity with additional mixing
e. Contact the cement supplier
6. Incompatibility
a. Check for changes in the cementitious materials
b. Reduce Class C fly ash replacement
c. Change chemical admixtures
d. Change the batching sequence
e. Cool the mixture.
7. Variation in air content
a. Check the air content/air entrainer dosage.
Mixture is Sticky
Potential Cause – Possible Solution
1. Sand too fine
a. Change the sand grading
2. Mix too sandy
a. Check the sand and combined aggregate grading
3. Cementitious materials
a. Check the cementitious materials contents (Mixtures containing GGBF
slag and fly ash appear sticky but finish well and respond well to
vibration energy)
b. Lower the vibration energy to avoid segregation
c. Adjust the mix proportioning
4. Using wood float on air-entrained concrete
a. Use magnesium or aluminum floats

10-3
Mixture Segregates
Potential Cause – Possible Solution
1. Inconsistent concrete material - batching, mixing, placing
a. Check aggregate gradation; poorly graded mixtures may tend to
segregate
b. Verify batching/mixing procedures so that the mixture is adequately
mixed
c. Check aggregate stockpile, storage, and loading procedures to prevent
aggregate segregation
d. Place concrete as close to final position as possible to minimize
secondary handling
e. Perform uniformity testing on batch plant, if necessary, use agitator
trucks for transport
f. Reduce the vibration energy if consolidation efforts cause segregation.
(Vibration at 5,000-8,000 vpm is sufficient for most well-graded
mixtures.)
Excessive Fresh Concrete Temperature
Potential Cause – Possible Solution
1. Hot ingredients
a. Do not add water
b. Follow hot-weather concreting practice as appropriate
c. Chill the mix water or use ice
d. Shade and sprinkle the aggregate stockpiles
2. Long haul times
a. Adjust the hauling operation to minimize haul times
b. Adjust paving time to off-peak traffic time if hauling through public
traffic
3. Hot weather
a. Follow hot-weather concreting practice as appropriate
b. Chill the mix water; sprinkle the aggregate stockpiles
c. Pave at night or start paving in afternoon
Air Content is Too Low or Too High
Potential Cause – Possible Solution
1. Temperature changes
a. The air-entraining admixture dosage may need to be adjusted during
hot/cold weather
2. Materials have changed
a. Check for uniformity of materials

10-4
3. Mix proportions have changed
a. Altering other admixture dosages may impact the effectiveness of the
air-entraining admixture.
b. Check slump; it is easier to entrain air with increasing concrete
workability
c. Check/monitor the moisture contents of the aggregate stockpiles
d. Check the batch weigh scales e. Verify that aggregate gradations are correct
f. Verify sand quantity
4. Short or inadequate mixing
a. Check the charging sequence
b. Increase mixing time
c. Check if the blades of the mixer are missing or dirty
Variable Air Content/Spacing Factor
Potential Cause – Possible Solution
1. Incorrect or incompatible admixture types
a. Change types or brands of admixtures
b. Try to work within one manufacturer’s family of admixtures if air-
entraining agent is being combined with other admixtures
2. Admixture dosage
a. Check the batching equipment for calibration and settings
b. Change the sequence of batching
3. Mix proportions have varied or changed
a. Check/monitor the moisture contents of the aggregate stockpiles
b. Check the batch weigh scales
c. Verify that aggregate gradations are correct
4. Cementitious materials
a. Check for changes in cementitious materials, particularly the loss-on-
ignition (LOI) content of fly ash.
5. Poor plant configuration
a. Introduce aggregates together on the plant’s belt feed (requires a
multiple weigh hopper)
6. Poor aggregate grading
a. Use a more well-graded coarse and fine aggregate mixture
b. Check variation in the amount of materials retained on the #30 through
#100 sieves
7. Temperature changes
a. Air-entraining admixture dosage may need to be adjusted during
hot/cold weather
b. Altering other admixture dosages may impact the effectiveness of the
air-entraining admixture; air-entraining admixtures work more
efficiently with increasing workability
8. Variable mixing
a. Ensure that each batch is handled consistently in the plant.

10-5
Mix Sets Early
Potential Cause – Possible Solution
1. Cementitious materials
a. Check for changes in the cementitious materials; differing sources or
changes in properties of a given material may result in incompatibility;
changes in proportions may also affect setting times
2. Admixture dosage
a. Check the dosage of chemical admixtures, particularly accelerators
b. Check the batching equipment
3. Hot weather
a. Adjust the mix proportions
b. Use mix designs that include GGBF slag or fly ash
c. Use a retarder
d. Reduce haul time if possible
e. Reduce the placement temperature of the concrete
f. In hot weather, use a hot weather mix design
g. Cool the concrete ingredients
Delayed Set
Potential Cause – Possible Solution
1. Excessive retarder dosage
a. Verify the proper batch proportions
b. Check the batching equipment
c. Reduce the dosage of the retarder
2. Excessive water reducer dosage
a. Verify the proper batch proportions
b. Reduce the dosage of water reducer
3. Retarder not dispersed well
a. Improve mixing to disperse the retarder
4. Supplementary cementitious materials interference
a. Reduce GGBF slag content; GGBF slag in excess of 25 percent can
cause a dramatic increase in set time
b. Eliminate/reduce fly ash content in the mix
5. Cold placement temperature
a. Follow cold-weather concreting practices if appropriate
6. Organic contamination
a. Verify the proper batch proportions
b. Check for contamination of water and aggregates

10-6
Supplier Breakdown, Demand Change, Raw Material Changes
Potential Cause – Possible Solution
1. Cement
a. Refer to backup lab mixes if conditions were anticipated
b. Switch sources, batch new mix designs, and develop new laboratory
strength gain and maturity information. (This action may require a
project delay. To avoid unacceptable delays, a contractual agreement
should be arranged prior to paving, which allows for unforeseen
material supply changes, burden of delay costs, and risk of paving
during batch revision testing. If paving activity is continued during
testing, compare early-age strengths (1- and 3-day) and maturity data
to confirm that the new mix will perform adequately.)
2. Supplementary cementitious materials
a. See cement supply change
b. Switch sources and compare early-age strengths (1- and 3-day) and
maturity data to confirm that the mix will perform adequately
3. Aggregates
a. See cement supply change
b. Switch sources and compare early-age strengths (1- and 3-day) and
maturity data to confirm that the mix will perform adequately
4. Chemical admixtures
a. See cement supply change
b. Switch admixture sources and compare early-age strengths (1- and 3-
day) and maturity data to confirm that the mix will perform adequately
EDGE AND SURFACE ISSUES
Concrete Surface Does Not Close Behind Paving Machine
Potential Cause – Possible Solution
1. Insufficient volume contained in the grout box
a. Place more material in front of the paver; consider using a spreader
2. The concrete is stiffening in the grout box
a. Check for premature concrete stiffening (admixture compatibility) (See
no. 2: Loss of workability/slump loss/early stiffening)
3. The fine/coarse aggregate volume or paste volume is too low
a. Check mixture proportions, particularly aggregate gradations
b. Check the uniformity of aggregate materials/supplies
4. The finishing pan angle needs adjustment
a. Adjust the pan angle
5. The paver speed is too high or vibrators need to be adjusted
a. Slow the paver
b. Lower the vibrator frequencies or use vibrators with greater force
c. Adjust the location of the vibrators; rise them closer to the surface
d. Place more material in front of the paver; consider using a spreader
e. Change the vibrator angle

10-7
Concrete Tears Through Paving Machine
Potential Cause – Possible Solution
1. Excessive concrete slump loss
a. Check for slump loss and mixture or weather changes
b. See no. 2: Loss of workability/slump loss/early stiffening
2. Insufficient concrete slump
a. Check the mixture proportions
3. Angular fine aggregate (manufactured sand)
a. Replace a portion of the manufactured sand with natural sand
4. Paver speed too high
a. Slow the paver
5. Coarse aggregate is segregated
a. Check the stockpile
6. Coarse aggregate is gap-graded
a. Check the combined aggregate grading
b. Blend the aggregate with intermediate aggregates to achieve a uniform
combined grading
Paving Leaves Vibrator Trails
Potential Cause – Possible Solution
1. Vibratory frequency too low
a. Check if the seals on the vibrators are leaking
2. Vibrator frequency too high
a. Lower the vibrator frequency
3. Paver speed too slow
a. Increase the paver speed
4. Non-workable concrete mix
a. Review concrete workability field test data
b. See no. 2: Loss of workability/slump loss/early stiffening
5. Over-sanded mixes
a. Increase the coarse aggregate
6. Poor combined aggregate grading
a. check the combined aggregate grading
Slab Edge Slump
Potential Cause – Possible Solution
1. Poor and/or nonuniform concrete - gap-graded aggregate, high water/cement
ratio, etc.
a. Verify the mix design and batching procedures
b. Check the aggregate grading - use a well-graded combined aggregate
gradation

10-8
2. Inadequate operation of equipment
a. Check the construction procedures
b. Adjust the outside vibrator frequency
c. Adjust the side form batter
3. Improper equipment setup
a. Adjust the overbuild
b. Check the track speed (same on both sides)
c. Check the pan profile
Honeycombed Slab Surface or Edges
Potential Cause – Possible Solution
1. Hot weather may induce premature stiffening
a. Follow hot-weather concreting practices if appropriate
b. See no. 2: Loss of workability/slump loss/early stiffening
2. Inadequate vibration
a. Check that all vibrators are working properly at the right frequency and
amplitude; the paver speed should not be too high
b. Add an additional vibrator near the slipformed edge
3. Poor workability
a. Check for changes in the aggregate grading
Plastic Shrinkage Cracks

10-9
Potential Cause – Possible Solution
1. High evaporation rate (excessive loss of moisture from surface of fresh
concrete; i.e., evaporation rate > bleed rate)
a. Apply the curing compound as soon as possible to protect the concrete
from loss of moisture
b. Use additional curing measures: fogging, evaporation retarder,
windbreaks, shading, plastic sheets, or wet coverings
c. Make sure the absorptive aggregates are kept moist; a dry concrete
mixture from concrete aggregates that are not saturated tends to surface
dry at mixing. This is a problematic if not accounted for
d. Use a well-graded combined aggregate (gap gradation requires more
paste and causes more shrinkage)
e. Refer to hot-weather concreting practices if appropriate
f. Pave at night
g. Chill the mixing water
h. Dampen the subgrade
i. Avoid paving on hot, windy days
j. Consider adding fibers to the mix
2. Delayed setting time
a. Check the time of set
PROBLEMS OBSERVED IN THE FIRST DAYS AFTER PLACING
STRENGTH
Strength Gain is Slow
Potential Cause – Possible Solution
1. Cold temperature during/after placement
a. Heat the mix water
b. Use burlap/insulating blankets for protection from freezing
c. Use an accelerating admixture
d. Eliminate/reduce GGBF slag and fly ash content in the mix
e. Increase the cement content
f. Use a Type III cement
g. Utilize early-entry sawing to reduce the potential for random cracking
h. Monitor the slab temperature with maturity sensors
2. Mix proportions or materials have changed
a. Check/monitor the moisture contents of the aggregate stockpiles
b. Check for uniformity of the cementitious materials
c. Check the batch weigh scales
d. Verify that aggregate gradations are correct
e. Verify that batch weights are consistent with the mix design

10-10
Strength is Too Low
Potential Cause – Possible Solution
1. Cementitious materials
a. Check for changes in the cementitious materials
b. Check that the correct materials have been loaded into the cement/fly
ash/slag silos
2. Water
a. Check the water content
b. Verify the aggregate moisture contents and batch weights
3. Change in sand grading
a. Check the sand stockpile to see whether the grading has changed.
4. Contamination with organics
a. Contamination of one of the ingredients with organics can also effect a
sudden change in the required dosage of air-entraining admixture; try
to isolate the source
5. Inadequate or variable mixing
a. Examine the mixer and mixing procedures
b. Check for worn mixer blades
c. Check for mixer overloading
d. Batch smaller loads
e. Check the sequencing of batching f. Check for mixing time consistency
g. Conduct batch plant uniformity testing
6. Plant operations
a. Verify the acceptability of the batching and mixing process
b. Check for adequate mixing times
c. Check if water was added to the truck
7. Testing procedures
a. Verify proper making, curing, handling, and testing of strength
specimens. (Flexural strength specimens are particularly vulnerable to
poor handling and testing procedures.)
b. Verify the machine acceptability testing
c. Test the cores sampled from the pavement to verify acceptance
8. Air-void clustering
a. Use a vinsol resin-based air-entraining admixture
b. Avoid retempering
c. Increase the mixing time

10-11
CRACKING
Early Age Cracking
Potential Cause – Possible Solution
1. Concrete mixture
a. Check the combined aggregate grading
b. Examine the fine aggregates; fine aggregates may be too fine and
angularity may cause harsh finishing (i.e., manufactured sands)
c. Reduce the paste content (minimize shrinkage potential)
d. Materials incompatibility may lead to delayed set and/or higher
concrete shrinkage; consider mixture component adjustments.
e. Eliminate or reduce the content of fly ash or GGBF slag in cool-
weather conditions
f. Consider using an accelerator in cold weather.
2. Sawing
a. Saw as early as possible but avoid excessive raveling
b. Saw in the direction of the wind
c. Check that the diamond saw blade is appropriate for concrete aggregate
hardness, fines, etc.
d. Use early-entry dry sawing
e. Use HIPERPAV to model stress versus strength gain for conditions to
determine the optimum sawing time
10-12
3. Curing
a. Improve/extend curing
b. Apply the curing compound at a higher rate
c. Apply the curing compound sooner
d. Use blankets between placing and saw-cutting
4. Insufficient joint depth
a. Check the saws for depth setting
b. Check the saw blade for wear (carbide blades)
c. Check that saw operators are not pushing saws too fast, causing them
to ride up
d. Look for base bonding or mortar penetration into the open-graded
base-altered effective section; increase the saw depth to create an
effective weakened plane
e. Check the slab thickness
5. Excessive joint spacing
a. Reduce spacing between the joints
b. Slabs are too wide in relation to thickness and length; add intermediate
joints
c. Maintain a reasonable length-width ratio
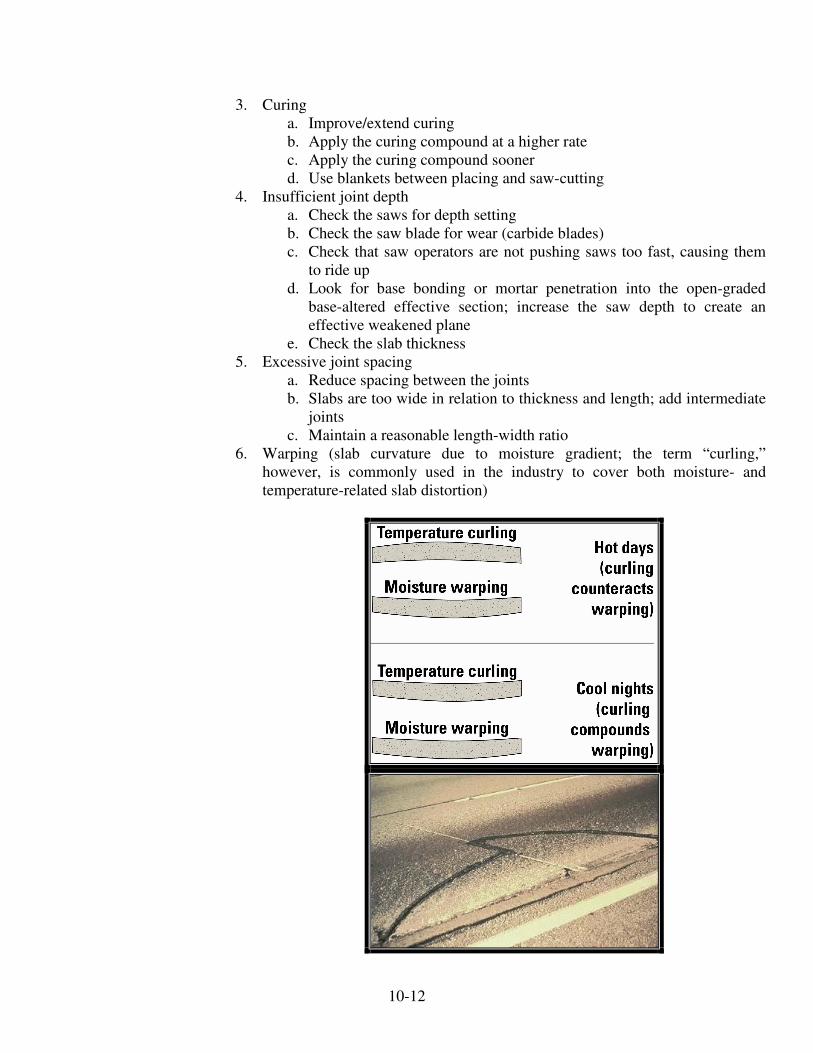
6. Warping (slab curvature due to moisture gradient; the term “curling,”
however, is commonly used in the industry to cover both moisture- and
temperature-related slab distortion)

10-13
a. Check the moisture state of base
b. Improve or extend curing
c. Minimize the shrinkage potential of the concrete mixture
d. Cover the slab, particularly when night/day temperatures vary widely
7. High temperature
a. Cool the raw materials before mixing the concrete: shade, spray, ice,
liquid nitrogen
b. Cool the equipment
c. Work at night
d. Watch for shaded areas where drying and strength gain may vary
within a single day’s work
e. Delay paving if conditions are too hot (>38° [100°F])
f. Apply an evaporative retardant prior to texturing
g. Apply the curing compound at an additional dosage rate and consider a
non-water-based compound with better membrane-forming solids
8. Too many lanes tied together (generally only a consideration for longitudinal
direction)
a. Do not exceed 15 m (50 ft) of pavement tied together
b. Add an untied construction or isolation joint
c. To prevent additional cracking, consider sawing through a longitudinal
joint to sever bars
9. Edge restraint (paving against an existing or previously placed lane)
a. Cracks occur due to restraint to movement (sometimes referred to as
sympathy cracks)
b. Tool the joint or use an early-entry dry saw to form the joints as early
as possible
c. Match the joint location and type
d. Eliminate tiebars in a longitudinal construction joint that is within 24
inches on either side of transverse joint locations. Match all locations
of the joints in the existing pavement (cracks, too)
10. Slab/base bonding or high frictional restraint
a. Moisten the base course prior to paving (reduce the base temperature
by evaporative cooling
b. Use a bond-breaking medium (see reflective cracks)
c. If the base is open graded, use a choker stone to prevent the penetration
of concrete into the base’s surface voids
11. Misaligned dowel bars
a. Investigate whether the joints surrounding the crack have activated and
are functioning; misaligned or bonded dowels may prevent joint
functioning, causing cracks
12. Cold front with or without rain shower
a. Use early-entry sawing to create a weakened plane prior to temperature
contraction
b. Skip-saw (saw every other joint or every third joint) until normal
sawing can be resumed
c. Use HIPERPAV to model stress versus strength-gain conditions that
may warrant a suspension or change of paving activities.

10-14
JOINT ISSUES
Raveling Along Joints
Potential Cause – Possible Solution
1. Sawing too soon
a. Wait longer to saw
b. Use formed joints
c. Blank out transverse tining at transverse contraction joints
2. Saw equipment problem
a. Blade selection for the concrete (coarse aggregate type) may be
inadequate
b. A bent arbor on the saw causes the blade to wobble
c. The second saw cut can go back and forth; consider a single-cut
design
3. Sawing too fast
a. Slow down
Spalling Along Joints
Potential Cause – Possible Solution
1. Excessive had finishing
a. Check for mixture problems that would necessitate overfinishing
b. Improve construction practice
2. Trying to fix edge slump of low spots by hand manipulating concrete
a. Check for mixture problems that would cause edge slump
b. Improve construction practice
3. Mortar penetration into transverse joints (after hardening mortar prevents joint
closure)
a. Mortar penetration occurs when paving against an existing previously
placed lane; apply duct tape or other means to block the penetration of
mortar into the transverse joints of the existing lane
4. Collateral damage from equipment, slipform paver tracks, screeds, etc
a. Protect the edges of the slab from damage using gravel or dirt ramps
b. Delay placement of the next phase of construction until the concrete
gains sufficient strength.

10-15
Dowels Are Out of Alignment
Potential Cause – Possible Solution
1. Movement in dowel basket assemblies
a. Cover the dowel baskets with concrete ahead of the paver
b. Use stakes to secure the baskets to the granular base
c. Increase the length and number of stakes
d. Use nailing clips on both sides of basket to secure the basket to the
stabilized base
2. Dumping directly on dowel baskets
a. Deposit the concrete a few feet from the dowel basket to allow the
concrete to flow around the dowel bars
3. Poor aggregate gradation
a. Dowel insertion into mixtures with gap-graded aggregates does not
work well; improve the aggregate grading
PREVENTING PROBLEMS THAT ARE OBSERVED SOME TIME AFTER CONSTRUCTION
EDGE AND SURFACE ISSUES
Clay Balls Appear at Pavement Surface
Potential Cause – Possible Solution
1. Aggregate stockpile contamination generally caused by the following: haul
trucks tracking clay and mud to stockpiles; loader operator digging into dirt;
dirt coming from the quarry
a. Educate the loader operator on proper stockpile management
techniques
b. Keep end-loader buckets a minimum of 2 ft off the ground
c. Do not stockpile aggregates on soft foundations
d. Stabilize the haul road at the plant site to avoid tracking contaminants
e. Use belt placers at stockpiles rather than end loaders
f. Check the aggregate producer’s stockpiles
g. Check for contamination in the hauling equipment
h. Doe not drive over a bridge to unload the aggregate
2. Mud being thrown into concrete trucks from muddy haul roads
a. Cover the trucks
Popouts
Potential Cause – Possible Solution
1. Unsound aggregates
a. Use only aggregates that have been tested for chert, shale, and/or other
undesirable fine particles
b. Reduce vibration to minimize the flotation of particles
2. Alkali-silica reactions
a. Use non-alkali silica reactive aggregates
b. Use blended cements or SCMs proven to control ASR

10-16
Scaled Surface
Potential Cause – Possible Solution
1. Premature finishing
a. Improve the finishing technique
2. Improper finishing
a. Do not add water to the surface during finishing
3. Over-finishing
a. Improve the finishing technique
4. Frost related
a. Protect the concrete from freezing until a sufficient strength is achieved
b. Concrete damaged by freezing must be removed and replaced
c. Check the air content and spacing factor in the hardened concrete
d. Premature salting; salts should not be applied to immature concrete
e. Check the de-icing salts being used
Dusting Along Surface
Potential Cause – Possible Solution
1. Adding water during finishing or finishing in bleed water
a. Prevent the addition of water during finishing
b. Delay finishing until after the dissipation of the bleed water
Surface Bumps and Rough Riding Pavement
Potential Cause – Possible Solution
1. Placement operations
a. Construct and maintain a smooth and stable paver track line
b. Check the string line tension and profile
c. Maintain a consistent quantity of concrete in front of the paver
d. Maintain a consistent forward motion; avoid a stop-and-go operation
e. Check the paver tracks
f. Check that the machine is level
g. Check the sensors on the paver
h. Verify that the paver electronics/hydraulics are functioning properly

10-17
2. Nonuniform concrete
a. Check the batching, mixing, and transport procedures for consistency
b. Check the aggregate grading and moisture contents for variations that
might lead to set and dry batches
3. Damming or rebound from dowel baskets
a. Lack of consolidation to achieve a uniform concrete density within the
dowel basket area may create a rough surface because the concrete
may settle or slough over the dowels
b. Check that the dowel baskets are secured
c. The basket assembly deflects and rebounds after the slipform paver
profile pan passes overhead and the extrusion pressure is released. The
result is a slight hump in the concrete surface just ahead of the basket.
Spring-back is more apt to occur on steeper grades and when there is
too much draft in the pan; do not cut the basket spacer wires to prevent
the basket from springing under the paver’s extrusion pressure
d. Do not over vibrate the concrete at the baskets in an effort to prevent
basket movement
4. Reinforcement ripple
a. Address reinforcement ripple issues with well-graded aggregates and
uniform concrete; consolidation is achieved at lower vibration energy
and extrusion pressure
b. Reinforcement ripple occurs when plastic concrete is restrained by the
reinforcing bars, resulting in a ripple in the surface, with the surface
slightly lower near each bar than in the area between the bars
c. Longitudinal depressions are caused when longitudinal bars limit the
restitution of the surface level behind the profile pan by restraining the
rebound of the concrete beneath the bars
d. Transverse ripple is caused by the transverse bars in the same way as
longitudinal depressions, except that transverse ripple is found to be
less noticeable than the prominent ridge caused by the damming effect
of the transverse bars upon the upsurge flow of concrete behind the
profile pan
e. The prominence of surface rippling depends on the finishing
techniques and depth of cover to the reinforcement, with less cover
producing more prominent rippling
5. Vertical grades (exceeding 3 percent)
a. Lower the slump of the concrete; the need to make an adjustment
depends upon whether it is difficult to maintain a uniform head of
concrete in front of the paver
b. Adjust the profile pan attitude, draft, or angle of attack. (When paving
up a steeper grade, the pan elevation may be adjusted to abut 1.0 in.
below the surface grade. When paving down a steeper slope, the pan
may be adjusted to about 25 mm [1.0 in.] above the surface grade.
This adjustment must be made carefully to avoid reinforcement ripple,
particularly a spring-back of the embedded dowel baskets.)
c. Adjust the staking interval; closely follow the grade and staking
calculations for these circumstances to reduce the semi-chord effect
enough to produce a smooth surface.

10-18
Surface is Marred or mortar is Worn Away
Potential Cause – Possible Solution
1. Rained-on surface
a. Cover the slab to protect from rain
b. Remove the damaged surface by grinding
c. Restore the surface texture (if required) by grinding
2. Improper curing type or application
a. Place a curing blanket or plastic sheets after the bleed water sheen
disappears
b. Consider using a membrane-forming curing compound instead of
sheets/blankets
3. Use of higher dosages (>25%) of GGBF slag
a. Do not add water to the mixture
b. Reduce the vibration energy to avoid bringing too much moisture to
the surface; vibration at 5,000-8,000 vpm is sufficient for most well-
graded mixtures
4. Over-sanded mixes
a. Increase the coarse aggregate
5. Abrasion
a. Use a hard, wear-resistant aggregate
b. Use a concrete mix with sufficient strength CRACKING
Cracking
Potential Cause – Possible Solution
1. Applied loads
a. Keep construction traffic away from the slab edges; early loading by
traffic or equipment causes higher edge stresses
b. Keep public traffic away from the slab edges
2. Loss of support
a. Ensure that the subgrade and base have been properly prepared
b. Ensure that the joints are properly filled and sealed where appropriate

10-19
3. Reflective cracks from stabilized bases
a. Isolate the slab from cracks in the base course by using bond breakers.
(Acceptable bond breakers include two coats of wax-based curing
compound, dusting of sand, bladed fines, asphalt emulsion,
polyethylene sheets, and tar paper. Sheet goods are difficult to handle
in windy or other harsh conditions.)
b. Joint the base course to match the joints in the pavement
4. Slab/base bonding or high frictional restraint
a. Moisten the base course prior to paving (reduce the base temperature
by evaporative cooling)
b. Use a bond-breaking medium (see “Reflective cracks from stabilized
bases,” immediately above)
c. If the base is open-graded, use a choker stone to prevent the
penetration of concrete into the base’s surface voids.
5. Mortar penetration into transverse joints (after hardening mortar prevents joint
closure)
a. Mortar penetration occurs when paving against an existing previously
placed lane; apply duct tape or other means to block the penetration of
mortar into the transverse joints of the existing lane
6. Differential support condition created by frost heaving, soil settling, or
expansive soils
a. Check the compaction, particularly above utility, culvert, and other
trenches.
b. Proof roll the base
c. Stabilize the subgrade soil
d. Use selective grading techniques; cross-haul the soils to create smooth
transitions between cut and fill sections and soil transitions
7. Misaligned dowel bars
a. Investigate whether the joints surrounding the crack have cracked and
are functioning; misaligned or bonded dowels may prevent joint
functioning, causing cracks
b. Designate personnel to ensure dowel alignment
8. Alkali-silica reactions

10-20
a. Avoid using reactive aggregates if possible
b. Use appropriate amounts of SCMs
c. Use blended cements or SCMs proven to control ASR
d. Use a low w/cm ratio
9. Chemical attack
a. Use a low w/cm ratio, maximum 0.45
b. Use an appropriate cementitious system for the environment
10. Frost related
a. Ensure that the air-void system of the in-place concrete is adequate
b. Use a low w/cm ratio
c. Use frost-resistant aggregates
d. Reduce the maximum particle size