1 the simplicity iii manual - - cadaver workshop · 5 the simplicity iii manual 12. a simplicity...
TRANSCRIPT

1 The SImplicity III Manual
Overview NeuroTherm® introduces a revolutionary new product; SImplicity III. This multi‐electrode radiofrequency probe has a unique design which allows for easy positioning using a single percutaneous entry point, and a consistent broad radiofrequency lesioning of the nerves that innervate the sacroiliac joint (SIJ). Patients diagnosed with persistent low back pain (below L5 and buttocks pain), where facetogenic source of pain has been ruled out, but have had positive temporary response to intraarticular SI joint injections, and present with a VAS score more than 50 mm (0‐100); may be a candidate for treatment using the SImplicity lll System as a more definitive palliative treatment. A successful outcome using SImplicity lll relies specifically on a correct diagnosis. Patients should have more than 80% pain relief on preferably two consecutive fluoroscopically guided SIJ intraarticular injections, and a confirmed diagnosis of SI joint pain or dysfunction.

2 The SImplicity III Manual
Principle
Though the concept of treatment using RF is sound, treatment of low back pain associated specifically with SI Joint pain is complicated because of the difficulty in locating the sacral nerves and ablating them. Two historical treatments have been described in the literature and are briefly summarized 1
• Yin technique: Locate relevant nerves by searching for the nerve using traditional sensory stimulation
o If the SI pain was reproduced, ablated is performed 80 C for 60 sec o If a sensory response was elicited, but did not reproduce the pain, the level
was not ablated o 64% of patients had > 50% pain relief at six months
• Kline technique‐ Perform dual electrode lesions in a leap frog fashion to create an
ablation line which will be long enough to ablate across all the sacral nerves o Sensory stimulation is not necessary o Care must be taken to not spread the electrodes too far apart (>4 mm) or
incomplete ablating between the electrodes can result o Several published results report success between 40‐60 %
Bradley Vilims, M.D., D.A.B.P.M. and NeuroTherm® now offer an exciting new option for treating pain related to the SI Joint. The SImplicity lll System shows these benefits over other traditional approaches:
• No introducer required • Curved electrode with diamond‐shaped tip, optimized for placement • Unique handle design maximizes push and twist maneuvrability • Three pole design used in conjunction with a unique algorithm in the NT 1100
creates large lesions without the need for excessive power
The picture above showing the 5 lesions that are made with the unique algorithm of the NT1100 NeuroTherm® generator. The first step is a bipolar lesion between electrode 1 and 2, second lesion is a bipolar between electrode 2 and 3. Third lesion is on electrode 1, fourth lesion is on electrode 2, and fifth lesion is on electrode 3.

3 The SImplicity III Manual
Technique
1. Place patient in the prone position with a pillow (or spinal imaging platform) beneath the abdomen to reduce the lumbar lordotic curvature
2. Apply a dispersive plate to the posterior thigh 3. Sterily prepare and drape the lower lumbar region and buttocks on the operative
side
4. Obtain an antero-posterior (AP) projection with a vertical position of the C-arm, centered on the inferior border of the ipsilateral sacrum*
5. Identify the skin entry point at the ipsilateral, lateral, inferior border of the sacrum, one cm lateral of and below the S4 foramen.*
Identifying skin entry point X-ray courtesy of Dr J. De Witte, OLV Aalst , Belgium

4 The SImplicity III Manual
6. A 25-Gauge 3-1/2 inch (10cm) spinal needle and 1% buffered Lidocaine can be used, to anaesthetize the aimed track of the SImplicity lll electrode.* Tip: you could use a pencil point spinal needle which is easier to advance when there is bone contact.
7. Advance the spinal needle to contact the sacral target point lateral to the S4 foramen making sure that the sacrum is contacted at an appropriate depth and that the needle has not entered either the S4 or any other sacral foramen, or ventured inferior to the sacral margin and into the pelvic cavity*
8. Once the periosteum is contacted, advance the needle in a cephalad and slightly lateral direction, staying lateral to the sacral foramen, in contact with the sacrum, and medial to the SI joint, and advance into the ligamentous tissue between the sacrum and ilium.*
Spinal needle placement (from the sacral target point to the mid-SIJ) to anesthetize the track of the SImplicity lll electrode (first placement). X-ray courtesy of Dr J. De Witte, OLV Aalst , Belgium
9. Once advanced along this line to a point where no further cephalad advancement can occur, remove the stylette and inject 4 cc of a 2% lidocaine solution +/- 1 cc of a non-particulate steroid as the needle is withdrawn, to anesthetize the lesion track Tip: anesthetize the track in two parts (see fig.)*
10. Make additional injections of local anesthetic solution along the intended lesion track as necessary to optimize patient comfort*
11. Attention should be redirected to the initial target point at the inferolateral border of the sacrum.*
Spinal needle placement (from the mid-SIJ to the sacral ala) to anesthetize the track of the SImplicity lll electrode (2nd placement). X-ray courtesy of Dr J. De Witte , OLV Aalst , Belgium

5 The SImplicity III Manual
12. A SImplicity III electrode is then inserted through the previously created skin wheal until contacting the inferolateral border of the sacrum. Verify that the electrode did not enter a sacral foramen or proceed inferior to the inferior border of the sacrum. * Tip: Use both hands to insert and gently steer the electrode with one hand at the electrode and one hand at the handle.* Tip: Placement with tip curved down until you reach periosteum, but always try to touch it tangentially, not under a steep angle. Touch down the handle to the skin, and steer the electrode with your other hand.* Tip: “wiggle” the electrode when advancing so it does not get “stuck” into periosteum; don’t turn the electrode more than 90° (look at the marker at the handle in case of doubt)*
AP view of the SImplicity lll being advanced. Assure bone contact, but merely touch the periosteum. X-ray courtesy of Dr J. De Witte , OLV Aalst , Belgium
13. The SImplicity III electrode is then advanced, maintaining continuous contact with the sacrum, on a cephalad and slightly lateral line, staying lateral to the sacral foramen, medial to the sacroiliac joint, and ventral to the ilium, until contact with the sacral ala prevents further advancement.* Tip: Half way in advancing the electrode, a critical point is encountered. You should make a lateral x-ray to make sure you are not advancing over the ilium, but indeed advancing into the deep interosseous ligament.* Beginners tip: you can use the 25-G spinal needle as a “marker” by placing it at the endpoint of the track of the SImplicity lll electrode. It defines the steering direction. Keep one eye at this needle and one eye at the electrode during “wiggling”.*

6 The SImplicity III Manual
Lateral view of the SImplicity lll being advanced, mainly to check if you are staying in contact with the sacral posterium. X-ray courtesy of Dr J. De Witte , OLV Aalst , Belgium
14. Appropriate positioning should be confirmed by changing the caudal/cephalad tilt of the C-arm to parallel the superior endplate of S1 and verifying, once again, that the entire length of the SImplicity III electrode was advanced to the ipsilateral sacral ala and the three independent, active contacts were positioned adjacent to the S1, S2, S3, and S4 lateral branch innervation pathways.* Tip: the electrode has 3 radiopaque markers in which you can verify if the length of the electrode is placed adjacent to the S1, S2, S3 & S4 lateral branch pathways *
15. A lateral view should then be obtained, confirming that the SImplicity III electrode remained in contact with the sacral periosteum, followed the curvature of the sacrum up to the sacral ala, and the three active contacts are in an appropriate position to lesion the lateral branches of S1, S2, S3, and S4 and that the most proximal contact is away from the dermis to prevent skin injury.*
AP view of the SImplicity lll placed correctly (endpoint adjacent to the S1 posterolateral branches) X-ray courtesy of Dr J. De Witte , OLV Aalst , Belgium
16. Lesioning is then carried out by using the SImplicity III pre-programmed steps degrees and step time can be adjusted (protocol is 85 °C and every step 1.5 minutes) *
17. The SImplicity III electrode is then removed, and verified to be intact.*
Lateral view of the SImplicity lll placed correctly X-ray courtesy of Dr J. De Witte , OLV Aalst , Belgium

7 The SImplicity III Manual
II. L5 Primary Dorsal Ramus Radiofrequency Lesioning *
The C‐arm is repositioned to an AP and caudal tilt projection
The sulcus between the S1 superior articular process and the sacral ala are to be identified, and after anesthetizing the skin; an 18‐gauge, 100 mm long, 10 mm curved sharp tip, radiofrequency cannula is placed to lie in contact with the S1 superior articular process just slightly above the groove formed between the superior articular process and sacral ala. Then advance until the active tip crosses the entire width of the superior articular process of S1, parallel to the L5 primary dorsal ramus.
Appropriate positioning is confirmed using both the AP view, ipsilateral oblique and lateral views. Motor stimulation is carried out at 2 Hz and at least 1.5 V verifying no motor recruitment in the ipsilateral lower extremity.
A solution containing lidocaine +/‐ a non‐particulate steroid solution is injected through the RF cannula, and radiofrequency lesioning of the L5 dorsal ramus is performed at 85 °C for up to 90 seconds.
Tip: First do the dorsal ramus L5 RF lesioning in the awake patient (as for a facet joint denervation). Then start IV sedation with for example propofol TCI 2‐3 µg/ml (at the discretion of the anaesthesiologist), and position the SImplicity lll electrode.
L5 Primary Dorsal Ramus Radiofrequency Lesioning X-ray courtesy of Dr J. De Witte , OLV Aalst , Belgium
8 The SImplicity III Manual
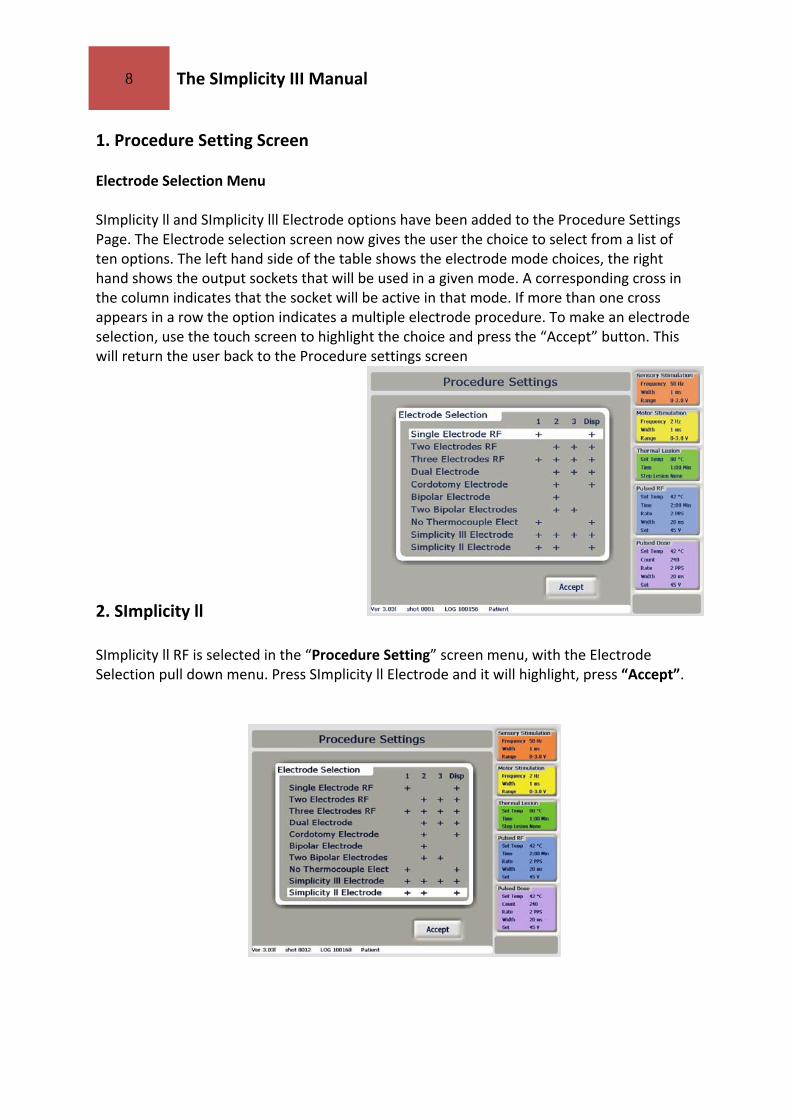
1. Procedure Setting Screen Electrode Selection Menu
SImplicity ll and SImplicity lll Electrode options have been added to the Procedure Settings Page. The Electrode selection screen now gives the user the choice to select from a list of ten options. The left hand side of the table shows the electrode mode choices, the right hand shows the output sockets that will be used in a given mode. A corresponding cross in the column indicates that the socket will be active in that mode. If more than one cross appears in a row the option indicates a multiple electrode procedure. To make an electrode selection, use the touch screen to highlight the choice and press the “Accept” button. This will return the user back to the Procedure settings screen 2. SImplicity ll SImplicity ll RF is selected in the “Procedure Setting” screen menu, with the Electrode Selection pull down menu. Press SImplicity ll Electrode and it will highlight, press “Accept”.

9 The SImplicity III Manual
This will automatically display the “Sensory Stimulation” screen. Note each electrode has its own graphical area. Electrode 1 is displayed on the left, with Electrode 2 being displayed on the right. Stimulation is done as in two electrode mode. Refer to NT1100 Manual sec. 9.5 Multiple Electrode Lesioning for lesion temperature and time settings. Press “Lesion”
First a dual lesion is made between electrode one and two.
Next a single lesion is done at electrode one.
Finally a single lesion is done at electrode two.

10 The SImplicity III Manual
3. SImplicity lll SImplicity lll RF is selected in the “Procedure Setting” screen menu, with the Electrode Selection pull down menu. Press SImplicity lll Electrode and it will highlight. Then press ‘Accept’. From the “Procedure Settings” screen press “Accept”. This will automatically display the “Sensory Stimulation” screen. Note each electrode has its own graphical area. Stimulation is done as in three electrode mode. Refer to NT1100 Manual sec. 9.5 Multiple Electrode Lesioning for lesion temperature and time settings. Press “Lesion” Electrode 1 is displayed on the left, with Electrode 2 in the middle and Electrode 3 being displayed on the right
First a lesion is created between electrode one and two.
Next a lesion is created between electrode two and electrode three.

11 The SImplicity III Manual
Each graph shows the temperature of each electrode. The NT1100 will control the
temperature of each probe automatically. At the top left of the screen there is a read out of time remaining until the end of the procedure.
The graphical interface of the lesion screens is also similar to that of the SImplicity ll mode. The temperature of electrodes 1 to 3 is shown above each graph, with the impedance, voltage, current and power shown underneath each graph. When the lesion is complete a tone will sound and the energy delivery will be stopped.
Next a lesion is created at electrode two.
Next a lesion is created at electrode one.
Finally a lesion is created at electrode three.

12 The SImplicity III Manual
Special Notes:
• In order to use the Auto dispersive mode your machine needs to be higher (serial number) then 7127‐06 (please contact your representative if your serial number is lower)
• To use the SImplicity functionality, auto dispersive must be on. This is activated by pressing OPTIONS from the welcome screen, pressing MORE, pressing AUTO DISPERSIVE, pressing ON, and pressing FINISH.
• You can also select the SImplicity II procedure where the lesion is shaped between electrode 2&3, this is intended for thin people and/or anatomical differences.
• On the electrode select screen you can choose between SImplicity II & SImplicity III, follow the instructions on the screen for connection with the cable
This document is intended as an outline for procedures involving SI joint denervation with radiofrequency lesioning to the L5 dorsal ramus and the lateral branches of S1, S2, S3 and S4. This document is for reference only, and should not be interpreted as a clinical directive from NeuroTherm® or any of its associates. *Special Thanks to Dr. J. De Witte for providing his clinical data, his expertise and copies of procedure X‐rays. Dr. J. De Witte works in OLV Hospital in Aalst in Belgium. And special thank‐you to Dr. Bradley Vilims, M.D., D.A.B.P. for his continued focus on product development. Dr. Vilims works in Denver at the Colorado Pain Specialists, PC 1. Cohen S., Sacroiliac Joint Pain: A Comprehensive Review of Anatomy, Diagnosis, and Treatment. Anesth Analg 2005; 101:1440‐53
429 Brighton Road Croydon, Surrey, CR2 6EU United Kingdom
Modemstraat 20 1033RW Amsterdam The Netherlands
2 DeBush Ave., Suite A‐2 Middleton, MA 01960 United States Phone: +31 204 702 702
Fax: +31 204 702 701 Email: [email protected]
Phone: +44 (0) 20 8660 4374 Fax: +44 (0) 20 8660 9417 Toll Free: +1 (888) 655‐3500
Phone: +1 (978) 777‐3916 Email: [email protected] Email: [email protected]

13 The SImplicity III Manual