05. let us spend lesiure time let us spend leisure … 5.pdf · effectively (lead up games) ......
TRANSCRIPT
32
05. Let us Spend Lesiure Time
Effectively (Lead up games)
5.1 Lead Up Games
We have studied this subject in grade 6 and 7. We know that we should
spend leisure usefully. We have created many games and learnt about many minor
games.
In grade 8, you are about to experience some games. What are the leading
games?
Check the list below with the list you prepared.
Organized games Less-organized games
Before finding an answer to the above question, let us try to
group the games we know, as organized games and less
organized games.
Crows and cranes
Bear family
Tredding the poison
Thieves
Dodge ball
Breaking the tail
Ping pong
Line foot ball
Statue
Tree to tree
Shadow
Volley ball
Aquatic sports
Athletics
Basket ball
Badminton
Cricket
Carrom
Cycling
Elle
Foot ball
Gymnastics
Hockey
Judo
Ko-Ko
Kabadi
Netball
Rugby
Softball cricket
Tennis
Table Tennis
Wushu
Wrestling
05LET US SPEND LEISURE TIME
EFFECTIVELY (LEAD UP GAMES)

33
You may be able to prepare a long list of games. You can get into
groups, list out as many games as possible. What are the differences between these
two groups of games?
characteristics of organized games.
v standard rules and regulations.
v a definite number of players.
v standard equipment.
v definite measurements of courts.
v pattern of play.
v well-established umpiring system and signals.
v a scoring system.
The less organized games are of a different set up. The above features
can be changed.
Changes will be due to:-
availability of the play area.
the number of players
the equipment
the time
the umpires
the purpose of the game
Rules and regulations are formed to suit the aims and objectives of the
game.
You have designed games of this nature in year 7. Minor games need
less rules and they are easy to organize.
What is a Lead Up Game?
Lead up games are different from minor games. These are organized
to develop skills of major games or organized games. They do not need much
space but should provide opportunity to practise the skill. At the same time it should
provide fun and enjoyment. These can be implemented with or without equipment.
They are more of competitive value. The rules and regulations are adjusted consider-
ing the rules and regulations of the major game. Always a lead up game leads up to a
major game.

34
Advantages of lead up games
v give an opportunity to practise the skills of a major game in sections.
v learn to implement the rules and regulations.
v learn correct movement of passing, receiving, approaching etc.
v learn leadership.
v learn followership.
v get the ability to work as a team.
v practise patience, tolerance.
v learn to accept defeat or victory.
v get the ability to face challenges.
v give mental satisfaction.
Let us play lead up games
1. Name of the game :- “hit from both sides”
Related major game :- Elle
Skill :- run between stations
Court :- 30 x 10 m
Number of players :- 16
Equipment :- 4 balls (rubber or tennis)
v The starting line is CD.
v Distance between is 25 m
v Distance of either side of the centre is 3m
v Group B stands 8 on each side
v They are provided with 4 balls to each side
v Group A stands outside the starting line.
v To the whistle of the teacher, number one from group A runs along the
centre line to the end of line.
v Group B children hit the player with the ball from where they are.
v A group player can jump, roll or toss to a side to escape the hit.
v Unbeaten run, score a point.
xxxxxxxxxxxxxxx
A group
3 m
B
B
25m
3 m
D
C
Fig 5'15'15'15'15'1
Centre Line
End Line

35
v This way all players get a chance to run
v Count the number of points
v Groups change
v Group B gets the chance of scoring.
Rules:-
v The beating group should stand on the 3m lines.
v The hit should be done below the shoulder.
List out the characteristics of a lead up game and check your list with the fol-
lowing characteristics.
1. Simple
2. One or two skills of the major game is included
3. Rules change (accordingly)
4. The play area according to space available
5. Many can participate
6. Opportunity for leadership
7. Develops team spirit
Let us learn some more lead up games leading to the development of skills
in some major games. These lead up games can be changed according to the
number of participants, the space, time and the equipment available. This is possible
because these do not have definite rules as in major games.
2. Name of the game :- One step back
Related major game :- Net ball/ Basketball
Skill :- Throwing and catching
Number of players :- Two in each group
Equipment :- A netball or a volleyball
Fig 5.2

36
How to play :-
Two players stand a metre apart facing each other, one in possession
of the ball. He/she throws the ball to the player opposite her/him. Each time he/she
catches the ball and passes it back successfully, takes a step back.
Rules:-
Be steady when catching the ball.
Cannot drop the ball
The player who breaks the above rules should take a step forward.
The players continue to throw and catch. The couple who has the widest distance
between, wins.
You can change the rules or add more if necessary.
3. Name of the game :-Jumping over a rope
Related major game :-Athletics-hurdling
Skill :-Jumping over a hurdle
Number of players :-Class in two groups lined up on either side (even
number of players)
Equipment :-A string 21/2 metres long with a ball of cloth tied at
the end.
How to play:-
One sits on the ground circles round holding one end of the rope over
the head. See the above illustration. When circling, the ball of cloth should not touch
the ground at any point but should go round just above the ground. When the string
approaches the children who are lined up, one runs up to jump over it. After jumping
runs forward to the opposite side to line up.
Each one after jumping should run forward faster than the movement of
the string to sit in front, before the string comes round his way.
Fig 5.3

37
Rules:-
v Those who fail to jump over or if the string touches the feet are out.
v The winners are the group that has many successful jumpers. The string should
rotate across the line of the children so that each child, one after the other can
jump over.
4 . Name of the game :- Wicket keeping
Related major game :-Cricket
Skill :-Wicket keeping & breaking
Number of players :-Two groups with equal number of players
for each
Equipment :-2 sticks, a metre long or two wicket poles and a
tennis ball. Children line up as shown in the illustration. The
wicket keeper is an opposing player. To a signal the ball is
thrown. He should hit the wicket with the ball. The wicket
keeper should block it and catch the ball and throw it back
to the next of the team. The player who takes his turn to play
should join at the back of his line. If the wicket keeper fails
to catch the ball, the substitute, should catch it and send it
back.
Rules:-
v The player should hit the wicket standing on the line drawn in front of each
group. He cannot cross the line.
v One can take only one turn (hit)
v The team that breaks the most number of wickets, wins.
Fig 5.4

38
5. Name of the game :- Ball in flight
Related major game :-Volleyball
Skill :-lifting the ball
Number of players :-two teams 6 or 8 in each team
Equipment :-a volleyball to each group. To the signal of the teacher
groups start playing. Keep the ball up by lifting with
both hands. Hands clasped and the lifting is done from
the lower part of the arm. At the next signal, groups
stop playing.
Rules:-
v Cannot lift the ball with one hand
v Cannot use the fingers to lift the ball
v If you drop the ball it is a minus point
v The group that has less number of minus points within the time given to
play, wins.
v Any skill of lifting the ball can be developed through this lead up game.
6. Name of the game :- Ball in the cage
Related major game :- Volley ball
Skill :- Service
Number of players :- Two groups of equal number of players
Equipment :- Two posts, a net or a rope or cord. Two volley
balls. Volley ball court or a similar space.
Fig 5.5
Fig 5.6
39
How to play :-
Tie the rope to the two posts at the end at a considerable height. Mark the
court as shown in the illustration and number the squares or cages. Instruct the children
what type of service to be used for the game depending on what you have taught. The
player is credited with the number of the cage, his service lands. Each player can score
up by serving to the cages that award more points.
Rules:-
v When serving, a player cannot trample the line.
v The serving should be done using the type of service instructed.
v To score a point, the ball should land in the opposite court without touching the
rope.
v Points are awarded according to the cage where the ball lands
v If the service touches the rope, does not go over the rope or goes out of court
5 points are deducted.
v When all players take their turns to serve, the game ends and the group that
scores the highest number of points, wins.
To develop the skills of serving, chances of serving for each player can be
increased and types of serving can be changed. You can design your own lead up
game depending on the skills learnt. At first the lead up game should be very simple
and should make it complex gradually So that in practising the skill it should be brought
into a game situation, before applying it in the major game.
Since most major games need equipment, the lead up games related to
the major game should also be done with the relevant equipment.
Check whether you have included the following in your list.
Athletics - Running events (Some)
Swimming
Kabadi
Thachchi
Karate (or any other defensive sport)
You can design lead up games to develop skills of these major games.
Activity 5.1
Prepare a list of major games that do not need
equipment.

40
eg:- Running - Taking off at a high speed is a skill that you should develop for sprinting
races.
Name of the game - accelerating
Number of players - eight in a group
Mark the area as shown in the illustration.
Line up the players on the starting line.Get them the position depending
on the type of start you have taught. (Standing or crouch start) At the signal or if you
have taught the command, players take off and stop at the signal given according to
the time limit decided on to complete the distance of 30m. The players score accord-
ing to the zone they are at the signal to stop. 10m zone, no points.
Points can be awarded to the group by adding the group marks. You can
make it complex deducting by the of points and reducing the width of the zone.
10m 5m 5m 5m 5m
30m
xxxx
xxxx
xxxx
xxx S
tarting L
ine
Fig 5.7
1 2 3 4
50 pts
10m zone no points
15m 5
20m 10
25m 15
30m 20
1st zone
2nd zone
3rd zone
4th zone

41
5.2 Volleyball
You have learnt in your previous grade that there are nearly six main
skills in volleyball. They are,
vServing
vReceiving
vSetting
vSpiking
vBlocking
vCourt defending
To be a successful player you must be able to perform all of the above
skills. To receive a service or to pass a ball, the best method is the over hand pass.
Overhand pass/ Volley pass
Overhand pass is lifting the ball using the finger tips and the wrist.
For this movement the assistance of the elbow, shoulders, hips, knees and an-
kles are necessary. This method of lifting the ball is necessary to control the ball
effectively. This skill can be used to receive as well as to pass the ball.
Let us learn the skill in sequence.
1.Stance
v Position under the ball.
v Keep the feet at shoulder width or in a steady
position with one foot in front.
v Keep your body weight on both feet
v Bend the knees and lower the trunk.
v Keep the trunk a little forward but straight.
v Keep the thumbs and the first finger in a triangular shape and the other
fingers relaxed at a circular shape.
Fig 5.9
Fig 5.8

42
v Keep the hands so formed above the forehead but in front.
v The elbows a little wider than the width of shoulders and above the level of the
shoulders.
v Eyes at the ball.
Movement
v As the ball touches the finger tips, move the hands from
the wrist towards the body.
v Stretch the ankle, knees, hips, shoulders elbow and wrist
while stretching the body.
v Push the ball up with the help of the finger tips.
Follow through
v Stretch the hands to the direction of the throw.
v Balance the body and get ready for the next move.
Activities to practise the overhead pass
Keep the ball on the finger tips correctly
Press the ball using the finger tips
Fig 5.12
Fig 5.10
Fig 5.11

43
Pick the ball off the ground, pressing the ball with correct position of
fingers when picking up.
Throw the ball up and let it fall on the ground
and when it bounces up, reach it with the position of the overhead
pass.
Throw the ball up and catch it at
the position of the overhead pass.
Throw the ball infront and up and run to receive it using the overhead
pass position and push it up and forward.
Throw the ball up and push the ball up several times, using the
overhead pass position.
Fig 5.13
Fig 5.14
Fig 5.15
Fig 5.16
44
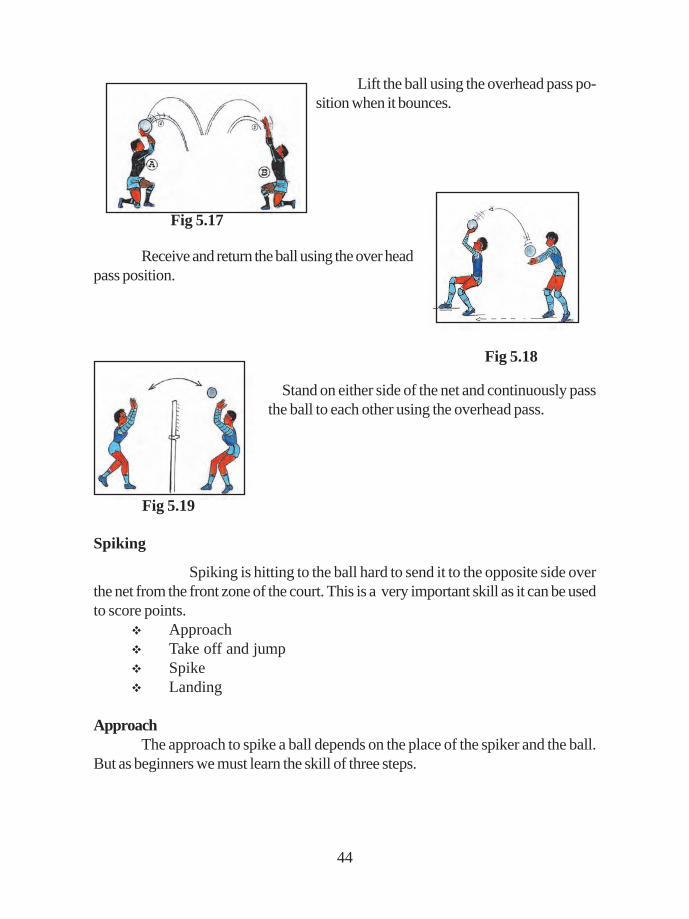
Lift the ball using the overhead pass po-
sition when it bounces.
Receive and return the ball using the over head
pass position.
Stand on either side of the net and continuously pass
the ball to each other using the overhead pass.
Spiking
Spiking is hitting to the ball hard to send it to the opposite side over
the net from the front zone of the court. This is a very important skill as it can be used
to score points.
v Approach
v Take off and jump
v Spike
v Landing
Approach
The approach to spike a ball depends on the place of the spiker and the ball.
But as beginners we must learn the skill of three steps.
Fig 5.17
Fig 5.18
Fig 5.19
45
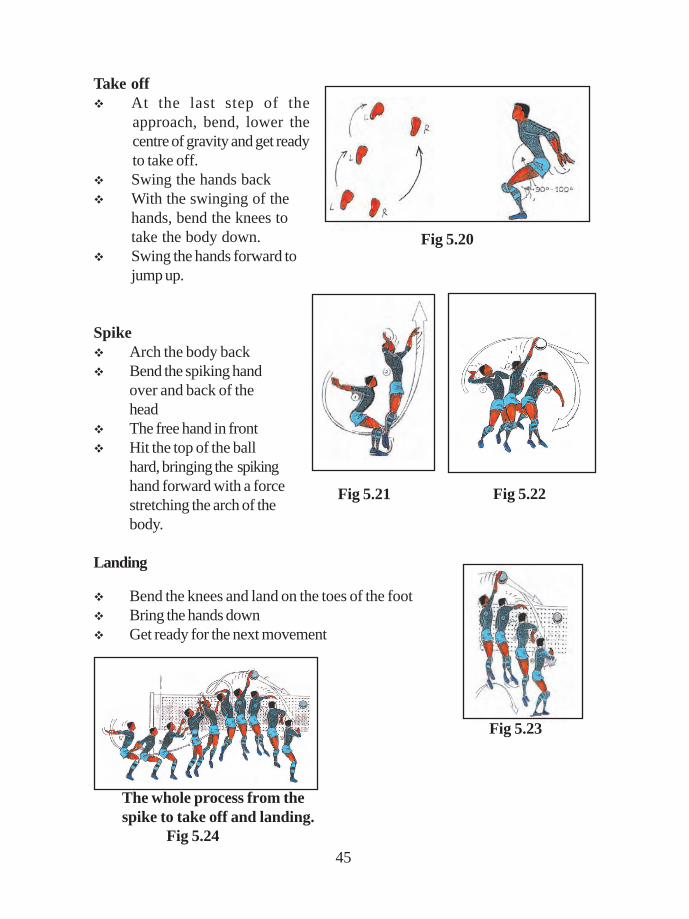
Take off
v At the last step of the
approach, bend, lower the
centre of gravity and get ready
to take off.
v Swing the hands back
v With the swinging of the
hands, bend the knees to
take the body down.
v Swing the hands forward to
jump up.
Spike
v Arch the body back
v Bend the spiking hand
over and back of the
head
v The free hand in front
v Hit the top of the ball
hard, bringing the spiking
hand forward with a force
stretching the arch of the
body.
Landing
v Bend the knees and land on the toes of the foot
v Bring the hands down
v Get ready for the next movement
Fig 5.20
Fig 5.22
Fig 5.23
Fig 5.24
The whole process from the
spike to take off and landing.
Fig 5.21

46
Activities to train spiking
v First, learn to practise the skill without the ball
v Practise the approach run
v Practise the take off
v Take off and arch the trunk
v Position the hands to spike
v Practise the landing after the spike
Each section of the skill should be practised.
Activities with the ball
Take the ball with both hands. Arch the back and take the ball over
the head to the back and hit the ground with the ball.
Repeat the above activity with one hand.
Keep the ball on the weak hand and throw the ball and hit with the
strong hand.
Throw the ball up and spike.
Fig 5.25
Fig 5.26
Fig 5.27

47
Throw the ball up, jump up and spike
Spike the ball, lifted up by a partner taking the necessary number of steps.
Types of Spikes
v Quick attack
v Meduim attack
v High attack
These attacks are used to suit the situation
Blocking
Blocking is stopping the ball coming to your court from the oppo-
site court. This is done by jumping up and reaching with both hands over the top
tape of the net to stop the ball. Blocking is permitted only to the players on the
front line.
Blocking is used to stop a spike. This is an attacking method too.
The best way to face a powerful spike is to block it.
This too should be mastered in steps.
Fig 5.28
Fig 5.30
Spike the ball, held by another player on the
other side of the net, at a lower level.
Fig 5.29
48
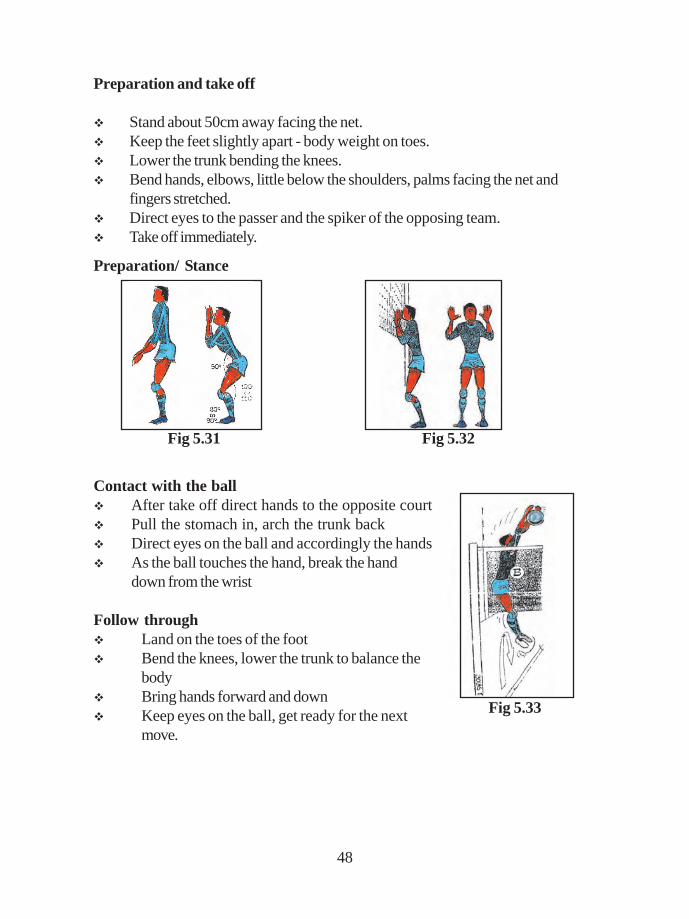
Preparation and take off
v Stand about 50cm away facing the net.
v Keep the feet slightly apart - body weight on toes.
v Lower the trunk bending the knees.
v Bend hands, elbows, little below the shoulders, palms facing the net and
fingers stretched.
v Direct eyes to the passer and the spiker of the opposing team.
v Take off immediately.
Preparation/ Stance
Contact with the ball
v After take off direct hands to the opposite court
v Pull the stomach in, arch the trunk back
v Direct eyes on the ball and accordingly the hands
v As the ball touches the hand, break the hand
down from the wrist
Follow through
v Land on the toes of the foot
v Bend the knees, lower the trunk to balance the
body
v Bring hands forward and down
v Keep eyes on the ball, get ready for the next
move.
Fig 5.31 Fig 5.32
Fig 5.33

49
Activities for blocking
Stand near a low net and practise the skill.
Practise the same, moving along the net.
Stand on either side of the net and practise in twos, touch-
ing each others hands over the net.
Repeat the above activity while moving.
Jump up to touch the ball held by a partner over the net.
The ball is spiked near the net, jump up to block it.
Fig 5.36
Fig 5.34
Fig 5.35
Fig 5.37
Fig 5.38
50
Methods of blocking
Methods of blocking vary according to the number of players participating.
1.Single block - blocked by one
2.Double block - blocked by two
3.Triple block - blocked by three
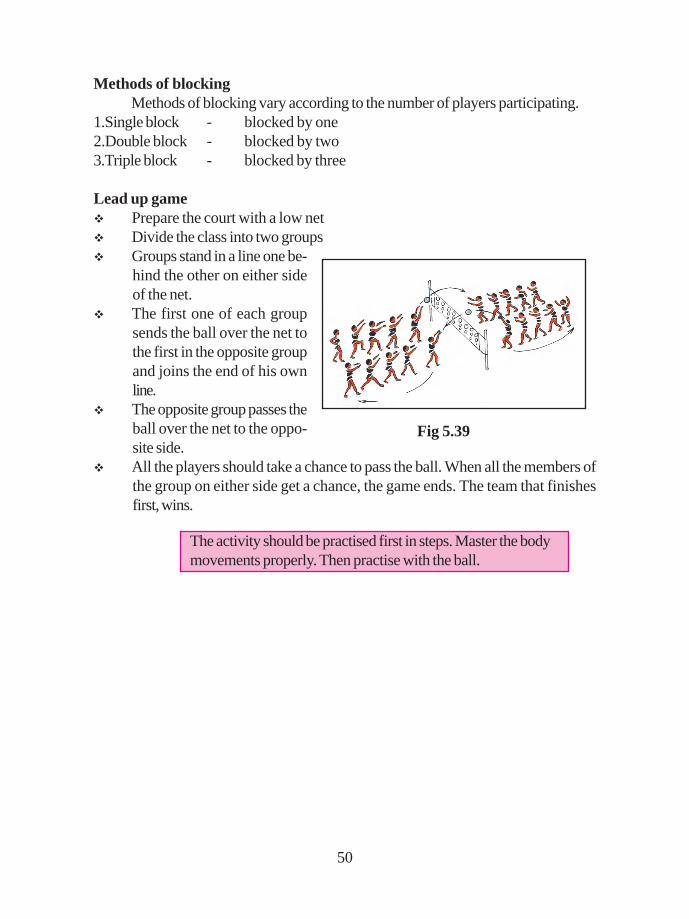
Lead up game
v Prepare the court with a low net
v Divide the class into two groups
v Groups stand in a line one be-
hind the other on either side
of the net.
v The first one of each group
sends the ball over the net to
the first in the opposite group
and joins the end of his own
line.
v The opposite group passes the
ball over the net to the oppo-
site side.
v All the players should take a chance to pass the ball. When all the members of
the group on either side get a chance, the game ends. The team that finishes
first, wins.
The activity should be practised first in steps. Master the body
movements properly. Then practise with the ball.
Fig 5.39

51
Tactics
Tactics are ways adopted to use the skills and rules to the advantage of the team
to win the game. Mastering skills alone will not serve the purpose.Though the game isplayed at a highly competitive level or for pleasure, victory is every player’s aim.Tactics are very important when both teams are highly skillful. Tactics are a way ofdeceiving the players without violating rules and the etiquette of the game.
Let us learn some simple tactics to suit your age and ability.They are receiving, passing, serving and blocking.Servicev Use various types of serving.v Serve to different places of the courtv Serve high, just above the netv Serve close to the end line, side linesv Serve to the weak player, weak side and empty space.v Serve to the places changed.
Spikev Spike avoiding the blockv Spike to weak players and weak sidev Spike to empty placesv Spike to the edge of side linesv Change the speed of the ballv Pretend to spike but push the ball to an empty place.
You can use your own tactics and create your tactics, studying the op-posing players. You must practise your tactics while training and get used to the changeof speed, movement and direction. To use the correct tactic at the appropriate timedepends on your intelligence.
Rule of servingThe player in the right hand corner of the court serves from the serving
area to start the game.
First serviceService is done by the player of the team who wins the toss at the begin-
ning of the game and at the deciding match (fifth round)v At the next rounds, the team that didn’t serve to begin the game in the previous
match, takes the first service.
v Service should be done according to the order of play.

52
Important points to be considered, after the service, to begin the competition.
v If the team that served first to begin the competition wins, the service of the next
round should be done by the same player who started that round.
v If the receiving side wins,they should change one place. The right hand corner
player of the front row should change to the right hand corner of the back row
and serve for that round.
The first umpire gives the signal to serve when the server is ready with the
ball and the players in both teams are ready.
Duties of the server
v Serve (Strike) the ball with one hand or any part of the arm after throwing the
ball up with one hand or both.
v Can throw the ball up only once. Can bounce or change from hand to hand.
v When striking the ball to serve or when taking off to serve the server cannot
touch the lines or be out of the serving area.
v Can go out of the serving area or land inside the court after the serve.
v Service should be done within 8 seconds after the umpire’s whistle.
v If the service is done before the whistle a re-serve is given as the former is not
valid.
Cover(screening)
v A player or players of the serving team cannot cover the path of the ball or the
player in action, from the opposing team.
v If a player or players of the serving side hold hands up, jump up, move from
side to side or group together to cover the path of the ball or the server, is
considered as a cover.
Fouls in service
If the server violates the following rules even if the opposing side is not set in
order, the chance to serve is given to the opposing side.
v If the service order is not observed.
v Service before umpires signal
v If the service is not done in the zone.
v If the ball goes out of the court.
Violating of rules, after the service and position of players.
If the server does not observe the rules of serving even the receiving side is
not in their proper places, it is considered as a fault in the service.

53
After a proper service if the ball goes out of the court or over the
corners and at the same time the opposing players are not in their correct positions, a
punishment is given to the opposing side.
Rules for spiking and blocking
1. Apart from service blocking all other attempts to send the ball to the opposite
court are considered as spikes.
2. The ball sent by five fingers is considered a valid pass. The ball cannot be
thrown.
3. A spike is completed, when the ball passes through the perpendicular area
above the net or when touched by a blocker of the opposite team.
4. A player cannot get the support of another player or an external object to
approach to spike or block. But if a player is about to violate the above rule
(touching the net crossing the middle line) another can prevent it.
5. When spiking, the player’s hand can go over the net to the opposing side but
the spike should be done in ones own court.
6. A front line player can spike the ball at any height but the ball should be in her/
his court at the time of spiking.
7. A back row (rear) player can spike the ball from his/her area from any height,
but the foot cannot touch or cross the spiking line. After the spike the player can
land on the front area.
8. A back line player can spike the ball from the front area but the ball should be
below the top tape of the net.
9. A player can send the hand over the net to the opposing side to block but
cannot touch the ball before the spike or during the spike and cannot obstruct
an opponent.
10. Any part of a player can go under the net on condition that this action will not
obstruct an opposing player.
11. When contacting the opposite court it is not incorrect to cross or step on the
middle line with one foot or both or be in the perpendicular plane of the middle
line.
12. Cannot touch the net or the flexible tape.
13. Blocking is permitted only to the front line players
14. One or a few players can put the hand or arm over the net and block
without obstructing the opposing players, but blocking can be done after the
opposing player has spiked the ball.
v “Combined blocking” is two or three players attempting to stop the ball.
v “Contact” is when one or many players contact the ball when blocking within a
simultaneous movement.

54
Limits of spiking
v A front player can strike the ball at any height provided that the ball is on his/her
court.
v A rear (back) player can strike the ball at any height from the rear zone. When
taking off to spike she/he cannot step on the front zone or line. But he can land
on the front zone after a spike.
v A rear player can spike the ball to the opposite court from the front zone but at
the time of the spike the ball should not be above the top tape of the net.
Fouls in spiking
v Spiking a ball, in the opposite side
v Spiking the ball out of the court.
v A rear player spiking a ball above the net from the front zone.
v Sending an opponent’s service ball, which is above the net from the front zone,
to the opposite court.
v Spiking the ball, above the tape of the net by the libro player.
Spiking/ Passing after blocking
Contact with the ball when blocking is not considered as an attempt
to pass the ball to the opposite court. They can attempt three times to send the ball to
the opposite court.
After the blocking any player or the blocker can either recover, lift or
spike the ball.
Blocking a service
A service cannot be blocked.
Fouls in blocking
v Contact the ball which is on the opposite court or before spiking.
v Blocking by a rear player or libro player.
v Blocking a service.
v Ball going out of court after blocking
v Blocking from outside the flexible rod
v Libro player attempting to block single or combined.

55
Court Defence
Court defence is recovering or receiving any ball that is coming from the
opposite court. Also recovering a ball that reaches you after touching a fellow player
or blocking also can be called a court defence.
When defending the court you have to position yourself properly and use
the correct technique to recover the ball before it touches the ground.
Various techniques of handling the ball are used to defend. Let us find out the
basic techniques of defence.
Preperation
v Raise the heel and keep the feet at shoulder
width
v Bend the knees and take the centre of gravity
down
v The body weight directed in front
v Keep the hands by the side
v Eyes at the ball and the strikers hand
Contact
v Reach under the ball quickly
v Bring palms together and stretch forward
v Bend the palms down from the wrist
v Direct the ball up controlling the speed of the ball
Follow through
v Body lifted up
v Hands up at the direction of the ball
v Eyes at the path of the ball
v Ready for the next move
Fig 5.41
Fig 5.40
Fig 5.42

56
One kneels down, hands in the ready position,
lift the ball sent by the partner.
Sit on heels, land in the ready position, lift the ball sent by the partner, up and
forward to the partner.
Take the correct position and be ready. The sender sends the ball to
different places. The server moves to get under the ball and pass it to the partner.
Activity 5.2
v Get into pairs
v One gets into the ready position
v The other sends the ball low and slow
v Send the ball up and forward to the partner
Fig 5.43
Fig 5.44
Fig 5.45
Fig 5.46

57
5.3 Net ball
Check with the list below whether you have written correctly.
v Foot work
v Throwing and catching
v Attacking
v Defending
v Shooting
If you want to enjoy a good game of netball, you should master the
skills. In grade 7 you have mastered the techniques of foot -work. Let us now learn
the techniques of throwing and catching the ball, attacking and defending, playing and
shooting.
Throwing and catching is very important in netball because this is a
game that depends on the efficiency of carrying the ball to the goal to score a point.
The time is limited and the players should feed the shooters to make many shots as
possible within the limited time to win the game. Accuracy in throwing is very
important. Opportunity and situation vary as there are opponents to block you and
the receiver who is very often on the move. To overcome these difficulties and make
the pass and move to the pass, there are various methods of passing adopted. They
are:-
Let us know how these passes are implemented.
v Chest pass
v Overhead pass
v Side pass
v Bounce pass
Double arm pass
v Shoulder pass
v Under arm pass
v Bounce pass
v Lob pass
Methods of throwing
Single handed pass
Activity 5.3
List out the skills of net ball you have learnt in grade 7

58
When throwing
v The foot, on the side of the hand with the ball should be kept behind.
v Direct your eyes and the free hand to the direction of the throw
v Throw the ball taking the back foot forward to balance the body.
Catching
v Stand one foot in front and hands stretched in front
v As you receive the pass, pull the ball towards you and take the front foot back.
Shoulder pass
This is a very easy pass to learn, because this is your normal throwing action you
have practised informally. You should practise the technique of other throws because
most of your actions are strange.
Please remember that there are three steps to follow in any pass.
Shoulder pass;
1. The starting position
2. Movement / action
3. Follow through
When learning the technique of each pass, learn the three body positions
properly to make the pass accurate.
v The hand with the ball must be taken behind the shoulder.
v Throw the ball using the shoulder, waist, hip on the side of the hand with the
ball.
v The weight of the body which was on the foot of the side of the hand with
the ball is transferred to the foot in front and the back foot comes forward.
v Throw the ball, stretching the hand to the direction of the throw.
v This pass is used to send the ball to a player at a distance.
Fig 5.47

59
Receiving the pass
v Stretch both hands with one foot in front and the trunk forward
v Catch the ball at the shoulder height and pull it forward
v Take the front foot back to balance the body.
Skill Drill to practise the throw
v Two groups stand on either side facing each group.
v No 1 of one group, throws the ball to the one in front and runs behind the
line.
v The receiver throws it back to the next opposite player and runs to the back
of the line.
v Practise with the correct technique.
Lob pass
The ball travels in a curved path
v The hand with the ball is kept at shoulder height and the foot on that
side behind.
v The free hand is kept front to have the balance.
v The path of the ball is a curve and the back foot comes forward after the
throw.
Catching
The skill for catching is the same as for shoulder pass.
Fig 5.48
Fig 5.49

60
Skill Drill
Two groups stand in a circle and the ball is passed to alternate players
in the group. The ball is passed over the head of the other. Number twos send the ball
to each other, Number ones pass the ball over the heads of number twos.
Under arm pass
v The ball is passed at a low level
v Bend the knees and keep the ball low. The path of the ball to the receiver could
be low or high depending on the position of the receiver.
v The foot on the side of the hand with the ball in front.
Catching
Feet apart or one foot in front, bend down, stretch hands in front to
receive the ball. After catching the ball, pull it towards you.
Skill Drill
Fig 5.50
Fig 5.51
Fig 5.52

61
v Stand in two lines facing each other at a distance of about two metres.
v As shown in the illustration, pass the ball to alternate players.
v The path of the ball is zig zag.
Bounce Pass
v Take the ball back at waist level. (hip level )
v Thrust the ball to hit at a place about 3 feet from the receiver.
v The ball would hit the ground and bounce back to the receiver.
v The path of the ball to the spot should be a straight line.
v This needs practice because the ball will reach the receiver only if it is bounced
properly. (we can use both hands)
Skill Drill
v Two groups on either side. One behind the other.
v Mark a spot in front of each line
v Hit the ball on to the spot to bounce to the reciever.
The movement of the hand with the ball should be like the way you hit
with a stone on to the water to splash.
Practise passing as the shoulder pass.
Fig 5.53
Fig 5.54

62
Double arm pass
Chest pass
v Hold the ball with both
hands
v Keep the feet apart or one
foot in front
v Keep the elbows close to
the body as much as
possible
v The ball should be at chest level
v Push the ball forward to the receiver.
v The path of the ball is straight.
v The foot work is the same as in other passes, to balance the body. One foot
comes in front.
Skill drill
v Stand in a semicircle.
v The thrower stands in a place in the middle of the semicircle with equal distances
to all the receivers.
v Thrust or push the ball to reach the receiver. The movement should be like
that of an arrow.
v All should practise passing the ball coming to the centre of the semicircle
Over head pass
v Hold the ball over the head and
back
v Bend the front knee and arch the
body back slightly.
v Body weight should be on the
back foot.
Fig 5.55
Fig 5.57
Fig 5.56

63
At the direction of the throw
The back foot comes forward to balance the body.
v Ball is released above the level of the head.
v It is a long distance pass.
Receiving technique is the same except that the ball will reach at a higher
level so that hands should be stretched up or sometimes jump up to catch.
Skill Drill
v Stand in a straight line.
v There should be a considerable distance away from each other so that the ball
has enough distance to travel.
v Over head pass is sent to alternate players
v No 1 to No 3 - 3 to 4 and so on and back vice versa
v No 2 to No 4 - 6 to 8 and so on and back vice versa
Side pass
v Hold the ball with both hands.
v Take it to the side.
v Send the ball in a straight line to the receiver.
v The foot of the side of the hand with the ball is sided, and the body weight is
on that foot.
Skill Drill
Stand in rows facing alternate directions. The gap in between two
passer of each team should be 4 feet. As shown in the illustration, pass the ball. This
pass is of a difficult technique like the bounce pass. During competitive plays, this pass
is very useful to avoid opponents when passing the ball.
Fig 5.58
Fig 5.59

64
Bounce pass with both hands.
v Hold the ball with both hands at chest level. (forward)
v Keep elbows close to the body.
v As you learnt, in chest pass push the ball hard to the ground to bounce and
reach the receiver.
v The action of the movement is different from the single handed bounce
pass.
Skill Drill
Stand in two lines with about 3m distance facing each other. Pass the
ball to the opposite players. Receive the pass and bounce back to the next. The ball
should hit the ground at a point about 2ms away from the passer (2/3 of the distance
between the passer and the receiver.)
Fig 5.60
Fig 5.61
Fig 5.62
3m
1m2m

65
Attack, defence and shooting
Netball is a game played with 7 players and 7 opponents. The
opponent’s task is to obstruct your team from taking the ball to shoot and block you
from shooting. This process of taking the ball avoiding, dodging to shoot goals is
called attacking. In the meantime the task of the opposing team is to block and obstruct
in order to move and possess the ball. This is called defending. Hence you must
understand that when the ball is on the opponent’s side you are defenders.
Attacking
You should Pass the ball among your team players avoid the opponents
to take possession of the ball. This needs a lot of tactics of getting escaped or being
free. Hence attacking involves a lot of skills.
These are,
v attacking to the left of the opponent
v attacking to the right of the opponent
v attacking to the front of the opponent
v attacking to the back of the opponent
When developing the art of getting free you should first be very
light on your ‘toes’.
Activities to develop this ability of being light on toes and being agile.
1. Skipping
2. Jump on your toes
3. Hop lifting the other knee up and down
4. Chasing behind a partner
5. Run forwards, backwards and sideways
6. Slide to the left and right
7. Slow run and fast run
8. Zig Zag running
Your teacher will help you to give you many more activities

66
Foot movements to get free from an opponent
1. Facing the partner - move to the right and then to the left, and
move to the right taking the left foot in front
of the left foot of the opponent, turning the
body clock wise, back to the opponent to face your player.
In the same way dodge to the left, keeping the right foot
in front of the right foot of the opponent, turning the body
anti clockwise to back the opponent.
2. Backing the partner
Dodge to the left, dodge to the right and dodge to the left and quickly
run away to the right. Similary move to the left.
3. Running back
Similarly be at a side of (left) your partner, dodge to the left and then to the right
and pretend to move further to send your opponent in front and then run back to get
free far behind your partner.
4. Be at the right of your partner and dodge the same way to run back.
Fig 5.64
Fig 5.65
2. Backing the partner
Dodge to the left, dodge to the right and dodge to the left and quickly run
away to the right. Similary move to the left.
Fig 5.63

67
Defending
A defensive player’s aim is to prevent the opponent from getting free
to get the ball and blocking her movements limiting her area of play.
There are three positions to stand with the partner to defend. They
are infront, back or at a side. Whatever position you take you should remember that
you position yourself in such a way that you could see the movement of the player and
the ball. The best position is illustrated in fig 5.5.4
You have studied the movements of your attacker. Get her to move and adjust your
movements accordingly to block her movements.
e.g. As your attacker moves to the right, be close to her without contact and block her
turn. She would take a turn clockwise. When she dodges to the left, block her from
taking a turn anti clockwise, to the left.
At the third attempt the attacker may take a
quick twist taking the left back and turning anti clockwise to
the right. With the help of your teacher learn the moves to
block the attacker. These movements are really challenging.
In twos get the partners to do the attacking movements, create
movements to block and enjoy the fun of success.
First practise all these activities without a ball
and then with a ball.
Activity 5.4
Position yourself as in the activity
Fig 5.68
Fig 5.66
Fig 5.67

68
Defending the ball
A defender
1. Defends the player
2. Defends the ball
When the attacker inspite of your defensive
tactics, gets free and receives the ball. Your next
step is to obstruct her pass.
The rule is, a defender can be as close as
possible to a partner without contact. But when in
possession of the ball she should be 3 feet away
from her, to defend an attack without obstructing.
v Identify the first landed foot of the attacker
after receiving the ball.
v Stand 3 feet away from the landing foot.
v With the attackers movements and eyes identify the direction of the throw
v With hands stretched up or side depending on the direction of the throw,
jump up, leap or reach to prevent the throw and receive the ball.(With a
partner, first practise the movements without a ball and then with a ball.)
Defending the position
Inspite of your defensive tactics if the attacker becomes successful,
your next move should be to prevent the attacker from positioning herself to a vacant
space.
Activity 5.5
v Get into pairs, stand facing each other .
v Remember to control your hands, keep them by the side without stretch
ing.
v Stand on the toes of the feet
v Bend knees slighty for easy quick moves.
v Move with her ahead of her and leap at the ball passed to her or tap it.
Fig 5.69

69
Shooting
However much skillful the
5 players are if the two shooters are unsuc-
cessful, the purpose and fun of the game will
be lost. Therefore, shooting is a skill that
should be mastered perfectly. This needs a
lot of practice.
First
1. Practise the technique of shooting
with one hand and both hands in a
stationary position.
2. Practise the technique of landing in
the circle with the ball and shooting from different angles.
3. Practise shooting with a defender, from different, angles.
Shooting-one hand
v Keep the ball firmly on the palm of the strong hand.
v Hold it at the level of the forehead at the centre between the arch of the
thumb and the first finger.
v The elbow should be in line with the palm directed towards the goal post.
v The eyes should be directed to the ring.
v Bend the knees slightly, raising the body, release the ball at a height,stretching
the hand. The force should generate from the toes across the hips, trunk to
shoulders and hands. The movement should flow without a break. The path of
the ball to ring should be from the hand up to the top of the ring and drop
through the ring. The ball should be released at its highest point.
v The follow through should be the fingers of the released hand directed to
the goal ring.
v This is a skill that needs a lot of practice to develop accuracy in the skill.
Fig 5.70
Fig 5.71

70
These should be practised and cannot learn by reading. Someone
should demonstrate the correct form of the skill for you to observe the movements
properly.
v Practise 1-4 activities with an opponent
v Learn to shoot with both hands. Hold the ball as in single handed shooting,
supported by the other hand and perform skills as explained in 1-4. or hold
with both hands and push the ball up observing the angles as mentioned
before.
Rules and regulations to attack and defence obstruction.
A defender can defend or obstruct an opponent in possession of the
ball from a distance of 0.9m (3 feet) away. The distance is measured
as mentioned below.
v The distance between the nearest foot of the defender and the first landed foot
or the pivoted foot of the attacker.
v If the attacker lifts the landed foot or the pivoted foot, the distance is meas
ured from the nearest foot of the defender to the place where the first landed
foot is.
v If the attacker lands or keeps both the feet when receiving the ball, the dis
tance is measured between the landed feet of each other.
v If the attacker lands on both simultaneously and lifts one, the distance is
measured from the landed foot to the nearest of the defender.
v The defender can defend or obstruct at the correct distance.
v By jumping, but by doing so shortens the permitted distance of 0.9 m, It is
considered as an obstruction.
v If the defender is within the permitted distance - 0.9 m, she can remain without
moving, without obstructing the opponent.
v If the defender is at the correct distance she cannot step forward to obstruct
an opponent who possesses the ball.
Activity 5.6
1. Learn to shoot from a static position from every angle of the ring.
This will improve your movement skill as well as accuracy.
2. Learn to shoot running into the circle.
3. Receive the ball from different places outside the circle and shoot.
4. Run into receive the ball from different places and take the “on
the run shot” Get the help of the teacher to practise these varied
skills.

71
Obstructing a player without a ball
If a defender is within the distance of 0.9m she is considered to have
obstructed, if she moves her hands. At this distance if the defender moves the hands
at the following instances it will not be considered as an obstruction.
v To block or change direction
v To catch a pass
v To receive a ball after an unsuccessful shot
v Signal for a pass, or show direction.
Interfering
v Frightening a player with or without a ball
v Penalty pass or shot from where the infringement occured. If the team is at a
disadvantage by doing so,the pass is awarded to the opposite team from the
place the victimised player was.
Defending a player out of court
A defender can defend a player out of court only from her area of
play, but without going out of court.
Penalty
A penalty pass or shot is given from the place where the player went
out of the court.
Contact
Physical contact
No player can deliberately or accidentally have physical contact with an
opponent.
A player cannot do the following when trying to get free or defend.
v Block the landing place of an opponent.
v Bang against or jump on an opponent
v Touch the ball held by an opponent
v Hit or toss the ball held by an opponent
v Push an opponent with the ball
The penalty for the above :-
v A penalty pass or shot is given from the place the infringement occured.
v If two players of either side contact each other and if it’s not a disadvantage for
both teams, it is ignored or the ball is tossed up between two opposing players
at the place the infringement occured.

72
5.4 Football (Soccer)
Football is the world’s most popular game. About 250 million engage in
this game and out of which about 40 million are women, about 207 countries participate
in this game and the numbers increase day by day.
You have developed the skills of controlling the ball to play the game
successfully in grade 7.. You should learn the techniques of kicking. Let us learn a few
skills. They are:-
v kicking
v heading
v throwing
v goal keeping
Kicking
Football as the name indicates is a game played by controlling the ball
with the feet unlike other games where a ball is handled by hand or a bat. This needs
a lot of practice. Kicking is done by different parts of the foot and directed to different
angles. Here are a few ways of kicking the ball.
Inside kick - kick from the inside of the foot
Instep kick - kick from the surface of the foot
Outside instep - kick from the outside of the surface of the foot
Inside instep kick - kick from the inside front of the foot.
Heel kick - kick from the heel
v Stand behind the ball.
v Keep the strong foot about 8-10cm away from the ball.
v Get the body weight on the foot. Bend the knee slightly.
v Keep the head over the ball and body slightly forward.
Fig 5.72
Inside kick

73
v Keep the hands by the side of the body to balance the body
v Turn the hip, bend the knee of the kicking foot to take the foot back and kick
the centre of the ball from the inside arch of the foot.
After the kick the foot should be directed towards the path of the ball.
Instep kick
v Stand behind the ball
v Keep the free foot about 10-15 cm away from the ball, but parallel. Get the
body weight on it.
v Keep the head over the ball, slightly bend the body forward.
v Keep the hands by the side of the body.
v Bend the kicking foot, take it from the hip, stretch it from the ankle and
kick the centre of the ball. When kicking, use the area between the ankle
and the toes.
v After the kick the foot should be directed towards the moving direction of the
ball.
v Instances to use this kick;
To send the ball to a distant player
Penalty kick
Activity 5.7
v Divide the class into two groups
v Form two lines facing each other.
v The first in the row kicks the ball from inside of the foot to the
player in front, runs back and joins the line.
v He receives it and sends to the next opposite player.
v All should get a chance to practise.
Fig 5.73

74
Outside instep kick
v Stand behind the ball.
v Keep the free foot parallel to the ball 20-25 cm away.
v keep the head over the ball. Bend the body forward. Balance the body weight.
v keep the hands by the sides of the trunk.
v keep the kicking foot directed towards the free foot, toes
directed towards the ground, area of the tiny toe of the
surface of the foot should touch the ball. The path of the
ball is a curve.
v After the kick the foot must be directed to the opposite
direction of the path of the ball.
v Instances of using the outside instep kick;
To deceive opponents
To kick, deceiving the goal keeper
Activity 5.8
v Divide the class into two groups and get them to line up
v The first in one row uses the kick to send the ball to the one in
front of the row
v The one in front, returns the kick and joins the end of the row.
v All should get a chance to practise the skill.
v Practise as many times as possible.
Activity 5.9
v Divide the class into two groups.
v Each group lines up on a straight line facing the group opposing 3m away
See fig 5.6.5
v The student in front of one row kicks the ball to the opposite row as explained
above and joins the end of his own line.
v The first player stops the ball from the outside of the foot and kicks it back to
the player on the opposite row.
v Continues till every one gets the chance of practising the skill.
Fig 5.75
Fig 5.74

75
Inside Instep Kick
v Keep the ball behind
v Free foot -20-25cm. away from the ball. The
weight of the body on the free foot, knee
slightly bent.
v Head - above the ball, trunk slightly inclined
forward.
v Hands -by the side of the body to assist, to balance
the weight of the body.
v Kicking foot-Approach to kick is not straight.
One should take a curved path. Bend the
knee take the foot back and kick the
bottom (inside) of the ball from the inside of the toe area of the foot.
v After the kick, the foot should be directed towards the path of the ball.
Instances of using this method;
To send the ball high to a player at a distance
To do a corner kick
To kick to the goal
To a free/ kick
Penalty kick
Activity 5.10
v Divide the class into two groups
v Line up as done for other skill drills
v The first in one row kicks the ball as explained above
v The first in the opposite row receives and kicks it
back.
v Practise the drill, till all get the chance of practissing the
kick.
Fig 5.76
Fig 5.77

76
Heel Kick
v Stand backing the ball
v Free foot - Keep a little away from the ball.
Bend the knee slightly and keep the
body weight on it.
v Head - Keep for the opposite direction
of the ball. Bend the trunk forward.
v Kicking foot - Take it forward and kick from the
heel.
v After the kick, the foot should be directed to the direction
of the path of the ball.
Instances of using this kick;
To kick the ball back
To deceive the players
Heading
This is a method used very often in this game. Heading the ball is a
skill you should train carefully.
v In a static position
v Jumping up
v Sailing
Activity 5.11
The formation is the same as for former drills.
Use the method of kicking to send the ball to each other.
Fig 5.80
Fig 5.78
Fig 5.79

77
Fig 5.81
Fig 5.82
Fig 5.84
Heading the ball in a static position.
v The ball is in front reaching towards you .
v The eyes must be focused at the ball.
v The ball must be touched with the forehead.
v Arch the body with feet slightly apart .
v Keep the hands by the side to balance the body.
v Use the strength of the upper body.
v Bring the trunk and the head to hit the ball.
Head the ball leaping from one foot.
v Use the technique as explained above.
v Reach the ball leaping from one foot.
v Land on the leaped foot.
Head the ball jumping from both feet.
v Reach the ball jumping up.
v Use the same technique of heading.
v Land on both feet.
Instances of using this technique.
v To get the ball to your side from the
opponents before it lands.
v To achieve a goal.
v To protect a player from opponents.
Fig 5.83
78
The formations for skill drills could vary according to the space and equipment available.
Goal Defence and Throw- In
Goal keeping is a special skill, because the satisfaction of playing
depends on the number of goals you score. The goalkeeper should be highly
agile and skillful to defend the goal if not the team will not enjoy the fun of winning. For
this, the goal keeper should be able to reach at every ball that comes and catch, kick
or hit it out of the goal posts.
Various methods of goal cover.
v Defend a ball rolling
v A ball not rolling
v A ball reaching at chest or abdomen level
v A ball reaching at head level
v A ball reaching from a side
v A ball reaching above the top bar
v A ball reaching with an opponent
Let us learn methods of defending the ball at a few of the instances
mentioned above.
Defend a ball rolling towards the goal.
Stance
v Feet slighly apart or steady position
v Trunk forward and down, knees bent
v Hands bent slightly and forward
v Eyes at the ball
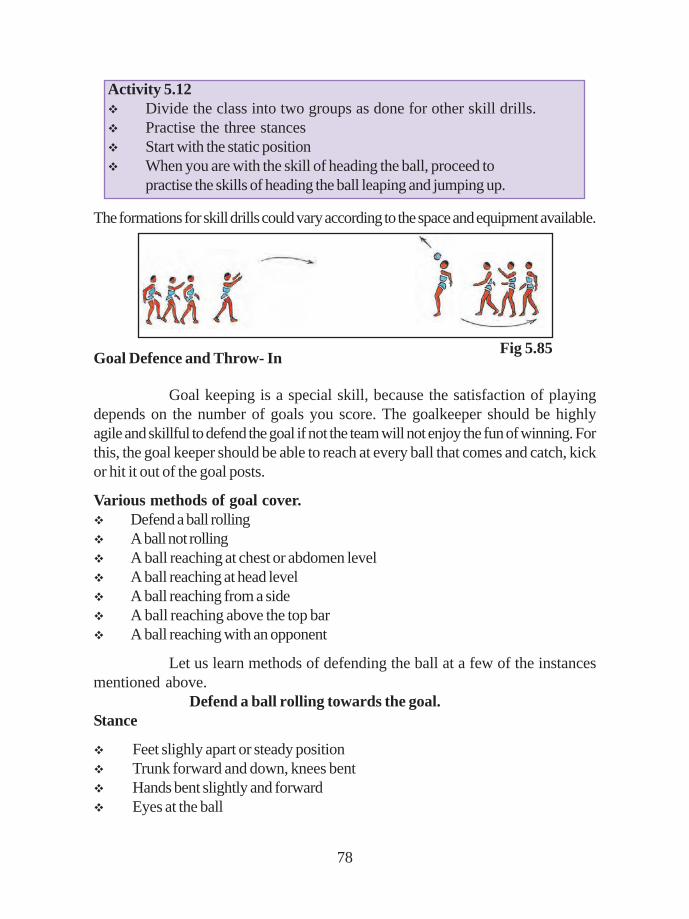
Activity 5.12
v Divide the class into two groups as done for other skill drills.
v Practise the three stances
v Start with the static position
v When you are with the skill of heading the ball, proceed to
practise the skills of heading the ball leaping and jumping up.
Fig 5.85

79
v Contact with the ball
v Watch the ball and position accordingly
v Stand feet together on the path of the ball
v Knees bend, trunk forward, fingers spread, palms facing the ball.
v Keep the palms under the ball and as it touches the palm, grab it towards you
immediately.
Throwing the ball
v Take the ball to the back from a side
v Throw it along the ground.
v The hand should leave the ball at the end of the throwing action.
v Collecting the ball rolling from a side
v Stance is as for the above skill.
v Watch the ball, study the way it rolls before an
opponent could reach at it. Toes of the right foot
should be directed towards the ball reaching from
the right and the left knee near the right foot.
v Toes of the left foot should be directed towards
the ball reaching from the left. Right knee must
be bent near the left foot.
v Hands should be as explained above.
v Grab the ball and throw the ball as mentioned
above.
Collecting the ball reaching towards you at chest or abdomen level.
v Stance is the same.
v Position according to the path of the ball.
Fig 5.86
Fig 5.87

80
Fig 5.88
v Feet apart to the width of the shoulders.
v Balance the weight of the body on both
feet
v Eyes at the ball
v Knees bent, trunk forward
v As the ball reaches at chest or abdo-
men level, leap and stretch hands grab
it and protect it.
It is very important to remember that, at every instance you should reach the ball
directed towards the goal, as quickly as possible before an opponent could reach it.
The skills should be practised quickly.
Throw - in
A throw - in is used when the ball goes out of court. A throw in is given
to a member of the opposite team who last touched it. You can throw - in with one foot
in front or feet apart. Whichever way you keep your feet, the body position is the
same.
Throw- in with one foot in front
v Hold the ball with both hands
v Arch the body back
v Throw turning the trunk to the direction of the throw.
Collecting a ball reaching at head level
v Watch the ball
v Keep the hands at the ball and palms
facing the ball
v Keep the thumbs close to each other,
keep fingers steady and strong.
v Leap and reach the ball.
v Grab it and protect it at chest level.
Fig 5.90
Fig 5.89
Activity 5.13
v The formation is the same as for the above skill drills.
v Use the correct techniques
v All should get the chance to practise the skill.

81
Throw - in feet apart
Rules to be observed when throwing in
v Should not touch the boundary lines
v Hold the ball with both hands
v Hold the ball over the head, stretch the hands and throw
v After the throw he cannot touch the ball or kick it again before another player
touches it.
A few rules in foot ball
Ball - Should be round Made of leather or similar material
Circumference is 68cm - 70 cm (270-280)
Weight 410g-450gm (14-16 ozs)
Fig 5.91
Fig 5.93
Fig 5.92

82
Number of players - Maximum 11 players
The one out,is the goal keeper
minimum 07 players
Reserve players (03-07)
Duration - Two sets with 45 mts each
Interval should not exceed 15mts.
Fouls for a free kick - Kicking an oppnent or attempting to do so
Putting feet across or trying to do so
Jumping on an apponent
Attacking an opponent
Pushing an opponent
Holding an opponent
Spitting on an opponent
Holding the ball
Contact with an opponent before touching the ball
Penalty kick - During the play if any of the above fouls is committed
penalty kick is awarded to the opposite team.
Indirect free kick
v After releasing the ball the goal keeper touching the ball before it is being touched
by another player.
v A team player passing the ball to the goal keeper purposely.
v The team goal keeper receiving a throw-in, sent by a team player.
v Injurious play
v Obstructing the play of an opponent
v Obstructing the goal keeper from releasing the ball
v Going to an area out of boundaries
offences
1. Unsportsmanship behaviour
2. Unaccepted behaviour or language
3. Violating the prevailing rules
4. Delay to restart the game
5. Not using the appropriate distance for a kick