zte tania - visit virgin mobile around the world | virgin · zte tania user guide . ... the manual...
TRANSCRIPT


LEGAL INFORMATION
Copyright © 2011 ZTE CORPORATION.
All rights reserved.
No part of this publication may be quoted, reproduced,
translated or used in any form or by any means, electronic or
mechanical, including photocopying and microfilm, without
the prior written permission of ZTE Corporation.
The manual is published by ZTE Corporation. We reserve the
right to make modifications on print errors or update
specifications without prior notice. Every effort has been made
in the preparation of this manual to ensure accuracy of the
contents, but all statements, information, and recommendations
in this manual do not constitute a warranty of any kind,
expressed or implied.
The Bluetooth® trademark and logos are owned by the
Bluetooth SIG, Inc. and any use of such trademarks by ZTE
Corporation is under license. Other trademarks and trade
names are the property of their respective owners.
Version No. : R1.0
Edition Time : 201110

Page 3
Contents Getting Started ................................................. 9
Overview ........................................................................ 9 Keys Explained ............................................................ 11
Starting Up ............................................................. 12 Installing the SIM Card and Battery ......................... 12 Removing the Battery and SIM Card ....................... 13 Charging the Battery ............................................... 14
Switching Your Phone On/Off....................................... 14 Setting Up Your Phone for the First Time ................ 15 Switching to Sleep Mode ........................................ 16 Waking up Your Phone ........................................... 16
Getting Around ............................................................. 17 Touch Control ......................................................... 17 Start Screen ........................................................... 18 Status Icons ............................................................ 20 Accessing the applications and Settings ................. 21 Hubs ....................................................................... 21 Adjusting the Volume .............................................. 21 Searching ............................................................... 22 Voice Interaction ..................................................... 22 Switching Between Running Applications ............... 22 Setting Up an Account ............................................ 23
Phone Calls ..................................................... 24 How to Make Calls ....................................................... 24

Page 4
Calling with the Keypad .......................................... 24 Calling from Your Contacts..................................... 25 Calling from Your Call History ................................ 25 Calling your Voicemail ............................................ 25
How to Receive Calls .................................................. 25 Answering or Rejecting a Call ................................ 26 Muting a Call .......................................................... 26 Putting a Call on Hold............................................. 26 Turning the Speakerphone On/Off .......................... 27 Ending a Call .......................................................... 27
Adjusting your Call Settings ......................................... 27
People .............................................................28 Importing SIM Card Contacts ....................................... 29 Contact Information ..................................................... 29 Creating a Contact ....................................................... 29 Searching for a Contact ............................................... 30 Linking Contact Information ......................................... 30 Unlinking Contact Information ...................................... 31 Creating a New Group ................................................. 31 The Me Tile ................................................................. 31
Using the Keyboard .......................................32 Entering Text ............................................................... 32 Moving the Cursor ....................................................... 33 Copying and Pasting ................................................... 34 Changing Keyboard Settings ....................................... 34

Page 5
Messaging ....................................................... 35 The Message Box ........................................................ 35 Sending a Message ..................................................... 35 Managing Message Threads ........................................ 36
Deleting a Message Thread .................................... 36 Deleting a Message ................................................ 36
Changing Message Settings ........................................ 36 Online Messaging ........................................................ 37
Email ................................................................ 38 Creating an Email account ........................................... 38 Receiving Emails ......................................................... 39 Composing and sending an Email ................................ 39 Replying to or Forwarding an Email.............................. 40 Deleting an Account ..................................................... 40 Email Settings .............................................................. 40
Getting connected to the Internet ................ 41 Adding a New GPRS/EDGE/3G Connection ................ 41 Turning on WiFi ............................................................ 42 Connecting to a WiFi Network ...................................... 42 Sharing Internet ........................................................... 42
Browsing the Internet .................................... 44 Navigating on a Web Page ........................................... 44 Browsing Options ......................................................... 45 Managing Bookmarks .................................................. 45
Editing a Bookmark ................................................. 45

Page 6
Deleting a Bookmark .............................................. 46 Changing Browser Settings ......................................... 46
Bluetooth® .......................................................47
Calendar ..........................................................48 Creating an Appointment ............................................. 48 Calendar Views ........................................................... 48 Viewing an Appointment .............................................. 49 Editing an Appointment ................................................ 49 Deleting an Appointment ............................................. 50 Handling Appointment Reminders ............................... 50 Hiding or Showing Appointments ................................. 50
Making the most of Multimedia ....................51 Syncing your Phone and your Computer ..................... 51 Taking Pictures with your Camera ............................... 51
Adjusting Camera Settings ..................................... 52 Shooting Video with your Camcorder ........................... 52
Adjusting your Video Settings ................................. 53 Listening to your FM Radio .......................................... 53 Playing your Music ...................................................... 54 Playing your Videos ..................................................... 54 Listening to or Watching Podcasts ............................... 54 Opening your Picture and Video Gallery ...................... 55
The Pictures Hub ................................................... 55 Viewing Pictures and Videos .................................. 55
Using Maps .....................................................56

Page 7
Enabling Location Services .......................................... 56 Bing Maps .................................................................... 56
Finding your Current Location ................................. 57 Viewing the Map ..................................................... 57 Getting Directions ................................................... 58 Searching for Places ............................................... 59 Exploring Nearby Places ......................................... 59 Clearing the Map .................................................... 59
Sorting out your Phone Settings .................. 60 Setting Time and Date ................................................. 60 Changing Display Settings ........................................... 60
Changing the Lock Screen Wallpaper ..................... 60 Adjusting Screen Timeout ....................................... 61 Adjusting Screen Brightness ................................... 61
Sound Settings ............................................................. 61 Language and Region Settings .................................... 62 Mobile Network Services .............................................. 62
Turning On/Off Flight Mode .................................... 62 Setting Up Mobile Services ..................................... 62
Security Settings .......................................................... 63 Protecting your Phone with a Password .................. 63 Protecting your SIM with a PIN ............................... 64 Protecting your Phone When You Lose It ............... 65
Privacy: Reset to Factory Settings................................ 65 Managing Application Settings ..................................... 65 Managing Other Settings.............................................. 65

Page 8
Other Applications .........................................67 Alarms ......................................................................... 67 Calculator .................................................................... 67 Games......................................................................... 67 Marketplace ................................................................. 67 Office ........................................................................... 67
Specifications .................................................69

Page 9
Getting Started Please read the Warranty, Safety & Regulatory Guide on our website at: www.zteuk.co.uk
For additional information about your phone go to
windowsphone.com
Overview
Volume Down
Volume Up
Headset Jack
Earpiece
Touch Screen
START Key
SEARCH Key
BACK Key

Page 10
POWER Key
Charger/ USB Jack
CAMERA Key
Loudspeaker
Camera with LED flash
Battery Cover
Page 11
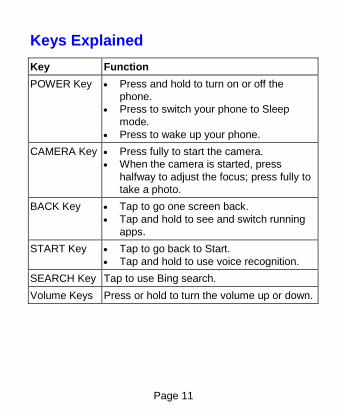
Keys Explained
Key Function
POWER Key Press and hold to turn on or off the
phone.
Press to switch your phone to Sleep
mode.
Press to wake up your phone.
CAMERA Key Press fully to start the camera.
When the camera is started, press
halfway to adjust the focus; press fully to
take a photo.
BACK Key Tap to go one screen back.
Tap and hold to see and switch running
apps.
START Key Tap to go back to Start.
Tap and hold to use voice recognition.
SEARCH Key Tap to use Bing search.
Volume Keys Press or hold to turn the volume up or down.

Page 12
Starting Up
Installing the SIM Card and Battery
Switch off your phone before installing or replacing the battery
or the SIM card.
1. Remove the back cover.
2. Hold the SIM with the cut corner oriented as shown and
slip it into the card holder.

Page 13
3. Insert the battery by aligning the gold contacts on the
battery with the gold contacts in the battery compartment.
Gently push down on the battery until it clicks into place.
4. Press the cover gently back into place until you hear a
click.
Removing the battery and SIM card
1. Make sure that your mobile phone is off.
2. Remove the back cover.
3. Lift the battery up and out.
4. Slide the SIM out.

Page 14
Charging the battery
When you first get your new phone you’ll need to charge the
battery.
1. Connect the adapter to the charger jack. Ensure that the
adapter is inserted with the correct orientation. Do not
force the connector into the charger jack.
2. Connect the charger to a standard AC wall outlet.
3. Disconnect the charger when the battery is fully charged.
Switching Your Phone On/Off Make sure the SIM is in your device and the battery is
charged.
Press and hold POWER Key to switch on your phone.
To switch it off, press and hold POWER Key. Then slide
down the picture on the screen.

Page 15
Setting Up Your Phone for the First Time
When you first power on your phone after you purchase it or
reset it to factory settings (see Sorting out Your Phone
Settings – Privacy: Reset to Factory Settings in the manual),
you need to do some settings before using it.
1. In the welcome screen, tap get started and select the
language you want to use.
2. Tap next. If you have changed the language, tap ok for
the phone to reboot and then tap next.
3. Read the Windows Phone Terms of Use and Privacy
Statement. Tap accept to continue.
4. Tap recommended to enable mobile data and send
information to Microsoft for product improvement. Or tap
custom to select the options you want to enable and tap
next.
5. Choose the time zone you are in and tap next.
6. Set the correct date and time. Tap the date or time box
and then scroll up or down to select the exact digits. Tap
next when you finish.
7. Sign in or create a Windows Live ID. You need it to get
apps, games, and music from Marketplace, find a lost
phone, and more. Tap not now to sign in or create an
account later.
8. Tap done. The phone will show the Start screen.

Page 16
Switching to Sleep Mode
To save battery power, Sleep Mode suspends your device to
a low-power-consumption state while the display is off. Your
device also goes into Sleep Mode by itself when the display
is automatically turned off after a certain period of time, which
you can set in Settings > system > lock + wallpaper >
Screen times out after.
Press POWER Key to switch to Sleep Mode.
Waking up Your Phone
1. Press POWER Key. The phone displays the lock screen.
2. Press the bottom of the screen and slide your finger up.
NOTE: If you have set a phone password (see Sorting out

Page 17
Your Phone Settings – Security Settings in the manual) you’ll
need to enter the password to unlock your screen.
Getting Around
Touch Control
You can use finger gestures to control your phone. The
controls on your touch screen change dynamically
depending on the tasks you’re performing.
1. Tap the buttons, icons, or applications to select items or
to open applications.
2. Tap and hold an item by keeping your finger on it to see
the available options.
3. Flick the screen to scroll up, down, left or right.
4. Point, drag and drop to move particular items across the
screen.
5. Pinch or double-tap the screen, to zoom in/out on a web
page or an image.
NOTE: You can view the phone screen in portrait or
landscape orientation simply by holding the phone upright or
turning it on its side.

Page 18
Start Screen On your Windows Phone, the Start Screen (or Start) is like a home screen: you can keep what really matters to you at easy reach. The start screen contains Windows Phone live tiles, which are shortcuts to functional features and apps. Pin all sorts of things to Start, including apps, websites, map locations, and even contacts. When you pin a contact to Start, you’ll see missed calls, SMS, IM, email, and feed updates from that person, right from that Tile. You can also customise your start screen layout. Check out the Start Here Guide that’s included in the box for more details about Start and the fun things you can do with it.

Page 19
Rearranging the Start Screen Tiles
1. Tap and hold the tile you want to move until other tiles
recede.
2. Drag the tile to a new position in the Start screen.
3. Tap the tile or a blank space to dock the tile.
Pinning New Items to the Start Screen
Lots of stuff can be pinned to the Start screen, such as
apps, contacts, and office documents.
To pin something to the Start screen, tap and hold it until a
menu pops up. Then tap pin to start.
Removing a Tile from the Start Screen
1. Tap and hold the tile you want to remove until other tiles
recede.
2. Tap on the upper-right corner of the tile.

Page 20
Status Icons
Your phone will tell you exactly what’s going on by showing
you different icons. Simply tap the top of the screen to see
the icons. After a few seconds, they will disappear again.
Here’s some of the icons you may see and what they mean.
GPRS connection No signal
EDGE connection Signal strength
3G connection No SIM installed
HSPA connection SIM card locked
Battery flat WiFi on but not connected
Battery very low Connected to a WiFi network
Battery medium Bluetooth connected
Battery high Silent mode
Battery full Vibrate mode (vibrate and no
ringtone)
Battery charging
Flight mode
Internet sharing on
Call forwarding Roaming
Page 21
TIP: When the phone notifies you of something on top of the
screen, for instance, a new message or a new found WiFi
network, tap the notification area to open the related screen,
such as the new message or WiFi settings.
Accessing the applications and Settings
From the Start screen, tap or flick your finger left to see
all your apps and settings.
Hubs
Your Windows Phone simplifies related experiences by
combining them into one hub. You can see all your contacts
and check out their status updates on social networks from
the People Hub; check all your music, video, podcast and
listen to FM radio from the Music+Videos Hub; explore Office
documents on your phone or online from the Office Hub, and
more.
Flick left or right in a hub to view different categories of
information.
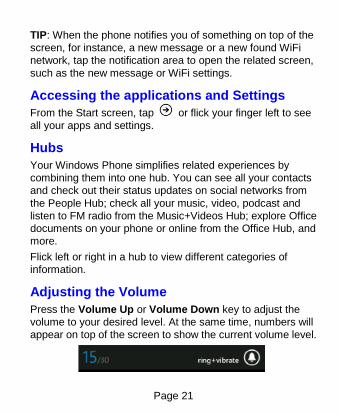
Adjusting the Volume
Press the Volume Up or Volume Down key to adjust the
volume to your desired level. At the same time, numbers will
appear on top of the screen to show the current volume level.

Page 22
Tap icon on the right to turn off ringtone and make the phone only vibrate or silent.
Tap or icon to turn ringtone back on.
Searching
1. From Start, press SEARCH Key to open the BingTM
search screen.
2. Tap the search box and enter the key words with the
onscreen keyboard. Then tap on the keyboard to
see the search results.
3. Tap the categories below the search box or flick left or
right to check out other results in other categories.
TIP: Tap , , or to search for local businesses, scan barcodes or texts, use audio search to find songs, or use your voice to do a search.
Voice Interaction
From any screen on your phone, tap and hold START Key to
bring up the Microsoft Tellme screen. Now you can use your
voice to call your contacts, open applications, text a friend,
search the web, and more.
Tap to learn what you can do and how to use this feature.
Switching between Running Applications
You can have multiple applications running on your phone.
Page 23
When you want to open another application without exiting
the current one, tap START Key and tap . then tap the new
application you want to open.
To switch back to the previous application, first tap and hold
BACK Key to see all running applications. Then flick left or
right to find the application you want and tap to restore it.
Setting up an Account
Set up an email, Windows Live, Google, and social network
account to synchronize emails, contacts, or receive updates
on your phone.
1. From Start, tap
2. Tap Settings > email+accounts > add an account.
3. Tap the account you want to set up and enter the email
address and password.
4. Tap sign in.

Page 24
Phone Calls
How to make calls
There are many ways to make a call with your phone. And
they’re all easy to do.
Calling with the Keypad
1. From Start, tap the Phone tile.
2. Tap to open the keypad.
3. Enter the phone number
Tap to delete wrong digits.
4. Tap call.
TIPS: To make international calls, hold 0 to enter the “+”.

Page 25
Calling from your Contacts
1. From Start, tap the People tile.
2. Flick up or down to scroll the contacts list and tap the
contact you want to call.
You can search for a contact by tapping at the
bottom of the contact list.
3. Tap the phone number.
Calling from your Call History
1. From Start, tap the Phone tile.
2. Tap in front of the name or number you want to call
in the history list.
Calling your Voicemail
Press and hold 1 key from the keypad to call your voicemail.
How to receive calls When you have an incoming call, the caller number appears
on the screen.

Page 26
Answering or rejecting a call
If How to answer How to reject
Display is
on
Tap answer Tap ignore
Display is
off
Press the bottom of
the screen and slide
your finger up. Then
tap answer.
Press the bottom of
the screen and slide
your finger up. Then
tap ignore.
Muting a Call
During a call, you can mute your microphone so that the
person you are speaking to cannot hear you, but you can still
hear them:
Tap mute to turn your microphone off. The mute button
changes colour. To turn your microphone back on, tap mute
again.
Putting a call on Hold
During a call, you can put it on hold by tapping hold. The
hold button changes colour.
To restore the call, tap hold again.
TIPS: If you accept an incoming call while you’re on another
call, the first call automatically goes on hold. Just press TAP
TO SWAP on top of the screen to switch between the two
callers.

Page 27
Turning the Speakerphone On/Off
Tap speaker during a call to turn the speakerphone on. This
speaker button changes colour. Tap speaker again to turn
off the speakerphone.
Ending a Call
Tap end call to finish a call.
Adjusting your Call Settings From Start, you can open the call settings menu by tapping
the Phone tile and selecting … > call settings.
Voicemail number Show the current voicemail number. Tap to
change it.
Show my caller ID
to
Set who can see your phone number when you
call.
Call forwarding Forward your incoming calls to a different
number.
International
assist
Correct common mistakes automatically when
you dial internationally or from abroad.
SIM security
See Sorting out Your Phone Settings – Security
Settings – Protecting Your SIM With a PIN in this
manual.

Page 28
People The People Hub stores all your contacts information. When you
sign in to an email or other accounts, such as Windows Live,
Outlook, Google, and Facebook, your contacts from these
accounts will also be imported to your phone, and you can
receive status updates from these contacts.
From Start, tap the People tile to open the People Hub.
In all, you can see all contacts you’ve created on the phone as
well as those imported from your email or other accounts.
If you have signed in to Windows Live or other social network
accounts, you can flick left or right to see status updates from
your online friends.

Page 29
Importing SIM Card Contacts Your phone does not automatically show contacts saved in
your SIM card. You need to import them to your phone by
doing the following:
1. From Start, tap the People tile to open the People Hub.
2. Under all in the People Hub, tap settings > import SIM
contacts.
Contact Information Under all in the People Hub, tap a contact to see that
contact’s profile. You can call, text, or email the contact from
the profile screen.
TIPS: Tap and hold a contact to edit or delete it.
If the contact is your Windows Live, Facebook, or Twitter
friend, you can flick left or right to see status updates, picture
albums, recent conversations or recent calls.
Creating a Contact 1. Under all in the People Hub, tap > new contact.
2. If you have signed in to multiple accounts, choose the
account that the new contact belongs to.
3. Enter the contact name, phone numbers, and other
information.
4. Tap to save the contact.

Page 30
Searching for a Contact
1. From Start, tap the People tile.
2. Tap at the bottom of the contacts list.
3. Input the contact name you want to search for.
The contacts matched will be listed as you type.
TIPS: Contacts are sorted in alphabetic order either by first or last name depending on the setting. You can tap any letter and then select the letter you need to quickly jump to the contacts with that first name or last name initial.
Linking Contact Information If someone’s contact information is saved on your phone and your phone has also imported the same contact from your Windows Live or other accounts, it is possible that you may see duplicated entries for the same person in the contact list.
You phone can automatically link most of the duplicated entries, but if it does not, you can manually do so, so that you can see someone’s information in a single profile.
1. From Start, tap the People tile.
2. Under all in the People Hub, tap the name of the contact you want to link.
3. Tap at the bottom of the screen and then tap choose a contact.
4. Tap the contact that you want the current contact to link to. Then tap BACK Key.

Page 31
Unlinking Contact Information 1. To break the link you have created, tap the contact name
in the People Hub.
2. Tap the link icon at the bottom of the screen.
3. Tap the name whose contact information you want to
unlink.
4. Tap unlink.
Creating a New Group
1. In all of the People hub, tap > new group.
2. Enter the group name and tap
3. Tap > add a contact and tap the contact you want to
add to the group. Tap add a contact again to add more.
4. Tap BACK Key.
Now you can see all contacts in the group. Flick left or right to
check updates from the group members.
The Me Tile After you sign in to Windows Live or certain social network accounts, a Me tile is automatically created on the Start screen, from which you can check your own profile, status updates, and comments you have received, or post a message, change your photo avatar and chat status, or reply to the comments you received.

Page 32
Using the Keyboard When you enter a field that needs text or numbers, a
keyboard automatically appears on the screen. After entering
your text, press BACK Key to close the keyboard.
Entering Text
The keyboard provides a layout similar to a desktop
computer keyboard. Turn the phone sideways and the
keyboard will change from portrait to landscape with larger
keys for you to type with.
Use the following keys when entering text. Note the keyboard
layout may change slightly in different apps.
Tap the alphabetic keys to enter letters. Tap and hold the
keys to enter associated accented letters or numbers. For
example, to enter È, tap and hold “E” and the available
accented letters appear. Then tap to choose È.
Tap once to use uppercase for the next letter. Tap

Page 33
the key twice to lock in uppercase mode.
Tap to delete any text you have entered.
Tap to select numbers and symbols. You can then
tap to find more.
Tap to choose a smiley face; you can then tap
to find more.
Tap to return to the alphabetical keyboard.
Tap to start a new line.
Tap ENG to change input language. You can enable
more languages by tapping Settings > keyboard
from the Start screen.
Moving the Cursor When entering text, you might want to move the cursor back.
Here is how.
1. Tap and hold the text box. A floating cursor will appear.
2. Drag the cursor to the position you want in the text field.
Then release your finger.

Page 34
Copying and Pasting 1. Tap the text field. The word you tapped will be selected.
2. Move the cursors before and after the word to adjust the
selection.
3. Tap to copy the selected text.
4. Move the cursor to the position you want to paste.
5. Tap to paste the text.
Changing Keyboard Settings 1. From Start, tap > Settings > keyboard.
2. Tap to check or uncheck the keyboard languages you
need. You can also tap typing settings to choose more
options.

Page 35
Messaging Your SMS (text message) and MMS (multimedia message)
are combined into one menu. From Start, tap the Messaging
tile to see it.
The Message Box Instead of an inbox and outbox, your phone organises all
messages you send and receive into one box, where
messages exchanged with the same number are grouped
into one message thread in the Messaging screen. You can
tap a thread to see the conversation you have had with
someone.
Message threads are sorted in chronological order with the
latest one on top.
Sending a Message
1. From Start, tap the Messaging tile.
2. Tap
3. Enter the recipient’s number or name. As you type the
name, matching contacts will appear. Tap a suggested
contact to add as a recipient.
4. Tap type a text message and type your message.
You can also tap to use voice recognition. Your
phone will convert the message you speak into text.

Page 36
If you are sending an MMS, tap to add a picture. You
can either add from your albums, or tap to shoot a
new picture.
5. Tap to send your message.
Managing Message Threads
Deleting a Message Thread
1. In the Messaging screen, tap and hold the thread you want
to delete, and then tap delete.
2. Tap delete to confirm.
Deleting a Message
1. In the Messaging screen, tap the thread to see the
conversation you’ve had with a certain contact.
2. Press and hold the message you want to delete.
3. Tap delete > delete.
Changing Message Settings The phone’s message settings are pre-configured for you to
use immediately. To change them, tap … > settings from the
Messaging screen.

Page 37
Online Messaging If you have signed in to your Windows Live, Facebook, or
other accounts that support online chat, you can send and
receive online messages to your friends in these accounts.
From Start, tap the Messaging tile and flick left or right to
online messaging.
Tap to create a new message.
Tap to pick a status.

Page 38
Creating an Email account 1. From Start, tap > Settings > email+accounts > add
an account.
2. Select the type of your account.
Tap Outlook if you want to add a Microsoft Exchange
Server account.
Tap other account or advanced setup if the account
you want to add is not in the list. The advanced setup
requires you to manually input the incoming and
outgoing servers. Consult your email service provider
if necessary.
3. Enter the email address and password. Then tap sign in.
For Microsoft Exchange Server accounts, you might need
to ask your Exchange Server administrator for detailed
parameters.
After the account is created, a new tile for the account is
created in the Start screen and a new shortcut appears in the
application list.

Page 39
Receiving Emails From Start, tap the tile for the email account to open the email inbox. Flick left or right to see only unread, urgent or other categorized emails.
Tap to synchronize emails in the account immediately, whatever the automatic sync settings are.
Composing and Sending an Email 1. Open the email account you want to use to send the
email.
2. Tap
3. Fill in one or more recipients in the To field.
Tap … > show cc & bcc to add carbon copy and blind
carbon copy recipients.
4. Enter the email topic in the Subject field.
5. Tap the space below the Subject field to enter the email
text.
Tap to add pictures to the email as attachments.
Tap … > priority to change email priority.
6. Tap to send the email immediately, or tap >
save to send the email later.

Page 40
Replying to or Forwarding an Email 1. Open the email you want to reply to or forward from the
INBOX screen.
2. Tap > reply / reply all / forward to reply to/forward
the Email.
Deleting an Account 1. From Start , tap > Settings > email + accounts
2. Tap and hold the account you want to delete and select delete from the pop-up menu.
3. Tap delete to confirm. All Email messages in the account will be deleted.
TIP: You need to reset your phone to delete the first Windows Live account. See Sorting out Your Phone Settings – Privacy: Reset to Factory Settings in the manual.
Email Settings 1. Tap the email account you want to set from the Start
screen or the application list.
2. Tap … > settings to set up sync settings, conversations,
signature, and self bcc.
3. Tap to save the settings.

Page 41
Getting Connected to the Internet Your phone’s impressive networking capabilities allow you to access the Internet or your corporate network with ease.
You can use default connection settings to connect to the web via your mobile network (GPRS/EDGE/3G), or WiFi.
The GPRS/EDGE/3G connection can be enabled/disabled
manually. Just tap START Key > and select Settings > mobile network and tap the Data connection on/off switch.
Adding a New GPRS/EDGE/3G
Connection To get connected via GPRS/EDGE/3G you need a data plan with your service provider. Also if the GPRS/EDGE/3G settings are not pre-configured on your phone, please contact your provider to get the necessary information.
1. From Start, tap > Settings > mobile network > add
apn.
2. Tap each field to enter the information you get from your
provider.
3. Tap to complete.

Page 42
Turning on WiFi WiFi provides wireless Internet access over distances of up
to 300 feet (100 meters).
1. Tap > Settings > WiFi.
2. Tap the On/Off switch to turn WiFi on.
Connecting to a WiFi Network 1. Tap > Settings > WiFi.
The phone will show available WiFi networks, their
security settings and signal strength.
2. Tap a WiFi network to connect to it.
If security features are implemented, you’ll need to enter a
password.
Sharing Internet You can use the phone as a portable WLAN router, sharing
your mobile data connection over WiFi with up to 5 guest
devices. The function need data connection on a mobile
network and will bring data charges, so get a data plan from
your service provider and make sure the GPRS/EDGE/3G
connection is correctly set.
1. From Start, tap > Settings > Internet Sharing.
2. Tap the On/Off switch to enable sharing.

Page 43
3. The phone will show the broadcast name, password, and
number of connected guests. If you want to change the
broadcast name or the password, tap setup. You can
also tap the box below Security type to change the WiFi
as an open one.

Page 44
Browsing the Internet You can use your phone to get on the Internet via a GPRS,
EDGE, 3G, or WiFi connection.
Tap the Internet Explorer tile or from Start tap > Internet
Explorer to open the web browser.
There are different ways to open web pages:
Tap the address bar at the bottom of the browser screen
to enter the website you want to browse. Then tap
Tap … > favourites from the browser screen and select a
bookmark to open.
Tap … > recent from the browser screen and choose an
item to open.
TIP: Some web sites automatically display a mobile version
of their web pages on your phone, even when you enter a
desktop version address. To view the full desktop version,
tap … > settings from the browser screen and select
Desktop version in Website preference.
Navigating on a Web Page Swipe your finger on the web page to view other areas of the
page.
Tap the screen twice quickly to zoom in or zoom out. You can
also pinch or spread the screen with two fingers to zoom out
or zoom in.

Page 45
Browsing Options Press … in the browser screen to access the following
options.
Switch browser tabs. You can tap to add a new tab.
Check recently visited web address.
Access favourites.
Add the current web address to favourites.
Share the current web address through messaging, mail,
or social networks.
Pin a shortcut for the current page to the Start screen.
Set up the web browser.
Tap or beside the address bar to reload or stop
loading the web page.
Tap and hold a URL link in a web page to open, share, or
copy the link URL.
Managing Bookmarks
Editing a Bookmark
1. Tap … > favourites in the browser screen.
2. Tap and hold the bookmark you want to edit and tap edit.
3. Enter your changes and tap

Page 46
Deleting a Bookmark
1. Tap … > favourites in the browser screen.
2. Tap and hold the bookmark you want to remove and tap
delete.
Changing Browser Settings Tap … > settings in the browser screen to change browser
settings.

Page 47
Bluetooth® Bluetooth
® is a short-range wireless communication
technology. Phones or other devices with Bluetooth
capabilities can exchange information wirelessly within a
distance of about 10 meters. The Bluetooth devices must be
paired before the communication is performed.
TIP: Your phone supports Bluetooth connection with a
Bluetooth headset.
1. From Start, tap > Settings > Bluetooth and tap the
On/Off switch to turn on Bluetooth.
Your phone automatically starts to search for visible
Bluetooth devices in range, and becomes discoverable
itself for other devices to find and connect.
2. Tap the device you want to pair with and, if required, enter
your PIN and tap done.
If a PIN is required, the same PIN may need to be entered
on the other device. Refer to the document for the other
Bluetooth device for information on pairing mode and
PIN.
To unpair from a Bluetooth device from Start, tap >
Settings > Bluetooth. Then tap and hold the paired device
and select delete to unpair from it.

Page 48
Calendar From Start, tap > Calendar to manage your schedule.
Besides saving appointments on the phone, you can also
synchronise appointments to your Google, Windows Live, or
Microsoft Exchange ActiveSync account, once you sign in to
the accounts on the phone.
Creating an Appointment 1. From Start, tap the Calendar tile.
2. Tap in day or agenda view.
3. Enter the appointment details, such as subject, location,
and reminder.
Tap the Calendar field to choose calendar account. If you
choose phone calendar, the appointment will appear on
your phone only. For other accounts, the appointment will
sync with the online server.
4. Tap to save the appointment.
Calendar Views You can open the calendar app and check your
appointments in day, agenda, or month view.
Appointments that belong to different calendar accounts are
shown in the day and agenda view in different colours.
Page 49
Day view: Day view displays your appointments in an
hour-by-hour format. Scroll up and down to see earlier
and later appointments.
Agenda view: Agenda view lists all your appointments in
chronological order.
Month view: Tap in day or agenda view to switch to
month view. You’ll see text on days that have
appointments. Tap a day to view appointments on that
day; scroll up and down to see earlier and later months.
Viewing an Appointment From Start, the Calendar tile shows your upcoming
appointments. You can check all appointments and here’s
how.
1. From Start, tap the Calendar tile.
2. Tap the appointment you want to see in day or agenda
view.
Editing an Appointment 1. From Start, tap the Calendar tile.
2. Tap and hold the appointment in day or agenda view, and
select edit.
3. Make the changes and tap to save.

Page 50
Deleting an Appointment 1. From Start, tap the Calendar tile.
2. Tap and hold the appointment in day or agenda view, and
select delete.
3. Tap delete to confirm. If the appointment is a recurring
one, you need to choose to delete just that occurrence or
all of them.
Handling Appointment Reminders If you set a reminder for an appointment, the phone will alert
you by playing a sound and displaying a reminder message
when the time comes.
Tap snooze to let the phone remind you later.
Tap dismiss to close the reminder message.
Hiding or Showing Appointments Now that you can manage your phone’s calendar, your
Windows Live calendar, Google calendar, etc, you can hide
the appointments from one calendar whilst showing those
from another.
1. From Start, tap the Calendar tile.
2. Tap … > settings.
3. Tap the on/off switch next to the calendar you want to
hide or show.

Page 51
Making the Most of Multimedia
Syncing your Phone and your
Computer You need to install the Zune software on your computer in order to sync media contents on your phone and your computer.
1. Connect your phone and your computer with the USB cable. The Zune software on the computer will open automatically.
For first time connection, wait for the software to recognize your phone and follow the onscreen instructions to finish setup.
2. In Zune’s media collection, drag the items you want to sync with the phone to the phone icon at the bottom left of the Zune window.
Taking Pictures with your Camera Your phone has a high-resolution digital camera. Open it by
holding down the CAMERA Key or by tapping > Camera.
NOTE: The first time you open the camera, you will be asked whether to share your phone’s location. Sharing this will add location information to the photos you take, so you’ll know where each photo was taken.

Page 52
Tap the + or – button on the screen to zoom in or out.
Press CAMERA Key lightly to focus and then press it fully
to take a shot. You can also tap the place you want to
focus on in the viewfinder screen to take a shot.
To view the photo you have taken, just tap or flick
right in landscape orientation. Continue flicking right to
see more photos or videos you have taken. Or tap or
flick down in portrait orientation.
Adjusting Camera Settings
From the camera’s viewfinder screen, tap to set up focus
mode, white balance, image effects, brightness, contrast,
saturation, sharpness, exposure value, ISO, metering,
anti-banding, photo resolution, or restore default camera
settings.
Tap , , to turn on or off flash light, or use auto flash.
Tap Save settings to close the camera settings and return to
the camera viewfinder screen.
Shooting Video with your Camcorder From the camera’s viewfinder screen, tap to open the
camcorder.
NOTE: Tap to return to the camera mode.
Tap the + or – button on the screen to zoom in or out.
Fully press CAMERA Key to start and end shooting.

Page 53
To view the video you shot, just tap or flick right in
landscape orientation, and then tap Go on flicking
right to see more photos or videos you shot. Or tap or
flick down in portrait orientation.
Adjusting your Video Settings
From the Camcorder Screen, tap to adjust white balance,
image effects, contrast, saturation, exposure value, ISO,
anti-banding, video resolution, or restore default camcorder
settings.
Tap or to turn on or off video light.
Tap Save settings to close the camcorder settings and return to
the viewfinder screen.
Listening to your FM Radio With the FM Radio, you can search for radio channels, listen
to them, and save them on your phone. Note that the quality
of the radio broadcast depends on the coverage of the radio
station in your area. The wired headset that comes with your
phone works as an antenna, so always connect the headset
when using the radio. When you receive an incoming call
while listening to the radio, the radio will be turned off.
To tune in, plug your headset into your phone. Tap the Music + Videos tile on the Start screen, and then tap Radio in Zune of the Music + Videos Hub.
Flick left or right to scan for available FM channels.

Page 54
Tap or to add or remove the current frequency to or
from favourites. You can tap to open favourites and tap
a frequency to change the channel.
Tap and hold the current frequency to pin it to the Start
screen, set available options, or switch between the
headset or phone speaker.
Tap or to stop or resume the radio reception.
TIP: The radio continues even if you exit the radio screen. If
you do not want to listen, exit the radio screen after tapping .
Playing your Music 1. Tap Music in Zune in the Music + Videos Hub.
2. Browse your music library and tap the song you want to
play.
3. Adjust the volume with Volume Keys.
Playing your Videos To play a video file, tap Videos in Zune of the Music +
Videos Hub. Browse through your video gallery and tap the
video you want to watch.
Listening to or Watching Podcasts Tap Podcasts in Zune of the Music + Videos Hub. Flick left

Page 55
or right to browse podcast feeds, and then tap the title of the
podcast you want.
Opening your Picture and Video
Gallery
Pictures Hub
From Start, tap the Pictures tile to open the Pictures Hub.
You can view photos and videos you’ve captured with the
phone camera, downloaded from the Internet, synchronized
from your computer, or from Windows Live or other
accounts.
Viewing Pictures and Videos
In the Pictures Hub, flick left or right to choose albums,
view by category, or check out picture updates from your
online friends.
Tap a picture or a video to view in full screen. You can then
tap … to share or delete local video/picture, auto-fix your
photo, save online photo to your phone, and more.

Page 56
Using Maps
Enabling Location Services Some applications need to access your location data in
order to offer more features. To use these features, you
need to enable location services.
1. From Start, tap > Settings > location.
2. Tap the On/Off switch for location services to turn it on.
3. Tap BACK Key to return to the system settings screen.
4. Flick left to the application settings and tap the
application that need location data, for example, maps.
5. Tap the On/Off switch for using your location.
Bing Maps Bing Maps, offered by Microsoft, allows you to track your
location, get directions to your destination, view traffic
situation, and search for places and businesses through
mobile data or WiFi connections.
From Start, tap > Maps to open Bing Maps.
NOTE: Real-time traffic information is only available in
some areas.

Page 57
Finding your Current Location
1. Open Bing Maps.
2. Tap at the bottom of the screen.
Viewing the Map
Moving around on the map
Slide your finger on the screen to move the map around
and see other areas.
Zooming in or out on the map
Zooming in Spread with two fingers on the map.
Zooming out Pinch with two fingers on the map.
Viewing satellite images
Open the Maps app, and tap … > aerial view on.
Getting address and other information for a place on
the map
1. Tap and hold a location on the map. The address of that
place appears over the location.
Page 58
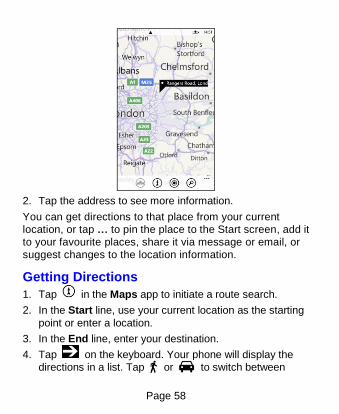
2. Tap the address to see more information.
You can get directions to that place from your current
location, or tap … to pin the place to the Start screen, add it
to your favourite places, share it via message or email, or
suggest changes to the location information.
Getting Directions
1. Tap in the Maps app to initiate a route search.
2. In the Start line, use your current location as the starting
point or enter a location.
3. In the End line, enter your destination.
4. Tap on the keyboard. Your phone will display the
directions in a list. Tap or to switch between
Page 59
directions for walking and driving.
5. Flick up and down to scroll the list of steps.
Searching for Places
1. When viewing the map, tap
2. Enter the address or name of the place you want to
search for in the search box and tap on the
keyboard. You can also tap in the search box to use
your voice for the search.
The search results will be marked on the map with and
numbers. Tap a marker to see its address, directions,
neighbourhood, etc.
3. To see all the search results in a list, tap … > search
results when viewing the map.
Exploring Nearby Places
When viewing the map, tap at the bottom of the screen
to explore businesses and attractions around the shown area.
Flick left and right to check places for eat and drink, shopping,
events, sightseeing, and more.
Clearing the Map
When viewing the map, tap … > clear map to remove all
markers left from searches you’ve done for places and
directions.

Page 60
Sorting out your Phone Settings
Setting Time and Date 1. From Start, tap > Settings > date + time.
2. Tap the On/Off switches to enable or disable 24-hour time
format and automatic time synchronization with your
mobile network.
If you want to set the time, date and time zone by yourself,
turn off automatic time synchronization. Then tap Time
zone, Date, and Time to set them up.
Changing Display Settings
Changing the Lock Screen Wallpaper
1. From Start, tap > Settings > lock + wallpaper.
2. Tap change wallpaper to select an image from your local
or online albums.
3. Tap the image you like.
4. If the image is larger than the allowed wallpaper size, crop
the image by moving the part you need into the cropping
box. You can also pinch or spread to zoom out or zoom in.
5. Tap .
TIP: To give the lock screen wallpaper a more dynamic look,
you can use the artist photo as the lock screen wallpaper when

Page 61
playing the artist’s music. Tap the On/Off switch below Show
artist when playing music in lock+wallpaper settings.
Adjusting Screen Timeout
Set the delay for the screen to automatically turn off.
1. From Start, tap > Settings > lock+wallpaper.
2. Tap the box below Screen times out after and tap the
time before the screen turns off.
Adjusting Screen Brightness
1. From Start, tap > Settings > brightness.
2. Tap the box below Level to choose brightness level, or tap
the On/Off switch below Automatically adjust.
Sound Settings By tapping > Settings > ringtones+sounds, you can
adjust the sound settings, such as ringtones and alerts.
Ringer: Tap the On/Off switch to enable or disable
ringtone sounds. When the ringer is disabled, the phone
will be silent or only vibrate.
Vibrate: Tap the On/Off switch to enable or disable
vibration.
Ringtone, New text or IM, New voicemail, or New
email: Tap each item to set ringtones or alerts for
different notifications.

Page 62
Play a sound for: Select the occasions for playing a
sound.
Language and Region Settings Changing the language and region settings will affect
display language, date format, keyboard layouts and more.
1. From Start, tap > Settings > region + language.
2. Tap the item you want to change and select the option
you think fit.
3. Some changes require you to restart the phone. Tap
Press here to accept changes and restart your phone
if necessary.
Mobile Network Services
Turning On/Off Flight Mode
Turning on flight mode will disable mobile, WiFi, FM radio,
and Bluetooth connections. While in flight mode, you can turn
back on WiFi, FM, and Bluetooth separately.
1. From Start, tap > Settings > flight mode.
2. Tap the On/Off switch below Status.
Setting up Mobile Services
From Start, tap > Settings > mobile network.
Data connection: Turn on or off mobile data service.

Page 63
Data roaming options: Allow or forbid data service when
on a roaming network.
3G connection: Choose whether to use 3G connection
when available.
Network selection: Switching mobile networks. Tap
automatic to let the phone register automatically, or tap
press to select to search and select network manually.
add apn / edit apn: Add or edit APN for mobile data
connection. Contact your service provider for the
parameters.
Security Settings
Protecting your phone with a password
Set up a password for your phone, so when you turn on the
phone or wake it up from Sleep Mode, you need to enter the
password.
1. From Start, tap > Settings > lock+wallpaper.
2. Tap the On/Off switch below Password.
3. Enter the password in the New password box and the
Confirm password box.
4. Tap done.
5. If you don’t want to enter the password every time you
wake up the phone from a brief sleep time, tap Require a
password after to set a time delay for the password

Page 64
protection to activate after the phone goes into Sleep
Mode.
Protecting your SIM with a PIN
Every SIM card comes with a PIN. The initial PIN is provided
by your mobile phone carrier. It’s best to lock your SIM as
soon as you can.
1. From Start, tap the Phone tile.
2. Tap … > call settings.
3. Tap the On/Off switch below SIM security.
4. Enter the PIN you’ve been given and tap enter.
Changing Your SIM PIN
You can change the PIN you’ve been given to one easier for
you to remember and harder for others to guess.
1. From Start, tap the Phone tile.
2. Tap … > call settings.
3. Tap change SIM PIN.
4. Enter the old PIN and tap enter.
5. Enter your new PIN and tap enter.
6. Enter the new PIN again and tap enter.
Restoring a Locked SIM Card
Put all your confidential passwords in a safe place for future
use. If you enter the wrong SIM PIN more times than allowed,
your SIM card will be locked and you cannot access the
Page 65
mobile phone network. Contact your operator for a PIN
Unlock Key (PUK) to restore the SIM card.
Protecting your phone when you lose it
You can find your lost phone on a map, make it ring, lock it, or
erase your personal information on it by signing in to your
Windows Live account at windowsphone.com
To use this function, sign in to the same Windows Live account
on the phone and make sure the phone’s data service is
enabled or WiFi is connected.
Privacy: Reset to Factory Settings From Start, tap > Settings > about > reset your
phone > yes.
WARNING: All your personal information and
downloaded applications on your phone will be erased
after the resetting.
Managing Application Settings From Start, tap > Settings and flick left or right to access the application settings. Tap the application in the list to see available options.
Managing Other Settings
theme: Set the background and accent colour to match

Page 66
your mood.
battery saver: Turn on battery saver to preserve the
battery.
ease of access: Turn on TTY/TDD mode or speech for
phone accessibility.
speech: Set speech recognition, audio confirmation, or
incoming message reading options.
phone update: Choose if you want to be notified when
new updates are found and how you want the phone to
check for updates.
about: View phone information, terms of use, privacy
statement, or reset your phone to factory settings.
feedback: Choose whether to send feedback to Microsoft
and how to send it.
SIM applications: Use applications in your SIM card if
available.

Page 67
Other Applications
Alarms 1. From Start, tap > Alarms.
2. Tap to create a new alarm.
3. Set time, repeat, sound, and alarm name. Tap to
save.
In the alarms list, tap the on/off switches to turn on/off each
alarm.
Calculator From Start, tap > Calculator.
Games From Start, tap the Games tile. You can sign in to your Xbox
Live account to download and play games from Marketplace.
Marketplace From Start, tap the Marketplace tile. You can sign in to your
Windows Live account to download games, apps, and music.
Office From Start, tap > Office to use the mobile version of

Page 68
Microsoft Office OneNote, Microsoft Office Word, Microsoft
Office Excel, and Microsoft Office PowerPoint.
You can create OneNote, Word, and Excel documents, edit
and view OneNote, Word, Excel, and PowerPoint documents,
no matter they are on your phone or online.

Page 69
Specifications Dimensions 128.6 x 67.8 x 10.7 mm
Weight Approx. 158 g (with battery)
Bearer GSM/WCDMA support
Main display dimension,
resolution 4.3 inches 480 x 800
Back
Camera
Sensor type CMOS
Still image
capture
resolution
5M Pixels with auto focus
Battery
Capacity 1400mAh
Standby time Approx. 200 hours (subject to
network status)
Voice talk time Approx. 240 min (subject to
network status)