zimbra foroutlook 2010 imap/pop configuration … microsoft word - configuration guide - zimbra for...
TRANSCRIPT

Zimbra Account in Outlook 2010 Setup Guide Page 1 of 14
Copyright © 1999-2013 Global Relay. Confidential and Proprietary. All Rights Reserved. Not to be reproduced or distributed without permission.
Zimbra for Outlook 2010 ‐ IMAP/POP
Configuration Guide Version 1.0.1 Sept 2013
Configuration Guide - Zimbra for Outlook 2010 – IMAP/POP Page 2 of 14 24/7 Technical Support: 1.866.484.6630 / [email protected] / [email protected] Copyright © 1999-2013 Global Relay. Confidential & Proprietary. All Rights Reserved. Not to be reproduced or distributed without permission.
Contents Introduction .......................................................................................................................... 3
Configuring Global Relay Archive for Zimbra with a IMAP Connection ............................................. 4
Saving Sent Items on a Server (Recommended Setting) ........................................................ 8
Configuring a Zimbra Account for Outlook with a POP connection ................................................. 10
Legal Information ................................................................................................................. 14

Configuration Guide - Zimbra for Outlook 2010 – IMAP/POP Page 3 of 14 24/7 Technical Support: 1.866.484.6630 / [email protected] / [email protected] Copyright © 1999-2013 Global Relay. Confidential & Proprietary. All Rights Reserved. Not to be reproduced or distributed without permission.
Introduction This guide provides you with step-by-step instructions for configuring a Zimbra account in Microsoft Outlook 2010 using an IMAP and a POP connection.
NOTE: We recommend you configure your account with an IMAP connection.
An IMAP connection syncs email data between devices, because all data is kept on the Zimbra server. When you read or delete an email, information is synced across all devices where you access your email account.
A POP connection downloads messages off the server, and multiple connections are not synced. When you read or delete an email, this action might not be reflected across other devices. For example, if all devices are set up to “leave a copy of messages on the server,” multiple devices download and store the same data independently, so deleting a message on one device (e.g. a smartphone) will not be reflected on other devices (e.g. a computer).

Configuration Guide - Zimbra for Outlook 2010 – IMAP/POP Page 4 of 14 24/7 Technical Support: 1.866.484.6630 / [email protected] / [email protected] Copyright © 1999-2013 Global Relay. Confidential & Proprietary. All Rights Reserved. Not to be reproduced or distributed without permission.
Configuring Global Relay Archive for Zimbra with a IMAP Connection
1. From the File menu, select Add Account.
2. Select Manually configure server settings or additional server types and click Next.

Configuration Guide - Zimbra for Outlook 2010 – IMAP/POP Page 5 of 14 24/7 Technical Support: 1.866.484.6630 / [email protected] / [email protected] Copyright © 1999-2013 Global Relay. Confidential & Proprietary. All Rights Reserved. Not to be reproduced or distributed without permission.
3. Select Internet E-mail and then click Next.
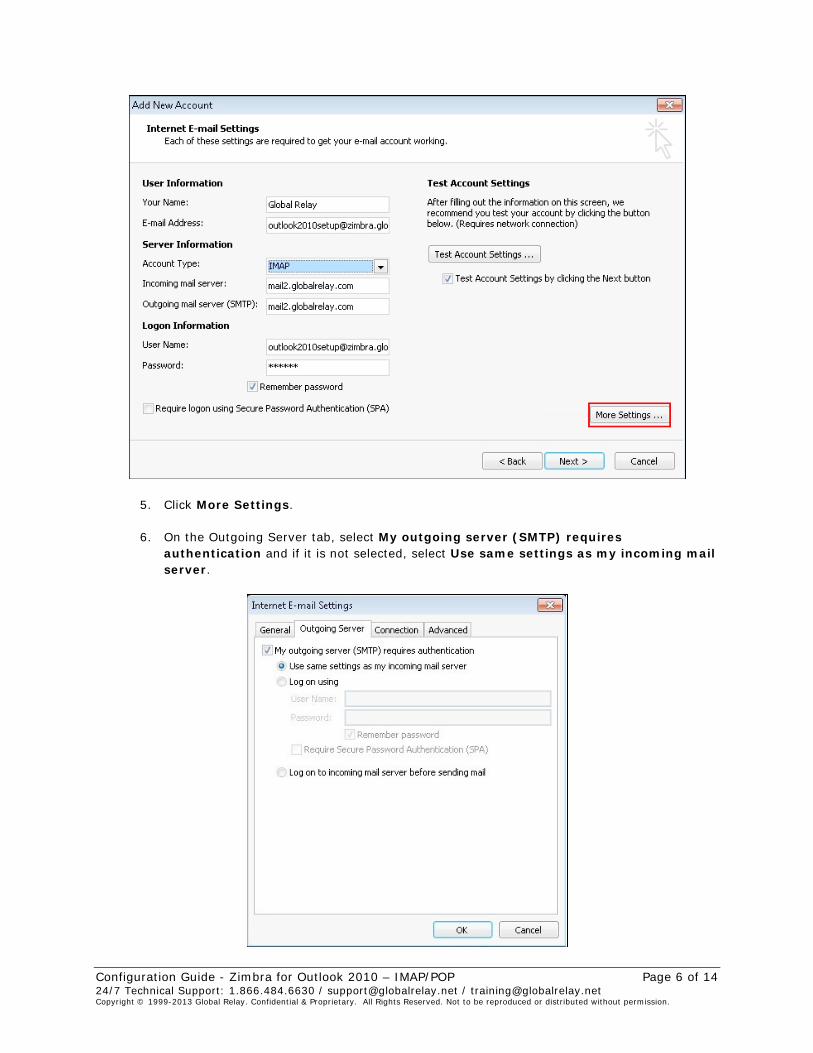
4. Set up the following information:
• Your Name: This is the name that recipients will see.
• Email Address
• Account Type: From the drop-down menu, select IMAP.
• Incoming mail server: Enter mail2.globalrelay.com
• Outgoing mail server SMTP: Enter mail2.globalrelay.com
• User Name: Enter your email address.
• Password: Enter your Zimbra mailbox password.
Configuration Guide - Zimbra for Outlook 2010 – IMAP/POP Page 6 of 14 24/7 Technical Support: 1.866.484.6630 / [email protected] / [email protected] Copyright © 1999-2013 Global Relay. Confidential & Proprietary. All Rights Reserved. Not to be reproduced or distributed without permission.
5. Click More Settings.
6. On the Outgoing Server tab, select My outgoing server (SMTP) requires authentication and if it is not selected, select Use same settings as my incoming mail server.

Configuration Guide - Zimbra for Outlook 2010 – IMAP/POP Page 7 of 14 24/7 Technical Support: 1.866.484.6630 / [email protected] / [email protected] Copyright © 1999-2013 Global Relay. Confidential & Proprietary. All Rights Reserved. Not to be reproduced or distributed without permission.
7. On the Advanced tab, set up the following information:
• Incoming server (IMAP): enter 993
• Outgoing server (SMTP): enter 465
• Use the following type of encrypted connection: select SSL for both the Incoming server (IMAP) and Outgoing server (SMTP).
8. Click OK.
9. Click Next and then click Finish.
Configuration Guide - Zimbra for Outlook 2010 – IMAP/POP Page 8 of 14 24/7 Technical Support: 1.866.484.6630 / [email protected] / [email protected] Copyright © 1999-2013 Global Relay. Confidential & Proprietary. All Rights Reserved. Not to be reproduced or distributed without permission.
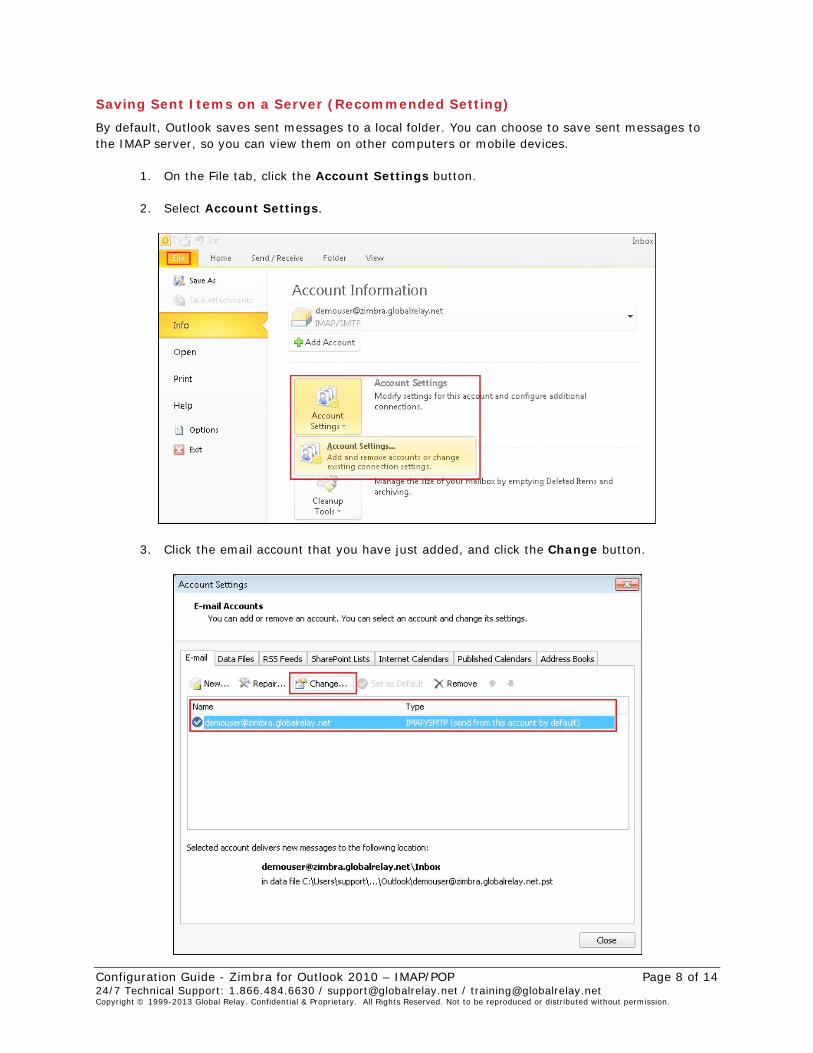
Saving Sent Items on a Server (Recommended Setting)
By default, Outlook saves sent messages to a local folder. You can choose to save sent messages to the IMAP server, so you can view them on other computers or mobile devices.
1. On the File tab, click the Account Settings button.
2. Select Account Settings.
3. Click the email account that you have just added, and click the Change button.
Configuration Guide - Zimbra for Outlook 2010 – IMAP/POP Page 9 of 14 24/7 Technical Support: 1.866.484.6630 / [email protected] / [email protected] Copyright © 1999-2013 Global Relay. Confidential & Proprietary. All Rights Reserved. Not to be reproduced or distributed without permission.
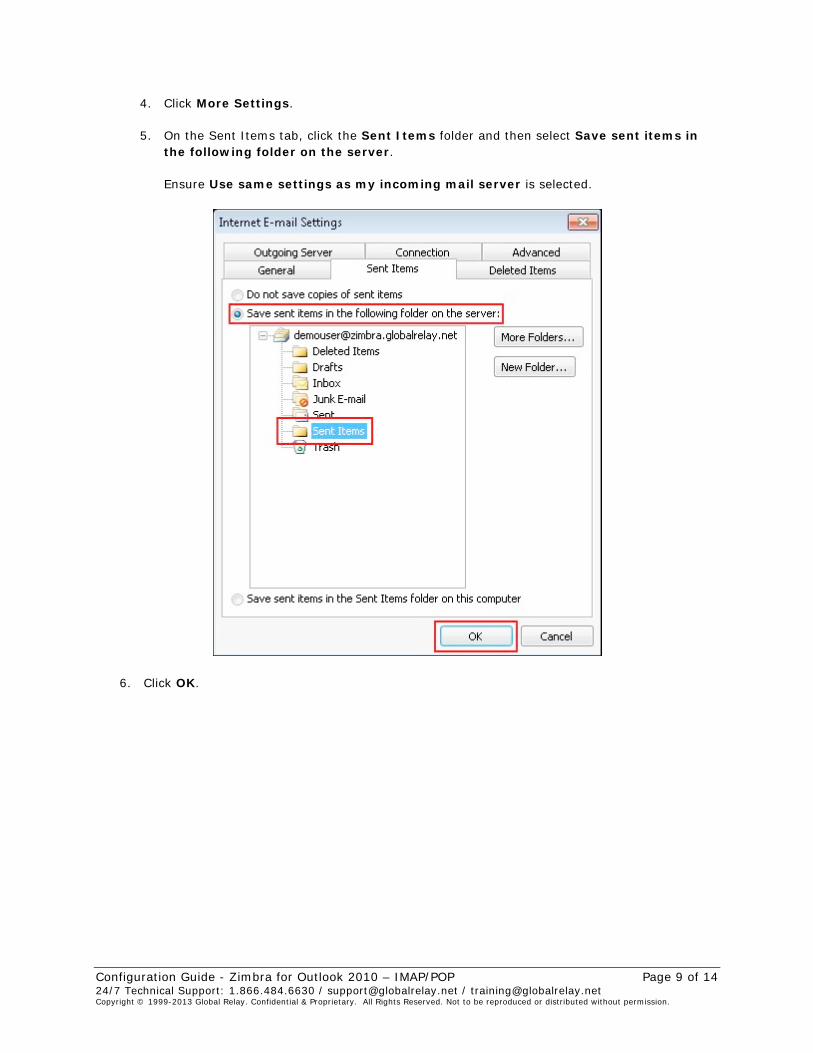
4. Click More Settings.
5. On the Sent Items tab, click the Sent Items folder and then select Save sent items in the following folder on the server.
Ensure Use same settings as my incoming mail server is selected.
6. Click OK.

Configuration Guide - Zimbra for Outlook 2010 – IMAP/POP Page 10 of 14 24/7 Technical Support: 1.866.484.6630 / [email protected] / [email protected] Copyright © 1999-2013 Global Relay. Confidential & Proprietary. All Rights Reserved. Not to be reproduced or distributed without permission.
Configuring a Zimbra Account for Outlook with a POP connection
1. From the File menu, select Add Account.
2. Select Manually configure server settings or additional server types and click Next.

Configuration Guide - Zimbra for Outlook 2010 – IMAP/POP Page 11 of 14 24/7 Technical Support: 1.866.484.6630 / [email protected] / [email protected] Copyright © 1999-2013 Global Relay. Confidential & Proprietary. All Rights Reserved. Not to be reproduced or distributed without permission.
3. Select Internet E-mail and click Next.
4. Set up the following information:
• Your Name: This is the name that recipients will see.
• Email Address
• Account Type: Select POP3
• Incoming mail server: Enter mail2.globalrelay.com
• Outgoing mail server SMTP: Enter mail2.globalrelay.com
• User Name: Enter your email address.
• Password: Enter your Zimbra mailbox password.

Configuration Guide - Zimbra for Outlook 2010 – IMAP/POP Page 12 of 14 24/7 Technical Support: 1.866.484.6630 / [email protected] / [email protected] Copyright © 1999-2013 Global Relay. Confidential & Proprietary. All Rights Reserved. Not to be reproduced or distributed without permission.
5. Click More Settings.
6. On the Outgoing Server tab, select My outgoing server (SMTP) requires authentication and if it is not selected, select Use same settings as my incoming mail server.

Configuration Guide - Zimbra for Outlook 2010 – IMAP/POP Page 13 of 14 24/7 Technical Support: 1.866.484.6630 / [email protected] / [email protected] Copyright © 1999-2013 Global Relay. Confidential & Proprietary. All Rights Reserved. Not to be reproduced or distributed without permission.
10. On the Advanced tab, set up the following information:
• Incoming server (POP3): enter 995
• Outgoing server (SMTP): enter 465
• Use the following type of encrypted connection: select SSL for both the Incoming server (POP3) and Outgoing server (SMTP).
7. In the Delivery section, select Leave a copy of messages on the server.
8. Select Remove from server after X days and enter the number of days.
9. Click OK.
10. Click Next and then click Finish.
Configuration Guide - Zimbra for Outlook 2010 – IMAP/POP Page 14 of 14 24/7 Technical Support: 1.866.484.6630 / [email protected] / [email protected] Copyright © 1999-2013 Global Relay. Confidential & Proprietary. All Rights Reserved. Not to be reproduced or distributed without permission.
Legal Information Global Relay, by publishing this document, does not guarantee that any information contained herein is and will remain accurate or that use of the information will ensure correct and faultless operation of the relevant service or equipment. Global Relay, its agents and employees, shall not be held liable to or through any user for any loss or damage whatsoever resulting from reliance on the information contained herein.
This document contains information proprietary to Global Relay and may not be reproduced, disclosed, or used in whole or part without the express written permission of Global Relay.
Any Software, including but not limited to, the code, screen, page, structure, sequence, and organization thereof, and Documentation are protected by national copyright laws and international treaty provisions. This User Guide is subject to U.S. and other national export regulations.
Nothing in this document is intended, nor does it, alter the legal obligations, responsibilities or relationship between yourself and Global Relay as set out in the contract existing between us.
Global Relay will not be liable for any compliance or technical information provided herein.