xr200 user's guide toc - allied fire and security xr200... · emergency evacuation plans the...
TRANSCRIPT
User’s GuideXR200
User’s GuideXR200

Copyright© 1995 - 1997 Digital Monitoring Products, Inc.Information furnished by DMP is believed to be accurate and reliable.
This information is subject to change without notice.
Copyright© 1995 - 1997 Digital Monitoring Products, Inc.Information furnished by DMP is believed to be accurate and reliable.
This information is subject to change without notice.
Silencing an Alarm
All/Perimeter and Home/Away Systems1. While the alarm bell or siren is sounding, enter your user code. The keypad displays DISARM SILENCE .
2. Press the SELECT key under SILENCE to stop the bell or siren. This does NOT disarm the system.
3. If your system is programmed to send an Abort (alarm cancel) report to the central station, the keypad displays ALARM CANCELLED .
Area Systems1. While the alarm bell or siren is sounding, enter your user code. The system silences the alarm bell or siren.
2. If your system is programmed to send an Abort (alarm cancel) report to the central station, the keypad displays ALARM CANCELLED .
About your systemEmergency Evacuation Plans ....................................... iiAbout Your Security System..........................................1The Security Command Keypad ...................................2Special Security Command Displays ............................3Special Security Command Tones ................................ 4Understanding Security System Terms ......................... 4General Arming Operation ............................................ 6
Arming and DisarmingArea System Arming .....................................................7Area System Disarming ................................................8All/Perimeter System Arming ........................................9All/Perimeter System Disarming ..................................10Home/Away System Arming .........................................11Home/Away System Disarming ....................................12
User MenuSecurity Command User Menu ....................................13Alarm Silence ...............................................................14Sensor Reset ...............................................................14Door Access .................................................................15Armed Areas Display....................................................15Outputs On Off ............................................................16
Zone Status ..................................................................16Bypass Zones ..............................................................17Zone Monitor ................................................................18System Status ..............................................................19System Test ..................................................................19User Codes ..................................................................20Schedules ....................................................................23Setting the Date and Time............................................27
Display EventsDisplay Events .............................................................28Arming and Disarming Event Displays .........................29Zone Event Displays ....................................................29User Code Change Event Displays ..............................30System Monitor Event Displays ...................................30Door Access Event Displays ........................................31Schedule Change Event Displays ................................31Zone Bypass Event Displays .......................................32Service Request Feature .............................................32
How Your System is SetupSystem Setup ...............................................................33Appendix ......................................................................38
Security Command User's Guidefor XR200 Command Processor Panels
Table of Contents
Security Command User's Guidefor XR200 Command Processor Panels
Table of ContentsAbout your systemEmergency Evacuation Plans ....................................... iiAbout Your Security System..........................................1The Security Command Keypad ...................................2Special Security Command Displays ............................3Special Security Command Tones ................................ 4Understanding Security System Terms ......................... 4General Arming Operation ............................................ 6
Arming and DisarmingArea System Arming .....................................................7Area System Disarming ................................................8All/Perimeter System Arming ........................................9All/Perimeter System Disarming ..................................10Home/Away System Arming .........................................11Home/Away System Disarming ....................................12
User MenuSecurity Command User Menu ....................................13Alarm Silence ...............................................................14Sensor Reset ...............................................................14Door Access .................................................................15Armed Areas Display....................................................15Outputs On Off ............................................................16
Zone Status ..................................................................16Bypass Zones ..............................................................17Zone Monitor ................................................................18System Status ..............................................................19System Test ..................................................................19User Codes ..................................................................20Schedules ....................................................................23Setting the Date and Time............................................27
Display EventsDisplay Events .............................................................28Arming and Disarming Event Displays .........................29Zone Event Displays ....................................................29User Code Change Event Displays ..............................30System Monitor Event Displays ...................................30Door Access Event Displays ........................................31Schedule Change Event Displays ................................31Zone Bypass Event Displays .......................................32Service Request Feature .............................................32
How Your System is SetupSystem Setup ...............................................................33Appendix ......................................................................38

Emergency Evacuation PlansThe National Fire Protection Association recommends that youestablish an emergency evacuation plan to safeguard lives in theevent of a fire or other emergency. Use the following steps as aguide.
Draw a floorplan of your home or businessOn a clean sheet of paper, draw the walls, windows, doors, andstairs. Also draw any obstacles that a person may encounter whileexiting the building such as large furniture or appliances.
Develop escape routesDetermine at least two routes the occupants in each room can taketo safely escape. One route can be the most obvious such as thedoor. Another can be through a window that can be easily opened.If the window is high off the ground, an escape ladder should beprovided.
Draw arrows on the floorplan to show escape routes from each room.
Decide where to meetPrearrange a meeting place outside and away from where emergencypersonnel are likely to be working. A neighbor's house or across thestreet in the front of the house are good locations. Always performa head count to make sure all occupants safely exited. NEVERENTER A BURNING BUILDING. If the head count shows one ormore persons missing, give this information immediately to theauthorities. Never enter a building to look for someone.
Practice your escape plansDevising an escape plan is only the beginning, before the plan can beeffective everyone should practice the escape routes from each room.
Building Front Building Back
First Floor Second Floor
Fire Escape
Window Ladder
Early detectionThe best way to survive a fire or other emergency is to get out early.The installation of a fire alarm system, with smoke and carbonmonoxide detectors in each room, can greatly decrease your risk ofloss or injury.

1
1
About Your Security SystemThe Security Command system has been designed with your safetyand comfort in mind. It uses the latest in computer based technologyto create the most advanced, user friendly security, fire, and accesscontrol system available.
The Security Command system combines ease of use with a simpleto understand Security Command keypad to offer the full range offeatures requested by today’s security system owners. SecurityCommand can protect both the interior and perimeter of your homeor business while you're away or just the perimeter when you'reinside.
You can turn portions of your protection on or off at any time bypressing a few keys, or have the system turn on or off automatically,every day, by entering a simple schedule. You can add, delete, andchange personal user codes at any time or check the status ofprotection devices in the system.
Parts of the SystemThere are two main parts to the Security Command system, theSecurity Command keypad and the keypad User Menu.
Security Command keypadThis is the device we've placed at certain locations throughout thepremises that allow you to turn the system’s protection on and offusing your personal user code.
Keypad User MenuThe keypad also provides a simple User Menu containing all of thefunctions you need to fully operate your system such as changingthe time of day or a personal user code.
A Note About False AlarmsOne of the most important concerns facing the security industrytoday is false alarms. The accidental dispatching of police and fireagencies places others in jeopardy by limiting the response capabilityof those emergency service units. We take this concern seriouslyand have spent many hours training our employees to recognize thecauses of false alarms and prevent them from occurring.
As part of our commitment to reducing false alarms, we’d like toencourage you to read this guide thoroughly. All the informationcontained here can help you quickly, and comfortably, learn theoperation of the Security Command system. If you have anyadditional questions, or feel that you need more training, pleasedon’t hesitate to contact us.
Test Your System WeeklyIt is recommended that you test the burglary portion of your systemat least once each week. Testing should involve an active test of alldoors, windows, and motion detectors connected to your system. Ifyour system also has fire protection, call the service department tofind out how this portion of your system should be tested.
Refer to the System Test section of this guide for instructions ontesting the burglary portion of your system.
Introduction
Introduction

2
2
Introduction
Data Entry keysThese keys allow you to enter your user code when arming ordisarming or enter other information into the system.
The ARROW keyThe ARROW key is used to go back through the keypad displayswhile operating your system. You can press the ARROW key to backup through the list of functions in the User Menu or to make acorrection by erasing the last character you entered.
The COMMAND keyThe COMMAND key allows you to advance through the keypaddisplays or User Menu or complete a data entry function.
AC LEDThis LED remains on steady as long as your system is connected toits AC power supply. Should there be an interruption, the LED turnsoff and the system's backup battery maintains normal operation fora time allowing you to contact our service department.
32-Character Keypad User Options MenuPress and hold the ARROW and COMMAND keys for about twoseconds. The keypad display shows SET BRIGHTNESS. Use theleft SELECT key to lower the display brightness. Use the rightSELECT key to increase the display brightness. Press COMMAND.
At SET TONE, use the left SELECT key to lower the keypad tone.Use the right SELECT key to raise the keypad tone. Press COMMAND.
At SET VOLUME LEVEL , use the left SELECT key to lower thekeypad volume. Use the right SELECT key to raise the keypadvolume. Press COMMAND.
At MODEL NUMBER , the model number of the keypad is displayed.Press the ARROW key to exit out of the User Options menu.
The Security Command KeypadYour system may have one or more easy to use Security Commandkeypads (16 or 32 character) that allow you to properly operate thesystem. The illustration and descriptions below highlight some of thekeypad features:
The SELECT keysThere are four keys under the display called the SELECT keys.These keys are one of the features that make your system so easyto operate. They allow you to choose what to do by pressing theSELECT key under choices being shown in the display.
Introduction
A B C D E F G H I J K L
V W XM N O P Q R S T U
Y Z
COMMAND9 0
1 2 3 4
5 6 7 8
POWER JONES RESIDENCEFR I 2 : 51 AM
Data Entry keysThese keys allow you to enter your user code when arming ordisarming or enter other information into the system.
The ARROW keyThe ARROW key is used to go back through the keypad displayswhile operating your system. You can press the ARROW key to backup through the list of functions in the User Menu or to make acorrection by erasing the last character you entered.
The COMMAND keyThe COMMAND key allows you to advance through the keypaddisplays or User Menu or complete a data entry function.
AC LEDThis LED remains on steady as long as your system is connected toits AC power supply. Should there be an interruption, the LED turnsoff and the system's backup battery maintains normal operation fora time allowing you to contact our service department.
32-Character Keypad User Options MenuPress and hold the ARROW and COMMAND keys for about twoseconds. The keypad display shows SET BRIGHTNESS. Use theleft SELECT key to lower the display brightness. Use the rightSELECT key to increase the display brightness. Press COMMAND.
At SET TONE, use the left SELECT key to lower the keypad tone.Use the right SELECT key to raise the keypad tone. Press COMMAND.
At SET VOLUME LEVEL , use the left SELECT key to lower thekeypad volume. Use the right SELECT key to raise the keypadvolume. Press COMAND.
At MODEL NUMBER , the model number of the keypad is displayed.Press the ARROW key to exit out of the User Options menu.
ACLED Lighted display
SELECT keys
Data Entry keys
COMMAND key
ARROW key
Lighted display
SELECT keys
AC LED
Data Entry keys
COMMAND key
ARROW key
The Security Command KeypadYour system may have one or more easy to use Security Commandkeypads (16 or 32 character) that allow you to properly operate thesystem. The illustration and descriptions below highlight some of thekeypad features:
The SELECT keysThere are four keys under the display called the SELECT keys.These keys are one of the features that make your system so easyto operate. They allow you to choose what to do by pressing theSELECT key under choices being shown in the display.
1 2 3 4
5 6 7 8
9 0 COMMAND
A B C DEF GHI JKL
VWXSTUPQRMNO
YZ
POWER
32-Character Keypad
16-Character Keypad
A B C D E F G H I J K L
V W XM N O P Q R S T U
Y Z
COMMAND9 0
1 2 3 4
5 6 7 8
POWER JONES RESIDENCEFR I 2 : 51 AM
ACLED Lighted display
SELECT keys
Data Entry keys
COMMAND key
ARROW key
Lighted display
SELECT keys
AC LED
Data Entry keys
COMMAND key
ARROW key
1 2 3 4
5 6 7 8
9 0 COMMAND
A B C DEF GHI JKL
VWXSTUPQRMNO
YZ
POWER
32-Character Keypad
16-Character Keypad

3
3
Special Security Command DisplaysAs you use your system, you’ll occasionally see a keypad displaythat asks you to enter a code or that describes a condition on thesystem. Below are some examples of the displays you'll see:
ALARMA 24 hour zone (for example fire or panic) or an armed burglary zonehas been tripped. Your system may sound bells or sirens.
TROUBLEThere is a problem with a protection device or system component.This display is accompanied by a description of the problem.
ENTER CODEThe system requires you to enter your user code. User codes canbe required for turning your system on (arming), turning your systemoff (disarming), and many other functions.
As you enter your user code, the keypad display shows an asterisk(*) in place of each digit pressed. This keeps others from seeing youruser code on the display as it’s entered.
TRY AGAIN or INVALID CODEThe user code you've entered is not recognized by the system.Check the user code and try again.
INVALID LEVELAll user codes have authority levels that allow the user to onlyaccess certain functions. When a user attempts a function outsidetheir authority, the INVALID LEVEL message displays.
Introduction
INVALID TIMEA level 1 or 2 user code has been entered outside of the validschedule. See Schedules and User Codes.
SYSTEM TROUBLE or SERVICE REQUIREDThere is a problem with one or more of the components in yoursystem. Contact our service department as soon as possible.
SYSTEM BUSYThe Security Command system is performing another task of ahigher priority. This usually only takes a few moments.
Special Wireless DisplaysYour system may use radio transmitters to send alarm and troubleinformation from the protection devices to the panel. Wirelesssystems operate the same as hardwired and also have a few uniquekeypad displays.
BACK DOOR - LOBAT – (Low Battery) The battery in a radiotransmitter is low. (BACK DOOR is used as an example only.)
BACK DOOR - MISNG - (Missing) The panel is not receiving theradio transmitter's periodic test report.
WIRELESS - TRBL - (Trouble) Some part of your wireless systemis operating improperly. Test the system to locate the trouble.

4
4
Special Security Command TonesYour keypad also contains a small speaker that allows it to alert youto events as they occur on your system. Below are brief descriptionsof the different tones you'll hear from the keypad:
Fire Alarm tone: An intermittent sweeping siren that sounds untilthe fire alarm is silenced, on LCD keypads only.
Burglary Alarm tone: A constant siren tone at maximum volumethat continues until the alarm is silenced, on LCD keypads only.
Key press tone: A short beep each time you press a key on thekeypad and it’s acknowledged by the system.
Prewarn tone: A continuous pulsed tone that sounds when youopen an entry delay door on a system that is armed (turned on)reminding you to disarm the burglary protection.
Monitor tone: A pulsed tone for one second, one pulse only thatsounds whenever a door or window is opened while you’re using thezone monitor function from the User Menu. LCD keypads sound adoor bell chime. See Zone Monitor.
Trouble tone: A steady tone indicating a trouble condition on yoursystem. Press a SELECT key to silence.
What to do when the trouble tone is sounding
You can silence the trouble tone by pressing any one of the toprow SELECT keys. This only silences the keypad and doesnot correct the condition that originally caused the trouble.
Introduction
Understanding Security System TermsThroughout this guide, and in some displays on your keypad, you’llsee certain words or phrases that might be unfamiliar. Althoughevery effort has been made to use terms that are commonly known,there are some for which there was no acceptable substitute.
Below are some terms you’ll see here and on your keypad display:
ArmingThis is the term used for turning on the burglary protection in one ormore areas of the system. Your system may require you to enter auser code. When armed, the system is able to sound alarm bells orsirens and, if monitored, send alarm reports to a central station whena burglary zone is tripped.
Fire, panic, and other 24 hour devices are always turned on and donot need to be armed.
DisarmingThis means turning off one or more areas of the system. Whendisarmed, the system does NOT sound alarms or send alarmreports to a central station when a burglary zone is faulted.
ZoneA zone refers to one or more protected openings (doors or windows)or protection devices (motion or glassbreak detectors) groupedtogether under the same zone name and number.
Often, similar devices in the same general area will share the samezone. For example, the windows on the east side of the premisescan all be grouped together in a zone named E. WINDOWS.

5
5
Understanding Security System TermsEntry or Exit zoneAlmost all systems have one or more doors through which you canenter or exit the premises. These doors are programmed with adelay time to allow you to enter or exit without setting off the alarm.
When you arm the system, activity on this zone is ignored until theprogrammed exit delay time expires. Once that time has expired andthe system is fully armed, opening the door causes the panel to startthe entry delay time. During the entry delay time, you must enter avalid user code to disarm the system or an alarm will occur.
Instant ZoneExterior windows and non entry doors, or interior protection devices,are typically not programmed with delay times. If these zones aretripped while the system is armed, an alarm occurs instantly.
24 Hour Zone A 24 hour zone is not turned on or off by arming or disarming yoursystem. Some examples of 24 hour zones are: fire zones, paniczones, and temperature control zones.
AreasAn area is made up of burglary zones that can be armed or disarmedtogether. One area might consist of the office doors and windows.When you arm the office, these zones arm together and sound analarm if opened.
Central Station MonitoringYour system can also be programmed to automatically send alarm,trouble, and arming and disarming reports to a central station.Operators at the central station can in turn dispatch the appropriateauthorities or contact you with the specific event information.
Introduction
StatusStatus is a feature that automatically displays the armed or disarmedstatus of your system on the Security Command keypads. Alarm ortrouble conditions on a zone or a system monitor such as AC orbattery trouble can also be displayed. There are two types of statusinformation available: Armed Status and Status List .
Armed StatusWith Armed Status, the keypad displays the current armed conditionof areas within your security system. For example:
When you arm areas 1 to 4, the keypad shows = 1 2 3 4When you arm areas 1 and 3, the keypad shows = 1 3
If your system is setup as an All/Perimeter or Home/Away systemand both the interior and perimeter is armed the display reads:
ALL SYSTEM ON
Status ListThe keypad Status List displays any alarm or trouble condition on azone, and any trouble condition on an internal system monitor. Thesystem monitors include the AC power, battery power, panel boxtamper, printer, and phone lines. If more than one alarm or troublecondition occurs at the same time, the keypad sequences thisinformation on its display.
If the alarm is from a 24 hour zone or a system monitor, it remainsin the Status List until it restores. If one or more armed burglaryzones trip at the same time, the last one to trip remains in the StatusList. This is to ensure that if a burglary has occurred the last zonetripped remains displayed even if it has been restored.

6
6
General Arming OperationYour system has been programmed to operate in one of threemodes: Area Arming, All/Perimeter, or Home/Away.
• Area Arming - Your burglary protection is divided into areas. Eacharea has a custom name, can be turned on or off independent ofother areas, and can have different schedules and authorized users.
• All/Perimeter - Your burglary protection is divided into two areas,Interior and Perimeter. You can turn on the just the Perimeterprotection while inside for security or turn on both as you leave.
• Home/Away - Perimeter, Interior, and a Bedrooms area you canleave turned off at night while you're sleeping.
Regardless of how your system has been programmed, much of theoperation is similar. Throughout this guide, any differences betweenthe systems are noted for your convenience.
Arming FunctionsAfter making your arming selection, the keypad displays any zonesthat are currently bypassed. These zones remain bypassed until thesystem is armed and then disarmed. Any 24 hour zones in a badcondition are also displayed.
Before arming, the system verifies that all doors, windows, and otherprotection devices to be armed are in a normal condition.If everything is okay, the system arms. If there is a problem on oneor more burglary zones the system cannot arm until the problem iscorrected. If the problem is simply an open door or window, correctthe problem and try arming again.
Introduction
If the problem cannot be corrected, you can force arm or bypass thezone or wait until the zone can be repaired by a service technician.A force armed zone is ignored by the system until it restores tonormal. A bypassed zone is ignored by the system during the entirearmed period. A zone remains bypassed until the system is disarmed.
In some cases, you might see the keypad display FRONT DOORBAD * . The asterisk next to BAD means that the zone is a priorityzone, which cannot be bypassed. The problem on the zone must becorrected before the system can be armed.
Armed Message: After all bypassing is completed or zone faultscorrected, the keypad briefly displays ALL SYSTEM ON if all areasin the system are arming and SYSTEM ON if only selected areas arearming. The keypad then displays the exit delay time as it countsdown. When the exit delay time expires, all disarmed zones arearmed.
If your system uses a keyswitch to arm an area, the exit delay timeis NOT shown on the keypad display.
ONE MOMENT . . . Message: If your system is monitored, it may beprogrammed to wait for the transmission of an arming report to thecentral station before displaying the armed message. See ArmingReport below. This is to verify your phone lines are working properly.While the system is waiting for the transmission, the display readsONE MOMENT.... If the report is received, the keypad displays thearmed message. If the report is not received, the keypad displaysLOCAL ALARM ONLY before displaying the armed message.
Arming Report : Your system can be programmed to send armingor zone bypassing reports to a central station. This feature isoptional and can be programmed for you at any time.

7
7Arming and Disarming
Area System ArmingArea Assignment: Your security system has been set up intoseparate areas. The number of areas and their names are listed inthe back of this guide.
Arming or Disarming: You can arm and disarm all areas at onetime or each area individually. You can only arm or disarm areasauthorized for your user code.
Arm all or Selective Arming: After entering your user code, thesystem allows you to arm either all of the areas to which you haveaccess or one or more selected areas. If you choose to arm all areas,the system begins verifying that all zones in those areas are in agood condition. If you choose to arm selected areas, the systemprompts you to choose the areas you want to arm.
Arming the System:
1. Press the COMMAND key until ARM DISARM is displayed.
2. Select ARM to arm the system.
3. Enter your user code if required.
The display reads ALL? NO YES .
4. Select NO to arm only selected areas. Go to step 5.Select YES to arm all areas authorized for your user code. Goto step 6.
5. If you selected NO in step 4, the display begins to list each areato which you have access followed by NO YES.
Example: OFFICE NO YES
5a. Select YES for each area you want to arm.
5b. Select NO for each area you do not want to arm.
Arming and Disarming
Note: You can also just press the area numbers you want to armwhile at the ALL? NO YES display. This changes the displayto AREAS: . The area numbers you select appear in the display.For example: AREAS: 2 4 . Press COMMAND when done.
6. The system displays any bypassed zones or bad 24 hour orPriority zones. A bad Priority zone cannot be armed.
7. At this point you can force arm or bypass any bad zones. Azone that is force armed will be restored into the system if it laterreturns to normal. A zone that is bypassed will remain bypasseduntil the system is disarmed. See steps 7a through 7d.
7a. If a problem exists on a zone, the zone name and problemis shown followed by: OKAY BYPASS STOP .
7b. Select OKAY to force arm the bad zone.
7c. Select BYPASS to bypass all bad zones being displayed.
7d. Select STOP to stop the system from arming. Correct thezone problem(s) and return to step 1.
8. The display reads SYSTEM ON if at least one area in thesystem is armed, and ALL SYSTEM ON if all areas in thesystem are armed.
9. The keypad then displays the exit time in seconds and countsdown the remaining time: EXIT : ## (## = seconds remaining)The exit zones arm when the delay time expires.
Area System ArmingArea Assignment: Your security system has been set up intoseparate areas. The number of areas and their names are listed inthe back of this guide.
Arming or Disarming: You can arm and disarm all areas at onetime or each area individually. You can only arm or disarm areasauthorized for your user code.
Arm all or Selective Arming: After entering your user code, thesystem allows you to arm either all of the areas to which you haveaccess or one or more selected areas. If you choose to arm all areas,the system begins verifying that all zones in those areas are in agood condition. If you choose to arm selected areas, the systemprompts you to choose the areas you want to arm.
Arming the System:
1. Press the COMMAND key until ARM DISARM is displayed.
2. Select ARM to arm the system.
3. Enter your user code if required.
The display reads ALL? NO YES .
4. Select NO to arm only selected areas. Go to step 5.Select YES to arm all areas authorized for your user code. Goto step 6.
5. If you selected NO in step 4, the display begins to list each areato which you have access followed by NO YES.
Example: OFFICE NO YES
5a. Select YES for each area you want to arm.
5b. Select NO for each area you do not want to arm.
Note: You can also just press the area numbers you want to armwhile at the ALL? NO YES display. This changes the displayto AREAS: . The area numbers you select appear in the display.For example: AREAS: 2 4 . Press COMMAND when done.
6. The system displays any bypassed zones or bad 24 hour orPriority zones. A bad Priority zone cannot be armed.
7. At this point you can force arm or bypass any bad zones. Azone that is force armed will be restored into the system if it laterreturns to normal. A zone that is bypassed will remain bypasseduntil the system is disarmed. See steps 7a through 7d.
7a. If a problem exists on a zone, the zone name and problemis shown followed by: OKAY BYPASS STOP .
7b. Select OKAY to force arm the bad zone.
7c. Select BYPASS to bypass all bad zones being displayed.
7d. Select STOP to stop the system from arming. Correct thezone problem(s) and return to step 1.
8. The display reads SYSTEM ON if at least one area in thesystem is armed, and ALL SYSTEM ON if all areas in thesystem are armed.
9. The keypad then displays the exit time in seconds and countsdown the remaining time: EXIT : ## (## = seconds remaining)The exit zones arm when the delay time expires.

8
8
Area System DisarmingDisarming: While the system is armed, you can only enter thepremises through an entry/exit delay door without causing an alarm.After opening the door, the Security Command keypad sounds aprewarn tone to remind you to disarm the system. You must disarmthe system before the entry delay time expires or an alarm on thedoor zone will occur.
During the entry delay time, the keypad displays ENTER CODE:.Enter your code to disarm the system. Only those areas assigned toyour code will disarm.
Schedules : If you’ve programmed schedules for your system anda level 2 code is entered outside of a schedule, the keypad displaysINVALID TIME. This lets the user know that they are disarmingoutside of their authorized time. If your system is monitored, anUnauthorized Entry report is sent to the central station.
All or Selective Disarming: After entering your user code, thesystem allows you to disarm either all of the areas to which you haveaccess or just selected areas. If you choose to disarm all areas, thesystem automatically disarms them. If you choose to disarm selectedareas, the names of those areas will be displayed on the keypad.
Alarm Display: After disarming, the keypad displays any zones thattripped or any transmission problems that occurred during thearmed period. All burglary zones are then disarmed and anybypassed zones are automatically reset.
Disarmed Message: The keypad displays ALL SYSTEM OFF afterthe system disarms.
Arming and Disarming
Central Station Report: A report of the system disarming can betransmitted to the central station. This is optional and can beprogrammed for you at any time.
Disarming an Area System
1. Press the COMMAND key until ARM DISARM is displayed.During entry delay this process starts at step 3.
2. Select DISARM to disarm areas.
3. The keypad displays ENTER CODE: . Enter your user code andpress COMMAND. The keypad displays ALL? NO YES .
4. Select YES to disarm all areas authorized for your user code.
Select NO to disarm only certain areas individually. The keypadthen displays the name of each area authorized for your usercode followed by the NO YES display.
Choose YES to disarm the area displayed.
Choose NO to not disarm and to display the next area.
Note: You can also just press the area numbers you want to disarmwhile at the ALL? NO YES display. This changes the displayto AREAS: . The area numbers you select appear in the display.For example: AREAS: 2 4 . Press COMMAND when done.
5. After all areas have been displayed, any alarms orcommunication problems that occurred during the armed periodare displayed.
6. If all areas have been disarmed, the keypad next displays ALLSYSTEM OFF.

9
9
All/Perimeter System ArmingArea Assignment: Your security system is divided into two separateareas. Motion detectors, inside doors, and other interior protectiondevices are assigned to the Interior area while windows and exteriordoors are assigned to the Perimeter area.
Perimeter or All: When you go to arm an All/Perimeter system, theSecurity Command keypad displays PERIM ALL. If you selectALL , you’re arming both the Perimeter and the Interior areas of thesystem. You’ll want to arm both of these areas when leaving thepremises with nobody left inside. Selecting PERIM arms only theperimeter of the system. Perimeter arming is for when you’re stayinginside but want the comfort of knowing the exterior doors andwindows are armed. Perimeter arming allows you to move freelyabout inside without setting off any interior alarms.
Instant: During the exit delay time, you can cancel the exit and entrydelays and cause all zones to be instant zones. Just press the farright SELECT key under INSTNT while the exit delay is displayed.This immediately arms the exit zones. However, no entry delay isprovided and an alarm will occur should an entry door be opened.
Arming an All/Perimeter System
1. Press the COMMAND key until PERIM ALL is displayed.
2. Select ALL to arm both the perimeter and interior areas. PressPERIM to arm the perimeter area only.
3. Enter your user code if required.
4. The system displays any Bypassed zones or bad 24 hour orPriority zones. A bad Priority zone cannot be armed.
5. At this point you can force arm or bypass any bad zones. Azone that is force armed will be restored into the system if it laterreturns to normal. A zone that is bypassed will remain bypasseduntil the system is disarmed. See steps 5a through 5d.
5a. If a problem exists on a zone, the zone name and problemis shown followed by OKAY BYPASS STOP .
5b. Select OKAY to force arm the zone(s) before arming.
5c. Select BYPASS to bypass the zone(s) before arming.
5d. Select STOP to stop the system from arming. Correct thezone problem(s) and return to step 1.
6. The keypad displays PERIMETER ON if only the perimeter isbeing armed and ALL SYSTEM ON if both the perimeter andinterior are being armed.
7. The keypad next displays EXIT: ## INSTNT and begins tocount down the number of seconds remaining for you to exit.When the delay expires, the exit zones are armed.
8. You can select INSTNT while EXIT: ## INSTNT is displayed toimmediately arm all exit zones and make them instant. Thekeypad displays INSTANT.
9. When the system is fully armed, the keypad displaysPERIMETER ON for perimeter arming and ALL SYSTEM ONfor perimeter and interior arming.
Arming and Disarming
All/Perimeter System ArmingArea Assignment: Your security system is divided into two separateareas. Motion detectors, inside doors, and other interior protectiondevices are assigned to the Interior area while windows and exteriordoors are assigned to the Perimeter area.
Perimeter or All: When you go to arm an All/Perimeter system, theSecurity Command keypad displays PERIM ALL. If you selectALL , you’re arming both the Perimeter and the Interior areas of thesystem. You’ll want to arm both of these areas when leaving thepremises with nobody left inside. Selecting PERIM arms only theperimeter of the system. Perimeter arming is for when you’re stayinginside but want the comfort of knowing the exterior doors andwindows are armed. Perimeter arming allows you to move freelyabout inside without setting off any interior alarms.
Instant: During the exit delay time, you can cancel the exit and entrydelays and cause all zones to be instant zones. Just press the farright select key under INSTNT while the exit delay is displayed. Thisimmediately arms the exit zones. However, no entry delay isprovided and an alarm will occur should an entry door be opened.
Arming an All/Perimeter System
1. Press the COMMAND key until PERIM ALL is displayed.
2. Select ALL to arm both the perimeter and interior areas. PressPERIM to arm the perimeter area only.
3. Enter your user code if required.
4. The system displays any Bypassed zones or bad 24 hour orPriority zones. A bad Priority zone cannot be armed.
5. At this point you can force arm or bypass any bad zones. Azone that is force armed will be restored into the system if it laterreturns to normal. A zone that is bypassed will remain bypasseduntil the system is disarmed. See steps 5a through 5d.
5a. If a problem exists on a zone, the zone name and problemis shown followed by OKAY BYPASS STOP .
5b. Select OKAY to force arm the zone(s) before arming.
5c. Select BYPASS to bypass the zone(s) before arming.
5d. Select STOP to stop the system from arming. Correct thezone problem(s) and return to step 1.
6. The keypad displays PERIMETER ON if only the perimeter isbeing armed and ALL SYSTEM ON if both the perimeter andinterior are being armed.
7. The keypad next displays EXIT: ## INSTNT and begins tocount down the number of seconds remaining for you to exit.When the delay expires, the exit zones are armed.
8. You can select INSTNT while EXIT: ## INSTNT is displayed toimmediately arm all exit zones and make them instant. Thekeypad displays INSTANT.
9. When the system is fully armed, the keypad displaysPERIMETER ON for perimeter arming and ALL SYSTEM ONfor perimeter and interior arming.
Arming and Disarming

10
10
All/Perimeter System DisarmingDisarming: While the system is armed, you can only enter thepremises through an entry/exit delay door without causing an alarm.After opening the door, the Security Command keypad sounds aprewarn tone to remind you to disarm the system. You must disarmthe system before the prewarn tone expires or an alarm on the doorzone will occur.
During the prewarn tone, the keypad displays ENTER CODE:. Enteryour code to disarm the system.
Schedules : If you’ve programmed schedules for your system anda level 2 code is entered outside of a schedule, the keypad displaysINVALID TIME. This lets the user know that they are disarmingoutside of their authorized time. If your system is monitored, anUnauthorized Entry report is sent to the central station.
Alarm Display: After disarming, the keypad displays any zones thattripped or any transmission problems that occurred during thearmed period. All burglary zones are then disarmed and anybypassed zones are automatically reset.
Disarmed Message: The keypad displays ALL SYSTEM OFF afterthe system disarms.
Central Station Report: A report of the system disarming can betransmitted to the central station. This is optional and can beprogrammed for you at any time.
Arming and Disarming
Disarming an All/Perimeter System
1. During the entry delay time, the keypad displays ENTERCODE: . Enter your user code and press COMMAND.
2. The keypad then displays any zones that went into alarm or anycommunication problems that occurred during the armed period.
3. The keypad next displays ALL SYSTEM OFF to confirm thesystem is disarmed.
Disarming During an Alarm
1. While the alarm bell or siren is sounding, enter your user codeand press COMMAND. The keypad displays DISARMSILENCE.
2. Press the SELECT key under DISARM to disarm the systemand silence the alarm.
The keypad next displays ALL SYSTEM OFF to confirm thesystem is disarmed.
3. Press the SELECT key under SILENCE to stop the bell or sirenbut NOT disarm the system.
If you do not press any SELECT key, or you press the COMMANDkey, the system will automatically disarm and silence the alarm.
4. If your system is programmed to send an Abort (alarm cancel)report to the central station, the keypad displays ALARMCANCELLED .
11
11
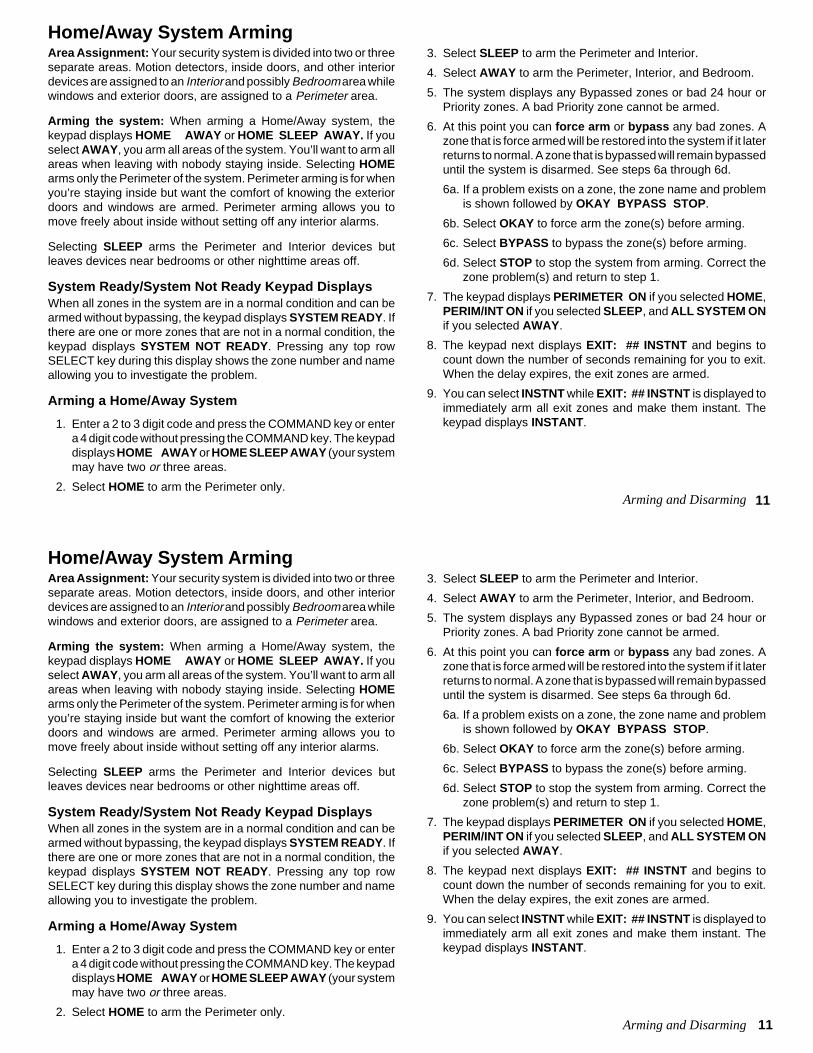
Home/Away System ArmingArea Assignment: Your security system is divided into two or threeseparate areas. Motion detectors, inside doors, and other interiordevices are assigned to an Interior and possibly Bedroom area whilewindows and exterior doors, are assigned to a Perimeter area.
Arming the system: When arming a Home/Away system, thekeypad displays HOME AWAY or HOME SLEEP AWAY. If youselect AWAY , you arm all areas of the system. You’ll want to arm allareas when leaving with nobody staying inside. Selecting HOMEarms only the Perimeter of the system. Perimeter arming is for whenyou’re staying inside but want the comfort of knowing the exteriordoors and windows are armed. Perimeter arming allows you tomove freely about inside without setting off any interior alarms.
Selecting SLEEP arms the Perimeter and Interior devices butleaves devices near bedrooms or other nighttime areas off.
System Ready/System Not Ready Keypad DisplaysWhen all zones in the system are in a normal condition and can bearmed without bypassing, the keypad displays SYSTEM READY. Ifthere are one or more zones that are not in a normal condition, thekeypad displays SYSTEM NOT READY. Pressing any top rowSELECT key during this display shows the zone number and nameallowing you to investigate the problem.
Arming a Home/Away System
1. Enter a 2 to 3 digit code and press the COMMAND key or entera 4 digit code without pressing the COMMAND key. The keypaddisplays HOME AWAY or HOME SLEEP AWAY (your systemmay have two or three areas.
2. Select HOME to arm the Perimeter only.
3. Select SLEEP to arm the Perimeter and Interior.
4. Select AWAY to arm the Perimeter, Interior, and Bedroom.
5. The system displays any Bypassed zones or bad 24 hour orPriority zones. A bad Priority zone cannot be armed.
6. At this point you can force arm or bypass any bad zones. Azone that is force armed will be restored into the system if it laterreturns to normal. A zone that is bypassed will remain bypasseduntil the system is disarmed. See steps 6a through 6d.
6a. If a problem exists on a zone, the zone name and problemis shown followed by OKAY BYPASS STOP .
6b. Select OKAY to force arm the zone(s) before arming.
6c. Select BYPASS to bypass the zone(s) before arming.
6d. Select STOP to stop the system from arming. Correct thezone problem(s) and return to step 1.
7. The keypad displays PERIMETER ON if you selected HOME,PERIM/INT ON if you selected SLEEP, and ALL SYSTEM ONif you selected AWAY .
8. The keypad next displays EXIT: ## INSTNT and begins tocount down the number of seconds remaining for you to exit.When the delay expires, the exit zones are armed.
9. You can select INSTNT while EXIT: ## INSTNT is displayed toimmediately arm all exit zones and make them instant. Thekeypad displays INSTANT.
Arming and Disarming
12
12
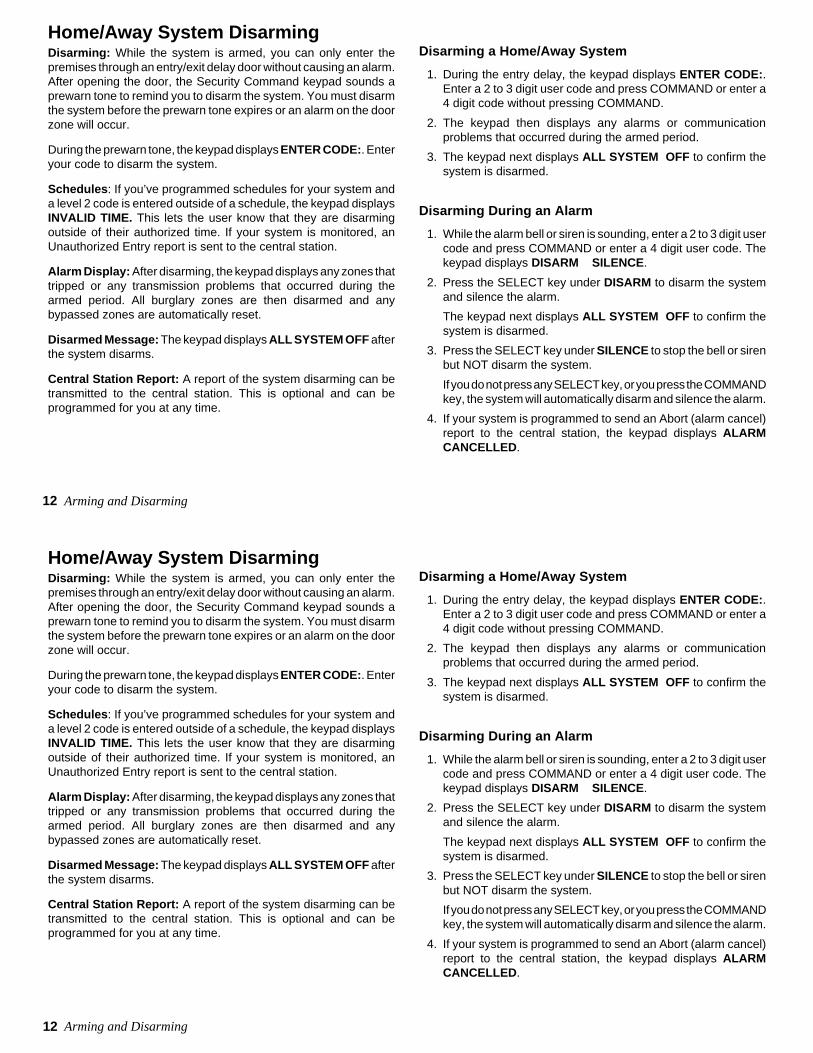
Home/Away System DisarmingDisarming: While the system is armed, you can only enter thepremises through an entry/exit delay door without causing an alarm.After opening the door, the Security Command keypad sounds aprewarn tone to remind you to disarm the system. You must disarmthe system before the prewarn tone expires or an alarm on the doorzone will occur.
During the prewarn tone, the keypad displays ENTER CODE:. Enteryour code to disarm the system.
Schedules : If you’ve programmed schedules for your system anda level 2 code is entered outside of a schedule, the keypad displaysINVALID TIME. This lets the user know that they are disarmingoutside of their authorized time. If your system is monitored, anUnauthorized Entry report is sent to the central station.
Alarm Display: After disarming, the keypad displays any zones thattripped or any transmission problems that occurred during thearmed period. All burglary zones are then disarmed and anybypassed zones are automatically reset.
Disarmed Message: The keypad displays ALL SYSTEM OFF afterthe system disarms.
Central Station Report: A report of the system disarming can betransmitted to the central station. This is optional and can beprogrammed for you at any time.
Arming and Disarming
Disarming a Home/Away System
1. During the entry delay, the keypad displays ENTER CODE:.Enter a 2 to 3 digit user code and press COMMAND or enter a4 digit code without pressing COMMAND.
2. The keypad then displays any alarms or communicationproblems that occurred during the armed period.
3. The keypad next displays ALL SYSTEM OFF to confirm thesystem is disarmed.
Disarming During an Alarm
1. While the alarm bell or siren is sounding, enter a 2 to 3 digit usercode and press COMMAND or enter a 4 digit user code. Thekeypad displays DISARM SILENCE .
2. Press the SELECT key under DISARM to disarm the systemand silence the alarm.
The keypad next displays ALL SYSTEM OFF to confirm thesystem is disarmed.
3. Press the SELECT key under SILENCE to stop the bell or sirenbut NOT disarm the system.
If you do not press any SELECT key, or you press the COMMANDkey, the system will automatically disarm and silence the alarm.
4. If your system is programmed to send an Abort (alarm cancel)report to the central station, the keypad displays ALARMCANCELLED .
13
13
User Menu
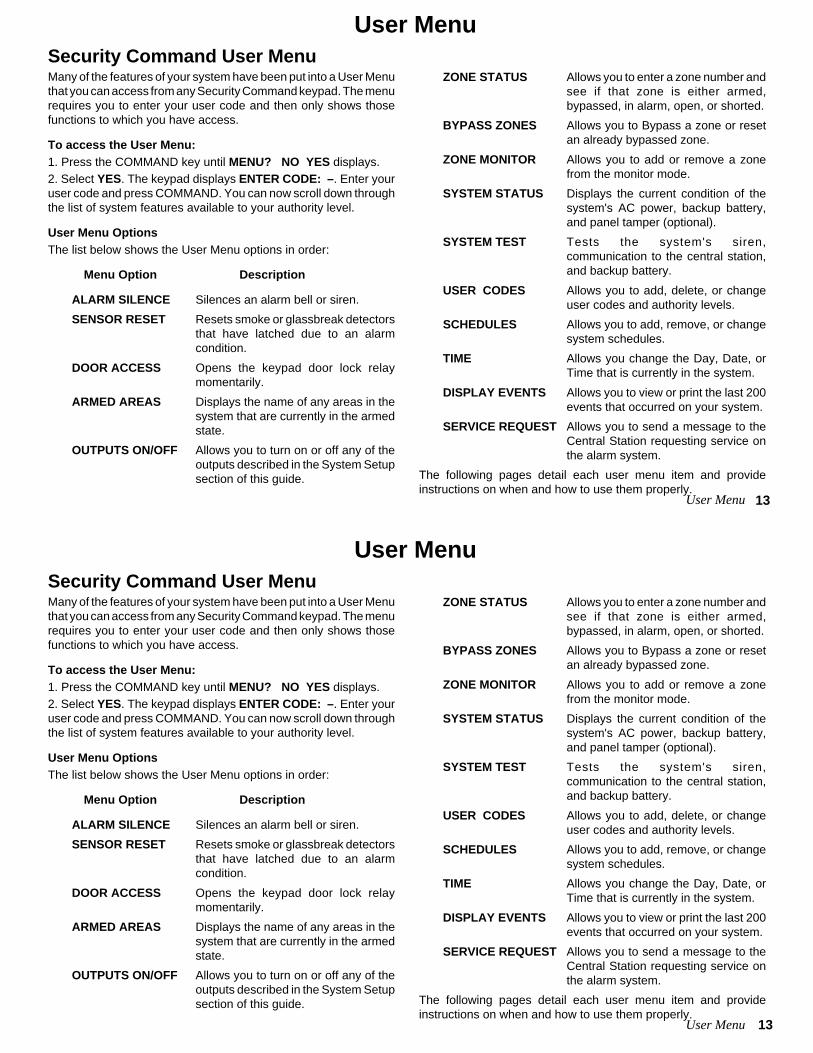
User MenuSecurity Command User MenuMany of the features of your system have been put into a User Menuthat you can access from any Security Command keypad. The menurequires you to enter your user code and then only shows thosefunctions to which you have access.
To access the User Menu:1. Press the COMMAND key until MENU? NO YES displays.2. Select YES. The keypad displays ENTER CODE: –. Enter youruser code and press COMMAND. You can now scroll down throughthe list of system features available to your authority level.
User Menu OptionsThe list below shows the User Menu options in order:
Menu Option Description
ALARM SILENCE Silences an alarm bell or siren.
SENSOR RESET Resets smoke or glassbreak detectorsthat have latched due to an alarmcondition.
DOOR ACCESS Opens the keypad door lock relaymomentarily.
ARMED AREAS Displays the name of any areas in thesystem that are currently in the armedstate.
OUTPUTS ON/OFF Allows you to turn on or off any of theoutputs described in the System Setupsection of this guide.
ZONE STATUS Allows you to enter a zone number andsee if that zone is either armed,bypassed, in alarm, open, or shorted.
BYPASS ZONES Allows you to Bypass a zone or resetan already bypassed zone.
ZONE MONITOR Allows you to add or remove a zonefrom the monitor mode.
SYSTEM STATUS Displays the current condition of thesystem's AC power, backup battery,and panel tamper (optional).
SYSTEM TEST Tests the system's siren,communication to the central station,and backup battery.
USER CODES Allows you to add, delete, or changeuser codes and authority levels.
SCHEDULES Allows you to add, remove, or changesystem schedules.
TIME Allows you change the Day, Date, orTime that is currently in the system.
DISPLAY EVENTS Allows you to view or print the last 200events that occurred on your system.
SERVICE REQUEST Allows you to send a message to theCentral Station requesting service onthe alarm system.
The following pages detail each user menu item and provideinstructions on when and how to use them properly.
User Menu
User MenuSecurity Command User MenuMany of the features of your system have been put into a User Menuthat you can access from any Security Command keypad. The menurequires you to enter your user code and then only shows thosefunctions to which you have access.
To access the User Menu:1. Press the COMMAND key until MENU? NO YES displays.2. Select YES. The keypad displays ENTER CODE: –. Enter youruser code and press COMMAND. You can now scroll down throughthe list of system features available to your authority level.
User Menu OptionsThe list below shows the User Menu options in order:
Menu Option Description
ALARM SILENCE Silences an alarm bell or siren.
SENSOR RESET Resets smoke or glassbreak detectorsthat have latched due to an alarmcondition.
DOOR ACCESS Opens the keypad door lock relaymomentarily.
ARMED AREAS Displays the name of any areas in thesystem that are currently in the armedstate.
OUTPUTS ON/OFF Allows you to turn on or off any of theoutputs described in the System Setupsection of this guide.
ZONE STATUS Allows you to enter a zone number andsee if that zone is either armed,bypassed, in alarm, open, or shorted.
BYPASS ZONES Allows you to Bypass a zone or resetan already bypassed zone.
ZONE MONITOR Allows you to add or remove a zonefrom the monitor mode.
SYSTEM STATUS Displays the current condition of thesystem's AC power, backup battery,and panel tamper (optional).
SYSTEM TEST Tests the system's siren,communication to the central station,and backup battery.
USER CODES Allows you to add, delete, or changeuser codes and authority levels.
SCHEDULES Allows you to add, remove, or changesystem schedules.
TIME Allows you change the Day, Date, orTime that is currently in the system.
DISPLAY EVENTS Allows you to view or print the last 200events that occurred on your system.
SERVICE REQUEST Allows you to send a message to theCentral Station requesting service onthe alarm system.
The following pages detail each user menu item and provideinstructions on when and how to use them properly.

14
14
Alarm SilenceUser Code Level: 2 and above.
Function: Silences the alarm bell or siren during an alarm.
Alarm Silence allows you to turn off the alarm bell or siren connectedto your system during an alarm. Using Alarm Silence does NOT stopan alarm report from being sent to the central station and does notreset any alarmed devices. Use the Sensor Reset function to resetdevices such as smoke detectors that have latched in alarm.
Note : You can also silence an alarm by entering your user code andpressing COMMAND while the bell or siren is still sounding.
Using the Alarm Silence Function
1. Access the User Menu.
2. The keypad displays ALARM SILENCE? .
3. Press any SELECT key. The system silences the bell or sirenand exits the User Menu.
User Menu
Sensor ResetUser Code Level: 1 and 2 - During schedules only. 3 to 9 - Anytime.
Function: Resets smoke or glassbreak detectors. Also clears Fire/Supervisory alarm and trouble displays.
Sensor Reset is used to reset smoke and glassbreak detectors afterthey have been tripped. Once these detectors have tripped, theymust be reset before they can detect any additional alarm conditions.When Sensor Reset is selected, power to the detectors is temporarilyremoved by the system allowing them to reset.
Make sure all smoke is cleared from around the area of the smokedetectors before performing a Sensor Reset to prevent the alarmfrom occurring again.
Resetting the Sensors
1. Access the User Menu.
2. Press COMMAND until SENSOR RESET displays.
3. The keypad displays SENSORS OFF for five seconds followedby SENSORS ON.
4. The keypad automatically exits the User Menu.

15
15
Door AccessUser Code Level: 1 and 2 - During schedules only. 3 to 9 - Anytime.
Function: Operates an electric door strike from the keypad.
Door Access is used to operate a door strike relay that is built intosome Security Command keypads. Power for the door strike isconnected to the keypad relay and can be interrupted by using theDoor Access function.
When Door Access is selected you’ll be asked to enter your usercode. When the user code is accepted, the door strike at the SecurityCommand you’re operating turns on momentarily.
Door Access also functions any time any area of the system isdisarmed at the door strike keypad or by simply entering your usercode and pressing COMMAND.
A report of this entry can be transmitted to your central station. Thisreport is optional and can be programmed for you at any time.
Using the Door Access
1. Access the User Menu.
2. Press COMMAND until DOOR ACCESS? displays.
3. Press any SELECT key. The door strike relay turns onmomentarily.
4. The keypad returns to the Status List display.
User Menu
Armed Areas DisplayUser Code Level : 1 and 2 - During schedules only. 3 to 9 - Anytime.
Function : Displays all armed areas in the system.
Armed Areas is used to display all of the armed areas in your systemat the Security Command keypads. Each armed area is displayedalong with its area number and name.
Using the Armed Areas Function
1. Access the User Menu.
2. Press COMMAND until ARMED AREAS? displays.
3. Press any SELECT key. The keypad displays the first armedarea name. To scroll through the list of armed areas, press theCOMMAND key.
All/Perimeter and Home/Away systems: Armed areas forthese systems are shown as PERIMETER, INTERIOR, andalso BEDROOMS for Home/Away systems.
4. If there are no armed areas, the keypad displays NONE.
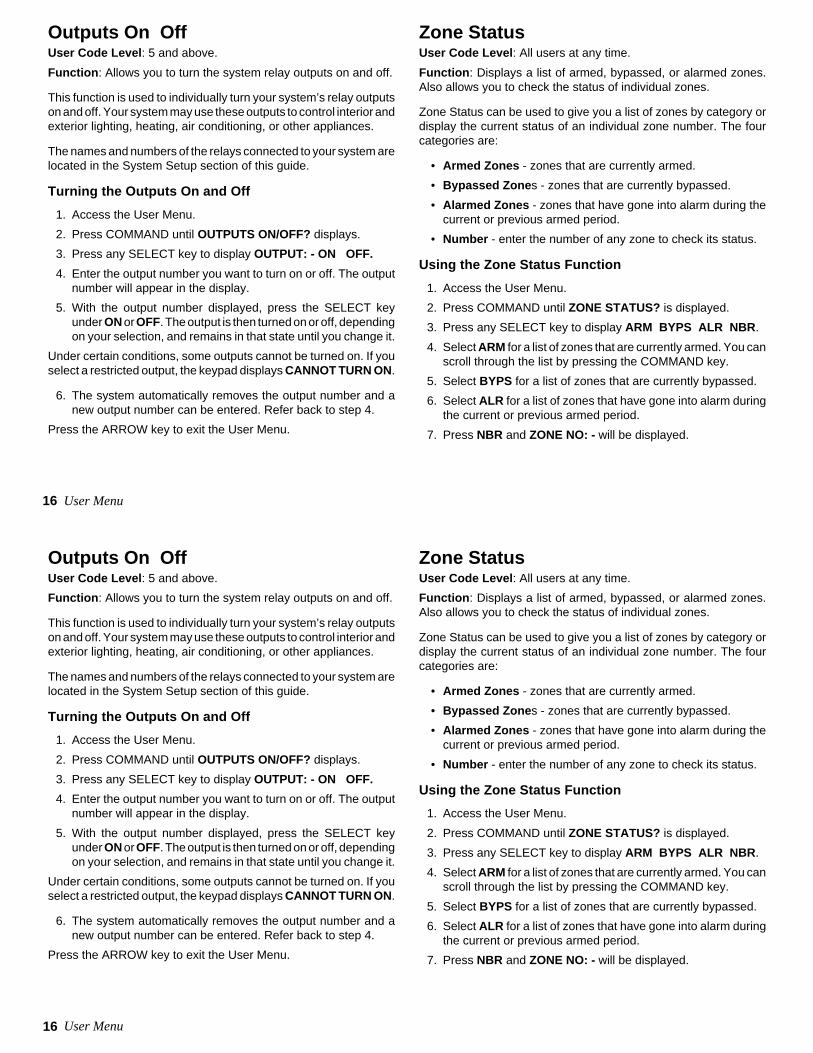
16
16
Outputs On OffUser Code Level : 5 and above.
Function : Allows you to turn the system relay outputs on and off.
This function is used to individually turn your system’s relay outputson and off. Your system may use these outputs to control interior andexterior lighting, heating, air conditioning, or other appliances.
The names and numbers of the relays connected to your system arelocated in the System Setup section of this guide.
Turning the Outputs On and Off
1. Access the User Menu.
2. Press COMMAND until OUTPUTS ON/OFF? displays.
3. Press any SELECT key to display OUTPUT: - ON OFF.
4. Enter the output number you want to turn on or off. The outputnumber will appear in the display.
5. With the output number displayed, press the SELECT keyunder ON or OFF. The output is then turned on or off, dependingon your selection, and remains in that state until you change it.
Under certain conditions, some outputs cannot be turned on. If youselect a restricted output, the keypad displays CANNOT TURN ON.
6. The system automatically removes the output number and anew output number can be entered. Refer back to step 4.
Press the ARROW key to exit the User Menu.
User Menu
Zone StatusUser Code Level : All users at any time.
Function : Displays a list of armed, bypassed, or alarmed zones.Also allows you to check the status of individual zones.
Zone Status can be used to give you a list of zones by category ordisplay the current status of an individual zone number. The fourcategories are:
• Armed Zones - zones that are currently armed.
• Bypassed Zone s - zones that are currently bypassed.
• Alarmed Zones - zones that have gone into alarm during thecurrent or previous armed period.
• Number - enter the number of any zone to check its status.
Using the Zone Status Function
1. Access the User Menu.
2. Press COMMAND until ZONE STATUS? is displayed.
3. Press any SELECT key to display ARM BYPS ALR NBR .
4. Select ARM for a list of zones that are currently armed. You canscroll through the list by pressing the COMMAND key.
5. Select BYPS for a list of zones that are currently bypassed.
6. Select ALR for a list of zones that have gone into alarm duringthe current or previous armed period.
7. Press NBR and ZONE NO: - will be displayed.
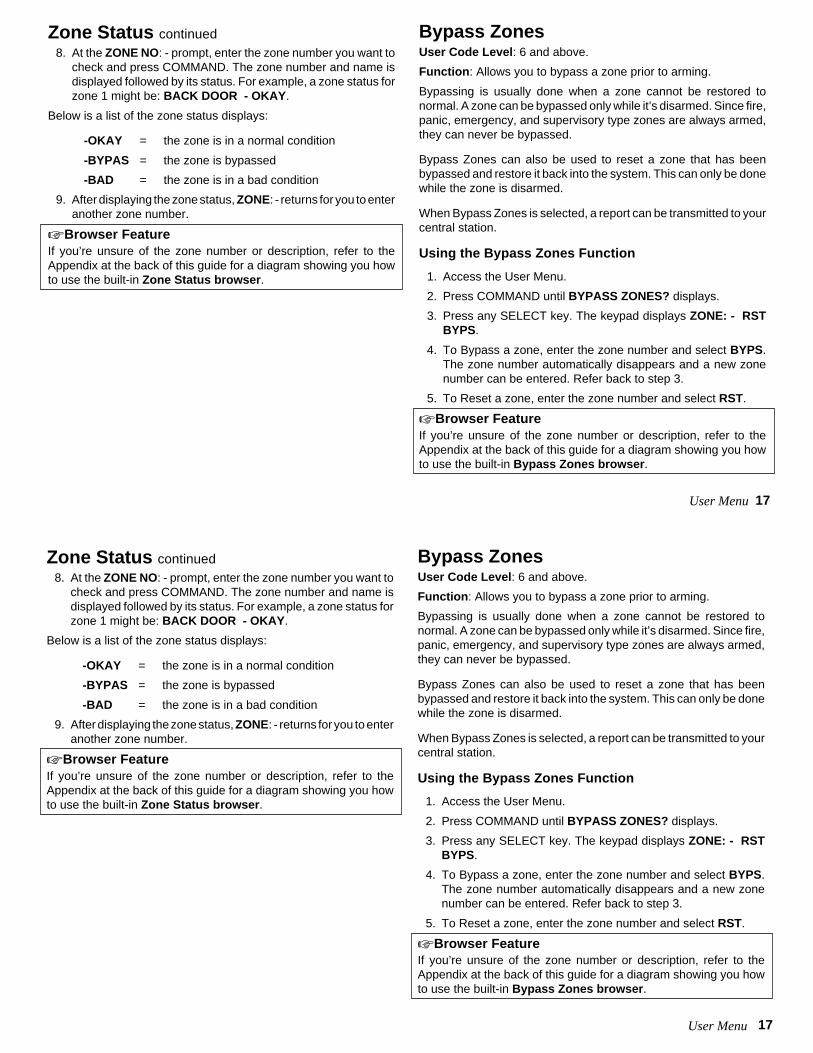
17
17
Zone Status continued8. At the ZONE NO: - prompt, enter the zone number you want to
check and press COMMAND. The zone number and name isdisplayed followed by its status. For example, a zone status forzone 1 might be: BACK DOOR - OKAY .
Below is a list of the zone status displays:
-OKAY = the zone is in a normal condition
-BYPAS = the zone is bypassed
-BAD = the zone is in a bad condition
9. After displaying the zone status, ZONE: - returns for you to enteranother zone number.
☞ Browser FeatureIf you’re unsure of the zone number or description, refer to theAppendix at the back of this guide for a diagram showing you howto use the built-in Zone Status browser .
User Menu
Bypass ZonesUser Code Level : 6 and above.
Function : Allows you to bypass a zone prior to arming.
Bypassing is usually done when a zone cannot be restored tonormal. A zone can be bypassed only while it’s disarmed. Since fire,panic, emergency, and supervisory type zones are always armed,they can never be bypassed.
Bypass Zones can also be used to reset a zone that has beenbypassed and restore it back into the system. This can only be donewhile the zone is disarmed.
When Bypass Zones is selected, a report can be transmitted to yourcentral station.
Using the Bypass Zones Function
1. Access the User Menu.
2. Press COMMAND until BYPASS ZONES? displays.
3. Press any SELECT key. The keypad displays ZONE: - RSTBYPS.
4. To Bypass a zone, enter the zone number and select BYPS.The zone number automatically disappears and a new zonenumber can be entered. Refer back to step 3.
5. To Reset a zone, enter the zone number and select RST.
☞ Browser FeatureIf you’re unsure of the zone number or description, refer to theAppendix at the back of this guide for a diagram showing you howto use the built-in Bypass Zones browser .
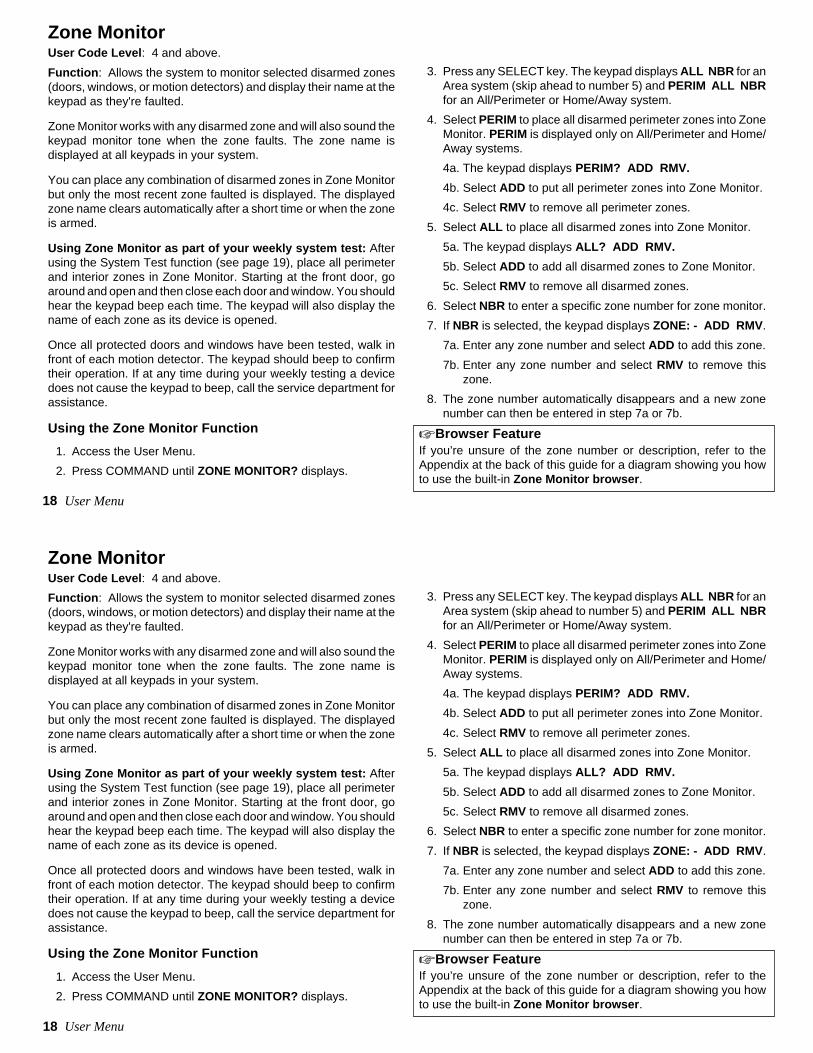
18
18
User Menu
Zone MonitorUser Code Level : 4 and above.
Function : Allows the system to monitor selected disarmed zones(doors, windows, or motion detectors) and display their name at thekeypad as they're faulted.
Zone Monitor works with any disarmed zone and will also sound thekeypad monitor tone when the zone faults. The zone name isdisplayed at all keypads in your system.
You can place any combination of disarmed zones in Zone Monitorbut only the most recent zone faulted is displayed. The displayedzone name clears automatically after a short time or when the zoneis armed.
Using Zone Monitor as part of your weekly system test: Afterusing the System Test function (see page 19), place all perimeterand interior zones in Zone Monitor. Starting at the front door, goaround and open and then close each door and window. You shouldhear the keypad beep each time. The keypad will also display thename of each zone as its device is opened.
Once all protected doors and windows have been tested, walk infront of each motion detector. The keypad should beep to confirmtheir operation. If at any time during your weekly testing a devicedoes not cause the keypad to beep, call the service department forassistance.
Using the Zone Monitor Function
1. Access the User Menu.
2. Press COMMAND until ZONE MONITOR? displays.
3. Press any SELECT key. The keypad displays ALL NBR for anArea system (skip ahead to number 5) and PERIM ALL NBRfor an All/Perimeter or Home/Away system.
4. Select PERIM to place all disarmed perimeter zones into ZoneMonitor. PERIM is displayed only on All/Perimeter and Home/Away systems.
4a. The keypad displays PERIM? ADD RMV.
4b. Select ADD to put all perimeter zones into Zone Monitor.
4c. Select RMV to remove all perimeter zones.
5. Select ALL to place all disarmed zones into Zone Monitor.
5a. The keypad displays ALL? ADD RMV.
5b. Select ADD to add all disarmed zones to Zone Monitor.
5c. Select RMV to remove all disarmed zones.
6. Select NBR to enter a specific zone number for zone monitor.
7. If NBR is selected, the keypad displays ZONE: - ADD RMV .
7a. Enter any zone number and select ADD to add this zone.
7b. Enter any zone number and select RMV to remove thiszone.
8. The zone number automatically disappears and a new zonenumber can then be entered in step 7a or 7b.
☞ Browser FeatureIf you’re unsure of the zone number or description, refer to theAppendix at the back of this guide for a diagram showing you howto use the built-in Zone Monitor browser .

19
19
System StatusUser Code Level : 1 and 2 - During schedules only. 3 to 9 - Anytime.
Function : Displays the current condition of internal system hardware.
System Status displays the condition of the panel's AC power,battery power, and optional panel tamper. When System Status isselected, each monitor is displayed followed by OKAY or TRBL(Trouble) to indicate the current condition.
Using the System Status Function
1. Access the User Menu.
2. Press COMMAND until SYSTEM STATUS? displays.
3. Press any SELECT key. The display starts listing each systemmonitor and status.
For example: AC POWER - OKAY
Below are the System Monitor displays:
Keypad Display What it monitors
AC POWER = AC power
BATTERY = Battery power
TAMPER = Panel box tamper
These are followed by either OKAY or TRBL (trouble).
If TRBL is displayed, call the service department for assistance.
4. The system then displays its firmware version (for example,VER_102_10/17/97), the panel model (MODEL XR200), thenexits the User Menu.
User Menu
System TestUser Code Level : 4 and above.
Function : System Test is used to test the battery, alarm bell or siren,and communication to a central station. The System Test functionbegins automatically as soon as you select it.
Using the System Test Function
1. Access the User Menu.
2. Press COMMAND until SYSTEM TEST? displays.
3. Press any SELECT key. The system test begins automaticallyand the keypad displays:
1) BELL SOUNDING during a two second bell test, then:
2) BATTERY - OKAY or BATTERY - TRBL to indicate thecondition of the battery, then:
* 3) TRANSMIT TEST and ATTEMPT NO : 1 during thetransmit test, then:
4) TRANSMIT OKAY or TRANSMIT FAILED to show theresults of the transmit test, then:
5) TEST END to indicate the System Test is complete.
6) You can end the transmit test by pressing the ARROW key.
* The transmit test does not operate on local systems.
Testing your system’s burglary protection: The System Testfunction should be a part of your weekly testing and should befollowed by placing the interior and perimeter burglary devicesin Zone Monitor mode. This allows you to open and then closeeach protected door and window while listening for the keypadto beep confirming its operation. See Zone Monitor.
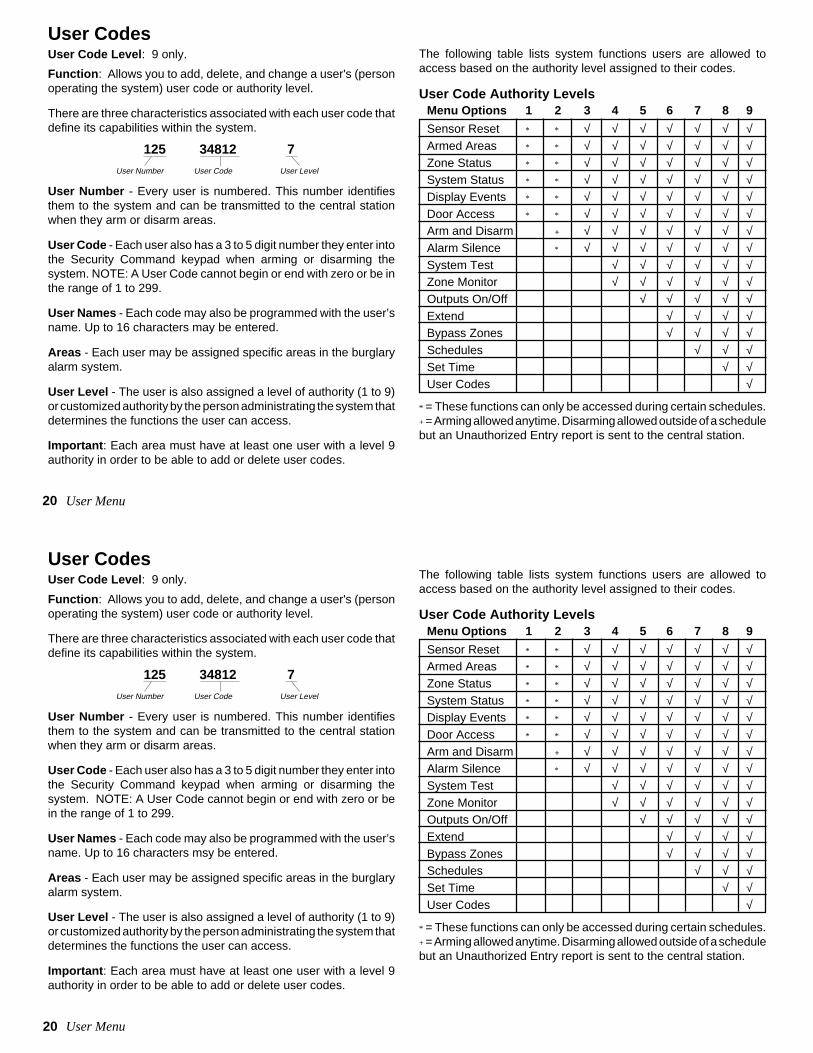
20
20
The following table lists system functions users are allowed toaccess based on the authority level assigned to their codes.
User Code Authority LevelsMenu Options 1 2 3 4 5 6 7 8 9
Sensor Reset * * √ √ √ √ √ √ √Armed Areas * * √ √ √ √ √ √ √Zone Status * * √ √ √ √ √ √ √System Status * * √ √ √ √ √ √ √Display Events * * √ √ √ √ √ √ √Door Access * * √ √ √ √ √ √ √Arm and Disarm + √ √ √ √ √ √ √Alarm Silence * √ √ √ √ √ √ √System Test √ √ √ √ √ √Zone Monitor √ √ √ √ √ √Outputs On/Off √ √ √ √ √Extend √ √ √ √Bypass Zones √ √ √ √Schedules √ √ √Set Time √ √User Codes √
* = These functions can only be accessed during certain schedules.+ = Arming allowed anytime. Disarming allowed outside of a schedulebut an Unauthorized Entry report is sent to the central station.
User Menu
User CodesUser Code Level : 9 only.
Function : Allows you to add, delete, and change a user's (personoperating the system) user code or authority level.
There are three characteristics associated with each user code thatdefine its capabilities within the system.
125 34812 7
User Number - Every user is numbered. This number identifiesthem to the system and can be transmitted to the central stationwhen they arm or disarm areas.
User Code - Each user also has a 3 to 5 digit number they enter intothe Security Command keypad when arming or disarming thesystem. NOTE: A User Code cannot begin or end with zero or be inthe range of 1 to 299.
User Names - Each code may also be programmed with the user’sname. Up to 16 characters may be entered.
Areas - Each user may be assigned specific areas in the burglaryalarm system.
User Level - The user is also assigned a level of authority (1 to 9)or customized authority by the person administrating the system thatdetermines the functions the user can access.
Important : Each area must have at least one user with a level 9authority in order to be able to add or delete user codes.
User Number User Code User Level
User Menu
The following table lists system functions users are allowed toaccess based on the authority level assigned to their codes.
User Code Authority LevelsMenu Options 1 2 3 4 5 6 7 8 9
Sensor Reset * * √ √ √ √ √ √ √Armed Areas * * √ √ √ √ √ √ √Zone Status * * √ √ √ √ √ √ √System Status * * √ √ √ √ √ √ √Display Events * * √ √ √ √ √ √ √Door Access * * √ √ √ √ √ √ √Arm and Disarm + √ √ √ √ √ √ √Alarm Silence * √ √ √ √ √ √ √System Test √ √ √ √ √ √Zone Monitor √ √ √ √ √ √Outputs On/Off √ √ √ √ √Extend √ √ √ √Bypass Zones √ √ √ √Schedules √ √ √Set Time √ √User Codes √
* = These functions can only be accessed during certain schedules.+ = Arming allowed anytime. Disarming allowed outside of a schedulebut an Unauthorized Entry report is sent to the central station.
User CodesUser Code Level : 9 only.
Function : Allows you to add, delete, and change a user's (personoperating the system) user code or authority level.
There are three characteristics associated with each user code thatdefine its capabilities within the system.
125 34812 7
User Number - Every user is numbered. This number identifiesthem to the system and can be transmitted to the central stationwhen they arm or disarm areas.
User Code - Each user also has a 3 to 5 digit number they enter intothe Security Command keypad when arming or disarming thesystem. NOTE: A User Code cannot begin or end with zero or bein the range of 1 to 299.
User Names - Each code may also be programmed with the user’sname. Up to 16 characters msy be entered.
Areas - Each user may be assigned specific areas in the burglaryalarm system.
User Level - The user is also assigned a level of authority (1 to 9)or customized authority by the person administrating the system thatdetermines the functions the user can access.
Important : Each area must have at least one user with a level 9authority in order to be able to add or delete user codes.
User Number User Code User Level

21
21
User Codes continued
Programming Custom User CodesIn addition to the preset authority levels, you can also create customauthority levels by selecting the CUSTOM option at the time the useris being added to the system. This option allows you to assignspecific User Menu access to individual users.
Adding User Codes:
1. Access the User Menu.
2. Press COMMAND until USER CODES? displays. (NOTE: Youmust have a level 9 authority. If you enter the User Menu witha lower authority, the keypad will not display USER CODES?.)
3. Press any SELECT key. The keypad displays ADD DEL CHG .
4. Press the SELECT key under ADD to add a new user code.
5. At the USER NUMBER:- prompt, enter a user number andpress COMMAND. The display changes to CODE NO:- .
6. Enter a user code of 3 to 5 digits (4 digits on the Home/Awaysystem) and press COMMAND. The user enters this numbereach time they arm, disarm, or make changes. If using accesscards, present the card instead of entering a code. After thecode is entered, the display changes to USER NUMBER ###.
7. A 16 character name may be entered to identify the user. Pressany top row key to clear the current name. You may then enterthe new name. After the name is entered, press COMMAND.See Entering Custom Names in the Appendix of this User’sGuide.
8. Areas systems only - The display changes to AREAS: # # # #(# = area number). Add or remove access to one or more areasby pressing the corresponding number keys. Press COMMAND.
Note: You may only add areas that are assigned to your code. User Menu
9. The display changes to LEVEL CUSTOM . Select LEVEL toassign a standard set of authorized functions as outlined in theUser Code Authority Levels table on the previous page.
10. At the LEVEL: - display, enter an authority level from 1 to 9.Press COMMAND. The displays shows USER # ADDED.
11. Select CUSTOM to customize the functions you want the userto access. This allows users to have certain capabilities outsideof a standard authority level. The following chart shows thecustom menu with default selections.
ARM/DIS (arm & disarm) NO SYS STAT (system status) NO
ALM SLNC (alarm silence) NO SYS TEST (system test) NO
SNSR RST (sensor reset) NO USR CODE (user codes) NO
DOOR ACS (door access) NO SCHEDULS (schedules) NO
ARM AREA (armed areas) NO TIME (day, date, and time) NO
OUTPUTS (outputs on off) NO DIS EVNT (display events) NO
ZN STATS (zone status) NO EXTEND (extend closing) NO
BYPAS ZN (bypass zones) NO * TEMP CODE (temporary code) NO
ZONE MON (zone monitor) NO
* • NO makes this a permanent user code.
• YES makes this a temporary code that expires in 7 days.
12. Press the ARROW key to exit the User Menu.
Note: Customized codes are not restricted to the schedules.
☞ Browser FeatureRefer to the Appendix at the back of this guide for a diagram showingyou how to use the buitl-in Add User Codes browser .
User Codes continued
Programming Custom User CodesIn addition to the preset authority levels, you can also create customauthority levels by selecting the CUSTOM option at the time the useris being added to the system. This option allows you to assignspecific User Menu access to individual users.
Adding User Codes:
1. Access the User Menu.
2. Press COMMAND until USER CODES? displays. (NOTE: Youmust have a level 9 authority. If you enter the User Menu witha lower authority, the keypad will not display USER CODES?.)
3. Press any SELECT key. The keypad displays ADD DEL CHG .
4. Press the SELECT key under ADD to add a new user code.
5. At the USER NUMBER:- prompt, enter a user number andpress COMMAND. The display changes to CODE NO:- .
6. Enter a user code of 3 to 5 digits (4 digits on the Home/Awaysystem) and press COMMAND. The user enters this numbereach time they arm, disarm, or make changes. If using accesscards, present the card instead of entering a code. After thecode is entered, the display changes to USER NUMBER ###.
7. A 16 character name may be entered to identify the user. Pressany top row key to clear the current name. You may then enterthe new name. After the name is entered, press COMMAND.See Entering Custom Names in the appendix of this User’sGuide.
8. Areas systems only - The display changes to AREAS: # # # #(# = area number). Add or remove access to one or more areasby pressing the corresponding number keys. Press COMMAND.
Note: You may only add areas that are assigned to your code. User Menu
9. The display changes to LEVEL CUSTOM . Select LEVEL toassign a standard set of authorized functions as outlined in theUser Code Authority Levels table on the previous page.
10. At the LEVEL: - display, enter an authority level from 1 to 9.Press COMMAND. The displays shows USER # ADDED.
11. Select CUSTOM to customize the functions you want the userto access. This allows users to have certain capabilities outsideof a standard authority level. The following chart shows thecustom menu with default selections.
ARM/DIS (arm & disarm) NO SYS STAT (system status) NO
ALM SLNC (alarm silence) NO SYS TEST (system test) NO
SNSR RST (sensor reset) NO USR CODE (user codes) NO
DOOR ACS (door access) NO SCHEDULS (schedules) NO
ARM AREA (armed areas) NO TIME (day, date, and time) NO
OUTPUTS (outputs on off) NO DIS EVNT (display events) NO
ZN STATS (zone status) NO EXTEND (extend closing) NO
BYPAS ZN (bypass zones) NO * TEMP CODE (temporary code) NO
ZONE MON (zone monitor) NO
* • NO makes this a permanent user code.
• YES makes this a temporary code that expires in 7 days.
12. Press the ARROW key to exit the User Menu.
Note: Customized codes are not restricted to the schedules.
☞ Browser FeatureRefer to the Appendix at the back of this guide for a diagram showingyou how to use the buitl-in Add User Codes browser .

22
22
User Codes continued
Ambush Codes
Your system may be programmed to allow user number 1 to be anAmbush code. This Ambush code functions identically to a standardcode with the exception that it sends a silent alarm to the centralstation. This silent alarm alerts the operator to a duress situation atthe premises and prompts the immediate notification of authorities.
Refer to the System Setup section of this guide to see if your systemis programmed for Ambush. If so, do NOT program a code for usernumber 1 unless you intend to use the Ambush function.
Deleting User Codes
1. Access the User Menu.
2. Press COMMAND until USER CODES? displays.
3. Press any SELECT key. The keypad displays ADD DEL CHG .
4. Press the SELECT key under DEL to delete a user code fromthe system. You must have a user code level of 9 or have acustom user code with that authority to be able to delete a usercode.
Important : Each area must have at least one user with a level 9authority in order to be able to add or delete user codes. Be carefulnot to delete all level 9 users from an area.
5. At the USER NUMBER: - prompt, enter the user number youwant to delete and press COMMAND. The displays changes toUSER # DELETED.
6. The display then changes back to USER NUMBER: - allowingyou to delete another user. Press the ARROW key twice to exitthe User Menu.
Changing User Codes
1. Access the User Menu.
2. Press the COMMAND key until USER CODES? displays.
3. Press any SELECT key. The keypad displays ADD DEL CHG .
4. Press the SELECT key under CHG to change a user code.
5. At the USER NUMBER: - prompt, enter the user number tochange and press COMMAND.
6. The display changes to CODE NO: * * * * *. Press a SELECT keyand enter the new user code. Press COMMAND.
Note : Changing a user code does not change the user number.
7. The display then shows the current user name. Press any toprow key to clear. See the Entering Custom Names section in theAppendix to enter a new name.
8. Areas systems only - The display changes to AREAS: # # # #(# = area number). Add or remove access to one or more areasby pressing the corresponding number keys. Press COMMAND.
9. The display changes to LEVEL CUSTOM. Refer to Adding UserCodes on the previous page for a description of this prompt.
10. After entering the authority level, the keypad displays USER #CHANGED for five seconds followed by USER NUMBER: - .This display allows you to enter another user number to change.Press the ARROW key twice to exit the User Menu.
☞ Browser FeatureRefer to the Appendix at the back of this guide for a diagram showingyou how to use the built-in Delete or Change User Codes browser .
User Menu
User Codes continued
Ambush Codes
Your system may be programmed to allow user number 1 to be anAmbush code. This Ambush code functions identically to a standardcode with the exception that it sends a silent alarm to the centralstation. This silent alarm alerts the operator to a duress situation atthe premises and prompts the immediate notification of authorities.
Refer to the System Setup section of this guide to see if your systemis programmed for Ambush. If so, do NOT program a code for usernumber 1 unless you intend to use the Ambush function.
Deleting User Codes
1. Access the User Menu.
2. Press COMMAND until USER CODES? displays.
3. Press any SELECT key. The keypad displays ADD DEL CHG .
4. Press the SELECT key under DEL to delete a user code fromthe system. You must have a user code level of 9 or have acustom user code with that authority to be able to delete a usercode.
Important : Each area must have at least one user with a level 9authority in order to be able to add or delete user codes. Be carefulnot to delete all level 9 users from an area.
5. At the USER NUMBER: - prompt, enter the user number youwant to delete and press COMMAND. The displays changes toUSER # DELETED.
6. The display then changes back to USER NUMBER: - allowingyou to delete another user. Press the ARROW key twice to exitthe User Menu.
Changing User Codes
1. Access the User Menu.
2. Press the COMMAND key until USER CODES? displays.
3. Press any SELECT key. The keypad displays ADD DEL CHG .
4. Press the SELECT key under CHG to change a user code.
5. At the USER NUMBER: - prompt, enter the user number tochange and press COMMAND.
6. The display changes to CODE NO: * * * * *. Press a SELECT keyand enter the new user code. Press COMMAND.
Note : Changing a user code does not change the user number.
7. The dispaly then shows the current user name. Press any top rowkey to clear. See the Entering Custom Names section in theAppendix to enter a new name.
8. Areas systems only - The display changes to AREAS: # # # #(# = area number). Add or remove access to one or more areasby pressing the corresponding number keys. Press COMMAND.
9. The display changes to LEVEL CUSTOM. Refer to Adding UserCodes on the previous page for a description of this prompt.
10. After entering the authority level, the keypad displays USER #CHANGED for five seconds followed by USER NUMBER: - .This display allows you to enter another user number to change.Press the ARROW key twice to exit the User Menu.
☞ Browser FeatureRefer to the Appendix at the back of this guide for a diagram showingyou how to use the built-in Delete or Change User Codes browser .
User Menu

23
23
SchedulesUser Code Level : 7 and above.
Function : The Schedules function allows you to enter into thesystem the times at which you normally turn your burglary protectionON and OFF each day of the week. Depending on your system’sprogramming, the ON time can be used to verify that the burglaryprotection is armed. Also, the schedule’s ON and OFF times can beused to automatically arm or disarm the burglary protection.
Schedules can also be used to restrict access to the system by userswith a 1 or 2 authority level assigned to their user codes.
Your system provides you with three different types of schedules:1. Permanent (PRM) , Primary (PRI) , and Secondary (SEC)
schedules occur at the same time until you change or deletethem.
2. Temporary (TEMP) schedules occur only once and then arecleared when they expire. These are typically used to allowsomeone off hours access to the premises when used with alevel 1 or 2 code.
3. Output (OUT) schedules allow you to set the times when relayoutputs connected to your system turn on and off automatically.
Setting an Arming and Disarming Schedule1. Access the User Menu and press COMMAND until
SCHEDULES? displays. Press any SELECT key.
2. The keypad displays PRM TMP OUT (or PRI SEC OUT).Press the SELECT key under PRM (or PRI). This will allow youto enter a schedule that remains in place until you change ordelete it.
3. The keypad displays SUN MON TUE WED. Press theCOMMAND key to display THU FRI SAT. Press the SELECTkey under the day you want the schedule to begin.
Note: After selecting the day of the week for the schedule to begin,the keypad displays any currently programmed Opening andClosing times previously set for that day. This feature allowsyou to review programmed schedules at any time.
4. If Opening and Closing times are displayed, the keypad thendisplays DELETE KEEP . Press the SELECT key underDELETE to enter new times.
5. The keypad then displays OPENING TIME? followed by thedisplay MON – : AM PM . Enter the new opening time andselect AM or PM.
Enter all schedule times using a 12 hour clock. For example, toenter 6 AM you would enter a 0 + 6 + 0 + 0 and press theSELECT key under AM.
The keypad then displays CLOSING TIME? followed by thedisplay MON – : AM PM . Enter the new closing time andselect AM or PM. Press the SELECT key under the day MON(whichever day is displayed) allows you to scroll through thedays of the week and create a schedule window that spansmultiple days.
Note: You must enter an Opening and Closing time or the systemwill not recognize the schedule.
The new schedule is now part of your system.
6. The keypad goes back to the SUN MON TUE WED displayallowing you to enter another schedule.
7. To clear a schedule, press DELETE and then AM when theopening time is requested.
Press the ARROW key to exit the User Menu.
User Menu
SchedulesUser Code Level : 7 and above.
Function : The Schedules function allows you to enter into thesystem the times at which you normally turn your burglary protectionON and OFF each day of the week. Depending on your system’sprogramming, the ON time can be used to verify that the burglaryprotection is armed. Also, the schedule’s ON and OFF times can beused to automatically arm or disarm the burglary protection.
Schedules can also be used to restrict access to the system by userswith a 1 or 2 authority level assigned to their user codes.
Your system provides you with three different types of schedules:1. Permanent (PRM) , Primary (PRI) , and Secondary (SEC)
schedules occur at the same time until you change or deletethem.
2. Temporary (TEMP) schedules occur only once and then arecleared when they expire. These are typically used to allowsomeone off hours access to the premises when used with alevel 1 or 2 code.
3. Output (OUT) schedules allow you to set the times when relayoutputs connected to your system turn on and off automatically.
Setting an Arming and Disarming Schedule1. Access the User Menu and press COMMAND until
SCHEDULES? displays. Press any SELECT key.
2. The keypad displays PRM TMP OUT (or PRI SEC OUT).Press the SELECT key under PRM (or PRI). This will allow youto enter a schedule that remains in place until you change ordelete it.
3. The keypad displays SUN MON TUE WED. Press theCOMMAND key to display THU FRI SAT. Press the SELECTkey under the day you want the schedule to begin.
Note: After selecting the day of the week for the schedule to begin,the keypad displays any currently programmed Opening andClosing times previously set for that day. This feature allowsyou to review programmed schedules at any time.
4. If Opening and Closing times are displayed, the keypad thendisplays DELETE KEEP . Press the SELECT key underDELETE to enter new times.
5. The keypad then displays OPENING TIME? followed by thedisplay MON – : AM PM . Enter the new opening time andselect AM or PM.
Enter all schedule times using a 12 hour clock. For example, toenter 6 AM you would enter a 0 + 6 + 0 + 0 and press theSELECT key under AM.
The keypad then displays CLOSING TIME? followed by thedisplay MON – : AM PM . Enter the new closing time andselect AM or PM. Pressing the SELECT key under the day MON(whichever day is displayed) allows you to scroll through thedays of the week and create a schedule window that spansmultiple days.
Note: You must enter an Opening and Closing time or the systemwill not recognize the schedule.
The new schedule is now part of your system.
6. The keypad goes back to the SUN MON TUE WED displayallowing you to enter another schedule.
7. To clear a schedule, press DELETE and then AM when theopening time is requested.
Press the ARROW key to exit the User Menu.
User Menu

24
24
User Menu
Schedules continued
Area SchedulesYour system may be programmed for Area schedules that allowsyou to set a separate schedule for each area of the system. If so,after selecting the schedule type (PRM, PRI, SEC, or TMP) thekeypad displays AREA NO: – . Enter the number of the area youwant to enter schedules. Press COMMAND to continue.
You can also press either of the two left SELECT keys to browsethrough a list of the areas. Press COMMAND when the area nameyou want is displayed.
All/Perimeter or Home/Away systems: Your system may beprogrammed for Area schedules that allows you to set a separateschedule for just the perimeter or interior of the system. If so, afterselecting the schedule type (PRM, PRI, SEC, or TMP) the keypaddisplays INT PERIM. Press the SELECT key under INT to programa schedule for just the interior of your system. Press the SELECTkey under PERIM to program a schedule for just the perimeter.
Extending SchedulesUser Code Level: 6 and above.
Depending on your system’s programming, when the scheduleexpires (the ON time) you can extend the schedule to a later time.The keypad buzzer sounds and the keypad displays “area name”and LATE or CLOSING TIME! . This reminds users still on thepremises to arm the system or extend the schedule.
To extend the system’s schedule:
1. Press any SELECT key and the keypad will display ENTERCODE:-.
2. Enter your code and press COMMAND. The system’s scheduleis automatically extended one hour.
3. The keypad then displays -: AM PM . You can enter a time toextend the schedule for greater than one hour. Press AM or PM.
Note: If the system is not armed, or the schedule extended, areport is sent to the central station.
User Menu
Schedules continued
Area SchedulesYour system may be programmed for Area schedules that allowsyou to set a separate schedule for each area of the system. If so,after selecting the schedule type (PRM, PRI, SEC, or TMP) thekeypad displays AREA NO: – . Enter the number of the area youwant to enter schedules. Press COMMAND to continue.
You can also press either of the two left SELECT keys to browsethrough a list of the areas. Press COMMAND when the area nameiyou want is displayed.
All/Perimeter or Home/Away systems: Your system may beprogrammed for Area schedules that allows you to set a separateschedule for just the perimeter or interior of the system. If so, afterselecting the schedule type (PRM, PRI, SEC, or TMP) the keypaddisplays INT PERIM. Press the SELECT key under INT to programa schedule for just the interior of your system. Press the SELECTkey under PERIM to program a schedule for just the perimeter.
Extending SchedulesUser Code Level: 6 and above.
Depending on your system’s programming, when the scheduleexpires (the ON time) you can extend the schedule to a later time.The keypad buzzer sounds and the keypad displays “area name”and LATE or CLOSING TIME! . This reminds users still on thepremises to arm the system or extend the schedule.
To extend the system’s schedule:
1. Press any SELECT key and the keypad will display ENTERCODE:-.
2. Enter your code and press COMMAND. The system’s scheduleis automatically extended one hour.
3. The keypad then displays -: AM PM . You can enter a time toextend the schedule for greater than one hour. Press AM or PM.
Note: If the system is not armed, or the schedule extended, areport is sent to the central station.
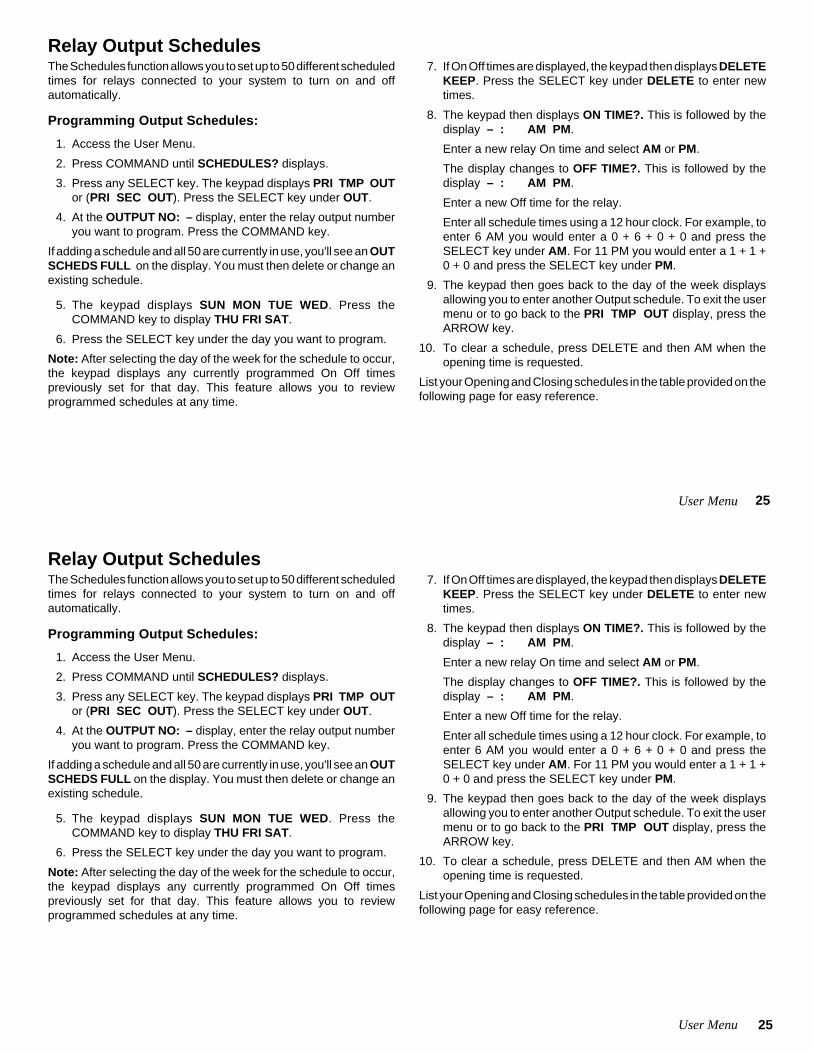
25
25
User Menu
Relay Output SchedulesThe Schedules function allows you to set up to 50 different scheduledtimes for relays connected to your system to turn on and offautomatically.
Programming Output Schedules:
1. Access the User Menu.
2. Press COMMAND until SCHEDULES? displays.
3. Press any SELECT key. The keypad displays PRI TMP OUTor (PRI SEC OUT). Press the SELECT key under OUT.
4. At the OUTPUT NO: – display, enter the relay output numberyou want to program. Press the COMMAND key.
If adding a schedule and all 50 are currently in use, you'll see an OUTSCHEDS FULL on the display. You must then delete or change anexisting schedule.
5. The keypad displays SUN MON TUE WED. Press theCOMMAND key to display THU FRI SAT.
6. Press the SELECT key under the day you want to program.
Note: After selecting the day of the week for the schedule to occur,the keypad displays any currently programmed On Off timespreviously set for that day. This feature allows you to reviewprogrammed schedules at any time.
7. If On Off times are displayed, the keypad then displays DELETEKEEP. Press the SELECT key under DELETE to enter newtimes.
8. The keypad then displays ON TIME?. This is followed by thedisplay – : AM PM .
Enter a new relay On time and select AM or PM.
The display changes to OFF TIME?. This is followed by thedisplay – : AM PM .
Enter a new Off time for the relay.
Enter all schedule times using a 12 hour clock. For example, toenter 6 AM you would enter a 0 + 6 + 0 + 0 and press theSELECT key under AM. For 11 PM you would enter a 1 + 1 +0 + 0 and press the SELECT key under PM.
9. The keypad then goes back to the day of the week displaysallowing you to enter another Output schedule. To exit the usermenu or to go back to the PRI TMP OUT display, press theARROW key.
10. To clear a schedule, press DELETE and then AM when theopening time is requested.
List your Opening and Closing schedules in the table provided on thefollowing page for easy reference.

26
26
User Menu
Area # __ , orInt or Perim
PRM - PRITMP - SEC
OpeningClosing
: _ M : _ M
: _ M : _ M
: _ M : _ M
: _ M : _ M
: _ M : _ M
: _ M : _ M
: _ M : _ M
Area # __ , orInt or Perim
PRM - PRITMP - SEC
OpeningClosing
: _ M : _ M
: _ M : _ M
: _ M : _ M
: _ M : _ M
: _ M : _ M
: _ M : _ M
: _ M : _ M
Area # __ , orInt or Perim
PRM - PRITMP - SEC
OpeningClosing
: _ M : _ M
: _ M : _ M
: _ M : _ M
: _ M : _ M
: _ M : _ M
: _ M : _ M
: _ M : _ M
Area # __ , orInt or Perim
PRM - PRITMP - SEC
OpeningClosing
: _ M : _ M
: _ M : _ M
: _ M : _ M
: _ M : _ M
: _ M : _ M
: _ M : _ M
: _ M : _ M
Area # __ , orInt or Perim
PRM - PRITMP - SEC
OpeningClosing
: _ M : _ M
: _ M : _ M
: _ M : _ M
: _ M : _ M
: _ M : _ M
: _ M : _ M
: _ M : _ M
Area # __ , orInt or Perim
PRM - PRITMP - SEC
OpeningClosing
: _ M : _ M
: _ M : _ M
: _ M : _ M
: _ M : _ M
: _ M : _ M
: _ M : _ M
: _ M : _ M
Area # __ , orInt or Perim
PRM - PRITMP - SEC
OpeningClosing
: _ M : _ M
: _ M : _ M
: _ M : _ M
: _ M : _ M
: _ M : _ M
: _ M : _ M
: _ M : _ M
Area # __ , orInt or Perim
PRM - PRITMP - SEC
OpeningClosing
: _ M : _ M
: _ M : _ M
: _ M : _ M
: _ M : _ M
: _ M : _ M
: _ M : _ M
: _ M : _ M
Output # __ Description_________
OnOff
: _ M : _ M
: _ M : _ M
: _ M : _ M
: _ M : _ M
: _ M : _ M
: _ M : _ M
: _ M : _ M
Output # __ Description_________
OnOff
: _ M : _ M
: _ M : _ M
: _ M : _ M
: _ M : _ M
: _ M : _ M
: _ M : _ M
: _ M : _ M
Output # __ Description_________
OnOff
: _ M : _ M
: _ M : _ M
: _ M : _ M
: _ M : _ M
: _ M : _ M
: _ M : _ M
: _ M : _ M
Output # __ Description_________
OnOff
: _ M : _ M
: _ M : _ M
: _ M : _ M
: _ M : _ M
: _ M : _ M
: _ M : _ M
: _ M : _ M
Output # __ Description_________
OnOff
: _ M : _ M
: _ M : _ M
: _ M : _ M
: _ M : _ M
: _ M : _ M
: _ M : _ M
: _ M : _ M
Output # __ Description_________
OnOff
: _ M : _ M
: _ M : _ M
: _ M : _ M
: _ M : _ M
: _ M : _ M
: _ M : _ M
: _ M : _ M
Out
put S
ched
ules
Arm
/Dis
arm
Sch
edul
es
Suggestion: Photocopy this page before using.
Sun Mon Tue Wed Thu Fri SatSchedules continued

27
27
Setting the Date and TimeUser Code Level : 8 and above.
Function: Allows you to change the current date and time displayedon the Security Command keypad and used by the system to logevents in its Event Memory program, and control schedules.
Setting the System’s Date and Time
1. Access the User Menu.
2. Press COMMAND until TIME? displays.
3. The keypad displays the current day and time. Press theCOMMAND key. The keypad displays the current date. Pressthe COMMAND key to make any changes.
4. The keypad displays TIME DAY DATE .
5. Press the SELECT key under TIME to change the time. Thekeypad displays – : AM PM . Enter the current time and selectAM or PM.
The display changes back to TIME DAY DATE .
6. Press the SELECT key under DAY to change the day of week.The keypad displays SUN MON TUE WED. If the current dayof the week is not displayed, press the COMMAND key.
7. The keypad displays THU FRI SAT. Press the SELECT keyunder the correct day. You can use the ARROW key to togglebetween the two day of the week displays.
User Menu
8. Press the SELECT key under DATE to change the date. Thekeypad displays
MONTH:- Enter one or two digits for the month.Press COMMAND.
DAY:- Enter up to two digits for the day.Press COMMAND.
YEAR:- Enter up to two digits for the year.Press COMMAND.
The display returns to the TIME DAY DATE display. Press theARROW key to exit the User Menu.
Note: The date and time portion of the Security Command Systemis year 2000 compliant.

28
28
Display EventsUser Code Level: 1 and 2 - During schedules only. 3 to 9 - Anytime.
Function: Allows you to review up to 200 past system events.
There are six event types:Zone Activity - Zone alarms, troubles, and restorals.Opening and Closing - Arming and disarming of the system.User Code Changes - Adding, deleting, and changing user codes.Schedule Changes - Adding, deleting, and changing schedules.Door Access - Each door access function used at a keypad.Supervisory - Problems with the system’s hardware components.
The system’s memory can hold amaximum of 200 events for 45 days.Any event older than 45 days iscleared automatically by the system.Also, once the full 200 events arestored, any new event causes theoldest event to be cleared.
Using the Display Events
1. Access the User Menu.
2. Press the COMMAND keyuntil DISPLAY EVENTS? displays. Press any SELECT key.
3. The keypad displays FRST LST PRT SRT. Select FRST(first) to view the oldest to newest events. Select LST (last) toview the newest to oldest events. If you select FIRST, use theCOMMAND key to scroll up through the events. If you selectLAST , use the ARROW key to scroll down through the events.
User Menu
Select PRT (print) to print the complete Display Events log.
Select SRT (sort) to sort through the Display Events log andcollect information specific to a user or system event.
4. To use the Sort feature, press the SELECT key under SRT. Thekeypad displays FRST DATE: 8/21 . Press any SELECT keyand enter a 4-digit beginning date for the sort. Press COMMAND.
5. The keypad displays LAST DATE: 10/17 . Press any SELECTkey and enter a 4-digit ending date for the sort. Press COMMAND.
6. The keypad displays USER NUMBER: - . To sort events for aparticular user, enter their user number or press COMMAND tosort for all users. To search for a user, press any SELECT keythen use the COMMAND and ARROW keys to browse throughthe user names in the system. When the user you want isdisplayed, press any SELECT key then press COMMAND.
7. The keypad next displays five event types that you can includein the sort. Press the right SELECT key to display YES as theevent type name is displayed on the keypad. Press COMMAND.
The following are the five sort event types:
ACCESSES = door accesses granted.DOOR NUMBER = leave blank for all doors.
ZONE EVENTS = zone alarms, troubles, and restorals.
ARM/DISARM = arming and disarming events.
USER EVENTS = adding, deleting, and changing user codes.
SUPERVISORY = system hardware problems.
8. After the last event type is displayed, the keypad again displaysFRST LST PRT SRT. At this point, you can view or print thenew sorted Display Events or press SRT for a new sort.
Display EventsUser Code Level: 1 and 2 - During schedules only. 3 to 9 - Anytime.
Function: Allows you to review up to 200 past system events.
There are six event types:Zone Activity - Zone alarms, troubles, and restorals.Opening and Closing - Arming and disarming of the system.User Code Changes - Adding, deleting, and changing user codes.Schedule Changes - Adding, deleting, and changing schedules.Door Access - Each door access function used at a keypad.Supervisory - Problems with the system’s hardware components.
The system’s memory can hold amaximum of 200 events for 45 days.Any event older than 45 days iscleared automatically by the system.Also, once the full 200 events arestored, any new event causes theoldest event to be cleared.
Using the Display Events
1. Access the User Menu.
2. Press the COMMAND keyuntil DISPLAY EVENTS? displays. Press any SELECT key.
3. The keypad displays FRST LST PRT SRT. Select FRST(first) to view the oldest to newest events. Select LST (last) toview the newest to oldest events. If you select FIRST, use theCOMMAND key to scroll up through the events. If you selectLAST , use the ARROW key to scroll down through the events.
User Menu
A B C D E F G H I J K L
V W XM N O P Q R S T U
Y Z
COMMAND9 0
1 2 3 4
5 6 7 8
POWER JONES RESIDENCEFR I 2 : 51 AM
ARROW key
SELECT keys
COMMAND key
Select PRT (print) to print the complete Display Events log.
Select SRT (sort) to sort through the Display Events log andcollect information specific to a user or system event.
4. To use the Sort feature, press the SELECT key under SRT. Thekeypad displays FRST DATE: 8/21 . Press any SELECT keyand enter a 4-digit beginning date for the sort. Press COMMAND.
5. The keypad displays LAST DATE: 10/17 . Press any SELECTkey and enter a 4-digit ending date for the sort. Press COMMAND.
6. The keypad displays USER NUMBER: - . To sort events for aparticular user, enter their user number or press COMMAND tosort for all users. To search for a user, press any SELECT keythen use the COMMAND and ARROW keys to browse throughthe user names in the system. When the user you want isdisplayed, press any SELECT key then press COMMAND.
7. The keypad next displays five event types that you can includein the sort. Press the right SELECT key to display YES as theevent type name is displayed on the keypad. Press COMMAND.
The following are the five sort event types:
ACCESSES = door accesses granted.DOOR NUMBER = leave blank for all doors.
ZONE EVENTS = zone alarms, troubles, and restorals.
ARM/DISARM = arming and disarming events.
USER EVENTS = adding, deleting, and changing user codes.
SUPERVISORY = system hardware problems.
8. After the last event type is displayed, the keypad again displaysFRST LST PRT SRT. At this point, you can view or print thenew sorted Display Events or press SRT for a new sort.
A B C D E F G H I J K L
V W XM N O P Q R S T U
Y Z
COMMAND9 0
1 2 3 4
5 6 7 8
POWER JONES RESIDENCEFR I 2 : 51 AM
ARROW key
SELECT keys
COMMAND key

29
29
About the Display Events SectionThis section of the user’s guide shows the User's Guide DisplayEvents items for both 16-character (single line) and 32-characterkeypad displays. While in the Display Events function, use theCOMMAND and ARROW keys to go forward or backward throughthe list of events.
Arming and Disarming Event DisplaysThis displays any arming or disarming of system areas.
16-Character Display Description
ARM 3 12 1017 Area 3 was armed by user 12 on Oct. 17.Press the SELECT key under 3 for thearea name, under 12 for the user name,or under 1017 for the time the armingoccurred.
32-Character Display Description
ARM 5:10P 10 / 17 The Perimeter was armed at 5:10 PM. PERIMET ER Press any Select key to display the area
number and user number then any Selectkey to display the user name.
Arming Event Types - There are 2 event type you may see here:
ARM - User armed the system DIS - User disarmed the system
Zone Event DisplaysThis section displays alarms, troubles, and other events that couldoccur on your protection zones.
16-Character Display Description
2 BURG ALR 1017 A burglary alarm occurred on zone 2.Press the right SELECT key for the timethe alarm occurred.
32-Character Display Description
ALR 10: 23P 10/17 An alarm occurred at 10:23 PM on Oct. 17.BASEMENT DOOR Press any SELECT key to see the zone
number and zone type.
Zone Type - There are 7 possible zone types you may see here.
FIRE - Fire PANC - Panic BURG - Burglary
EMRG - Emergency SUPV - Supervisory
AUX1 - Auxiliary 1 AUX2 - Auxiliary 2
Event Types - There are 6 event types you may see here:
ALR - Alarm TBL - Trouble RST - Restore
LOW - Low battery MIS - Missing wireless transmitter
Note: LOW and MIS are for wireless systems only.
User Menu
User Menu
Zone Event DisplaysThis section displays alarms, troubles, and other events that couldoccur on your protection zones.
16-Character Display Description
2 BURG ALR 1017 A burglary alarm occurred on zone 2.Press the right Select key for the time thealarm occurred.
32-Character Display Description
ALR 10: 23P 10/17 An alarm occurred at 10:23 PM on Oct. 17.BASEMENT DOOR Press any Select key to see the zone
number and zone type.
Zone Type - There are 7 possible zone types you may see here.
FIRE - Fire PANC - Panic BURG - Burglary
EMRG - Emergency SUPV - Supervisory
AUX1 - Auxiliary 1 AUX2 - Auxiliary 2
Event Types - There are 6 event type you may see here:
ALR - Alarm TBL - Trouble RST - Restore
LOW - Low battery MIS - Missing wireless transmitter
Note: LOW and MIS are for wireless systems only.
About the Display Events SectionThis section of the user’s guide shows the User's Guide DisplayEvents items for both 16-character (single line) and 32-characterkeypad displays. While in the Display Events function, use theCOMMAND and ARROW keys to go forward or backward throughthe list of events.
Arming and Disarming Event DisplaysThis displays any arming or disarming of system areas.
16-Character Display Description
ARM 3 12 1017 Area 3 was armed by user 12 on Oct. 17.Press the Select key under 3 for thearea name, under 12 for the user name,or under 1017 for the time the armingoccurred.
32-Character Display Description
ARM 5:10P 10/ 17 The Perimeter was armed at 5:10 PM. PERIMET ER Press any Select key to display the area
number and user number then anySelect key to display the user name.
Arming Event Types - There are 2 event type you may see here:
ARM - User armed the system DIS - User disarmed the system

30
30
User Code Change Event DisplaysThis displays any addition, deletion, or change to a user code.
16-Character Display Description
12 ADD 19 1017 User 12 added user 19 on Oct. 17. Pressthe right SELECT key for the time thisoccurred.
32-Character Display Description
ADD 11: 41A 10 / 17 User 19 added by user 12 at 11:41 AM.US:19 BY US:12 Press the Select key under either user
(US:) number for the user name.
User Code Event Types - There are 3 event types you may see here:
ADD - User added DEL - User deletedCHG - User code or authority level has been changed.
Supervisory Event DisplaysThis displays the date and time of an automatic test report.
16-Character Display Description
AUTO RECALL 1017 The test report was sent on Oct. 17.
32-Character Display Description
MSG 11: 58P 10 / 17 The test report was sent to the centralAUTO RECALL station at the date and time shown.
System Monitor Event DisplaysThis displays any problems with the system's AC power, battery, orphone line(s) or any opening of a tampered panel box.
16-Character Display Description
POWER TBL 1017 An AC failure occurred on Oct. 17. Pressthe SELECT key under 1017 for the time.
32-Character Display Description
TBL 11:41A 10/17 An AC failure occurred on Oct. 17. PressPOWER the SELECT key under 1017 for the time
the failure occurred.
System Monitor Event Types - There are 2 event types:
TBL - Trouble RST - RestoreSystem Monitor Event Names - There are 5 system monitors:
POWER - AC power to panel BATTERY - On panel
LINE 1 - Phone line number 1
LINE 2 - Phone line number 2 TAMPER - On panel box
User Menu
User Menu
System Monitor Event DisplaysThis displays any problems with the system's AC power, battery, orphone line(s) or any opening of a tampered panel box.
16-Character Display Description
POWER TBL 1017 An AC failure occurred on Oct. 17. Pressthe Select key under 1017 for the time.
32-Character Display Description
TBL 11:41A 10/17 An AC failure occurred on Oct. 17. PressPOWER the Select key under 1017 for the time
the failure occurred.
System Monitor Event Types - There are 2 event types:
TBL - Trouble RST - RestoreSystem Monitor Event Names - There are 5 system monitors:
POWER - AC power to panel BATTERY - On panel
LINE 1 - Phone line number 1
LINE 2 - Phone line number 2 TAMPER - On panel box
User Code Change Event DisplaysThis displays any addition, deletion, or change to a user code.
16-Character Display Description
12 ADD 19 1017 User 12 added user 19 on Oct. 17.Press the right Select key for the timethis occurred.
32-Character Display Description
ADD 11: 41A 10 / 17 User 19 added by user 12 at 11:41 AM.US:19 BY US:12 Press the Select key under either user
(US:) number for the user name.
User Code Event Types - There are 3 event type you may see here:
ADD - User added DEL - User deletedCHG - User code or authority level has been changed.
Supervisory Event DisplaysThis displays the date and time of an automatic test report.
16-Character Display Description
AUTO RECALL 1017 The test report was sent on Oct. 17.
32-Character Display Description
MSG 11: 58P 10 / 17 The test report was sent to the centralAUTO RECALL station at the date and time shown.

31
31
Door Access Event DisplaysThis displays the keypad address where a *Door Access occurredand the user number of the person granted access.
16-Character Display Description
DOOR 3 024 1017 Door (keypad) #3 was accessed byuser 24 on Oct. 17. Press the SELECTkey under 1017 for the time of occurrenceor under 024 for the user name.
32-Character Display Description
ACC 5:18P 10/17 Door (keypad) #3 was accessed byDOOR 3 USER:024 user 24 on Oct. 17. Press the SELECT
key under 1017 for the time of occurrenceor under 024 for the user name.
About Door AccessDoor Access is a feature available only on certain Security Commandkeypads that contain a built-in door releasing relay. When lowvoltage power for an electric door strike or magnetic lock is connectedto the relay’s contacts, users entering a valid user code can releasethe lock and gain access to the protected area.
The Display Events feature logs the user number and name of theperson granted access, the date and time, and from which keypadthey entered their code.
Schedule Change Event DisplaysThis displays Changes made to the system’s schedules.
16-Character Display Description
PRM MON 024 1017 A Permanent schedule for Monday waschanged by user 24 on Oct. 17. Pressthe SELECT key under 1017 for thetime of occurrence or under 024 for theuser name.
32-Character Display Description
PRM 9:41A 10/17 A Permanent schedule for Monday wasSCH MON USER:024 changed by user 24 on Oct. 17.
Schedule Types - There are 4 possible schedule types:
PRM - Permanent TMP - Temporary PRI - Primary
SEC - Secondary
MON - This is the day of the week in which the schedule changeoccurred. The days are displayed using three letters. Press theSELECT key under the day of the week to display the scheduledOpening time and once again for the scheduled Closing time.
024 - User number of the person who made the change. Press theSELECT key under this number to display the user's name.
User Menu
Door Access Event DisplaysThis displays the keypad address where a *Door Access occurredand the user number of the person granted access.
16-Character Display Description
DOOR 3 024 1017 Door (keypad) #3 was accessed byuser 24 on Oct. 17. Press the Select keyunder 1017 for the time of occurrence orunder 024 for the user name.
32-Character Display Description
ACC 5:18P 10/17 Door (keypad) #3 was accessed byDOOR 3 USER:024 user 24 on Oct. 17. Press the Select key
under 1017 for the time of occurrence orunder 024 for the user name.
About Door AccessDoor Access is a feature available only on certain Security Commandkeypads that contain a built-in door releasing relay. When lowvoltage power for an electric door strike or magnetic lock is connectedto the relay’s contacts, only users entering a valid user code canrelease the lock and gain access to the protected area.
The Display Events feature logs the user number and name of theperson granted access, the date and time, and from which keypadthey entered their code.
User Menu
Schedule Change Event DisplaysThis displays Changes made to the system’s schedules.
16-Character Display Description
PRM MON 024 1017 A Permanent schedule for Monday waschanged by user 24 on Oct. 17. Pressthe Select key under 1017 for the time ofoccurrence or under 024 for the username.
32-Character Display Description
PRM 9:41A 10/17 A Permanent schedule for Monday wasSCH MON USER:024 changed by user 24 on Oct. 17.
Schedule Types - There are 4 possible schedule types:
PRM - Permanent TMP - Temporary PRI - Primary
SEC - Secondary
MON - This is the day of the week in which the schedule changeoccurred. The days are displayed using three letters. Press theSELECT key under the day of the week to display the scheduledOpening time and once again for the scheduled Closing time.
024 - User number of the person who made the change. Press theSELECT key under this number to display the user's name.
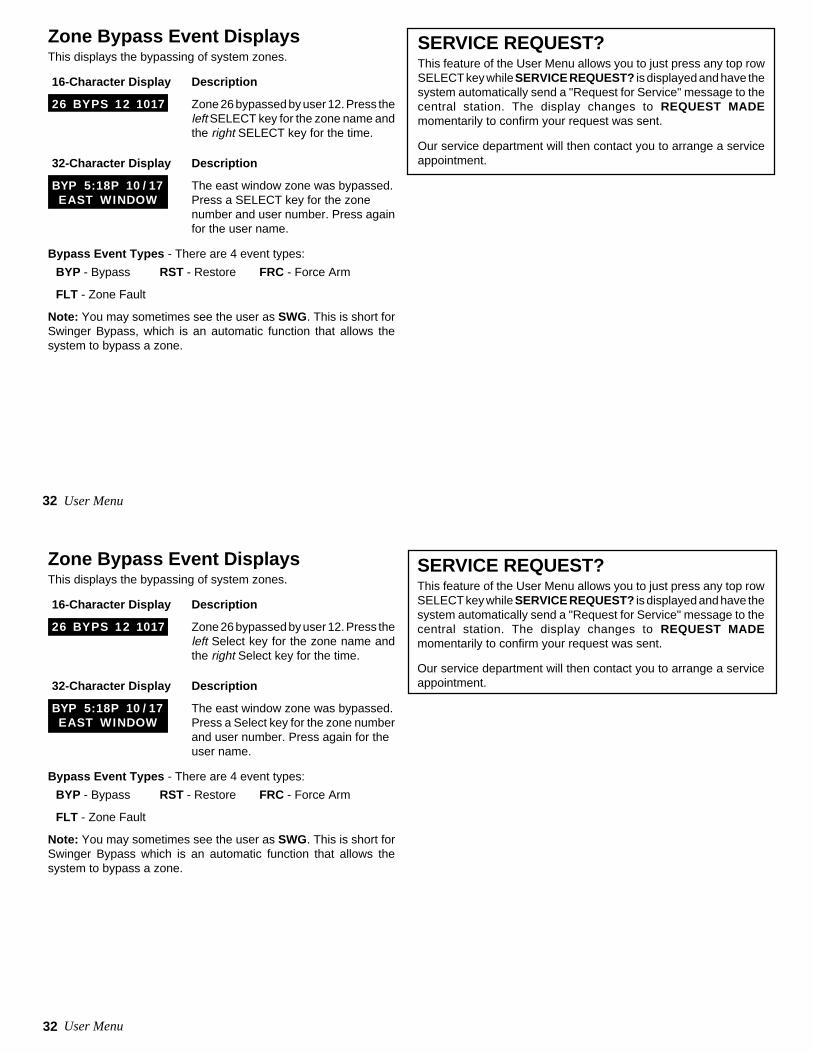
32
32
Zone Bypass Event DisplaysThis displays the bypassing of system zones.
16-Character Display Description
26 BYPS 12 1017 Zone 26 bypassed by user 12. Press theleft SELECT key for the zone name andthe right SELECT key for the time.
32-Character Display Description
BYP 5:18P 10 / 17 The east window zone was bypassed. EAST WINDOW Press a SELECT key for the zone
number and user number. Press againfor the user name.
Bypass Event Types - There are 4 event types:
BYP - Bypass RST - Restore FRC - Force Arm
FLT - Zone Fault
Note: You may sometimes see the user as SWG. This is short forSwinger Bypass, which is an automatic function that allows thesystem to bypass a zone.
User Menu
SERVICE REQUEST?This feature of the User Menu allows you to just press any top rowSELECT key while SERVICE REQUEST? is displayed and have thesystem automatically send a "Request for Service" message to thecentral station. The display changes to REQUEST MADEmomentarily to confirm your request was sent.
Our service department will then contact you to arrange a serviceappointment.
User Menu
Zone Bypass Event DisplaysThis displays the bypassing of system zones.
16-Character Display Description
26 BYPS 12 1017 Zone 26 bypassed by user 12. Press theleft Select key for the zone name andthe right Select key for the time.
32-Character Display Description
BYP 5:18P 10 / 17 The east window zone was bypassed. EAST WINDOW Press a Select key for the zone number
and user number. Press again for theuser name.
Bypass Event Types - There are 4 event types:
BYP - Bypass RST - Restore FRC - Force Arm
FLT - Zone Fault
Note: You may sometimes see the user as SWG. This is short forSwinger Bypass which is an automatic function that allows thesystem to bypass a zone.
SERVICE REQUEST?This feature of the User Menu allows you to just press any top rowSELECT key while SERVICE REQUEST? is displayed and have thesystem automatically send a "Request for Service" message to thecentral station. The display changes to REQUEST MADEmomentarily to confirm your request was sent.
Our service department will then contact you to arrange a serviceappointment.

33
33
System SetupWe've provided this System Setup section to allow you to track thecurrent and future status of the programmable options on yourSecurity Command system. If you make changes to the system, youshould update the information contained on these pages.
Your system is monitored by a central station.❏ Yes ❏ No
C/S Name:
Address:
City/State:
Emergency Phone:
Service Phone:
Service Manager:
Your system sends Opening and Closing reports.❏ Yes ❏ No
Your system sends Zone Bypass reports.❏ Yes ❏ No
Your system sends Ambush reports.❏ Yes ❏ No
Security Command keypadsAddress Locations
1
2
3
4
5
6
7
8
Which keypads display System Status?❏ 1 ❏ 2 ❏ 3 ❏ 4 ❏ 5 ❏ 6 ❏ 7 ❏ 8 ❏ N/A
Which keypads display Armed Status?❏ 1 ❏ 2 ❏ 3 ❏ 4 ❏ 5 ❏ 6 ❏ 7 ❏ 8 ❏ N/A
Which keypads provide Door Access reports?❏ 1 ❏ 2 ❏ 3 ❏ 4 ❏ 5 ❏ 6 ❏ 7 ❏ 8 ❏ N/A
System Setup
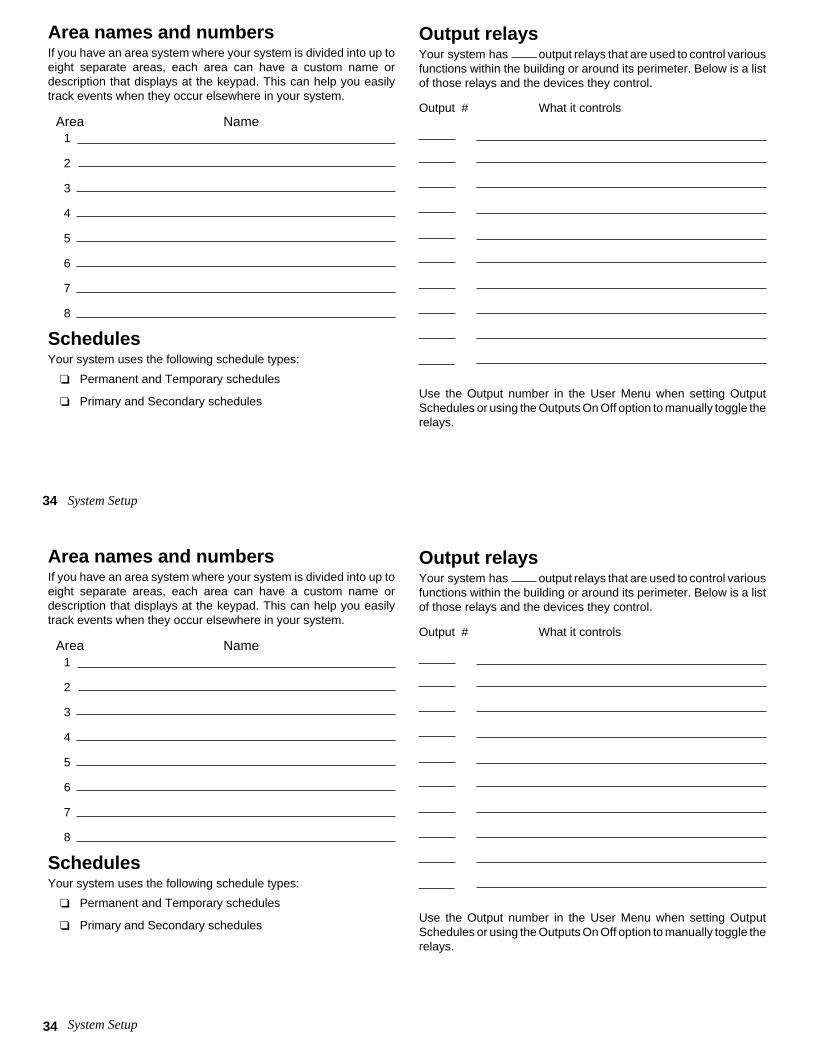
34
34
Area names and numbersIf you have an area system where your system is divided into up toeight separate areas, each area can have a custom name ordescription that displays at the keypad. This can help you easilytrack events when they occur elsewhere in your system.
Area Name1
2
3
4
5
6
7
8
SchedulesYour system uses the following schedule types:
❏ Permanent and Temporary schedules
❏ Primary and Secondary schedules
System Setup
Output relaysYour system has output relays that are used to control variousfunctions within the building or around its perimeter. Below is a listof those relays and the devices they control.
Output # What it controls
Use the Output number in the User Menu when setting OutputSchedules or using the Outputs On Off option to manually toggle therelays.

35
35
LEVEL CUSTOM
ARM/DIS YES
ARM/DIS NO
COMMAND
= press this SELECT key.)(
Press the COMMAND key to display the next menu option.
Use the following table to track custom user codes in your system.
User Name
User #
Arm and Disarm
Alarm Silence
Sensor Reset
Door Access
Arm Areas
Outputs on/off
Zone Status
Bypass Zones
Zone Monitor
System Status
System Test
User Codes
Schedules
Time
Display Events
Extend Closing
Temporary Code
Area 1
Area 2
Area 3
Area 4
Area 5
Area 6
Area 7
Area 8
Suggestion: Photocopy this table before using. System Setup
User CodesDepending on how your system is programmed, you may have 50to 200 user codes available. As you add new users or changecurrent users' codes, you can keep track of their level of access tothe system, and the areas in which their codes will operate.
Custom user codesWhen adding codes to the system through the User Menu, you canchoose the CUSTOM option to select the specific menu items youwant the user to access.
After adding the code into the keypad you'll see the LEVEL CUSTOMdisplay. Choosing CUSTOM displays the full list of keypad menuoptions one at a time. A YES next to the option means it is enabledfor the user. To disable the option, press the second SELECT keyfrom the right to display NO. See below:

36
36
Suggestion: Photocopy this page before using.
User User Name Level Areas of access
1 2 3 4 5 6 7 81 2 3 4 5 6 7 81 2 3 4 5 6 7 81 2 3 4 5 6 7 81 2 3 4 5 6 7 81 2 3 4 5 6 7 81 2 3 4 5 6 7 81 2 3 4 5 6 7 81 2 3 4 5 6 7 81 2 3 4 5 6 7 81 2 3 4 5 6 7 81 2 3 4 5 6 7 81 2 3 4 5 6 7 81 2 3 4 5 6 7 81 2 3 4 5 6 7 81 2 3 4 5 6 7 81 2 3 4 5 6 7 81 2 3 4 5 6 7 81 2 3 4 5 6 7 81 2 3 4 5 6 7 81 2 3 4 5 6 7 81 2 3 4 5 6 7 81 2 3 4 5 6 7 81 2 3 4 5 6 7 81 2 3 4 5 6 7 8
System Setup
Standard User CodesYou can program user numbers from 1 to (50, 100, or 200).
Use the tables provided below to track users of the system.
37
37
System Setup
Frequently asked questionsThis section of the user's guide attempts to answer questions youmight have regarding the operation of your Security Commandsystem.
Q. If I bypass an exit delay door when I arm the system, will I get analarm if I come through it later?
A. You won't get an alarm from the door because it's bypassed butif you also walk through a motion detector or other armed door insidethe premises you will get an alarm.
Q. When I arm or disarm my Area system, I get ALL? NO YESdisplayed. Does this mean all areas in the system?
A. Choosing YES arms or disarms all areas that are authorized foryour user code.
Q. How do I create a schedule that starts at 8:00 am on Monday andends at 5:00 PM on Friday.
A. In the days of the week display, select MON (Monday). For theOPENING TIME?, enter 0 + 8 + 0 + 0 AM. For the CLOSING TIME? ,at the MON — : AM PM display press the SELECT key under MON;this scrolls through the days of the week. Stop at the day you wantthe schedule to end. Next, enter 0 + 5 + 0 + 0 PM into the FRI — :AM PM closing time display. Press COMMAND. Press the ARROWkey to exit the User Menu.
This sets the opening time to 8:00 am Monday and the closing timeto 5:00 PM Friday. You can substitute any other day or time in thisexample.
Q. What do I do if I want to be in the building past the scheduledclosing (arming) time?
A. If your system is programmed for Closing Check, the keypademits a steady tone after the schedule expires and displays “areaname” LATE or CLOSING TIME! . During this display, pressing anySELECT key displays ENTER CODE: . Enter your user code andpress COMMAND. Your schedule is automatically extended onehour.
The keypad now displays — : AM PM . Enter in the new time youwant the schedule to expire and press COMMAND.
The time you enter may extend past midnight by pressing the AMkey after the appropriate time has been entered.

38
38
Zone Status BrowserStart Here
Appendix
Zone Status BrowserStart Here
Appendix
ZONE STATUS?
ARM BYPS ALR NBR
ZONE NO: –
SELECT ZONE . . .
COMMAND
Access the User Menu. PressCOMMAND until ZONESTATUS appears.
Press any SELECT key thenpress the SELECT key underNBR.
SELECT AREA . . .
COMMAND
FRONT OFFICE
COMMAND
24 HOUR ZONES
COMMAND
Press one of the left twoSELECT keys to browsethrough the names of zones.
When the area where the zone islocated is displayed, press anySELECT key.
This prompt allows you to searchfor a zone by area. Press theCOMMAND key to scroll throughthe list of areas.
After all the areas aredisplayed, the system allowsyou to search through the 24hour zones (Fire, Panic,Supervisory, etc.).
Press the COMMAND key to scrollthrough the list of all zone names.
EAST DOORWhen the correct zone name isdisplayed, press any SELECT key.
ZONE NO : 0 1 2Verify the zone number matchesthe previously shown name.
COMMAND
COMMAND
EAST DOOR – OKAYThe system displays one of thesezone status messages:
–OKAY = the zone is normal–BYPAS = the zone is bypassed–BAD O = the zone is open–BAD S = the zone is shorted
Press COMMAND.
SELECT ZONE . . .
COMMAND
HALL SMOKE
ZONE NO : 0 3 4
COMMAND
COMMAND
HALL SMOKE –OKAY
Press COMMAND.
When the correct zone name isdisplayed, press any SELECT key.
Verify the zone number matchesthe previously shown name.
Pressing COMMANDallows you to enteranother zone number.
The system displays one of thesezone status messages:
–OKAY = the zone is normal–BYPAS = the zone is bypassed–BAD O = the zone is open–BAD S = the zone is shorted
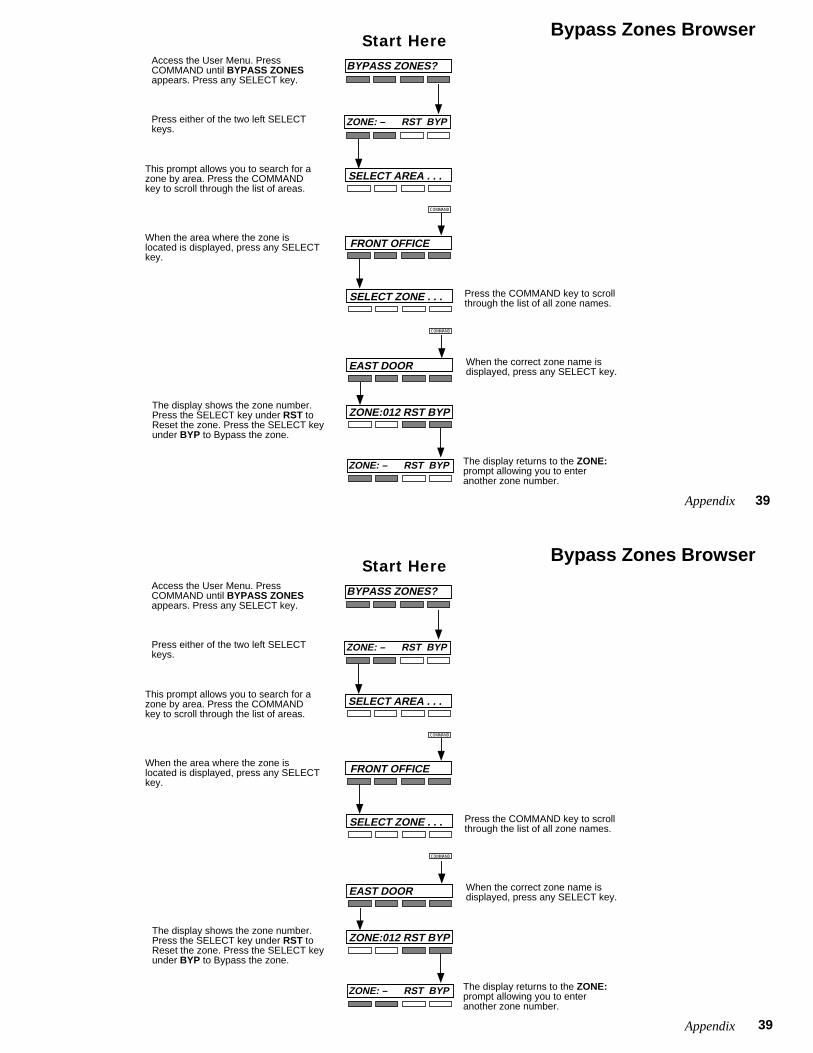
39
39
BYPASS ZONES?
ZONE: – RST BYP
SELECT ZONE . . .
COMMAND
Access the User Menu. PressCOMMAND until BYPASS ZONESappears. Press any SELECT key.
Press either of the two left SELECTkeys.
SELECT AREA . . .
COMMAND
FRONT OFFICEWhen the area where the zone islocated is displayed, press any SELECTkey.
This prompt allows you to search for azone by area. Press the COMMANDkey to scroll through the list of areas.
Press the COMMAND key to scrollthrough the list of all zone names.
EAST DOOR When the correct zone name isdisplayed, press any SELECT key.
ZONE:012 RST BYPThe display shows the zone number.Press the SELECT key under RST toReset the zone. Press the SELECT keyunder BYP to Bypass the zone.
ZONE: – RST BYP The display returns to the ZONE:prompt allowing you to enteranother zone number.
Start HereBypass Zones Browser
Appendix

40
40
Zone Monitor Browser
Appendix
SELECT ZONE . . .
COMMAND
Access the User Menu. PressCOMMAND until ZONE MONITOR?displays. Press any SELECT key.
Press the SELECT key under NBR.
COMMAND
FRONT OFFICEWhen the area where the zone islocated is displayed, press any SELECTkey.
Press either of the two left SELECT keys.
Press the COMMAND key to scrollthrough the list of all zone names.
EAST DOOR When the correct zone name isdisplayed, press any SELECT key.
ZONE:012 ADD RMVThe display shows the zone number.
ZONE MONITOR?
ALL NBR
ZONE: – ADD RMV
Selecting ADDputs the zone inthe monitor mode.
Selecting RMV removesthe zone from the monitormode.
SELECT AREA . . . This prompt allows you to search for azone by area. Press the COMMAND keyto scroll through the list of areas.
Start Here
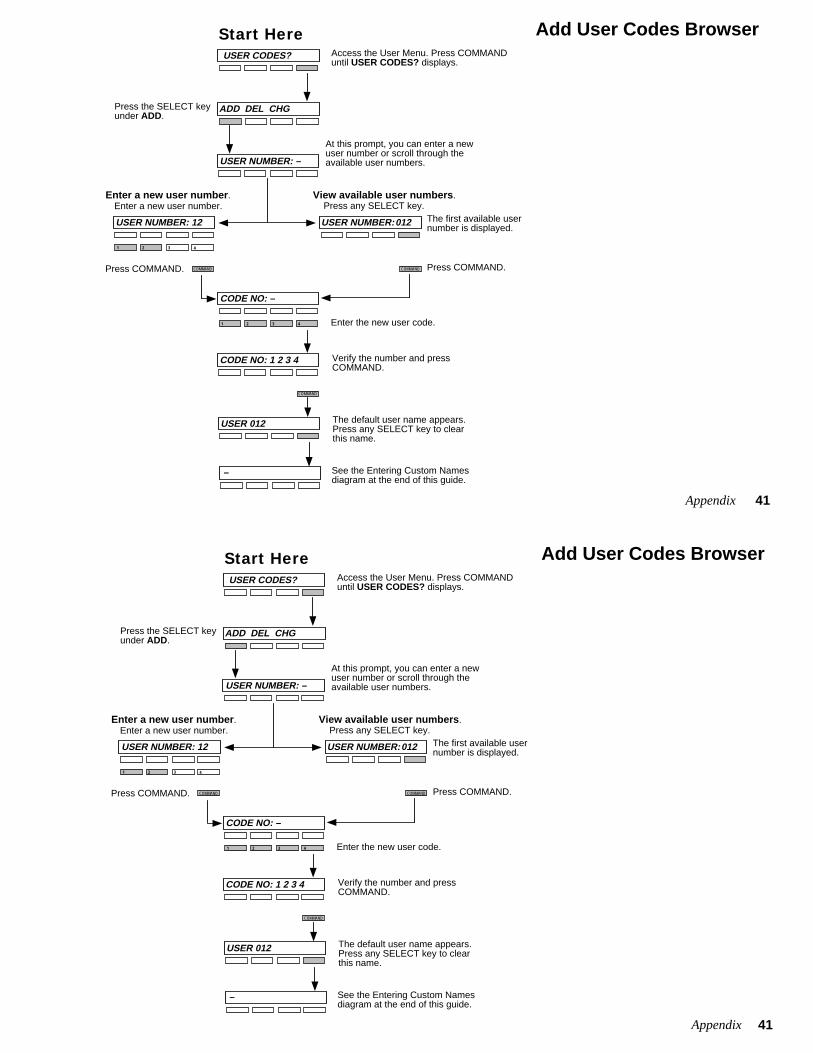
41
41
Add User Codes Browser
Appendix
Start HereUSER CODES?
ADD DEL CHG
USER NUMBER: –
1 2 43
USER NUMBER: 012
COMMAND
CODE NO: 1 2 3 4
Access the User Menu. Press COMMANDuntil USER CODES? displays.
Press the SELECT keyunder ADD.
At this prompt, you can enter a newuser number or scroll through theavailable user numbers.
Enter a new user number.Enter a new user number.
View available user numbers.Press any SELECT key.
COMMAND
CODE NO: –
1 2 43
Press COMMAND.Press COMMAND.
Enter the new user code.
Verify the number and pressCOMMAND.
The first available usernumber is displayed.
USER 012 The default user name appears.Press any SELECT key to clearthis name.
COMMAND
– See the Entering Custom Namesdiagram at the end of this guide.
USER NUMBER: 12

42
42
Delete User Codes Browser
Appendix
USER CODES?
ADD DEL CHG
USER NUMBER: –
1 2 43
MIKE JONES
COMMAND
Access the User Menu. Pressthe COMMAND key until USERCODES? displays.
Press the SELECT keyunder DEL.
At this prompt, you can enter a usernumber or scroll through the list ofuser names.
Enter a user number.View current user names.
Press any SELECT key.
COMMAND
USER 12 DELETED
Press COMMAND.Press COMMAND.
USER NUMBER: 013
The first available username is displayed.
USER NUMBER: 12
KATIE SMITH The next available username is displayed.
If this is the user youwant to delete, pressany SELECT key.
Verify the user number.
COMMAND
USER 13 DELETED
Press COMMAND.
Start Here

43
43
Appendix
Change User Codes BrowserStart HereUSER CODES?
ADD DEL CHG
USER NUMBER: –
1 2 43
MIKE JONES
COMMAND
Access the User Menu. PressCOMMAND until USER CODES?displays.
Press the SELECT keyunder CHG.
At this prompt, you can enter a usernumber or scroll through the list ofuser names
Enter a user number.View current user names.
Press any SELECT key.
COMMAND
CODE NO: * * * * *
Press COMMAND.Press COMMAND.
USER NUMBER: 013
The first available username is displayed.
USER NUMBER: 12
KATIE SMITH The next available username is displayed.
If this is the user youwant to change, pressany SELECT key.
Verify the user number.
COMMAND Press COMMAND.
CODE NO:
Press any SELECT key toclear the present code.
1 2 43
COMMANDEnter a new code andpress COMMAND.
Follow the prompts to complete the codechange. You can also press any SELECT keyhere to clear a custom user name and use thedata entry keys to enter a new user name.
KATIE SMITH

44
44
Appendix
Entering Custom Names– Once you've cleared the default
name, the display shows just adash on the left side.
To enter a custom name intothe keypad, you'll be usingthe 3 rows of number keys.
To enter a custom name, pressthe number key above the letteryou want to enter.
Under each numberkey are three letters.
1 2 43
5 6 87
9 0 COMMAND
{
1A B C
1
A B C
1
2
Once the letter you want isdisplayed, press the number keyabove the next letter you want toenter.
You can enter up to 16 charactersfor each name into the keypad.
A
1 2 43
5 6 87
9 0 COMMAND
3
4
9
The nine and zero keys . . .
Y Z (space)
Pressing the 9 key provides youwith Y, Z, and a space that youcan use between names. Forexample: BOB S MI T H.
0
– .Pressing the 0 (zero) key providesyou with a (dash), (period),(asterisk), and a (pound sign).
* #
With the number displayed, pressthe SELECT key that matches theposition of the letter. See example.
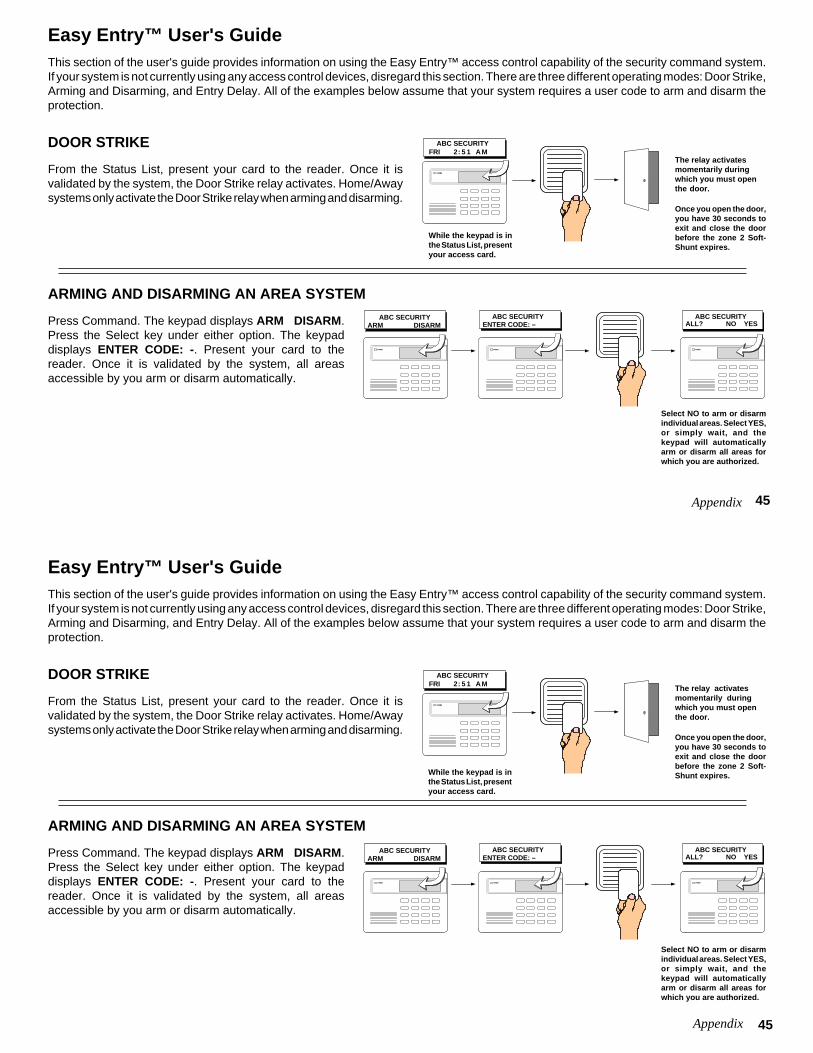
45
45
The relay activatesmomentarily duringwhich you must openthe door.
Once you open the door,you have 30 seconds toexit and close the doorbefore the zone 2 Soft-Shunt expires.
Easy Entry™ User's GuideThis section of the user's guide provides information on using the Easy Entry™ access control capability of the security command system.If your system is not currently using any access control devices, disregard this section. There are three different operating modes: Door Strike,Arming and Disarming, and Entry Delay. All of the examples below assume that your system requires a user code to arm and disarm theprotection.
DOOR STRIKE
From the Status List, present your card to the reader. Once it isvalidated by the system, the Door Strike relay activates. Home/Awaysystems only activate the Door Strike relay when arming and disarming.
Select NO to arm or disarmindividual areas. Select YES,or simply wait, and thekeypad will automaticallyarm or disarm all areas forwhich you are authorized.
ARMING AND DISARMING AN AREA SYSTEM
Press Command. The keypad displays ARM DISARM .Press the Select key under either option. The keypaddisplays ENTER CODE: -. Present your card to thereader. Once it is validated by the system, all areasaccessible by you arm or disarm automatically.
Appendix
Appendix
The relay activatesmomentarily duringwhich you must openthe door.
Once you open the door,you have 30 seconds toexit and close the doorbefore the zone 2 Soft-Shunt expires.
Easy Entry™ User's GuideThis section of the user's guide provides information on using the Easy Entry™ access control capability of the security command system.If your system is not currently using any access control devices, disregard this section. There are three different operating modes: Door Strike,Arming and Disarming, and Entry Delay. All of the examples below assume that your system requires a user code to arm and disarm theprotection.
DOOR STRIKE
From the Status List, present your card to the reader. Once it isvalidated by the system, the Door Strike relay activates. Home/Awaysystems only activate the Door Strike relay when arming and disarming.
Select NO to arm or disarmindividual areas. Select YES,or simply wait, and thekeypad will automaticallyarm or disarm all areas forwhich you are authorized.
ARMING AND DISARMING AN AREA SYSTEM
Press Command. The keypad displays ARM DISARM .Press the Select key under either option. The keypaddisplays ENTER CODE: -. Present your card to thereader. Once it is validated by the system, all areasaccessible by you arm or disarm automatically.
ABC SECURITYFRI 2: 5 1 AM
POWER
While the keypad is inthe Status List, presentyour access card.
ABC SECURITYARM DISARM
ABC SECURITYENTER CODE: –
ABC SECURITYALL? NO YES
POWER POWER POWER
ABC SECURITYFRI 2: 5 1 AM
POWER
While the keypad is inthe Status List, presentyour access card.
ABC SECURITYARM DISARM
ABC SECURITYENTER CODE: –
ABC SECURITYALL? NO YES
POWER POWER POWER

46
46
ARMING AND DISARMING AN ALL/PERIMETER SYSTEM
Press Command. The keypad displays PERIM ALL (when arming) or DISARM? .Press the Select key under the option. The keypad displays ENTER CODE: -.
Present your card to the reader. Once it is validated by the system, both areas armor disarm automatically and the Door Strike relay activates.
ARMING AND DISARMING A HOME/AWAY SYSTEM
Home/Away system Arming and Disarming - Present your card to the reader. If the systemis armed, once the card is validated all areas are disarmed.
If the system is disarmed when you present your card, once it is validated all areas are armedin the AWAY mode.
The system arms ordisarms the areasand activates theDoor Strike relay.
ENTRY DELAYOnce the protected door is opened and the entry delay starts, thekeypad displays ENTER CODE: -. Present your card to the reader and,once it is validated, the system disarms all areas accessible by you.Area systems provide a delay to allow selected areas only to bedisarmed. See Arming and Disarming above.
Using the access reader for user menu accessYou can also use a card reader to access the User Menu when theMENU? NO YES display is shown, and a code is requested.
The system disarms the areas and activates the DoorStrike relay. Area systems allow a delay for you toselect only certain areas. See Arming and Disarming.
Appendix
Appendix
ARMING AND DISARMING AN ALL/PERIMETER SYSTEM
Press Command. The keypad displays PERIM ALL (when arming) or DISARM? .Press the Select key under the option. The keypad displays ENTER CODE: -.
Present your card to the reader. Once it is validated by the system, both areas armor disarm automatically and the Door Strike relay activates.
ARMING AND DISARMING A HOME/AWAY SYSTEM
Home/Away system Arming and Disarming - Present your card to the reader. If the systemis armed, once the card is validated all areas are disarmed.
If the system is disarmed when you present your card, once it is validated all areas are armedin the AWAY mode.
The system arms ordisarms the areasand activates theDoor Strike relay.
ENTRY DELAYOnce the protected door is opened and the entry delay starts, the keypaddisplays ENTER CODE: -. Present your card to the reader and, once itis validated, the system disarms all areas accessible by you. Areasystems provide a delay to allow selected areas only to be disarmed. SeeArming and Disarming above.
Using the access reader for user menu accessYou can also use a card reader to access the User Menu when theMENU? NO YES display is shown, and a code is requested.
The system disarms the areas and activates the DoorStrike relay. Area systems allow a delay for you toselect only certain areas. See Arming and Disarming.
POWER
ABC SECURITY
ENTER CODE: -
Access door isopened.
POWER
PERIM ALL
DISARM?or
POWER
ABC SECURITYFRI 2: 5 1 AM
POWER
POWER
ABC SECURITY
ENTER CODE: -
Access door isopened.
POWER
ABC SECURITYFRI 2: 5 1 AM
POWER
PERIM ALL
DISARM?or
POWER

47
47
Pager Direct™
Security Command Alphanumeric Paging
Area Names
Security Command Numeric Paging
Area Names
Pager Direct™ User's GuidePager Direct uses the reporting capability of your security system to dial your pager number and send reports in much the same way assomeone sending you a pager message would do. You can receive reports of alarms, troubles, or armings and disarmings of the systemand know at a glance the status of your system.
Appendix
Appendix
Cut along dotted lines Cut along dotted lines
Fold○ ○ ○ ○ ○ ○ ○ ○ ○ ○ ○ ○ ○ ○ ○ ○ ○ ○ ○ ○ ○ ○ ○ ○ ○ ○ ○ ○ ○ ○ ○ ○ ○ ○ ○ ○ ○ ○ ○ ○ ○ ○ ○ ○ ○ ○ ○ ○ ○ ○ ○ ○ ○ ○ ○ ○ ○ ○ ○ ○ ○ ○ ○ ○ ○ ○ ○ ○ ○ ○
Pager Direct™
Security Command Alphanumeric Paging
Area Names
Pager Direct™
Security Command Numeric Paging
Area Names
Pager Direct™ User's GuidePager Direct uses the reporting capability of your security system to dial your pager number and send reports in much the same way assomeone sending you a pager message would do. You can receive reports of alarms, troubles, or armings and disarmings of the systemand know at a glance the status of your system.
List your system's area names and numbers below:
Area Name Area Name
1 _______________________ 3 ______________________
2 _______________________ 4 ______________________
Service Department Phone: ______________________
Emergency Phone: _____________________________
Central Station Phone: ____________________________
Cut along dotted lines Cut along dotted lines
Fold○ ○ ○ ○ ○ ○ ○ ○ ○ ○ ○ ○ ○ ○ ○ ○ ○ ○ ○ ○ ○ ○ ○ ○ ○ ○ ○ ○ ○ ○ ○ ○ ○ ○ ○ ○ ○ ○ ○ ○ ○ ○ ○ ○ ○ ○ ○ ○ ○ ○ ○ ○ ○ ○ ○ ○ ○ ○ ○ ○ ○ ○ ○ ○ ○ ○ ○ ○ ○ ○
Pager Direct™
List your system's area names and numbers below:
Area Name Area Name
1 _______________________ 3 ______________________
2 _______________________ 4 ______________________
Service Department Phone: ______________________
Emergency Phone: _____________________________
Central Station Phone: ____________________________
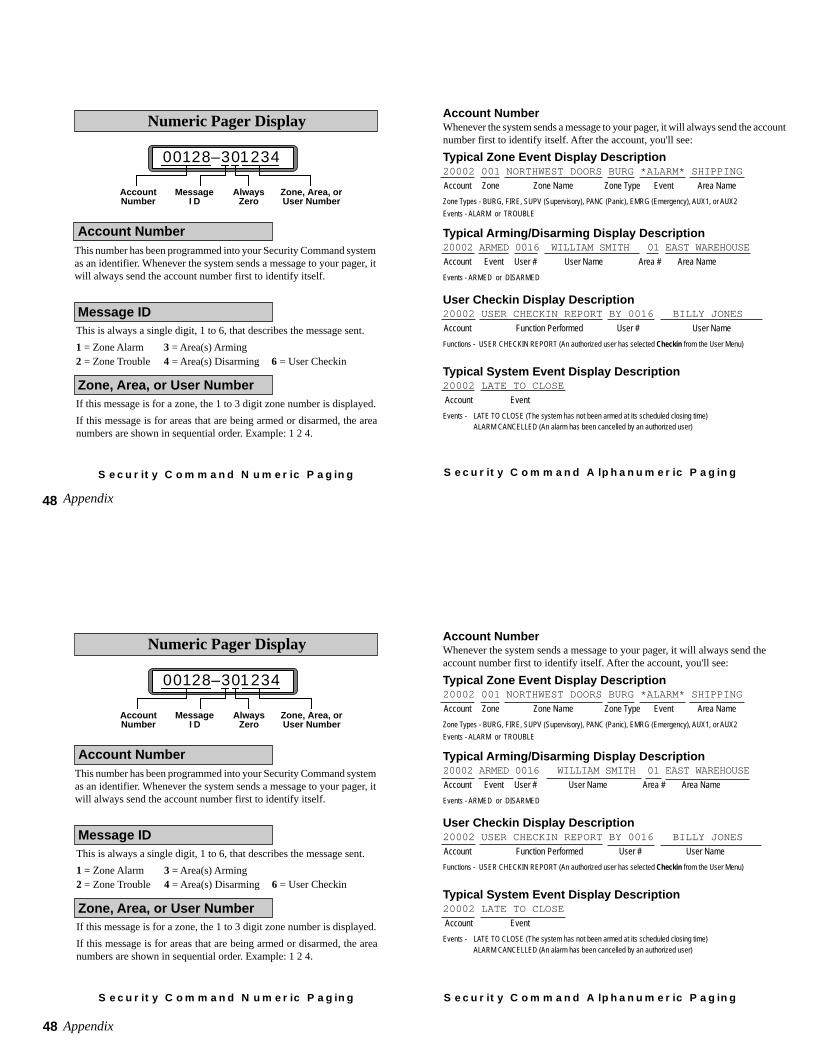
48
48
Account NumberWhenever the system sends a message to your pager, it will always send the accountnumber first to identify itself. After the account, you'll see:
Typical Zone Event Display Description20002 001 NORTHWEST DOORS BURG *ALARM* SHIPPING
Account Zone Zone Name Zone Type Event Area Name
Zone Types - BURG, FIRE, SUPV (Supervisory), PANC (Panic), EMRG (Emergency), AUX1, or AUX2
Events - ALARM or TROUBLE
Typical Arming/Disarming Display Description20002 ARMED 0016 WILLIAM SMITH 01 EAST WAREHOUSE
Account Event User # User Name Area # Area Name
Events - ARMED or DISARMED
User Checkin Display Description20002 USER CHECKIN REPORT BY 0016 BILLY JONES
Account Function Performed User # User Name
Functions - USER CHECKIN REPORT (An authorized user has selected Checkin from the User Menu)
Typical System Event Display Description20002 LATE TO CLOSE
Account Event
Events - LATE TO CLOSE (The system has not been armed at its scheduled closing time)ALARM CANCELLED (An alarm has been cancelled by an authorized user)
Account Number
Security Command Numeric Paging
Numeric Pager Display
This number has been programmed into your Security Command systemas an identifier. Whenever the system sends a message to your pager, itwill always send the account number first to identify itself.
Message IDThis is always a single digit, 1 to 6, that describes the message sent.
1 = Zone Alarm 3 = Area(s) Arming2 = Zone Trouble 4 = Area(s) Disarming 6 = User Checkin
Zone, Area, or User NumberIf this message is for a zone, the 1 to 3 digit zone number is displayed.
If this message is for areas that are being armed or disarmed, the areanumbers are shown in sequential order. Example: 1 2 4.
00128–301234
AccountNumber
MessageI D
AlwaysZero
Zone, Area, orUser Number
Appendix
Appendix
Account Number
Security Command Numeric Paging
Numeric Pager Display
This number has been programmed into your Security Command systemas an identifier. Whenever the system sends a message to your pager, itwill always send the account number first to identify itself.
Message IDThis is always a single digit, 1 to 6, that describes the message sent.
1 = Zone Alarm 3 = Area(s) Arming2 = Zone Trouble 4 = Area(s) Disarming 6 = User Checkin
Zone, Area, or User NumberIf this message is for a zone, the 1 to 3 digit zone number is displayed.
If this message is for areas that are being armed or disarmed, the areanumbers are shown in sequential order. Example: 1 2 4.
00128–301234
AccountNumber
MessageI D
AlwaysZero
Zone, Area, orUser Number
Security Command Alphanumeric Paging
Security Command Alphanumeric Paging
Account NumberWhenever the system sends a message to your pager, it will always send theaccount number first to identify itself. After the account, you'll see:
Typical Zone Event Display Description20002 001 NORTHWEST DOORS BURG *ALARM* SHIPPING
Account Zone Zone Name Zone Type Event Area Name
Zone Types - BURG, FIRE, SUPV (Supervisory), PANC (Panic), EMRG (Emergency), AUX1, or AUX2
Events - ALARM or TROUBLE
Typical Arming/Disarming Display Description20002 ARMED 0016 WILLIAM SMITH 01 EAST WAREHOUSE
Account Event User # User Name Area # Area Name
Events - ARMED or DISARMED
User Checkin Display Description20002 USER CHECKIN REPORT BY 0016 BILLY JONES
Account Function Performed User # User Name
Functions - USER CHECKIN REPORT (An authorized user has selected Checkin from the User Menu)
Typical System Event Display Description20002 LATE TO CLOSE
Account Event
Events - LATE TO CLOSE (The system has not been armed at its scheduled closing time)ALARM CANCELLED (An alarm has been cancelled by an authorized user)

49
49
FA100 User's GuideThese instructions guide you through the operation of your system using the FA100 Wireless Command Transmitter. The FA100 operatesfor the Home/Away or ALL/Perimeter arming systems.
Arming a Home/Away or ALL/Perimeter System1. Press the HOME button to arm the Perimeter burglary protection.
2. Press the AWAY button to arm all of the burglary protection.
Disarming a Home/Away or ALL/Perimeter System1. Press the OFF button to disarm all of the burglary protection.
Using the ALERT ButtonPressing the ALERT button sends a Panic alarm to the panel. If your system is monitored by a central station, the proper authorities willbe notified of the alarm.
FA113 User's GuideThese instructions guide you through the operation of your system using the FA113 Wireless Keychain Remote.
Arming1. Press the ON button to arm all of the burglary protection.
Disarming1. Press the OFF button to disarm all of the burglary protection.
Using the ALERT ButtonsPress the two ALERT buttons simultaneously to send a Panic alarm to the panel. If your system is monitored by a central station, the properauthorities will be notified of the alarm.
Appendix
Appendix

50
50
Alarm display 3Ambush codes 22Area Schedules 24Armed Message 6Arming
All/Perimeter mode 9, 46Area mode 7, 45Home/Away mode 11, 46Instant mode 9, 11using Easy Entry™ 45with doors and windows open 6
Bypassing a zone 17restoring a bypassed zone 17zones that can't be bypassed 17
CLOSING TIME! display 23ONE MOMENT message 6Disarming 4
alarm display 8, 10, 12clears alarm displays 5during an alarm 10, 12Easy Entry™ keypads 45ENTER CODE display 3, 8, 10, 12keypad display 8, 10, 12only selected areas 8prewarn tone 8, 10, 12reporting to central station 8, 10, 12
Door Strike operation 45Easy Entry™ 45Emergency procedures iiEntry and Exit zones 5Events held in memory
amount 28False Alarms 1Keypad Messages 3
ALARM CANCELLED 10, 12BAD * 6CLOSING TIME! 23ONE MOMENT ... 6INSTNT 9, 11LOCAL ALARM ONLY 6
Keypad operation 2Keypad tones
during a trouble condition 4entering while armed 4Zone Monitor tone 4
Keyswitch operationexit delay display 6
Monitoring zones 18Outputs
names and numbers 16, 34turning on and off 16
Pager reporting 47
quick reference card 47Perimeter protection 4
arming 9, 11Power (AC) LED 2Priority zone
BAD * condition 6Relay (output) control 16Resetting a smoke detector 14Security Command keypad 1, 2Sending reports to a Central station 5, 8,10, 12Sending reports to your pager 47Sensor Reset 14
before using 14for wireless systems 14
Silent alarm 21System Setup 33System status 5Testing the system 1Turning the system off 8, 10, 12Turning the system on 7, 9, 11User Codes 20
Ambush codes 21areas 20authority level 21, 22deleting 22
IndexTemporary codes 21user number 20user names 20
User Menu 1accessing 13, 46restrictions 20
Using Schedules 23automatic arming 23automatic disarming 23
Using the keypad 2arrow key 2command key 2top row keys 2
Viewing past events 28arming and disarming 29system troubles 30user code changes 30zone alarms and troubles 29
WirelessFA100 49FA113 49Keychain Remote 49low battery displays 3
Zones 524 hour zones 5bypassed 6force armed 6
Zone Monitor 18
Index
Alarm display 3Ambush codes 22Area Schedules 24Armed Message 6Arming
All/Perimeter mode 9, 46Area mode 7, 45Home/Away mode 11, 46Instant mode 9, 11using Easy Entry™ 45with doors and windows open 6
Bypassing a zone 17restoring a bypassed zone 17zones that can't be bypassed 17
CLOSING TIME! display 23ONE MOMENT message 6Disarming 4
alarm display 8, 10, 12clears alarm displays 5during an alarm 10, 12Easy Entry™ keypads 45ENTER CODE display 3, 8, 10, 12keypad display 8, 10, 12only selected areas 8prewarn tone 8, 10, 12reporting to central station 8, 10, 12
Appendix
Appendix
Door Strike operation 45Easy Entry™ 45Emergency procedures iiEntry and Exit zones 5Events held in memory
amount 28False Alarms 1Keypad Messages 3
ALARM CANCELLED 10, 12BAD * 6CLOSING TIME! 23ONE MOMENT ... 6INSTNT 9, 11LOCAL ALARM ONLY 6
Keypad operation 2Keypad tones
during a trouble condition 4entering while armed 4Zone Monitor tone 4
Keyswitch operationexit delay display 6
Monitoring zones 18Outputs
names and numbers 16, 34turning on and off 16
Pager reporting 47
quick reference card 47Perimeter protection 4
arming 9, 11Power (AC) LED 2Priority zone
BAD * condition 6Relay (output) control 16Resetting a smoke detector 14Security Command keypad 1, 2Sending reports to a Central station 5,8, 10, 12Sending reports to your pager 47Sensor Reset 14
before using 14for wireless systems 14
Silent alarm 21System Setup 33System status 5Testing the system 1Turning the system off 8, 10, 12Turning the system on 7, 9, 11User Codes 20
Ambush codes 21areas 20authority level 21, 22deleting 22
Temporary codes 21user number 20user names 20
User Menu 1accessing 13, 46restrictions 20
Using Schedules 23automatic arming 23automatic disarming 23
Using the keypad 2arrow key 2command key 2top row keys 2
Viewing past events 28arming and disarming 29system troubles 30user code changes 30zone alarms and troubles 29
WirelessFA100 49FA113 49Keychain Remote 49low battery displays 3
Zones 524 hour zones 5bypassed 6force armed 6
Zone Monitor 18

LT-0287 (11/97)
LT-0287 (11/97)