xcelligence real-time cell analsis® real-time cell analsis cim protocol cim protocol using the...
TRANSCRIPT
xCELLigence® Real-Time Cell AnalysisCIM Protocol
CIM Protocol
Using the xCELLigence® RTCA DP Instrument to Perform Cell Invasion and Migration (CIM) Assays

2 Application Protocol: Using the xCELLigence RTCA DP Instrument to Perform Cell Invasion and Migration Assays
OverviewCI
M P
roto
col
The xCELLigence® RTCA DP Instrument
The xCELLigence Real-Time Cell Analyzer Dual Purpose (RTCA DP) instrument is part of the xCELLigence line of instru-ments from ACEA Biosciences. In addition to enabling label-free, real-time monitoring of cell proliferation, morphology, and attachment quality (similar to all the xCELLigence instruments), the DP model has the additional capability of monitoring cell invasion and migration. The instrument contains three plate cradles (Figure 1) that can be operated simultaneously yet independently of one another, enabling maximal productivity for multiple users. The DP instrument is placed in a standard CO2 incubator and is powered and controlled via a cable connected to a work station housed outside the incubator. The user friendly RTCA software allows for real-time interfacing with all three cradles, and includes real-time data display and analysis functions. The DP instrument can use, in 16-well formats, both the standard electronic plate (E-Plate® 16) and the electronic cell invasion and migration plate (CIM-Plate® 16). Note that the E-Plate 16 is available with either a glass or PET (polyethylene terephthalate) bottom. It is also available in a format (E-Plate View 16) where electrodes are absent from a small region of the wells, facilitating visual inspection in a microscope.
Figure 1. xCELLigence RTCA DP instrument and work station. Note that the instrument has three separate cradles, each of which holds a 16-well plate.
3Application Protocol: Using the xCELLigence RTCA DP Instrument to Perform Cell Invasion and Migration Assays
OverviewCIM
Protocol
Cell Invasion and Migration Plate
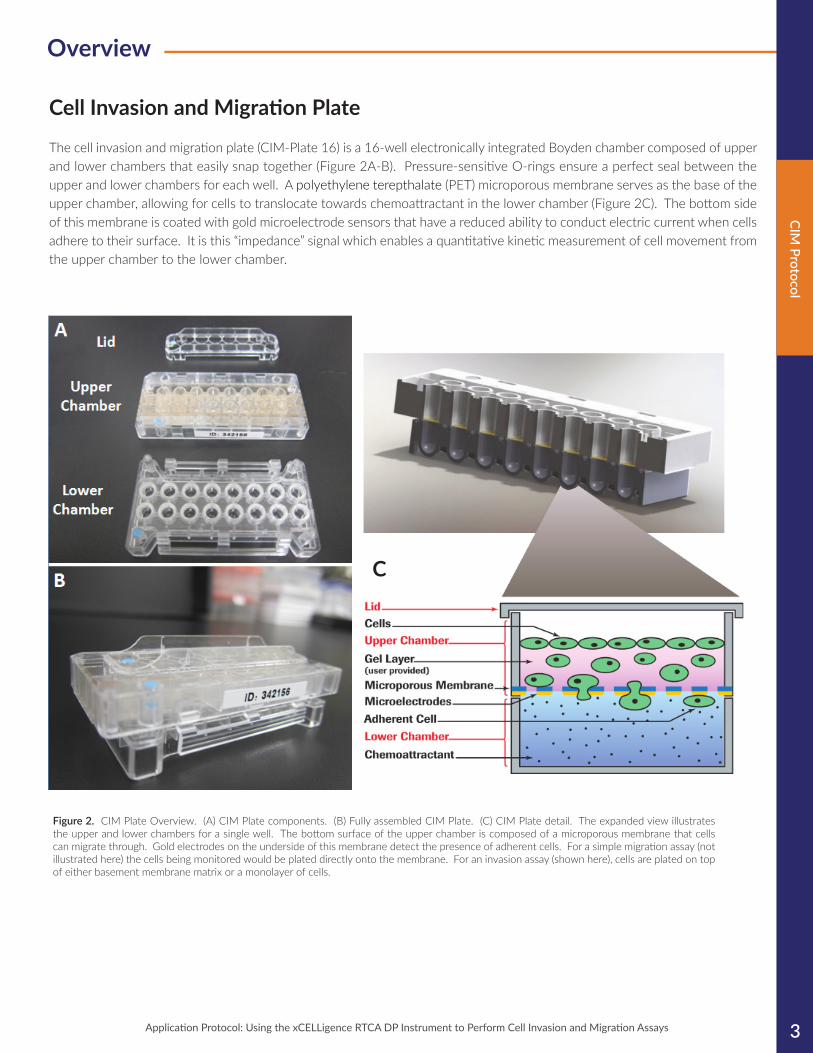
The cell invasion and migration plate (CIM-Plate 16) is a 16-well electronically integrated Boyden chamber composed of upper and lower chambers that easily snap together (Figure 2A-B). Pressure-sensitive O-rings ensure a perfect seal between the upper and lower chambers for each well. A polyethylene terepthalate (PET) microporous membrane serves as the base of the upper chamber, allowing for cells to translocate towards chemoattractant in the lower chamber (Figure 2C). The bottom side of this membrane is coated with gold microelectrode sensors that have a reduced ability to conduct electric current when cells adhere to their surface. It is this “impedance” signal which enables a quantitative kinetic measurement of cell movement from the upper chamber to the lower chamber.
Figure 2. CIM Plate Overview. (A) CIM Plate components. (B) Fully assembled CIM Plate. (C) CIM Plate detail. The expanded view illustrates the upper and lower chambers for a single well. The bottom surface of the upper chamber is composed of a microporous membrane that cells can migrate through. Gold electrodes on the underside of this membrane detect the presence of adherent cells. For a simple migration assay (not illustrated here) the cells being monitored would be plated directly onto the membrane. For an invasion assay (shown here), cells are plated on top of either basement membrane matrix or a monolayer of cells.
C
4 Application Protocol: Using the xCELLigence RTCA DP Instrument to Perform Cell Invasion and Migration Assays
Cell Migration AssayCI
M P
roto
col
1. Introduction
The below protocol is for a basic migration assay using the xCELLigence RTCA DP instrument with fetal bovine serum (FBS) as the chemoattractant. Though this protocol has been optimized using the HT1080 human fibrosarco-ma cell line, assay conditions may require additional optimization if different cell lines or chemoattractants are used.
2. Reagents & Equipment
Reagents
• Cells: HT1080 cells were purchased from ATCC and were 60%-80% confluent at the time of detachment.
» Critical: The ultimate success of migration experiments is influenced by the cell culture conditions used prior to the assay, including the method of detaching the cells from the flask.
» Critical: The number of cells used in a migration experiment will ultimately depend on the cell type being used. It is imperative to conduct preliminary experiments to determine the optimal cell number for each cell line. We recommend initially seeding 20,000-80,000 cells in a final volume of 100 µL.
• Cell detachment solution: While trypsin-EDTA can be used for cell detachment, for cells that are especially sensitive to protease treatment a non-enzymatic cell dissociation solution should be used (Sigma; Cat. #C5789).
» Critical: If using the protease method of cell detachment, it is important to minimize the time of incu-bation with the protease. Because cell surface receptors such as integrins play an important role in cell migration, it is important to preserve the number and integrity of these proteins as much as possible.
• Serum-free media (SFM): Use the same media that the cells are cultured in, without the serum.
» Critical: Because some cell types are sensitive to a total absence of serum it may be necessary to include a low concentration of serum in the “SFM”. In this case, we recommend testing a range of 0.1-2% serum. Alternatively, the SFM can be supplemented with bovine serum albumin (BSA) in the range of 0.25-0.5%. It is important to use highly pure forms of BSA and not a crude frac-tionation product which may contain factors capable of influencing cell adhesion and migration.
• Chemotaxis inducer: This is typically fibroblast-conditioned media, or SFM supplemented with 5-10% serum or other chemotactic agents such as growth factors.
» Critical: The media in the upper and lower chambers should be identical except for the chemotaxis inducer (present in the lower chamber but absent in the upper chamber).
• PBS without calcium and magnesium
5Application Protocol: Using the xCELLigence RTCA DP Instrument to Perform Cell Invasion and Migration Assays
Cell Migration AssayCIM
Protocol
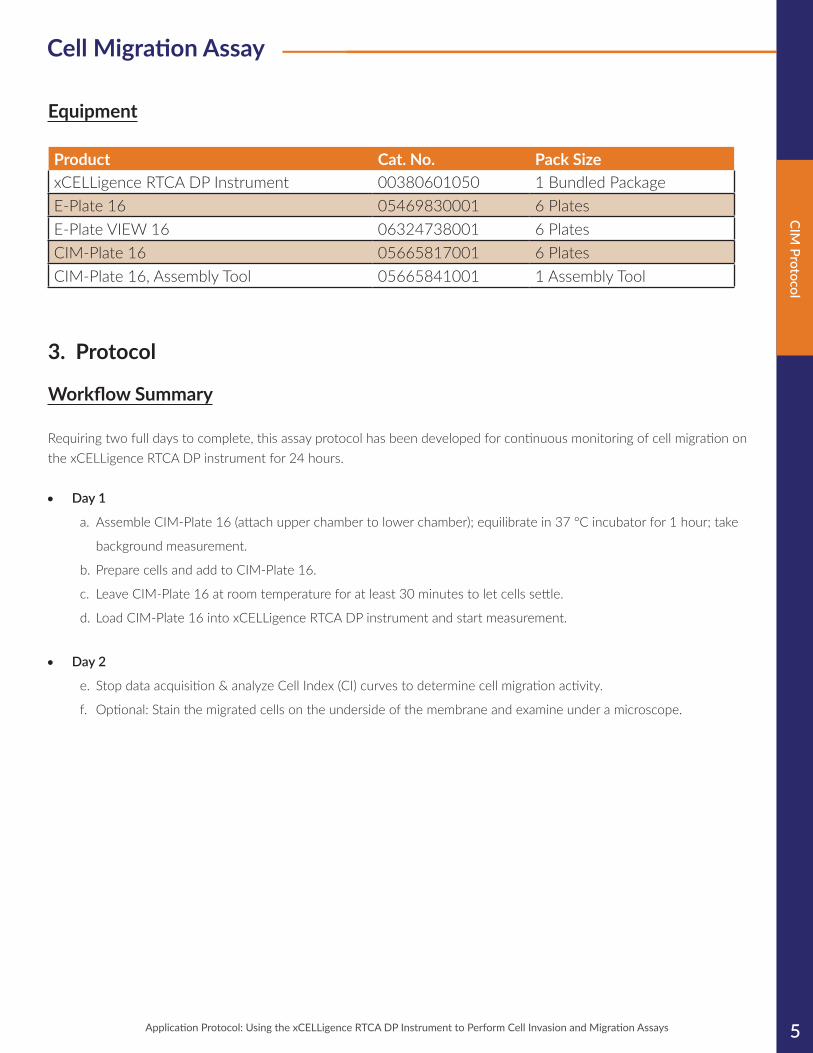
Equipment
Product Cat. No. Pack SizexCELLigence RTCA DP Instrument 00380601050 1 Bundled PackageE-Plate 16 05469830001 6 PlatesE-Plate VIEW 16 06324738001 6 PlatesCIM-Plate 16 05665817001 6 PlatesCIM-Plate 16, Assembly Tool 05665841001 1 Assembly Tool
3. Protocol Workflow Summary
Requiring two full days to complete, this assay protocol has been developed for continuous monitoring of cell migration on the xCELLigence RTCA DP instrument for 24 hours.
• Day 1
a. Assemble CIM-Plate 16 (attach upper chamber to lower chamber); equilibrate in 37 °C incubator for 1 hour; take
background measurement.
b. Prepare cells and add to CIM-Plate 16.
c. Leave CIM-Plate 16 at room temperature for at least 30 minutes to let cells settle.
d. Load CIM-Plate 16 into xCELLigence RTCA DP instrument and start measurement.
• Day 2
e. Stop data acquisition & analyze Cell Index (CI) curves to determine cell migration activity.
f. Optional: Stain the migrated cells on the underside of the membrane and examine under a microscope.
6 Application Protocol: Using the xCELLigence RTCA DP Instrument to Perform Cell Invasion and Migration Assays
Cell Migration AssayCI
M P
roto
col
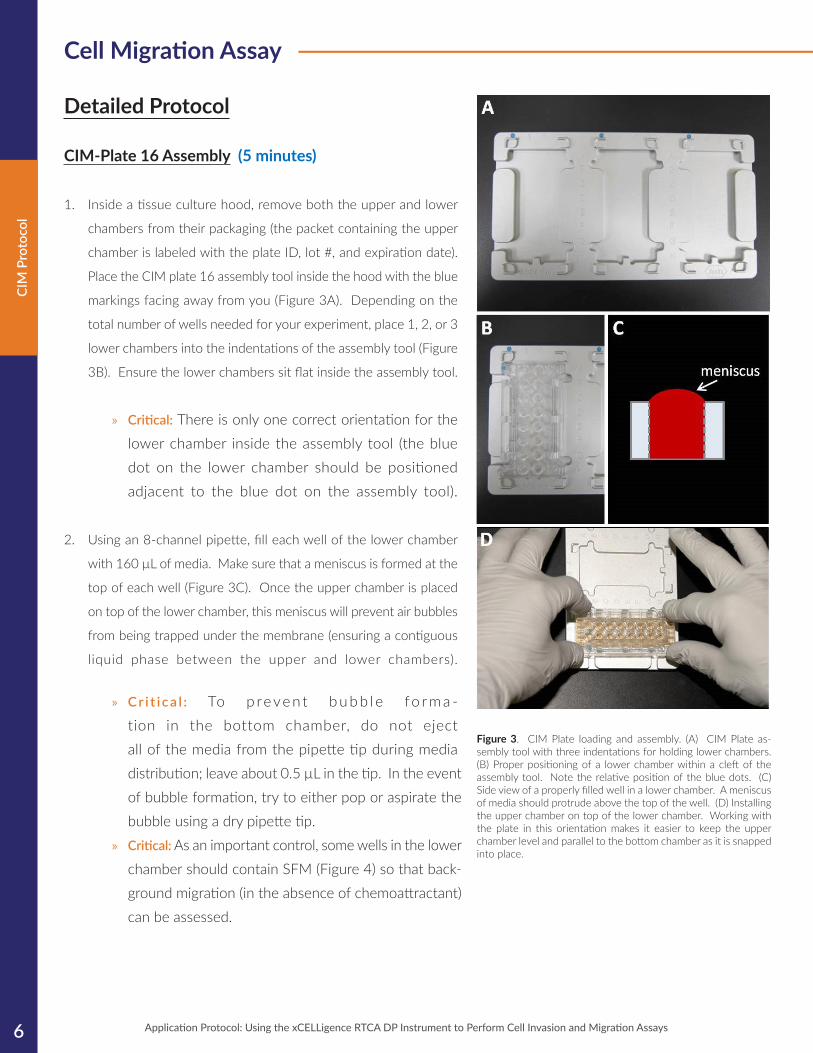
Detailed Protocol CIM-Plate 16 Assembly (5 minutes)
1. Inside a tissue culture hood, remove both the upper and lower
chambers from their packaging (the packet containing the upper
chamber is labeled with the plate ID, lot #, and expiration date).
Place the CIM plate 16 assembly tool inside the hood with the blue
markings facing away from you (Figure 3A). Depending on the
total number of wells needed for your experiment, place 1, 2, or 3
lower chambers into the indentations of the assembly tool (Figure
3B). Ensure the lower chambers sit flat inside the assembly tool.
» Critical: There is only one correct orientation for the lower chamber inside the assembly tool (the blue dot on the lower chamber should be positioned adjacent to the blue dot on the assembly tool).
2. Using an 8-channel pipette, fill each well of the lower chamber
with 160 µL of media. Make sure that a meniscus is formed at the
top of each well (Figure 3C). Once the upper chamber is placed
on top of the lower chamber, this meniscus will prevent air bubbles
from being trapped under the membrane (ensuring a contiguous
liquid phase between the upper and lower chambers).
» Cr i t i ca l : To p reve nt bu bb le fo r ma -tion in the bottom chamber, do not eject all of the media from the pipette tip during media distribution; leave about 0.5 µL in the tip. In the event of bubble formation, try to either pop or aspirate the bubble using a dry pipette tip.
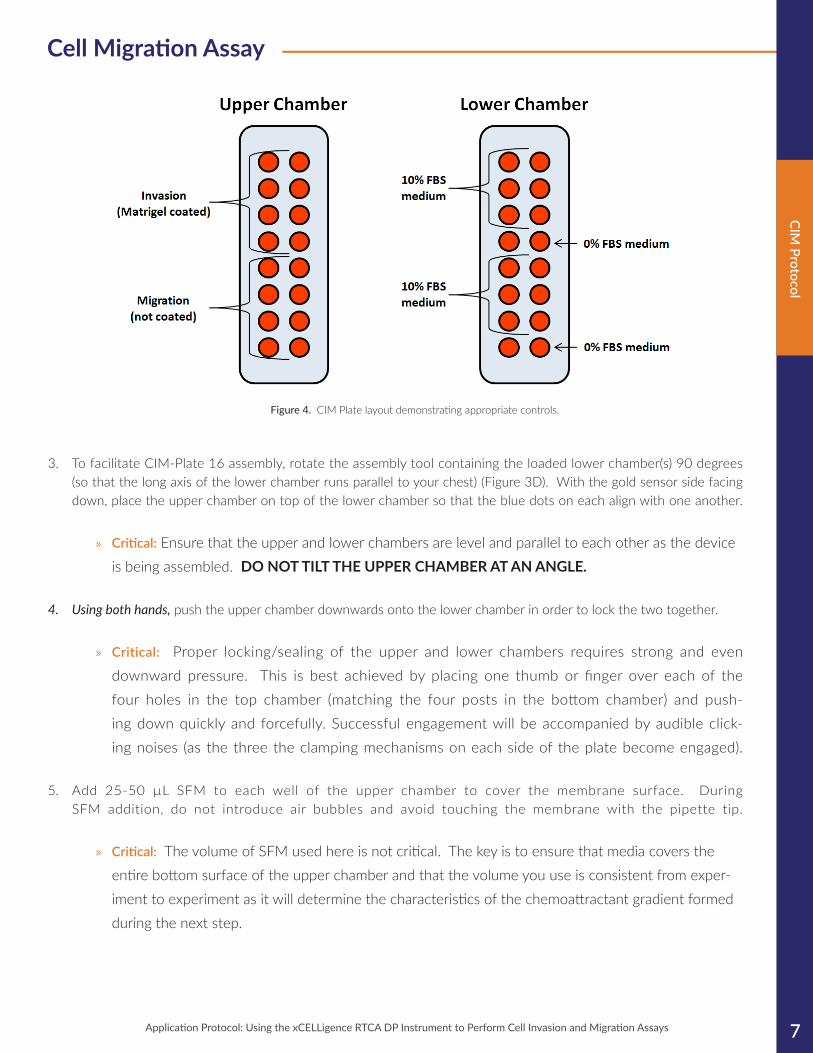
» Critical: As an important control, some wells in the lower chamber should contain SFM (Figure 4) so that back-ground migration (in the absence of chemoattractant) can be assessed.
Figure 3. CIM Plate loading and assembly. (A) CIM Plate as-sembly tool with three indentations for holding lower chambers. (B) Proper positioning of a lower chamber within a cleft of the assembly tool. Note the relative position of the blue dots. (C) Side view of a properly filled well in a lower chamber. A meniscus of media should protrude above the top of the well. (D) Installing the upper chamber on top of the lower chamber. Working with the plate in this orientation makes it easier to keep the upper chamber level and parallel to the bottom chamber as it is snapped into place.
7Application Protocol: Using the xCELLigence RTCA DP Instrument to Perform Cell Invasion and Migration Assays
Cell Migration AssayCIM
Protocol
3. To facilitate CIM-Plate 16 assembly, rotate the assembly tool containing the loaded lower chamber(s) 90 degrees (so that the long axis of the lower chamber runs parallel to your chest) (Figure 3D). With the gold sensor side facing down, place the upper chamber on top of the lower chamber so that the blue dots on each align with one another.
» Critical: Ensure that the upper and lower chambers are level and parallel to each other as the device is being assembled. DO NOT TILT THE UPPER CHAMBER AT AN ANGLE.
4. Using both hands, push the upper chamber downwards onto the lower chamber in order to lock the two together.
» Critical: Proper locking/sealing of the upper and lower chambers requires strong and even downward pressure. This is best achieved by placing one thumb or finger over each of the four holes in the top chamber (matching the four posts in the bottom chamber) and push-ing down quickly and forcefully. Successful engagement will be accompanied by audible click-ing noises (as the three the clamping mechanisms on each side of the plate become engaged).
5. Add 25-50 µL SFM to each well of the upper chamber to cover the membrane surface. During SFM addition, do not introduce air bubbles and avoid touching the membrane with the pipette tip.
» Critical: The volume of SFM used here is not critical. The key is to ensure that media covers the entire bottom surface of the upper chamber and that the volume you use is consistent from exper-iment to experiment as it will determine the characteristics of the chemoattractant gradient formed during the next step.
Figure 4. CIM Plate layout demonstrating appropriate controls.
8 Application Protocol: Using the xCELLigence RTCA DP Instrument to Perform Cell Invasion and Migration Assays
Cell Migration AssayCI
M P
roto
col
CIM-Plate 16 Equilibration at 37 °C (60 minutes)
Place the CIM-Plate 16 into the xCELLigence RTCA DP instrument inside the 37°C incubator. Note that the CIM-Plate 16 only fits into the instrument in one orientation: the tapered corner of the CIM-Plate 16 must align with the tapered corner of the instrument’s cradle. Incubate for 1 hour to allow the CIM membrane to reach equilibrium with the media and for a gradient of the chemoattractant to form by passive diffusion.
Background Measurement (5 minutes)
Determine background impedance values by initiating step 1 in the RTCA software.
Cell Preparation (30 minutes)
» Critical: Like any other cell-based assay, the ultimate success of the migration experiment using the CIM-Plate 16 depends on the quality and handling of the cells. It is imperative to execute proper cell handling/maintenance in order to obtain reliable and reproducible results. Also, because some cell types can display higher levels of background migration with increasing passage number, it is important to re-cord passage number for each experiment. Cells should be passaged the day prior to the experiment and should be 60-80% confluent at the time that they are detached/collected for seeding the CIM-Plate 16.
» Critical: For cell types that display an inherently high level of background migration it may be useful to subject them to serum-starvation prior to their detachment and subsequent seeding in the CIM-Plate 16. For a standard migration assay cells can be serum-starved 1-16 hours. These conditions need to be determined empirically.
1. Remove serum containing media from the tissue culture flask and gently rinse the cell monolayer once with PBS.
2. Trypsinize cells by adding 0.5 mL of 0.05% Trypsin/EDTA solution per T25 flask and leave the flask at room tem-perature or 37°C for 1-2 minutes.
» Critical: Do not over-trypsinize the cells! Because cell migration and invasion are dependent on the integrity of cell surface receptors such as integrins, it is important to minimize the time of pro-tease treatment. For cell types that are especially sensitive to protease-digestion it may be neces-sary to explore alternative methods of cell detachment (i.e. using EDTA-based buffers).
3. Stop trypsinization by adding media-containing serum or TNS (from Lonza, Cat. #CC-5002) at a volumetric ratio of 1:1.
4. Collect cells in SFM and centrifuge. For most cells 5 minutes at 800xg is sufficient.
5. Gently resuspend the cell pellet in a few mL of SFM and determine cell concentration under a microscope using a hemocytometer. Adjust the concentration of the cell suspension to 3×10⁵ cells/mL using SFM. At a minimum, use triplicates or quadruplicates for each experimental condition being examined.
9Application Protocol: Using the xCELLigence RTCA DP Instrument to Perform Cell Invasion and Migration Assays
Cell Migration AssayCIM
Protocol
Cell Addition to CIM-Plate 16 (10 minutes)
1. Add 100 μL of cell suspension to each well of the upper chamber. The final number of cells per well should be around 30,000.
» Critical: Be aware that during this step bubbles can get trapped in the bottom of the well, forcing cells to migrate unevenly across the membrane surface, or blocking cell migration altogether. The best way to avoid bubble entrapment during cell addition is to first slightly tilt the assembled CIM-Plate 16 at an angle, followed by insertion of the pippette tip all the way to the bottom of the well (avoiding contact with the membrane) and slowly ejecting the cell suspension. One way to check for possible bubble entrapment is to observe the level of the media in the wells of the upper chamber. If a well contains an air bubble the volume will appear to be slightly higher than the other wells. If you observe this immediately after addition of cell suspension, try carefully aspirating the cell suspension and reapplying it to the well. Alternatively, if this is observed later, it is best to leave the bubble in place and simply make a note of it in your laboratory notebook.
Place CIM-Plate 16 at Room Temperature (30 minutes)
After cell addition, leave the CIM-plate 16 in the hood at room temperature for 30 minutes to allow the cells to settle evenly onto the bottom surface of the upper chamber. Failure to perform this step can result in large well to well variation in the migration signal for the following reason: Immediate warming to 37°C can cause convection currents to form within the well, and these currents can push cells to the well perimeter, resulting in an uneven distribution of cells on the impedance electrodes after migration.

10 Application Protocol: Using the xCELLigence RTCA DP Instrument to Perform Cell Invasion and Migration Assays
Cell Migration AssayCI
M P
roto
col
Start Measurement (3-24 hours)
Place the loaded CIM-plate 16 into the xCELLigence RTCA DP instrument inside the 37°C incubator. Using the RTCA software on the workstation, program a run of 24 hours with readings being taken every 15 minutes.
» Critical: It is important to place the CIM device in the same module that was used for background measurement (each device can have slightly different background im-pedance measurements, which can affect the coefficient of variation of the data).
» Critical: The main factor determining the length of time a migration assay is monitored is the doubling time of the cells being used. In the 3-24 hour time range, impedance measurements reflect bona fide cell migration from the upper chamber to the lower chamber. At later time points cells that have already migrated to the underside of the membrane will be proliferating. In this time regime imped-ance changes are the result of both continued migration through the membrane and cell growth on the membrane. For this reason, it is usually preferable to assess migration at time points well below the doubling time of the cells being used.
Data Analysis
1. Stop data acquisition after 24 hours.
2. Average all the replicates on the display page.
3. Analyze the Cell Index (CI) curves. As a general rule, in order to be considered a positive migration signal (above background noise), the averaged CI should be ≥ 0.1. However, for data points being used for analysis the averaged CI should ideally be 0.5-1.0 or greater.
» Critical: It is important to note that different cell types will produce impedance changes of varying mag-nitude depending on the number of cells added and the overall volume and morphology of the cells. If the change in CI for a given cell type at a particular density is less than 0.1, there are a number of parameters that can be optimized to increase the overall signal. These include increasing the number of cells added, and testing various conditions for coating the membrane with extracellular matrix proteins.
4. There are multiple ways to analyze and quantify cell migration data using the CIM-Plate 16. Some users will assess the rate of migration (slope) during a desired time window, while others will simply plot the Cell Index value for critical timepoints.

11Application Protocol: Using the xCELLigence RTCA DP Instrument to Perform Cell Invasion and Migration Assays
Cell Migration AssayCIM
Protocol
Troubleshooting
This protocol may require some practice with the CIM-Plate 16 in order to obtain reproducible data. Because the impedance biosensor is very sensitive, particular attention should be paid to properly assemble and prepare the device to avoid bubbles and generate a uniform layer of migrated cells during the experiment. Potential problems and corresponding solutions are listed below:
1. There is large variation between the replicates:
• Verify that bubbles are not introduced into the top or bottom chambers during device assembly. Bubbles on the electrode surface (at the interface between the top and bottom chambers) are particularly detri-mental to replicate quality and are not easy to spot once the CIM-Plate 16 has been assembled. How-ever, after an assay has been run the presence of bubbles may easily be diagnosed by staining the mem-brane (see “Cell Imaging” protocol below); bubbles will show as round areas without any migrated cells.
• It is important to perform the full 1 hour “CIM-Plate 16 Equilibration at 37°C” step de-scribed above for proper equilibration and establishment of the chemotactic gradient.
• It is important to perform the full 30 minute incubation described in the above step “Place CIM-Plate 16 at Room Temperature” to ensure even distribution of the migrated cells across the electrodes.
• Make sure cells are well suspended prior to seeding into the device; some dense cells may settle significantly just during the time it takes to pipette across all 16 wells. Thus, a best practice is to mix the source tube of cells prior to each round of pipetting.
2. No signal is detected in wells expected to have a good migration signal:
• Make sure that the cells have indeed migrated by staining the membrane (see “Cell Imaging” protocol be-low). If cells have not migrated, consider testing the chemotactic reagent for activity.
• Verify that the cells can adhere well to the impedance electrodes by setting up a standard E-Plate 16 under conditions similar to the final state of the CIM experiment (i.e. after full diffusion of the che-motactic agent). Failure of cells to adhere well can be mitigated by pre-coating the CIM electrodes with an extracellular matrix (ECM) protein prior to assembling the CIM-Plate 16. A typical protocol for pre-coating regular plates with ECM may be adapted: simply invert the upper chamber of the CIM-Plate 16 and take special care to evenly coat the entire surface of the electrode array with the ECM protein.
• Because some cell types are sensitive to a total absence of serum it may be necessary to include a low con-centration of serum in the “SFM”. In this case, we recommend testing a range of 0.1-2% serum.
12 Application Protocol: Using the xCELLigence RTCA DP Instrument to Perform Cell Invasion and Migration Assays
Cell Migration AssayCI
M P
roto
col
Cell Imaging
» Recommendation: Even though not required, when performing pilot experiments it is recommend-ed that the cells on the underside of the membrane be stained in order to get a feel for the extent of cell migration and its correlation with CI signal. To stain the cells, a typical protocol for staining a Boy-den chamber or transwell device may be employed. The protocol used by ACEA R&D is as follows:
1. Disassemble the CIM plate by pressing the two handles on the lower chamber and gently removing the upper cham-ber.
2. Remove media from the upper chamber wells with a multi-channel pipette while avoiding contact with the membrane.
3. Stain the migrated cells on the CIM membrane. Diff-Quick staining kit by Fisher Scientific is recommended (Cat. #NC9409820). A modified staining procedure is briefly described below:
• Place the upper chamber in fixative solution for 2 minutes. The bottom side of the membrane (containing the electrodes) should be in direct contact with the fixative.
• Repeat, using solution I for 1 minute.
• Repeat, using solution II for 1 minute.
• Gently rinse the bottom side of the membrane (containing the electrodes) with water.
• Gently remove any unmigrated cells from the membrane: Rub a damp cotton swab along the bottom of the wells in the upper chamber.
• Visualize and count the cells using an upright microscope.

13Application Protocol: Using the xCELLigence RTCA DP Instrument to Perform Cell Invasion and Migration Assays
Cell Invasion AssayCIM
Protocol
1. Introduction
Matrigel® Coating of CIM-Plate 16 for Invasion Experiment
This protocol is optimized for detecting cell invasion through Matrigel basement membrane matrix using ACEA’s CIM-Plate® 16 and the xCELLigence RTCA DP instrument, with fetal bovine serum (FBS) as the chemoattractant. Consisting of extracellular matrix (ECM) proteins and growth factors that collectively mimic the basement membrane underlying epithelial cells, Matrigel is broadly used for assessing cell invasion, especially cancer cell invasion, in vitro. The Matrigel used in this protocol (supplied by Corning) was extracted from the Engelbreth-Holm-Swarm (EHS) mouse sarcoma, a tumor rich in ECMs including collagen IV, heparan sulfate proteoglycans, entactin, and nidogen.
2. Reagents & Equipment
Reagents
• Cells: HT1080 cells (ATCC®; Cat. #CCL-121™) were used in this protocol. If other cell lines will be used, the protocol may require additional optimization.
• Matrigel (from Corning; Cat. #354234): After thawing the Matrigel on ice, dispense 100 µL aliquots in 0.5 mL tubes and store at -80oC. Subjecting Matrigel to multiple freeze/thaw cycles is not recommended.
» Critical: Because the concentration and quality of Matrigel can vary from batch to batch, each new batch should be subjected to a titration assay, and the results compared with previous batches.
• HT1080 cell culture complete media: DMEM containing 10% FBS, 1% Penicillin-Streptomycin solution, and 1% MEM Nonessential Amino Acid solution.
Equipment
See equipment listed in the Migration Assay Protocol

14 Application Protocol: Using the xCELLigence RTCA DP Instrument to Perform Cell Invasion and Migration Assays
Cell Invasion AssayCI
M P
roto
col
3. Protocol
Workflow Summary
Requiring two full days to complete, this assay protocol has been developed for continuous monitoring of cell invasion on the xCELLigence RTCA DP instrument for 24 hours.
• Day 1
a. Coat upper chamber with Matrigel and place in 37°C incubator for 4 hours.
b. Assemble CIM-Plate 16 (attach upper chamber to lower chamber); equilibrate in 37°C incubator for 1 hour; take
background measurement.
c. Prepare cells and add to CIM-Plate 16.
d. Leave CIM-Plate 16 at room temperature for at least 30 minutes to let cells settle.
e. Load CIM-Plate 16 into xCELLigence RTCA DP instrument and start measurement.
• Day 2
f. Stop data acquisition and analyze the Cell Index (CI) curves to determine cell invasion activity.
g. Optional: Stain the migrated cells on the underside of the membrane and examine under a microscope.
Detailed Protocol
Matrigel Coating of the Upper Chamber of CIM-Plate 16 (4 hours)
» Critical: The day prior to the experiment, place pipette tips, Eppendorf tubes, and the upper cham-ber of the CIM-Plate 16 at 4°C to cool. Also, transfer a tube of aliquoted Matrigel from -80°C to 4 °C.
1. Dilute the Matrigel with pre-cooled SFM on ice in pre-cooled Eppendorf tubes. Approximate-ly 1 mL of diluted Matrigel is needed to coat all 16 wells of the upper chamber of a CIM-Plate 16.
2. Dilute Matrigel with cold SFM to a concentration of 800 µg/mL, being careful to maintain the Matrigel solution on ice to avoid polymerization.
3. Add 50 µL of Matrigel solution into each well of the upper chamber. Gently tap the plate to ensure the Matrigel evenly covers the entire surface of each well.
4. Remove 30 µL of the nascent Matrigel solution from each well, leaving the remaining 20 µL to coat the membrane surface of each well.
» Critical: This step is crucial in order to have an even layer of Matrigel in the wells. When removing the 30 µL of Matrigel, insert pipette tip into the well as far as possible without actually touching the membrane; withdraw the Matrigel slowly. Be careful to not introduce air bubbles during this step.
15Application Protocol: Using the xCELLigence RTCA DP Instrument to Perform Cell Invasion and Migration Assays
Cell Invasion AssayCIM
Protocol
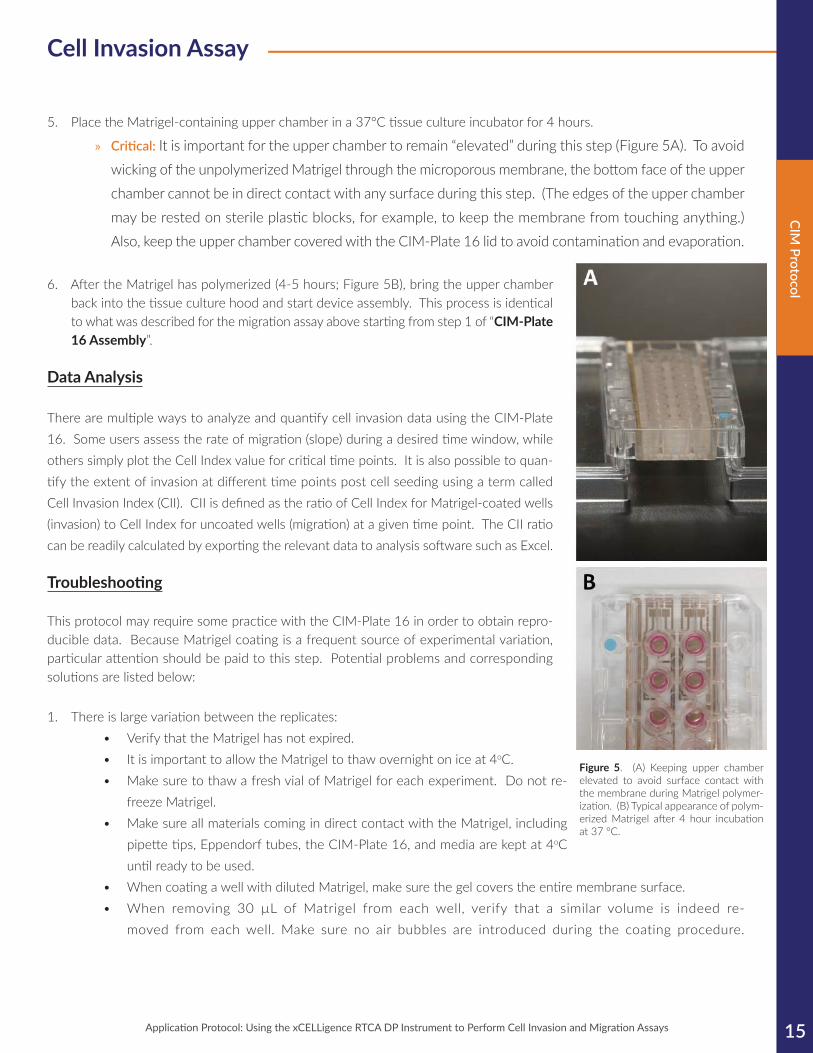
5. Place the Matrigel-containing upper chamber in a 37°C tissue culture incubator for 4 hours.
» Critical: It is important for the upper chamber to remain “elevated” during this step (Figure 5A). To avoid wicking of the unpolymerized Matrigel through the microporous membrane, the bottom face of the upper chamber cannot be in direct contact with any surface during this step. (The edges of the upper chamber may be rested on sterile plastic blocks, for example, to keep the membrane from touching anything.) Also, keep the upper chamber covered with the CIM-Plate 16 lid to avoid contamination and evaporation.
6. After the Matrigel has polymerized (4-5 hours; Figure 5B), bring the upper chamber back into the tissue culture hood and start device assembly. This process is identical to what was described for the migration assay above starting from step 1 of “CIM-Plate 16 Assembly”.
Data Analysis
There are multiple ways to analyze and quantify cell invasion data using the CIM-Plate 16. Some users assess the rate of migration (slope) during a desired time window, while others simply plot the Cell Index value for critical time points. It is also possible to quan-tify the extent of invasion at different time points post cell seeding using a term called Cell Invasion Index (CII). CII is defined as the ratio of Cell Index for Matrigel-coated wells (invasion) to Cell Index for uncoated wells (migration) at a given time point. The CII ratio can be readily calculated by exporting the relevant data to analysis software such as Excel.
Troubleshooting
This protocol may require some practice with the CIM-Plate 16 in order to obtain repro-ducible data. Because Matrigel coating is a frequent source of experimental variation, particular attention should be paid to this step. Potential problems and corresponding solutions are listed below:
1. There is large variation between the replicates:• Verify that the Matrigel has not expired.• It is important to allow the Matrigel to thaw overnight on ice at 4oC.• Make sure to thaw a fresh vial of Matrigel for each experiment. Do not re-
freeze Matrigel.• Make sure all materials coming in direct contact with the Matrigel, including
pipette tips, Eppendorf tubes, the CIM-Plate 16, and media are kept at 4oC until ready to be used.
• When coating a well with diluted Matrigel, make sure the gel covers the entire membrane surface.• When removing 30 µL of Matrigel from each well, verify that a similar volume is indeed re-
moved from each well. Make sure no air bubbles are introduced during the coating procedure.
Figure 5. (A) Keeping upper chamber elevated to avoid surface contact with the membrane during Matrigel polymer-ization. (B) Typical appearance of polym-erized Matrigel after 4 hour incubation at 37 °C.
16
Cell Invasion AssayCI
M P
roto
col
2. No signal is detected in wells coated with Matrigel:• Make sure that the Matrigel is sufficiently diluted; for each new batch of Matrigel it is imperative to perform
a titration assay.
3. There is no difference in signal or CI dynamics between Matrigel-coated wells and uncoated control wells:• The Matrigel may be too dilute; try reducing the extent of dilution.• The Matrigel may not be sufficiently polymerized; it is important to allow the Matrigel to polymerize at 37°C
in a CO2 incubator. A humidified environment is required for optimal Matrigel polymerization.
© 2015 ACEA Biosciences, Inc. All rights reserved.
6779 Mesa Ridge Road Ste 100 San Diego, CA 92121 | 866.308.2232 | www.aceabio.com
XCELLIGENCE, E-PLATE, CIM-PLATE, and ACEA BIOSCIENCES are registered trademarks of ACEA Biosciences, Inc. in the US and other countries.