working with hololens and unity - iowa state...
TRANSCRIPT

Working With Hololens and Unity
Ryan Krause Tyler Thompson Robert Young Zachary Koehn
Foreword Hey there, From September 2016 to May 2017, we’ve been working with the Microsoft Hololens, a mixed reality device that allows users to see holograms in the real world. We’ve learned a lot along the way, so we hope that everything in this document is helpful to both old and new developers. At the very least, we hope we save you some headaches down the road. Please note that this information may be outdated at some point, as this document was created using Unity version 5.5. Also, screenshots, code snippets, and online documentation used throughout this document may also have changed since the time of this document’s creation. Throughout the document, you’ll see tips, warnings, and other notes about what we’ve learned. This information was found through discovery, online help forums, or directly from Microsoft. These tips will show up like this:
This is a tip! Listen to this to avoid headaches in development.
We would like to thank Iowa State University, our advisor, our professors, and other students for helping make this project a reality. ~May1737
2

Foreword 2
Introduction 4
Making A Hololens Project In Unity 6 Fixing the Camera 6 Build Settings 6 Player Settings 7 Quality Settings 8
Building And Deploying For Hololens 9 Visual Studio Setup 9 Enable Developer Mode On Hololens 10 Pairing Device 10
Using The Device Portal 10 Connecting 11 Using the Portal 12
Gaze 14 Finding Where the User is Looking 14 Creating a Cursor 14
Gestures 16 AirTapping In General 16 Airtapping a Specific Object 16 Adding a Click Sound 18
Spatial Mapping 19 Setting Up The Spatial Mapping Object 19 Spatial Mapping Collider 19 Spatial Mapping Renderer 21 Placing an object in the real world 22 World Anchors in Unity 23 World Anchors Across Multiple Sessions 23 Transfering World Anchors Between Devices 25 Spatial Understanding 27
Voice Commands 28 Creating Voice Commands 28
Achieving 60FPS 30
Misc. Information 31 Compile Early 31 Use Directives 31 UI 31 Alternate Input Options 32 Image Recognition 32 Other Resources 32
References 33
3

Introduction Welcome to Hololens development! Hopefully you’re reading this to learn more about working with the Hololens, so we’re glad to help. To get started, you’ll need some tools installed. These tools are:
● Visual Studio (we use 2015 Update 3) ● Unity (we’re on 5.5) ● Hololens Emulator (optional)
If you don’t have access to a physical Hololens device, then you are able to use the Hololens Emulator to develop.
When working with the emulator, be sure to still test your app on a real device. It may look fine on a 2D screen, but in your 3D environment it may need to be fixed.
Note that all of these tools can be downloaded from Microsoft’s Mixed Reality Developer’s page.
Once you’ve got the tools all set up, then you’re good to go! Also be sure that you’ve gone through the steps of setting up your Hololens device if you have one. We’ll talk about how to use it in future sections. We’ll be assuming that you are familiar with the basics of Unity, C#, and general programming terms. This document will not be teaching you how to make a game step by step, but it will provide the tools needed to understand the functionality the Hololens can add to your game. With that being said, let’s begin with Unity.
4

Making A Hololens Project In Unity When Unity creates a default scene, two objects are created: A camera and a directional light. Lights are fine to keep in the scene, but it may impact performance. The camera is the main issue currently, so let’s take care of that first.
Fixing the Camera Unity defaults to showing a skybox in the game, something that we don’t want. On the Camera component, change the clear flag to be “Solid Color” and that color should be black (rgb 0,0,0). This adds no color to our view, so we’re safe to look at the real world environment.
While it’s not required, it’s recommended to set the camera position to be (0,0,0). Also make sure that the rotation of the camera is (0,0,0).
The “Clipping Planes” of the camera can be changed to have a near clipping field of .85 and the far clipping plane can be around 15. This is the range that user’s will see holograms, and is recommended by Microsoft to have a comfortable experience.
A value of .85 means that holograms have to be .85 meters away before they are visible. All Unity units can be converted to meters on a 1:1 scale.
Depending on the situation, you can make the clipping plane be very close, especially if the hologram isn’t moving. Try testing different values to see what works best for your game.
Build Settings Let’s now point out to Unity that we’re planning on making a Hololens app. We’ll start out by going to the build settings, and choose Windows Store. Make sure to click on “switch platform” before continuing. Now, let’s update the options on the right. We’re making a Hololens D3D application.
5

Player Settings Next up, we need to check some boxes in settings so Unity is allowed to use the Hololens to it’s full potential. Go up to the edit dropdown, go to project settings, and let’s start with “Player” Settings. Here, let’s first click on the “Other Settings” option, and we’ll begin by checking the “Virtual Reality Supported” box. In the VR SDK’s box, make sure Windows Holographic is added. Hit the plus icon and add it if it’s not.
By enabling this, the Hololens device will override the Main Camera in the scene. As the Hololens moves around the room, the camera position/rotation will be updated accordingly.
If you want something to follow the player as they move, make sure it’s a child of the main camera. You should never have the camera be a child of anything, as that parent will be left behind as the camera is moving around.
Still in the player settings, let’s look at the Publishing Settings. We’ll be enabling some capabilities, so our app has the needed permissions to do what it needs. We’ll enable the following:
● InternetClient / InternetClientServer
6

○ This is how your app can connect to the internet, very useful when you have an online application.
● PrivateNetworkClientServer ○ This is how you connect to other devices on your computer. Sounds pretty useful,
and Microsoft recommends turning it on. ● Webcam
○ If you’re doing any picture or video capture, you’ll need to enable this. ● Microphone
○ Needs to be enabled if you have any voice commands in your app. ● SpatialPerception
○ Extremely important if you want to have any spatial mapping components in your app.
There are other capabilities to add, but those change depending on your app. Feel free to play around with others.
Quality Settings While we’re still updating settings, let’s update our Quality settings too. These are also found in the project settings option. Here, let’s change the defaults of our game to be “Fastest.” Remember, we’re trying to get our game to run at 60fps, and this is one of the easiest way to reach that goal.
7

For more tips on reaching 60 fps, read the “Achieving 60fps” section. Microsoft won’t publish your game if you don’t meet this requirement.
Excellent! Now that our project is setup to run with the Hololens, let’s work on building and deploying to the Hololens.
8

Building And Deploying For Hololens If you’ve set up the build settings correctly, then you should be building for the Windows Store platform. Here’s a refresher as to what those settings look like:
Go ahead and click “Build” and save it to a folder somewhere. Note that it will save the solution in the folder you select, but will also make a UWP in the same place as the folder you select.
Visual Studio Setup Inside of the folder you just created, open up the Visual Studio Solution file. Once there, change the settings in Visual Studio to be a Release x86 build. This will make it so you won’t be able to get good debug logs, but it will make your app run faster. Feel free to change as you’re testing, but the final build should be tested with Release x86.
9

Enable Developer Mode On Hololens Before you deploy, you’ll need to enable developer mode on your Hololens. This can be found in the settings, under “Update & Security” and “For Developers.” Be sure to enable developer mode. You can also enable the “Device Portal” while you’re here, we’ll talk about that later. To build and deploy, you can select the target device in the dropdown of the green play button. You can use the USB connector to connect the Hololens device to the computer and deploy using the Device option. You can also use the “Remote Device” option, but you’ll need to know the IP address of your Hololens. You can get that address from internet settings.
Using “Device” is faster, but you’re then tethered to your computer for the first run. Using “Remote Device” is slower, but you are able to wander around the room.
Pairing Device Regardless of the option you choose, go ahead and hit the play button. Visual Studio will eventually prompt you for a PIN to enable access to the device. In the Developer Settings, go ahead and click the “Pair” button to view the PIN. This PIN will change, so don’t worry about writing it down. Enter this PIN into Visual Studio to complete the process. Once the deploy is successful, the app will automatically start. If you’re in debugging mode, you’ll see different messages appear in the console. Note that you’re still able to set breakpoints while in this mode. After the first run, the app will permanently appear on the Hololens device, so you can keep testing your app without having to redeploy each time. Be aware though, that debug statements won’t appear after the first run.
Using The Device Portal Microsoft has created a webpage that allows developers to extend the use of the Hololens. In the portal, you’re able to check system performance, record video, take pictures, view the spatial mapping mesh of the room, and more.
10
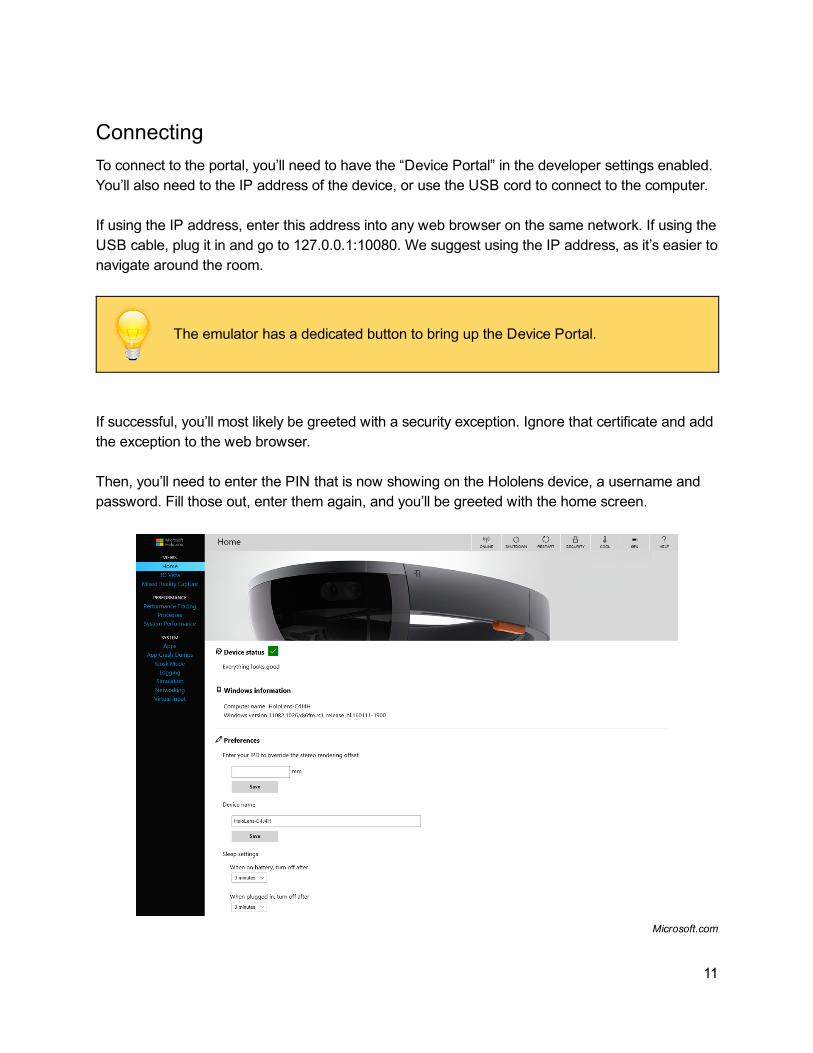
Connecting To connect to the portal, you’ll need to have the “Device Portal” in the developer settings enabled. You’ll also need to the IP address of the device, or use the USB cord to connect to the computer. If using the IP address, enter this address into any web browser on the same network. If using the USB cable, plug it in and go to 127.0.0.1:10080. We suggest using the IP address, as it’s easier to navigate around the room.
The emulator has a dedicated button to bring up the Device Portal.
If successful, you’ll most likely be greeted with a security exception. Ignore that certificate and add the exception to the web browser. Then, you’ll need to enter the PIN that is now showing on the Hololens device, a username and password. Fill those out, enter them again, and you’ll be greeted with the home screen.
Microsoft.com
11

Using the Portal First let’s check out the 3D view. This is a way to see what the Hololens is seeing. If you hit the “Update” button under surface reconstruction, you’ll see the mesh of the room you’re currently in. You’re also able to download the room mesh for use in other applications. If you have an application that doesn’t render the spatial mapping mesh, then this is a good alternative to debug with.
Microsoft.com
Next up let’s look at the Mixed Reality Capture area. This page is very useful, as you can record, take pictures, and livestream your app from this page.
Microsoft.com
12

Whenever you say “Hey Cortana, take a picture” or “Hey Cortana, record a video” those media files will also appear here.
When recording video or livestreaming, your framerate will drop down to 30fps.
Finally, look at the “System Performance” section. This is where you can see different values such as Frame Rate, CPU, GPU, etc. This can be good to monitor when testing your app. These values can also be monitored using the Unity Profiler, so it just comes down to personal preference.
Microsoft.com
There are other areas of the portal, but they are used for specific purposes. Feel free to explore on your own.
13

Gaze The Hololens will use where the user is looking to determine where to put the “cursor.” This is referred to as “Gaze.” Because the Hololens just overrides the main camera, we can find where the user is looked easily.
Finding Where the User is Looking
Vector3 playerPosition = Camera . main . transform . position; Vector3 LookDirection = Camera . main . transform . forward;
Using these two variables, we can do a raycast to see if the player is looking at anything. Note that in order to have a raycast hit, the object it hits needs to have a collider attached to it.
RaycastHit hit; if ( Physics . Raycast ( playerPosition , lookDirection , out hit ) {
//we hit something } Else {
//we didn't hit anything }
Using this code, you can determine if the user is looking at something. The object that was hit is saved to a RaycastHit object.
Creating a Cursor It’s common practice to have some cursor so that the user knows where they are looking and what they’re focusing on. We can modify the code, and place it on a cursor gameObject to achieve this goal.
RaycastHit hit; if ( Physics . Raycast ( playerPosition , lookDirection , out hit ) {
//we hit something Transform . position = hit . point; Renderer . enabled = true;
} Else {
//we didn't hit anything Renderer . enabled = false;
}
14

By placing this code on a gameobject that has a mesh renderer component, it will always appear in front of the player, and overlay the object with a collider it’s looking at. Note that we disable the cursor when it doesn’t hit anything, or else the cursor would seem to get “stuck” when looking away. Be aware that Physics.Raycast can take an argument LayerMark, so that it will only collide against certain objects. In some cases, you may want to use the SpatialMapping layer, so that what you’re looking at won’t stack in front of other “normal” objects in the scene. We’ll explore the meaning behind this in the Spatial Mapping section. Gaze is used in combination of gestures in order to “click” on objects, which we’ll take a look at in the next section.
15

Gestures In order to interact with gameObjects, gestures need to be implemented to handle user input. In order to use these gestures in Unity, you’ll need to include the UnityEngine.VR.WSA.Input namespace. A full list of available gestures, such as TapEvent, HoldStartedEvent, is available in the Unity Documentation.
AirTapping In General To use gestures, make sure that you’ve included UnityEngine.VR.WSA.Input. After that, you’re able to create a new GestureRecognizer and set up the callback methods for each gesture event.
Void Start () { GestureRecognizer recognizer = new GestureRecognizer (); recognizer . TappedEvent += ( source , tapCount , ray ) => {
//We tapped! } recognizer . startCapturingGestures ();
}
You should only have one GestureRecognizer in the scene. If you want to add more methods, add it to the existing recognizer.
Using this code segment, we can make something happen whenever we do the AirTap gesture in view of the Hololens. We can also add other methods for other events here in the same way. Be sure to check the delegate templates for each method so you know how to add a new callback method.
Airtapping a Specific Object However, we don’t want just anything to happen when we tap, we want to interact with the object that we’re looking at. We’ll borrow some of the code found in the gaze section and add it to what we have so far.
Gameobject focusedObject;
16

Void Start () {
GestureRecognizer recognizer = new GestureRecognizer (); recognizer . TappedEvent += ( source , tapCount , ray ) => {
//focusedObject.doSomething(); } recognizer . startCapturingGestures ();
} Void Update () {
RaycastHit hit; if ( Physics . Raycast ( playerPosition , lookDirection , out hit ) {
//we hit something focusedObject = hit . gameobject;
} Else {
//we didn't hit anything }
}
Using the above code, you’ll be able to save the object that you’re looking at, and then you can call a method on that saved object. Reminder, you need to have a collider on that object to be hit by a raycast. Unfortunately, there’s no way to easily call a method without getting the script using getComponent first. Since we want to make this work with any game object, we would have to find out which script has the logic we want to run. Fortunately, Unity has a method that we can use to do this job for us. Modifying the code in the tapEvent callback, we get this:
recognizer . TappedEvent += ( source , tapCount , ray ) => { focusedObject . sendMessage (" onSelect ");
}
The beauty behind this method is that if any script on the gameObject has an onSelect method, that method will be run. However, this means that the box collider and the script need to be on the same gameObject. Also, there needs to be an onSelect method somewhere in the script. This will now work with any game object in the scene, provided it has the requirements listed above.
17

sendMessage can also take in an argument using sendMessage(“onSelect”, arg). In your script, onSelect(Object arg) will be run. onSelect() will still run as normal.
If you’re testing in the Unity Editor, you can create a OnMouseDown() method and call onSelect() in that method.
Adding a Click Sound If you want to add a click sound for feedback, then you can add an audiosource to the gameobject, then modify the script to be:
audioSource = getComponent<AudioSource>(); recognizer . TappedEvent += ( source , tapCount , ray ) => { audioSource.play();
focusedObject . sendMessage (" onSelect "); }
We would recommend against creating custom gestures as we haven’t explored too much with them.
18

Spatial Mapping Spatial Mapping is one of the biggest features that can set a game apart from other platforms. Using Spatial Mapping, users are able to place gameobjects on tables, on the floor, on walls, etc. Fortunately Unity makes it very simple to add Spatial Mapping to your game. We’ll also talk about some advanced features of Spatial Mapping which include saving holograms across multiple sessions and sharing your hologram placements with other users.
It’s strongly recommended to add a SpatialMapping layer to Unity, we’ll be using that layer throughout to keep performance high and calculations low.
Setting Up The Spatial Mapping Object To add spatial mapping quick and easy, create a new empty gameobject called Spatial Mapping. Change it’s position to be 0,0,0. Change the layer of this gameobject to be the “SpatialMapping” layer we’ve created. In the inspector, add the components: Spatial Mapping Renderer and Spatial Mapping Collider. We’ll walk through each option here, but that is all you’ll need to add spatial mapping to your game.
Avoid moving the Spatial Mapping Object, it’s expensive to do.
Spatial Mapping Collider The spatial mapping collider is how everything in the game knows how to collide against objects in the room. There’s some settings that we can change to fit our app.
19

● Mesh Layer ○ Set to be SpatialMapping
● Freeze Updates ○ When false, this will keep updating when running the game. When set to true, the
game will stop updating the mesh. You’ll want it to be false at the start of the game always. If you have a static area, you can have the user scan the area for a few seconds, then freeze updates after scanning the room once.
● Time Between Updates ○ This is how often the mesh will be updated while playing the game in seconds. ○ You can set this to be 0. It will be limited by the calculations of the Hololens when
updating the mesh. ● Removal Update Count
○ This is how often the mesh will remove bad spatial mapping triangles from the mesh. For example, if there is a chair that is scanned and the chair is moved, the mesh will take this many seconds before removing it.
○ Try to keep it low. ● Level of Detail
○ How precise the mesh is going to be. This affects how quickly the mesh is calculated too.
○ You can usually get by with “Low” if you just need basic floor, table, and wall shapes.
● Bounding Volume & Size ○ Spatial Mapping has a limited range before it will cut off to save memory. You can
either use a sphere or cube to scan in, and most rooms are cube shaped so use that.
○ The size should be the size of an average room in meters. Be aware that it is half of the room size, so 4,4,4 will be an 8m x 8m x 8m room.
20

All other options can be ignored as they are either generated automatically at runtime or are selfexplanatory.
Spatial Mapping Renderer The Spatial Mapping Renderer is similar, this is how you can display to the user what they will be seeing. Follow the same guidelines as the collider, with some extra options.
● Render State ○ This is how the user will see the room scan mesh. If it’s visualization, users will see
a colored mesh that changes color based off of distance from the player. Occlusion will act as there’s a tinted glass effect over objects. You’ll be able to see objects behind walls, but only silhouette mostly. None will show no effect.
The collider will update slower than the renderer, so there may be some small disconnect. Also make sure that the “Level of Detail” for both the collider and renderer are the same.
Because these are components in Unity, you can use getComponent<SpatialMappingRenderer/Collider>() and access all of those variables from a script. You’ll need to use the namespace UnityEngine.VR.WSA in order to do this.
21

Placing an object in the real world Now that you’ve added these components to Unity, it’s possible to place objects on surfaces in the real world. We’ll use some of the gaze and gesture script logic from before, but we’ll add some more logic.
Bool placing; RaycastHit hit; Void Start () {
Placing = true; } Void Update () {
if ( Physics . Raycast ( playerPosition , lookDirection , out hit , 10 , 1 << LayerMask . nameToLayer ( "SpatialMapping" )) {
if ( placing ) { transform . position = hit . hitPoint; Quaternion newRot = Camera . main . transform . rotation; newRot . x = 0; newRot . z = 0; Transform . rotation = newRot;
} }
} Void onSelect () {
Placing = ! placing; }
This script can go any gameobject and that gameobject will follow your gaze. You can then air tap to place the object. Note that we added two arguments to Raycast. The 10 means we’re only checking 10 meters in front of us to place a hologram. The last argument is making sure that we’re only Raycasting against the Spatial Mapping layer. This last argument is very important, without it, the raycast will hit the object you’re trying to place, update the position, raycast will hit that, update the position, and so on. The result is this object that keeps flying towards your face. That’s very important, so we’ll make a warning box for that.
When trying to place an object using a raycast, make sure you’re only doing a raycast against the spatial mapping layer.
22

Finally, we have a variable that determines if the object has been placed yet. If it hasn’t, keep moving the position where we’re looking. We also rotate the object so it’s always facing with us. If it’s has been placed, hold still. We can change this variable by performing the AirTap gesture on the object. This will work with any game object, and you’ll be able to place it against any floor, ceiling, wall, or table surface. However, you should only be placing one object at a time.
World Anchors in Unity Now that you’ve placed a hologram, we have the ability to save it’s position so that future app sessions will remember its position. This saves the user from having to place a hologram every time the app is run. We’ll begin by introducing another Unity Component called World Anchor. We’ll add it at runtime. For example, in the above script, once placing becomes false, you can just type
WorldAnchor anchor = gameObject . AddComponent < WorldAnchor >();
Be aware though, that this gameObject should never move again. If you need to update the position, you need to call
DestroyImmediate ( anchor );
Now you’re free to move the gameobject around. So far all we’ve done is make it so your gameobject’s are “anchored” in the real world. That means that as you’re moving around the room, or if you lose your bearings, the gameobject won’t lose its position.
World Anchors Across Multiple Sessions However, we’re interested in saving this anchor across sessions. This requires us to set up something called the World Anchor Store. Using this store, we can save and load anchors to a form of dictionary that is saved on the Hololens. We’ll need to use the namespace UnityEngine.VR.WSA.Persistence for this to work. We recommend making a static script class for the store, so you can use it from any object. Also use DontDestroyOnLoad() to make sure the store doesn’t delete itself. Let’s begin by setting up the store. We’ll begin by using this code:
23

Using UnityEngine . VR . WSA . Persistence; WorldAnchorStore store; Void start () {
WorldAnchorStore . getAsync ( storeLoaded ); } Void storeLoaded ( WorldAnchorStore store ) {
This . store = store; }
This code will create an async call that fetches the store from the device. This usually takes a few seconds, so we do it when the application starts. We have a storeLoaded callback that saves the reference to our store for later use. Next up, we want to save and load anchors to the store.
Public void SaveAnchor ( string name , WorldAnchor anchor ) { if (! this . store . Save ( name , anchor )) {
//Saving Anchor Failed (can't save two anchors to one string key) }
} Public void LoadAnchor ( string name , gameObject obj ) {
if (! this . store . Load ( name , obj )) { //Anchor was not found/loaded.
} }
As said, these two methods are meant to work with any objects that are passed in. They can fail, so it’s possible to make the methods return true or false. Note that LoadAnchor will automatically add the world anchor to the gameobject. To use it, we can have code like this:
… WorldAnchor anchor = gameobject . addComponent < WorldAnchor >(); WorldAnchorStore . instance . SaveAnchor ( gameobject . name , anchor ); … … if (! hasLoadedAnchor ) {
24

WorldAnchorStore . instance . LoadAnchor ( gameobject . name , gameobject ); hasLoadedAnchor = true ; //should make sure the above doesn't fail
} …
Before calling these methods, it would be a good idea to make sure that the store has been initialized.
Congratulations! You’ve now saved your objects to the Hololens memory store. If done correctly, all future application runs will automatically place the object.
There existed a bug in Visual Studio 2015 that would clear the WorldAnchorStore when using the Wifi method of deploying to the Hololens. The direct Device method worked fine. This may or may not have been fixed.
Transfering World Anchors Between Devices Finally, there is one other feature built into the Hololens and Unity. It’s possible to export the anchor store to another Hololens device so that they can receive all of the anchors. We’ll use something called a WorldAnchorTransferBatch for this, and we’ll need to the UnityEngine.VR.WSA.Sharing namespace. We’ll begin by creating two WorldAnchorTransferBatch objects to use, and then we’ll have to modify our save and load to handle this new functionality.
Using UnityEngine . VR . WSA . Sharing ; WorldAnchorTransferBatch transferBatch ; WorldAnchorTransferBatch loadedBatch ; Void Start () {
transferBatch = new WorldAnchorTransferBatch ();
25

} Public void SaveAnchor ( string name , WorldAnchor anchor ) { transferBatch . AddWorldAnchor (
if (! this . store . Save ( name , anchor )) { //Saving Anchor Failed (can't save two anchors to one string key)
} } Public void LoadAnchor ( string name , gameObject obj ) {
if (! this . store . Load ( name , obj )) {
//Anchor was not found/loaded. } if ( loadedBatch != null ) {
loadedBatch . LockObject ( name , obj ); }
}
Using that code is enough to save and load anchor’s to and from their correct batch. The transfer batch is the anchors that are being exported, and the loaded batch is the anchors that were imported. Let’s look at that import/export code below:
List < Byte > exportingAnchorBytes = new List < Byte >(); ... WorldAnchorTransferBatch . ExportAsync ( transferBatch , OnExportDataAvailable , OnExportComplete ); ... private void OnExportDataAvailable ( byte [] data ) { exportingAnchorBytes . AddRange ( data ); } private void OnExportComplete ( SerializationCompletionReason completionReason ) { if ( completionReason == SerializationCompletionReason . Succeeded ) { //Success! Give the List of bytes to your receiving device. } }
The above code will take care of exporting our transferBatch. There’s two callbacks, as the data appears in stages. Once the export is complete, you’ll need to send the bytes to your other device. We’ve used both networking and saving to a file for this process to work. Now that we’ve exported the anchors, we need to import the anchors!
26

… WorldAnchorTransferBatch . ImportAsync ( exportingAnchorBytes . ToArray (), OnImportComplete ); ... private void OnImportComplete ( SerializationCompletionReason completetionReason , WorldAnchorTransferBatch deserializedBatch ) { if ( completetionReason == SerializationCompletionReason . Succeeded ) { loadedBatch = deserializedBatch ; } }
Importing is much simpler, as all we have to do is save the new WorldAnchorTransferBatch once it’s completed importing. We’ll save it to loadedBatch, and we already modified LoadAnchor() to check the loadedBatch.
Importing a WorldAnchorTransferBatch won’t save it to the store, so if you want to have anchors be saved on the device, you’ll need to save them to the WorldAnchorStore once you’ve imported all anchors.
Anchors received by using a transfer batch need the necessary environmental data to place the WorldAnchor.
Spatial Understanding Spatial Mapping is one of the biggest features of the Hololens, and we unfortunately couldn’t discover everything it has to offer. Be aware that there are ways to automatically place objects in the scanned room using spatial understanding. Using spatial understanding, the program can decide the best place to place an object (on a wall or such), instead of having the user place every single object manually.
27

Voice Commands Voice commands are another way to add input to your application. Note that you’ll need the Microphone capability enabled before voice commands will work correctly. We’ll be using Windows Speech Recognition, so we’ll need the UnityEngine.Windows.Speech namespace.
Creating Voice Commands To set up voice commands, you’ll need to create a keywordRecognizer, add some keywords to listen for, then start listening. If we hear the user say a keyword that we’re looking for, then we’ll execute the action we tied to that keyword.
Using UnityEngine . Windows . Speech; KeywordRecognizer keywordRecognizer = null ; Dictionary < string , System . Action > keywords = new Dictionary < string , System . Action >(); Void Start () { keywords . Add ( "VoiceCommand" , () => { //Do this command }); … add more commands keywordRecognizer = new KeywordRecognizer ( keywords . Keys . ToArray ()); keywordRecognizer . OnPhraseRecognized += KeywordRecognizer_OnPhraseRecognized ; keywordRecognizer . Start (); } private void KeywordRecognizer_OnPhraseRecognized ( PhraseRecognizedEventArgs args ) { System . Action keywordAction ; if ( keywords . TryGetValue ( args . text , out keywordAction )) { keywordAction . Invoke (); } }
It’s recommended to create keywords that have more than one syllable. This makes it more distinct from other words.
28

Make sure that you only have one keyword recognizer in the scene. You can make each keyword doing any event that you need it to.
All apps have “Select” saved to an airtap event, you don’t need to implement this yourself.
29

Achieving 60FPS If you want to get your application up on the Windows Store, then you’ll need to make sure that your application is a steady 60fps throughout. For most smaller apps this should be no problem, but as more and more objects get added you need to start optimizing.
● Make sure default graphics settings are set to fastest ● Disable shadows on all objects ● Do NOT use the Unity Standard Shaders. Find Hololens specific shaders or use Mobile
shaders. ● Use batching to cut down on overhead ● Keep the number of tris/poly’s on screen low, under 50,000 should be fine. ● Don’t use a lot of physics calculations in the app ● Follow standard Unity conventions, don’t call Gameobject.Find() or getComponent() every
frame. If you are still having trouble reaching 60fps, use the Unity Profiler to determine where the frame rate is dipping. It may be the object mesh is too complex, or doesn’t have an optimal material/shader attached to it.
30

Misc. Information
Compile Early Be aware that Windows Store applications run on a different underlying platform than general Unity PC games. That being said, note that all libraries available on PC aren’t always available on the Hololens. For example, using Thread on PC will use System.Threading. However, the Hololens will crash while compiling this code, so you’ll need to use an alternative like Tasks. So above all:
When using a new library or tool, build it for Hololens to see if the library/tool is supported. Some aren’t, so this will save you some time.
Use Directives If you’re creating a multiplatform application (say PC, Tablet, and Hololens) it’s very useful to use directives to compile on different platforms. For example, you could have code like this:
#ifdef UNITY_STANDALONE //Do PC/Mac/Linux specific code #endif #ifdef UNITY_UWP //Do Hololens specific code #endif
Note that this also comes in handy when working with the Hololens namespaces such as UnityEngine.VR.WSA. That means that when you try to compile for standalone, you’ll receive a compile error. That can be fixed by placing the entire script in one of those directives.
UI When using UI elements in Unity, make sure your canvas is set to world space. You can add a “Hololens Input Module” to your EventSystem so you can tap on buttons. An alternative would be adding box colliders to each button, then placing the onSelect() method on the button object.
31

Alternate Input Options The Hololens comes with a clicker that can be used in replacement of airtapping and some gestures. You do not need to handle this, as the gestures are designed to work with both. You can check the “source” variable of a gesture event to determine if it came from a clicker, a hand, or voice. It’s also possible to use an Xbox One S controller with the Hololens. There is currently an asset package in the Unity asset store that will handle all of this for you.
Image Recognition If you do want to do something with image recognition on Hololens, there is a software service called Vuforia that can accomplish this task. You just need to supply an image, attach a gameobject to it, and it will appear when the image is in focus. There are also other software packages out there that accomplish this task, so take a look around at other options.
Other Resources Finally, don’t be afraid to download other Hololens apps off of the store. You’ll learn a lot by seeing with other developers did! Also check out Microsoft’s tutorials in the Academy, as well as check out the developer forums.
32

References Microsoft Developer Pages: https://developer.microsoft.com/enus/windows/mixedreality/academy https://developer.microsoft.com/enus/windows/mixedreality/design https://developer.microsoft.com/enus/windows/mixedreality/development Unity Documentation: https://docs.unity3d.com/560/Documentation/ScriptReference/
33