word processing basics word 6.0 for windows 3.1 & … closing a file you can remove a document...
TRANSCRIPT
-
Word Processing Basics~
Word 6.0 for Windows 3.1 &Word 7.0 for Windows ‘95
DSKL 817Adaptive Computer Access
Carolyn FioriAdaptive Computer Technology Specialist
High Tech CenterCollege of San Mateo
revision Spring 1997Thanks to Helene Maxwell, Mark Tomes, and Ellen Cutler for their ideas and materialsthat helped me as this manual has evolved over the years. Pages marked EC came
directly from Ellen’s material.

1
Getting Started
Word for Windows 3.1
1. Choose 5 from the HTC Main Menu. Press <Enter>. This loads inWindows. The Program Manager will be on the screen.
2. Click one time on the Word icon in upper right corner. This loadsMicrosoft Word for Windows.
orYou can use a keyboard shortcut - Ctrl + Alt + W
Word for Windows ‘95
1. Double click on the Word icon.or
You can use a keyboard shortcut - Ctrl + Alt + W
Note:This manual is arranged in alphabetical order.
Check the index at the end to find something specific.

2
Cancel - Undo a command
Sometimes you press the wrong key, get into the wrong menu or choose a menu youdon't know how to use. If you do something you don't want to and then change yourmind, you can undo it.
If you press the wrong key, from the Edit menu choose Undo.
If a dialog box opens up and you don't want it, click on the Cancel button.

3
Centering a title or text
1. Click the Centering icon on the Toolbar. Type in your text. When you press
Return/Enter, the centering will continue. If you want to go back and align left for
your paragraph, click on the Align Left icon on the Toolbar.or
If you have already typed something and then decide to center it:
1. Move the I -beam to the line you want centered and click.
2. Click the centering icon on the Toolbar.
Note: Make sure you do not have spaces before or after the group of words youwant centered. Words and spaces will be centered. This may not be theresult you want.

4
Closing a file
You can remove a document from your workspace by closing the file. Go to the Filemenu and choose Close. Your document is closed but you are still in Word.
Word can have 10 documents open at a time. You can leave documents stacked oneon top of each other until you're finished. The open documents are listed under theWindow menu. The check mark indicates which document is on top or active. Choosethe document you want to work with by pointing to it and clicking on the title.
ColumnsTo format your text in 2 or 3 columns like a newspaper or newsletter, use onthe toolbar. In columns, text flows from the bottom of one column to the top of the next.Word automatically adjusts the width of the columns to fit between the margins youhave set.
1. Place your cursor where you want your columns to start.
2. Choose how many columns you want.
3. View your columns in Page Layout. You cannot see the columns in NormalView.

5

6
Cut & Paste - Moving blocks of text
To move text to a different location in the document:
1. Select the block of text you wish to move. Highlight the area by dragging the
I-beam across the word/words. (See section on Selecting Text.)
2. From the Edit menu, choose Cut. The text will disappear from the screen but be
stored in the computer’s memory or clipboard.
3. Place the I-beam where you would like to move this text. Click to move the
blinking cursor.
4. From the Edit menu, choose Paste. Your text reappears in the new location.
To move text to another document:
1. Select the block of text you wish to move by highlighting it.
2. From the Edit menu, choose Cut. The text will disappear from the screen but be
stored in the memory or clipboard.
3. From the File menu, choose Open. Open the desired document. or From the
Window menu, select the opened document that you would like to activate.
4. Place the I-beam where you would like the text to be. Click to move the blinking
cursor into position.
5. From the Edit menu, choose Paste.

7
Erasing words or spaces
Backspace (large key near =) - erases one letter or space to the left (<--) of the cursor. If you keep pressing, it will continue erasing to the left andcontinue erasing up your document.
Delete (below the Insert key) erases one letter or space to the right (-->). It will also repeat.
Note: You can also erase/delete words, lines, paragraphs after you have selectedthe text. See section on Selecting.

8
Exit/Quit
When you are finished, save your document and quit the program.
1. From the File menu select Exit.
2. If you’ve made changes and haven’t saved, you will be asked “Do you want tosave changes?”. Make sure you are saving on your disk.
3. Windows 3.1: When you’re finished, the program will close and you will bereturned to the Program Manager. Close all windows by double clicking in thecontrol menu box in upper left corner or use Ctrl F4. Close the ProgramManager: Alt F4 or from the File Menu choose Exit Windows.
Windows ‘95: When you’re finished, you are returned to the desktop. Check theStart Menu bar. Close all programs. Take out your disk and you’re done.
4. Leave the computer on unless asked to Shut Down.

9
Finding Text (EC)
Word’s Find command will search automatically through your document andfind specific text you want to edit.
Finding Procedure
1. Put the cursor (insertion point) at the beginning of your document.2. Open the Edit menu and choose Find....3. In the Find What box, type the text for which you want Word to search.
Special Notes:Whole Word Box If there is an X in the Whole Word box,
Word will find whole words only. Forexample, if you ask Word to find theword "bed," it will not find "bed" in"embedded."
Match Upper/Lowercase Box If there is an X in the MatchUpper/Lowercase box, Word will find textwith the exact same capitalization foundin the text you typed in the Find Whatbox. For example, if you ask Word tofind "My," it will not find "my."
4. Click once in the Find Next button.5. Word will find the first occurrence of the text you typed in the Find What
box.6. To find the next occurrence, click again in the Find Next button. To
return to your document before Word has searched the entiredocument, click once in the Cancel button.

10
Finding and Replacing ProcedureWord's Replace command will search your document for specified text andreplace it with new text. Amazing!
1. Put your cursor at the beginning of your document.2. Open the Edit menu and choose Replace.3. In the Find What box, type the text you want to change.4. In the Replace With box, type the new text.
Special Note: Decide if you want to activate the Whole Word and MatchUpper/Lowercase options.
5. Click once in the Find Next button.6. Word will stop on the first occurrence of the text for which you are
searching. Click once in the Replace button if you want to replace thetext.
7. Click once in the Find Next button to proceed to the next occurrence ofthe text.

11
Footnotes/Reference Notes (EC)
A footnote is a note of explanation or reference placed below the text on aprinted page. Endnotes are notes of explanation or references that appearin a group at the end of a document.
Creating a Reference note1. Put your cursor where you want the reference note reference mark to
appear2. Open the Insert menu and choose Footnote.3. You will see a footnote dialogue box.4. Click once in the OK button to let Word know that it can number your
notes automatically starting with number one. Your window now hasTWO WINDOW PANES, one for your document and one for yourreference note.
5. Type the text of your note in the reference note window pane. Word willcreate the note in 10-point plain text.
6. Click anywhere in your document to continue working.7. You can close the reference note window by clicking once on the Close
button of the reference note window.
Editing a Reference note1. If the reference note window is not open, Open the View menu and
select Footnotes.2. Make your changes to the text of the notes.
Deleting a Reference note1. Select (highlight) the reference mark in your document.2. Tap the delete key. Word will automatically delete the reference note
text that goes with the reference mark number.
Moving a Reference note1. Select the reference number of the reference note you want to move.2. Use cutting and pasting OR dragging and dropping to move your
reference note.
Telling Word Where to Print Your Reference Notes
1. Open the Insert menu and choose Footnote... Click once on theOptions button
2. Put your pointer on the down arrow in the Place At: box.

12
3. Press and hold the mouse button to open the drop down list.4. Select one of the placement options.
Note: Placement Options:Bottom of Page All reference notes (footnotes) will be placed at the
bottom of the page on which their reference notereference number occurs.
Beneath Text All reference notes (footnotes) will be placed justafter the last line of text on the page on which theirreference note number occurs.
End of Section If you have created a multi-section document, thereference notes (endnotes) can be printed at the endof each section.
End ofDocument
All notes are printed at the end of your document. Ifyou want your reference notes (endnotes) on aseparate page at the end of your document, inserta hard page break (Insert menu) right after the endof your text.
5. Click OK after you have made your choice.

13
Hanging Indent - Indent a block of text
Example1. This is an example of a hanging indent. It refers to the second line of this
paragraph. As you can see, the second line is lined up .5” from the regularmargin under the word “This.”
Directions:1. Before you start typing, from the Format menu, choose Paragraph.2. Next to Special, click on the little arrow to the right and a menu will drop down.
Click on Hanging. There is a preview of what your document will look like at thebottom of the window. Then click on the OK button.
If you have already typed the paragraph and now want to make changes:1. Click in the paragraph or highlight all the paragraphs you want to change.2. Then from the Format menu, choose Paragraph.3. Next to Special, click on the little arrow to the right and a menu will drop down.
Click on Hanging. There is a preview of what your document will look like at thebottom of the window. Then click on the OK button.

14
Headers and Footers (EC)
Headers: A header is text that is repeated at the top of every page (orevery other page). Headers consist of valuable information likethe document's title or topic.
Footers: Footers have the same job as headers. Instead ofappearing at the top of the page, they appear at thebottom, or foot, of the page
Default Position: Headers are automatically placed in the middle of thetop margin. Since the top margin is 1 inch, the headerswill be placed 0.5 inches below the top of the page.
Footers are automatically placed in the middle of thebottom margin. Since the bottom margin is 1 inch, thefooters will be placed 0.5 inches up from the bottom ofthe page.
Basic Procedure for Creating Headers and Footers (EC)1. Open the View menu and choose Header/Footer.

15
2. Choose Header or Footer.3. Click once in the OK button.4. Type your text in the window.5. Click the Close box to close the window.
Special Note: You will not see your header (or footer) on your regularediting screen (Normal View). You can view it from Print Preview or with thePage Layout view (View Menu)
Special and Wondrous Options (EC!)
Now that you know the basic steps for creating a header or a footer, you willlearn about the special options available to you for your headers and footers
Formatting Your Header or Footer
Trying out the Preset Tabs1. Open your header or footer window.2. Tap your tab key once. Your cursor moves to the center of your footerat position 3 inches. You can create centered text.3. Tap your tab key again. This time you get a right justified tab atposition 6 inches. This allows you to type right justified text.
Adding Borders1. Open your header or footer window.2. Open the Format menu and choose Border.3. Design your border.4. Click once in the OK button.
Adding Page Numbers, the Time or the Date1. Open your header or footer window.2. Put your cursor (insertion point) where you want the information (pagenumber, time or date) to appear3 Click once on the page number, date or time icon.

16
Inserting text
1. The programs start in an insert mode i.e.. when you type, words will beinserted to the left of cursor.
2. Move the I-beam to where you would like to insert text and click the mousebutton once. Type and words will be inserted to the left of the blinkingcursor.
If you press the Insert Key, insert is turned off and Typeover is turned on. (OVR islit at the bottom of your screen on the Status Bar.) Typeover means that whateveryou type will type over the existing letters and spaces.
Inserting a Space/Spaces
1. Use the Space Bar (1 space) and the Tab (.5 inch) to add spaces in yourdocument. You can't use the arrow keys to move words over or addspaces. The arrow keys only move the cursor around in your document.
Use the space bar only to put a space between your words. Use the Tab tomove the cursor and line up words or to put your name over to the right sideof you page.
2. Press the <Return>/<Enter> to move the cursor down to a new line whenyou are at the end of a paragraph. Press <Return>/<Enter> again to add ablank line between the paragraphs.
3. When the cursor is in front of text, press the <Return> to move all this textdown to the next line. If you do this by mistake, press the Delete key orBackspace key to move the text back up.
17
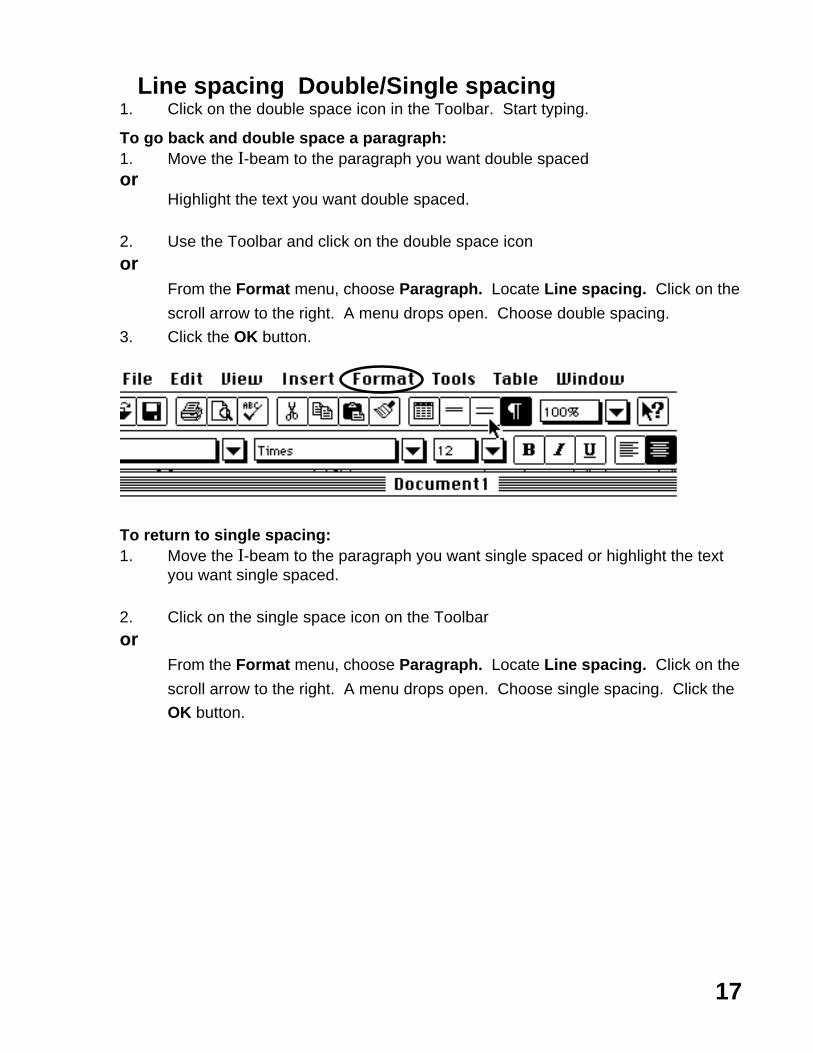
Line spacing Double/Single spacing1. Click on the double space icon in the Toolbar. Start typing.
To go back and double space a paragraph:1. Move the I-beam to the paragraph you want double spacedor
Highlight the text you want double spaced.
2. Use the Toolbar and click on the double space iconor
From the Format menu, choose Paragraph. Locate Line spacing. Click on the
scroll arrow to the right. A menu drops open. Choose double spacing.
3. Click the OK button.
To return to single spacing:1. Move the I-beam to the paragraph you want single spaced or highlight the text
you want single spaced.
2. Click on the single space icon on the Toolbaror
From the Format menu, choose Paragraph. Locate Line spacing. Click on the
scroll arrow to the right. A menu drops open. Choose single spacing. Click the
OK button.

18
Margins
By default, there will be an inch on each side of the page when you print it. If you wantmore space, you can change the margins.
Margins can be changed from their default settings by dragging the blacktriangle-shaped markers on either end of the ruler. Text that is then typed in willconform to these margin settings.
To change margins for entire document
1. From the File menu, choose Page Setup. Click the Document button.
2. Click in the boxes to the left, delete the setting (inches), and type in new settings
for left, right, top and/or bottom margins.
To change margins for more than one paragraph
1. Select the paragraphs to be changed.
2. Drag the black triangle-shaped markers on the ruler to a new position.

19
Moving the cursor
There are different types of cursors:Arrow Cursor You see the arrow cursor when you are working in the
menus or on the left margin to select lines.Blinking I-beam Cursor You see this blinking cursor in your document. It fits nicely
between words. You select and edit text with this cursor.
You can move your blinking cursor around in your document. You cannot move thecursor into space where you have not typed. To move the blinking cursor:
Arrow keys:Move the cursor left or right one letter at a time; up or down a line at a time.
Mouse1. Move the I-beam cursor to the desired location.2. Click the mouse button once. Blinking cursor moves to where you clicked.
Quick Moves
To the beginning of the document.Drag the small white box in the scrollbar to the top. Move I-beam cursorwhere you want. Then click themouse once.
To the end of the document.Drag the small white box in the scrollbar to the bottom. Move I-beamcursor where you want. Then clickthe mouse once.
To the beginning of the lineMove I-beam cursor where youwant. Then click the mouse once.Or press the Home key.
To the end of the lineMove I-beam cursor where youwant. Then click the mouse once.Or press the End key.
One word at a time to the rightCtrl + Right Arrow
One word at a time to the leftCtrl + Left Arrow
Moves up or down one screen at a time Page up or Page down
Goes to a specific page From the Edit menu, choose Go to.

20
New Document
Start a new document from the File menu by choosing New then <Enter> at theNormal/Blank Template dialog box.
or
Use the Toolbar and click on the icon labeled New (first one on left).
21
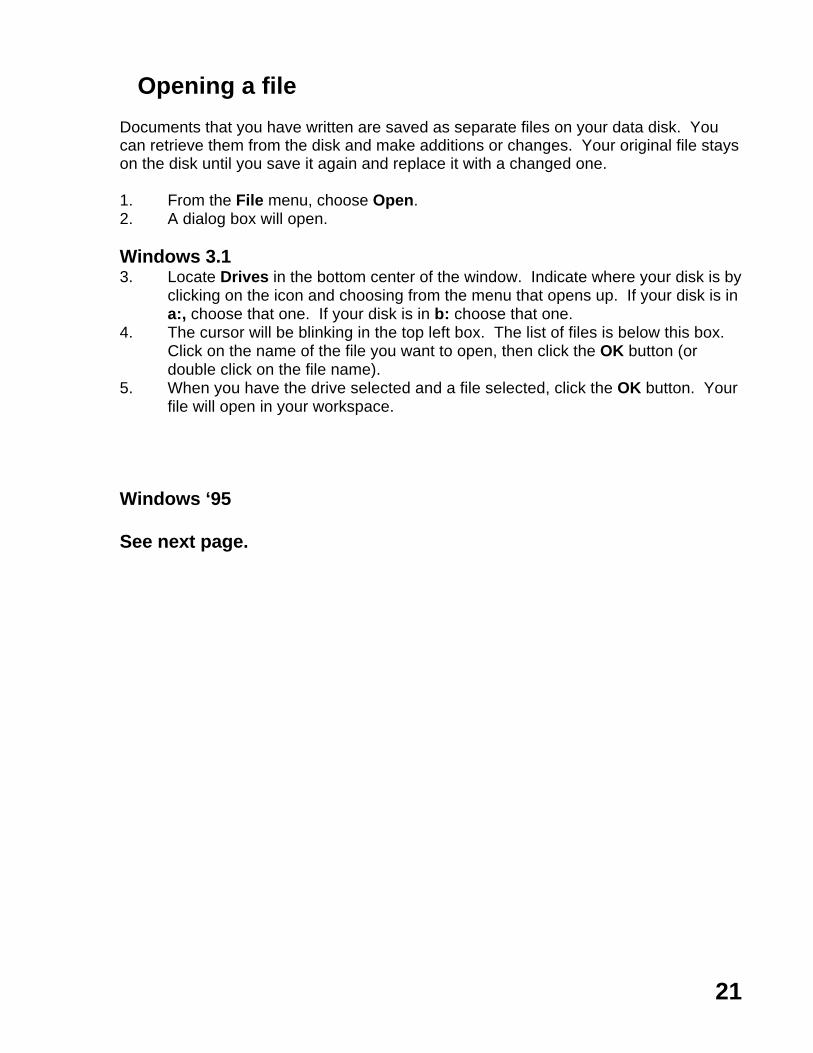
Opening a file
Documents that you have written are saved as separate files on your data disk. Youcan retrieve them from the disk and make additions or changes. Your original file stayson the disk until you save it again and replace it with a changed one.
1. From the File menu, choose Open.2. A dialog box will open.
Windows 3.13. Locate Drives in the bottom center of the window. Indicate where your disk is by
clicking on the icon and choosing from the menu that opens up. If your disk is ina:, choose that one. If your disk is in b: choose that one.
4. The cursor will be blinking in the top left box. The list of files is below this box.Click on the name of the file you want to open, then click the OK button (ordouble click on the file name).
5. When you have the drive selected and a file selected, click the OK button. Yourfile will open in your workspace.
Windows ‘95
See next page.

22
Outlining with Word (EC)Outline Heading Any text automatically assigned an outline heading
levelBody Text Text that is NOT part of any outline heading level
Creating and Editing an Outline:
TO DO THISBegin an outline Go to View menu and select Outline.
Your ruler bar will change to the outlinebar with the icons you will need for anoutline.
Select a topic and anysubtopics in order to movetopic and subtopics right, left,up or down
Click on the + or - next to the topic.
Move a topic to the right or leftone level
Select topic, click on ←← or →→Move a topic above or belowadjacent topic
Select topic, click on ↑↑ or ↓↓Change a topic to body text Select topic, click on →→Expand subtopics or body textbeneath a topic Select topic, click on +Collapse subtopics or body textbeneath a topic Select topic, click on -Expand outline to show outlineat various levels
Select topic, click on 1-9 or All.
Numbering an Outline
1. Select the part of the outline you want to have in number format.THIS IS NECESSARY, CRITICAL, ESSENTIAL...
2. Open Tools menu and choose Bullets and Numbering.3. Is the circle next to Outline highlighted? If not, click once in this circle
to choose Outline.4. Click once on the Outline format option.
Observe that Word illustrates this option in a sample box on the right ofthe dialogue box.
5. Click on the OR' button.

23
Note: If you move topics after they have been numbered, you will haveto repeat the above steps to renumber the topics in the correctsequence.
Printing an Outline:1. Make sure that the parts of the outline you want printed are displayed.
Word will not print collapsed subtopics.2. Open File menu and choose Print.

24
Page Numbers
1. From the Insert menu, choose Page Numbers.
2. Position: Click on the arrow to the right and choose top of document or
bottom of document.
3. Alignment: Click on the arrow to the right and choose where on the line you
want your page number to appear (Center or right are usual places to choose.).
4. There is a preview box to the right so you can see where your page number will
be inserted.
5. Click on the OK button.
25
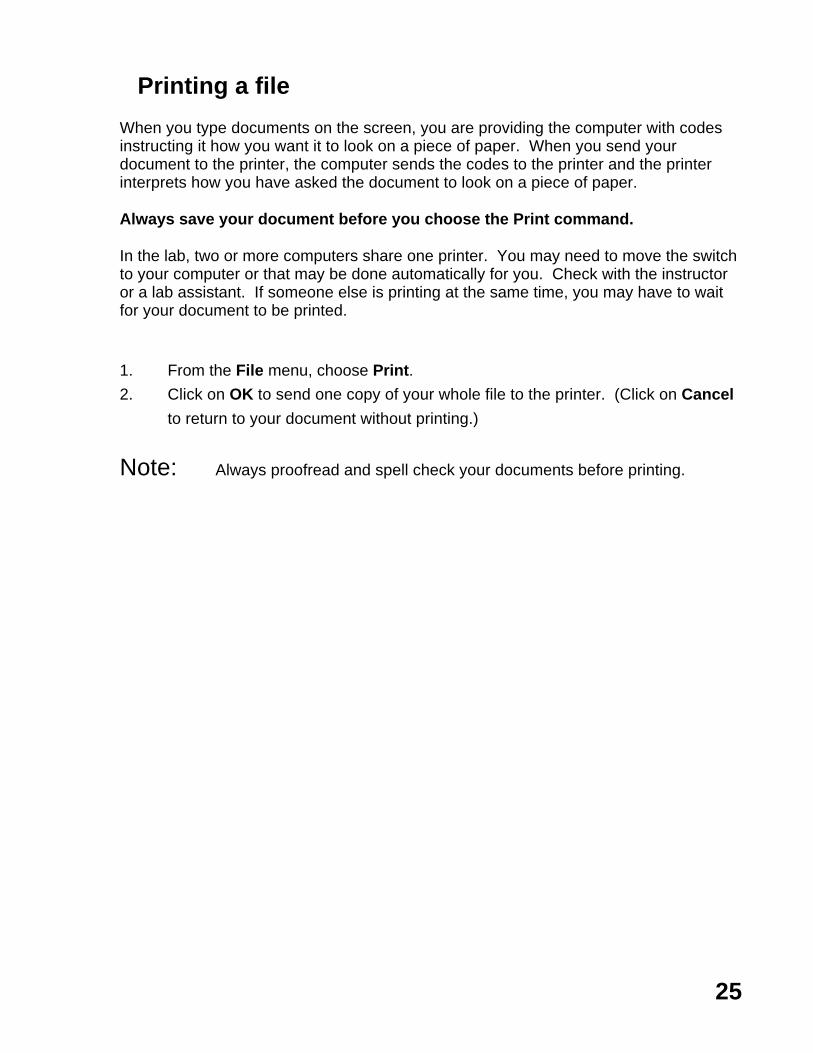
Printing a file
When you type documents on the screen, you are providing the computer with codesinstructing it how you want it to look on a piece of paper. When you send yourdocument to the printer, the computer sends the codes to the printer and the printerinterprets how you have asked the document to look on a piece of paper.
Always save your document before you choose the Print command.
In the lab, two or more computers share one printer. You may need to move the switchto your computer or that may be done automatically for you. Check with the instructoror a lab assistant. If someone else is printing at the same time, you may have to waitfor your document to be printed.
1. From the File menu, choose Print.
2. Click on OK to send one copy of your whole file to the printer. (Click on Cancel
to return to your document without printing.)
Note: Always proofread and spell check your documents before printing.

26
Saving a file
Be as specific as possible when naming a file so that you will remember itscontents later when you have many documents on your disk.
Use different names when naming your files. You cannot have 2 files with the samename.
Naming your files: You may use 8 letters or numbers for your file name. Nospaces. The Word Program adds .doc to all your documents. This is called anextension. You don’t need to type it in.
You can save files many times, keeping the same filename and replacing the olddocument with the new document.
1. From the File menu, choose Save.
2. A dialog box will open.
Windows 3.1
3. The cursor will be blinking in the top left box. Type in a name for your file.
4. Locate Drives in the bottom center of the window. Indicate where your disk is byclicking on the icon and choosing from the menu that opens up. If your disk is ina:, choose that one. If your disk is in b: choose that one.
5. When you have the drive selected and a name for your file, click the OK button. Yourfile is saved.
Windows ‘95
See next page.
27
Selecting Blocks of Text- Highlighting Text (Win95)
Using the Mouse:
1. Move the I-beam to the beginning of the text you wish to select.
2. Press and hold down the mouse button and drag it across the text..
3. The text selected will be black or a color.
4. Release the mouse button.
5. To erase, press the delete key. Or make changes in size and style.
Using the keyboard:
1. Move the I-beam to the beginning of the text you wish to select. Point and
click.
2. Hold down the shift key and use the arrow keys to move across the text you
want highlighted.
3. The text selected will be black or a color.
4. To erase, press the delete key. Or make changes in size and style.
Using the trackball:
1. Move the I-beam to the beginning of the text you wish to select.
2. Press the drag key then use the ball to move the highlight across the text you
want selected.
3. The text selected will be black or a color. Press the drag key again to
release.
4. To erase, press the delete key. Or make changes in size and style.
28
Special Characters
Bullets and symbols are included in the fonts installed in your computer system. Youcan add these special characters to your documents just like you would add a letter orpunctuation.
Inserting a special character with the Symbol command
1. Position the blinking cursor where you want to insert the special character.
2. From the Insert menu, choose Symbol. The dialog box displays the charactersfor the active font.
3. If you want to view characters in a different font or point size, choose that font orsize from the Font menu.
4. Click on the character(s) in the Symbol dialog box that you want to insert.
5. Click on the close box or button.
Note: Check in AutoCorrect for more symbols.

29
Spell Check - Whole Document
Note: Save your document before you check the spelling.
The Spell Check is another program inside your word processing program. You mustrespond to its prompts or suggestions until it is finished. If you want to stop in themiddle, close the Spell Check window.
1. From the Tools menu, choose Spelling or F72. The spell check will highlight a word it cannot find it its dictionary. The word will
appear at the top of the dialog box after Not in dictionary.
A suggestion will appear on the next line after Change to:
3. If the highlighted word in your text is correct, click once on the Ignore button.
4. If you see a suggestion with the correct spelling, click to select it and that
suggestion will appear in the Change to box. Click the Change button. The
Spell Check will insert that word into your document.
5. If you want to make corrections yourself, type in your correction in the
Change to box. When done, click on the Change button.
6. At the end of the spell check, a dialog box will open and tell you its finished.
Click on OK.
7. Save before you continue.
Spell Check - one word at a time
If you want to check one word:
1. Highlight that word. From the Tools menu, choose Spelling or F72. If correct, the spell check will tell you it is spelled correctly. If incorrect or not in
dictionary, the spell check will proceed with giving you suggestions. Do the
same as you did checking your whole document.
Red squiggly lines - This means that the word is misspelled or not in dictionary
1. Point to the middle of the word with the red squiggly line. Click the right mousebutton. A little menu will open with spelling suggestions. Point to the one youwant the click. Your word will be corrected.
30
Spelling command (Tools menu) (EC)
Dialog Box Options
Not In Dictionary
Displays a word not found in the main dictionary or open custom dictionaries.
Change To
Type or select a word from the Suggestions list to replace the word Not in Dictionary
Suggestions
Lists suggested replacement words from the dictionary. You can choose one of theseby clicking on it then clicking on the Change Button.
Add Words To
Select the dictionary to which you want to add the word in the Not In Dictionary box ifthe word is correctly spelled but not found in the main dictionary -- for example, thename of a person or city that you type often. Do not add word to the HTC computersunless you check with the instructor.
Ignore Button
Skips the word in the Not in Dictionary box. Does not correct the spelling of the word inthe Not In Dictionary box. Word will continue to display the word during the spellingcheck.
Ignore All Button
Leaves the word in the Not In Dictionary box unchanged during all spelling checks inthe current Word session.
Start Button
Continues the spelling check after you go back to the document and make a change.
Change/Delete Button
Changes the word in the Not In Dictionary box to the word in the Change To box. If theChange To box is empty, the name of the button changes to Delete.

31
Change All/Delete All Button
Changes the word in the Not In Dictionary box to the word in the Change To box for allinstances in the document. If the Change To box is empty, the name of the buttonchanges to Delete All, to delete all instances of the selected word in the documentduring the current spelling-checking session.
Add Button
Adds the word in the Not In Dictionary box to the dictionary selected in the Add WordsTo box. Do not add word to the HTC computers unless you check with theinstructor.
AutoCorrect Button
Adds a word to the AutoCorrect list so that Word can correct any misspellings of itautomatically as you type.
Options
Displays a dialog box in which you can specify the rules that Word uses to checkspelling.
Undo Last
Reverses the most recent actions made during the current spelling-checking session,one at a time.
Cancel/Close
Closes the Spelling dialog box, but does not reverse any changes you have made. Thename of the Cancel button changes to Close after youmake a change in the document.

32
Tabs
1. Tabs are preset every .5”. (.5”, 1”, 1.5”, 2”, 2.5” etc.) Use the Tab key to indentthe first line of a paragraph and to line up rows of text.
2. Remember: Tabs add spaces to your text.
3. If you want to set tabs other than at the .5” mark, you will find Tabs in theFormat menu under Paragraph. Check the Help screen or the documentationfor more information. For purposes of this class, use the preset Tabs.

33
Tables
Arranging text in columns by creating a table is much easier than setting up columnswith tabs. In Word, tables consist of rows and columns divided into rectangular areascalled cells, which you can fill with text and graphics. Text wraps within each cell, soyou can edit without disturbing the laying of the columns.
You can insert an empty table with the Table button on the Toolbar or the Tablecommand in the Insert menu.
Inserting an empty table1. Position the blinking cursor where you want to insert the table.
2. On the Toolbar, click and hold down the Table button.
3. On the Table button grid, drag the mouse to select the number of columns androws you want the new table to have. Release the mouse button and your tableis inserted in your document.
Tips• To add columns in an existing table, click on the Table button or Choose Insert
row/column from the Table menu.• To change the width of columns or cells in a table, select the column or cell, and
move the marker on the ruler.• To insert a tab in a table, press Option+Tab instead of just the Tab key.• Change the format of cells, rows or columns by selecting what you want to
change, then choose your formatting from the Toolbar or menus. You cancenter, align left, enlarge the type, bold, italic the same way you do in yourdocuments.
Moving Around Your Table (EC)There are keys with special jobs for helping you move around your Table.
Tab Pressing tab advances the insertion point to a new cell.
Shift-Tab Moves the insertion point backwards to the preceding cell.
Return Key Starts a new paragraph within a cell.
Option-Tab Moves to the next tab stop WITHIN a cell.
Quickly Selecting Specific Rows and Columns in a Table

34
Selecting One Cell Move your pointer to the left of thecell so that it looks like an arrowointin to the right. Click once.
Selecting and Entire Row Move your pointer to the left of therow you want to select so that yourpointer looks like an arrow pointingto the right. Double click.
Selecting an Entire Column Put your cursor at the top of thecolumn you want to select so that itlooks like an arrow pointing straightdown. Click once.
Selecting an Entire Table Open the Table menu and chooseSelect Table.
Special Note: You can also use your mouse to select parts of your table bydragging across the areas you want to select.
Creating Borders for Your Whole Table
You have observed that your tables have little dots (grid lines) around eachcell. These grid lines will NOT appear when you print your table. If youwant borders around your table data to appear when you print, you need tolet Word know this.1. With your cursor anywhere with your table, select your whole table
(Table menu, Select Table).2. Open the Format menu and choose Border...3. Click once on the Grid option.4. Click once in the OK button.
35
Justification of Text in CellsBefore beginning the following steps, be sure that the indent icon (Not themargin icon and Not the tables icon) on your ruler is selected.
1. Put your insertion point in the cell.2. Click in the placement option (flush left, centered, or flush right) of your
choice from the Ruler line.
Special Note: If you want to change how text is aligned in a group of cells,simply select those cells, and click once on the alignment icon of yourchoice
Inserting Row and Columns1. Put your insertion point (cursor) anywhere in the row BELOW -where
you want your new row to appear. If you are inserting a column, putyour insertion point in the column to the RIGHT of where you want thenew column to appear.
2. To insert TWO or MORE rows or columns, select (drag over) thenumber of rows (or columns) you want to insert before going to the Editmenu.
3. Open the Table menu, choose Insert Cells and let Word know what youwant.
Adding Rows to the End of a Table1 Put the insertion point just outside (to the right) the last row at the end
of your table.2. Press the Tab key once, and you will have a NEW row at the END of
your table.
Adding Columns to the End (Right Side) of a Table1. Put the insertion point just outside (to the right) the edge of your table.2. Open the Table menu and choose Select Column3. Open the Table menu again and choose Insert Column.
36
Deleting CellsSpecial Note: If you delete the cell, you will also erase the text in the cell.1. Select the columns(s) or rows(s) you want to delete.2. Open the Table menu and choose Delete Columns or Delete Rows.
Changing Column Width1. Put your cursor in the column whose width you want to change.2. Look to the left of your ruler line. Do you see a margin icon symbol? If
not, click on the symbol you see (indent marker icon or T icon) until yousee the margin icon symbol.
3. Observe the T's on your ruler, representing where your columns beginand end.
4. Drag the T's to the location of your choice.

37
Thesaurus (EC)
General Operating Procedure
1. Place your insertion point anywhere in the word you want to look up.
2. Open the Tools menu and choose Thesaurus.
3. You will get a Thesaurus dialogue box.
You will find the word you are looking in the Synonyms For: box/
4. Observe the Meaning box on the left and the Synonyms box on the
right.
The Meanings box contains different words representing the different
shades of meaning of the word you are looking up.
The first word in the Meanings box is highlighted.
Synonyms for this word are in the Synonyms box on the right.
Click once on a different word in the Meanings box and its synonyms
will appear in the Synonyms box.
Thesaurus command (Tools menu)Replaces a word or phrase in the document with a synonym, antonym,or related word.
Dialog Box Options
Looked Up/Not Found
Displays the word or phrase you selected before choosing the Thesaurus command orthe last word you looked up. Lists all words previously looked up during the currentthesaurus session. If the selected word is not in the thesaurus, the name of the boxchanges to Not Found. You can also type the word you want to look up and thenchoose the Look Up button.Replace With Synonym/Antonym/Related Word

38
Displays all synonyms, antonyms, or related words for the word you look up in theMeanings box. If the document is empty when you choose the Thesaurus command,the name of the box is Insert. You can type a word in it and look it up. The list changesaccording to the meaning you select, and it displays the synonyms for each selectedmeaning.
Meanings/Alphabetical List
Select the meaning that best matches the context of the selected word or phrase. IfWord does not find a synonym for the selected word or phrase, the Meanings boxdisplays a list of entries that are similar in spelling to the word or phrase.
Replace/Insert
Replaces the selected word or phrase with the word or phrase in the Replace WithSynonym/Antonym/Related Word box. If the document or paragraph is empty when youchoose the Thesaurus command, the name of the button changes to Insert. The Insertbutton is available as soon as you type in the Replace With Synonym/Antonym/RelatedWord box.
Look Up
Displays a list of synonyms for the word in the Replace WithSynonym/Antonym/Related Word box or the Looked Up box.
Previous
Displays the last word that was looked up, its meanings, and synonyms for it.

39
Title Page
Make a title page file that you can use over and over again. When you are creating thefile, you can check your formatting with the Print Preview command. Save the file whenyou are satisfied. Later, you can just change names and dates and print a new titlepage for the paper you’re working on.
Directions:
1. Make a title page to use as the cover for papers.
2. Your title should be a little above the center of the page. Press return until your
cursor is down about 1/3.(Check scroll bar on the right).
3. Center the cursor. Type in your title.
4. To make your title larger:
Highlight your title and go to the Font menu and choose 24 points. Now click
on the B on the Toolbar for bold or go to the Format menu and choose Bold.
5. Put your cursor at the end of your title. Press <Return> until your about 2.5
inches from the bottom of the page.
6. You are now towards the bottom of the page. Tab to the right and type in your
name, date, class, days/time of class. Example:
Emmerson Fiori
November 11, 1994
High Tech Center
MWF 2:00 - 3:00
7. Save this file a Title.
8. Now when you need a title page, retrieve this one, change the title, date and
class then print. Do not save. Keep the same filename Title. Use it again later
when you need another title page.
40
Typing Text
Type in your text using the keyboard. Do not press the <Return>/<Enter>key at theend of lines. As the cursor reaches the end of a line, it automatically goes to thebeginning of the next line. This is called Wraparound or Word Wrap.
Do not expect your line endings to match those in the book. The line endings dependon the chosen printer and the computer that you are using (IBM or MAC). Let yourwords wrap to the next line by themselves.
You may see on your screen these characters:¶ This means that you have pressed the <Return>or<Enter> keys····· This means that you have pressed the Spacebar.
You can keep these on your screen or turn them off by pressing the ¶ button on yourtoolbar.
Cursor
In the blank area of the new document, the blinking cursor tells you where you can startwriting. It is shaped like a capital I so it is called the I-beam cursor. The cursorchanges to an arrow in the ruler, menu bar and finder.
The blinking cursor is the point where letters are produced. Or in other words, theblinking cursor is where the action happens. Put the cursor in the correct position,click the mouse button, then type, delete or issue a command. The dark, longerunderline found at the end, indicates the end of the file.
Keyboard
All keys on the keyboard will repeat when held down. This includes letters, numbers,punctuation, function keys, Space Bar and <Return> key. You just need to use a lighttouch. The Ctrl, Alt and Shift keys are used in combination with other keys. You holddown these keys then press another key.
Holding down the Shift key makes capital letters and the upper punctuation marks onthe keys with double characters (like 1, 2, 3, ;, [ /) . Use the Caps Lock only when youwant all capitals in a word or sentence. Remember to release the Caps Lock whenyou are done.
Function Keys
The function keys are found across the top of some of the keyboards and arenumbered F1, F2, F3, etc. Tap, do not hold down, the Function key. Holding aFunction key makes it repeat.

41
Workspace
In Normal View, you do not see the margins on the screen. The 1” margin is setautomatically for you. They will be there when you print your document. The programautomatically leaves a one inch margin at the top, bottom, left and right. If you wantwider or narrower margins (to fit more or fewer words on a page), you can changethem.
Page View shows you the entire document including the margins. Your paper is whiteand the gray section is like the desktop.
Using the Ruler and Toolbar
The Ruler gives you information about your margins and tabs. The Toolbarat the top of the screen has buttons to click to issue commands. All of thesecommands are available in the menu bar. Using these tools (Ruler andToolbar) can be quicker than dropping down a menu.
42
Index
Cancel, 2Centering, 3Closing a file, 4Columns, 5Cut & Paste, 6Delete, 7Double space, 17Erasing, 7Exit/Quit, 8Finding Text, 9Footers, 14Footnotes, 11Hanging Indent, 13Headers, 14Highlighting Text, 27Inserting, 16Inserting a Space, 16Line spacing, 17Margins, 18Moving blocks of text, 6Moving the cursor, 19New Document, 20Opening a file, 21Outlining, 22Page Numbers, 24Printing, 25Red squiggly lines, 29Ruler, 41Saving a file, 26Selecting, 27Single spacing, 17Special Characters, 28Spell Check - Whole Document, 29Tables, 33Tabs, 32Thesaurus, 37
Title Page, 39Toolbar, 41Typing Text, 40Undo, 2Workspace, 41