with programming button - unitedshade dual switched motor with programming button you will be...
TRANSCRIPT
q
united shadeshades of excellence
PROGRAMMINGINSTRUCTIONSFORMOTORIZEDSHADES
EYELINE
VERSION 1.0
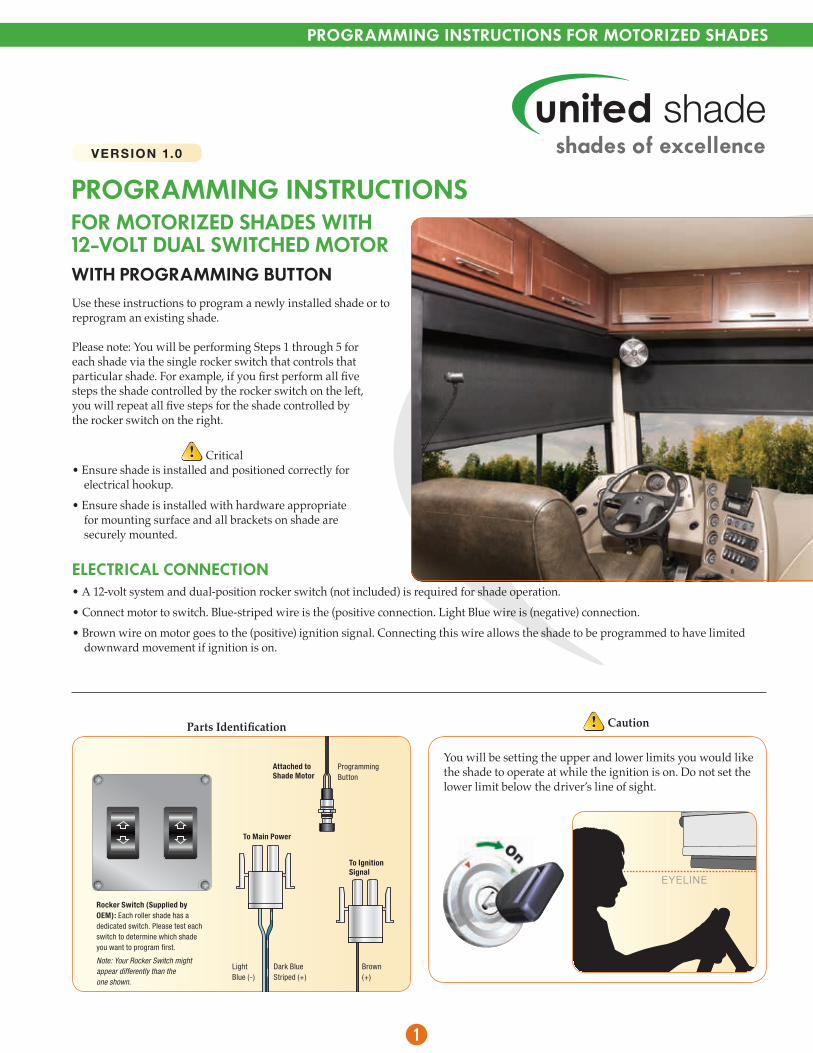
Dark Blue Striped (+)
Light Blue (-)
Brown (+)
Programming Button
Rocker Switch (Supplied by OEM): Each roller shade has a dedicated switch. Please test each switch to determine which shade you want to program first.
Note: Your Rocker Switch might appear differently than the one shown.
To Main Power
To Ignition Signal
Attached to Shade Motor
PROGRAMMINGINSTRUCTIONSFORMOTORIZEDSHADESWITH12-VOLTDUALSWITCHEDMOTORWITHPROGRAMMINGBUTTON
You will be setting the upper and lower limits you would like the shade to operate at while the ignition is on. Do not set the lower limit below the driver’s line of sight.
Parts Identification
Use these instructions to program a newly installed shade or to reprogram an existing shade.
Please note: You will be performing Steps 1 through 5 for each shade via the single rocker switch that controls that particular shade. For example, if you first perform all five steps the shade controlled by the rocker switch on the left, you will repeat all five steps for the shade controlled by the rocker switch on the right.
Critical• Ensure shade is installed and positioned correctly for
electrical hookup.• Ensure shade is installed with hardware appropriate
for mounting surface and all brackets on shade are securely mounted.
ELECTRICALCONNECTION• A 12-volt system and dual-position rocker switch (not included) is required for shade operation.• Connect motor to switch. Blue-striped wire is the (positive connection. Light Blue wire is (negative) connection. • Brown wire on motor goes to the (positive) ignition signal. Connecting this wire allows the shade to be programmed to have limited
downward movement if ignition is on.
Caution

w
STEP2:IGNITION-ONPROGRAMMINGSetting lower limit
F Fine-tune your Lower Stop Position by lightly pressing and releasing the Down switch until you reach your desired Lower Stop Position. Do not press the Up rocker switch, only use the Down.
E Lower shade by pressing the “Down” wall rocker switch. Approximately 6” before the shade reaches your desired Lower Stop Position then release the Down switch.
GOnce you have reached your Lower Stop Position press and hold the “Up” switch and when the motor beeping stops, release the Up switch. You have programmed the lower stop point and ready for Step 3.
AFirst make sure shade is fully raised using the wall rocker Up switch.
B Now locate the Programming Button Wire with black button on the upper right end of the shade.
CWhile holding the wall switch in the Down position, press and hold the Programming Button until motor beeps. Hold until motor beeping stops. Release both.
STEP1:SETTINGUPSHADEPROGRAMMINGMODE
Remember, don't obstruct driving view.

e
STEP3:IGNITION-ONPROGRAMMINGSetting upper limit
H From the position you just left the shade in, raise the shade by pressing the “Up” wall switch. Approximately 6” before shade reaches your desired Upper Stop Position, release the Up switch.
I Fine-tune the Upper Stop Position by lightly pressing and releasing the Up switch until you reach your desired Upper Stop Position. Do not press the Down rocker switch only use the Up.
J Once you have reached your Upper Stop Position press the “Down” switch until motor beeping stops. You have now set the Upper and Lower limits for the shade in Ignition-On mode.

r
Printed in U.S.A. ©2014 Dicor Corporation US-82 TM/05-14
a dicor company
united shade52878 Airport Parkway • Elkhart IN 46514 574-262-0954 • www.unitedshade.com
Ignition-On programming must be completed first.
Ignition-Off programming is done to establish the limits for shade movement when you’re reached your destination or rest area.
K With ignition off, there must be no power to the brown wire (brown wire — ignition off). If there’s power to the brown wire when the ignition is off, stop programming and rewire system.
Ignition-Off programming is done in the same manner used for Ignition-On program (Steps 1 - 3) with the exception of the ignition wire is not energized for Ignition-Off programming.
Lower limit is set first, upper limit is set last.
STEP4:IGNITION-OFFPROGRAMMING
L With ignition power on, confirm that the shade stops at Ignition-On settings. With ignition power off, confirm that the shade stops at Ignition-Off settings. If shade does not operate as programmed, return to programming instructions beginning with Ignition-On program Step 1. If shade does not stop at programmed lower limit while ignition power is on, check to insure brown wire on shade motor is properly connected to an ignition positive connection. Do not operate shade while driving until all programming steps have been completed and checked.
Problem Solutions
My shade will not move. a. Check power source and switch. If both work, then motor needs to be reprogrammed.b. If problem with power source or switch, please call your dealer or OEM. NOTE: Shade must have 12-volt power source. Power must be within 9-12 volts
to make sure damage does not occur to motor.
Shade doesn't fully lower. a. If ignition is "ON", shade is only programmed to move that distance.b. If ignition is "OFF", motor needs to be re-programmed. See Step 1.
Motor specifications a. Volts: 12v b. Torque: 1 NMc. RPM: 30d. Tube Diameter: 25 MM (0.984-inches)e. Watts: 11w
TROUBLESHOOTING
STEP5:PROGRAMMINGCHECK
United Shade reserves the right to change shade products, fabrics, colors, patterns, hardware and shade componentry without notice, and is not responsible for printing errors or omissions. United Shade is not responsible for damages to shade or vehicle caused by improper wiring.