wiring scheme of a shooting range without power supplypage 3 meyton elektronik gmbh http: e-mail:...
TRANSCRIPT

Page 1
Meyton Elektronik GmbHhttp: www.meyton.eue-mail: [email protected]
This description presupposes the following:1. The electrical installation (230 V, 110 V or 100 V) of the building is existent.2. The LAN (Local Area Network – Ethernet / IEEE 802.3) is existent and it is
compatible to our requirement.3. If a overvoltage protection is needed, it should be installed by the customer
Wiring scheme of a shooting range without power supply
Outlet (male) for the power supply1. TX-GND2. RX-GND3. TX data (out)4. RX data (in)5. 12 Volt (in)6. 24 Volt (in)7. GND + Shield
Outlets (female) for measuring frames1. TX-GND2. RX-GND3. TX data (in)4. RX data (out)5. 12 Volt (out)6. 24 Volt (out)7. GND + Shield
cable between ControlPC and measuring frame
6x2 6x2
Cable with a plug for a power outlet.Connect it to the power outlet at the end of installation.
6x2

Page 2
Meyton Elektronik GmbHhttp: www.meyton.eue-mail: [email protected]
Wiring scheme of a shooting range with power supply
up to 6 frames per power supply
up to 6 cables
Outlet (male) for the power supply1. TX-GND2. RX-GND3. TX data (out)4. RX data (in)5. 12 Volt (in)6. 24 Volt (in)7. GND + Shield
Outlets (female) for measuring frames1. TX-GND2. RX-GND3. TX data (in)4. RX data (out)5. 12 Volt (out)6. 24 Volt (out)7. GND + Shield
Cable with a plug for a power outlet.Connect it to the power outlet at the end of installation.
cable between power supply and measuring frame
6x2 6x2 6x2
Cable with a plug for a power outlet.Connect it to the power outlet at the end of installation.
up to 6 ControlPCs per power supply
1 - white - TX12 - brown - TX1 GND3 - green - RX14 - yellow - RX1 GND5 - grey - TX26 - rose - TX2 GND7 - blue - RX28 - red - RX2 GND9 - black - TX310 - magenta - TX3 GND11 - grey/rose - RX312 - red/blue - RX3 GND13 - white/green - TX414 - brown/green - TX4 GND15 - white/yellow - RX416 - yellow/brown - RX4 GND17 - white/grey - TX518 - grey/brown - TX5 GND19 - white/rose - RX520 - rose/brown - RX5 GND21 - white/blue - TX622 - brown/blue - TX6 GND23 - white/red - RX624 - brown/red - RX6 GND
This description presupposes the following:1. The electrical installation (230 V, 110 V or 100 V) of the building is existent.2. The LAN (Local Area Network – Ethernet / IEEE 802.3) is existent and it is
compatible to our requirement.3. If a overvoltage protection is needed, it should be installed by the customer
12x212x2
2x2
2x2 2x2
12x2

Page 3
Meyton Elektronik GmbHhttp: www.meyton.eue-mail: [email protected]
Wiring scheme of a shooting range with power supply and gateway
up to 10 frames per power supply Outlet (male) for the power supply1. TX-GND2. RX-GND3. TX data (out)4. RX data (in)5. 12 Volt (in)6. 24 Volt (in)7. GND + Shield
Outlets (female) for measuring frames1. TX-GND2. RX-GND3. TX data (in)4. RX data (out)5. 12 Volt (out)6. 24 Volt (out)7. GND + Shield
Cable with a RJ45 plug.Connect it to the RJ45 Cat 5e outlet (LAN, Ethernet 10/100BaseTx).
Cable with a plug for a power outlet.Connect it to the power outlet at the end of installation.
cable between power supply and measuring frame
6x2 6x2 6x2
Cable with a RJ45 plug.Connect it to the RJ45 Cat 5e outlet (LAN, Ethernet 10/100BaseTx).
Cable with a plug for a power outlet.Connect it to the power outlet at the end of installation.
up to 10 ControlPCs per power supply
This description presupposes the following:1. The electrical installation (230 V, 110 V or 100 V) of the building is existent.2. The LAN (Local Area Network – Ethernet / IEEE 802.3) is existent and it is
compatible to our requirement.3. If a overvoltage protection is needed, it should be installed by the customer
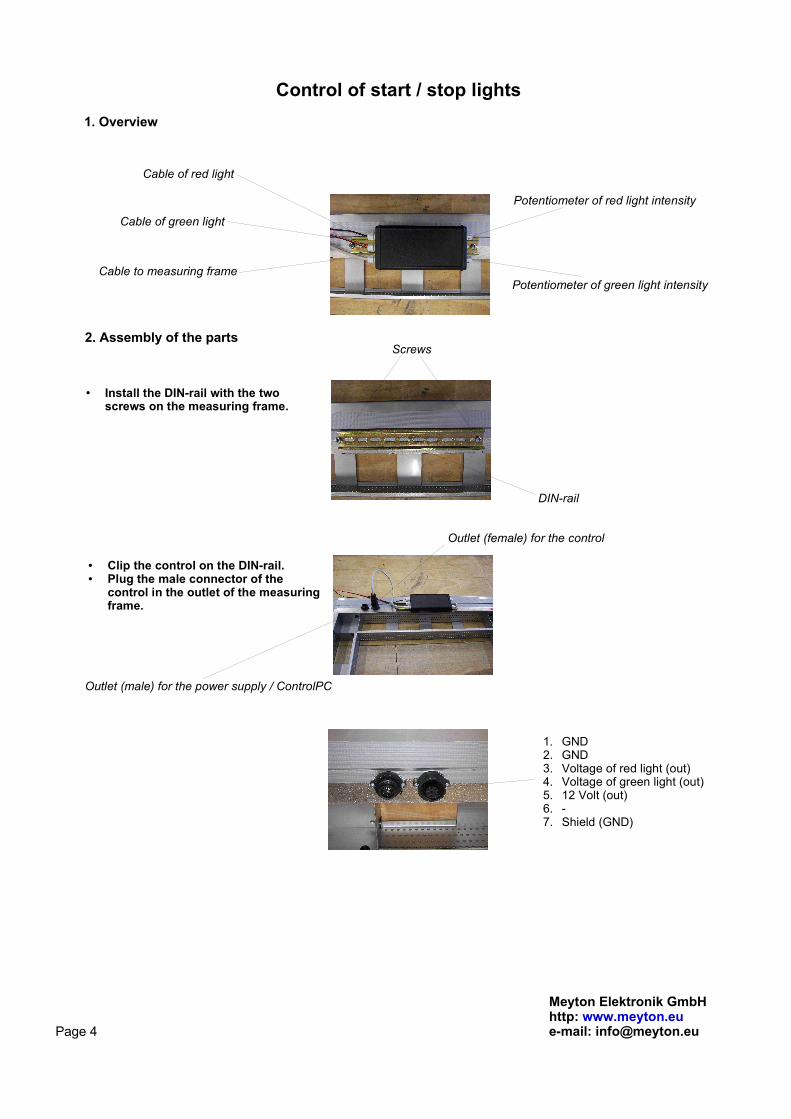
Control of start / stop lights
Potentiometer of red light intensity
Potentiometer of green light intensity
Cable of red light
Cable of green light
Cable to measuring frame
1. Overview
2. Assembly of the parts
● Install the DIN-rail with the two screws on the measuring frame.
Screws
DIN-rail
● Clip the control on the DIN-rail.● Plug the male connector of the
control in the outlet of the measuring frame.
Outlet (male) for the power supply / ControlPC
Outlet (female) for the control
Meyton Elektronik GmbHhttp: www.meyton.eue-mail: [email protected]
1. GND2. GND3. Voltage of red light (out)4. Voltage of green light (out)5. 12 Volt (out)6. -7. Shield (GND)
Page 4

Page 5
Meyton Elektronik GmbHhttp: www.meyton.eue-mail: [email protected]
Voltage of red light
GND of red lightVoltage of green light
GND of green light
Fuse
Screw of cover
Screw of cover
Red / green light (LED cluster)
Voltage of red / green light
GND of red / green light
Double core cable
Red light
Green light
● Mount the double core cable of each light in the control.● Install the cable from the control to the red and green light.● Connect the cable of the red and green light and the control's cables with insulating screw joints.